Grundig Business Systems GDM70X0 Dictation Machine User Manual II
Grundig Business Systems GmbH Dictation Machine II
Contents
- 1. Annex
- 2. User Manual I
- 3. User Manual II
User Manual II
17
Operating
To interrupt the recording please move x
(I) the slide switch to the position “ll”.
The dictation machine switches over to the recording pause
“ll”, the LED-indicator blinks red.
(II) move the slide switch to the position “e”.
Continue with the recording, xby moving the slide switch to the
position “g”. Continue dictating your text.
Stop the recording by x
(I) pressing the recording button or by moving the slide
switch either to the position “ ” or the “i” posi-
tion.
(II) move the slide switch to the position “e”.
Select and listen to a dictation
Move the slide switch to the position x“e”.
Press one of the up-down buttons. x
Select the desired dictation by using the up-down naviga- x
tion buttons. Confirm the selected dictation by pressing the
“OK” button.
Move the slide switch to the position x“f”, in order to listen to
the dictation.
The progress bar on the display increases. The minutes and
seconds of the current dictation position shown on the dis-
play increase.
Move the slide switch to the position x“e” in order to interrupt
the play-back process.
Setting the volume
Press the up-down buttons during play-back. x
The volume indicator appears on the display.
Set the play-back volume as desired xby means of the up-
down buttons.
The play-back volume can be turned up/down or soundless.
The default average volume can be restored by pressing the x
“OK” button.
18
Operating
Danger of hearing impairment
Do not hold the dictation machine near your ear during play-
back, particularly when the volume is turned up to a maximum
in order to save you from hearing damages.
Fast forward and rewind
Move the slide switch to x
(I) ”h” (fast forward) or “i” (rewind).
(II) ”i” (rewind) or press the button “Fast Forward”.
The progress bar increases or decreases and the dictation
position changes.
Fast play-back
Move the slide switch to the position x“e”.
Move the slide switch to the position “ xf”, in order to listen to
the dictation.
The progress bar on the display increases. The minutes and
seconds of the current dictation position shown on the dis-
play increase.
Press the button “ xSpeed”.
Set the play-back speed as desired xby means of the up-down
buttons.
Move the slide switch to the position x“e” in order to interrupt
the play-back process.
Press the “ xOK” button, to turn back to the standard play-back
speed.
Insertion of a dictation part
Additional dictation parts can be inserted at any position desired.
Move the slide switch to the position x“e”.
Select the desired dictation by using the up-down naviga- x
tion buttons.
Move the slide switch to the position x“f”, in order to listen to
the dictation.
Move the slide switch at the respective dictation position to x
the position “e”.
WARNING
19
Operating
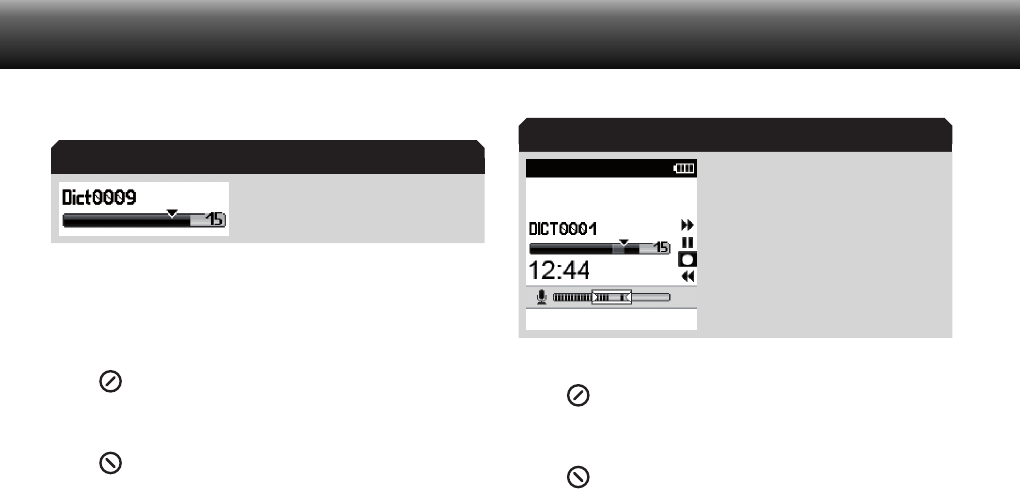
Control if the insertion mode is activated. x
The insertion mode is marked
through a triangle in the progress
bar.
When the overwriting mode is still active, please press the x
“Overwr.” button.
The Digta changes into the insertion mode.
Start the recording by x
(I) pressing the recording button and then moving the
slide switch to the position “g”. Dictate the text
which shall be inserted.
(II) move the slide switch to the “g” position. Dictate
the text which you like to insert.
Recording in the insertion mode
Stop the insertion by x
(I) pressing the recording button or by moving the slide
switch either to the position “h” or the “i” posi-
tion.
(II) move the slide switch to the “e” position.
Overwrite dictation parts
You can overwrite a dictation from any dictation position on.
Move the slide switch to the position “ xe”.
Insertion mode
Insertion mode
20
Operating
Select the desired dictation by using the up-down naviga- x
tion buttons.
Move the slide switch to the position x“f”, in order to listen to
the dictation.
Move the slide switch at the respective dictation position to x
the position “e”.
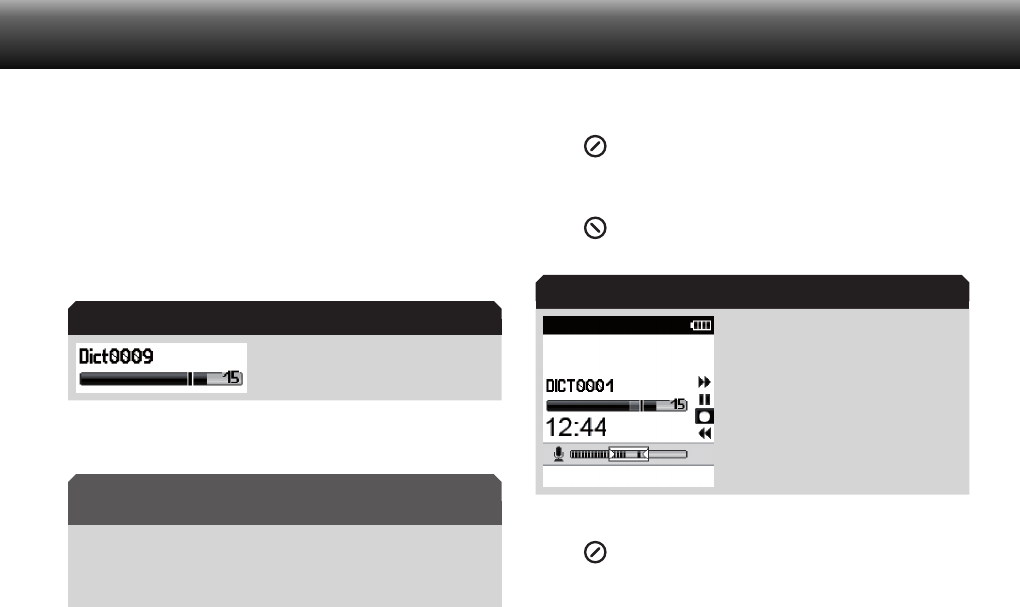
Control if the overwriting mode is activated. x
The overwriting mode is marked by
means of a line in the progress bar.
In case that the insertion mode is still active, please press the x
button “Overwr.”.
Overwriting of data
The dictation will be overwritten from the selected dictation
position on.
Start the recording by x
(I) pressing the recording button and then moving the
slide switch to the position “g”. dictate the mod-
fied text.
(II) move the slide switch to the “g” position. Dictate
the modified text.
Recording in the overwriting mode
Stop the modification by x
(I) pressing the recording button or by moving the slide
switch either to the position “h” or the “i” pos-
tion.
Overwriting mode
NOTICE
Overwriting mode
21
Operating
(II) moving the slide switch to the position “e”.
Adding of dictation parts
An additionally recorded text can be added at the end of a
recorded dictation.
Move the slide switch to the position x“e”.
Select the desired dictation by using the up-down naviga- x
tion buttons.
Move the slide switch to the position x“f”, in order to listen to
the dictation.
Press the button x “ ” (skip to the end).
The cursor skips to ( ) the next mark when dictation infos or
indices exist (see the comprehensive manual, chapter “Info/
Index-function”). Skip until the dictation end is reached.
Move the slide switch to the position “ xe”.
Start the recording by x
(I) pressing the recording button and then moving the
slide switch to the position “g”. Dictate the text
which you like to add.
(II) moving the slide switch to the “g” position. Dictate
the text which you like to add.
Accomplish the attachment by x
(I) pressing the recording button or by moving the slide
switch either to the position “h” or the “i” posi-
tion.
(II) moving the slide switch to the position “e”.
Changing of dictation features
The dictation features of stored dictations can be adapted
subsequently.
The dictation features are only available in the Menu Mode.
Move the slide switch to the position x“e”.
Skip mark aim
Dictation features
22
Operating
Select the desired dictation from the list by using the up- x
down navigation buttons.
Press the button x“Details”.
The menu for changing the dictation features appears on the
display.
The selected features which imply different operating proce-
dures are opened according to the menu item selected. For
further information please read the comprehensive manu-
al, chapter “Changing of dictation features”. You will find this
manual in the “Docu” directory on the included CD.
Info/Index-function
Additionally you can include specific information and index
markings for the typist to specified dictation parts.
The Info/Index-function is only available in the Menu Mode.
An audible signal is generated during the play-back of the infos
and indices. The infos and indices are transfered to the PC
together with the dictation.
For further information concerning infos and indices, please
read the comprehensive manual, chapter “Info/Index-
function”. You will find this manual in the “Docu” directory on
the included CD.
Move the slide switch to the position “ xe”.
Press the “ xDelete” button.
A list featuring all elements which you can delete appears
(dictation, index or info, dictation part, folder).
Menu “Details”
Menu Mode
Info/Index-function
23
Operating
The deletable elements list is only available in the Menu Mode.
For further information please see the comprehensive manual.
You will find this manual in the “Docu” directory on the includ-
ed CD.
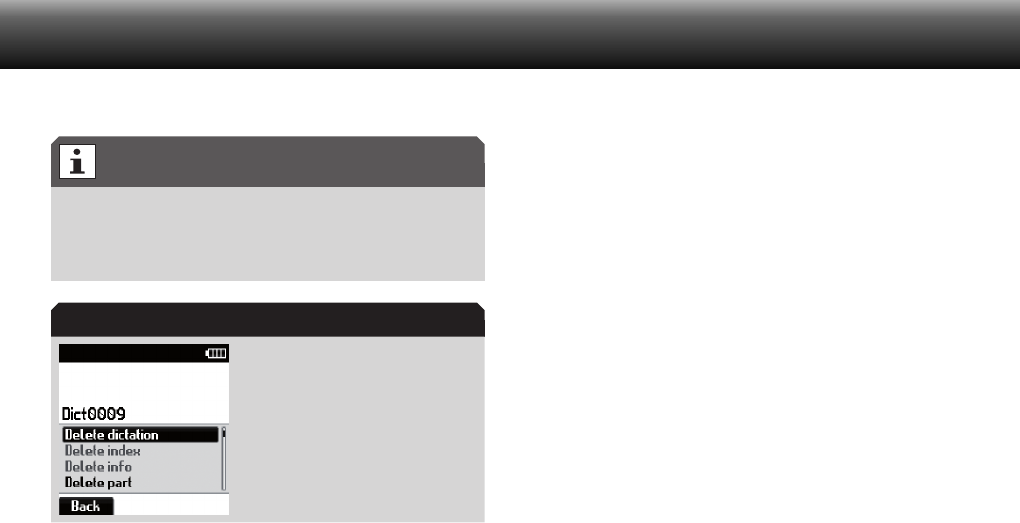
Deletable elements list
Control if x“Delete dictation” has been selected and confirm
it by pressing the “OK” button.
A security question prompts, to prevent deleting dictation
parts by mistake.
Confirm the question by pressing the “ xOK” button to delete
the entire dictation.
Press the “ xBack” button in case that you do not want to
delete the dictation.
Connect dictation machine to the PC
Connect your Digta by means of the USB-cable to your PC in x
order to transfer dictations to your PC and to transmit them
to your typist.
The dictation machine must be switched on to enable the x
communication between the two devices.
The computer identifies the device as removable disk and as
USB audio/HID device. The Grundig Business System PC-soft-
ware can be configurated so that the PC transfers the dicta-
tions from the dictation machine automatically, and transfers
them so that the memory space of the dictation machine is
fully available again.
Deletable elements list
Deletable elements

24
The menu mode at a glance
The menu functions are switched off in
the Easy Mode. For switching over to the
Menu Mode, please press the “MENU”
and “NEW” button at the same time when
switching on the device, until the first indi-
cation appears on the display. Please
select the Menu Mode from the displayed
profile list.
USB-operations
Activation of USB connecting (only •
when the device settings are set to
“Manually connecting”)
Data list* (only available when the data
list was read in)
Select: Select data set for a new dic-•
tation
Workflow: Activation of data set request •
by pressing the NEW-button for a new
dictation
Delete: Delete data list•
Scanner*
Dictation search: Search of data set by •
means of the scanner
Scan-Workflow: Enable scanner in •
workflow
Programming: Programme barcode-•
reader
Folder
Select the folder in which the dictation •
shall be saved (main folder and sub-
folder A, B, C, D, E or F)
Profile
Select user profile based on the pre-•
defined device settings
Recording
Microphone sensitivity: Set microphone •
sensitivity
Voice Activation: Switch on voice acti-•
vation (The recording stops automati-
cally during recording pause)
Recording format: Select recording •
format (DSS/WAV*/MP3*, sample rates)
Automatic follow-up dictation: New dic-•
tation automatically by setting a spe-
cific time
Display
View: Display of main screen (recording, •
playback) switching on and off (time,
advanced status bar, dictation posi-
tion number, no/reference/ID, recording
progress display, recording symbol)
Date and time: Set of date and time•
Illumination: Setting of display illumina-•
tion operation time
Language: Selection of the display lan-•
guage
The menu mode at a glance

25
Operating
Workflow
Request to typist, worktype, group*, •
category* priority and number/refer-
ence activation by pressing the NEW-
button for a new dictation
Device settings
Sleep mode: Select the time when the •
energy saving, non-operative state shall
be activated automatically. The Digta
will switch off completely after 30 min-
utes.
Audio signals: On-/Off-switching of •
audio signals
USB connecting: Automatically USB •
connecting or after having selected it in
the menu
Loudspeaker: Switch off the loudspeak-•
ers for play-back with headphones in
the Digta Station*
Forward-/rewind: Change the forward/•
rewind speed. Switching on-/off frag-
mented play-back
NiMH-rechargeable battery: Switching •
over from battery to external charged
NiMH-rechargeable battery
Foot control: Selection of foot control •
functions for recording or play-back
and changing the operation time of
short backspace (only available in com-
bination with Digta Station*)
Resetting of counter: Reset dictation •
counter to “1”
Change PIN: Change personal identifi-•
cation number (PIN)
Slide switch: Changing the order of •
functions of the slide switch positions
Reset: Format memory und reset of •
device settings
Bluetooth*
Bluetooth functions on/off •
Info
Version: Information about serial •
number and firmware-version
Disk: Information about the memory •
capacity of the internal or external
memories
26
Technical data
The storage capacity for
recording: 10 minutes
DSS Standard Play (SP):
DSS Pro Quality Play (QP):
WAV Mono* (depending on
sample rate):
WAV Stereo* (depending on
sample rate):
approx. 1 MB
approx. 2 MB
9.6 MB (8 kHz sample rate) up to
57.6 MB (48 kHz sample rate)
19.2 MB (8 kHz sample rate) up to
115.2 MB (48 kHz sample rate)
Response area
DSS Standard Play (SP):
DSS Pro Quality Play (QP):
WAV Mono* / WAV Stereo*:
200 - 5 500 Hz
200 - 7 500 Hz
200 - 3 500 Hz to 200 - 20 000 Hz,
depending on the sample rate
selected
Microphone socket 3.5 mm jack; stereo
Earphone jack 3.5 mm jack; stereo (mono ear-
phone can be used)
Connections USB 1.1, USB 2.0 High Speed
Batteries 2 x 1.5 V; type Micro/AAA
Rechargeable battery Rechargeable battery pack 962
(Li-polymer rechargeable battery,
3.7 V/ 1000 mAh)
Battery operation up to 25 hours
Dimensions (W x H x D,
without protruding operat-
ing elements)
approx. 130 x 52 x 22 mm / 5.12 x
2.05 x 0.87 inch
Weight incl. rechargeable
battery pack 962
approx. 122 g / 4.303 oz
Technical data

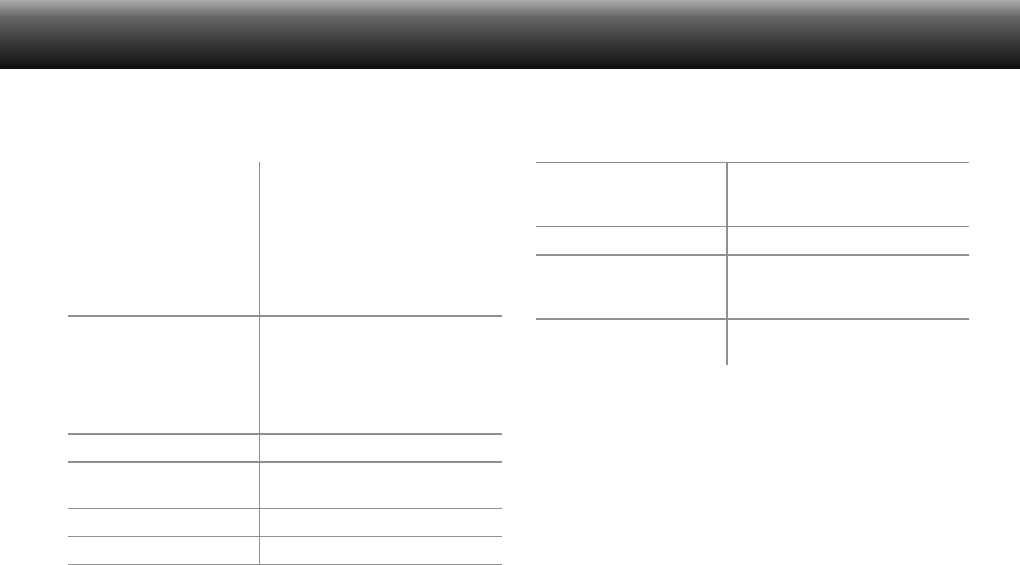
Trouble shooting
Electrical devices can bring along malfunctions. These malfunctions cannot necessarily be referred to the device. You can check if you can remedy the
errors by means of the following table.
Malfunctions Possible reasons Removal of defect
The devices cannot be switched
on.
The battery is empty.
The current supply is interrupted.
Charge the batteries or exchange them.
(see chapter “insert battery/rechargeable battery”)
The device is not responding to
slide switch- and button oper-
ations.
The keylock is activated. Press the lower function button until the keylock is deactivated.
There is no sound or too quiet. The microphone sensitivity or the play-back
volume are not set correctly.
Set the microphone sensitivity in the menu “recording” to
“conference” or hold the device closer to your mouth during
recording.
Set up the play-back volume. (see chapter “volume setting”)
The sound is distorted or too loud. The microphone sensitivity or the play-back
volume are not set correctly.
Set the microphone sensitivity in the menu “recording” to “dic-
tation” or increase the distance between the device and your
mouth during recording.
Turn down the play-back volume. (see chapter “Volume set-
tings”)
No menu function available. The device is running in the Easy Mode. Switch over to the Menu Mode when switching on the device.
(see chapter “Change of profile”)
27
Trouble shooting
Grundig Business Systems GmbH
Weiherstraße 10
D-95448 Bayreuth
Germany
info@grundig-gbs.com
www.grundig-gbs.com
37345 951 0100 01/2011
Grundig Business Systems GmbH
Weiherstraße 10
D-95448 Bayreuth
Germany
info@grundig-gbs.com
www.grundig-gbs.com
37345 951 0700 01/2011