Grundig Color Television Vision 7 37 7952 T Users Manual 02Vision 37_42 7952_en
VISION 7 37-7952 T to the manual 0b338569-3156-452e-9c14-3dbf7f06841d
2015-02-02
: Grundig Grundig-Color-Television-Vision-7-37-7952-T-Users-Manual-429938 grundig-color-television-vision-7-37-7952-t-users-manual-429938 grundig pdf
Open the PDF directly: View PDF ![]() .
.
Page Count: 54

COLOR TELEVISION
VISION 7 37-7952 T
VISION 7 42-7952 T

2
CONTENTS------------------------------------------------------------------------------------------------
4 SET-UP AND SAFETY
6 GENERAL INFORMATION
6 Special features of your television
6 Receiving digital stations
6 What is Common Interface?
7 CONNECTION/PREPARATION
7 Connecting the antenna and the mains cable
8 Inserting batteries in the remote control
9 OVERVIEW
9 Connections on the television
10 Controls on the television
11 The remote control
13 SETTINGS
13 Searching for television stations
14 Changing stored channels for digital stations
16 Picture settings
17 Audio settings
20 TELEVISION OPERATION
20 Basic functions
21 Zoom function
22 Zap function
22 Electronic TV guide
23 Changing the picture format
24 TELETEXT MODE
24 TOP text or FLOF text mode
24 Normal text mode
24 Additional functions
26 CONVENIENCE FUNCTIONS
26 Convenience functions
27 Parental control
29 Timer functions
31 USB-MODE
31 The file formats
32 Connecting external data media
33 The file browser
34 Settings in the USB setup menu
34 Playback – Basic functions
35 Additional playback functions

ENGLISH
3
CONTENTS------------------------------------------------------------------------------------------------
37 USING EXTERNAL DEVICES
37 DVD player, DVD recorder, video recorder or set-top box
37 High definition – HD ready
37 Connecting a DVD player, DVD recorder, video recorder or set-top box
39 Headphones
40 Decoder or satellite receiver
41 Camcorder
41 Hi-fi system/AV receiver
42 PC MONITOR MODE
42 Connecting a PC
42 Selecting the channel position for the PC
42 Settings for the PC
43 OPERATION WITH COMMON INTERFACE
43 Inserting the CA module
43 Access control for CA module and smart card
44 SPECIAL SETTINGS
44 Tuning digital television stations
45 Tuning analogue television stations
47 Changing stored channels for analogue stations
49 INFORMATION
49 Displaying signal information
49 Updating software
50 Dismantling the stand of the unit
51 Technical data
51 Service information for dealers
51 Environmental note
52 Troubleshooting
53 Additional Information for units sold in the UK.

Please note the following information when setting up your television
set.
This television set is designed to receive and display video and audio
signals.
Any other use is expressly prohibited.
External light falling on the screen impairs picture quality.
To assure sufficient ventilation make sure there is enough space
around it in the wall unit.
The television set is designed for use in dry rooms. If you do use it in
the open, please ensure that it is protected from moisture, such as
rain or splashing water. Do not expose the television set to any mois-
ture.
Do not place any vessels such as vases on the television, as they may
spill liquid, thus presenting a safety risk.
Place the television set on a solid, level surface. Do not place any
objects such as newspapers on the television set or cloth or similar
items beneath it.
Do not place the television set close to heating units or in direct sun-
light, as this will impair cooling.
Heat build-up can be dangerous and shortens the operating life of
the television set. For reasons of safety, have a specialist remove any
dirt deposits in the set from time to time.
Do not open the television set under any circumstances. Warranty
claims are excluded for damage resulting from improper handling.
Make sure the power cord or the power supply unit (if provided) are
not damaged.
The television set may only be operated with the mains cable/
adapter supplied.
Thunderstorms are a danger to all electrical devices. Even if the
tele vision set is switched off, it can be damaged by a lightning strike
to the mains or the antenna cable. Always disconnect the mains and
antenna plugs during a storm.
Clean the screen with a soft, damp cloth. Only use plain water.
Only clean the television housing with the cloth provided. Only use
plain water.
Please note when deciding where to put the device that furniture
surfaces are covered by various types of lacquer and plastic, most
of which contain chemical additives. These may cause corrosion to
the feet of the device, thus resulting in stains on the surface of the
furniture which can be difficult or impossible to remove.
SET-UP AND SAFETY ------------------------------------------------------------
4

The screen of your LCD television meets the highest quality
standards and has been checked for pixel faults.
Despite the great care taken in manufacturing, technological
reasons make it impossible to completely discount the possibility that
some pixels may be faulty.
Provided they are within the thresholds specified by the DIN norm,
pixel faults of this kind cannot be regarded as a defect as defined by
the warranty.
Notes:
Do not connect any other equipment while the device is switched
on. Switch off the other equipment as well before connecting it.
Only plug the device into the mains socket after you have con-
nected the external devices and the antenna.
Make sure the power plug is freely accessible.
Caution:
If you want to use a wall bracket for your television, make sure
you read the assembly instructions for the wall bracket carefully
or have your specialist dealer mount it for you.
When buying the wall bracket, make sure that all the fastening
points needed on the television are there on the wall bracket and
that they are all used when it is mounted.
SET-UP AND SAFETY ------------------------------------------------------------
5
ENGLISH

6
Special features of your television
Your television set enables you to receive and watch digital stations
(via DVB-T), including in High Definition (HD).
At present, reception for these digital television stations in High Defi-
nition is only possible in some countries in Europe.
This television can receive and process all analogue and all
unencrypted digital stations. This television set has an integrated
digital and analogue receiver. The digital receiver unit converts the
signals from digital stations to provide outstanding audio and picture
quality.
The TV guide (only for digital stations) tells you of any schedule
changes at short notice, and provides an overview of all the stations’
schedules for the next few days.
Detailed information on the individual stations – if it is provided by
the broadcaster – is also available in the electronic programme
guide.
You can connect various data media, for example, an external hard
drive, a USM memory stick or a digital camera to the USB socket.
Using the file browser, you can then select and play the file formats
you want (for example, MP4, MP3 or JPEG data).
Receiving digital stations
To receive digital stations you need a digital rooftop or indoor an-
tenna (passive or active indoor antenna with its own power supply).
Unlike analogue broadcasting, not every station has its own trans-
mission frequency. Instead, several stations are grouped into what
are known as bouquets on a regional or national level.
You can find the current transmission information on teletext from var-
ious broadcasters, or look in a TV guide or on the Internet.
What is Common Interface?
Common Interface (CI) is an interface for DVB receivers.
Encoded stations can only be viewed with a CA module suitable for
the encoding system and the corresponding smart card.
The television set is equipped with a Common Interface slot into
which CA modules from various providers can be inserted.
You can insert the provider’s smart card into the CA module in order
to enable the encrypted stations you want to see.
GENERAL INFORMATION----------------------------------------
ENGLISH
7
CONNECTION/PREPARATION ----------------------
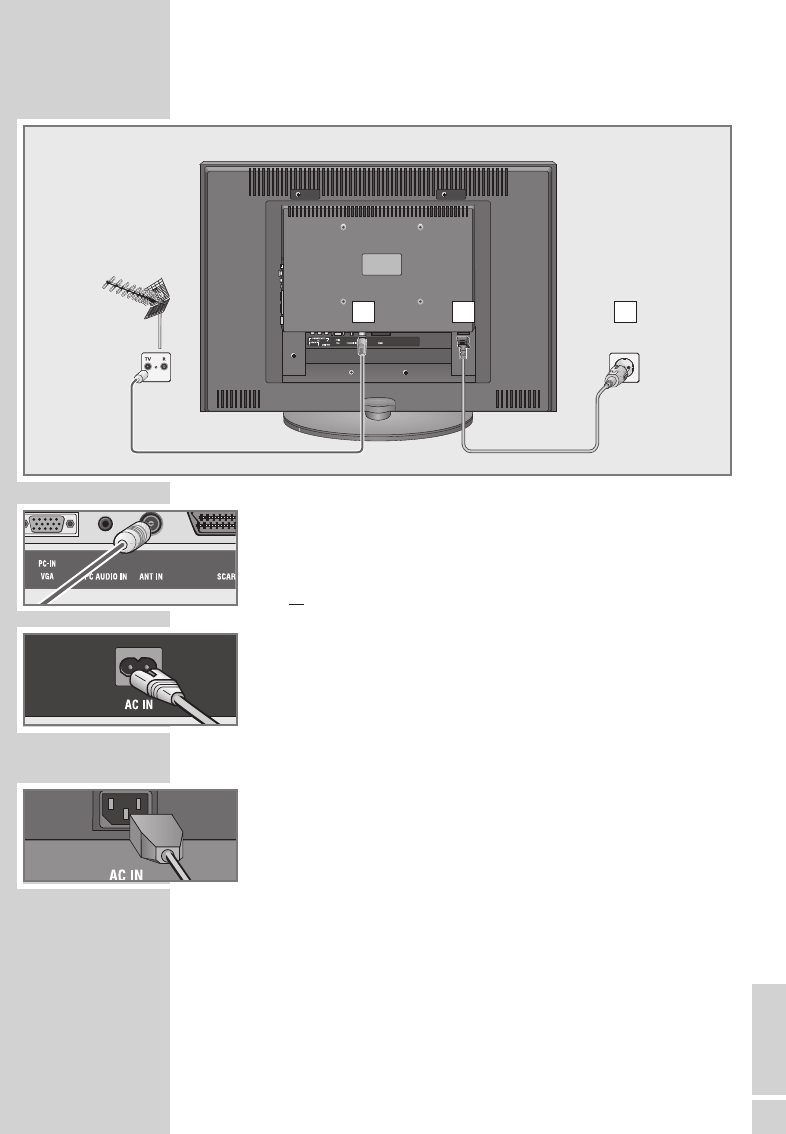
Connecting the antenna and the mains cable
1Plug the cable of the rooftop or indoor antenna (passive or
active indoor antenna with its own power supply for digital tele-
vision stations) into the antenna socket »ANT IN« on the tele -
vision set;
or
plug the rooftop antenna cable (for analogue television stations)
into the »ANT IN« socket on the television.
Note:
When connecting an indoor antenna you may have to try it out
at different positions until you get the best reception.
2Plug the mains cable supplied into the »AC IN« mains socket of
the television.
3Plug the mains cable into the wall socket.
Note:
Only plug the device into the mains socket after you have
connected the external devices and the antenna.
Only connect the television using the power cord supplied to a
suitable earthed safety socket.
Do not use an adapter plug or extension lead which does not
meet the applicable safety standards. Do not tamper with the
power cord.
1 2 3
Vision 37
Vision 42

Inserting batteries in the remote control
1Open the battery compartment by removing the lid.
2Insert the batteries (3 x 1.5 V micro for example R03 or AAA).
Observe the polarity (marked on the base of the battery com-
partment).
3Close the battery compartment.
Note:
If the television no longer reacts properly to remote control
commands, the batteries may be flat. Be sure to remove used
batteries.
The manufacturer accepts no liability for damage re sulting from
used batteries.
Environmental note
Batteries, including those which contain no heavy metal, may not
be disposed of with household waste. Please dispose of used
batteries in an environmentally sound manner. Find out about the
legal regulations which apply in your area.
CONNECTION/PREPARATION ----------------------
8
OVERVIEW ----------------------------------------------------------------------------------------------
9
ENGLISH
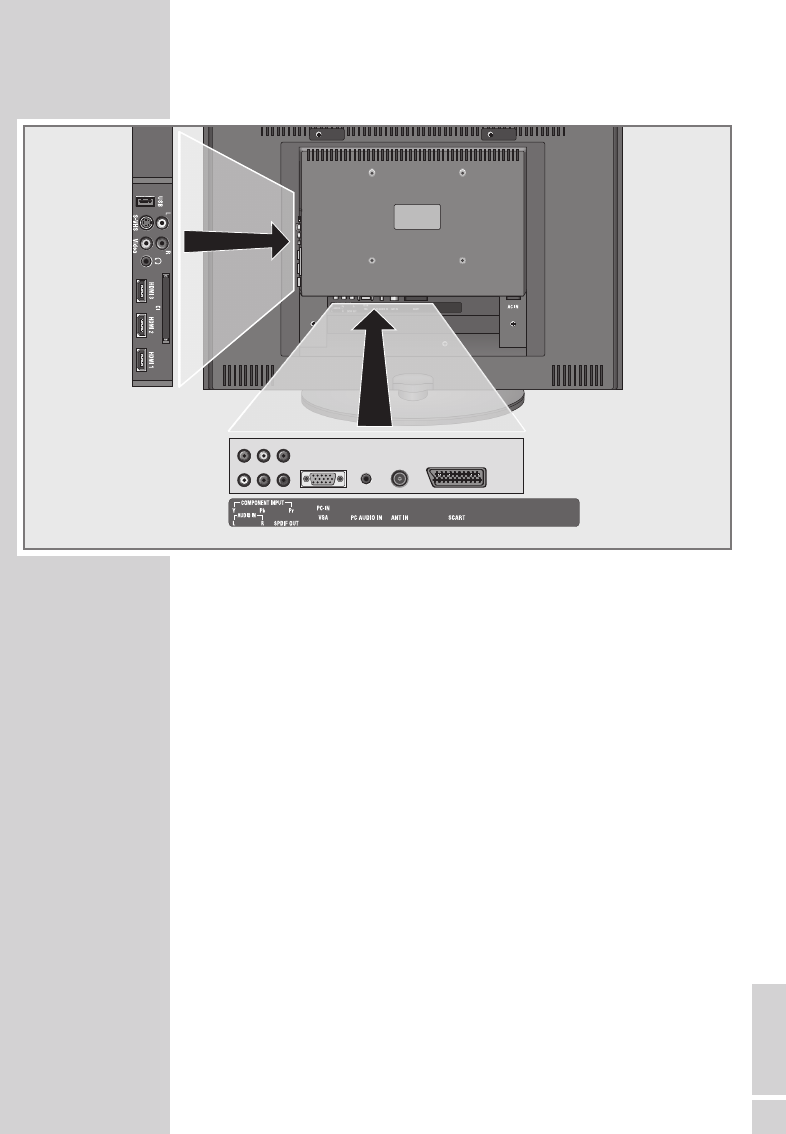
Connections on the television
USB USB socket for external data media.
L R Audio signal input for camcorder.
S-VHS Video signal input for S-Video camcorder.
Video Video signal input for camcorder.
UHead phone connection (3.5 mm jack plug).
CI Common Interface slot.
HDMI3 HDMI socket, audio/video signal input (HDMI).
HDMI2 HDMI socket, audio/video signal input (HDMI).
HDMI1 HDMI socket, audio/video signal input (HDMI).
COMPONENT
INPUT
Y Pb Pr Video signal input (YUV signal).
AUDIO IN LR Audio signal input (YUV signal).
SPDIF OUT Audio output sockets (coaxial) for PCM/AC3
signals. For connecting to a digital multi-channel
audio/video amplifier or AV receiver.
PC-IN VGA VGA socket, video signal input for PC.
PC AUDIO IN Audio signal input for PC.
ANT IN Antenna socket.
SCART Euro/AV socket (FBAS signal, RGB signal).
AC IN Socket for the mains cable.
OVERVIEW ----------------------------------------------------------------------------------------------
10
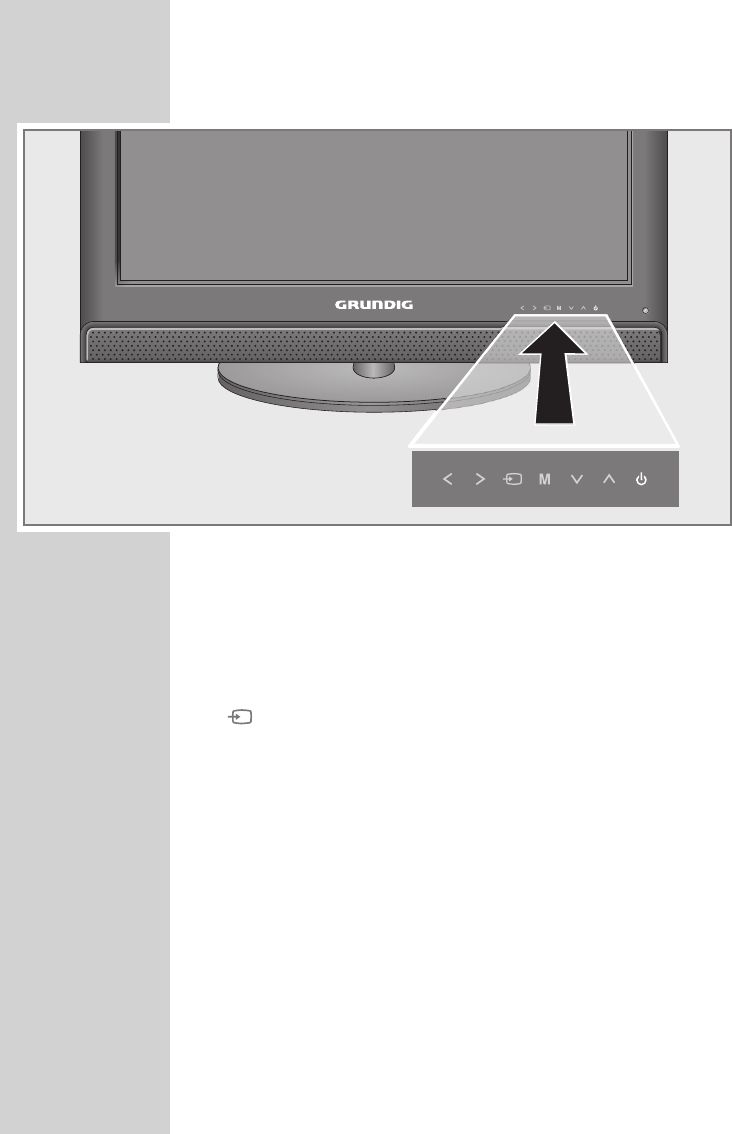
Controls on the television
Note:
The sensor button »8« is always lit. The symbols of the other sensor buttons
light up briefly if you brush your hand over the control panel. To operate,
briefly tap the respective button symbol.
Adjust the volume;
select menu functions.
Opens the pre-selection for AV channels.
Press »
Λ
« or »
V
« in the menu,
confirm with » « or » «.
MOpens the main menu.
Select the menu item with »
Λ
« or »
V
«;
activate the function with » « or » «;
set the function with » « or » «;
switch off the menu with »M«.
ΛV
Switch on the television from standby;
select the station in steps;
select a function in the menu.
8Switches the television on and back into standby mode.
The only way to disconnect the television from the mains is
to pull out the plug.
V
Λ
V
Λ
V
Λ
V
Λ
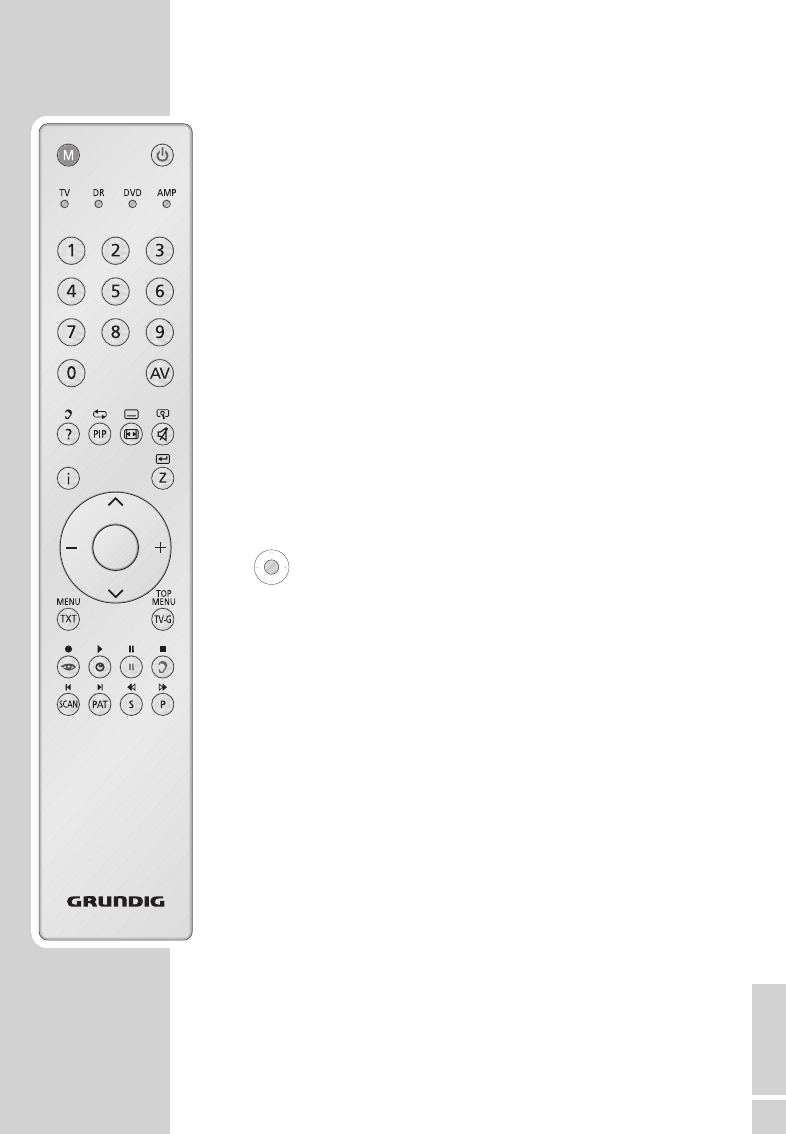
The remote control
8Switches off the television set (stand-by).
1...0 Switches the television on from standby mode
Selects channels directly.
AV Opens the pre-selection for AV channels and the
USB input.
Then select with »
V
« or »
Λ
«.
?Displays the number and name of a station;
reveals answers in teletext mode.
PIP Updates the page in teletext mode.
ESwitches between picture formats.
dSound on/off (mute).
iOpens the menu.
ZZapping function;
switches the menus back one menu level.
ΛV
Switches the television on from standby;
selects stations step by step;
moves the cursor in the menus up and down.
(OK)Calls up the channel list;
activates various functions.
– + Adjusts the volume;
moves the cursor left/right.
TXT Switches between teletext and TV modes
TV-G Opens the electronic TV guide.
zSelects various picture settings;
selects a page in teletext mode.
¥Displays the time;
selects a page in teletext mode.
3Freeze-frame;
selects a page in teletext mode.
FSelects different sound settings (in analogue TV
operation);
selects different languages (in digital TV opera-
tion);
selects desired topic in teletext mode.
OVERVIEW ----------------------------------------------------------------------------------------------
11
ENGLISH

SCAN Enlarges the picture;
switches to double character size in teletext mode.
PAT Selects the split screen function in teletext mode.
SSelects different subtitles (in digital TV operation);
selects subpages in teletext mode.
PSelects channel lists (»All Channels«, »RADIO«,
»FAV1« to »FAV4«);
page hold in teletext mode.
MSwitches to operation of a GRUNDIG
digital receiver, GRUNDIG digital receiver with
hard disk (PDR), GRUNDIG DVD player,
GRUNDIG DVD recorder or GRUNDIG
AV receiver.
Press »M« until the »DR«, »DVD« or »AMP«
display lights up.
Then select the one you want.
If you do not press a button within 10 seconds,
the remote control returns to television mode
(»TV«).
Note:
»DR« has been programmed for operating a
GRUNDIG digital receiver (remote control
level 1).
»DVD« has been programmed for operating a
GRUNDIG DVD player.
»AMP« has been programmed for operating a
GRUNDIG AV receiver.
The functions available depend on the model of
the device you are using.
Just try it out.
You can change this programming:
Press and hold down »M« and press three
number buttons to enter the code:
»1«, »2«, »3« for a GRUNDIG DVD player.
»4«, »5«, »6« for a GRUNDIG DVD recorder.
»1«, »4«, »7« for a GRUNDIG digital receiver
(remote control level 1).
»2«, »5«, »8« for a GRUNDIG digital receiver
(remote control level 2).
»3«, »6«, »9« for a GRUNDIG digital receiver
with a hard disc (PDR).
OVERVIEW ----------------------------------------------------------------------------------------------
12
SETTINGS----------------------------------------------------------------------------------------------------
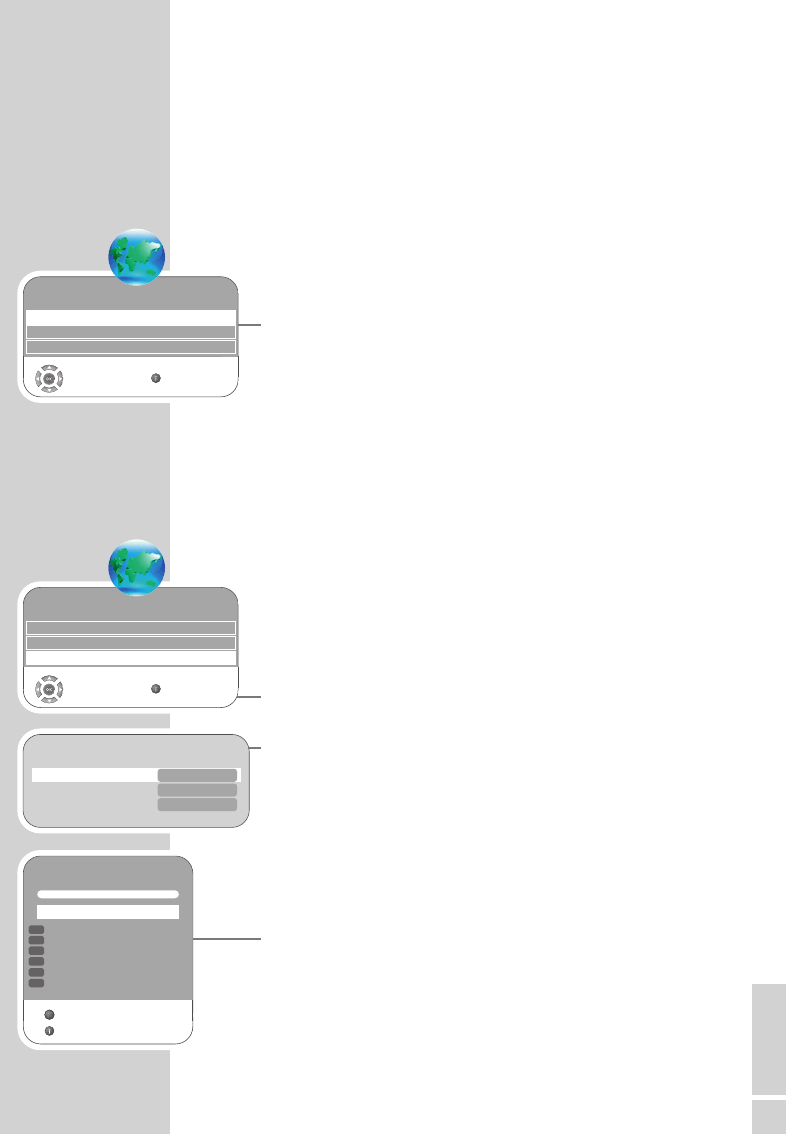
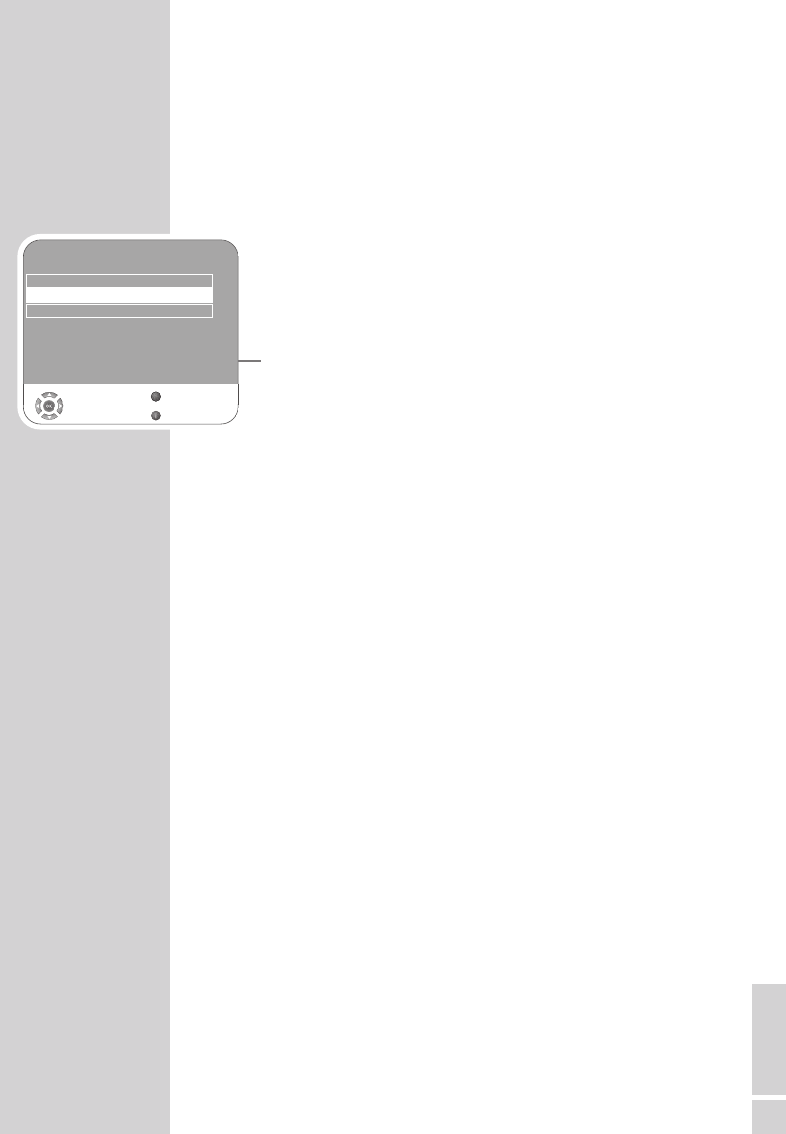
Searching for television stations
The television has an automatic tuning function, which first searches
for digital TV channels and then analogue ones.
You start the search and can then sort the television stations into your
order of preference.
There are 400 presets for digital channels and 99 for analogue
channels, to which you can assign TV stations from the antenna or
from the cable connection (analogue channels).
1Press »8«, »1…0« or »
V
« or »
Λ
« to switch on the television from
standby mode.
– The »Installation Guide« menu appears when the device is first
switched on.
2Press »–« or »+« to select the language.
Help:
If the »Installation Guide« menu does not appear on the screen,
make the setting by following the instructions on returning the tel-
evision to its factory condition on page 26.
Note
The antenna power supply may only be switched on if the an-
tenna is actually an active indoor antenna with a signal amplifier
and it is not already supplied with a voltage via a mains plug
(or similar supply).
Otherwise you may cause a short circuit and irreparably damage
your antenna.
3Select the »Active Antenna Power« with »
V
« or »
Λ
«.
Press »–« or »+« to switch on the antenna voltage (»On«).
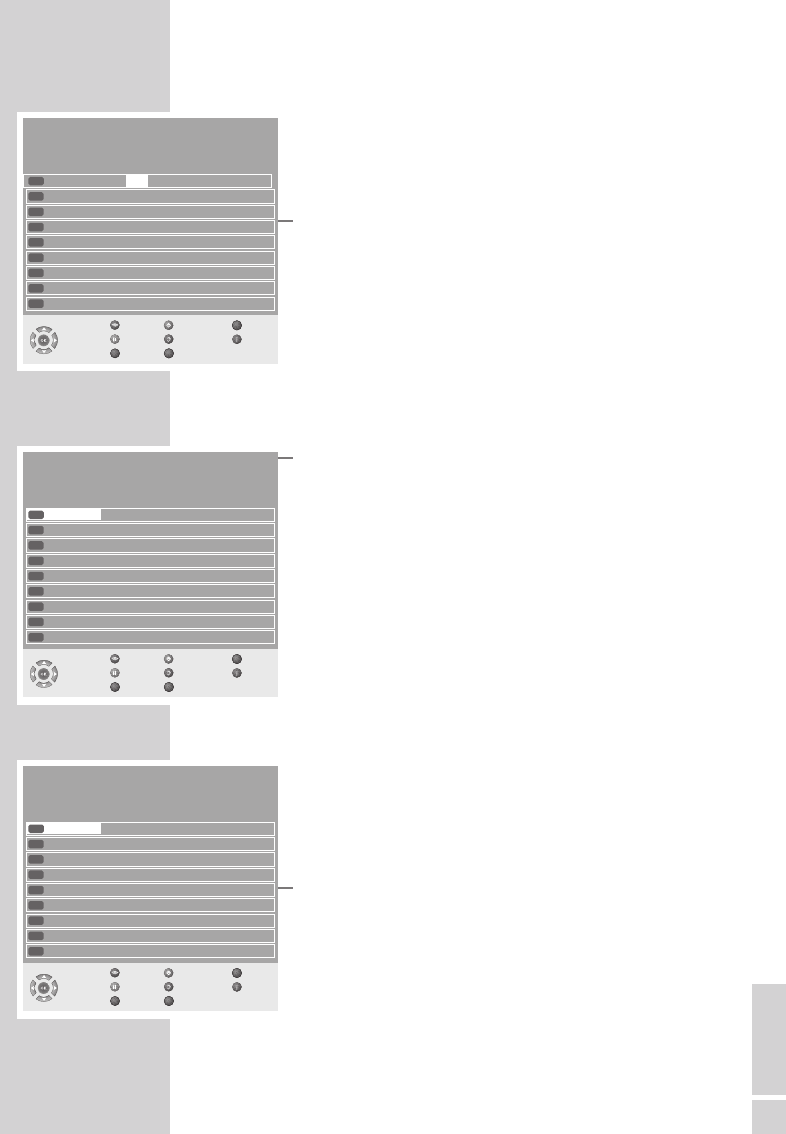
4Select »Auto Tuning« with »
V
« or »
Λ
« and confirm with »G«.
– »Country Selection« is active.
5Press »–« or »+« to select the country.
6Select the »Scan Type« with »
V
« or »
Λ
«.
Press »–« or »+« to select whether you want to search for only
digital television stations (DTV), only analogue television stations
(ATV) or both (ATV & DTV).
7Select »Time zone« with »
V
« or »
Λ
«.
Press »–« or »+« to select time zone.
8Press »G« to start the search.
– The »Searching...« menu appears, and the search for TV
stations begins. This may take several minutes depending on
the number of television stations received.
– The search is ended when the »Programme Table« appears.
Note:
The search can be ended prematurely with »i«.
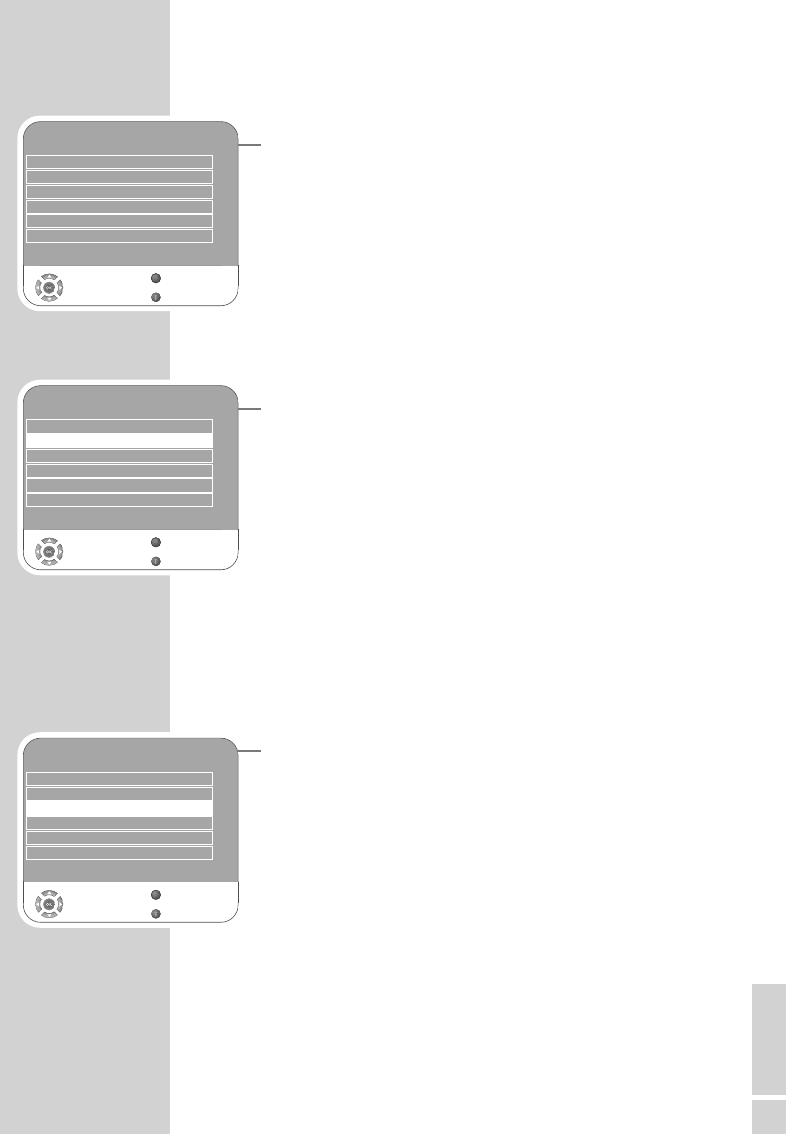
13
ENGLISH
Please select country and scan type, then press OK to start tuning
Country Selection
Scan Type
Time Zone
Deutschland s
a
ATV & DTV
Berlin GMT+1
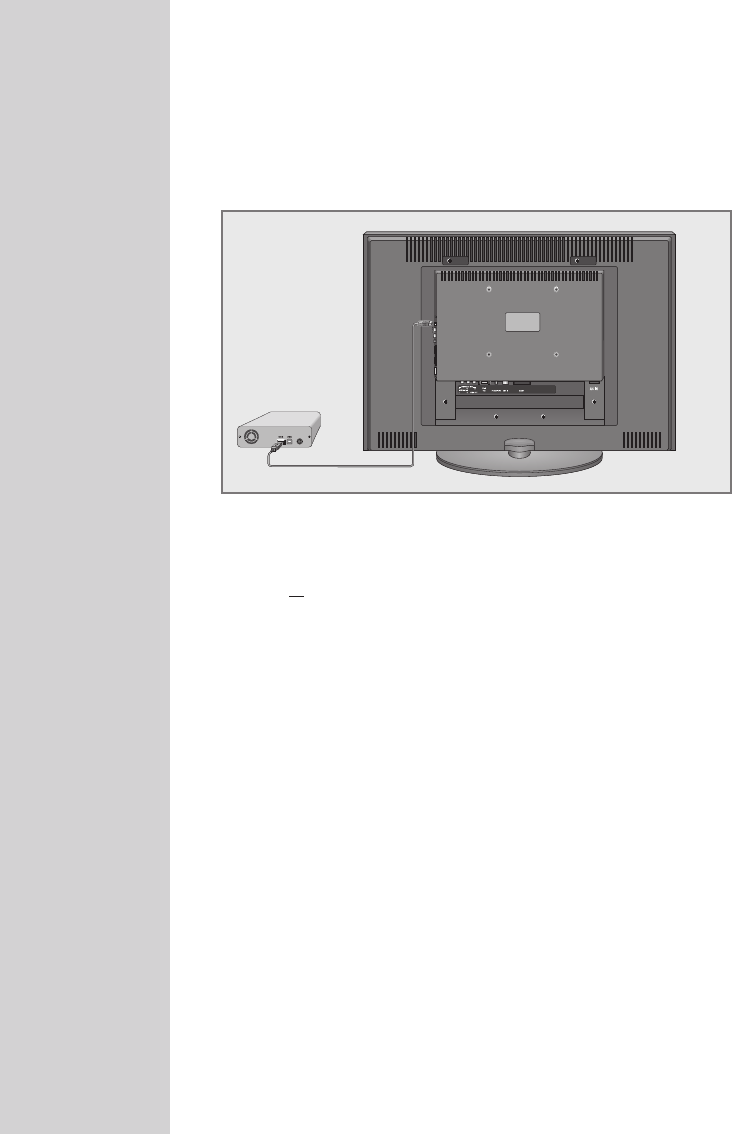
Searching...
57 % UHF CH49 DTV
ZDF
ZDFinfokanal
SAT.1
N24
ProSieben
kabel eins
Exit
GGGGGGGGGGGGGGGG
DTV
DTV
DTV
DTV
DTV
DTV
Skip
Z
Installation Guide
Language Settings English
Active Antenna Power Off
Select Exit
Auto Tuning s
Installation
Menüsprache Deutsch
Aktivantenne Aus
Auswählen Ende
Programmsuchlauf s

SETTINGS----------------------------------------------------------------------------------------------------
Changing stored channels for digital stations
You can change the order of the channels found as required, delete
channels you do not need and block access to certain presets
(parental control).
Press »F« (blue) to switch between »Programme Table – ALL TYPE«,
»Programme Table – DTV«, »Programme Table – RADIO« and »Pro-
gramme Table – ATV«.
Press »z« (red) to display the channels assigned to a network.
Press »P« to switch the channel list to the next page, press »S« to
switch it back to the previous page.
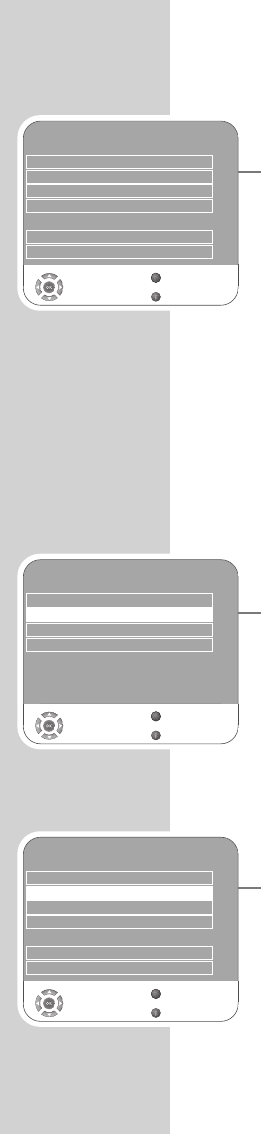
Opening the channel list
1Open the menu with »i«.
– The »PICTURE« menu is displayed.
2Select the »CHANNEL SETUP« menu with »–« or »+«.
3Select »Programme Table« with »
V
« or »
Λ
« and confirm
with »G«.
– The »Programme Table« menu is displayed.
Moving channels to different presets
1In the »Programme Table« menu, press »
V
« or »
Λ
« to se-
lect the channel to be moved.
2Press »¥« (green) to highlight the channel.
3Enter the new presets with one, two or three digits using
»1…0«.
4Press »G« to confirm the entry.
Notes:
To sort the other television channels, repeat steps 1to 4.
Stations that are assigned to fixed preset numbers (such as
French stations with LCN coding) cannot be moved.
14
CHANNEL SETUP
Auto Tuning
Digital Manual Tuning
Analogue Manual Tuning
Programme Table
Signal Information
CA - Module Not Inserted
Select
Back
Exit
Active Antenna Power On
s
s
s
s
s
Z
1
Programme Table
2 ZDF
DTV
3 RTL Television
DTV
4 SAT.1
DTV
6 VOX
DTV
7 RTL2
DTV
8 kabel eins
DTV
9 Super RTL
DTV
Service Type ALL TYPE
Network All Networks
CHANNEL SETUP CA FAV1 FAV2 FAV3 FAV4 -D
-New position Back
Exit
Select
DTV 1 Das Erste
Z
09
5 ProSieben New position
DTV
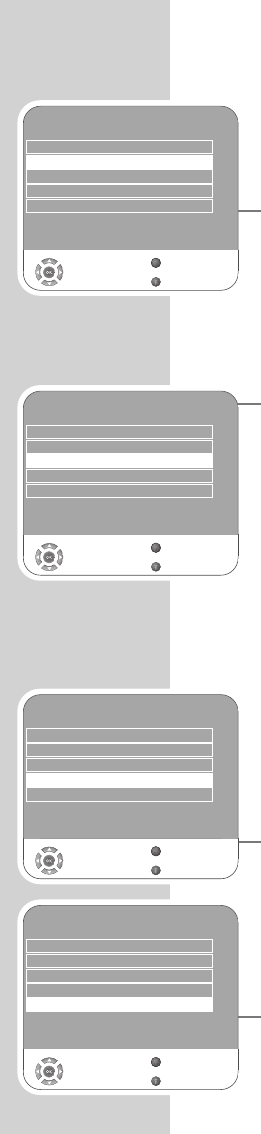
Creating a list of favourites
You can select your favourite channels and save them in up to
four lists (FAV1 to FAV4).
1In the »Programme Table« menu, select the television
channel with »
V
« or »
Λ
«.
2“Push” the television channel with »–« or »+« into the
favourites list 1 to 4 and save it with »G«.
– The position in the favourites list is marked with »«.
– You can enter the same channel in more than one
favourites list.
Note:
You can delete channels from the favourites list. Press »
V
«
oder »
Λ
« and »–« or »+« to select the channel and »G«
to delete it.
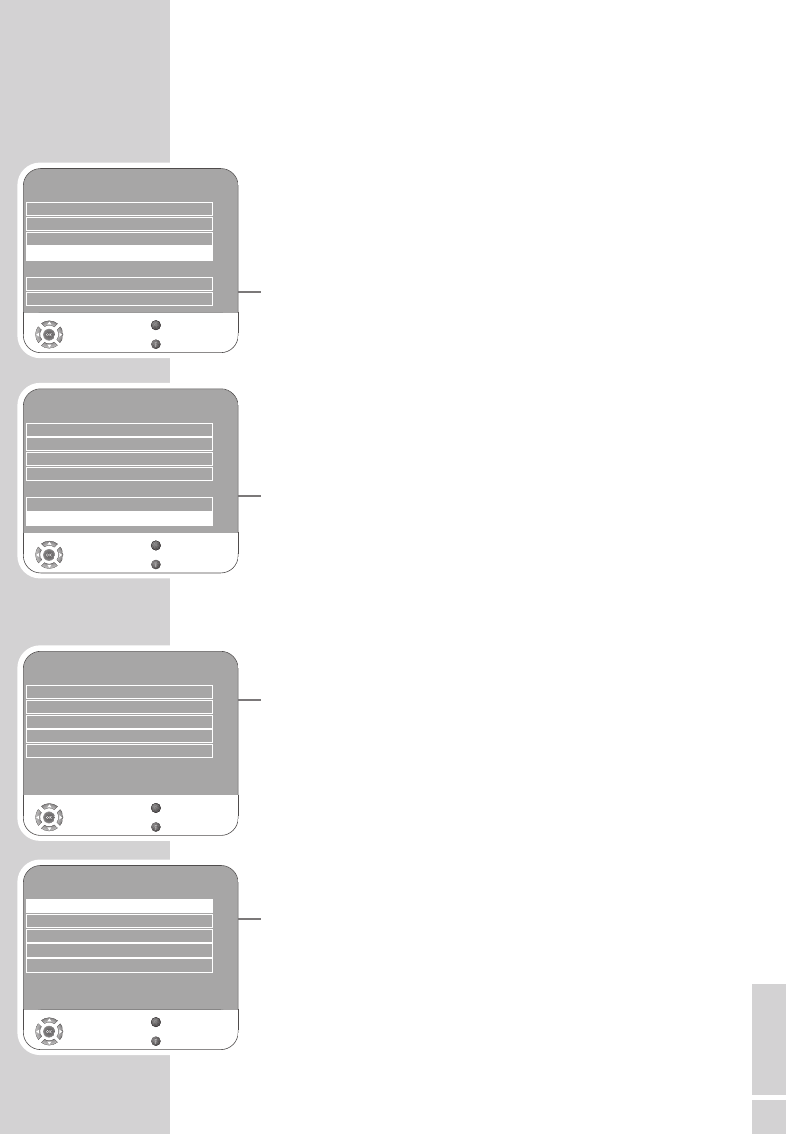
Deleting channels
1In the »Programme Table« menu, press »
V
« or »
Λ
«to
select the channel to be deleted and press »3« (yellow) to
confirm.
2Press »¥« (green) to confirm the deletion.
Notes:
Press »z« (red) to delete all the channels.
Presets whose channels have been deleted are no longer
shown in the »Programme Table«.
Skipping television stations
You can highlight television stations to be skipped when you se-
lect with »
V
« or »
Λ
«. It is still possible to select using the num-
ber buttons.
1In the »Programme Table« menu, select the television chan-
nel with »
V
« or »
Λ
«.
2Press »+« to switch to the »-« symbol and press »G« to
highlight the television channel.
– The channel is marked with »-«.
Note:
Channels can be enabled again. Press »
V
« or »
Λ
« to
select the channel, press »+« to switch to the symbol »-«
and press »G« to enable the channel again.
Ending the settings
1Press »i« to finish the settings.
SETTINGS----------------------------------------------------------------------------------------------------
15
ENGLISH
Programme Table
2 ZDF
DTV
3 SAT 1
DTV
4 ProSieben
DTV
5 3sat
DTV
6 kabel eins
DTV
7 WDR 3
DTV
8 N24
DTV
9 Doku
DTV
Service Type ALL TYPE
Network All Networks
CHANNEL SETUP CA FAV1 FAV2 FAV3 FAV4 -D
Network Move Back
Delete Service Type Exit
Prev. Page
Next Page
Select
DTV Das Erste
SP
Z
Programme Table
2 ZDF
DTV
3 SAT 1
DTV
4 ProSieben
DTV
5 3sat
DTV
6 kabel eins
DTV
7 WDR 3
DTV
8 N24
DTV
9 Doku
DTV
Service Type ALL TYPE
Network All Networks
CHANNEL SETUP CA FAV1 FAV2 FAV3 FAV4 -D
Network Move Back
Delete Service Type Exit
Prev. Page
Next Page
Select
DTV 1 Das Erste
SP
Z
Programme Table
1 Das Erste -
2 ZDF
DTV
3 SAT 1
DTV
4 ProSieben
DTV
5 3sat
DTV
6 kabel eins
DTV
7 WDR 3
DTV
8 N24
DTV
9 Doku
DTV
Service Type ALL TYPE
Network All Networks
CHANNEL SETUP CA FAV1 FAV2 FAV3 FAV4 -D
Network Move Back
Delete Service Type Exit
Prev. Page
Next Page
Select
DTV 1 Das Erste
SP
Z

16
SETTINGS----------------------------------------------------------------------------------------------------
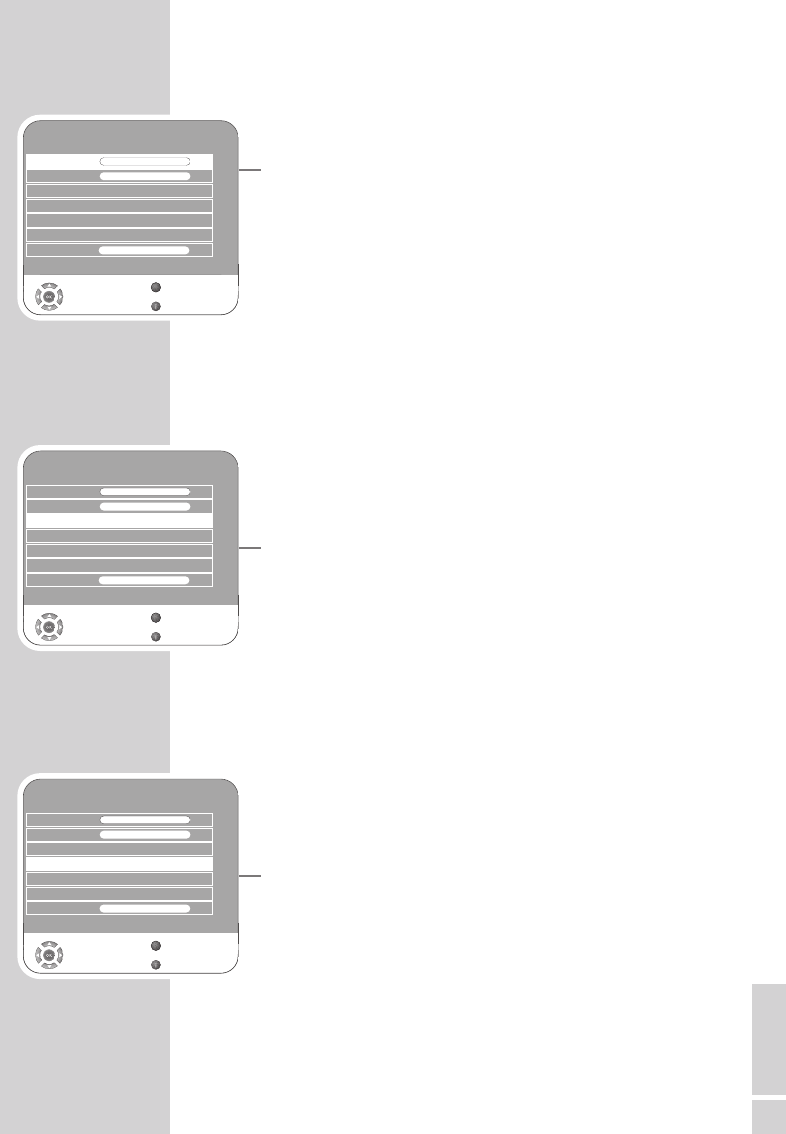
Picture settings
1Open the menu with »i«.
– The »PICTURE« menu is displayed.
2Select »Picture Mode«, »Brightness«, »Contrast«, »Colour«,
»Sharpness« or »Colour Temperature« with »
V
« or »
Λ
«.
Select the value with »–« or »+« and confirm with »G«.
Notes:
Other settings can be found on the second page of the
»PICTURE« menu.
3Switch to the second menu page with »
V
« and confirm
»Advanced Picture Settings« with »G«.
4Select »DNR«, »Mpeg NR«, »Vibrant colour«, »Perfect Clear«,
»Dynamic Contrast«, »Dynamic Backlight« or »Backlight« with
»
V
« or »
Λ
«.
Select the value with »–« or »+« and confirm with »G«.
Notes:
You can only select the »Mpeg NR« function on digital and AV
presets.
»Mpeg NR« reduces any interference from artefacts (pixel
blocks) from digital stations with MPEG compression (such as
from DVB-T receivers or DVD players).
»Dynamic Contrast« the contrast adjusts according to the picture
content to ensure optimum contrast.
»Dynamic Backlight« backlighting adjusts according to the pic-
ture content to ensure optimum contrast.
You can only change the backlighting if the »Dynamic Backlight«
function is switched off.
5Press »i« to end the setting.
PICTURE
Picture Mode Vivid
Brightness 45
GGGGGGGG
Contrast 88
GGGGGGGGGGGGGG
Colour 55
GGGGGGGGGG
Sharpness 50
GGGGGGGGG
Colour Temperature Medium
Select
Back
Exit
Z
1
PICTURE
DNR Auto
Mpeg NR Off
Vibrant Colour Off
Perfect Clear Off
Dynamic Contrast Off
Dynamic Backlight Off
Select
Back
Exit
Backlight 100
GGGGGGGGGGGGGGGGG
Z
1
ENGLISH
17
SETTINGS----------------------------------------------------------------------------------------------------
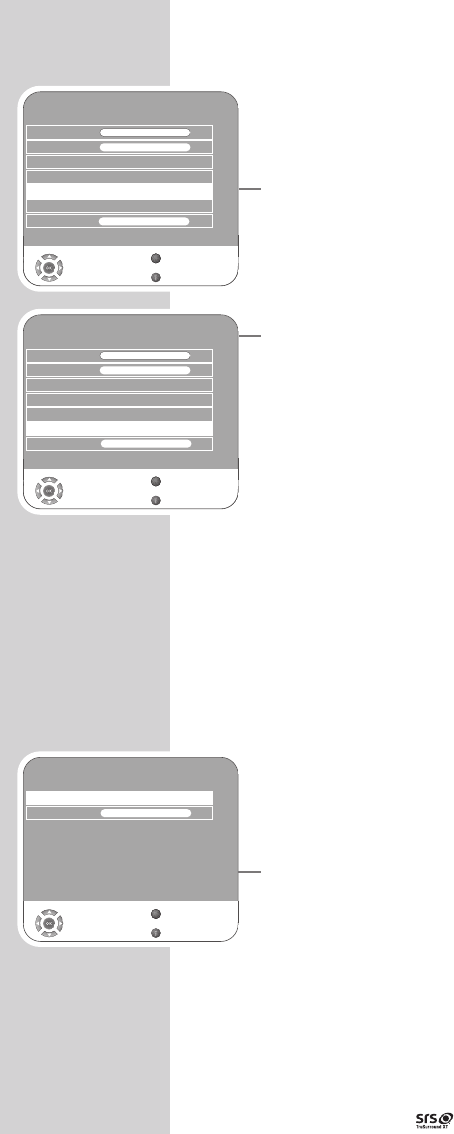
Audio settings
1Open the menu with »i«.
– The »PICTURE« menu is displayed.
2Select the »SOUND« menu with »–« or »+« and confirm with
»G«.
Note:
Additional operations are explained in the following sections.
Volume
1Select »Volume« with »
V
« or »
Λ
« and adjust the setting with
»–« or »+«.
Balance
1Select »Balance« with »
V
« or »
Λ
« and adjust the setting with
»–« or »+«.
Automatic volume
The television channels broadcast at different volumes. The automatic
volume limiting (AVL) function means the volume is kept the same
when you switch between channels.
1Select »AVL« with »
V
« or »
Λ
« and then select »On« with »–« or
»+«.
Note:
If the »SRS« setting has been selected in the »Sound Mode« line,
the AVL line cannot be selected.
Stereo / two channel, mono
If the device receives two channel programmes, e.g. a film with the
original sound on sound channel B (display: »Dual II«) and the
dubbed version on sound channel A (display: »Dual I«), you can
select the sound channel you desire.
If the device receives stereo or Nicam programmes, it switches
automatically to stereo sound (display: »Stereo«).
You can switch the sound to »Mono« if the stereo reception
quality is poor.
1Select »Sound Type« with »
V
« or »
Λ
« and adjust the setting with
»–« or »+«.
Stereo width
Widens the audio output for stereo programmes and improves the
sound with mono reception.
1Select »Sound Mode« with »
V
« or »
Λ
«.
2Press »–« or »+« to select the setting »Spatial«.
SOUND
Balance 0
GGGGGGGGGGGGGGGGGG
AVL Off
Sound Type Stereo
Sound Mode Normal
Equalizer
Select
Back
Exit
Volume 29
GGG
Z
s
Headphone 21
s
1
GGGG
SOUND
Balance 0
GGGGGGGGGGGGGGGGGG
AVL Off
Sound Type Stereo
Sound Mode Normal
Equalizer
Select
Back
Exit
Volume 29
GGG
Z
s
Headphone 21
s
1
GGGG
SOUND
Balance 0
GGGGGGGGGGGGGGGGGG
AVL Off
Sound Type Stereo
Sound Mode Normal
Equalizer
Select
Back
Exit
Volume 29
GGG
Z
s
Headphone 21
s
1
GGGG
18
SRS TruSurround XT*
SRS TruSurround XT is a patented audio technology, which is inte-
grated in the television set and only requires the built-in speakers to
produce a Surround Sound effect.
1Select the »Sound Mode« line with »
V
« or »
Λ
«.
2Select the setting »SRS« with »–« or »+«.
Equaliser
The equaliser offers you four preset sound settings (Music, Sports,
Movie and Speech) and one which you can create yourself (User).
1Select »Equalizer« with »
V
« or »
Λ
« and confirm with »G«.
– The »EQUALIZER« menu appears.
Note:
If the »SRS« setting has been selected in the »Sound Mode« line,
the »Equalizer« line cannot be selected.
2Select the audio setting »User« with »–« or »+« and confirm with
»
V
«.
– The frequency band »120 Hz« is activated.
3Set the desired value with »
V
« or »
Λ
« and select the next
frequency band with »–« or »+«.
4Press »Z« to save the setting.
Audio description (audio subtitles)
Audio description is an additional audio channel for people who
are visually impaired. The activities, surroundings, scene changes or
the appearance, the gestures and facial expressions of the actors
are described.
This sound is transmitted at the same time as the normal sound with
digital television stations. This depends on the programme being
broadcast.
1Select »o« with »
V
« or »
Λ
«.
2Select »Audio Description« with »
V
« or »
Λ
« and press »G« to
confirm.
3Select »On« with »–« or »+«.
4Select the »Volume« with »
V
« or »
Λ
« and adjust with »–« or
»+«.
SETTINGS----------------------------------------------------------------------------------------------------
* Under licence from SRS Labs, Inc.
TruSurround XT, SRS and the symbol are trademarks of SRS Labs, Inc.
SOUND
Balance 0
GGGGGGGGGGGGGGGGGG
AVL Off
Sound Type Stereo
Sound Mode Normal
Equalizer
Select
Back
Exit
Volume 29
GGG
Z
s
Headphone 21
s
1
GGGG
SOUND
Balance 0
GGGGGGGGGGGGGGGGGG
AVL Off
Sound Type Stereo
Sound Mode Normal
Equalizer
Select
Back
Exit
Volume 29
Z
s
Headphone 21
s
1
GGGG
Select
Back
Exit
Audio Description Off
SOUND
Z
1
Volume 16
GGG
GGG
ENGLISH
19
TruBass and Dialog Clarity
The »TruBass« setting gives you an increased bass effect.
»Dialog Clarity« recognises dialogue sections in audio recordings
and improves dialogue reproduction.
The two functions can be found on the second page of the
»SOUND« menu.
Note:
The »SRS« setting must be selected in the »Sound Mode« line.
1Select »TruBass« or »Dialog Clarity« with »
V
« or »
Λ
«.
2Select the setting with »–« or »+«.
3Press »Z« to end the setting.
Concluding the settings
1Press »i« to finish the settings.
SETTINGS----------------------------------------------------------------------------------------------------
TruBass On
Select
Back
Exit
Audio Description
SOUND
Z
1
Dialog Clarity Off
s
s

20
Basic functions
Switching on and off
1Press »8«, »1…0« or »
V
« or »
Λ
« to switch on the device from
standby mode.
2Press the »8« button to switch the television to standby mode.
Selecting channels
1Use »1…0« to select channels directly.
2Press »
V
« or »
Λ
« to move up and down channels.
3Open the channel list by pressing »G«, select the station with »
V
«
or »
Λ
« and press »G« to switch off the channel list.
Selecting stations from lists
You can select stations from various lists, (e.g. All Channels, FAV1).
1Press »P« to call up the overview of channel lists.
– The overview is displayed.
2Press »
V
« or »
Λ
« to select the channel list and »G« to confirm.
3Press »
V
« or »
Λ
« to select the channel and »G« to confirm.
Selecting AV channels
1Call up the »INPUT SOURCE« menu with »AV«.
2Select the desired AV channel position with »
V
« or »
Λ
« and
press »G« to confirm.
3Switch back to the television channel with »1…0«.
Switching between digital and analogue channels
1Open the »INPUT SOURCE« menu by pressing »AV«.
2Press »
V
« or »
Λ
« to select »DTV« (digital presets) or »ATV«
(analogue presets) and press »G« to confirm.
Adjusting the volume
1Adjust the volume with »–« or »+«.
Muting
1Use »p« to switch the sound off (mute) and to switch it on again.
Displaying time
1You can display the time by pressing the »¥« button.
TELEVISION OPERATION ------------------------------------------

ENGLISH
21
Displaying information
1Press »?« to display the information.
– The display disappears automatically after a short while.
Freeze-frame
If you wish to view a particular scene for longer, you can freeze the
frame of the current programme.
1Press »3« (yellow).
2To quit this function, press »3« again.
Picture settings
You can select different picture settings.
1Select the desired picture setting from »User«, »Sports«, »Movie«,
»Natural« or »Vivid« with »z«.
– You can alter the »User« picture setting, see the ”Picture
settings” chapter on page 16.
Sound settings
You can select various audio settings when watching analogue
channels.
1Select »User«, »Speech«, »Movie«, »Sports«, »Music« or by
pressing »F« (blue).
– You can modify the »User« audio setting – see the “Equaliser”
chapter on page 18.
Audio language
You can select various languages when watching digital channels.
This depends on the programme being broadcast.
1Press »F« (blue) to open the selection menu.
2Select your language using »
V
« or »
Λ
« and press »G« to
confirm.
Subtitles
You can select various subtitles when watching digital channels.
This depends on the programme being broadcast.
1Open the selection menu with »S«.
2Select your language using »
V
« or »
Λ
« and press »G« to
confirm.
Zoom function
With this function, you can enlarge the picture on the television or
computer.
1Activate the zoom function by pressing and holding down
»SCAN«.
TELEVISION OPERATION ------------------------------------------

22
Zap function
This function allows you to save the television channel which you are
currently watching and switch to other channels (zapping).
1Select the channel you want to save in the zap memory with
»1…0« or »
Λ
« »
V
«, (e.g. channel 1, BBC 1) and save by pres-
sing »Z«.
2Change channels with »1…0« or »
Λ
« »
V
«.
3You can now use »Z« to switch between the saved channel (in the
example, BBC1) and the channel you were watching before.
4Press »i« to quit the zap function.
– The display disappears.
Electronic TV guide
The electronic program guide offers an overview of all programmes
that will be broadcast in the next week (for digital stations only).
1Press »TV-G« to see programme information.
Notes:
Not all stations supply provide a detailed TV guide.
Many broadcasters supply the daily programme but no detailed
descriptions.
There are broadcasters which do not provide any information at
all.
2Select the television station with »
V
« or »
Λ
«.
– The programmes being shown on the selected television
channel for today are displayed.
In addition, information about the programme currently being
transmitted is displayed with detailed information.
3Press »+« to switch to today’s programme.
Note:
You can open and switch off extensive programme information
with »?«.
4Press »
V
« to select information on the next programme and, »
Λ
«
to return to the information for the current programme.
5Press »¥« (green) to select the next days, and »z« (red) to
return to today.
6Switch back to the station selection by pressing »–«.
Note:
Press »F« (blue) and »G« to transfer the selected programme into
the memory timer.
7Press »i« to quit the electronic programme guide.
TELEVISION OPERATION ------------------------------------------

ENGLISH
23
Changing the picture format
The television automatically switches to the 16:9 format if this
format is detected via the Euro-AV socket.
1Select the picture format with »E«. The selected picture
format, for example »16:9«, appears on the screen.
– You can choose between the following picture formats:
»AUTOMATIC« format
The picture format is automatically switched to »16:9« for 16:9
programmes.
The picture format is automatically switched to »4:3« for 4:3
programmes.
»16:9« and »14:9« formats
During programmes in 4:3 format, the picture is stretched horizon-
tally if »16:9« or »14:9« is selected.
The picture geometry is stretched horizontally.
With actual 16:9 signal sources (from a set-top box on the Euro-AV
socket) the picture fills the screen completely and with the correct
geometry.
»4:3« format
The picture is shown in 4:3 format.
»LetterBox« format
The letterbox setting is especially suitable for programmes in 16:9
format.
The black borders which are usually at the top and bottom of the
screen are eliminated, 4:3 pictures fill the screen.
The transmitted pictures are enlarged, but are slightly cropped at the
top and bottom. The picture geometry remains unchanged.
»Subtitle« format
If you cannot read the subtitles which appear on the bottom of the
screen, then select »Subtitle«.
»Panorama« format
This setting is suited to films with a large width/height ratio.
During programmes in 4:3 format the picture is stretched horizon-
tally if the »Panorama« function is selected. The picture geometry is
stretched horizontally.
TELEVISION OPERATION ------------------------------------------

24
TOP text or FLOF text mode
1Press »TXT« to switch to teletext mode.
2You can directly select teletext pages with »1...0«.
To return to page 100, press »i«.
Note:
At the bottom of the screen, you will see an information line con-
sisting of a red, green and, depending on the station, yellow and
blue text field. Your remote control has buttons with the corre-
sponding colours.
3Press »z« (red) to scroll back a page.
4Press »¥« (green) to scroll to the next page.
5Press »3« (yellow) to select chapters.
6Press »F« (blue) to select topics.
7Press »TXT« to switch off teletext mode.
Normal text mode
1Press »TXT« to switch to teletext mode.
2You can directly select teletext pages with »1...0«.
To return to page 100, press »i«.
3Press »
V
« to scroll back a page.
4Press »
Λ
« to scroll to the next page.
5Press »TXT« to switch off teletext mode.
Additional functions
Skipping the waiting time
While a page is being searched for, you can switch to the television
channel.
1Enter the teletext page number using »1…0« and then press
»PIP«.
– As soon as the page is found, the page number is displayed.
2Press »PIP« to switch to the teletext page.
Increasing character size
If you have difficulty reading the text on the screen, you can double
the character size.
1To enlarge the character size of a teletext page, press »SCAN«
repeatedly.
TELETEXT MODE ----------------------------------------------------------------------------

ENGLISH
25
Page stop
A multiple page may contain several sub-pages, which are auto-
matically scrolled by the transmitting station.
1Stop the sub-pages with »P«.
2Press »P« to quit the function.
Calling up a sub-page directly
If the selected teletext page contains further pages, the number
of the current sub-page as well as the total number of pages is
displayed.
1Call up the sub-pages with »S«.
2Press »1…0« to enter the sub-menu.
3Press »S« to quit the function.
Reveal answer
Certain teletext pages contain ”hidden answers” or information
which can be called up.
1Display information with »?«.
2Conceal information with »?«.
Split screen (Split Screen)
With this function you can see the television channel on the left and
the teletext page on the right.
1To activate the split screen function, press »PAT«.
– The television channel and the teletext page appear next to
each other on the screen.
2To deactivate the split screen function, press »PAT«.
TELETEXT MODE ----------------------------------------------------------------------------
26
CONVENIENCE FUNCTIONS ------------------------------
Convenience functions
1Open the menu with »i«.
– The »PICTURE« menu is displayed.
2Select »OPTIONS« with »–« or »+« and press »G« to confirm.
Note:
Additional operations are explained in the following sections.
Changing the menu language
1Select »Language Settings« with »
V
« oder »
Λ
« and press »G«
to confirm.
2Select »Language Settings« with »
V
« oder »
Λ
.
3Select the language with »–« or »+«.
4Press »i« to finish the setting.
Language settings
(only for digital television channels)
You can alter the appearance of subtitles or disable them, select the
subtitle language, select a second subtitle language, and select the
audio language and a second audio language.
1Select »Language Settings« with »
V
« or »
Λ
« and press »G« to
confirm.
2Select »Audio Languages«, »Subtitle Languages«, »Hard of Hear-
ing«) with »
V
« or »
Λ
« and press »G« to confirm.
3Select »Primary« or »Secondary« with »
V
« or »
Λ
« and press
»G« to confirm.
4Press »–« or »+« to make the setting.
5Select »Close« with »
V
« or »
Λ
« and press »G« to confirm.
6Press »i« to end the setting.
Resetting the television to its original state
This function enables you to delete the station lists and all custom
settings.
1Select »Restore Factory Defaults« with »
V
« oder »
Λ
« and press
»G« to confirm.
2Select the »Yes « button with »–« or »+« and confirm the reset
function with »G«.
– The »Installation Guide« menu is displayed.
3Continue the settings as described in the chapter on searching
for television stations on page 13.
Audio Languages English
Select
Back
Exit
Language Settings English
OPTIONS
Z
1
Subtitle Languages English
Hard of Hearing Off
OPTIONS
Language Settings
Restore Factory Defaults
Country Deutschland
Game Mode Off
Software Update
SPDIF Output PCM
Select
Back
Exit
s
s
s
Z
1
OPTIONS
Language Settings
Restore Factory Defaults
Country Deutschland
Game Mode Off
Software Update
Select
Back
Exit
s
s
s
Z
1
SPDIF Output PCM
ENGLISH
27
* “Dolby”and the double-D symbol are trademarks of Dolby Laboratories.
Manufactured under license from Dolby Laboratories.
CONVENIENCE FUNCTIONS ------------------------------
Game mode
This function is only available for preset channels »HDMI1«,
»HDMI2«, »HDMI3«, »YPBPR« or »PC«.
Use this function to adjust the screen settings of the television set for
games. Connect the games console using the »HDMI1«, »HDMI2«,
»HDMI3«, »COMPONENT INPUT VIDEO IN Y Pb Pr« or
»PC-IN VGA« sockets.
You can no longer make settings in the »PICTURE« menu.
1Select »Game Mode« with »
V
« or »
Λ
«
2Press »–« or »+« to switch the function on or off.
3Press »i« to end the setting.
Selecting the audio signal for digital output
Here you select whether the audio signal is emitted from the »SPDIF
OUT« socket in PCM data format or in AC3 format.
1Select »SPDIF Output« by pressing »
V
« or »
Λ
«.
2Select the signal type (»PCM« or »Dolby* D«) by pressing »–«
or »+«.
3Quit the setting by pressing »i«.
Parental control
1Open the menu with »i«.
– The »PICTURE« menu is displayed.
2Select the »PARENTAL CONTROL« menu with »–« or »+« and
press »G« to confirm.
3Enter the PIN code »0000« with »1 ... 0«.
Note:
Additional operations are explained in the following sections.
Lock the system
Using this function, you can lock the television menus so that they
can only be accessed by entering a PIN code.
1Select »Lock System« with »
V
« or »
Λ
«.
2Activate the lock with »–« or »+«.
3Press »i« to end the setting.
OPTIONS
Language Settings
Restore Factory Defaults
Country Deutschland
Game Mode Off
Software Update
Select
Back
Exit
s
s
s
Z
1
PARENTAL CONTROL
Lock System Off
Set PIN
Block Programme
Parental Guidance 4
Select
Back
Exit
s
s
Z
Panel Lock Off
1
PARENTAL CONTROL
Lock System Off
Set PIN
Block Programme
Parental Guidance 4
Select
Back
Exit
s
s
Z
Panel Lock Off
1
SPDIF Output PCM
OPTIONS
Language Settings
Restore Factory Defaults
Country Deutschland
Game Mode Off
Software Update
Select
Back
Exit
s
s
s
Z
1
SPDIF Output PCM
28
Changing the PIN code
Instead of the default code »0000«, you can enter a personal code.
Please take note of your personal code.
1Select »Set PIN« with »
V
« or »
Λ
« and press »G« to confirm.
2Enter your new personal PIN code with »1 ... 0« in four digits.
3Enter your personal PIN code again with »1 ... 0« and press
»G« to confirm.
4Press »i« to end the setting.
Block a television channel
You can block individual television channels which are not suitable
for children using a personal PIN code.
1Select »Block Programme« with »
V
« or »
Λ
« and press »G« to
confirm.
– The channel list is displayed.
2Select the television channel in the »Programme Table« with »
V
«
or »
Λ
« and press »¥« (green) to confirm.
– The »D« symbol is displayed in front of the channel in the Pro-
gramme Table.
3Press »i« to end the setting.
Note:
Press »
V
« or »
Λ
« to release the channel and switch off the block
by pressing »¥« (green).
Authorise channels
There are movies which contain contents or scenes which are not
suitable for children.
Certain programmes contain information which identifies these
contents or scenes and have been given an access level from 4 to
18. You can select one of the access levels and thus authorise the
playback.
1Select »Parental Guidance« with »
V
« or »
Λ
«.
2Select the access level with »–« or »+«.
3Press »i« to end the setting.
Blocking the control panel (parental control)
If the control panel block is activated, the buttons on the television do
not work.
1Select »Panel Lock« with »
V
« or »
Λ
«.
2Activate (On) or deactivate (Off) the panel block with »–« or
»+«.
3Press »i« to end the setting.
CONVENIENCE FUNCTIONS ------------------------------
PARENTAL CONTROL
Lock System Off
Set PIN
Block Programme
Parental Guidance 4
Select
Back
Exit
s
s
Z
Panel Lock Off
1
PARENTAL CONTROL
Lock System Off
Set PIN
Block Programme
Parental Guidance 4
Select
Back
Exit
s
s
Z
Panel Lock Off
1
PARENTAL CONTROL
Lock System Off
Set PIN
Block Programme
Parental Guidance 4
Select
Back
Exit
s
s
Z
Panel Lock Off
1
PARENTAL CONTROL
Lock System Off
Set PIN
Block Programme
Parental Guidance 4
Select
Back
Exit
s
s
Z
Panel Lock Off
1
ENGLISH
29
Timer functions
1Open the menu with »i«.
– The »PICTURE« menu is displayed.
2Select the »TIMER« menu with »–« or »+« and press »G« to
confirm.
Notes:
The correct time is shown in »Clock«.
Additional operations are explained in the following sections.
Switch-off timer
In the »Off Time« menu, you can enter a switch-off time for the tele -
vision. The television switches off after the entered time has elapsed
in stand-by.
1Select »Off Time« with »
V
« or »
Λ
« and press »G« to confirm.
2Select »Repeat« with »
V
« or »
Λ
« and select the mode with »–«
or »+«.
3Select »Hour« with »
V
« or »
Λ
« and enter the time with »1…0«.
4Select »Minute« with »
V
« or »
Λ
« and enter the time with
»1…0«.
5Select »Close« with »
V
« or »
Λ
« and press »G« to confirm.
6Press »i« to end the setting.
Switch-on timer
In the »On Time« menu, you can enter a switch-on time for the tele -
vision.
The television switches on with the preset volume and the desired
channel after the set time in stand-by mode has elapsed.
1Select »On Time« with »
V
« or »
Λ
« and press »G« to confirm.
2Select »Activate« with »
V
« or »
Λ
« and press »–« or »+« to
choose when the television should switch on.
3Select »Hour« with »
V
« or »
Λ
« and enter the time with »1…0«.
4Select »Minute« with »
V
« or »
Λ
« and enter the time with
»1…0«.
5Select »Volume« with »
V
« or »
Λ
« and set the volume by pressing
»–« or »+«.
6Select »Mode« with »
V
« or »
Λ
« and press »–« or »+« to select
»DTV« or »ATV«. This entry is only possible if you have already
entered a switch-on time.
7Select »Program« with »
V
« or »
Λ
« and enter the television
channel by pressing »–« or »+«.
8Select »Close« with »
V
« or »
Λ
« and press »G« to confirm.
9Press »i« to end the setting.
CONVENIENCE FUNCTIONS ------------------------------
TIMER
Clock 19 /Jun 2008 14:35
Off Time Off
On Time Off
Sleep Timer Off
Auto Sleep Off
Time Zone Berlin GMT+1
Select
Back
Exit
Z
1
TIMER
Clock 19 /Jun 2008 14:35
Off Time Off
On Time Off
Sleep Timer Off
Auto Sleep Off
Time Zone Berlin GMT+1
Select
Back
Exit
Z
1
TIMER
Clock 19 /Jun 2008 14:35
Off Time Off
On Time Off
Sleep Timer Off
Auto Sleep Off
Time Zone Berlin GMT+1
Select
Back
Exit
Z
1

30
Enter the switch-off time (Sleep Timer)
In the »Sleep Timer« menu you can enter a time for the television to
switch off. After this time has elapsed, the television switches to
standby mode.
1Select »Sleep Timer« with »
V
« or »
Λ
«.
2Select the switch-off time with »–« or »+«.
Note:
Switch off the function by pressing »–« or »+« to set it to »Off«.
3Press »i« to end the setting.
Automatic switch-off (Auto Timer)
If this function is activated, the television switches off after 5 minutes
on stand-by if no video signal is transmitted.
1Select »Auto Sleep« with »
V
« or »
Λ
«.
2Press »–« or »+« to switch the function »On«.
Note:
Switch off the function by pressing »–« or »+« to set it to »Off«.
3Press »i« to end the setting.
Setting the time zone
The television automatically detects the local difference to Green-
wich Mean Time (the selected channel provides a time signal). You
can set the local time difference yourself if the time is not detected or
is not the same as your local time.
1Select »Time Zone« with »
V
« or »
Λ
«
2Set the time zone with »–« or »+« (in Germany: + 1.00 hour).
3Press »i« to end the setting.
CONVENIENCE FUNCTIONS ------------------------------
TIMER
Clock 19 /Jun 2008 14:35
Off Time Off
On Time Off
Sleep Timer Off
Auto Sleep Off
Time Zone Berlin GMT+1
Select
Back
Exit
Z
1
TIMER
Clock 19 /Jun 2008 14:35
Off Time Off
On Time Off
Sleep Timer Off
Auto Sleep Off
Time Zone Berlin GMT+1
Select
Back
Exit
Z
1
TIMER
Clock 19 /Jun 2008 14:35
Off Time Off
On Time Off
Sleep Timer Off
Auto Sleep Off
Time Zone Berlin GMT+1
Select
Back
Exit
Z
1

ENGLISH
31
The file formats
Your television can be operated via the USB input with the following
file formats:
MP4 video data
The MP4 process was designed to compress video files.
An MP4 video is an encoder/decoder, based on the MPEG-4 com-
pression system, which is used to decrypt and display compressed
video data.
This enables the televsion to play back videos compressed in the
MPEG 4 SP format.
MPEG 4 SP files are “packaged” with the audio data – which have
been compressed using MP3, AAC or Dolby Digital©– in this “.AVI”
or “.MP4” file.
MP3/WMA audio data
MP3 stands for MPEG-1 Audio Layer 3 and comes from the Motion
Picture Expert Group (MPEG) standard, which was developed for
compressing audio and video data.
WMA is a compression standard for audio data (Windows Media
Audio).
These formats enable audio files to be saved on a computer with a
sound quality similar to that of a CD.
MP3 files can be organised into folders and subfolders similar to
files on a computer.
JPEG picture data
JPEG stands for Joint Picture Experts Group. This process was de-
signed to compress picture files.
JPEG files can be saved onto a data medium along with other file
types.
The files can be compiled in folders. This structure is similar to that of
an MP3 CD.
USB-MODE ----------------------------------------------------------------------------------------------
32
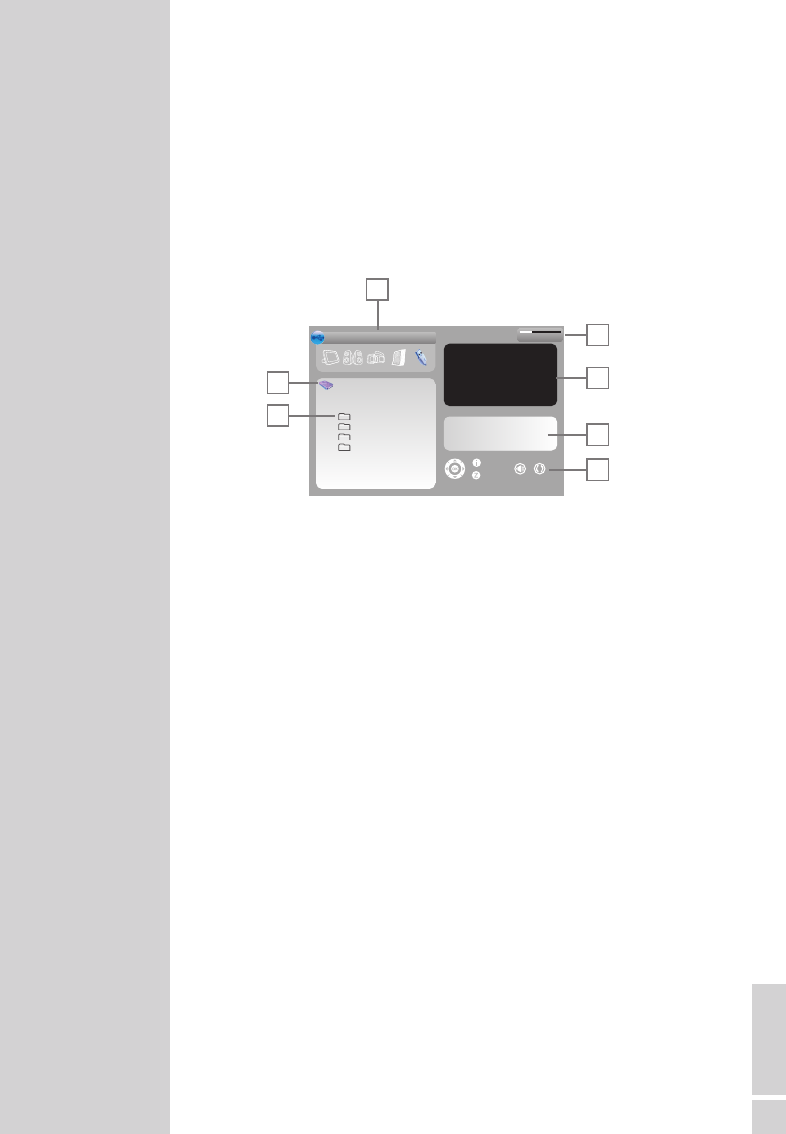
Connecting external data media
Before connecting the data medium, switch the television to stand-by
with »8«. Connect the device and then switch the television on again.
Before connecting the data medium, the television must first be
switched to standby, otherwise files can be damaged.
1Connect the USB interface »USB« of the television and the
corresponding socket on the data device (external hard drive,
digital camera, card reader or MP3 player) using a USB cable;
or
plug the memory stick into the USB interface »USB« of the tele-
vision.
Note:
A bi-directional data transfer as defined for ITE (Information
Technology Equipment) devices in EN 55022/EN 55024 is not
possible.
USB transfer is not in itself an operating mode. It is only an addi-
tional function.
USB-MODE ----------------------------------------------------------------------------------------------
ENGLISH
33
The file browser
The file browser displays the data (AVI., JPEG, MP3, MP4 or WMA
data) that the external data medium offers.
If a data medium contains different file formats, you can deactivate
data you do not need for the playback using a filter function (All
Supported, Text, Movie, Music, Photo).
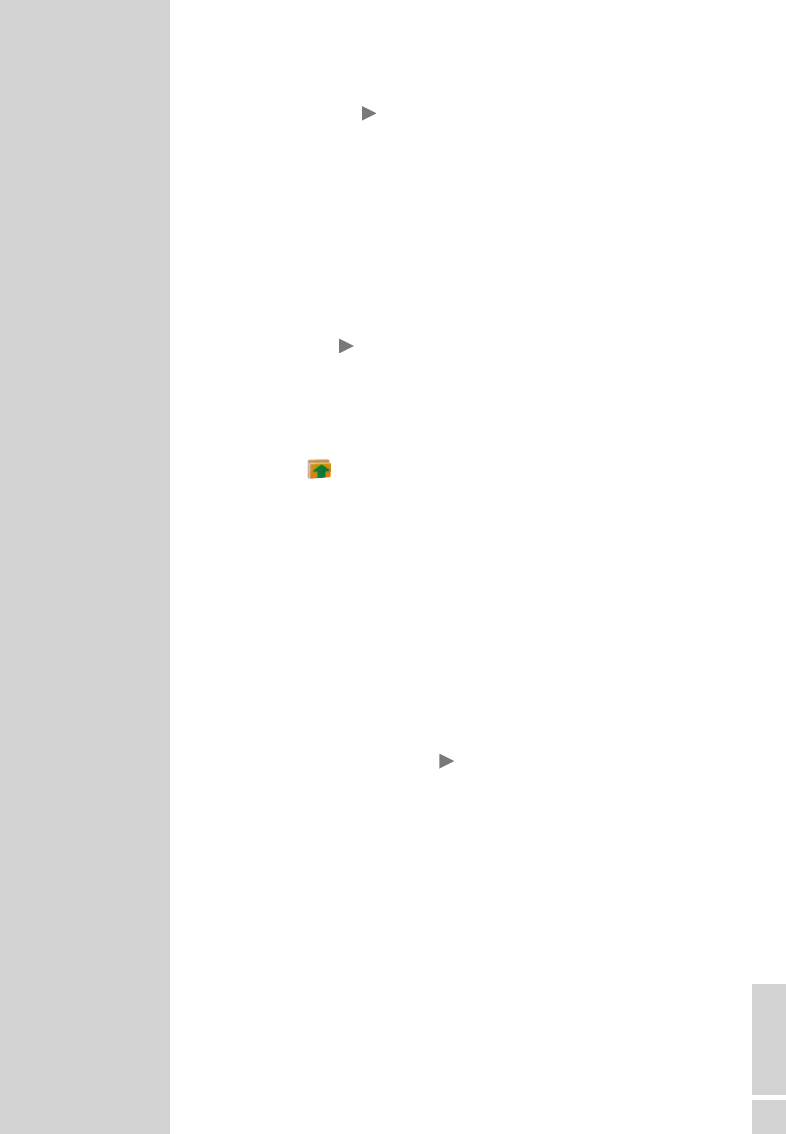
The main menu of the file browser
1Selected data format.
2Name of the data medium.
3Total folders on the data medium.
4Total memory and available memory of external data medium.
5Inset picture of a selected JPEG picture.
6Status information for the selected file.
7Menu navigation.
USB-MODE ----------------------------------------------------------------------------------------------
All Supported
1/1
PMP
C:\
Bilder
Musik 1
Musik 2
Filme
1
2
3
5
6
7
Menu
Back
16GB/20GB Free 4

34
USB-MODE ----------------------------------------------------------------------------------------------
Settings in the USB setup menu
Opening the USB setup menu
1Open the menu with »i«.
– The »PICTURE« menu is displayed.
2Select the »USB SETUP« menu with »–« or »+«.
Note:
Additional operations are explained in the following sections.
Switching on automatic preview
If the automatic preview is switched on, you can see the selected
JPEG picture in the main menu of the file browser.
1Select »Auto Preview« with »
V
« or »
Λ
«
2Press »–« or »+« to switch on the (on) function.
3Press »i« to end the setting.
Selecting the display duration of the slideshow
1Select »Slide Show Interval« with »
V
« or »
Λ
«.
2Select the time (3, 5, 10 seconds) with »–« or »+«.
3Press »i« to end the setting.
Selecting the display mode
1Select »View Mode« with »
V
« or »
Λ
«.
2Press »–« or »+« to select the function.
3Press »i« to end the setting.
Playback – Basic functions
1Press »AV« to select data medium, press »
V
« or »
Λ
« to select
»USB« and press »G« to confirm.
– The file browser (the “Contents”) of the data medium is dis-
played.
2Select file format (All Supported, Text, Movie, Music, Photo) with
»–« or »+«.
3Switch to the file overview with »G«.
4Select the file you want with »
V
« or »
Λ
« and press »G« to
confirm.
– A list of sub-directories appears.
Note:
Switch back to the main folder with »Z«.
USB SETUP
Auto Preview Off
Slide Show Interval 5s
View Mode Original
Select
Back
Exit
Z
1
ENGLISH
35
USB-MODE ----------------------------------------------------------------------------------------------
5Select the track or picture with »
V
« or »
Λ
« and start play by
pressing » «.
– You can view information on the film by pressing »z« (red).
– For playing MP3 or WMA data, information on the album,
track and singer is displayed at the right of the menu.
– When playing picture data, information about the resolution
and the size is displayed at the right of the menu.
Note:
The file browser is switched off when playing picture data. Press
»7« to switch back to the file browser.
6Press »!« to pause playback.
7Press » « to resume normal playback.
8Press »7« to end playback.
– The file browser appears.
Note:
To return to the main folder, press »
Λ
« to select the folder icon
» ..« and then press »G«.
Additional playback functions
Depending on the file formats used, the following additional
functions are possible.
If the »-« symbol appears on the television screen, then the selected
function is not possible with this file.
Play selected tracks
Only play the marked tracks.
1Select the track with »
V
« or »
Λ
« and highlight using »G«.
2Select the next track with »
V
« or »
Λ
« and highlight with »G«.
3Start playback with » «.
4Press »7« to end playback.
Note:
To remove the highlighting, select the track with »
V
« or »
Λ
« and
switch off the marking with »G«.
Selecting a track or picture in steps (SKIP)
1During playback, select the next track/picture you want with
»6«.
2Select the previous track/picture with »5«.
– Playback begins with the track or picture you selected.

36
USB-MODE ----------------------------------------------------------------------------------------------
Forward search (only MP4 video files)
You can select different speeds (2-fold, 4-fold, 8-fold and 16-fold
forwards and backwards).
1Select the playback speed during playback by pressing »m« or
»,«.
2Press » « to resume playback.
Enlarge/reduce picture
(only JPEG/MP4 video files)
This function allows you to enlarge or reduce various picture sections.
1Press »G« during pause or playback.
Turn the picture display
(only JPEG files)
The pictures can be rotated by 90°.
1During playback, press »–« or »+« to rotate the pictures by 90°.
Repeat functions
Options:
–» «, the selected track is repeated once;
–» «, all tracks are played repeatedly.
1Before playback, select the repeat function with »PIP«.
2Start playback with » «.
3Deactivate the repeat function with »PIP«.
– The display changes to » «.

ENGLISH
37
DVD player, DVD recorder, video recorder or
set-top box
Note:
Which television socket(s) you connect your external devices to
depends on the sockets the external device is equipped with and
the signals which are available.
Note that with many external devices the resolution of the video
signal must be adapted to the input sockets on the television
(check the external device’s instruction manual). You can find out
which values you need to set by referring to the guidelines in the
section about connection options.
Note:
Do not connect any other equipment while the device is switched
on. Switch off the other equipment as well before connecting it.
Only plug the device into the mains socket after you have
connected the external devices.
High definition – HD ready
Your television can playback high-definition television signals
(HDTV).
You can connect the input sources (HDTV set-top box or High
Definition DVD player) to the »HDMI« socket (digital HDTV signal).
This ensures that you can view digital HDTV programmes, even if
they are copy-protected (HDCP High Bandwidth Digital Content Pro-
tection).
Connecting a DVD player, DVD recorder,
video recorder or set-top box
With a digital audio/video signal
Video signal: digital video; resolution: standard 576p; HDTV 720p,
1080i, 1080p.
Audio signal: digital audio (stereo, multi-channel compression,
uncompressed).
Channel position »HDMI1«, »HDMI2« or »HDMI3«.
1Connect the »HDMI1«, »HDMI2« or »HDMI3« socket on the
television and the corresponding HDMI socket on the external
device using a standard HDMI cable (digital video and audio
signal).
USING EXTERNAL DEVICES ----------------------------------
38
With an analogue video signal (progressive)
Video signal: YUV; resolution: standard 576p; HDTV 720p, 1080i.
Audio signal: stereo, analogue.
Channel position »YPBPR«.
1Connect the »COMPONENT INPUT Y Pb Pr« sockets on the
television and the corresponding sockets on the external device
using cinch cables (video signal).
2Connect the »COMPONENT INPUT AUDIO IN L R« sockets
on the television to the corresponding sockets on the external
device using cinch cables (audio signal).
Using the Euro/AV socket
Video signal: FBAS/RGB.
Audio signal: stereo, analogue.
Channel position »SCART«.
1Connect the »SCART« socket on the television and the corre-
sponding socket on the external device using a EURO-AV cable
(video and audio signal).
With S-Video signal
Video signal: Y/C.
Audio signal: stereo, analogue.
Channel position »S-Video«.
1Connect the »S-VHS« socket on the television and the corre-
sponding socket on the external device using an S-Video cable
(video signal).
2Connect the »L R« sockets on the television to the corresponding
sockets on the external device using cinch cables (audio signal).
With an analog TV signal
Video signal: FBAS.
Audio signal: stereo, analogue.
Channel position »AV«.
1Connect the »Video« cinch socket on the television and the
corresponding socket on the external device using cinch cables
(video signal).
2Connect the »L R« sockets on the television to the corresponding
sockets on the external device using cinch cables (audio signal).
USING EXTERNAL DEVICES ----------------------------------
ENGLISH
39
Using a video recorder, DVD player or
set-top box
1Switch on the video recorder, DVD player or set-top box and se-
lect the function you wish to use.
2Press »AV«, select the input signal channel with »
Λ
« or
»
V
« (»SCART«, »AV«, »S-Video«, »HDMI1«, »HDMI2«,
»HDMI3« or »YPBPR«) and press »G« to confirm.
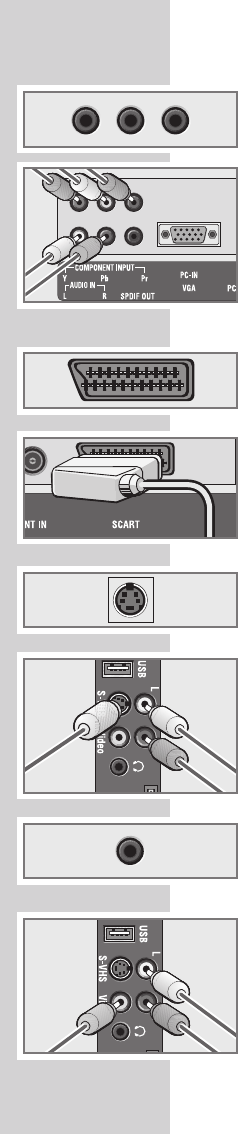
Headphones
Connecting the headphones
1Plug the headphone jack (3.5 mm ø jack plug) into the head-
phone socket on the right side of the television.
Selecting audio settings for the headphones
1Open the menu with »i«.
– The »PICTURE« menu is displayed.
2Select the »SOUND« menu with »–« or »+« and confirm with
»G«.
3Select the »Headphone« with »
V
« or »
Λ
«.
4Adjust the volume with »–« or »+«.
5Press »i« to end the setting.
USING EXTERNAL DEVICES ----------------------------------
SOUND
Balance 0
GGGGGGGGGGGGGGGGGG
AVL Off
Sound Type Stereo
Sound Mode Normal
Equalizer
Select
Back
Exit
Volume 29
Z
s
Headphone 21
s
1
GGGG
GGG
40
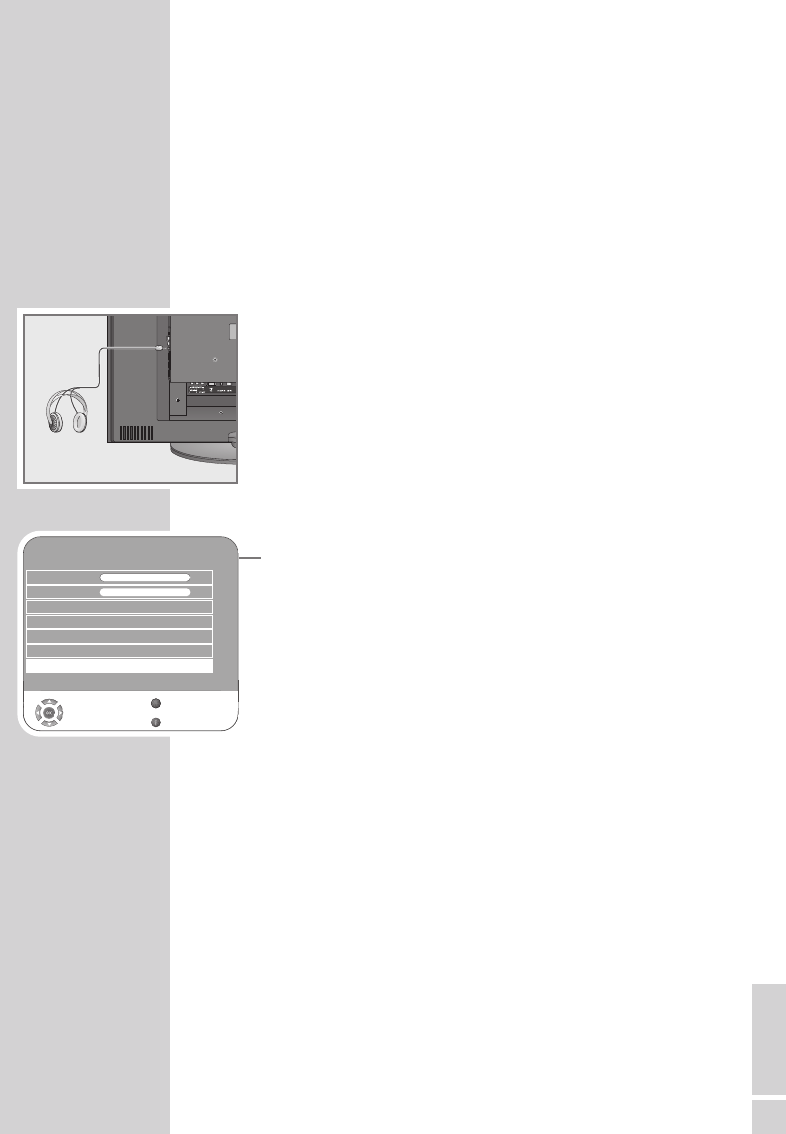
Decoder or satellite receiver
In order for the television to receive encoded programs from a
privately operated station, a decoder is needed.
Connecting a decoder or satellite receiver
1Connect the »SCART« socket on the television set and the ap-
propriate socket on the decoder using a EURO-AV cable.
Using a decoder or satellite receiver
1Switch on the television and the decoder or the satellite receiver.
2Press »AV«, select the channel »SCART« with »
V
« or »
Λ
« and
press »G« to confirm.
Activating the preset for a decoder
If this function is activated, the decoder (connected to the »SCART«
socket) provides a decoded audio/video signal.
1Open the menu with »i«.
– The »PICTURE« menu is displayed.
2Select »OPTIONS« with »–« or »+« and press »G« to confirm.
3Select the »Decoder Settings« with »
V
« or »
Λ
«.
4Press »–« or »+« to switch the function (»On«).
5Press »i« to end the setting.
USING EXTERNAL DEVICES ----------------------------------
Decoder
OPTIONS
Language Settings
Restore Factory Defaults
Country Deutschland
Game Mode Off
Decoder Settings Off
Select
Back
Exit
s
s
Z
1
SPDIF Output PCM
ENGLISH
41
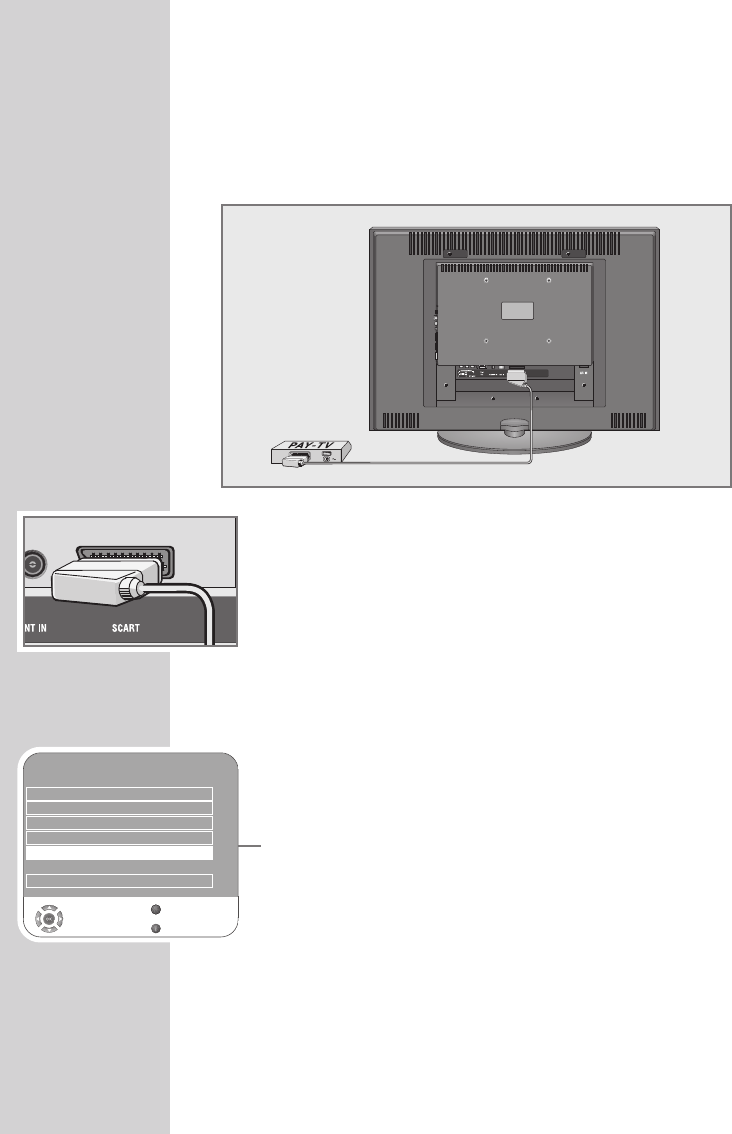
Camcorder
Connecting the camcorder
1Connect the yellow socket »Video« on the television and the
corresponding socket on the camcorder (VHS, Video 8) with a
cinch cable (picture signal);
or
connect the »S-VHS« socket (picture signal) on the television and
the corresponding socket on the camcorder (S-VHS, Hi 8) with a
S-Video cable.
2Connect the white and red sockets »L R« on the television and the
corresponding sockets on the camcorder with a cinch cable
(audio signal).
Note:
There must not be video signals at »Video« and »S-VHS«
sockets at the same time. This could lead to picture disturbances.
Operating with a camcorder
1Switch on the camcorder, insert a cassette and start playback.
2Press »AV«, select the »AV« or »S-Video« channel with »
V
« or
»
Λ
« and press »G« to confirm.
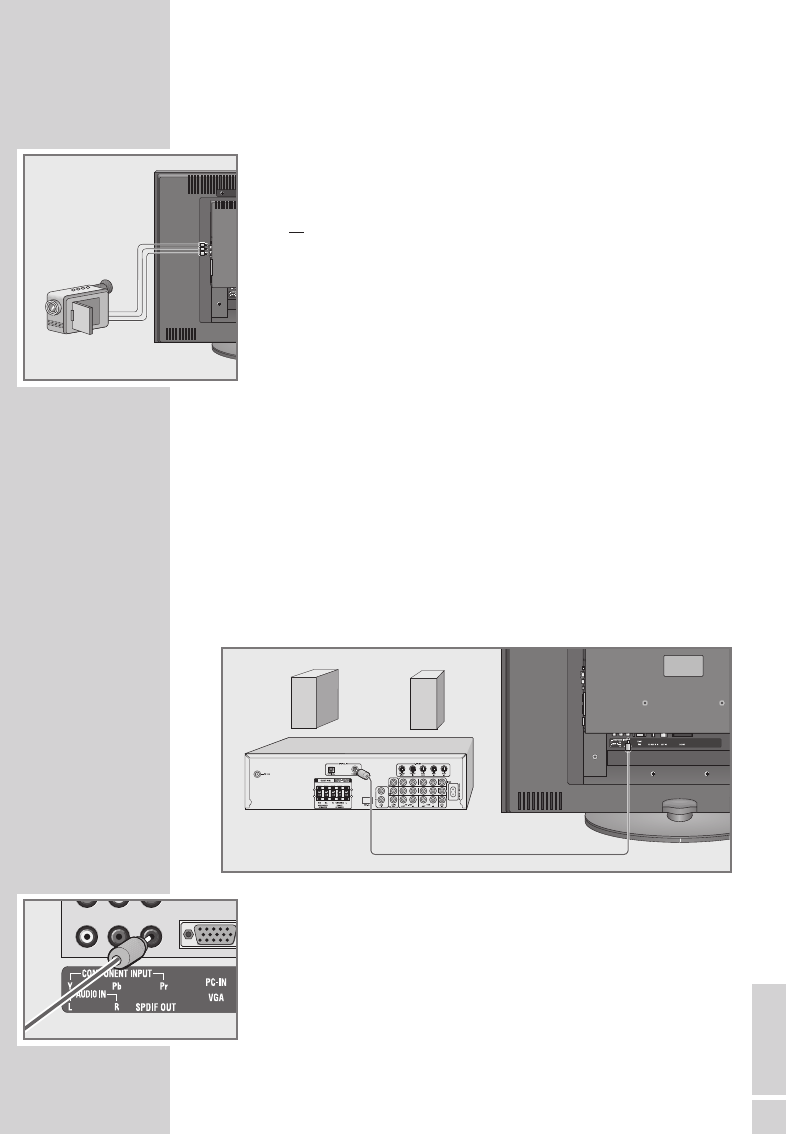
Hi-fi system/AV receiver
Connecting the hi-fi system/AV receiver
1Connect the socket »SPDIF OUT« on the television to the corre-
sponding socket on the AV receiver using a cinch cable (digital
audio signal).
USING EXTERNAL DEVICES ----------------------------------
42
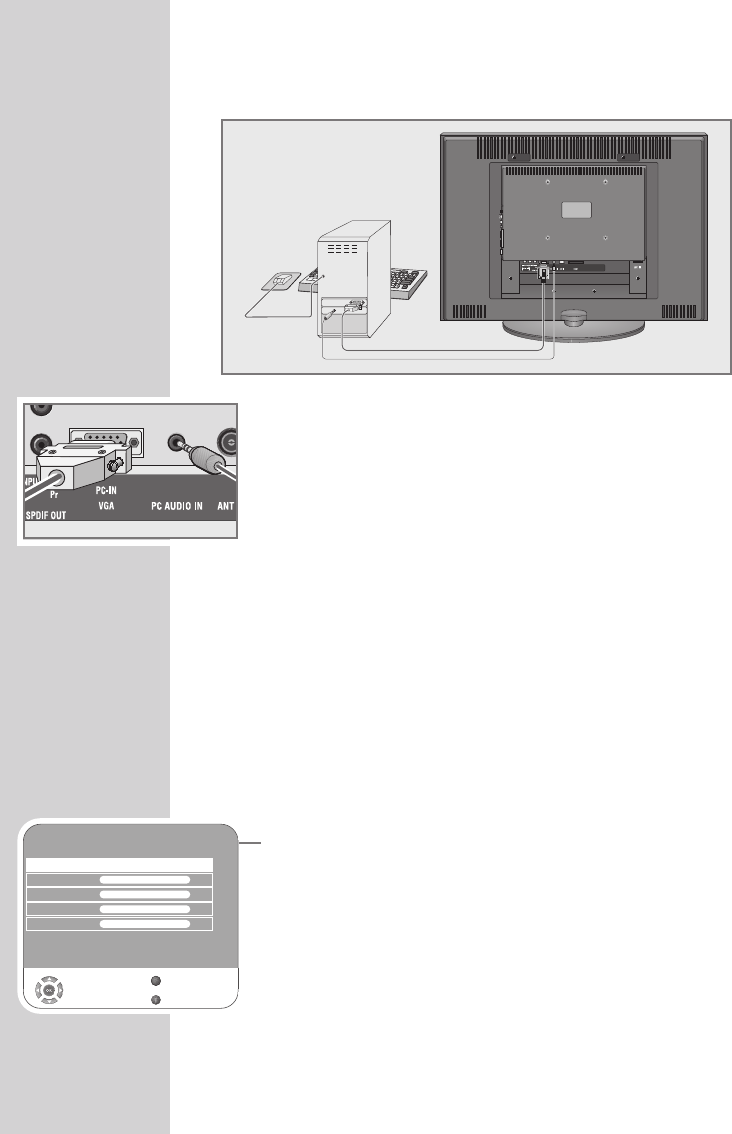
Connecting a PC
1Connect the socket »PC-IN VGA« on the television to the corre-
sponding socket on the PC using a VGA cable.
2Connect the socket »PC AUDIO IN« on the television to the
corresponding socket on the PC using a cinch cable (audio
signal).
Note:
Adjust your PC to the monitor (for example, picture resolution
1280 x 768, picture frequency 60 Hz).
Selecting the channel position for the PC
1Press »AV«, select the »PC« channel with »
V
« or »
Λ
« and press
»G« to confirm.
Settings for the PC
1Open the menu with »i«.
– The »PICTURE« menu is displayed.
2Select the »PC SETUP« menu with »–« or »+« and confirm with
»G«.
3Select the function or setting you want with »
V
« or »
Λ
« and press
»–« or »+« to execute it.
– Options:
»Auto Adjust« For automatic PC configuration;
»Horizontal Position« Adjust the picture position horizon-
tally;
»Vertical Position« Adjust the picture position vertically;
»Size« Set the cycle frequency;
»Phase« Remove horizontal flicker, blurring
and horizontal lines.
4Press »i« to finish the settings.
PC MONITOR MODE ----------------------------------------------------------
PC SETUP
Auto Adjust
Horizontal Position 45
GGGGGGGG
Vertical Position 45
GGGGGGGG
Size 0
GGGGGGGGGG
Phase 50
GGGGGGGGG
Select
Back
Exit
Z
1
ENGLISH
43
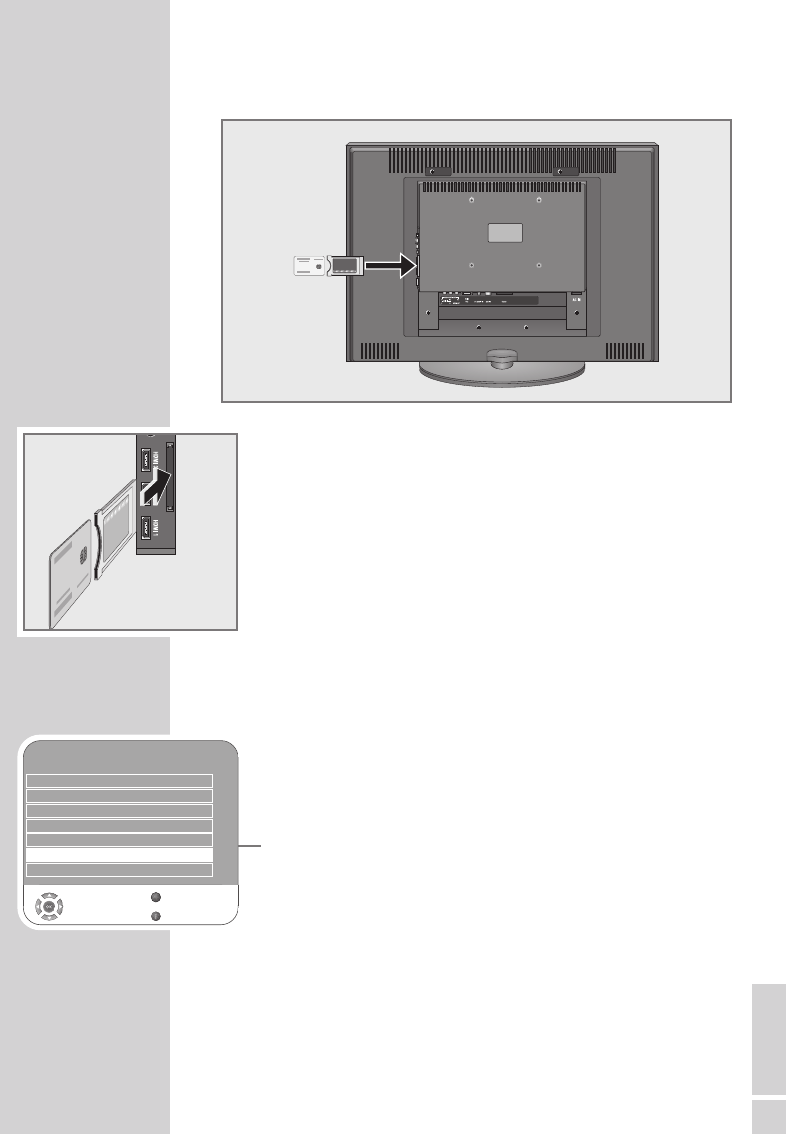
Inserting the CA module
Note:
Switch off the appliance before inserting the CA module in the
»CI« slot.
1Insert the smart card into the CA module.
2Insert the CA module with the smart card into the »CI« slot on the
television.
Note:
To see which CA module is in the Common Interface slot, go to
the »CA - Module« submenu.
Access control for CA module and smart card
1Open the menu with »i«.
– The »PICTURE« menu is displayed.
2Select the »CHANNEL SETUP« menu with »–« or »+« and con-
firm with »G«.
3Select »CA–Module« with »
V
« or »
Λ
« and press »G« to
confirm.
Notes:
This menu give operating instructions and – after you enter your
PIN code – access to channels of the PAY-TV provider.
The remaining settings are described in the manuals for your CA
module and smart card.
4Press »i« to finish the settings.
OPERATION WITH COMMON INTERFACE
CHANNEL SETUP
Auto Tuning
Digital Manual Tuning
Analogue Manual Tuning
Programme Table
Signal Information
CA - Module IRDETO ACCESS
Select
Back
Exit
Active Antenna Power On
s
s
s
s
s
Z
1

44
SPECIAL SETTINGS ------------------------------------------------------------------
Tuning digital television stations
This search deletes all television stations included in the channel list!
Tuning all digital television stations using the
search
1Open the menu with »i«.
– The »PICTURE« menu appears.
2Select the »CHANNEL SETUP« menu with »–« or »+«.
3Select »Auto Tuning« with »
V
« or »
Λ
« and confirm with »G«.
4Select »Country Selection« by pressing »
V
« or »
Λ
« and press
»–« or »+« to make the setting.
5Select the »Scan Type« with »
V
«.
Press »–« or »+« to select the »DTV« display and start the search
with »G«.
– The »Searching...« menu appears, and the search for digital
TV stations begins. This may take several minutes depending
on the number of television stations received.
– The search is ended when the »Programme Table« appears.
Note:
You can stop the search by pressing »i«.
6Press »i« to end the setting.
Tuning the digital television stations by entering
the channel numbers
1Open the menu with »i«.
– The »PICTURE« menu appears.
2Select the »CHANNEL SETUP« menu with »–« or »+«.
3Select »Digital Manual Tuning« with »
V
« or »
Λ
« and press »G«
to confirm.
– The »Digital Manual Tuning« menu appears.
4Enter channel number directlywith »1 ... 0« and press »G« to
confirm.
– The search is finished when the channels found appear in the
list.
5Press »i« to end the setting.
CHANNEL SETUP
Auto Tuning
Digital Manual Tuning
Analogue Manual Tuning
Programme Table
Signal Information
CA - Module Not Inserted
Select
Back
Exit
Active Antenna Power On
s
s
s
s
s
Z
1
Searching...
57 % UHF CH49 DTV
ZDF
ZDFinfokanal
SAT.1
N24
ProSieben
kabel eins
Exit
GGGGGGGGGGGGGGGG
DTV
DTV
DTV
DTV
DTV
DTV
Skip
Z
Digital Manual Tuning
UHF CH 34
Frequency 578 MHz
Poor Normal Good
Select Back
Exit
GGGGGGGGGGGGGGGG
Z
09
–
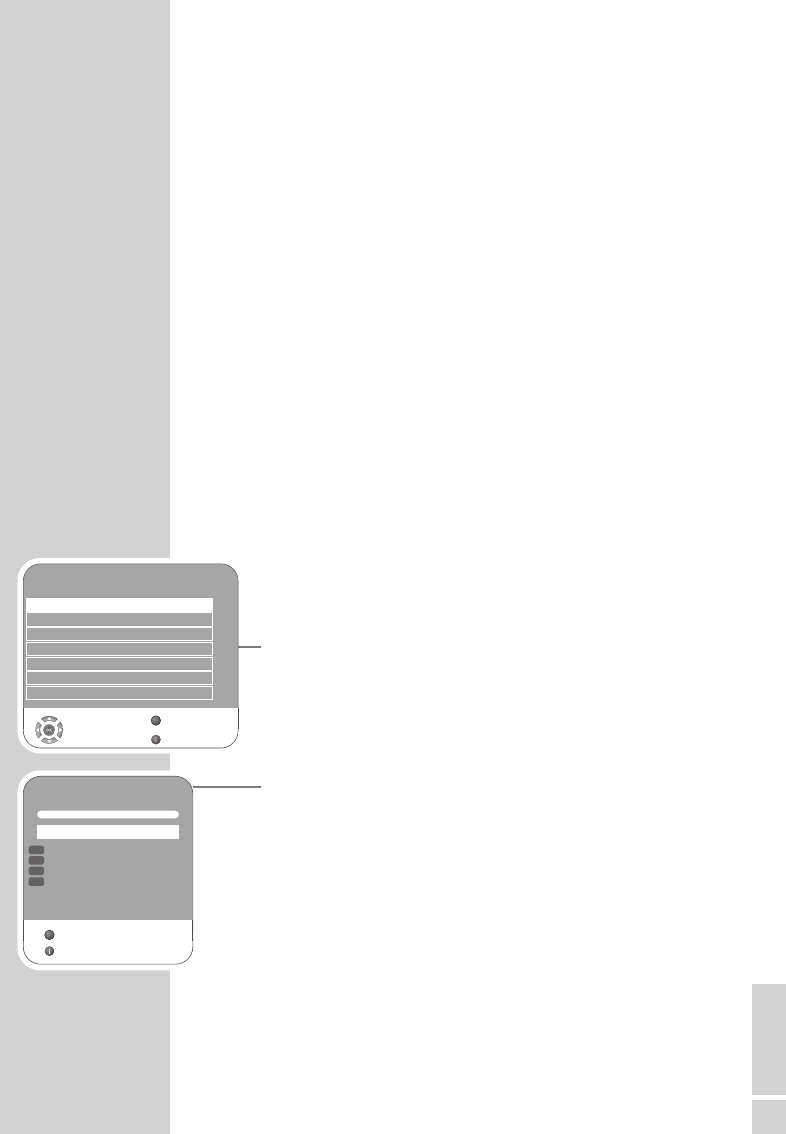
ENGLISH
45
SPECIAL SETTINGS ------------------------------------------------------------------
Tuning analogue television stations
This setting is only necessary if you cannot receive any digital stations
and you have not carried out an analogue search during initial setup.
The television station can be set directly or using the search.
Switching the television to analogue channels
1Open the »INPUT SOURCE« menu by pressing »AV«.
2Select input source »ATV« with »
V
« or »
Λ
« and press »G« to
confirm.
Note:
Additional operations are explained in the following sections.
Re-tuning all analogue television channels
These settings are only necessary if you can not receive any digital
stations or if you want to re-tune all analogue channels.
The analogue television stations are listed in the channel list after the
digital television stations.
Note:
Plug the rooftop antenna cable (for analogue television stations)
into the »ANT IN« socket on the television.
1Open the menu with »i«.
– The »PICTURE« menu appears.
2Select the »CHANNEL SETUP« menu with »–« or »+«.
3Select »Auto Tuning« with »
V
« or »
Λ
« and confirm with »G«.
4Select »Country Selection« by pressing »
V
« or »
Λ
« and press
»–« or »+« to make the setting.
5Select the »Scan Type« with »
V
«.
Press »–« or »+« to select the »ATV« display and start the search
with »G«.
– The »Searching...« menu appears, and the search for analogue
TV stations begins. This may take several minutes depending
on the number of television stations received.
– The search is ended when the »Programme Table« appears.
Note:
You can stop the search by pressing »i«.
6Press »i« to end the setting.
CHANNEL SETUP
Auto Tuning
Digital Manual Tuning
Analogue Manual Tuning
Programme Table
Signal Information
CA - Module Not Inserted
Select
Back
Exit
Active Antenna Power On
s
s
s
s
s
Z
1
Searching...
14%... 161.25 MHz ATV
1 ARD
2 ZDF
3 BR3
4 3 SAT
Exit
GGGGGGGGGGGGGGGG
ATV
ATV
ATV
ATV
Skip
Z
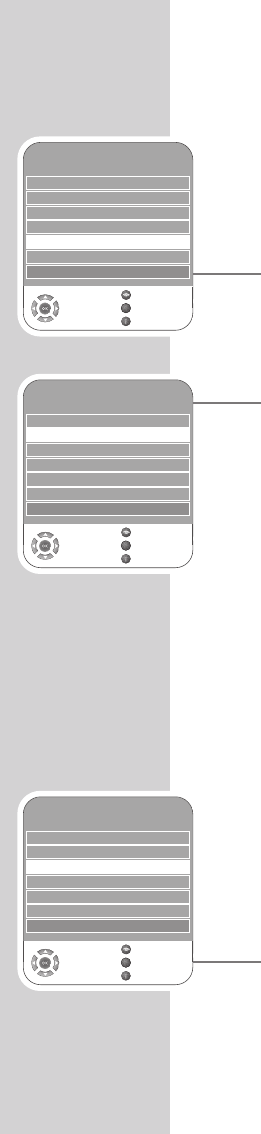
46
SPECIAL SETTINGS ------------------------------------------------------------------
Tuning the analogue television channels by
entering the channel numbers
1Open the menu with »i«.
– The »PICTURE« menu appears.
2Select the »CHANNEL SETUP« menu with »–« or »+«.
3Select »Analogue Manual Tuning« with »
V
« or »
Λ
« and press
»G« to confirm.
4Select the »Programme No« by pressing »
V
« or »
Λ
« and press
»–« or »+« to set the preset.
5Select »Current Channel« with »
V
« or »
Λ
«.
6Press »G« to choose between »S« (special channel) or »C«
(channel).
7Enter the channel number with »–« or »+« step by step or with
»1…0« directly.
Note:
The current system is displayed in the »System« line. If the colour
and/or sound is not functioning correctly, select »System« with
»
V
« or »
Λ
«.
Select the necessary settings with »–« or »+«.
8Press »z« (red) to finish the setting.
Note:
To set other television stations, repeat steps 4to 8.
9Press »i« to end the setting.
Fine tuning analogue television stations
The television automatically tunes itself to the best possible recep-
tion. You may need to fine tune it manually in areas where the re-
ception is poor.
1Select stations with »1 ... 0« directly or step by step with »
V
« or
»
Λ
«.
2Open the menu with »i«.
– The »PICTURE« menu appears.
3Select the »CHANNEL SETUP« menu with »–« or »+«.
4Select »Analogue Manual Tuning« with »
V
« or »
Λ
« and press
»G« to confirm.
5Select »Fine Tuning« with »
V
« or »
Λ
« and set with »–« or »+«.
6Press »z« (red) to finish the setting.
7Press »i« to end the setting.
Analogue Manual Tuning
System BG
Current Channel S 21
Fine Tuning as + 00
Search as
Programme No 1
Skip Yes
Select
Save
Back
Frequency 443.25 MHz
Exit
Z
Analogue Manual Tuning
System BG
Current Channel S 21
Fine Tuning as + 00
Search as
Programme No 1
Skip Yes
Select
Save
Back
Frequency 443.25 MHz
Exit
Z
Analogue Manual Tuning
System BG
Current Channel S 21
Fine Tuning as + 00
Search as
Programme No 1
Skip Yes
Select
Save
Back
Frequency 443.25 MHz
Exit
Z

ENGLISH
47
SPECIAL SETTINGS ------------------------------------------------------------------
Changing stored channels for analogue stations
If channels were stored with the automatic channel search during
the tuning of the television channels, you can delete them. You can
also store stations in a different preset, change or enter the name of
a stations as well as skip channels.
Select channel lists
1Open the menu with »i«.
– The »PICTURE« menu is displayed.
2Select the »CHANNEL SETUP« menu with »–« or »+« and con-
firm with »G«.
3Select »Programme Table« with »
V
« or »
Λ
« and press »G« to
confirm.
Note:
Additional operations are explained in the following sections.
Deleting channels
1In the »Programme Table« menu, press »
V
« or »
Λ
« to select the
channel to be deleted and press »3« (yellow) to confirm.
2Press »¥« (green) to confirm the deletion.
Note:
Press »z« (red) to delete all the channels.
Sorting television channels
1In the »Programme Table« menu, select the channel to be moved
with with »
V
«, »
Λ
«, »–« or »+«.
2Highlight the channel with »¥« (green).
3Select a new channel position by pressing »
Λ
«, »
V
«, »–« or
»+« and then press »G« to confirm.
– All of the channels that follow move up one position.
Note:
To sort the other television channels repeat steps 1to 3.
Entering the channel names
(maximum of 5 characters)
1In the »Programme Table« menu, select the desired channel with
»
Λ
«, »
V
«, »–« or »+«.
2Highlight the channel with »z« (red).
3Select letters or numbers with »
Λ
« or »
V
«, move to the next
position with »–« or »+« and repeat.
4Store the channel name with »G«.
Note:
To enter additional channel names, repeat steps 1to 4.
CHANNEL SETUP
Auto Tuning
Digital Manual Tuning
Analogue Manual Tuning
Programme Table
Signal Information
CA - Module Not Inserted
Select
Back
Exit
Active Antenna Power On
s
s
s
s
s
Z
1

48
Skipping television channels
You can highlight television stations to be skipped when you select
with »
Λ
« or »
V
«. It is still possible to select using the number buttons.
1In the »Programme Table« menu, select the desired channel with
»
Λ
«, »
V
«, »–« or »+«.
2Press »+« to switch to the »-« symbol and press »G« to highlight
the television channel.
– The channel is marked with »-«.
Note:
Channels can be enabled again. Press »
V
« or »
Λ
« to select the
channel, press »+« to switch to the symbol »-« and press »G«
to enable the channel again.
Creating a list of favourites
You can select your favourite channels and save them in up to four
lists (FAV1 to FAV4).
1In the »Programme Table« menu, select the television
channel with »
V
« or »
Λ
«.
2“Push” the television channel with »–« or »+« into the favourites
list 1 to 4 and save it with »G«.
– The position in the favourites list is marked with »«.
– You can enter the same channel in more than one favourites
list.
Note:
You can delete channels from the favourites list. Press »
V
« oder
»
Λ
« and »–« or »+« to select the channel and »G« to delete it.
Concluding the settings
1Press »i« to finish the settings.
SPECIAL SETTINGS ------------------------------------------------------------------
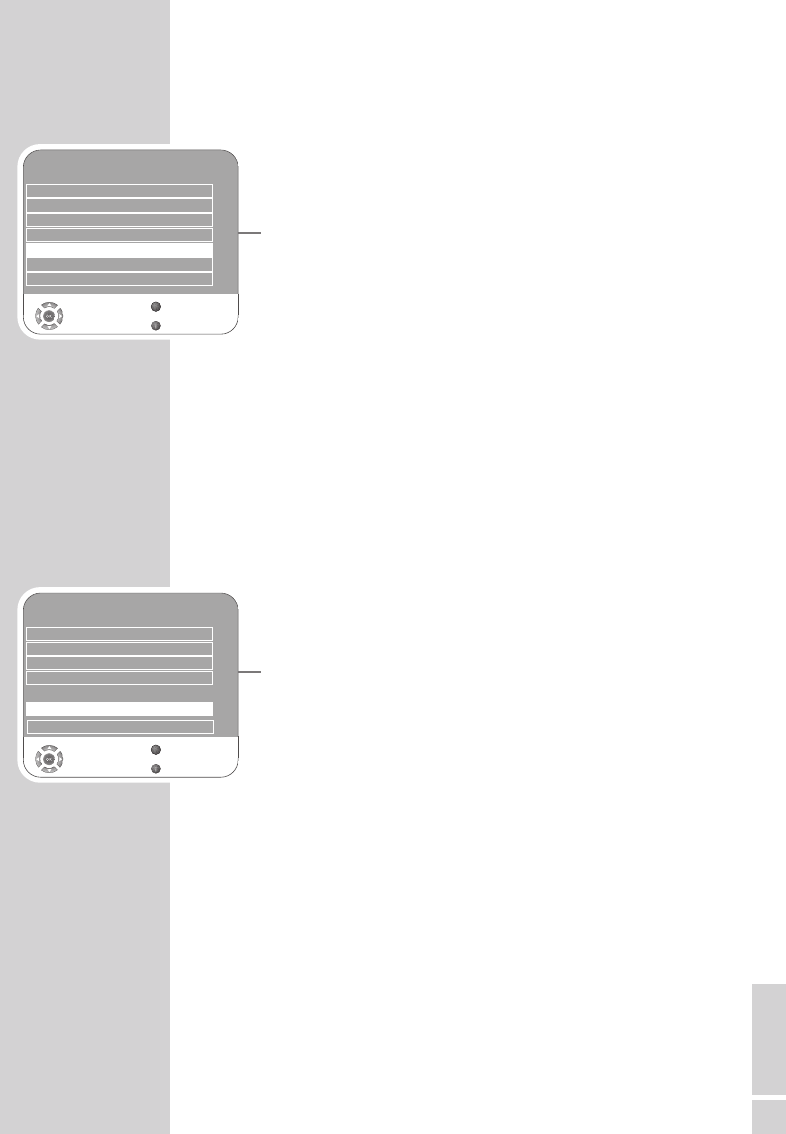
ENGLISH
49
Displaying signal information
(only for digital television channels)
1Open the menu with »i«.
– The »PICTURE« menu appears.
2Select the menu »CHANNEL SETUP« with »–« or »+«.
3Select »Signal Information« with »
V
« or »
Λ
« and press »G« to
confirm.
– You will see information on the channel, modulation, quality
and signal strength.
Notes:
The lower section of the menu shows the signal properties. The
further the bar for »Quality« and »Signal Strength« extends to
the right, the better the reception signal.
The signal level not only depends on your receiver system, but
also on the channel which is currently active. Remember this when
aligning your antenna using the signal level display.
4Press »i« to end the display.
Updating software
(only for digital television channels)
1Open the menu with »i«.
– The »PICTURE« menu appears.
2Select the »OPTIONS« menu with »–« or »+«.
3Select the »Software Update« menu by pressing »
V
« or »
Λ
«.
4Press »G« to start the software update.
– The software is updated automatically, if possible.
5Press »i« to end the setting.
INFORMATION ------------------------------------------------------------------------------
CHANNEL SETUP
Auto Tuning
Digital Manual Tuning
Analogue Manual Tuning
Programme Table
Signal Information
CA - Module Not Inserted
Select
Back
Exit
Active Antenna Power On
s
s
s
s
s
Z
1
OPTIONS
Language Settings
Restore Factory Defaults
Country Deutschland
Game Mode Off
SPDIF Output PCM
Software Update
Select
Back
Exit
s
s
s
Z
1
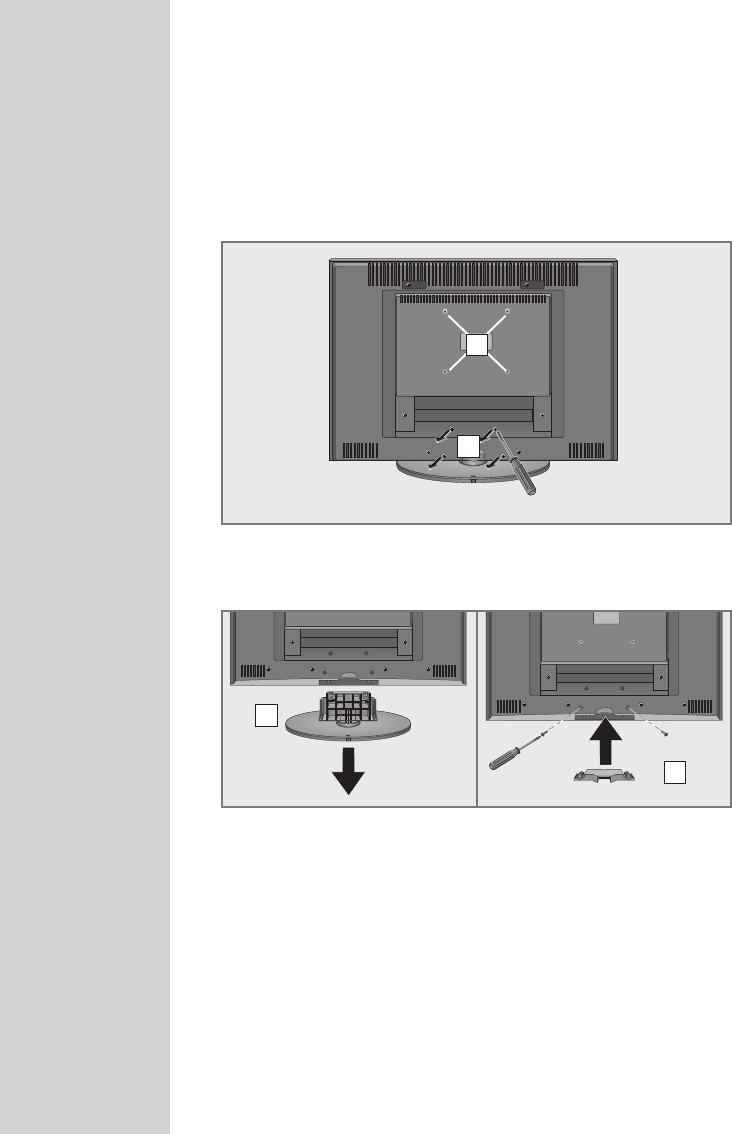
50
INFORMATION ------------------------------------------------------------------------------
Dismantling the stand of the unit
If you want to attach your television to the wall with a wall bracket,
you need to dismantle the stand.
1Place the television carefully front down on a table on top of a
suitable base, such as foam.
2Unscrew the four screws (A).
3Remove the stand (B).
4Attach the cover (C) provided and fasten with two screws.
Caution:
Follow the assembly instructions for the wall bracket carefully or
have a specialist assemble it for you.
When purchasing the wall bracket, make sure that all the fasten-
ing points (D) on the television are also on the wall bracket and
that they are all used when mounting it.
D
A
B
C
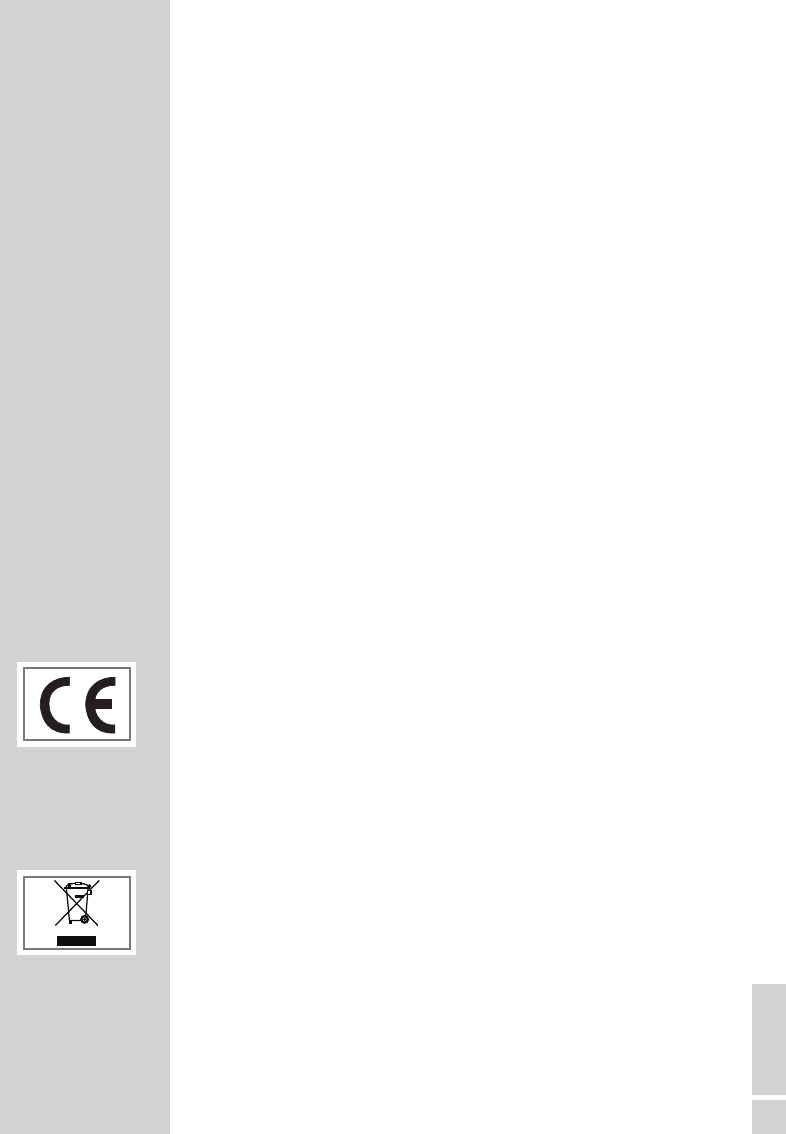
ENGLISH
51
INFORMATION ------------------------------------------------------------------------------
Technical changes and errors reserved.
Technical data
Operating voltage: 230V, 50 Hz
Power consumption: in operation 170 W (Vision 37)
in operation 210 W (Vision 42)
in standby < 1.2 W
Sound output: 2 x 20 watts music (2 x 10 sine wave)
Reception ranges: Analogue: C01 ... C80,
special channels
S01 ... S41
Digital: VHF/UHF
Bandwidth 7 MHz and 8 MHz
COFDM modes: 2k and 8k
Constellation: 16QAM,
64QAM, QPSK
Preset channels: 400 (digital), 99 (analogue) and
8 AV, 1 USB
Screen size: 94 cm/37“ (Vision 37)
107 cm/42“ (Vision 42)
Max. resolution: WUXGA 1920 x 1080
Weight: approx 18.5 kg (Vision 37)
approx 23.2 kg (Vision 42)
Service information for dealers
The television set may only be operated with the mains adapter sup-
plied.
The product complies with the following EU directives:
2006/95/EG directive for electrical equipment to be used within
defined voltage ranges. 2004/108/EG directive on electromag-
netic compatibility.
The device complies with the following standards: EN 60065,
EN 55013, EN 55020, EN 55022, EN 55024.
Environmental note
This product has been made from high-quality parts and materials
which can be re-used and recycled.
Therefore, do not throw the product away with normal household
waste at the end of its life. Take it to a collection point for recycling
electrical and electronic devices. This is indicated by this symbol on
the product, in the operating manual and on the packaging.
Please find out about collection points operated by your local
authority.
Help protect the environment by recycling used products.
52
Troubleshooting
If the remedies given below do not work, please consult an autho-
rised GRUNDIG dealer. Please bear in mind that malfunctions can
also be caused by external devices such as video recorders or satel-
lite receivers.
NOTE:
This is a Class A product. During operation the device can cause
radio interference. In this case the user may have to remedy this.
Please contact your specialist dealer.
INFORMATION ------------------------------------------------------------------------------
Fault
Screen lit (snow), but no station
Poor picture contrast
Interference to picture and/or
sound
Ghosts, reflection
No colour
Picture but no sound
Teletext missing or faulty
Remote control does not work
Picture is dark in PC mode
Possible cause
Antenna cable
No television station pro-
grammed
Picture settings incorrectly set
Problem at station
Interference from other devices
Channel setting
Antenna
Colour intensity at minimum
TV standard setting (if setting
option is available)
Problem at station
Volume set to minimum
Problem at station
Television station (has no tele-
text) or antenna system
Station signal too weak
No optical connection
Remote control batteries
Operating condition undefined
Incorrect setting for picure reso-
lution and picture frequency on
the PC
Remedy
Is the antenna cable connected?
Start the station search
Adjust the brightness, contrast
or colour setting
Test with another channel
Change the position of the
device
Automatic or manual channel
setting/fine tuning
Have antenna cable or system
checked
Turn up the colour
Select the correct colour stan-
dard
Test with another channel
Turn up or switch on the volume
Test with another channel
Test another channel for fine
tuning and ghosts
Check the antenna system
Point the remote control at the
television set
Check the batteries, change if
necessary
Switch off the television with the
main power button for approxi-
mately 2 minutes
Change the setting on the PC
(for example, picture resolution
1280 x 768, picture frequency
60Hz)

ENGLISH
53
Additional Information for units sold in the UK.
Units sold in the UK are suitable for operation from a 240V ac, 50Hz
mains supply.
The range of multi-system receivers is built to work in most European
countries. However, the mains plug and socket system for the UK differs
from many European countries.
This appliance has been supplied with a fitted, non-removable, approved
converter plug for use in the UK. This converter plug is fitted with a 5A
rated fuse.
In case this appliance is supplied with a moulded 2-pin Euro plug only,
which is unsuitable for UK operation, this must be cut off and immediately
disposed of. An approved 13A, 3-pin UK plug should then be fitted by a
qualified electrician.
Note:
The severed Euro plug must be destroyed to avoid a possible
shock hazard should it be inserted into a socket elsewhere.
If a non-rewireable 3-pin plug or a rewireable 13A (BS1363) 3-pin plug
is used, it must be fitted with a 5A ASTA or BSI approved BS1362 fuse. If
any other type of plug is used it must be protected by a 5A fuse either in
the plug, or at the distribution board. If this type of plug becomes defec-
tive, ensure that the fuse is removed before disposal, to eliminate poten-
tial shock hazard.
If it is necessary to change the fuse in the non-rewireable plug, the cor-
rect type and rating (5A ASTA or BSI approved BS1362) must be used
and the fuse cover must be refitted. If the fuse cover is lost or damaged,
the lead and plug must not be used until a replacement is obtained. Re-
placement fuse covers should be obtained from your dealer.
Important:
The wires in the mains lead are colour coded in accordance with the fol-
lowing code:
BLUE – NEUTRAL
BROWN – LIVE
As the colours of the wires in the mains lead of your appliance may not
correspond with the coloured marking identifying terminals in your plug,
proceed as follows:
Connect the BLUE coloured wire to plug terminal marked with the letter
“N” or coloured black.
Connect the BROWN coloured wire to the plug terminal marked with the
letter “L” or coloured red.
In no circumstance must any of the wires be connected to the terminal
marked with the letter “E”, earth symbol “V”, coloured green, or green &
yellow.
INFORMATION ------------------------------------------------------------------------------

Grundig Multimedia B.V.
Atrium, Strawinskylaan 3105 • NL-1077 ZX Amsterdam • http://www.grundig.com
09/14
