Grundig Pro Ceramic Hair Clipper Set Mc 6540 Users Manual 2 6540.ENG
MC 6540 to the manual ccb33ba4-7061-4c79-8b81-ae4344a28569
2015-02-02
: Grundig Grundig-Grundig-Pro-Ceramic-Hair-Clipper-Set-Mc-6540-Users-Manual-430080 grundig-grundig-pro-ceramic-hair-clipper-set-mc-6540-users-manual-430080 grundig pdf
Open the PDF directly: View PDF ![]() .
.
Page Count: 16

ǵ
PRO CERAMIC
HAIR CLIPPER
SET
MC 6540

2
_________________________________________________________
3
_________________________________________________________
A
F
G
H
I
B
C
D
E

4
_________________________________________________________

5
_________________________________________________________
DEUTSCH 6 - 15
ENGLISH 16 - 25
POLSKI 26 - 35

16
SAFETY_______________________________________________
ENGLISH
Please note the following
information when using the
appliance:
7The appliance is designed for
domestic use only.
7Observe these instructions in
order to prevent damage to the
appliance or danger arising from
improper use. Keep them in a
safe place.
7Never use the appliance in the
bath, shower or over a wash-
basin filled with water; nor
should it be operated with wet
hands.
7Do not immerse the appliance in
water or let it come into contact
with water, even during cleaning.
7Do not drop the appliance.
7Do not use the appliance near
water in bathtubs, wash basins or
other vessels.
7Pull out the mains plug after use.
7If the appliance is used in the
bathroom, it is essential that the
mains adapter is pulled out after
use, as water close to the
appliance can still constitute a
danger, even if it is switched off.
7Never use the appliance if it is
visibly damaged.
7Keep the appliance away from
children.
7Do not open the appliance under
any circumstances. No warranty
claims are accepted for damage
resulting from improper handling.

ENGLISH 17
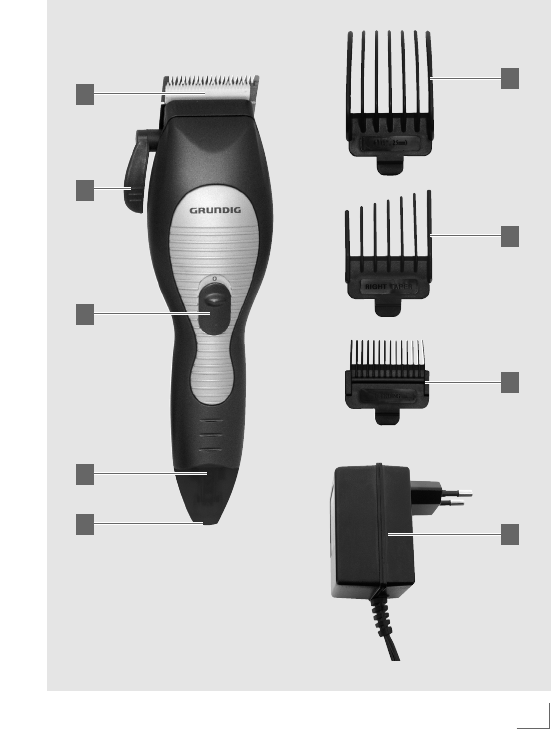
OVERVIEW__________________________________________
Fold out page 2 so that you have
the illustrations in front of you.
Controls
On/off switch.
LED, lights red when the
appliance is connected to the
mains.
Lever for moving the lower
blade.
Cutting head.
Socket for mains adapter lead.
E
D
C
B
A
Accessories
Combs of various sizes for
different trimming grades
(#1 to #7).
Two combs for side-on fine
trimming (right and left).
Comb for short hair and
graduation (blending).
Mains adapter.
Other accessories
1 x Scissors.
1 x Face/neck cleaning brush.
3 x Hair clips.
1 x Appliance cleaning brush.
1 x Oil for cutting head.
I
H
G
F

18 ENGLISH
POWER SUPPLY ___________________________________
Operation with
rechargeable batteries
When using the built-in recharge-
able nickel metal hydride batteries,
use the mains adapter supplied as a
charger.
1Plug the mains adapter into the
socket, and plug the mains
adapter into the mains socket.
Notes
7Completely charge up the batter-
ies (16 hours) before you first use
them or if you have not used
them for a long time.
7When switched off the charging
time is approximately 8 hours. If
you switch on the appliance while
it is charging, charging will stop.
7The ambient temperature should
be between 5 °C and 40 °C.
E
7When fully charged, the
appliance works for around
45 minutes. It is not advisable to
charge the batteries after every
use, especially if you do not use
the appliance for the full 45 min-
utes. Only charge the batteries
when they are completely
discharged. This increases their
life. Do not charge them every
day.
Environmental note
7This appliance contains nickel
metal hydride batteries. Do not
dispose of it with your household
waste at the end of its service life.
Open the housing. Remove the
batteries and take them to a bat-
tery collection box in a shop or
public collection point.

ENGLISH 19
POWER SUPPLY ___________________________________
Mains operation
(with mains adapter)
Check that the voltage on the mains
adapter type plate corresponds to
your local mains supply. The only
way to disconnect the device from
the mains supply is to unplug the
adapter.
1Insert the mains adapter plug in
the socket.
2Insert the mains adapter plug in
the socket.
– The built-in batteries are
switched off.
Note
7Only use the appliance in battery
mode when in the bathroom or
beside a water connection; never
run it from the mains.
E
20 ENGLISH
OPERATION ________________________________________
Special features
The appliance has a ceramic/stain-
less steel cutting head . You can
adjust the steel blade while
trimming using the lever . This
allows you to finely adjust the trim-
ming length.
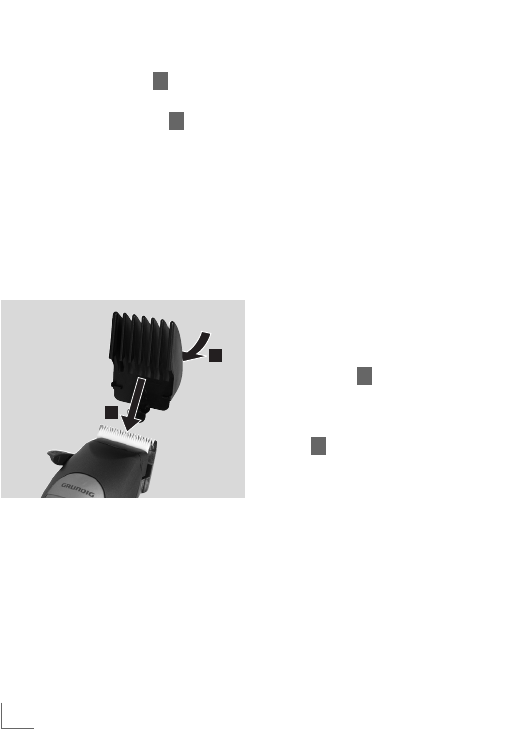
Trimming hair
1Put on a comb for the cutting
grade you need (see the table
below).
C
D2To do this, put the teeth of the
cutting head in the central grove
of the comb and gently press on
the bottom of the blade head
until it catches (1and 2).
3Place a towel around the neck
and shoulder of the person
whose hair you are trimming.
Make sure the person is seated
so that their head is roughly at
your eye level. Before trimming,
comb the hair so that it falls nat-
urally and you can see the direc-
tion in which it grows.
4Switch on the appliance using
the switch and start
trimming.
5Turn off the appliance using
the switch when you have
finished trimming.
6Take off the comb. Gently pull
the bottom catch away from the
cutting head until it comes loose.
Then lift off the comb.
A
A
1
2

ENGLISH 21
OPERATION ________________________________________
Using the lever
You can continuously adjust the
lever while trimming. This adjusts
the trimming length without you
having to attach a comb.
When the lever is at the top, the
cutting length is shortest. The further
you push down the lever, the
greater the cutting length.
With the lever right down, the
cutting length is the same as with a
3 mm comb attachment.
Using the lever extends the life of
the blades, because the cutting
angle changes with each adjust-
ment.
If the blades are blocked by very
thick hair, you can unblock them by
moving the lever without having to
remove the lower steel blade.
C
When you have finished trimming,
clean the blades of hair clippings
by quickly moving the lever from
maximum to minimum with the
appliance still on.
Comb attachment grades
Note
7All the lengths here are approxi-
mate.
Comb #1
Comb #2
Comb #3
Comb #4
Comb #5
Comb #6
Comb #7
3 mm
6 mm
9 mm
12 mm
16 mm
20 mm
25 mm

22
OPERATION ________________________________________
ENGLISH
Useful tips
7Hold the appliance with a
relaxed and comfortable grip.
7Always cut against the natural
direction of the hair.
7As you cut, take a break at regu-
lar intervals. You can always
make a correction, but not once
the hair has been cut.
7Only cut a small amount the first
time you use the trimmer. This is
the only way to get used to the
variable grades.
7Do not force the comb through
the hair. Let it guide you.
7Keep combing the hair. Only look
for hair which is too long and
comb out clippings.
7To ensure good results, the hair
should be dry.
Environmental note
This product has been made from
high-quality parts and materials
which can be re-used and recycled.
Therefore, do not throw the product
away with normal household waste
at the end of its life. Take it to a col-
lection point for recycling electrical
and electronic devices. This is indi-
cated by this symbol on the product,
in the operating manual and on the
packaging.
Please find out about collection
points operated by your local
authority.
Help protect the environment by
recycling used products.

ENGLISH 23
CLEANING AND CARE___________________________
Cleaning and care
1Switch off the appliance and
unplug it if you are running it
from the mains.
2Take off the comb and clean the
blades with the brush supplied.
3Only clean the housing and the
comb with a damp, soft cloth.
Note
7Never immerse the appliance,
lead or mains adapter in water
or other liquids.
4Before using the appliance
again, dry all parts completely
using a towel.
5Do not use cleaning agents.
6Put on the protective cover sup-
plied.
Note
7Remove any clippings after each
use.
Adjusting the blades
When new, the blades are optimally
aligned. However, you need to
readjust the blades if you replace
them or if you have removed the
lower blade for cleaning.
1Loosen the screws.
2Align the teeth of upper blade
(ceramic) and the lower blade
(stainless steel). The points of the
teeth on the upper blade should
be roughly 1.2 mm behind those
of the lower blade.
3If the blades are not correctly
aligned, switch off the
appliance, loosen the screws
again and readjust the blades.
4Tighten the screws once you
have aligned the blades.

24
CLEANING AND CARE___________________________
ENGLISH
Note
7Normally you do not need to oil
the blades, because they are
made of two different materials
(ceramic and steel). If you want to
maintain the original condition of
the blades for as long as
possible, it is worth oiling the cut-
ting head at regular intervals.
Storage
If you do not want to use the appli-
ance for a long period of time,
please store it carefully.
1Ensure that it is unplugged and
is completely dry.
2Store the parts in the original
packaging in a cool, dry place.
To prevent damage to the cutting
head, put on the protective cover
supplied.
3Make sure the appliance is kept
out of reach of children.

ENGLISH 25
INFORMATION ____________________________________
This product fulfils the
European directives
89/336/EEC and
73/23/EEC.
Technical data
Power supply
Batteries: Nickel metal hydride
Mains adapter
Guarantee
The guarantee does not cover the
cutting head or defects which do
not significantly impair the value or
function of the appliance. The
guarantee is invalidated if the
appliance is damaged, opened or
improperly used.
Technical and design modifications reserved.
Ni-MH
Grundig Multimedia B.V.
Atrium, Strawinskylaan 3105 • NL-1077 ZX Amsterdam • http://www.grundig.com
