Guangzhou EHang Intelligent Technology GBO-200 G-BOX User Manual
Guangzhou EHang Intelligent Technology Co., Ltd. G-BOX Users Manual
Users Manual

Operating Manual
GHOSTDRONE 2.0 Aerial
GHOSTDRONE 2.0 created by EHang, Inc.
GHOSTDRONE 2.0 Operating Manual includes packing list, assembly, parts and
specification information.
Congratulations on purchasing your new GHOSTDRONE 2.0!
For customer service and support, please e-mail support@ehang.com
or contact our customer service hotline: 888-800-7056.
www.ehang.com
www.twitter.com/theghostdrone
www.facebook.com/theghostdrone
www.instagram.com/theghostdrone
forum.ehang.com
Thank you, and enjoy your GHOSTDRONE!
TABLE OF CONTENTS
Instroduction
Diagram -------------------------------------------------03
Packing List ---------------------------------------------03
Assembly
Propellers -----------------------------------------------04
Propeller Guards ---------------------------------------05
Camera --------------------------------------------------05
Gimbal ---------------------------------------------------07
Accessories
Battery ---------------------------------------------------09
G-BOX ---------------------------------------------------12
LED Indicator Light Instructions ----------------------14
Specifications
Specifications ------------------------------------------15
FAQ
FAQ ------------------------------------------------------17
INTRODUCTION
With dual-sensor flight controller and high efficiency dynamic system, GHOSTDRONE 2.0
secures safer and more stable flight. Its smart battery LCD screen displays real-time
battery status information. Our GHOSTDRONE 2.0 Aerial version contains the 3-axis
gimbal, which ensures the camera always steady and stable, helping you record the
exciting moments in your life.

Diagram
Front Indicator Light
Motor
Smart Flight Battery
Gimbal
Aircraft Body
Propeller
Landing Gear
Packing List
Aircraft*1 Propeller*8 Propeller Guard*4
Battery Charger*1 Info Package*1
G-BOX*1 Tool Kit*1
Note:
The tool kit contains a USB charging cable, a battery charging cable, a wrench, a screw
driver, 4 vibration dampeners and 15 screws.
Extra 4 propellers, 4 vibration dampers and 3 screws are provided for free.
The USB cable is used to charge the G-BOX as well as connecting the GHOSTDRONE to a
PC to update the aircraft’s firmware.
ASSEMBLY
Aircraft Install the propellers Install the propeller guards Install the camera
Propellers
GHOSTDRONE 2.0 uses 2-bladed 8.5-inch self-tightening propellers. Propeller nuts have
two colors, silver and black. Each indicates different rotating directions.
Icon Explanations
LOCK: Tighten the propeller in this direction.

UNLOCK: Remove the propeller in this direction.
Installation
1. Put the aircraft upside down on soft surface to avoid scratches.
2. Match the silver nut propellers with the L motors (with silver motor shaft), and tighten
the propellers according to the LOCK instructions.
3. Attach the black nut propellers to the R motors in the same way.
Disassembling
Keep the motor deadlocked in place with one hand and remove the propeller according
to the UNLOCK instructions.
Propeller Guards
It is optional to use the propeller guards.
Installation: Place the guards over the aircraft. Use the screwdriver to tighten the 3
screws.
Disassembling: Unscrew the three holding screws and remove the guard.
Note: We recommend using propeller guards in a complex environment, such as crowd,
group of buildings or obstacles.
Camera
The gimbal is compatible with GoPro 3, GoPro 3+, GoPro 4 and EHang camera. Camera is
not included in the box.
1. Remove the camera guard. Connect the gimbal black plug with the Camera USB
interface.
2. Use the camera guard to fix the Camera lens, and tighten the screws.
Completed Assembly
Gimbal
The gimbal is preassembled and ready to use. If one needs to dissemble the gimbal,
refer to the following instructions. The gimbal is compatible with GoPro 3, GoPro 3+,
GoPro 4 and EHang camera.
Gimbal spare parts
3-Axis Gimbal *1 Plate Adapter *1 Adapter Cable *1 Copper Pillar *4 Screw *4
Gimbal Assembly
1. Put the aircraft upside down on a soft surface to avoid unnecessary scratches, and use
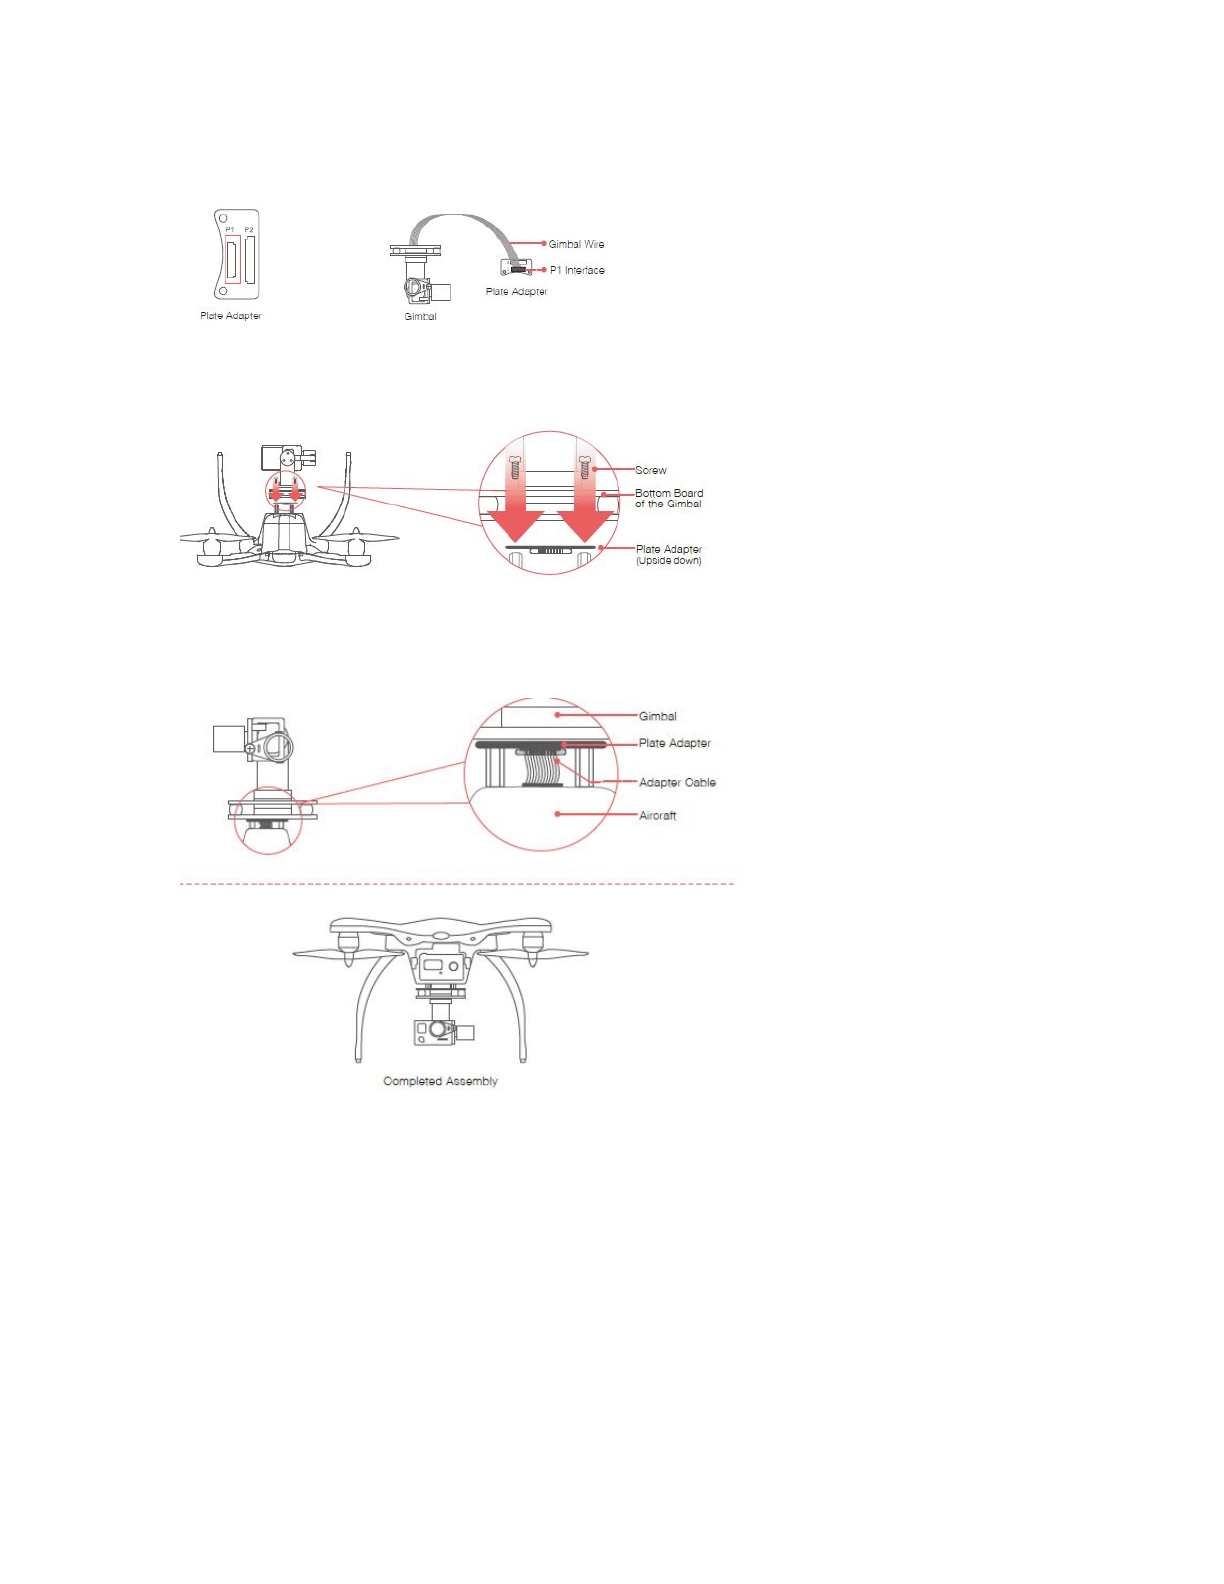
ascrewdriver to tighten four copper pillars on the bottom of the aircraft.
2. Connect the gimbal wire to the P1 interface on the plate adapter.
Plate Adapter Gimbal Gimbal Wire P1 Interface Plate Adapter
3. Mount the plate adapter to the gimbal by using two screws.
Screw Bottom Board of the Gimbal Plate Adapter(Upside down)
4. Fix the gimbal base by tightening two screws on the other two copper pillars.
5. Connect the plug of the adapter cable to the plate adapter P2 interface. Connect the
other end of the cable to the aircraft.
Gimbal Plate Adapter Adapter Cable Aircraft Completed Assembly
ACCESSORIES
Battery
Improper use of battery may lead to fire, explosion or other dangers. Please be familiar
with the product before using.
The 4S lithium polymer battery is specially designed for the GHOSTDRONE 2.0, with
capacity of 4500mAh, voltage of 14.8V, charge-discharge management functionality and
a smart display screen. The battery should only be charged by EHang charger.
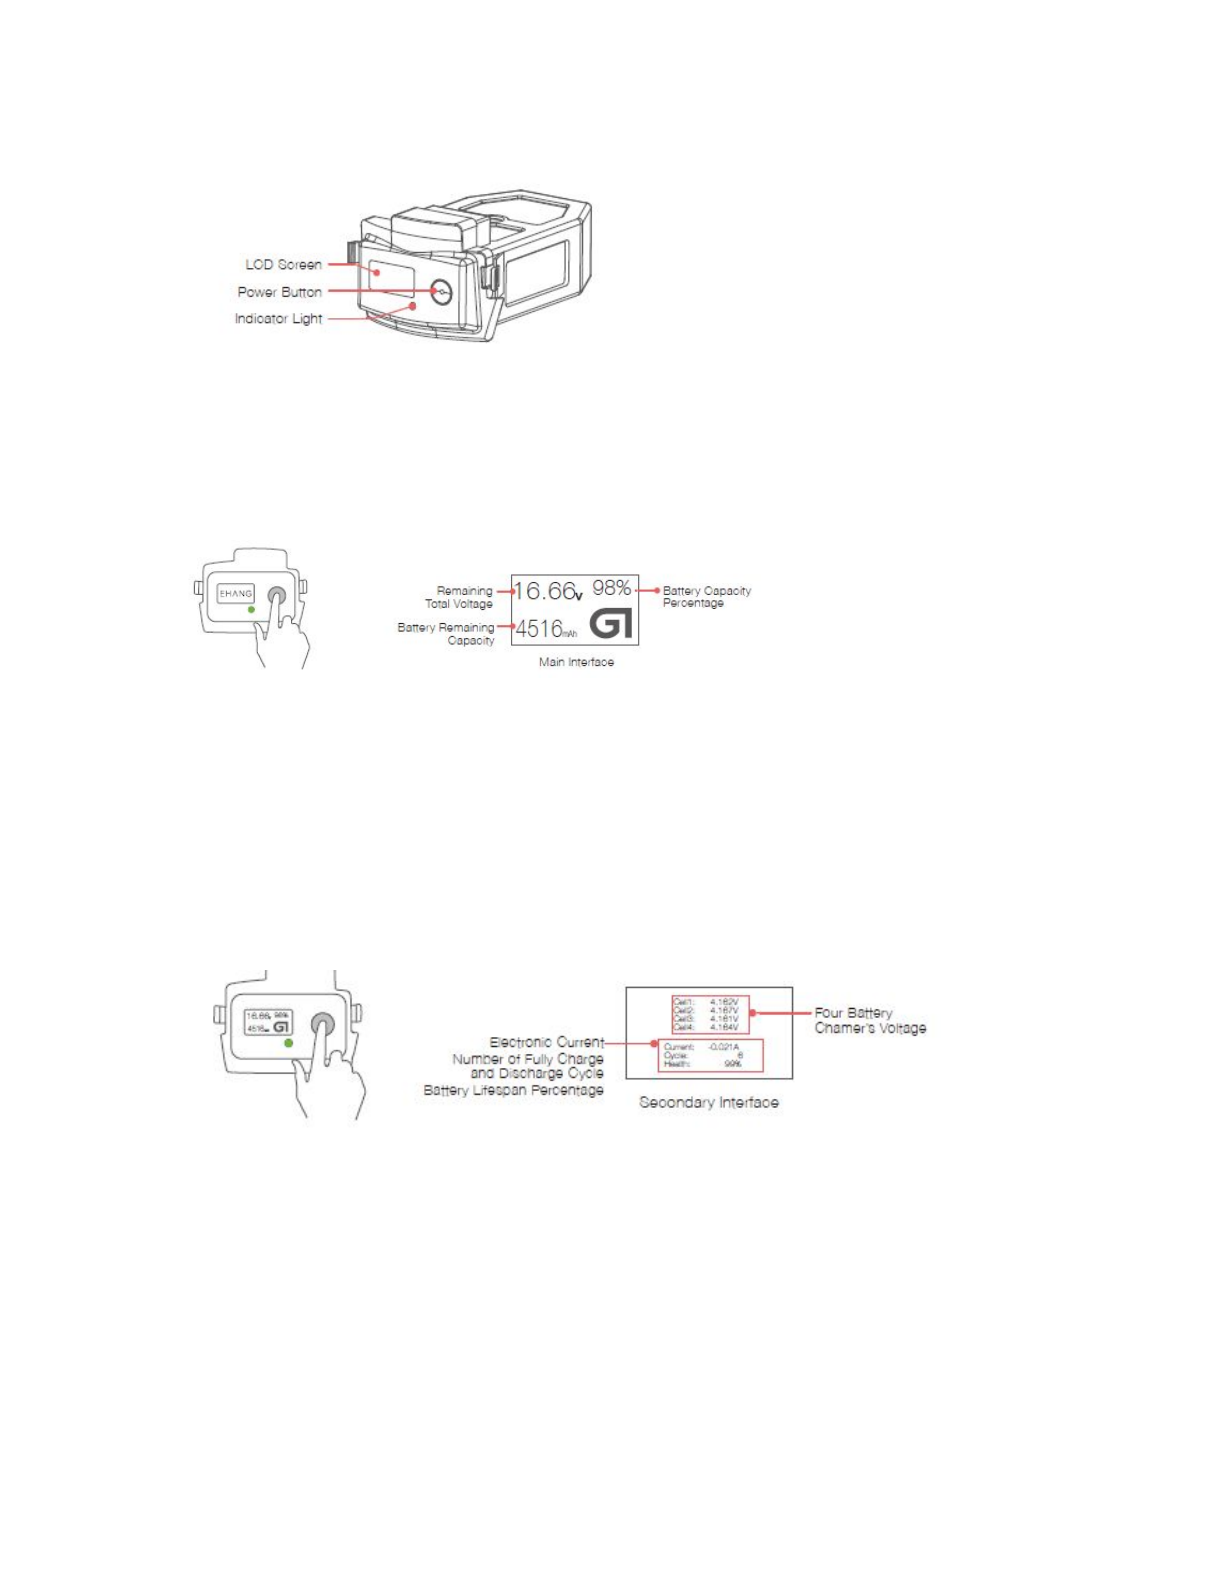
Battery Structural Diagram
LCD Screen Power Button Indicator Light
Powering On
Press the power button, then press and hold the button again in 3 seconds until the last
letter “G” of logo “EHANG” appears on the screen. The LED indicator light turns on once
the battery is turned on, referring to the diagram below.
Remaining Total Voltage
Battery Remaining Capacity
Battery Capacity Percentage
Main Interface
Note: When the battery is powered off, press the power button to check the battery life.
(Main interface will display for 3 seconds while the LED Indicator light stays off during
the whole process.)
When the battery is powered on, press the power button once to enter the secondary
interface, referring to the picture below:
Electronic Current
Battery Lifespan Percentage
Number of Fully Charge
and Discharge Cycle
Four Battery Chamer’s Voltage
Secondary Interface
Powering Off
Press the power button, then press and hold again until the ‘!’ of ‘SEE YOU !’ sign
disappears on the screen.
Battery Charging
Connect the battery to the charger, and then connect the charger to a wall socket (use
the plug if necessary). Once connected successfully, the LED indicator light flashes slowly
and the screen displays current capacity level as below:
Battery Capacity Percentage
Remaining Time to Fully Charge the Battery
Charging Electric Current
Remaining Total Voltage
Four Battery Chamer’s Voltage
Charging Interface
Battery Discharging
When the battery is discharging, the LED indicator light stays on and the screen displays
as below:
Remaining Battery Capacity Percentage
Remaining Discharge Time
Discharge Interface
Discharging Current
Total Voltage
Accumulated Discharging Time
LED Indicator Light Instructions

Low frequency flash (Green) Charging
High frequency flash (Green) Low battery
Solid green Working
Light off Standby
Warning
Only the EHang original charger should be used to charge the battery.
Do not use the batteries from other companies. EHang is not responsible for any
dangerous accidents caused by third party batteries.
Do not use the battery if it is inflated, damaged or deformed.
Do not plug or unplug the battery into the aircraft when it is powered on, otherwise the
battery interface will be damaged.
Recharge the battery only after it cools down to room temperature.
Do not leave the battery on combustibles or unattended when charging.
Do not charge or store the battery under direct sunlight.
Do not use the battery in strong electrostatic or electromagnetic environments,
otherwise the electronic protection devices might be damaged leading to dangerous
accidents.
Do not use any conducting wires or any metallic substance that would cause battery
short circuit.
Do not attempt to dismantle the battery case.
Do not attempt to dismantle, pierce or cut a battery.
If the battery terminal gets dirty, please clean it with a dry cloth before using, or might
cause charging malfunction.
Storage Instructions
The battery should be stored in an environment with the temperature of 23±5°C.
The battery must be stored in places away from children, water, fire and metal.
If the battery is not being used for more than 1 week, keep the battery capacity between
50% to 60%. Charge and discharge the battery once every two months.
Do not discard batteries in general household waste. Damaged or unusable batteries
must be disposed in containers specially reserved for this purpose. When disposing of
batteries, follow appropriate local guidelines and regulations.
G-BOX
G-BOX is a wireless interface unit designed specifically for controlling and interfacing
with the GHOSTDRONE. GHOSTDRONE 2.0 G-BOX is compatible with both Android and
iOS system.
Each GHOSTDRONE is paired with one G-BOX. The GHOST App cannot operate the
GHOSTDRONE without a G-BOX. Please store the G-BOX appropriately. If G-BOX is
missing, it will be necessary to replace a new G-BOX unit.
G-BOX USB Power Cable

The USB port is for charge use only.
Structural Diagram
Charging Port
Power Indicator
Switch
Charge/Battery Level Indicator
Power Indicator
iOS Android Communication Indicators
Main Antenna Direction
iOS Andriod
Using the G-BOX
Power On
Press the power button once.
After the G-BOX turns on, the battery indicator, PWR and DATA indicators will turn on.
After several seconds the battery indicators turns off to save battery.

Power Off
Hold the power button until the PWR indicator turns off.
While Charging
The four LEDs next to the power button flash in sequence.
Fully Charged
The left side LED flashes while the right three LEDs on the right are solid.
Electric current
The number of flashing LEDs indicates G-BOX's power levels.
Switch/Battery Level Indicator Charging G-BOX (with battery charger)
Note: You can charge the G-Box by connecting it to a PC with a USB cable. When
charging through a USB adapter, the required input current is 500 mA or higher.
Procedure
Press the Power Button
iOS Indicator
Android Indicator
Indicator Status Explanation: Flash Off Solid
①Turn on G-BOX;
②Switch to iOS/Android;
③Communication indicator shows the status;
④When G-BOX connects with mobile phone/tablet successfully, the communication
indicator shows the corresponding status.
Important Tip
Keep the G-BOX within your 3 meter’s radius during flight (We suggest keeping it in
hand). If the G-BOX is not near you, you may lose connection with the GHOSTDRONE.
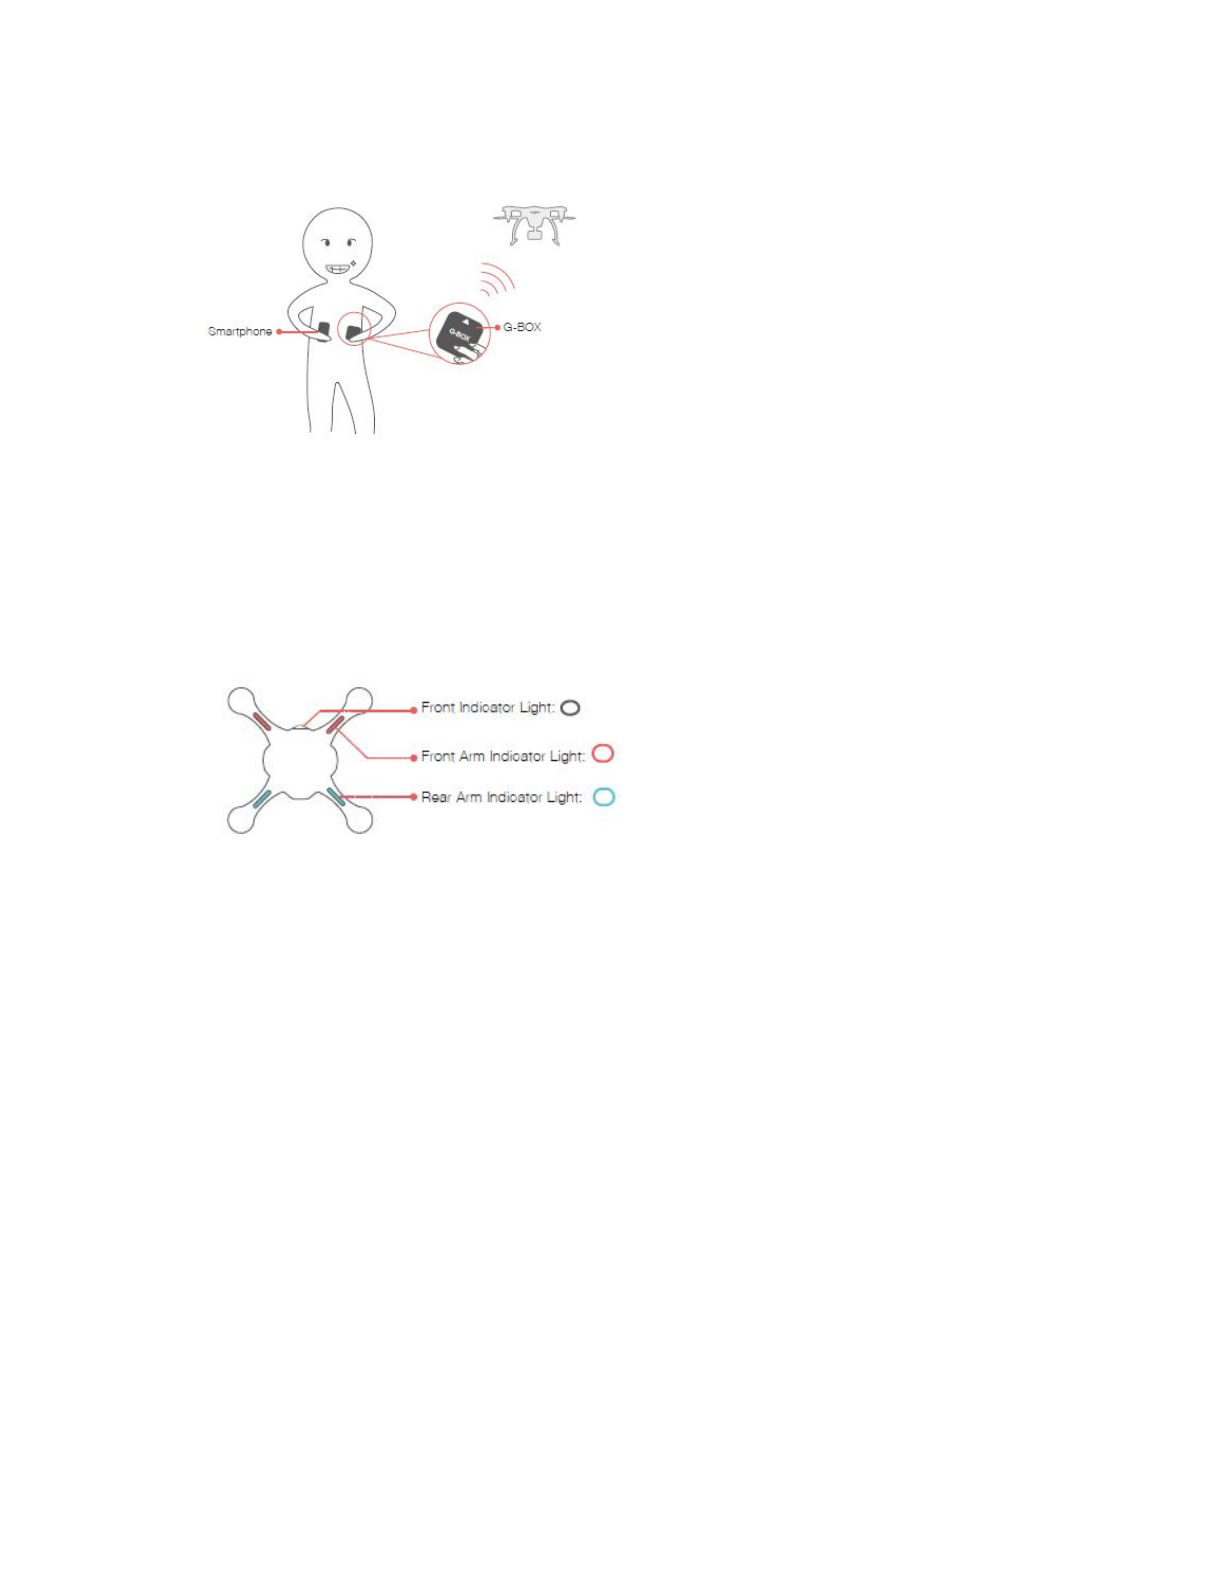
Best communication can be acquired when G-BOX’s main antenna is pointing to the
GHOSTDRONE.
Smartphone G-BOX
Aircraft Indicator Lights Instructions
On GHOSTDRONE 2.0, there are four arm indicator lights and one front indicator light.
The front indicator light displays multiple colors; the two front arm indicator lights
display red; and the rear two lights display blue.
The following chart describes the display status of the lights and their corresponding
explanation.
Front Indicator Light:
Front Arm Indicator Light:
Rear Arm Indicator Light:
Legend
High Frequency
Low Frequency Flash
Medium Frequency Flash
Solid

Front Indicator Light Arm Indicator Light Descriptions
After powering on, front indicator light shows in white solid color then flashes in blue
and green at high frequency until stop
Initializing
Flashes in yellow and blue at low frequency alternately
When transmitter “Unlock” or “Throttle” Joystick position is incorrect, do not unlock.
(Skip this status when not using transmitter.)
Medium frequency flash (red) Unlock check not pass, do not unlock.
Low frequency flash (yellow) GPS is not 3D locked. Unlock is only accessible in
manual mode.
Low frequency flash (blue) GPS is 3D locked. Ready to unlock.
Solid yellow GPS is not 3D locked. Unlock successful.
Solid green GPS is 3D locked. Unlock successful.
Low frequency flash (yellow)
Low battery. (Not related to unlock or not.)
Aircraft Indicator Light Status Information Chart
Terminologies
3D Lock: Lock aircraft’s current three-dimension location using GPS.
High Frequency Flash: Flash rapidly at the frequency of 5 Hz.
Medium Frequency Flash: Flash at the frequency of 2 Hz.
Low Frequency Flash: Flash slowly at the frequency of 1 Hz.
SPECIFICATIONS
Aircraft

Weight 1150 g
Shaft Distance 350 mm
Height 195 mm
Hover Accuracy horizontal: ±1, mvertical: ±0.2 m
Maximum Tilt Angle ±45°
Maximum Horizontal Speed 30 km/h (GPS mode) / 60 km/h (Manual mode)
Maximum Ascend Speed 2.5 m/s
Maximum Descend Speed 1.5 m/s
Maximum Hover Time 25 min
Communication Frequency 2.400 GHz ~ 2.483 GHz
Maximum Communication Distance 1000 m
Stable Transmission Distance 500 m
Output Power 255 W (Hover) 450 W (Maximum)
Operating Temperature -10°C~40°C
Wind Resistance <10.7 m/s (24 mph)
G-BOX
Communication Wi-Fi + Bluetooth + 2.4 GHz wireless data transmission
Voltage 3.7 V
Electronic Current 1500 mAh
Live Stream Video
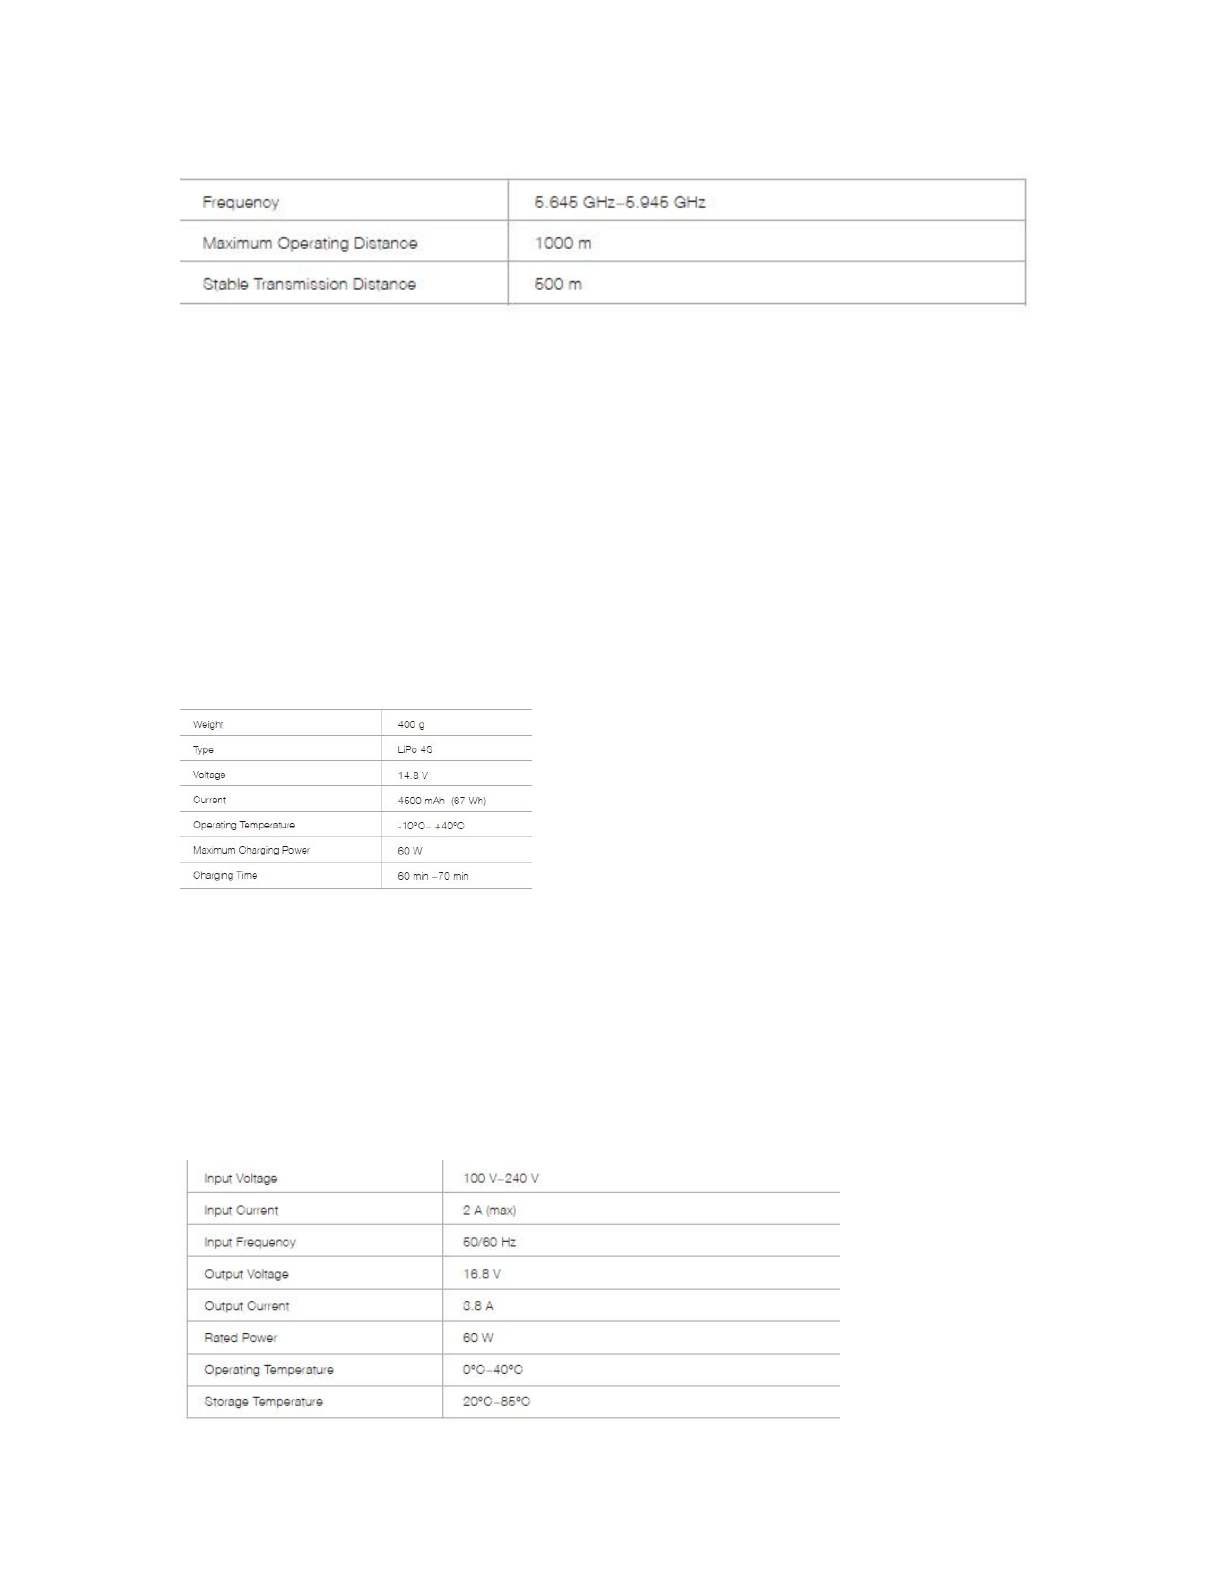
Frequency 5.725 GHz~5.850 GHz
Maximum Operating Distance 1000 m
Stable Transmission Distance 500 m
Propeller
8.5-inch 2-bladed self-tightening propellers
Battery
Weight 400 g
Type LiPo 4S
Voltage 14.8 V
Current 4500 mAh (67 Wh)
Operating Temperature -10°C~ +40°C
Maximum Charging Power 60 W
Charging Time 60 min ~70 min
Battery Charger
Input Voltage 100 V~240 V
Input Current 2 A (max)
Input Frequency 50/60 Hz
Output Voltage 16.8 V
Output Current 3.8 A
Rated Power 60 W
Operating Temperature 0°C~40°C
Storage Temperature Storage Temperature
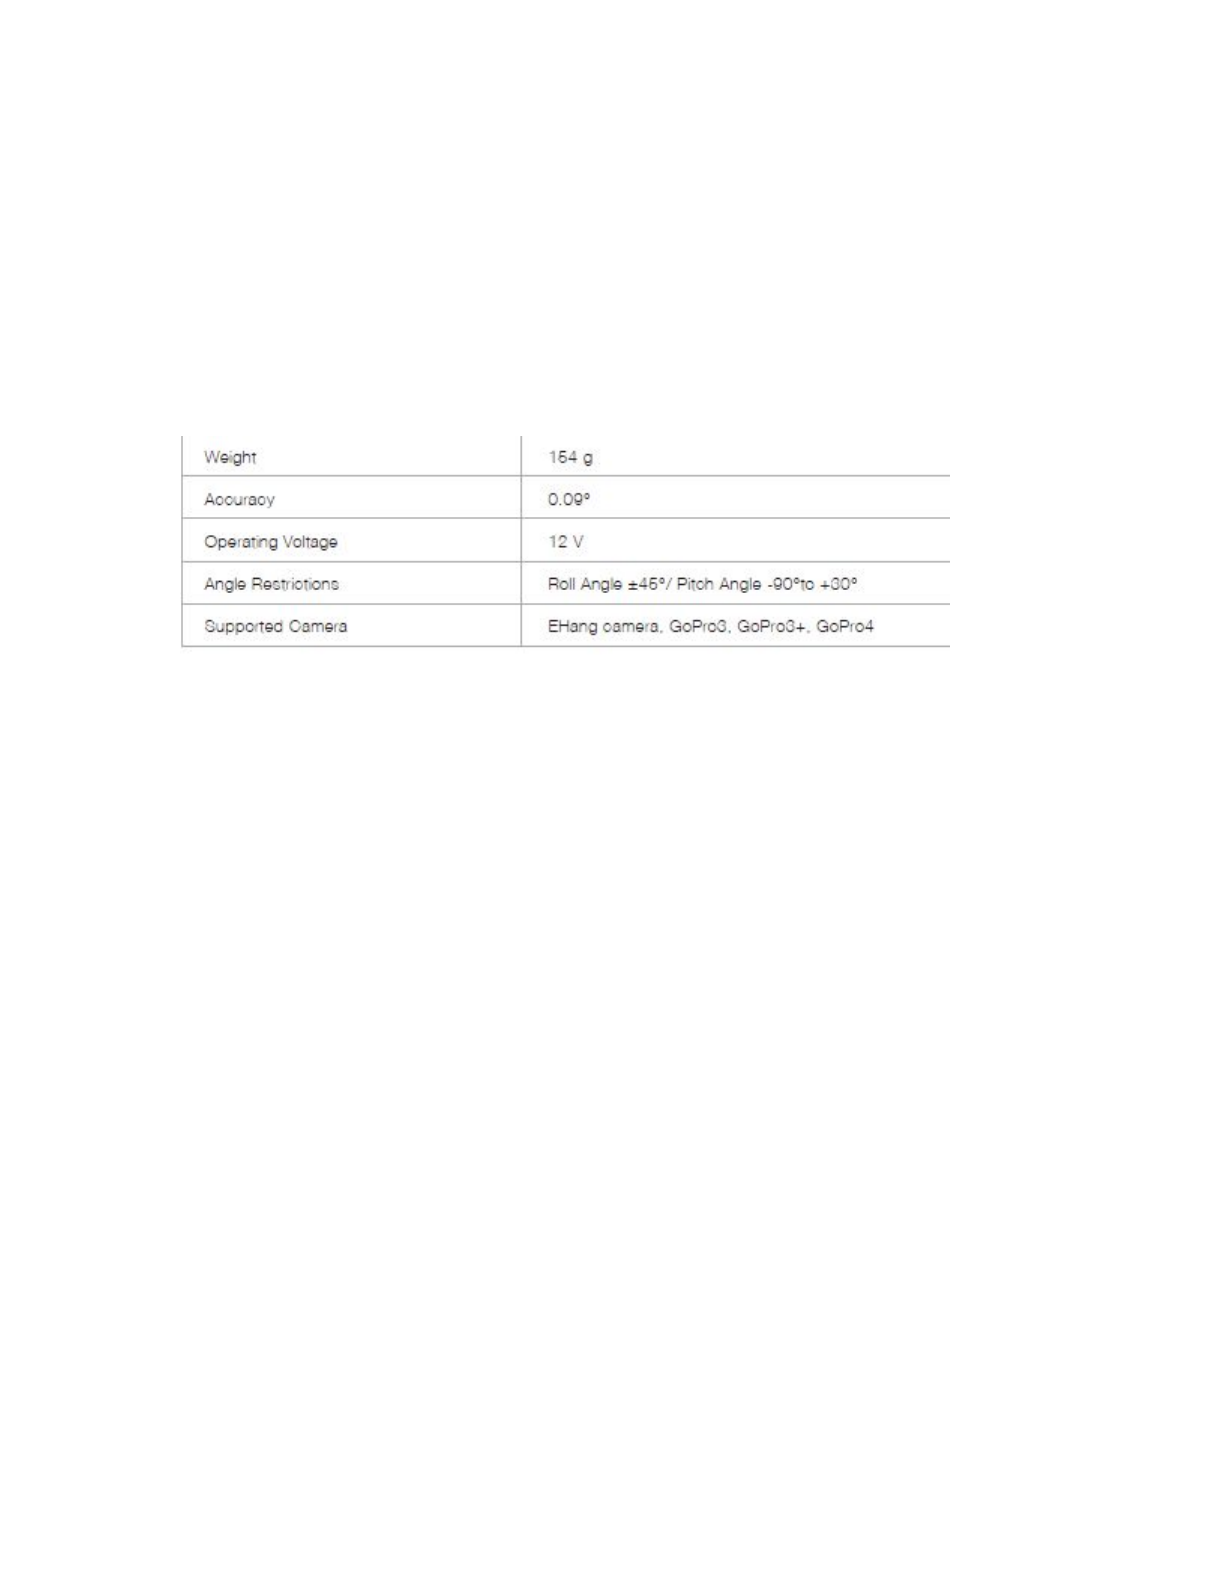
3-Axis Gimbal
Weight 154 g
Accuracy 0.09°
Operating Voltage 12 V
Angle Restrictions Roll Angle ±45°/ Pitch Angle -90°to +30°
Supported Camera EHang camera, GoPro3, GoPro3+, GoPro4
FAQ
1. Is the G-BOX compatible with Android and iOS?
Yes. GHOSTDRONE 2.0 G-BOX is compatible with both Android and iOS. Move the paddle
to the desired operating system with G-BOX turned on.
2. What’s the battery capacity? How long is the charging time?
GHOSTDRONE 2.0 is equipped with 4500-mAh 4S Lithium polymer battery and an LCD
screen showing information including battery capacity, voltage, remaining capacity etc.
The charging time is about 60 to 70 minutes which will also be shown on the screen for
viewing conveniently.
3. How to download the App?
1. Go to www.ehang.com to download Android/iOS App.
2. Search “GHOSTDRONE” on Google Play to download Android App.
3. Search “GHOSTDRONE”on App Store to download iOS App.
4. How to use AVATAR App?
AVATAR App is used to fly the aircraft with smart gesture control. Connect smartphone
with G-BOX and aircraft, and open AVATAR App. After the aircraft takes off, tilt the phone
forward to direct the aircraft flying forward; Tilt the phone backward to direct the

aircraft flying backward. Similar controls can apply for flying the aircraft leftward or
rightward. The AVATAR smart gesture control is simpler and more intuitive, which
definitely brings you more fun.
5. Can GHOSTDRONE 2.0 automatically dodge obstacles?
Obstacle avoidance function is currently unavailable for GHOSTDRONE 2.0. Please
beware of the flying environment and it is highly recommended to fly the aircraft in an
open area.
6. What will happen if “Lock” button is accidentally hit during flight?
If the “Lock” button is pressed during flight, a confirmation dialog box will pop up. The
aircraft will be locked after confirmation. But it is still recommended to operate
cautiously during flight.
7. Can the propeller guards and landing gears be used at the same time?
Yes. It is recommended to use the propeller guards in a complex environment, such as
crowd, group of buildings or obstacles to avoid unnecessary lost.
8. What will happen if the smartphone goes out of battery during flight?
The aircraft will return automatically if not receiving any command in 5 seconds.(The
aircraft battery life should be sufficient)
9. How to update App and download user manual?
Update reminder will automatically pop up on the App interface. You can also visit
official website to download the latest App and user manual.
Website: www.ehang.com
Business Hour: Monday – Friday 10:00 A.M – 6:00 P.M (PST)
Customer Service Phone: 888-800-7056
Customer Service Email: support@ehang.com
The SAR limit of Europe is 2.0 W/kg. Device types G-BOX has also been tested against this SAR
limit. The highest SAR value reported under this standard during product certification worn on the
body is 0.343 W/kg. This device was tested for typical body-worn operations with the back of the
G-BOX kept 0cm from the body. To maintain compliance with RF exposure requirements, use
accessories that maintain a 0cm separation distance between the user's body and the back of the
G-BOX. The use of belt clips, holsters and similar accessories should not contain metallic components
in its assembly. The use of accessories that do not satisfy these requirements may not comply with RF
exposure requirements, and should be avoided.
Regulatory Conformance
Hereby, Guangzhou EHang Intelligent Technology Co.,Ltd. declares that this device is in compliance
with the essential requirements and other relevant provisions of Directive 1999/5/EC.
For the declaration of conformity, visit the Web site http://www.ehang.com/cn/
Notice: Observe the national local regulations in the location where the device is to be used. This
device may be restricted for use in some or all member states of the European Union (EU)

This device complies with part 15 of the FCC rules. Operation is subject to the following two
conditions: (1) this device may not cause harmful interference, and (2) this device must accept any
interference received, including interference that may cause undesired operation.
NOTE: The manufacturer is not responsible for any radio or TV interference caused by unauthorized
modifications to this equipment. Such modifications could void the user’s authority to operate the
equipment.
NOTE: This equipment has been tested and found to comply with the limits for a Class B digital
device, pursuant to part 15 of the FCC Rules. These limits are designed to provide reasonable
protection against harmful interference in a residential installation. This equipment generates uses
and can radiate radio frequency energy and, if not installed and used in accordance with the
instructions, may cause harmful interference to radio communications. However, there is no
guarantee that interference will not occur in a particular installation. If this equipment does cause
harmful interference to radio or television reception, which can be determined by turning the
equipment off and on, the user is encouraged to try to correct the interference by one or more of the
following measures:
- Reorient or relocate the receiving antenna.
- Increase the separation between the equipment and receiver.
-Connect the equipment into an outlet on a circuit different from that to which the receiver is
connected.
-Consult the dealer or an experienced radio/TV technician for help
- This device and its antenna(s) must not be co-located or operating in conjunction with any other
antenna or transmitter.
The SAR limit of USA (FCC) is 1.6 W/kg averaged over one gram of tissue. Device types G-BOX
(FCC ID: 2ADPF-GBO-200) has also been tested against this SAR limit. The highest SAR value
reported under this standard during product certification when properly worn on the body is
1.084W/kg. This device was tested for typical body-worn operations with the back of the G-BOX kept
0cm from the body. To maintain compliance with FCC RF exposure requirements, use accessories that
maintain a 0cm separation distance between the user's body and the back of the G-BOX. The use of
belt clips, holsters and similar accessories should not contain metallic components in its assembly. The
use of accessories that do not satisfy these requirements may not comply with FCC RF exposure
requirements, and should be avoided.