Guangzhou Rigal Electronics RD-601 DLP Smart Projector User Manual 1
Guangzhou Rigal Electronics Co., Ltd. DLP Smart Projector 1
15_RD-601 UserMan
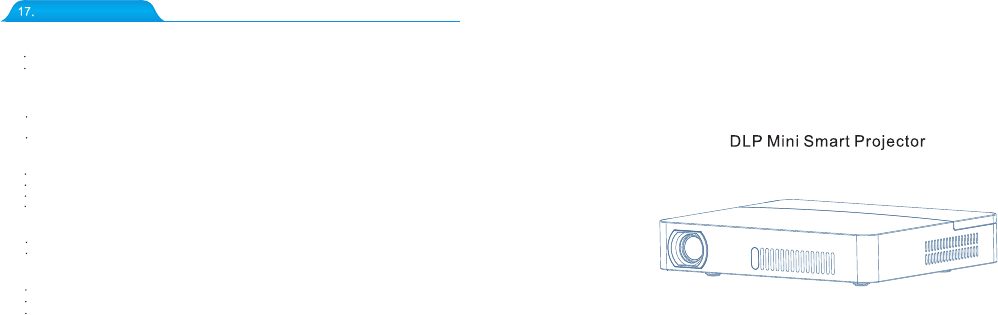
Instrucation Manual
Safety Instruction
Installation
To get a better view, please use this projector in a semi dark room.
Please use this projector carefully, dropping it may cause damaged parts or result in
a blurred image or abnormal displaying.
Power
Be careful while using the power cord, avoid excessive bending. Damaging the power cable
may cause electric shock and fire.
It is better to unplug the power cord after poweringoff.
Cleaning
Unplug the power cable first.
Clean the shell regularly with a damp cloth, neutral detergent can be used.
Please use a glasses cloth or lens paper, not to scratch the lens.
Please clean projector ’s vents and speakers regularly by banister brush, or the vents will be blocked.
High temperature attention
When projection is finished, the exhaust port will be very hot, may cause burning.
While projecting, please do not look the lens directly or it may hurt your eyes.
Warning tips
Do not disassemble the projector, which may cause electric shock and void the warranty.
Please do not put any liquids or weight on the projector.
To assure the stability of heat exhaust, please open the height bracket in the bottom before starting.
111
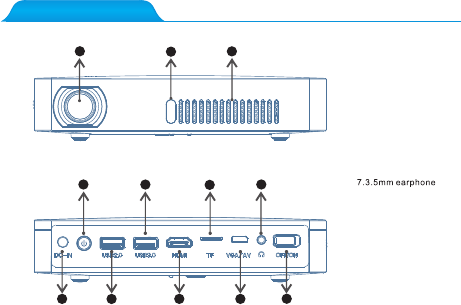
1.Projector Overview (1)
Warning Tip: computer/video port need to match the especial cable
with the projector( More details please inquiry the distributor) .
123
4
4567
8910 11 12
1.Projection lens
2.Front IR remote
control sensor
3.Ventilation holes
8.Adapter connection port
4.Power on/off
5.U disk/mouse port
6.TF card reader
9.U disk/mouse port
10.HDMI input port
11.Computer/video port
12.Switch
Warning Tips: It’s strictly prohibited to block the air intake window,
this may cause over heating and damage the projector.
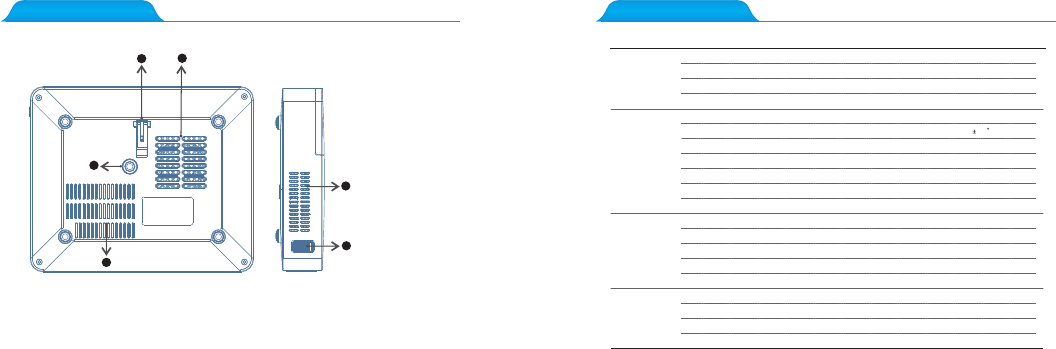
1.Projector Overview (2) 2. Specifications
Optical
parameters
Projection
parameters
System
parameters
Physical
interface
Display chip:0.3'' DMD RGB-LED
Brightness uniformity:98%
Contrast ratio:1000:1
Resolution:
1280*800
Projection size:20-200 inch
Focus mode: manual focus
Battery time:about 120 minutes
Power adapter:DC19V/3.42A
Power:32W
Size: 175*145*31mm
CPU: Mstar-6A628VX quadcore1.5GHZ
RAM:1GB DDR3
Operation system: based on Android 4.4
Bluetooth: support bluetooth 4.0
TF: 32GB(Max)
DC power jack x 1
USB 3.0 x 1
TF card reader x1
3.5mm earphone jack x 1
Brightness:1600 lumens(international standard 350 Ansi Lumens)
Battery capacity: 10,000 mAh
Speaker:2W*2
N.W.:600g
GPU:Mali-450MP2
ROM: 8GB eMMC
USB 2.0 x 1
HDMI x 1
VGA/AV x 1
1
12
3
4
5
6
1.Height bracket
2.Air intake hole
3.Stend hole(M5)
4.Battery ventilation
holes
5.Ventilation holes
6.Focus knob
IR: IR remote control
Smart phone pusher: Airplay, Miracast etc.
Battery: Low batter y warning; overcharge warning
Throw ratio: 1.47:1
Lens: High light transmittance coating glasses
Keystone: Electro nical adjusting 40
Offset:100%
WiFi: 802.11ac WiFi, 2.4G
NTSC: ≥120%
3D display: Yes
Battery: Li-ion sty le
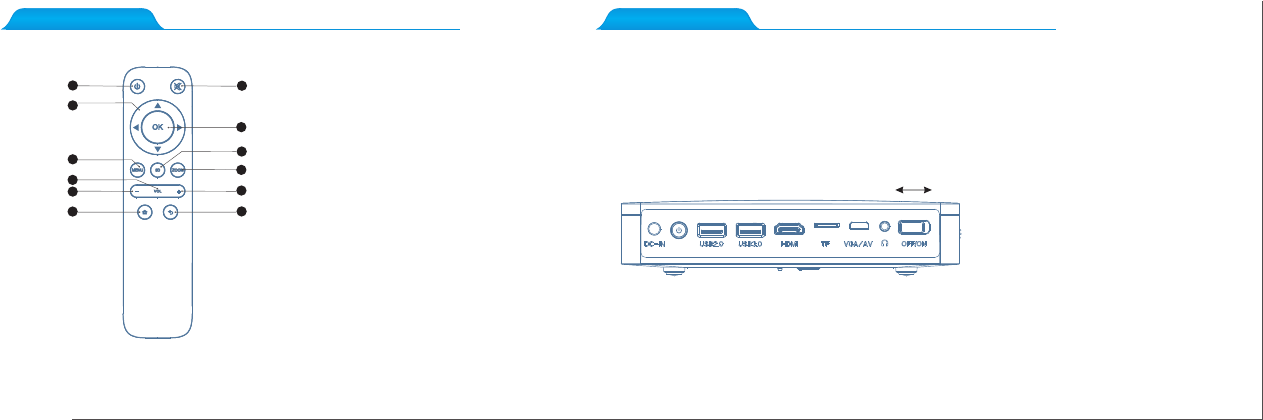
3.Remote Control 4.Powering On/Off
1.ON: Plug the DC terminal of power adaptor to DC-IN terminal of projector, adjust the master switch
on the right to “ON”, while the red indicator light , press the power key.
2.OFF: Press the power key while the projector is working normally, if the indicator light turn from green
to red, the projector is off.
Switch on
Switch off
1
2
3
4
5
6
7
8
9
10
11
12
1.Power
2.Arrow keys
3.Menu
8.Enter
4.Volume
5.Vol-
6.Homepage
7.Mute
9.3D conversion
10.Aspect
11.Vol+
12.Exit
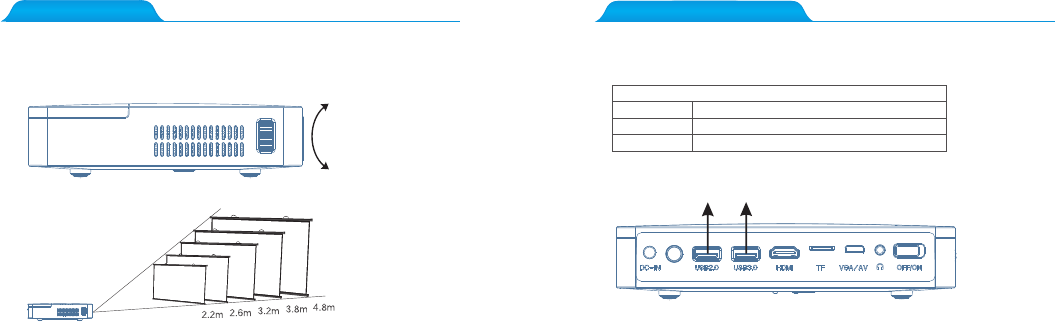
5.How to Focus? 6.How to use the USB2.0/3.0 interface ?
Adjust the focus button up or down lightly until the images clear.
Adjust the focus button up or down lightly
until the images clear.
150 inch
120 inch
100 inch
80 inch
60 inch
USB2.0/3.0 interfaces could be connected with mouse/keyboard; it could read the video,
audio,picture,office document;it also could be installed APK applications.
Support Format
Picture Format
Audio Format
Video Format
MP3/WMA/MP2/OGG/AAC/M4A/DTS etc
JPG/JPEG/GIF/BMP/PNG etc
MP4/AVI/MOV/FLV/VOB/3GP/MPG/RMVB/WMV etc
connect mouse/keyboard/U disk

7.How to connect WiFi?
WiFi connection steps:
8.How to connect Bluetooth?
3. Select the “Bluetooth device” which you want to link in the list, click the device and then connect
match with projector
Setting”, find the “Bluetooth Setting” and select “Bluetooth” and open;
it is ok.
Please press the “System Setting”, find the “Network Setting” and select the
virtual keyboard will be showed on the bottom of the screen after press “OK” key,
Please press the main interface on the remote control, the main screen appears,
“Wireless router” which you want to link in the list (like the picture as follow). The
type password, then click to link it.
For the first time to connect the Bluetooth devices, (such as Bluetooth Speaker/ Headset),you need to
2.Press the main interface on the remote control, the main screen appears,click the “system
Steps: 1.Please select the “ blutooth device” what you want;
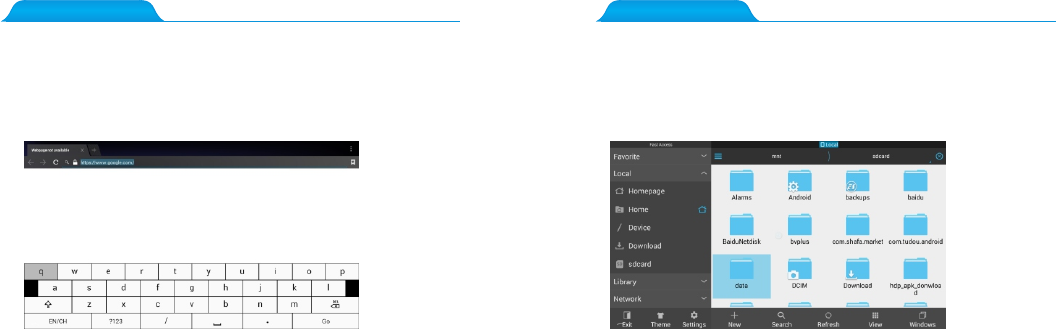
9. Surfing the Net 10.File Management
Please press the main interface on the remote control, the main screen appears ,
and press “My Media”, find the “Web Browser”. The default website is Google, if
you want to go to other website, please enter the correct website what you want.
(like www.yahoo.com.)
Click the file you need in the right list, press the left button in mouse mode, then
Please press the main interface on the remote control, the main screen appears ,
and press “My Media” find the “File Browser”, and select the “sda1” in “Local”;
you can choose “copy”, “paste”, “delete” etc.

11.Local Play 12.APK Install Instructions
Put the U disk with audio, video and text into the USB2.0 or USB3.0 interface,
pre ss the main interface on the remote control, the main screen appears, and
press the “ My Media,” find the “ Local,” and select the “sda1", choose and play
the file what you want.
Tips: Please try to use the office software when you found the file cannot be opened.
Please press the main interface on the remote control, the main screen appears,
and press the “All applications”, find the “ Play Store”, download and install the software.

13. Wireless Display for Android 14.Wireless Display for ios
1. Please press the main interface on the remote control, the main screen appears,
and press the “My Media”, find the “Miracast”.
2. Android mobile phone and projectors need to be in the same Wifi.
3. Open the taskbar to find “multi screen interactive”,(use the phone Android 4.4
or above version), please auto searching the “MCast-f7cc”, and click it.
1. Please press the main interface on the remote control, the main screen appears,
and press the” My Media”, find the “ wireless one screen”;
2.Projector and iphone need to be in the same Wifi;
3. From down to up open the interface in the iphone.
a. select Aliplay;
b. select device link(such as: ILINK-a38e6) and switch on Mirroring button.
Tip: Due to mobile Android updating the advanced version in the future, maybe
will not work well with projector on wireless display function. Tip: Due to mobile ios updating the advanced version in the future, maybe
will not work well with projector on wireless display function.

15.3D Function 16.How to Charge
1. 3D video play:
2. 3D format to be translated in 2D video play:
and set
"3D-2D" to 3D video format and the operation process has been completed.
Tips: 1. Please сharge the battery with the original power adapter;
2. The product only be suitable for a non high temperature environment;
3. When it is charging, do not block the battery cooling holes;
4. Please don't stab or crash the battery when it is charging;
5. Do not get the battery wet.
Self Detect off
3D Coversion Auto
3D-2D None
LR View Switch Off
When playing the video, the video sources for the 3D format, please press “3D”
on the remote control, then the main screen appears, “Close” the “3D conversion”
When playing video, the video sources for the 3D format, it will recognize the 3D
format automatically and change 3D mode; if not successful, please press “3D”on
the remote control , the main screen appears, then select “ 3D conversion” for
“up-down” or “left-right” format.
1. To charge when projector is off: when the projector is connected with the power adapter, put
the switch in the “OFF” position, it means it is charging.
2. To charge when projector is off: when the projector is connected with the power adapter, put
the switch in the “ON” position, and press the switch, the charging icon" " will be displayed
on the upper right of the main interface, it means it is charging.
FCC ID: 2AK43RD-601
FCC statement
This device complies with Part 15 of the FCC Rules: Operation is subject to
the following two conditions:
1. This device may not cause harmful interference and
2. This device must accept any interference that is received, including any interfer
ence that may cause undesired operation.
This device is acting as slave and operating in the 2.4 GHz (2412 ~2462 MHz)
band.
Ad Hoc function is supported but not able to operate on non-US frequencies.
Do not use the device with the environment which below minimum -10 ℃ or maximum
over 50℃ .
NOTE: This equipment has been tested and found to comply with the limits for
a Class B digital device, pursuant to part 15 of the FCC Rules. These limits are
designed to provide reasonable protection against harmful interference in a
residential installation. This equipment generates uses and can radiate radio
frequency energy and, if not installed and used in accordance with the
instructions, may cause harmful interference to radio communications.
However, there is no guarantee that interference will not occur in a particular
installation. If this equipment does cause harmful interference to radio or
television reception, which can be determined by turning the equipment off and
on, the user is encouraged to try to correct the interference by one or more of
the following measures:
- Reorient or relocate the receiving antenna.
- Increase the separation between the equipment and receiver.
-Connect the equipment into an outlet on a circuit different from that to which
the receiver is connected.
-Consult the dealer or an experienced radio/TV technician for help
Changes or modifications to this unit not expressly approved by the party responsible for compliance
could void the user's authority to operate the equipment.