Guo Wei Electronics DECT49B94TAMBS Digital Cordless Telephone with Answering Machine (Base) User Manual SunCorp Generic GAP Specification
Shenzhen Guo Wei Electronics (H.K.) Co. Ltd. Digital Cordless Telephone with Answering Machine (Base) SunCorp Generic GAP Specification
User Manual

Studio
MMI Specification
Document 2.0
1 of 83

Revision History
Revision
document Author Date Comments
Version 1.0 Wenfei 10 Nov 05 Initial document
Version 1.1 Wenfei 24 Dec 05 Add support for RPAS menu on Base to work with DECT 10
H/S 3.1
Modify CID icon clarification 3.8.2
Change SMS service centre 4.4.5
Add Automatic SMS Registration 4.4.5.10
Version 1.2 Wenfei 10 Apr. 06 Remove Automatic SMS registration
Add Remark on Call Screening 4.3.8
Version 2.0 Chester 24 Sep 08 Add ECO
Add HS name & HH-MM toggle
Modify Russian CID menu
Add Hot Key menu
Reference
DECT 20 MMI specifications
Revision
document Author Date Comments
Version 1.1 Wing 11 Oct 02 Initial document
Version 1.2 Wing 15 Nov 02 Update, add answered/unanswered call icon
3 H/S > 2H/S
Version 1.3 Wing PAGE
Version 1.4 Wing 17 JAN 03 Delete 3 way conversation, B/U charging LED and H/S
LED, changed H/S Menu setting (ear volume) and charging
iron for quick charging.
Version 1.5 Wing,
Derek
20 MAR 03 30 phonebook, 3 languages, 3.5.6, 4 base per H/S, CLIP
operation, Menu structure, test mode, Flash display “R”,
pause display “P”
Version 1.5.1 Derek 28-MAR-2003 Add a Auto Searching Function in Selection Base Menu
Define the function for short and long press KEY_STAR
during talk or pre-dialing and number storage mode in more
details
Version 1.6 Wing 03 Apr 03 Language: English, French, German, Special caller texts
display format
Version 1.7 Yamada 04 Apr 03 Change the “UNLOCK method. Down key to allow to recall
CLIP list
Version 1.7a Parag 04 Apr 03 Update Revision number on title page
Version 1.8 Wing 14 Apr 03 1.3.1 3.1 3.2 4 4.1.3 8.2
Version 1.9 Wing 24 JUN 03 1.3.1 2.2 3,2 3.2.4 3.7.1 3.3.1 Menu structure 4.1.2
4.7.2
Version 1.9a Wing 17 JUL03 3.9.1
Version 2.0 Wing 12 Aug03 3.5.1
For DECT 9+ Yamada 25 Oct03 Modify the document for DECT 9+
DECT 9+ R1.1 Yamada 28 Oct 03 Add more explanation for features
DECT 9+ Yamada 27 Nov 03 Add the alarm activation
Modify the handset paging
2 of 83

DECT 9+ R1.3 WP Chen 3 June 04 Update
DECT 20 R1.4 WP Chen
Zhang Ye
23 Aug 04 Update: Platform to DECT20
Items:3.2.5,3.2.8,3.3.1,3.7.2,3.13,4.0,4.2 and 4.2.7,4.3.10.2
DECT 20-2/
DECT 48-2
R1.5
Ruth
Wilson
13th June 05 Updated to full DSPG DECT 20-2/DECT 48-2 specification
13th July 05 Updated Standby display, Date Format, PIN CODE entry,
Charge LED
DECT 20-2-2 MMI Addendum
Revision
document Author Date Comments
Version 0.1 Ruth 17th July 05 Initial document
Version 1.2 Ruth 24th July 05 Support of # & * in SMS, EEPROM control of VMWI LED,
EEPROM control of Flash rate on Base LED for Talk &
Event, new EEPROM parameter for Flash rate of Base
LED on “In Use” & “Event”, Holland DTMF “SECRET”
Version 1.21 Ruth 29th July 05 Added new DATE – TIME menu, re-order languages
Version 1.22 Ruth 1st August 05 Clarification on out of range/unregistered
DECT 15/49 Telephone Answering and Recording Machine operation requirement Document
Revision
document Author Date Comments
Revision 1.0 Yamada 15 Sep 04 Initial document
Revision 1.1 Yamada 03 Feb 05 Add base operation and LED display on the base
Add the option for without voice prompt
Delete Time setting from the menu
Revision 1.2 Yamada 16 Feb 05 Describes more detail about “No Voice prompt”
Describes more about Call screening and remote
interrogation
Revision 1.3 Yamada 14 Mar 05 Modify for Answer delay setting
Add the “DEL ALL?” on the handset display when finish
playing the message.
Add the option “New message playback” by Short press or
Long press.
Revision 1.4 Yamada 24 June 05 Add the DECT 15 menu
Add EEPROM setting for recording time limit
Revision 1.5 Yamada 01 Aug 05 Delete Time setting menu operation
Add the handset TAM icon display indication description
Revision 1.6 Yamada 02 Aug 05 Change the Flashing timing for TAM icon
3 of 83
Contents
FEATURE LIST.......................................................................................................... 8
1 FEATURES OF SUNCORP GAP DECT............................................................ 12
1.1 Purpose of this document ....................................................................................................... 12
1.2 General features ....................................................................................................................... 12
1.3 Handset description ................................................................................................................. 13
1.3.1 Handset keypad................................................................................................................... 13
1.3.2 LCD display ......................................................................................................................... 16
1.3.3 Standby display ................................................................................................................... 17
1.3.4 LED...................................................................................................................................... 17
1.3.5 Tones................................................................................................................................... 18
1.4 Base description....................................................................................................................... 18
1.4.1 Page Key ............................................................................................................................. 18
1.4.2 LED...................................................................................................................................... 18
1.4.3 Tones................................................................................................................................... 19
2 MAIN USER INTERFACE.................................................................................. 20
2.1 Power up.................................................................................................................................... 20
2.2 Standby mode........................................................................................................................... 20
2.3 TALK mode................................................................................................................................ 20
2.4 Intercom mode.......................................................................................................................... 21
2.5 Incoming call mode .................................................................................................................. 21
2.6 MENU mode............................................................................................................................... 21
2.7 Phonebook mode...................................................................................................................... 21
2.8 Redial list mode ........................................................................................................................ 21
2.9 CLIP mode................................................................................................................................. 21
2.10 Charging mode...................................................................................................................... 21
2.11 VoiceMail................................................................................................................................ 21
2.12 Incoming SMS Mode............................................................................................................. 22
2.13 Message Mode....................................................................................................................... 22
2.14 Answer Machine Mode ......................................................................................................... 22
2.15 Busy mode............................................................................................................................. 22
2.16 Power down........................................................................................................................... 22
3 CALL USER INTERFACE.................................................................................. 23
3.1 Incoming call............................................................................................................................. 23
3.1.1 To answer the call: .............................................................................................................. 23
3.2 External outgoing call.............................................................................................................. 23
3.2.1 Normal dialling:.................................................................................................................... 23
3.2.2 Pre-dialling:.......................................................................................................................... 23
3.2.3 Dialling PAUSE.................................................................................................................... 23
3.2.4 Flash key ............................................................................................................................. 24
3.2.5 DTMF dialling ...................................................................................................................... 24
3.2.6 Pulse dialling ....................................................................................................................... 24
3.2.7 Temporary DTMF dialling.................................................................................................... 24
3.2.8 Dial tone detection............................................................................................................... 24
3.2.9 Call timer display ................................................................................................................. 24
3.2.10 Mute..................................................................................................................................... 24
3.2.11 Changing Earpiece Volume during Call .............................................................................. 25
3.3 Incoming SMS........................................................................................................................... 25
3.3.1 To read the message: ......................................................................................................... 25
3.4 Direct access memory ............................................................................................................. 25
3.4.1 How to access the direct memory dial number during idle.................................................. 25
3.4.2 During OFF HOOK .............................................................................................................. 25
4 of 83
3.5 Redial feature............................................................................................................................ 26
3.5.1 Redial list ............................................................................................................................. 26
3.5.2 Dial out redial after OFF HOOK .......................................................................................... 26
3.5.3 Delete a redial buffer : ......................................................................................................... 26
3.5.4 Delete all redial buffer : ....................................................................................................... 26
3.5.5 Store a Redial list into PHONEBOOK ................................................................................. 26
3.6 Internal call transfer ................................................................................................................. 26
3.7 Conference call between two handset and external caller .................................................. 27
3.8 Caller ID (CLIP) features .......................................................................................................... 27
3.8.1 General features.................................................................................................................. 27
3.8.2 Caller ID display .................................................................................................................. 27
3.8.3 Recall CLIP list .................................................................................................................... 29
3.8.4 Delete one CLIP list............................................................................................................. 30
3.8.5 Delete all CLIP list ............................................................................................................... 30
3.8.6 Store a CLIP list into PHONEBOOK ................................................................................... 30
3.8.7 Dial out CLIP list .................................................................................................................. 30
3.9 Phonebook ................................................................................................................................ 30
3.9.1 Dial a number of the phonebook list.................................................................................... 30
3.9.2 Dial a number of the phonebook list during Talk................................................................. 31
3.10 Intercom................................................................................................................................. 31
3.10.1 Internal call .......................................................................................................................... 31
3.10.2 End of intercom call............................................................................................................. 31
3.10.3 Intercom mode..................................................................................................................... 31
3.10.4 End of intercom ................................................................................................................... 31
3.11 Page button ........................................................................................................................... 31
3.12 Battery and charge management ........................................................................................ 32
3.12.1 Battery indicator................................................................................................................... 32
3.12.2 Low battery conditions......................................................................................................... 32
3.12.3 Charge conditions................................................................................................................ 32
3.12.4 Quick charge ....................................................................................................................... 32
3.12.5 Start-up with low batteries ................................................................................................... 32
3.13 Range indication................................................................................................................... 33
3.13.1 Out of range tone................................................................................................................. 33
3.13.2 In range tone ....................................................................................................................... 33
3.13.3 Range limit tone during a call .............................................................................................. 33
3.14 Alarm activation .................................................................................................................... 33
3.14.1 During idle ........................................................................................................................... 33
3.14.2 During Talk .......................................................................................................................... 33
3.14.3 During ringing or paging ...................................................................................................... 34
4 MENU SETTINGS.............................................................................................. 35
4.1 MESSAGE PLAY ....................................................................................................................... 40
4.2 PHONEBOOK ............................................................................................................................ 41
4.2.1 Add a name ......................................................................................................................... 41
4.2.2 Delete a name ..................................................................................................................... 41
4.2.3 Modify a name or number ................................................................................................... 42
4.3 TAM SETTING ........................................................................................................................... 42
4.3.1 Answer ON/OFF.................................................................................................................. 42
4.3.2 Answer mode....................................................................................................................... 42
4.3.3 Record Memo ...................................................................................................................... 43
4.3.4 Outgoing message .............................................................................................................. 43
4.3.5 Day Setting .......................................................................................................................... 44
4.3.6 Answer Delay ...................................................................................................................... 44
4.3.7 Security Code (PIN) ............................................................................................................ 44
4.3.8 Call Screening ..................................................................................................................... 45
4.4 SMS............................................................................................................................................ 45
4.4.1 PERSONAL SMS ................................................................................................................ 46
4.4.2 INBOX ................................................................................................................................. 47
4.4.3 WRITE ................................................................................................................................. 47
4.4.4 Delete All ............................................................................................................................. 48
5 of 83
4.4.5 SMS Settings....................................................................................................................... 48
4.5 SETUP........................................................................................................................................ 51
4.5.1 BASE VOL........................................................................................................................... 52
4.5.2 BASE MEL........................................................................................................................... 52
4.5.3 DEL HS................................................................................................................................ 52
4.5.4 PIN CODE ........................................................................................................................... 52
4.5.5 Dial mode selection (This mode will not appear when set the Pulse dialling disable by
EEPROM) .......................................................................................................................................... 52
4.5.6 Recall duration selection ..................................................................................................... 52
4.5.7 Default settings.................................................................................................................... 53
4.5.8 RCID (MENU can be enabled or disabled by EEPROM).................................................... 54
4.5.9 ECO MODE ......................................................................................................................... 55
4.6 HANDSET .................................................................................................................................. 56
4.6.1 BEEP ................................................................................................................................... 56
4.6.1.1 KEYTONE ........................................................................................................................... 56
4.6.1.2 LOW BATTERY................................................................................................................... 56
4.6.1.3 OUTRANGE ........................................................................................................................56
4.6.2 INT RING VOL..................................................................................................................... 56
4.6.3 EXT RING VOL ................................................................................................................... 56
4.6.4 INT MELODY....................................................................................................................... 56
4.6.5 EXT MELODY ..................................................................................................................... 56
4.6.6 CLOCK SET ........................................................................................................................ 56
4.6.7 ALARM SET ........................................................................................................................ 57
4.6.8 AUTO ANSWER.................................................................................................................. 57
4.6.9 NAME .................................................................................................................................. 57
4.6.10 LANGUAGE......................................................................................................................... 57
4.6.11 DATE SET ........................................................................................................................... 57
4.6.12 HOT KEYS .......................................................................................................................... 58
4.6.13 KEY LOCK........................................................................................................................... 58
4.6.13.1 Quick KEY LOCK ................................................................................................................ 58
4.6.13.2 To unlock key: ..................................................................................................................... 58
4.7 REGISTER ................................................................................................................................. 58
4.7.1 SELECT BASE .................................................................................................................... 58
4.7.2 REG BASE .......................................................................................................................... 58
5 ANSWER MACHINE FEATURES...................................................................... 60
5.1 Base description....................................................................................................................... 60
5.1.1 One digit 7 segment LED Display on the base unit............................................................. 60
5.1.2 LED...................................................................................................................................... 60
5.1.3 Buttons for TAM control....................................................................................................... 60
5.1.4 Supervisory tone duration ................................................................................................... 60
5.1.5 Voice prompts (It is available by EEPROM setting) ............................................................ 60
5.2 Base unit operation.................................................................................................................. 62
5.2.1 Display................................................................................................................................. 62
5.2.2 In sue LED indication .......................................................................................................... 63
5.2.3 Key Operation...................................................................................................................... 63
5.2.4 Stop ..................................................................................................................................... 63
5.2.5 Volume control..................................................................................................................... 64
5.2.6 Answer delay ....................................................................................................................... 64
5.2.7 Message Alert setting (If set “No Voice prompt, this function shall not be available) ........ 65
5.2.8 Answer on/off setting...........................................................................................................65
5.2.9 Outgoing message .............................................................................................................. 66
5.2.9.1 Recording OGM...................................................................................................................66
5.2.9.2 Checking OGM. ...................................................................................................................66
5.3 Call answering and message recording................................................................................. 67
5.4 Memory full................................................................................................................................68
5.5 Message playback.................................................................................................................... 68
5.5.1 Playback .............................................................................................................................. 68
5.5.2 Skip forwards and backwards. ............................................................................................ 69
5.5.3 Fast play .............................................................................................................................. 69
6 of 83
5.5.4 Deleting messages during playback.................................................................................... 69
5.5.5 End of message play........................................................................................................... 70
5.5.6 Playing new messages........................................................................................................ 70
5.5.7 Setting is “No voice prompt” ................................................................................................ 70
5.6 Remote interrogation. .............................................................................................................. 70
5.6.1 With Voice prompt ...............................................................................................................70
5.6.2 Without Voice prompt .......................................................................................................... 73
5.7 Technical requirement ............................................................................................................. 74
5.7.1 Default setting data ............................................................................................................. 74
5.7.2 Setting for countries variance and type of product.............................................................. 74
5.7.3 BPR detection (Branch Phone Detection)........................................................................... 74
5.7.4 CPC (ECS) detection (End of call signal)............................................................................ 74
5.7.5 Silence detection ................................................................................................................. 75
5.7.6 Tone detection..................................................................................................................... 75
5.7.7 DTMF detection ................................................................................................................... 75
5.7.8 AGC for recording................................................................................................................ 76
5.7.9 Audio out put level setting ................................................................................................... 76
5.7.10 Supervisory tone.................................................................................................................. 76
5.7.11 Tail cut ................................................................................................................................. 76
5.7.12 Ring signal detection ...........................................................................................................76
5.7.13 LED flashing ........................................................................................................................ 77
5.7.14 Data storage ........................................................................................................................ 77
6 PREFIX DIALLING............................................................................................. 78
6.1 Detect string.............................................................................................................................. 78
6.2 Replace string........................................................................................................................... 78
6.3 Detecting and replacment........................................................................................................78
7 QUICK DEFAULT SETTINGS ........................................................................... 80
8 SUBSCRIBE A NEW HANDSET ....................................................................... 81
9 TEST MODES .................................................................................................... 82
9.1 Handset test modes.................................................................................................................. 82
9.2 Base unit test modes ............................................................................................................... 82
10 SPECIFICATIONS........................................................................................... 83
10.1 CLIP Standards ..................................................................................................................... 83
10.2 DECT Specifications.............................................................................................................83
7 of 83

Feature List
DECTStudio
Display and Aesthetics
1 Primary Liquid Crystal Display
Handset : 2-line Black and White
including icons; Alphanumeric 14
segments x 12
2 Secondary Display
3 Icon set
4 Key count
Handset : CCITT keys (12), Talk (1),
SMS [option] (1), Flash (1), INT (1),
Phonebook/Back (1), Up (1), down
(1), Menu (1), Redial (1), Clear (1);
Base : Page (1), up (1), down (1),
play (1), stop (1), delete (1), skip
back/forwards (2), answer (1), OGM
(1)
5 Animations
6 LEDs / Indicators
Handset: in use (1 LED) (presence
subject to Industrial design) ; Base :
Power/in use/events (1 LED),
charging (1 LED), Messages (1x 7-
segment LED)
7 Display Backlight Industrial design and cost Dependent
8 Backlit keypad Options Industrial design and cost Dependent
9 Set Menu Background Colour
10 Screensaver in Primary LCD in power save
11 Idle Display Handset Name / Clock (user
selectable), Date
Character Sets / Text
1 Font Description
2 Predictive Text
3 Word wrap YES
4 Character type(s) supported
Phonebook : alpha-numeric;
proprietary character set; SMS :
alpha-numeric; proprietary character
set
ID General Features
1 GAP Compatibility YES
2 Multi-base / Handset 4 Base / 5 Handsets
3 Base Station / Handset System Security (PIN code) 4 DIGIT
4 Dialling Mode
Tone / Standard Pulse. Pulse menu
option can be hidden by EEPROM
setting
5 Paging From base to handset(s) YES
6 3 way conferencing (2 internal with 1 external) YES
7 3 way conferencing plus simultaneous intercom YES
8 Auto-talk / Standby Yes, user can disable Auto-talk
9 Recall / Flash Timed Break (Flash) only; Flash time
user switchable
10 Dialling Pause YES
11 Pre-dialling Facility YES
8 of 83

12 Out-of-range Warning Standby : visual; In Call : audible and
visual
13 PABX Access code
14 Restore to Default Settings YES
15 Alarm YES
16 Walky Talky Feature
17 Call Barring
18 Low Battery Warning Standby : visual; In Call : audible and
visual
19 Call Timer YES
20 Handset Power On/Off YES, on R key
21 Microphone Mute Facility YES
22 Last Number Redial 10 entries - Delete All / Selective
Delete
23 Display Languages
17 - English, French, German, Italian,
Spanish, Danish, Swedish, Slovak,
Dutch, Portuguese, Norwegian,
Russian, Greek, Hungarian, Polish,
Czech, Finnish
24 Ability To Name Handsets YES
25 Calendar Function
26 Keypad Lock YES
27 Call Transfer Between Handsets YES
28 Intercom Between Handsets YES
29 Handset Priority
30 Resident Games
31 Downloadable Games
32 ECO Mode YES
33 Other Features (L)
ID Sounds / Audio
1 Resident Ringer Melodies Handset : 5 - Monophonic; Base : 5 -
Monphonic
2 Ringer Volume Control Handset : 5 Levels + OFF; Base : 5
Levels + OFF
3 Internal Calls Melodies : 5 - Monophonic; Volume :
5 Levels + OFF
4 Handset Receiver Volume Control 5 Levels
5 Audio clips
6 Vibrating Ringer (Handset)
7 Keytone on/off YES
8 Audio Quality Specifications
9 Echo Canceller
10 Handset Amplification
11 Handsfree
12 Hearing Aid Compatibility Industrial design and cost Dependent
13 Wired Headset Compatibility Industrial design and cost Dependent
Phonebook Features
1 Phonebook Handset : 50, available in idle/during
talk
2 Copy Phonebook across handsets
9 of 83

3 SIM Reader / Writer
4 SIM PIN entry
5 SIM area code programming
6 Menu option to Empty Phonebook
7 Save Number in pre-dial mode
8 Copy Caller ID entry to phonebook YES
9 Copy Redial number to phonebook YES
Caller ID Features
1 Caller Display In Base
2 Caller ID Mode FSK/DTMF
3 Other Caller ID modes supported Bellcore / "KPN"/Russian CID
4 Caller ID Type Type 1 and 2
5
Can see both name and number on the display
during incoming caller ID YES
6 Calls List 40, dynamic allocation between
Received and Missed
7 Caller ID matching to Phonebook Ringtones : Resident - Direct
Assignment
8 Calls List Includes Time / Date of Call YES
Network Related Features
1 Network Services Menu
2 Multi-Country Settings
unless otherwise stated by EEPROM
parameters set at factory. KPN
requires specific hardware
3 Option to Disable RPAS Factory setting & Menu selection
4 Hot Keys Under digits 1 and 2 - can store R, P,
*, # and numbers. User changeable
5 Prefix Dialling Factory setting
6 Area Code Management TBA
7 Network Voice Mail Indication (FSK) YES
Messaging Features
1 Messaging Technologies Supported SMS Protocol 1
2 Supported Formats (Messaging)
3 DCS coding TBA
4 Message Capacity SMS : 15 (dynamic over all SMS
mailboxes), located in the base
5 Long Message support
6 Sub Addressing to handset (multi-handset SMS) YES
7 Multi-user SMS (sub-addressing to base mailbox)
8 Templates
9 Drafts Folder message buffer only
10 Matching Incoming SMS Number to Phonebook
11 Emoticons
12 Dedicated New SMS Indicator Handset icon steady, base LED
flashes
13
Audible Alert On Incoming SMS Messages
(Handset) YES, can be disabled by user
14 Message Forwarding YES (includes editing)
15 Reply To Messages YES
10 of 83

16 Send SMS to email
17 Send SMS to fax
18 SMS Service Centres 2 Send / 2 Receive
19 Calling SMS Sender / Receiver
20 Automatic SMS Registration
21 SMS Notification (Delivery Report)
22 Audible confirmation of successful SMS sent
23 Send SMS from Calls List / Redial List
24 Save SMS Number to phonebook
Answering Machine Features
1 Voice Prompts English, French, German, Italian
2 Outgoing Message
1 x Answer & Record, 1 x Answer
only (max recording time 3 minutes
for each)
3 Audible Message Alert
4 Pre-recorded OGM YES
5 Total Recording Time (excluding voice prompts) 18 Minutes
6 Incoming Messages Each ICM : Max 3 minutes; Max
Number of messages : 59
7 Call Screening YES
8 Call Intercept YES
9 Memo Message OPTION
10 Message Counter 1 x 7 segment LED
11 Message Playback Features Skip Back, Skip Forwards, Pause,
Delete, Stop
12 Message Full Indication YES
13 Private Playback Via Handset YES
14 Ring Delay Selector 2-9, Toll Saver
15 Remote Access ID 3digit
16 Remote Access Options
Messages : Play, Delete (selective
and all), Skip back, skip forwards;
General : Switch on/off, change
OGMs
17 Two Way Recording
Technical Characteristics
1 Last Number Redial Memory Length 32 Digits
2 Phonebook Name Length 12 characters
3 Memory Number Length 20 Digits
4 Handset Name Length 10 characters
5 Battery Type NiMH
11 of 83

1 Features of SunCorp GAP DECT
1.1 Purpose of this document
The purpose of this document is to describe the specifications and the MMI
products. It includes information about :
• Hardware and software features
• User interface description
• User settings
1.2 General features
General features
Phonebook of 50 entries
Search by name
10 last numbers redial
Different melody for internal and external calls
Automatic answering when taking the handset from the
base
Automatic phone off when placing the handset on
cradle
Mute key
Pre-dialling
Dialling mode changing during conversation
User friendly menu
Display length of conversation
Seventeen Languages
PIN code for set-up
Page function
Select earpiece volume (Total 5 step)
Select ringer volume (Total 5 steps)
5 different melodies
Out of range tone
Battery warning tone
Customisable name of each handset
Alarm Clock on the handset
5 Portable Parts per base
4 Fixed Parts per handset
*Caller ID Type I & II
*CLIP type I & II FSK (ETSI) & DTMF
Display caller name*
List of last 40 calls
Time stamped calls
Redial last outgoing number
Display caller number during conversation
Intercom
Free intercom between handsets
Transfer a call to another handset
Conference call between two handset and line
Option functions (Set by EEPROM)
Two direct access keys
Prefix dialling number
SMS
Stores 15 text messages
Answer Machine
User changeable Voice prompts
Up to 18 minutes recording time
7 Segment LED message indicator
Hardware option
Head set jack
Backlight LCD
Backlight key board
LED for Talk and incoming ring
*only if the function is supported by the network and type II is option
12 of 83

1.3 Handset description
1.3.1 Handset keypad
Some keys have more than one usage depending on the MMI state (standby, in call, menu mode).
The table hereafter gives all the possible actions for each key. In the following chapters, the reference
for one key will be indicated with the main action of the key. Sometimes the second (or third) meaning
will be indicated as follows: KEY_USE1/KEY_USE2.
Talk mode Menu mode
Key name Standby mode Incoming
call Incoming
SMS Msg Mode from
incoming
call
Outgoing
call Phonebook mode
KEY_MENU/OK
MENU Enter menu Confirm Confirm confirm confirm
KEY_LNR
Redial/Pause Enter Redial list
Redial (first
key in call)
Pause (after
first key)
Pause Pause Redial (first
key in call)
Pause (after
first key)
Pause
KEY_UP/CLIP
▲ Enter
CLIP list
Ringer
volume up
Choose Receiver
Volume Up
Receiver
Volume Up
choose choose
KEY_DOWN/CLI
P ▼
Enter
CLIP list
Ringer
volume down
Choose Receiver
Volume
Down
Receiver
Volume
Down
choose choose
KEY_MEM/EXIT
Enter
Phonebook
Enter
Phonebook
Enter
Phonebook
Enter
Phonebook
Exit Exit
KEY LEAR _C
X Exit Clear / Exit Toggle Mute Toggle Mute Clear / Exit Clear / Exit
KEY_HOOK
Go in TALK
mode
Go in TALK
mode
Standby
mode
Standby
mode
KEY_INT
Int Intercom Transfer the
call
Transfer the
call
KEY_R/
R POWER Power off
(hold)
Flash Flash
KEY_0
0 Pre-dial 0
Toggle HS
name and HH-
MM (Long
Press)
0 Dial 0 Dial 0 0
KEY_1
1 Pre-dial 1
(DDK1:Long)
1 Dial 1 Dial 1 1
KEY_2
2 Pre-dial 2
(DDK2:Long)
2 Dial 2 Dial 2 2
KEY_3
3 Pre-dial 3 3 Dial 3 Dial 3 3
KEY_4
4 Pre-dial 4 4 Dial 4 Dial 4 4
KEY_5
5 Pre-dial 5 5 Dial 5 Dial 5 5
KEY_6
6 Pre-dial 6 6 Dial 6 Dial 6 6
13 of 83

KEY_7
7 Pre-dial 7 7 Dial 7 Dial 7 7
KEY_8
8 Pre-dial 8 8 Dial 8 Dial 8 8
KEY_9
9 Pre-dial 9 9 Dial 9 Dial 9 9
KEY_STAR/LO
CK
*
Pre-dial *
Toggle key lock
(Hold)
Dial *
Go into
DTMF mode
from pulse
Dial *
Go into
DTMF mode
from pulse
*
KEY_HASH
# Pre-dial # Toggle to
display
additional
digits
Dial #
Go into
Conference
call
Dial #
Go into
Conference
call
#
Short press is less than 1 second
Long press is more than 1.5 second
Hold is press and hold more than 3 seconds
KEY_MEM will not be used for Exit or cancel in any mode, with the exception of Redial list, CID list
and when modifying a Phonebook entry, where the functionality will remain as described in DECT 20-1
specification. In these instances, KEY_MEM will remain as Exit. In all other cases, KEY_MEM is
assigned only to activating Phonebook.
KEY_CLEAR will be used as Exit for all modes, except where text entry is in progress or when
KEY_CLEAR is used to delete a Redial / CID item. During text entry, a long press of KEY_CLEAR will
clear all text displayed.
1.3.1.1 TIME Entry
The following rules will be applied for the user entering of Time.
• Time range is between 00 :00 – 23 :59.
• Only numeric values are permitted for entry, any other key press with emit an error beep
• The first digit will be enabled only for {0,1,2} other digits will be ignored and make and error
beep
• When the first digit is set to 2, pressing 0-3 on the second digit will advance the cursor.
Pressing 4-9 will not change the digit, and an error beep would be heard.
• When the second digit is greater than 3, pressing 0-1 on the first digit will advance the cursor
to the second digit. Pressing 2 will not change the first digit, and an error beep will be heard.
The user is expected to change the second digit before entering the first digit.
• The third digit will enable {0-5}, other digits will be ignored when pressed.
• The fourth digit will be enabled for {0-9}
• The user will not be able to enter a temporary illegal number.
• In addition, the user will be able to exit from time entry, by pressing <KEY_CLEAR>. In this
case, no changes will be made to the time entry, and the user will return to the menu one level
above.
1.3.1.2 Spanish key entry
First press Second press Third press Fourth press Fifth press
Space - 1
A B C 2
D E F 3
14 of 83

G H I 4
J K L 5
M N Ň O 6
P Q R S 7
T U V 8
W X Y Z 9
15 of 83
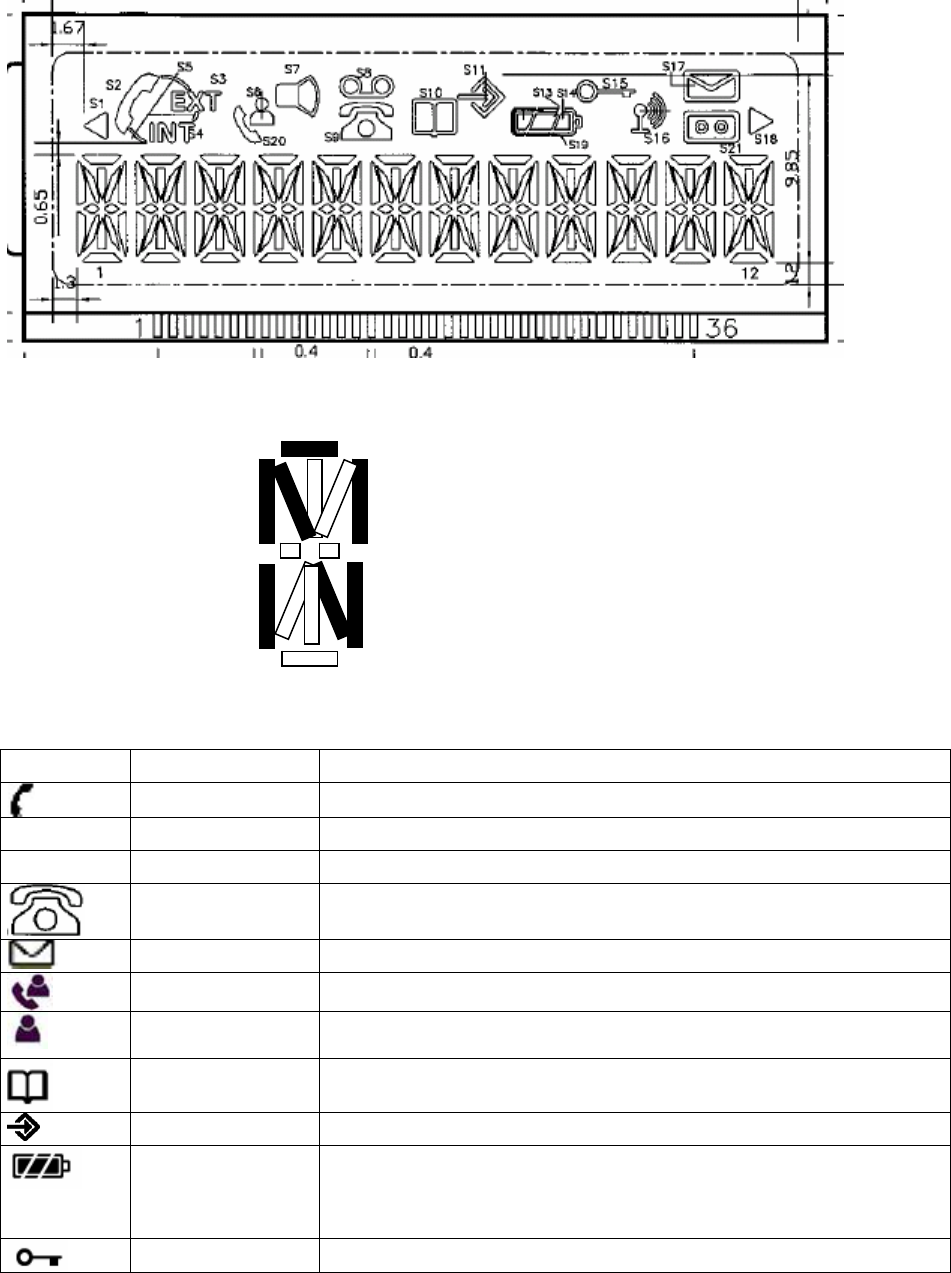
1.3.2 LCD display
The LCD display is composed of 12 characters in capital letter form (12 * 14 segments alphanumeric
chars) and 16 icons.
Spanish language as shown below.
The definition
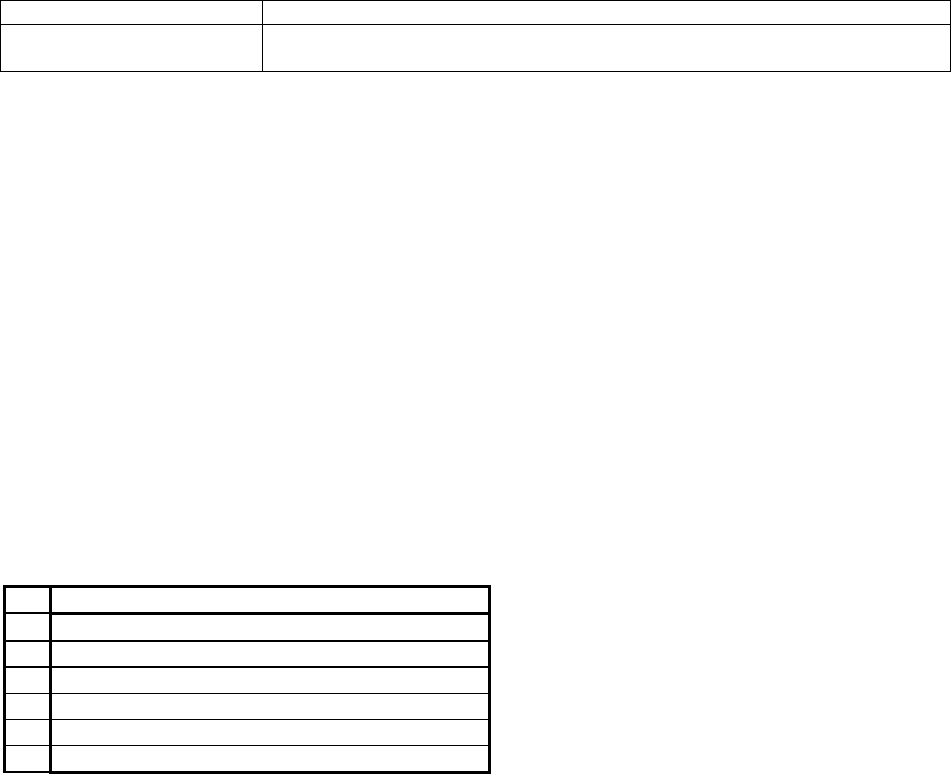
Icon NAME
new character will be supported for theA
of the icons is as follows:
Definition
HOOK_IND Off hook indicator
External call engaged
INT Internal call engaged
NEW_CLIP_IND le /new numbers in call listing Caller identification availab
NEW_SMS_IND Message waiting
CLIP_ANSWERED indicate answered call
CLIP_UNANSWER
ED indicate unanswered call
PHONEBOOK_IND honebook indicator P
MENU_IND Menu indicator
BATTERY 3 levels battery indicator
1 segment: weak, 2 segments: medium, 3 segments: full
The segments scroll during battery recharging and stop scrolling
when battery is full
LOCK_IND Handset keypad locked. When in SMS, indicates the private mailbox
EXT EXT
INT
16 of 83
ANTENNA Signal strength indicator.
The icon is steady when handset is locked to its base
The icon flashes when the handset is unlocked or not subscribed to
any base
W LEFT_ARROW Indicates that displayed number is longer than the screen (12 digits)
X RIGHT_ARROW Indicates that displayed number is longer than the screen (12 digits)
V
MWI_IND Voice Mail Waiting indicator
TAM_IND ine Local answering mach
display
the display shows the current time and the handset number (space and 1 digit). An
eter, HS lab e display of the ‘HS’ text. When the HS label parameter is
t will be displa n in Example 1, when the HS label parameter is not set, the
as shown in Example 2. The default will be to have the text displayed i.e. HS label
EX 2(_15 – 53____ 2_)
fter Talk OFF, the display shows the handset name and the communication duration alternately for 5
c
HANDSET )
and m cond)
tion LED state
1.3.3 Standby
In standby mode,
M paramEEPRO
set the ‘H
el, controls th
yed as showS’ tex
text will be removed
parameter set.
EX 1(_15 – 53_HS_ 2_)
A
se onds
EX 3(MY
(The “-“ between hour inute shall be flashing every se
1.3.4 LED
• Talk LED
Ac
Standby mode OFF
Subscription mode Flash
In call Flash
Incoming call Flash synchronized with PSTN ring pattern.
• Key backlight LED LED state Action
Standby mode OFF
Durin ming call Flash (0.25 s ON/OFF) g inco
Exte ll ON rnal ca
Exte ll on hold Flash (0.5 s ON/OFF) rnal ca
• LCD backlight LED
tion LED state Ac
Stan ey
es
OFF dby mode (No k
pr s)
17 of 83

Pres any key ON for 8 seconds after press last key s
Durin OFF g key lock
Incom ON ing call
1.3.5 Tones
Nr Name
1 Ring 1
2 Ring 2
3 Ring 3
4 Ring 4
5 Ring 5
6 TONE_CONFIRM
7
8
9 TONE_LOW_BATT
10 TONE_FREE
ONE_CALL_WAITING
11 T
12 TONE_BUSY
13 TONE_ERROR
4 TONE_IN_RANG
1E
15 TONE_WARNING
16 TONE_OFF_HOOK_WARNING
17 TONE_RING_BACK
18 TONE_ALARM_CLOCK
19 TONE_NEW_SMS
1.4 Base description
1.4.1 Page Key
Key action MMI action
Short press (<5 s) Send a page to handsets
Long Press (>=5s) Enters subscription mode (in use LED will flash)
1.4.2 LED
D Power/In use LE
Action LED state
Standby mode ON
Subscription mode Flash
In call Flash
Incoming call Flash synchronized with PSTN ring pattern
New SMS Flash slowly, 0.75s ON/OFF
New VMWI Flash slowly, 0.75s ON/OFF
The flash rate for “In call” and “Event” (“new SMS” & “new VMWI”) will each be controlled by a
parameter which defines the Flash rate of the Base LED.
7 Segment message indicator
Answer on with messages Number of the messages
18 of 83
Charge LED
Action LED state
Standby mode, Handset
charging in cradle
ON
Note, the Base LED will flash either when a new SMS message is received or when a new VMWI
essage is received, as described above.
The B h whilst there are unread SMS messages or any active VMWI
r S e unread messages can be removed either by reading the messages or by deleting the
s single message or by deleting all of the SMS messages.
r V the active messages will be removed by a VMWI OFF message, or by deleting an
iv MWI message, or by manual override and delete of all messages by the user via a long
es ers will be handled for VMWI, so a single VMWI OFF
ess ay only remove a specific VMWI message, with others remaining active, and the LED
nti ne exception condition is when a HS is registered to the BS, and either out of
nge or powered down. In this case, the VMWI OFF indication will not reach the HS, and the Base
ED will continue to blink until the HS returns to within range, and the Service centre sends a VMWI
OFF message. In this case, the user may over-ride the function, and turn off the Base LED, using a
long press of ‘5’. Flashing of the BASE LED on VMWI will be controlled via an EEPROM parameter,
default value will be ON.
1.4.3 Tones
The five base melodies are shown in the following table
Nr Name
m
ase LED will continue to flas
messages.
Fo MS, th
messa
Fo
ges, either a
MWI,
ind idual V
pr s of the ‘5’ key. Note that multiple serv
m age m
co nuing to Flash. O
ra
L
1 Ring 1
2 Ring 2
3 Ring 3
4 Ring 4
5 Ring 5
6 TONE_CONFIRM
19 of 83

2 Main User interface
2.1 Power up
Plug the power supply into the base. The in use LED will power on and TONE_CONFIRM.
Insert batteries in the handset. If battery level is enough (see Start up with low batteries chapter), the
handset will start.
The display will show “BASE 1” and antenna flashing, until it locks onto its subscribed base. If the
handset finds its base in the first 10 seconds, no beeps are played (see Range indication chapter).
Then the display shows the standby display.
2.2 Standby mode
In standby mode, the display shows the current time and the handset number, preceded by HS.
The ANTENNA icon is steady. The BATTERY icon indicates the charge level.
Handset:
Events Handset mode
Press KEY_HOOK Enter TALK mode
Press KEY_INT Enter intercom mode
Press KEY_MENU Enter MENU mode
Press KEY_MEM Enter phonebook mode
Press KEY_STAR/LOCK
(hold 3 second)
Enter KEY LOCK mode
Press KEY_LNR/PAUSE Enter redial list mode
Press KEY_DOWN/CLIP Enter CLIP mode
Press KEY_R/POWER
(hold 3 second)
Enter power down mode
Press 1,2,3……0,*,# Pre-dialling
Incoming call signal Incoming call mode
Another handset TALK Busy mode
Battery is low Battery low icon
Battery is too low Power down mode
On charging Charging mode
Long press for 1 or 2 Access direct pre-programmed
number
Base:
Events Base mode
Press PAGE KEY Enter PAGE mode
Long press PAGE KEY Enter SUBSCRIPTION mode
Incoming call signal Incoming call mode
2.3 TALK mode
Refer to External outgoing call
20 of 83

2.4 Intercom mode
Refer to intercom
2.5 Incoming call mode
Refer to incoming call
2.6 MENU mode
Refer to MENU settings
2.7 Phonebook mode
Refer to phonebook
2.8 Redial list mode
Refer to redial features
2.9 CLIP mode
Refer to Caller ID (CLIP) feature
2.10 Charging mode
Refer to Charging conditions
2.11 VoiceMail
An indication is given to the user when voicemail is waiting, called the VMWI (Voice Mail Waiting
Indication).
VWMI notifications/de-notifications can be received from multiple voicemail servers. Matching of VMWI
notifications/de-notification will be done using the number field.
On receipt of a VWMI ‘ON’ message
- The VMWI notifications will be stored in the CID list.
- Each entry will show the CID of the voice mail server, including the box number if
provided.
- The name of the voice mail server, as sent in the 'Name' field will also be stored in CID,
along with the Date/Time of the call. The Name field can receive up to 50 characters, but
the display will be truncated to 12 characters.
- Note that no additional VWMI will be added to the list, if the server number is already
existing on the list, but in this case the date and time will be updated on the existing entry
in the CID list. The name field will also be replaced. It may contain the number of new
messages for the user
- The icon will be flash.
- Note that the CID list will operate as a FIFO buffer. If the CID list is full, on receipt of a new
notification, it will replace the oldest non-VMWI item in the CID list.
- s the voicemail server, the user can press To acces whilst the VMWI is displayed in
the CID list.
n receipt of a VMWI ‘OFF’ message
- ch already exists in the CID list, then the
- If the item does not exist on the list, then the de-notification will be ignored.
O
If the de-notification matches an item whi
notification will be removed from the list.
21 of 83

- If no other notifications remain in the list, the icon will be removed
The user can manually turn off the display of the VMWI icon, by a long press of '5', whilst viewing CID
list. This will delete all VMWI items in CID list and turn off the icon in ALL HANDSETS
The user can manually remove VMWI notifications from the CID list using the delete function.
2.12 Incoming SMS Mode
Refer to Incoming SMS
2.13 Message Mode
Refer to SMS
2.14 Answer Machine Mode
Refer to Massage Play
Refer to TAM Settings
Refer to Answer machine features
2.15 Busy mode
When one Handset is TALK, another handset’s “EXT” icon, and TONE_BUSY in earpiece if press
KEY_HOOK
2.16 Power down
Make a long press on KEY_R/POWER, and the handset power down.
Press and hold KEY_R/POWER for 5 seconds to wake it up.
When the handset wakes up, the clock time data shall be transferred from base.
22 of 83

3 Call User interface
3.1 Incoming call
Display
The display shows "CALL" and EXT icon blinks (0.5 s ON/OFF), if caller ID information is available
(see 3.5), caller name or number is displayed.
Both the Talk indication LED and key backlight shall be flashed during ringing. (0.25 s ON/OFF)
And LCD backlight shall be turned on.
Handset and base ringer melody and level as MENU setting.
Note 2: It is possible to change ring volume during the incoming alert by using KEY_UP/CLIP and
KEY_DOWN/CLIP keys.
The ring volume will be displayed as “VOLUME n” (1<=n<=5) or “VOL OFF” during 8 s unless
KEY_HOOK is pressed.
Incoming alert phase:
The incoming call phase begins with the first ring (ALERT_ON) signal of the handset and stops:
• If the user take the call (see operation)
• If the call is not answered and the caller release its call or another parallel phone answers.
EXT icon and LEDs will stop flashing after FTXX_LINE_EXPIRY.
The Base ring alert is synchronized with the PSTN ring ON/OFF pattern.
RPAS disable:
If the first ring period is less than the RPAS length value which is define by EEPROM, the unit shall not
emit the ring alert sound. The default setting shall be defined by EEPROM setting.
Note: the function of RPAS setting menu will be enabled, if DECT 10 handset registers to the DECT
20 base.
3.1.1 To answer the call:
Press KEY_HOOK.
Simply lift the handset from the cradle.
HOOK_IND icon will be displayed.
Note 1: After it goes to talk mode automatically, KEY_HOOK will be disabled about 3 seconds to
prevent unwanted hang up.
Note 2: Once handset TALK on, another handset’s display “EXT” icon and can not TALK &
TONE_BUSY in earpiece if press KEY_HOOK
3.2 External outgoing call
3.2.1 Normal dialling:
• Press
KEY_HOOK
• Enter the called number
3.2.2 Pre-dialling:
Pre-dialling allows you to enter and modify a number before dialling.
• Dial your called number. Up to 32 digits (included pause, *,#)are allowed. If the number
exceeds 12 digits, the last 12 digits are displayed and LEFT_ARROW is ON, Press
KEY_CLEAR key to delete last digit.
• Press
KEY_HOOK, the digits are dialled, digit(s)
3.2.3 Dialling PAUSE
Press KEY_LNR (after first key) to make a pause, which is displayed as a "P".
23 of 83
The time is adjustable by FP EEPROM settings
3.2.4 Flash key
During a call, press shortly KEY_R to perform a Flash break and displayed as a “R”.
The flash time is adjustable by FP EEPROM settings
3.2.5 DTMF dialling
DTMF tone duration (pause before, tone length, pause after, high & low group level) is adjustable by
FP EEPROM settings
3.2.6 Pulse dialling
Pulse timing (make, break, pause after) is adjustable by FP EEPROM settings
Pulse dialling mode can be disabled by EEPROM settings.
(If disabled by setting, the dialling setting menu shall not be on the handset setting menu)
3.2.7 Temporary DTMF dialling
During a call or pre-dialling, when the selected dial mode is pulse and you want to dial DTMF codes,
During talk, long press KEY_STAR/LOCK to switch into DTMF dialling, only during this call.
During pre-dialling or number storage, long press KEY_STAR/LOCK is used to program the digits
after the KEY_STAR going temporarily to DTMF dialling. This will be displayed as a “d”.
3.2.8 Dial tone detection
During an external outgoing call, the dial tone detection is activated. When detected the digits which
have been dialled on the handset (pre-dialled or post dialled) are sent to the line.
If the dial tone is not detected, a time out expires and the digits are sent.
The time out is adjustable by FP EEPROM settings
No dial tone detection time out : selected by EEPROM data
with dial tone detection time out : selected by EEPROM data
3.2.9 Call timer display
After going off hook, the display is blank during 15 s unless you press a key. The communication
duration is displayed after 15 s after the last pressed key. This delay duration can be set as an
EEPROM parameters.
If you press a key (0 - 9) during the conversation, the communication duration is not reset to zero and
reappears after 15 seconds. At the end of each call, the duration of communication and the handset
name are displayed alternately for 5 seconds.
3.2.10 Mute
It is possible to mute the microphone during a conversation.
Press KEY_CLEAR/KEY_MUTE during the conversation, the microphone is then deactivated, the
external correspondent is put on hold; you can talk freely without being heard by the calling party.
“MUTE” is displayed.
No digit key or KEY_INT can be used during mute.
And Phonebook can be reviewed but can’t be dialled out during mute.
From Mute function, the following key functions are active
Press KEY_CLEAR/KEY_MUTE again to return to normal mode.
Press TALK_OFF to finish the conversation
If call is muted before CID is received, CID will be displayed in preference to “MUTE” for 7 seconds.
24 of 83
3.2.11 Changing Earpiece Volume during Call
It is possible to change earpiece volume during a call using KEY_UP/CLIP and KEY_DOWN/CLIP.
The earpiece volume will be displayed as “EARVOL n” (1<=n<=5) during 8 s unless a key digit
(KEY_0 to 9 + KEY_HASH + KEY_STAR) is pressed.
3.3 Incoming SMS
Incoming alert phase:
The incoming SMS indication will first check to see if message memory is available:
• If the message memory is full, then the SMS call is not taken.
o The SMS icon blinks (0.5 s ON/OFF)
o An error beep will be given
• If the message can be accepted
o If a SMS is directed to a particular sub-address, the SMS will only be displayed on the
HS associated with that sub-address, and shown as part of the “PERSONAL SMS”
mailbox for that handset, otherwise, it will be displayed on all HS, shown as the
“INBOX”.
o The display shows "x NEW MSG" and SMS icon appears.
o The number of new messages indicated to the user will be the total number of unread
messages available, both private, shown in “PERSONAL SMS” and public, shown as
“INBOX” and relevant to that HS.
o An audible message alert will be given if the user setting is enabled.
o The Base LED will flash.
o Note that all symbol characters require to be translated to ‘-‘ on incoming text
o Note that all characters require to be translated to upper case
If the new messages are ‘private’ only, the user will drop into the ‘PERSONAL SMS’ mailbox.
If the new messages are ‘public’ only, the user will drop into the ‘INBOX’ mailbox.
• If the new messages are both ‘private’ and public’ the user will be given the option of which
mailbox they wish to access, by presenting the option of selecting “PERSONAL SMS” and
scroll down to select “INBOX”
3.3.1 To read the message:
The senders number will be displayed
Press KEY_OK.
The message will be displayed
Scroll up and down to view complete message
Press
KEY_OK. To display further menu options
On incoming SMS meesage, support display of # & * characters.
3.4 Direct access memory
The product has two locations of direct access memory dial number, DDK1 and DDK2, as described in
section Error! Reference source not found.. The number is pre-programmed to the EEPROM and
user cannot change it. The maximum digits for each location are 16 digits and there is no name for this
direct access dial number.
3.4.1 How to access the direct memory dial number during idle
User press and hold the KEY_1 or KEY_2 for more than 1.5 second (Long press), then the unit
display pre-programmed number on the LCD and dial it out. KEY_1 for location number 1 and KEY_2
for location number 2.
3.4.2 During OFF HOOK
When the unit is on OFF HOOK mode, it is only allowed to access direct access memory number
when the first key in is long press for KEY_1 or KEY_2.
25 of 83
3.5 Redial feature
3.5.1 Redial list
Up to 10 last redial numbers (32 digits) are stored in the redial list (in PP EEPROM).
The last calls appear with their name if they are stored in the phonebook.
To retrieve the entries:
On the DECT 20-2 model, Press KEY_LNR
If the list is already empty, then “empty” is displayed
• Scroll through the calls with the up KEY_UP/CLIP and down KEY_DOWN/CLIP arrows.
The phonebook name is displayed if it exists. Otherwise it displays the first 12 digits of the
number.
• Press KEY_OK to toggle between name and number,
• Press KEY_MEM/EXIT return to standby mode
To dial out number just simple press KEY_HOOK.
3.5.2 Dial out redial after OFF HOOK
To recall the last redial entry, just take the line by KEY_HOOK and press KEY_LNR to dial.
3.5.3 Delete a redial buffer :
• Press KEY_CLEAR and “DELETE ?” appears.
• Press KEY_OK to make redial number deleted, or press KEY_MEM/EXIT to
cancel the delete operation.
To return to the previous menu, press KEY_MEM/EXIT
3.5.4 Delete all redial buffer :
• Long press KEY_CLEAR and “DELETE ALL?” appears.
• You can either press KEY_OK again and all redial are deleted, or press
KEY_MEM/EXIT to cancel the delete all operation.
To return to the previous menu, press KEY_MEM/EXIT
3.5.5 Store a Redial list into PHONEBOOK
• Press KEY_OK during display the redial number which you wish to store to the
phonebook. The display show “ADD ?”.
• After appearing the “ADD ?” And press KEY_OK to confirm. The display show
“NAME ?”.
• Enter the name.
• Press KEY_OK after modified name.
• Press KEY_OK after modified number.
• Select the melody of your choice (1 to 5) and validate
• Press KEY_OK to confirm.
3.6 Internal call transfer
When you wish to transfer an external call to another extension:
• During a call, press KEY_INT
• Select the number of the internal correspondent that you wish to call; the external caller is put
on hold.
• When the internal correspondent picks up, press KEY_HOOK to hang up and transfer the call.
26 of 83
If the internal correspondent does not pick-up, press KEY_INT again to reconnect to the external caller
on line.
3.7 Conference call between two handset and external caller
When you wish to talk an external call and other handset:
• During a call, press KEY_INT
• Select the number of the internal correspondent that you wish to call; the external caller is put
on hold.
• When the internal correspondent picks up, you can talk with internal correspondent first with
external call on hold.
• Press KEY_# to go to Conference call.
• When one of handset press KEY_HOOK or press KEY_INT. Then the conference call is
finished, but other handset still talk with external caller.
If the internal correspondent does not pick-up, press KEY_INT again to reconnect to the external caller
on line.
3.8 Caller ID (CLIP) features
3.8.1 General features
The phone supports CLIP DTMF and FSK type I and II. See 8.1 for more details.
3.8.2 Caller ID display
Note: Caller identification is only available if you have subscribed to this service with your network
operator.
The CID is decoding and display is subject to the following restrictions
1) We can receive max 50 name chars but display only first 12. CID with more than 50 name chars will not be decoded.
2) We can receive max 60 number digits but display only last 20. CID with more than 60
number digits will not be decoded.
3) We also have a max total length for CID data of 75 bytes, e.g. name length 40 and number
length 40 will not be decoded
During the incoming alert:
The CLIP information is displayed if they are provided.
Order of display:
• Phonebook name and calling number alternately if the number matches with the CLIP calling
number. Frequency of flash is 0.5 seconds NAME, 0.5 seconds NUMBER
• CLIP calling name and calling number alternately if the network is transmitted. However, if the
number is match with one of phonebook memorized number, it shall use phonebook
memorized name.
• “CALLBACK” and calling number alternately if a call is received as a response to “Recall on
Busy”. Note that Phonebook matching will not occur in this case.
• CLIP calling number
• Number matching method is as follows.
- If the one of number which CLIP or phonebook is less than 5 digits, it will not
compare. (If the one of phonebook number is 1234, this number will not use for
number matching)
- If the CLID received 10 digits and phonebook number is 8 digits, CLID last 8 digits will
use for the matching with that phonebook number. And if the CLID is 8 digits and
phonebook number is 10 digits, Phonebook number last 8 digits will use for the
matching with that CLID number.
27 of 83

A VMWI de-notification is never stored in the call list.
Incoming calls from or Outgoing calls to the SMS service centre will not be stored in the call list.
The following special network messages are managed and displayed at the place of calling number:
Message CLIP type Meanings
WITHHELD FSK type I & II The caller hides its identity
UNAVAILABLE FSK type I & II Network failure, the calling number can’t be transmitted
Special caller texts display format:
Display CLIP TYPE Caller texts from network
WITHHELD FSK type I & II PRIVATE
UNAVAILABLE FSK type I & II UNAVAILABLE
INT NATIONAL FSK type I & II INTERNATIONAL
OPERATOR FSK type I & II OPERATOR
PAYPHONE FSK type I & II PAYPHONE
RINGBACK FSK type I & II RINGBACK
CID icon behavior:
On an Incoming call with CID, the EXT and CID icon will flash. As soon as the call is answered, the
CID icon will turn off. The CID icon should not be displayed once the call is in progress, except in the
case of call waiting, when the CID icon will flash. If there are missed calls remaining unread in the CID
list, the CID icon will flash again after the call is completed.
Note that the CID icon is used to indicated missed calls only to the user.
There are a number of additional features implemented for CID to handle network operator variants as
detailed below
• Handling for space and dash characters, according to BT specification.
o All non-alphabetic characters are stripped out, with the exception of *, and # before
storing in the CID database.
o For the purpose of Phonebook matching, *, # and P characters can be excluded on an
individual basis during the matching process. The use of each of these characters in
matching is controlled by individual EEPROM bit. Default values for each character is
that they are included in the matching algorithm
• Updating CID records with date/time on DTMF networks.
• CID for Telia, Sweden
• CID for Tele Danmark
• CID for Finland
• CID for Norway
• CID for New Zealand
• KPN Reverse Polarity
A number of new EEPROM parameters are provided to support multi-country CID, as described below
Parameter Description Default value
CidDtmfDecodeFirstPart Decode the first or last part of DTMF CID.
Example: A1234D5678C -> can be displayed as
1234 or 5678. If 1, then first part is decoded.
0
CidDtmfRejectInvalid If set to 0, then all CID DTMF will be accepted and
passed to HS. If set to 1, then an illegal DTMF CID
will be rejected (without end code or timeout)
0
28 of 83
DTMF max delay The maximum delay allowed between DTMF tones
in a DTMF CID in multiples of 100ms (Inter-digit
delay)
10 (1 second)
CidDtmfIgnoreD3 If set to 1, then CID of type D3# will be ignored. 0
CidDtmfPrefixZeros If set to 1, then CID with length 8 or 9 will be
prefixed with 0 and length 10 or more will be
prefixed with 00
0
CidDtmfVmwiNumberMatch If set to 1, then each CID is compared to a pre-
defined VMWI center number
0
DTMF VMWI Match Size Number of digits in CID DTMF VMWI matching
number. Maximum value is 12.
0
DTMF VMWI Match Digits Digits 0 to 11 of CID DTMF VMWI matching
number.
0
Special caller texts display format:
Display CLIP TYPE Caller texts from network
WITHHELD Holland DTMF D0000000000C (SECRET)
3.8.3 Recall CLIP list
Unanswered and answered calls are stored in the CLIP list of each handset independently (in
EEPROM).
Note: any new CLIP call will be stored in EEPROM .
Size storage
Each entry will store:
¾ The call number (20 digits)
¾ The caller name (12 digits) if the network send it
¾ The date and hour of the call
Storage sequence
The CLIP information that has been received during incoming alert phase (calling number, name
date/hour) is stored then displayed.
I
f the new call entries, The icon will flash (480ms ON/OFF) and will off after all new call is read.
Note: The new message indication is reset at power up, so the icon is always off after a reset.
MMI operation
To retrieve the entries:
1. Press KEY_ UP/CLIP or KEY_ DOWN/CLIP to enter the call list. The icon will stay ON
for Unanswered Calls and the icon will stay ON for Answered Calls. If the list is already
/CLIP and down KEY_DOWN/CLIP arrows.
3. You w
viewed. The
empty, then “EMPTY” is displayed
2. Scroll through the calls using the up KEY_UP
ill find the different fields of the entry:
If the call is unanswered and un and icon will stay ON. The
will be turned off after it is viewed.
If a matched number found in phonebook memory , the corresponding name will be
shown otherwise if the caller name is available, the caller name will be displayed. If
both are not available, the caller number is displayed first.
29 of 83

Press KEY_OK, the first 12 digits of caller number is displayed , press KEY_OK aga
to check the remaining digits ( if more than 12 digits )
Press KEY_OK The date a
in
4. nd hour is displayed if any. The date will be displayed either as
et
. When the CLIP found no matched number in Phone Book and Calling Number is present,
KEY_DOWN/CLIP . Error tone will be
o return to the previous menu, press KEY_MEM/EXIT.
To dial out number just simple press KEY_HOOK
3.8.4 Delete one
•
• There you can either press KEY_OK and CLIP deleted, or presses
EM/EXIT to cancel the delete operation.
3.8.5 Delete a
• ars.
There you can either press KEY_OK and all CLID are deleted, or press
ll operation.
_MEM/EXIT
3.8.6 Store a
• )
• KEY_DOWN/CLIP to move the cursor for edit or delete
hall display “NAME ?”. And
d number.
• Select the melody of your choice (1 to 5) and validate
• Press KEY_OK to confirm.
To recall the number from CLIP list , pressing KEY_HOOK will dial out the number .
he phonebook contains up to 50 names of 12 characters max. and numbers of 20 digits. Phonebook
stored in PP EEPROM. One handset phonebook is independent from other locked handsets.
To call a corresp
•
DD-MM or MM-DD, depending upon the Date Format EEPROM parameter, which can be s
on an individual HS basis.
5
when press KEY_OK again , CLIP data can be stored into phone book ( see 3.5.6 )
To select another call list, simply press KEY_UP/CLIP or
sounded if reach the top or bottom of the list.
T
CLIP list
Press KEY_CLEAR and “DELETE ?” appears.
KEY_M
ll C IP list
Long press KEY_CLEAR and “DELETE ALL?” appe
•
L
KEY_MEM/EXIT to cancel the delete a
To return to the previous menu, press KEY
CLIP list into PHONEBOOK
After appearing the “ADD ?” and press KEY_OK to confirm ( after 3.6.3 step 5
Press KEY_UP/CLIP or
name. If the CLIP data does not have name, LCD s
then enter the name.
• Press KEY_OK after modified or enter the name.
• Press KEY_OK after modifie
3.8.7 Dial out CLIP list
3.9 Phonebook
T
is
3.9.1 Dial a number of the phonebook list
ondent whose name you have saved in the phonebook:
Press KEY_MEM/EXIT to enter the phonebook. The will be ON.
Press the first letter of the name; the first name that starts with this letter in the
alphabet appears. For instance to find names begi
•
nning by A, press once on
KEY_2, to find names beginning by B, press twice on KEY_2, to find names
beginning by C, press three times on KEY_2
30 of 83

• Go through the list of names with the KEY_UP/CLIP and KEY_DOWN
keys the list scrolls up/down in an alphabetical order.
Press KEY_MENU/OK to d
/CLIP
• isplay the number and user can press the
called phone book
ber is more than 12.
• Press
KEY_HOOK to dial the number of the correspondent whose name is
displayed.
3.9.2 Dial a nu
•
KEY_MENU/OK again to display remaining digits if the re
num
• Press KEY_MEM/EXIT returns to standby mode
OR
m er of the phonebook list during Talk.
Press KEY_MEM/EXIT to enter the phonebook. The will be ON.
Press the first letter of the name; the f
b
• irst name that starts with this letter in th
alphabet appears. For instance to find names beginning by A, press once on
to find names beginning by B, press twice on
e
s
•
KEY_2, KEY_2, to find name
beginning by C, press three times on KEY_2
Go through the list of names with the KEY_UP/CLIP and KEY_DOWN/CLIP
keys the list scrolls up/down in an alphabetical order.
• Press KEY_MENU/OK to display the number and user can press the
K
p
EY_MENU/OK again to start dialling or display remaining digits if the recalled
hone book number is more than 12.
• Press KEY_MENU/OK again to start dialling and return to normal Talk mode.
• Press KEY_MEM/EXIT without dialling, then returns to normal Talk mode
3.1
3.10
set (1 to 5)
0 Intercom
.1 Internal call
• Press KEY_INT
Enter the number of the internal hand•
The and “INT” icons displayed, the number of the internal handset display “INT” with call
handset number and rings (INT MEL
er
).
y mode if the number of the internal handset is not
ava
3.10.2 End of intercom call
ed then go to ring in mode. OK go to INTERCOM mode
Remark: the caller handset go to standb
ilable or caller handset
Incoming call appli
The number of the internal handset press KEY_HO
3.10.3 Intercom mode
The and “INT” icons displayed on both handsets.
3.10.4 End of intercom
ercom) press KEY_HOOK, go to standby mode
Incoming call applied then go to ring in mode.
Any handset (int
3.11 Page button
ress Page button on the base. P
31 of 83

The handsets will ring RING_1 at volume of Handset internal ring level setting and display INT with
“□□□□”during 30s unless page key is pressed again on the base or a key is pressed on any locked
set to key lock, user can be stop the paging by pressing any key)
3.12 Battery t
3.12.1 Battery indicator
5 levels indicato
handset. (When the handset
and charge managemen
rs icon for mean battery voltage:
> = EEP_BAT_FULL_LEVEL
> = EEP_BAT_HALF3_LEVEL
> = EEP_BAT_HALF2_LEVEL,
Blin BAT_ALARM_LEVEL
.12.2 Low battery conditions
• If mean battery level is less than EEP_BAT_HALF1_LEVEL,
option is ON
be emitted every minute.
In any state (standby or call), If mean battery level is less than EEP_BAT_ALARM_LEVEL, handset
will ente
.12.3 Charge conditions
• If battery warning tone option is ON
ut on its charger (debounce time: 200 ms)
will be played.
king > = EEP_
3
If the following conditions are applied:
During a call,
• If battery warning tone
then a TONE_LOW_BATT will
r in power down mode.
3
If the following conditions are applied:
• In standby mode,
• The handset is p
then a TONE_CONFIRM
Charging icon:
Scroll for display handset is charging, fast scroll when quick charging mode,
If the battery voltage below EEP_BAT_HALF2_LEVEL, the charging mode is always quick charge
limit which defined by EEPROM setting
ries
ode
3.12.4 Quick charge
mode first until the following condition detect.
• If detect negative ∆V then stop quick charge
• If reach to time
3.12.5 Start-up with low batte
If battery level at start-up is lower than EEP_BAT_HALF2_LEVEL, the handset will stay in sleep m
(no LCD, no RF, no MMI working). You need to put the handset into charge until battery level reaches
EEP_HALF2_LEVEL.
32 of 83
3.13 Range indication
When the handset is out of r
access the functions, the us
ange of the Base, certain functions will not be available. On trying to
er will be presented with an error beep. Where a function is not available,
is described in the individual menu section.
Not option has been
ena d erence source not found..
s are applied:
s been out of range since EEP_RANGE_OUT_DELAY s
•
a TONE_WARNING has been played, a TONE_IN_RANGE is played when the handset goes into
GE only if it goes into range after more than 10
ing a call
all is released (on both handset and base).
tion
.14.1 During idle
llow the handset internal ring level. However, if the setting is “OFF” the alarm
o to talk mode.
do not press any key for more than one minute, the alarm shall stop automatically.
.14.2 During Talk
The sound level shall be same as Battery Low warning tone. During generating the alarm sound, press
any key to stop the alarm without any operation.
it
e for all descriptions below, the TONE_WARNING will only be sounded is the
ble , as described in section Error! Ref
3.13.1 Out of range tone
If the following condition
• The handset ha
If range warning tone option is ON
then a TONE_WARNING will be played.
EEP_RANGE_OUT_DELAY : selected by EEPROM data
3.13.2 In range tone
If
range the next time.
Note: at start-up, the handset plays the TONE_IN_RAN
s.
3.13.3 Range limit tone dur
During a call, in range limit conditions, the handset will play a TONE_WARNING in the Buzzer
The tone is repeated until range conditions are good
If the handset goes out of range, the c
3.14 Alarm activa
When the unit is set to alarm ON and the clock reach to the alarm setting time, the handset shall
generate the alarm sound and display “ALARM ON” on LCD. Once the clock is reach to alarm setting
time, the alarm setting shall be OFF.
3
The sound level shall fo
sound level shall be “LEVEL 1”. During generating the alarm sound, press any key to stop the alarm
without any operation even the handset is “Key Lock” mode. For example, press “KEY_HOOK” to
stop the alarm, however, the handset should not g
If
3
33 of 83
3.14.3 During ringing or paging
ll not active during paging or ringing.
The alarm sound sha
34 of 83

4 MENU Settings
selections scr
KEY_MENU/O l in a loop (you r
rn to the last). To val
IT.
e a selection, p
backward) message
number)
(P
ke
ress “3” or “6”
y to skip essage from
ge
mber)
forward)
(P
m
lay next
messa
nu
(Press Clr ke
m
ALL MSG:XX SG 1,2 ---- #2 ress “1” or “4”
key to skip
backward)
lay previous
message from
message
mber)
M (P (P
nu
(Press “3” or “6”
key to skip
rward)
age from
essage
fo
(Play next
mess
m
number)
(“Mes
th
play next
message)
NUM MELO
Menu structure
A wide range of phone settings are accessible through a user friendly menu.
• To enter the menu, press KEY_MENU/OK
• Scroll through the selections using the KEY_UP/CLIP and KEY_DOWN/CLIP keys, the
ol etu the first after idat ress
K
• To return to the previous menu, press KEY_MEM/EX
• To escape a menu and return to standby mode, press and hold KEY_MEM/EXIT
• After 15 s without pressing any key, the handset returns in standby mode
MSG PLAY NEW MSG:XX MSG 1,2, ----
#1
(Press “1” or “4”
key to skip
(Play previous
message from
y
to delete)
(“Message
deleted” and
then start to
play next
essage)
(Press Clr key
to delete)
sage
deleted” and
en start to
PHONEBOOK ADD ENTRY NAME ? BER ? DY 1 … 5
35 of 83

MODIFY ELODY 1 ... 5
ENTRY
M
TAM SETTING S ON/OFF turn to idle
ep
urn ON the AN ON Re
with S_be
(T
TAM Icon)
OFF rn OFF the
M Icon)
Return to idle
with S_beep
(Tu
TA
### S MODE ANS & REC AN Return to idle
with S_beep
ANS ONLY Return to idle
with S_beep
ANS & REC
### - #4
- #4
REC OGM ANS & REC
### ---#5
--
DEL OGM ### ) --ANS & REC
###
(Delete OGM
--#6
DELETE
ENTRY
CONFIRM ?
MEMO REC (RECORDING)
----#3
OGM SETTING PLAY OGM (Play OGM) ----
ANS ONLY ### (Play OGM) ----
(Record OGM)-
ANS ONLY ### (Record OGM)-
-#5
ANS ONLY ### (Delete OGM) --
--#6
36 of 83

THURSDAY
FRIDAY
SATURDAY
SUND
ANS DELAY
with S
3 idle
with S_beep
Return to
4 Return to idle
with S_beep
5 Return to idle
ep with S_be
6 idle
th S_beep
Return to
wi
7 Return to idle
with S_beep
8 Return to idle
with S_beep
9 dle
th S_beep
Return to i
wi
TS Return to idle
th S_beep wi
SEC CODE _X_X
=Current
ode)
nter the new
de)
X
(X
c
(E
co
SMS BOX UMBER? IN READ REPLY N
DELETE
FORWARD MBER? NU
### DAY SETTING MONDAY
TUESDAY
WEDNESDAY
AY
2 Return to idle
_beep
37 of 83

DETAILS
PERSO
SMS
NAL PLY MBER? READ RE NU
DELETE
FORWARD MBER? NU
DETAILS
WRITE NUMBER?
DELETE ALL INBOX
PERSONAL
SMS
SMS
TTINGS
RT N
SE
MSG ALE O
OFF
SEND
SERVICE
SEND 1
SEND 2
RCV CENTRE CEIVE 1 MBER? RE NU
RECEIVE 2 MBER? NU
SEND CENTRE ND 1 MBER? SE NU
SEND 2 MBER? NU
TERMINAL NO
SETUP E BASE VOLUM VOLUME OFF
VOLUME 1 ... 5
BASE MELODY ELODY 1 … 5 M
DEL HANDSET ? NDSET ? PIN HA
PIN CODE PIN ? W PIN NE
RETYPE
DIAL MODE TONE DIAL
PULSE DIAL
RECALL RECALL1
RECALL2
PIN ? DEFAULT CONFIRM ?
++RCID ON / OFF ON
OFF
NUM LENGTH 7
6
5
RING DELAY 0 … 9
ECO ON MODE
OFF
HAND TSE BEEP KEYTONE ON
OFF
LOW BATTERY ON
OFF
OUT RANGE ON
OFF
INT RING VOL VOLUME OFF
VOLUME 1 … 5
38 of 83

EXT RING VOL VOLUME OFF
INT MELODY MELODY 1 … 5
EX ELODY MELODY 1 … 5 T M
OFF AUTO
ANSWER
ON
NAME
LANGUAGE ENGLISH
FRANCAIS
ESPANOL
ITALIANO
DEUTSCH
NEDERLANDS
PORTUGUES
DANSK
SUOMI
SVENSKA
NORGE
ΕΛΛΗΝΙΚΑ
РУССКИЙ
POLSKI
ČESKY
SLOVENCINA
MAGYAR
HOT
KEYS HOT KEY 1… 2 NUMBER?
KEY LOCK ?
E - TIME DATE SET
CLOCK SET
ALA
DAT
RM SET ON
OFF
REGISTER SELECT BASE *+BASE 1 2 3
4
NEW BASE X
AUTO
REG BASE +BASE 1 2 3 SEARCHING X PIN ?
4
Note * O number will be shown.
otes : + Registered Base Number will blinking
tart to play with following order.
essages, if no message, then “You
2. “Message 1”
5. Start to play message
,
e
to
nt down, after finish count down, then go to idle with
S_beep.
s : nly registered base
N
Notes : ###: Those menus will not be appeared when the EEPROM setting is “No Voice prompt”
# 1: After press KEY_Menu/OK, then the unit s
1. “You have XX new messages”. (XX=number of m
have no messages”)
3. Day announcement
4. Time announcement
6. During playing message, the LCD shall indicate “MSG X” (X=message number)
7. After finish all message play back, then “End of message”, “To delete all messages
press delete”
8. There will be 8 seconds waiting period for message deletion. And LCD shall indicat
from 8 to 0 count down by one second step.
9. If press KEY_Clr, the unit shall announce “All messages deleted” and then return
idle.
10. If no operation during cou
39 of 83
# 2: After press KEY_Menu/OK, then the unit start to play with following order.
11. “You have XX messages”. (XX=number of messages, if no message, then “You have
no messages”)
12. “Message 1”
13. Day announcement
14. Time announcement
15. Start to play message
umber)
r finish all message play back, then “End of message”, “To delete all messages,
press delete”
ate
ond step.
19. If press KEY_Clr, the unit shall announce “All messages deleted” and then return to
idle.
ation during count down, after finish count down, then go to idle with
KEY_Menu/OK, then the unit announce “Please speak after the tone, to end
ss #”. During recoding, the LCD shall flash “RECORDING”. After press #, the
unit shall return to idle.
there is no user recorded outgoing message, the default
unit shall return to idle with S_beep.
ase speak after the tone, to end
re rd ing, the LCD shall flash “RECORDING”. After press #, the
un sh oing message. After play back, the unit shall return to
id i
g message shall be deleted. And start to
age. If there is no recorded outgoing message, it will not delete
are two sub menu for
• New messages play
u shall b s pla ess KEY chang
es play”. The LCD display shall be as follows.
• NEW MSG: XX (XX=Total numbe new messages)
• ALL MSG: XX (XX= Total numbe essages)
lect menu and pres EY_Menu/OK to start playback the messages. During messa ying, the
D shall indicate the current playback mes mber such as SG 1, MSG 2 ---.
ring message play, it is possible to skip forward or skip backwa by pressing KEY_1/3/4/6.
current message will be replay if pressing KEY_1 or KEY_4 d ng message play. If pressing
_1 or KEY_4 twice within one second, play will skip back to the start of previous me age during
essage play. Pressing KEY_3 or KEY_6 to skip to next message playing. The messages will be
KEY_Clr during playing message. Confirmation that the message has been
d it announcing, "Message deleted" and skipping forward to play the next
messag sequence. Messages are marked for deletion at this stage but are
only t
16. During playing message, the LCD shall indicate “MSG X” (X=message n
17. Afte
18. There will be 8 seconds waiting period for message deletion. And LCD shall indic
from 8 to 0 count down by one sec
20. If no oper
S_beep.
# 3: After press
recording pre
# 4: Play the outgoing message. If
message shall be played. After play back, the
# 5: fte /OK, then the unit announce “Ple A r press KEY_Menu
co ing press #”. During recod
rded outgit all play back the reco
le w th S_beep.
/OK, the recorded outgoin# 6: After press KEY_Menu
play default outgoing mess
the message and just play the default outgoing message. After play, the unit shall return to
idle with S_beep.
4.1 MESSAGE PLAY
Select “MSG PLAY” from the main menu and press KEY_Menu/OK. There
essage play. m
• All messages play
t menThe firs
messag
e “New message y” and then pr _UP/DOWN to e to “All
r of
r of m
Se s Kge pla
LC sage nu M
Du rd
The
EY uri
ssK
m
selectively deleted if press
delete will be by the un
e, or to the end of message
ac ually deleted after return to idle.
40 of 83

At e EY_Clr within 8 seconds of the
end t ress delete”. If press KEY_Clr at this
stage, “All messages deleted” shall be announced and all the messages just played shall be deleted
messages have been played). If no instruction is received within
ep. During above count down period, it is preferable to
have a indicatio D
During playing m el by pressing
KEY_UP/DOW
During playing m pressing KEY_Menu/OK. All
deletion marked
4.2 PHONE
• Select "PHONEBOOK"
S RY"
•E me and validate.
•E lephone number and validate
•It r the following data for number entering.
KEY_0
AR and KEY_#
NR (Pause)
- KEY_R (Recall, Flash)
date
• Press KEY_OK to confirm.
write text as well as figures. This is useful for entering a name into the
ect
s B, press 2 twice and so on. To select A and then B consecutively,
sele 1 oves on to the next character, then select a B.
o se ect an
Fifth press
nd of the message play, all messages may be deleted if press K
of he prompt “End of messages. To delete all messages, p
(new messages only when only new
8 seconds the u snit hall return to idle with S_be
n “ EL ALL ?” and “8->0” on the display.
essages, it is possible to adjust the play back sound lev
N.
es is possible to exit and return to idle by
messages shall be deleted.
sages, it
BOOK
4.2.1 Add a name
• elect "ADD ENT
a nter the new n
nter the new te
is possible to ente
- KET_1 to
- KEY_ST
- KEY_L
• Select the melody of your choice (1 to 5) and vali
With your telephone you can
address book, giving a name to a handset, …
To select a letter, press the corresponding key as many times as is necessary. For example to sel
an 1, pre s 2 once, to select a
ct a , wait until the cursor m
l empty space, press 1. T
To select a dash, press 1 twice
During text entry, a long press of KEY_CLEAR will clear all text displayed.
The keypad characters are as follows: ess First press Second press Third press Fourth pr
Space - 1
A B C 2
D E F 3
G H I 4
J K L 5
M N O 6
P Q R S 7
T U V 8
W X Y Z 9
4.2.2 Delete a name
• Select "DELETE ENTRY"
• Move through the list of names using the KEY_UP/CLIP and KEY_DOWN/CLIP keys the list
scrolls down in alphabetical order.
41 of 83
• Press KEY_OK when you find the name you wish to delete
• "CONFIRM ?" appears, press KEY_OK to confirm.
• Select "MODIFY ENTRY"
hrough the list of names with the KEY_UP/CLIP and KEY_DOWN/CLIP
he list scrolls down in alphabetical order.
ursor for edit or delete
(1 to 5) and validate
• Press KEY_OK to confirm.
4.3
Sele
men
• ANS ON/OFF
• MEMO REC
• OGM SETTING
• ANS DELAY
Select “ANS ON/OFF” from the menu and press KEY_Menu/OK. There are two items under this
he LCD display shall be “ON” and “OFF”. (The current setting shall be first and then change to other
select “ON” and then press KEY_Menu/OK, the unit will answer the call.
If se ct “
(Please see the “Call answering and message recording” section)
After s e unit shall return to idle with S_beep.
4.3. A
The unit
answer o
Select “A
The CD
change t
If select “
“Answer
4.2.3 Modify a name or number
• Move t
keys. T
• Press KEY_OK when you find the name to modify
• Press KEY_UP/CLIP or KEY_DOWN/CLIP to move the c
name.
• Press KEY_OK after modified name.
• Press KEY_CLEAR to delete number.
umber. • Press KEY_OK after modified n
• Select the melody of your choice
TAM SETTING
ct “TAM SETTING” from the main menu and press KEY_Menu/OK. There are the following sub
us.
• ANS MODE
• DAY SETTING
• SEC CODE
And then select the menu by pressing KEY_UP/DOWN.
4.3.1 Answer ON/OFF
menu.
• Answer ON setting
• Answer OFF setting
T
by pressing KEY_UP/DOWN)
If
le OFF” and then press KEY_Menu/OK, the unit will not answer the call.
elected by KEY_Menu/OK, th
2 nswer mode
has two-operation mode for answering the call. One is answer and record mode and other is
nly mode.
NS MODE” from the menu and press KEY_Menu/OK. There are two items under this menu.
Answer and record •
• Answer only
L display shall be “ANS & REC” and “ANS ONLY”. (The current setting shall be first and then
o other by pressing KEY_UP/DOWN)
Answer and record” and then KEY_Menu/OK, the unit will be answer and record mode and
and Record” OGM will be selected.
42 of 83
If se ct “
OGM wil
After selected by KEY_Menu/OK, the unit shall return to idle with S_beep.
4.3. R
A user. The memo shall
be recorded through the handset microphone.
• After press KEY_Menu/OK, then the unit announce “Please speak after the tone, to end
recording press #”. Then start to record a memo.
• Press KEY_# or KEY_CLEAR to end recording.
T apacity and this shall only occupy the memory
spa
ri
res
em e procedure for incoming message play.
.3.4 utgoing message
The pro
A&R Hello, your call cannot be taken at the moment so please leave your message after the tone.
ot be taken at the moment and you cannot leave a message, so please call
Under the “O .
• Pla
• Re
• De
ressing KEY_Menu/OK will cause the handset to show the currently selected OGM for
recording/checking and deleting (Answer and record or Answer only).
nd Record” or “Answer Only” by using “Answer mode” setting.
Recor
• u (Answer and Record or Answer Only),
pre
eco ng beep.
Onc arted, the previous user OGM cannot be retrieved.
• During recording, the LCD shall flash “RECORDING”.
until KEY_# or KEY_CLEAR is pressed, the maximum OGM length is
reached, or the memory capacity is full. The unit terminates recording with a long beep. If an
d progress the call as normal. Any OGM already
le Answer only” and then KEY_Menu/OK, the unit will be answer only mode and “Answer only”
l be selected.
3 ecord Memo
personal memo may be recorded and left as a message for another
• Select "Record Memo" from menu and then press KEY_Menu/OK.
• After press #, the unit shall return to idle.
he memo may be any length up to memory c
ce needed for the recording.
Du ng recording, the LCD shall flash “RECORDING” and recording continues until the # button is
p sed or the maximum message length is reached.
os are played back using thM
4 O
duct shall be supplied with two pre-recorded announcements.
AO Hello, your call cann
later
GM SETTING” menu, there are following menus
y outgoing message (PLAY OGM)
cord outgoing message (REC OGM)
lete outgoing message (DEL OGM)
P
• Select “Answer A
d Outgoing message
Under the selected Record outgoing message men
ssing KEY_Menu/OK causing the unit announces, “Please speak after the tone. To end
r rding, press #”. The user is then informed that recording can commence by a lo
e recording has st
• Recording continues
incoming call is received during recording, the recording will be interrupted: the product will
present the incoming call screens an
recorded will be retained.
43 of 83
•At the end of recording, the unit shall play recorded outgoing massage through the handset
receiver for checking.
The outgoing message may be checked by
ay outgoing message menu (Answer and Record or Answer Only),
•
hecking an OGM does NOT select it as the current OGM to be played to line
menu (Answer and Record or Answer Only),
pressing KEY_Menu/OK causing the unit to delete recorded outgoing message and play the
• Press KEY_Menu/OK can be used to stop the outgoing message play.
M menu.
(if being
tone will be heard, then start to play default outgoing message.
4.3.5 D
•
The han ys the g.
• Select the desired day by pres or KEY_DOWN then press KEY_Menu/OK.
.6 Answer Dela
• Select "Answer Delay" from TAM Settings menu the ress KEY_Menu/OK.
• The han t LCD displays the rrent setting.
• Select the desired answer delay by press KEY_UP or KEY_DOWN then press
KEY_Menu/OK.
4.3.7 S
A cu
only
Tia
th idle.
• Under the selected Pl
pressing KEY_Menu/OK causing the unit to play outgoing massage.
Press KEY_Menu/OK can be used to stop the outgoing message play.
Note that recording/c
when the answering machine takes a call. (See Answer mode setting).
The outgoing message may be deleted by
• Under the selected Delete outgoing message
default outgoing massage.
It can be deleted the outgoing message during playing the OGM under PLAY OG
During playing OGM, press KEY_CLEAR, The outgoing message play will stop
playing) and a beep
ay Setting
Select "Day Setting" from TAM Settings menu.
• dset LCD displa current settin
s KEY_UP
4.3 y
n p
dse cu
ecurity Code (PIN)
stomer programmable 3 digit PIN protects entry to the remote interrogation feature. It can
be changed via the handset menu.
he product shall be supplied with a factory set PIN of 000. The code can only be changed v
e handset menu when the unit is
44 of 83

• S ct "Security Code" from TAM settings menu and press KEY_Menu/OK to confirm will
curity code.
• The e ew code or press KEY_Menu/OK to confirm the current setting.
4.3.8 C
When the unit have a call, and the answering machine has answered the call, the handset shall
indicate “SC e line. Then user can press KEY_Menu/OK to screen the
call. If user n
During screenin by
pressing KEY_C
During screenin
return to idle
When the user sto
Any valid message already recorded shall be retained.
ng the handset from the base does not take the line
dire ly, en if the
4.4 S S
SMS functions will n
• Select “SM
• y
mes as is wice
n
r tw
First pr
ele
cause the handset to show the currently selected se
us r can then enter a n
all Screening
REEN?” after TAN takes th
wa ts to take a call, just press KEY_TALK.
g the call, user can take a call by pressing KEY_TALK or stop screening
lr.
g the call, the handset shall display “SCREEN” on that handset and other handset
screen with “EXT” icon on.
p screening the call, all handset display “SCREEN?” again.
Rem rk: Once the TAM takes the line, simply liftia
ct ev auto answer set to ON.
M
ot be available when the handset is either out of range or unregistered.
S”
For all text entry or modification, to select a letter, press the corresponding key as man
2 tti necessary. For example to select a A, press 2 once, to select a B, press
a d so on. To select A and then B consecutively, select a 1, wait until the cursor moves on to
the next character, then select a B. To select an empty space, press 1. To select a dash,
p ess 1 ice. The keypad characters are as follows:
es Second press Third press Fourth press Fifth press
s
0
Space - 1
B C 2 A
D 3 E F
G H I 4
J K L 5
M N O 6
P Q R S 7
T U V 8
W X Y Z 9
#
*
T through the message text, the KEY_UP/CLIPo move and KEY_DOWN/CLIP keys will
ove the r delete text. Text entry will continue
rom the n
s a character present above
he curso
m cursor the corresponding left/right for edit o
f ew cursor position.
EY_CLEK AR can be used to delete characters. When there i
t r, the displayed character will be deleted e.g ABCDE => ABCE. When there is no
c aracter above the cursor, press KEY_CLEAR will delete the character to the left of the
rsor e.g. ABCDE_ => ABCD.
h
cu
Long press of KEY_CLEAR will delete the entire text.
45 of 83

• re valid
- KEY_LNR/PAUSE
.Press KEY_CLEAR will delete the digit to the left of the cursor. Long press of KEY_CLEAR
ntire number.
For all number entry, the following keys a
- KEY_1 to KEY_0
will delete the e
KEY_MEM will enter the phonebook.
• The will be ON.
• Press the first letter of the name; the first name that starts with this letter in the
ginning by A, press once on
ss twice on KEY_2, to find names
s with the KEY_UP/CLIP and KEY_DOWN/CLIP
abetical order.
•
dited as described above.
.4.1 PERSONAL SMS
lect “PERSONAL SMS”
alphabet appears. For instance to find names be
KEY_2, to find names beginning by B, pre
beginning by C, press three times on KEY_2
• Go through the list of name
keys the list scrolls up/down in an alph
Press KEY_MENU/OK to select the number and return to the SMS phone
number edit. Number can then be e
4
• Se
• Display
icon.
• Note, only ‘private’ message associated with that HS and its sub-address will be
displaye
re recent messages at the top.
The CID of the sender will be displayed
Messages which have not been read will have an * in front of the first digit
If the CID number is greater than 11 digits, the X icon will be displayed..
y the additional digits.
LIP
keys.
keys.
4.4.1.1 R
• Note last message sent will be saved.
• On failure to successfully send the message, a SEND FAIL will be displayed and
r presented with the option of to re-try.
d in the INBOX
he KEY_UP/CLIP and KEY_DOWN/CLIP • Move through the list of messages with t
keys. The list scrolls down in date/time order, mo
•
•
• KEY_HASH can be used to displa
• Messages which have been read will have a space character in front of the first
digit
Press KEY_OK when y• ou find the message required
• The text message will then be displayed. Note only the text string will be displayed,
no details. KEY_UP/CLIP and KEY_DOWN/C• Move through the message text with the
• Press KEY_OK will display further options.
• Press KEY_CLEAR to return to upper menu.
• Move through the options with the KEY_UP/CLIP and KEY_DOWN/CLIP
Press KEY_CLEAR to return to text message. •
EPLY
• Select “REPLY”
• Enter the Reply text message and validate
• Press KEY_OK to confirm
• The original send number will be displayed
• KEY_MEM/EXIT will enter the phonebook
he message • Modify & validate the number to which to send t
• Press KEY_OK to confirm
the use
46 of 83
4.4.1.2 ELETE
4.4.1.3 ORWAR
Enter the number to which to send the message
• KEY_MEM/EXIT will enter the phonebook
odify & validate the number to which to send the message
ess KEY_OK to confirm
essage sent will be saved.
nd the message, a “SEND FAIL” will be displayed and
the option to re-try.
•
.4.1.4 DETAILS
•
d.
N/CLIP keys.
•
BOX”
ss
crolls down in date/time order, more recent messages at the top.
Messages which have been read will have a space character in front of the first
digit
KEY_HASH can be used to display the additional digits.
• Press KEY_OK when you find the message required
• The text message will then be displayed. Note only the text string will be displayed,
no details.
CLIP
KEY_OK will display further options.
o return to upper menu.
Move through the options with the KEY_UP/CLIP and KEY_DOWN/CLIP keys.
essage.
4.4.3 WRITE
• Select “WRITE”
D
• Select “DELETE”
• Press KEY_OK to confirm
F D
• Select “FORWARD”
• Original message text will be displayed, edit cursor should be placed at the end of
the message. Modify the text message and validate.
Press KEY_OK to confirm •
•
• M
• Pr
• Note last m
• On failure to successfully se
the user presented with
4
Select “DETAILS”
• The CID of the sender will be displaye
• The date and time of the call will be displayed.
• Move through the information with the KEY_UP/CLIP and KEY_DOW
Press KEY_OK or KEY_CLEAR to exit
4.4.2 INBOX
• Select “IN
• Note, only ‘public’ messages, not associated with any HS or specific sub-addre
will be displayed in the INBOX
• Move through the list of messages with the KEY_UP/CLIP and KEY_DOWN/CLIP
keys. The list s
• The CID of the sender will be displayed
• Messages which have not been read will have an * in front of the first digit
•
• If the CID number is greater than 11 digits, the X icon will be displayed..
• Move through the message text with the KEY_UP/CLIP and KEY_DOWN/
keys.
• Press
•
•
Press KEY_CLEAR t
•
Press KEY_CLEAR to return to text m
47 of 83

• e text will be display
• message and validate
• the message
• M/EXIT will enter the phonebook
e
•
• nt will be saved.
ge, a L” will be displayed and
th
4.4.4 Delete
Select
• Select
• Press KEY_OK to confirm.
• Select “SMS Settings”
.4.5.1 . NETWORK TYPE (Hidden in the EEPROM)
rk supports sub-addressing. A ‘Network type’
parameter will be stored for each of RECEIVE 1 and RECEIVE 2, SEND 1 and SEND 2.
that no
ub-address is present, and only the DMI is appended to the receive centre.
Wh th NTRE number will be interpreted assuming both
SA and DMI are appended.
no interp n of the SEND CENTRE number will assume that
umbe ould be sent according to the SEND MODE
rameter setting
er will be
.4.5.2 SMS Timers (Hidden in the EEPROM)
Parameter Description of Function Range of values
Default
Note that last sent messag ed
Enter the text
• Press KEY_OK to confirm
Enter the number to which to send
KEY_ME
• Modify & validate the number to which to send
Press KEY_OK to confirm
Note last message se
the messag
• On failure to successfully send the messa
e user presented with the option to re-try.
“SEND FAI
All
“DELETE ALL”
“INBOX” or “PERSONAL SMS”
•
4.4.5 SMS Settings
4
The type of the network determines whether the netwo
When this value is set (i.e 1), the interpretation of the RECEIVE CENTRE number will assume
s
en e value is not set (i.e. 0), the RECEIVE CE
When this value is set (i.e 1), the interpretation of the SEND CENTRE number will assume that no
sub-address should be appending on SEND number. Note that this parameter will over-ride the SEND
MODE parameter setting
When this value is
sub-addressing is in u
t set (i.e 0), the
se, and that the n
retatio
r sh
pa
For each of RECEIVE 1, RECEIVE
0.
2, SEND 1 and SEND2, the default value for this paramet
4
A number of new EEPROM parameters will be available to adjust SMS Timing parameters as
described below.
Validity Length of tim
Period message existence in the SC memory before
delivery to the recipient has been carried out.
minutes intervals up to 12 hours)
144 to 167 12 hours + ((VP -143)
e the SC shall guarantee the 0 to 143 (VP + 1) x 5 minutes (i.e. 5
x
30 minutes)
168 to 196 (VP – 166) x 1 day
197 to 255 (VP – 192) x 1 week
7 days
48 of 83

VPF 0-3 2 Defines Format of Validity Field
PI 0-255 0 D Protocol Identifier
Ad
type
pe-of-Number
Bits 3, 2, 1, 0 specify Numbering-Plan-
N/A 0x80
dress Bits 6, 5, 4 specify Ty
Identification
Timer T10 Minimum delay time between the accepting of the n = 1.
call and the sending of the first FSK-Frame.
T10min = n x 100 ms;
.256 10
Timer T11 Minimum delay time between two successive
FSK-F
n = 1..256
rame. T11min = n x 100 ms; ETSI
2
recommedation minimum 100ms
Timer T12 Packet response timer during a call; T12min = n
x100ms; ETSI recommendation 4000 ms
n = 1..256 40
Call Setup Packet response timer when the phone has
service centre. The timeout is a multiple of 1s.
1..256 30
Timer Dialed out and is awaiting a response from the
4.4.5.3 MSG ALERT
An audible alert can b iving nding of text messages
• Select “MSG ALERT”
• Select “ON” o ate
Note: No audible alert tone on message sen
e selected on rece and/or se
r “OFF” and valid
t required
ICE 4.4.5.4 SEND SERV
The user has the ability to select the send centre to be used for the transmitting of messages.
• Select “SEND SERVICE”
• Select “SEND1” or “SEND2” and validate
However, if both send centre numbers are identical when shipped from the factory, then neither the
SEND SERVICE selection menu, nor the SEND 2 option sub-men under the SEND service menu will
be displayed to the user. Only the SEND 1 number will be available for the user to change. In this case
the SMS SETTINGS menu option will be as shown below.
SMS SETTINGS MSG ALERT ON
OFF
RCV CENTRE RECEIVE 1 NUMBER ?
RECEIVE 2 NUMBER ?
SEND CENTR
TERMINAL NO
E SEND 1 NUMBER ?
NUMBER ?
Note that the menus will not be disabled if the user changes the SEND numbers to be identical at a
later date. In this case the menus will remain.
4 TR.4.5.5 RCV CEN E
vic to recei
supported for inco g messag th
ec
ENTRE”
The number of the ser e centre from which ve messages can be entered. A maximum of two
service centres will be min es. Note bo service centres will be active to
r eive message
• Select “RCV C
49 of 83

• Select ”RECEIVE 1” or “RECEIVE 2” and validate
• Modify & validate the service centre number
• Press KEY_OK to confirm
On entering either Receive 1 or Receive 2 Centre numbers, the user should have the ability to clear
the previously entered number i.e. a zero length string will be permitted.
A new EEPROM parameter will be defined to hide the SMS service centre menus. A single parameter
will m th of the RCV CENTRE numbers as well as both of the SEND be aintained which effects bo
CEN R
T E numbers.
In ad ers are identical when shipped from the factory, then RECEIVE dition, if both RCV CENTRE numb
2 option under the RCV CENTRE menu will not be available to the user. Only th
ill be available for the user to change.
e RECEIVE 1 option
w
this case the SMS SETTINGS menu option will be as shown below. In
SMS SETTINGS MSG ALERT ON
OFF
SEND SERVICE SEND 1
SEND 2
RCV CENTRE RECEIVE 1 NUMBER ?
SEND CENTRE SEND 1 NUMBER ?
SEND 2 NUMBER ?
TERMINAL NO NUMBER ?
efault value will be that the display of the service centre menus will be ENABLED. D
Note that the menus will not be disabled if the user changes the RECIEVE numbers to be identical at a
later date. In this case the menus will remain.
4.4. 5.6 SEND CENTRE
ages can be entered. A maximum of two The m nu ber of the service centre from which to receive mess
service centres will be supported for outgoing messages.
• Select “SEND CENTRE”
• Select ”SEND 1” or “SEND 2” and validate.
• Modify & validate the service centre number
• Press KEY_OK to confirm
A new EEPROM parameter will be defined to hide the SMS service centre menus. A single parameter
will be maintained which effects both of the RCV CENTRE numbers as well as both of the SEND
CENTRE numbers.
In this case the SMS SETTINGS menu option will be as shown below.
SMS SETTINGS MSG ALERT ON
OFF
SEND SERVICE SEND 1
SEND 2
TERMINAL NO NUMBER ?
50 of 83

Default v s will be ENABLED. alue will be that the display of the service centre menu
4.4.5.7 TERMINAL NUMBER
The user can enter the network specific default sub-address.
• Select “TERMINAL NO”
• Modify the terminal number, the values can be 0, 6..9
• Press KEY_OK to confirm
A ne E ide tw EPROM parameter will be defined to h he Terminal number menu.
In thi below. s case the SMS SETTINGS menu option will be as shown
SMS SETTINGS MSG ALERT ON
FF O
SEND SERVICE SEND 1
SEND 2
RCV CENTRE RECEIVE 1 NUMBER ?
RECEIVE 2 NUMBER ?
SEND CENTRE SEND 1 NUMBER ?
SEND 2 NUMBER ?
Def t enu will be ENABLED.
4.4.
The umber used to dial the sending service centre will be generated according to a sending mode parameter.
e sending mode will define
w its of the SEND CENTRE number will remain or be removed
ess of the terminal will be appended
whether the default DMI value of zero will be appended
The ast two digits of the SEND CENTRE number, and append both the
sub- r
o a receiving mode
te CENTRE number. The parameter will be stored in EEPROM, but will
iving mode will define whether the last two digits of the RECEIVE
CEN r be removed during the number comparison.
the last two digits of the RECEIVE CENTRE
• Select "SETUP"
aul value will be that the display of the Terminal Number m
5.8 SENDING MODE (Hidden in the EEPROM)
n
The dialed number is generated from a combination of the SEND CENTRE number, selected either from SEND
1 or SEND 2, the terminal sub-address, and the default DMI value. The parameter will be stored in EEPROM,
not be changebut will able by the user. Th
• hether the last two dig
• whether the sub-addr
•
default sending mode will be to keep the l
add ess of the terminal and the default DMI.
4.4.5.9 RECEIVING MODE (Hidden in the EEPROM)
The number used to compare the incoming SC number will be generated according t
parame r from the selected RECEIVE
not be angeable by the user. The recech
TRE number will remain o
The default receiving mode will be to use
number in the comparison.
4.5 SETUP
51 of 83
• In idle, all the handsets which registered to the same base can enter the “SETUP” menu in
4.5.
This me me
desired volume (VOLUME OFF or VOLUME 1 to 5) and validate
4.5.2
menu enables you to select base ring melody
dset’s association with a base to allow another handset to be associated
NDSET" and validate
ode and validate
t the handset to be cancell validate
CODE
code is used in subscriptio peration or to modify some critical parameters in the base.
he PIN code:
ct "PIN CODE" and validate
r the old 4 figure confidentia nd validate
ter the new 4 figure confident e
r the new confidential code alidate
user may cancel out of the PIN code entry, using a long press of the <KEY_CLEAR>
ial mode selection (This mod ot appear when set the Pulse dialling disable by
EPROM)
dialling are available:
MF tone dialling
Pulse dialling
dialling mode:
IALMODE” and validate
NE” or “PULSE” of dia
selected by EEPRO
ote: the Dial mode selection menu can be hidden to lock the base into pulse or DTMF dialling by the
on selection
• Choose RECALL 2 to select long flash time
ECALL 1 & 2 timing : selected by EEPROM data
on in if RECALL 1 & RECALL 2 is same timing. The recall menu will be
se.
the same time, and the last setting will be validated.
1 BASE VOL
nu enables you to adjust base ring volu
• Select "BASE VOLUME" and validate
• Select the
BASE MEL
This
• Select "BASE MELODY" and validate
• Select the melody of your choice (1 to 5) and validate
4.5.3 DEL HS
You can cancel a han
• Select "DEL HA
nter the PIN c• E
• Selec ed and
4.5.4 PIN
The base PIN n o
tTo change
• Sele
te• En l code a
• En ial code and validat
nd time and v• Ente
he
a seco
• T
4.5.5 D e will n
E
Two types of
1. DT
2.
To change the
• Select “D
• Select “TO l mode and validate
data FTXX_DIAL_MODI : M
N
CONFIG_ENA_MENU_DIALMODE flag (see various factory settings).
.5.6 Recall durati4
• Select "RECALL"
• Choose RECALL 1 to select short flash time
R
Note: not recall select functi
hidden from the user in this ca
52 of 83

4.5.7 Default settings
nction will not be available when t is out of range of the base or unregistered.
s you to reset both han se with default settings.
,
e and va
, press KE o confirm
By quick default,
“DEFAULT” appears, then
Th ter settings and make a software RESET.
Default par
This fu he handset
This menu enable dset and ba
By SET UP menu
• Select "DEFAULT"
• Enter the base PIN cod lidate
• "CONFIRM ?" appears Y_OK t
• Press and hold * key when insert the battery for 5 seconds,
“CONFIRM?”, press KEY_OK to confirm
en e handset and base will apply default parame th
ameter Value
et me TBD
ON
Hands na
Low battery indicator
Out of range indicator ON
Key click
uto answer
ON
A ON
INT melody 1
INT volume 3
EXT melody 1
EXT volume 3
ear volume 3
Language English
Phonebook Empty
CLID list Empty
Redial list Empty
PIN CODE 0000
PAUSE 3 s
dial m ode DTMF(Tone)
OFF
00 :00
Key lock
CLOCK
ALARM OFF
RECEIVE 1 tbd
RECE 2IVE tbd
tbd
tbd
VICE
SEND 1
SEND 2
SEND SER SEND 1
MSG RALE T ON
NO 0
ODE 3 (Dial SMS-C number + senders SA digit + DMI mode 0)
MODE 0
TERMINAL
SENDING M
RECEIVING
Defau alu for
each co
The fo win M parameters, see also CID
S Timing Default values.
fault par
lt v es in handset and base are defined by EEPROM settings [1]. So they can be adjusted
untry.
llo g table contains the default values to be used for new EEPRO
parameter defaults and SM
De ameter Value
RECEIVE 1 Network Type 0
RECEIVE 2 Network Type 0
SEND 1 Network Type 0
53 of 83

SEND 2 Network Type 0
Date 01-01
PB Match with # ENABLED
PB Match with * ENABLED
PB Match with ‘P’ ENABLED
VMWI Base LED Flash ON
“In call” Base LED Flash Rate 500ms
“Event” Base LED Flash Rate 750ms
4.5.8 RCID (MENU can be enabled or disabled by EEPROM)
This feature provides the opportunity to enable or disable Russian CID. Menu can be enabled or
disabled by EEPROM.
• Select “RCID”
• Select “ON” for enabling Russian CID mode
• Or select “OFF” for normal CID only
tically.
u is available:
… 7
• If the Russian CID mode is selected, the number 255 will be sent to the line atuoma
Furthermore, the following submen
NUM LENGTH 5
RING DELAY 0 … 9
Note:
1. If RCID is set to on, it is equal to select Russian CID auto mode. In this case, user is able to set
ID information is only shown on the display after user take the line or
ay
w this incoming number instead of “SCREEN?”. When the caller leaves a message,
“SCREENING” is displayed.
4.5.8.1
•ING DELAY setting. The ring
delay in answering machine is set to e.g. 2, so after 2 rings the answering machine will
starts, the incoming number will be displayed and start OGM.
UAL MODE)
y in answering
ndset on the
4.5.8
•
ignored.
4.5.8
Techni a
RING DELAY. Incoming CID will be shown on the display after certain rings set by user.
2. If RCID is set to off, it is equal to select Russian CID manual mode, in this case, RING DELAY will
not be significant. The incoming C
TAM seize the line.
3. When the answering machine answers the call and the incoming number is identified, the displ
should sho
RCID ON (AUTO MODE)
If to set auto mode in RUS CID, so Ring delay will follow R
switch on, RCID procedure
4.5.8.2 RCID OFF (MAN
• If to set manual mode in RUS CID, so Ring delay will be 0. The ring delay in answering
machine is set to e.g. 4, so if after 2 rings the recipient will pick up the handset, RCID
procedure starts, the incoming number will be displayed but answering machine won’t
switch on.
• If to set manual mode in RUS CID, so Ring delay will be 0. The ring dela
ick up the hamachine is set to e.g. 4, so if after 2 rings the recipient will p
parallel connected terminal equipment, RCID procedure starts, the incoming number will
be displayed but answering machine won’t switch on.
.3 NUM LENGTH
Select number length between 5 … 7, the max number length of CID received will be
limited to the selected value.
• Number with length longer than the set value will be
.4 RING DELAY
•Select ring delay between 0 … 9, the answering machine will switch on after the
corresponding number of rings if RCID is set to ON.
l requirement for the RUc S CID:
54 of 83
1. For the nt, which forms and transfers in the communication line a frequency signal
«Search» ing subscriber, the following
quirements should be carried out:
1.1. Frequency of a signal «Search» should be (500±2,5) Hz.
al «Search» in points of connection to the communication line should not
1.3. T wave form.
signal «Search» to the communication line should occur in one of the following
l a microtelephone tube by the subscriber;
- At the answer of the caused subscriber to parallel connected terminal equipment.
Technic achine:
2. If nswer to an entering call in this mode the
be carried out:
the communication line at receipt no more than six
par s
2.2. te train the terminal equipment should transfer the causing
message. If during transfer of the proceeding message or during recording
terminal equipment is going to a colloquial mode, the answering machine
sho
2.3. e nication line on the part of terminal equipment should
occur at receipt of a signal «Is busy» or upon termination of time of recording of the entering message
established by the manufacturer.
2.4. In a mode without recording the entering message the release and clearing of a line on the part of
hould occur upon termination of reproduction of the proceeding speech
4.5.
•
• When “ON” is selected, ECO Mode in Base will be activated.
1. E
communication
le, if handset talking with external line, handset will monitor the Received
) of the traffic channel. If the RSS value is larger than RSSI threshold which
ndset MCU will control RF
transceiver d
z Hands w rst time.
z Handset cannot toggle ECO mode in idle and standby mode.
z Handset will try to enter ECO mode when handset is talking with base, entering Base setting,
enter SMS menu.
n one
e based on their RSSI
receiv
z Hands E AX value in EEPROM.
2. ECO Mode in Base through operating the menu in Handset
e Low Power menu in Base Setting to let user enable or disable Base ECO mode
ot enter ECO mode automatically like handset.
base by factory default, base will enter Low Power mode when
z If ECO o e
norma n
z If ECO o
z If there is ccessed by any
terminal equipme
with the purpose of automatic definition of number of the caus
re
1.2. The level of a sign
exceed 0 dBm.
he signal «Search» should have the sine
1.4. Transfer of a
modes:
- At remova
- At imitation answer of the caused subscriber by an answering machine, the modem or the fax -
modem;
al requirement for the answering m
the terminal equipment provides the automatic a
following requirements should
2.1. The terminal equipment should close a train of
cel of a calling signal.
Af r short circuit of communication line
subscriber the proceeding
the entering message the
uld be disconnected.
Th release and clearing of the commu
the terminal equipment s
message.
9 ECO MODE
Select “ON” or “OFF” and validate
Technical requirement of ECO mode:
CO Mode in Handset
Handset will be automatically in ECO mode according to the RSSI value during
with base. For examp
Signal Strength (RSS
set in EEPROM, handset will enter ECO mode automatically, ha
to ecrease the transmit power.
et ill check ECO mode when find the registered base in fi
access TAM and
z Handset ECO mode will not be affected by base, that means if there is more tha
hands re rs to ECO modet gister to base, different handsets ente
ed.
t CO feature can be disabled if RSSI threshold is set to Me
There is on
manually. Base cann
z If ECO mode is enabled in
power up.
m de is enabled in base, there is ECO icon in handset LCD dashboard to replac
tenna icon. l a
m de is disabled in base, base will be in normal TX power mode.
any one Handset is talking with base, Base ECO mode cannot be a
55 of 83
other
z Base O
4.6.1 BEEP
Beep features
The handsets may or may not emit beeps while the keys are pressed , the batteries are low and when
TTERY
.6.1.3 OUTRANGE
NGE" and validate
.6.
his menu enables you to adjust handset ring volume (intern melody)
4.6. G VOL
This les you to adjust handset ring volume (extern melody)
XT RING VOL" and validate
e desired volume (VOLUME OFF or VOLUME 1 to 5) and validate
4.6. ODY
This s you to choose a different melody for internal call
Select "INT MELODY" and validate
Select the melody of your choice (1 to 5) and validate
4.6.5 EXT DY
This ou to choose a different melody for external call
d validate
lody of your choice (1 to 5) and validate
Clock setting is 24-hour format.
• When enter Clock setting mode, LCD display current time with flashing hour
Handsets.
EC mode feature can be disabled by base EEPROM.
4.6 HANDSET
• Select "HANDSET"
the handset is out of range of the base.
4.6.1.1 KEYTONE
• Select "KEYTONE" and validate
• Select “ON” or “OFF” and validate
4.6.1.2 LOW BA
• Select "LOW BATTERY" and validate
• Select “ON” or “OFF” and validate
4
• Select "OUT RA
• Select “ON” or “OFF” and validate
4 2 INT RING VOL
T
• Select "INT RING VOL" and validate
• Select the desired volume (VOLUME OFF or VOLUME 1 to 5) and validate
3 EXT RIN
menu enab
• Select "E
h• Select t
4 INT MEL
menu enable
•
•
MELO
menu enables y
• Select "EXT MELODY" an
• Select the me
4.6.6 CLOCK SET
indication.
• Enter the current time by 24-hour format and validate. And same time, the update
data send to base to keep for all the handset to have same clock.
56 of 83
• If the CLIP data has time data, the clock shall be updated by CLIP time data.
4.6.7
This me
.6.8
n there is an incoming call and the handset is on the base, the phone automatically takes the line.
ANSWER” and validate
validate
.6.
This fun t.
•
anguage.
guag
to be supported, are listed in priority order below. The number of
languag
•
•
• Germ
•
•
DATE SET
the DATE FORMAT setting for the handset i.e DD-MM
• The time data shall be kept at base unit and when the handset turned on, the time
data shall be transferred from base to handset.
ALARM SET
nu makes the handset to have alarm clock feature.
• Select ON or OFF and validate
• If select ON, then the menu go to alarm time setting mode
• Time setting is same as Clock setting
AUTO ANSWER 4
Whe
• Select "AUTO
• Select "ON" to activate "OFF" to deactivate and
4 9 NAME
ction allows you to personalise each handse
• Select "NAME" and validate
Enter the name and validate (max 10 chars)
4
The fun
.6.10 LANGUAGE
ction allows you to personalise the l
• Select "LANGUAGE" and validate
• Select the lan e of your choice and validate
The languages, which require
es supported will be 17.
• English
Dutch
French
an
• Italian
• Spanish
• Greek
• Russian
• Danish
• Finnish
• Swedish
• Norwegian
• Polish
Czech Rep
• Slovakia
Portuguese
• Hungary
4.6.11
• Select "DATE SET" and validate
• Entering the date will be according to
or MM-DD
57 of 83

• The current date will be displayed as 01-01
• Enter the new date and validate. Note that during date entry, the user will be prevented from
-31 are valid and
for MM, the values 01-12 are valid. Date validation will be performed for each month. An error
beep sho ld be given to the user on each invalid number entry and the user will be required to
alid number. The user can cancel out of date entry at any point, by the use of the
<KEY_CLEAR>
appear. When
• Note also that this function will not be available when the handset is out of range or
KEYS
• Enter the number to be stored and validate
• The Hot Key will be automatically enabled after storing the number.
4.6.13 KEY LOCK
This function allows you to lock the key
• Select "KEY LOCK?” and validate
• Press KEY_MENU/OK to lock key,
entering an invalid date in each of the DD or MM parts. For DD, the values 01
u
re-enter a v
• Note that when in using a HS with previous Base version, this menu will not
using a previous HS with the new Base version, the old handset will not use the new date
setting, even though it is supported by the base.
unregistered.
4.6.12 HOT
This function allows you to edit the 2 Hot Key number.
• Select Hot Key 1 … 2 and validate
icon displayed and go to standby mode.
Note :Press KEY_HOOK key can be OFF HOOK during incoming call and KEY LOCK is on.
4.6.13.1 Quick KEY LOCK
Simply press and hold KEY_STAR/LOCK 3 second
4.6.13.2 To unlock key:
• Press any key “PRESS *” is displayed, within 5s time out
• Press KEY_STAR/LOCK to unlock key
4.7 REGISTER
• Select "REGISTER" and validate
• Select “SELECT BASE” or “REG BASE” by KEY_UP or KEY_DOWN
• Press KEY_OK to confirm
4.7.1 SELECT BASE
• Select "SELECT BASE" and validate
• “BASE 1 2 3 4” is displayed ( only the registered base number will be shown and current
base number will be blinking)
• Press 1 - 4 to confirm the selection or KEY_UP/KEY_DOWN + KEY_F to select auto
searching.
• Valid tone is sounded if valid base is found
• “NOT REGISTER” is shown and error tone sounded the selection is invalid
4.7.2 REG BASE
• Select "REG BASE" and validate
• “BASE 1 2 3 4” is displayed ( only the registered base number will be blinking )
• Press 1 - 4 to confirm the selection
• It is now searching the base in subscription mode and “SEARCHING…” is displayed
58 of 83
• Valid tone is sounded and “PIN ?” is shown if valid base found
•d verified by base
• Valid tone sounded if subscription is successful and back to standby mode.
On the base:
g PAGE_KEY
• The base will then emit a beep, the Line LED will flash. It is now ready to be associated with a
new hand during the 90 seconds after pressing the button only.
s located the base, a valid tone is played.
ate the base, it will return to the previous configuration after 1 minute. Try
aga b e number and check that you are not in a environment where there is
interference
a a base, it is given a handset number by the base. It is this number
whi andset after the name and must be used for internal calls.
Enter subscription PIN code an
• Put the base into subscription mode, by pressing and holdin
set,
If the handset ha
If th ae h ndset does not loc
y changing the basin
When handset is associated with
ch is displayed on the h
59 of 83

5
5. One digit 7 segme D Display on t
5.1.2 LED
In sue indication
Answer machine features
5.1 Base description
1.1 nt LE he base unit
•
5.1.3 Buttons for TAM control
• Answer On/Off
• Volume Up
• Volume Down
• Skip Backward
• Skip forward
• Stop
• Delete
• OGM
• Play
5.1.4 Supervisory tone duration
• Long beep --------------------------- 700mS
• Short beep --------------------------- 125mS
• Error tone ---------------------------- 4 times Short beep with 100ms pause
• Message alert tone ---------------- 300mS
5.1.5 Voice prompts (It is available by EEPROM setting)
All of the prompts are played to line or handset or both.
Table 1 Audible Indications
Nr Context Prompt To
line? To
H/S ?
Message recording and play back
1. Message recording “Hello, your call cannot be taken at the moment
so please leave your message after the tone” Y Y
2. Message recording “Hello, your call cannot be taken at the moment
and you cannot leave a message so please call
later”
Y Y
3. Message recording “Please speak after the tone” Y Y
60 of 83

Nr Context Prompt To
line? To
H/S ?
4. Message recording “To end recording press #” Y Y
5. Message playback “You have no/one/’n’ (new) messages” Y Y
6. Message playback “Message ‘x’” Y Y
7. Message playback “Message deleted” Y Y
8. Message playback “End of messages” Y Y
9. Message playback “To delete all messages, press delete” Y Y
10. Message playback “All messages deleted” Y Y
Line remote interrogation
11. Remote access “Please enter your security code” Y
12. Remote access “Incorrect security code” Y
13. Remote access “To hear main menu, press 1” Y
14. Remote access “To delete all messages, press 5” Y
15. RA Main menu “To play all messages, press 2” Y
16. RA Main menu “To play new messages, press 3” Y
17. RA Main menu “To skip back during messages, press 4” Y
18. RA Main menu “To delete during messages, press 5” Y
19. RA Main menu “To skip forward during messages, press 6” Y
20. RA Main menu “To set Answer on or off, press 7” Y
21. RA Main menu “To hear the outgoing message menu, press 8” Y
22. RA Main menu “To set a new security code, press 9” Y
23. RA Main menu “To hear main menu again, press 1” Y
24. RA Main menu “To set new security code, press Star. To hear
your security code, press #” Y
25. RA Main menu “Please enter new security code after the tone” Y
26. RA OGM menu “To Play outgoing message, press 2” Y
27. RA OGM menu “To record answer and record outgoing Y
61 of 83

Nr Context Prompt To
line? To
H/S ?
message, press 3”
28. RA OGM menu “To record answer only outgoing message,
press 4” Y
29. RA OGM menu “To select answer and record outgoing
message, press 5” Y
30. RA OGM menu “To select answer only outgoing message,
press 6” Y
31. RA OGM menu “To hear the outgoing message menu again,
press 8” Y
32. RA OGM menu “To hear main menu again, press 1” Y
33. Various “zero” (as in security code) Y Y
34. Various “oh” (as in "three oh five pm") Y Y
35. Various “one” to “fifty nine” Y Y
36. Various “Sunday" to "Saturday” Y Y
37. Various “On” Y
38. Various “Off” Y
39. Various “am” Y
40. Various “pm” Y
5.2 Base unit operation
5.2.1 Display
(7 segment LED)
• No messages ------------------------------------Æ “0”
• Answer on with messages (Less than 9) -Æ Number of messages
• Answer on with messages (More than 9)--Æ “9” flashing
• Answer off ------------------------------------------Æ “-“ and “X” flashing slow
• Answer off with more than 9 message ------Æ “-“ and “9” flashing slow
• Memory full -----------------------------------------> “F“ and “X” flashing slow
• Memory full with Answer off --------------------> “-“ and “F“ flashing slow
• During Play back ICM ------------------------Æ Message number (If more than 9, just indicate “9”)
• During Play back OGM -----------------------Æ OGM number and “P” flashing
• During remote interogation-------------------Æ “A” flashing (Line and Handset)
• During recording OGM, ICM and Memo --Æ “r” Flashing
• Without time setting --------------------------> “F” or “X” or “-“ and “C” flashing slow
62 of 83
• During volume control --------------------------------> “0” “1” ----“9” “H”
Flashing slow: 1.75S / 0.25S
Flashing : 0.5S/0.5S
X=number of messages
5.2.2 In sue LED indication
• Power on the unit ---------------------> Turn on
• During OFF HOOK -------------------> Flashing (0.5S/0.5S)
5.2.3 Key Operation
Answer On/Off: Answer On/Off setting only
Volume Up: Loud speaker volume control only
Volume Down: Loud speaker volume control only
Skip Backward:
Short press during idle: Play the message alert setting or no action
Short press during play: Skip backward the message
Long press during idle: Go into Message alert On/Off setting or no action
Long press during play: same as short press
Skip forward:
Short press during idle: Play the current Ring delay setting
Short press during play: Skip forward the message
Long press during idle: Ring delay setting mode
Long press during play: same as short press
Stop:
Short press during idle: Play the current day and time setting
Short press during play: Stop to play message
Long press during idle: No action
Long press during play: same as short press
Delete:
Short press during idle: Play the current security code setting
Short press during play: Delete the message
Long press during idle: No action
Long press during play: same as short press
OGM:
Short press during idle: Play the current setting OGM
Short press during play: No action
Long press during idle: Go into OGM selection and recording mode or OGM recording mode
Long press during play: No action
Play:
Short press during idle: Start to play the new messages
Short press during play: Pause to play messages
Long press during idle: Start to play all messages
Long press during play: same as short press
5.2.4 Stop
When the unit is carrying out an operation started at the base, operation of the STOP button shall
generally cause the unit to abandon the function and reset to the previous answer mode. One
short beep will be heard. Examples of functions affected and the effects are:
63 of 83
Message play Unit abandons message play with all messages saved.
Message paused Unit abandons message play with all messages saved.
OGM Play Unit abandons outgoing message play.
ICM record STOP is ignored.
Pressing STOP on the base will NOT affect operations started from the handset.
Remark: The messages are deleted during playing messages. The message cannot be
recovered by any means.
5.2.5 Volume control
• An electronic volume control shall be provided on the base unit. Eleven different settings (0 – 9+H)
shall be provided to regulate the loudspeaker volume level. If the base has seven-segment, the
LED display shall show “0” for off, then “1” - “9” and “H” for the maximum setting.
• When the volume control is set at its minimum (0) position there will be no audible output during
call screening and during remote interrogation, but there will be a level 1 (audible) output from the
loudspeaker during other operations (examples are outgoing message check, message play etc).
After such operations (played at level 1), the volume shall retain its previous 0 setting for call
screening (and remote interrogation) if the volume control has not been adjusted.
• During outgoing message check, message play (including the wait period at the end of playback),
and voice prompts, any adjustment of the volume control by the user will cause the volume to
increase or decrease from the low volume setting. When the operation is completed, the new
setting for the volume control shall be stored.
• If the volume control is adjusted during the idle mode, the unit shall emit a short beep for each
step in the volume setting. As the volume control is increased, the beep gets louder and as the
volume control is decreased, the beep gets quieter. At the quiet and loud end-stops, the unit emits
two beeps (H level for maximum setting).
• If the volume up or down button is held down the settings will change at the rate of two steps per
second. If the button is pressed and released rapidly then the settings will change at the same
rate as the button presses.
• The base loudspeaker volume control is only for base and handset receiver volumes shall be
independent.
5.2.6 Answer delay
The unit shall have a selectable delay of between 2 and 9 rings or Time Saver by press and Hold
“SKIP FORWARDS” button. Press “SKIP FORWARDS” button for check the setting of Answer delay.
• The default setting at power up or hard reset shall be 6 rings. (According to EEPROM setting)
• The Time Saver protocol shall answer calls after 6 rings if no new messages have been recorded
or 2 rings if new messages have been recorded.
• When enter to the Answer delay setting mode by hold press “SKIP FORWARDS” button, after
that, each short pres “SKIP FORWARDS” button to increase one step for answer delay
with announcement. The order shall be as follows.
2 - 3 - 4 - 5 - 6 - 7 - 8 - 9 - TS - 2 - 3 -------
64 of 83
• No action for about 2 second, the unit shall announce “Calls will be answer after X rings” and
return to idle.
• If keep pressing “SKIP FORWARDS”, the unit count up the setting about one to two step
per second until release the button.
5.2.7 Message Alert setting (If set “No Voice prompt, this function shall not be available)
The unit shall have the facility to sound an audible alert when new messages have been
received. This shall be at the volume set by the control for the base unit tone caller.
The Message Alert shall default to OFF at power up and can be turned “On” or “Off” by press and
Hold “SKIP BACKWARDS” button. Short press “SKIP BACKWARDS” button for check the setting
of Message alert.
When the Message Alert feature is ON, the alert tone will be played only when the product is idle
on condition that there is new message or memo has been recorded.
The message alert tone shall stop sounding as soon as the user starts message play at the base
or handset. After message play the message alert will not sound (even if switched on) if all new
messages have been partly played back (i.e. part of each actual message). The message alert
tone shall then stay silent until a new message is received even if messages are saved.
If the Message Alert feature is set to ON and new messages are waiting to be played (i.e. the
tone is sounding), playing part of each new message through remote interrogation shall silence
the sound.
5.2.8 Answer on/off setting
The default setting is Answer on. When switched to Answer On, the product shall answer calls
according to the answer delay setting. As the unit is supplied with a two type of pre-recorded
outgoing message, it shall always be possible to switch the unit to Answer on mode.
When the unit is idle and set to Answer On, the 7-segment LED shall indicate the number of
messages recorded. If the recording capacity is full, the display will flash “F” slowly alternating
with the number of messages and Handset displayed “Answer machine on" icon.
When the unit is idle and set to Answer Off, the 7 segments LED shall indicate one bar in the mid-
position flashing slowly alternating with the number of messages.
• Switching Answer on/off at base The product shall be capable of being switched to and
from the answer mode by means of the Answer on/off button on the base. In the idle state,
operation of the Answer on/off button shall toggle the unit to and from the Answer On mode.
When the unit is set to Answer Off and the user presses the button the unit shall announce
“Answer on” followed by the current outgoing message and switch to Answer on. When
switching to Answer Off the unit shall announce just “Answer off”.
• Switching Answer on/off remotely. This is described under "Remote Switch On" below in
this document.
• If the unit was set to Answer On before a call but the memory capacity is full then the unit
will continue to answer normally but will play the Answer Only message "Hello, your call
cannot be taken at the moment and you cannot leave a message, so please call later”. It
will only revert to Answer and Record answering after the user deletes some messages
(locally or remotely).
65 of 83
• If the unit is “No voice prompt” and memory capacity become full then the unit will change to
Answer OFF mode. It will change back to Answer ON mode by deleting messages. To
delete messages, it is possible to delete by Local, Handset remote or line remote
interrogation.
Remark: The unit shall normally revert to the previous answer setting at the end of any answered call.
However, if a caller remotely accesses the machine and sets it to Answer Off or On then it shall stay in
that mode.
If set to “No voice prompt”. The operation will be as follows
The default setting is Answer OFF. When switched to Answer On, the product shall answer calls
according to the answer delay setting. It shall always be possible to switch the unit to Answer on
mode when there is recorded OGM. However, if user does not record the OGM, it is not possible
to set to Answer ON mode. There will be error tone when user try to set to Answer ON mode
without OGM.
When there is OGM and set to Answer On, the unit shall play recorded OGM and set to Answer
ON.
5.2.9 Outgoing message
5.2.9.1 Recording OGM.
It shall be possible to record the outgoing message by pressing and holding the OGM button
to enter the OGM selection mode first and then press and hold the Skip backward or Skip
forward button. The skip backward is for “Answer and record” OGM, the Skip forward is for
“Answer only” OGM. The operation of the button causes the prompt “Please speak after the
tone. To end recording, release the button” to be given. The user is then informed that
recording can commence by a long tone. Once recording has started, the previous user OGM
cannot be retrieved.
(If set “No Voice prompt, this function shall be as follows)
It shall be possible to record the outgoing message by pressing and holding the OGM button
The user is then informed that recording can commence by a long tone and stop recording by
release the button. Once recording has started, the previous user OGM cannot be retrieved.
If the memory is full when try to record the OGM, the unit shall emit the error tone. If during recording the OGM, the memory
capacity reach to full, the unit shall emit the L_beep and stop recording.
5.2.9.2 Checking OGM.
Pressing and releasing the OGM button briefly the unit shall announce, “ Your answer and
record outgoing message is” or “Your answer only outgoing message is”, then the OGM
message. The display on the base shall show “P” and OGM number (Answer and record is 1,
Answer only is 2) during these prompts and the outgoing message playback (Only for
Category 2). STOP can be used to stop the outgoing message play.
If set to “No Voice prompt”, the operation shall be as follows.
Pressing and releasing the OGM button briefly the unit shall play current recorded OGM. If the
unit does not have recorded OGM, it will be error tone. The display on the base shall show “P”
during playing OGM or if no OGM, it shall indicate “E”
Deleting OGM. (If set “No Voice prompt, this function shall not be available)
The current (user's own) outgoing message can be deleted by pressing the Del button on the
base whilst the OGM is playing. The outgoing message will stop and a single short beep will
be heard, then "Your answer and record outgoing message is", if answer and record outgoing
message is being deleted, followed by the default outgoing message. If the default OGM is
playing the Del button will be ignored.
Selecting OGM (If set “No Voice prompt, this function shall not be available)
66 of 83
Pressing and hold the OGM. On/Off button, the unit will announce, “Please select outgoing
message”. Then, the user may press Skip forward to select Answer Only Outgoing message
or Skip backward to select Answer and Record Outgoing Message. Then, the unit will play the
OGM as same as checking OGM.
5.3 Call answering and message recording
• When switched to the answer ON mode, the product shall answer calls according to the
selected answer delay and the outgoing message shall be played 1 second after the line
has been seized. If the default outgoing message (Answer and record mode) is being used
it shall be “Hello, your call cannot be taken at the moment so please leave your message
after the tone”.
• The OGM can be skipped by detecting # DTMF tone. So, during playing the OGM, if the unit
detect # tone, the OGM playing shall stop immediately and an invitation to record tone shall
be given.
• After the outgoing message, an invitation to record tone shall be given after which recording
shall commence immediately.
• The unit shall stop recording, send L_beep, and release the line when any of the following
conditions are detected:
¾ Silence for more than X seconds. (X is defined by EEPRON setting)
¾ Network tone for more than “X” seconds. (“X” is defined by EEPRON setting)
¾ The maximum message length is reached. (The maximum message length is defined
by EEPRON setting)
¾ Exhaustion of memory
¾ End of call signal (ECS)
The unit shall also stop recording and release the line when an extension off-hook (BPR)
signal is detected, but no voice prompt will be played.
• In the case of maximum message length the unit shall send L_beep and release the line.
• If the recording capacity is exhausted during recording, the unit shall send L_beep to line
and release the line. Valid messages (see below) shall be indicated and saved.
• All messages and memos will be day and time voice stamped at beginning or end of each
message depended on EEPROM setting.
• When a CLI is received containing the current time, the time stamp will be updated to the
time delivered in the CLI information. The day part of the stamp will remain unaltered.
• At the end of the call, the unit shall automatically reset to the previous answer mode unless
the memory capacity is full. In these circumstances, the unit shall revert to answer only
mode and play the outgoing message “Hello, your call cannot be taken at the moment and
you cannot leave a message so please call later”.
• The sequence of playing message and day and time stamp is country dependent.
67 of 83
• When switched to the answer ON mode with Answer only mode, the product shall answer
calls according to the selected answer delay and answer only outgoing message shall be
played after the line has been seized. If the default outgoing message is being used it shall
be “Hello, your call cannot be taken at the moment and you cannot leave a message so
please call later” and will wait 8 seconds to allow remote interrogation before release
the line.
• If the unit is in Answer Off mode before a call then it will answer after Answer OFF Ring
delay setting, then play the outgoing message and record any incoming message. It will
only revert to Answer On after the call if the caller sets it to Answer On during remote
access. If set to Answer Off and the memory capacity was full before the call then the unit
will answer after answer OFF ring delay setting to allow remote access. It will play the
Answer only outgoing message, then wait for 8 seconds to allow remote access before
releasing the line.
• If the unit is set to “No voice prompt”, all announcements shall not play except recorded
OGM play. If the memory is full, the unit shall send the error tone and then release the line.
5.4 Memory full
• The definition of memory full is less than 15 seconds recording capacity available before
start to record the message. However, if there is more than 15 seconds recording capacity
available when start to record the message, it will be memory full during recording the
message when use up all the memory.
• If the memory becomes full while the caller is leaving a message the unit shall send
“memory is full” announcement and then L_beep and disconnect the line. The unit will
switch to memory full mode (see below).
• On releasing the line the unit will also switch to memory full mode if the remaining recording
capacity is less than 15 seconds, or there are a total of 59 messages.
• Memory full mode. (This function is not available if the setting is “No voice prompt”)
If the memory is full, the unit after seizing the line and playing the memory full (Answer
only) outgoing message and will wait 8 seconds to allow remote interrogation. If no
interrogation instruction is received, the unit will send L_beep and release the line. If the call
is terminated after messages have been deleted so that more than 15s recording capacity is
available, the unit reverts to the normal answer mode.
• Memory full mode for “No voice prompt”
If the memory is full, the unit become Answer OFF mode. After the number of ringes
for Answer OFF mode, the unit takes line and sending the L_beep message and will wait 8
seconds to allow remote interrogation. If no interrogation instruction is received, the unit will
send L_beep and release the line. If the call is terminated after messages have been
deleted so that more than 15s recording capacity is available, the unit reverts to the
previous answer mode that is before memory become full.
5.5 Message playback
5.5.1 Playback
• When messages have been recorded a long press of the PLAY button on the base shall
cause the product to announce “You have ‘n’ messages” (where “n” is the number of the
messages) and to commence replay from the start from oldest message recorded. All
messages shall be played.
68 of 83
• At the start of each message, the unit shall announce the message number in the recorded
sequence e.g. "message 1"
• During message play, the 7 segment displays shall indicate the order number of the
message being played: "1" to "9" then "9" flashing for messages 10 onwards.
• Once playback has commenced, a short operation of the PLAY button shall cause the
messages to be paused. In the pause mode the 7-segment display flashes “P” and a short
beep shall be heard every 10 seconds.
• Replay is continued if the PLAY button is pressed again, but if no instruction is received for
60s the unit automatically reverts to the previous answer mode with all messages saved.
• Functions accepted during the pause mode are summarized below.
¾ Press PLAY: The unit continues playback
¾ Press STOP: The unit abandons pause and resets to the Answer On mode
with the messages saved.
¾ Press DELETE: The unit selectively deletes the current message as described
below.
¾ Press |< SKIP: The unit skips backwards as described below and continues
playback.
¾ Press SKIP >|: The unit skips forwards as described below and continues
playback.
5.5.2 Skip forwards and backwards.
• Skip forwards is controlled by the SKIP >| button. Each time the button is pressed and
released, the unit shall stop the current message being played and skip forwards to the start
of the next message. If the current message is the last message, the unit shall respond as
described under “End of message” below.
• Replay the current message is controlled by the |< SKIP key. During message playback,
brief press the |< SKIP key will cause the unit to replay the current message.
• Skip backwards is controlled by the |< SKIP key. During message number playback,
pressing the |< SKIP key will cause the unit to play the previous message. However, if after
the message number playback, the unit will replay those messages from message number
playback.
5.5.3 Fast play
• If the SKIP >| key is pressed and held during the actual message playback, it will play
continue at 1.5 times normal speed. If the key is still pressed at the end of a message then
the Day/Time stamp and message number will be announced at the normal speed but the
next message will be played at 1.5 times normal speed. When the key is released the
messages will continue at the normal speed.
• If messages are played and no other key is pressed then all the messages will automatically
be saved and indicated on the 7-segment displays. The audible message alert will not
sound (even if switched on) if all new messages (including mailbox messages) have been
partly played back. Similarly the Time Saver answer delay (if selected) will answer after 6
rings if all new messages have been partly played back.
• If the STOP button is pressed during replay, message play is abandoned and the unit resets
to the previous answer mode with all messages saved as described above under “Stop”.
5.5.4 Deleting messages during playback
Messages may be selectively deleted during replay by pressing the DEL button during replay.
The unit shall announce, “Message deleted” and mark the current message for deletion but
not actually delete the message until after the 8-second decision period described below. After
69 of 83

a message is marked for deletion, the unit skips to the start of the next message. If the
current message is the last message the unit shall continue as described below.
The message has deletion mark will be deleted when press the stop button or end of the 8
seconds decision period. There is no way to recover it.
5.5.5 End of message play
• At the end of message play and messages remain which are NOT marked for deletion, the
unit announces “End of messages. To delete all messages, press delete”. The 7 segment
display counts down from “ 8” to “ 0” in one second steps (Category 2 only). During this
period pressing the DEL button marks all messages for deletion (unit announces “All
messages deleted”) but the countdown continues. If the user does not press DEL before
the counter reaches “0” only those messages previously marked for deletion shall be
deleted. Pressing STOP at any time during this 8-second period abandons the countdown.
The messages will be deleted which have marked for deletion.
• The volume control keys will function during the 8-second wait period at the end of message
play but no beeps will be generated as the volume is adjusted.
• At the end of the 8-second decision period the unit will generate one short beep (1S), any
messages not deleted by the user are automatically saved and indicated on the message
counter and the unit reverts to the previous answer mode.
• If the PLAY button is pressed during the idle mode when there are no messages to be
played, the unit announces, "You have no messages" and reverts to the previous answer
mode.
5.5.6 Playing new messages
It shall be possible to play new messages only by short pressing the PLAY button. The unit
shall announce, “You have ‘n’ new messages” (or “You have no new messages” if this is the
case). Where there are new messages to play only these will be played back and shall be
paused, skipped, deleted, etc. as above. As an example, if there are 5 messages of which the
last 2 are new, the unit will announce, “You have 2 new messages”
5.5.7 Setting is “No voice prompt”
If the unit is set to “No voice prompt”, the following function and announcements are not play
during playing message.
• Time Day stamp
• Message number announcement
• Delete message instruction
• “You have N (New) message” announcement
5.6 Remote interrogation.
The remote interrogation facilities, which shall be protected by the security code. During remote
interrogation from the line, the handset shall display “REMOTE” and only KEY_TALK is valid during
this mode to interrupt the remote interrogation.
5.6.1 With Voice prompt
• Access to the remote interrogation feature shall be via a break-in instruction at any time
following the start of the outgoing message. The break-in code (DTMF *). A maximum of two
attempts at entering the correct security code shall be allowed in one call.
70 of 83
• Following acceptance of the break-in code (*), the unit shall suspend its current operation,
announce to line "Please enter your security code", and prepare to accept the first digit of
the PIN. If no further digits are entered within a further 8-second period, the unit send
L_beep and releases the line.
• If less than three digits are entered within an 8-second period, following any DTMF ‘*’, the
unit shall announce to line "Incorrect security code, please enter your security code". It shall
then prepare to accept the whole PIN again, within a further 8-second period as on the first
attempt. The process is as for the first attempt but if the second attempt is unsuccessful
then the unit shall announce "Incorrect security code” and send L_beep and then release
the line.
• e unit recognises the third DTMF digit the unit shall check the validity of the PIN. If
the PIN is incorrect, (and if this is the first attempt), the unit shall announce to line "Incorrect
security code, please enter your security code". It shall then prepare to accept the first digit
of the PIN again, within an 8-second period as on the first attempt. The process is as for the
first attempt but if the second attempt is unsuccessful then the unit shall announce "Incorrect
security code” and send L_beep and then release the line.
• If the PIN was correct and the unit has new messages, the unit announces "You have 'n'
new message(s)" and the new messages are played to line. If the caller clears the line
during Remote Interrogation, the unit will not hold the line indefinitely. If the caller has
cleared the unit shall, at worst, clear after the 8-second period at the end of message
playback.
• If the unit does not have any new messages then the unit announces “You have no new
messages” then "To hear main menu, press 1" waits 8 seconds and if no DTMF instructions
are received and send L_beep before releasing the line.
• After message play, all messages may be deleted if DTMF 5 is keyed within 8 seconds of
the end of the prompt “End of messages. To delete all messages, press 5. To hear main
menu, press 1”. If DTMF 5 is detected at this stage, “All messages deleted “To hear main
menu, press 1” shall be announced and all the messages just played shall be deleted (new
messages only when only new messages have been played). If no instruction is received
within 8 seconds the unit shall and send L_beep and release the line.
• If DTMF 1 is received the unit shall play the menu:
To play all messages, press 2
To play new messages, press 3
To skip back during messages, press 4
To delete during messages, press 5
To skip forward during messages, press 6
To set Answer on or off, press 7
To hear the Outgoing message menu, press 8
To set a new security code, press 9
To hear main menu again, press 1
• If DTMF 2 is detected at this stage, “You have ‘n’ message(s)” shall be announced then the
messages are played. At the end of the replay the unit shall offer the opportunity to delete
all messages as above. In this case, “All messages deleted” will include new and old
messages. If there is no messages to play the unit shall announce, “You have no
messages”.
• If DTMF 3 is detected at this stage, “You have ‘n’ new message(s)” shall be announced then
the messages are played. If there is no new messages to play the unit shall announce, “You
have no new messages”.
When th
71 of 83

• During message play, messages will be paused if DTMF 2 is received. The confirmation
tone will be heard after 10 seconds, which is repeated every 10 seconds.
• While message play is paused, it will resume if DTMF 2 is received. Confirmation that the
DTMF 2 has been detected will be by the user hearing the messages.
• If a message is left paused for more than 60 seconds, all messages shall be saved (except
those deleted before the last “End of messages” prompt), and send L_beep and then line
released.
• During message play or message pause, the current message will be replay if a single
DTMF 4 is received during message play. If DTMF 4 is received during message number
playing will skip back to the start of previous message. Messages will be selectively deleted
if DTMF 5 is received. Confirmation that the message has been deleted will be by the unit
announcing, "Message deleted" and skipping forward to play the next message, or to the
end of message sequence described above. Messages are marked for deletion at this stage
but are only actually deleted after the line is released.
• During message play, messages will skip forwards if DTMF 6 is received. Play will skip
forward to the start of the next message.
• It shall be possible to interrupt an operation or the remote interrogation menus by sending
an appropriate DTMF signal. If the remote menu is being playback, pressing invalid DTMF
has no effect (No 4 short beeps). The menu is being played without any interrupt. After the
menu is played to end, it waits the user enter the DTMF for 8 seconds, if a DTMF instruction
is received which is not valid, then 4 short beeps will be played to line and the count down
counter (8 seconds) keeps counting down. After 8 seconds time out, the unit will send
L_beep.
• If the end of messages is reached during skip forwards, “End of messages” will be played
after the DTMF 6 is recognised.
• If the line is released by the unit for any reason prior to the voice prompt signifying the end
of messages for current replay, all messages shall be saved (except those previously
marked for deletion).
• If the line is released for any reason after the voice prompt signifying the end of messages
but before a further replay is initiated, all messages shall be saved (except those previously
marked for deletion).
• After the line is released any messages that have not been deleted shall be saved and
indicated on the message counters.
• During remote interrogation, the handset shall display "REMOTE" flashing.
• If DTMF 7 is detecting during main menu, the unit shall announce, “Answer OFF” if the
previous setting is answer on. If the previous setting is answer OFF, the unit shall announce
“Answer On” followed by current setting OGM play.
• Any valid message recorded before remote interrogation is attempted (successfully or not)
shall be saved and indicated after the line is released (unless deleted during remote
interrogation).
5.6.1.1 Recording and checking outgoing messages in remote interrogation
• If DTMF 8 is detected at this stage, the unit shall announce:
To play outgoing message, press 2
72 of 83
To record answer and record outgoing message, press 3
To record answer only outgoing message, press 4
To select answer and record outgoing message, press 5
To select answer only outgoing message, press 6
To hear the outgoing message menu again, press 8
To hear main menu again, press 1
• If DTMF 2 is detected at this stage, the unit shall announce, “Your outgoing message is” and
play the currently selected OGM.
• If DTMF 3 or 4 is detected, the unit shall announce, “Please speak after the tone. To end
recording, press square” then play the invitation to record tone to line and start to record. At
the end of recording it will announce, “Your answer and record outgoing message is” (DTMF
3) or "Your answer only outgoing message is" (DTMF 4) as appropriate and play the new
message. The answer mode will remain unchanged after the recording: that is, the latest
outgoing message recorded will not affect the current answer mode. However, if the
memory is full during OGM recording, the unit will announce “Sorry, the memory full”. Then,
wait the remote interrogation without replay the recording OGM.
• If DTMF 5 is detected, the unit shall announce, “Your answer and record outgoing message
is” and play the current A&R OGM.
• If DTMF 6 is detected, the unit shall announce, “Your answer only outgoing message is” and
play the current AO OGM.
• Following any of the outgoing message menu functions as a result of detecting DTMF 2, 3,
4, 5, 6 the product shall announce:
To hear main menu again, press 1
To hear the outgoing message menu again, press 8
• If DTMF 8 is detected, the unit shall announce the outgoing message menu.
• If DTMF 1 is detected, the unit shall announce the main menu.
5.6.2 Without Voice prompt
All the operation shall be same as above except voice prompt and some menus as follows. So the
operation shall be as follows.
DTMF 2 ------ Play all messages
DTMF 3 ------ Play new messages
DTMF 4 ------ Skip back the message playing (This is only valid during playing messages)
DTMF 5 ------ Delete the message (This is only valid during playing messages)
DTMF 6 ------ Skip forward the message playing (This is only valid during playing messages)
The following functions are not for “No voice prompt”
Answer ON/OFF setting
Outgoing message menu
Security code setting
Main menu
If the unit detect the Digits 1, 7, 8, 9, 0, # or * during remote interrogation, the unit shall send the Error
tone to the line.
73 of 83
5.7 Technical requirement
The unit shall have the following function and parameter for EEPROM setting.
5.7.1 Default setting data
The following default data setting shall be inside the EEPROM
• Number of ring cadences for answering the call when the TAM is set to on
(XX times)
• Ringer period of incoming call for answering the call when the TAM is set to off
(XX S)
• Message alert on/off default setting
• Default OGM (Answer and record or Answer only)
• Default Day setting
• PIN code default data
• Answer and record OGM recording time limit (1- X minutes and no limit)
• Answer only OGM recording time limit (1- X minutes and no limit)
• Incoming message recording time limit (1- X minutes and no limit)
• Memo recording time limit (1- X minutes and no limit)
5.7.2 Setting for countries variance and type of product
• The day and time voice will be stamped at the beginning of each message or
end of each message.
• 7 segment LED or single LED for message indication
• With voice prompt or not
• Setting for Message play operation
- Short press “PLAY” button for New message play and Long press “Play”
button for All message play
- Short press “PLAY” button for All message play and Long press “Play” button
for New message play
5.7.3 BPR detection (Branch Phone Detection)
The product shall detect the branch phone OFF_HOOK during answering the call. Once detect the
OFF_HOOK, the unit shall release the line. The detection conditions are as follows.
• If the line current to the unit is changing more than 2mA
• The BPR detection shall not enable for “X” ms after TAM has been on line.
• The BPR signal shall be persisted more than “Y” ms for the BPR signal to be valid.
X and Y are defined by EEPROM setting.
X= 0ms - 2000ms (The setting shall be less than 100ms step or less)
Y= 100ms - 1000ms (The setting shall be less than 100mS step or less)
5.7.4 CPC (ECS) detection (End of call signal)
The product shall detect the CPC (ECS) signal during answering the call. Once detect the signal, the
unit shall release the line. The detection conditions are as follows.
74 of 83
• Detecting CPC signal duration is more than “X “ ms.
• The CPC detection shall not enable for “Y” second after Tam has been on line.
X and Y are defined by EEPROM setting.
X= 0ms - 200ms (The setting shall be less than 2ms step or less)
Y= 100ms - 1000ms (The setting shall be less than 100mS step or less)
5.7.5 Silence detection
The product shall have silence detection for detecting the silence. If the unit detect silence for more
than “X” second during recording the messages, the unit shall release the line. The silence mean if the
signal level is below “Y” dB at in put of the device.
The signal frequency is more than 4Khz and less than 250Hz is not treat as voice signal. Therefore, if
there is signal that is more than 4Khz or less than 250hz, but the unit still need to detect silence if the
voice band signal level is less than “-Y” dB. According to this requirement, it shall have the following
LPF and HPF after the AGC. The filet parameter shall be as follows.
• LPF ------ Fc (Corner frequency) ---- about 3.4Khz
Frequency response ------ more than 18dB OCT
• HPF ------- Fc (Corner frequency) ------------ About 300 Hz
Frequency response ---------- more than 24 dB OCT
“X” and “Y” are defined by EEPROM setting.
X= 3 seconds - 10 second (1 second step or less)
Y= 0 dB - 40dB (1dB step or less)
(This value is relative value to reference AGC output level)
5.7.6 Tone detection
The product shall have tone detection for detecting the network tone. If the unit detect network tone for
more than “X” second during recording the messages, the unit shall release the line. The tone
detection parameters are as follows.
• Detecting frequency is “Y” Hz to “Z” Hz
• Tone detector shall detect continues tone and also ON/OFF tone such as busy tone
“X”, “Y” and “Z” are defined by EEPROM
X= 3 seconds - 10 second (1 second step or less)
Y= 300Hz - 500Hz (10Hz step or less)
Z= 500Hz - 750Hz (10Hz step or less)
5.7.7 DTMF detection
The product shall have DTMF signal detection for remote interrogation. The detection parameters are
as follows.
• The duration of valid DTMF signal ---------- 50 ms
• The duration of valid inter digit pause ------ 50 ms
• Maximum twist level for detection ------------ +/- 10dB
• DTMF detection sensitivity is as follows
- If the level is more than “X” dB then it shall be detected
- If the level is less than “X” -10dB then it shall not be detected
“X” is defined by EEPROM setting
75 of 83
X= 0dB - 20dB (1dB step or less)
(This value is relative value to reference AGC output level)
5.7.8 AGC for recording
The product shall have the following AGC circuit for recording the message.
• Attack time ----------- “X”
• Decay time ----------- “Y”
• Line input level versus AGC output
Input level ------ 0dBm - -40dB
AGC output level needs to be less than 6dB level changing
It is better to have the AGC level control starting level “Z” setting.
“X”, “Y” and “Z” are defined by EEPROM
X= 50ms -300mS (10ms step or less)
Y= 100mS - 2000ms (10ms step or less)
Z= -30dB - -40dB (1dB step or less)
(“Z” is line input level)
5.7.9 Audio out put level setting
The product shall have the following independent level control setting by EEPROM.
• Voice prompt playback audio output level for Base speaker (Volume control position “5”)
• Voice prompt playback audio output level for the line
• Voice prompt playback audio output level for Handset
• Recorded message playback audio output level for Base speaker (Volume control position
“5”)
• Recorded message playback audio output level for the line
• Recorded message playback audio output level for Handset
• Supervisory tone audio output level for Base speaker (Volume control position “5”)
• Supervisory tone audio output level for the line
• Supervisory tone audio output level for Handset
5.7.10 Supervisory tone
The characteristics of the main tone shall be as follows.
• Level ------------------------ defined by section 5.8 setting
• Frequency ----------------- 1400Hz +/- 50 Hz
• Duration defined by ----- individual product MMI specification
5.7.11 Tail cut
The product shall have the setting for define the tail cut length for detecting the silence or network tone
during recording the message.
5.7.12 Ring signal detection
The product shall detect the Ring signal with the following conditions.
• Detection frequency --------- 13.5 Hz - 70Hz
• Ring ON detection period -------- “X” ms
• Ring OFF detection period ------ “Y” ms
• Call hung up the telephone ------ “Z” ms
(If product detect Ring ON and Ring OFF then it will count ‘1 cycle of Ring input“)
76 of 83
(Z is to define that caller hung up the phone without answer the call)
“X” and “Y” are defined by EEPROM setting.
X= 200ms - 800ms (10ms step or less)
Y= 200ms - 2000ms (10ms step or less)
Z= 3s - 10s (0.5s step or less)
5.7.13 LED flashing
LED flashing speed shall be as follows.
• Flashing fast ----------- 0.5s ON/OFF
• Flashing slow ---------- 1.75s / 0.25s alternatively
5.7.14 Data storage
The recorded data, voice prompt data and voice prompt combination table shall be stored to the data
Flash memory.
The product will be for any countries and therefore the voice prompt language will be different.
77 of 83

6 Prefix dialling
There are two data for prefix dialing. One is Detect string and other is Replace string. If user enter the
number and first several string match with the pre-programmed string data, then the string will be
replaced by pre-programmed Replace string data. This function can be enabled or disabled by
EEPROM setting. Prefix dial feature should default to disabled.
6.1 Detect string
The pre-programed detect string is 5 digits inside the EEPROM. The data is 1 to 0 and F (F is for
blank) If the Detect string need to be 003 then the data shall be F,F,0,0,3
6.2 Replace string
The pre-programed replace string is maxmum 10 digits inside the EEPROM. The data is 1 to 0
6.3 Detecting and replacment
The prefix dialing is only working when the dialing is prepared dialing which mean enter the dial
number during idle mode and then OFF HOOK. The prduct will check the first few digis (maximum 5
digits depended on Detect string data) and if match with detect string, then replace the detected string
to the replace string. If the detect string is all F, there will be no matching and add the replace string to
the dialed number except the dialed number starting from not 1 to 0.
EX 1
Detect string : FFF00
Replace string : 1234567
Dialing number : 00567456
The product will dial ---- 1234567-567456
EX 2
Detect string : FFFFF
Replace string : 1234567
Dialing number : 00567456
The product will dial ---- 1234567-00567456
EX 3
Detect string : FFFFF
Replace string : 1234567
Dialing number : 13567456
The product will dial ---- 1234567-13567456
EX 4
Detect string : FFFFF
Replace string : 1234567
Dialing number : #13567456
The product will dial ---- #13567456
EX 5
Detect string : FFFF0
Replace string : 1234567
Dialing number : 00567456
The product will dial ---- 1234567-0567456
EX 6
Detect string : FFFF0
Replace string : 1234567
78 of 83
Dialing number : 0567456
The product will dial ---- 1234567-567456
EX 7
Detect string : FFF00
Replace string : 1234567
Dialing number : 0567456
The product will dial ---- 0567456
79 of 83

7 Quick default settings
If you have lost your PIN code, the following procedure allows you to restore default settings on
handset and base.
Press KEY_STAR on handset when power up (insert and remove batteries). The display shows
“DEFAULT”. Press KEY_OK. When the handset locks onto its base, both will restart.
80 of 83

8 Subscribe a new handset
Refer to MENU mode’s REGISTER page
Note that if a handset fails to register to the Base, certain functions will not be available. On trying to
access the functions, the user will be presented with an error beep. Where a function is not available,
it is described in the individual menu section.
The base can support a maximum of 5 handsets. If you already have 5 handsets, and you wish to
change one of them, you must firstly delete a handset, then associate the new handset.
For SMS
On Handset registration, a sub-address equating to the handset number will be assigned and a private
mailbox created for that handset.
On Handset de-registration, the mailbox associated with that Handset will be automatically deleted.
81 of 83

9 Test modes
9.1 Handset test modes
Refer to document of TEST MODE
9.2 Base unit test modes
Refer to document of TEST MODE
The product shall have at least the following test mode.
• Continuous recording mode for line and local
• Continuous recorded message playback mode for line and local
• Continuous voice prompt playback mode for line and local
• All voice prompt playback mode
• Co tenuous supervisory tone play mode
• Silence detection indicator
• Network tone indicator
82 of 83

83 of 83
10 Specifications
10.1 CLIP Standards
The phone supports the following CLIP features defined by the identified standard:
Feature Country Standard
FSK type I All applicable ETS 300 659-1
FSK type II ETS 300 659-2
Note : No impedance matching is required
British Telecom S4005 Requirements for Caller Display Products, Version 1, February 2005
Telia, CID Requirement Specification, 1056-1B, 2001-01-12
Transfer of number information on analogue exchange line, incoming call, 8211 A-331 E, 92-12-14
Tele Danmark, PSTN Supplementary Services, Call Waiting with CLIP DTMF Supplementary
Services, TDK-TS 900 268, April 1998
Tele Danmark, Sending of A-subscriber number on B-Subscriber line in PSTN, TDK-TS 900 216, April
1998
Tele Danmark, User-network access protocol specification for MWI notification using DTMF signalling,
TDK-TS 900 231-2, April 1997
GFI 9502 “CLIP DTMF” Protocol 12.12.95
Telenor, FSK Signalling towards Analog PSTN interfaces, A21-1, Edition 2, 990812
Dutch Telecom, Calling Line Indication Presentation, T11-12E, 28P
th
P Sep 1995
KPN, Fixed Network Access Terminations, Part II, Analogue Network Terminations (PSTN), version
3.3, November 2003
10.2 DECT Specifications
The phone complies with the following standards
Part Standard
DECT Radio EN301 406
DECT GAP TBR 22
Analog Telephone Network TBR 21 and TBR 38
EMC EN301 489-1 and EN301 489-6
Safety EN 60950
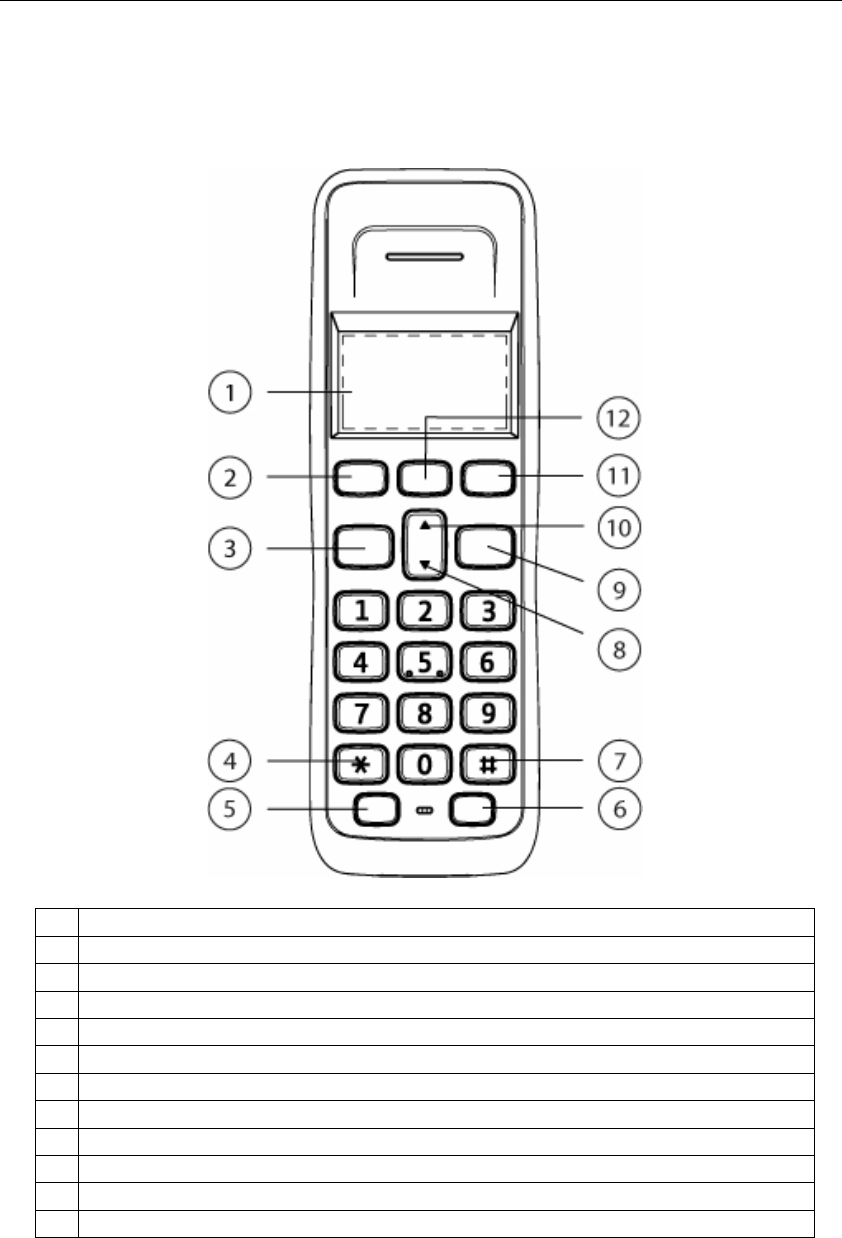
Product Definition Document SGW Europe Ltd.
PD489 8
2 Panel Layout
2.1 Handset
1 1-line Black and White excluding icons; Alphanumeric 14 segments x 12
2 Phonebook / Clear / Back
3 Talk On
4 * / Switch from Pulse to Tone / Engage Key Lock
5 Recall / Intercom
6 Last Number Redial
7 # / Enter Pause
8 Enter Calls List / Volume Down / Scroll Down
9 Talk Off / Power On/Off
10 Volume Up / Scroll Up
11 Menu / OK / Mute
12 GOOGLE 411 key
Note: Space is on KEY_1.
Note 2: Long press on KEY_0 will toggle idle screen between the Handset Name and
number and the HH:MM time display.
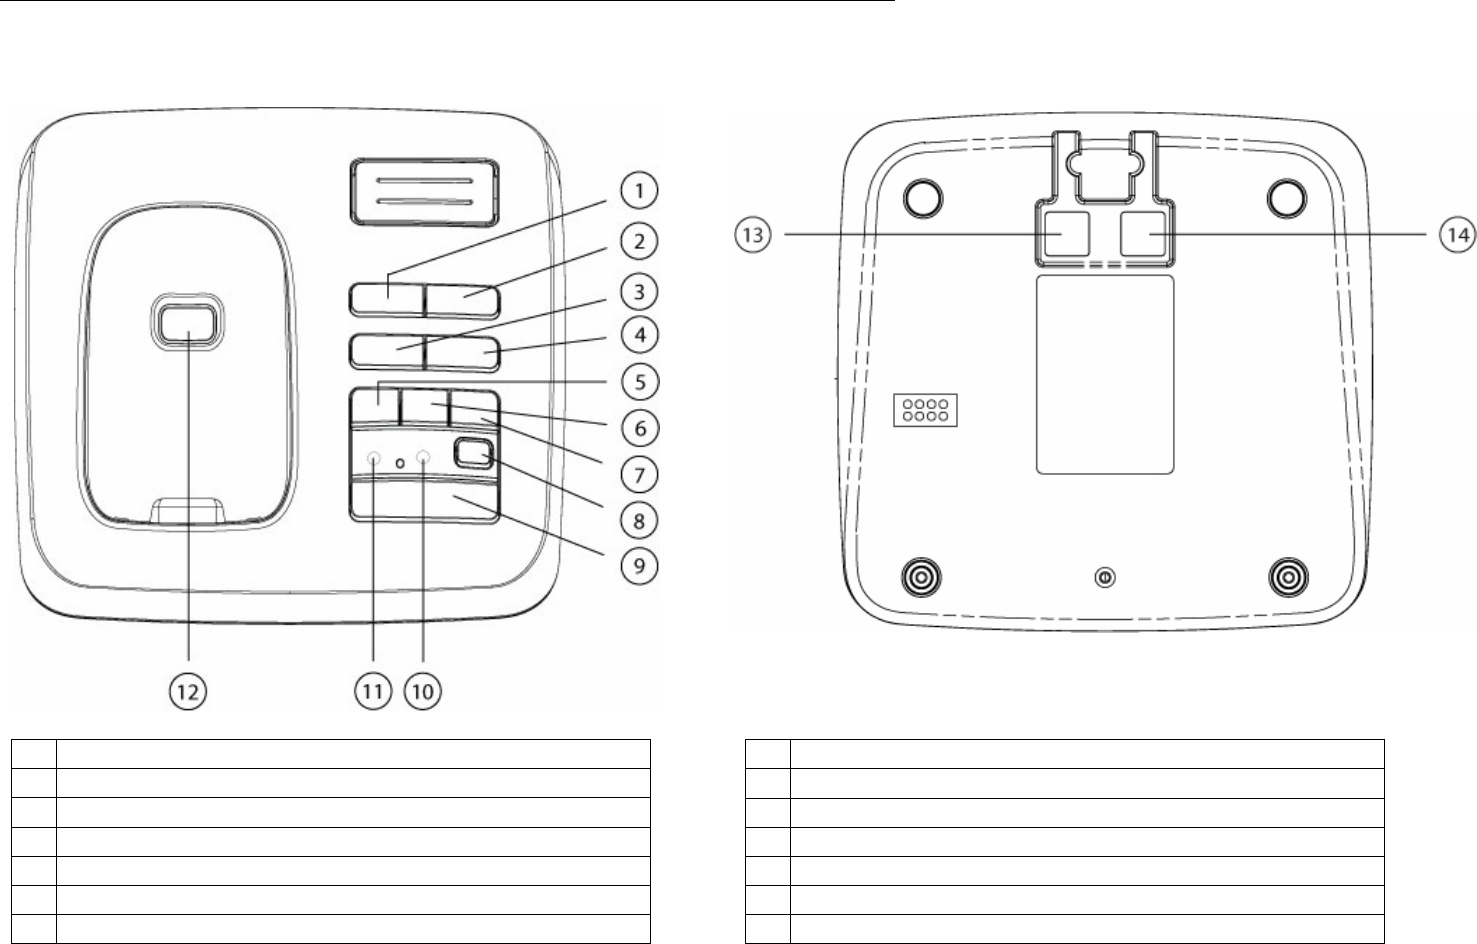
Product Definition Document SunCorp Communications (Europe) Ltd.
PD485
2.2 Base
1 Volume Down
2 Volume Up
3 Answer On/Off
4 OGM
5 Skip Backwards / Set Answer Alert
6 Stop
7 Skip Forward / Set Answer Delay
8 Delete
9 Play / Pause
10 New TAM Message Indicator LED (Red)
11 Power / In use / Events Indicator LED (Green)
12 Page Key
13 Telephone Line connector port
14 Main Power connector port
Warning:
This device complies with part 15 of the FCC Rules. Operation is subject to the following two conditions: (1) This
device may not cause harmful interference, and (2) this device must accept any interference received, including
interference that may cause undesired operation. Changes or modifications not expressly approved by the party
responsible for compliance could void the user's authority to operate the equipment.
Privacy of communications may not be ensured when using this telephone!