HACH LANGE LOC100 The LOC 100 RFID Tag read/write device can be used to write the operator ID and location ID to a RFID label on a sampling bottle together with the time and date. This information (sample ID) can then be read by an RFID-compatible photometer User Manual Doc012 97 98 90327 QRG
HACH LANGE GmbH The LOC 100 RFID Tag read/write device can be used to write the operator ID and location ID to a RFID label on a sampling bottle together with the time and date. This information (sample ID) can then be read by an RFID-compatible photometer Doc012 97 98 90327 QRG
UserMan

DOC012.978.90327
LOC 100
06/2011, Edition 2A
Pъководство за потребителя bg
Uživatelská příručka cs
Brugervejledning da
Bedienungsanleitung de
Εγχειρίδιο Χρήστη el
User Manual en
Basic User Manual en
Manual del usuario es
Manual básico del usuario es
Manuel d'utilisation fr
Manuel d'utilisation de base fr
Korisnički priručnik hr
Felhasználói kézikönyv hu
Manuale utente it
Instrukcja obsługi pl
Manual do utilizador pt
Manual do utilizador básico pt
Manual al utilizatorului ro
Pуководство пользова ru
Návod na použitie sk
internal use only
Uporabniški priročnik sl
Bruksanvisning sv
Kullanım Kılavuzu tr
internal use only
Deutsch ........................................................................................................................................................... 3
English ........................................................................................................................................................... 15
internal use only

Deutsch 3
Deutsch
Technische Daten
Änderungen vorbehalten.
Leistungsspezifikationen
Display 128 x×64 Punkte
Eingabe 3 Folientasten
Stromversorgung 2 wiederaufladbare AA Ni-MH Akkus (im Lieferumfang enthalten)
Betriebsstunden 1000 Arbeitszyklen, ca. 2 Monate
Ladezeit bei Vollladung 18 Stunden
Schnittstelle Mini-USB
Echtzeituhr Genauigkeit 1 Sek./Tag
Größe 65 x×22 x×120 mm
Gewicht 166 g
internal use only
Deutsch 4
Sicherheitshinweise
Lesen Sie die gesamte Bedienungsanleitung sorgfältig durch, bevor Sie
das Gerät auspacken, aufstellen und in Betrieb nehmen. Achten Sie auf
alle Gefahren- und Warnhinweise. Nichtbeachtung kann zu schweren
Verletzungen des Bedieners oder zu Beschädigungen am Gerät führen.
Um sicherzustellen, dass die Schutzvorrichtungen des Geräts nicht
beeinträchtigt werden, darf dieses Gerät auf keine andere als die in
dieser Bedienungsanleitung beschriebene Weise verwendet oder
installiert werden.
Hinweis: Informationen, die Aspekte aus dem Haupttext ergänzen.
Warnschilder
Beachten Sie alle Kennzeichen und Schilder, die am Gerät angebracht
sind. Nichtbeachtung kann Personenschäden oder Beschädigungen des
Geräts zur Folge haben. Für auf dem Instrument angebrachte Symbole
finden sich in der Bedienungsanleitung entsprechende Warnhinweise.
RFID-Modul
RFID Technologie ist eine Funkanwendung. Funkanwendungen
unterliegen nationalen Zulassungsbedingungen. Die Benutzung des
LOC 100 ist aktuell in den folgenden Ländern erlaubt: EU. Wir weisen
darauf hin, dass außerhalb der genannten Regionen die Benutzung des
LOC 100 gegen nationales Recht verstoßen kann. Der Hersteller behält
sich vor auch in weiteren Ländern Zulassungen zu erwirken. In
Zweifelsfällen kontaktieren Sie bitte Ihren zuständigen Vertriebspartner.
Das LOC 100 enthält ein RFID-Modul zum Empfangen und Senden von
Informationen und Daten. Das RFID-Modul arbeitet mit einer Frequenz
von 13.,56 MHz.
GEFAHR
Zeigt eine potenziell oder unmittelbar gefährliche Situation an, die, wenn sie nicht
vermieden wird, zum Tod oder zu schweren Verletzungen führt.
WARNUNG
Zeigt eine potenziell oder unmittelbar gefährliche Situation an, die, wenn sie nicht
vermieden wird, zum Tod oder zu schweren Verletzungen führen kann.
VORSICHT
Kennzeichnet eine mögliche Gefahrensituation, die geringfügige oder
mittelschwere Verletzungen zur Folge haben kann.
ACHTUNG
Kennzeichnet eine Situation, die, wenn sie nicht vermieden wird, zu Schäden am
Gerät führen kann. Informationen, die besonders hervorgehoben werden sollen.
Dieses Symbol kann am Gerät angebracht sein und verweist auf
Bedienungs- und/oder Sicherheitshinweise in der
Bedienungsanleitung.
Mit diesem Symbol gekennzeichnete elektrische Geräte dürfen ab
dem 12. August 2005 europaweit nicht mehr im unsortierten Haus-
oder Gewerbemüll entsorgt werden. Gemäß geltenden
Bestimmungen (EU-Direktive 2002/96/EG) müssen ab diesem
Zeitpunkt Verbraucher in der EU elektrische Altgeräte zur Entsorgung
an den Hersteller zurückgeben. Dies ist für den Verbraucher
kostenlos.
Hinweis: Wenden Sie sich an den Hersteller oder
Lieferanten, um zu erfahren, wie Sie ausgediente Geräte,
vom Hersteller geliefertes elektrisches Zubehör sowie alle
Hilfsartikel zur sachgemäßen Entsorgung oder
Wiederverwertung zurückgeben können.
internal use only

Deutsch 5
Certification
FCC ID: YCB - LOC100
IC ID: 5879A - LOC100
This device complies with Part 15 of the FCC rules and Industry Canada
license exempt RSS standard(s).
Operation is subject to the following two conditions:
1. this device may not cause interference, and
2. this device must accept any interference, including interference that
may cause undesired operation of the device."
Changes or modifications to this equipment not expressly approved by
the party responsible for compliance could void the user's authority to
operate the equipment.
This equipment has been tested and found to comply with the limits for a
Class A digital device, pursuant to Part 15 of the FCC rules. These limits
are designed to provide reasonable protection against harmful
interference when the equipment is operated in a commercial
environment. This equipment generates, uses and can radiate radio
frequency energy and, if not installed and used in accordance with the
instruction manual, may cause harmful interference to radio
communications. Operation of this equipment in a residential area is
likely to cause harmful interference, in which case the user will be
required to correct the interference at their expense. The following
techniques can be used to reduce interference problems:
1. Disconnect the equipment from its power source to verify that it is
or is not the source of the interference.
2. If the equipment is connected to the same outlet as the device
experiencing interference, connect the equipment to a different
outlet.
3. Move the equipment away from the device receiving the
interference.
4. Reposition the receiving antenna for the device receiving the
interference.
5. Try combinations of the above.
Befolgen Sie zusätzlich zu den lokal geltenden Richtlinien die folgenden
Sicherheitshinweise.
Sicherheitshinweise für die bestimmungsgemäße Verwendung des
Geräts:
•Betreiben Sie das Gerät nicht in Krankenhäusern oder
vergleichbaren Einrichtungen in der Nähe von medizinischen
Gerätschaften, wie etwa Herzschrittmachern oder Hörgeräten.
•Betreiben Sie das Gerät nicht in der Nähe von hochbrennbaren
Stoffen, wie etwa Treibstoffen, leicht brennbaren Chemikalien und
Sprengstoffen.
•Betreiben Sie das Gerät nicht in der Nähe von brennbaren Gasen,
Dämpfen, oder Staub.
•Setzen Sie das Gerät nicht starken Vibrationen oder Stößen aus.
•Das Gerät kann in unmittelbarer Nähe von Fernsehgeräten, Radios
und Computern Störungen verursachen.
•Öffnen Sie nicht das Gerät.
Wenn Sie das Gerät nicht bestimmungsgemäß verwenden, führt das
zum Verlust der Garantie.
WARNUNG
Das Gerät darf nicht in gefährlichen Umgebungen verwendet werden.
Der Hersteller und seine Lieferanten übernehmen weder ausdrückliche oder
indirekte Garantie für die Verwendung bei Hochrisikoaktivitäten.
internal use only

Deutsch 6
Akkus
Lieferumfang
Zum Lieferumfang des LOC 100 gehören folgende Komponenten:
•RFID Lese-/Schreibeinheit LOC 100
•USB-Kabel
•zwei AA Ni-MH Akkus
•Bedienungsanleitung LOC 100
Hinweis: Sollte eines der aufgelisteten Teile fehlen oder defekt sein,
wenden Sie sich bitte sofort an den Hersteller oder die zuständige
Vertretung.
Produktbeschreibung
Mit dem RFID-Lese/Schreibgerät LOC 100 können Sie die
Informationen Anwender-ID und Probenort-ID zusammen mit Uhrzeit
und Datum auf ein Probenflaschen-Etikett schreiben.
Jeder Probenflasche sind dann eindeutig folgende Informationen
zugewiesen:
•Probenort: wo ist die Probe genommen worden?
•Zeit: Wann ist die Probe genommen worden?
•Anwender: Wer hat die Probe genommen?
Diese Informationen (Proben-ID) können anschließend von einem RFID-
fähigen Photometer eingelesen werden, um zusammen mit den
Messergebnissen gespeichert zu werden. So ist eine lückenlosen
Dokumentation von Probenort, Probennahmezeit und Anwender
gegeben.
Das RFID-Starter-Set zur Probenidentifikation besteht aus:
•dem RFID-Lese/Schreibgerät LOC 100
•zwei Anwender RFID-Tags
•fünf Probenort RFID-Tags
•fünf Sets Probenflaschen-Etiketten mit Proben RFID-Tags, in Rot
(3x×), Blau (3x×), Gelb (3x×), Grün (3x×) und Schwarz (3x×),.
Alle RFID-Tags können durch das LOC 100 bzw. dem RFID-Modul im
Photometer beliebig oft neu beschrieben und ausgelesen werden.
Im folgenden wird der Schreib- und Lesevorgang der einzelnen
Komponenten genau beschrieben.
GEFAHR
Feuer und Explosionsgefahr.
Verwenden Sie für das Messgerät nur die mitgelieferten NiMH-Akkus und stellen
Sie sicher, dass die Akkus richtig in das Akkufach eingesetzt sind. Ein falsches
Einsetzen der Akkus kann Schäden am Gerät, Feuer oder Explosionen zur Folge
haben.
Verwenden Sie auf keinen Fall Batterien. Der Einsatz von Batterien kann
Schäden am Gerät, Feuer oder Explosionen zur Folge haben.
internal use only
Deutsch 7
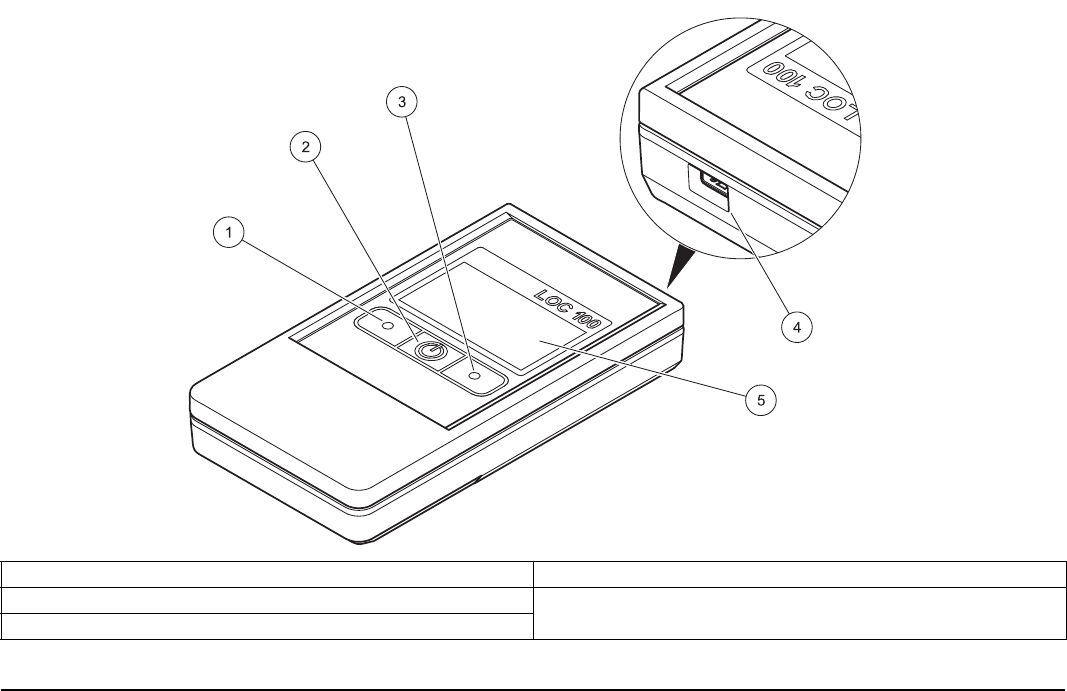
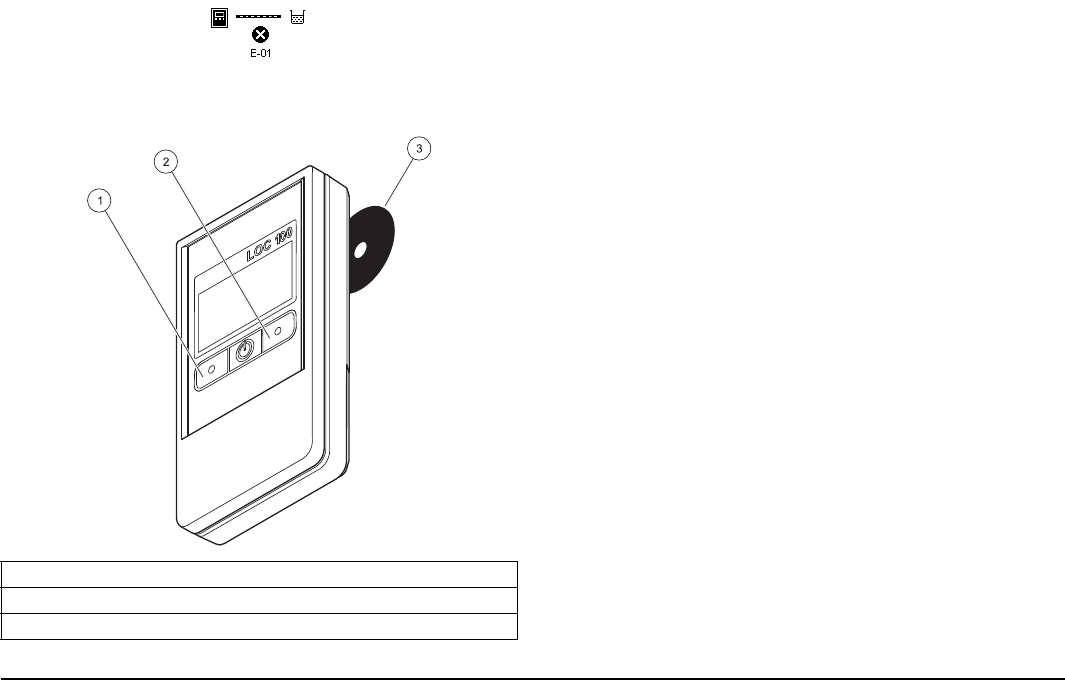
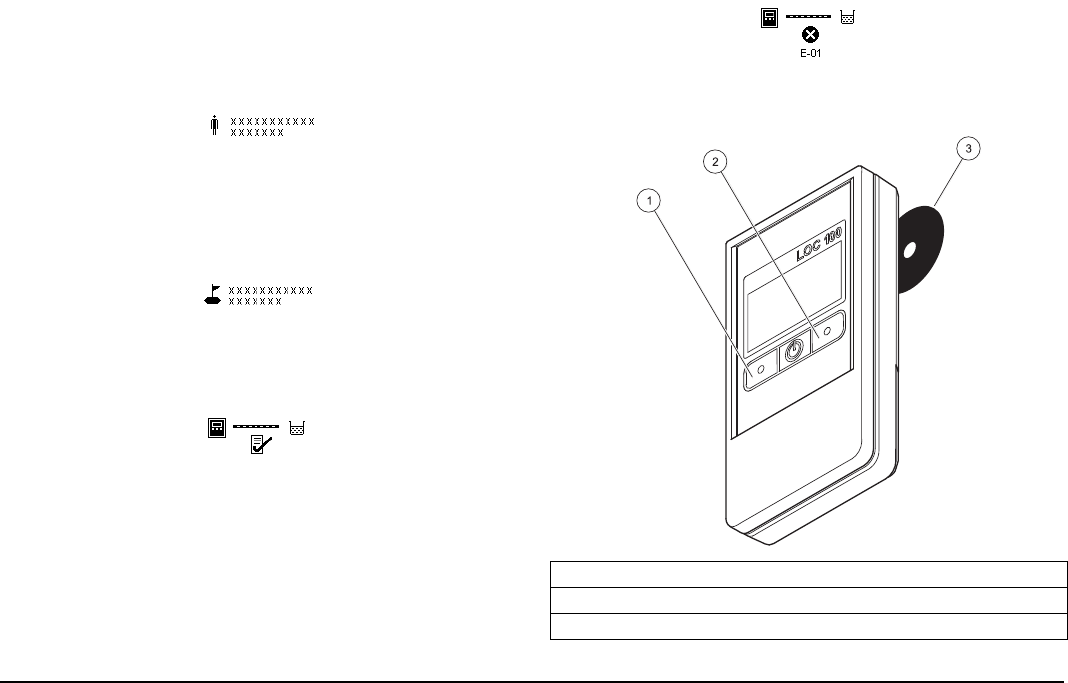
Abbildung 1 Frontansicht LOC 100
1. Taste links (Lesen) 4. Mini-USB Schnittstelle
2. Ein/Aus Taste 5. Display
3. Taste rechts (Schreiben)
internal use only

Deutsch 8
Abbildung 2 Rückansicht LOC 100
1. Schraube 3. RFID-Modul
2. Abdeckung Akkufach 4. Akku Typ AA (2x×)
internal use only
Deutsch 9
Inbetriebnahme
RFID-Lese/Schreibgerät LOC 100 vorbereiten
1. Öffnen Sie das Akkufach, indem Sie die Schraube auf der
Rückseite lösen.
2. Legen Sie zwei Akkus Typ AA in das Akkufach, beachten Sie die
Polung.
3. Schließen Sie das Akkufach wieder und fixieren es mit der
Schraube.
4. Schalten Sie das LOC 100 mit der Ein/Aus Taste ein.
a. Laden Sie die Akkus, indem Sie das LOC 100 über ein USB-
Kabel mit dem Photometer verbinden. Alterrnativ können Sie
den Ladevorgang auch über ein USB-Kabel mit einem
handelsüblichen PC oder einem Notebook durchführen.
b. Alternativ können Sie die Akkus in einem externen
handelsüblichen Ladegerät für NiMH-Akkus aufladen.
c. Lesen Sie den Ladezustand der Akkus über eine
Statusanzeige im Display des LOC 100 ab.
Die Nennkapazität der Akkus wird erst durch mehrmalige
Lade/Entlade-Zyklen erreicht.
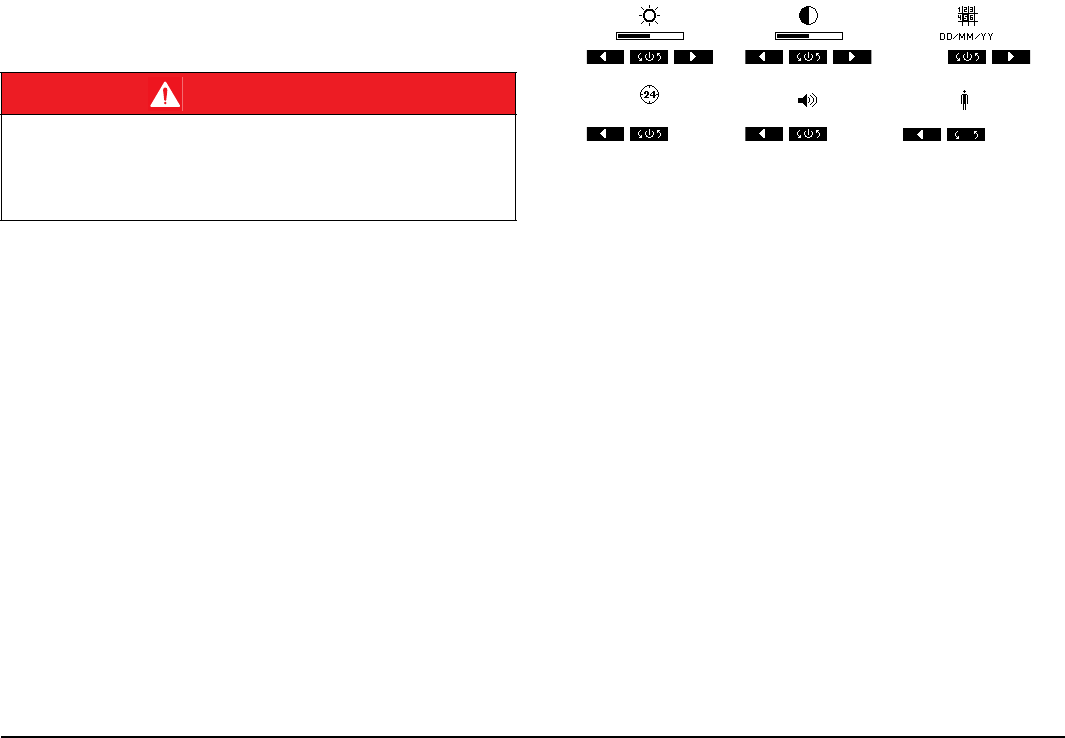
5. Durch längeres Drücken der Ein/Aus Taste öffnen Sie das
Konfigurationsmenü. Stellen Sie mit den drei Tasten Helligkeit,
Kontrast, Datum, Uhrzeit, Ton und Lesen der Anwender-ID ein.
Hinweis: Wenn das LOC 100 über ein USB-Kabel mit dem
Photometer verbunden ist, werden die Akkus geladen und das
LOC 100 übernimmt Datum und Uhrzeit vom Photometer.
Hinweis: Alle Einstellungen sind auch über den PC möglich. Verbinden
Sie hierzu das LOC 100 über das USB-Kabel mit dem PC . Das LOC 100
wird als RFID-Massenspeicher angezeigt, in der Datei RFID.exe können
die Einstellungen Helligkeit, Kontrast, Datum, Uhrzeit und Ton
vorgenommen werden.
GEFAHR
Feuer und Explosionsgefahr.
Verwenden Sie für das Messgerät nur die mitgelieferten NiMH-Akkus und keine
Batterien!
Stellen Sie sicher, dass die Akkus richtig in das Akkufach eingesetzt sind. Ein
falsches Einsetzen der Akkus kann Schäden am Gerät, Feuer oder Explosionen
zur Folge haben.
internal use only

Deutsch 10
Probenflaschen vorbereiten
Abbildung 3 Proben-ID Etikett auf Probenflasche
Kleben Sie ein Proben-ID Etikett so auf die Probenflasche, dass die
Unterkante des Etiketts ca. 2 cm über dem Flaschenboden ist.
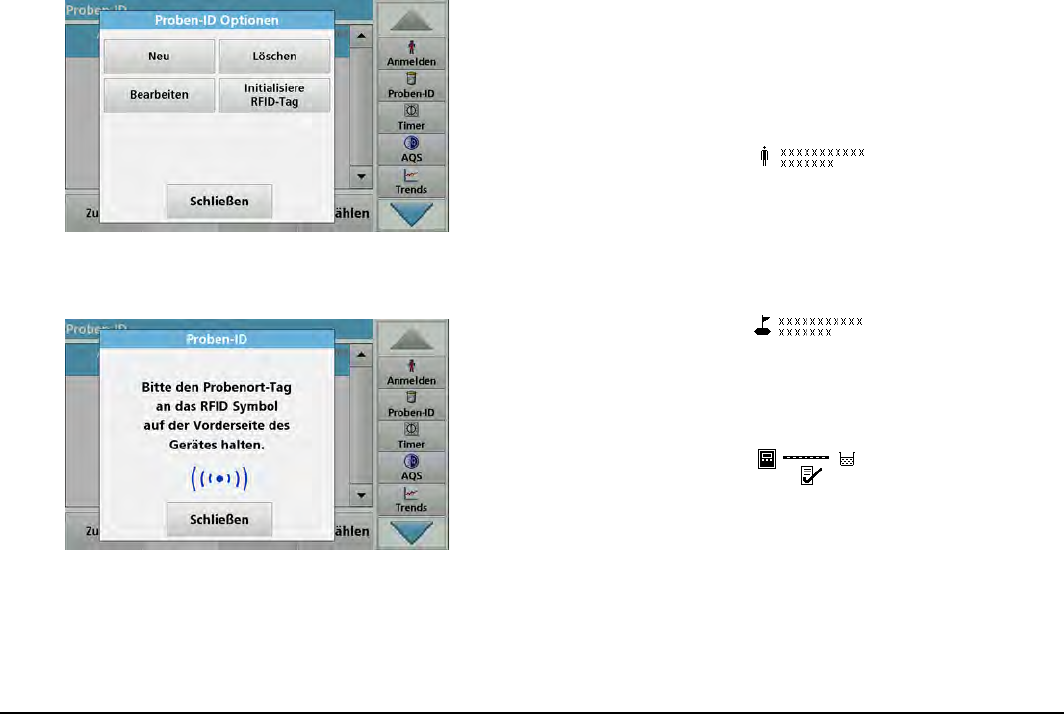
Initialisierung von Anwender und Probenort RFID-Tag
am Photometer
1. Definieren Sie eine Anwender-ID (siehe Photometer
Bedienungsanleitung).
2. Wählen Sie Initialisiere RFID-Tag.
3. Folgen Sie der Anweisung auf dem Bildschirm und halten Sie den
Anwender RFID-Tag vor das RFID-Modul des Photometers.
Ein Siglnalton bestätigt den erfolgreichen Schreibvorgang.
4. Sie können einen Anwender RFID-Tag jederzeit neu beschreiben.
Hierzu bestätigen Sie die Meldung „Anwender-ID überschreiben“
mit OK und geben, falls die alte Anwender-ID mit einem Passwort
geschützt ist, das Passwort ein.
5. Definieren Sie eine Proben-ID (siehe Photometer
Bedienungsanleitung).
internal use only
Deutsch 11
6. Tippen Sie Initialisiere RFID-Tag.
7. Folgen Sie der Anweisung auf dem Bildschirm und halten Sie den
Probenort RFID-Tag vor das RFID-Modul des Photometers.
Ein Siglnalton bestätigt den erfolgreichen Schreibvorgang.
8. Sie können einen Probenort RFID-Tag jederzeit neu beschreiben.
Hierzu bestätigen Sie die Meldung „Probenort RFID-Tag
überschreiben“ mit OK.
Daten einlesen und Etikett beschreiben
1. Schalten Sie das LOC 100 ein.
2. Lesen Sie die am Photometer initialisierte Anwender-ID ein, indem
Sie das LOC 100 über den Anwender RFID-Tag halten und die
linke Taste kurz drücken. Das LOC 100 versucht 5 Sek. lang das
Tag zu lesen. Nach erfolgreichem Lesen wird im Display die
Anwender-ID angezeigt. (Dieser Schritt ist optional - das Lesen der
Anwender-ID kann im Konfigurationsmenü deaktiviert werden)
3. Lesen Sie die am Photometer initialisierte Proben-ID ein, indem Sie
das LOC 100 über den Probenort RFID-Tag halten und die linke
Taste kurz drücken. Das LOC 100 versucht 5 Sek. lang das Tag zu
lesen. Nach erfolgreichem Lesen wird im Display die Probenort-ID
angezeigt..
4. Beschreiben Sie das leere Proben RFID-Tag, indem Sie das
LOC 100 über das Flaschenetikett halten und die rechte Taste kurz
drücken. Im Display wird eine erfolgreiche Übertragung angezeigt.
Hinweis: Proben RFID-Tags können auf diesem Weg beliebig oft
neu beschrieben werden. Proben RFID-Tags sind
spülmaschinenfest. Wiederholte Reinigung, insbesondere bei
höheren Temperaturen kann jedoch die Funktion des Tags
beeinflussen. Kontrollieren Sie den Proben RFID-Tag, indem Sie
den RFID-Tag mit dem Photometer auslesen (Proben RFID-Tag am
Photometer auslesen).
internal use only
Deutsch 12
Hinweis: Erfolgreiches Lesen oder Schreiben wird durch einen
einzelnen, langen Ton quittiert. Ein Fehler z. B. durch zu großen Abstand
zum Tag wird durch 5 kurze Töne und eine Fehlermeldung angezeigt.
Abbildung 4 Lesen und Schreiben von Daten mit dem LOC 100
Proben RFID-Tag am Photometer auslesen
1. Halten Sie das Etikett der Probenflasche vor das RFID-Modul des
Photometers.
Die Proben-ID wird eingelesen und als Schaltfläche in der
Werkzeugleiste im Photometer angezeigt.
2. Bestimmen Sie die Probenparameter, indem Sie die Probe gemäß
der Arbeitsvorschrift der entsprechenden Tests vorbereiten. Setzen
Sie die vorbereitete Küvette in den Küvettenschacht des
Photometers ein.
3. Die Messung wird gestartet und das Ergebnis wird angezeigt.
4. Tippen Sie auf die Proben-ID Schaltfläche in der Werkzeugleiste.
Die eingelesene Proben-ID wird der Messung zugeordnet.
5. Entnehmen Sie erst jetzt die Küvette.
Das Messergebnis wird zusammen mit der Proben-ID im
Photometer gespeichert.
Hinweis: Die Proben-ID wird solange als Schaltfläche in der
Werkzeugleiste angezeigt, bis das Photometer ausgeschaltet wird.
1. linke Taste (Lesen)
2. rechte Taste (Schreiben)
3. Anwender RFID-Tag oder Probenort RFID-Tag
internal use only
Deutsch 13
Fehlermeldungen
Angezeigte
Fehler Beschreibung der Fehler Fehlerbehebung
E-01 RFID Kommunikationsfehler :
Tag schickt keine Antwort
Entfernung zu groß oder Tag defekt.
Positionieren Sie den
RFID Tag näher am
Gerät oder ersetzen Sie
den Tag.
E-02 RFID Kollisionsfehler:
Mehrere Tags in Reichweite
Entfernen Sie alle Tags
aus dem Lesebereich, bis
auf den, der gelesen
werden soll .
E-03
Unbekannter oder falscher Tag:
Schreibversuch auf einem Tag, der
nur für einen Lesevorgang
vorgesehen ist, oder umgekehrt.
Einlesen der Anwender-ID, obwohl
diese Funktion deaktiviert wurde.
Überprüfen Sie, ob Sie
den richtigen Tag für den
Vorgang benutzen.
E-04 Fehler im Datenformat:
Die Datenstruktur auf dem Tag ist
fehlerhaft.
Tag ist beschädigt und
muss ersetzt werden.
Ersatzteile
Beschreibung Kat.-Nr.
RFID-Set zur Probenidentifikation, inklusive RFID Lese-/
Schreibeinheit LOC 100 und Anwender-, Proben- und
Probenort-Tags
LQV156.99.10001L
QV156.99.10002
RFID Lese-/Schreibeinheit LOC 100 LQV156.99.20001L
QV156.99.20002
2 RFID Anwender-Tags LZQ086
3 RFID Proben-Tags, schwarz LZQ067
3 RFID Proben-Tags, gelb LZQ068
3 RFID Proben-Tags, rot LZQ069
3 RFID Proben-Tags, blau LZQ070
3 RFID Proben-Tags, grün LZQ071
5 RFID Probenort-Tags, schwarz LZQ072
2 wiederaufladbare AA Ni-MH Akkus LZQ073
internal use only

Deutsch 14
internal use only
English 15
English
Specifications
Subject to change without notice.
Performance specifications
Display 128 x×64 pixels
Input 3 touch keys
Power supply 2 rechargeable AA Ni-MH batteries (included within the scope of delivery)
Operating hours 1000 work cycles, approx. 2 months
Charging time required for full
charge 18 hours
Interface Mini USB
Real-time clock Accuracy 1 second/tag
Size 65 x×22 x×120 mm
Weight 166 g
internal use only
English 16
Safety information
Please read this entire manual before unpacking, setting up, or
operating this equipment. Pay attention to all danger and warning
statements. Failure to do so could result in serious injury to the operator
or damage to the instrument.
To make sure that the protection provided by this instrument is not
impaired, do not use or install this instrument in any manner other than
that specified in these operating instructions.
Note: Information that supplements points in the main text.
Warning signs
Read all labels and tags attached to the instrument. Failure to do so may
result in personal injury or damage to the instrument. If noted on the
instrument, corresponding symbols will be included in the relevant safety
information in the user manual.
RFID module
RFID technology is a radio application. Radio applications are subject to
national conditions of authorization. The use of the LOC 100 is currently
permitted in the following countries: EU. The manufacturer advises that
the use of the LOC 100 outside of the above-mentioned regions may
contravene national laws. The manufacturer reserves the right also to
obtain authorization in other countries. In case of doubt, please contact
the distributor.
The LOC 100 contains an RFID module to receive and transmit
information and data. The RFID module operates with a frequency of
13.,56 MHz.
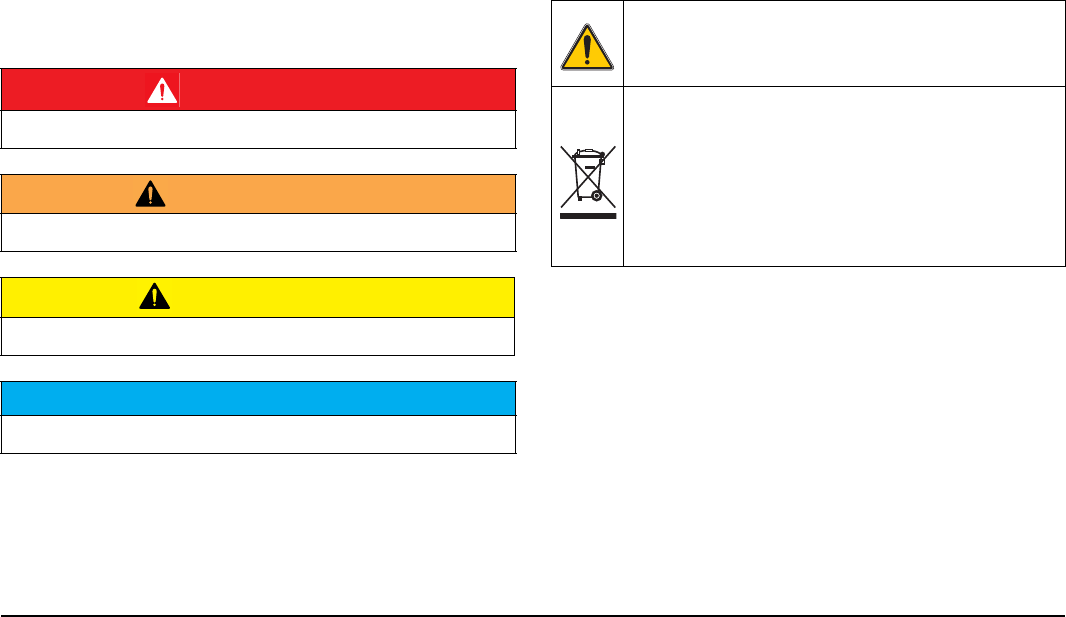
DANGER
Indicates a potentially or imminently hazardous situation that, if not avoided,
results in death or serious injury.
WARNING
Indicates a potentially or imminently hazardous situation that, if not avoided, may
result in death or serious injury.
CAUTION
Indicates a potentially hazardous situation that may result in minor or moderate
injury.
NOTICE
Indicates a situation that, if not avoided, could result in damage to the instrument.
Information that requires special emphasis.
This symbol may be noted on the instrument and refers to
operational and/or safety information in the user manual.
Electrical equipment marked with this symbol may not be disposed of
via European domestic or public disposal systems after 12 August
2005. In accordance with current regulations (EU Directive 2002/96/
EC), users within the EU must now return old electrical equipment to
the manufacturer for disposal The user bears no costs for this
process.
Note: Please contact the manufacturer or supplier for
instructions on how to return end-of-life equipment,
manufacturer-supplied electrical accessories and all auxiliary
items for proper disposal or recycling.
internal use only
English 17
Certification
FCC ID: YCB - LOC100
IC ID: 5879A - LOC100
This device complies with Part 15 of the FCC rules and Industry Canada
license exempt RSS standard(s).
Operation is subject to the following two conditions:
1. this device may not cause interference, and
2. this device must accept any interference, including interference that
may cause undesired operation of the device."
Changes or modifications to this equipment not expressly approved by
the party responsible for compliance could void the user's authority to
operate the equipment.
This equipment has been tested and found to comply with the limits for a
Class A digital device, pursuant to Part 15 of the FCC rules. These limits
are designed to provide reasonable protection against harmful
interference when the equipment is operated in a commercial
environment. This equipment generates, uses and can radiate radio
frequency energy and, if not installed and used in accordance with the
instruction manual, may cause harmful interference to radio
communications. Operation of this equipment in a residential area is
likely to cause harmful interference, in which case the user will be
required to correct the interference at their expense. The following
techniques can be used to reduce interference problems:
1. Disconnect the equipment from its power source to verify that it is
or is not the source of the interference.
2. If the equipment is connected to the same outlet as the device
experiencing interference, connect the equipment to a different
outlet.
3. Move the equipment away from the device receiving the
interference.
4. Reposition the receiving antenna for the device receiving the
interference.
5. Try combinations of the above.
Follow the following safety information, in addition to any local guidelines
in force.
Safety information for the correct use of the instrument:
•Do not operate the instrument in hospitals or comparable
establishments in the vicinity of medical equipment, such as pace
makers or hearing aids.
•Do not operate the instrument in the vicinity of highly flammable
substances, such as fuels, highly flammable chemicals and
explosives.
•Do not operate the instrument near combustible gases, vapors or
dust.
•Do not vibrate or jolt the instrument.
•The instrument can cause interference in immediate proximity to
televisions, radios and computers.
•Do not open the instrument.
Improper use of the instrument voids the warrantee.
WARNING
The instrument may not be used in dangerous environments.
The manufacturer and its suppliers reject any express or indirect guarantee for
use with high-risk activities.
internal use only
English 18
Batteries
Scope of delivery
The LOC 100 scope of delivery comprises the following items:
•LOC 100 RFID read/write device
•USB cable
•Two AA NiMH batteries
•LOC 100 user manual
Note: If any of these items are missing or damaged, please contact the
manufacturer or the responsible sales representative immediately.
Product description
The LOC 100 RFID read/write device can be used to write the operator
ID and location ID onto a sample bottle label together with the time and
date.
Every sample bottle then clearly has the following information assigned
to it:
•Location — where was the sample taken?
•Time — when was the sample taken?
•Operator — who took the sample?
This information (sample ID) can then be read by an RFID-compatible
photometer so that it can be saved together with the test results. This
allows the sample location, sample time and the operator to be
documented consistently.
The RFID starter set for sample identification comprises:
•The LOC 100 RFID read/write device
•Two operator RFID tags
•Five location RFID tags
•Five sets of sample bottle labels with sample RFID tags, in red
(3x×), blue (3x×), yellow (3x×), green (3x×) and black (3x×).
All RFID tags can be written and read out as many times as required
using the LOC 100 or the RFID module in the photometer.
The following describes the writing and reading process of the individual
components in detail.
DANGER
Risk of fire and explosion.
Only use the NiMH rechargeable batteries provided in the measuring instrument
and make sure that the batteries are correctly inserted into the battery
compartment. Incorrect insertion of the batteries could cause damage to the
instrument, fire or explosions.
Do not use other types of batteries under any circumstances. The use of other
types of batteries could cause damage to the instrument, fire or explosions.
internal use only

English 19
Figure 1 Front view of LOC 100
1. Left key (Read) 4. Mini-USB port
2. On/Off key 5. Display
3. Right key (Write)
internal use only

English 20
Figure 2 Rear view of LOC 100
1. Screw 3. RFID module
2. Battery compartment cover 4. AA rechargeable battery (2x×)
internal use only
English 21
Commissioning
Prepare the LOC 100 RFID read/write device
1. Open the battery compartment by releasing the screw on the back
side.
2. Insert two type AA batteries into the battery compartment; note the
poles.
3. Close the battery compartment and secure it with the screw.
4. Switch on the LOC 100 using the On/Off key.
a. To charge the batteries, connect the LOC 100 to the
photometer via a USB cable. Alternatively, the batteries can be
charged via a USB cable using a standard PC or laptop.
b. It is also possible to charge the batteries in a standard external
charger for NiMH rechargeable batteries.
c. The battery charge is shown via a status display on the
LOC 100 screen.
The nominal capacity of the batteries is not reached until
repeated charge/discharge cycles have been completed.
5. Press and hold down the On/Off key to open the Configuration
menu. Use the three keys to adjust the brightness, contrast, date,
time, tone and reader of the operator ID.
Note: If the LOC 100 is connected to the photometer via a USB
cable, the rechargeable batteries are charged and the date and time
are transferred from the photometer to the LOC 100.
Note: All settings can also be made from the PC. To do so, connect the
LOC 100 to the PC using a USB cable. The LOC 100 is displayed as an
RFID mass storage device; the settings for brightness, contrast, date,
time and tone can be changed in the RFID.exe. file.
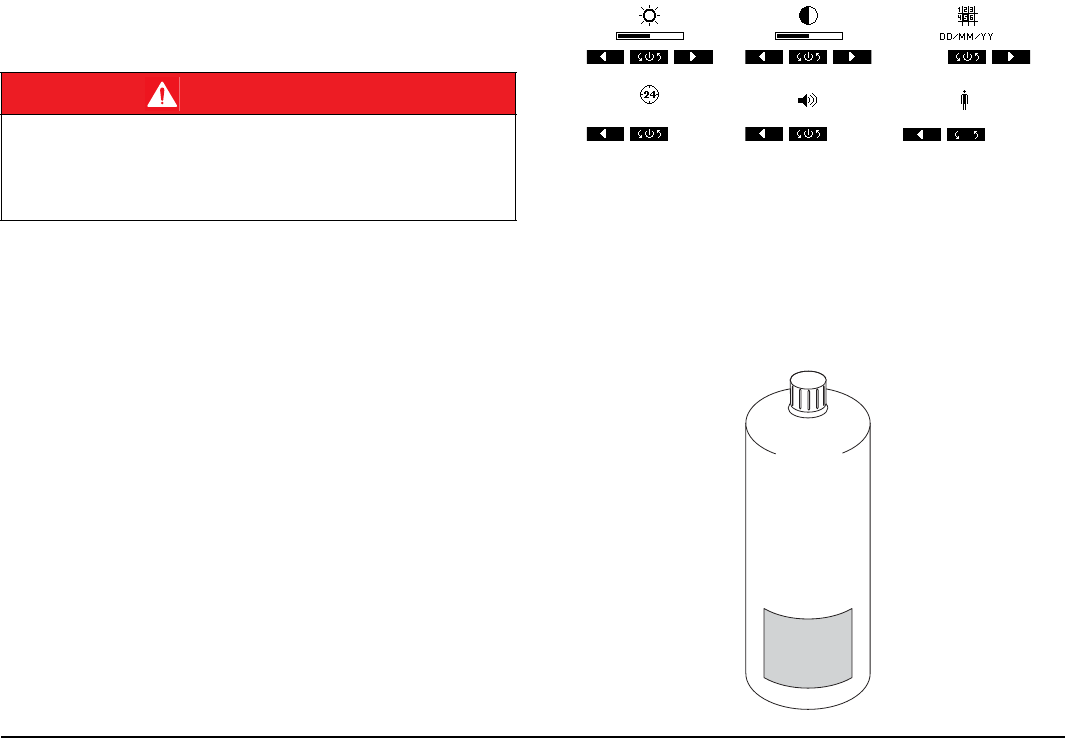
Prepare sample bottles
Figure 3 Sample ID label on a sample bottle
DANGER
Risk of fire and explosion.
Only use the NiMH batteries provided in the measuring instrument; no other
battery types are permitted.
Make sure that the batteries are inserted correctly into the battery compartment.
Incorrect insertion of the batteries could cause damage to the instrument, fire or
explosions.
internal use only
English 22
Glue the sample ID label onto the sample bottle so that the lower edge
of the label is approximately 2 cm above the bottom of the bottle.
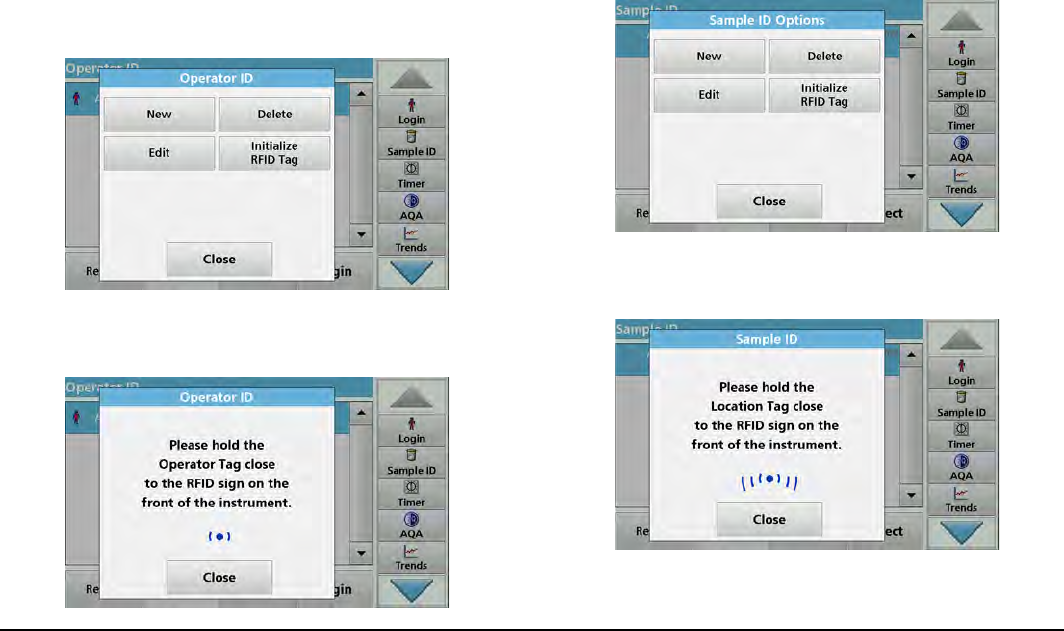
Initialize operator and location RFID tag on the pho-
tometer
1. Specify the operator ID (refer to photometer operating instructions).
2. Select Initialize RFID Tag.
3. Follow the onscreen instructions and hold the operator RFID tag in
front of the photometer RFID module.
A sound confirms that the writing process has been successful.
4. The operator RFID tag can be rewritten at any time. To do so,
confirm the "Overwrite Operator ID" message with OK and enter
the password, if the old operator ID is protected with a password.
5. Specify a sample ID (refer to photometer operating instructions).
6. Press Initialize RFID Tag.
7. Follow the onscreen instructions and hold the location RFID tag in
front of the photometer RFID module.
A sound confirms that the writing process has been successful.
8. The location RFID tag can be rewritten at any time. To do so,
confirm the "Overwrite location RFID tag" message with OK.
internal use only
English 23
Read data and write on label
1. Switch on the LOC 100.
2. Read in the operator ID initialized on the photometer by holding the
LOC 100 above the operator RFID tag and briefly pressing the left
key. The LOC 100 attempts to read the tag for five seconds. Once
the tag has been read successfully, the operator ID is shown on the
screen. (This step is optional. The option to read out the operator
ID can be deactivated in the Configuration menu).
3. Read in the sample ID initialized on the photometer by holding the
LOC 100 above the location RFID tag and briefly pressing the left
key. The LOC 100 attempts to read the tag for five seconds. Once
the tag has been read successfully, the location ID is shown in the
display.
4. Write on the empty sample RFID ID tag by holding the LOC 100
over the label and pressing the right key. A successful transfer is
shown in the display.
Note: This method can be used to write sample RFID tags as many
times as required. Sample RFID tags are dishwasher-proof.
However, repeated cleaning, particularly at high temperatures, can
impair the function of the tag. Read out the RFID tag using the
photometer (Read out the sample RFID tag on the photometer) to
check the sample RFID tag.
Note: One long tone indicates that the tag has been read or written
successfully. An error, e. g. because the distance from the tag is too
great, is indicated by five short tones and an error message.
Figure 4 Read and write data using the LOC 100
1. Left key (Read)
2. Right key (Write)
3. Operator RFID tag or location RFID tag
internal use only

English 24
Read out the sample RFID tag on the
photometer
1. Hold the sample bottle label in front of the photometer RFID
module.
The sample ID is read in and displayed as a button on the toolbar in
the photometer
2. To determine the sample parameters, prepare the sample in
accordance with the process specification for the relevant tests.
Insert the prepared cell into the photometer cell compartment.
3. This action will start the measurement process and the results will
be displayed.
4. Press the Sample ID key in the toolbar.
The read-in sample ID is assigned to the measurement.
5. Remove the cell.
The measurement result is saved with the sample ID in the
photometer.
Note: The sample ID will be shown as a key in the toolbar until the
photometer is switched off.
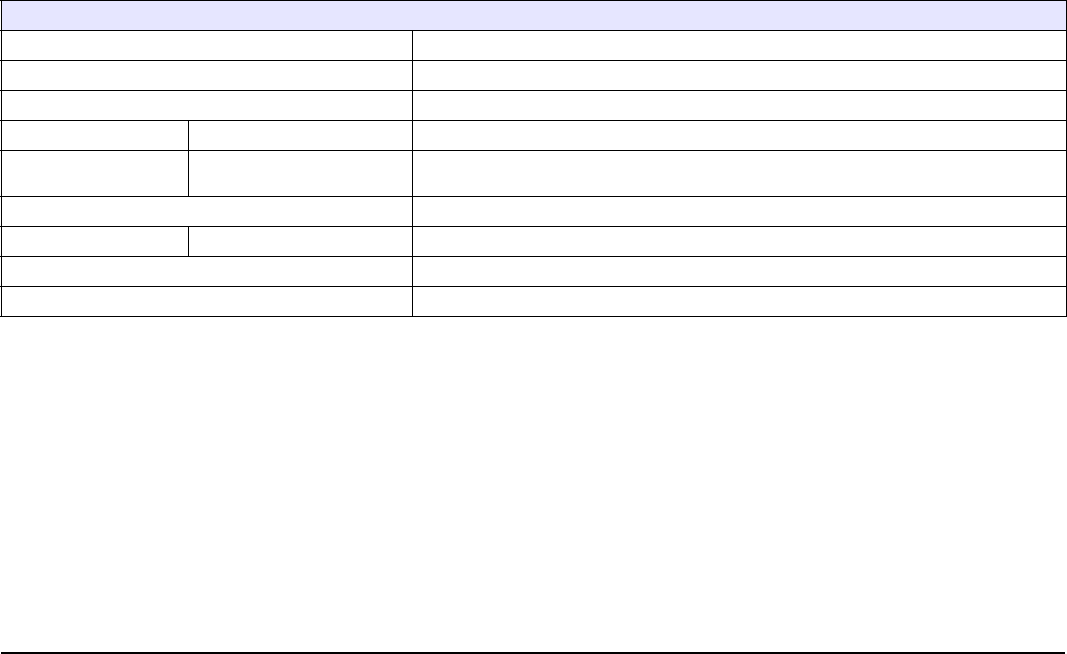
Error messages
Displayed
errors Error description Troubleshooting
E-01 RFID communication error:
Tag sends no answer.
Distance too great or tag defective.
Position the RFID tag
closer to the instrument
or replace the tag.
E-02 RFID collision error:
Several tags within range.
Remove all tags from the
reading area, except the
one that needs to be
read.
E-03
Unknown or incorrect tag:
Attempts to write on a tag intended
for reading or vice versa.
Reads in the operator ID, even
though this function was deactivated.
Check whether the
correct tag is being used
for the procedure.
E-04 Data format error:
The data structure on the tag is
incorrect.
Tag is damaged and
must be replaced.
internal use only
English 25
Replacement parts
Description Cat. no.
RFID set for sample identification, including LOC 100 RFID
read/write device and operator, sample and location tags LQV156.99.10001L
QV156.99.10002
LOC 100 RFID read/write device LQV156.99.20001L
QV156.99.20002
Two RFID operator tags LZQ086
Three RFID sample tags, black LZQ067
Three RFID sample tags, yellow LZQ068
Three RFID sample tags, red LZQ069
Three RFID sample tags, blue LZQ070
Three RFID sample tags, green LZQ071
Five RFID location tags, black LZQ072
Two rechargeable AA Ni-MH batteries LZQ073
internal use only

English 26
internal use only

www.hach.com www.hach-lange.com
© HACH Company-LANGE GmbH, 2011. All rights reserved. Printed in Germany
internal use only