HAHNTECH REH-1501 Two Way Personal Communicator User Manual REH 1501
HAHNTECH Co., Ltd. Two Way Personal Communicator REH 1501
HAHNTECH >
Users Manual
REH-1501 User Manual
1. Safety Information
* RF Operation Characteristics
- Your REH-1501 Device contains a transmitter and a receiver.
When it is ON, it receives and transmits radio frequency(RF) energy.
The REH-1501 operates in the frequency range of 900MHz and employs
digital modulation techniques.
When you communicate with your REH-1501, the output power level is
typically 1 Watt.
But transmissions occur infrequently and usually follow within a few
seconds of a page that has been received or when the unit is first turned
on.
In 1991, the Institute of Electrical and Electronics Engineers(IEEE), and in
1992, the American National Standards Institute(ANSI), updated the 1982
ANSI Standard for safety levels with respect to human exposure to RF
Energy.
Over 120 scientists, engineers, and physicians form universities,
government helth agencies and industry, after reviewing the available
body of research, developed this updated standard.
* Electronic Devices
Most modern electronic equipment is shielded form RF energy, however,
RF energy form your REH-1501 may effect inadequately shielded
electronic equipment.
Check with the manufacturer or it's representative to determine if the
following equipment or systems are adequately shielded from external RF
energy:
- Motor Vehicle electronic and entertainment systems(standard and any
add-on equipment)
- Medical Equipment, hospital or personal(such as pacemakers, hearing
aids, etc.)
Turn OFF your REH-1501 in health care facilities when any regulation
posted in the areas instructs you to do so. Hospitals or health care
facilities may be using equipment that could be sensitive to external RF
energy.
* Aircraft
Current regulations prohibit the use of certain types of portable electronic
devices(PEDs) on board commercial aircraft, due to the potential for
interference with navigational and communications equipment.
- The following devices may not be operated at any time on aircraft:two-
way transmitting pagers; commercial two-way transmitters(walkie-
talkies); and devices designed to radiate RF energy on a specific
frequency.
- The following devices may be operated when the aircraft is at the gate
with the boarding door open, or at the captain’s discretion only, when
the aircraft is away from the gate during extended ground time:
cellular telephones.
- Conventional one-way pagers may be operated at all times.
* Blasting Areas
To avoid interfering with blasting operations, turn OFF your REH-1501
when in a “blasting area” or in areas posted “Turn off two-way radio”.
Construction crews often use remote control RF devices to set off
explosives.
Potentially Explosive Atmospheres
Do not allow your REH-1501 to be within the proximity of any potentially
explosive atmospheres.
It is rare, but your REH-1501 may generate sparks. REH-1501s have
internal electronic circuits which may be operational even whin the device
is turned OFF or the battery removed.
Areas with a potentially explosive atmosphere are often, but not always,
clearly marked and include the following:
- Gas stations
- Below deck on boats
- Fuel or chemical transfer/storage facilities
- Areas where air may contain chemicals or particles, such as grain
dust, or metal powders
- Any area where you would normally be advised to turn OFF your
motor vehicle
Do not transport or store flammable gas, liquid, or explosives in the
compartment of your vehicle that contains your REH-1501.
2. Getting Started
2.1 Unpacking Your REH-1501
Your REH-1501 comes with the following parts and accessories
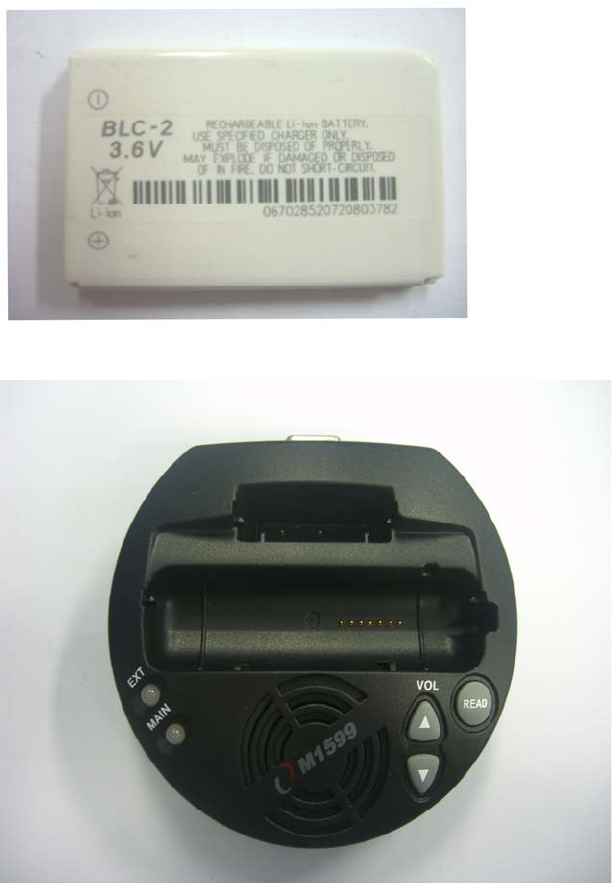
1) 3.6V Lithium Ion Battery
2) Battery Charger
3) Holster
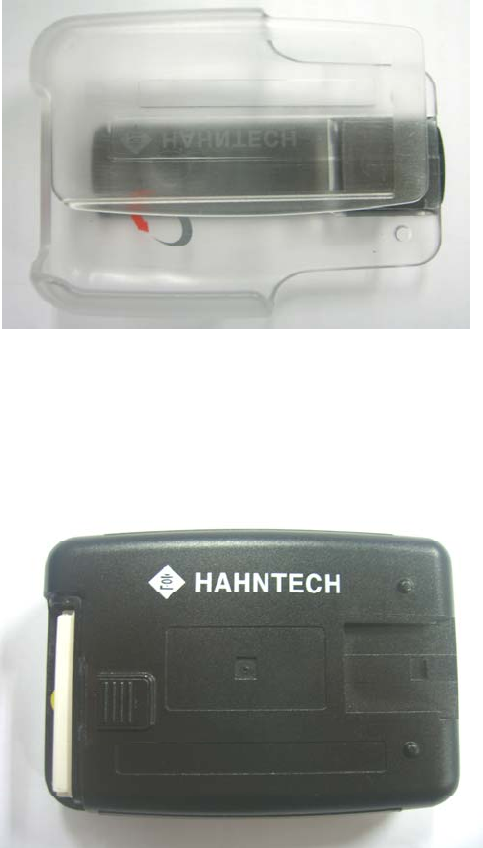
2.2 Installing Battery
1) Press down and slide cover off.
2) Push the battery into battery case.
- Label must be facing upward.
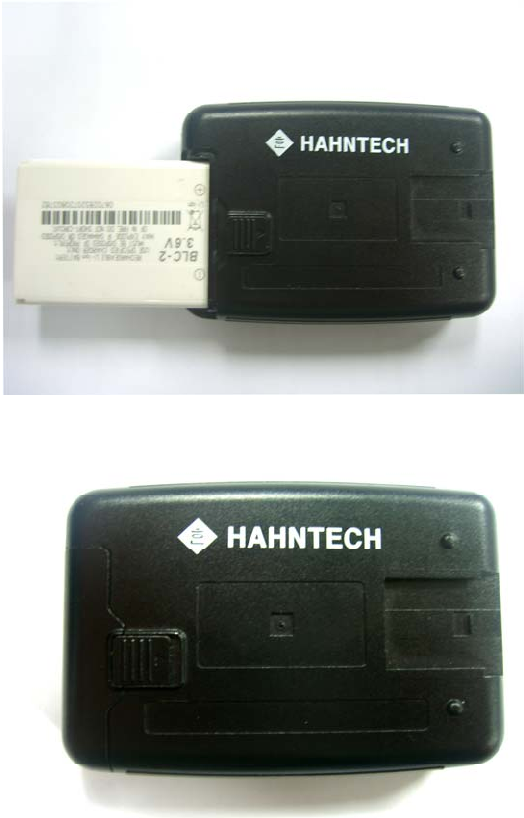
3) Press cover into place and slide fully closed
2.3 Charging the Battery
1) Connect Battery Charger
- Plug transformer into 115VAC power source.
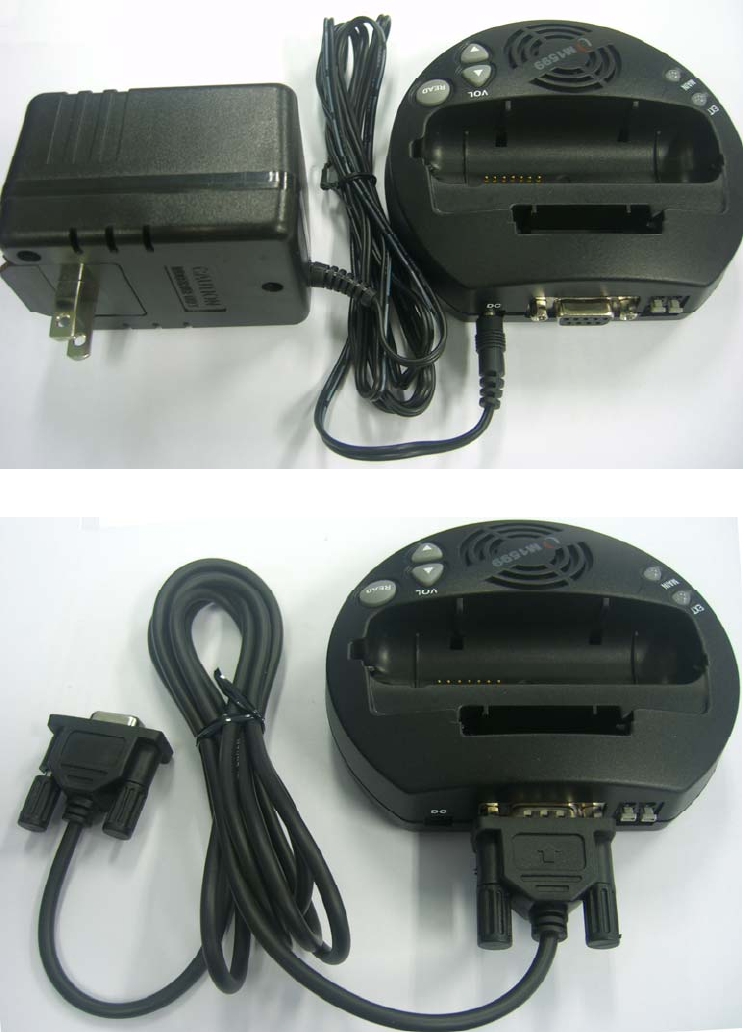
- Connect jack with charger.
2) Put REH-1501 into Battery charger.
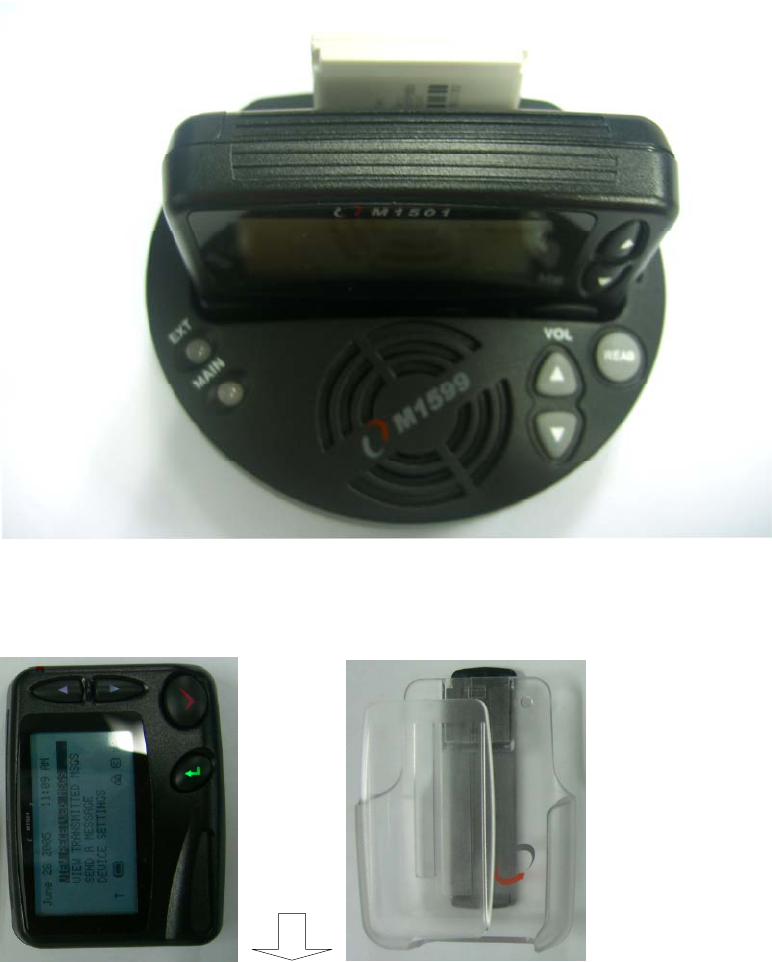
2.4 Using the REH-1501 Holster
A belt-worn holster is provided with your REH-1501.
After attaching the holster to your belt(using the belt clip on the back of
the holster), insert your REH-1501 into the holster with the Battery cover
at the top, facing inward.
The LCD display faces outward in the holster, with thumb grip at the top.
The REH-1501 is held firmly in place and can be easily grasped and
removed when you need to use it.
3. About your REH-1501
3.1 The External Contact Point
The external contact point is located on the front edge of your REH-1501.
You can plug in the REH-1501 to battery charger to recharge battery, or
the serial cable to exchange information between your REH-1501 and a
personal computer.
3.2 The Back Light
The LCD display and keyboard keys can be backlit for use in low light
conditions. Use any key to turn the back light on and off.
- To turn on the back light Device Setting -> System Setting ->
Backlight -> Use Backlight -> ON and Device Setting -> System
Setting -> Backlight -> Remain On -> 10 sec or 20 sec or 30 sec
- To turn off the back light Device Setting -> System Setting ->
Backlight -> Use Backlight -> OFF
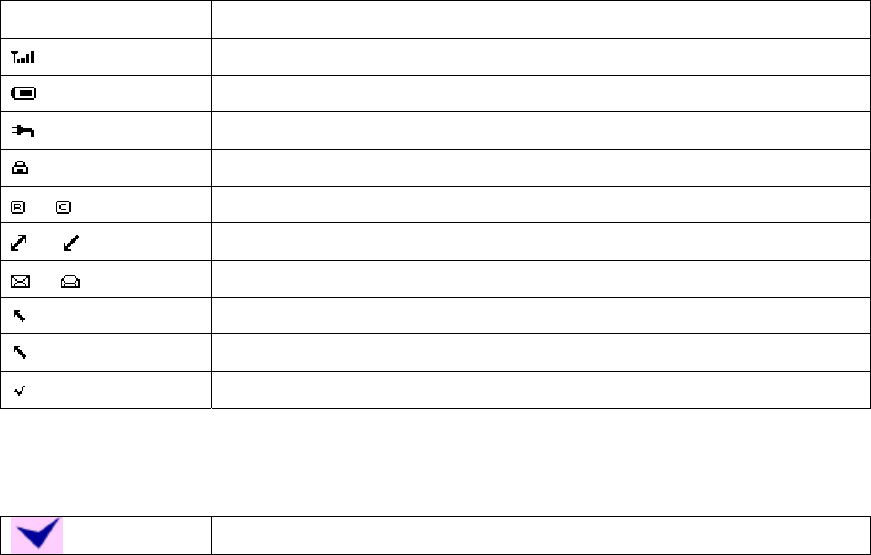
3.3 The LCD Display
As soon as you insert a charged battery in your REH-1501, the LCD screen
will show a display of text and system icons.
System Icon Description
Signal Strength
Battery Life
Battery Charging
Encryption On/Off
/ Campus / Roaming
/ Coverage
/ Unread/Read Message
Mail Sending
Sent Message
Send Complete
3.4 Key Board
The Key board consists of 4 keys.
Enter(Execute this menu)
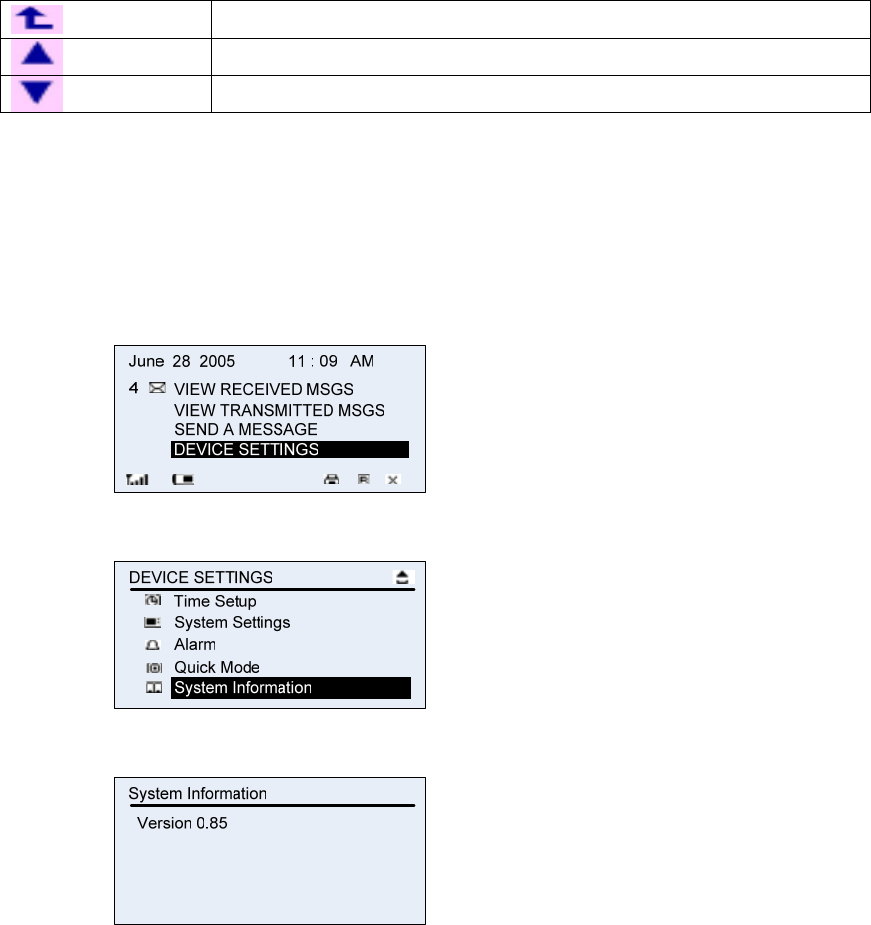
Escape(Go to previous menu)
Up
Down
4. Setting Up Your REH-1501
4.1 Viewing System Information
To view system information about your REH-1501:
1) Select DEVICE SETTINGS from main menu.
2) Select System Information from DEVICE SETTINGS menu.
3) Press Enter button.
4) When Finished, push ESC button to exit from the System Information
display and return to the Main menu.
4.2 Customizing the New Message Alert
You can change your inbox alert settings or turn the alert on or off. Alert
Setting is divided two region. First Global Setup and second Folder Setup.
The Global Setup is setup of all personal folder and Folder Setup is setup
of each personal folder.
4.2.1 Global Setup
1) Select DEVICE SETTINGS from main menu.
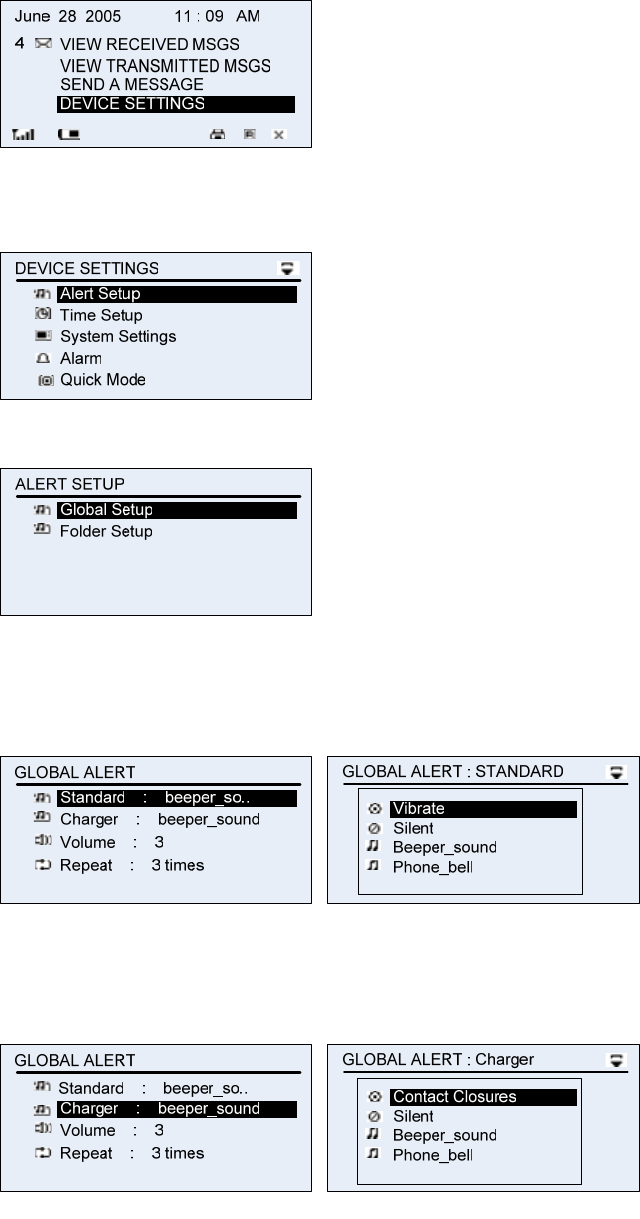
2) Select Alert Setup from DEVICE SETTINGS menu.
3) To Global Setting, Select Global Setup from ALERT SETUP
4) Select Standard, and Select alerting standalone sound among
vibrator, silent, beeper_sound, phone_bell, high_way_star,
beep_sound2.
5) For Setting charger alerting sound, select Charger from GLOBAL
ALERT. And Select alerting sound among contact_closure, silent,
beeper_sound, phone_bell, high_way_star, beep_sound2.
6) To alerting volume setting, select Volume from GLOBAL ALERT.
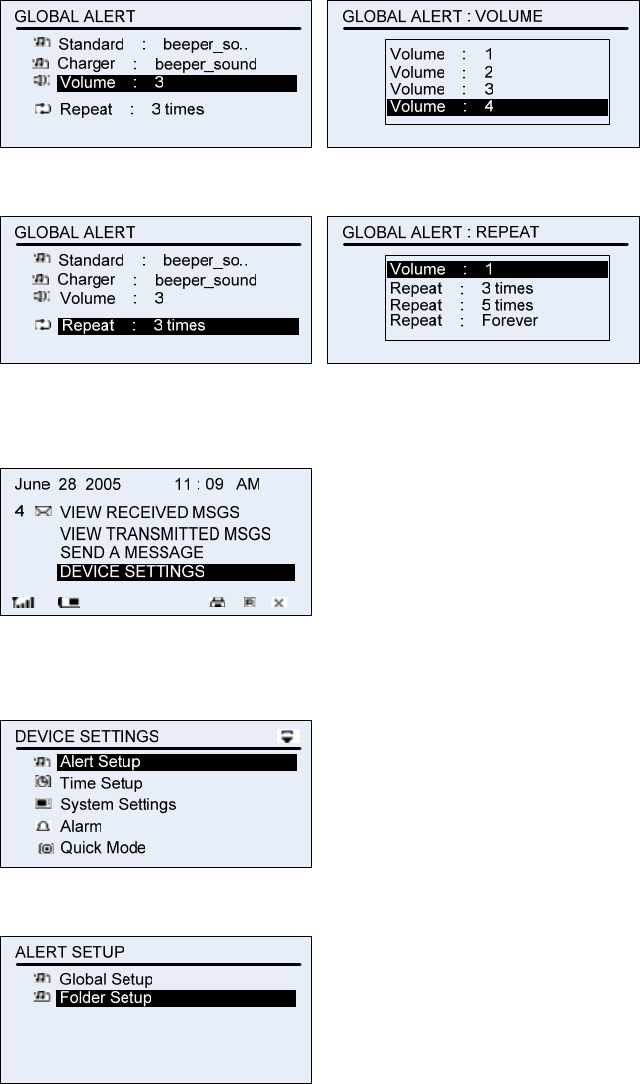
7) To alerting time setting, select Repeat from GLOBAL ALERT.
4.2.2 Folder Setup
1) Select DEVICE SETTINGS from main menu.
2) Select Alert Setup from DEVICE SETTINGS menu.
3) To Folder Setting, Select Folder Setup from ALERT SETUP
4) Select Folder for setting.
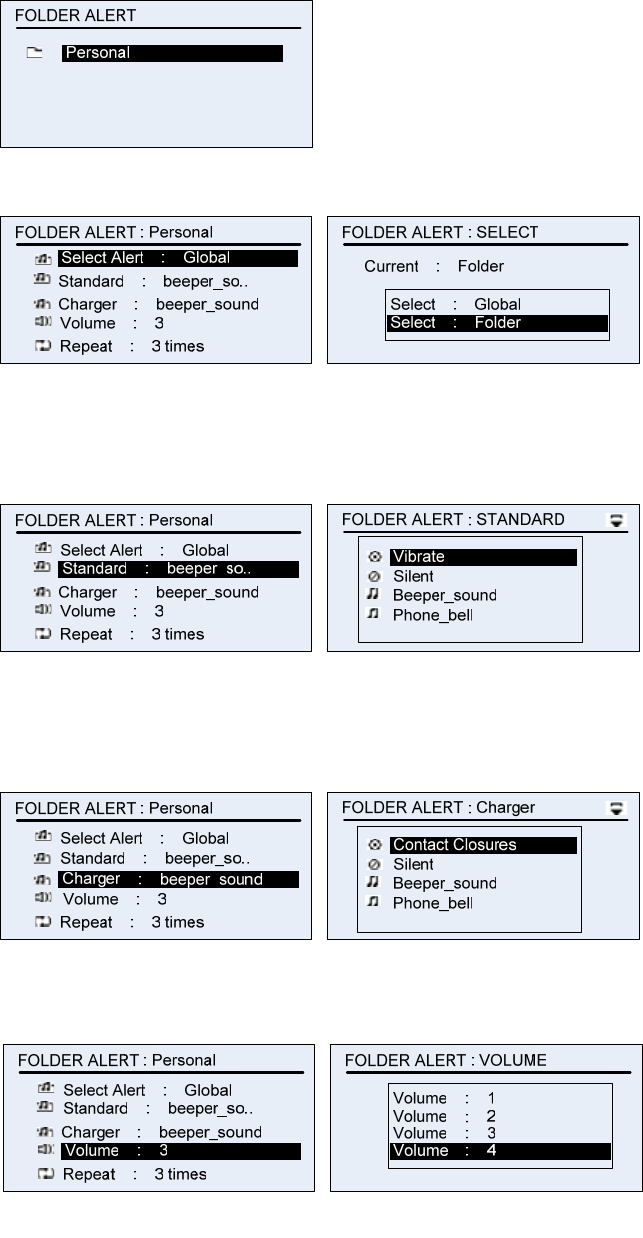
5) To Select Global or Folder from FOLDER ALERT : SELECT
6) Select Standard, and Select alerting standalone sound among
vibrator, silent, beeper_sound, phone_bell, high_way_star,
beep_sound2.
7) For Setting charger alerting sound, select Charger from FOLDER
ALERT:Personal. And Select alerting sound among contact_closure,
silent, beeper_sound, phone_bell, high_way_star, beep_sound2.
8) To alerting volume setting, select Volume from FOLDER
ALERT:Personal.
9) To alerting time setting, select Repeat from FOLDER ALERT:Personal.
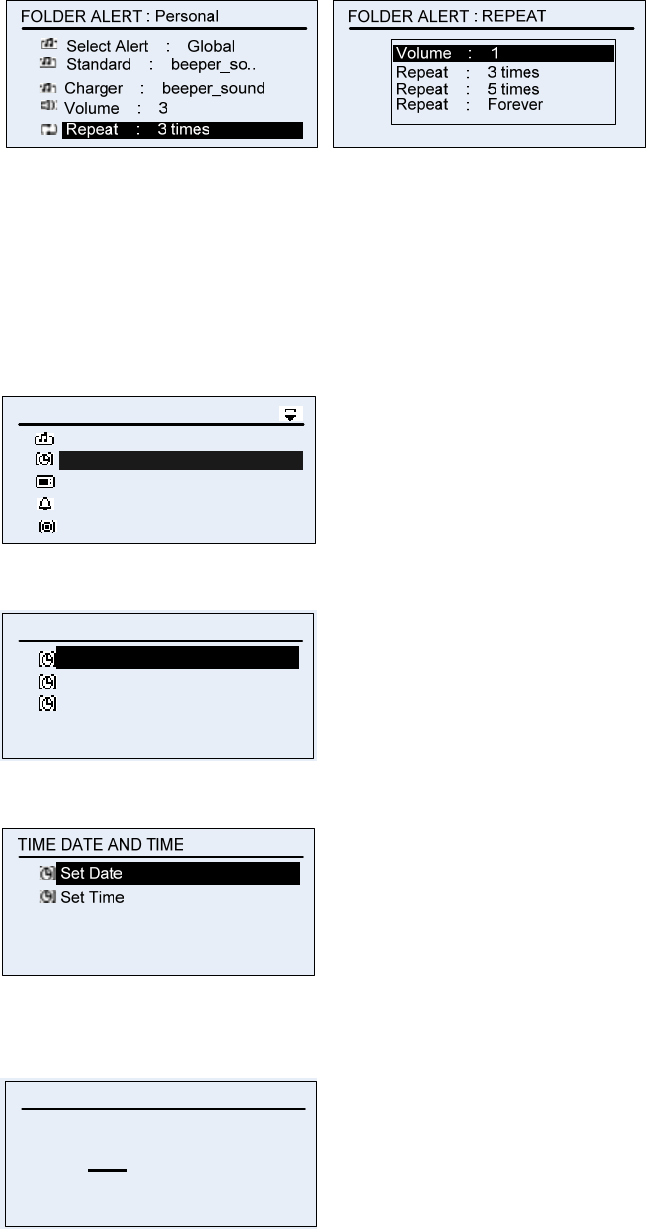
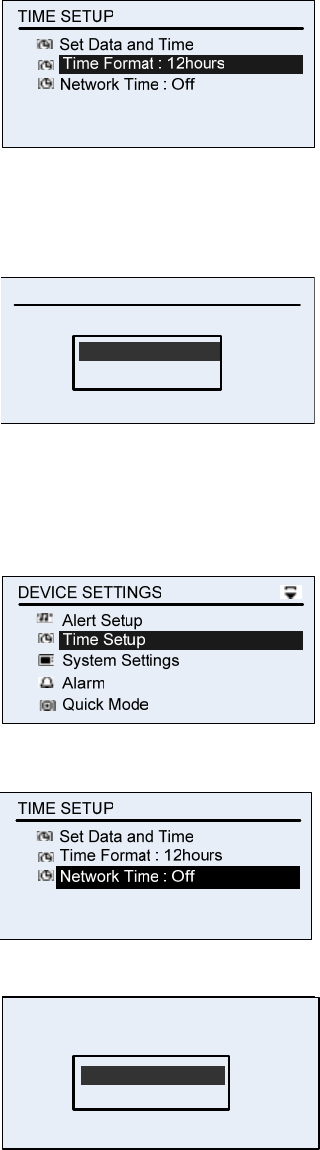
4.3 Time Setup
In setting time, there are Day Setup and Time Setup.
4.3.1 Day Setup
1) Select Time Setup from DEVICE SETTINGS menu.
Time Setup
System Settings
Alarm
DEVICE SETTINGS
Quick Mode
Alert Setup
2) Select Set Data And Time form TIME SETUP menu.
Time Format : 12hours
TIME SETUP
Set Data and Time
Network Time : Off
3) Select Set Data from TIME DATE AND TIME.
4) Setting the present date by using UP/DOWN KEY.
SET DATE
0 6 . 2 8
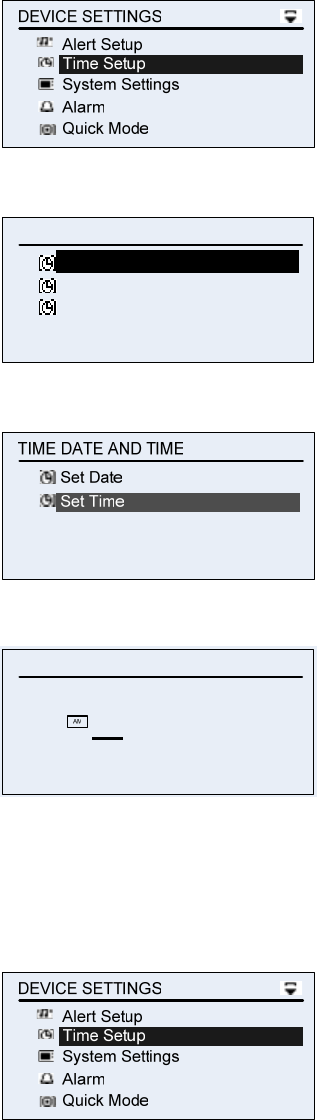
4.3.2 Time Setup
1) Select Time Setup from DEVICE SETTINGS menu.
2) Select Set Data and Time from TIME SETUP menu.
Time Format : 12hours
TIME SETUP
Set Data and Time
Network Time : Off
3) Select Set Time from TIME DATE AND TIME menu.
4) Setting the present time by using UP/DOWN KEY.
SET TIME
11 . 2 8
4.3.3 Setup the Form of Time Setup.
1) Select Time Setup from DEVICE SETTINGS menu.
2) Select Times Format from TIME SETUP.
3) Select 24hours or 12hours.
Format : 24hours
TIME FORMAT
Current : 12hours
Format : 12hours
4.3.4 Select On/Off to Network Time.
1) Select Time Setup from DEVICE SETTINGS.
2) Select Network Time from TIME SETUP.
3) Select On/Off to Network Time.
Network : Time On
NETWORK TIME
Current : Net Time Off
Network : Time Off
4.4 System Settings
In System Setting, there are s LCD Contrast Setup and Key Click Setup and
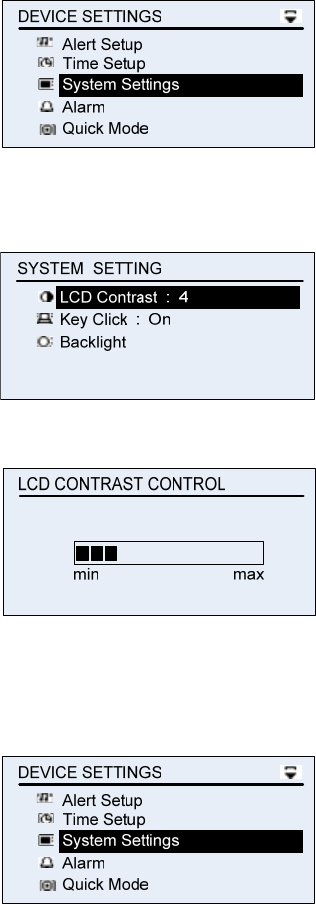
Back Light Setup.
4.4.1 LCD Contrast
1) Select System Settings form DEVICE SETTINGS menu.
2) Select LCD Contrast from SYSTEM SETTING menu.
3) Select optimum LCD Contrast by using UP/DOWN KEY.
4.4.2 Key Click
1) Select System Settings from DEVICE SETTINS menu.
2) Select Key Click from SYSTEM SETTING menu.
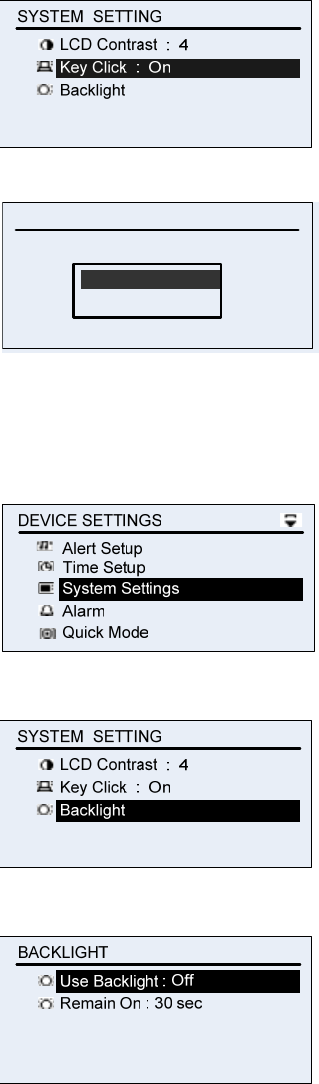
3) Select On or Off)
Key Click On
KEY CLICK
Current : Click On
Key Click Off
4.4.3 Back Light
1) Select System Settings from DEVICE SETTINGS menu.
2) Select BACKLIGHT from SYSTEM SETTING menu.
3) Select Use Back Light from BACKLIGHT menu.
4) Select On or Only at Night or Off.
On
USE BACKLIGHT
Use : Off
Only at Night
Off
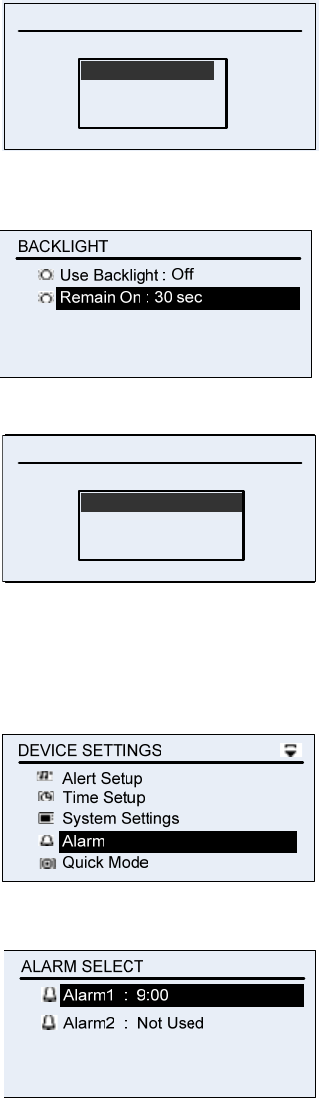
5) To Select Remain time, select Remain on from Back Light
6) Select 10sec / 20sec o/ 30sec.
Remain On : 10 sec
REAMIN ON
Remin On : 30 sec
Remain On : 20 sec
Remain On : 30 sec
4.4 Alarm
1) Select Alarm from DEVICE SETTINGS menu.
2) Select Alarm1,2 from ALARM SELECT menu.
4.4.1 Set Alarm
1) Select Set Alarm from ALARM SETUP menu.
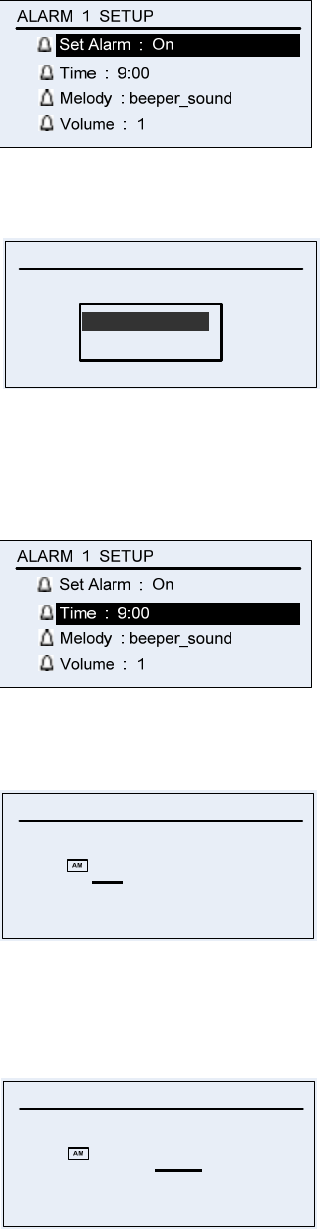
2) Select On/Off.
Alarm : On
SET ALARM
Current : Alarm On
Alarm : Off
4.4.2 Time
1) Select Time from ALARM SETUP menu.
2) Select time from Time menu by using UP/DOWN Key.
SET TIME
11 . 2 8
It’ll move automatically to the Minute Setup
3) Select the Minute by using Up/Down Key after setting hour from
Time Menu.
SET TIME
11 . 2 8
4.4.3 Melody
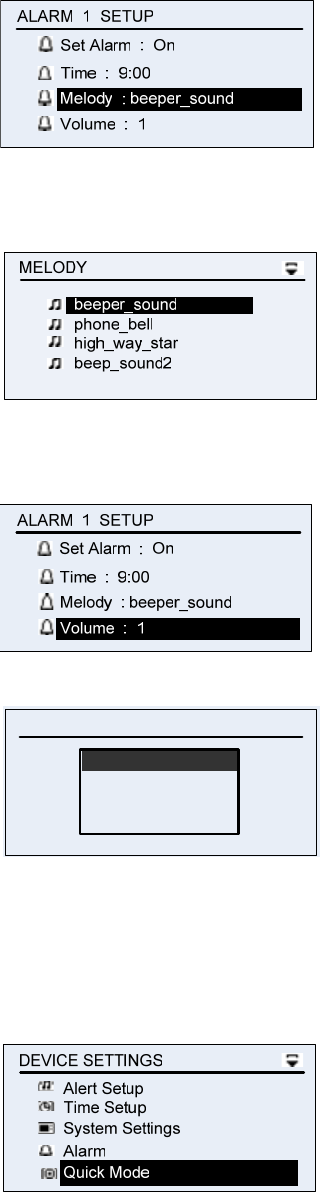
1) Select Melody from ALARM SETUP menu.
2) Select melody which you want from MELODY menu.
4.4.4 Volume
1) Select Volume from ALARM SETUP menu.
2) Select volume which you want from VOLUME menu.
Volume : 1
VOLUME
Volume : 2
Volume : 3
Volume : 4
Cf) Using Alarm1 and Alarm2 is same
4.5 Quick Mode
1) Select Quick Mode from DEVICE SETTINGS menu.
4.5.1 Set Mode
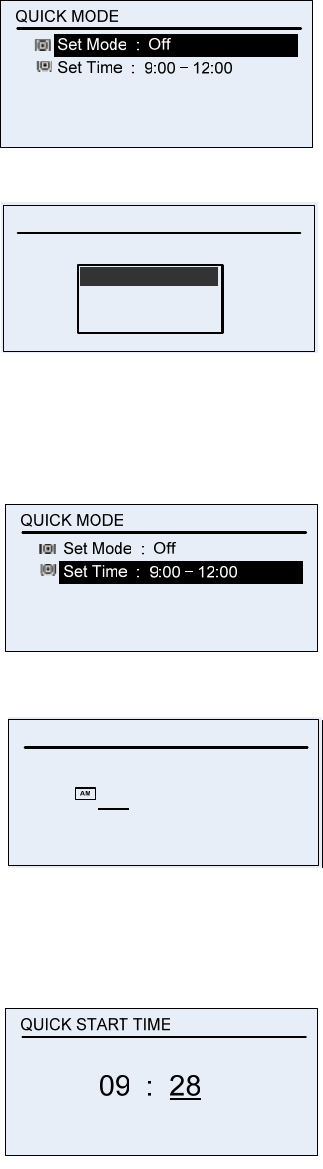
1) Select Set Mode from QUICK MODE menu.
2) Select ON/OFF/AUTO from Setup Mode.
Quick Mode : On
SETUP MODE
Current : Quick Mode Off
Quick Mode : Off
Quick Mode : Auto
4.5.2 Set Time
1) Select Set Time from QUICK MODE menu.
2) Select the time form Quick Start Time.
QUICK START TIME
09 : 2 8
It’ll move automatically to the Minute Setup
4) Select the Minute by using Up/Down Key after setting hour from
QUICK START TIME menu.
5 .MESSAGE DESCRIPTION
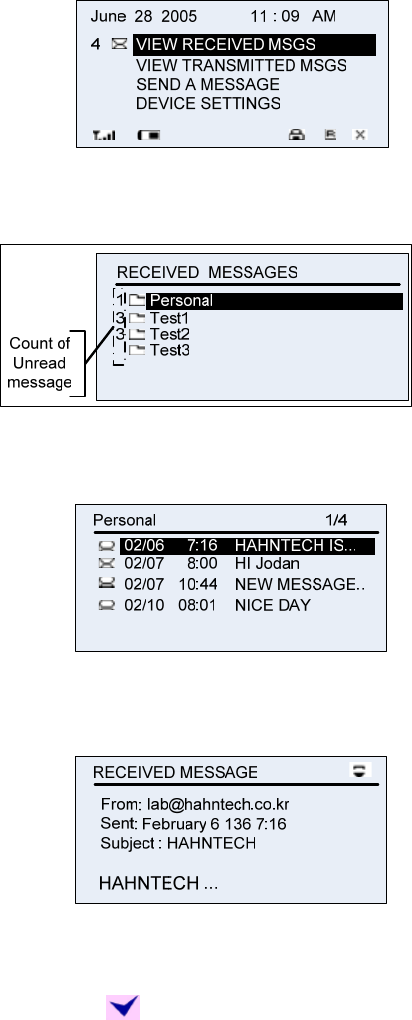
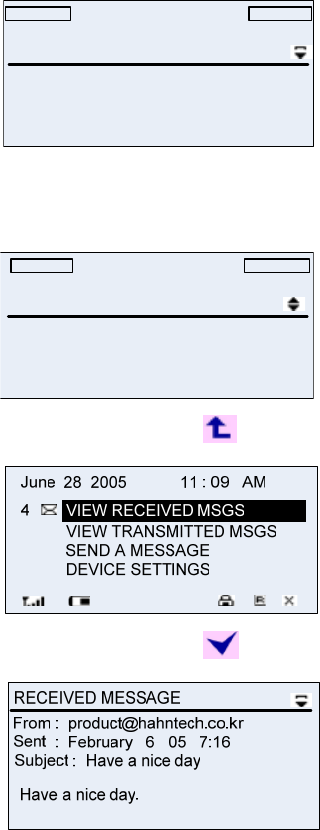
5.1 VIEW RECEIVED MESG
1) Select VIEW RECEIVED MESG from Main screen.
2) Select Folder you want from RECEIBED MESSAGE menu.
(The maximum of the folder is 17)
5) Select Message you want in the Folder.
(It’ll arrange the order of receiving)
6) You can make sure sender, date, time, head, body in RECEIVED
MESSAGE screen.
5.2 Replying to the received message.
1) Select from the screen checking message.
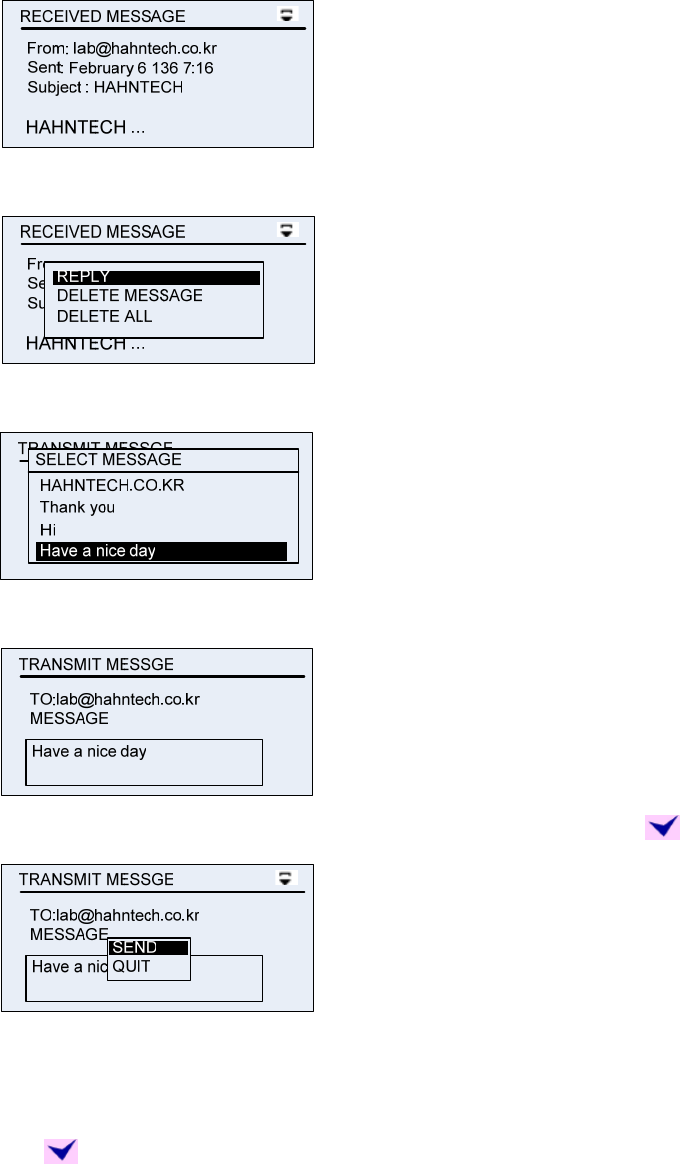
2) Reply seeing the selecting screen.
3) Select massage you want from SELECT MESSAGE menu.
7) Check the body of the sending massage.
8) Select SEND/QUIT in the TRANSMIT MESSAGE when put the .
Cf) There are some messages which you can’t reply.
5.3 Deleting the received message
1) Put the in the main screen checking message.
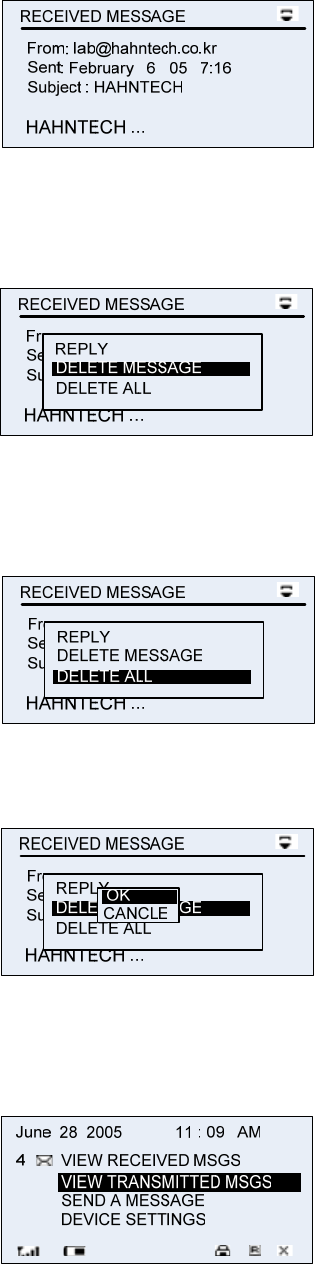
2) Select to delete the all or the present message.
① You can see below screen checking deleted message if you select
DELETE MESSAGE.
② You can see the screen checking deleted all messages in Folder if
you select DELETE ALL.
3) Select DELETE/CANCLE.
5.4 Checking the transmitted message
1) Select VIEW TRANSMITTED MSGE from Main screen.
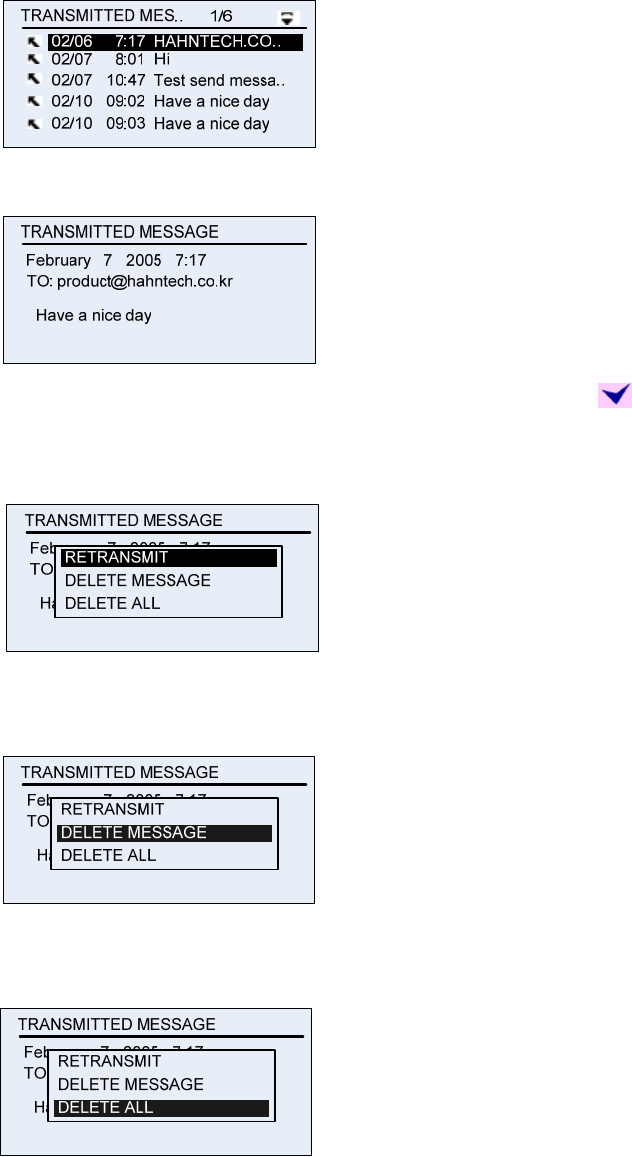
2) Select the checking message from TRANSMITTED MESSAGES
4) Checking sending time/ From/To.
5) Select to retransmit or delete the message if you put the .
1. You can see the screen checking the retransmit if you select
RETRANSMIT
2. You can see below the screen checking to delete the message if
you select DELETE MESSAGE.
3. You can see the screen checking all deleted messages in the
Folder if you select DELETE ALL.
6) Select Retransmit/Delete (After selecting, move to the Main Menu)
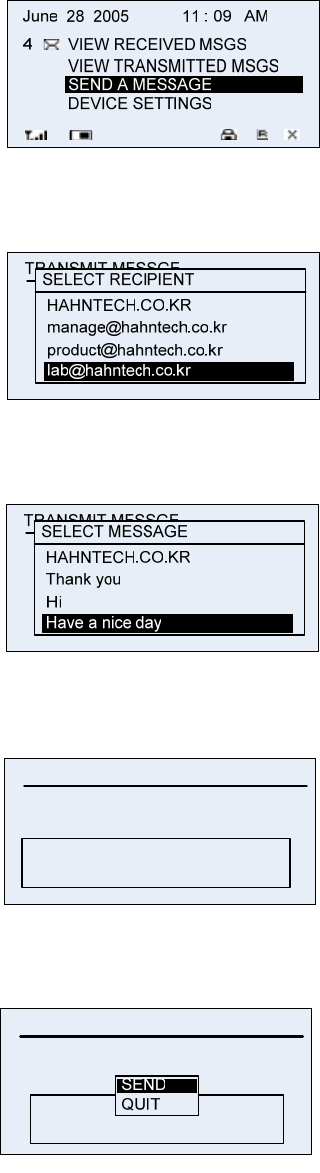
5.5 Sending messages
1) Select SEND A MESSAGE from main screen.
2) Select the receiver.
(The maximum select list is 16)
4) Select the sending message.
5) Check the receiver and sending message.
TRANSMITTED MESSAGE
February 7 2005 7:17
TO: product@hahntech.co.kr
Have a nice day
6) Select send/Quit.
(After selecting, move to the Main Menu)
TRANSMITTED MESSAGE
February 7 2005 7:17
TO: product@hahntech.co.kr
Have a nice day
5.6 Checking the Receiving Message
1) Move to the screen of MESSAGE RECDIVE when receive the message
MESSAGE RECEIVE
From: product@hahntech.co.kr
Test message send.
Have a nice day.
Rome was not built in a day.
Subject: Have a nice day
① Checking to scroll the message by using Up/Down key.
MESSAGE RECEIVE
From: product@hahntech.co.kr
Have a nice day.
Rome was not built in a day.
Do to others as you would be done by.
Subject: Have a nice day
② If you select the , move to Main Menu.
③ If you select the , move to Received Message View.
6. Maintenance
- Clean with a soft cloth dampened with soap and water.
- Do not immerse in water. Do not use alcohol or other cleaning solutions.
- Do not expose to excessive heat or extreme shock or moisture.

Safety Information
1 . SAFETY INFORMATION FOR FIXED WIRELESS TERMINALS
POTE NTIALLY EXPLOSIVE ATMOSPHERES
Turn your phone OFF when in any area with a potentially explosive atmosphere
and obey all signs and instructions. Sparks in such areas could cauls e an
explosion or fire resulting in bodily injury or even death.
INTERFERENCE TO MEDICAL DIVICES
Certain electronic equipment may be shielded against RF signal from you wireless
phone. (pacemakers, Hearing Aids, and so on) Turn your phone OFF in health care
facilities when any regulations posted in these areas instruct you to do so.
RF signals may affect improperly installed or inadequately shielded electronic
system in motor vehicles.
EXPOSURE TO RF ENERGY
Use only the supplied or an approved replacement antenna.
Do not touch the antenna unnecessarily when the phone is in use.
Do not move the antenna close to, or touching any exposed part of the body when
making a call.
SAFETY INFORMATION FOR RF EXPOSURE
Body worn operation
This device was tested for typical body-worn operations with the back of the phone
kept 15 mm. from the body. To maintain compliance with FCC RF exposure
requirements, use only belt-clips, holsters or similar accessories that maintain a 15 mm.
separation distance between the user’s body and the back of the phone, including the
antenna. The use of belt-clips, holsters and similar accessories should not contain
metallic components in its assembly. The use of accessories that do not satisfy these
requirements may not comply with FCC RF exposure requirements, and should be
avoided.

SAR INFORMATION
THIS MODEL PHONE MEETS THE GOVERNMENT’S
REQUIREMENTS FOR EXPOSURE TO RADIO WAVES.
Your wireless pager is a radio transmitter and receiver. It is designed and manufactured not to
exceed the emission limits for exposure to radiofrequency (RF) energy set by the Federal
Communications Commission of the U.S. Government. These limits are part of comprehensive
guidelines and establish permitted levels of RF energy for the general population. The
guidelines are based on standards that were developed by independent scientific organizations
through periodic and thorough evaluation of scientific studies. The standards include a
substantial safety margin designed to assure the safety of all persons, regardless of age and
health. The exposure standard for wireless mobile phones employs a unit of measurement
known as the Specific Absorption Rate, or SAR. The SAR limit set by the FCC is 1.6 W/kg. *
Tests for SAR are conducted with the phone transmitting at its highest certified power level in all
tested frequency bands. Although the SAR is determined at the highest certified power level,
the actual SAR level of the phone while operating can be well below the maximum value. This is
because the phone is designed to operate at multiple power levels so as to use only the power
required to reach the network. In general, the closer you are to a wireless base station antenna,
the lower the power output. Before a phone model is available for sale to the public, it must be
tested and certified to the FCC that it does not exceed the limit established by the government
adopted requirement for safe exposure. The tests are performed in positions and locations (e.g.,
at the ear and worn on the body) as required by the FCC for each model. The worn on the body,
as described in this user guide, is 0.655W/Kg
. (Body-worn measurements differ among phone
models, depending upon available accessories and FCC requirements). While there may be
differences between the SAR levels of various phones and at various positions, they all meet
the government requirement for safe exposure. The FCC has granted an Equipment
Authorization for this model phone with all reported SAR levels evaluated as in compliance with
the FCC RF exposure guidelines. SAR information on this model phone is on file with the FCC
and can be found under the Display Grant section of http://www.fcc.gov/ oet/fccid after
searching on FCC ID: SNZREH-1501
.
Additional information on Specific Absorption Rates (SAR) can be found on the Cellular
Telecommunications Industry Association (CTIA) web-site at http://www.wow-com.com.
* In the United States and Canada, the SAR limit for mobile phones used by the public is 1.6
watts/kg (W/kg) averaged over one gram of tissue. The standard incorporates a sub-stantial
margin of safety to give additional protection for the public and to account for any variations in
measurements.
FCC Compliance Information
This device complies with Part 15 of FCC Rules.
Operation is subject to the following two conditions:
(1) This device may not cause harmful interference, and
(2) This device must accept any interference received.
Including interference that may cause undesired operation.
Information to User
This equipment has been tested and found to comply with the limits for a Class B digital
device, pursuant to part 15 of the FCC Rules. These limits are designed to provide
reasonable protection against harmful interference in a residential installation. This
equipment generates, uses and can radiate radio frequency energy and, if not installed
and used in accordance with the instructions,
may cause harmful interference to radio communications. However, there is no guarantee
that interference will not occur in a particular installation. If this equipment does cause
harmful interference to radio or television reception, which can be determined by turning
the equipment off and on, the user is encouraged to try to correct the interference by one
or more of the following measures:
- Reorient or relocate the receiving antenna.
- Increase the separation between the equipment and receiver.
- Connect the equipment into an outlet on a circuit different from that to which the receiver
is connected.
- Consult the dealer or an experienced radio/ tv technician for help.
CAUTION
The user who makes changes or modifications to the unit without the express
approval by the manufacturer will void user authority to operate the equipment.