HAITIAN ELECTRONIC TECHNOLOGY HT-860 Wireless Microphone User Manual
HAITIAN ELECTRONIC TECHNOLOGY CO., LTD. Wireless Microphone Users Manual
Users Manual
UHF/PLL/TONE-LOCK
Digital wireless conference microphone
100% anti-interference
Operating manual
Be s t ch oi c e fo r me e ti ng
De a ler :
Al l r igh t s rese r ved , v er s i o n w i ll i n v e st ig a t e
888.800
BATT
Product Name: WIRELESS MEETING MICROPHONE
Model: HT-860
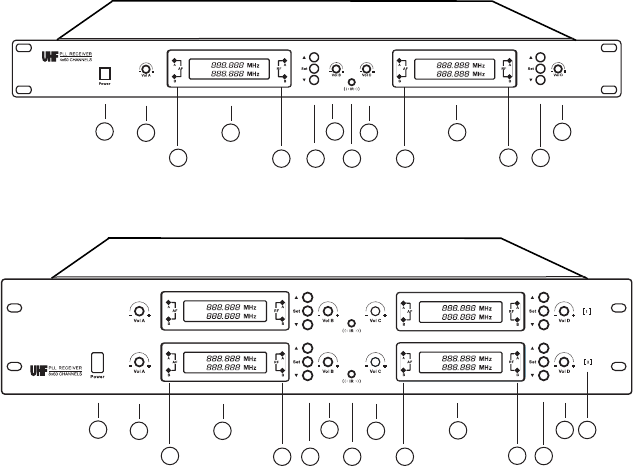
Front View of Receiver
2
C:
D:
A:
B:
A:
B:
C:
D:
1012
8911 13
12345
67
14
15
1012
8911 13
12345
67
A:
B:
C:
D:
14
Front panel of 4 channel receiver
Front panel of 8 channel receiver
1.Power switch
2.Channel A volume knob
3.Channel B volume knob
4.Channel C volume knob
5.Channel D volume knob
6.LCD display of channel A & B
7.LCD display of channel C & D
8.AF indicator of channel A & B
9.RF indicator of channel A & B
10.AF indicator of channel C & D
11.RF indicator of channel C & D
12.Setting key of channel A & B
13.Setting key of channel C & D
14.Infrared Sensor: Broadcasts
IR signal to transmitter to
synchronize frequencies
15.Group I and II for 8 channel
receiver
1
Features
* Adopt UHF 550-980MHz PLL frequency synthesizer technology,
adjustable transmitter frequency and power
* Adopt multi-channel high band and intermediate band frequency
selective filtering, fully eliminate interference signal
* Built-in feedback eliminating technology which can decrease the
feedback and noise effectively
* Built-in multiple noise detecting circuit and TONE-LOCK system
to make sure the system has strong anti-jamming function
* Perfect performance with the best chips and components, adopt
SMD original mount design, enhance the product quality and
stability
* Automatic scanning and selecting the frequency, easy for
installation and using.
* Operation distance up to 100 meters with the best condition, 50
meters in normal condition.
Thanks for your support and trust of our company. We offer a
varied range of wireless microphones for all applications and the
range covers all situations in which microphones a implemented.
Al l mi c ro p ho n es d es i gn e d w i t h t h e l a t e s t An t i0 E MI / RF I
technologies. Please read the user manual carefully before use the
products.
With high flexibility and reliability, our UHF wireless meeting
microphone system is an ideal choice for mobile conference
systems. It offers simple operation, compact structure, elegant
appearance , anti-interf e r ence as we l l as UHF, PLL and
TONE-LOCK features. The wireless meeting microphone system
can be perfectly integrated into any meeting rooms, without
additional wiring. I addition, multiple devices can be used together.
Overview
3
12V 1 200mA A&B-ANTC&D-AN T MIX D C B A
AUDIO O UT
MIX - BAL
DC I N
1616
17
18 1 9 2021222 3
16 16
17
18 1 9 20212223 24
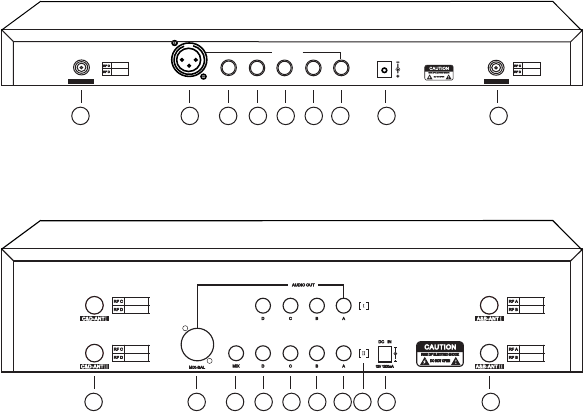
Rear View of Receiver
Rear panel of 4 channel receiver
Rear panel of 8 channel receiver
16.Antenna Socket
17.DC input (12V)
18.Channel A, B, C, D mix output (BAL/XLR)
19.Channel A, B, C, D mix output (UNBAL)
20.Channel A output
21.Channel B output
22.Channel C output
23.Channel D output
24.Group I and II for 8 channel receiver
4
Operation of Receiver
1.Install the antenna to receiver with correct frequency, the angle
between antenna and receiver should be vertical.
2.Connect the receiver power socket with the power adapter output
jack.
3.Press the power switch for 1.5 seconds, LCD backlight is light; this
indicator receiver power is on. Please adjust each channel's volume
knob to the proper position to turn on the corresponding transmitter,
RF LED indicator and TONE frequency LED will flash, it means
signal has been received. AF LED will flash when speak with
microphone transmitter. Hold the power switch for 2 seconds if you
want turn off the receiver.
4.Channel frequency setting:
a). Press set key one time, LCD will display the frequency setting,
user can press “UP” & “DOWN” key to set the frequency manual,
please press set key again to save the setting
b). Press set key two times to enter MODE setting, user can use
“UP”& “DOWN” key to select the CHANNEL and TUNE mode, in
CHANNEL mode frequency band is 250kHz, total 60 point, in
TUNE mode frequency band is 50kHz, total 300 point. User can
save the setting with “SET” key press.
c). Press set key three times to enter SQ setting. User can use “UP”
& “DOWN” key to select the SQ (-70~-95dBm), each step 5dBm,
and then press “SET” key to save the setting.
d). Short press set key to enter the setting menu and then long press
set key for 2 seconds to switch Channel A to Channel B setting.
( Other channels same setting method)
5.IR sync
a). Short press “UP” key one time to enter channel A or channel C IR
sync function.
b). Press “UP” key again for 2 seconds to enter automatically
frequency scanning and selecting, and then use transmitter IR
sensor aim at the receiver's IR port to transmit the parameter,
receiver will save the setting and exit automatically by any key
if the IR sync succeed
5
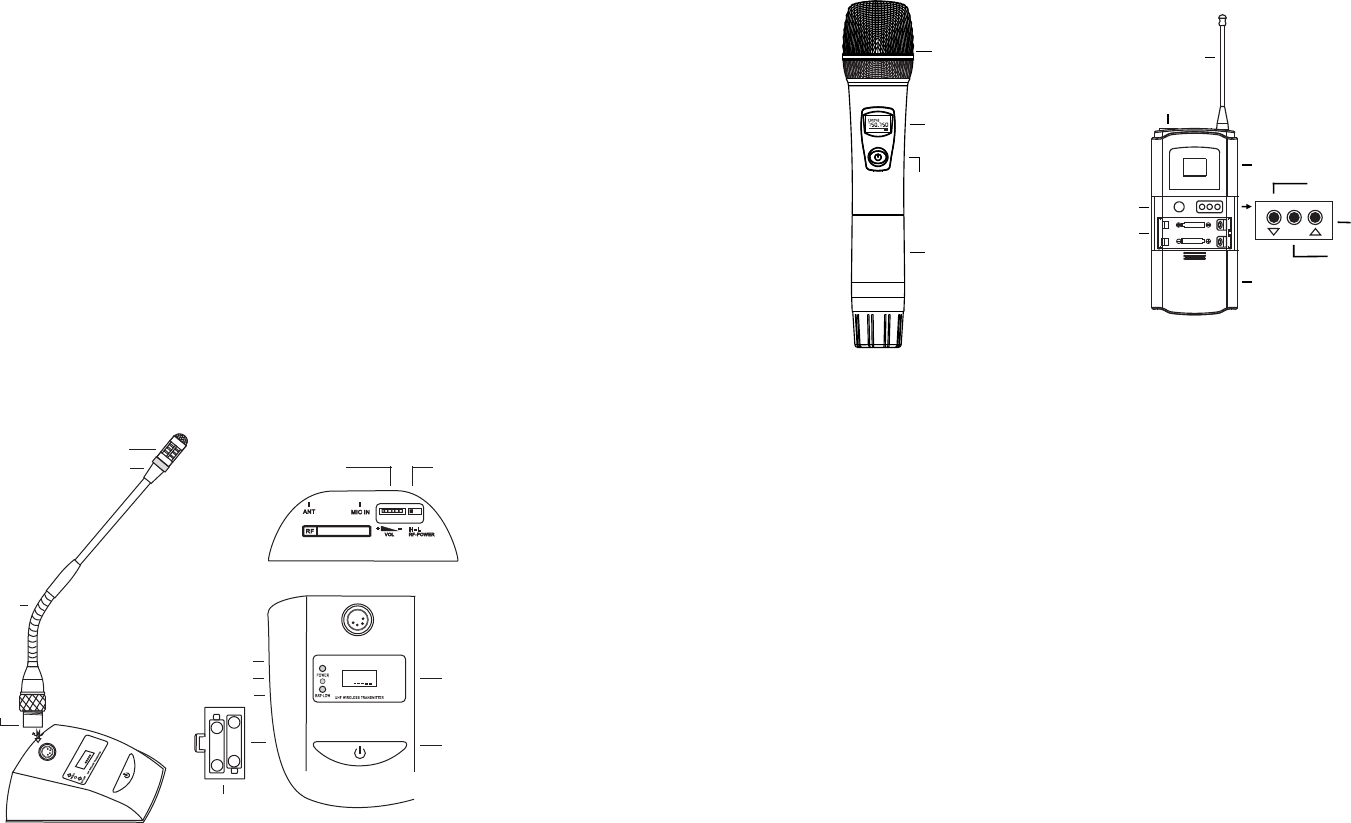
Microphone Transmitter (option)
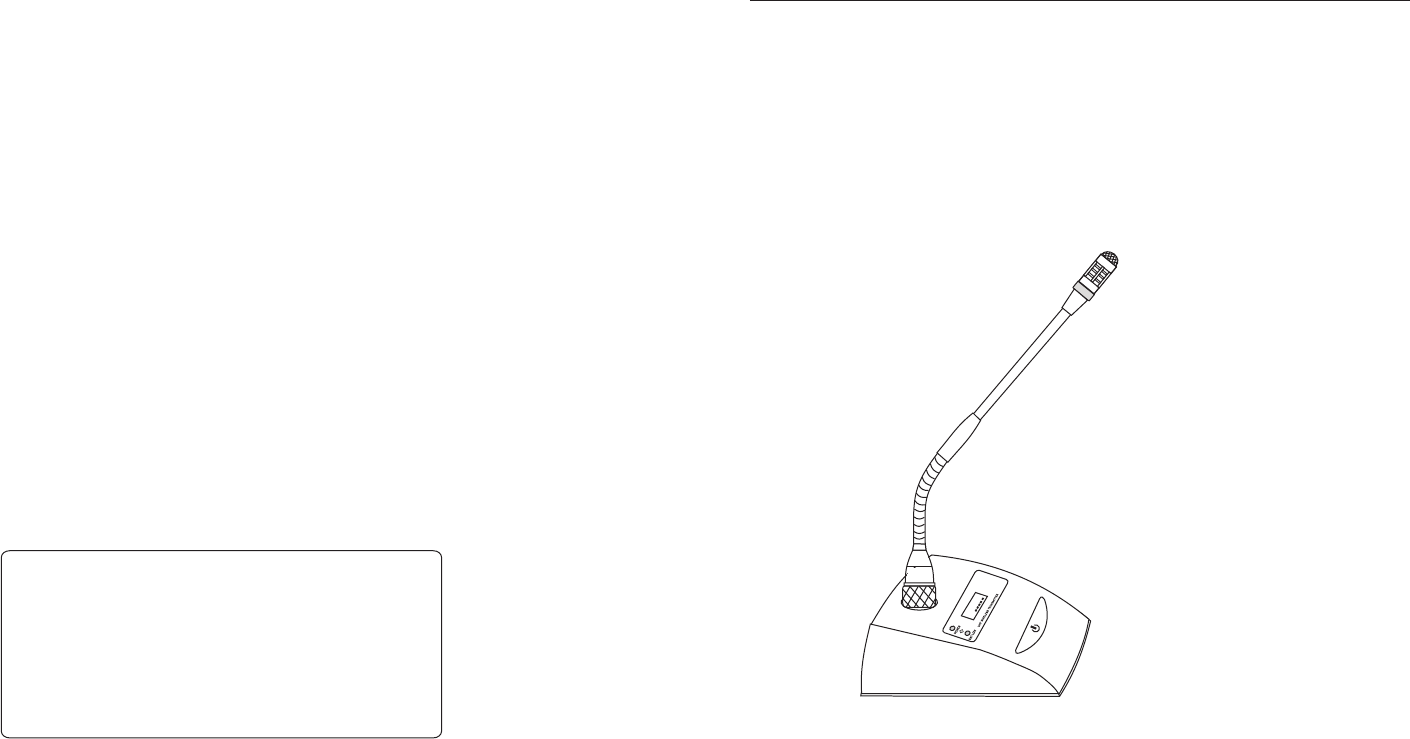
A: Desktop Meeting Microphone
+
+
-
-
Microphone volume
gain knob
RF power switch
H:High,L:Low
Channel frequency/battery
level LCD display
888.800
BATT
IR sensor
Battery low indicator
Battery box
( bottom)
888.800
BATT
Rotating
plug
Condenser microphone
cartridge
Microphone LED
Flexible
pole
Power on/off indicator
Mic on/off key
Function type:
(On-Mute-Off)
(On-Off)
c). Short press “DOWN” key one time to enter channel C or channel
D IR sync function.
d). Press “DOWN” key again for 2 seconds to enter automatically
frequency scanning and selecting, and then use transmitter IR
sensor aim at the receiver's IR port to transmit the parameter,
receiver will save the setting and exit automatically by anykey if
the IR sync succeed
6.Volume adjustment: Please adjust the volume with the knob to the
proper position to get the best sound level.
7.RF PWR adjustment of microphone transmitter: We suggest low
level if the distance between receive and microphone transmitter
less than 20 meters to save the battery power, and high level if the
distance more than 20 meters.
(We have setting the frequency and channel before send the
products, please do not change the setting if unnecessary)
6
Operation of Desktop Meeting Microphone Transmitter
B. Handheld and Lavalier Microphone Transmitter
Interchangeable microphone
net head
On/Off switch
Frequency LCD display
Battery cover
Lavalier microphone
/Audio source input
Antenna
Battery cover
Frequency LCD display
Channel setting key
Channel down key
Channel up key
CHANN EL
SE T
IR sensor
Battery box
1.Open the battery cover and put into two pieces AA 1.5V batteries,
please make sure the battery polar is correct. (Note: Please don't
make the battery polar wrong, it would be damaged electronic
component inside the transmitter.)
2.Press power switch, the power indicator is light; it means
microphone transmitter work normally.
3.User can set the microphone volume with volume gain knob.
4.User can set the microphone transmitter RF power with the switch;
correct setting can save the battery power and reduce the influence.
5.Turn off the microphone with power switch for 1 second.
7
Technique Specifications
1. System Parameter:
Working frequency: UHF 615,000-659.750 MHz
PLL technology:
4 group system frequency, each group 60 points adjustable
4 group * 60=240 frequency point sharing
Frequency stability: <±10PPM
Dynamic range: > 105dB
T.H.D.: <0.5%
Frequency response: 50Hz~18 kHz
Audio output: Balance output:0~600mV;
Unbalance output: 0~300mV
Tone frequency: 32K~51.2 kHz
2. Receiver Parameter
Carrying frequency: UH
Power adapter supply voltage: AC110V-AC230V 50/60Hz
DC input voltage: DC12V, 1200mA
Power consumption: 8W
S/N Ratio: > 105dB
T.H.D.: <0.5%
Frequency response: 50Hz~18 kHz
3. Transmitter Parameter
Carrying frequency: UH
RF output consumption
Input audio source: Mic in/Line in
Modulation mode: FM
Max Modulation: ±45kHz
Higher harmonic: less than 60dB of the main wave benchmark
Power supply: 3V (2x AA 1.5V batteries or 1.2V-1800mAh
rechargeable batteries)
Battery Life: 8 hours
8
Please prevent the equipment dripping by water; do not put
the liquid articles such as vase on the equipment. This machine
has no maintain part, for preventing electric shock from being
dangerous, do not turn on the machine cover without
permission.If need to maintain, please contact sale agent.
Warning
1. Read the operating instructions-You must read all the safety and
operating instructions carefully before use the equipment.
2. Reserved the operating instructions-Please reserved all the
safety and operating instructions, ready for the future checking.
3. Warning - Please note all the warning of the applications of this
machine during operation.
4. Follow the instructions - Please follow the instructions of the
machine and all operations.
5. Additional devices-Only allow the additional devices which
recommended by the manufacture, in order to avoid accident.
6. Rainy and humidity-Keep away from the water
7. Ventilation- Use and storage of the machine needs good
ventilation environment, each equipment space at least more
than 5cm.
8. Heat-Please keep away from the heat, including: heater, radiator,
stove and so on.
9. Power-Please use the standard power volts marked in the
machine.
10. Equipment should not place naked flame sources, such as
lighted candles.
11. Do not throw waste batteries, please put it into the designated
recycling bins.
12. Don't put all the liquid or heavy objects; prevent water droplets
or water splash on the equipment.
13. Equipment can be used in tropical or temperate zone
F 615,000-659.750 MHz
F 615,000-659.750 MHz
-2.9 dBm

Trouble Shooting
Problem/Status Solution
No sound(Status: No
receiver RF signal )
* Make sure transmitter and receiver's power switch
“ON” position
* Check the battery polar
* Check the antenna of the receiver
* Make sure there are no obstruct between antenna
and transmitter
No sound (Status: RF
& AF signal active)
*
* Check the connection of receiver, amplifier and
mixer.
* Check the volume knob of amplifier and mixer
Check receiver volume knob
No sound (Status: RF
signal active, no AF
signal)
*
* Exchange the microphone if necessary
Check transmitter 's power
Distortion or unwanted
noise bursts
*
in-ear monitor system, etc.)
* Change receiver and transmitter to a different
frequency
* Reduce transmitter gain
* Replace transmitter battery
* If use multiple systems, increase the frequency
band between systems
Remove RF interference (CD players, computers,
Can not turn on/off
transmitter
* Replace the battery
Dealer:
Al l r i g h t s re s e r ve d, v e r s io n w i l l i n ve s t i ga te
FCC warning statement
This device complies with Part 15 of the FCC rules.
Operation is subject to the following two conditions:
1)this device may not cause harmful interference, and
2) this device must accept any interference received,
including interference that may cause undesired operation.
Changes or modifications not expressly approved
by the party responsible for compliance could void the
user's authority to operate the equipment.