HAN Networks AP27X HAN Access Point User Manual
HAN Networks Co., Ltd. HAN Access Point
Contents
User manual
HAN Access Point
AP271
Regulatory Compliance and Safety
Information
enterprise.alcatel-lucent.com Alcatel-Lucent and the Alcatel-Lucent
Enterprise logo are trademarks of Alcatel-Lucent. To view other trademarks
used by affiliated companies of ALE Holding, visit:
enterprise.alcatel-lucent.com/trademarks. All other trademarks are the
property of their respective owners. The information presented is subject to
ALE without notice. Neither ALE Holding nor any of its affiliates assumes any
responsibility for inaccuracies contained herein. (2017)
This Quick Start Guide assists you in quickly connecting to
and configuring OmniAccess Stellar APs. To learn more
please refer to the OmniAccess Stellar User Guide.
OmniAccess Stellar APs also support an OmniVista solution.
To learn more about the OmniVista solution, please refer
to OmniVista User Guide or online help.
Unpack
When you get the standard OmniAccess Stellar packing
box, the following items are included:
Access Point (AP)
Mounting Bracket
Quick Start Guide
Installation Guide
User Guide Info Card
Regulatory Compliance and Safety Information
Network Topology Overview
The following figure illustrates a typical WiFi network
topology based on OmniAccess Stellar APs.
Note: To keep AP in WiFi Express (Cluster) mode, please
ensure there is no DHCP option 43 and 138 in network.
With DHCP option 43 or 138 the AP comes up in WiFi
Enterprise (OV managed) mode. The AP operating mode is
retained once it completes the automatic selection. To
reselect operating mode, user can press reset button for 5
seconds to reset to factory default and reboot it.
Figure 1: WiFi Network Topology
All APs connect to a PoE switch and the PoE switch
physically connects to a router that provides DHCP service
for both AP and WiFi users. If the AP receives option 43 or
option 138 from the DHCP server specifying the
management IP, the AP will boot up and connect to
OmniVista 2500 for management. For further instructions
on OmniVista 2500 please refer to the OmniVista help.
If the AP does not receive either option 43 or option 138
from the DHCP server, it will continue to boot up in
cluster mode. All APs will be assigned to the same VLAN
and compose an AP cluster. To continue with the following
sections, it’s assumed all devices have been physically
connected as in Figure 1 and all APs are powered up by a
PoE switch or power adapter ordered from ALE. (tip: You
can also configure the first AP and power on others to join
the cluster automatically.)
Please verify that PoE is enabled on the port that AP is
connected to.
How to Access AP Web Page
OmniAccess Stellar is based on a cluster architecture,
with one cluster supporting maximum 64 APs. All APs that
are in the same VLAN and also have the same cluster ID
belong to one cluster. The cluster will select a Primary
Virtual Controller (PVC) and a Secondary Virtual
Controller (SVC) based on the priority attribute, product
type, software and hardware version and MAC address.
The PVC is responsible for the cluster management, such
as configuration synchronization, usage data statistics,
firmware upgrading, etc. and the SVC is the backup of the
PVC. By default, the PVC will broadcast the WLAN
‘mywifi-xxxx’ (xxxx = the last two bytes of the PVC MAC
address). You can connect to ‘mywifi-xxxx’ and browse
http://mywifi.al-enterprise.com:8080 to access the AP
web page. Chrome, Firefox, and IE are supported.
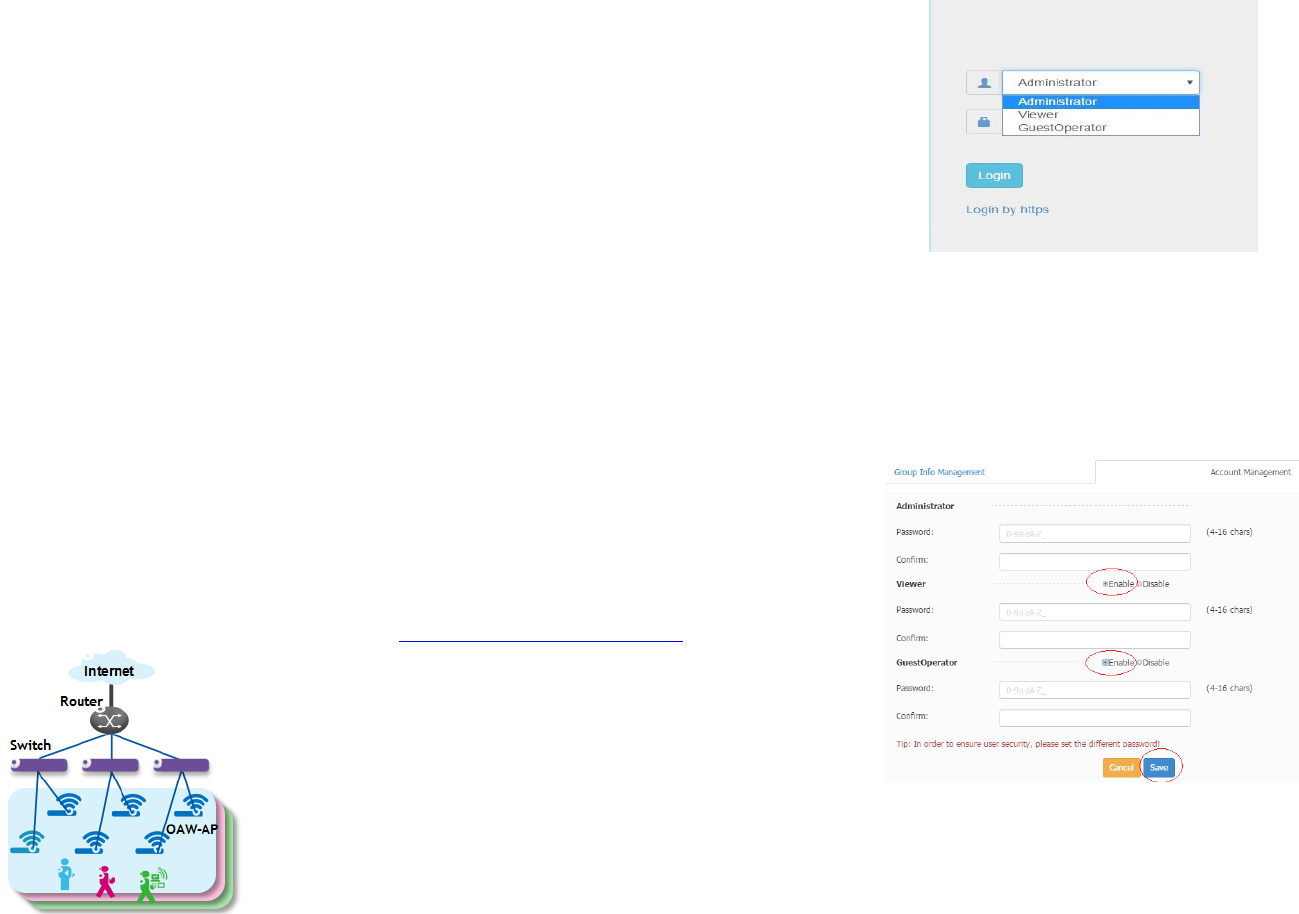
About Login Accounts
There are three pre-configured login accounts:
Administrator, Viewer and GuestOperator. You may modify
the account password but the account name isn’t
modifiable. Administrator can configure and check the AP
status, Viewer can check the AP status ONLY, while
GuestOperator can check the AP status and register
accounts for portal authentication. By default, the
password for all accounts is ‘admin’ and the wizard will
guide you to modify the Administrator password upon AP
login.
Figure 2: AP Login Page
Initially, only the Administrator account is enabled, both
the Viewer and GuestOperator accounts are disabled but
may be enabled by clicking System->General->Account
Management when logging in with Administrator, as
illustrated in Figure 3. Each account supports ONLY one
connection session.
Figure 3: Enable Viewer or GuestOperator Account
AP Initialization with Wizard
When initially logging into an AP, a configuration wizard
will pop up. The following steps show how to use the
setup wizard to modify the Administrator password and
create a WLAN.
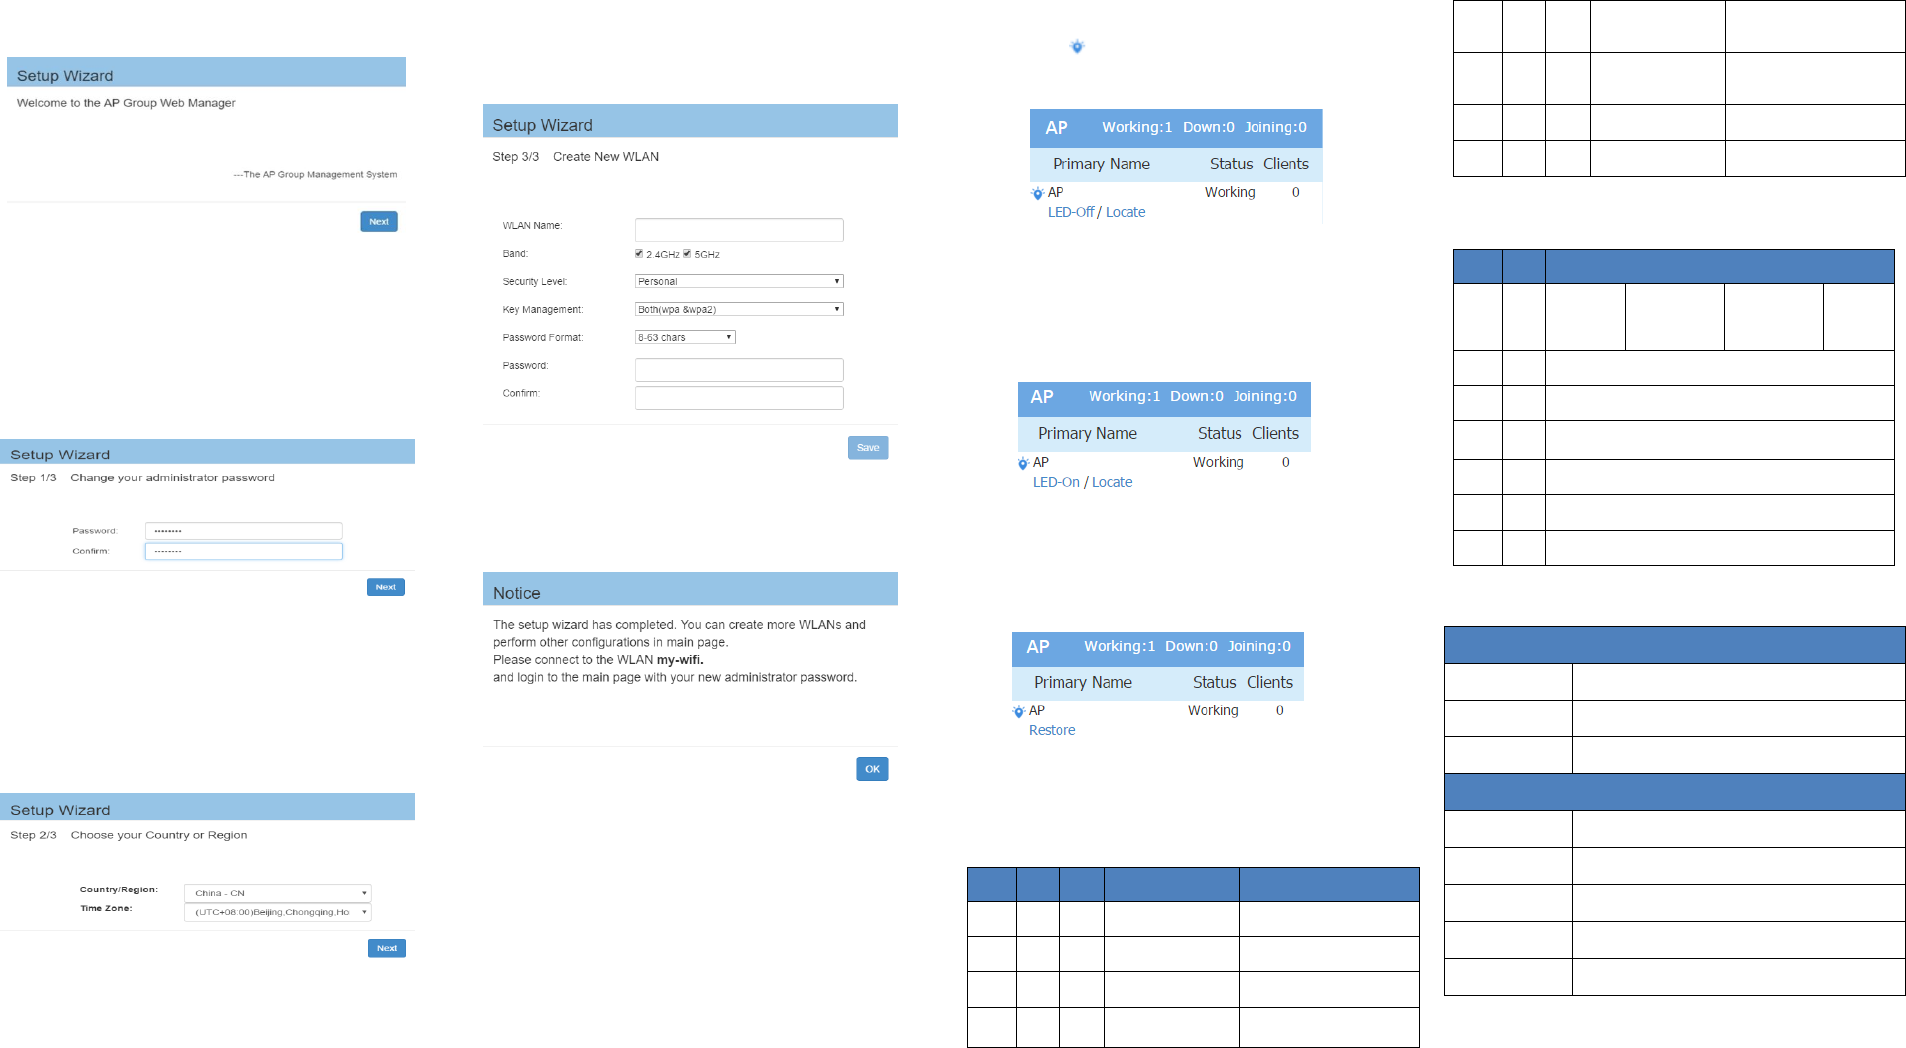
Step 1: Welcome Page
Figure 4: AP Wizard-Welcome Page
Step 2: Modify Administrator Password
The password has to be composed of numbers and capital
or lower-case letters of the English alphabet and with a
length of 4-16 characters.
Figure 5: AP Wizard-Modify Administrator Password
Note: The AP will be suffixed with xx (xx=US, JP (Japan),
IL(Israel) and RW(Rest of the world)). The page below
will be displayed to select the country when the suffix is
RW. For the other suffixes this page is not displayed.
Step 3: Create a WLAN
For example, create a WLAN ‘management’ for network
management purposes, select ‘both(WPA&WPA2)’ security
method and set the password to be ‘abc123!#’. By default
portal authentication is disabled when creating a WLAN,
if you want to enable the portal page authentication,
please refer the User Guide for details.
Figure 6: AP Wizard-Create WLAN
Step 4: Confirmation Page
Figure 7: AP Wizard-Notice
After you complete AP initialization with the Wizard, the
WLAN ‘mywifi-xxxx’ will be deleted. You can then
connect to the ‘management’ WLAN to continue with
other configuration tasks.
Locate AP or Turn LED Off
If you can’t find where an AP is installed by the specified
MAC address, you can locate the AP using the LED. Or, if
desired, the LED may be turned off. It can be turned on
again later for diagnostics if needed. Below are the steps
for LED operation.
Step 1: Click to launch ‘LED-Off/Locate’ button.
Figure 8: LED-Off/Locate Button
Step 2: Click ‘LED-Off’ to turn off the LED. The button
will revert to ‘LED-On’.
Figure 9: Turn Off LED Lights
Step 3: Click ‘Locate’ to locate the AP and click ‘Restore’
to recover the normal state. Once you click ‘Locate’, the
LED will alternate flashing between red, blue and green
color.
Figure 10: Restore LED Lights
OmniAccess Stellar AP1101 / AP1221 / AP1222 /
AP1231 / AP1232 LED Specification
Red
Blue
Green
Time Line
Status
ON
Power on
ON
Bootloader-OS loading
System start up
Flash
System running
Network abnormal
(Interface down)
Flash
System running
Network normal, without SSID
created.
ON
System running
Network normal, single band
working, either 2.4Ghz or 5Ghz
working.
ON
System running
Network normal, dual bands
working, both 2.4Ghz and
5Ghz are working.
Flash
Flash
System running
Red and Blue LED alternate
flashing; OS is upgrading.
Flash
Flash
Flash
System running
3 LEDs alternate flashing;
Used for locating an AP.
OmniAccess Stellar AP1251 LED Specification
Item
Icon
Status
LED1
SYS
Power on: on
Bootloader-OS
loading: Flash
Running: On
Upgrade:
Flash
LED2
2.4G
With SSID created: On (Once SSID created on 2.4G, Light On)
LED3
5G
With SSID created: On (Once SSID created on 5G, Light On)
LED4
ENET0
Ethernet linkup: On
LED5
ENET1
Ethernet linkup: On
LED6
RSRV0
Location: Flash (for Locating function in Web )
LED7
RSRV1
Default is off
Contacting Alcatel-Lucent Enterprise
Support Contact
Main Site
http://enterprise.alcatel-lucent.com
Support Site
https://support.esd.alcatel-lucent.com
Support Email
ebg_global_supportcenter@al-enterprise.com
Support Telephone
North America
1-800-995-2696
Latin America
1-877-919-9526
Europe
+800 00200100 (Toll Free) or +1(650)385-2193
Asia Pacific
+65 6240 8484
Other Region
1-818-878-4507