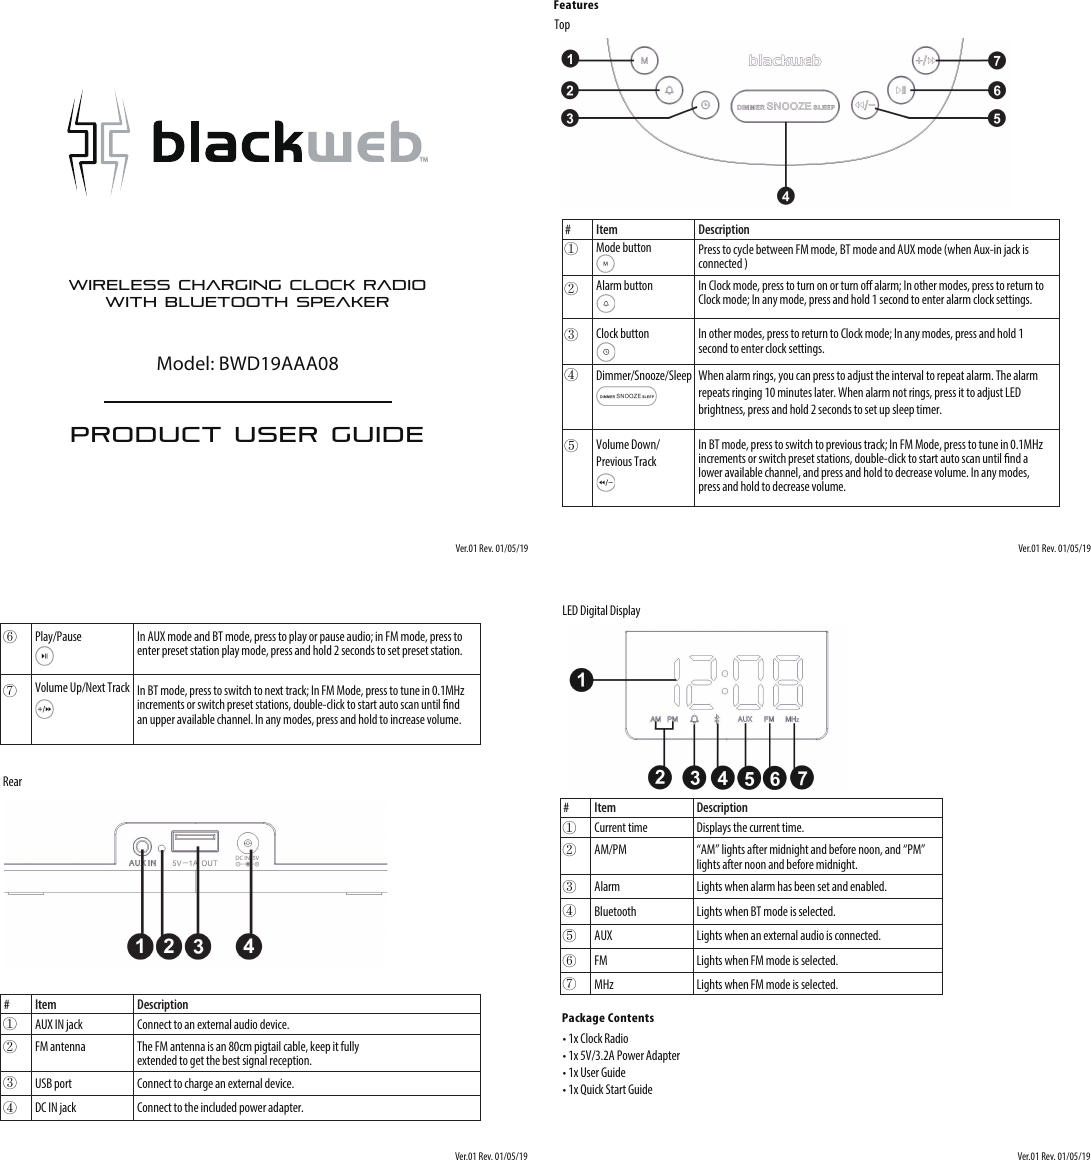
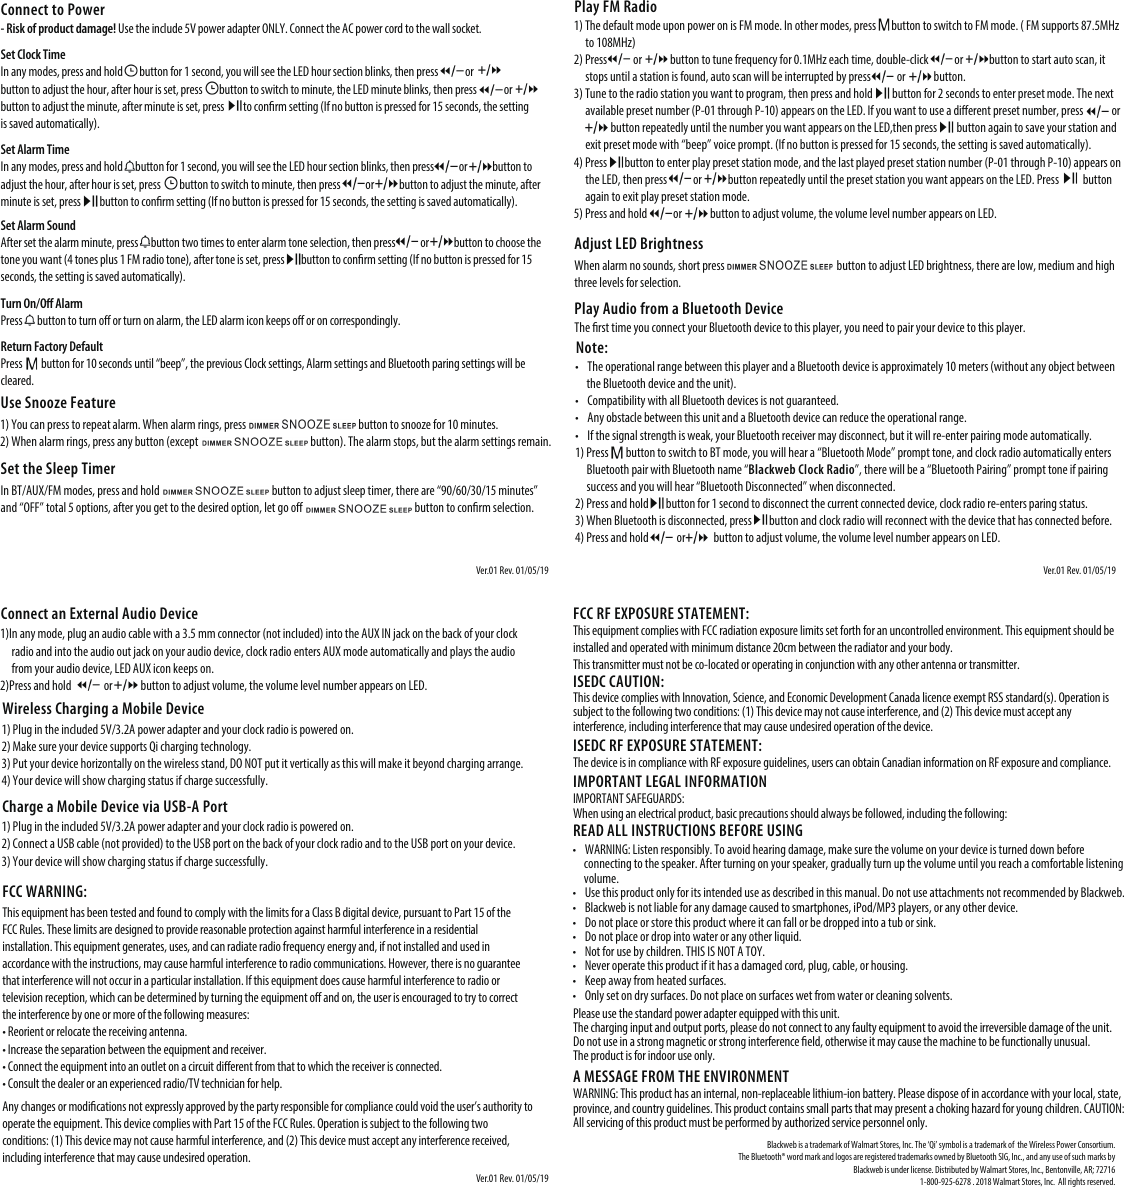
HANK ELECTRONICS BWD19AAA08 WIRELESS CHARGING CLOCK RADIO WITH BLUETOOTH SPEAKER User Manual

HANK ELECTRONICS CO., LTD. WIRELESS CHARGING CLOCK RADIO WITH BLUETOOTH SPEAKER

User_Manual

WIRELESS CHARGING CLOCK RADIOWITH BLUETOOTH SPEAKERPRODUCT USER GUIDEModel: BWD19AAA08TMFeaturesTopPackage Contents• 1x Clock Radio• 1x 5V/3.2A Power Adapter• 1x User Guide• 1x Quick Start GuideRearItem Description#Mode button①Press to cycle between FM mode, BT mode and AUX mode (when Aux-in jack is connected )Clock button③In other modes, press to return to Clock mode; In any modes, press and hold 1 second to enter clock settings.Alarm button②In Clock mode, press to turn on or turn o alarm; In other modes, press to return to Clock mode; In any mode, press and hold 1 second to enter alarm clock settings.Dimmer/Snooze/Sleep④When alarm rings, you can press to adjust the interval to repeat alarm. The alarm repeats ringing 10 minutes later. When alarm not rings, press it to adjust LED brightness, press and hold 2 seconds to set up sleep timer.Volume Down/Previous Track⑤In BT mode, press to switch to previous track; In FM Mode, press to tune in 0.1MHz increments or switch preset stations, double-click to start auto scan until nd a lower available channel, and press and hold to decrease volume. In any modes, press and hold to decrease volume.Item Description#AUX IN jack①Connect to an external audio device.USB port③Connect to charge an external device.FM antenna ②The FM antenna is an 80cm pigtail cable, keep it fully extended to get the best signal reception.DC IN jack④Connect to the included power adapter.Play/Pause⑥In AUX mode and BT mode, press to play or pause audio; in FM mode, press to enter preset station play mode, press and hold 2 seconds to set preset station.In BT mode, press to switch to next track; In FM Mode, press to tune in 0.1MHz increments or switch preset stations, double-click to start auto scan until nd an upper available channel. In any modes, press and hold to increase volume.Volume Up/Next Track⑦LED Digital DisplayItem Description#Current time①Displays the current time.Alarm③Lights when alarm has been set and enabled.AM/PM②“AM” lights after midnight and before noon, and “PM” lights after noon and before midnight.Bluetooth④Lights when BT mode is selected.AUX ⑤Lights when an external audio is connected.FM⑥Lights when FM mode is selected.MHz⑦Lights when FM mode is selected.Ver.01 Rev. 01/05/19 Ver.01 Rev. 01/05/19Ver.01 Rev. 01/05/19 Ver.01 Rev. 01/05/19
Set Alarm SoundAfter set the alarm minute, press      button two times to enter alarm tone selection, then press            or            button to choose the tone you want (4 tones plus 1 FM radio tone), after tone is set, press        button to conrm setting (If no button is pressed for 15 seconds, the setting is saved automatically).Any changes or modications not expressly approved by the party responsible for compliance could void the user’s authority to operate the equipment. This device complies with Part 15 of the FCC Rules. Operation is subject to the following two conditions: (1) This device may not cause harmful interference, and (2) This device must accept any interference received, including interference that may cause undesired operation.This equipment complies with FCC radiation exposure limits set forth for an uncontrolled environment. This equipment should be installed and operated with minimum distance 20cm between the radiator and your body.This transmitter must not be co-located or operating in conjunction with any other antenna or transmitter.FCC RF EXPOSURE STATEMENT:This device complies with Innovation, Science, and Economic Development Canada licence exempt RSS standard(s). Operation is subject to the following two conditions: (1) This device may not cause interference, and (2) This device must accept any interference, including interference that may cause undesired operation of the device.Blackweb is a trademark of Walmart Stores, Inc. The ‘Qi’ symbol is a trademark of  the Wireless Power Consortium.The Bluetooth® word mark and logos are registered trademarks owned by Bluetooth SIG, Inc., and any use of such marks by Blackweb is under license. Distributed by Walmart Stores, Inc., Bentonville, AR; 727161-800-925-6278 . 2018 Walmart Stores, Inc.  All rights reserved.ISEDC CAUTION:The device is in compliance with RF exposure guidelines, users can obtain Canadian information on RF exposure and compliance.ISEDC RF EXPOSURE STATEMENT:IMPORTANT SAFEGUARDS:When using an electrical product, basic precautions should always be followed, including the following:Please use the standard power adapter equipped with this unit.The charging input and output ports, please do not connect to any faulty equipment to avoid the irreversible damage of the unit.Do not use in a strong magnetic or strong interference eld, otherwise it may cause the machine to be functionally unusual.The product is for indoor use only.IMPORTANT LEGAL INFORMATIONREAD ALL INSTRUCTIONS BEFORE USINGA MESSAGE FROM THE ENVIRONMENTWARNING: This product has an internal, non-replaceable lithium-ion battery. Please dispose of in accordance with your local, state, province, and country guidelines. This product contains small parts that may present a choking hazard for young children. CAUTION: All servicing of this product must be performed by authorized service personnel only.•    WARNING: Listen responsibly. To avoid hearing damage, make sure the volume on your device is turned down before connecting to the speaker. After turning on your speaker, gradually turn up the volume until you reach a comfortable listening volume.•    Use this product only for its intended use as described in this manual. Do not use attachments not recommended by Blackweb.•    Blackweb is not liable for any damage caused to smartphones, iPod/MP3 players, or any other device.•    Do not place or store this product where it can fall or be dropped into a tub or sink.•    Do not place or drop into water or any other liquid.•    Not for use by children. THIS IS NOT A TOY.•    Never operate this product if it has a damaged cord, plug, cable, or housing.•    Keep away from heated surfaces.•    Only set on dry surfaces. Do not place on surfaces wet from water or cleaning solvents.Set Alarm TimeIn any modes, press and hold      button for 1 second, you will see the LED hour section blinks, then press            or            button to adjust the hour, after hour is set, press         button to switch to minute, then press            or            button to adjust the minute, after minute is set, press         button to conrm setting (If no button is pressed for 15 seconds, the setting is saved automatically).Connect to Power- Risk of product damage! Use the include 5V power adapter ONLY. Connect the AC power cord to the wall socket.Set Clock TimeIn any modes, press and hold        button for 1 second, you will see the LED hour section blinks, then press             or              button to adjust the hour, after hour is set, press        button to switch to minute, the LED minute blinks, then press             or             button to adjust the minute, after minute is set, press         to conrm setting (If no button is pressed for 15 seconds, the setting is saved automatically).Use Snooze Feature1) You can press to repeat alarm. When alarm rings, press                                                    button to snooze for 10 minutes.2) When alarm rings, press any button (except                                                    button). The alarm stops, but the alarm settings remain.Set the Sleep TimerIn BT/AUX/FM modes, press and hold                                                    button to adjust sleep timer, there are “90/60/30/15 minutes” and “OFF” total 5 options, after you get to the desired option, let go o                                                    button to conrm selection.Turn On/O AlarmPress       button to turn o or turn on alarm, the LED alarm icon keeps o or on correspondingly.Return Factory Default Press         button for 10 seconds until “beep”, the previous Clock settings, Alarm settings and Bluetooth paring settings will be cleared.Play FM Radio  1) The default mode upon power on is FM mode. In other modes, press       button to switch to FM mode. ( FM supports 87.5MHz to 108MHz)2) Press            or             button to tune frequency for 0.1MHz each time, double-click            or            button to start auto scan, it stops until a station is found, auto scan will be interrupted by press            or             button.3) Tune to the radio station you want to program, then press and hold         button for 2 seconds to enter preset mode. The next available preset number (P-01 through P-10) appears on the LED. If you want to use a dierent preset number, press             or                 button repeatedly until the number you want appears on the LED,then press         button again to save your station and exit preset mode with “beep” voice prompt. (If no button is pressed for 15 seconds, the setting is saved automatically).4) Press        button to enter play preset station mode, and the last played preset station number (P-01 through P-10) appears on the LED, then press            or            button repeatedly until the preset station you want appears on the LED. Press           button again to exit play preset station mode.5) Press and hold            or             button to adjust volume, the volume level number appears on LED.Adjust LED BrightnessWhen alarm no sounds, short press                                                    button to adjust LED brightness, there are low, medium and high three levels for selection.Play Audio from a Bluetooth DeviceThe rst time you connect your Bluetooth device to this player, you need to pair your device to this player.Note:Connect an External Audio Device •    The operational range between this player and a Bluetooth device is approximately 10 meters (without any object between the Bluetooth device and the unit).•    Compatibility with all Bluetooth devices is not guaranteed.•    Any obstacle between this unit and a Bluetooth device can reduce the operational range.•    If the signal strength is weak, your Bluetooth receiver may disconnect, but it will re-enter pairing mode automatically.1) Press        button to switch to BT mode, you will hear a “Bluetooth Mode” prompt tone, and clock radio automatically enters Bluetooth pair with Bluetooth name “Blackweb Clock Radio”, there will be a “Bluetooth Pairing” prompt tone if pairing success and you will hear “Bluetooth Disconnected” when disconnected.2) Press and hold        button for 1 second to disconnect the current connected device, clock radio re-enters paring status.3) When Bluetooth is disconnected, press        button and clock radio will reconnect with the device that has connected before.4) Press and hold             or             button to adjust volume, the volume level number appears on LED.1)In any mode, plug an audio cable with a 3.5 mm connector (not included) into the AUX IN jack on the back of your clock radio and into the audio out jack on your audio device, clock radio enters AUX mode automatically and plays the audio from your audio device, LED AUX icon keeps on.2)Press and hold               or             button to adjust volume, the volume level number appears on LED.Wireless Charging a Mobile Device1) Plug in the included 5V/3.2A power adapter and your clock radio is powered on.2) Make sure your device supports Qi charging technology.3) Put your device horizontally on the wireless stand, DO NOT put it vertically as this will make it beyond charging arrange.4) Your device will show charging status if charge successfully.Charge a Mobile Device via USB-A Port1) Plug in the included 5V/3.2A power adapter and your clock radio is powered on.2) Connect a USB cable (not provided) to the USB port on the back of your clock radio and to the USB port on your device.3) Your device will show charging status if charge successfully.FCC WARNING:This equipment has been tested and found to comply with the limits for a Class B digital device, pursuant to Part 15 of the FCC Rules. These limits are designed to provide reasonable protection against harmful interference in a residential installation. This equipment generates, uses, and can radiate radio frequency energy and, if not installed and used in accordance with the instructions, may cause harmful interference to radio communications. However, there is no guarantee that interference will not occur in a particular installation. If this equipment does cause harmful interference to radio or television reception, which can be determined by turning the equipment o and on, the user is encouraged to try to correct the interference by one or more of the following measures:• Reorient or relocate the receiving antenna.• Increase the separation between the equipment and receiver.• Connect the equipment into an outlet on a circuit dierent from that to which the receiver is connected.• Consult the dealer or an experienced radio/TV technician for help.Ver.01 Rev. 01/05/19 Ver.01 Rev. 01/05/19Ver.01 Rev. 01/05/19

Navigation menu