HARRIS TR-399-A2 Dual mode dual band cell phone User Manual users manual
HARRIS CORPORATION Dual mode dual band cell phone users manual
HARRIS >
Contents
- 1. users manual
- 2. Users manual update
- 3. Updated Manual
- 4. Users Manual
users manual
0RELOH3KRQH
8VHU·V*XLGH
$#
5G352
'XDOEDQGWULPRGH
IRU7'0$6\VWHPV

5HJLVWHU\RXUQHZSKRQHSXUFKDVH(ULFVVRQRULJLQDODFFHVVRULHV
DQGVHHWKHODWHVWLQSURGXFWVE\YLVLWLQJXVDWKWWSZZZHULFVVRQFRPXVFRQVXPHU

Table of Contents
Guidelines for Safe and Efficient Use . . . . . 1
*HQHUDO
([SRVXUHWR5DGLR)UHTXHQF\(QHUJ\
$QWHQQD&DUHDQG5HSODFHPHQW
%DWWHU\
'ULYLQJ
(OHFWURQLF'HYLFHV
$LUFUDIW
3RZHU6XSSO\
%ODVWLQJ$UHDV
3RWHQWLDOO\([SORVLYH$WPRVSKHUHV
&KLOGUHQ
3URGXFW&DUH
(IILFLHQW2SHUDWLRQ
Getting Started. . . . . . . . . . . . . . . . . . . . . . . . 7
$WWDFKLQJ<RXU%HOW&OLSRU6ZLYHOWR<RXU%DWWHU\
$WWDFKLQJDQG5HPRYLQJ<RXU%DWWHU\
&KDUJLQJ<RXU%DWWHU\
<RXU&KDUJHU
:KHQWR&KDUJH<RXU%DWWHU\
Learning About Your Terminal. . . . . . . . . . 12
3KRQH0RGH5DGLR0RGH2SHUDWLRQ
'LVSOD\,QGLFDWRUV
,QGLFDWRU/LJKW)XQFWLRQV
.H\%XWWRQ)XQFWLRQ
'HVFULSWLRQVRI7HUPLQDO)HDWXUHV
Basic Operations. . . . . . . . . . . . . . . . . . . . . 16
7XUQLQJ<RXU7HUPLQDO2QDQG2II
0DNLQJ&DOOV
$QVZHULQJ&DOOV
:KLOH2QD&DOO
5DGLR0RGH9ROXPH&RQWURO
(PHUJHQF\&DOOV
$OHUW&DOOV
,QWHUQDWLRQDO&DOOV
&DOOHU1XPEHU,GHQWLILFDWLRQ
/RZ%DWWHU\3RZHU$OHUW
6HFXULW\&RGH
*URXS&DOOLQJZLWK7'0$3UR
'LVSOD\0HVVDJHV
6XPPDU\RI%DVLF2SHUDWLRQV
Using Menus . . . . . . . . . . . . . . . . . . . . . . . . 25
Table of Contents
Table of Contents
2SHQLQJ0HQXV
&KDQJLQJ6HWWLQJV
([LWLQJ0HQX0RGH
4XLFNO\$FFHVVLQJ0HQXV
([DPSOHVRI8VLQJ0HQXV
0HQX2YHUYLHZ
Storing and Recalling Numbers . . . . . . . . . 29
6WRULQJ1XPEHUV
5HFDOOLQJ1XPEHUV
$OWHULQJRU(UDVLQJ1XPEHUV
Message Services . . . . . . . . . . . . . . . . . . . . 33
7H[W0HVVDJH6HUYLFH
9RLFH0DLO6HUYLFH
4XLFN$FFHVVWR7H[WDQG9RLFH0DLO0HVVDJHV
Menu Descriptions. . . . . . . . . . . . . . . . . . . . 39
0HPRU\0HQX
0HVVDJHV0HQX
6\VWHP2SWLRQV0HQX
*HQHUDO6HWXS0HQX
&DOO6HWXS0HQX
6RXQGV0HQX
&DOO'DWD0HQX
/RFNV0HQX
&DOO&DUGV0HQX
7HUPLQDO0HQX
Problems You Can Solve . . . . . . . . . . . . . . 50
'LVSOD\HG0HVVDJHVDQG([SODQDWLRQV
3UREOHPVDQG3RVVLEOH6ROXWLRQV
,I<RX1HHG$VVLVWDQFH
Index. . . . . . . . . . . . . . . . . . . . . . . . . . . . . . . 53

Guidelines for Safe and Efficient Use 1
General
Your terminal is a radio transmitter and receiver. When
the terminal is turned on, it receives and transmits radio
frequency (RF) energy. Depending on the type of termi-
nal you have bought, it operates in different frequency
ranges and employs commonly used modulation tech-
niques. The system that handles your call when you are
using your terminal controls the power level at which
your terminal transmits.
Exposure to Radio Frequency Energy
The International Commission on Non-Ionizing Radia-
tion Protection (ICNIRP), sponsored by the World
Health Organization (WHO), published a statement in
1996 which sets limits for exposure to RF fields from
handheld mobile terminals. According to this statement,
which is based on the available body of research, there is
no evidence that mobile terminals meeting the recom-
mended limits can cause any adverse health effects. All
Ericsson telephones conform to the ICNIRP recommen-
dations and international exposure standards, such as:
•CENELEC European Pre-standard ENV50166-2
•ANSI/IEEE C95.1-1992 (USA, Asia-Pacific)
If you want to limit RF exposure even further, you may
choose to control the duration of your calls and operate
your terminal in the most power efficient manner.
Antenna Care and Replacement
•Do not bend the antenna since it is sensitive and
this will reduce its performance.
•Do not use the terminal with a damaged antenna.
Take your terminal to a qualified service center for
repair.
•Do not use an antenna designed for any other type
of telephone than the one you have bought. Unau-
thorized antennas, modifications, or attachments
could damage the terminal and may violate the
appropriate regulations and will void the warranty.
•Ericsson cannot guarantee the terminal being water
resistant.
Battery
•The terminal is water-resistant when the battery is
removed.
Guidelines for Safe and Efficient Use

2Guidelines for Safe and Efficient Use
•Do not use the terminal with a damaged battery.
Use only the designated Ericsson battery.
•Do not use a battery designed for any other type of
telephone than the one you have bought. Unautho-
rized batteries could damage the terminal and may
violate the appropriate regulations and will void the
warranty and Ericsson can not guarantee the termi-
nal being water resistant.
Driving
Check the laws and regulations on the use of telephones
in the areas where you drive. If you are going to use your
terminal while driving:
•Get to know your wireless terminal and its features
such as speed dial and redial.
•When available, use a handsfree
device.
•Position your wireless terminal
within easy reach.
•Suspend conversations during
hazardous driving conditions or
situations.
•Do not take notes or look up phone numbers while
driving.
•Dial sensibly and assess the traffic; if possible, place
calls when you are not moving or before pulling
into traffic.
•Do not engage in stressful or emotional conversa-
tions that may be distracting.
•Use your terminal to call for help.
•Use you terminal to help others in emergencies.
•Call roadside assistance or a special wireless non-
emergency assistance number when necessary.
•Give full attention to driving.
RF energy may affect some electronic systems in motor
vehicles. In addition, some vehicle manufacturers forbid
the use of mobile phones in their vehicles. Check with
your vehicle manufacturer’s representative to be sure that
your terminal will not affect the electronic systems of
your vehicle.
Electronic Devices
Most modern electronic equipment, for example equip-
ment in hospitals and cars, is shielded from RF energy.
However, RF energy from telephones may affect some
electronic equipment.
•Turn off your terminal in health care facilities when
regulations posted in the areas instruct you to do so.
•Do not use your terminal near medical equipment
without requesting permission.
Mobile phones may affect the operation of some
implanted cardiac pacemakers, equipment for people
with hearing impairments and other medically
implanted equipment. Pacemaker patients should be

Guidelines for Safe and Efficient Use 3
aware that the use of a terminal very close to a pace-
maker might cause the device to malfunction. Avoid
placing the terminal over the pacemaker, i.e. in your
breast pocket. When using the terminal, place it at the
ear opposite your pacemaker. If a minimum distance of
15 cm is kept between the terminal and the pacemaker,
the risk of interference is limited. Contact your cardiolo-
gist for more information.
Aircraft
•Turn off your terminal before boarding any aircraft.
•Do not use it on the ground without crew permis-
sion.
To prevent interference with aircraft systems, you must
not use your terminal while the plane is in the air.
Power Supply
•Connect AC (Power supply) only to designated
power sources as marked on the product.
•Make sure the AC (Power Supply) is dry and clean
before you plug it in.
•To reduce risk of damage to the electric cord,
remove it from the outlet by holding onto the AC
adapter rather than the cord.
•Make sure the cord is located so that it will not be
stepped on, tripped over or otherwise subjected to
damage or stress.
•To reduce the risk of electric shock, unplug the unit
from any power source before attempting any clean-
ing, then use a soft, damp cloth.
Blasting Areas
Tur n o ff your terminal when in a blasting area or in
areas posted “turn off two-way radio” to avoid interfer-
ing with blasting operations. Construction crews often
use remote control RF devices to set off explosives.
Potentially Explosive Atmospheres
Your Ericsson terminal is specially designed for use in
hazardous environments or areas with potentially explo-
sive atmospheres. However, you must pay special atten-
tion and be more careful when using the phone in such
environments.
The terminal is designed for use in these environments
only with the specially marked intrinsically safe Ericsson
battery included in your phone package. Do not use the
phone with any other type of battery other than the one
marked “Intrinsically Safe.”
Areas with a potentially explosive atmosphere are often,
but not always, clearly marked. They include fuelling

4Guidelines for Safe and Efficient Use
areas, such as gas stations, below deck on boats, fuel or
chemical transfer or storage facilities, and areas where
the air contains chemicals or particles, such as grain,
dust, or metal powders.
Do not transport or store flammable gas, liquid, or
explosives in the compartment of your vehicle, that con-
tains your terminal and accessories.
Children
Do not allow children to play with your terminal since
they could hurt themselves or others or accidentally
damage the terminal.
Product Care
Although the terminal is resistant to rain and running
water, do not unnecessarily subject it to water. If you
need to wash your terminal, it is recommended that you
do it gently in cold water under a water tap. Make sure
that your battery is properly connected, the antenna is
properly screwed on and that all accessories are removed
before you wash your terminal. Do not use any deter-
gent or washing powder.
•Do not immerse the product in water.
•Do not expose your product to liquids other than
water.
•Do not expose your product to extreme tempera-
tures.
•Do not use any other accessories than Ericsson
originals. Failure to do so may result in loss of per-
formance, fire, electric shock or injury, and will
void the warranty.
•Do not attempt to disassemble the product. Doing
so will void the warranty. This product does not
contain consumer serviceable components. Service
should be performed by Authorized Service Centers
only.
•The terminal will not withstand dust, moisture or
rain if the battery and/or the antenna are not prop-
erly connected.
•Removal of the battery and antenna should be done
under dry conditions. Make sure that no moisture
gets into the terminal.
Efficient Operation
To use your terminal for optimum performance with
minimum power consumption:
•In the Phone Mode, hold the terminal as you
would a telephone. While speaking directly into the
mouthpiece, angle the antenna in a direction up
and over your shoulder.
•In Radio Mode and Speakerphone Mode, hold the
terminal in front of your face about 30 - 50 cm
away and speak in the direction of the terminal.
Guidelines for Safe and Efficient Use 5
•Do not hold the terminal close to your ear while it
is in Speakerphone or Radio Mode.
•Do not hold the antenna when the terminal is in
use. Holding the antenna affects call quality, may
cause the terminal to operate at a higher power level
than needed and shorten talk and standby times.
6Guidelines for Safe and Efficient Use
Getting Started 7
Complete the following steps after you have removed
your terminal and its components from the box:
1 Attach your belt clip or swivel to your battery
(optional).
2 Attach the battery to your terminal.
3 Before using your terminal, fully charge the battery
using the charger provided with your terminal.
Attaching Your Belt Clip or Swivel to Your
Battery
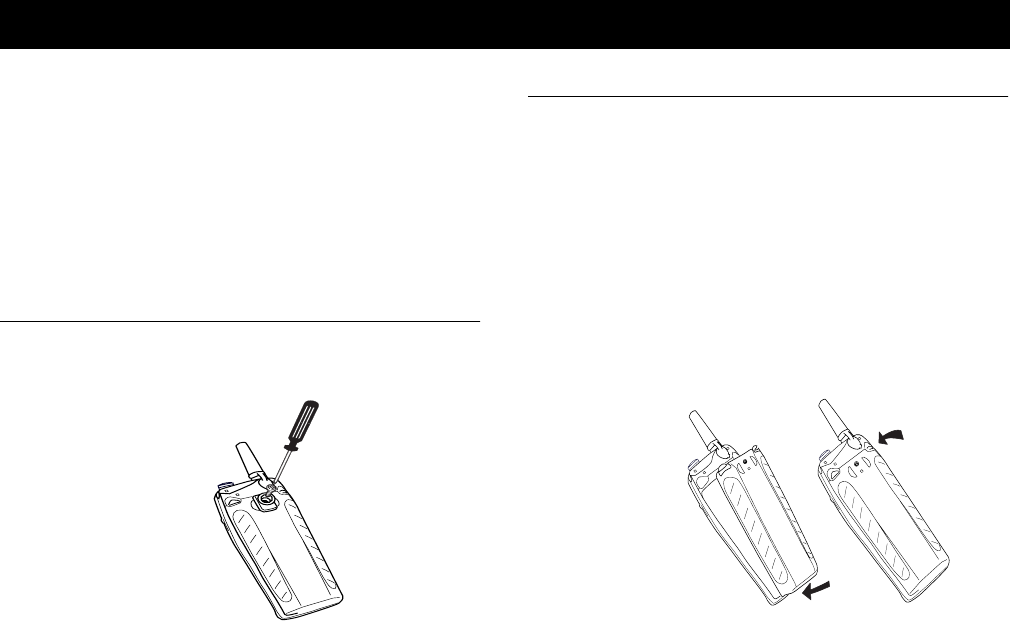
Attach your belt clip or swivel with the screw provided.
Using the belt clip or swivel is optional.
Attaching and Removing Your Battery
Attaching Your Battery
Your terminal comes with a nickel metal hydride
(NiMH) battery. The battery is not charged when you
buy your terminal, but there may be enough power to
turn on the terminal. It is recommended that you charge
the battery before you use the terminal.
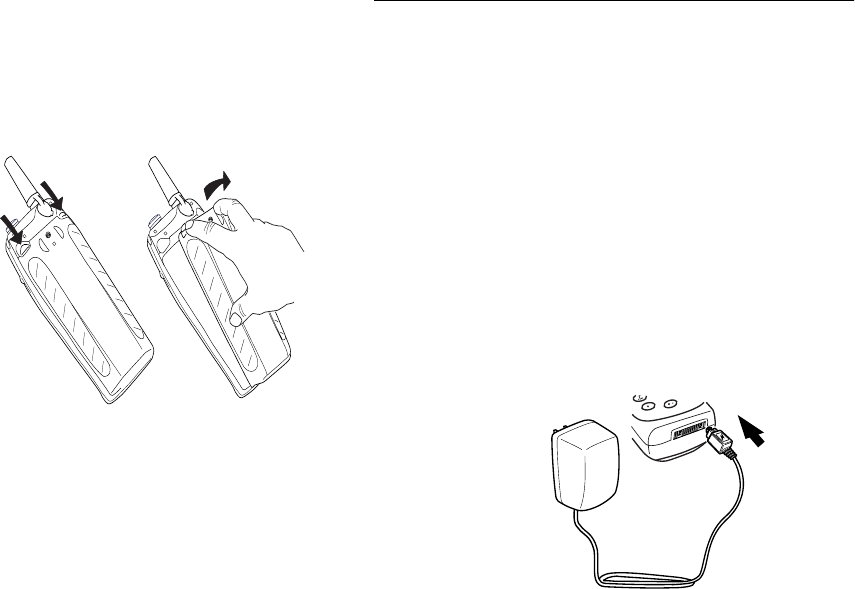
1 Place the battery on the back of the terminal.
2 Align the tabs on the bottom of the battery with the
slots on the bottom of the terminal.
3 Attach the battery to your terminal as shown in the
following illustration.
Getting Started
8Getting Started
Removing Your Battery
Removing the battery is the reverse of attaching it to the
terminal.
1 Make sure that the terminal is turned off before
removing the battery.
2 Press the two latches on the top of the battery.
3 Lift the battery up and away from the terminal.
Charging Your Battery
Your terminal is packaged with a rapid charger. You
should fully charge the battery before you attempt to use
your terminal. While you are charging your terminal
with your rapid or travel charger, you will still be able to
make and receive calls. You can purchase an overnight
charger or a travel charger from your nearest Ericsson
accessory retailer.
Never attach the charger to a terminal that does not have
a battery installed.
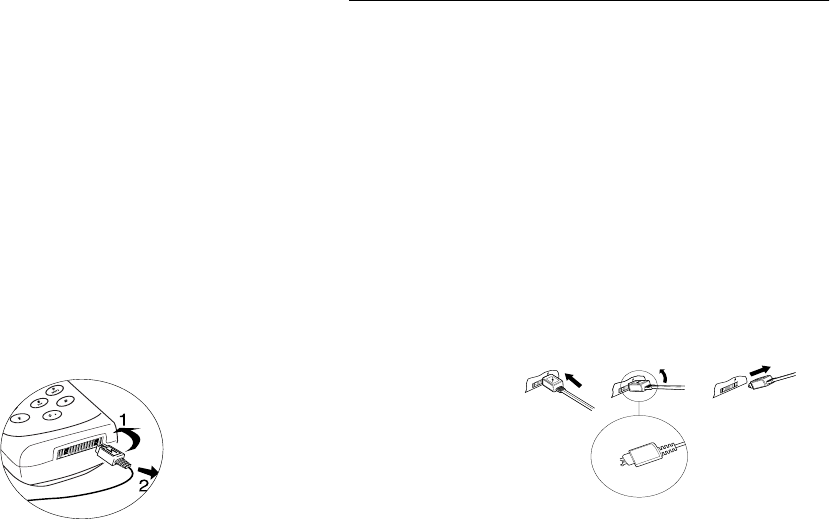
1 Make sure that the battery is attached to the termi-
nal.
2 Connect the charger to the AC power.
3 Connect the other end of the cable to the terminal
according to the picture. The flash symbol on the
plug must face upward (you may have to press
firmly).
Getting Started 9
The terminal automatically starts charging the battery
when you attach the charger. The following indicate
charging:
•The battery meter in the display will continuously
fill and empty.
•The indicator on top of the terminal will show a
steady red light (green, if the terminal is turned on).
When the battery is fully charged, the battery meter in
the display shows full and the indicator on top of the
terminal shows a steady green light.
Note! It is possible to use the terminal while the battery is
being charged with the rapid charger or travel charger.
This is not true with the overnight charger. Using the
terminal to make or receive calls while the terminal is
being charged will increase the charging time.
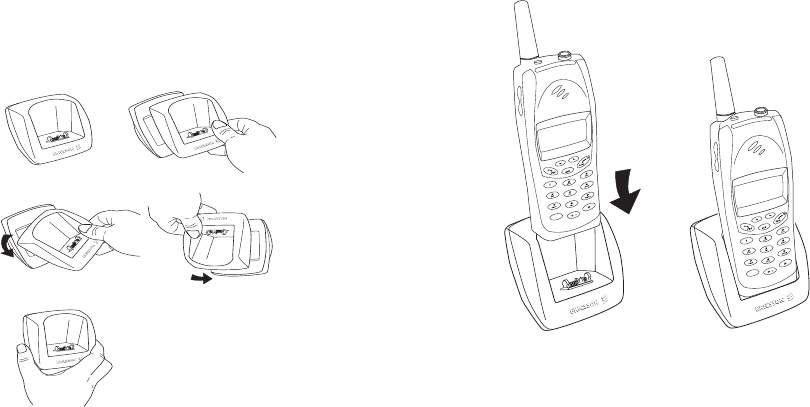
To disconnect the charger, first lift the plug connected to
the terminal upwards and then pull it out.
Your Charger
Rapid Charger
The rapid charger supplies power to charge your battery
while the battery is attached to your terminal. You can
make and receive calls while using the rapid charger, if
you wish. To charge your battery with the rapid charger:
1 Plug the charger into a standard wall electrical out-
let.
2 Hold the terminal with the display and keypad up.
3 Hold the small plug on the charger cord so the light-
ning bolt symbol is up.
4 Align the small plug on the charger cord with the
connector on the bottom of your terminal. The con-
nector on the terminal is above the lightning bolt
symbol.
5 Press the plug into the connector until the plug
"snaps" into place.
Note! To disconnect the charger, first twist the plug connected
to the terminal upwards and then pull it out.
10 Getting Started
Desk/Wall Stand
The desk/wall stand for your Ericsson rugged terminal
serves both as a charger and a holder for the terminal.
When the battery runs low, just place the terminal in the
desk/wall stand to charge it (the charger must be con-
nected to the desk/wall stand).
The desk/wall stand, which consists of two separate
pieces, can be placed on a table or attached to the wall.
Separate and rotate the two pieces to change between
desk and wall stand modes.
To use your desk/wall stand, do the following:
1 Separate the two pieces of the desk/wall stand (see
picture below).
2 Place the desk/wall stand on a table or attach it to
the wall.
3 Using the appropriate cord supplied with the
charger, attach the terminal to the charger.
4 Plug the other end of the charger cord into a stan-
dard electrical wall outlet.
Note! The flash symbol must face upwards.
5 Place the terminal in the desk/wall stand for charg-
ing.

Getting Started 11
Travel Charger
The travel charger supplies power to charge your battery
while the battery is attached to your terminal. You can
make and receive calls while using the travel charger, if
you wish. To charge your battery with the travel charger:
1 Using the appropriate cord supplied with the
charger, attach the terminal to the charger.
2 Using the other cord supplied, plug the charger into
a standard electrical wall outlet.
When to Charge Your Battery
The NiMH battery that comes with your terminal can
be charged whenever you wish without losing perfor-
mance. This is not the case with the cheaper nickel cad-
mium type batteries, often sold as accessories from other
suppliers. For optimal talk and standby time in the long
run, we recommend that you only use Ericsson original
batteries with your Ericsson terminal.
To remind you that the battery will soon need to be
charged or replaced with a charged one, the following
will occur:
•An alarm signal (a long beep) sounds and the mes-
sage Low Battery! appears for 10 seconds in the
display.
•The indicator light on top of the terminal starts
blinking red.
Note! If the terminal is left turned on, the low battery alarm
will be repeated several times and, finally, the terminal
will turn itself off when the battery is no longer able to
power it satisfactorily. It might be possible to turn the
terminal on again, but you will not be able to make or
receive any calls. You should charge the battery or
replace it with a charged one.
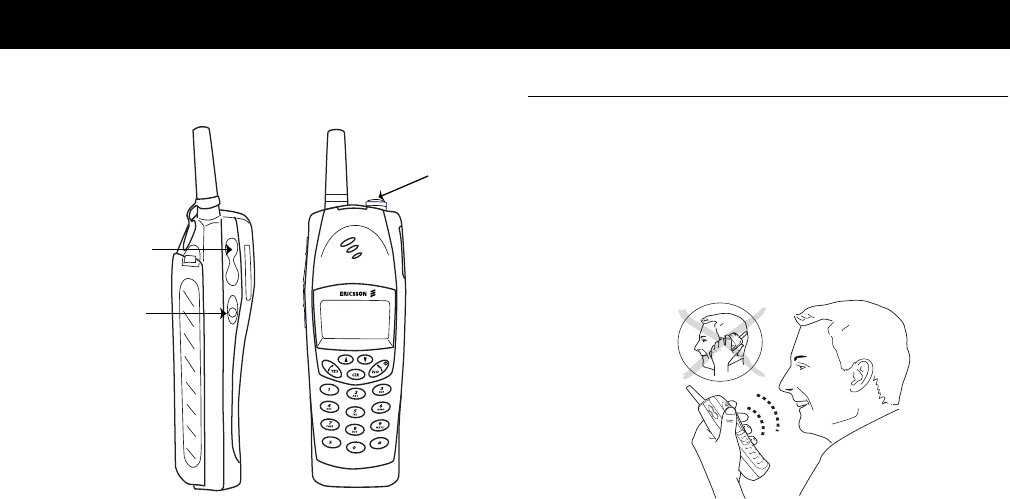
12 Learning About Your Terminal
Your digital wireless terminal is similar in appearance to
the illustration below.
1 Volume Control for Phone Mode
2 Push-To-Talk for Radio Mode
3 Mode/Volume Control
Phone Mode/Radio Mode Operation
Your Ericsson rugged terminal combines phone and
push-to-talk radio features in a single terminal. The ter-
minal operates in Phone Mode when the mode control
button is down. It provides full duplex audio like a stan-
dard cellular phone. The terminal operates in Radio
Mode when the mode control button is up. It operates
like a mobile radio on the cellular network with half-
duplex audio (speak or listen) and high speaker volume.
Press the Push-To-Talk (PTT) button to initiate a call in
Radio Mode and press and hold the PTT button to
speak. Use the top volume control to select radio audio
volume.
Learning About Your Terminal
1
2
3
Learning About Your Terminal 13
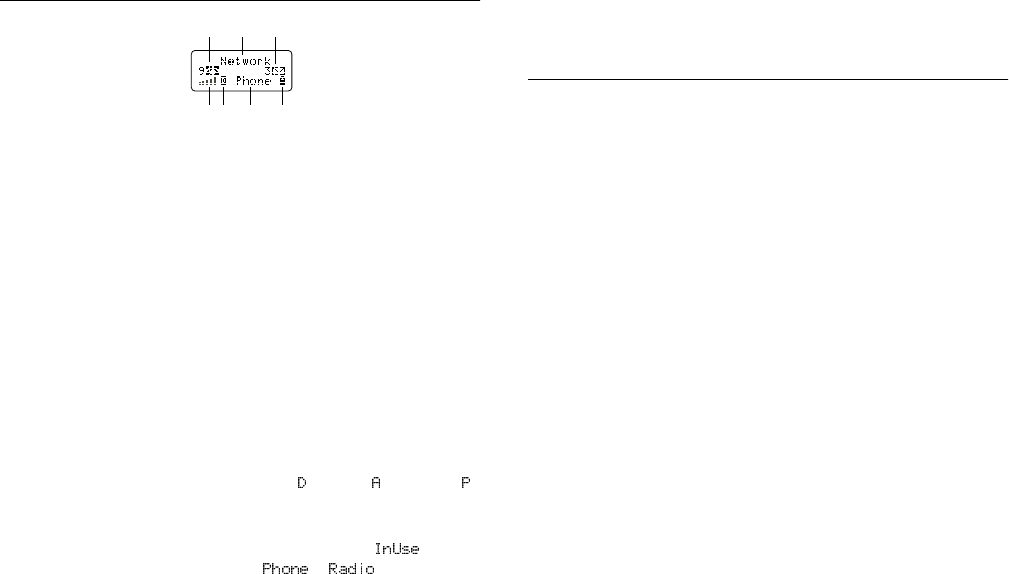
Display Indicators
The display shown above represents the standby display.
1 Voi c e Mail Ic o n indicates that you have voice mail
that you have not retrieved. The number indicates
the number of messages.
2 Service Provider shows the name of your service
provider network on the top line.
3 Text Message Icon indicates that you have text mes-
sages that you have not retrieved. The number indi-
cates the number of messages. An F indicates that
text message memory is full.
4 Signal Strength Indicator shows the relative signal
strength from the system. More bars indicate a
stronger signal.
5 System Indicator shows whether your terminal is
operating in a Digital ( ), Analog ( ), or Private ( )
system.
6 Status Indicator shows the operating status of your
terminal or call type. For example, is shown
during a call and or is shown during
standby.
7 Battery Strength Icon shows the strength of your
battery. A full icon indicates a fully-charged battery.
Indicator Light Functions
The color and state of the indicator light on top of your
terminal indicates the following conditions:
1 Slow Flashing Green indicates that the terminal is
in standby.
2 Rapid Flashing Green indicates that the terminal is
receiving a call.
3 Steady Green indicates that the terminal is receiving
power from an external source, such as a travel
charger.
4 Flashing Red indicates that the terminal’s battery
power is low.
123
45 67

14 Learning About Your Terminal
Key/Button Function
YES • Press and hold to turn your terminal On.
• Press to place a call while in Phone Mode.
• Press to answer a call.
• Press to store menu settings.
• Press and hold (after entering a number) to make a
calling card call while in Phone Mode.
• Press and hold (during a call) to send displayed
numbers as tones.
• Press during a call to switch between calls (call wait-
ing or three-way calling features must be activated
by your service provider).
NO • Press and hold to turn your terminal On or Off.
•Press to end a call.
• Press to exit a menu without saving changes made
in the menu.
• Press to temporarily mute the ringer when receiving
a call.
• Press to recall numbers stored in memory, when
your terminal is in Standby Mode.
• Press twice to recall the last number called, when
your terminal is in Standby Mode.
• Press to scroll through menus and menu setting
selections when your terminal is in Menu Mode, or
to scroll through stored numbers.
• Press to scroll through messages.
• Press and hold to go up through a message, one
screen at a time.
• Press to increase the volume during a call while in
Phone or Private Mode.
• Press to enter Menu Mode.
• Press to scroll through menus and menu setting
selections when your terminal is in Menu Mode, or
to scroll through stored numbers.
• Press to scroll through messages.
• Press and hold to go down through a message, one
screen at a time.
• Press to decrease the volume during a call while in
Phone or Private Mode.
CLR • Press to erase the last digit entered from the display.
• Press and hold to clear all digits or letters from the
display.
• Press and hold to delete numbers in memory and
text messages.
• Press to exit Menu Mode.
• Press and hold during a call to mute the micro-
phone (press and hold again to deactivate mute)
while in Phone Mode.

Learning About Your Terminal 15
Descriptions of Terminal Features
This table lists the distinguishing features of the Ericsson
terminal described in this manual.
Upper Side
Key
• Press to increase volume during a call while in
Phone Mode.
Lower Side
Key
• Press to decrease volume during a call while in
Phone Mode.
Mode/
Volume
Control
• Push button to switch the terminal between Radio
and Phone Mode (when the button is out Radio
Mode is selected, when the button is in, Phone
Mode is selected).
• Knob increases or decreases the speaker high-level
volume for Radio Mode.
• Release button after answering a call in Phone
Mode to put phone into Speakerphone Submode.
• Turn to increase or decrease the speaker high-level
volume for Speakerphone Mode.
• Push button down after answering a call in Radio
Mode to put phone into Private Submode.
PTT
(Push-To-
Talk Bu tt on)
• Press to place a call in Radio Mode.
•Press and hold the PTT button to unmute the micro-
phone and mute the speaker during conversation in
Radio Mode (releasing the PTT button will unmute
the speaker and mute the microphone). When plac-
ing a call in Radio Mode, the user must press and
release the PTT, and press and hold the PTT a second
time to unmute the microphone.
Alert Button • Press to view the default Alert Number.
• Press and hold to place a call to a preprogrammed
Alert Number (in Radio and Phone Mode).
• Press and hold during an active call to place a sec-
ond call to the Alert Number.
Note! Your service provider must activate 3-way calling.
R250d PRO
Side Volume Keys Yes
Phone Number Storage 150 phone numbers,
25 Group numbers,
and 5 Alert Numbers
Text Message Memory 2KB maximum
Last Dialed Memory 20 numbers
Caller ID Log 20 numbers
16 Basic Operations
Turning Your Terminal On and Off
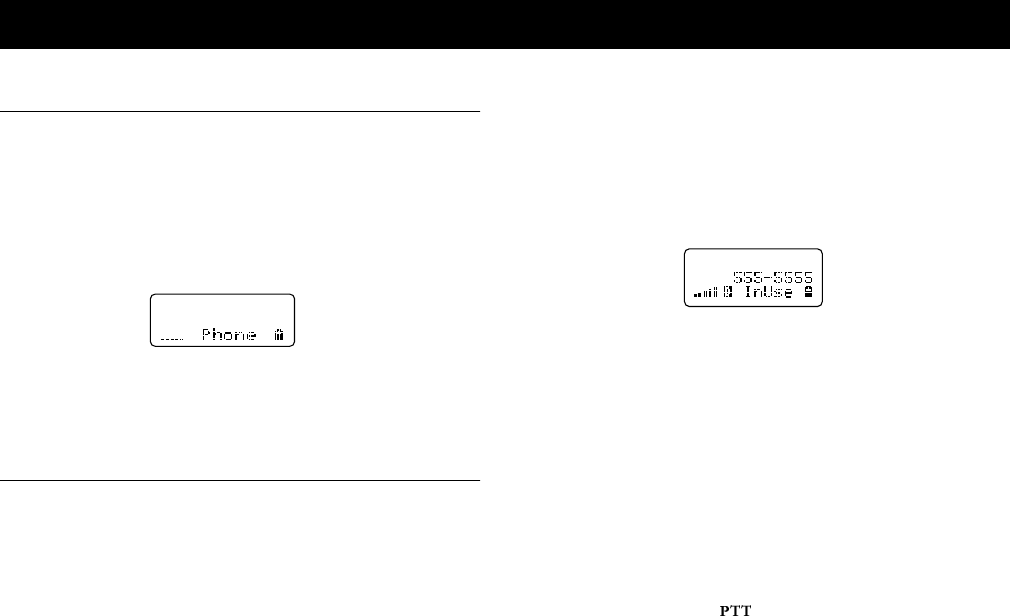
Press and hold YES or NO until your terminal beeps. The
display and keypad backlighting will come on for about
15 seconds. The display should look similar to this illus-
tration. After your terminal locates the network, your
service provider’s name appears in the first line of the
display. If there is no service provider, then the word
Scanning... appears in the first line of the display.
Press and hold NO until your terminal beeps and the dis-
play goes blank.
Making Calls
Making Calls in Phone Mode
1 Verify that Phone Mode is selected.
2 Enter the phone number you want to call by press-
ing the numeric keys. The number is shown in the
display. Press CLR to erase a digit. Press and hold
CLR to erase all digits.
3 Press YES. Dialing is shown in the display while
your terminal attempts to access the system. When
your terminal accesses the system, InUse is shown
on the bottom line of the display. Call replaces
Dialing, as shown in this illustration.
If the Call Timer is enabled, the duration of the call
(in minutes and seconds) is shown in the display
beside Call.
4 When you finish your conversation, press NO to end
the call.
Making Calls in Radio Mode
1 Verify that Radio Mode is selected.
2 Enter the phone number you want to call by press-
ing the numeric keys. The number is shown in the
display. Press CLR to erase a digit. Press and hold
CLR to erase all digits.
3 Press . Dialing is shown in the display while
your terminal attempts to access the system. When
Basic Operations
Call 00:01
Basic Operations 17
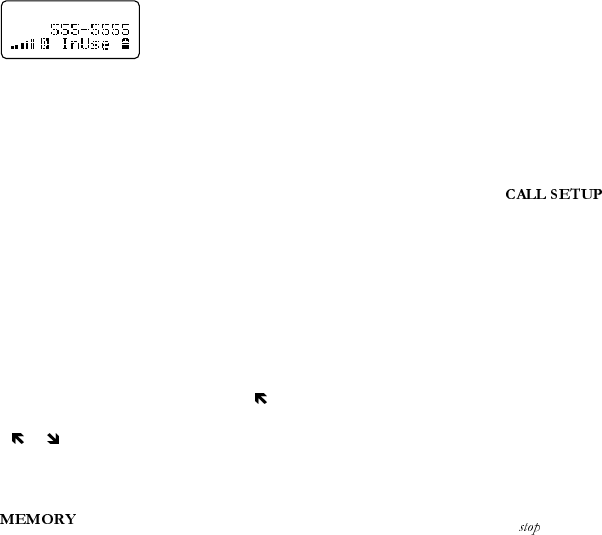
your terminal accesses the system, InUse is shown
on the bottom line of the display. Call replaces
Dialing, as shown in this illustration.
If the Call Timer is enabled, the duration of the call
(in minutes and seconds) is shown in the display
beside Call.
4 When you finish your conversation, press NO to end
the call.
Automatic Redial
If you try to place a call and the system is not available,
your terminal automatically redials the number every 15
seconds for three minutes if the Auto Retry feature is
enabled (see Call Setup Menu).
Redialing the Last Number You Called
Your terminal temporarily stores numbers you have pre-
viously called. To view these numbers, press twice.
The last number you called is shown in the display.
Press or to scroll through the other numbers. You
can place a call to a number shown in the display by
pressing YES in Phone Mode or PTT in Radio Mode.
You can also view the last numbers you called through
the Menu.
Super Dial (Phone Mode Only)
The Super Dial feature (when enabled through the Call
Setup Menu) gives you one-touch dialing for phone
numbers stored in memory locations 1 through 9.
To u se Super Dial, press and hold the numeric key (1 -
9) that corresponds to the memory location containing
the number you want to call. For example, if you want
to call the number stored in memory location 7, press
and hold 7.
Speed Dial
The Speed Dial feature (when enabled through the
Menu) lets you quickly dial a phone
number stored in memory.
To u se Speed Dial, enter the number of the memory
location containing the number you want to call, then
press YES in Phone Mode or PTT in Radio Mode. For
example, if you want to call the number stored in mem-
ory location 12, press 1, then press 2 and press YES in
Phone Mode or PTT in Radio Mode.
Stop and Pause Dialing
Stop and pause dialing lets you enter a group of numbers
with stops and/or pauses between groups. This feature is
useful when you need to dial a phone number and then
another number, such as an access number for an
answering machine or voice mail system.
A causes the terminal to stop transmitting numbers
until you press YES. You can enter a stop in a series of
Call 00:01

18 Basic Operations
digits by pressing and holding # until S is shown in the
display.
A temporarily suspends transmitting numbers for
approximately two seconds before sending the next
series. You can enter a pause in a series of digits by press-
ing and holding * until P is shown in the display.
For example, if your office has a voice mail system that
requires you to dial a phone number, followed by your
extension, followed by an access code, you could enter
the following: 555-1111S2222P33333 where 555-
1111 is the phone number to enter your voice mail sys-
tem. S is a stop. 2222 is your extension. P is a pause.
33333 is your security code.
When you press YES in Phone Mode or PTT in Radio
Mode, your terminal dials the number and then stops
transmitting tones. When your voice mail system asks
for your extension, press YES to transmit your extension.
After a two second pause, your access code is automati-
cally transmitted.
If the timing in your voice mail system does not allow
you to use a pause, you can enter a stop instead of the
pause.
You can also store groups of numbers with stops and
pauses, such as the above example, in a memory loca-
tion. You can then dial the numbers by entering the
memory location and pressing YES.
Answering Calls
Answering Calls in Phone Mode
When your terminal receives a call, the ring tone sounds
(unless you have disabled it through the
Menu), the words Call Receive flash in the display,
the display and keypad backlighting flash, and the indi-
cator light on top of the terminal rapidly flashes green.
If you have caller ID service from your system, the
caller’s terminal number is shown in the display. If the
caller’s number is stored in the terminal memory, the
name stored with the number is also shown.
1 Press any key except NO to answer the call. The
words Call Receive are replaced by the call
timer (if it is enabled).
2 Press NO to end the call.
Answering Calls in Radio Mode
1 To answer a call in Radio Mode, press any key
except the NO key. If auto answer is selected, then
the terminal will automatically answer the incoming
call.
2 Press NO to end the call.
Temporarily Muting the Ring Tone
To temporarily mute the ring tone without answering
the call, press NO on the front keypad.

Basic Operations 19
Call Receive is still shown in the display, and you
can still answer the call by pressing any key except NO.
Unanswered Calls
Your terminal’s display shows the number of calls you
have received but did not answer. You can clear the
number from the display by pressing any key or by turn-
ing the terminal Off.
If Caller Number Identification (CNI) is available from
your service provider, unanswered calls will be stored in
the ReceiveLog section of the Menu.
You can delete a number from the Last Dialed list by
pressing and holding CLR while the number is shown in
the display.
While On a Call
Using Speakerphone Submode
While on an active call in Phone Mode, the terminal will
switch to Speakerphone if the mode button is released
(up). The terminal will provide high speaker volume.
Audio is full duplex allowing you to talk and listen at the
same time.
Using Private Submode
While on an active call in Radio Mode, the terminal will
switch to Private Submode if the mode button is pressed
down. The terminal will operate the same as it does in
Phone Mode conversation.
Increasing or Decreasing Volume During a Call in Phone
Mode
To increase the speaker volume during a call, press the
upper key on the side of your terminal. To decrease the
speaker volume during a call, press the lower key on the
side of your terminal.
Muting the Microphone During a Call in Phone Mode
To mute the microphone during a call, press CLR for one
second or longer. Mic Muted is shown in the display.
Press CLR again (for one second or longer) to return to
your call.
Call Waiting
If you have call waiting service from your system, press
YES to answer a call when you receive the call waiting
signal. You can switch between the two calls by pressing
YES. Do Not press NO until you are ready to end both
calls.
Radio Mode Volume Control
To increase or decrease the speaker high-level volume
while you are in Radio Mode, rotate the volume control
knob. Rotate the knob clockwise to increase volume and
counterclockwise to decrease volume.

20 Basic Operations
Emergency Calls
Your terminal was programmed with an emergency
number (911) when it was manufactured. The pro-
grammed emergency number can be dialed and called at
any time, if there is a 911 system available, regardless of
any call restrictions (except Keypad Lock) you have set
through the Menu. A representative from your
service provider or the retail outlet where you purchased
your terminal should be able to change the emergency
number in your terminal, if a 911 system is not available
in your service area.
If police, fire, or medical help is needed, dial 911 or your
emergency number and press YES. Tell the dispatcher
that you are calling from a wireless terminal. Wireless
911 calls do not automatically provide emergency per-
sonnel with your name, location, or terminal number.
The dispatcher will want to know the following:
1 Your name and wireless phone number.
2 The nature of the emergency.
3 If police, fire, or medical assistance is needed.
4 The exact location of the emergency including cross
streets, mileposts, or landmarks.
5 How many people are involved, their condition, and
if help is being administered.
Alert Calls
Use the Alert button on your terminal to automatically
call a programmed Alert Number. to place a call, press
and hold the Alert button. To display the default Alert
Number, press and release the Alert button. Press or
to select any of the 5 Alert Numbers that have been
programmed into your phone. To change any of the
stored Alert Numbers, see the section Recalling Num-
bers.
Note! The factory default Alert phone number is 911.
International Calls
If allowed by your system, you can place international
calls with your terminal just as you would from any
phone. If you have difficulty completing international
calls, check with your system operator for information.
Caller Number Identification
If your system provides Caller ID service, your terminal
shows the phone number of an incoming call in the dis-
play. Also, if the number is one that you have stored in
memory with a name, the name is shown with the
phone number when your terminal rings. If the Caller
ID information is not available, the message NO ID or a
Basic Operations 21
blank line is shown in the display. The word Private
may be shown if the caller ID is restricted by the system.
Low Battery Power Alert
The low battery alert sounds when your battery is reach-
ing its lowest operational power level. The words Low
Battery flash in the display, and the indicator light on
top of your terminal flashes red. When this happens,
leave your terminal turned On. The terminal discharges
the battery and then shuts itself Off. You should charge
the battery within 24 hours so that the battery can
charge to full capacity.
Security Code
Your terminal has a security code that you must enter to
gain access to certain functions, such as call restrictions
and calling card numbers. The factory-programmed
code is 0000. You should change this code to provide
maximum security for your terminal.
Group Calling with TDMA Pro
If your service provider has the Ericsson TDMA Pro
Server, the R250d terminal supports group calling. Eric-
sson TDMA Pro supports calling a group of phones by
dialing a single group number defined in the TDMA
Pro database. When the terminal calls a group or receives
a group number, the display will indicate the group
name associated with the number on the second line of
the display.
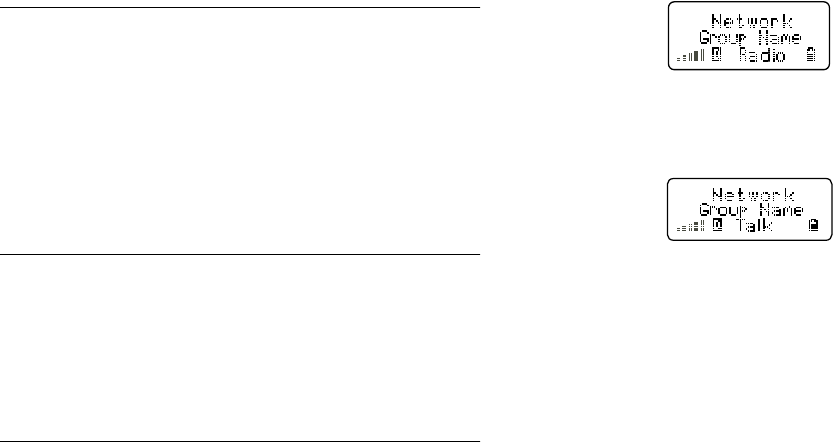
When the call is active, the terminal will display the
group or alert call type on the third line of the display as
shown below.
The following group call types may be available:
•Talk - A group call where all member numbers are
dialed simultaneously and each member is included
when the terminal is answered. An active Talk
group call includes all members of the group who
answered the call. This is a two-way voice conversa-
tion. Your terminal will automatically answer Talk
group calls when Radio Mode is selected.
•Broadcast - A group call where live or pre-recorded
broadcast voice is sent to all member numbers of
the group when the terminal is answered. This is a
one-way voice conversation. Your terminal will

22 Basic Operations
automatically answer Broadcast group calls when
Radio Mode is selected.
•Sequential - A group call where each member num-
ber is dialed in a sequential order until one member
answers. When one member answers, the call is
active. This is a two-way voice conversation.
•First Answer - A group call where all member num-
bers are dialed simultaneously until one member
answers. When one member answers, the call is
active and ringing stops on the other terminals.
This is a two-way voice conversation.
Your Ericsson rugged terminal provides a flashing dis-
play when answering a call associated with an Alert
number stored in the TDMA Pro database or the termi-
nal Alert number memory. The terminal can store 25
group numbers and five Alert numbers. You must enter
your security code before you can store or delete Group
numbers or Alert numbers.
Contact your service provider for more information on
TDMA Pro.
Display Messages
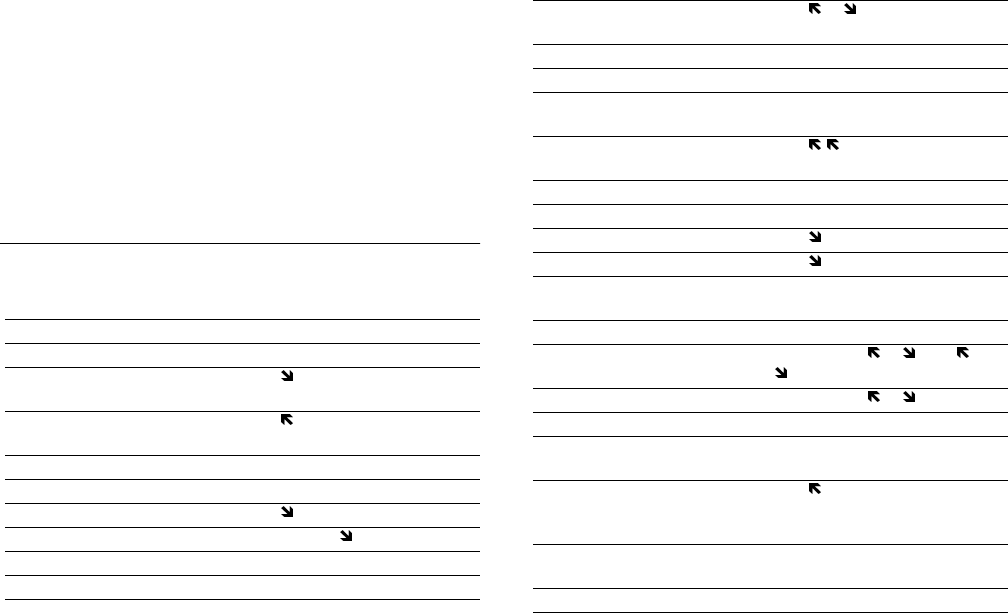
Call Receive Your terminal is receiving a call.
Dialing Your terminal is dialing the number shown in
the display.
InUse You have a call active.
Call MM:SS The elapsed time of your active call, in minutes
and seconds.
Low Battery The battery is reaching its lowest operational
power level.
System Busy! Your system has no channels available. Try
again later.
Scanning... The terminal is searching for a system.
## Calls The numbers of calls you have not answered.
Mic Muted The microphone is muted.
Phone Locked The terminal is locked to prevent unauthorized
use.
Keypad Lock The keypad is locked to prevent unauthorized
use.
Call is Restricted You attempted to call a terminal number that is
restricted in the Menu.
Charging Only The terminal is in charge-only mode and will
not make or receive calls.
Charging Complete Charging is finished.
Silent The terminal ringer is muted.
Phone The terminal is operating in Phone Mode.
Radio The terminal is operating in Radio Mode.
Basic Operations 23
Summary of Basic Operations
Mode Change! The terminal has changed modes.
Bcst The terminal has an active Broadcast Group
Call.
Talk The terminal has an active talk group call.
Sequ The terminal has an active sequential group
call.
FAns The terminal has an active first answer group
call.
No Service The terminal is searching for a wireless system.
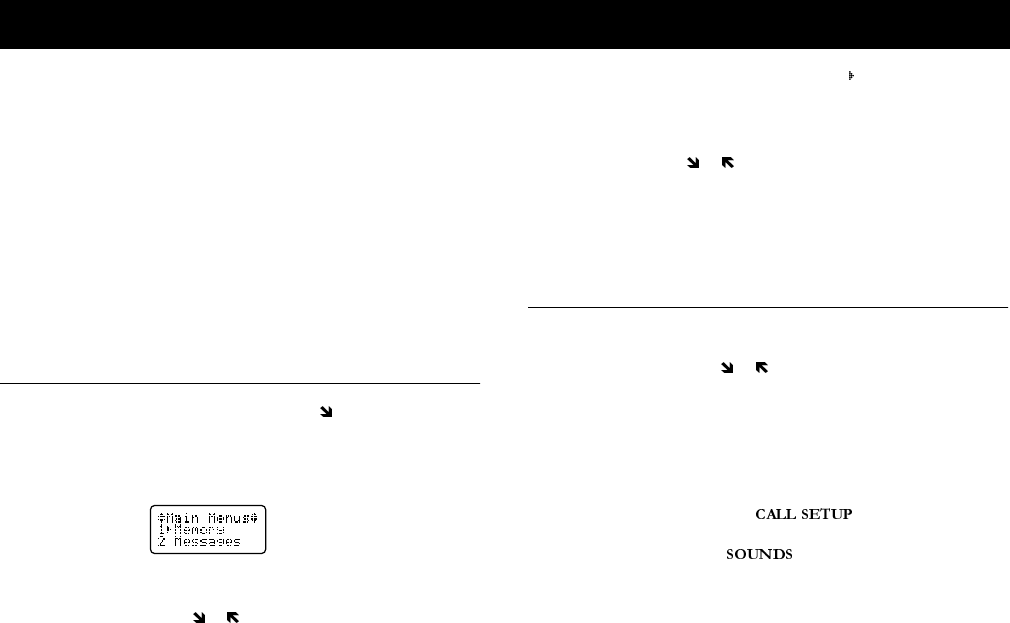
To Do This: Press:
Turn your terminal On Press and hold YES or NO.
Turn your terminal Off Press and hold NO.
Decrease volume during a call in
Phone Mode
Press or lower side key.
Increase volume during a call in
Phone Mode
Press or upper side key.
Answer a call Press any key except NO.
End a call Press NO.
Enter Menu Mode Press .
Enter Menu Mode during a call Press and hold .
Go back one level in Menu Mode Press NO.
Exit Menu Mode Press CLR.
Scroll through menus or menu set-
tings
Press or .
Erase the last digit/letter entered Press CLR.
Erase all digits/letters entered Press and hold CLR.
Call the number shown in the dis-
play in phone mode
Press YES.
Recall a recently dialed number from
memory
Press .
Save the text message you are reading Press YES.
Select a highlighted menu setting Press YES.
Switch Keypad Lock On and Off Press then *.
Switch Silent Mode On and Off Press then #.
Call number in display using calling
card in Phone Mode
Press and hold YES.
Send DTMF tones during a call Press and hold YES.
Quick Access to Voice Mail Press and hold or , then or
, then YES.
Quick Access to Text Messages Press and hold or , then YES.
Mute your voice during a call Press and hold CLR.
Mute the ringer when a call is
received in Radio or Phone Mode
Press NO.
Access RCL mode (recall names,
numbers and memory positions
stored in memory)
Press and press YES.
Call the number shown in the dis-
play in Radio Mode
Press the PTT.
Speak during active Radio Mode call Press and hold PTT.
To Do This: Press:

24 Basic Operations
Increase/decrease volume in Radio
Mode
Rotate top volume knob.
Change from Phone Mode to Radio
Mode
Release top mode button.
Change from Radio Mode to Phone
Mode
Press top mode button.
Put into Speakerphone Submode Release top mode button after
answering a call in Phone Mode.
Put into Private Submode Press top mode button after answer-
ing a call in Radio Mode.
To Do This: Press:
Using Menus 25
This chapter explains how to use your terminal’s menus.
You should read this chapter thoroughly to understand
how to navigate through the menu system and how to
change menu settings.
Your terminal’s menus are an easy way for you to:
•Store and recall numbers in memory
•Check text messages and voice mail
•Set up call features
•Change ring tone and other sound settings
•Change other settings for your terminal
Opening Menus
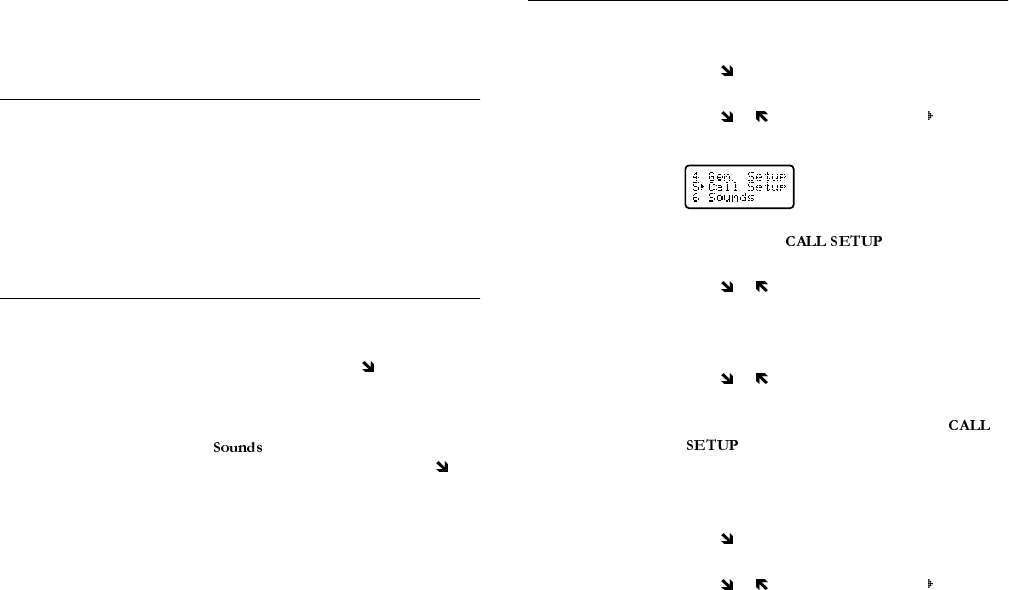
To open the main menu, press . Main Menus and the
names of the first two menus are shown in the display.
Pressing NO when the main menu is shown in the display
returns your terminal to standby mode.
To open one of the submenus:
1 Press or to scroll through the list of submenus.
2 When the menu pointer ( ) is beside the submenu
you want to open, press YES. The list of settings for
the submenu is shown in the display.
3 You can scroll through the list of settings by pressing
or .
4 To back up to the list of submenus, press NO. Press-
ing NO from a list of submenu settings returns you
to the main menu list.
Changing Settings
Open the menus as previously described, then:
1 Press or to scroll through the list until the
menu pointer is beside the setting you want to
change.
2 Press YES. The choices available for the setting are
shown in the display. The current active choice is
enclosed in brackets. Some settings have two
choices, such as On and Off for the Speed Dial set-
ting in the Menu. Other settings
have a list of choices, such as the Ring Pulse setting
in the Menu.
3 Press YES to store the choice you selected or press
NO if you want to exit the menus without storing
any changes you have made. If you store your
Using Menus
26 Using Menus
changes, the words SELECTION STORED! are
shown briefly in the display. The list of settings is
then shown in the display.
Exiting Menu Mode
Press NO at any menu level to go back one level. Press
CLR to exit menu mode.
Note! If your terminal receives a call while it is in Menu Mode,
the terminal automatically exits menu mode to allow
you to answer the call.
Quickly Accessing Menus
If you know the numbers associated with the submenu
and setting you want to change, you can quickly access
that submenu and setting by pressing , followed by the
number of the submenu and then the number of the set-
ting. For example, suppose you want to change the
sound the keys on your terminal make when you press
them. Since submenu is number 6, and the
Key Sounds setting is number 3, you could press ,
then 6, then 3 to go directly to the choices for Key
Sounds.
Examples of Using Menus
Turning Minute Minder ON
1 Press . The main menu list is shown in the dis-
play.
2 Press or until the menu pointer ( ) is beside
Call Setup.
3 Press YES. The Menu settings are
shown in the display.
4 Press or until the menu pointer is beside Min-
uteMind.
5 Press YES. The choices for MinuteMind (ON and
OFF) are shown in the display.
6 Press or until [ON] is enclosed in brackets.
7 Press YES. SELECTION STORED! is shown briefly
in the display, then the settings list for the
Menu is shown.
8 Press CLR to exit Menu Mode.
Changing the Volume of the Ring Tone in Phone Mode
1 Press . The main menu list is shown in the dis-
play.
2 Press or until the menu pointer ( ) is beside
Sounds.
Using Menus 27
3 Press YES. The Menu settings are shown
in the display.
4 Press or until the menu pointer is beside Ring
Volume.
5 Press YES. The list of choices for Ring Volume are
shown in the display.
Off
High
Escalating
Medium
Low
Extra-Low
6 Press or until the menu pointer is beside the
Ring Volume choice you want. As you scroll
through the choices, the terminal sounds the ring
volume for each choice.
7 Press YES to store your choice. SELECTION
STORED! is shown briefly in the display, then the
Menu settings are shown.
8 Press CLR to exit Menu Mode.
Menu Overview
The following list shows the menus and setting for your terminal. Options
that require you to enter the security code are marked with a "+".
1 Memory 1 Store Mem.
2 RCL Mem.
3 StoreScrpd
4 RCL ScrPad
5 RCL LastNo
6 MemoryUsed
2 Messages 1 UnreadText
2 Old Text
3 Delete All
4 VoiceMsgs1
5 VoiceMsgs2
3 System Opt 1 Sys Select
2 Home Only
3 Phone No. +
4 SystemInfo
5 Privacy
6 Time/Date
28 Using Menus
4 Gen. Setup 1 KeypadLock
2 Back Light
3 Contrast
4 Greeting
5 Language +
6 MenuReset +
7 Noise Canc (Handsfree Only)
8 Echo Canc (Handsfree Only)
9 Training (Handsfree Only)
5 Call Setup 1 Super Dial
2 Speed Dial
3 Answer Opt
4 Call Timer
5 MinuteMind
6 Auto Area
7 AutoPrefix
8 Auto Retry
9 Tone Send
0 AccessTone
6 Sounds 1 SilentMode
2 Msg Tone
3 Key Sound
4 Key Volume
5 Ear Volume
6 HandF Vol
7 Ring Pulse
8 Ring Pitch
9 RingVolume
0 Alert
7 Call Data 1 ReceiveLog
2 Last Time
3 Elapsed
4 Call Count
5 Time Count
8 Locks + 1 Auto Lock
2 Dialing
3 Call Cards
4 Receiving
5 Sec. Code
9 Call Cards + 1 CardSelect
2 Card1Setup
3 Card2Setup
0 Terminal 1 Radio Setup
2 Group Setup
3 Alert Setup
Storing and Recalling Numbers 29
You can store phone numbers and associated names in
your terminal’s memory to use for Recall dialing, Speed
Dial, and Super Dial. Each number you store can be up
to 32 digits in length, and any names you store can be
up to 24 characters in length. Group and Alert Numbers
are accessed through and
submenus.
Note! The number of phone numbers that your terminal can
store is based on each number containing 12 digits and
having an eight-character name stored with the number.
Storing longer numbers and names reduces the amount
of memory available and the actual numbers you can
store. You can view the percentage of memory used and
available through the Menu.
Storing Numbers
Storing a Number and Name in Memory
There are two ways you can do this:
1 Store a number using the Menu.
2 Store a number shown in the display.
Storing a Number by Using the Memory
Menu
1 Press to access Menu Mode.
2 Press or until the menu pointer ( ) is beside
Memory.
3 Press YES to open the Menu.
4 Press or until the menu pointer is beside
Store Mem.
5 Press YES to open the Store Mem selection. The
next open memory location is shown in the display,
similar to this illustration.
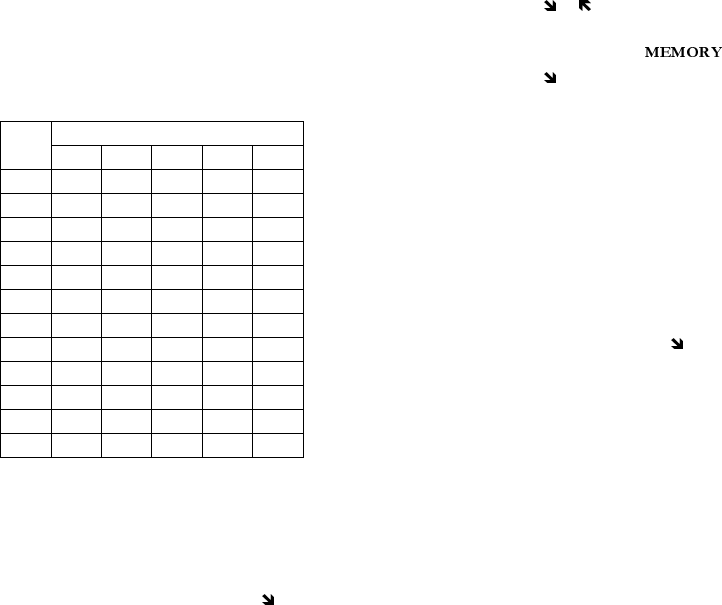
6 Enter a name you want associated with this tele-
phone number. The following table shows which
keys to press and the number of times you must
press them to enter letters.
7 Press to move the cursor to the No: line in the
display.
8 Enter the phone number you want to store.
Storing and Recalling Numbers
30 Storing and Recalling Numbers
Note! To enter letters from the keypad, you must press a key
from one to five times, depending on which letter you
want to enter.
9 Press YES to store the number. Stored in mem-
ory! is shown in the display.
Storing a Number Shown in the Display
1 Enter a number.
2 With the number shown in the display, press to
access Menu Mode.
3 Press or until the menu pointer is beside Mem-
ory.
4 Press YES to open the Menu.
5 Press until the menu pointer is beside Store
Mem.
6 Press YES to open the Store Mem selection. The
number is shown in the No: line of the Store Mem
display.
7 If you want to enter a name to be associated with
this number, enter it now on the Name: line.
8 Press YES to store the number in memory.
Specifying a Memory Location
If you want to store a phone number in a specific mem-
ory location, follow the previous steps for entering the
number and name, then press to move the cursor to
the STORE: line. Enter the memory location number.
Phone numbers stored in locations one through nine can
be used with the Super Dial feature in Phone Mode. All
one- and two-digit memory locations can be used with
the Speed Dial feature for Phone Mode and Radio
Mode.
Storing a Number in Secure Memory
A number stored in secure memory cannot be recalled
unless you enter the correct security code. To store a
number in secure memory, follow the previously
described steps for entering a name and number, then
press and hold YES. The terminal prompts you to enter
Press
This
Number of Times
One Two Three Four Five
1space&1
2ABC2
3DEF3
4GHI 4
5J KL5
6MNO6
7PQRS7
8TUV8
9WXYZ9
00
*, ‘“*
#- . ? #
Storing and Recalling Numbers 31
your security code. If you enter the correct code, the
number is stored and Stored Securely in Mem-
ory is shown in the display.
Storing a Group Number or Alert Number
A number cannot be stored in Group memory or Alert
memory unless you enter the correct security code. To
store a number, select the appropriate submenu. The ter-
minal prompts you to enter your security code. If you
enter the correct code, the terminal will allow you to
store a number. Follow the same procedure as Storing
Numbers.
Recalling Numbers
Recalling a Number Using the Up Arrow
1 Press . The display will look similar to this illus-
tration.
2 To recall by name, press the key which represents
the first letters of the name.
OR
To recall by number press twice to move the cur-
sor to the RECALL: line and enter the memory
location where the number is stored.
3 Press YES. The number is displayed after a two-sec-
ond timeout.
Recalling Previously Dialed Numbers
For instructions on how to recall previously dialed num-
bers, see Redialing a Number USing the Up Arrow.
Recalling a Number Using the Memory Menu
1 Press to access Menu Mode.
2 Press or until the menu pointer is beside Mem-
ory.
3 Press YES to open the Menu.
4 Press or until the menu pointer is beside RCL
Mem.
5 Press YES to open the RCL Mem. display. You can
recall a number in memory by the location number
or by name.
6 To recall by name, enter the letters of the name in
the Name: line. You can enter just a few letters of
the name or the complete name. If you enter just a
few letters, the terminal finds the first name in
memory that begins with the letters you entered.
OR
If you want to search by the location number, press
until the cursor is on the RECALL: line and enter
the number. The number is shown in the display.
7 You can place a call to the number in the display by
pressing YES in Phone Mode or PTT in Radio Mode.

32 Storing and Recalling Numbers
Recalling a Number From Secure Memory
1 Follow the previously described steps for opening
RCL Mem. in the Menu.
2 Press until the cursor is on the RECALL: line.
3 Enter the location of the number stored in secure
memory.
4 Press . Security Code: is shown in the dis-
play.
5 Enter your security code.
6 If you enter the correct security code, the number is
shown in the display.
Recalling a Group or Alert Number
Recalling a Group Number or Alert Number operates
the same as normal (non-secure) numbers.
Altering or Erasing Numbers
Altering a Number in Memory
You can alter or delete a number in memory by doing
the following:
1 Recall the number as previously described.
2 When the number is shown in the display, press
or to move the cursor to the No: line.
3 To add digits to the end of the number, just enter
the digits.
4 To replace digits, press CLR to erase the digits you
want to change and then enter the new digits.
5 Press YES to store the altered number. The message
Same name in memory 000 Save anyway?
is shown in the display.
6 Press YES to replace the number you previously
stored with the modified number.
Erasing a Number From Memory
1 Press .
2 Press until the number and name you want to
erase is shown in the display.
3 Press and hold CLR. Erase memory? Location
000 is shown in the display.
4 Press YES to erase the number from memory. Mem-
ory is erased! is shown briefly in the display.
Altering or Erasing a Group Number or Alert Number
A Group Number or Alert Number cannot be altered or
erased unless you enter the correct security code. To alter
or erase a number, follow the procedure for non-secure
numbers. The terminal prompts you to enter your secu-
rity code before the number is modified. If you enter the
correct code, you can modify the phone number.

Message Services 33
Your terminal can receive two types of message service
(text messages and voice mail) if these services are avail-
able from your service provider. If you subscribe to
either or both services, callers can leave you text mes-
sages or voice mail. Your service provider then transmits
the text messages and voice mail notifications to your
terminal.
Text Message Service
Your terminal supports three message categories: Nor-
mal, Urgent, and Emergency. The actual tagging of the
text message is dependent on the system used by your
service provider. Your service provider transmits mes-
sages to your terminal. If your terminal is On, it receives
the messages as described below. If your terminal is not
turned On, your service provider retains the messages
and transmits them again later.
Note! Your Ericsson rugged terminal holds up to 10 messages
or a maximum of 2KB of message text.
When reviewing a text message, the status of the text
message is shown using the following letters:
•R - Read, text message has been read but not saved.
•S - Saved, text message has been read and saved.
•U - Unread, text message has not been read.
Normal Messages
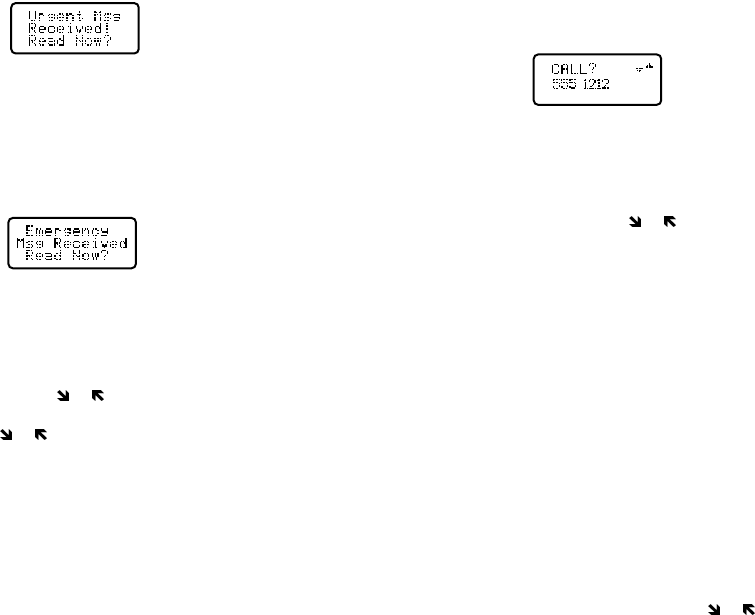
If your terminal is turned On when it receives a normal
text message, your terminal sounds a brief tone and a
message similar to the one in this illustration is shown in
the display. After 10 seconds, the message will be saved
and the text message icon ( ) will appear in the dis-
play. You have a choice of reading the message immedi-
ately by pressing YES, or reading it later by pressing NO.
Pressing NO clears the message received alert from the
display and places a number and icon in the display to
remind you of your messages.
Urgent Messages
If your terminal is turned On when it receives an urgent
text message, your terminal sounds a brief tone and a
message similar to the one in this illustration is shown in
the display. As with normal messages, you have a choice
of reading the message immediately or reading it later.
Urgent messages are always shown before normal mes-
sages, regardless of the order in which they were
received.
Message Services
34 Message Services
Emergency Messages
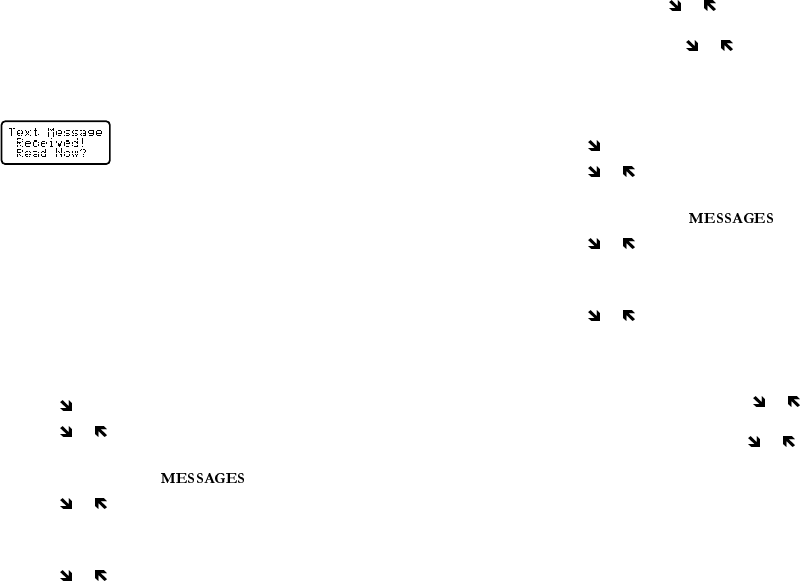
If your terminal is turned On when it receives an emer-
gency message, your terminal sounds two brief tones,
and a message similar to the one in this illustration is
shown in the display for a few seconds.
Reading Text Messages Immediately
When a message received notice is shown in the display,
you can read the message by pressing YES. You can scroll
through the message one line at a time by pressing and
releasing or . You can scroll up or down through
the message three lines at a time by pressing and holding
or .
Call-Back Messages
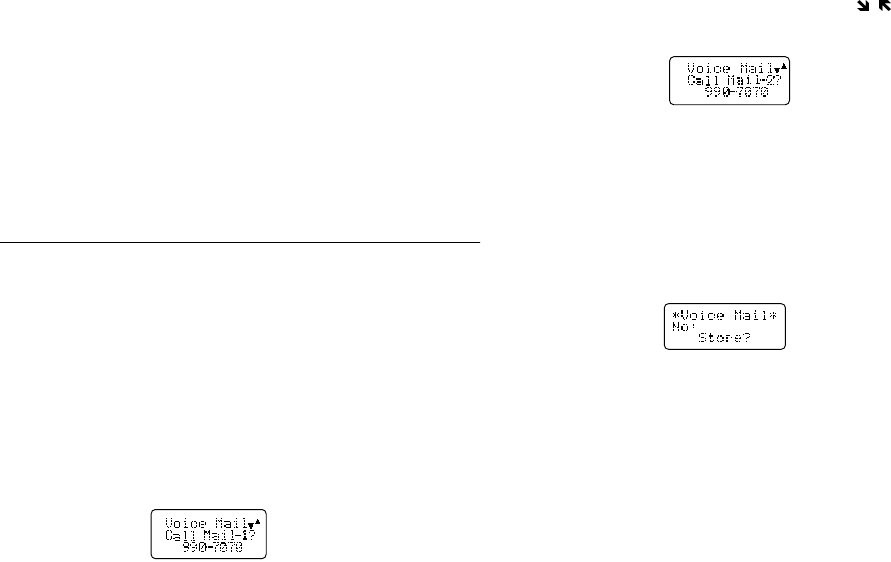
Some text messages you receive may be call-back mes-
sages. A call-back message contains one or more phone
numbers included by the person sending the message. If
you press YES while reading a call-back message, a screen
similar to the one shown here appears. To dial the dis-
played number, press YES (to place a calling card call to
the displayed number, press and hold YES). If you do not
wish to call the displayed number, press NO to resume
reading the actual message.
The up and down arrows in the top right part of the dis-
play indicate that there is more than one number in the
message. (The arrows would not appear if there were just
one number.) You can scroll through the available num-
bers by pressing or . When you see the desired
number, press YES to dial that number.
If you do not call back the number in the message, you
have the same options for saving and deleting the mes-
sage as you do with other text messages.
If you like, you can edit a displayed call-back number
before you make the call. In the display, the cursor
appears in reverse video, and it is initially positioned at
the far left of the second line. In editing the number, you
can:
•Enter a number at the cursor location by pressing a
number key. If a digit is already in the cursor loca-
tion, that digit, as well as all digits to its right, move
one position to the right.
•Clear the digit at the cursor location by pressing
CLR.
•Move the cursor position without clearing anything
by pressing and holding or .
Message Services 35
Receiving Messages While on a Call
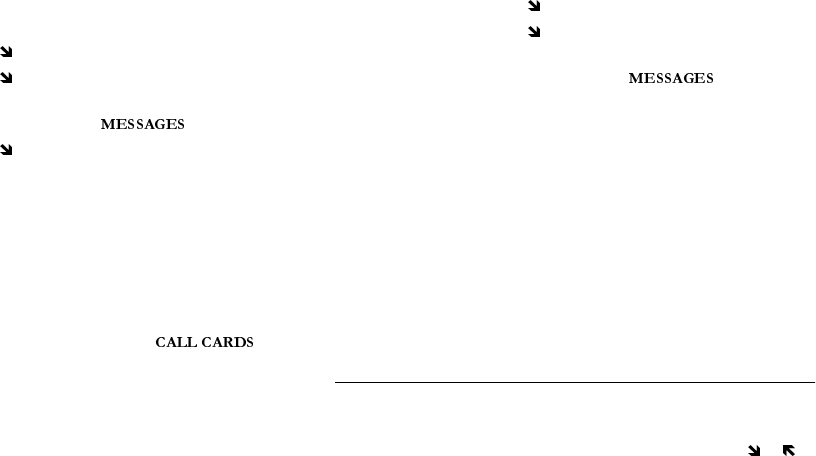
When you receive a message while on a call, your termi-
nal sounds a brief tone and a message similar to the one
in this illustration is shown in the display. Press YES to
display the incoming message, or press NO to continue
talking and have the message treated as an unread mes-
sage.
You cannot receive messages during a call if the message
memory is full.
Retrieving Unread Text Messages
If you have messages that you have not read, a number
and the text message icon are shown in the display. If
the letter F is shown with the icon, your terminal’s text
message memory is full.
To read these messages:
1 Press to enter Menu Mode.
2 Press or until the menu pointer is beside
Messages.
3 Press YES to open the Menu.
4 Press or until the menu pointer is beside
UnreadText.
5 Press YES to open the list of messages.
6 Press or until the menu pointer is beside the
message you want to read.
7 Press YES to open the message. Once the message is
open, you can scroll through the message one line at
a time by pressing or . You can scroll up or
down through the message three lines at a time by
pressing and holding or .
Retrieving Saved Text Messages
To read saved messages:
1 Press to enter Menu Mode.
2 Press or until the menu pointer is beside
Messages.
3 Press YES to open the Menu.
4 Press or until the menu pointer is beside Old
Text.
5 Press YES to open the list of messages.
6 Press or until the menu pointer is beside the
message you want to read.
7 Press YES to open the message. Once the message is
open, you can scroll through the message one line at
a time by pressing and releasing or . You can
scroll up or down through the message three lines at
a time by pressing and holding or .
Saving and Deleting Text Messages
After you have retrieved and read a text message, you
can:
• Save the message to memory:
Press and hold YES.
36 Message Services
• Delete the message:
Press and hold CLR.
• Move to the next message:
Press 1.
• Return to the previous message:
Press 3.
Note! Saved text messages are retained. Unsaved text messages
are retained only until the space is needed for new mes-
sages.
Voice Mail Service
Your terminal can receive voice mail notification when it
is turned On. If your service provider transmits the noti-
fication and your terminal is turned Off, you will receive
notification the next time you turn your terminal On.
Receiving Voice Mail When Your Terminal Is in Standby
If your terminal is turned ON and is in standby when it
receives a voice mail notice, your terminal sounds a brief
tone. If you have previously stored a home-system access
number, a message similar to the one in this illustration
is shown in the display.
To call the number shown, press YES in Phone Mode or
PTT in Radio Mode. To return to Standby Mode, press
NO. To access a non-home system access number (if you
have previously stored it), press , . You will then see
a message similar to the one in this illustration.
If you have not stored an access number, or if you have
stored only one access number and attempt to scroll to
another number, you will see Access Number Not
Stored when you receive a voice mail notice. After the
Access Number Not Stored screen has been dis-
played for five seconds, your terminal displays another
screen, similar to the one in this illustration, that gives
you the opportunity to store an access number.
The number is stored as Mail-1 if no access number had
been previously stored, or as Mail-2 if one number had
already been stored. After you store the number, your
terminal displays a screen asking if you want to call that
number.
Receiving Voice Mail During a Call
If your terminal receives a voice mail notice during a
call, a brief tone sounds and Voice Mail Received
is briefly shown in the display.
Message Services 37
After you end your call, a number and the voice mail
icon are shown in the display.
Listening to Voice Mail When the Icon Is Shown in the
Display
If there is a number beside the voice mail icon in the dis-
play, you have voice mail messages that you have not
heard. To listen to these voice mail messages:
1 Press to enter Menu Mode.
2 Press until the menu pointer is beside Mes-
sages.
3 Press YES to open the menu.
4 Press until the menu pointer is beside either
VoiceMsgs1 or VoiceMsgs2.
5 To access your home-system access number, move
the cursor to VoiceMsgs1 and press YES. To access
your non-home system access number, move the
cursor to VoiceMsgs2 and press YES. (You can
make a credit card call by pressing and holding YES
while in Phone Mode if you previously set up the
option.)
Note! To set up calling cards, refer to the
Menu section in the Menu Descriptions chapter
6 If you have not stored your voice mail number, enter
it now.
7 Press YES in Phone Mode or PTT in Radio Mode to
call your selected access number.
Storing Your Voice Mail Number
You can store a home-system voice mail access number
and a non-home system access number. It is a good idea
to store your voice mail access number(s) so that a num-
ber automatically displays when you receive a voice mail
notice.
1 Press to enter Menu Mode.
2 Press until the menu pointer is beside Mes-
sages.
3 Press YES to open the Menu.
4 To store a home-system access number, move the
cursor to VoiceMsgs1 and press YES. To store a
non-home system access number, move the cursor
to VoiceMsgs2 and press YES.
5 Enter your voice mail phone number on the No:
line.
6 Press YES. SELECTION STORED! is shown in the
display.
7 Press NO twice to exit Menu Mode.
Quick Access to Text and Voice Mail
Messages
The Quick Message feature lets you quickly read text
messages or retrieve voice mail messages. To access the
Quick Message feature, press and hold either or .
What happens next depends on which types of messages
are available:
38 Message Services
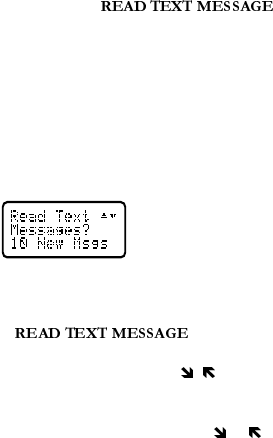
•If only text messages are waiting, Read Text
Messages? is shown in the display. Press YES to
go directly to the
Menu. Press NO to return to Standby Mode.
•If only voice mail messages are waiting, Get
Voice Mail Msgs? is shown in the display. Press
YES to call your voice mail access number.
•If both text and voice mail messages are waiting,
your terminal displays a modified version of the
Read Text Messages? screen, as shown in the
illustration.
In the upper right corner of this screen are two
arrows, which indicate that both voice and text
messages are available. From here, you can access
the Menu by pressing
YES, or you can go to the Get Voice Mail
Msgs? screen by pressing NO, , . The Read
Text Messages? and Get Voice Mail
Msgs? screens are circular. To switch back and
forth between the two screens press or .
Menu Descriptions 39
Press to access the menus.
Press or to scroll through menus, functions in
menus, and settings in a function.
Press YES to select a menu, function, or setting which is
beside the menu pointer ( ).
Press NO to go back one level in the menu structure.
Press CLR to exit the menus completely.
Memory Menu
The Menu contains the following choices
for storing and recalling numbers.
Store Mem
Use Store Mem. to store a phone number and an accom-
panying name.
RCL Mem.
RCL Mem. lets you recall a phone number by the name
stored with the number or by the memory location
number. You can also access RCL Mem. by pressing .
StoreScrpd
Use StoreScrpd to store, in the scratch pad memory, a
number shown in the display.
RCL ScrPad
RCL ScrPad lets you recall a number stored in the
scratch pad memory. You can also view the numbers in
the scratch pad memory by pressing , then #.
RCL LastNo
Use RCL LastNo to view the list of numbers you previ-
ously called. You can also view the last numbers called
by pressing twice.
MemoryUsed
MemoryUsed shows you the percentage of the termi-
nal’s memory that is occupied.
Messages Menu
The Menu contains the following choices
for accessing services that may be available from your
provider.
Menu Descriptions

40 Menu Descriptions
UnreadText
If you have text message service from your provider, this
menu feature lets you read your unread text messages.
Old Text
If you have text message service from your provider, this
menu feature lets you read your old text messages.
Delete All
This function lets you delete all text messages, both old
and new, at once.
VoiceMsgs1
If you have voice mail service from your provider, this
menu feature lets you access your home system access
number.
VoiceMsgs2
If you have voice mail service from your provider, this
menu feature lets you access your non-home system
access number.
System Options Menu
The Menu contains the following
choices for selecting system preferences. (Selections
available are dependent on your provider.)
Sys Select
This feature allows you to manually select a system from
which to obtain service, instead of having the terminal
automatically select an available system. This can
include your public home system as well as Private Sys-
tem Identifiers (PSIDs) that have been programmed into
your terminal. This function is particularly useful if you
have access to more than one system. Only systems that
are currently available can be selected. This varies
depending on your geographic location. Once a system
is selected, the terminal remains locked onto that system
until:
•Signal strength no longer permits.
•The terminal is turned Off.
•You select Normal in this menu.
Home Only
The availability of the Home Only Menu item is depen-
dent on your provider’s phone setup. Home Only lets
you have your terminal look only for your home system
when you turn on the terminal. The terminal does not
search for other systems if your home system is not avail-
able.
Phone No.
The Phone No. function shows you the phone number
programmed into your terminal. You are prompted for
the security code to gain access to this function.

Menu Descriptions 41
SystemInfo
This feature displays the available digital channel ser-
vices. If no services are available, the information fields
are blank. If the terminal is locked in analog mode, or if
the information cannot be obtained, the message Sys-
tem Info Not Available is shown. YES indicates
feature capability; NO means the feature is not available.
Privacy
If your service provider offers digital voice encryption,
use this function to request voice privacy service.
Voice Privacy service is not available in all areas. If voice
privacy is active, the digital voice privacy indicator text, a
reverse text , is shown in the display.
If voice privacy is requested but not granted, your termi-
nal sounds a Voice Privacy Not Active Tone. The tone
sounds at the beginning of the call, and then every 30
seconds during the call, as a reminder. You can turn the
tone feature off through the Sounds Menu.
Time/Date
This function lets you retrieve the time and date from
the system, if available from the service provider.
General Setup Menu
The Menu lets you customize your ter-
minal to suit your personal preferences.
KeypadLock
You can lock the keypad so that pressing keys has no
effect. This feature is useful in circumstances when the
keys may be accidentally pressed such as when you are
carrying your terminal in a briefcase or purse. You can
also activate the keypad lock by pressing and then *.
•The keypad remains locked until you do one of the
following:
•Replace the battery.
•Turn the terminal Off by pressing and holding NO,
and then turn the terminal back On by again press-
ing and holding NO or YES.
•Press , then *.
Back Light
You can set the display and keypad backlighting to stay
on continuously or automatically turn off when the ter-
minal is in Standby Mode or when there has been no key
pressed for 20 seconds.
Contrast
You can change the terminal display contrast setting.
The contrast settings range from 1 to 5, with 5 being the
highest contrast level.
Greeting
Each time the terminal is turned on, you can have the
terminal display a welcome greeting that you enter your-

42 Menu Descriptions
self. The alphanumeric keypad displays both letters and
numbers.
You can enter up to a three-line, 36-character message
(12 characters per line). The message displays when you
turn on the terminal. The greeting function is automati-
cally turned off if no characters are entered.
Language
You can choose between four different languages
(English, French, Spanish, and Portuguese) for text
shown in the display. You are prompted for the security
code to gain access to this function.
Accessing Your Native Language
•Press 4 5 to access the Languages submenu.
•Enter your security code at the prompt (default is
0000).
•Use or to scroll through the list of available
languages until the cursor ( ) is next to the appro-
priate language.
•Press YES to store your selection.
•Press CLR to exit Menu Mode.
Menu Reset
Menu Reset allows you to quickly return your terminal
to its factory settings for Sound and Setup functions.
You are prompted for the security code to gain access to
this function. Press YES to return the terminal to its fac-
tory settings.
Note! Remember that the security code also changes back to
the original factory setting (0000). This will also erase
your phonebook.
Noise Canc (Handsfree Only)
Noise Canc allows you to mute noise when you are con-
nected to an accessory that supports this function. The
two options for Noise Canc are On and Off.
Echo Canc (Handsfree Only)
Echo Canc allows you to mute the echo noise when you
are connected to an accessory that supports this func-
tion. It is also required for Speakerphone Mode. The
two options for Echo Canc are Auto and Off.
Training (Handsfree Only)
Training assists you in determining the DSP parameters
when you are connected to a smart handsfree device.
When you are prompted with Install?, choose either
YES or NO.
Call Setup Menu
The Menu contains the following
choices for enhancing the use of your terminal.
Super Dial
Tu r ni ng o n Super Dial allows you to dial a number
stored in memory locations one through nine by press-
Menu Descriptions 43
ing and holding the numeric key corresponding to the
memory location while in Phone Mode.
Speed Dial
Tu r ni n g o n Speed Dial allows you to dial a number
stored in a memory location by entering the one or two-
digit location number and pressing YES while in Phone
Mode or PTT while in Radio Mode.
Answer Opt
The Answer Opt function lets you select how to answer
calls. You can set your terminal to let you press YES to
answer, any key to answer, or automatically answer after
two rings.
Call Timer
Call Timer, when turned on, shows the approximate
duration of the current call. The timer shows minutes
and seconds, and resets after 99 minutes.
MinuteMind
MinuteMind, when turned on, times your calls by
sounding a short beep in the terminal speaker or hands-
free loudspeaker about 10 seconds before each full
minute during a call.
Auto Area
You can store an area code which Auto Area automati-
cally adds to the seven-digit number you dialed. Enter
the area code on the display, then select On to activate
the feature.
Note! Auto Area does not add the area code to numbers shown
in the display by Caller ID.
AutoPrefix
You can store a 1- to 12-digit prefix which the AutoPre-
fix function automatically adds to a dialed number.
When you dial a 4- or 5-digit phone number, the prefix
is automatically added to the number. To send a number
to office extensions, store the 3-digit prefix in the Auto-
Prefix function. You need only to dial the last four or
five digits of the number.
For example, if you save 123 as the auto prefix and the
function is turned on, to call 123-7654 just dial 7654.
The prefix 123 is automatically added. The auto prefix is
not added for numbers longer than five digits or to
numbers that start with *.
Auto Retry
When enabled, the Auto Retry function repeats a call
attempt every fifteen seconds for up to three minutes if
the call cannot be delivered through the system.
Tone Send
When enabled, the Tone Send function allows your ter-
minal to send DTMF tones during a call. This allows
operations like electronic banking and other DTMF
tone operated activities. When Tone Send is turned Off,
your terminal does not send DTMF tones.

44 Menu Descriptions
AccessTone
When enabled, AccessTone sounds three short beeps to
indicate your outgoing call has connected to the system.
Sounds Menu
The Menu contains the following choices for
setting the different volumes and sounds for ringing,
keypad, speaker, and handsfree kits.
SilentMode
When SilentMode is enabled, your terminal does not
make any keypad or ringing sounds in Phone Mode. You
can quickly activate SilentMode by pressing , then #.
Press , then # again to disable SilentMode. The word
Silent is shown in the display when the terminal is in
Silent Mode.
Msg Tone
This feature allows you to turn on or off the tone that
sounds when an incoming text message is received or a
message waiting signal is received.
Key Sound
Key Sound allows you to choose the sound made when
you press keys: a click, a continuous tone, a quick tone
burst, or no sound at all in Phone Mode.
Key Volume
Key Volume allows you to select the volume level of the
sounds made when you press keys in Phone Mode.
Ear Volume
Ear Volume allows you to adjust the volume of the
speaker using the menu setting. You can also adjust the
volume during a call by pressing or , or by using the
side volume keys in Phone Mode.
Handsfree Volume
HandsF Vol allows you to set the speaker volume when
you are in Phone Mode.
Ring Pulse
Ring Pulse allows you to choose the type of tone for the
ring pulse in Phone Mode. Each tone is demonstrated as
you scroll through the selections. There is also a System
Set selection, which is controlled by the system.
Ring Pitch
Ring Pitch allows you to adjust the ring pitch from Low,
Medium, High, or Mixed, and demonstrates those tones
as you scroll through the selections in Phone Mode.
There is also a System Set selection, which is controlled
by the system.
Ring Volume
Ring Volume allows you to set the level of the ring vol-
ume from Extra Low, Low, Medium, High, Escalating,
Menu Descriptions 45
or Off in Phone Mode. The Escalating volume setting
rises in steps from the lowest to the highest level as the
terminal continues to ring.
Alert
Alert allows you to set the sound, vibrator, or both for
incoming call notification.
Call Data Menu
The Menu contains the following choices
for providing information on calls that have been made
from or received by the terminal.
ReceiveLog
If you have Caller ID from your service provider, this
menu lists the last 20 calls received with caller ID (the
latest call appears first). Press YES to dial a number
shown in the display.
Note! The Auto Area feature does not insert the area code in a
phone number shown in the display by ReceiveLog.
Use the arrow keys to scroll through the list of received
calls. If the received number is stored in memory with a
name, the name is also shown in the display.
Last Time
The Last Time function indicates the approximate dura-
tion of the last call, in minutes and seconds.
Elapsed
The Elapsed time meter shows the hours and minutes
that have been used. The elapsed time cannot be reset.
Press NO to exit.
Call Count
The Call Count function indicates the total number of
calls made from the current phone number shown in the
display. Press to display the home count. Press to
return to the total count display. To reset from Standby
Mode, press 74 , and then press YES to reset.
Time Count
The Time Count function shows the approximate total
time that the terminal has been in use. Press to dis-
play the home count. Press to return to the total
count display. To reset from Standby Mode, press
75 , and then press YES to reset.
Locks Menu
The Menu contains the following choices for
enabling protection services in the terminal to limit its
use. You can select the lock options most useful for your
desired level of terminal security. You must enter your
security code before you can open the Menu.

46 Menu Descriptions
Auto Lock
When selected, the terminal is automatically locked
from making calls each time you turn the terminal On.
To unlock the terminal, enter the security code.
Dialing
You can use this option to restrict outgoing calls. Selec-
tions for this function include:
• Allow all
No outgoing call restrictions.
• Restrict all
Allows dialing of emergency numbers only.
• Local + 800 # only
Only numbers with up to 7 digits and 10-11 digit
800, 888, or 877 numbers. No operator access.
• Memory only
Allows calls only to numbers stored in memory.
Numbers cannot be stored in memory while this
restriction is enabled.
• Local + 800 # + mem only
Only the combination of the two preceding options
can be dialed.
• Restrict Internat.
Only 11 digits or fewer can be dialed, and operator
access is restricted.
• Restrict 900 #
No calls allowed with the area codes 900, 0-900, or
1-900. No operator access.
• Restrict Operator
Allows all calls except for operator access (dialing
0).
Call Cards
You can Allow or Restrict the use of calls using a calling
card or calling card features.
Receiving
You can allow or restrict incoming phone calls. If
selected, the terminal does not ring during incoming
calls.
Sec. Code
You can change your four-digit security code. The fac-
tory-set code is 0000. You are prompted to repeat the
code for verification.
Call Cards Menu
The Menu contains the following
choices for storing two calling card numbers to use for
making long distance phone calls in Phone Mode.
Note! You must enter your security code before you can open
the Menu.
Menu Descriptions 47
Card Select
You can store two calling card numbers. You select
which number your terminal uses through the
Menu.
1 Press to enter Menu Mode.
2 Press or until the menu pointer is beside Call
Cards.
3 Press YES to open the Menu.
4 Press or until the menu pointer is beside
CardSelect.
5 Press YES.
6 Press or until the card you want to use (Card
One or Card Two) is enclosed in brackets.
7 Press YES to store your selection.
Card1 and Card2 Setup
Calling Card Setup
Make sure you have the following:
•Calling Card Access Number (a number provided
by your long distance service provider).
•Verification Number (a number you must enter to
allow the calling card call to be completed).
To set up a calling card, complete the following steps.
1 Press to enter Menu Mode.
2 Press or until the menu pointer is beside Call
Cards.
3 Press YES to open the Menu. You
are prompted to enter your security code.
4 Press or until the menu pointer is beside
Card1Setup or Card2Setup.
5 Press YES to enter card setup.
6 Press or until the menu pointer is beside
Access No.
7 Press YES.
8 Enter the calling card access number.
9 Press YES to store the number.
10 Press to move to Ver. no.
11 Enter the verification number.
12 Press YES to store the number.
Changing the Flow Order
If your long distance service provider requires a different
dialing, you may need to change the Flow Order.
Flow order determines when the numbers are transmit-
ted by your terminal. The default flow is:
•Access number
•Stop
•Number you are calling
•Stop
•Ver ificati on n um ber
To c ha n ge t h e f l o w o r d e r :
48 Menu Descriptions
1 From the previous Step 12, press until the menu
pointer is beside Flow dom. (domestic) or Flow
int. (international).
2 Press YES.
3 Press to scroll through the flow order.
4 To change a flow setting, press until the menu
pointer is beside the setting you want to change.
5 Press 1 to scroll through the options for that setting.
6 When you have the flow order you want, press YES
to store the selection.
Using a Calling Card
To place a call using a calling card:
1 Enter or recall the number you want to call.
2 Press and hold YES. The calling card number is
shown in the display.
3 Release the key after the number has been displayed.
4 If you are using stops between numbers, you must
press YES or any number key to send the next
sequence of numbers. If you use pauses, the num-
bers are sent automatically after the specified length
of time chosen in the Flow function.
Terminal Menu
The Menu contains the following sub-
menus for enhancing the use of your terminal for
, , and .
Radio Setup
contains the following choices for adjust-
ing the volume levels and answer options while you are
in Radio Mode.
Key Volume
Key Volume allows you to adjust the volume of the key
tones. Key Volume is adjustable in five different levels to
take full advantage of the speaker high level in Radio
Mode.
Ring Volume
Ring Volume allows you to set the volume of audible
alert when a call is received. The options for Ring Vol-
ume are High, Escalating, Medium, Low, and Off.
Note! Off results in no audible alert.
Answer Option
Answer Opt. allows you to set one of three values for
individual calls (non-Group). The options for Answer
Opt are Radio Auto, Radio Yes, and Radio Any.
Group Setup
contains the following choices for estab-
lishing, editing, and using Groups.
Store Group
Use Store Group to store Group phone numbers with
accompanying names.

Menu Descriptions 49
Recall Group
RCL Group lets you recall a Group by the name stored
with the number or by the memory location number.
Default Group
Default Group allows you to list the default Group call
number.
Alert Setup
contains the following choices for estab-
lishing, editing, and using Alert groups.
Store Alert
Store Alert allows you to store an Alert phone number
and an accompanying name.
RCL Alert
RCL Alert lets you recall an Alert phone number by the
name stored with the number or by the memory loca-
tion number.
Default Alt.
Default Alt. allows you to list the default Alert call num-
ber.
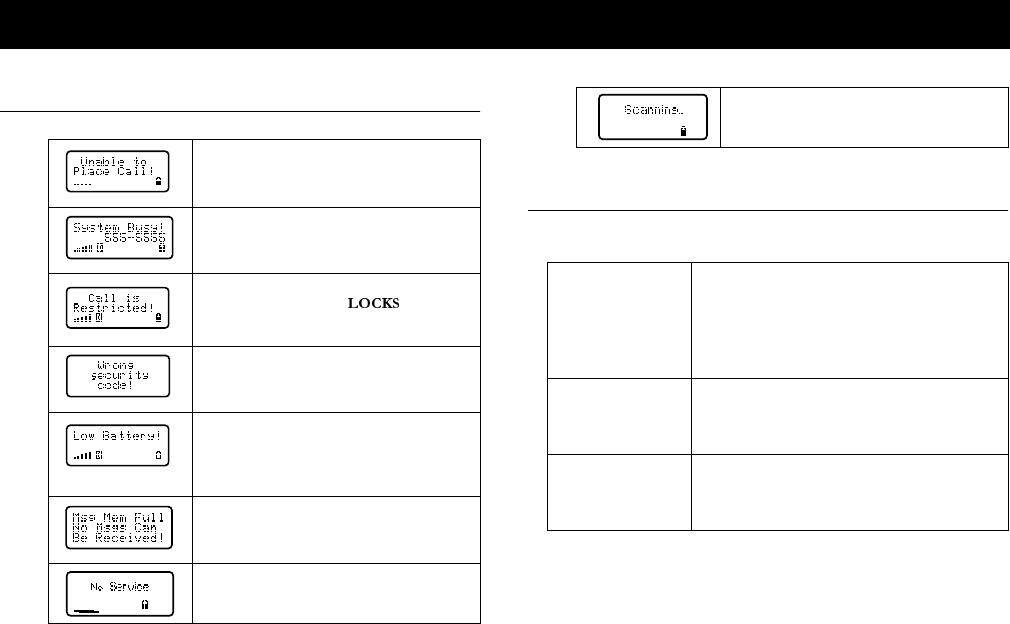
50 Problems You Can Solve
Displayed Messages and Explanations
Problems and Possible Solutions
.
Problems You Can Solve
The signal is too weak to make a call. Try
again when the signal strength is one bar or
stronger.
The system is busy with other calls. Wait a
while and try your call again.
You called a number for which you have set
call restrictions. See the Menu for
changing call restrictions.
You entered an incorrect security code. Enter
the correct security code.
The battery power is low. When the terminal
shuts itself off, replace the battery with a fully
charged one, or use an alternate power
source, such as a travel charger.
Your text message memory is full. Erase some
stored messages so you can receive more mes-
sages.
Your terminal is searching for a wireless sys-
tem.
Your terminal is searching for a wireless sys-
tem.
The terminal does
not turn On.
Recharge or replace the battery.
If you are using a battery eliminator, make sure
that the battery eliminator is fully inserted into
the vehicle cigarette lighter. Make sure the vehicle
is supplying power to the cigarette lighter.
The terminal is not
ringing when a call is
received.
Check the Sounds Menu to make sure the termi-
nal is not set for Silent Mode.
The terminal
becomes warm dur-
ing long calls.
This is not a problem. The terminal may feel
slightly warm during extended calls.

Problems You Can Solve 51
If You Need Assistance
If you need additional information or if you would like
to purchase Ericsson Original Accessories:
•In North America, call 1-800-ERICSSON (374-
2776).
•In Latin America, call 305-755-6789.
•Elsewhere, call 919-472-7908.
Calls are being
dropped.
You are probably in a geographic area with mini-
mal service. Wait until the signal strength indica-
tor in your terminal’s display shows a relatively
high signal strength (more bars) before trying to
make a call. Make note of geographic locations
where calls are dropped and contact your service
provider.
The signal strength
varies.
This is a common occurrence. Transmitter sites
are set in geographic areas, and coverage is not
100% all of the time. Signal strength varies as you
travel between cells.
52 Problems You Can Solve

Index 53
A
Access Tone 44
Accessing Your Native Language 42
Aircraft 3
Alert 45
button 15
calls 20
low battery 21
Alert numbers 31
Alert Setup 49
Default Alt. 49
RCL Alert 49
Store Alert 49
Altering numbers 32
Answer Opt 43
Answering calls 18
Antenna
care 1
replacement 1
Assembly 712 16 25 29
Attaching 7
battery 7
belt clip 7
swivel 7
Auto Area 43
Auto Lock 46
Auto Prefix 43
Auto Retry 43
Automatic redial 17
B
Back Light 41
Basic operations
summary 23
Battery
attaching 7
charging 7
removing 7 8
when to charge 11
Belt clip
attaching 7
Blasting areas 3
Button
alert 15
functions 14
PTT 15
C
Call Cards 46
Call Cards Menu 46
Card1 Setup 47
Card2 Setup 47
Call Count 45
Call Data Menu 45
Call Count 45
Elapsed 45
Last Time 45
ReceiveLog 45
Time Count 45
Call restrictions 50
Call Setup Menu 42
Access Tone 44
Answer Opt 43
Auto Area 43
Auto Prefix 43
Auto Retry 43
Call Timer 43
MinuteMind 43
Speed Dial 43
Super Dial 42
Tone Send 43
Call Timer 43
Call waiting 19
CallCards Menu
Card Select 47
Caller number identification 20
Calls
alert 20
Index

54 Index
answering 18
answering in phone mode 18
answering in radio mode 18
emergency 20
group 21
international 20
making 16
making in phone mode 16
making in radio mode 16
unanswered 19
Calls are being dropped 51
Card Select 47
Card1 Setup 47
Card2 Setup 47
Changing 26
Changing settings 25
Changing the volume of the ring
tone 26
Charger
travel 11
Charging
battery 8
with desk/wall stand 10
with rapid charger 9
with travel charger 11
Charging your battery 8
how 8
when 11
Children 4
CLR key 14
Contrast 41
D
Decreasing volume 19
Default Alt. 49
Delete All 40
Desk 10
Desk/wall charger 10
Desk/wall stand 10
Dialing 46
Allow all 46
Local + 800 # only 46
Local + 800# + mem only 46
Memory only 46
Restrict 900# 46
Restrict all 46
Restrict Internat. 46
Restrict Operator 46
speed 17
stop and pause 17
super 17
Display 13
indicators 13
messages 22
Displayed 50
Down arrow key 14
Driving guidelines 2
During a call
decreasing volume 19
increasing volume 19
muting the microphone 19
E
Ear Volume 44
Echo Canc 42
Efficient phone operation 1
Elapsed 45
Emergency
calls 20
messages 34
Erasing numbers 32
Exiting menu mode 26
Exposure to radio frequency energy 1
F
Functions
button 14
key 14
G
General Setup Menu 41
Back Light 41
Contrast 41
Echo Canc 42
Greeting 41
KeypadLock 41
Language 42

Index 55
Menu Reset 42
Noise Canc 42
Training 42
Greeting 41
Group
numbers 31
Setup 48
Group calling 21
Guidelines for safe and efficient use
aircraft 3
antenna care and replacement 1
blasting areas 3
children 4
driving 2
efficient phone operation 1
electronic devices 2
general 1
potentially explosive
atmospheres 3
product care 4
H
Handsfree Volume 44
Home Only 40
I
Incorrect security code 50
Increasing volume 19
Indicator light funtions 13
International calls 20
K
Key
CLR 14
down arrow 14
functions 14
lower side 15
mode control 15
NO 14
Sound 44
up arrow 14
upper side 15
Volume 44
volume control 15
YES 14
KeypadLock 41
L
Language 42
Last Time 45
Listening to voice mail 37
Locks Menu 45
Auto Lock 46
Call Cards 46
Dialing 46
Receiving 46
Sec. Code 46
Low battery alert 21 50
M
Making calls 16
phone mode 16
Memory Menu 39
MemoryUsed 39
RCL LastNo 39
RCL Mem. 39
RCL ScrPad 39
Store Mem 39
StoreScrpd 39
MemoryUsed 39
Menu 39
Call Cards 46
Call Data 45
Call Setup 42
General Setup 41
Locks 45
Memory 39
Messages 39
Overview 27
overview 27
Sounds 44
System Options 40
Terminal 48
Menu mode
exiting 26
Menu Reset 42
Menus
examples of using 26

56 Index
opening 25
using 25
Message
services 33
text 33
text memory full 50
Messages
call-back 34
deleting text 35
display 22
emergency 34
normal 33
quick access to text 37
quick access to voice mail 37
reading text 34
receiving 35
retrieving saved 35
saving text 35
unread 35
urgent 33
Messages Menu 39
Delete All 40
Old Text 40
UnreadText 40
VoiceMsgs1 40
VoiceMsgs2 40
Microphone
muting 19
MinuteMind 26 43
turning on 26
Mode
key 15
phone 12
radio 12 19
Msg Tone 44
Muting the microphone 19
N
Native language 42
accessing 42
NO key 14
Noise Canc 42
Normal messages 33
Numbers
altering 32
erasing 32
recalling 29 31
recalling alert 32
recalling from secure memory 32
recalling group 32
recalling previously dialed
numbers 31
recalling using the Memory
Menu 31
recalling using the up arrow 31
storing 29
storing in memory 29
storing when in display 30
O
Off
turning 16
Old Text 40
On
turning 16
Opening menus 25
Operation
phone mode 12
radio mode 12
P
Pause dialing 17
Phone mode operation 12
Phone Number. 40
Potentially explosive atmospheres 3
Privacy 41
Private submode 19
Problems
call restictions 50
calls are being dropped 51
incorrect security code 50
low battery power 50
searcing for a wireless system 50
signal strength varies 51
system busy 50
terminal becomes warm 50
terminal not ringing 50
terminal will not turn on 50

Index 57
text message memory full 50
weak signal 50
Product care 4
PTT button 12 15
Push-to-talk button 12
Q
Quick access
text messages 37
voice mail messages 37
R
Radio
frequency energy exposure 1
mode operation 12
mode volume control 19
Radio Setup 48
Rapid 9
Rapid charger 9
RCL
Alert 49
LastNo 39
Mem. 39
ScrPad 39
Reading text messages 34
Recalling
alert number 32
group number 32
number from secure memory 32
numbers 29 31
numbers using the Memory
Menu 31
numbers using the up arrow 31
previously dialed numbers 31
ReceiveLog 45
Receiving 46
Receiving messages while on a call 35
Redial
automatic 17
the last number you called 17
Redialing 17
Removing your battery 7 8
Retrieving
saved text messages 35
unread text messages 35
Ring
Pitch 44
Pulse 44
Volume 44
Ring tone volume 26
S
Searching for a wireless system 50
Sec. Code 46
Secure memory
storing a number 30
Service
voice mail 36
Settings
changing 25
Signal strength varies 51
SilentMode 44
Sounds Menu 44
Alert 45
Ear Volume 44
Handsfree Volume 44
Key Sound 44
Key Volume 44
Msg Tone 44
Ring Pitch 44
Ring Pulse 44
Ring Volume 44
SilentMode 44
Speakerphone submode 19
Specifiying a memory location 30
Speed dial 17 43
Stand
desk 10
wall 10
Stop 17
Stop and pause dialing 17
Store Mem 39
StoreScrpd 39
Storing
alert number 31
group number 31
number in secure memory 30

58 Index
numbers 29
specifying a memory location 30
Storing your voice mail number 37
Submode
private 19
speakerphone 19
Summary of basic operations 23
Super 42
Super dial 17 42
Swivel
attaching 7
Sys 40
System busy 50
System Options Menu 40
Home Only 40
Phone Number 40
Privacy 41
Sys Select 40
SystemInfo 41
Time/Date 41
SystemInfo 41
T
TDMA Pro group calling 21
Temporarily muting the ring tone 18
Terminal
description 15
diagram 12
features 15
front view 12
side view 12
Terminal becomes warm 50
Terminal Menu 48
Alert Setup 49
Group Setup 48
Radio Setup 48
Terminal not ringing 50
Text message memory full 50
Text messages
quick access 37
service 33
Time Count 45
Time/Date 41
Tone Send 43
Tone temporarily muting 18
Training 42
Travel charger 11
Turning
MinuteMind on 26
terminal off 16
terminal on 16
U
Unanswered calls 19
UnreadText 40
Up arrow key 14
Upper side key 15
Urgent messages 33
Using menus 25
V
Voice mail
listening 37
quick access to messages 37
receiving 36
receiving during a call 36
service 36
storing your number 37
VoiceMsgs
140
240
Volume
control key 15
radio mode control 19
ring tone 26
W
Weak signal 50
When to charge your battery 11
While on a call 19
Will not turn on 50
Y
YES key 14
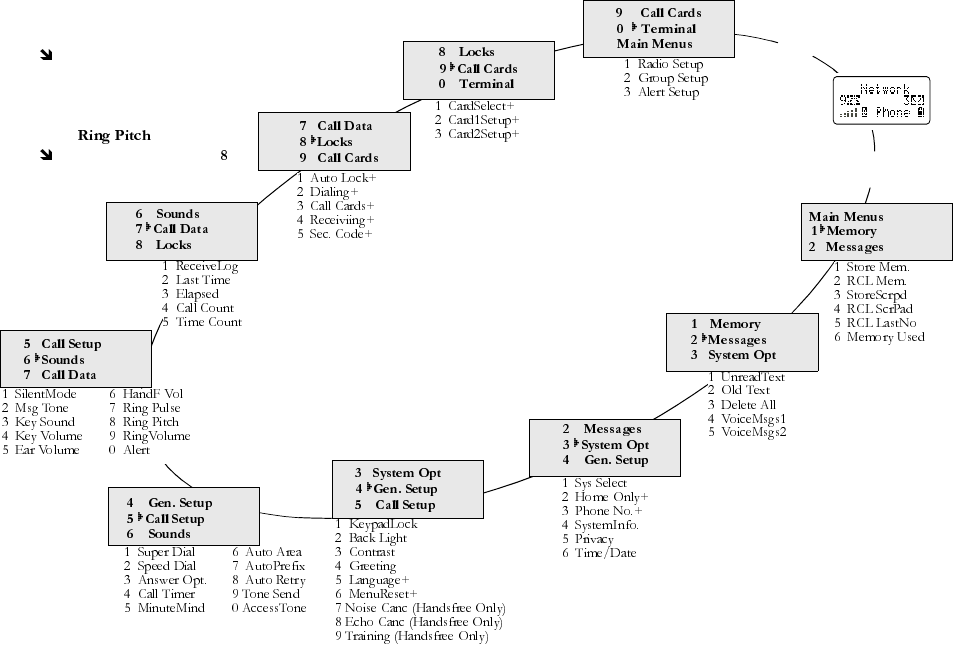
7KH5G0HQX
You can quickly access all the menus by
pressing . The menus are organized in
a circle. Quickly access menus and set-
tings by using the numbers that appear
next to each menu and setting. For exam-
ple, access the submenu by
pressing and then entering 6, then .Ö
Ö
+ Options that require you to enter a security code.

R250d Quick Reference Card
AE/LZT 123 5170 R1
Turn Phone ON/OFF Press and hold NO
Enter Menu Mode Press
During a call,
press and hold
Calling
Answer a Call Press YES
End a Call Press NO
Recall Last Dialed No. or upper side key
NO to exit
Recall a No. from
Memory or upper side key (enter
name or to scroll list)
Speed Dial No. from
Memory Enter memory location No.
and press YES
(Activate Speed Dial: 5 2 [On])
Super Dial No. from
Memory Press and hold memory
location No.
(Activate Super Dial: 5 1 [On])
Store Displayed No. in
Scratch Pad 1 3
Recall No. from Scratch
Pad 1 4
Indicators
Call Timer 5 4 [On] or [Off]
Minute Minder 5 5 [On] or [Off]
Access Tone 5 0 [On] or [Off]
Display
Contrast 4 3
Back Light 4 2
Language 4 5 (requires security
code, default code is 0000)
Sounds
Mute Microphone On Press and hold CLR
Mute Microphone Off Press and hold CLR
Mute Ringer Press a side key or NO
Ring Pulse 6 7
Ring Pitch 6 8
Ring Volume 6 9
Silent Mode On/Off #
Earpiece Volume 6 5
(during a call) Press upper side key to
increase or lower side key
to decrease
Speaker Volume 6 6
Message Tone 6 2
Dialing Codes
Pause Dialing PPress and hold *
Stop Dialing SPress and hold #
Message Services
Quick Access to Voice
Mail and Text Messages Press and hold
to switch between voice
mail and text message
displays
Press YES to call
Security
Lock Keypad *
Unlock Keypad *
Locks Settings 8

R250d Quick Reference Card
AE/LZT 123 5170 R1
http://mobile.ericsson.com
Using a Calling Card
1. Enter or recall the No. being called
2. Press and hold YES until your calling card number
appears in the display
3. If you are using stops (S) between numbers,
press YES to send the next sequence of numbers
Calling Card (requires a security code)
Select Calling Card 9 1
Set Up Calling Card 1 9 2
Set Up Calling Card 2 9 3
Memory
Location
Name Phone Number
1.
2.
3.
4.
5.
6.
7.
8.
9.
10.
11.
12.
13.
14.
15.
16.
17.
18.
19.
Memory
Location
Name Group Number
20.
21.
22.
23.
24.
25.
26.
27.
28.
Memory
Location
Name Alert Number
29.
30.
31.
32.
33.
34.
35.
36.