HELLA and KGaA 934692A Field Disturbance Sensor User Manual Testreport ETS 300 335
Hella KGaA Hueck & Co. Field Disturbance Sensor Testreport ETS 300 335
Contents
- 1. Users Manual-1
- 2. Users Manual-2
Users Manual-1

Reference Test report no. 15009836
EUT: LCA 3.5 - GM
FCC ID: NBG934692A
FCC Title 47 CFR Part 15 C
Date of issue: 2015-03-31
Date: 2015-03-13
Vers. no. 1.15
m. dudde hochfrequenz-technik Rottland 5a D-51429 Bergisch Gladbach/ Germany Tel: +49 2207-96890 Fax +49 2207-968920
Annex acc. to FCC Title 47 CFR Part 15
relating to
Hella KGaA Hueck & Co.
LCA 3.5 - GM
Annex no. 5
User Manual
Title 47 - Telecommunication
Part 15 - Radio Frequency Devices
Subpart C – Intentional Radiators
Measurement Procedure: ANSI C63.4-2009

Reference Test report no. 15009836
EUT: LCA 3.5 - GM
FCC ID: NBG934692A
FCC Title 47 CFR Part 15 C
Date of issue: 2015-03-31
Date: 2015-03-13
Vers. no. 1.15
m. dudde hochfrequenz-technik Rottland 5a D-51429 Bergisch Gladbach/ Germany Tel: +49 2207-96890 Fax +49 2207-968920
Compliance Statements in the User’s Manual of the test equipment (EUT)
Brand/Trade name: Hella
Model name: LCA 3.5 - GM
FCC Certification Number: NBG934692A
Dear Sir / Madam,
On behalf of our customer Hella KGaA Hueck & Co. we declare that they ensure that the following will be
included in a prominent location of the owner’s manual of the car:
The title “CAUTION TO USERS” or “FCC/IC WARNING NOTE” or relevant title and “Changes or
modifications not expressly approved by the party responsible for compliance could void the user’s
authority to operate the equipment.”
This device complies with Part 15 of the FCC Rules. Operation is subject to the following two conditions:
(1) this device may not cause harmful interference, and (2) this device must accept any interference
received, including interference that may cause undesired operation.
This device complies with Industry Canada licence-exempt RSS standard(s). Operation is subject to the
following two conditions: (1) this device may not cause interference, and (2) this device must accept any
interference, including interference that may cause undesired operation of the device.
Le présent appareil est conforme aux CNR d'Industrie Canada applicables aux appareils radio exempts de
licence. L'exploitation est autorisée aux deux conditions suivantes : (1) l'appareil ne doit pas produire de
brouillage, et (2) l'utilisateur de l'appareil doit accepter tout brouillage radioélectrique subi, même si le
brouillage est susceptible d'en compromettre le fonctionnement.
Yours sincerely,
Mr. Ajit Phadtare
Homologation Deapartment
m. dudde hochfrequenz-technik
Hella KGaA
Hueck & Co.
59552 Lippstadt
Technical bulletin
– Product development –
Date: 30 Sep 2013
No: 1 rev 5
Page 1 of 8
Subject:
Guideline for positioning SBZA/LCA generation 3.5 radar sensors in a
vehicle
Division: E-ED-DAS
Org.-unit/Gr.: DR /
DMD
Reference to:
Annexes:
Editors: Dr. John, Sievers Review: Dr. Kühnau Status: released
This document has to be treated confidentially. Its contents are not to be exploited or disclosed without our express permission. All rights reserved.
Guideline for positioning
SBZA/LCA generation 3.5 radar sensors
in a vehicle
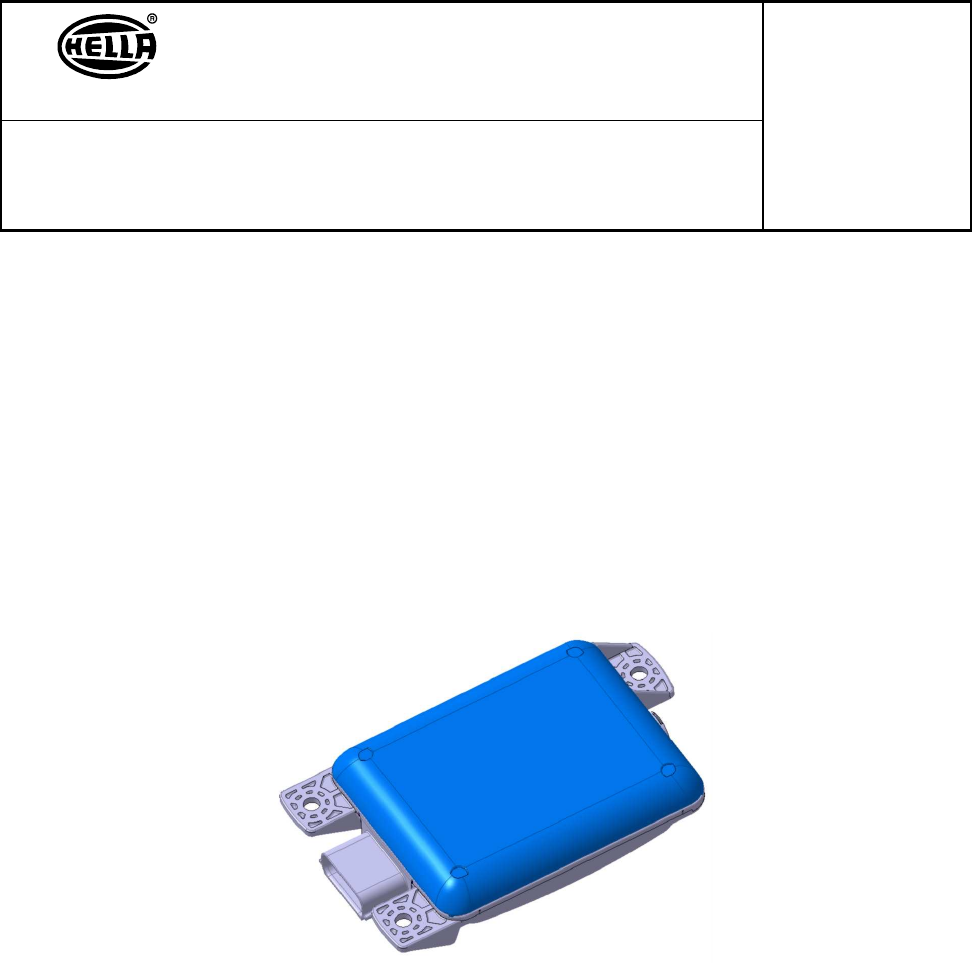
SBZA/LCA generation 3.5 rear radar sensor
Hella KG
Hueck & Co.
59552 Lippstadt
Subject: Guideline for positioning SBZA/LCA generation 3.5
radar sensors in a vehicle
Date: 30 Sep 2013
No: 1 rev 5
Page 2 of 8
Editors: Dr. John, Sievers Review: Dr. Kühnau Status: released
This document has to be treated confidentially. Its contents are not to be exploited or disclosed without our express permission. All rights reserved.
Revisions:
Revision / Dat
e
Changes
No 1 rev 1 / 10 December 2012 Derivation of SBZA/LCA generation 3.5 guideline from BSD
generation
3.0 guideline and implementation of GM specific data
No 1 rev 2 / 25 February 2013 DIS 3D changed; Fascia thickness changed from 3-4mm to 2,8-
4mm; text changed for: screwing/facial mounting/Device zero
point
No 1 rev 3 / 06 March 2013 Changed definition of device zero point
No 1 rev 4 / 22 March 2013 Changed pictures and clearer definition of other requirements
No 1 rev 5 / 30 September 2013 Changed screw and torque dimensions and clearer definition of
other requirements
Table of contents:
1 Introduction............................................................................................................................................ 3
2 Guidelines for sensor integration in a vehicle........................................................................................ 4
2.1 Sensor data ............................................................................................................................ 4
2.2 Sensor positioning / mounting................................................................................................. 4
2.3 Shielding / bracket design....................................................................................................... 5
2.3.1 Body shell mounting................................................................................................. 5
2.3.2 Fascia mounting....................................................................................................... 6
3 Further explanations ............................................................................................................................. 7
3.1 Device zero point and antennas midpoint ............................................................................. 7
3.2 Master and Slave assignment ............................................................................................... 8
3.3 Angle and plane definition………………………………………………………………………….8
Hella KG
Hueck & Co.
59552 Lippstadt
Subject: Guideline for positioning SBZA/LCA generation 3.5
radar sensors in a vehicle
Date: 30 Sep 2013
No: 1 rev 5
Page 3 of 8
Editors: Dr. John, Sievers Review: Dr. Kühnau Status: released
This document has to be treated confidentially. Its contents are not to be exploited or disclosed without our express permission. All rights reserved.
1 Introduction
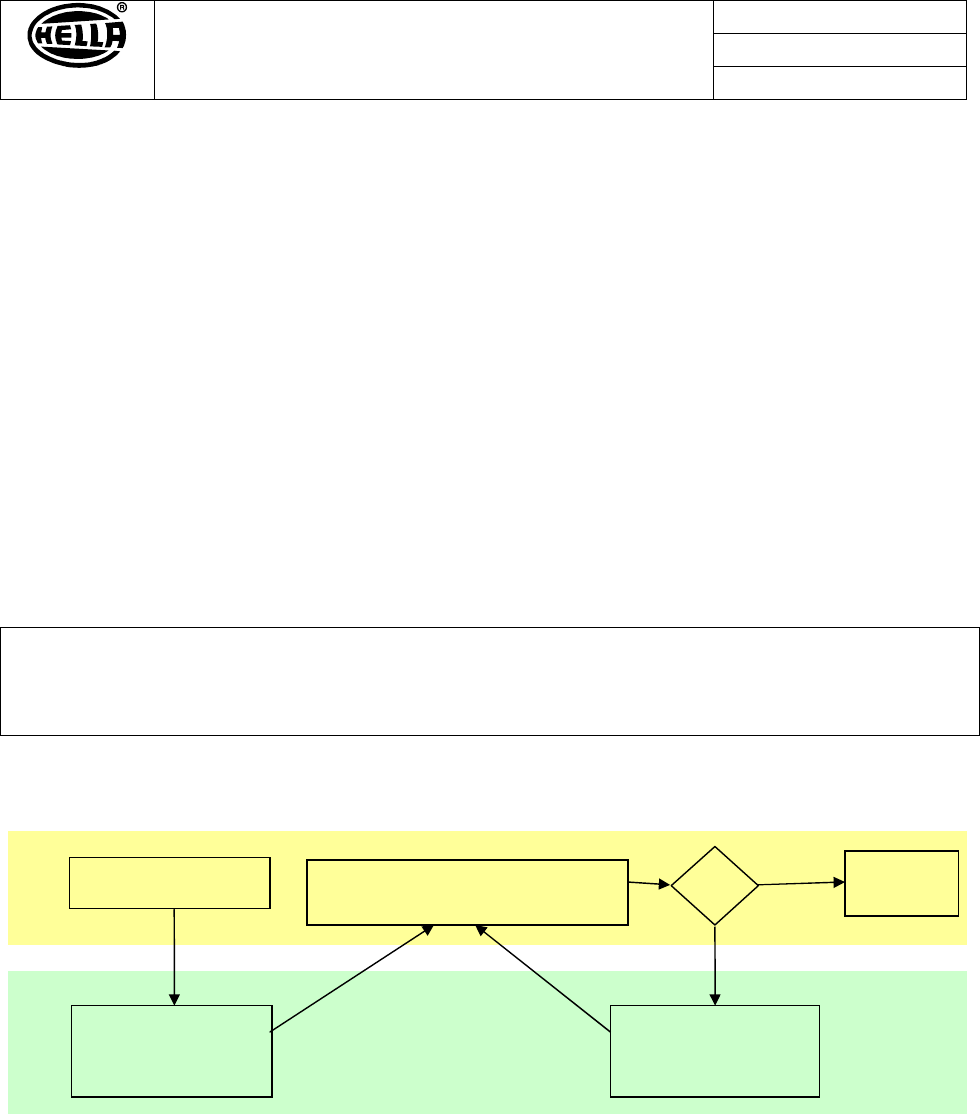
This document describes the radar-technology-based SBZA/LCA generation 3.5 sensor and provides
guidelines for its integration in a vehicle.
Due to the fact that radar waves can penetrate plastics, the integration is possible behind the bumper
fascia and thus invisible from the exterior. However, the plastic and other materials which surround the
sensor may cause bending, refraction and reflection of the radar waves. Distances, clearances, selected
radii and other constructive elements in their arrangement can lead to constructive or destructive
interference of the radar waves. In case of an unfavorable configuration of all parameters towards each
other, the sensor properties can be influenced disadvantageously.
For these reasons, a generally valid positioning guideline which covers the entire configuration and
degrees of freedom of all OEMs and guarantees undisturbed sensor properties cannot be given.
This document includes guidelines which describe in general the ideal positioning and which correspond
to the accumulated experience.
The final integration position of the SBZA/LCA sensors, the design of the sensor
shielding/bracket and guideline violations in any case must be agreed upon with Hella
KGaA Hueck & Co. (see Fig. 1).
Fig. 1: Typical flow of the coordination process for the SBZA/LCA positioning.
Hella radar
positioning guideline
Select sensor
integration position /
design of sensor
shielding / bracket
Check for meeting the guideline,
simulate for occurrence of angle
characteristic curve modifications
Update sensor
integration position
and / or
design of sensor
shielding / bracket
Start
application
Hella OEM
Ok?
no
yes
CAD data /
materials
Hella KG
Hueck & Co.
59552 Lippstadt
Subject: Guideline for positioning SBZA/LCA generation 3.5
radar sensors in a vehicle
Date: 30 Sep 2013
No: 1 rev 5
Page 4 of 8
Editors: Dr. John, Sievers Review: Dr. Kühnau Status: released
This document has to be treated confidentially. Its contents are not to be exploited or disclosed without our express permission. All rights reserved.
2 Guidelines for sensor integration in a vehicle
2.1 Sensor data
Dimension: 98 x 77 x 26 mm³ (see also 3D data and drawings)
Weight: < 170 g
Car connector: meets 064-S-008-I-Z02 USCAR 0,64mm SEALED MALE
Cone of rays: XZ plane: 180° (min. required: 140 °) / XY plane: 40°
CAD data: Sensor (3D incl. cone DIS 10000928533 (Body.Master)
of rays) DIS 10000928533 (Body.Slave)
2.2 Sensor positioning / mounting
Position: Two sensors (one Master on the left and one Slave on the right) behind the
rear fascia.
Positioning: - Azimuth angle: 38 - 42°
- Elevation angle +3°
- Tolerances Azimuth: ± 3°
Elevation: + 0.75° / - 1.25°
- Distance radome to fascia > 6 mm
- Height above road 400 - 650 mm
Connector orientation: Either both pointing outwards or both pointing towards rear vehicle center
(see also chapter 3)
Fascia: - Thickness 2.8 - 4 mm
- Thickness variations no sudden variations
- Base material permittivity 2 - 3
- Paint permittivity < 100 (paint thickness 15 µm;
metallic content approx. 7 weight-%)
< 50 (paint thickness 45 µm;
metallic content approx. 5 weight-%)
Space between - metallic parts
sensor and fascia: (like trim strip or
ultrasonic sensors) not allowed
- cables or bearing
structures not allowed, exceptions possible after
positive radar simulation
Mounting: - on one side catching, as free from play as possible
- on the other side screwing
- Diameter of screw: 17mm (flat washer also possible)
- screw locking shall be provided by GM
- plastic relaxation
of mounting plate shall be considered by GM
- contact surfaces the design of the contact surfaces between
the bracket side and screw side must be flat
and not allowed to be positioned in the
deformation areas of the bracket or screw.
Sensor vibration: < 0.2 g up to approx. 2000 Hz
NOTICE
:
Screw used to fix the sensor to the fascia is M4.2 x1.41 Hex
Washer Head Tapping Screw Assembly with Flat Washer BR (metric) (Point
Material acc to ISO 2702 and Surface treatment acc to GMW 4205).
Recommended fastening torque for M4.2 screw is 2.5 ± 0.5 Nm.
Connection has to be tested and approved by Hella
Hella KG
Hueck & Co.
59552 Lippstadt
Subject: Guideline for positioning SBZA/LCA generation 3.5
radar sensors in a vehicle
Date: 30 Sep 2013
No: 1 rev 5
Page 5 of 8
Editors: Dr. John, Sievers Review: Dr. Kühnau Status: released
This document has to be treated confidentially. Its contents are not to be exploited or disclosed without our express permission. All rights reserved.
2.3 Shielding / bracket design
Purpose: The shielding / bracket protects the sensor against unwanted reflections
(road surface, tires, other objects behind fascia) and reduces multipath
effects, which have disadvantageous influence on sensor performance
Bracket material: - radar absorbing plastic, for example:
- Witcom PA6-2004/39 (PA6 with GF20 / conductive)
- Witcom PP-2008/003 (PP with GF30 / conductive)
- For mechanical reasons of fascia mounting, the same bracket material as
the fascia could be required. Additional absorbing material could be
necessary.
- Realization needs to be agreed on with Hella
Approximate wall - same like fascia if using ultrasonic welding technique (2.8mm–4mm).
thickness: If thickness is chosen smaller than 2.8mm and/or is not a constant value,
Hella must be notified before design release.
Design: - Side walls surround / cut the cone of rays
- Distance between shielding / bracket and cone of rays revolving 2 mm
(nom.)
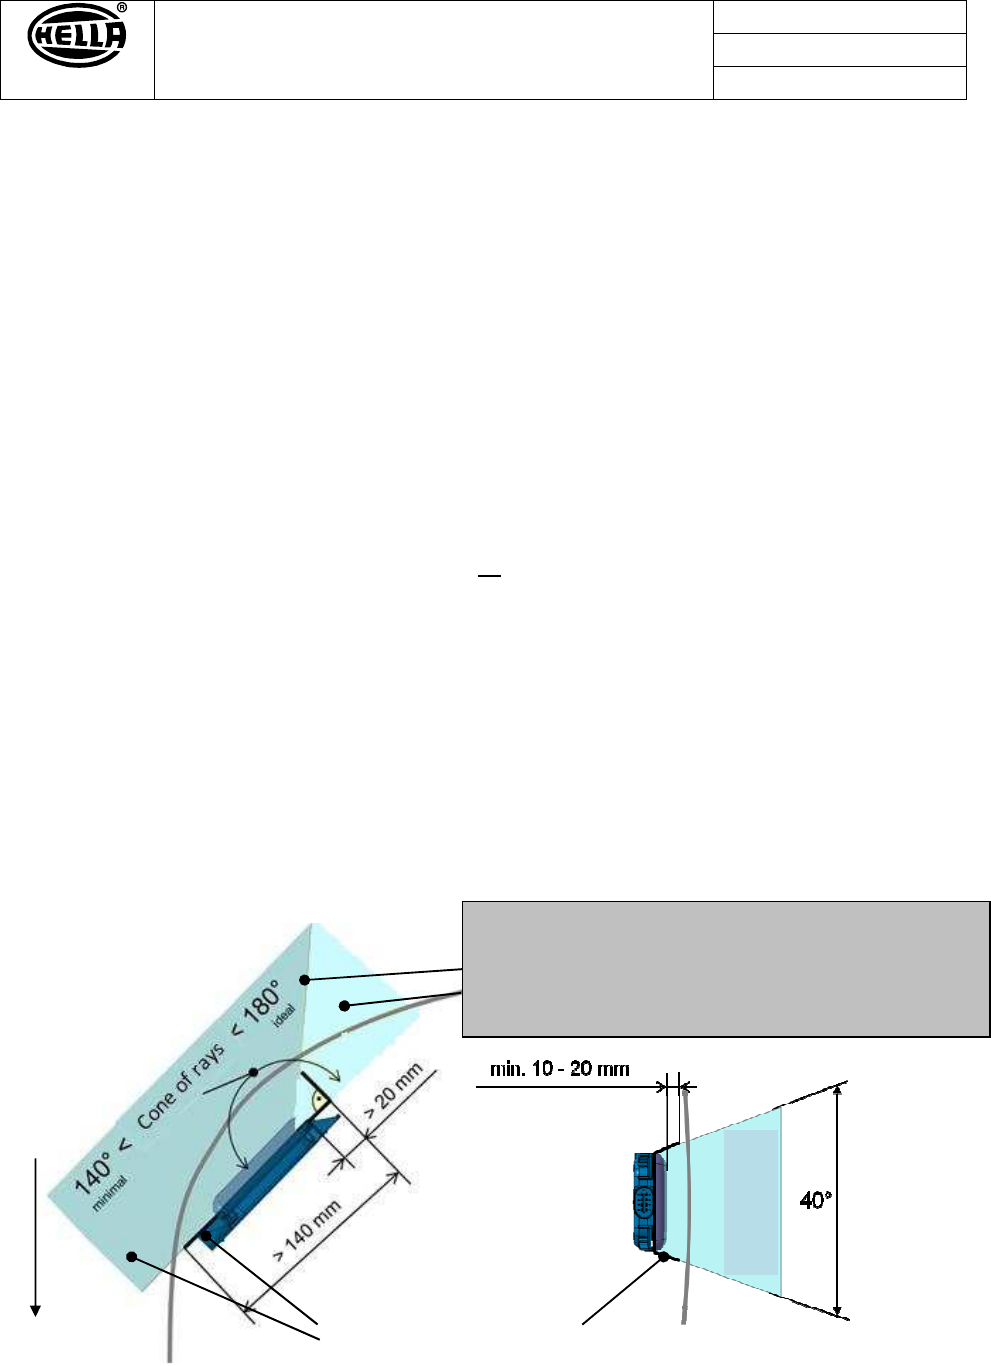
- Design if cone of rays is cut (<180°; see Fig . 3 and 4):
- right angled / no chamfer
- Base length: > 20 mm
- Certain mounting positions may lead to special requirements concerning
some shielding / bracket surfaces, for example convex instead of planar.
In such cases, the practicality will be checked together with GM.
2.3.1 Body shell mounting
To minimize disturbances due to reflections by one’s own rear tires, the road surface below the
sensor, other objects behind the fascia, the clearance between shielding and fascia shall be as
small as possible. Clearance values larger than 10 mm have to be agreed on with Hella.
Clearance between shielding and fascia: revolving approx. 10 mm
For larger clearance values, shielding overhang
at upper sensor side (see Fig. 2): min. 10 - 20 mm
Length of shielding (see Fig. 2): > 140 mm
Schematic illustration:
Fig. 2: Body shell mounting (schematically)
Cone of rays:
optimum for integration & application: 180°
minimum required: 140°
light blue range => verify in each case: 140° - 18 0°
(only on one side)
Shielding (schematically)
XZ plane
Cone of rays
Driving direction
Hella KG
Hueck & Co.
59552 Lippstadt
Subject: Guideline for positioning SBZA/LCA generation 3.5
radar sensors in a vehicle
Date: 30 Sep 2013
No: 1 rev 5
Page 6 of 8
Editors: Dr. John, Sievers Review: Dr. Kühnau Status: released
This document has to be treated confidentially. Its contents are not to be exploited or disclosed without our express permission. All rights reserved.
2.3.2 Fascia mounting (preferred from Hella point of view)
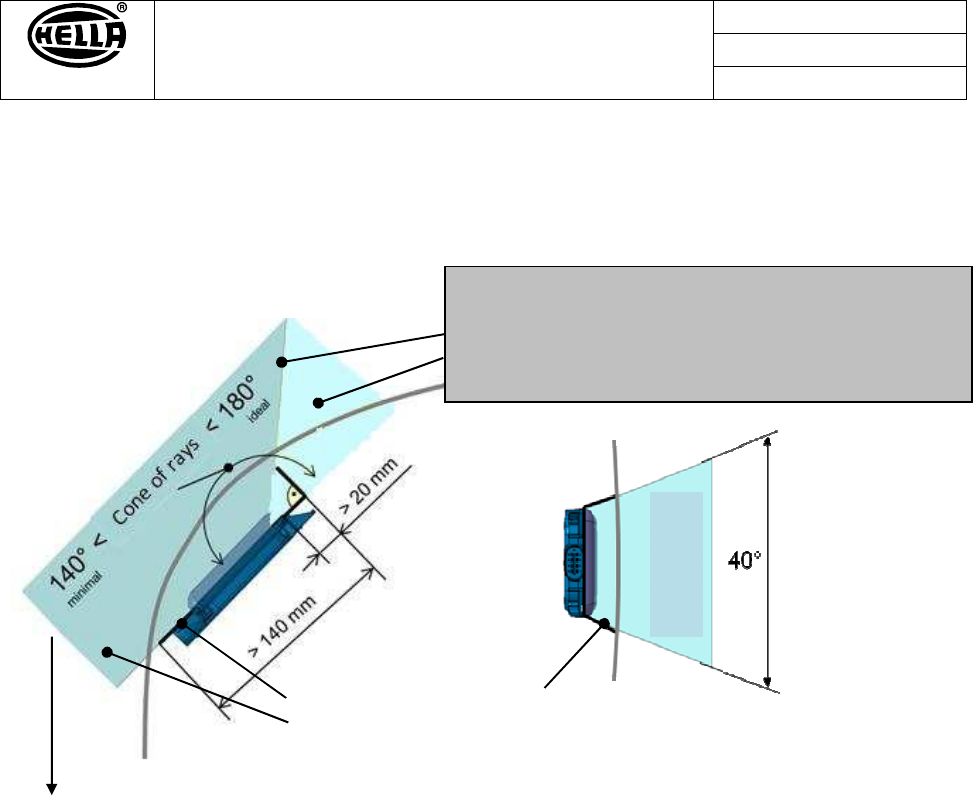
Clearance betw. shielding / bracket and fascia: revolving 0 mm (shielding connected
to fascia)
Schematic illustration:
Fig. 3: Fascia mounting (schematically)
Cone of rays:
optimum for integration & application: 180°
minimum required: 140°
light blue range => verify in each case: 140° - 18 0°
(only on one side)
Shielding (schematically)
XZ plane
Cone of rays
Driving direction
Hella KG
Hueck & Co.
59552 Lippstadt
Subject: Guideline for positioning SBZA/LCA generation 3.5
radar sensors in a vehicle
Date: 30 Sep 2013
No: 1 rev 5
Page 7 of 8
Editors: Dr. John, Sievers Review: Dr. Kühnau Status: released
This document has to be treated confidentially. Its contents are not to be exploited or disclosed without our express permission. All rights reserved.
3 Further explanations
3.1 Device zero point and antennas midpoint
For the proper function of the sensors in the vehicle it is necessary that the software knows the exact
finally determined position of the sensors relative to the vehicle zero point. Now, two special points are
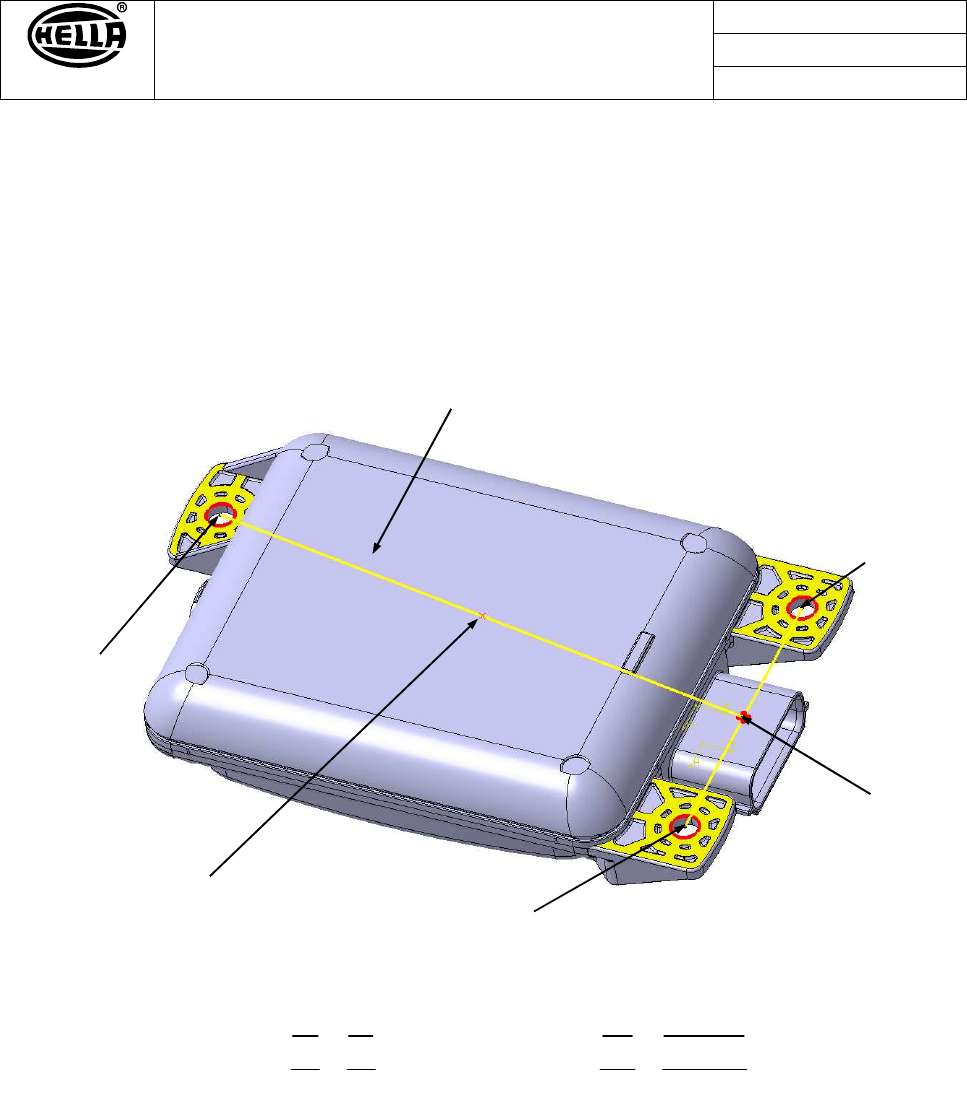
relevant for the calculation of the position of the SWA sensors: The device zero point E and the antennas
midpoint G.
The device zero point E results from the midpoints of the individual fastening clips (preliminary values):
The antennas midpoint G amounts from the device zero point E:
X: - 24.47 mm (according to coordinate system defined in above figure)
Y: - 13.95 mm
Z: - 6,9 mm
Since the distance from the device zero point to the antennas midpoint is a constant, the software
requires only the dimensions of the device zero point related to the vehicle’s zero point.
2
57
2
=
=
ab
D
2
119
2
=
=
Dc
E
a
D
b
c
Device zero point „E“
Antennas midpoint „G“
Hella KG
Hueck & Co.
59552 Lippstadt
Subject: Guideline for positioning SBZA/LCA generation 3.5
radar sensors in a vehicle
Date: 30 Sep 2013
No: 1 rev 5
Page 8 of 8
Editors: Dr. John, Sievers Review: Dr. Kühnau Status: released
This document has to be treated confidentially. Its contents are not to be exploited or disclosed without our express permission. All rights reserved.
3.2 Master and Slave assignment
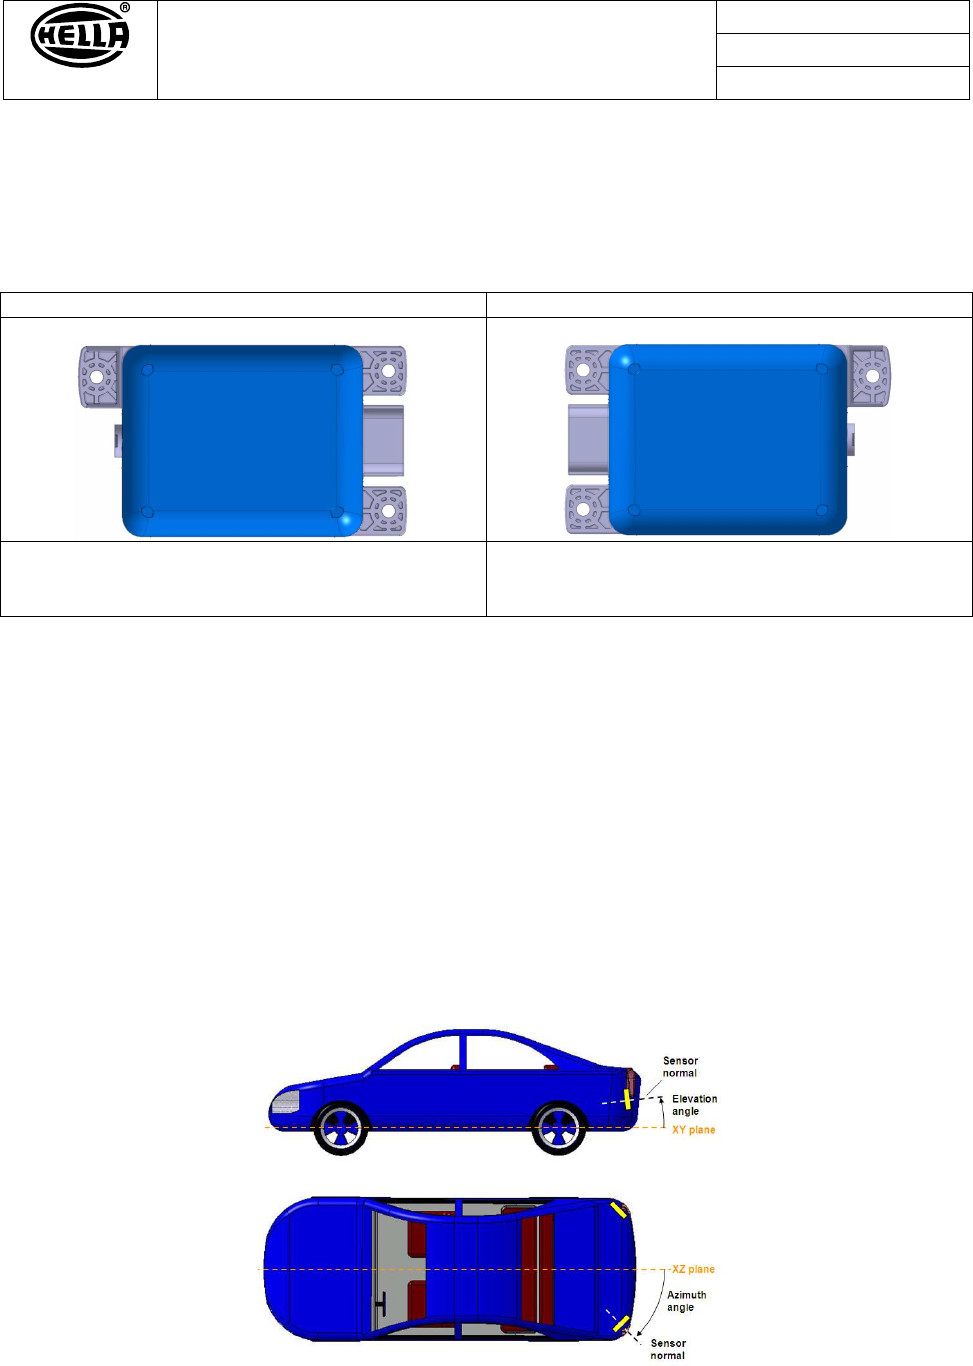
The SBZA/LCA system consists of two similar radar sensors. The main differences are in the component
placement on the printed circuit board and the position of the fastening clips. The sensor performing
communication with the vehicle data network is called “Master“ and the other sensor is called “Slave“
(see Tab. 1).
Master Slave
•
Performs communication with vehicle data
network
• Performs communication with Slave sensor
•
Performs only communication to Master
sensor
• Controls the HMI, if available
Tab. 1: Assignment of Master and Slave sensors.
Both sensors are mounted in the left and right rear corners of a vehicle. The vehicle connectors may
either both point outwards or both point towards the rear vehicle center. Hella’s experiences show that
for some car lines one orientation is more advantageous than the other orientation to faster reach a
sufficient function performance. This aspect will be evaluated during the sensor simulation (see Fig. 1).
Typically the Master sensor should be mounted on the left side of the vehicle. The Slave sensor should
be mounted on the right side of the vehicle. If the vehicle data network access for the Master is easier on
the right side of the vehicle, Master and Slave positions may also be switched.
The label of the sensor, mounted on the left side, is marked with “LH”, the sensor on the right side “RH”.
After the final sensor position is fixed for a car line, the position and assignment details have to be
implemented in the sensor software to achieve the correct system function.
3.3 Angle and plane definition
Fig. 4: Angle and plane definition