HIMS EB100A Electronic Magnifier (E-bot ADV) User Manual
HIMS International Corporation Electronic Magnifier (E-bot ADV)
HIMS >
User Manual
Easy to use, Versatile compatibility -
Advancing a new standard of transportable magnifier!
Intelligent electronic reading magnifier
E-bot
Intuitive to use for everyone
Display via PC, Mac, iPad/Android tablet, or any HDMI monitor
Wireless remote control for convenient operation
Quick and comfortable reading via the optical character recognition
function

ZOOM
CONTRAST
COLOR
OCR
Thank you for purchasing E-bot.
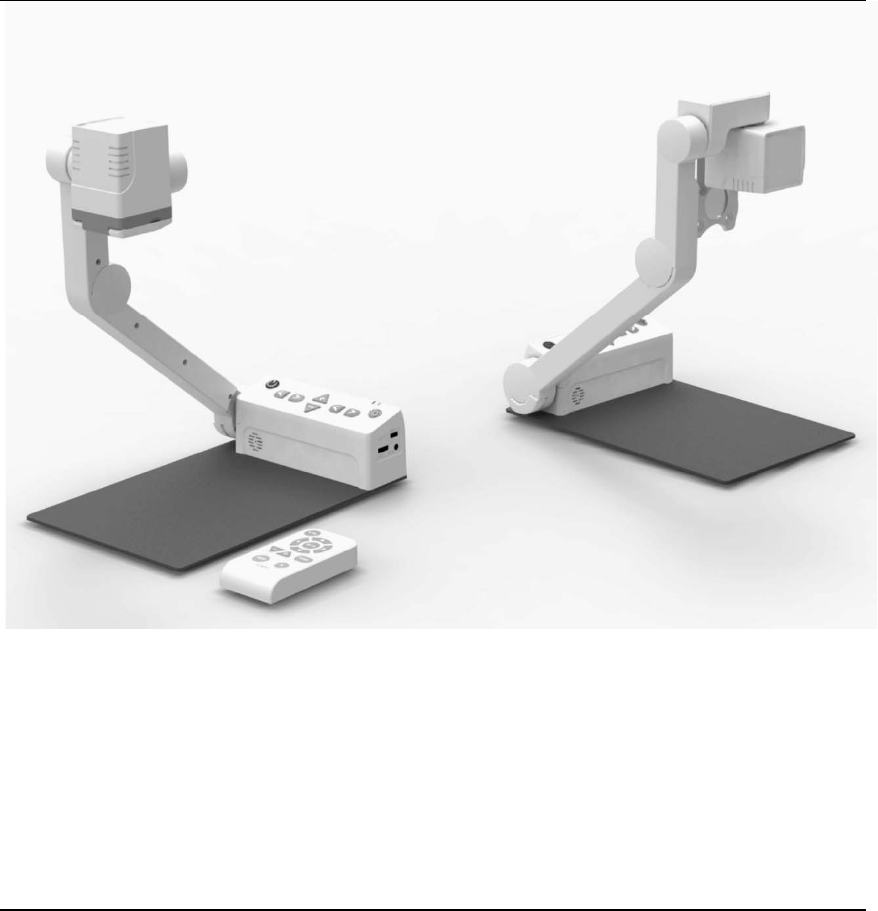
E-bot HD is an electronic reading magnifier, which can enlarge the text
of a wide variety of resources via a high-resolution camera.
You can change the magnification level for your
convenience depending on the size of the text.
E-bot provides you with various color modes so
that you can select the color that best matches
your needs and the material you are reading.
You can adjust the contrast to see the image
clearly no matter the material being viewed.
E_bot supports optical character recognition. You
can hear the text via the built-in text-to-speech
voices.
Table of Contents
1. Safety Precautions .........................................................................................................................................................6
2. Package Contents ..........................................................................................................................................................7
3. E-bot Orientation ............................................................................................................................................................8
1) Product .....................................................................................................................................................................8
2) Back side of product ............................................................................................................................................9
3) Side of product .......................................................................................................................................................9
4) Front of product .................................................................................................................................................. 10
5) Wireless remote controller .............................................................................................................................. 10
6) Back side of Wireless remote controller .................................................................................................... 11
4. Getting Started ............................................................................................................................................................. 12
1) E-bot Setup .......................................................................................................................................................... 12
2) Charging ................................................................................................................................................................ 13
3) Charging via the AC Adapter ......................................................................................................................... 14
4) Charging via USB .............................................................................................................................................. 14
5) Connecting to displays ..................................................................................................................................... 14
6) Connecting a monitor (HDMI) ....................................................................................................................... 15
7) Connecting an On-Lap monitor (DC OUT) ............................................................................................... 15
8) Connecting to a PC (USB, Wi-Fi) ................................................................................................................ 16
9) Connecting to an Apple iPad or Android Tablet (Wi-Fi) ...................................................................... 18
5. Basic Functions of E-bot ........................................................................................................................................... 19
1) Power On/Off ....................................................................................................................................................... 19
2) Changing Camera Modes ............................................................................................................................... 19
3) Magnification ....................................................................................................................................................... 20
4) Changing the Color Mode ............................................................................................................................... 21
5) Contrast ................................................................................................................................................................. 23
6) LED light On/Off ................................................................................................................................................. 24
7) Finding your current Reading Position ....................................................................................................... 24
8) Switching to and from Natural Color mode .............................................................................................. 25
9) Freeze .................................................................................................................................................................... 26
10) Focus lock ......................................................................................................................................................... 26
6. Advanced features ...................................................................................................................................................... 28
1) Using the menu .................................................................................................................................................. 28
2) Color mode settings .......................................................................................................................................... 29
Setting the color mode ............................................................................................................................. 29
To disable color modes ........................................................................................................................... 30
3) Marker .................................................................................................................................................................... 31
Set Marker .................................................................................................................................................... 31
Set Marker position and size ................................................................................................................. 32
4) OCR ........................................................................................................................................................................ 33
OCR execution............................................................................................................................................ 33
Reading/navigating recognized text. .................................................................................................. 34
OCR views .................................................................................................................................................... 34
OCR correction ........................................................................................................................................... 35
OCR Language setting ............................................................................................................................ 35
5) E-bot operating Language .............................................................................................................................. 36
6) Voice Guide ......................................................................................................................................................... 36
Voice Guide On/off .................................................................................................................................... 36
TTS Volume ................................................................................................................................................. 36
TTS Speed ................................................................................................................................................... 37
TTS Pitch ...................................................................................................................................................... 37
TTS voice ...................................................................................................................................................... 38
7. Using other functions ................................................................................................................................................. 38
1) Initialization .......................................................................................................................................................... 38
2) Information ........................................................................................................................................................... 38
3) Wi-Fi password change ................................................................................................................................... 39
4) Keyboard Hot keys: (Only when using PC to display and control E-bot.) .................................... 40
8. Troubleshooting ........................................................................................................................................................... 41
1) When the wireless controller does not work ............................................................................................ 41
Check the Main body channel values ................................................................................................ 41
Checking the wireless remote control channel value ................................................................... 41
9. A/S .................................................................................................................................................................................... 42
10. Specification ................................................................................................................................................................ 433
※ Smart Pad Viewer Gesture ........................................................................................................................................ 444
※ How to control ................................................................................................................................................................. 488

E-bot manual
1. Safety Precautions
※ For your safety and protection of the E-bot, please read and abide
by the following important safety precautions.
1) Do not plug the AC adapter into a faulty electrical outlet. This is to
prevent electrical shock or fire.
2) Do not touch the AC adapter with wet hands.
3) Use only the AC adapter provided with the E-bot. Using another AC
adapter may damage the device. Be advised that damage caused
by misuse is not covered by the warranty.
4) Please do not remove the power cable when the E-bot is turned on
as this can damage the product.
5) Do not use the E-bot in a moisture-rich environment such as a
bathroom, shower or a wet kitchen counter as moisture may get
inside the unit and damage the components.
6) Do not use E-bot in extreme high or low temperatures. We
recommend that you do not use this device in environments below
0°C or above 40°C, as the image may display inaccurately.
7) Always turn off the power before moving the product to another
location.
8) When you press the release switch to fold the E-bot, please grip the
arm and manually fold the unit. Allowing the arm to simply drop may
cause impact damage to the unit.
9) Do not use the DC OUT at the back of the device as a power supply
for devices other than authorized visual displays for E-bot as this
can damage the product and/or the connected device.

E-bot manual
2. Package Contents
1) Product
2) 1 Battery
3) Wireless remote controller
4) Battery for Wireless remote controller
5) Adapter
6) Cable(USB 3.0, HDMI, HDMI to DVI gender)
7) Carrying Case
8) Product Case
9) Earphones
10) User Guide
11) PC install program
E-bot manual
3. E-bot Orientation
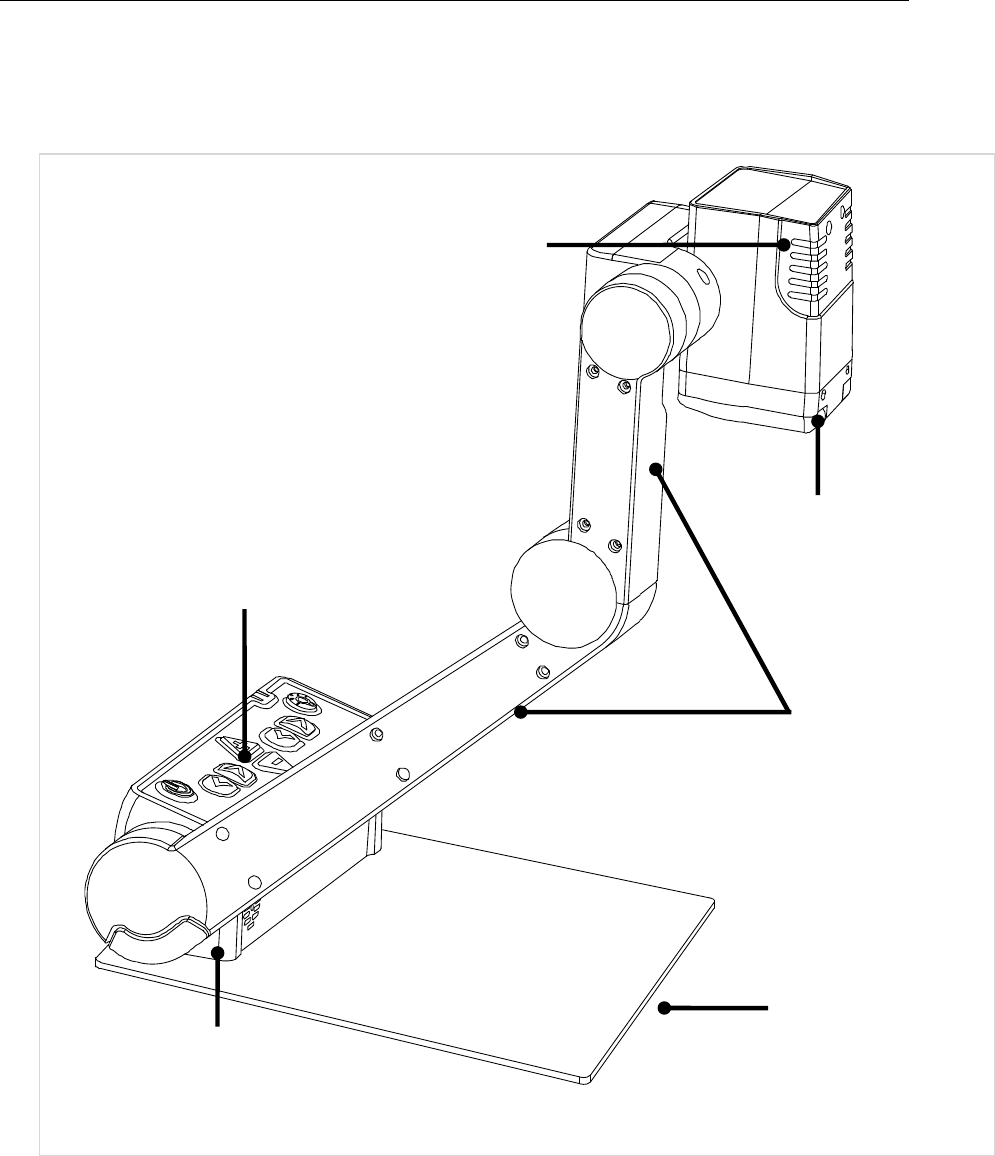
1) Product
Camera
Arm
Front controller
Table
Camera
Arm Lock button
Near Camera Lens
E-bot manual
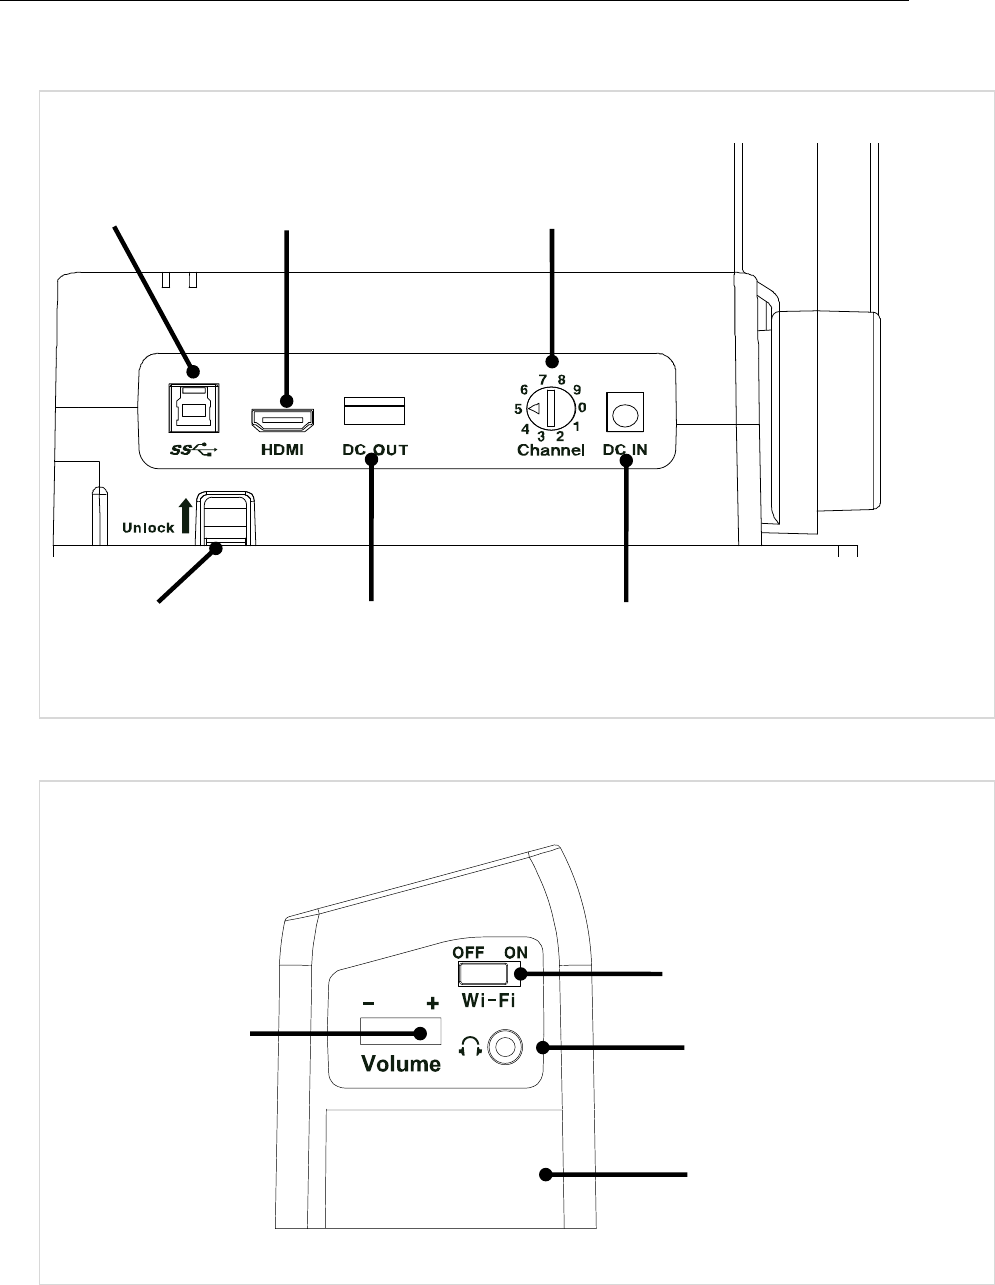
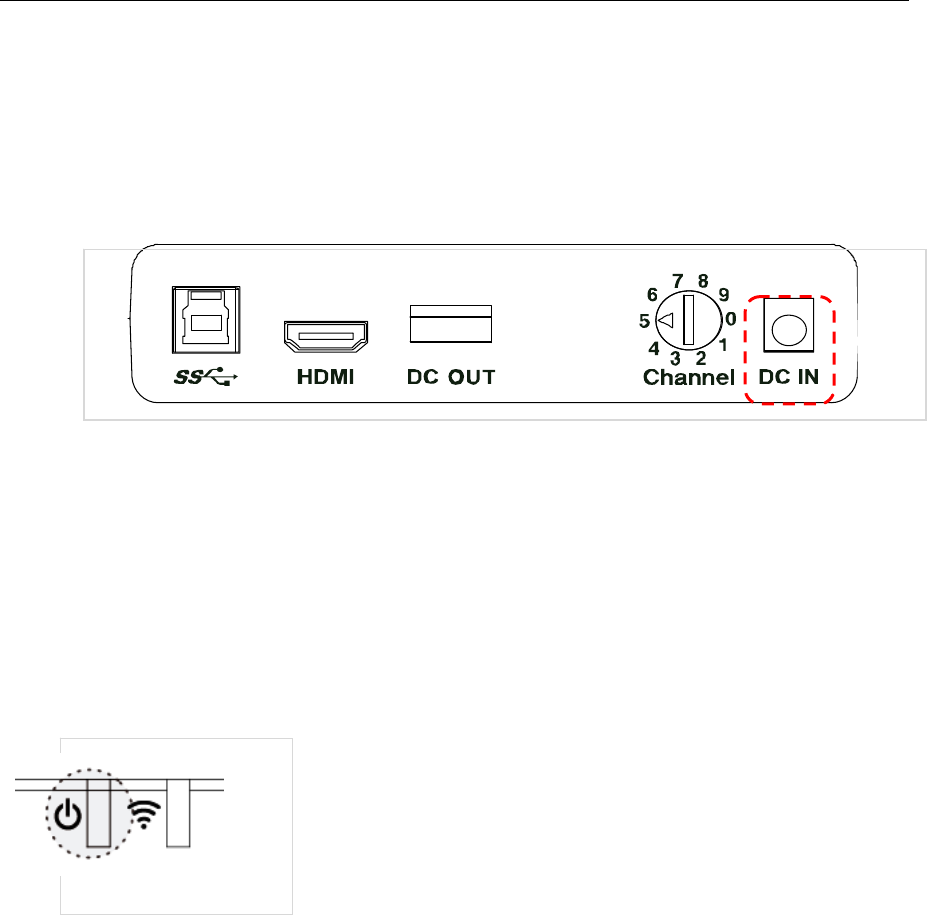
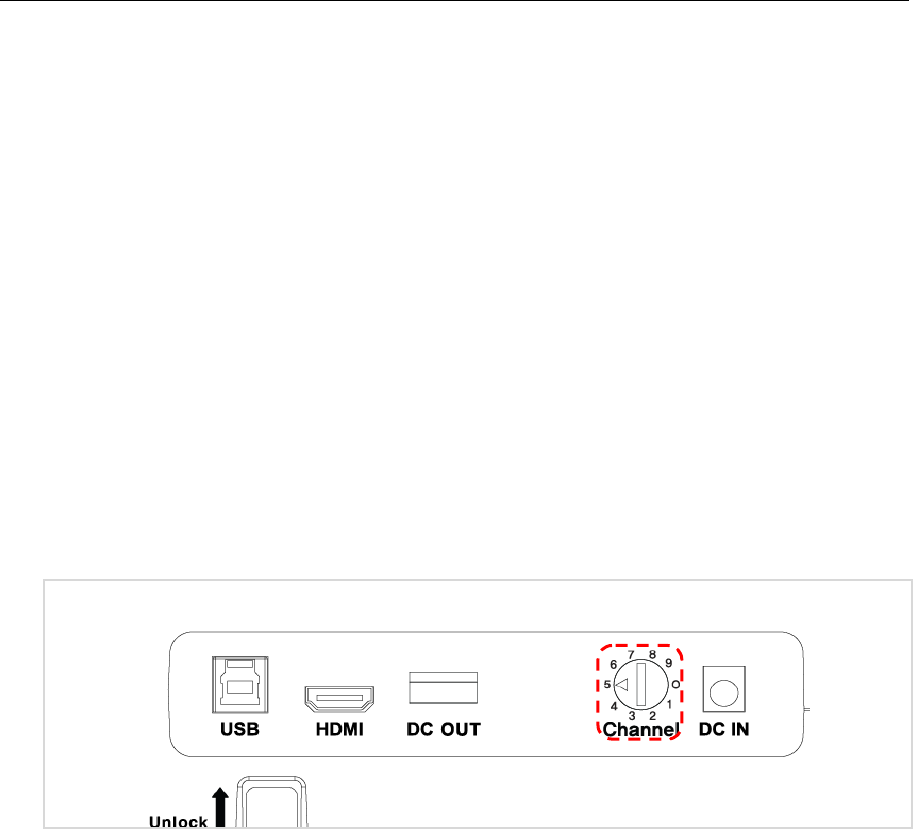
2) Back side of product
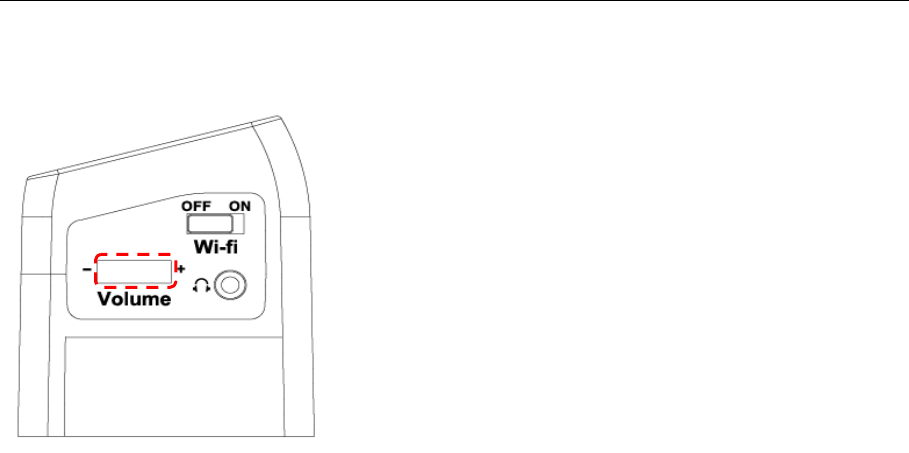
3) Side of product
Volume
Switch
Wi-Fi switch (Wireless)
Earphone Jack
Battery
USB 3.0 port
(PC connection)
HDMI port
(Monitor Connection) ID switch
DC IN port
DC OUT port (USB
Monitor Connection)
Battery
Release button
E-bot manual
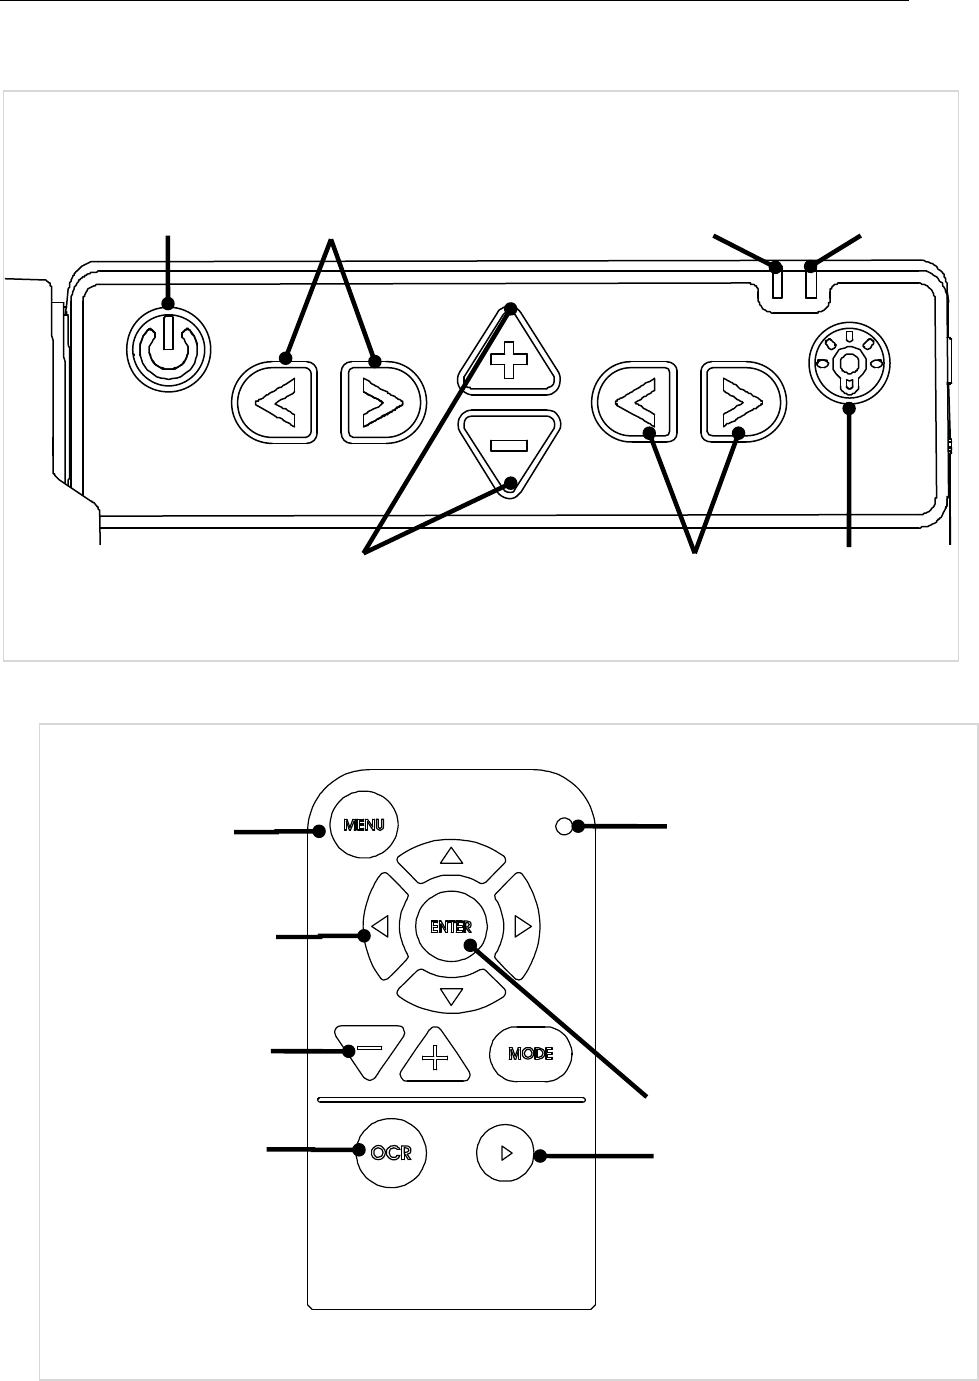
4) Front of product
5) Wireless remote controller
Menu Button
Navigation Button
Zoom in / out
Button
OCR Button
Power LED
Enter Button
Play Button
Power Button Mode Button
Zoom Button Contrast Button
Power LED Wi-Fi LED
LED Light
Button

E-bot manual
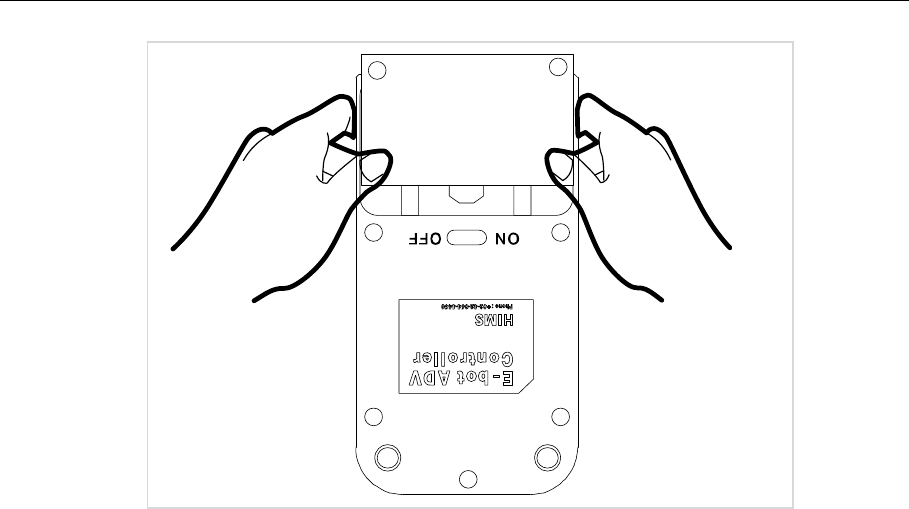
6) Back side of Wireless remote controller
ID Switch
Power Switch
Battery
Battery Cover
E-bot manual
4.
Getting Started
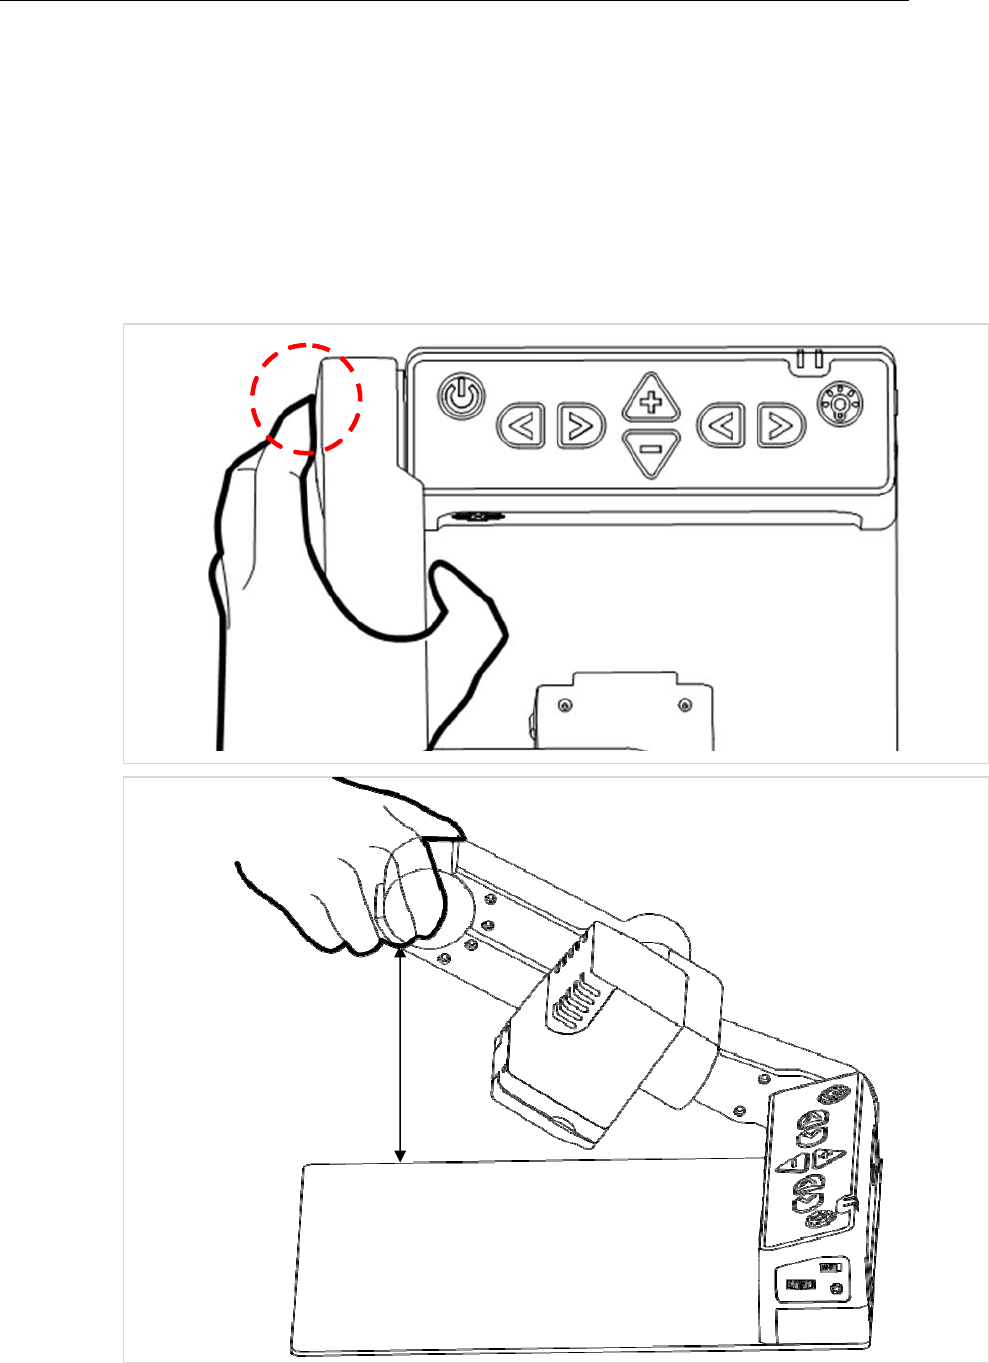
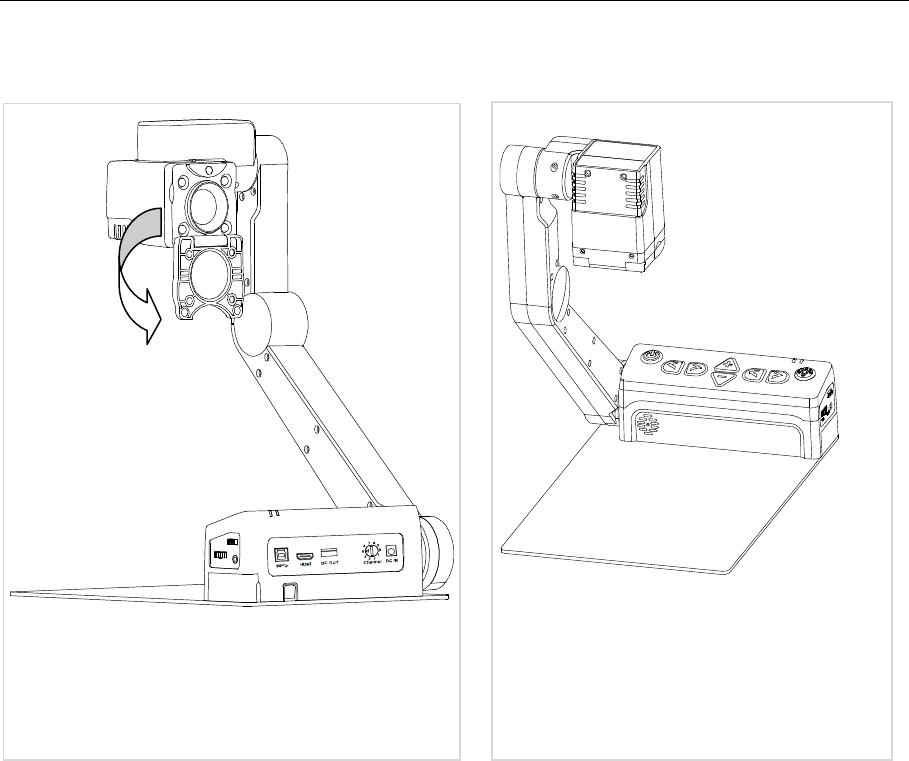
1) E-bot Setup
Follow the instructions below to setup the E-bot.
①
Press and hold the Lock button on the left side of the E-bot.
While holding the lock button, unfold the longer arm upward.
45°
E-bot manual
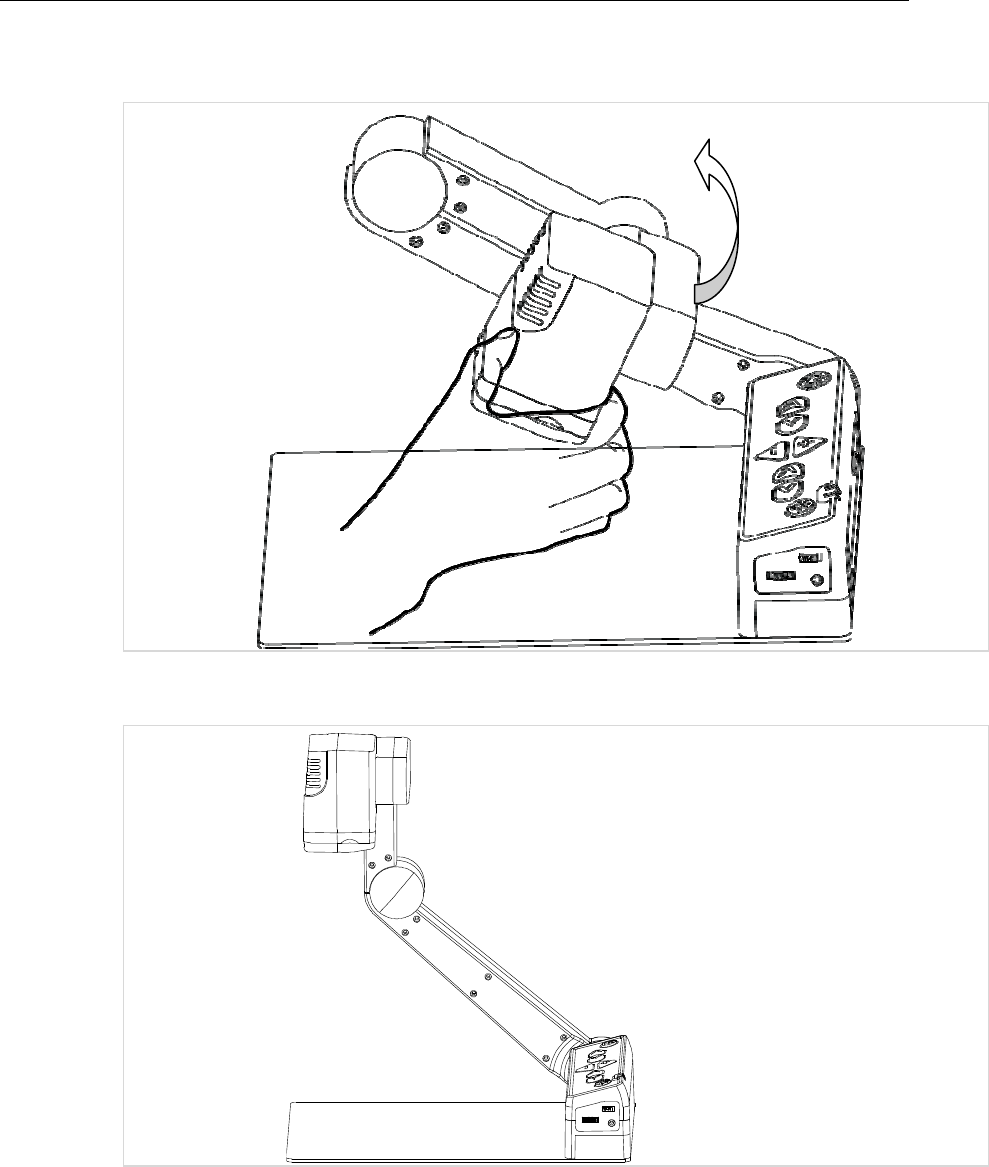
② Then, grip the shorter camera arm and unfold it upward as well.
③ The setup to use E-bot is complete.
2) Charging
E-bot has a removable battery, allowing you to use the product
without a power supply.
E-bot manual
※ When you use the E-bot for the first time or after a long period of
disuse, please allow the unit to charge for more than 5 hours
3) Charging via the AC Adapter
The DC jack is located on the back of the E-bot.
When E-bot is connected to the AC adapter, the battery is being
charged. When the battery is being charged, the Power LED
appears red. When the battery is fully charged, the power LED color
is changed to green.
The power LED is located on the top right of the control panel of the
main body. The power LED indicates status as follows:
4) Charging via USB
※ If you connect the E-bot to a computer via USB while E-bot is
powered off, the E-bot’s battery is charged.
When E-bot is powered on, power is no longer supplied to the
battery for charging, but rather, is used for outputting video data to
the PC.
5) Connecting to displays
E-bot is compatible with various types of display devices, such as
desktop video monitors, laptop computers, and Apple or Android
E-bot manual
tablets.
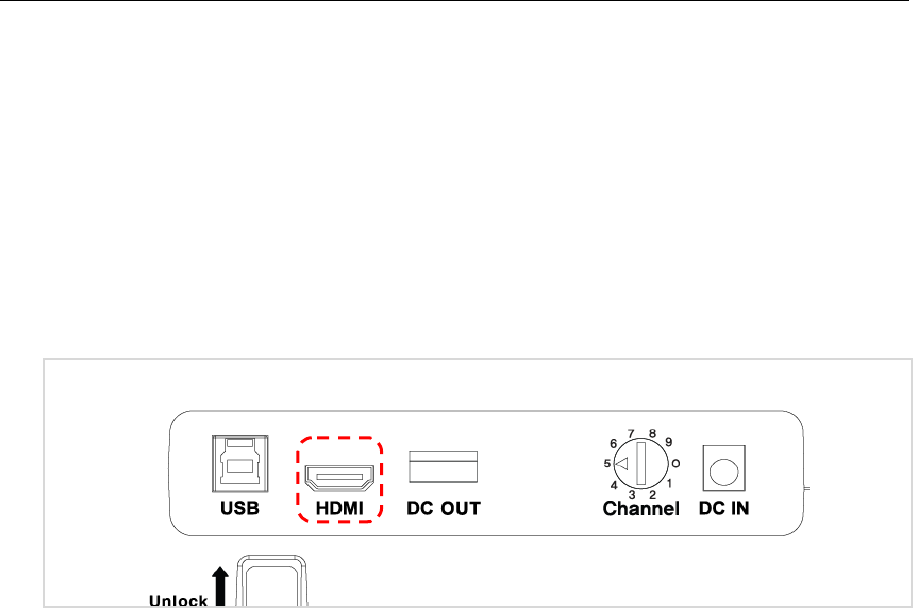
6) Connecting a monitor (HDMI)
You can connect E-bot directly to a desktop monitor or TV via HDMI
without the need for a computer or additional software as all of E-
bot’s programming and controls are on the main body of the unit
and the wireless remote control.
※ The monitor needs an external power source even though the E-
bot is connected to AC power.
※ If the monitor has no HDMI port, please use the included HDMI to
DVI gender adapter.
7) Connecting an On-Lap monitor (DC OUT)
The On-Lap Monitor is a portable, USB powered LCD, sold
separately. Because its power comes from USB, it does not require
an external power source. If you connect the On-Lap Monitor's USB
power cable (USB 2.0) to the DC OUT port on the back of E-bot,
you can use E-bot’s power to power the On-Lap monitor. Connect
On-Lap’s HDMI cable to E-bot’s HDMI port to display E-bot’s output
on the On-Lap monitor.
E-bot manual
※ Note: The DC OUT port is used only for connecting the On-Lap
monitor. Please do not connect USB drives or other USB devices
to the DC out port.
8) Connecting to a PC (USB, Wi-Fi)
You can view E-bot’s high-resolution image using a PC via the
included USB 3.0 cable or via Wi-Fi. You can also control E-bot’s
functions via your PC’s keyboard and/or mouse.
※ For instructions on controlling E-bot using a keyboard and mouse,
please refer to the last section of this manual.
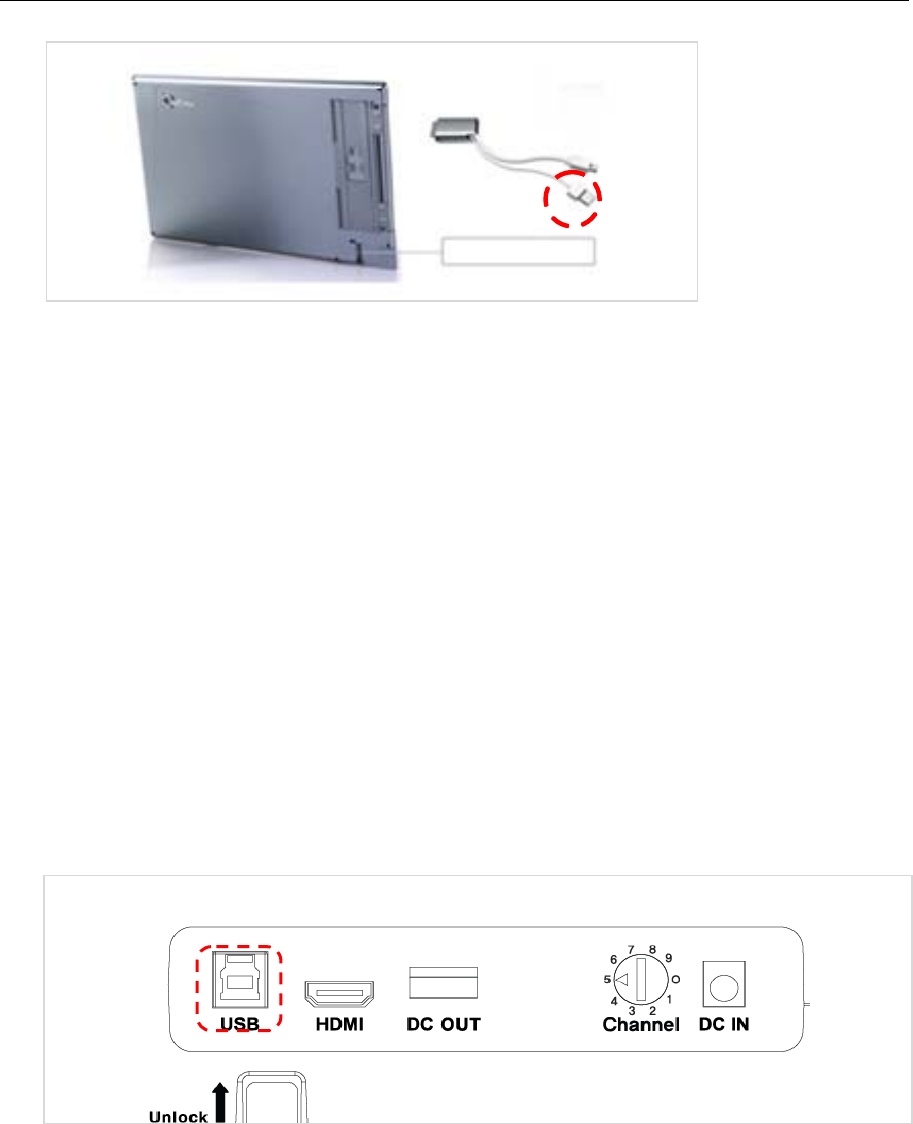
USB
① Please install the E-bot Viewer program on your PC using the
installation CD in your packing box.
② Connect the E-bot’s USB 3.0 port to the USB port of your PC
using the included USB 3.0 cable.
③ When the installation is complete, turn on the E-bot. At this point,
Video & Power Port
E-bot manual
make sure the Wi-Fi switch is set to off. And run the E-bot
Viewer on your PC. Select USB as the connection method.
※ If you connect E-bot to a PC which does not support USB 3.0, the
enlarged image resolution is automatically adjusted to
accommodate the difference in connection speed. Please note: E-
bot cannot be supported on Mac computers which do not have
USB 3.0 capability.
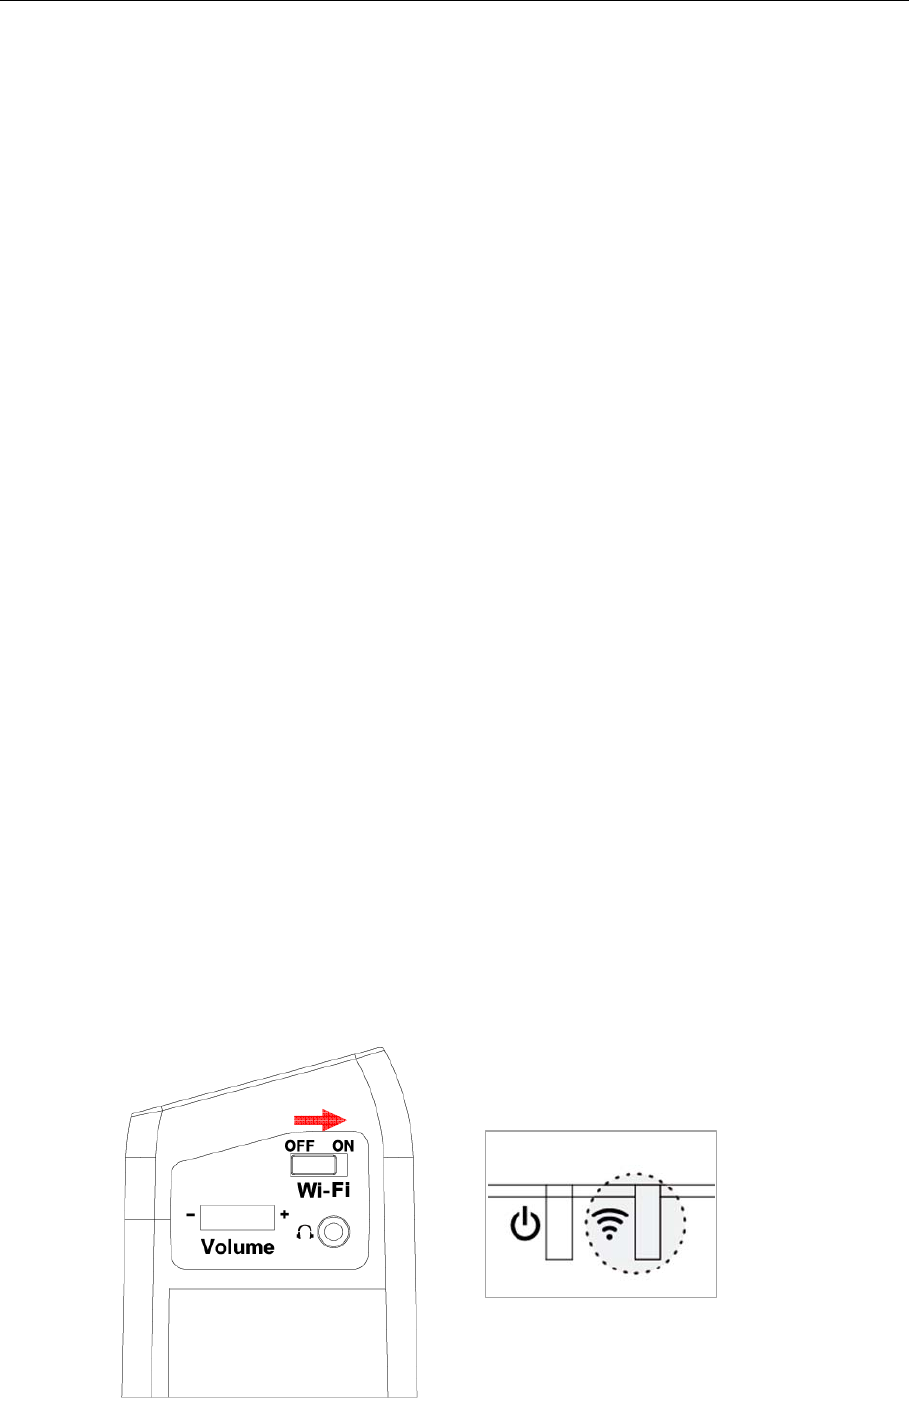
Wi-Fi
E-bot can output magnified images via Wi-Fi connection to Windows
PC’s, Android tablets and Apple iPads. Note: Wi-fi output is not
supported on Mac computers.
① To output to your PC via Wi-fi, install the E-bot Viewer
program on your PC using the installation CD in your packing
box.
② Set the E-bot Wi-Fi switch to ON. The Wi-Fi LED is changed
to blue to indicate Wi-fi is on.
The Wi-Fi LED is located on the top right of the control panel on the
main body. Wi-Fi LED status is shown as follows:
E-bot manual
③ Enter the PC's wireless network connection area and
connect to the E-bot network.
④ When you are asked for the network key, please enter the E-
bot’s Wi-fi password. The default password is '00000000 '.
⑤ Once your PC is connected to the E-bot network, Run the E-
bot Viewer program on your PC, and select Wi-fi as the
connection method.
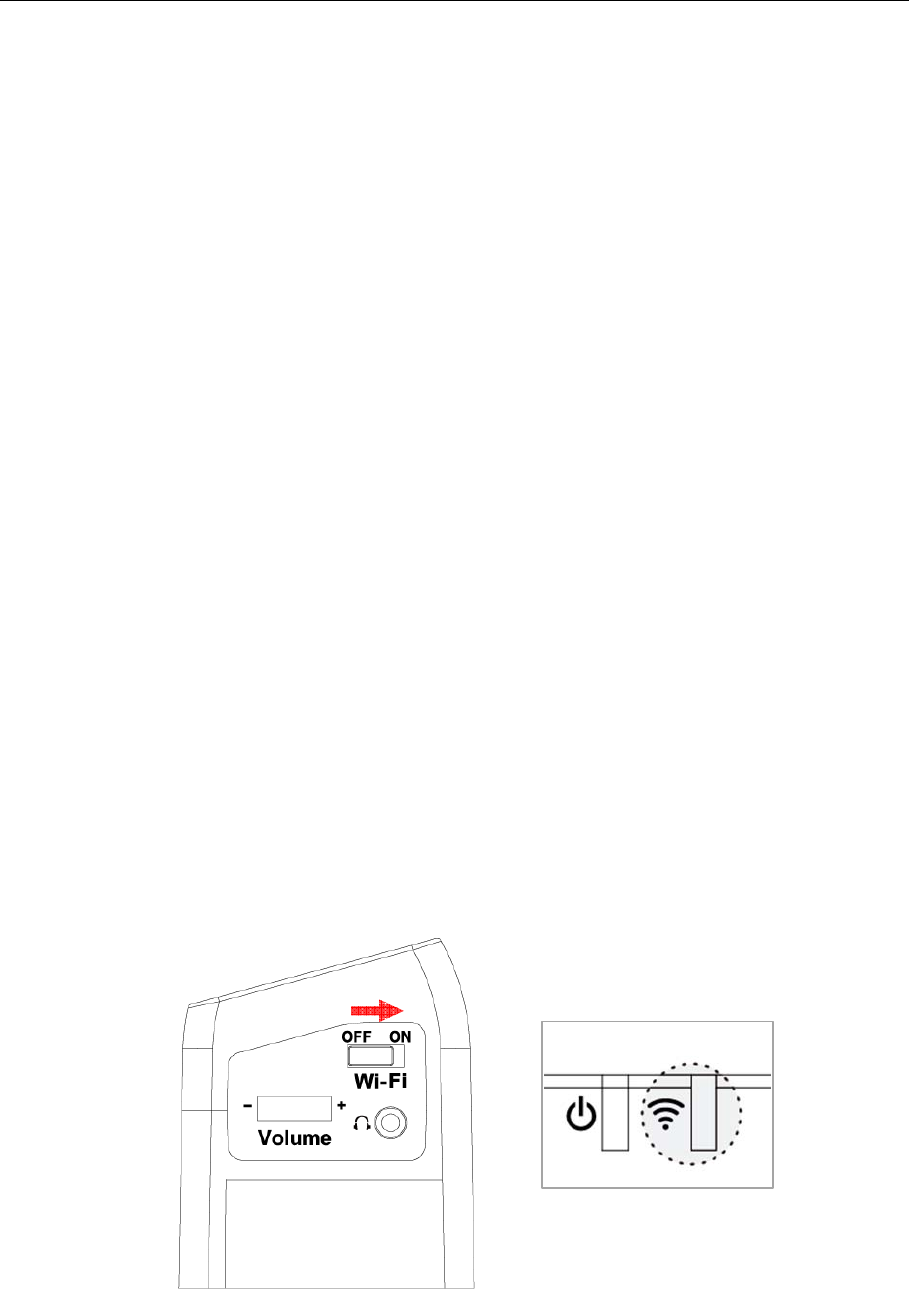
9) Connecting to an Apple iPad or Android Tablet (Wi-Fi)
You can view E-bot’s magnified image using an Apple iPad or
Android tablet using a Wi-Fi connection. E-bot’s functions can then
be operated via the tablet’s touch screen.
① To view and operate E-bot via your tablet, please connect to the
Apple or Android app store, and install the E-bot Viewer
application.
② When the installation is complete, turn on the E-bot. Then turn
on the Wi-Fi switch on the right side. Once Wi-Fi is turned on,
the Wi-Fi indicator light on the main body appears blue.
③ Be sure Wifi is on on your tablet, then select and connect to “E-
bot” from the Wi-Fi networks list.

E-bot manual
④ Connecting to E-bot requires a network key. By default, it is
“00000000”. Enter the network key and connect as you would
normally connect to a Wi-fi network on your tablet.
⑤ Run the E-bot Viewer app on your tablet, and make sure that the
image is displaying correctly.
※ Note: In the E-bot's options menu, you can change the Wi-Fi
password.
5. Basic Functions of E-bot
1) Power On/Off
Press and release the power button on the E-bot's main body to
power the unit on or off.
When the power is turned on, press and hold the power button for
more than 2 seconds, the unit powers off. If you do not intend to use
E-bot for a long period of time, please power it off.
Note: If the E-bot is in the folded position, it cannot be powered on.
2) Changing Camera Modes
E-bot has two camera modes; near viewing mode and distance
viewing mode. The camera mode can be changed by rotating the
camera.
E-bot manual
Flipping down the close-up lens switches to distance viewing mode.
Flip the close-up lens closed to switch back to near viewing mode.
※ Magnification, color mode, and function settings for each mode
are saved separately. So when switching the camera mode, the
settings are automatically changed to the settings you last used
for that mode.
3) Magnification
You can change the magnification level to suit your visual needs
and the size of the print you’re currently reading.
Near viewing mode Distance viewing mode
E-bot manual
Press the Zoom In button (+) to increase the magnification level.
Press the Zoom Out button (-) to decrease the magnification level.
As you press and hold either of these buttons, the magnification
level is adjusted continuously.
The zoom in / out buttons on the wireless controller are located as
shown below:
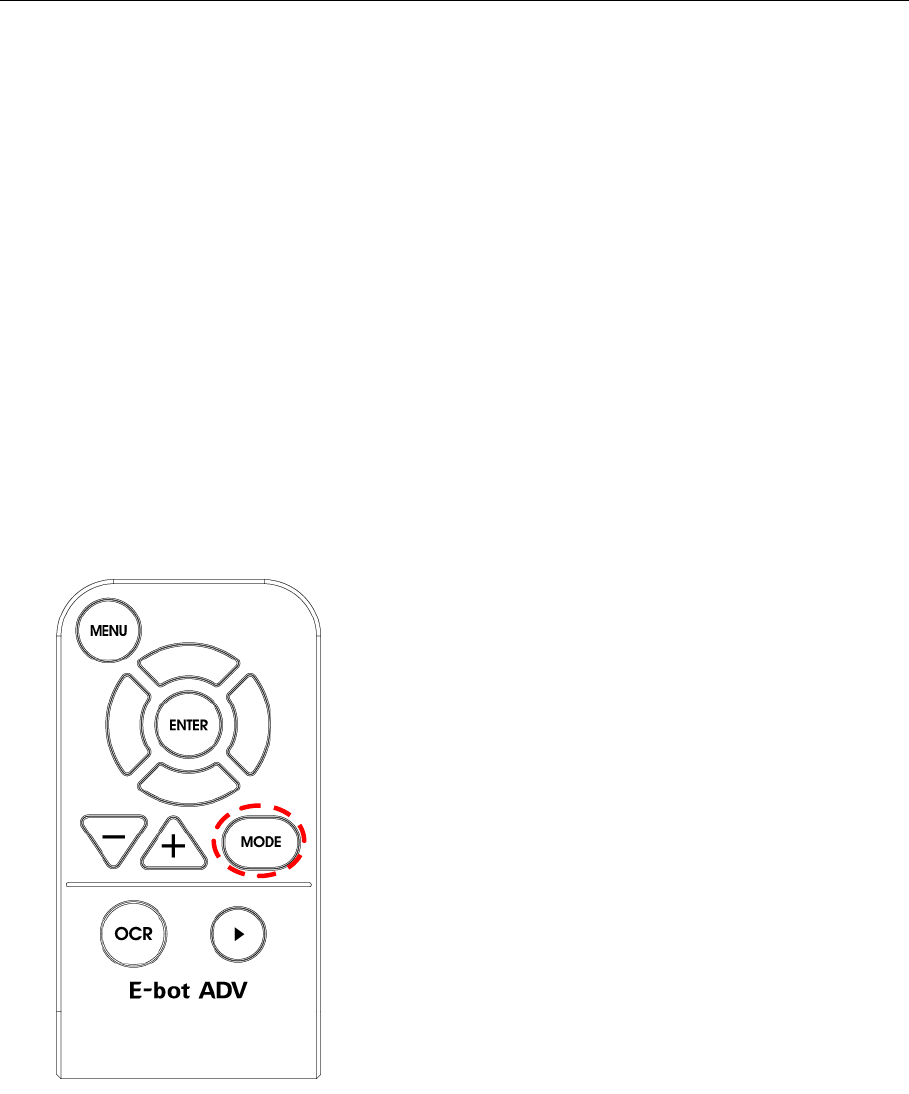
4) Changing the Color Mode
You can change the color of the text and/or background on the
screen to accommodate your visual needs in regards to text type
and your visual condition.
E-bot manual
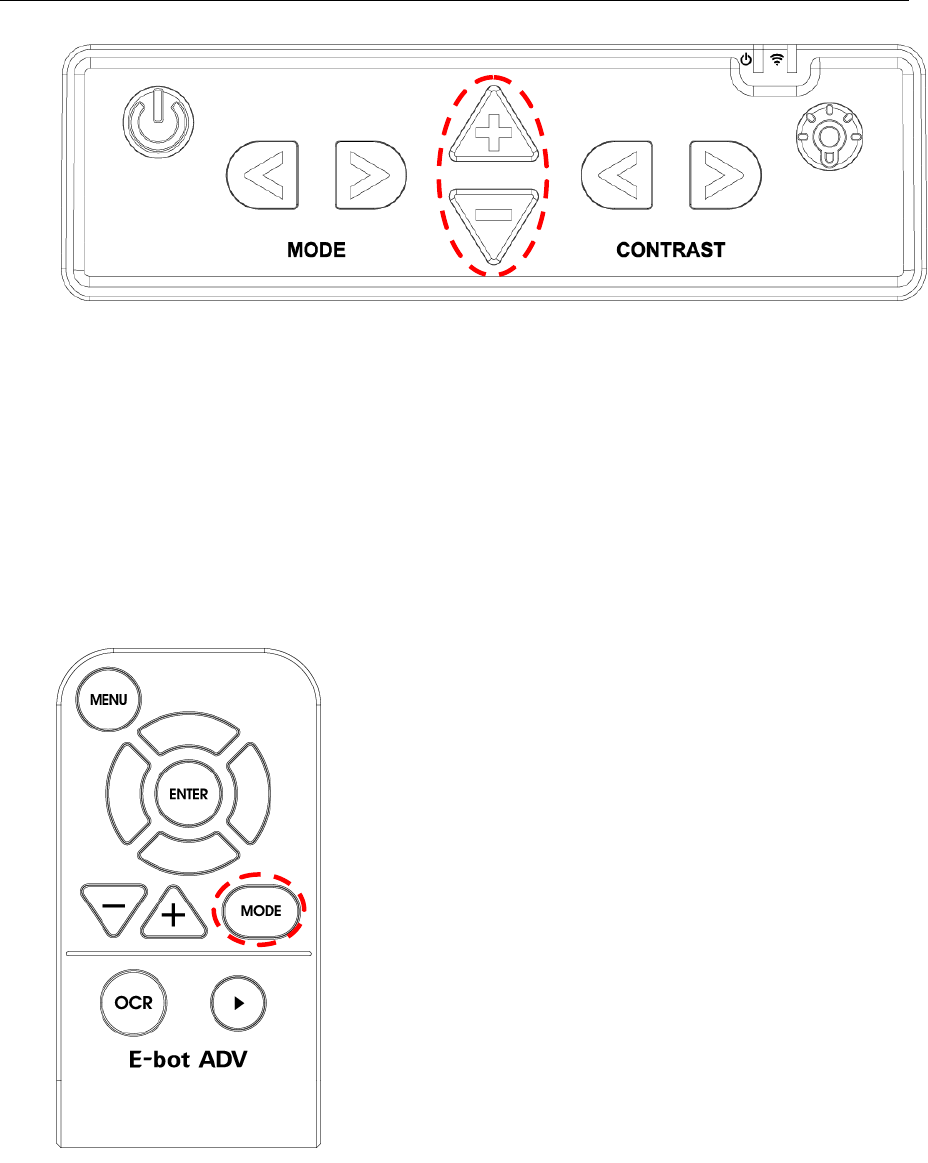
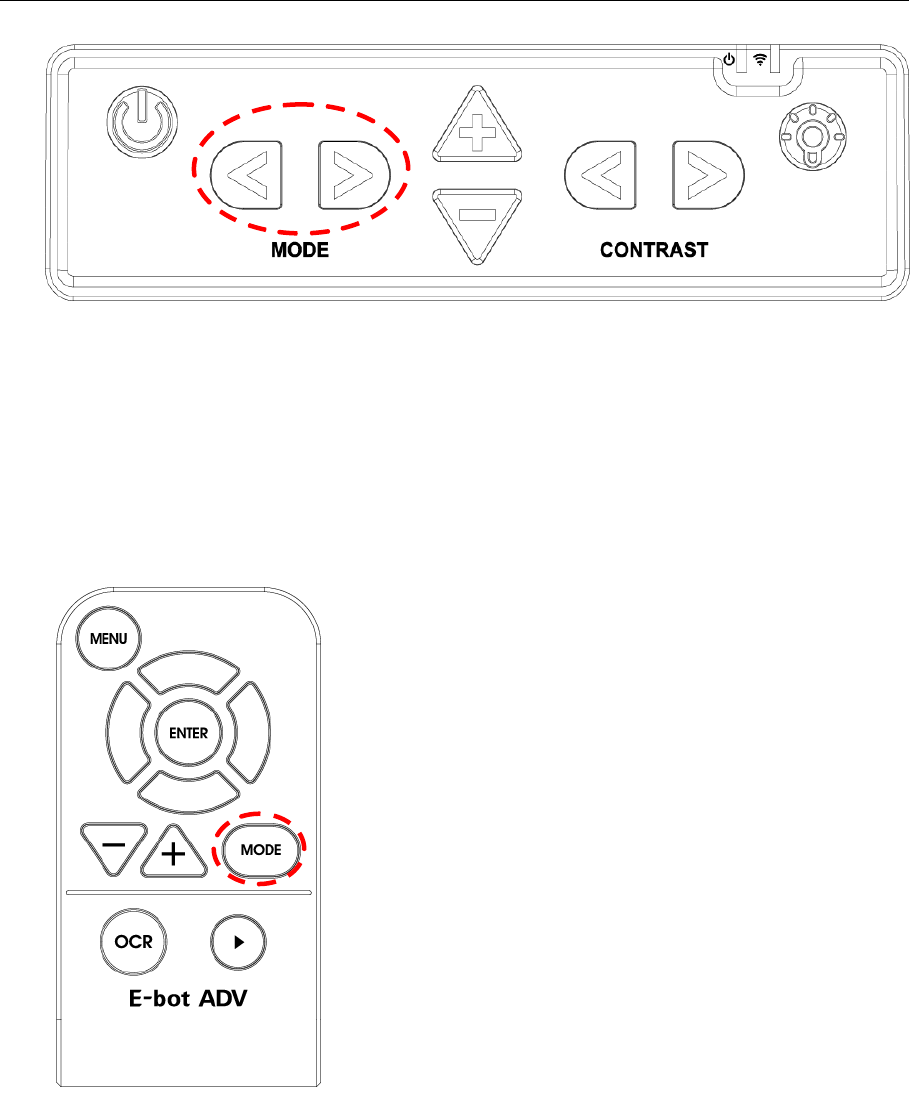
Press the Previous color button to change to the previous color
mode. To change to the next color mode, press the next color
button.
You can also use the Mode button on the wireless controller to cycle
through the color modes.
There are 7 color modes provided by default:.
1. Natural Color Mode
2. White text / black background
3. Black letters / white background
4. Black and White (Gray)
5. Yellow letters / black background
E-bot manual
6. Yellow letters / blue background
7. Green letters / black background
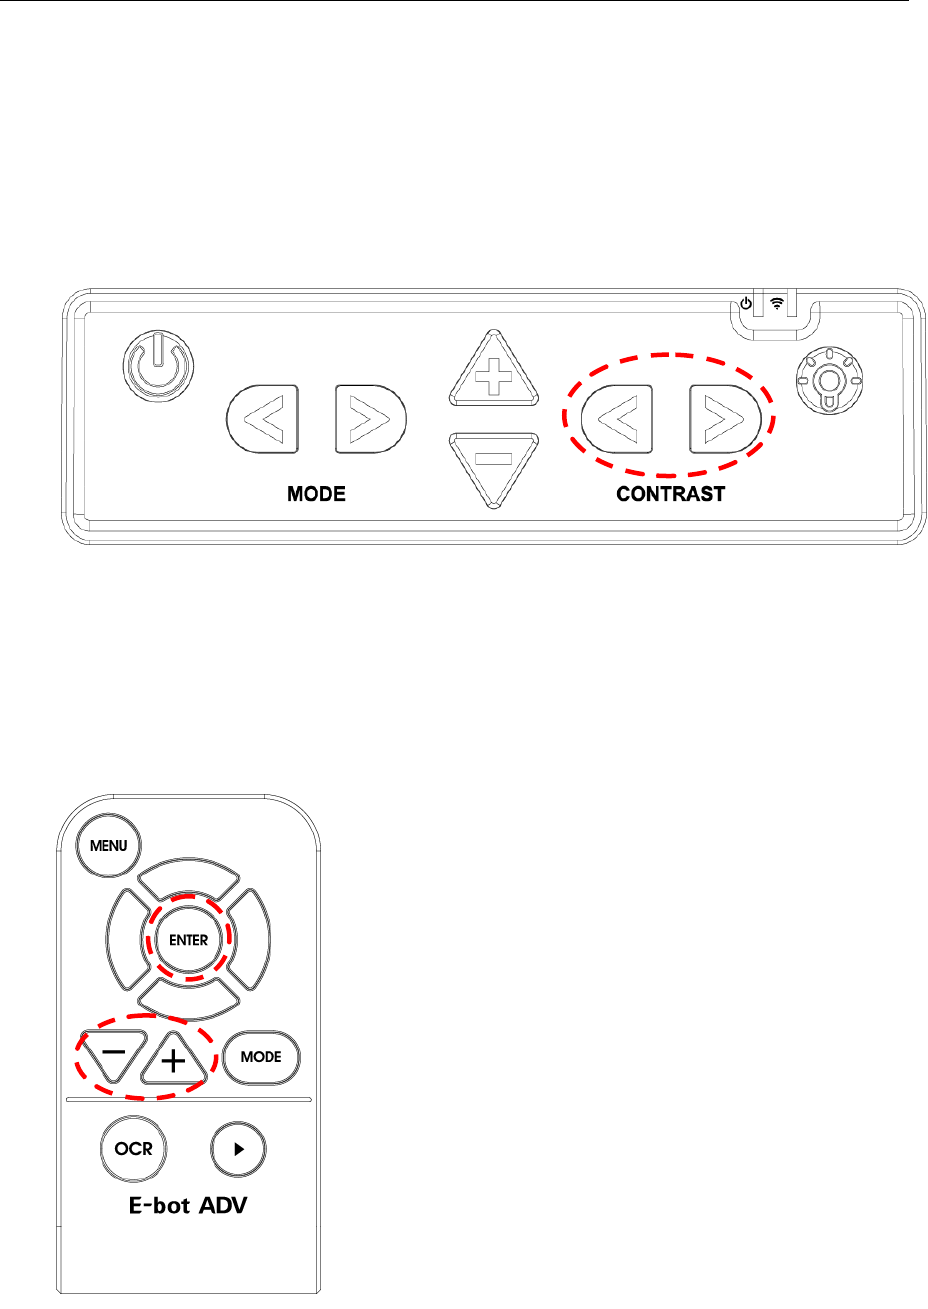
5) Contrast
Due to variations in paper type, text type and color and the
background color of documents or books that you are reading, you
may need to adjust the contrast to read the documents or books
clearly.
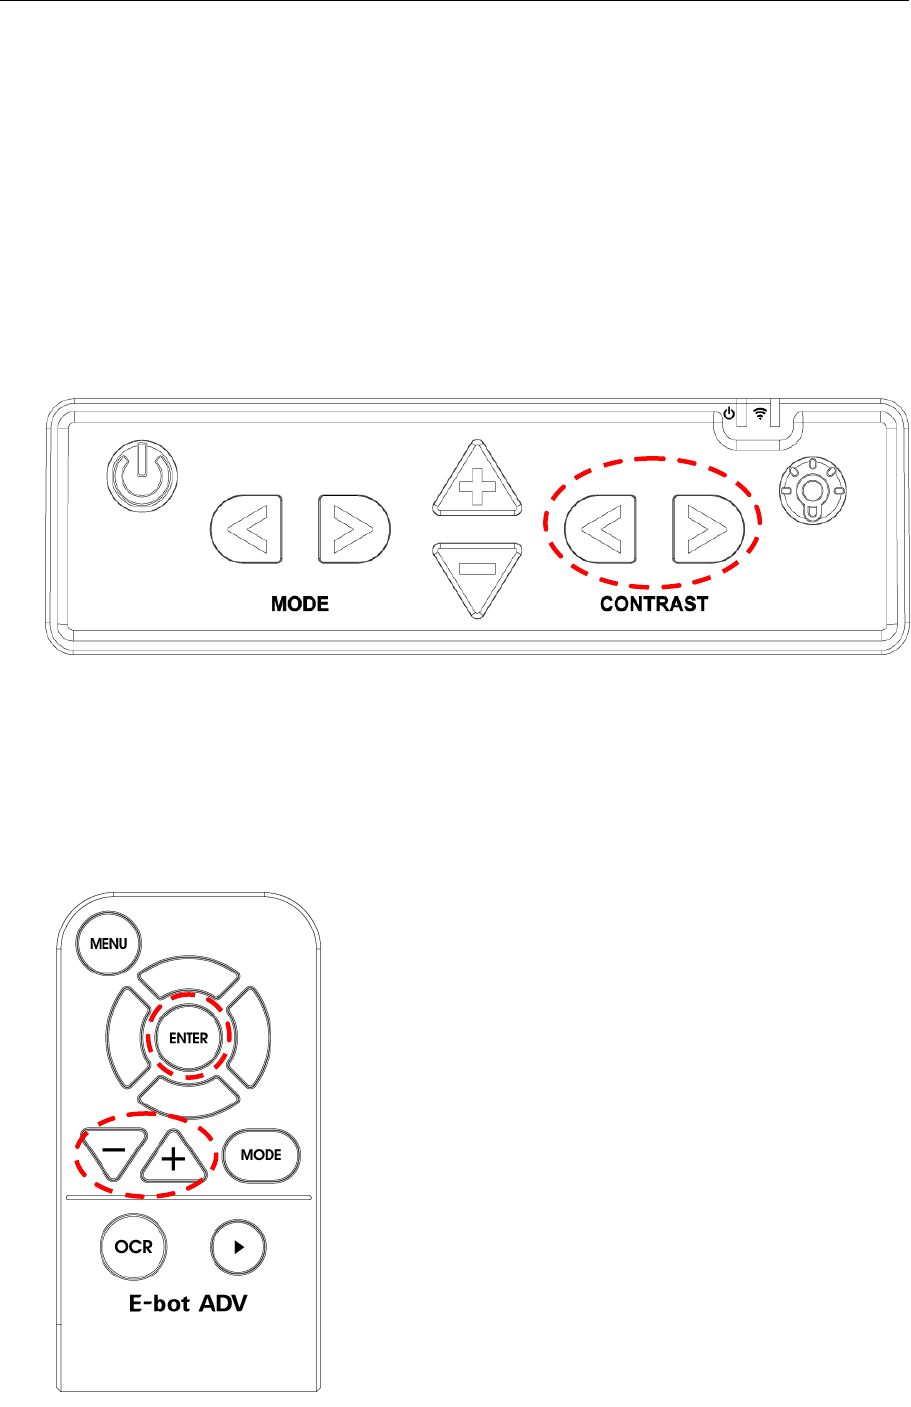
You can adjust contrast by using the Contrast Increase/Decrease
buttons on the control panel on the main body.
Or press the Enter button and Zoom In/Out button simultaneously
on the wireless controller.
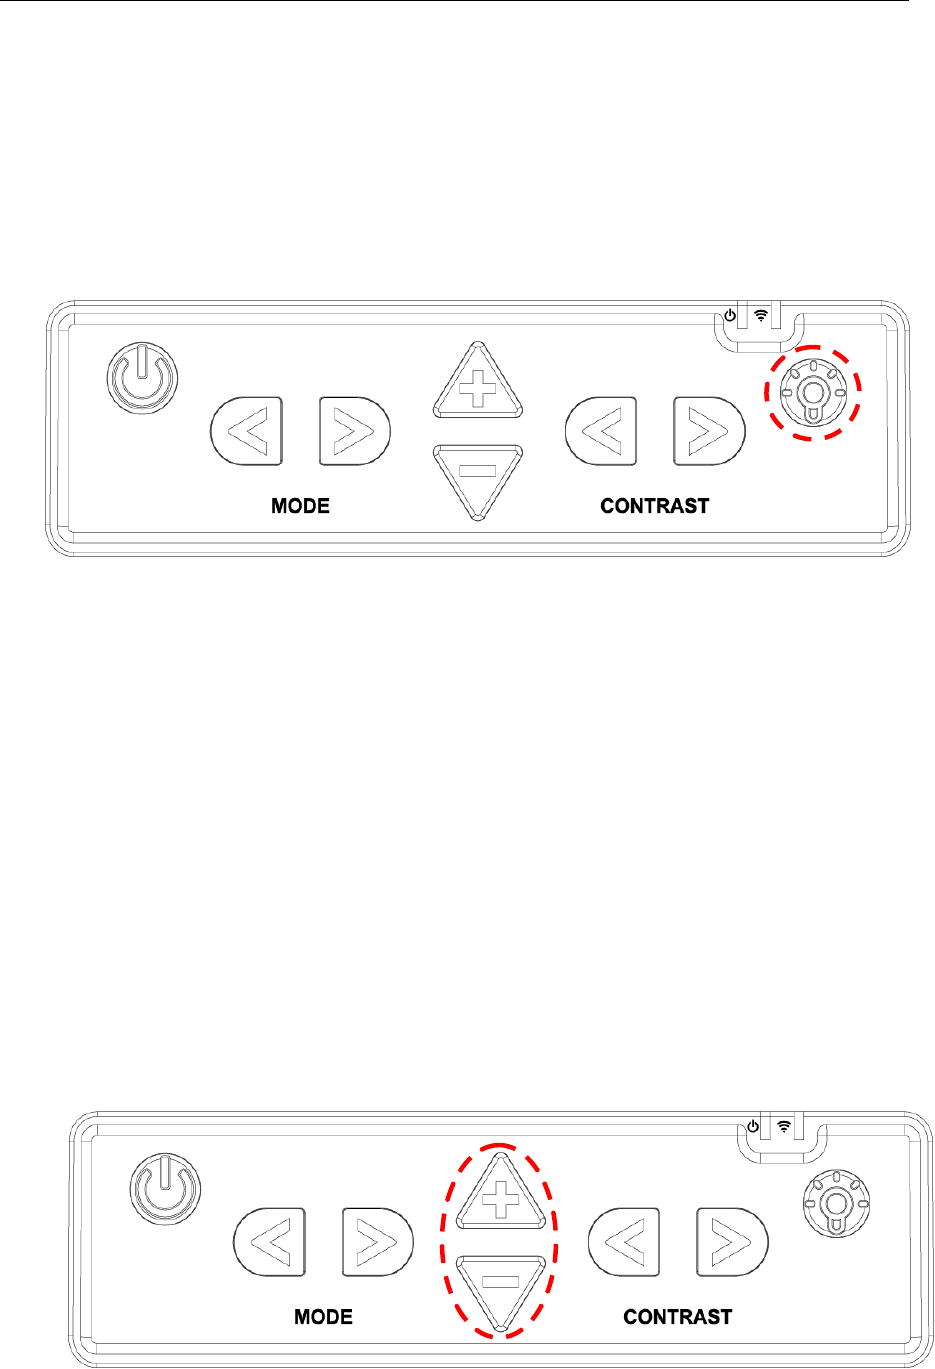
E-bot manual
6) LED light On/Off
In the near view mode, the built-in light is automatically turned on to
ensure a clear image. E-bot contains a sensor to detect the amount
of illumination in your current surroundings, and lighting is
automatically adjusted according to the ambient brightness.
Press the LED button to turn the lights on or off. When viewing
glossy objects, please turn off the LED light to avoid glaring.
※ If you turn the power off, when you turn it back on, the LED light is
automatically turned off.
※ When using distance view mode, the LED light is not turned on.
7) Finding your current Reading Position
Use the Find location function, to find the position of the magnified
text you are currently reading in relation to the document placed on
the reading plate or the presentation screen or whiteboard you are
viewing from a distance.
E-bot manual
Press and hold the Zoom in button and Zoom out together, the
magnification level is reduced back to normal and a red cross
appears in the center of the display to assist your orientation so that
you can locate the placement of the text in relation to the whole
document.
Release both the Zoom in and Zoom out buttons, and the
magnification level returns to the rate you were using before
pressing the Zoom buttons.
Use the following key combination on the wireless controller to find
your reading location:
8) Switching to and from Natural Color mode
The E-bot allows you to alternate between Natural color mode and
your current color mode setting. Press the Color Mode button on the
wireless remote control for more than 2 seconds to switch between
Natural Color Mode and your current color mode setting.
E-bot manual
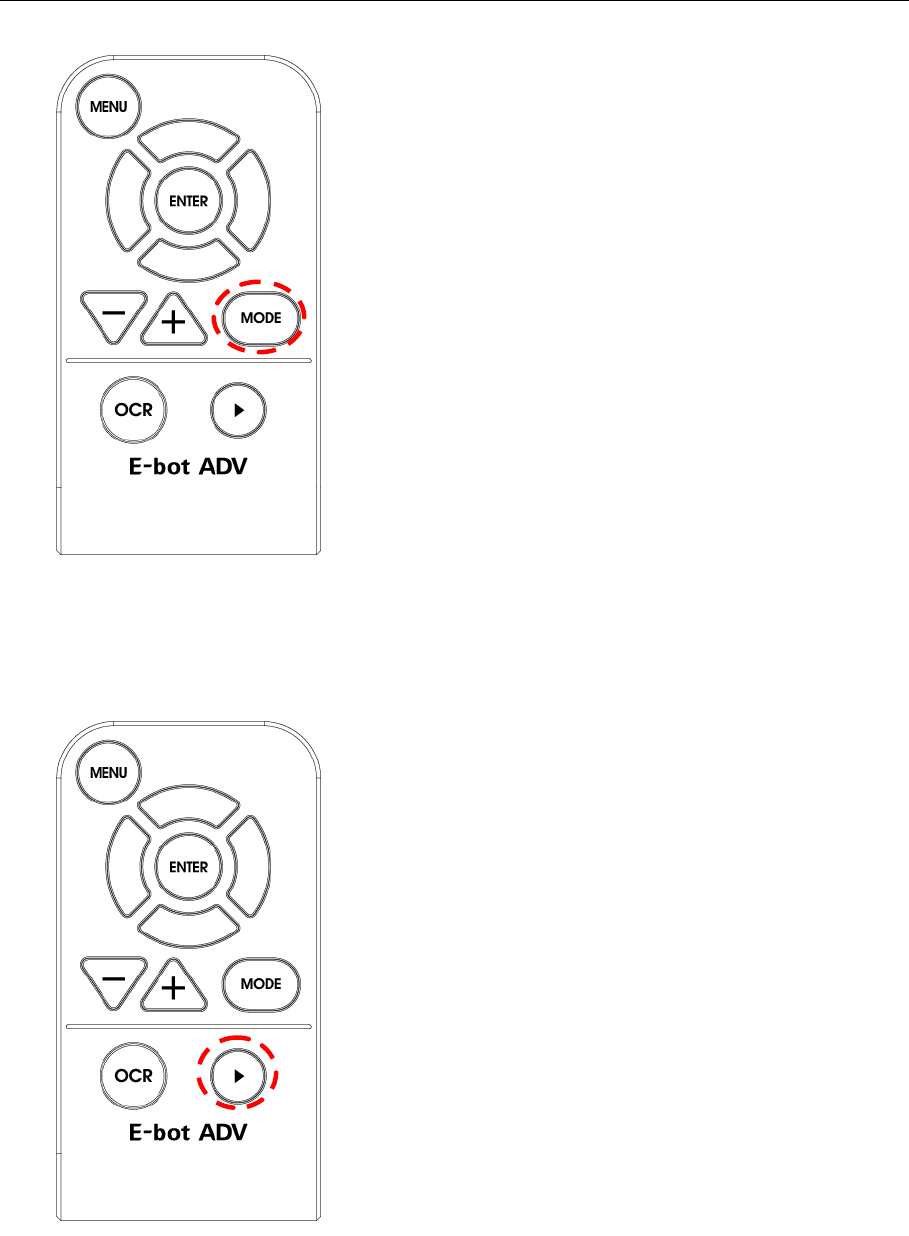
9) Freeze
Press and release the Play/Pause button to take a still shot.
Press the Play/Pause button again to release the still shot and
return to the live camera mode.
10) Focus lock
E-bot manual
By default, E-bot uses automatic focus. However, if you’re writing
under the camera or doing something else on which you don’t want
the camera to focus, you can use the Focus lock to lock the focus
on the text rather than allowing the auto focus to follow your hand or
pen.
Press both the Contrast Increase button and Contrast Decrease
button on the top of the main body.
Or press the Enter button on the wireless controller for more than 2
seconds.
When focus lock is activated, the Focus Lock icon is displayed on
the screen.
E-bot manual
※ Focus is unlocked automatically when the camera is switched
from Distance view mode to near view mode or powering off when
focus is locked.
6.
Advanced features
1) Using the menu
You may change many of the E-bot’s settings via the Options menu.
Use the menu in the manner described below:
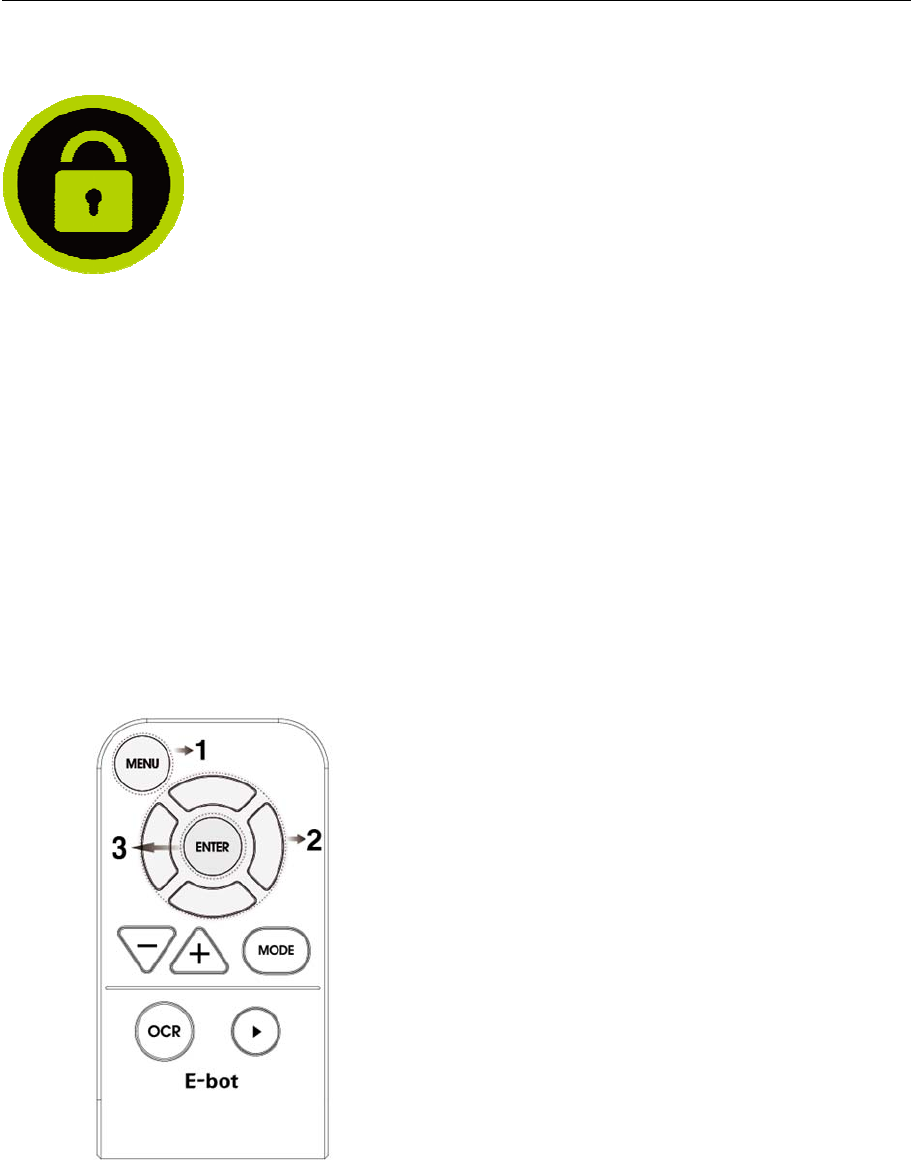
① Menu: Press the menu button on the wireless controller, and a
menu window pops up on the left side of the screen.
② Tabs: The Menu consists of two tabs, 'Options' and 'OCR'. You
can set the options related to magnification functions in the
1. Menu button: 1) Open Menu
2) Select item
3) Close Menu
2. Up/down button: Move between items
Right/Left button : Change setting values
3. Enter Menu: Select item

E-bot manual
'Options' tab, and can set the options related to OCR functions in
the 'OCR' tab.
You can move between the Tabs using the Right and Left
buttons.
③ Move between options: You can move through options in a tab
using the Up and Down buttons. To select an Item, press the
Enter button.
④ Moving back a level: to move back a level in the menu structure,
press the menu button.
⑤ Closing the Menu: To close the menu, press the menu button
from the top level of the menu structure.
2) Color mode settings
You can set the color mode to best accommodate your visual
condition or the material you are reading. You can also disable color
modes that are not useful to you.
Setting the color mode
※ You can change to the frequently-used color except for Natural
color mode. Up to 7 color modes can be set on the options setting.
① Bring up the menu while using the view in which you want to
change (for instance, if you bring up the menu while using the
near view, the color mode of the near view is changed)
② You can modify the color modes by choosing the “Color Mode”
setting in the Options tab of the menu.
③ You can modify any of the color modes numbered 1 to 7. Select
the mode you want to set.
E-bot manual
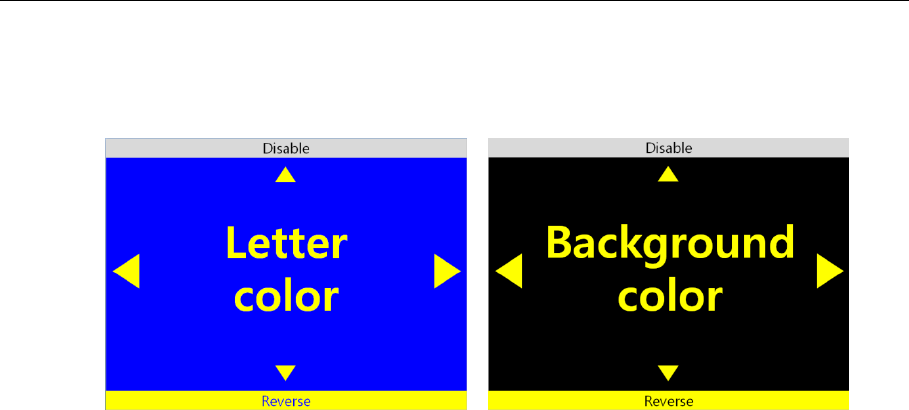
④ The text Letter Color is displayed on the screen. Select the color
of the text using the left and right arrows
* The text color and background color being displayed are
exchanged when the [Reverse] button is pressed.
⑤ Select the Background color when you have finished selecting
the text color. Use the same method as when setting the letter
color..
* If Grayscale is chosen when selecting the Letter color, the
Color setting mode is exited without selecting a Background
color.
⑥ After you have selected the background color, you are returned
to the menu window.
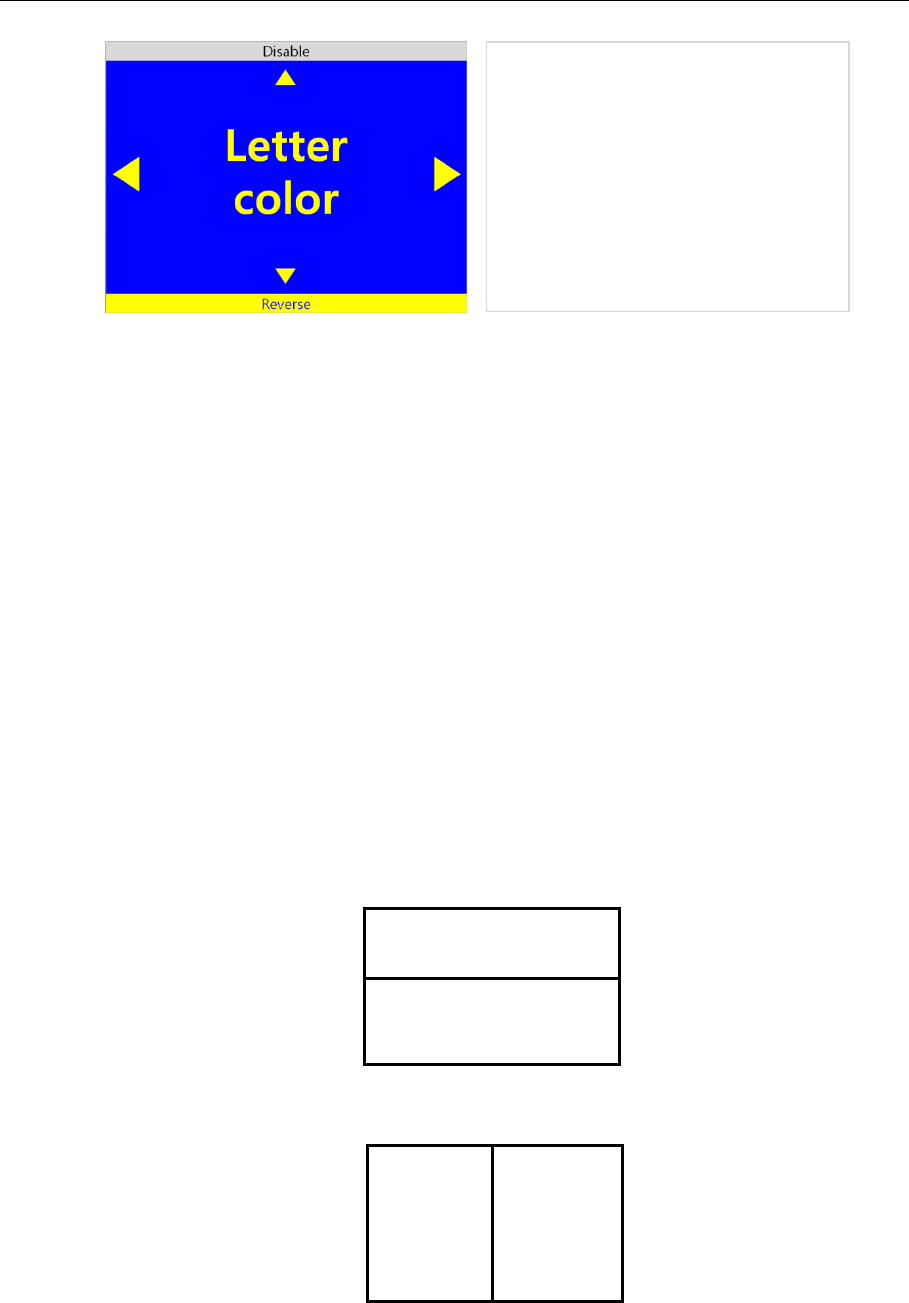
To disable color modes
You can disable color modes that are not useful to you so that you
may cycle through useful color modes more quickly.
① Bring up the Menu, go to the Options tab, then select “Set color
mode”.
② Select one of the color modes numbered 1 to 7.
③ If you press the Up arrow key when “Letter color” is displayed, a
window appears asking whether to disable the current Color
mode. Choose ‘Yes’ to disable the Color mode or ‘No’ to cancel.
E-bot manual
④ When you have made your selection, you are returned to the
menu.
3) Marker
The Marker helps you to focus on the text that you are reading by
narrowing the display area with window markers or by underlining
the sentence that you are reading.
Set Marker
There are 4 kinds of markers; Horizontal Line Marker, Vertical Line
Marker, Horizontal Window Marker and Vertical Window Marker.
Horizontal Line Marker
Vertical Line Marker
Horizontal Window Marker
[A window asking whether to
disable Color mode]
ABCDEFGHIJKLMNOPQR
ABCDEFGHIJKLMNOPQR
ABCDEFGHIJKLMNOPQR
ABCDEFGHIJKLMNOPQR
ABCDEFGHIJKLMNOPQR
ABCDEFGHIJKLMNOPQR
ABCDEFGHIJKLMNOPQR
ABCDEFGHIJKLMNOPQR

E-bot manual
Vertical Window Marker
① Bring up the Menu, select “Options” then select “Marker”.
② Next, select the marker type; ‘Horizontal line marker’, ‘Vertical
line marker’, ‘Horizontal window marker’, ‘Vertical window
marker’. A check mark appears next to the selected marker.
③ After you have chosen the marker setting, the selected marker is
displayed on the screen and you are returned to the Menu again.
* Select the marker setting from the menu again to disable the
marker.
Set Marker position and size
You can adjust the size of the window marker and location of the
line marker.
① Bring up the Menu and select “Options” then “Marker”.
② If the line marker is selected, , the “Adjust location of marker”
item appears. If the window marker is selected, the “adjust size
of window marker” option appears. Select the relevant marker
setting.
③ Use the arrow keys to adjust location or size.
ABCDEFGHIJKLMNOPQR
ABCDEFGHIJKLMNOPQR
ABCDEFGHIJKLMNOPQR
ABCDEFGHIJKLMNOPQR
ABCDEFGHIJKLMNOPQR
ABCDEFGHIJKLMNOPQR
ABCDEFGHIJKLMNOPQR
ABCDEFGHIJKLMNOPQR
E-bot manual
④ Press Enter, and the setting is saved and you are returned to the
menu.
※ Note: markers cannot be used in OCR mode.
4) OCR
Recognizes text under the camera when using near view mode and
reads it aloud with built-in text-to-speech voices.
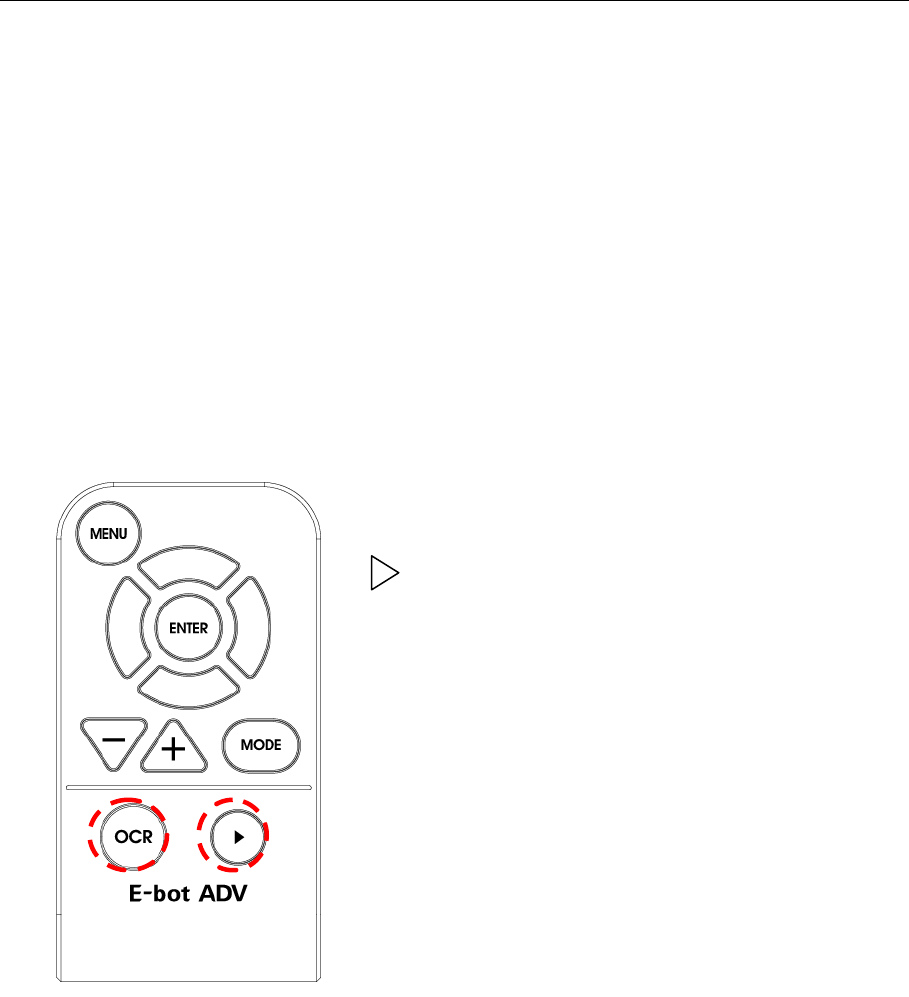
OCR execution
When using near view, the image freezes when the OCR button is
pressed. The text displayed on the frozen screen is recognized then
read aloud using the internal TTS voices.
※ While recognition is being performed, a message indicating
recognition is in progress appears. Please do not perform other
functions while recognition is in progress.
∙ OCR button : OCR execution
∙ button : OCR Play/Pause

E-bot manual
Press the Play/Stop button to stop and start reading text aloud, if
the Play/Stop button is pressed after text reading has completed,
reading will start again from the beginning of the text.
Press the OCR button again to exit the OCR function and return to
live camera mode.
※ If the magnification level is changed during viewing of
recognized text, the magnification level is changed. However, if
the the OCR view is set to image, the magnification level cannot
be adjusted below the magnification level that was set when
OCR was first played.
※ You may change the Color mode when viewing an OCR scan.
The available color modes are the same as those available in
near view mode.
Reading/navigating recognized text.
Press the Right arrow key to move to the next sentence.
Press the Left arrow key to move to the previous sentence.
Press the Down arrow key to move to the next paragraph.
Press the Up arrow key to move to the previous paragraph.
Navigate to the place where you want to begin reading text aloud
and press the Play/Stop button to begin reading at that point.
OCR views
You may display OCR results as either an image, or as recognized
text.
① Bring up the Menu then press the Right arrow key to move to the

E-bot manual
OCR tab and select”OCR View”.
② There are 4 options for displaying OCR results. , The current
setting is indicated with a check mark. Select your desired view
for OCR results.
Image : Displays scanned image, highlights word beingread
aloud.
Whole text : Extracts recognized text and shows it on the
screen.
Line : Extracts recognized text and shows the line
currently being read aloud..
Word : Extracts recognized text and shows each wordas it
is read aloud on the screen.
OCR correction
The deskew function corrects the orientation of the text to the
horizontal if it is not aligned correctly for more accurate text
recognition. You can turn this option on or off.
① Bring up the Menu, and press the right arrow key to move to
OCR tab, then “OCR Correction”. Select the “Deskew” item.
② If the check box is checked Deskew is on. If it is not checked,
Deskew is off.
③ Press enter to change the setting.
OCR Language setting
This feature distinguishes and recognizes up to 3 different
languages even if they are mixed on the screen.
① Bring up the Menu and press the Right arrow to move to the

E-bot manual
OCR tab. Then, select the OCR language setting.
② Select the language you want to add. E-bot can recognize up to
3 languages simultaneously. . Note: the base language cannot
be unchecked.
※ Language recognition is distinguished by paragraph if the
selected language is based on Alphabet.
5) E-bot operating Language
You can change the basic language E-bot uses for its voice guide
and menu system.
① Bring up the Menu and select “Language” from the ‘Options’ tab.
② Navigate to the language you wish to use with the Up and Down
arrows, and press the Enter key on your chosen language.
.
6) Voice Guide
This option determines whether E-bot speaks as you navigate
menus or press buttons.
Voice Guide On/off
① Bring up the Menu and select “Voice guide” from the ‘Options”
tab
② If the checkbox is checked, the voice guide is on; if it is not
checked, voice guide is Off. Press the Enter button to change
the setting.
TTS Volume
You can adjust the volume of the TTS voice in two ways.
E-bot manual
Adjusting on the main body
① E-bot’s volume dial is located on the right side of the body.
② Turn the dialaway from you,and the volume is increased, turn
the dial toward you, and the volume is decreased.
Adjusting in the menu
① Bring up the Menu, and select “Volume” in the “OCR” tab
② You can select from 14 volume levels. Use the Left and Right
arrows to choose your desired volume level, then press
Enter to save the settings. You can Mute the volume by
setting the level to 0.
TTS Speed
The TTS speed setting controls both the speed of the guide voice
as well as the OCR reading voice.
① Bring up the Menu, and select “TTS speed” from the OCR tab.
② The TTS speed is adjustable using 14 levels. Use the Left and
Right arrows to adjust the speed of the TTS then press Enter to
save the setting.
TTS Pitch

E-bot manual
You can adjust the TTS voice pitch.
① Bring up the Menu, and select “TTS pitch” from the “OCR” tab.
② The TTS pitch can be adjusted among 14 levels. Use the Left
and Right arrows to control the pitch of the TTS then press Enter
to save the setting.
TTS voice
Use this setting to select the gender of the voice.
① Bring up the Menu and Select “TTS type” from the “Options”
tab.
② Use the Left and right arrows to select voice betweenmale and
female.
7. Using other functions
1) Initialization
① Set the settings back to the factory defaults.
② Bring up the Menu and Select “Initialization” from the “Options”
tab.
③ You can initialize settings in the “Options” tab, in the “OCR” tab,
or initialize all settings.
Initialize Options: Initialize settings in the Options tab of the
Menu.
Initialize OCR: Initialize settings in the OCR tab of the Menu.
Initialize all settings: Initialize all settings including options
tab and OCR tab settings.
2) Information

E-bot manual
Use this option to check general information about the E-bot.
① Bring up the Menu and select “Information” from the “Options”
tab.
② Here, you can check the following information about E-bot:.
Software version
Products serial number
Remaining battery
Wi-Fi AP
Information of wireless remote control
3) Wi-Fi password change
An eight -digit number is needed to connect E-bot to Wi-Fi using an
iPad, Android tablet or PC. The default password is 00000000. To
change the password, follow the instructions below:
① Bring up the Menu and select “Wi-Fi password change” in the
“Options” tab.
② A window asking for the current password appears. Input the
password using the virtual keyboard on the screen. Use the
arrow keys to navigate to the character you want to type, and the
Enter button to input the character. Input the current password
and press Enter on the virtual keyboard.
③ A window asking for the new password appears. Input the 8-digit
password in the manner described above.
④ A window asking you to reconfirm the password to change
appears. Input the new password again.
⑤ When you have finished the above steps, the new password is
set.

E-bot manual
4) Keyboard Hot keys: (Only when using PC to display and control E-
bot.)
When using the E-bot Viewer application on your PC to display and
control E-bot, you can use your keyboard and mouse to control e-
bot’s functions.
Users can even define the hotkeys to use E-bot more conveniently
for them.
① Bring up the Menu and select “Hotkey change” in the “Options”
tab.
② A list of hot keys is displayed. Select one of the hot keys in the
list.
E-bot manual
8. Troubleshooting
1) When the wireless controller does not work
The main body and the connected controller’s channel setting value
must be set the same for the controller to operate E-bot properly. If
there are two or more E-bots in the same place, settings must be
set differently, so that the controllers do not control the wrong E-bot,
etc.
Check the Main body channel values
① Please check the channel values on the rear of the Main
body. An Arrow is pointing to the number currently set.
Checking the wireless remote control channel value
② Remove the battery cover from the back of the remote
control.
③ Check the channel setting switch. It can set the channel
values as shown in the below picture. Make sure it is set to
the same channel value as the one shown on the main body
of your E-bot. If the channel value is different, please use (-)
a screw driver or your fingernail to change the setting.
E-bot manual
※ Changing the battery of the wireless controller, if the wireless
controller does not operate even though the channel value is the
same, please change the battery in the wireless controller.
9. A/S
Manufacturer: HIMS International
Manufacturer Address: 174 Gajeong-ro, Yuseong-gu,
Daejeon, Korea 305-350
E-mail: sale@himsintl.com
Phone Number: 042-864-4601
FAX: 042-864-0133

E-bot manual
10. Specification
Camera HD, 60fps
Video output
Wi-Fi : Android Tablet, iPad, Windows PC
USB3.0 : Windows PC & MAC
USB2.0 : Windows PC
HDMI : TV, Monitor
Distance Viewing Supported
Magnification rate
9.7”(Tablet) : 0.8x ~ 35x
13.3”(Monitor) : 1.2x ~54x
24”(Monitor) : 2.2x ~ 97x
Color modes
8 modes
(7 modes are user-definable from color pallet and
enable/disable modes independently)
Contrast Supported
Marker(Line/Window) Supported
Focus Lock Supported
Find reading location Supported
Still image Supported
OCR Supported
LED Light * Support only Near view mode
* Automatic brightness control
Battery Rechargeable Lithium Ion battery
More than 4 hours battery life
Size Folded : 315mm(H) x 215mm(W) x 99mm(D)
Unfolded : 315mm(H) x 215mm(W) x 369mm(D)
Weight 2.3kg / 5.0lbs
E-bot manual
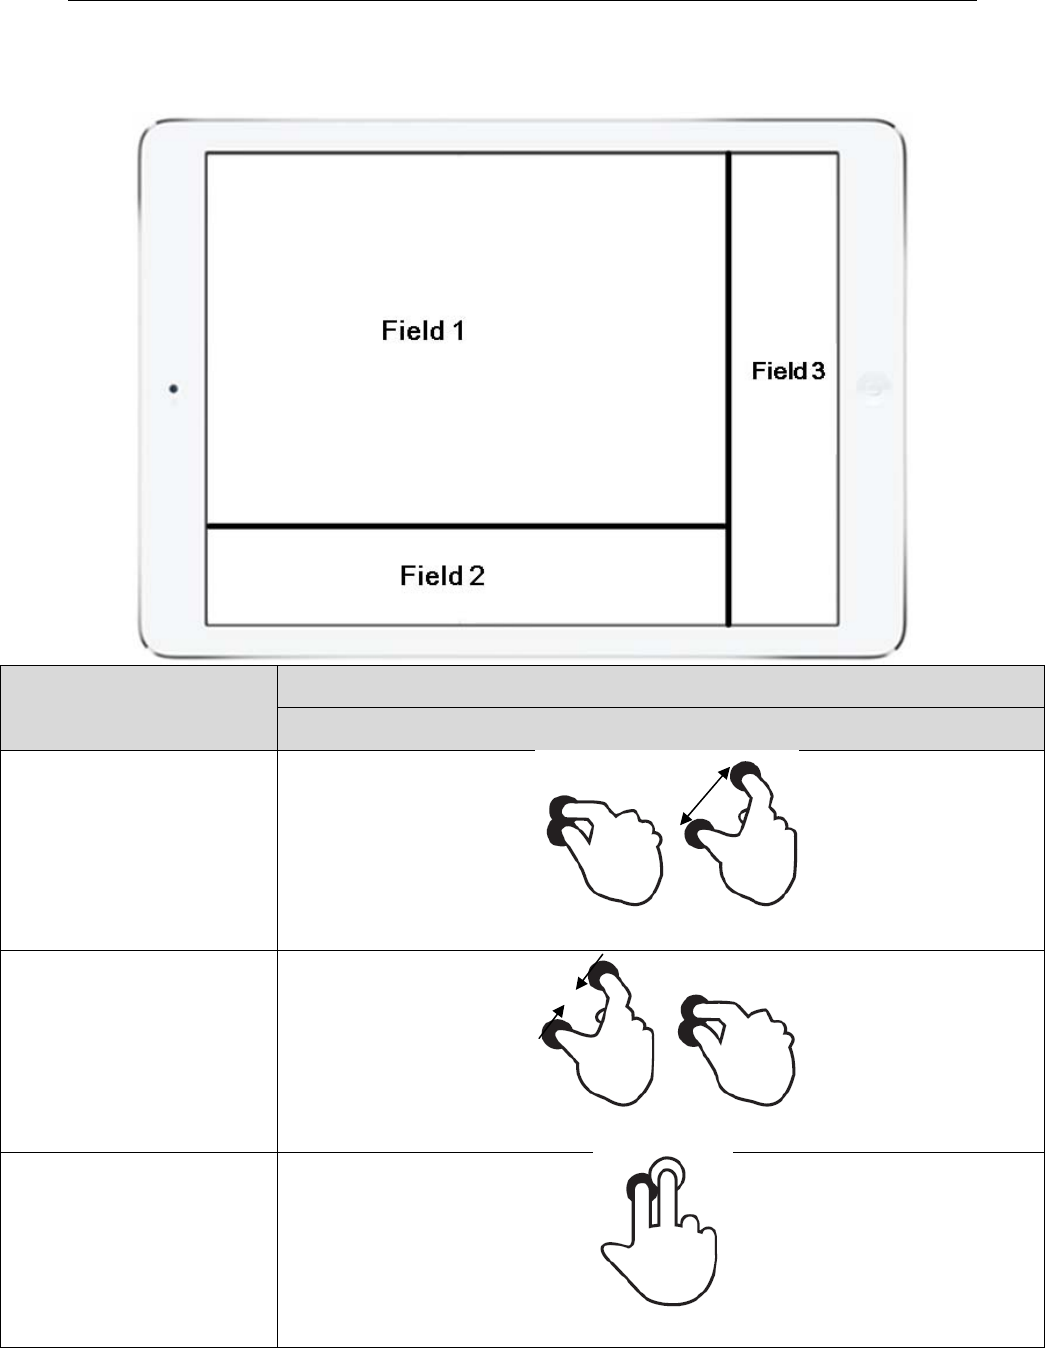
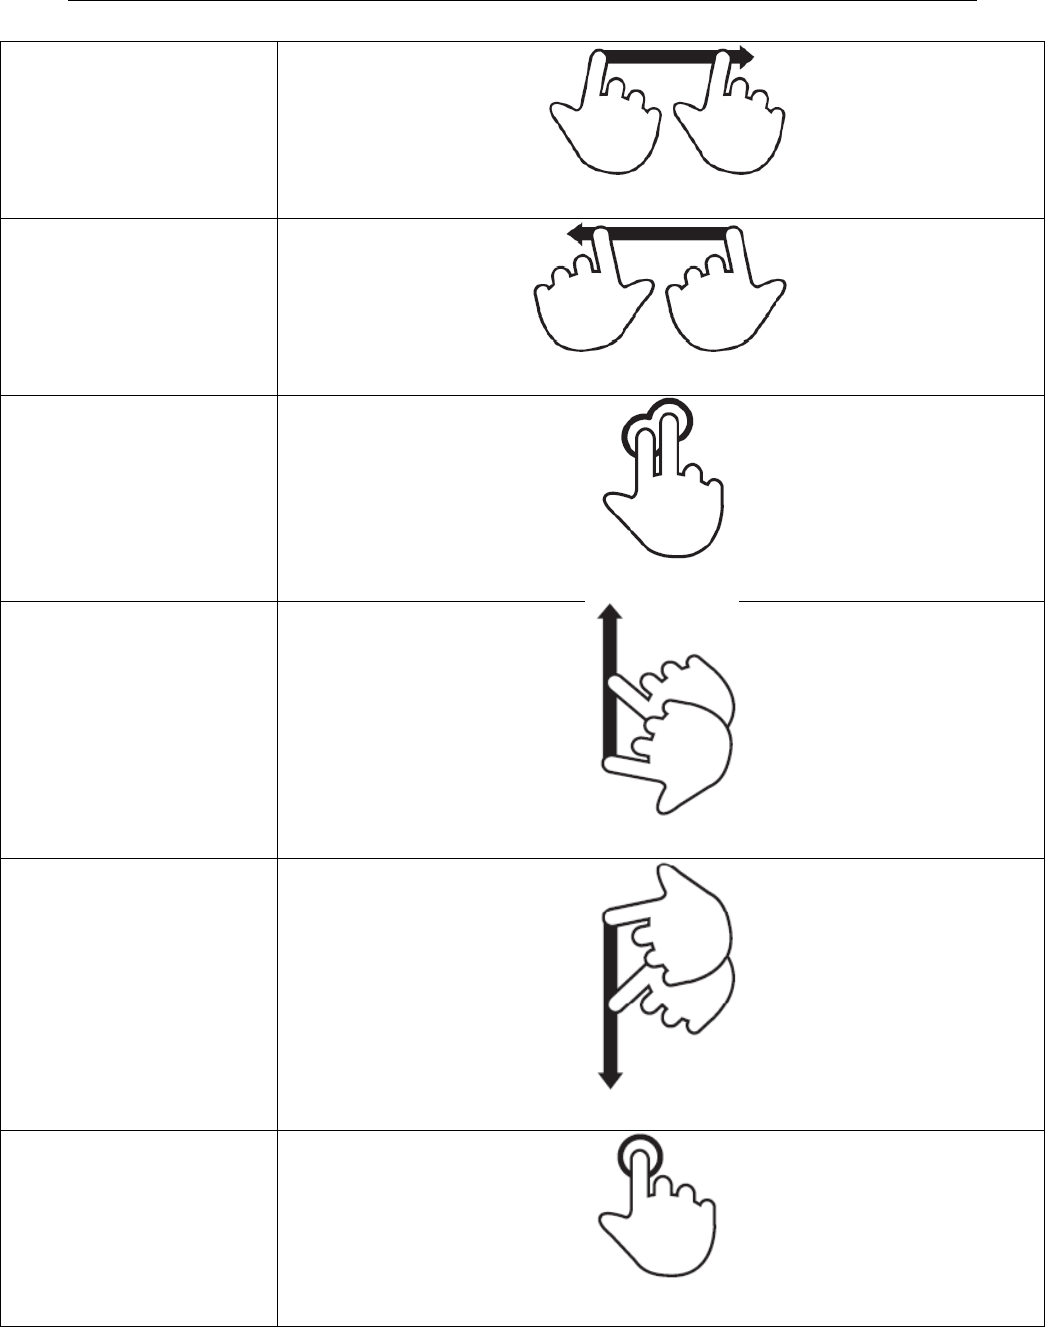
※ Smart Pad Viewer Gesture
Functions Smart Pad
Gesture
Zoom In
(Field 1) Move fingers away from each other
Zoom Out
(Field 1) Pinch fingers towards each other
Find Position
(Field 2) Two-finger one-tap more than 2 seconds
E-bot manual
Next color mode
(Field 2) One-finger flick to right
Previous color mode
(Field 2) One-finger flick to left
Switch to
Natural Color Mode
(Field 2) Two-finger double-tap
Contrast Up
(Field 3) One finger flick to up
Contrast Down
(Field 3) One finger flick to down
Freeze
(Field 1) One finger Double-tap
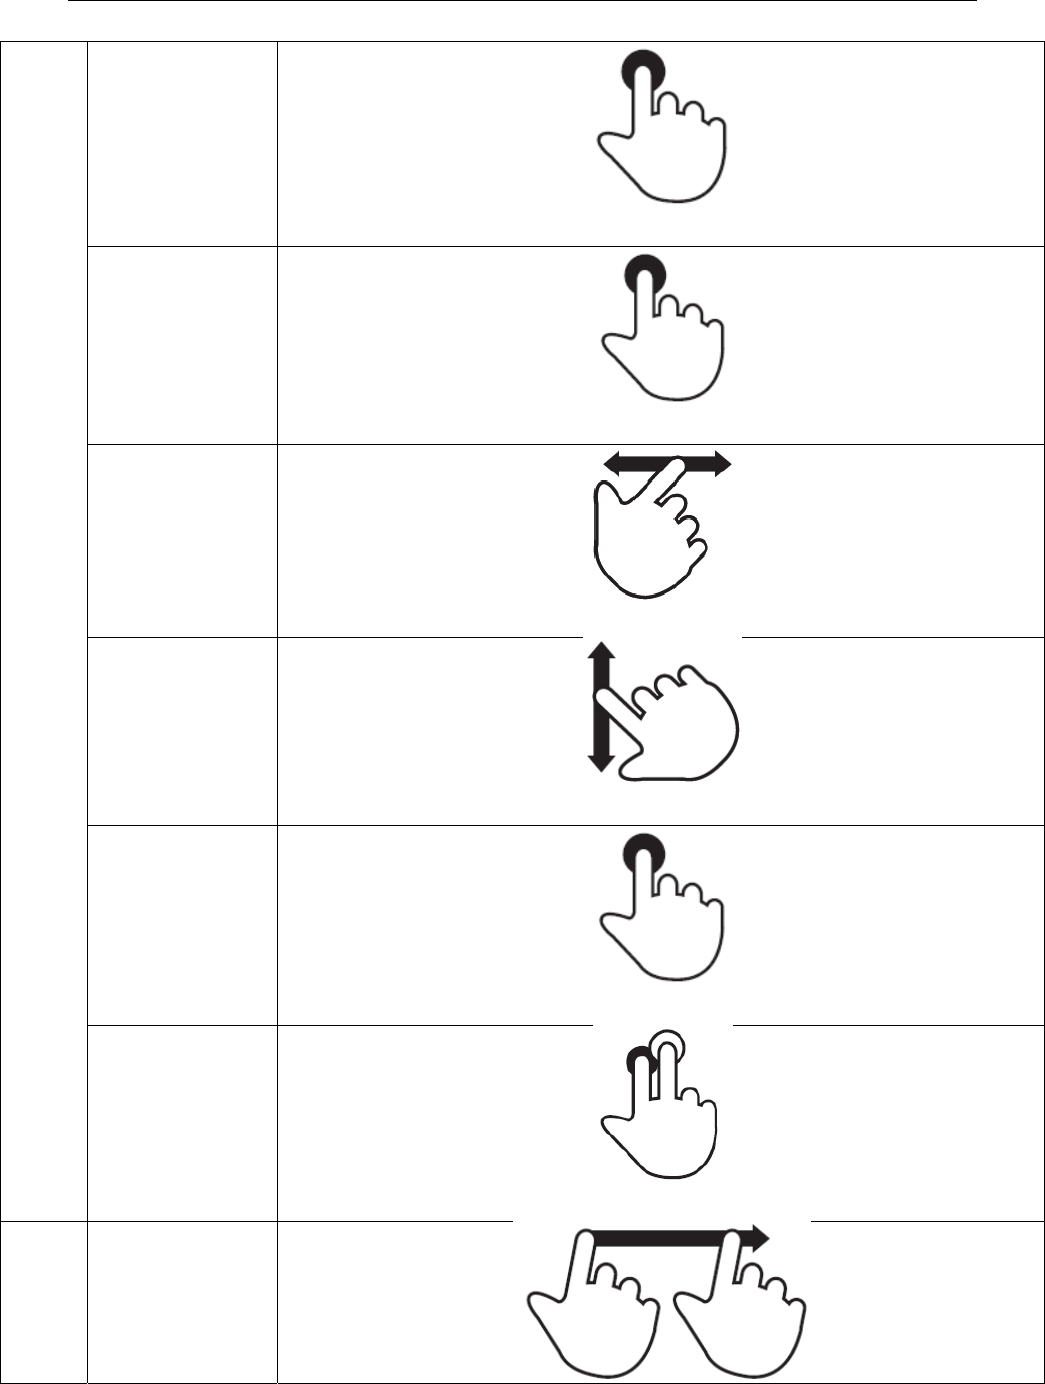
E-bot manual
OCR
OCR Execution
(Field 2) One finger Tap for more than 2 seconds
OCR Play/ Pause
(Field 1) One finger Double-tap
Move
Sentence
(Field 1) One finger flick to left or to right
Move
paragraph
(Field 1) One-finger flick up or down
OCR Exit
(Field 2) One finger Tap for more than 2 seconds
OCR mode
↔ Camera
Preview
(Field 2) In OCR mode, Two-finger one-tap more than 2 seconds
Menu Open
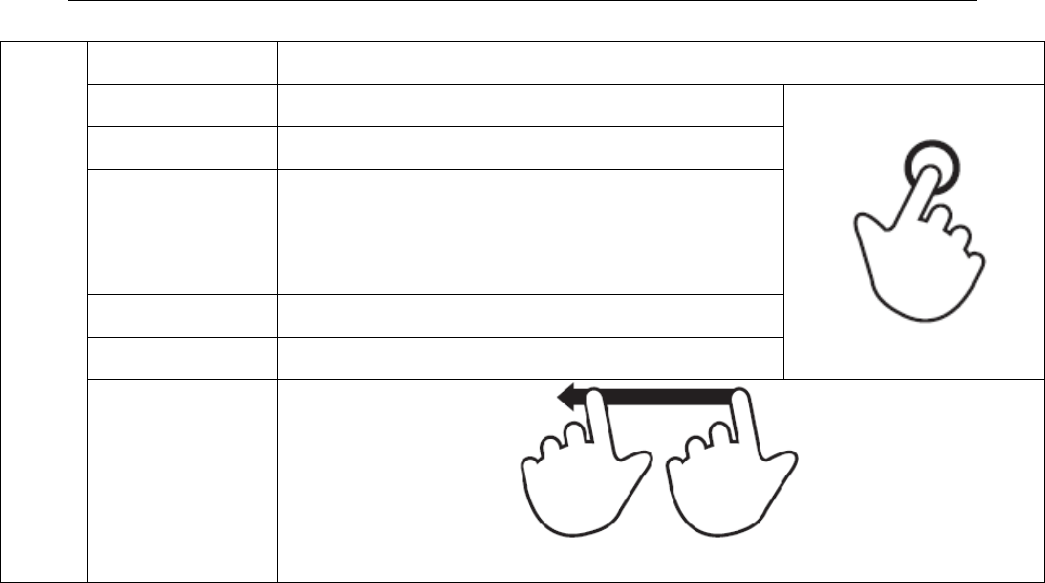
E-bot manual
One finger Tap on the left end of the screen and flick to right
Moving tap One finger Tap on the tap
Move an item One finger Tap on the wanted item
Select / Set /
Enter the sub-
item
One finger Tap on the wanted item
Save One finger Tap on the confirm icon
Cancel / Exit One finger Tap on the cancel icon
Close
One finger Tap on the right end of the screen and flick to left

E-bot manual
※ How to control
Features
How to Control Additional
Descriptio
n
Main
Body
Remote Controller Keyboard Mouse Touchpad
Power
Power On
Power
BTN
shortly
(when
power
is off) x x x x
It takes
around 45
seconds to
boot E-bot
up
Power Off
Hold
Power
BTN
over 3
second
s
Sleep mode
Power
BTN
shortly
x x x x
Enter/Release
the Sleep
mode
Light On/Off Light
BTN x x x x Only in Near
View mode
Zoom Zoom In Zoom
In BTN Zoom In BTN [+] Wheel scroll up
(click Left click to
Move fingers away
from each other
Continuous
zoom

E-bot manual
stop zooming in)
Zoom
Out
Zoom
Out
BTN
Zoom Out BTN [ - ]
Wheel scroll down
(click Left click to
stop zooming out)
Pinch fingers towards
each other
Continuous
zoom
Find
Position
Zoom
in BTN
+Zoo
m out
BTN
Zoom In BTN
+Zoom Out BTN
Ctrl + [f]
need to be kept
holding
x
Two-finger one-tap
on the bottom of the
screen for more than 2
seconds
Toggle
between
“Current
zoom
position" and
“Minimum
zoom
position”
Color
Mode
Mode
changes
Previo
us
Color
Mode
BTN/
Next
Color
mode
BTN
Color Mode BTN [m]/ [Shift]+[m] Left click shortly One-finger flick
to right on the bottom
Changes in
the stored
order
Switch to
Natural
Color
Mode
x Hold the Color Mode
BTN for 2 seconds [n] x Two-finger double-
tap on the bottom
Toggle
between
“Natural
color mode”

E-bot manual
and
“previous
color mode”
Set Color
Mode x Menu>Options
>Set Color Mode
Menu>Options
>set Color mode
Menu>Options
>set Color mode
Menu>Options
>set Color mode
Color modes
from 1 to 7
can be set
Reverse
Color
Mode
x
Menu>Options>Set
Color Mode>select
color mode want to
change>[↓]
Menu>Options>Set
Color Mode>select
color mode want to
change>[↓]
Menu>Options>Set
Color Mode>select
color mode want to
change>[↓]
Menu>Options>Set
Color Mode>select
color mode want to
change>[↓]
Disable
Color
Mode
x
Menu>Options>Set
Color Mode>select
color mode want to
change>[↑]
Menu>Options>Set
Color Mode>select
color mode want to
change>[↑]
Menu>Options>Set
Color Mode>select
color mode want to
change>[↑]
Menu>Options>Set
Color Mode>select
color mode want to
change>[↑]
Contrast
Contrast
Up
Increas
e
contra
st BTN
Enter BTN + Zoom In
BTN [c] or [↑] Menu>Options
>select Contrast
One finger Tap on
right end of the screen
and flick to up
Contrast
Down
Decrea
se
contra
st BTN
Enter BTN + Zoom
Out BTN [Shift]+[c] or [↓] Menu>Options
>select Contrast
One finger Tap on
right end of the screen
and flick to down
Freeze On / Off x Play/Pause BTN [Space] x One finger Double-
tap
Focus Lock On / Off Increas Hold the Enter BTN [Ctrl] + [l] Menu>Options Menu>Options Only in Near

E-bot manual
e
contra
st BTN
+
Decrea
se
contra
st BTN
for
2 seconds
>select Focus lock >select Focus lock View mode
Marker
Set Marker x Menu>Options
>Marker
Menu>Options
>Marker>select Marker
Menu>Options
>Marker>select Marker
Menu>Options
>Marker>select Marker
Select
between the
Horizontal /
Vertical Line
marker and
the
Horizontal /
Vertical
Window
marker
Marker
Position x
(When Marker is set)
Menu>Options
>Marker>Set line
maker position
(When Marker is set)
Menu>Options
>Marker>Set line
maker position
(When Marker is set)
Menu>Options
>Marker>Set line
maker position
(When Marker is set)
Menu>Options
>Marker>Set line
maker position
*Set the
location of
Line marker
Marker
Size x
(When Marker is set)
Menu>Options
>Marker>Set window
(When Marker is set)
Menu>Options
>Marker>Set window
(When Marker is set)
Menu>Options
>Marker>Set window
(When Marker is set)
Menu>Options
>Marker>Set window
*Set the size
of Window

E-bot manual
marker size marker size marker size marker size marker
Menu
Open x Menu BTN [Ctrl] + [M] Right click
One finger Tap on the
left end of the screen
and flick to right
-
Moving
tap x
Left (BTN), Right
(BTN)
(In the top-level menu
item)
(In the top-level menu
item)
[←], [→]
Left click
on the wanted item
One finger Tap
on the tap
*Move
between
Main
Category of
menu item.
*Two kinds
of tabs:
'Options',
'OCR'
Move an
item x Up (BTN), Down
(BTN) [↑], [↓] Left click
on the wanted item
One finger Tap
on the wanted item
Move
between the
items at the
same level
Select /
Set / Enter
the sub-
item
x Enter BTN [Enter] Left click
on the wanted item
One finger Tap
on the wanted item -
Cancel /
Exit x Menu BTN [Back space] or ESC Left click
on the ‘Exit’ item
One finger Tap
on the ‘Exit’ -

E-bot manual
Close x
Menu BTN
(In the top-level menu
item)
(In the top-level menu
item)
[Back space] or [ESC]
Left click on the ‘Exit’
item
(In the top-level menu
item)
One finger Tap on the
right end of the
screen and flick to left
-
OCR
OCR
Execution x OCR BTN [o] Wheel click
One finger Tap on the
bottom for more than
2 seconds
Execution /
Play the OCR
program
OCR Play/
Pause x Play/Pause BTN [Space] x One finger Double-
tap -
Move
Sentence x Left BTN/Right BTN [←], [→] x One finger flick to
left or to right -
Move
paragraph x Up BTN/Down BTN [↑], [↓] x One-finger flick up
or down -
OCR
Correction x
Menu>OCR>OCR
correction>Correct
Angle or Perspective
Menu>OCR>select
OCR correction
Menu>OCR>select
OCR correction
Menu>OCR>select
OCR correction
Angle
correction
and
Perspective
correction
OCR Exit x OCR BTN or Menu
BTN [ESC] x
One finger Tap on the
bottom for more than
2 seconds
Exit the OCR
/ Switch to
the Real
View mode
OCR View x Menu>OCR> Menu>OCR>select
OCR View
Menu>OCR>select
OCR View
Menu>OCR>select
OCR View
Choosing
among
Image, Full

E-bot manual
text, Line and
Word
OCR
Language
Setting
x Menu>OCR>OCR
language
Menu>OCR>select
OCR language setting
Menu>OCR>select
OCR language setting
Menu>OCR>select
OCR language setting
Up to 3
languages
can be
recognized
at the same
time
Voice
guide
Voice
Guide
On/Off
x Menu>Options
>Voice guide On/Off
Menu>Options
>select Voice guide
On/Off
Menu>Options
>select Voice guide
On/Off
Menu>Options
>select Voice guide
On/Off
Set to
ON/Off the
Voice guide
TTS Voice x Menu>OCR>Voice
settings>TTS voice
Menu>OCR>TTS
setting>TTS
voice>select
Male/Female
Menu>OCR>TTS
setting>TTS
voice>select
Male/Female
Menu>OCR>TTS
setting>TTS
voice>select
Male/Female
Select type
of TTS
playback
voice
TTS Speed x Menu>OCR>Voice
settings>TTS speed
Menu>OCR>TTS
setting>TTS
speed>select TTS
speed
or ] , [
Menu>OCR>TTS
setting>TTS
speed>select TTS
speed
Menu>OCR>TTS
setting>TTS
speed>select TTS
speed
TTS playback
voice speed
adjustment
TTS pitch x Menu>OCR>Voice
settings>TTS pitch
Voice
Volume
Down/Up
Rotate
wheel
to the
Menu>OCR>Voice
settings>TTS volume
Menu>OCR>TTS
setting>TTS
volume>select TTS
Menu>OCR>TTS
setting>TTS
volume>select TTS
Menu>OCR>TTS
setting>TTS volume

E-bot manual
left/rig
ht on
the
right
side of
main
body
volume volume
Menu Language
Setting x Menu>Options>
Language
Menu>Options>
Language>select
language
Menu>Options>
Language>select
language
Menu>Options>
Language>select
language
Menu
Settings and
Guide
Speech
Language
Settings
Wi-Fi Password
Change x
Menu>Options>
Wi-Fi Password
Change
Menu>Options>
Wi-Fi Password
Change
Menu>Options>
Wi-Fi Password
Change
Menu>Options>
Wi-Fi Password
Change
Wi-Fi default
password is
'00000000'
Initialize x Menu>Options>Initiali
ze
Menu>Options>Initiali
ze
Menu>Options>Initiali
ze
Menu>Options>Initiali
ze
*Option
Reset
*OCR Reset
*All settings
Reset
(Wi-Fi
password will
not be reset)
Information x Menu>Options Menu>Options Menu>Options Menu>Options *Software

E-bot manual
>Information >Information >Information >Information Version
*Serial
number
*Battery
status
*Wi-Fi AP
FCC Information to User
This equipment has been tested and found to comply with the limits for a Class B digital device,
pursuant to Part 15 of the FCC Rules. These limits are designed to provide reasonable
protection against harmful interference in a residential installation. This equipment generates,
uses and can radiate radio frequency energy and, if not installed and used in accordance with
the instructions, may cause harmful interference to radio communications. However, there is no
guarantee that interference will not occur in a particular installation. If this equipment does
cause harmful interference to radio or television reception, which can be determined by turning
the equipment off and on, the user is encouraged to try to correct the interference by one of the
following measures:
• Reorient or relocate the receiving antenna.
• Increase the separation between the equipment and receiver.
• Connect the equipment into an outlet on a circuit different from that to which the receiver is
con-nected.
• Consult the dealer or an experienced radio/TV technician for help.
Caution
Modifications not expressly approved by the party responsible for compliance could void the
user’s authority to operate the equipment.
FCC Compliance Information : This device complies with Part 15 of the FCC Rules.
Operation is subject to the following two conditions: (1) This device may not cause harmful
interference, and (2) this device must accept any interference received, including interference
that may cause undesired operation
IMPORTANT NOTE:
FCC RF Radiation Exposure Statement:
This equipment complies with FCC RF radiation exposure limits set forth for an uncontrolled
environment.
The antennas used for this transmitter must be installed to provide a separation distance of at
least 25 cm from all persons and must not be co-located or operating in conjunction with any
other antenna or transmitter.
1) Read these instructions.
2) Keep these instructions.
3) Heed all warnings.
4) Follow all instructions.
5) Do not use this equipment near water.
6) Do not using near any heat sources such as radiators, heat resisters, stove, or other
equipment that produce heat.
European CE notice to users and product statements
This product is CE marked according to the provisions of the R&TTE
Directive(99/5/EC). Hereby, HIMS International Corporation declares that
this product is in compliance with the essential requirements and other
relevant provisions of Directive 1999/5/EC.
For further information, please contact http:// www.himsintl.com
HIMS International Corporation
174, Gajeong-ro, Yuseong-gu, Daejeon, KOREA 305-350
Tel: +82-42-864-4460
Fax: +82-42-864-4462
URL: www.himsintl.com
CONTACT INFORMATION
Manufacturer Address : 174, Gajeong-ro, Yuseong-gu, Daejeon, KOREA 305-350
To locate in-country HIMS International Corporation, distributors of the Electronic Magnifier (E-bot ADV)
please refer to the HIMS International Corporation Website http:// www. www.himsintl.com
These distributor(s) represent local contacts for this product.
CORPORATE HEADQUARTERS:
HIMS International Corporation
174, Gajeong-ro, Yuseong-gu, Daejeon, KOREA 305-350
Tel: +82-42-864-4460
Fax: +82-42-864-4462
Web: http:// www.himsintl.com
This device complies with Industry Canada license-exempt RSS standard(s).
Operation is Subject to the following two condition: (1) this device may not cause interference
,and (2) this device must accept any interference, including interference that may cause undesired
operation of the device.

EUROPEAN UNION “DECLARATION OF CONFORMITY”
DECLARATION OF CONFORMITY
HIMS International Corporation
174, Gajeong-ro, Yuseong-gu, Daejeon, KOREA 305-350
declare under our sole responsibility that the product(s)
Electronic Magnifier (E-bot ADV)– EB100A
to which this declaration relate(s) is in conformance with the following standards:
EN 301 489-1 V1.9.2:2011
EN 301 489-17 V2.2.1 :2012
EN 55022:2010
EN 55024:2010
EN 60950-1:2006/A2:2013
EN 300 328 V1.7.1:2006
following the provisions of the 1999/5/EC Directives.