HIMS EB100PC Remote Controller (E-bot PRO Controller) User Manual
HIMS International Corporation Remote Controller (E-bot PRO Controller) Users Manual
HIMS >
Users Manual

2
Safety Precautions
For your safety and protection of the E-bot, please read and abide
by the following important safety precautions.
1) Do not plug the AC adapter into a faulty electrical outlet. This is to
prevent electrical shock or fire.
2) Do not touch the AC adapter with wet hands.
3) Use only the AC adapter provided with the E-bot. Using another AC
adapter may damage the device. Be advised that damage caused
by misuse is not covered by the warranty.
4) Please do not remove the power cable when the E-bot is turned on
as this can damage the product.
5) Do not use the E-bot in a moisture-rich environment such as a
bathroom, shower or a wet kitchen counter as moisture may get
inside the unit and damage the components.
6) Do not use E-bot in extreme high or low temperatures. We
recommend that you do not use this device in environments below
0°C or above 40°C, as the image may display inaccurately.
7) Always turn off the power before moving the product to another
location.
8) When you press the release switch to fold the E-bot, please grip the
arm and manually fold the unit. Allowing the arm to simply drop may
cause impact damage to the unit.
9) Do not use the DC OUT at the back of the device as a power supply
for devices other than authorized visual displays for E-bot as this
can damage the product and/or the connected device.
3
Marked Symbol Description
Caution: is used to note information for safe and proper use of
the product.
Note
: is used to introduce reference and usage Tips.

4
Table of Contents
Safety Precautions ...................................................................................................................................................................... 2
Marked Symbol Description ..................................................................................................................................................... 3
Package Contents ....................................................................................................................................................................... 6
E-bot PRO Orientation ............................................................................................................................................................... 7
1) Product .......................................................................................................................................................................... 7
2) Back side of product ................................................................................................................................................ 8
3) Side of product .......................................................................................................................................................... 8
4) Front of product ......................................................................................................................................................... 9
5) Wireless controller ................................................................오류! 책갈피가 정의되어 있지 않습니다.
6) Back side of Wireless controller ...................................................................................................................... 10
Getting Started ........................................................................................................................................................................... 11
1) Set up the E-bot .....................................................................오류! 책갈피가 정의되어 있지 않습니다.
2) Inserting the battery .............................................................................................................................................. 15
3) Charging .................................................................................................................................................................... 16
4) How to replace a wireless remote control battery ...오류! 책갈피가 정의되어 있지 않습니다.
5) Wireless controller Power On / Off ................................오류! 책갈피가 정의되어 있지 않습니다.
6) Power On/Off .......................................................................................................................................................... 18
7) Installing the PC Viewer Program(Will be added later) ......................................................................... 20
8) Connecting to displays ........................................................................................................................................ 20
Basic Functions of E-bot ........................................................................................................................................................ 24
1) Changing Camera Modes .................................................................................................................................. 25
2) Magnification ........................................................................................................................................................... 26
3) Changing the Color Mode .................................................................................................................................. 27
4) Contrast ..................................................................................................................................................................... 28
5) LED light On/Off ..................................................................................................................................................... 29
6) Finding your current Reading Position ......................................................................................................... 30
7) Focus lock ................................................................................................................................................................ 31
8) Freeze ........................................................................................................................................................................ 32
Advanced features .................................................................................................................................................................... 33
1) Using the menu ...................................................................................................................................................... 33
2) Auto Scroll ................................................................................................................................................................ 34
3) Color mode settings ............................................................................................................................................. 35
4) Marker ........................................................................................................................................................................ 37
5) OCR ............................................................................................................................................................................ 39
6) Save ............................................................................................................................................................................ 42
Preferences .................................................................................................오류! 책갈피가 정의되어 있지 않습니다.

5
1) Voice Guide ............................................................................................................................................................. 44
2) E-bot operating Language ................................................................................................................................. 45
3) Camera position preference ............................................................................................................................. 46
4) Initialization .............................................................................................................................................................. 46
5) Information ............................................................................................................................................................... 47
6) Wi-Fi password change ...................................................................................................................................... 47
7) Keyboard Hot keys ............................................................................................................................................... 48
Tablet Viewer Gestures .......................................................................................................................................................... 49
Quick Guide to PC operations ............................................................................................................................................. 53
Troubleshooting ......................................................................................................................................................................... 55
1) When the wireless controller does not work .............................................................................................. 55
2) Even though the values are the same channel, wireless remote control does not operate
normally ............................................................................................................................................................................... 56
3) The product does not turn on when you press the power button ..................................................... 56
A/S ................................................................................................................................................................................................. 56
An FCC warning ........................................................................................................................................................................ 58

6
Package Contents
1) E-bot
2) 1 E-bot Battery
3) Wireless controller
4) Battery for Wireless controller
5) AC Adapter
6) Cables (USB 3.0, HDMI, HDMI to DVI gender)
7) Carrying Case
8) Headphones
9) SD Card 16GB
10) User Guide
11) PC installation program
7
E-bot PRO Orientation
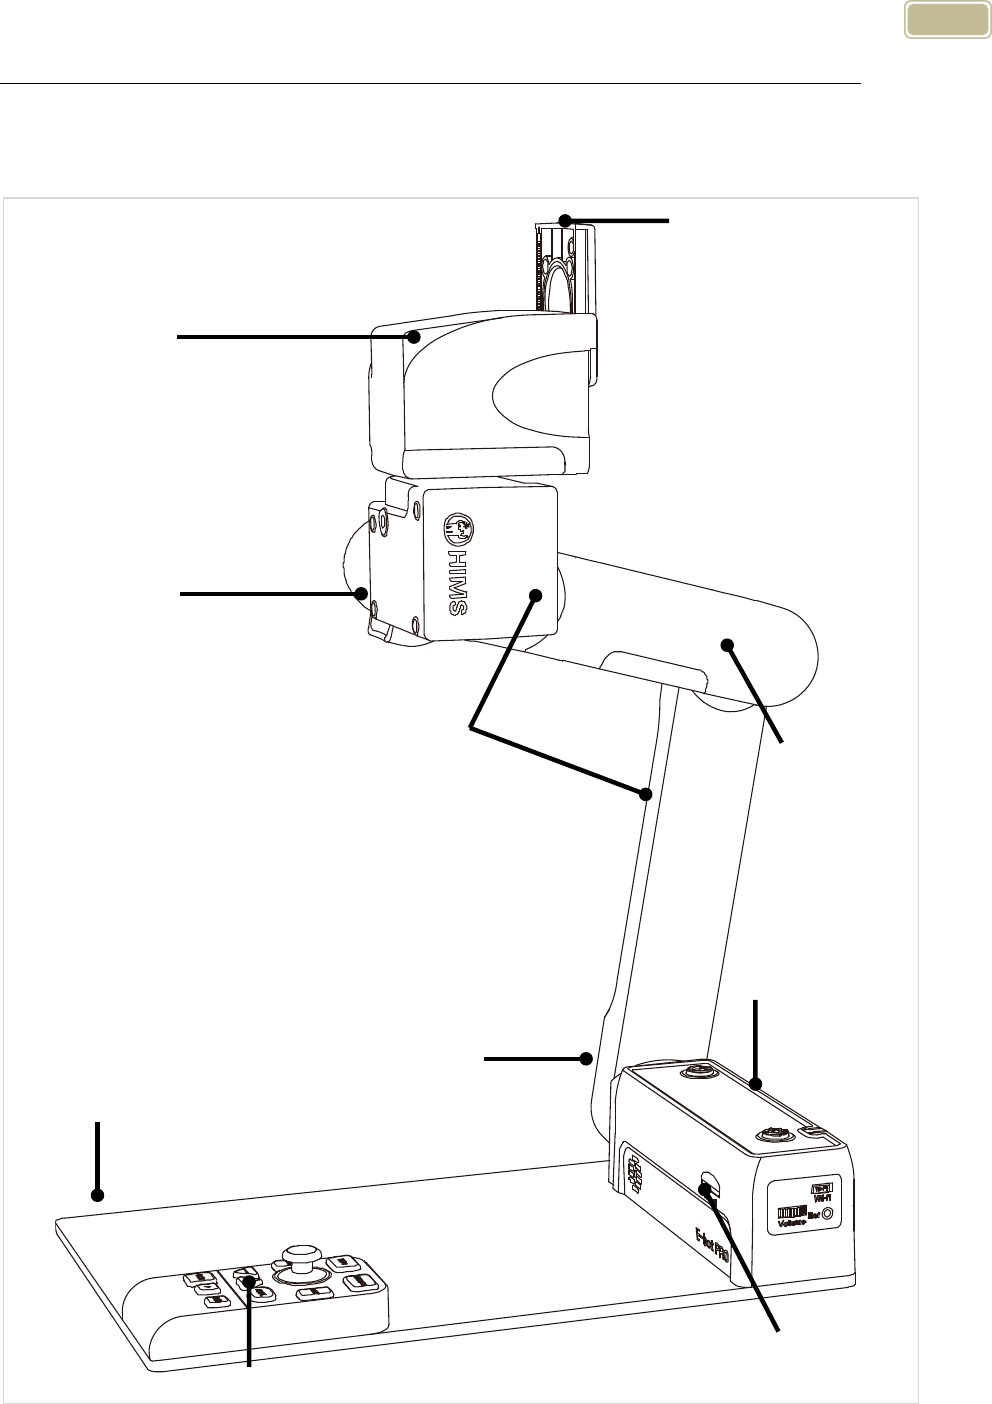
1) Product
Camera
Arm
Front
controller
Table
Camera
Arm Lock button
Near
Camera
Lens
Wireless controller SD Card
Camera
Arm’s
Joint
Camera
Arm’s
Handle
8
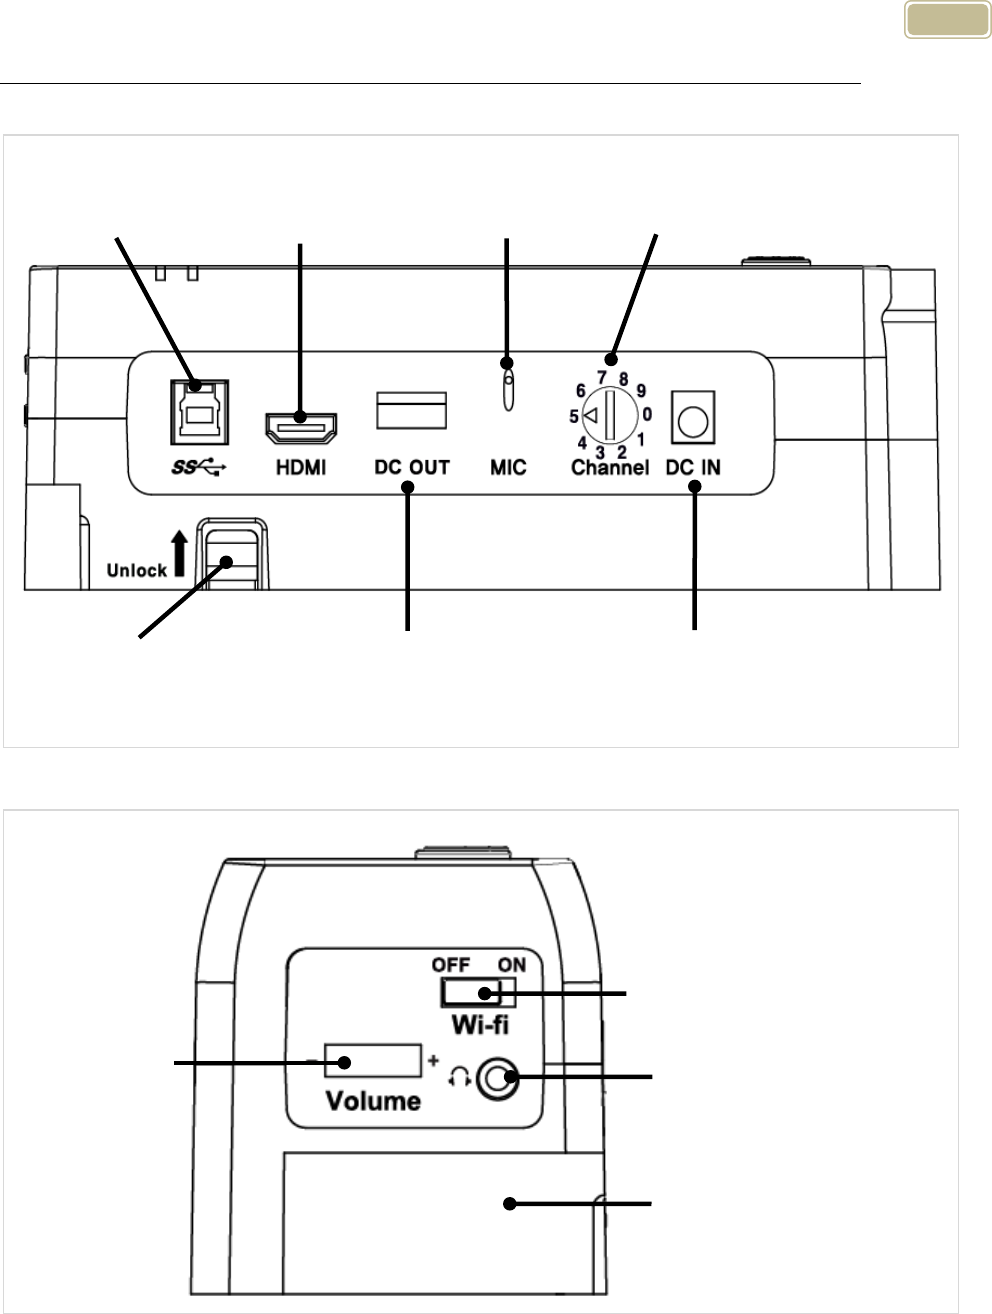
2) Back side of product
3) Side of product
Volume
Switch
Wi-Fi switch (Wireless)
Earphone Jack
Battery
USB 3.0 port
(PC connection)
ID switch
DC IN port
DC OUT port (USB
Monitor Connection
)
Battery
Release button
HDMI port
(Monitor Connection)
Mic
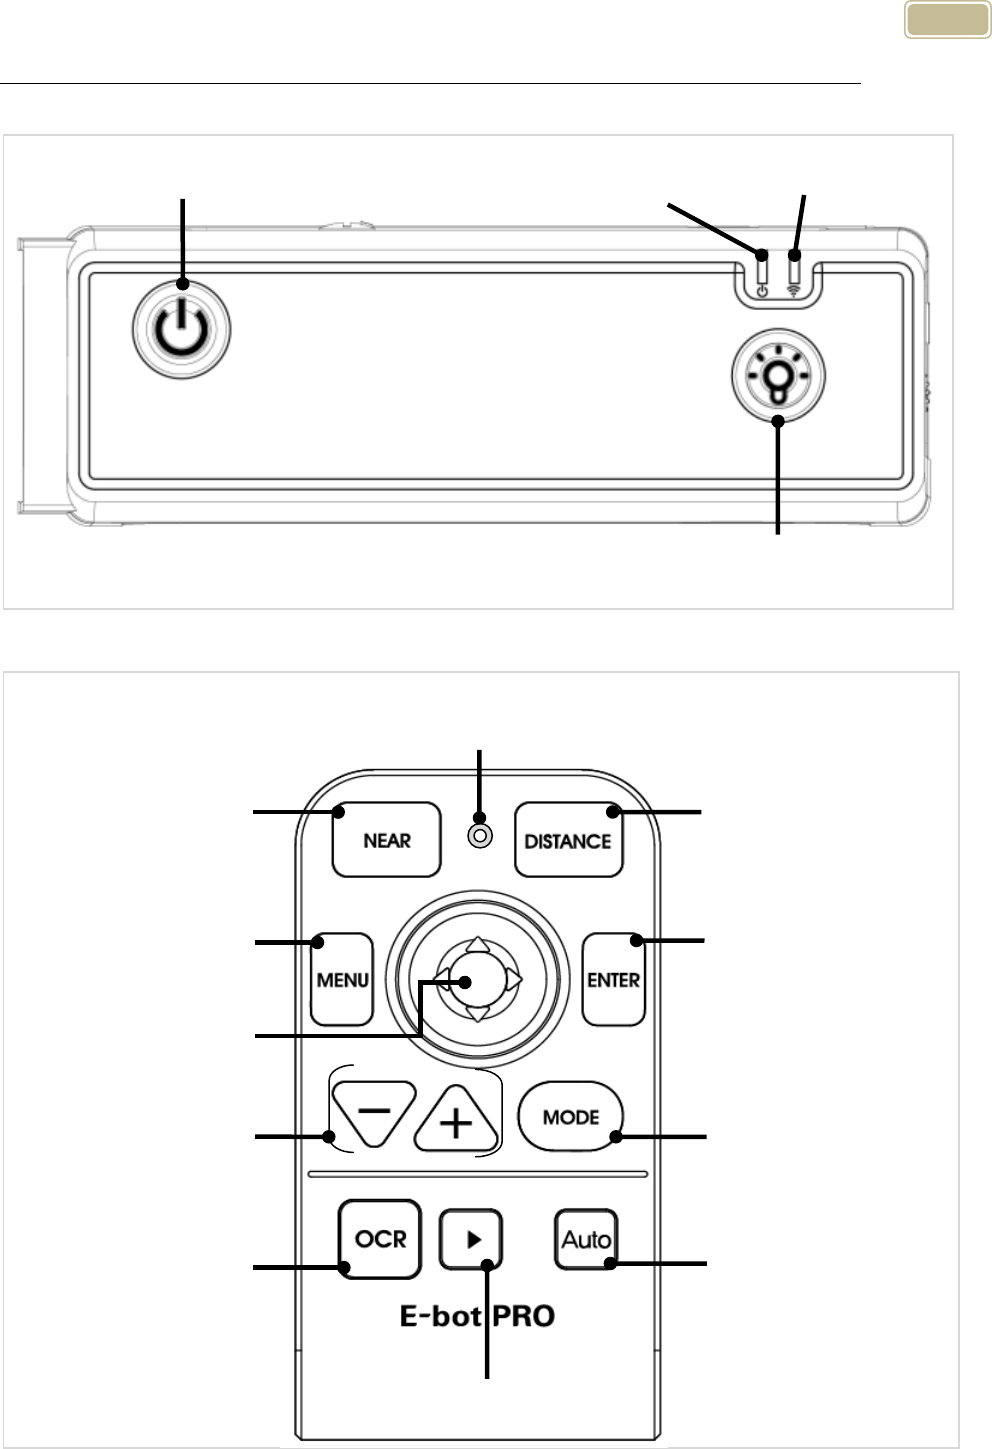
9
4) Front of product
5) Wireless controller
Near View Button
Menu Button
Zoom in / out
Button
OCR Button
Power LED
Enter Button
Distance View Button
Joystick (Navigation)
Color Change Button
Auto Scroll Button
Power Button
LED Light Button
Power LED
Wi-Fi LED
Play/Pause Button
10
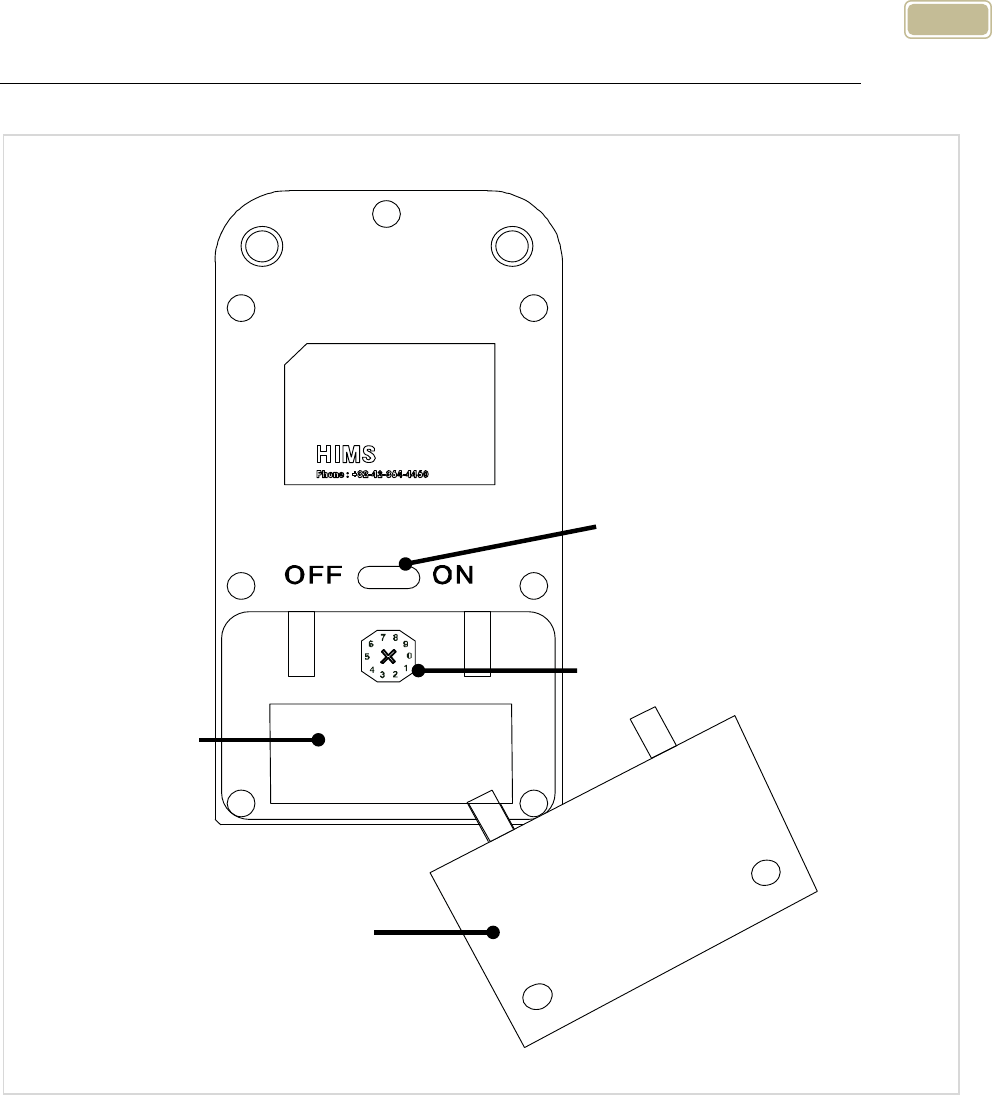
6) Back side of Wireless controller
ID Switch
Power Switch
Battery
Battery Cover
11
Getting Started
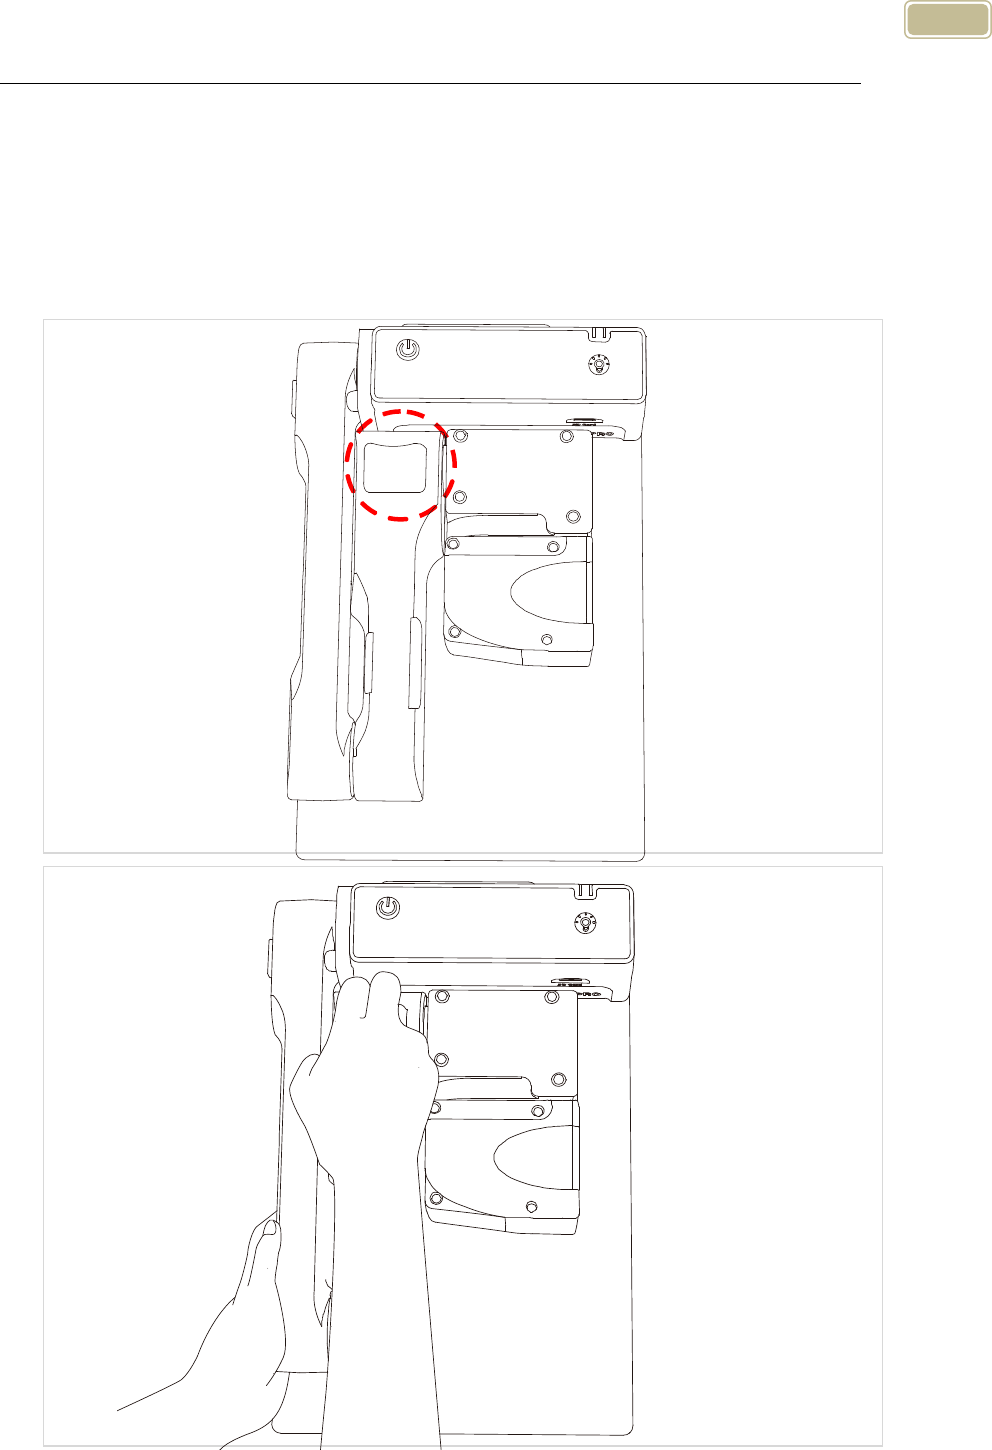
1) Unfolding the E-bot
Follow the instructions below to setup the E-bot.
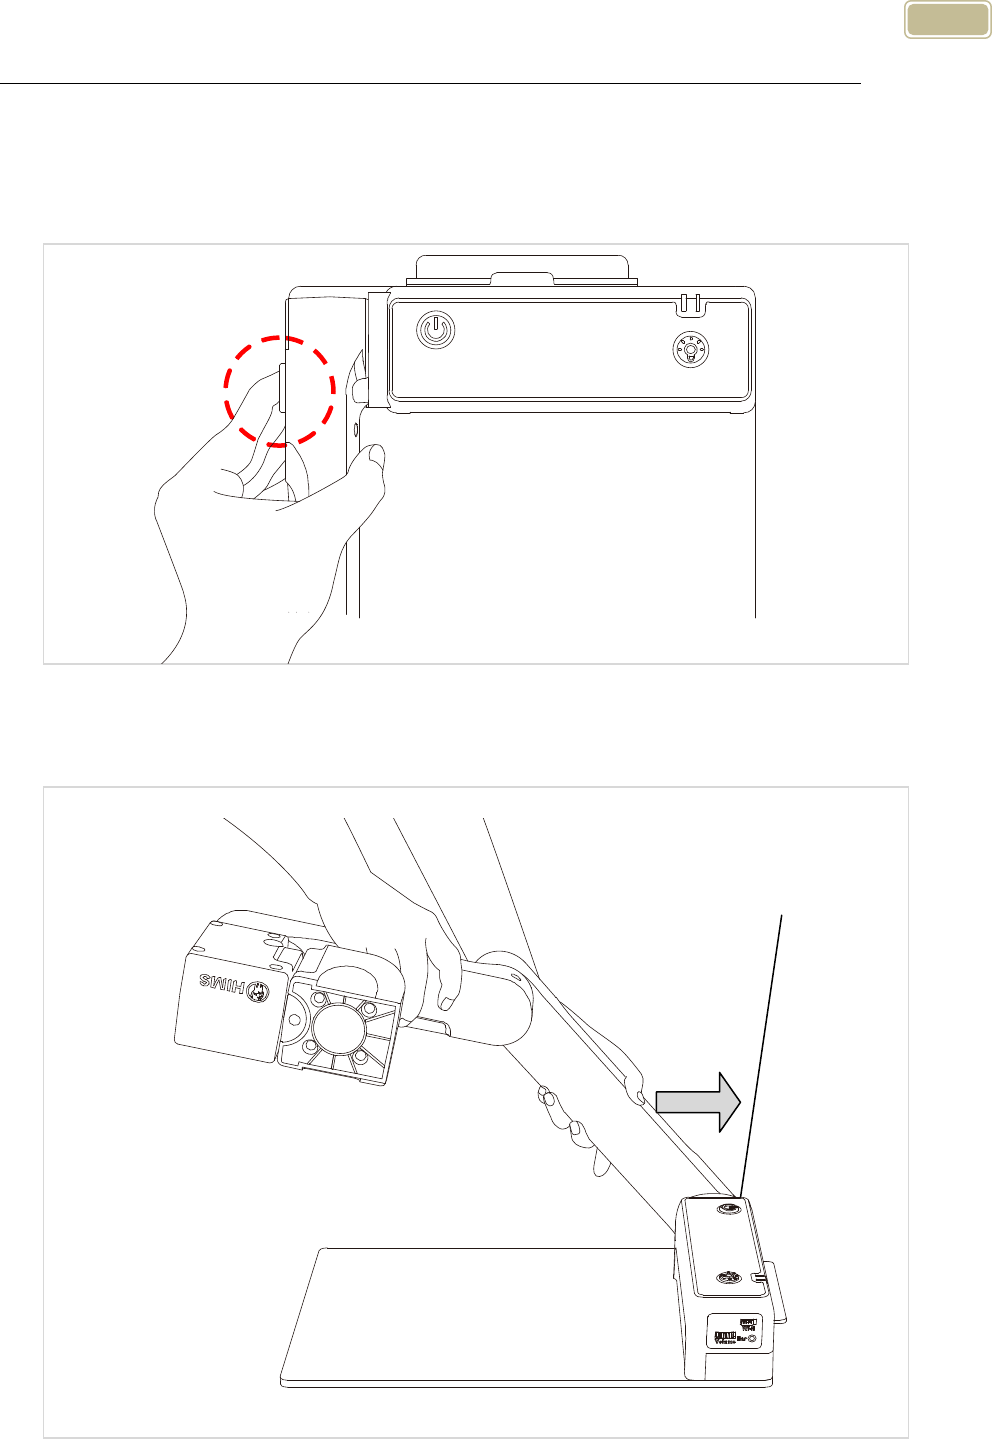
① Grip the camera handle and unfold it upward.
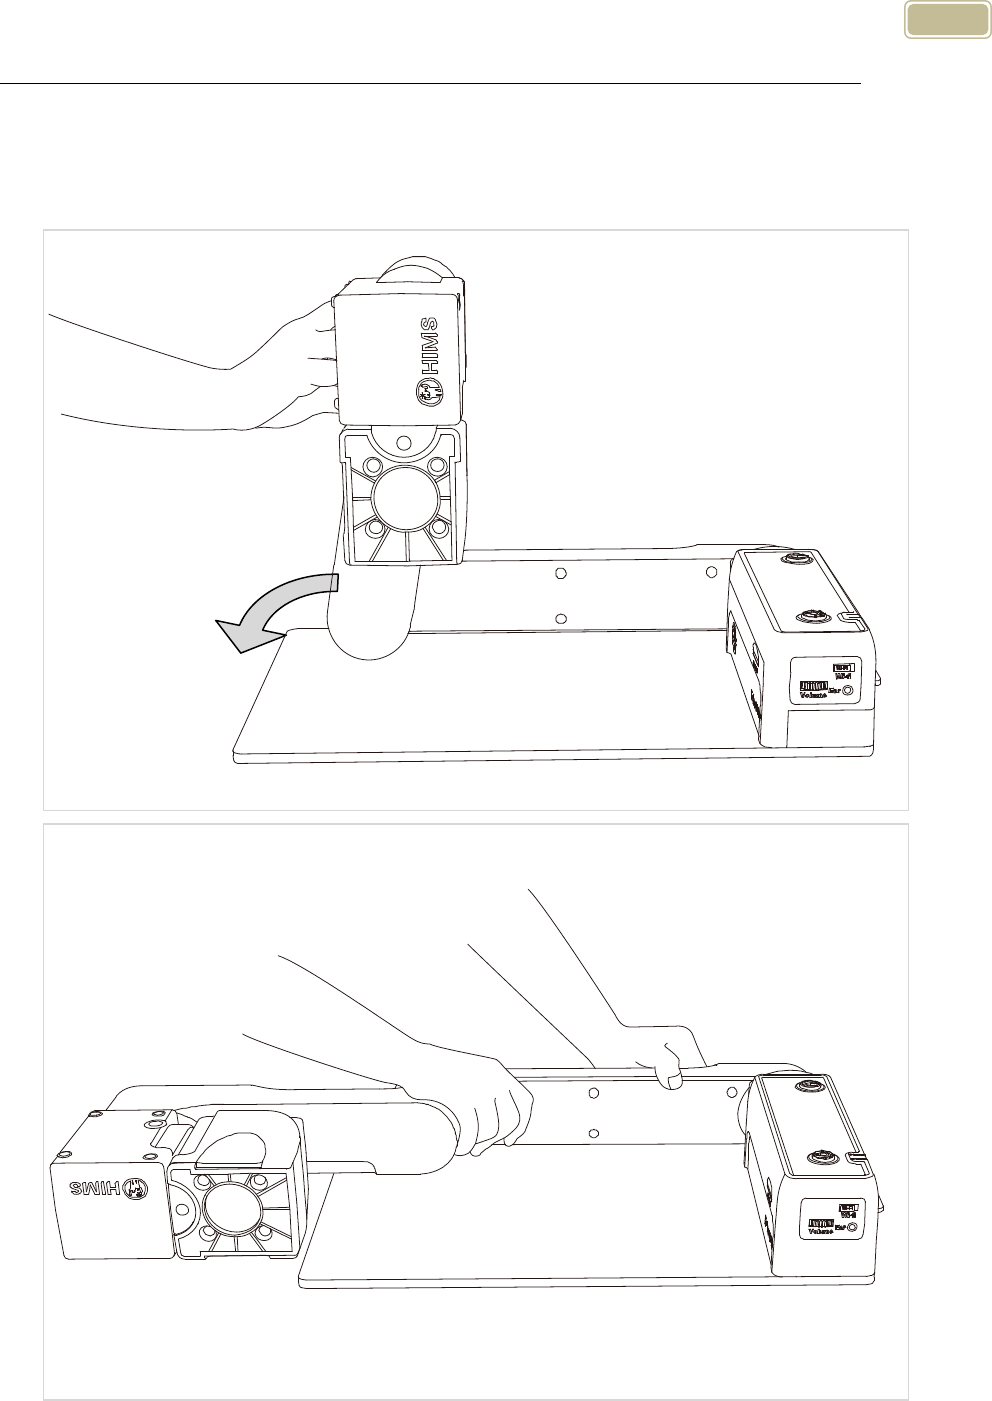
12
② Continue to unfold the camera until it lays flat on the desk or
table top.
13
③ Press and hold the Lock button on the left side of the E-bot.
While holding the lock button, unfold the longer arm upward
until it clicks in to place.
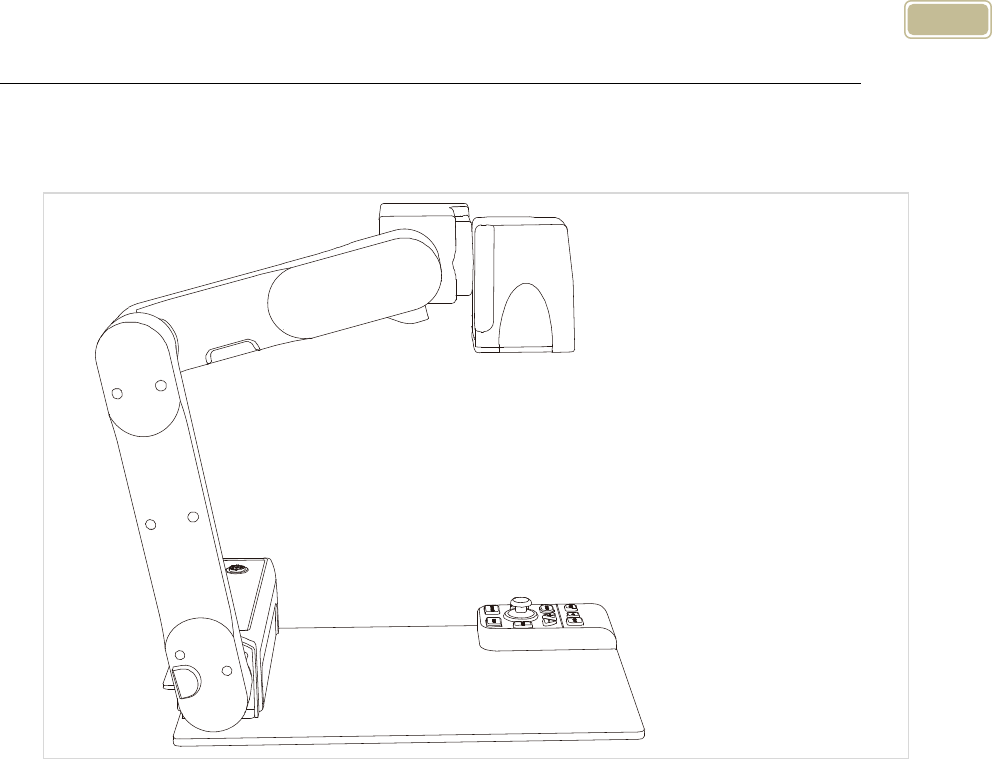
④ The camera arm should be at a 90 degree angle as shown in
the illustration.
14
⑤ The E-bot is ready for use.
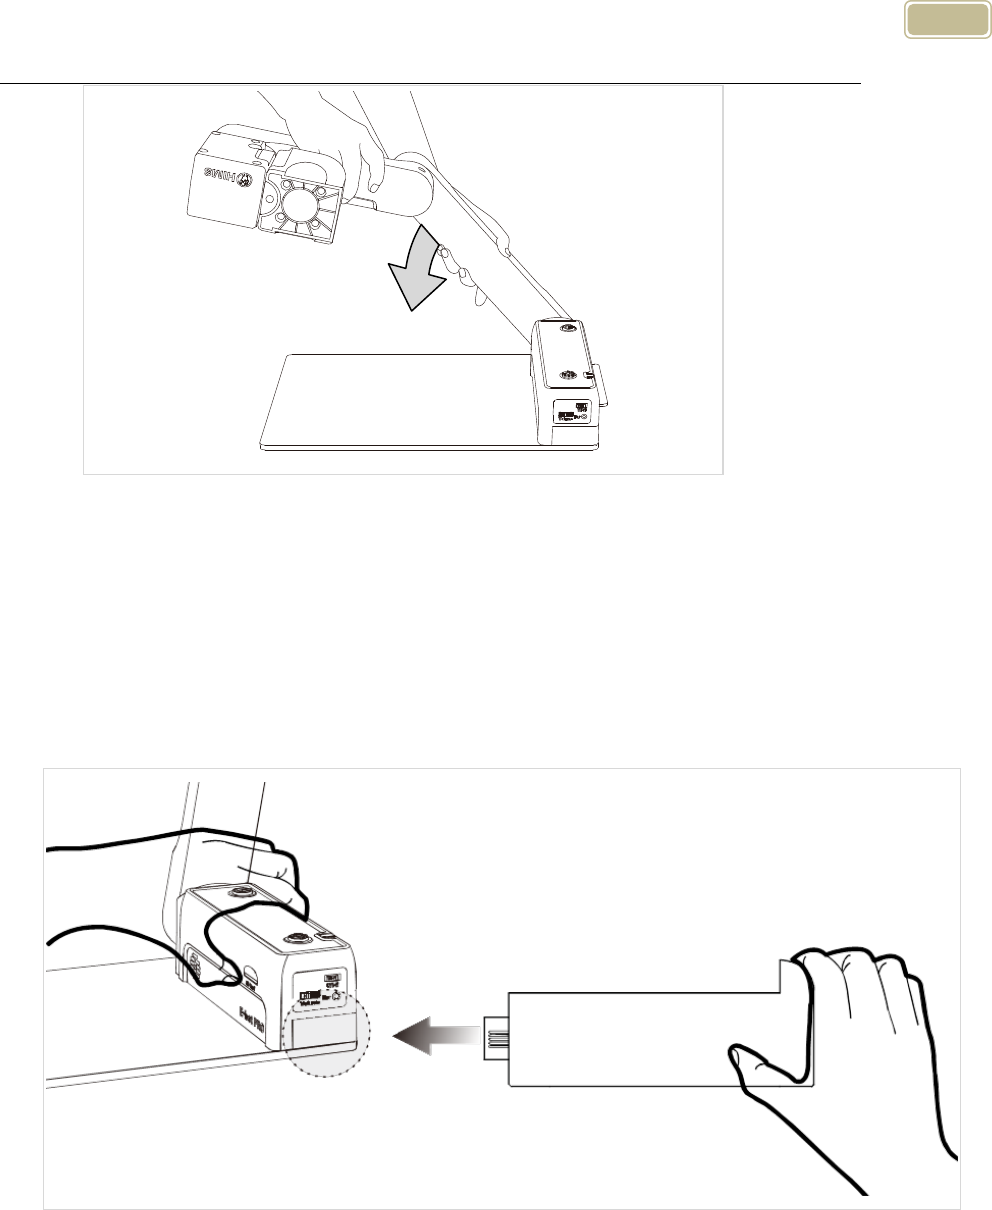
Folding
① Press the power button to turn off the power.
② Press the lock button, fold the longer arm down.
③ Grip the camera piece and fold it inside as well.
15
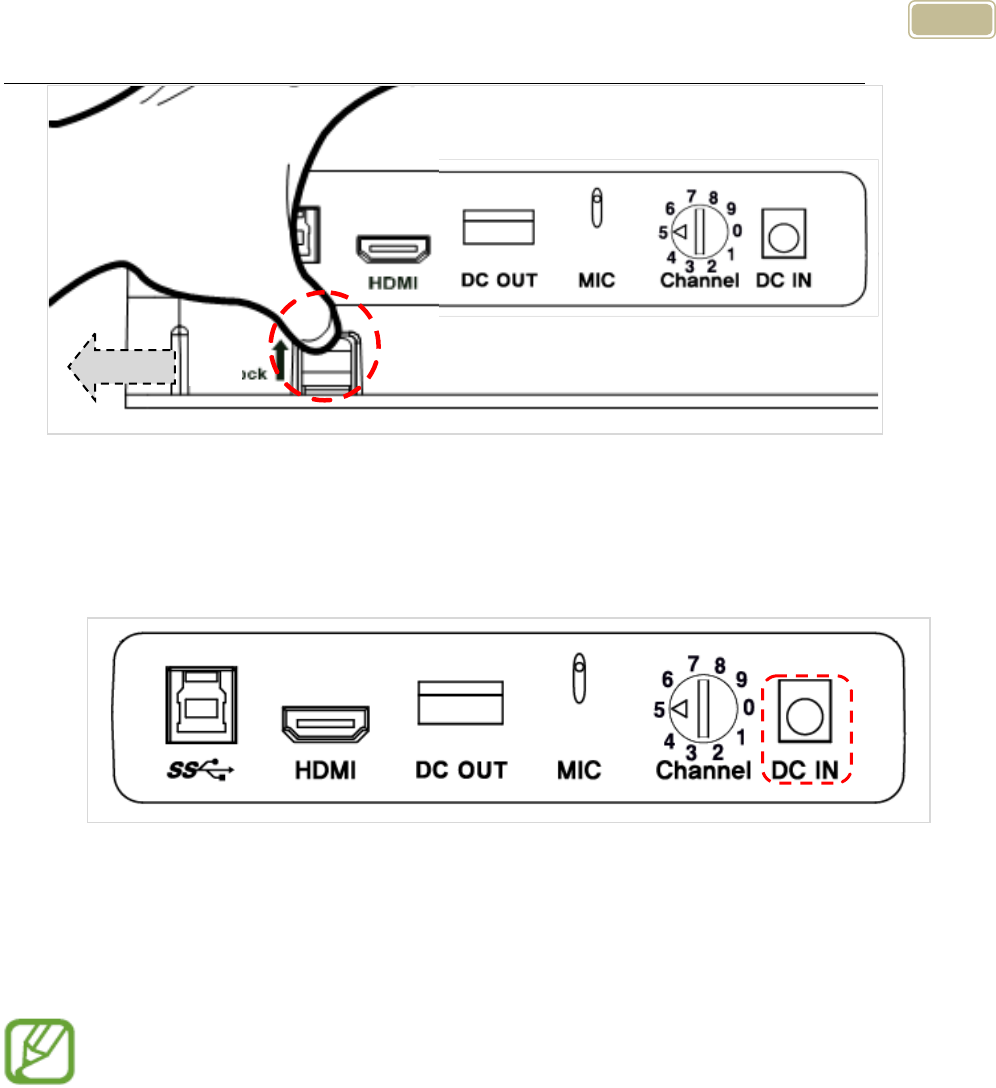
2) Inserting the battery
① Grip the product’s main body and insert the battery.
② When the battery is fully inserted, you will feel and hear it click
in to place.
Removing the battery
① Lift the battery release button on the back side of the unit.
② While lifting the battery release button, pull the battery out of
the compartment.
16
3) Charging
Charging via the AC Adapter
① The DC jack is located on the back of the E-bot.
② When E-bot is connected to the AC adapter, the battery is
being charged.
When you use the E-bot for the first time or after a long period of
disuse, please allow the unit to charge for more than 5 hours
Charging via USB
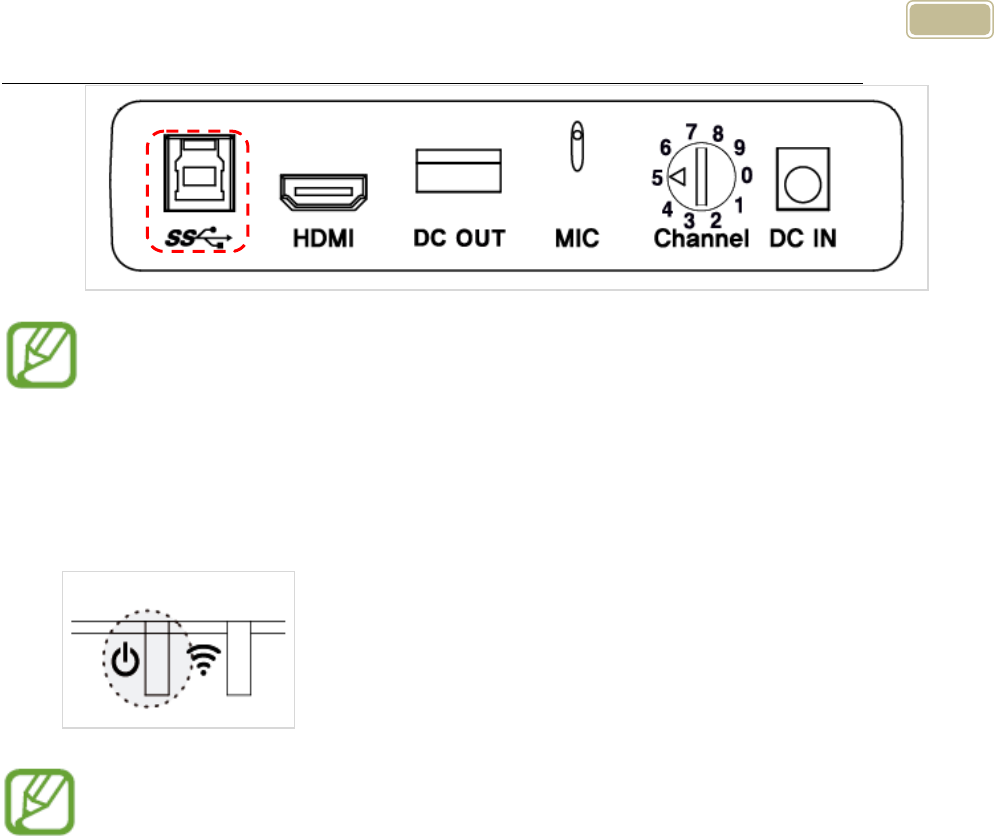
① Connect the larger end of the USB 3.0 cable to the USB port
on your PC.
② Connect the smaller, flatter end of the USB 3.0 cable to the
USB port on the back side of the unit.
②
①
17
If you connect the E-bot to a computer via USB while E-bot is
powered off, the E-bot’s battery is charged.
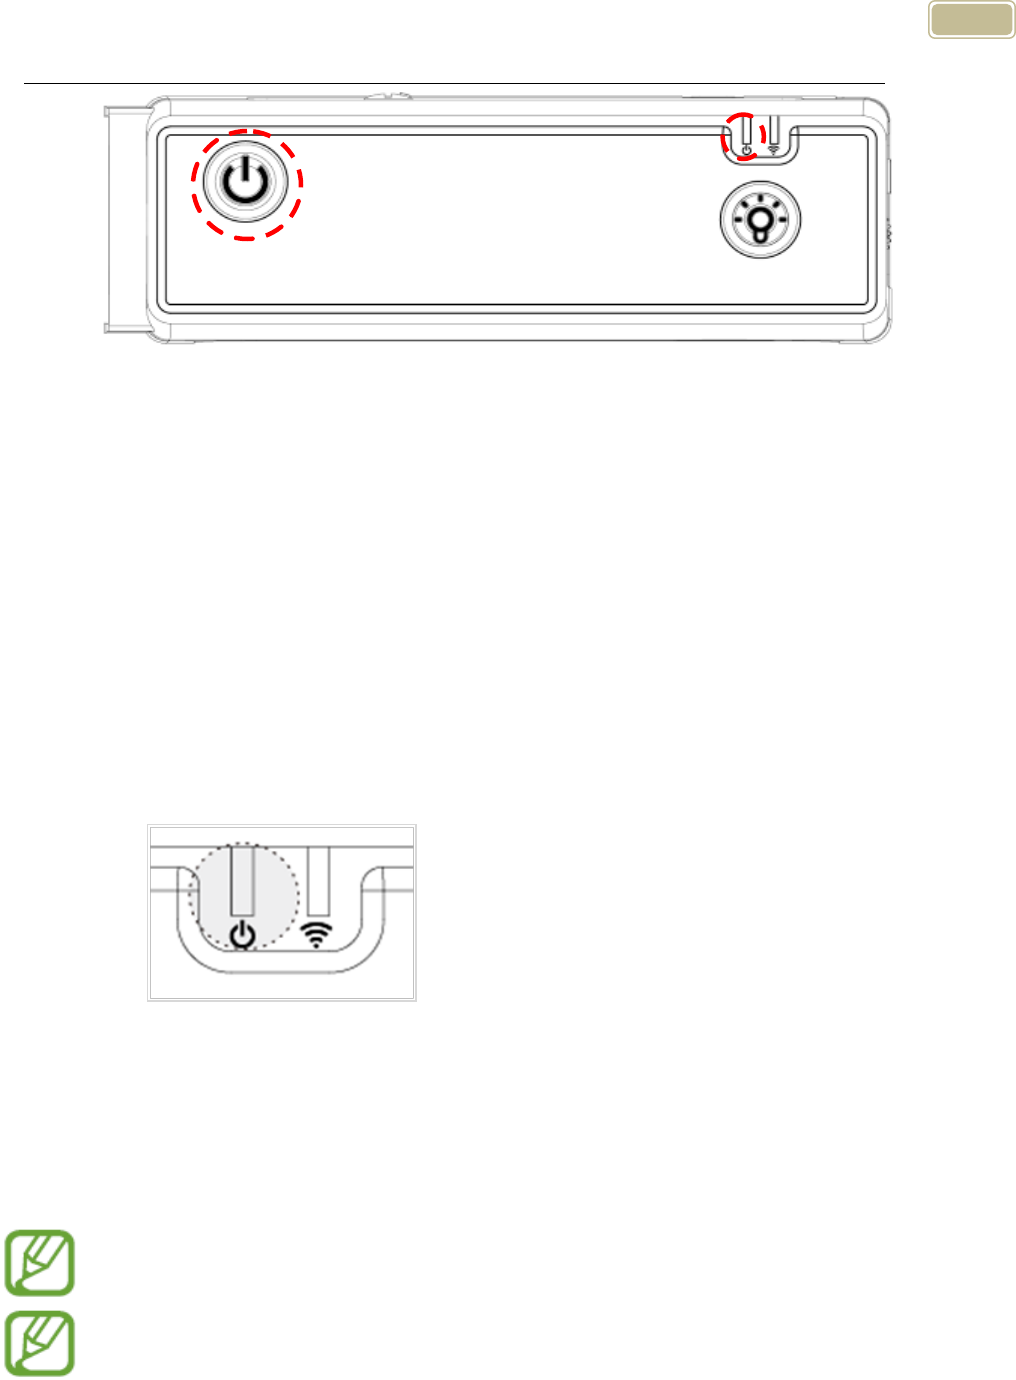
The power LED indicator
The power LED is located on the top right of the control panel of the
main body. The power LED indicates status as follows:
When the battery is being charged, the Power LED appears red.
When the battery is fully charged, the power LED color is changed
to green.
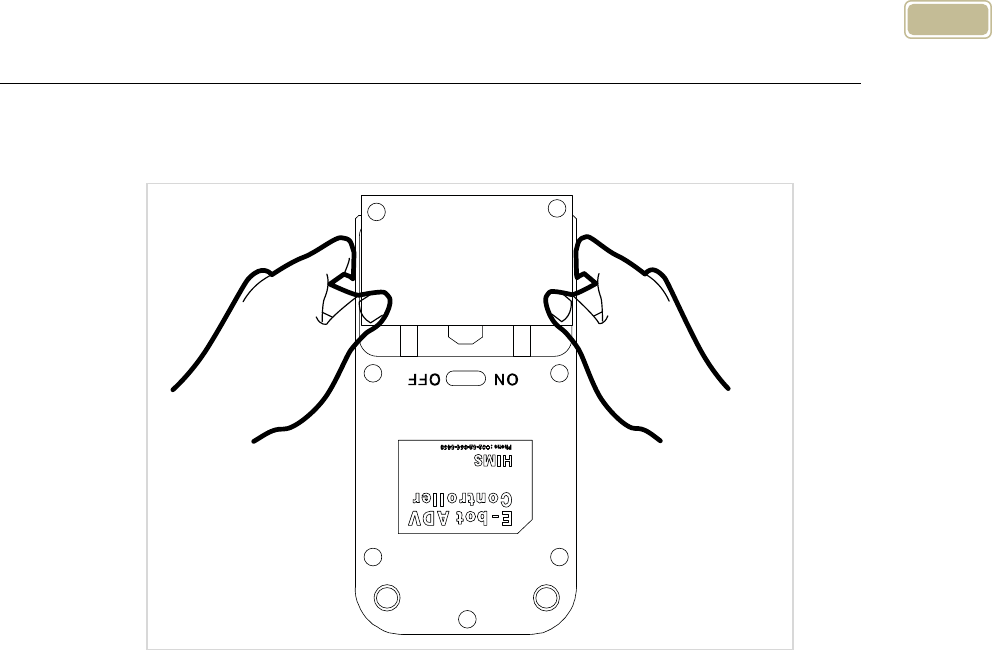
4) How to replace the battery on the wireless remote control
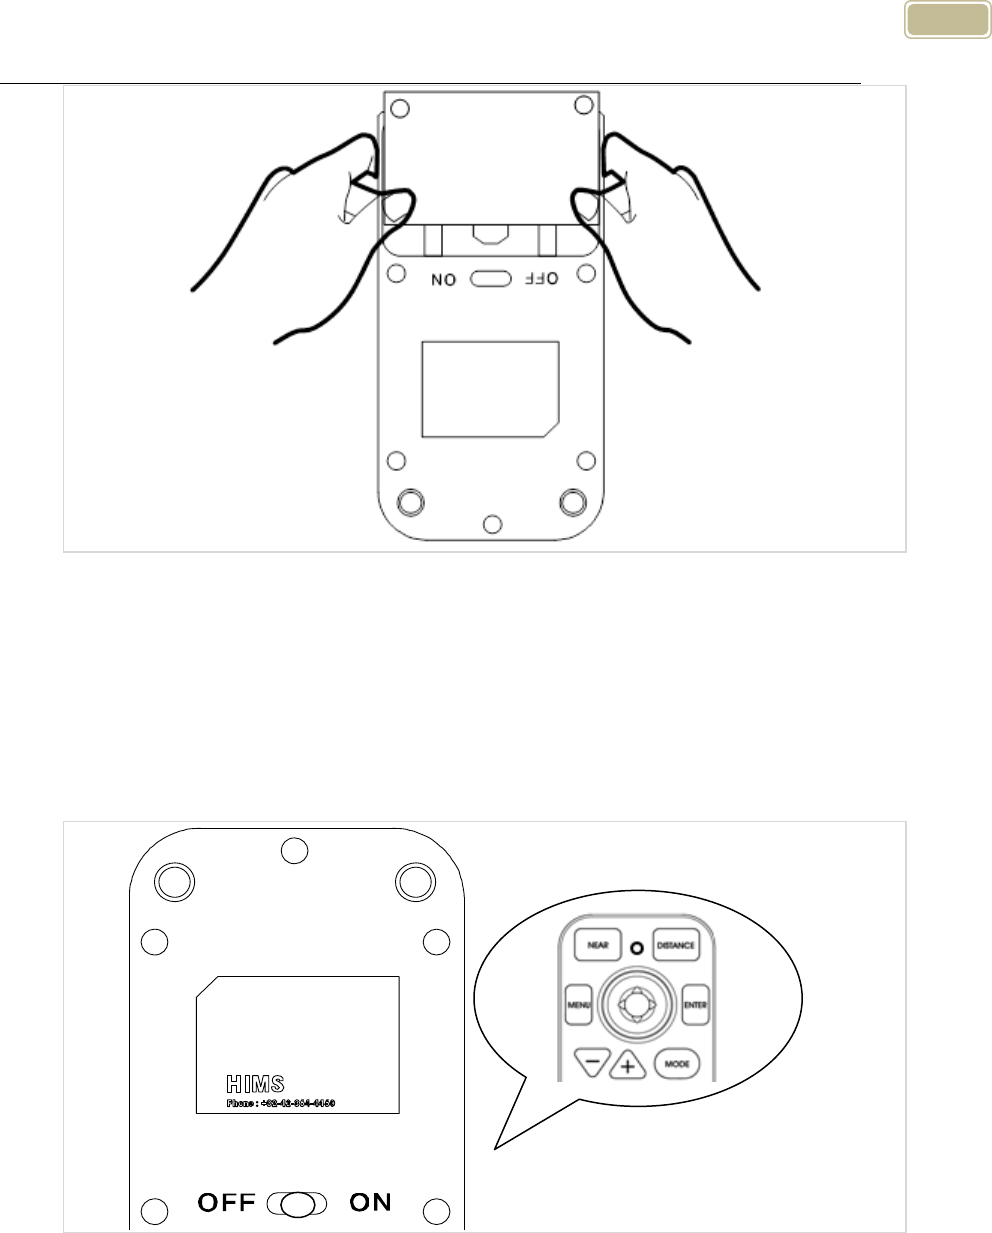
① Place your fingers in the grooves on the cover on the back of
the wireless remote control by using two hands and push down
and away to remove the battery cover from the unit.
② Open the battery cover, replace the battery.
18
5) Wireless Controller Power On / Off
① Push the power switch on the back of the wireless controller to
ON. To power it off, push the power switch to OFF.
② Once you press the button on the wireless controller, the
Power LED lights up.
6) Power On/Off
19
① Press and release the power button on the E-bot's main body
to power the unit on or off.
② The HIMS logo appears and the camera motor automatically
places the camera in the downward position for viewing a
document on the reading plate. The loading time takes 20 to
25 seconds.
③ When the power is turned on, the Power LED changes to
green. When the battery is being charged, the Power LED
appears red.
④ Press the power button briefly again to place the E-bot into
sleep mode.
⑤ When the power is turned on, press and hold the power button
for more than 2 seconds, the unit power is completely off.
⑥ Note: the advantage of Sleep mode is that loading time is shortened.
Also note: If the E-bot is in the folded position, it cannot be powered
on. If the E-bot is folded when it is turned on, the power shuts
completely off.
20
7) Installing the PC Viewer Program(Will be added later)
8) Connecting to displays
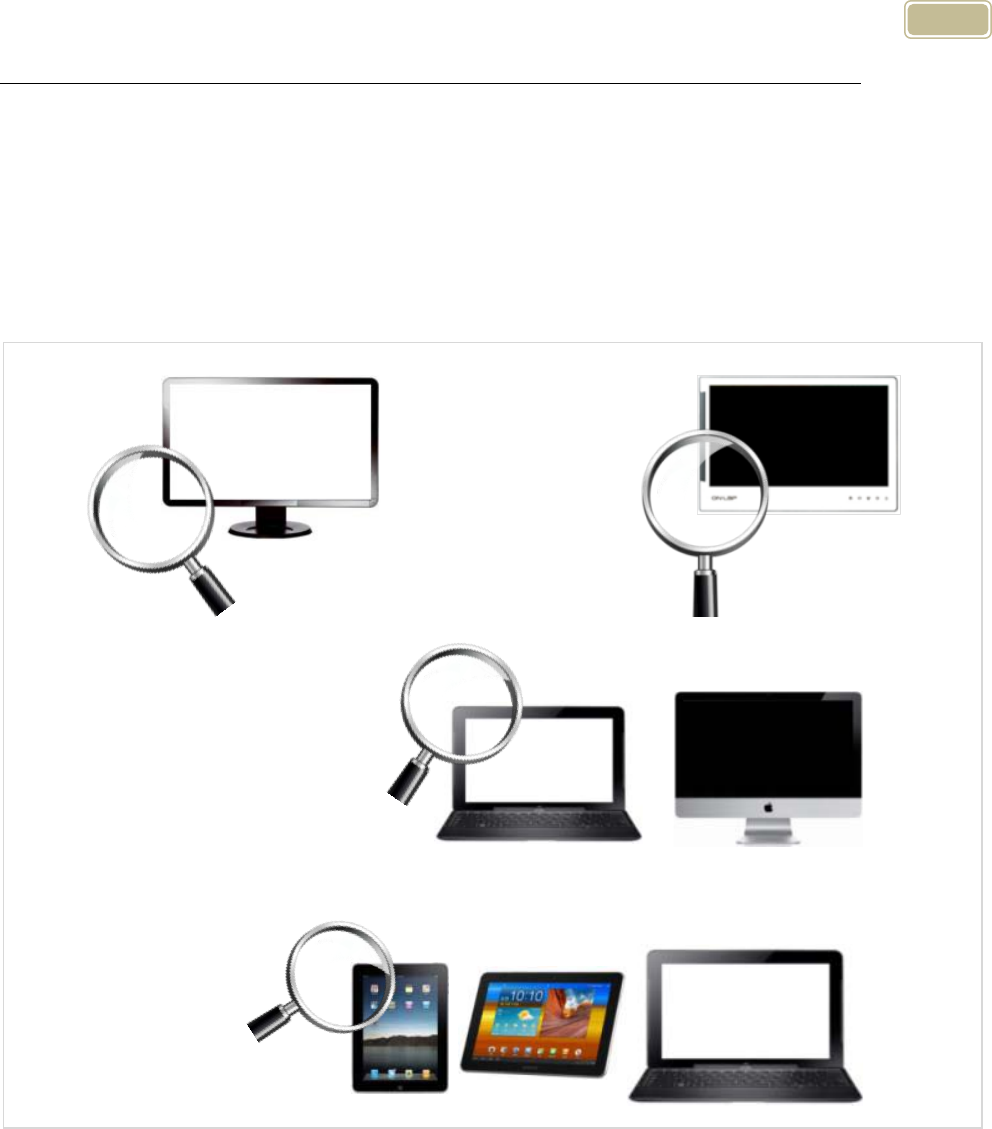
E-bot is compatible with various types of display devices, such as
desktop video monitors, laptop computers, and Apple or Android
tablets.
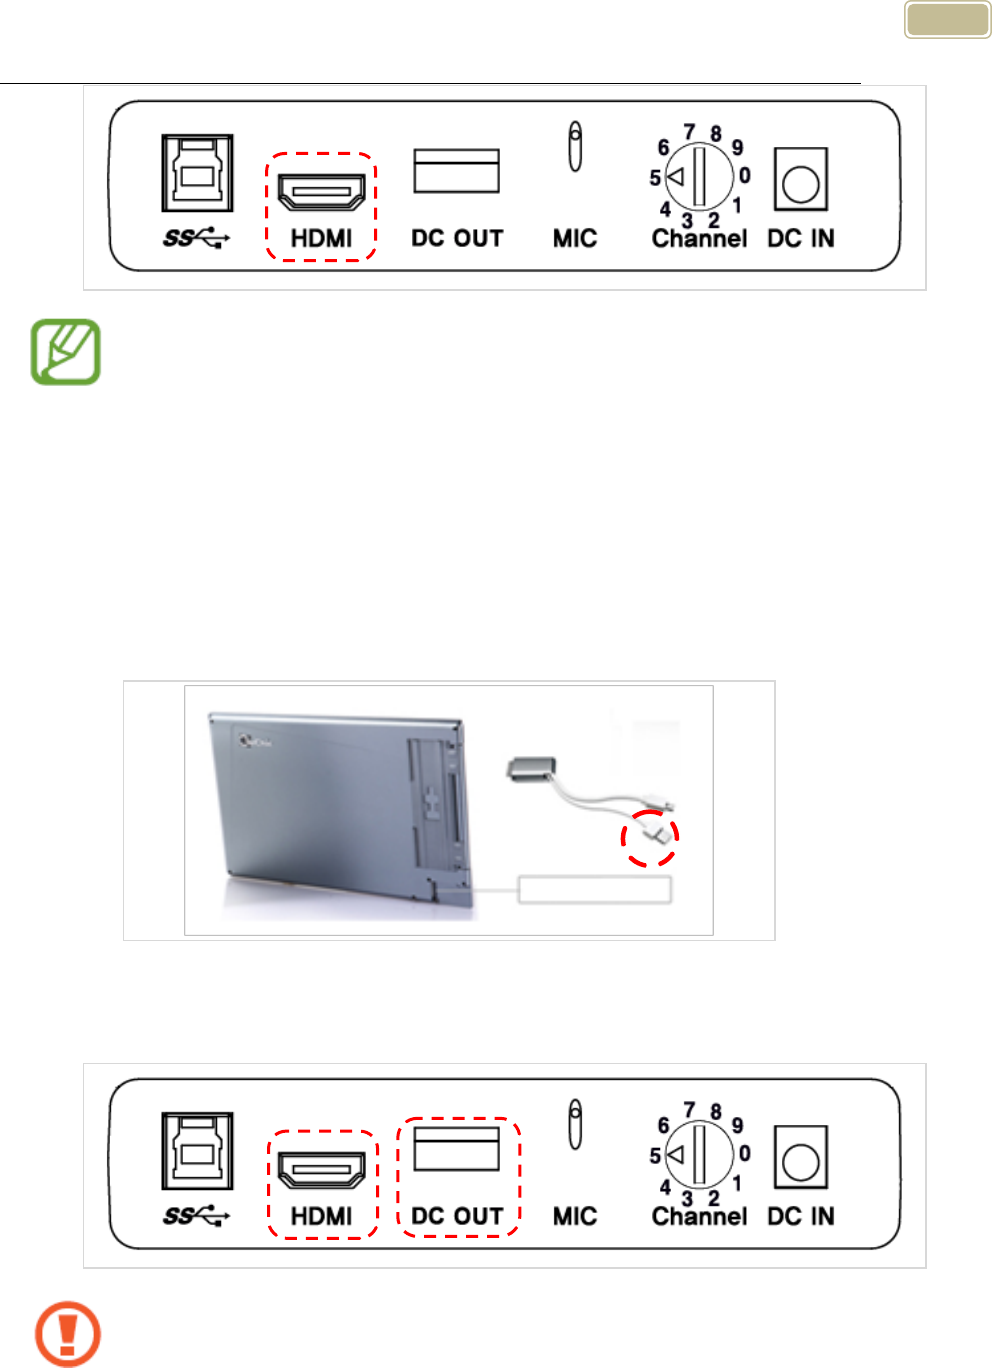
Connecting a monitor (HDMI)
① Connect the monitor's power cord to a power outlet.
② Connect the HDMI cable to the HDMI port on the monitor.
③ Connect the opposite end of the HDMI cable to the HDMI port
on the back side of the E-bot.
Monitor
USB Monitor
PC
Pad, Window PC
21
If the monitor has no HDMI port, please use the included HDMI
to DVI gender adapter.
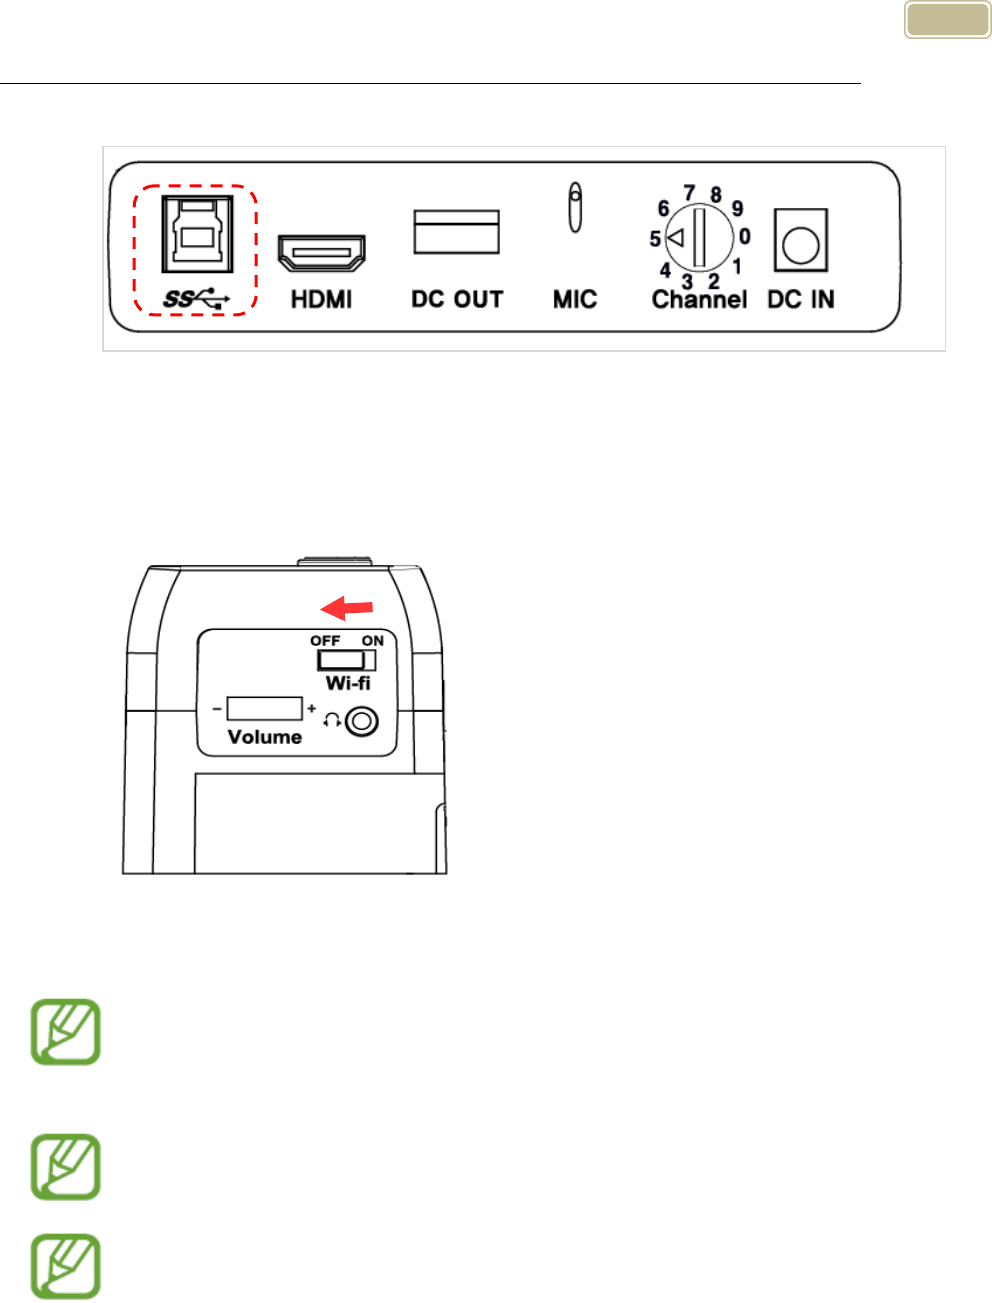
Connecting an On-Lap monitor (DC OUT)
The On-Lap Monitor is a portable, USB powered LCD, sold
separately. You may purchase it from HIMS International.
① Connect the On-Lap Monitor's USB power cable (USB 2.0) to
the DC OUT port on the back of E-bot.
② Connect On-Lap’s HDMI cable to E-bot’s HDMI port to display
E-bot’s output on the On-Lap monitor.
Caution: The DC OUT port is used only for connecting the On-
Lap monitor. Please do not connect USB drives or other USB
devices to the DC out port.
Video & Power Port
22
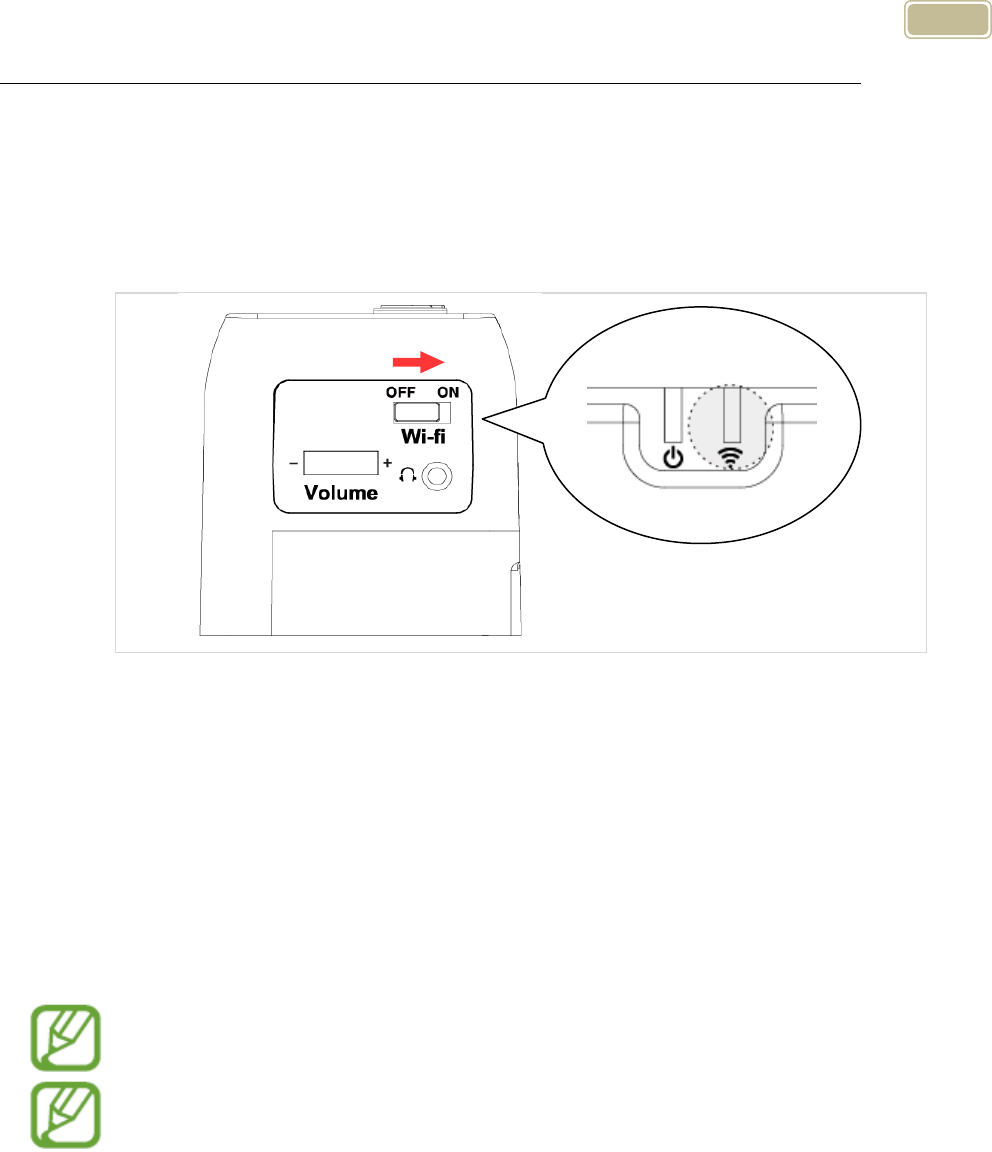
Connecting to a PC (USB)
① Connect the E-bot’s USB 3.0 port to the USB port of your PC
using the included USB 3.0 cable.
② Turn on the E-bot. At this point, make sure the Wi-Fi switch is
set to off.
③ And run the E-bot Viewer on your PC. Select USB as the
connection method.
If you connect E-bot to a PC which does not support USB 3.0,
the enlarged image resolution is automatically adjusted to
accommodate the difference in connection speed.
E-bot cannot be supported on Mac computers which do not
have USB 3.0 capability.
For instructions on controlling E-bot using a keyboard and
mouse, please refer to the last section of this manual.
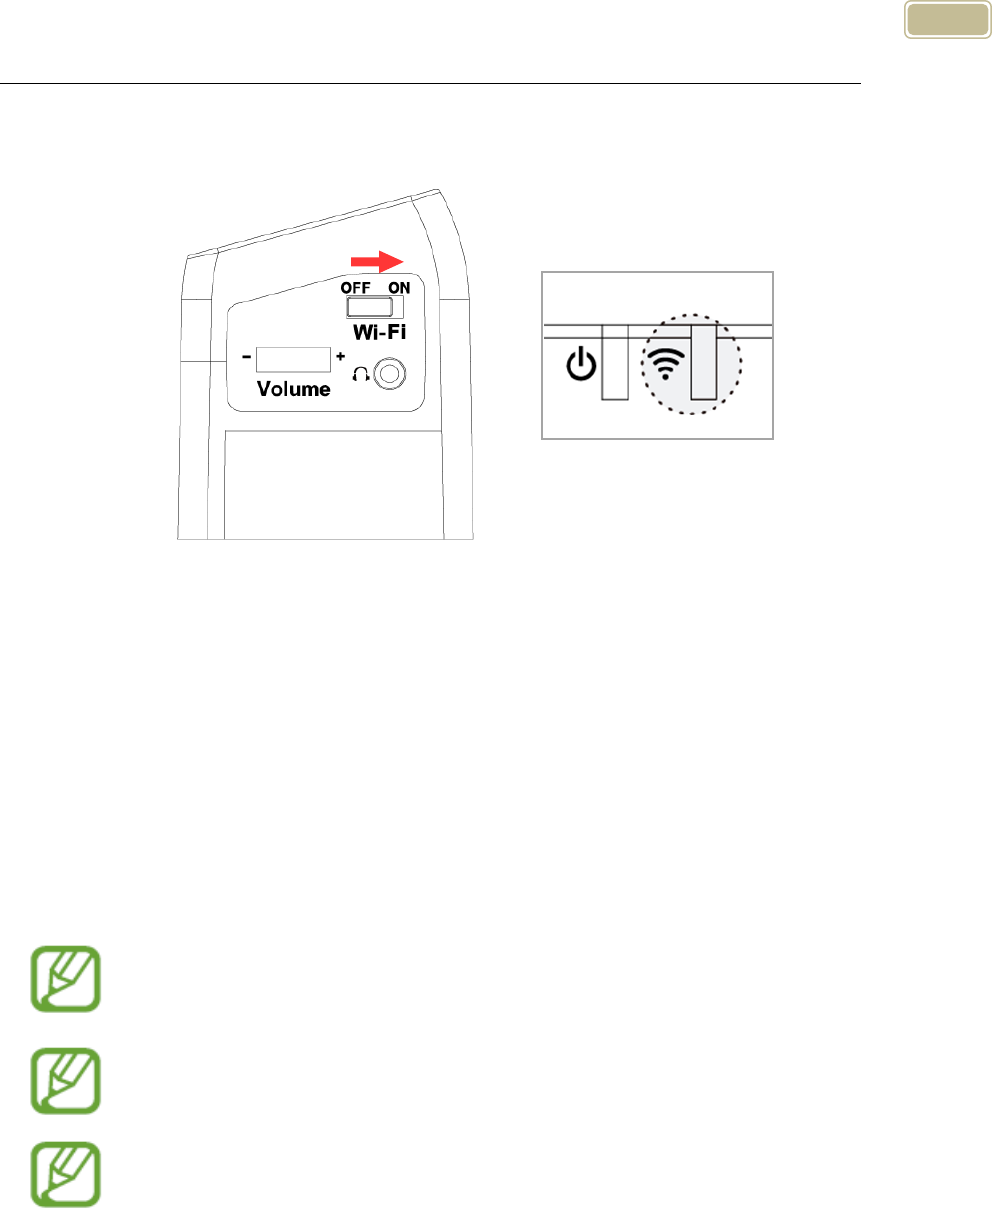
Connecting to a PC (Wi-Fi)
E-bot can output magnified images via Wi-Fi connection to Windows
23
PC’s, Android tablets and Apple iPads.
① To output to your PC via Wi-Fi, turn on the E-bot.
② Set the E-bot Wi-Fi switch to ON. The Wi-Fi LED is changed
to blue to indicate Wi-Fi is on.
③ Enter the PC's wireless network connection area and
connect to the E-bot network.
④ When you are asked for the network key, please enter the E-
bot’s Wi-Fi password. The default password is '00000000 '.
⑤ Once your PC is connected to the E-bot network, run the E-
bot viewer program on your PC, and select Wi-Fi as the
connection method.
In the E-bot's options menu, you can change the Wi-Fi
password.
Wi-Fi output is not supported on Mac computers.
Connecting to an Apple iPad or Android Tablet (Wi-Fi)
① To view and operate E-bot via your tablet, please connect to the
Apple or Android app store, and install the E-bot Viewer
application.
② When the installation is complete, turn on the E-bot. Then turn
on the Wi-Fi switch on the right side. Once Wi-Fi is turned on,
24
the Wi-Fi indicator light on the main body appears blue.
③ Be sure Wi-Fi is ON on your tablet, then select and connect to
“E-bot” from the Wi-Fi networks list.
④ Connecting to E-bot requires a network key. By default, it is
“00000000”. Enter the network key and connect as you would
normally connect to a Wi-Fi network on your tablet.
⑤ Run the E-bot Viewer app on your tablet, and make sure that the
image is displaying correctly.
In the E-bot's options menu, you can change the Wi-Fi
password.
For instructions on controlling E-bot using a tablet, please refer
to the last section of this manual.
Note; Tablets running iOS 7 and higher, Android 4.3 and higher,
and Full versions of Windows are supported. (Tablets running
Windows RT are not supported.) You may also run the PC
Viewer application on laptops and desktops running Windows
XP, Windows vista, Windows 7, and Windows 8.
Basic Functions of E-bot
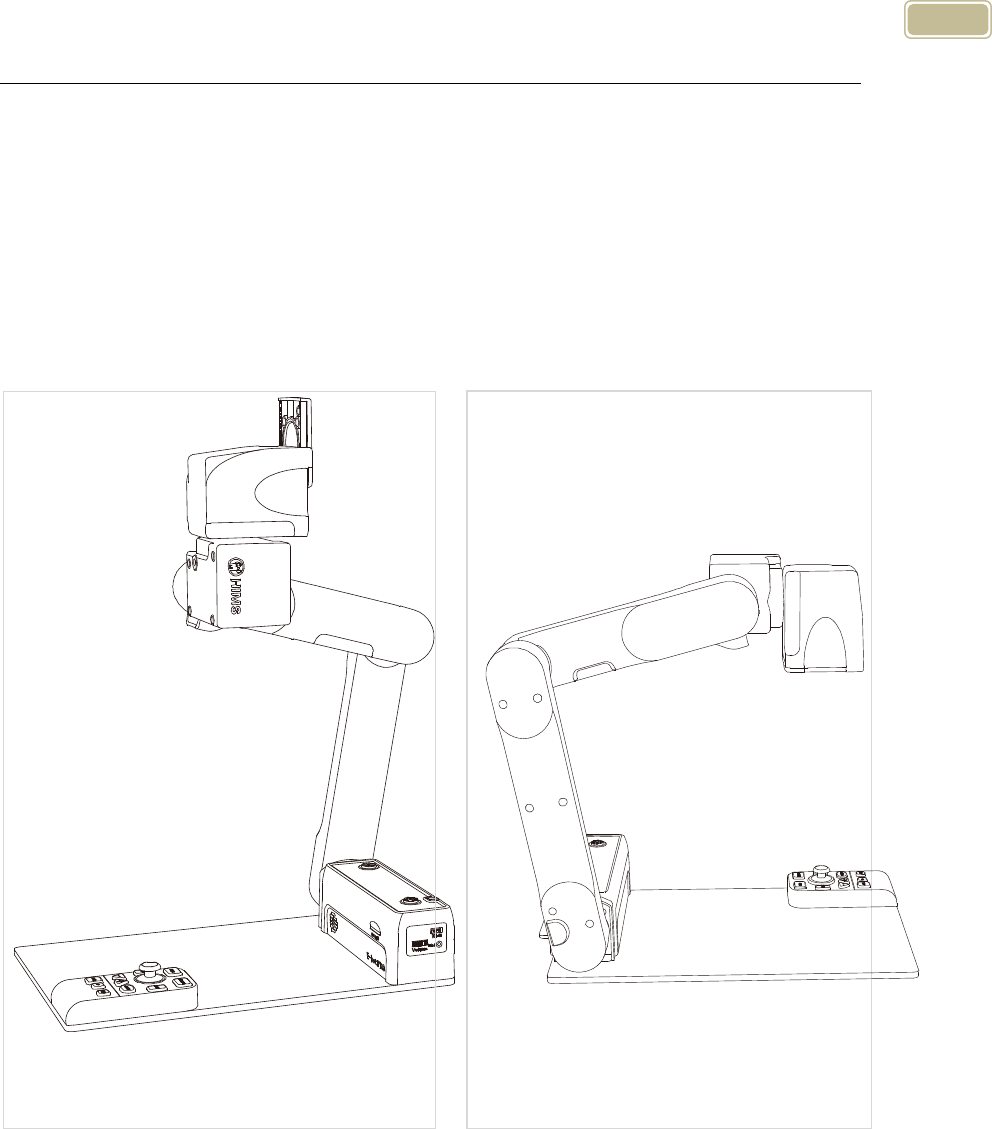
25
1) Changing Camera Modes
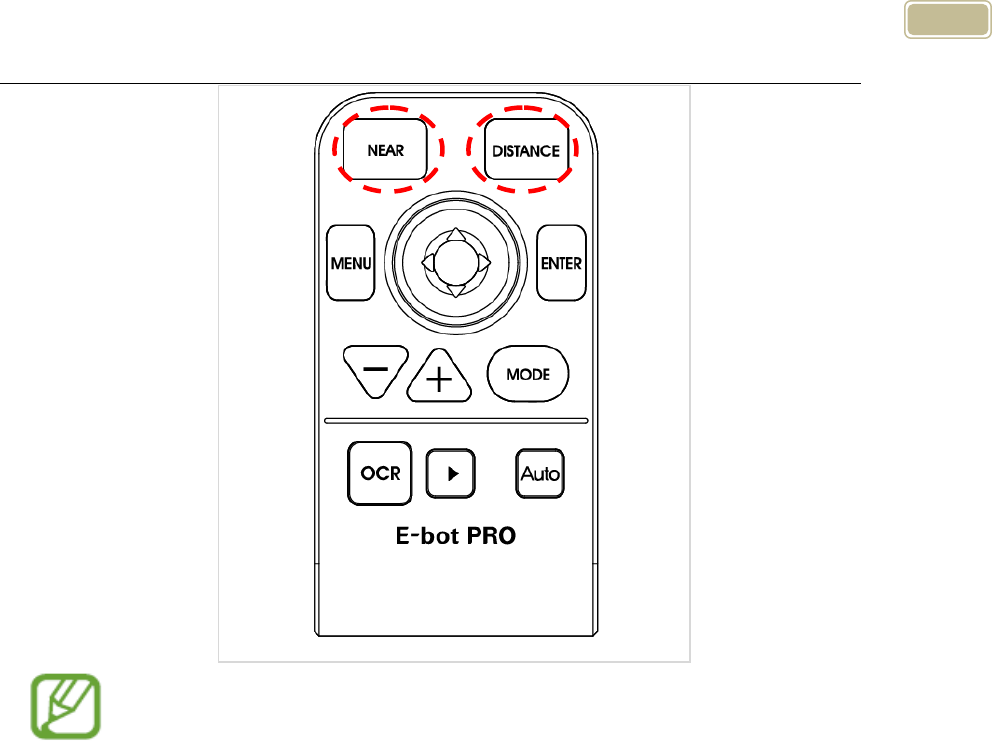
E-bot has two camera modes; near viewing mode and distance
viewing mode. The camera mode can be changed by pressing the
buttons on the top row of the wireless controller. Press the button on
the right to switch to Distance view, and press the button on the left
to switch to Near view.
Near viewing mode
Distance viewing mode
26
Magnification, color mode, and function settings for each mode
are saved separately. So when switching the camera mode, the
settings are automatically changed to the settings you last used
for that mode.
2) Magnification
You can change the magnification level to suit your visual needs
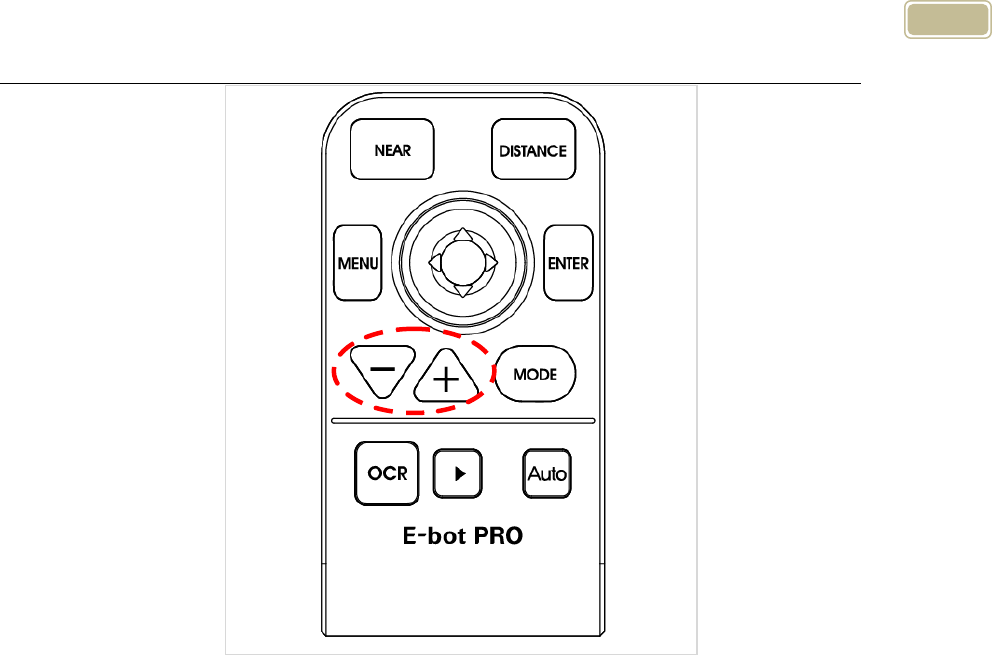
and the size of the print you’re currently reading. The zoom in / out
buttons on the wireless controller are located as shown below:
27
Press the Zoom In button (+) to increase the magnification level.
Press the Zoom Out button (-) to decrease the magnification level.
As you press and hold either of these buttons, the magnification
level is adjusted continuously.
3) Changing the Color Mode
You can change the color of the text and/or background on the
screen to accommodate your visual needs in regards to text type
and your visual condition.
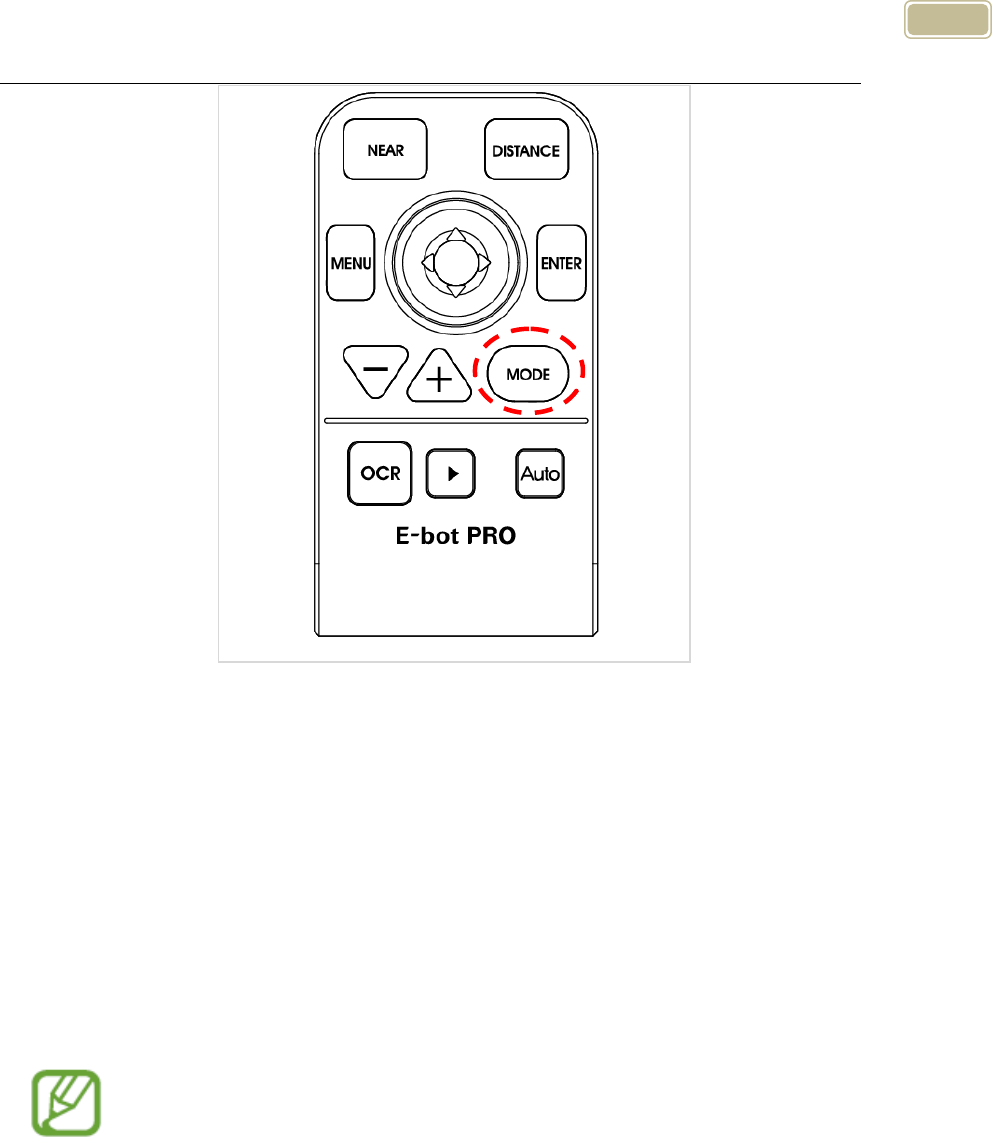
You can use the Mode button on the wireless controller to cycle
through the color modes.
28
There are 7 color modes provided by default:.
1. Natural Color Mode
2. White text / black background
3. Black letters / white background
4. Black and White (Gray)
5. Yellow letters / black background
6. Yellow letters / blue background
7. Green letters / black background
The E-bot PRO allows you to alternate between Natural color
mode and your current color mode setting. Press the Color
Mode button on the wireless remote control for more than 2
seconds to switch between Natural Color Mode and your
current color mode setting.
4) Contrast
Due to variations in paper type, text type and color and the
background color of documents or books that you are reading, you
29
may need to adjust the contrast to read the documents or books
clearly.
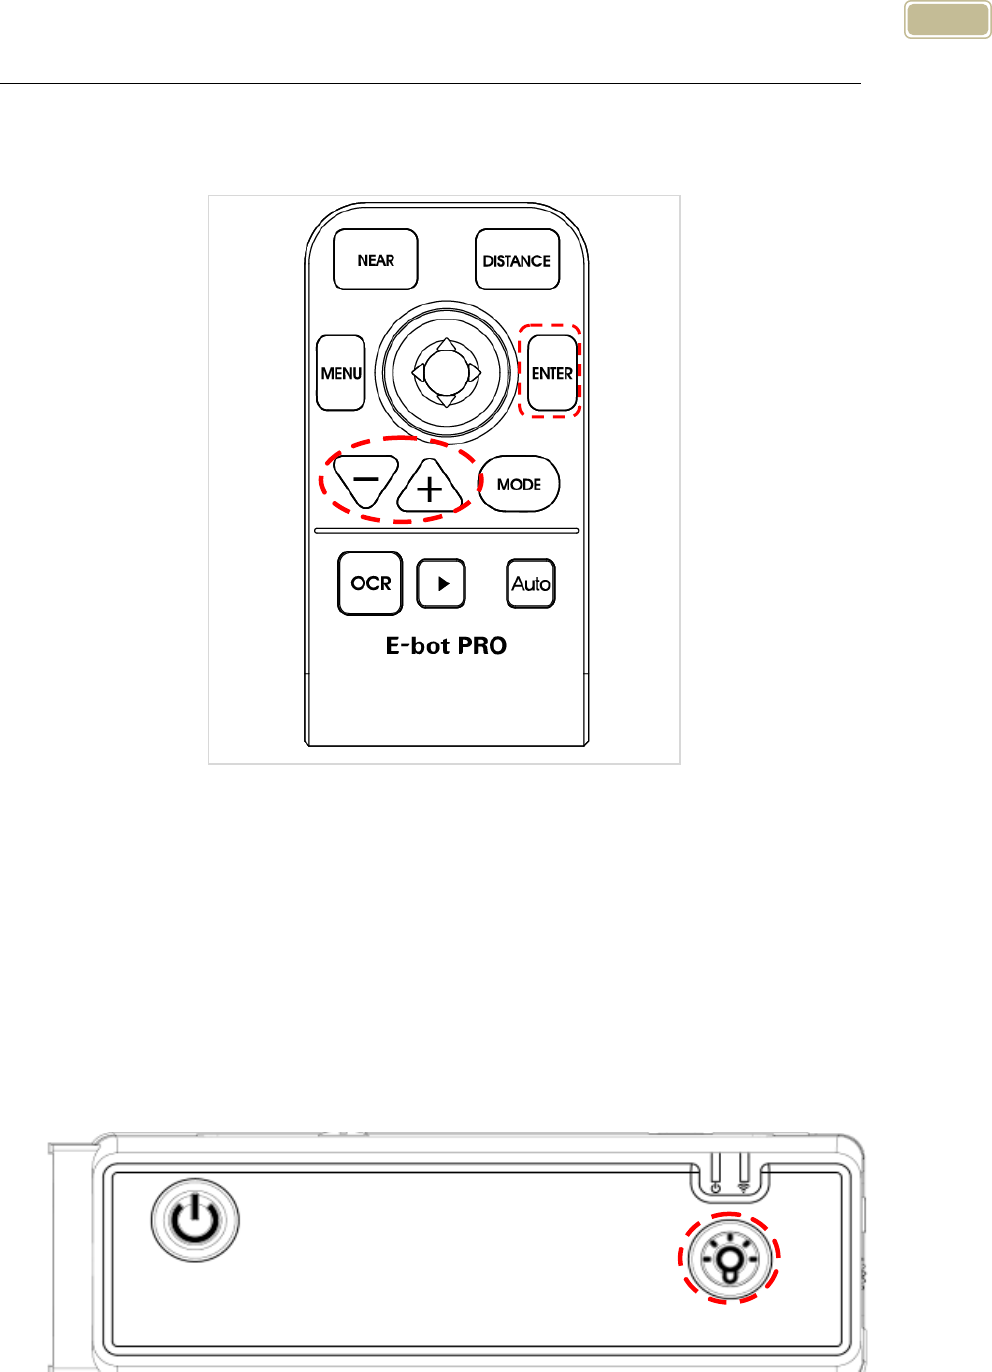
Press the Enter button and Zoom In/Out button simultaneously on
the wireless controller.
5) LED light On/Off
In the near view mode, the built-in light is automatically turned on to
ensure a clear image. E-bot contains a sensor to detect the amount
of illumination in your current surroundings, and lighting is
automatically adjusted according to the ambient brightness.
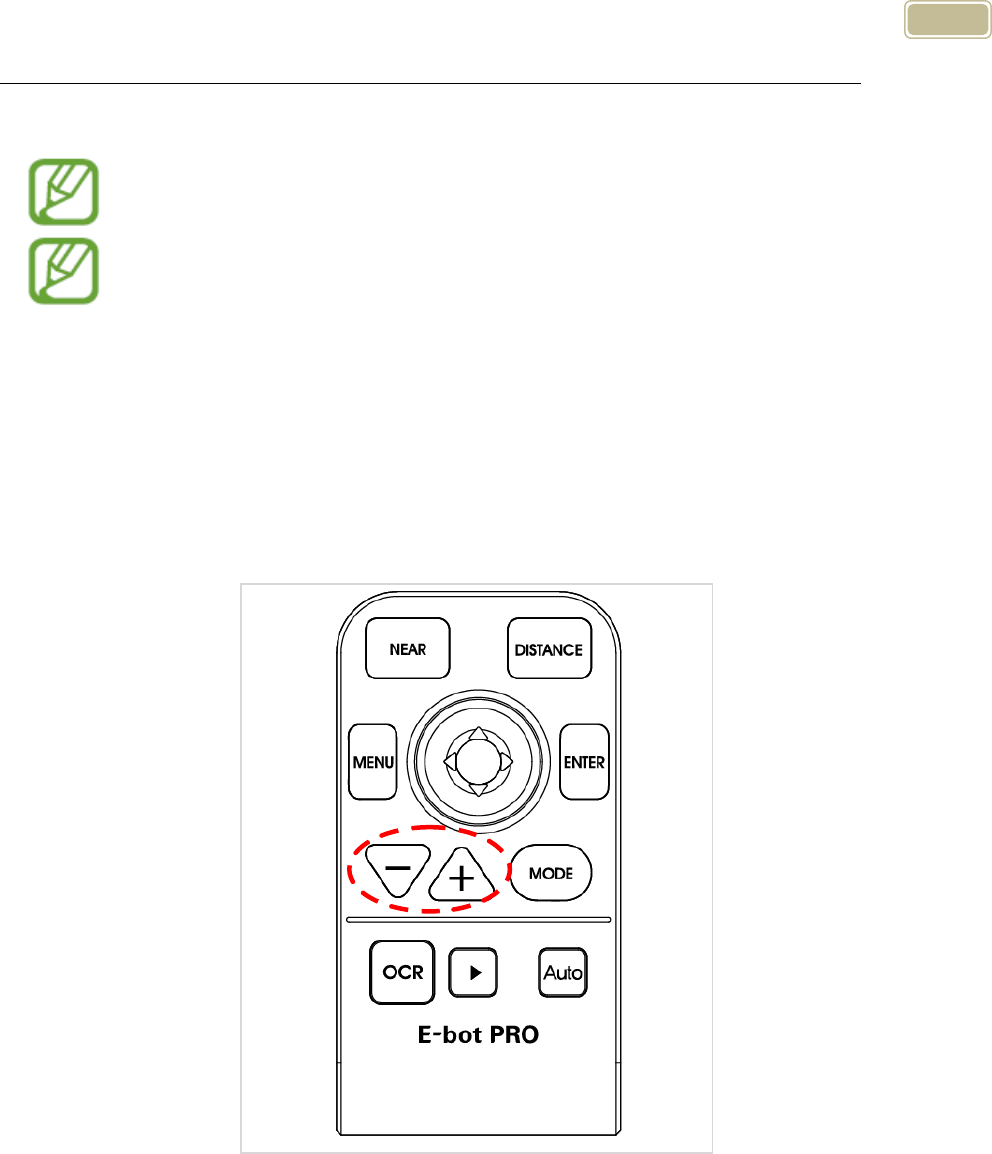
Press the LED button to turn the lights on or off. When viewing
30
glossy objects, please turn off the LED light to avoid glaring.
If you turn the power off, when you turn it back on, the LED light
is automatically turned off.
When using distance view mode, the LED light is not turned on.
6) Finding your current Reading Position
Use the Find location function, to find the position of the magnified
text you are currently reading in relation to the document placed on
the reading plate in front of you or the presentation screen or
whiteboard you are viewing from a distance.
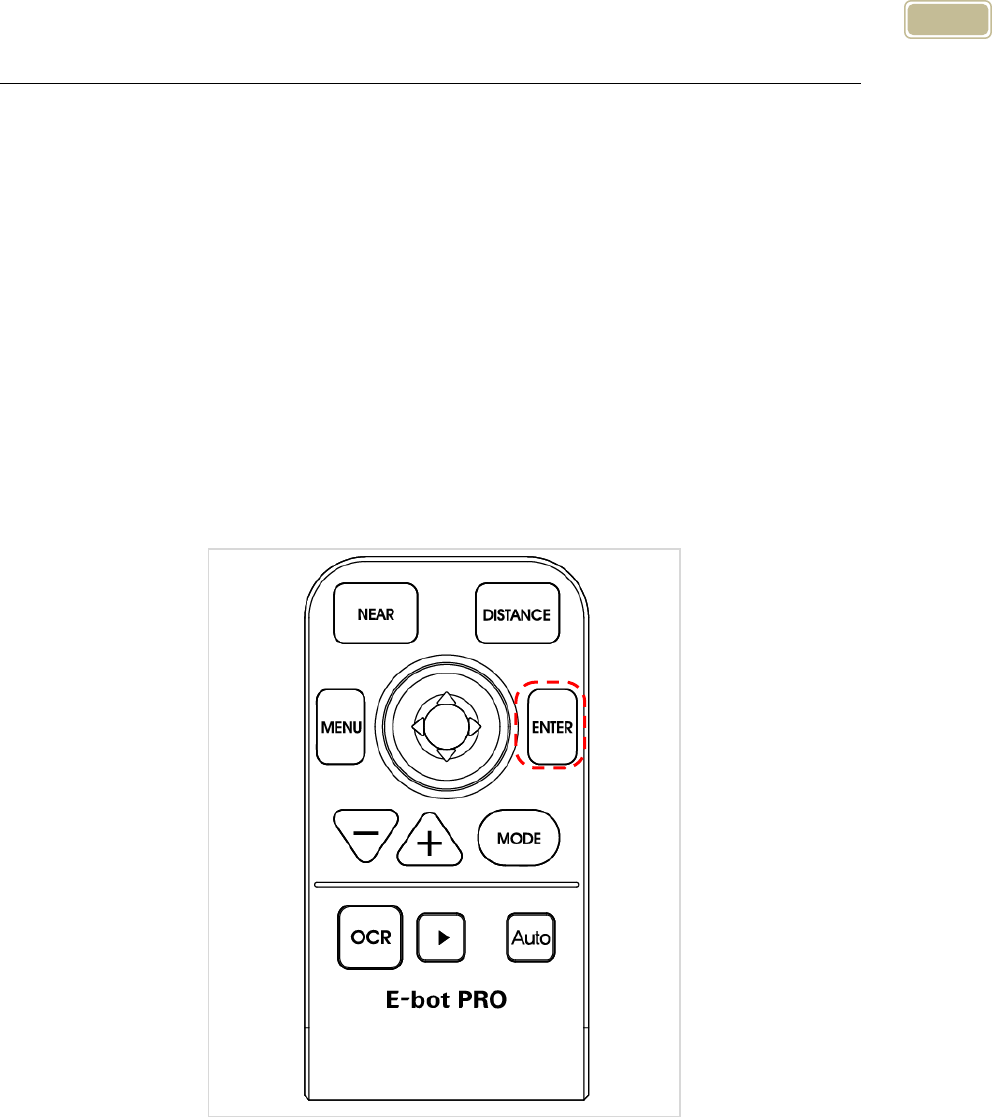
Press and hold the Zoom in button and Zoom out together, the
magnification level is reduced back to normal and a red cross
appears in the center of the display to assist your orientation so that
you can locate the placement of the text in relation to the whole
document.
31
Release both the Zoom in and Zoom out buttons, and the
magnification level returns to the rate you were using before
pressing the Zoom buttons.
7) Focus lock
By default, E-bot PRO uses automatic focus. However, if you’re
writing under the camera or doing something else on which you
don’t want the camera to focus, you can use the Focus lock to lock
the focus on the text rather than allowing the auto focus to follow
your hand or pen.
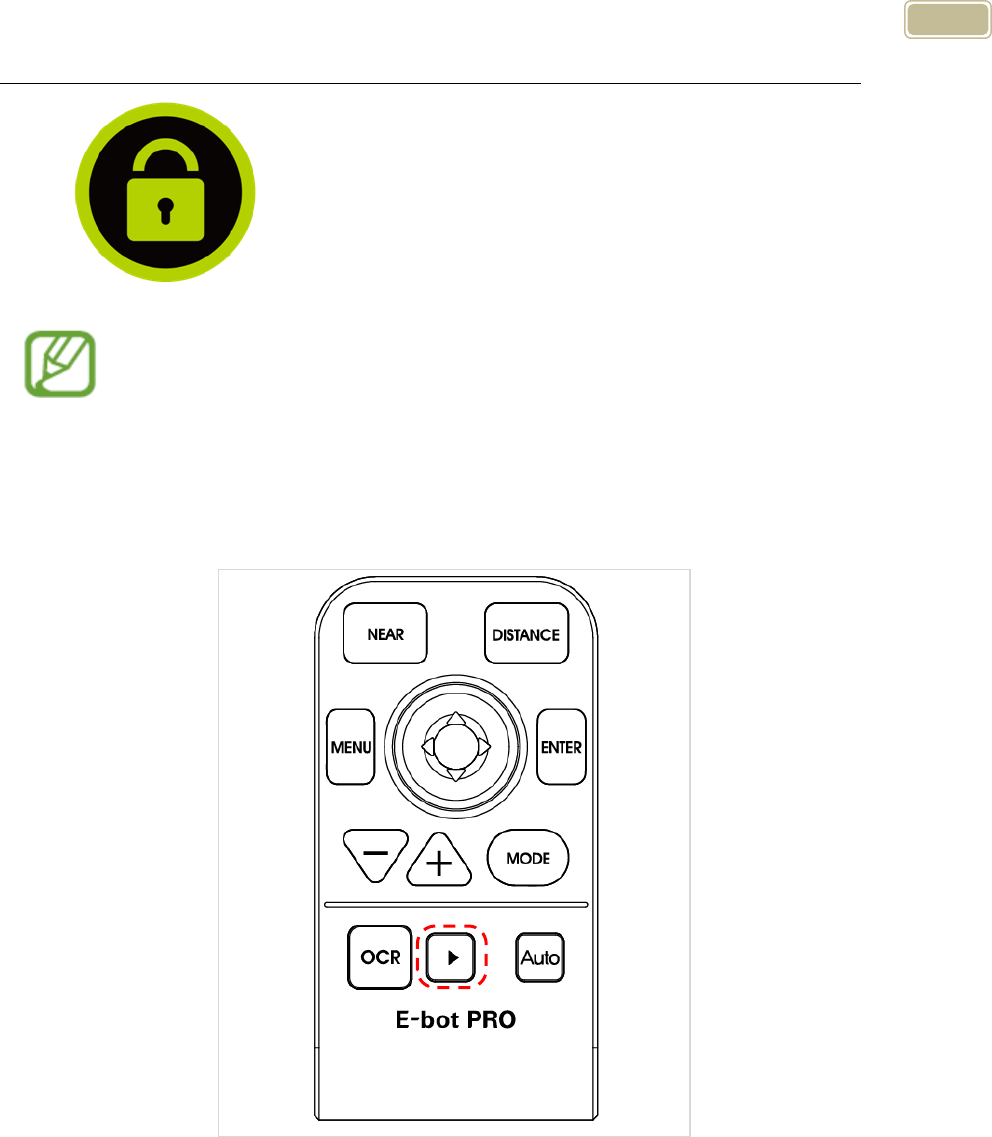
Press the Enter button on the wireless controller for more than 2
seconds.
When focus lock is activated, the Focus Lock icon is displayed on
the screen.
32
Focus is unlocked automatically when the camera is switched
from Distance view mode to near view mode or powering off
when focus is locked.
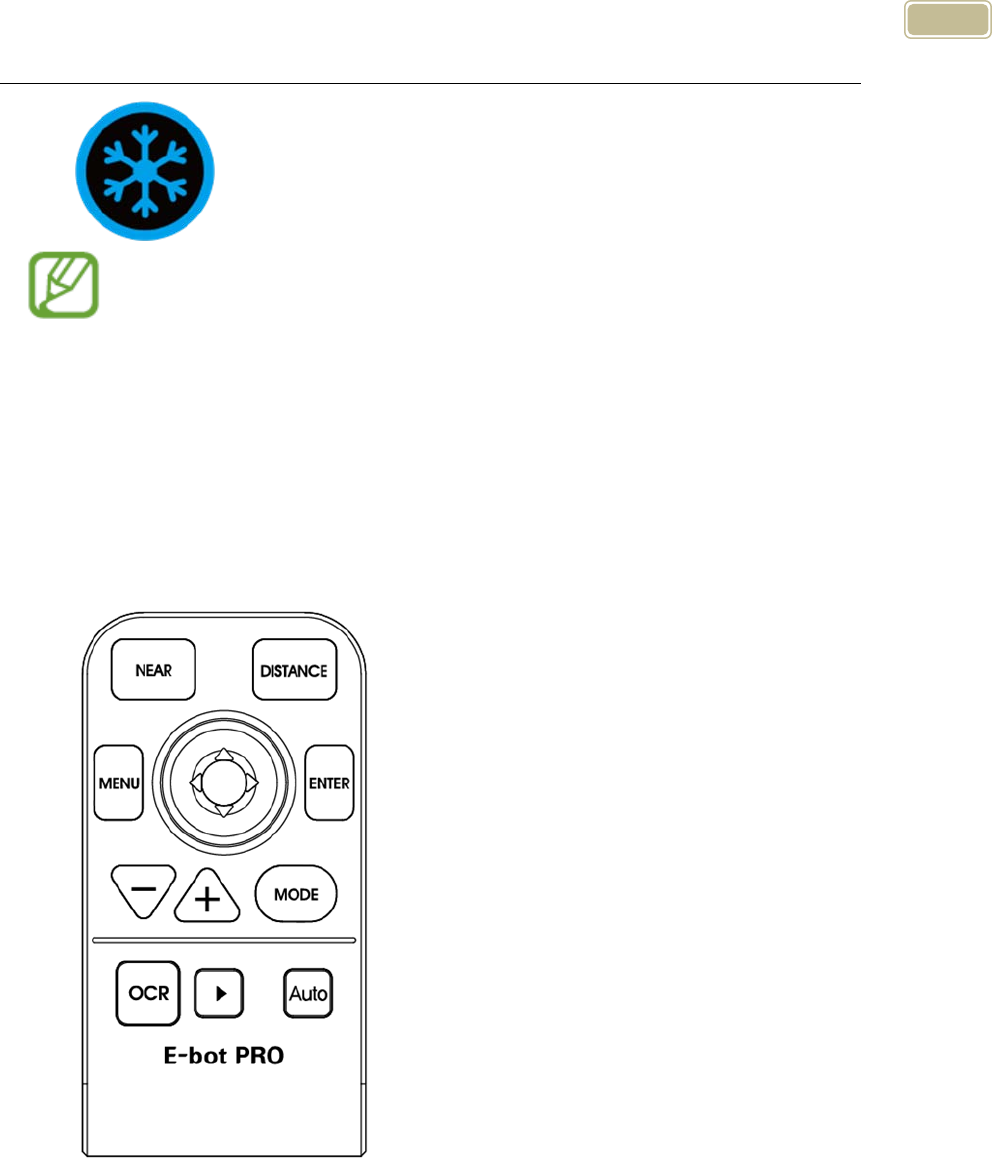
8) Freeze
Press and release the Play/Pause button to take a still shot.
Press the Play/Pause button again to release the still shot and
return to the live camera mode.
When the screen is frozen, the Freeze icon is displayed on the
screen.
33
When the screen is frozen, the magnification level cannot be
reduced.
Advanced features
1) Using the menu
You may change many of the E-bot’s settings via the Options menu.
Use the menu in the manner described below:
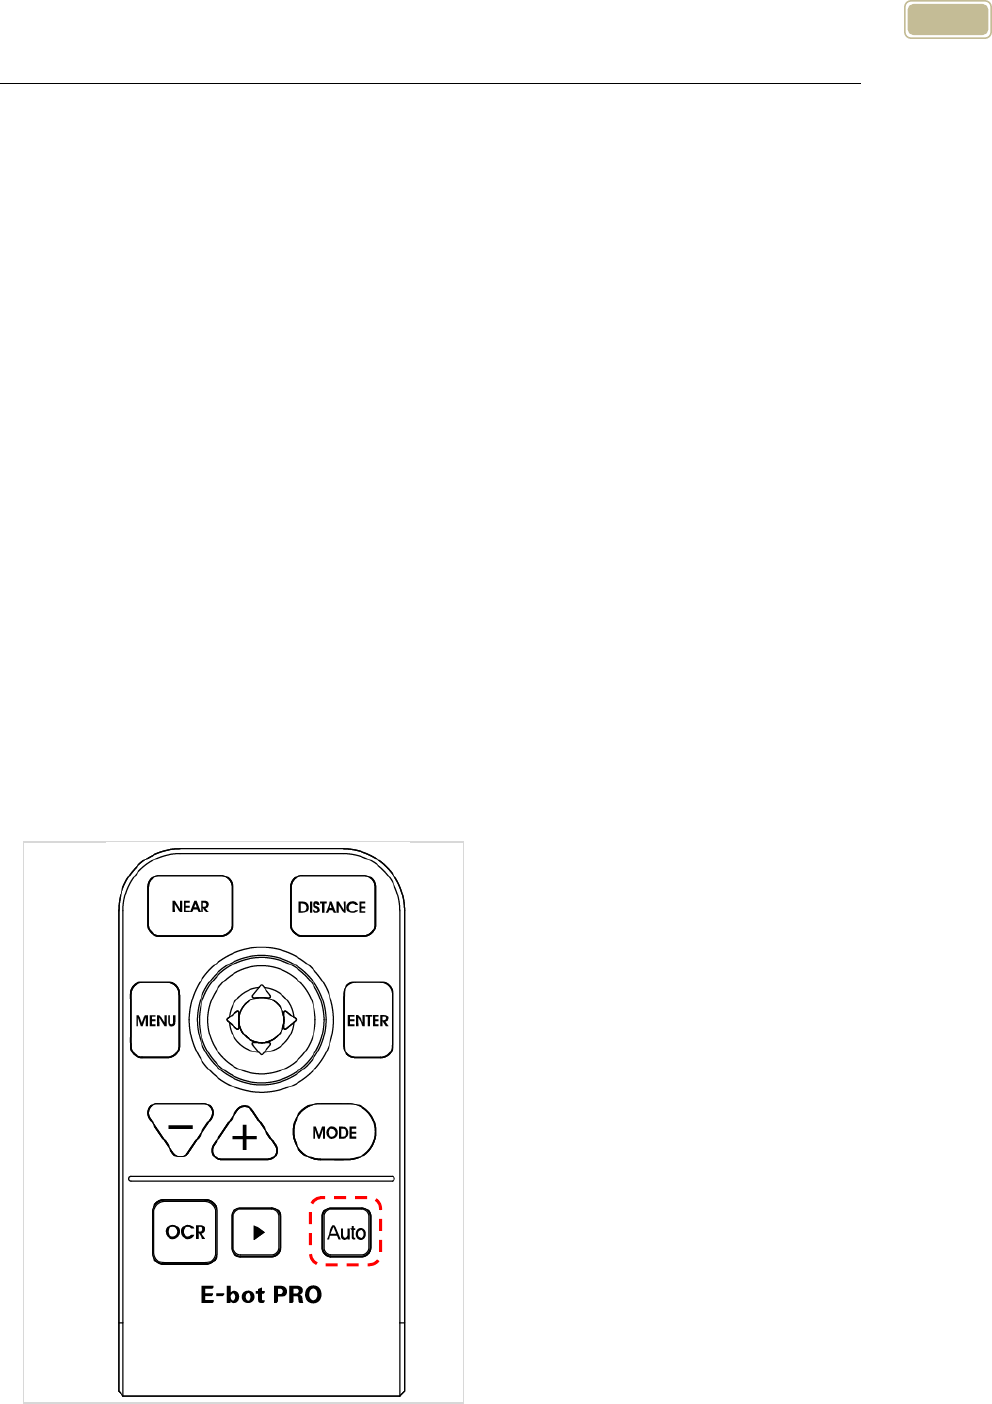
① Menu: Press the menu button on the wireless controller and a
menu window pops up on the left side of the screen.
② Tabs: The Menu consists of three tabs, “Options’, “OCR” and
“Files”. You can set the options related to magnification functions
in the 'Options' tab, and can set the options related to OCR
1. Menu button: 1) Open Menu
2) Select item
3) Close Menu
2. Joystick (Up/down): Move between items
Joystick (Right/Left): Change setting values
3. Enter Menu: Select item
34
functions in the 'OCR' tab. The “Files” tab allows you to control
your saved images, videos, and OCR recognition files.
③ You can move between the Tabs by moving the joystick left and
right.
④ You can move through options in a tab by moving the joystick up
and down. To select an Item, press the Enter button.
⑤ Moving back a level: to move back a level in the menu structure,
press the menu button.
⑥ Closing the Menu: To close the menu, press the menu button
from the top level of the menu structure.
2) Auto Scroll
You can use the auto scroll function to move the camera in the set
direction automatically as you read material.
To execute auto scroll, press the auto scroll button on the wireless
controller. To stop auto scrolling, press the auto scroll button again.
Range setting

35
① The range setting allows you to specify the size of the page you
are viewing/scrolling.
② Press the menu button, navigate to the auto scroll menu, and
then press the enter button.
③ Press the enter button on the range setting.
④ You can select the A4 size or custom setting.
Speed setting
① The Speed setting lets you control how fast the camera scrolls
through the document.
② Press the menu button, navigate to the auto scroll menu, and
then press the enter button.
③ Press the enter button on the speed setting.
④ Set the speed using the joystick, and press the enter button.
3) Color mode settings
You can set the color mode to best accommodate your visual
condition or the material you are reading. You can also disable color
modes that are not useful to you.
Setting the color mode
You can change to the frequently-used color except for Natural
color mode. Up to 7 color modes can be set on the options
setting.
① Bring up the menu while using the view in which you want to
change (for instance, if you bring up the menu while using the
near view, the color mode of the near view is changed)
② You can modify the color modes by choosing the “Color Mode”
setting in the Options tab of the menu.
③ You can modify any of the color modes numbered 1 to 7. Select
36
the mode you want to set.
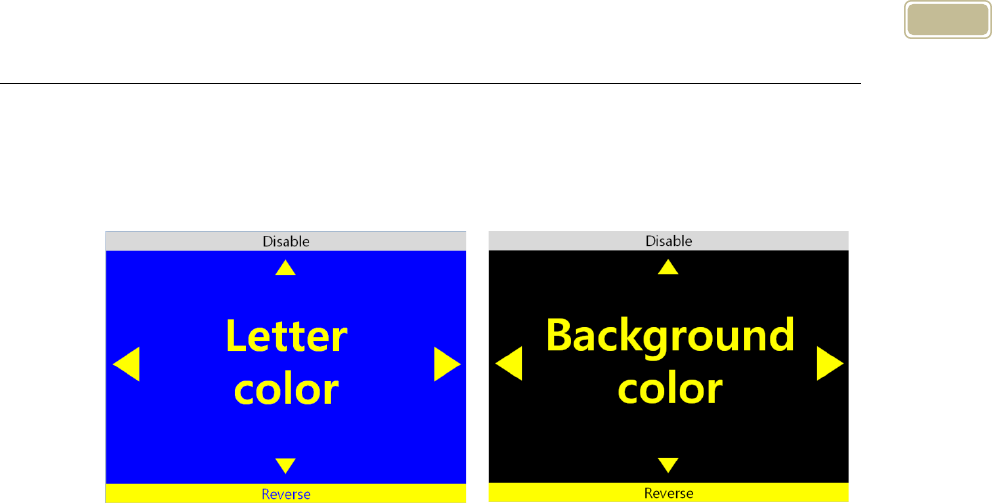
④ The text Text color is displayed on the screen. Select the color of
the text using the left and right arrows.
The text color and background color being displayed are
exchanged when the [Reverse] is activated.
⑤ Select the Background color when you have finished selecting
the text color. Use the same method as when setting the text
color.
If Grayscale is chosen when selecting the text color, the Color
setting mode is exited without selecting a Background color.
⑥ After you have selected the background color, you are returned
to the menu window.
To disable color modes
You can disable color modes that are not useful to you so that you
may cycle through useful color modes more quickly.
① Bring up the Menu, go to the Options tab, then select “Set color
mode”.
② Select one of the color modes numbered 1 to 7.
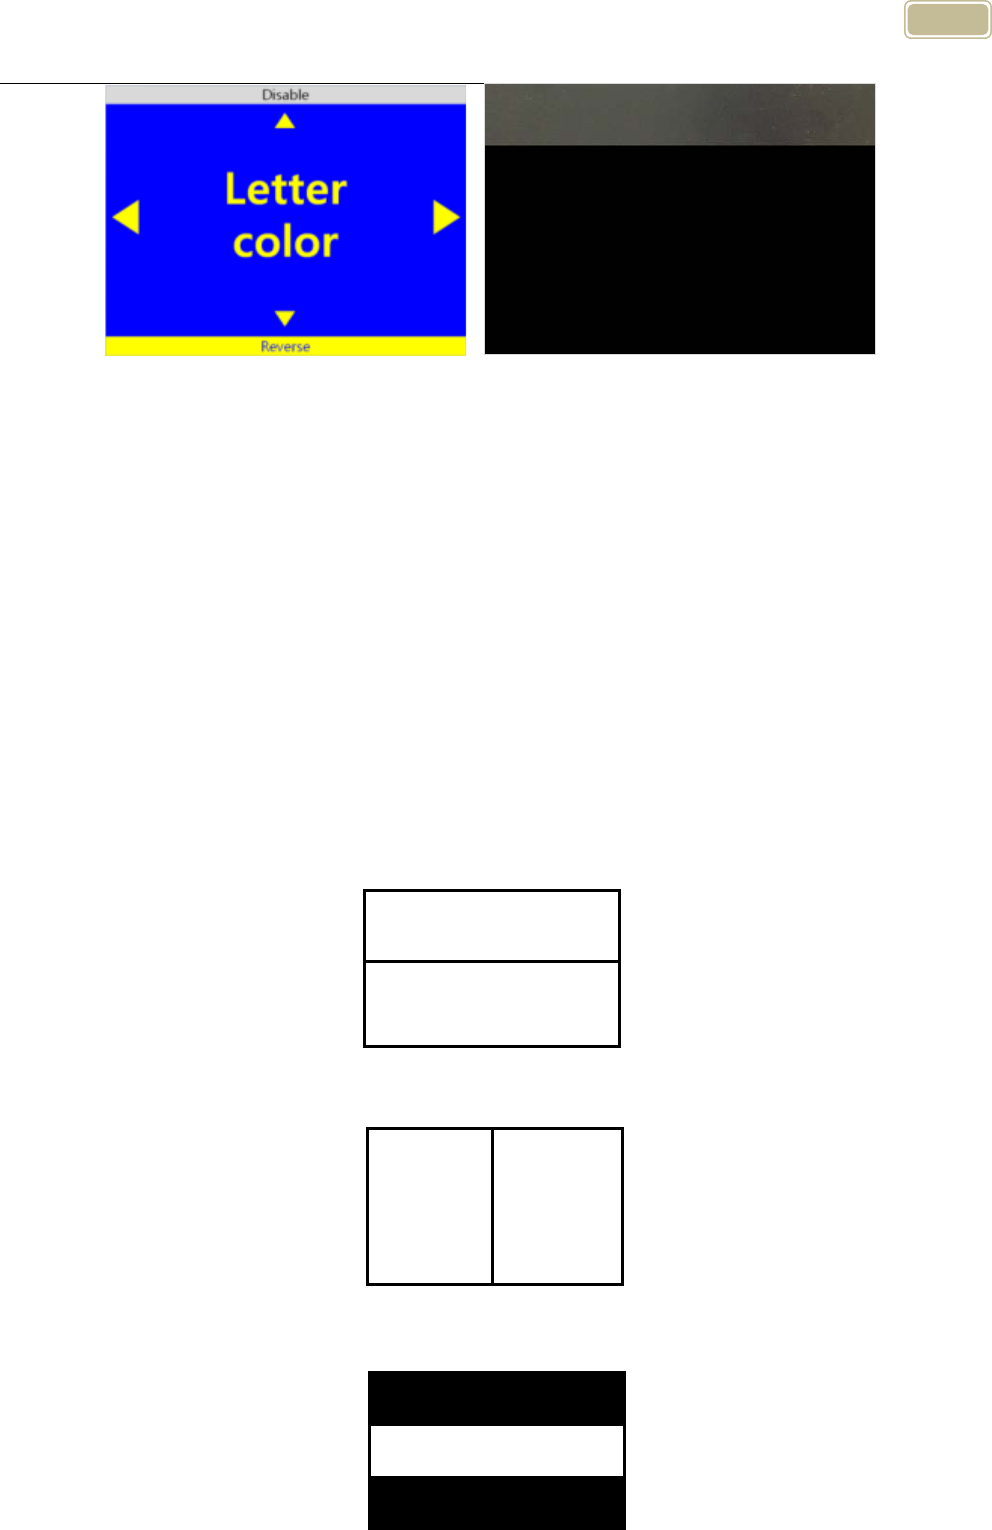
③ If you press the Up arrow key when “Text color” is displayed, a
window appears asking whether to disable the current Color
mode. Choose ‘Yes’ to disable the Color mode or ‘No’ to cancel.
37
④ When you have made your selection, you are returned to the
menu.
4) Marker
The Marker helps you to focus on the text that you are reading by
narrowing the display area with window markers or by underlining
the sentence that you are reading.
Set Marker
There are 4 kinds of markers; Horizontal Line Marker, Vertical Line
Marker, Horizontal Window Marker and Vertical Window Marker.
Horizontal Line Marker
Vertical Line Marker
Horizontal Window Marker
ABCDEFGHIJKLMNOPQR
ABCDEFGHIJKLMNOPQR
ABCDEFGHIJKLMNOPQR
ABCDEFGHIJKLMNOPQR
ABCDEFGHIJKLMNOPQR
ABCDEFGHIJKLMNOPQR
ABCDEFGHIJKLMNOPQR
ABCDEFGHIJKLMNOPQR
ABCDEFGHIJKLMNOPQR
ABCDEFGHIJKLMNOPQR
ABCDEFGHIJKLMNOPQR
ABCDEFGHIJKLMNOPQR

38
Vertical Window Marker
① Bring up the Menu, select “Options” then select “Marker”.
② Next, select the marker type; ‘Horizontal line marker’, ‘Vertical
line marker’, ‘Horizontal window marker’, ‘Vertical window
marker’. A check mark appears next to the selected marker.
③ After you have chosen the marker setting, the selected marker is
displayed on the screen and you are returned to the Menu again.
* Select the marker setting from the menu again to disable the
marker.
Set Marker position and size
You can adjust the size of the window marker and location of the
line marker.
① Bring up the Menu and select “Options” then “Marker”.
② If the line marker is selected, the “Adjust location of marker” item
appears. If the window marker is selected, the “adjust size of
window marker” option appears. Select the relevant marker
setting.
③ Use the arrow keys to adjust location or size.
④ Press Enter, and the setting is saved and you are returned to the
menu.
Markers cannot be used in OCR mode.
ABCDEFGHIJKLMNOPQR
ABCDEFGHIJKLMNOPQR
ABCDEFGHIJKLMNOPQR
ABCDEFGHIJKLMNOPQR
39
5) OCR
Recognizes text under the camera when using near view mode and
reads it aloud with built-in text-to-speech voices.
OCR execution
When using near view, the image freezes when the OCR button is
pressed. The text displayed on the frozen screen is recognized then
read aloud using the internal TTS voices.
While recognition is being performed, a message indicating
recognition is in progress appears. Please do not perform other
functions while recognition is in progress.
Press the Play/Stop button to stop and start reading text aloud, if
the Play/Stop button is pressed after text reading has completed,
reading will start again from the beginning of the text.
Press the OCR button again to exit the OCR function and return to
live camera mode.
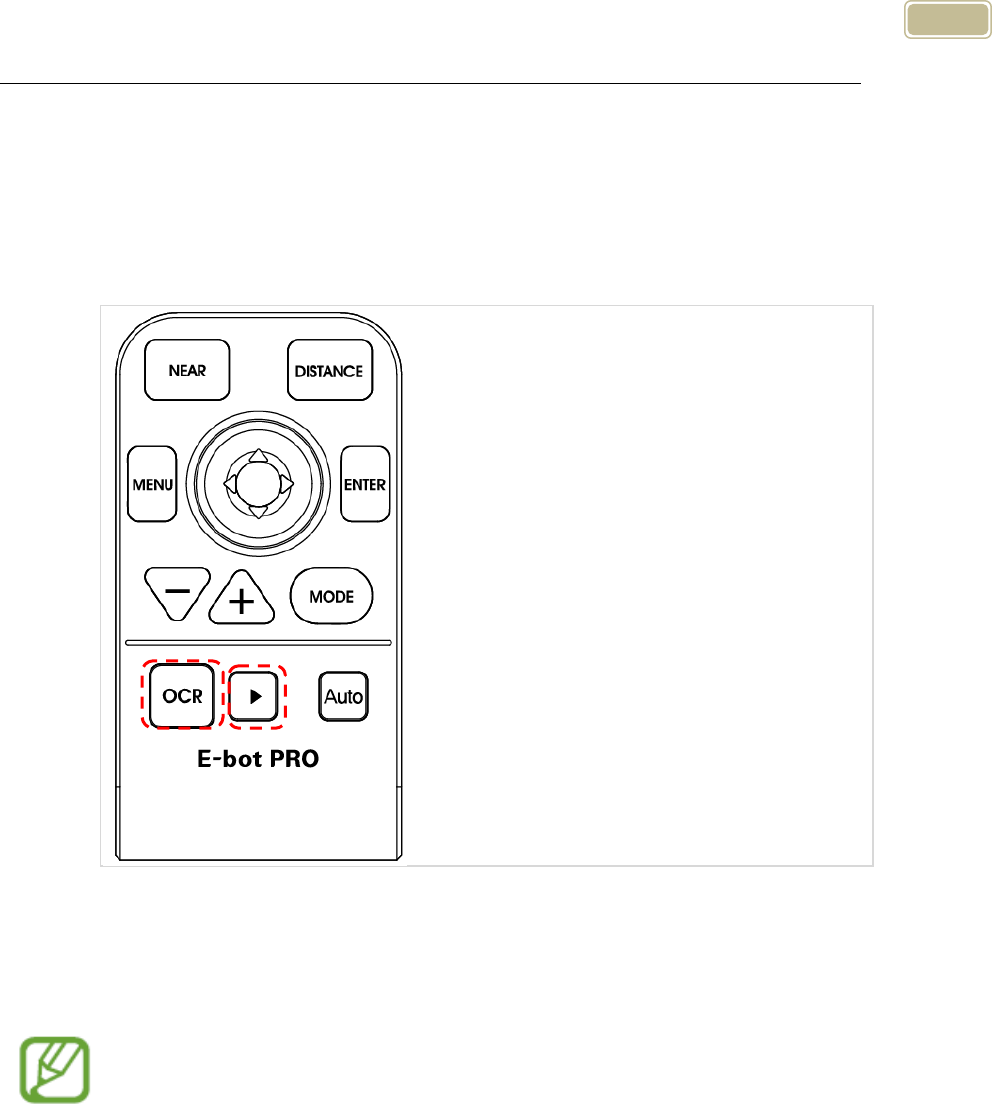
∙ OCR button : OCR execution
∙ button : OCR Play/Pause

40
If the magnification level is changed during viewing of
recognized text, the magnification level is changed. However, if
the OCR view is set to image, the magnification level cannot be
adjusted below the magnification level that was set when OCR
was first played.
You may change the Color mode when viewing an OCR scan.
The available color modes are the same as those available in
near view mode.
Reading/navigating recognized text
Move the Joystick to the Right to move to the next sentence.
Move the Joystick to the Left to move to the previous sentence.
Move the Joystick Down to move to the next paragraph.
Move the Joystick Up to move to the previous paragraph.
Navigate to the place where you want to begin reading text aloud
and press the Play/Stop button to begin reading at that point.
OCR views
You may display OCR results as either an image, or as recognized
text.
① Bring up the Menu then move the Joystick to the Right to move
to the OCR tab and select “OCR View”.
② There are 4 options for displaying OCR results. , The current
setting is indicated with a check mark. Select your desired view
for OCR results.
Image : Displays scanned image, highlights word being read
aloud.
Whole text : Extracts recognized text and shows it on the

41
screen.
Line : Extracts recognized text and shows the line
currently being read aloud..
Word : Extracts recognized text and shows each word as it
is read aloud on the screen.
OCR screen ↔ live -View mode
While using OCR, you can return to the live -view mode.
① Press both the Enter button and OCR button on the wireless
controller.
② To return to the OCR view, press the Enter button and OCR
button at the same time.
Note: You cannot access the menu in this mode.
OCR correction
The Angle Correction function corrects the orientation of the text to
the horizontal if it is not aligned correctly for more accurate text
recognition. You can turn this option on or off.
① Bring up the Menu, and move the Joystick to the right to move to
the OCR tab, then “OCR Correction”. Select the “Angle
correction” item.
② If the check box is checked, Angle Correction is on. If it is not
checked, Angle Correction is off.
③ Press enter to change the setting.
OCR Language setting
This feature distinguishes and recognizes up to 3 different
languages even if they are mixed on the screen.
① Bring up the Menu and move the Joystick to the Right to move to
42
the OCR tab. Then, select the OCR language setting.
② Select the language you want to add. E-bot can recognize up to
3 languages simultaneously.
The base language cannot be unchecked.
Language recognition is distinguished by paragraph if the
selected language is based on Alphabet.
6) Save
E-bot PRO can save videos, photo images and OCR recognition
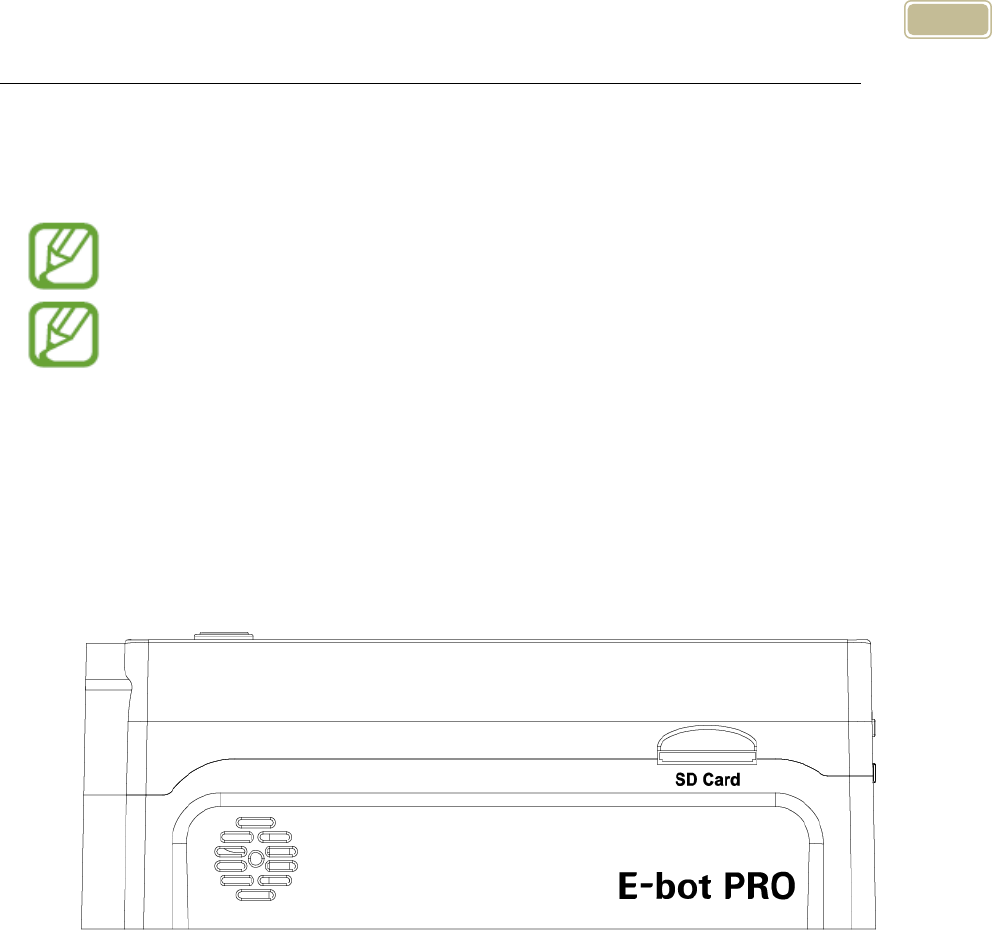
files via an SD card.
Before using the storage function, you must insert an SD card.
images
① Press the Play/Pause button for more than 2 seconds at the
desired location.
② To access a saved image , bring up the Menu and select
“image” from the ‘Save’ tab.
③ You can see the saved images.
④ To delete the image, select the ‘delete’ menu in the “image”
section of the ‘Files” tab.
⑤ You can selectfrom two deletion options: full size image and
select all.

43
Videos
① To record the video, press the play/pause button for more
than 2 seconds.
② When finished recording the video, , press the play/pause
button for more than 2 seconds to save it.
③ Pause : To pause recording, press the play/pause button
quickly.
④ Cancel : press the menu button to cancel the recording.
⑤ To access the saved video, bring up the Menu and select
“video” from the “Files” tab.
⑥ You can see the saved videos.
You can fast-forward through a video using the joystick.
⑦ To delete the video, select the ‘delete’ option in the “video”
section of the “Files” tab.
⑧ Again, you have the two deletion options: full size image and
select all.
OCR
① To save an OCR recognition file, press the play/pause button
for more than 2 seconds.
② To check the saved recognition file, bring up the Menu and
select “OCR” from the “files” tab.
③ You can see the saved OCR recognition files.
④ To delete the OCR recognition files, select the ‘delete’ option
in the “OCR” section of the “Files” tab.
⑤ As above, you can select from 2 deletion options: full size
image and select all.
Options
44
1) Voice Guide
This option determines whether E-bot speaks as you navigate
menus or press buttons.
Voice Guide On/off
① Bring up the Menu and select “Voice guide” from the ‘Options”
tab
② If the checkbox is checked, the voice guide is on; if it is not
checked, voice guide is Off. Press the Enter button to change
the setting.
TTS Volume
You can adjust the volume of the TTS voice in two ways.
Adjusting on the main body
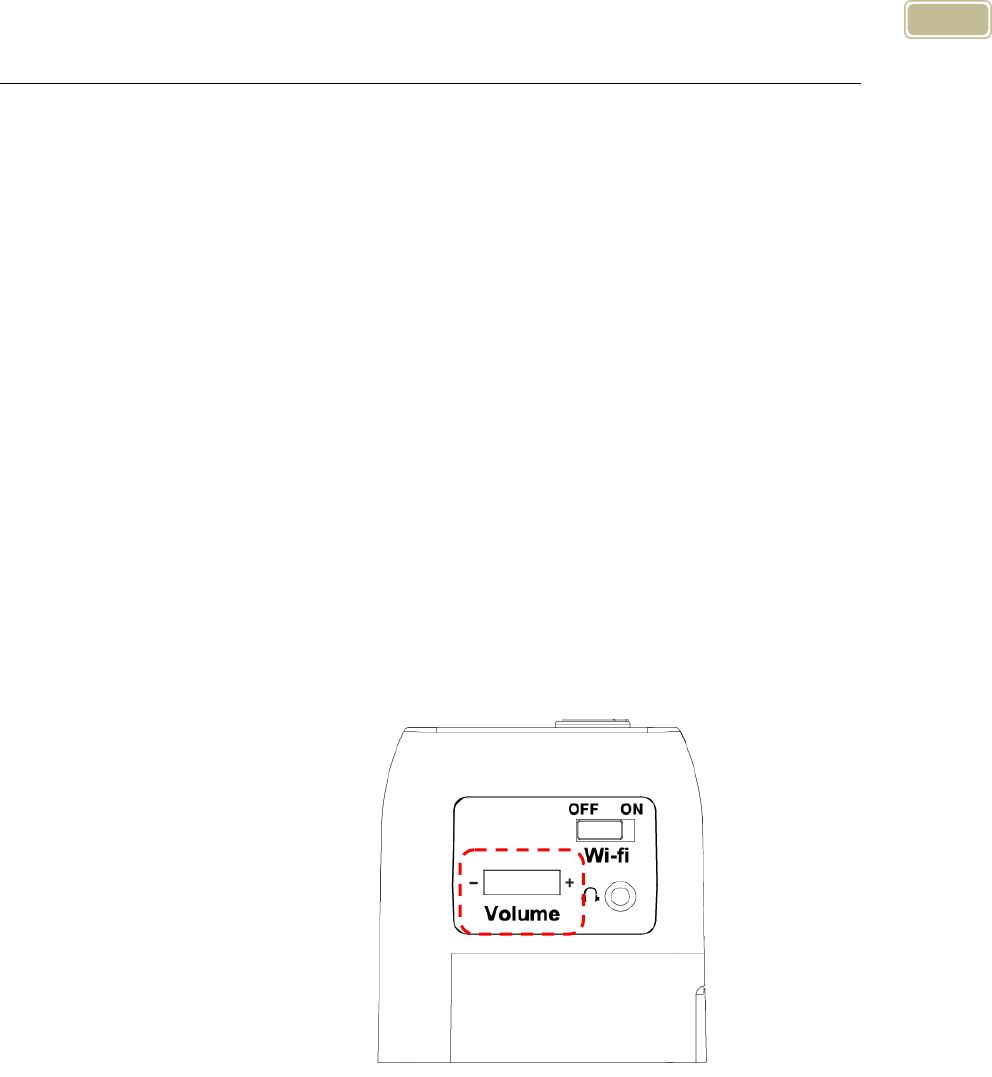
① E-bot’s volume dial is located on the right side of the body.
② Turn the dial away from you, and the volume is increased,
turn the dial toward you, and the volume is decreased.
Adjusting in the menu
① Bring up the Menu, and select “Volume” in the “OCR” tab
② You can select from 14 volume levels. Use the Left and Right
arrows to choose your desired volume level, and then press

45
Enter to save the settings. You can mute the volume by
setting the level to 0.
TTS Speed
The TTS speed setting controls both the speed of the guide voice
as well as the OCR reading voice.
① Bring up the Menu, and select “TTS speed” from the OCR tab.
② The TTS speed is adjustable using 14 levels. Use the Left and
Right arrows to adjust the speed of the TTS then press Enter to
save the setting.
TTS Pitch
You can adjust the TTS voice pitch.
① Bring up the Menu, and select “TTS pitch” from the “OCR” tab.
② The TTS pitch can be adjusted among 14 levels. Use the Left
and Right arrows to control the pitch of the TTS then press Enter
to save the setting.
TTS voice
Use this setting to select the gender of the voice.
① Bring up the Menu and Select “TTS type” from the “Options” tab.
② Use the Left and right arrows to select voice between male and
female.
2) E-bot operating Language
You can change the basic language E-bot uses for its voice guide
and menu system.
① Bring up the Menu and select “Language” from the ‘Options’ tab.
② Navigate to the language you wish to use with the Up and Down
arrows, and press the Enter key on your chosen language.

46
3) Camera position preference
Position setting
You can set your favorite positions for the camera in the
near/distance view mode, and automatically move the camera to the
saved point.
① In the near/distance view mode, bring up the Menu and
select “Camera position preference” from the ‘Options’ tab.
② Place the camera in the location you want to save, and then
press the enter button.
③ After the setting is completed, if you press the near or
distance view button, the camera goes to the set position.
Set the camera direction
① Press the menu button.
② Select “camera direction” from the ‘Options’ tab.
③ Choose from a Vertical or Horizontal.
Joystick sensitivity
① Bring up the Menu and select “Joystick sensitivity” from the
‘Options’ tab.
② If you select the auto scroll, Speed will vary depending on
the slope of a joystick. When set to a specific speed,
regardless of the tilt of the joystick scrolling occurs at the set
speed.
4) Initialization
① Set the settings back to the factory defaults.
② Bring up the Menu and Select “Initialization” from the “Options”
tab.
③ You can initialize settings in the “Options” tab, in the “OCR” tab,

47
or initialize all settings.
Initialize Options: Initialize settings in the Options tab of the
Menu.
Initialize OCR: Initialize settings in the OCR tab of the Menu.
Initialize all settings: Initialize all settings including options
tab and OCR tab settings.
5) Information
Use this option to check general information about the E-bot.
① Bring up the Menu and select “Information” from the “Options”
tab.
② Here, you can check the following information about E-bot:.
Software version
Products serial number
Remaining battery
Wi-Fi AP
Information of wireless remote control
6) Wi-Fi password change
An eight -digit number is needed to connect E-bot to Wi-Fi using an
iPad, Android tablet or PC. The default password is 00000000. To
change the password, follow the instructions below:
① Bring up the Menu and select “Wi-Fi password change” in the
“Options” tab.
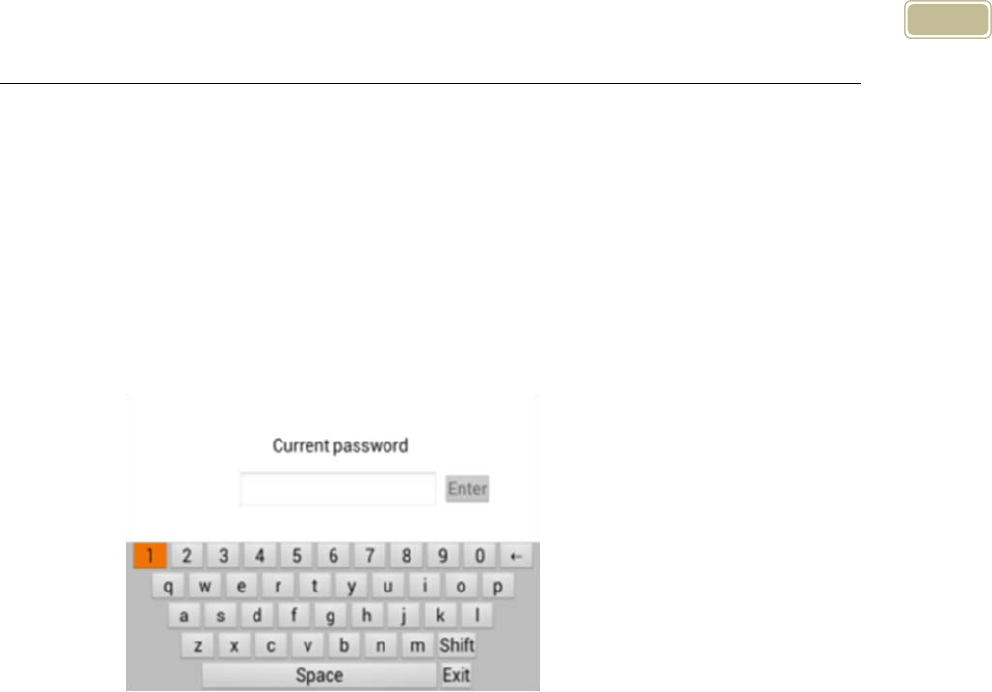
② A window asking for the current password appears. Input the
password using the virtual keyboard on the screen. Use the
arrow keys to navigate to the character you want to type, and the
Enter button to input the character. Input the current password
and press Enter on the virtual keyboard.
48
③ A window asking for the new password appears. Input the 8-digit
password in the manner described above.
④ A window asking you to reconfirm the password to change
appears. Input the new password again.
⑤ When you have finished the above steps, the new password is
set.
7) Keyboard Hot keys
When using the E-bot Viewer application on your PC to display and
control E-bot, you can use your keyboard and mouse to control e-
bot’s functions.
Users can even define the hotkeys to use E-bot more conveniently
for them.
① Bring up the Menu and select “Hotkey change” in the “Options”
tab.
② A list of hot keys is displayed. Select one of the hot keys in the
list.
49
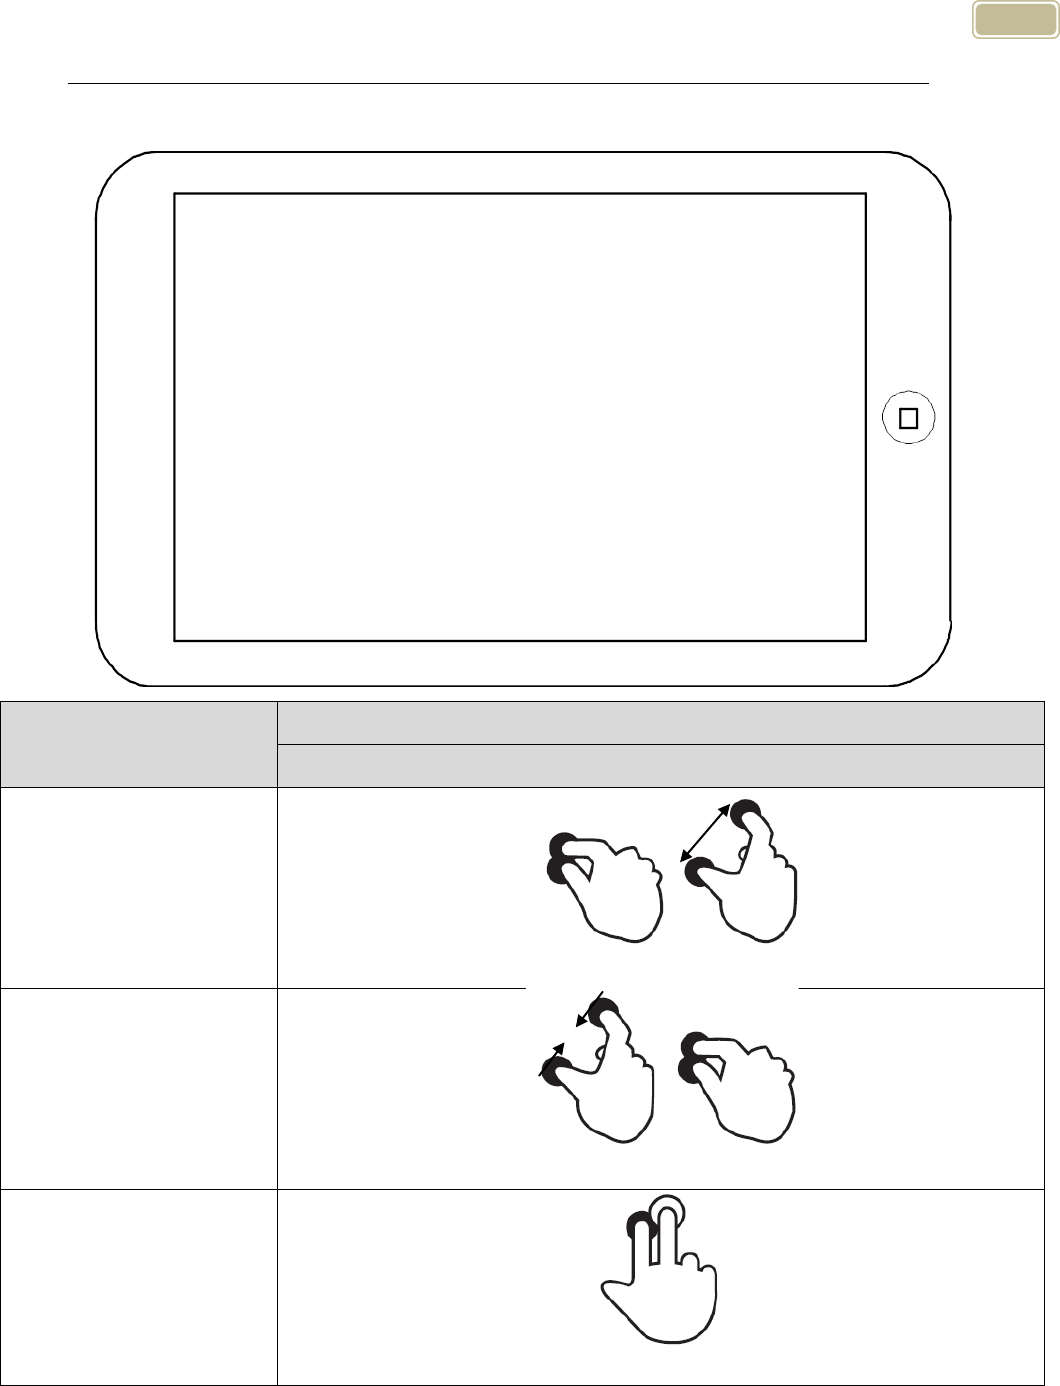
Tablet Viewer Gestures
Functions
Tablet
Gesture
Zoom In
(Field 1) Move fingers away from each other
Zoom Out
(Field 1) Pinch fingers towards each other
Find Position
(Field 2) Two-finger one-tap more than 2 seconds
50
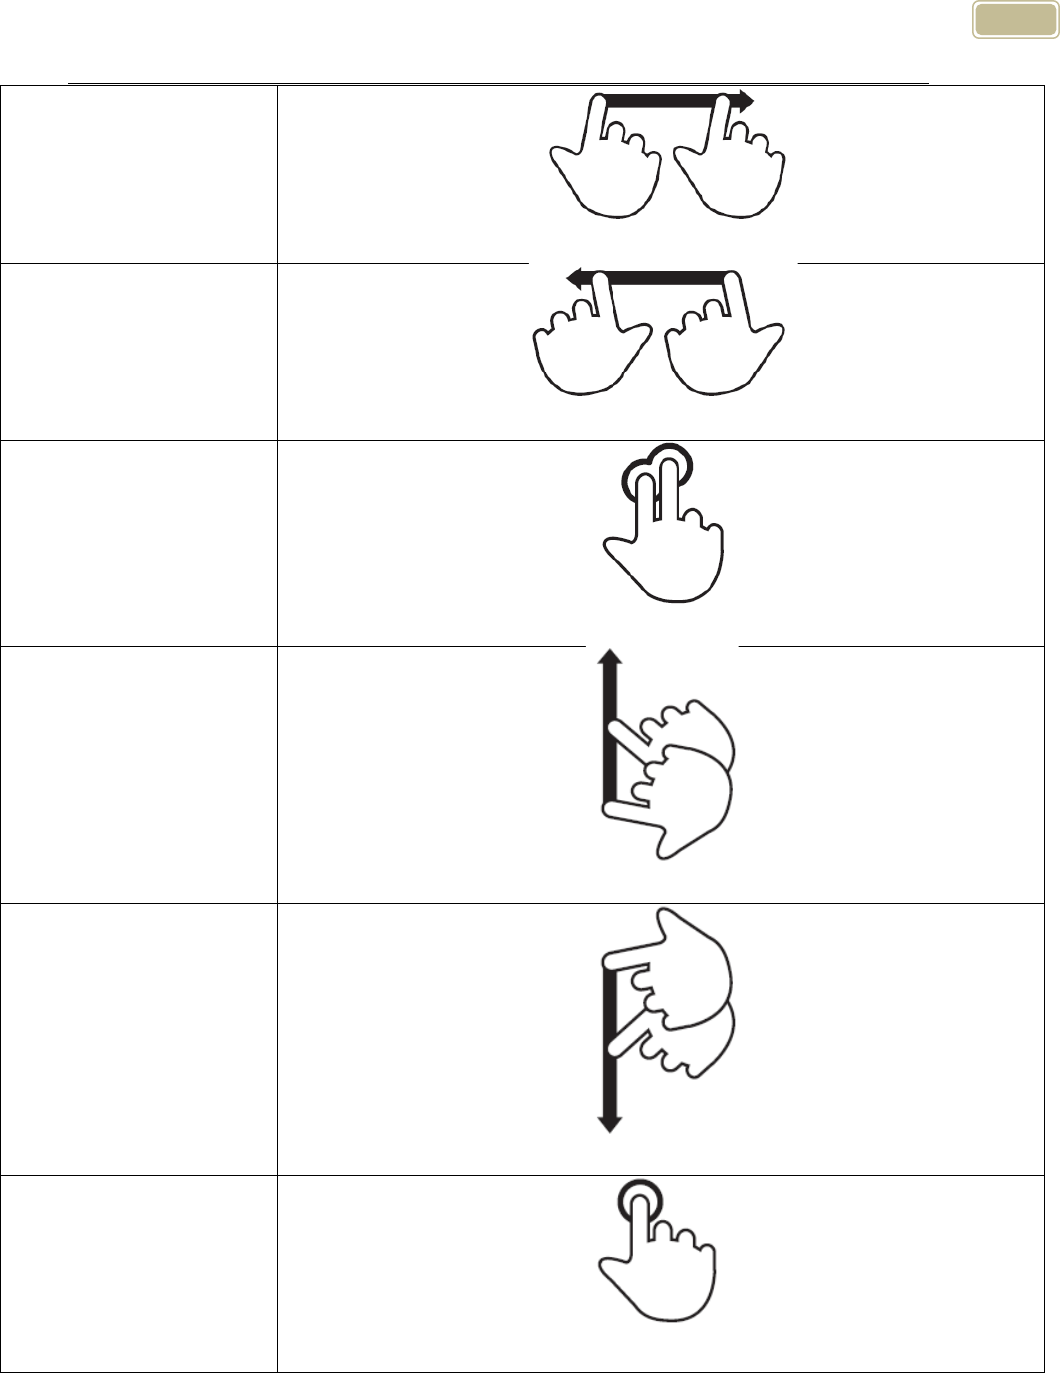
Next color mode
(Field 2) One-finger flick to right
Previous color mode
(Field 2) One-finger flick to left
Switch to
Natural Color Mode
(Field 2) Two-finger double-tap
Contrast Up
(Field 3) One finger flick to up
Contrast Down
(Field 3) One finger flick to down
Freeze
(Field 1) One finger Double-tap
51
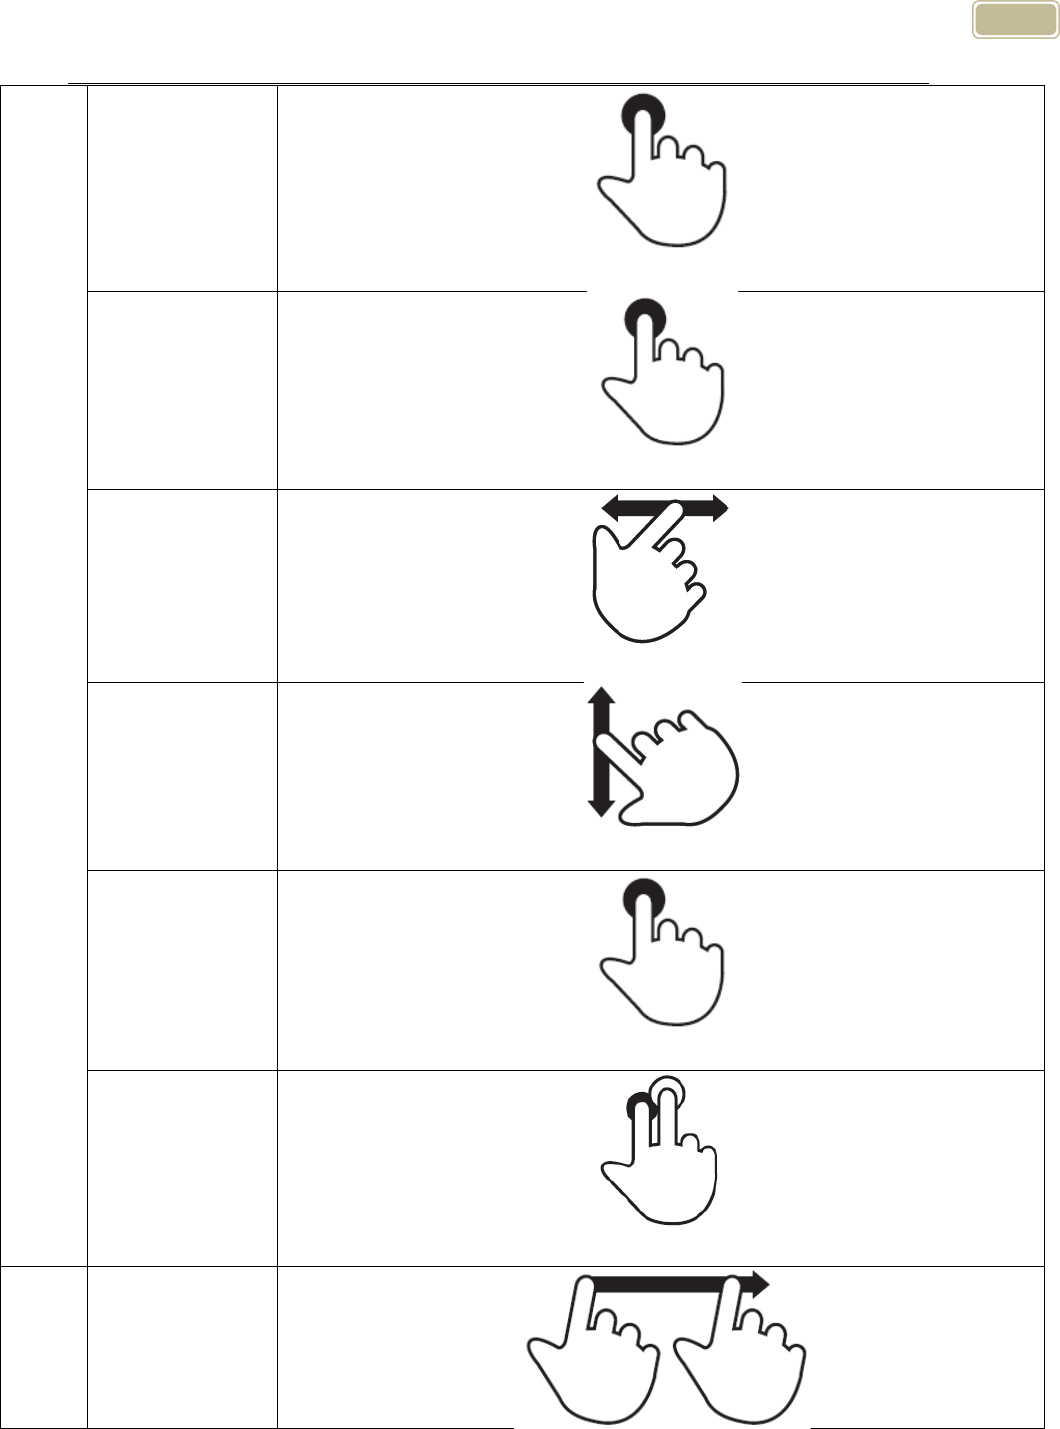
OCR
OCR Execution
(Field 2) One finger Tap for more than 2 seconds
OCR Play/ Pause
(Field 1) One finger Double-tap
Move Sentence
(Field 1) One finger flick to left or to right
Move
paragraph
(Field 1) One-finger flick up or down
OCR Exit
(Field 2) One finger Tap for more than 2 seconds
OCR mode
↔ Camera
Preview
(Field 2) In OCR mode, Two-finger one-tap more than 2 seconds
Menu
Open
52
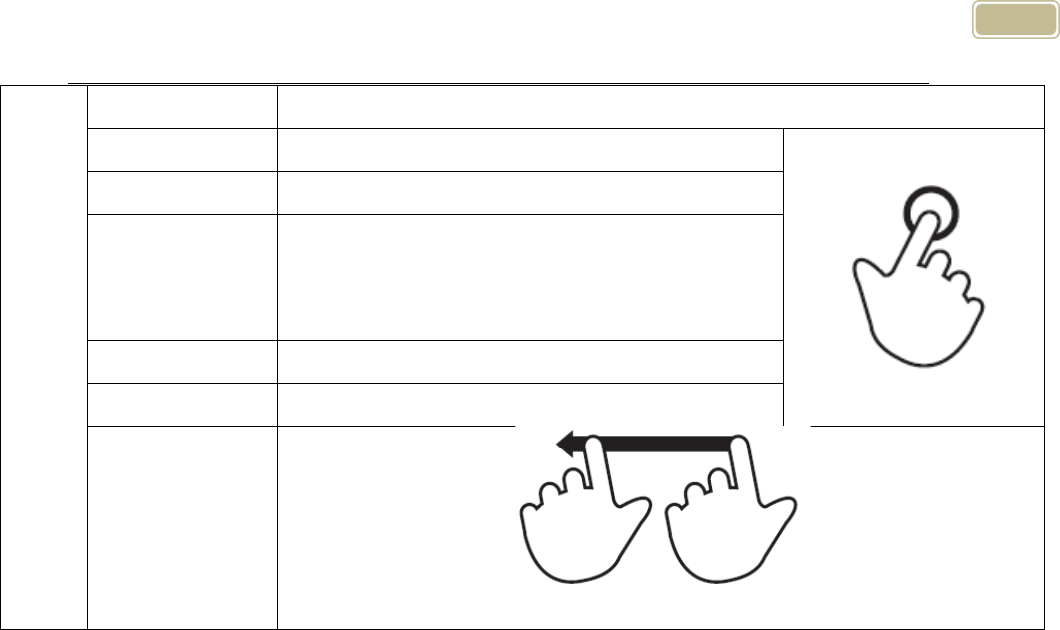
One finger Tap on the left end of the screen and flick to right
Moving tap
One finger Tap on the tap
Move an item
One finger Tap on the wanted item
Select / Set /
Enter the sub-
item
One finger Tap on the wanted item
Save
One finger Tap on the confirm icon
Cancel / Exit
One finger Tap on the cancel icon
Close
One finger Tap on the right end of the screen and flick to left
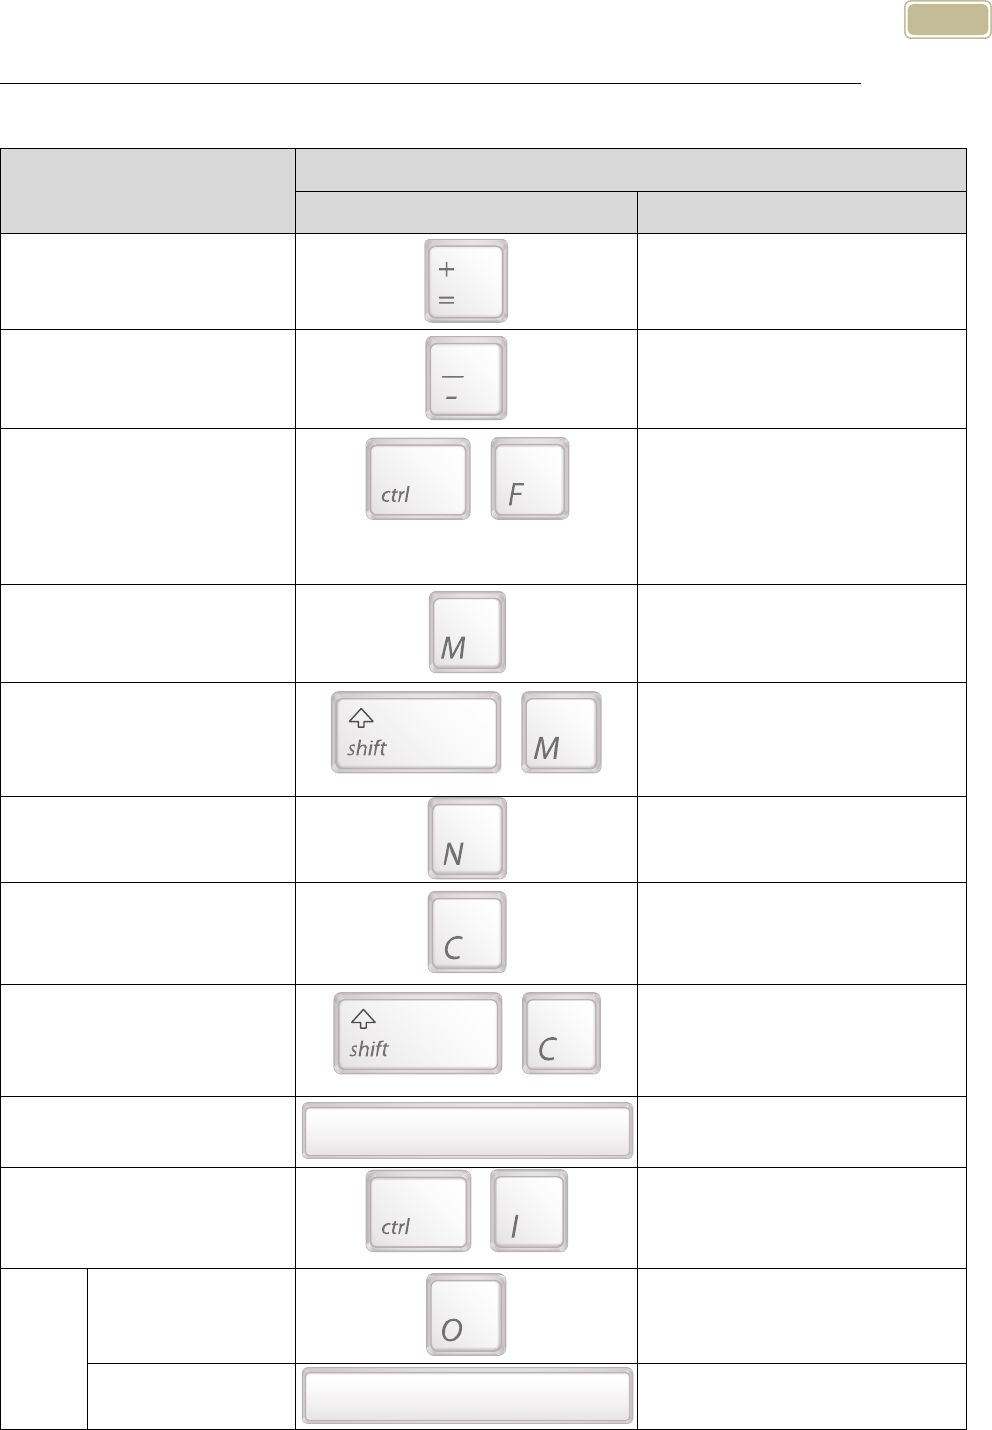
53
Quick Guide to PC operations
Function
PC
Keyboard
Mouse
Zoom-in
Wheels up
Zoom-out
Wheels down
Find position
+
For more than 2 seconds
-
Next Color
Left-click
Previous Color
+
Right-click
Quick color change
-
Increase Contrast
-
Decrease Contrast
+
-
Freese
-
Focus Lock
+
-
OCR
Execution
Click Wheel
Play/Pause
-
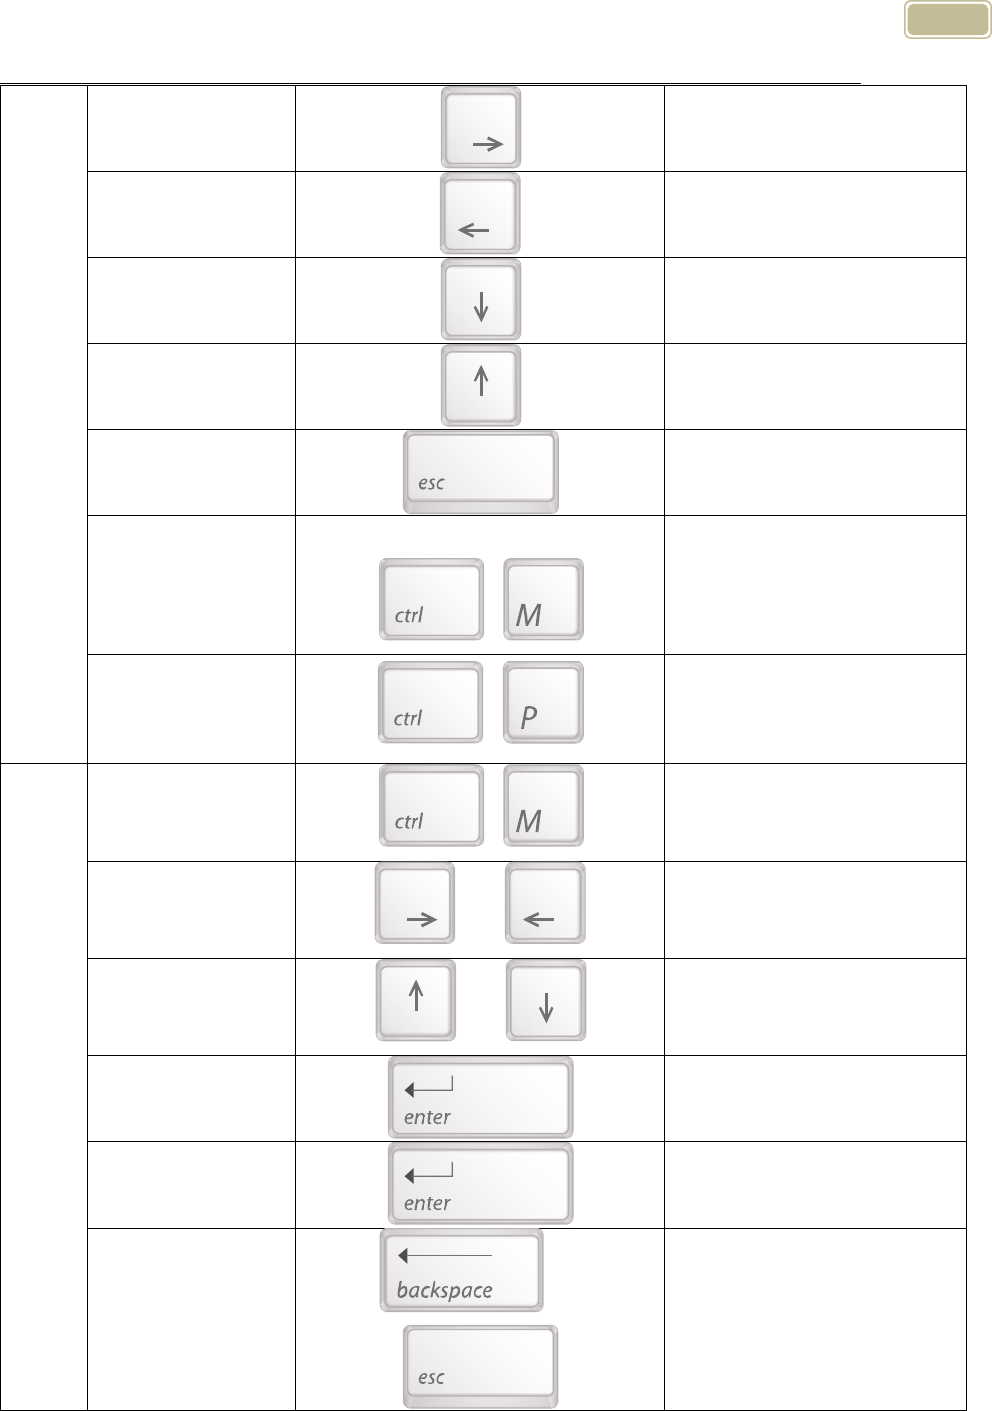
54
OCR
Next Sentence
-
Previous Sentence
-
Next paragraph
-
Previous
paragraph
-
Exit
-
Bring OCR menu
(In OCR mode)
+
(In OCR mode)
Right-click
OCR Mode
↔ Real View mode
+
Menu
Open
+
Right-click
Moving tap
or
Left-click on the item
Move an item
or
Left-click on the item
Select Items
Left-click on the item
Save Settings
Left-click on the item
Cancel Settings
OR
Left-click Exit
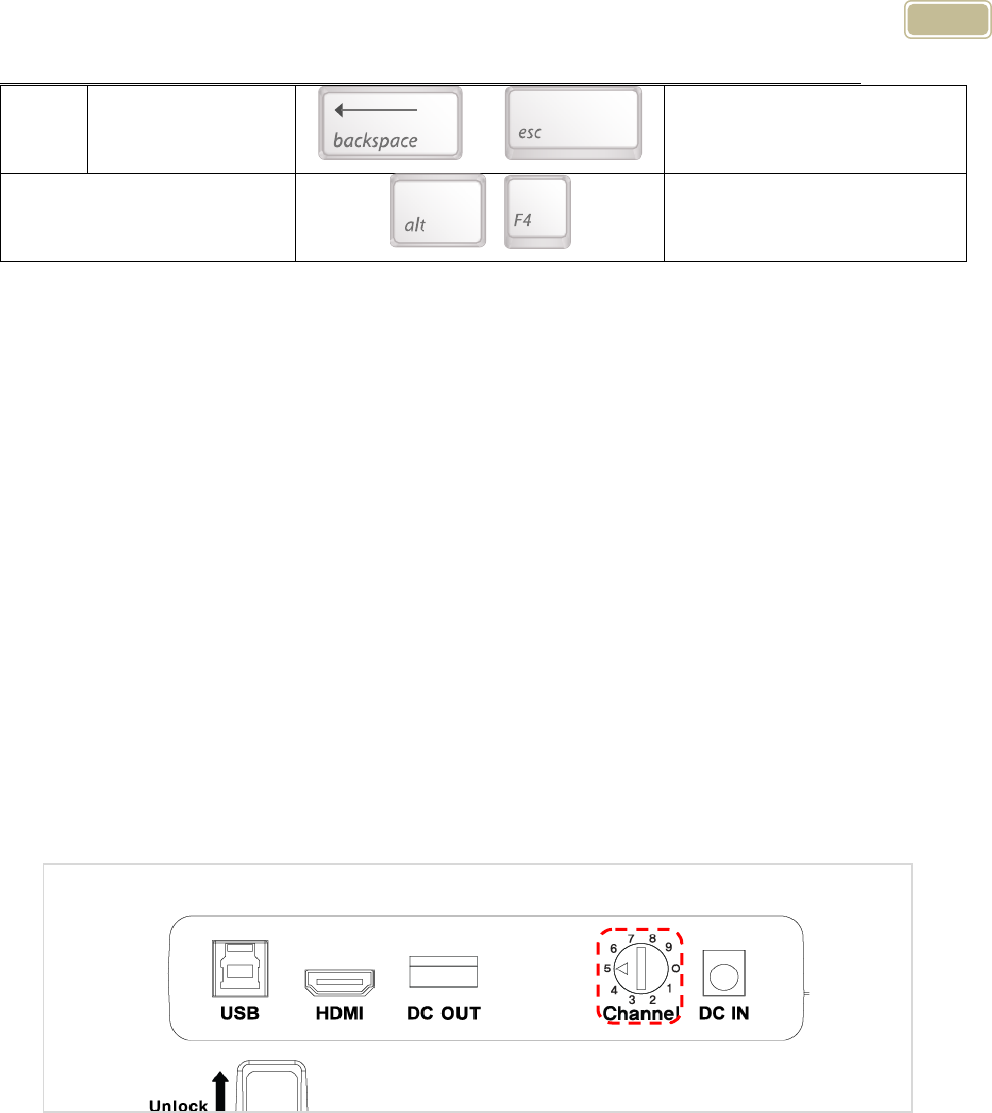
55
Close
OR Left-click Exit
Exit program
+
Troubleshooting
1) When the wireless controller does not work
The main body and the connected controller’s channel setting value
must be set the same for the controller to operate E-bot properly. If
there are two or more E-bots in the same place, settings must be
set differently, so that the controllers do not control the wrong E-bot,
etc.
Check the Main body channel values
① Please check the channel values on the rear of the Main
body. An Arrow is pointing to the number currently set.
Checking the wireless remote control channel value
① Remove the battery cover from the back of the remote
control.
② Check the channel setting switch. It can set the channel
values as shown in the below picture. Make sure it is set to
the same channel value as the one shown on the main body
56
of your E-bot. If the channel value is different, please use (-)
a screw driver or your fingernail to change the setting.
※ Changing the battery of the wireless controller, if the wireless
controller does not operate even though the channel value is
the same, please change the battery in the wireless controller.
2) Even though the values are the same channel, wireless remote
control does not operate normally
Replace the batteries in the wireless remote control.
3) The product does not turn on when you press the power button
Make sure the product’s arm is folded.
A/S
Manufacturer: HIMS International
Manufacturer Address: 174 Gajeong-ro, Yuseong-gu,
Daejeon, Korea 305-350
E-mail: sale@himsintl.com
Phone Number: 042-864-4601

57
FAX: 042-864-0133

58
An FCC warning
NOTE: This equipment has been tested and found to comply with
the limits for a Class B digital device, pursuant to part 15 of the FCC
Rules. These limits are designed to provide reasonable protection
against harmful interference in a residential installation.
This equipment generates uses and can radiate radio frequency
energy and, if not installed and used in accordance with the
instructions, may cause harmful interference to radio
communications. However, there is no guarantee that interference
will not occur in a particular installation. If this equipment does
cause harmful interference to radio or television reception, which
can be determined by turning the equipment off and on, the user is
encouraged to try to correct the interference by one or more of the
following measures:
- Reorient or relocate the receiving antenna.
- Increase the separation between the equipment and receiver.
- Connect the equipment into an outlet on a circuit different from that
to which the receiver is connected.
- Consult the dealer or an experienced radio/TV technician for help.
CAUTION: Changes or modifications not expressly approved by the
manufacturer responsible for compliance could void the user’s
authority to operate the equipment.
FCC Information to User
This equipment has been tested and found to comply with the limits for a Class B digital device,
pursuant to Part 15 of the FCC Rules. These limits are designed to provide reasonable
protection against harmful interference in a residential installation. This equipment generates,
uses and can radiate radio frequency energy and, if not installed and used in accordance with
the instructions, may cause harmful interference to radio communications. However, there is no
guarantee that interference will not occur in a particular installation. If this equipment does
cause harmful interference to radio or television reception, which can be determined by turning
the equipment off and on, the user is encouraged to try to correct the interference by one of the
following measures:
• Reorient or relocate the receiving antenna.
• Increase the separation between the equipment and receiver.
• Connect the equipment into an outlet on a circuit different from that to which the receiver is
con-nected.
• Consult the dealer or an experienced radio/TV technician for help.
Caution
Modifications not expressly approved by the party responsible for compliance could void the
user’s authority to operate the equipment.
FCC Compliance Information : This device complies with Part 15 of the FCC Rules.
Operation is subject to the following two conditions: (1) This device may not cause harmful
interference, and (2) this device must accept any interference received, including interference
that may cause undesired operation
Information to user.
The users manual or instruction manual for an intentional or unintentional radiator shall caution
the user that changes or modifications not expressly approved by the party responsible for
compliance could void the user's authority to operate the equipment. In cases where the manual
is provided only in a form other than paper, such as on a computer disk or over the Internet, the
information required by this section may be included in the manual in that alternative form,
provided the user can reasonably beexpected to have the capability to access information in
that form.
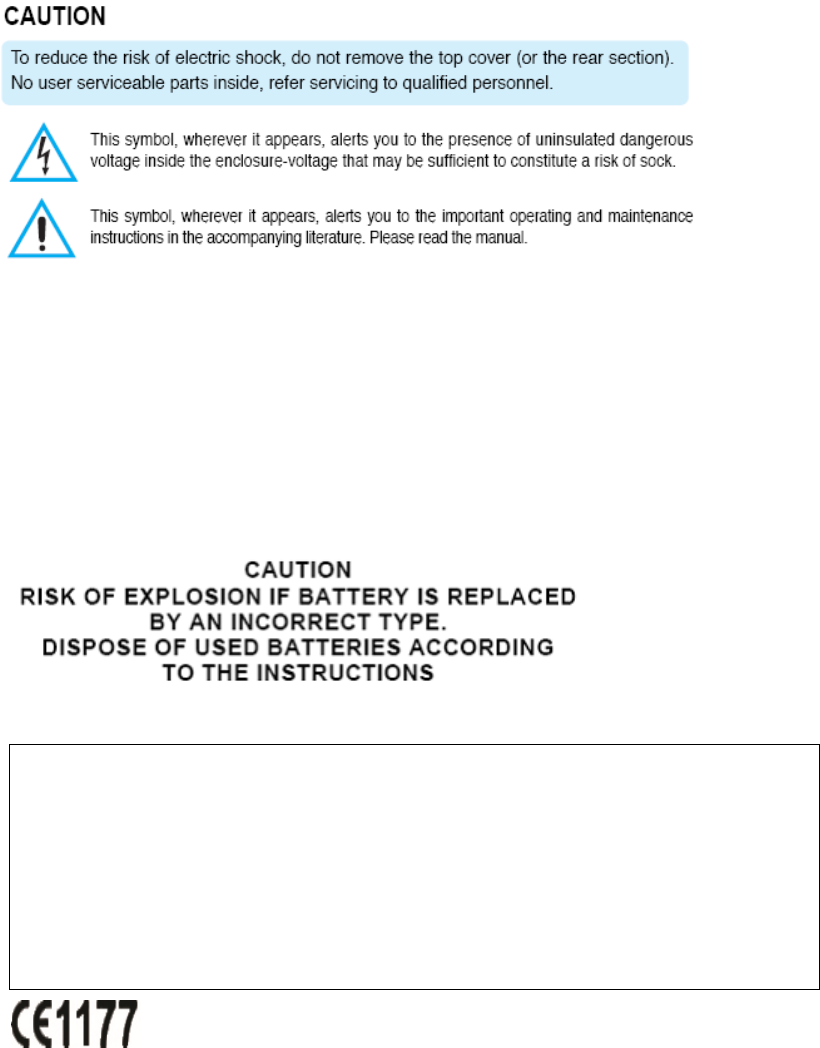
IMPORTANT NOTE:
IMPORTANT Safety Instruction:
1) Read these instructions.
2) Keep these instructions.
3) Heed all warnings.
4) Follow all instructions.
5) Do not use this equipment near water.
6) Do not using near any heat sources such as radiators, heat resisters, stove, or other
equipment that produce heat.
European CE notice to users and product statements
This product is CE marked according to the provisions of the R&TTE
Directive(99/5/EC). Hereby, HIMS International Corporation declares that
this product is in compliance with the essential requirements and other
relevant provisions of Directive 1999/5/EC.
For further information, please contact http:// www.himsintl.com
HIMS International Corporation
174, Gajeong-ro, Yuseong-gu,Daejeon, KOREA 305-350
Tel: +82-42-864-4460 / Fax: +82-42-864-4462
URL: www.himsintl.com
CONTACT INFORMATION
Manufacturer Address : 174, Gajeong-ro, Yuseong-gu,Daejeon, KOREA 305-350
To locate in-country HIMS International Corporation, distributors of the Remote Controller (E-bot PRO
Controller) please refer to the HIMS International Corporation Website http://www.himsintl.com
These distributor(s) represent local contacts for this product.
CORPORATE HEADQUARTERS:
HIMS International Corporation
174, Gajeong-ro, Yuseong-gu,Daejeon, KOREA 305-350
Tel: +82-42-864-4460
Fax: +82-42-864-4462
Web: http://www.himsintl.com
This device complies with Industry Canada license-exempt RSS standard(s).
Operation is Subject to the following two condition: (1) this device may not cause interference
,and (2) this device must accept any interference, including interference that may cause undesired
operation of the device.

EUROPEAN UNION “DECLARATION OF CONFORMITY”
DECLARATION OF CONFORMITY
HIMS International Corporation
174, Gajeong-ro, Yuseong-gu,Daejeon, KOREA 305-350
declare under our sole responsibility that the product(s)
Remote Controller (E-bot PRO Controller) – EB100PC
to which this declaration relate(s) is in conformance with the following standards:
EN 301 489-1 V1.9.2:2011
EN 301 489-3 V1.5.1:2012
EN60950-1:2006+A12:2012
EN 300 220-1 V2.4.11:2012
EN 300 220-2 V2.4.11:2012
following the provisions of the 1999/5/EC Directives.