HM Electronics HS6100 Headset for wireless intercom system User Manual Operating Instructions Sheet
HM Electronics Inc Headset for wireless intercom system Operating Instructions Sheet
User Manual
HS6100
HM ELECTRONICS, INC. 14110 Stowe Drive, Poway, CA 92064 USA • Phone: 1-800-848-4468 Fax: (858) 552-0172
HME# 400G653
Rev A 6/22/10
Wireless Headset
OPERATING INSTRUCTIONS
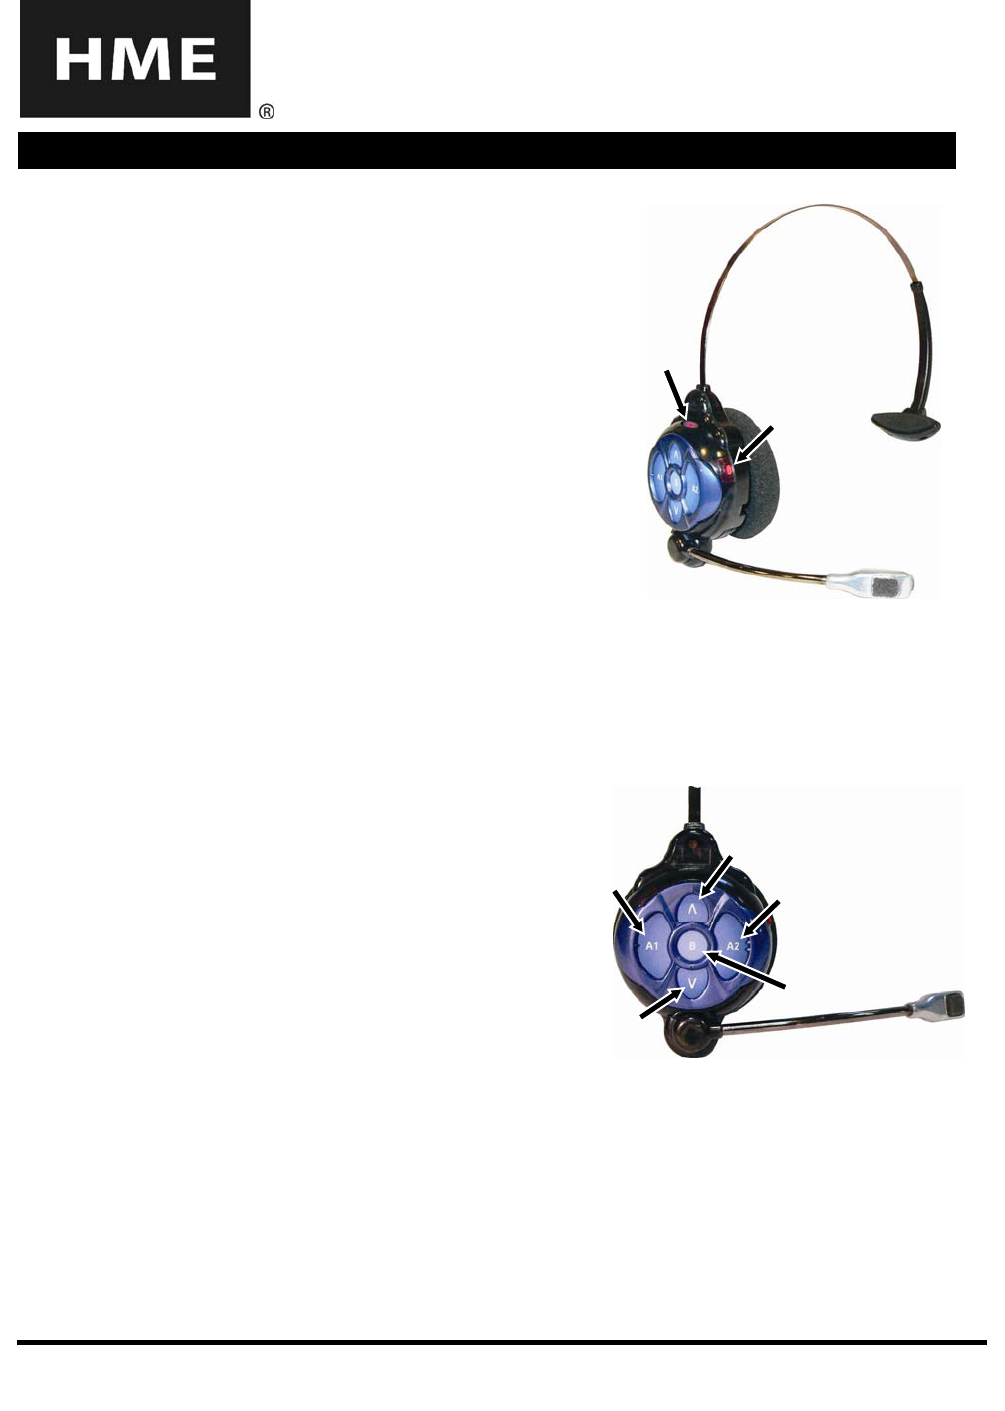
Power
light
Power
b
utton
SETUP
Power On/Off
To turn the power on
Press and release the red power button on the headset
earpiece. A voice message in the earpiece will say
“Headset #, Battery Full/Half/Low” and the red power
light will begin blinking. See Figure 1.
To turn the power off
Press and hold the power button for approximately
3 seconds. A voice message in the earpiece will say
“Headset off,” and the power light will go off.
Figure 1. Headset power button
and power light
Configure Headset
Start with power OFF and press any of the following button combinations while turning the power ON.
Immediately release all buttons after pressing the power button. Each of these settings has an
associated voice prompt. Listen to the voice prompt to confirm the setting.
• Hands Free (HF) on/off – Press and hold B and the
UP arrow S while you press the power button to turn
the headset on in the HF mode. With the power off,
press and hold B and the DOWN arrow T while you
press the power button to turn off the HF mode.
Figure 2. Headset buttons
B
T
A1 A2
S
• Auto HF (AHF) – Press and hold A1 or A2 and the
UP arrow S while you press the power button to turn
the headset on in the Auto HF mode. Set the base
transceiver switch K1-3 to on (See Figure 4). When
you turn the unit off, the AHF mode will not be saved.
• “B” Channel HF (BHF) – Press and hold B and A2
while you press the power button to turn the headset
on in the BHF mode. This will keep the B channel
open to allow hands-free communication with other
crew members. If a customer arrives, B-channel
communication will automatically be interrupted to
allow communication with the customer on A1 or A2.
• Language selection – To change between English and another language, press and hold A1 and the
DOWN arrow T while you press the power button to turn the headset on. Doing this again changes
back to the first language.
• Play status – Press A2 and the DOWN arrow T while you press the power button to turn the
headset on. An example of the status you will hear is: “Headset #, Battery Full/Half/Low,
English/Espanol, Hands-free on/off, firmware version #.”
2
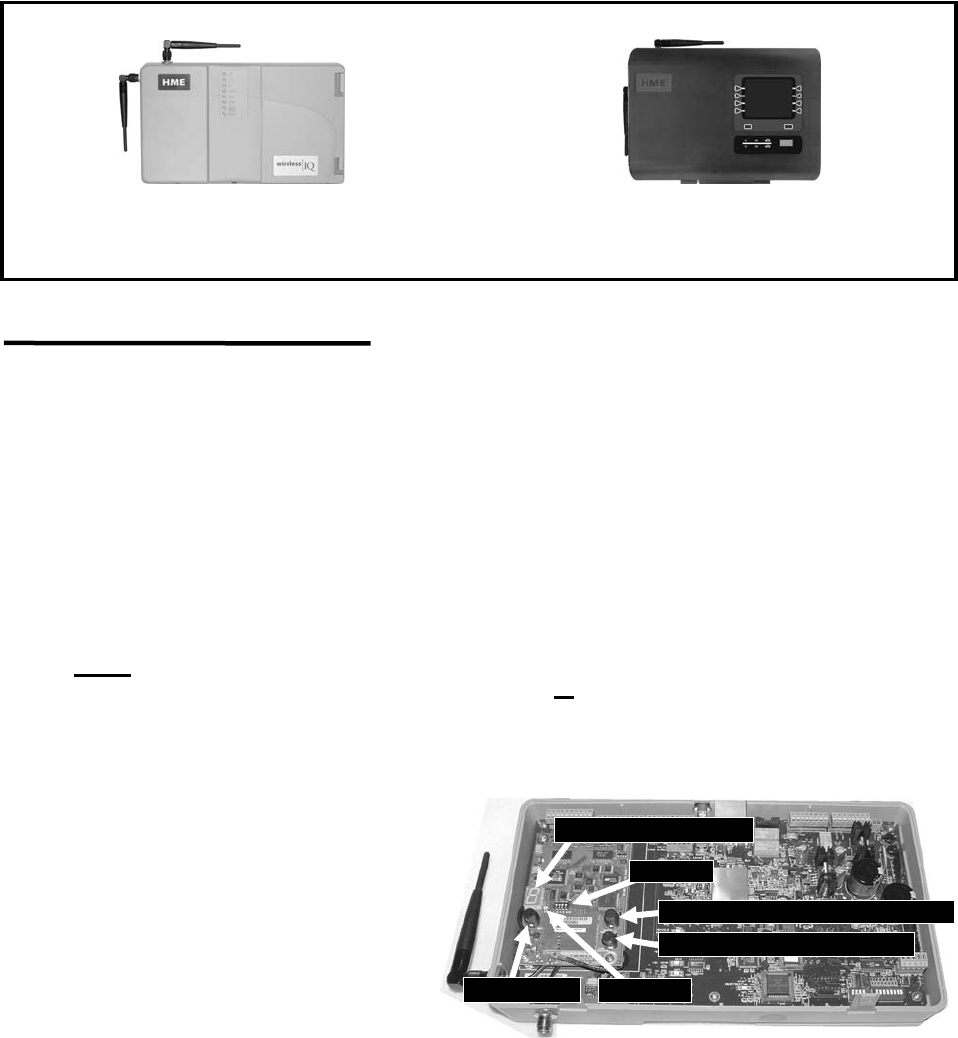
Headset Registration
Each HS6100 Headset must be registered for use with a specific base station. The base station thereby
recognizes all headsets registered to it when their power is on, and will be able to tell the difference between
them and other electronic equipment operating on similar frequencies. A maximum of 15 headsets can be
registered. If one is replaced, you must register the new one before you use it. When a headset is replaced,
the old one remains in memory. Register all active HS6100s the same way, one at a time.
NOTE: Headsets must be within 6 feet (1.83 meters) of the base station while being registered.
Figure 3. Wireless IQ™ and ionIQ™ base stations
If your base station looks like this If your base station looks like this
see registration instructions below see registration instructions on page 3
Wireless IQ™ base station ionIQ™ base station
For Wireless IQ™ Audio Systems, Register each Headset as follows:
NOTE: If the maximum number of 15 is exceeded, an “F” for Full will appear on the Communicator ID
display. You must clear all current registrations and re-register all active headsets. Refer to Figure 4.
Open the base station and press the CLEAR ALL REGISTRATION button and the RESET button at the
same time. Continue holding the CLEAR ALL REGISTRATION button after releasing the RESET
button, until “c” appears on the display.
• Be certain all headsets to be registered are turned off and the base station power is on. Other
headsets can be on or off.
• Open the base station and locate the items shown in Figure 4.
⎯ If no headsets are on, the status light will be blinking red. If any headsets are on, the status
light will be on steady green.
⎯ Press the START REGISTRATION button. The Communicator ID display will show a small
“o” for open, and the status light will be blinking green.
• Either press and hold the B button on the headset while pressing and releasing the power button
to turn the headset on, and then release the B button, or press the power button and hold it for
approximately 10 seconds. This will cause the headset to enter the registration mode.
⎯ The status light in the base station will be blinking green and the Communicator ID display will
continue to show a small “o” for open.
⎯ The headset power light will be blinking amber.
When the registration is
successfully completed:
RESET button
CLEAR ALL REGISTRATION button
START REGISTRATION button
Status light
K1 switch
Communicator ID display
• The green status light in the base
station will be on steady and the
Communicator ID display will show
the ID number assigned to this headset.
ID numbers are assigned sequentially
as 0 thru 9, A, b, C, d and E.
• The power light on the headset will
remain on steady green.
Figure 4. Registration buttons and indicators in base station
If registration failed:
• A message in the headset will say “Beltpac #, Battery Low/Half/Full, Registration …” The power
light will blink red and after a delay of up to 1.5 minutes you will hear “Registration failed.”
• Note the condition of the STATUS light in the base station. Press the RESET button. The STATUS
light may blink and change colors. When the STATUS light returns to its previous condition, press
the START REGISTRATION button and repeat the registration procedure.
• If the registration fails again - In the USA call HME Customer Support at 1-800-848-4468.
Outside the USA, call your local HME representative for help.
3
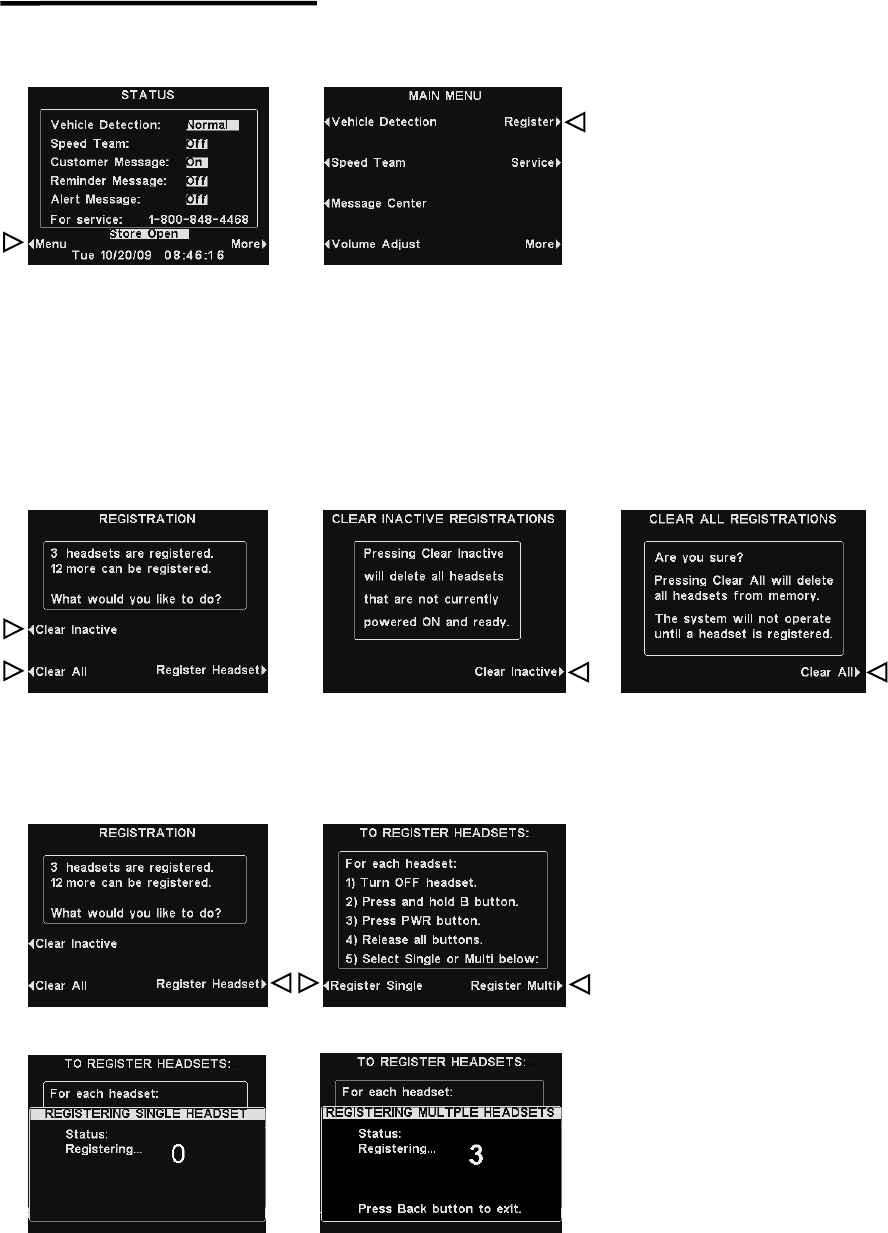
For ion IQ™ Audio Systems, register each COMMUNICATOR® as follows:
• On the ion IQ base station STATUS display, press the Menu button.
• On the MAIN MENU display, press the Register button.
• The REGISTRATION display indicates the number of headsets already registered and how many more
can be registered.
⎯ If you would like to unregister some of your headsets, turn OFF all the headsets you want to
unregister and turn ON all the headsets you want to remain registered, and then press the Clear
Inactive button on the REGISTRATION display to unregister all the headsets that are not turned on,
and press the Clear Inactive button on the CLEAR INACTIVE REGISTRATIONS display.
⎯ If you would like to unregister all of your headsets, press the Clear All button on the REGISTRATION
display and then press the Clear All button on the CLEAR ALL REGISTRATIONS display.
CAUTION:
When clearing all headsets, the base station will shut down and re-start.
• To register headsets, press the Register Headset button on the REGISTRATION display.
• On the TO REGISTER HEADSETS display, follow the instructions in the box.
• To register only one headset, press the Register Single button.
To register more than one headset, press the Register Multi button.
When each registration is successfully completed:
• The ID number assigned to this Communicator will be shown.
ID numbers are assigned sequentially as 0 thru 9, A, b, C, d and E.
• The power light on the Communicator will remain on steady green.
• When you have finished registering Communicators, press the Back button to exit the registration mode.
You can repeat pressing the Back button until you return to the MAIN MENU or STATUS display.
4
OPERATION
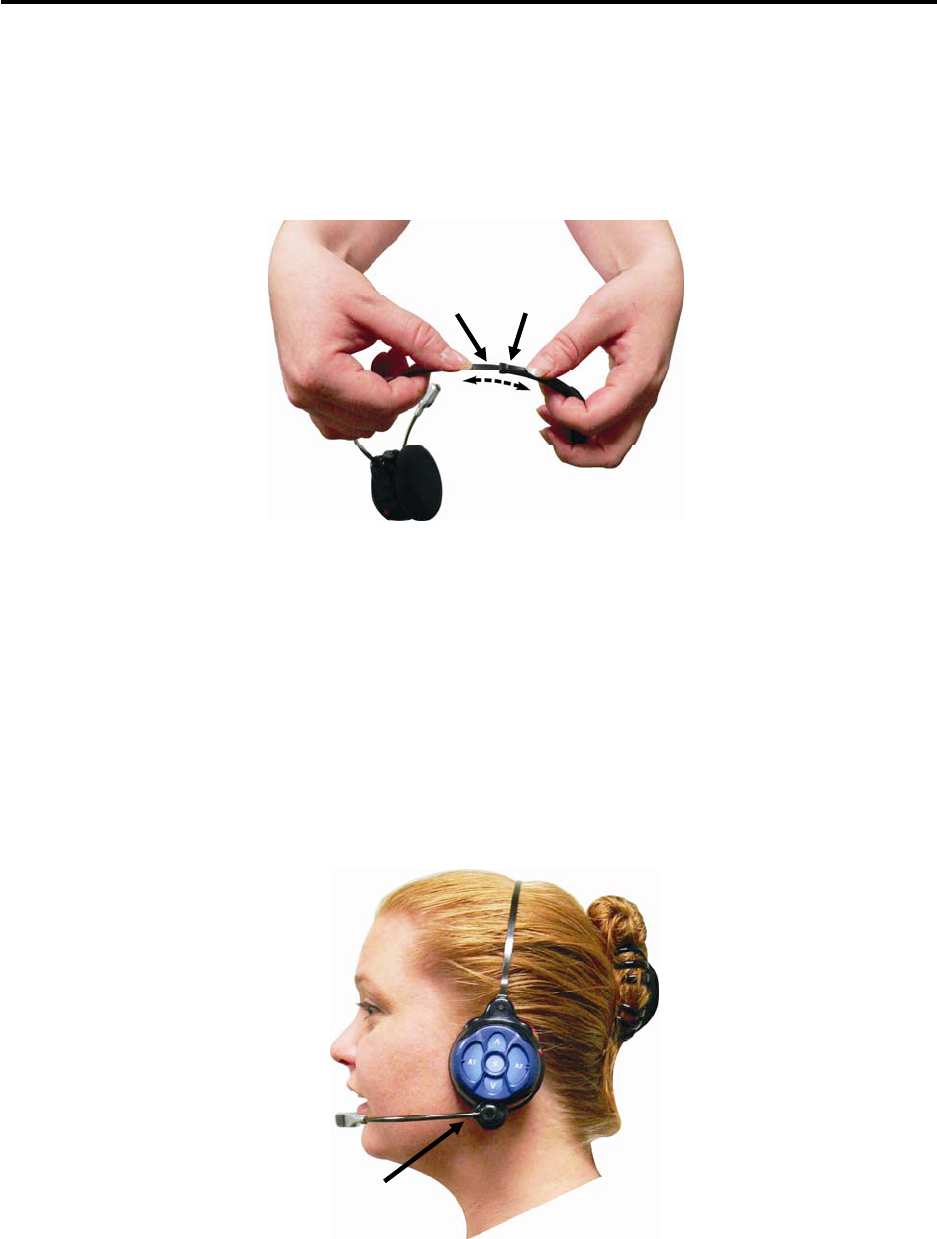
Wearing the Headset
Adjust the Headset to Your Head Size
You can adjust the head size of HS6100 for best fit by sliding the metal headband in or out of its
plastic size adjuster, as show in Figure 5.
Size
adjuster
Metal
b
and
Figure 5. Headset size adjustment
Put the Headset on
• The headset can be worn with the microphone and controls on either side of your head.
• Put the headset on your head, with the headset band behind your neck as shown in Figure 6.
• Hold the microphone boom at its base and adjust it so the microphone is near the side of your mouth.
Hold microphone boom here
to adjust microphone position.
Figure 6. Correct wearing of the headset
5
Talking to Customers
With your fingertip, press and release either the A1 or the A2 button and speak into the microphone. You
will hear a single tone in the headset, indicating the microphone is on. When you have finished talking to
the customer, press the A1 or A2 button again. You will hear a double tone in the headset, indicating the
microphone is off.
NOTE: In the Auto-Hands-Free mode, the headset will automatically stop transmitting when the car
drives away.
Talking to Other Crewmembers
Press and hold the B button and speak into the microphone.
Release the button when you finish speaking.
Battery
Battery-release latch
(blue button)
Changing Batteries
When a battery is becoming weak, a voice
in the earpiece will say “Change battery.”
When this happens, remove the battery from
the headset by pressing the blue battery-release
latch and carefully sliding the battery out of the
earpiece, as shown in Figure 7.
Figure 7. Battery release
Recharging Batteries
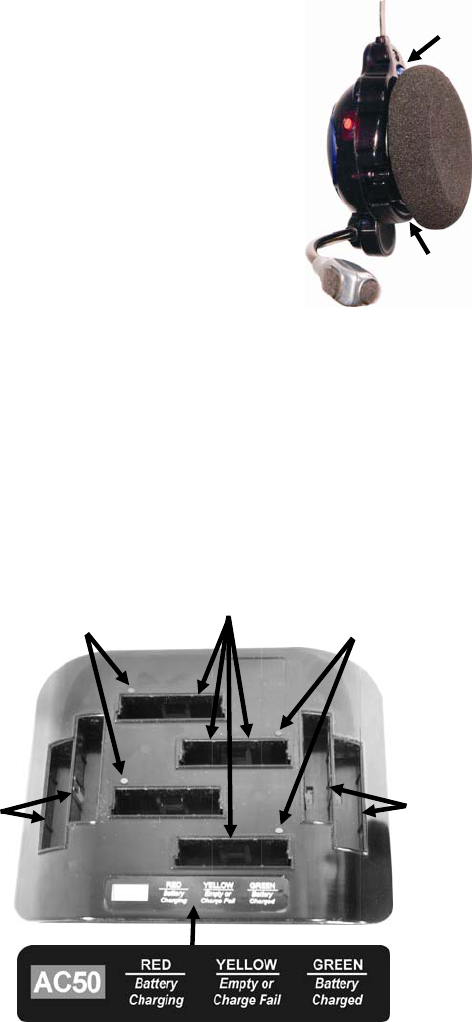
Place a battery in one of the four charging ports on the AC50 battery charger, as shown in Figure 8.
The battery status lights indicate the charging status, as shown on the battery status guide at the bottom
of the AC50 front panel. When a battery charging port is empty, its status light will be yellow. When you
place a battery in a port for charging, its status light will turn red. When a battery is fully charged, its
status light will turn green. Install fully charged batteries in headsets or store them in the storage ports
until they are needed. Battery charging time is approximately 2.5 hours.
Battery
charging ports
Battery
status lights
Battery
storage ports
Battery
stora
g
e
p
orts
Battery
status lights
Figure 8. AC50 battery charger

6
Routine Operation
SINGLE-LANE OPERATION
(one base station for one speaker post) DUAL-LANE OPERATION
(two base stations for two speaker posts)
Hands-Free (HF) Mode: Hands-Free (HF) Mode:
• Alert tone (single beep) sounds in headset, then
customer at speaker post or menu board can be heard.
• Adjust customer’s voice level with up and down
arrows on headset if necessary.
• Press and release A1 or A2 button to speak and
listen to customer. A single beep will be heard and
light on headset will come on when headset begins
transmitting.
• Press and release A1, A2 or B button to end
communication with customer. Two beeps will be
heard and light on headset will go off when headset
stops transmitting.
• Press and release A1 or A2 button if you want to
speak to the customer again. A single beep will be
heard and light on headset will come on when
headset begins transmitting.
• If customer drives away from speaker post or
menu board, headset automatically stops
transmitting. Light on headset will go off.
• Alert tone (single beep for Lane 1, double beep for Lane 2)
sounds in headset, then customer at speaker post or menu board
can be heard.
• Adjust customer’s voice level in headset if necessary.
• Press and release A1 button for Lane 1, A2 for Lane 2, to
speak and listen to customer. A single beep will be heard and
light on headset will come on when headset begins transmitting.
• Press and release A1, A2 (depending on lane) or B button to
end communication with customer. Two beeps will be heard and
light on headset will go off when headset stops transmitting.
• Press and release A1 button for Lane 1 or A2 for Lane 2, to
speak to the customer again. A single beep will be heard and
light on headset will come on when headset begins transmitting.
• To change lanes, press and release the opposite A button. A
voice in the headset will say “Lane 1” or “Lane 2.”
• If customer drives away from speaker post or menu board,
headset automatically stops transmitting. Light on headset will
go off.
Auto Hands-Free (AHF) Mode: Auto Hands-Free (AHF) Mode:
NOTE: Only one headset can be set for Auto Hands-Free at a time.
• Alert tone (single beep) sounds in headset, then
customer at speaker post or menu board can be heard.
• Adjust customer’s voice level with up and down
arrows on headset if necessary.
• Speak and listen to customer without pressing any
buttons. A single beep will be heard and light on
headset will come on when headset begins
transmitting.
• Press and release A1, A2 or B button to end
communication with customer. Two beeps will be
heard and light on headset will go off when headset
stops transmitting.
• Press and release A1 or A2 button if you want to
speak to the customer again. A single beep will be
heard and light on headset will come on when
headset begins transmitting.
• If customer drives away from speaker post or menu
board, headset automatically stops transmitting.
Light on headset will go off.
• Alert tone (single beep for Lane 1, double beep for Lane 2)
sounds in headset, then customer at speaker post or menu board
can be heard.
• Adjust customer’s voice level in headset if necessary.
• Speak and listen to customer without pressing any buttons. A
single beep will be heard and light on headset will come on
when headset begins transmitting.
• Press and release A1, A2 (depending on lane) or B button to
end communication with customer. Two beeps will be heard
and light on headset will go off when headset stops transmitting.
• Press and release A1 button for Lane 1 or A2 for Lane 2, to
speak to the customer again. A single beep will be heard and
light on headset will come on when headset begins transmitting.
• If customer drives away from speaker post or menu board,
headset automatically stops transmitting. Light on headset will
go off.
Push-To-Talk (PTT) Mode: Push-To-Talk (PTT) Mode:
• Alert tone (single beep) sounds in headset, then
customer at speaker post or menu board can be heard.
• Adjust customer’s voice level with up and down
arrows on headset if necessary.
• Press and hold A1 or A2 button to speak to
customer. A single beep will be heard when headset
begins transmitting. Light on headset will be on
while headset is transmitting.
• Alert tone (single beep for Lane 1, double beep for Lane 2)
sounds in headset, then customer at speaker post or menu board
can be heard.
• Adjust customer’s voice level in headset if necessary.
• Press and hold A1 button to speak to customer in Lane 1; A2
to speak to customer in Lane 2. A single beep will be heard
when headset begins transmitting. Light on headset will be on
while headset is transmitting.
• To change lanes, press and release the opposite A button.
A voice in the headset will say “Lane 1” or “Lane 2.”
Crew Hands-Free (CHF) Mode:
• Press and release B button to speak and listen to other crew members. A single beep will be heard and light on headset
will come on when headset is transmitting.
• Press and release B button to end communication with crew members. Two beeps will be heard and light on headset
will go off when headset stops transmitting.
• Press and release B button if you want to speak to crew members again.
NOTE: Pressing A1, A2 or B and talking when someone else is talking will not stop them from being heard, but
you and the other person will be heard at the same time.
7
FCC Regulations
This device complies with Part 15 of the FCC Rules. Operation is subject to the following two conditions: (1) This device may
not cause harmful interference, and (2) This device must accept any interference received, including interference that may cause
undesired operation.
This equipment has been tested and found to comply with the limits for Class B Digital Device, pursuant to Part 15 of the FCC Rules.
These limits are designed to provide reasonable protection against harmful interference in a residential installation. This equipment
generates and can radiate radio frequency energy and, if not installed and used in accordance with the instructions, may cause harmful
interference to radio communications. However, there is no guarantee that interference will not occur in a particular installation.
Any changes or modifications not expressly approved by HM Electronics, Inc. could void the user’s authority to operate the
equipment. To comply with FCC radiation exposure requirements, use of this device is limited to configurations tested and
approved by HM Electronics. Other accessories used with this device must not contain any metallic components.
This headset is a radio transmitter and receiver. When it is on, it receives and sends out RF energy. In August 1996, the U.S.
Federal Communications Commission (FCC) adopted RF exposure guidelines with safety levels for hand-held wireless devices.
These guidelines are consistent with the safety standards previously set by both U.S. and international standards bodies in the
following reports:
• ANSI C95.1 (American National Standards Institute, 1999)
• NCRP Report 86 (National Council on Radiation Protection and Measurements, 1986)
• ICNIRP (International Commission on Non-Ionizing Radiation Protection, 1996)
This headset complies with the standards set by these reports and the FCC guidelines.
Industry Canada (IC)
The term “IC:” before the certification/registration number only signifies that the Industry Canada technical specifications were met.
Operation is subject to the following two conditions: (1) This device may not cause harmful interference, and (2) This device
must accept any interference received, including interference that may cause undesired operation.
Hereby, HM Electronics, Inc. declares that the HS6100 is in compliance with the essential requirements and other relevant
provisions of R&TTE Directive 1999/5/EC.
This product operates in the 2400 to 2483.5 MHz frequency range.
Waste Electrical and Electronic Equipment (WEEE)
The European Union (EU) WEEE Directive (2002/96/EC) places an obligation on producers (manufacturers, distributors and/or
retailers) to take-back electronic products at the end of their useful life. The WEEE Directive covers most HME products being
sold into the EU as of August 13, 2005. Manufacturers, distributors and retailers are obliged to finance the costs of recovery
from municipal collection points, reuse, and recycling of specified percentages per the WEEE requirements.
Instructions for Disposal of WEEE by Users in the European Union
The symbol shown below is on the product or on its packaging which indicates that this product was put on the market after
August 13, 2005 and must not be disposed of with other waste. Instead, it is the user’s responsibility to dispose of the user’s
waste equipment by handing it over to a designated collection point for the recycling of WEEE. The separate collection and
recycling of waste equipment at the time of disposal will help to conserve natural resources and ensure that it is recycled in a
manner that protects human health and the environment. For more information about where you can drop off your waste
equipment for recycling, please contact your local authority, your household waste disposal service or the seller from whom you
purchased the product.