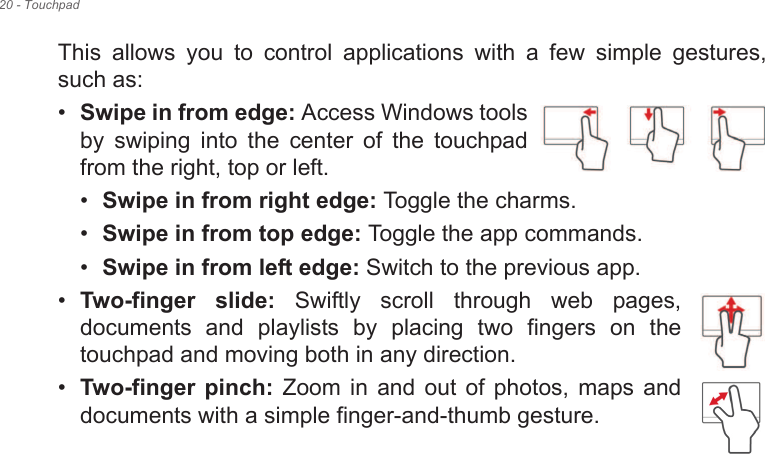
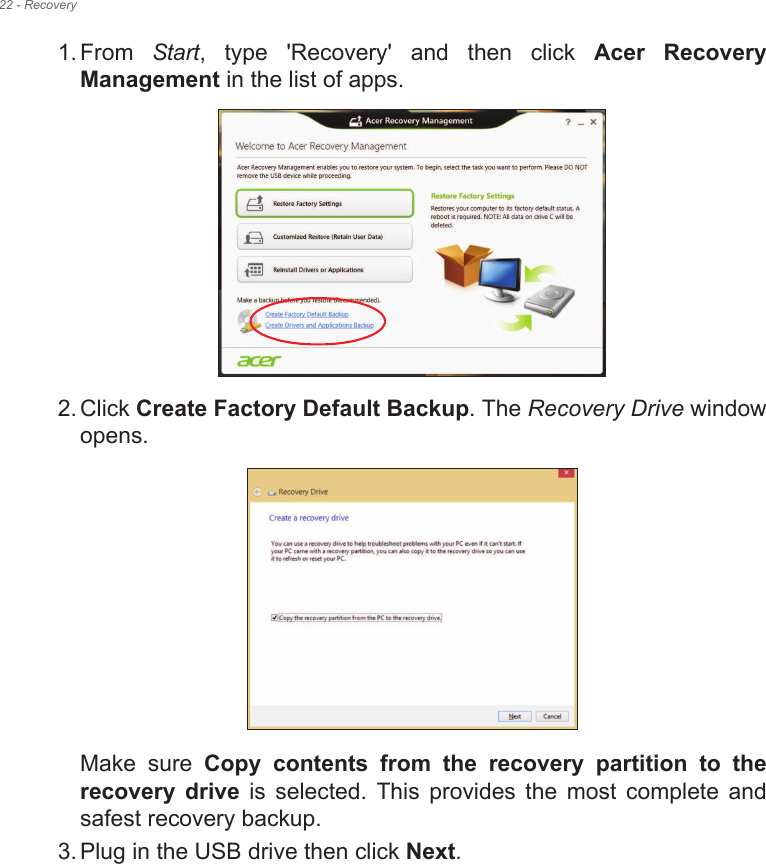
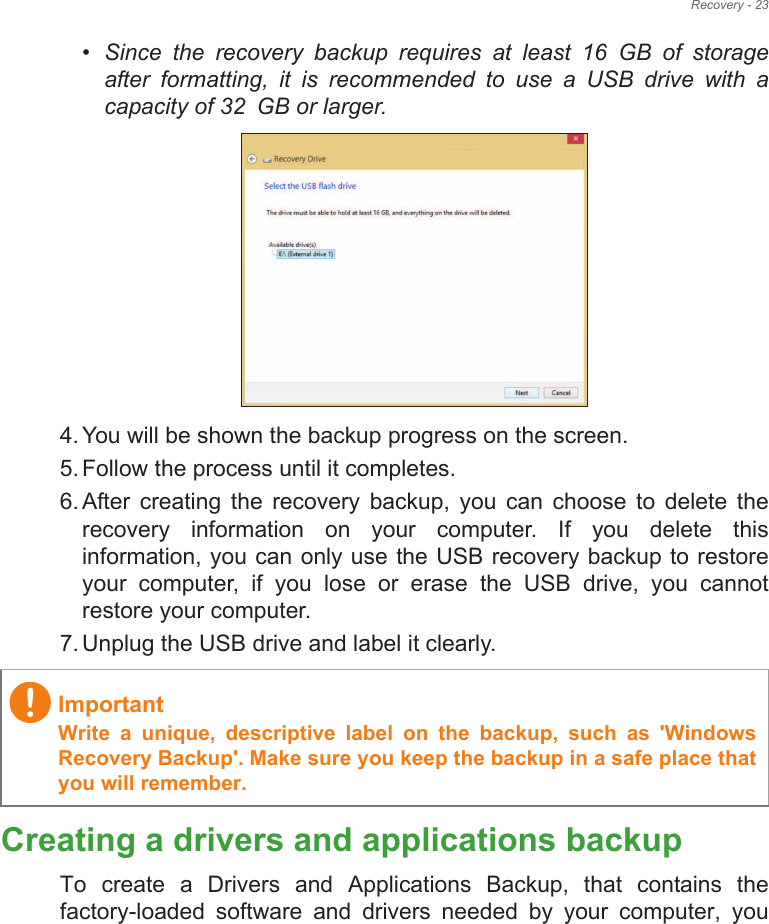
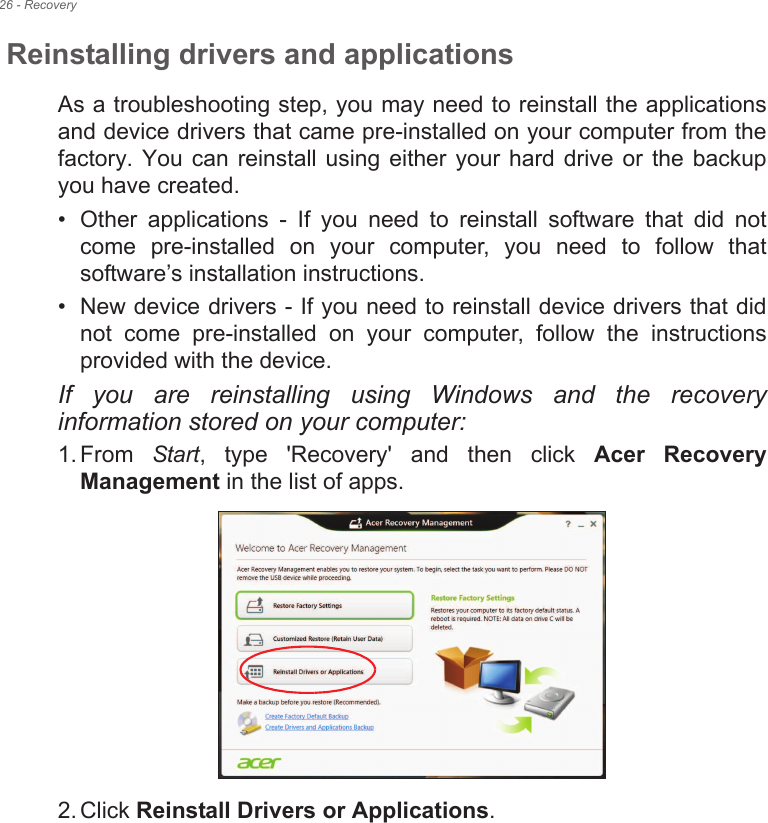
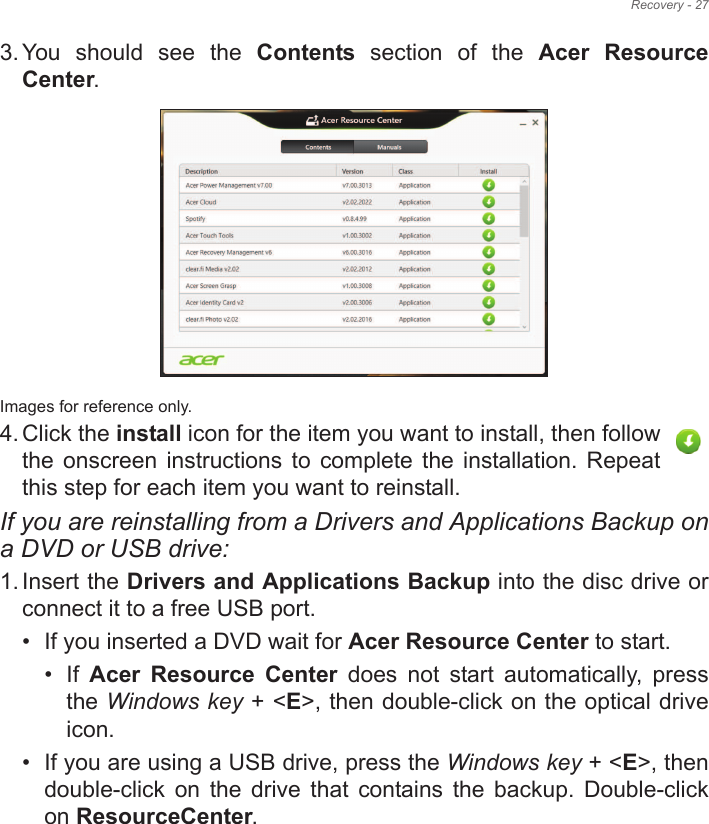
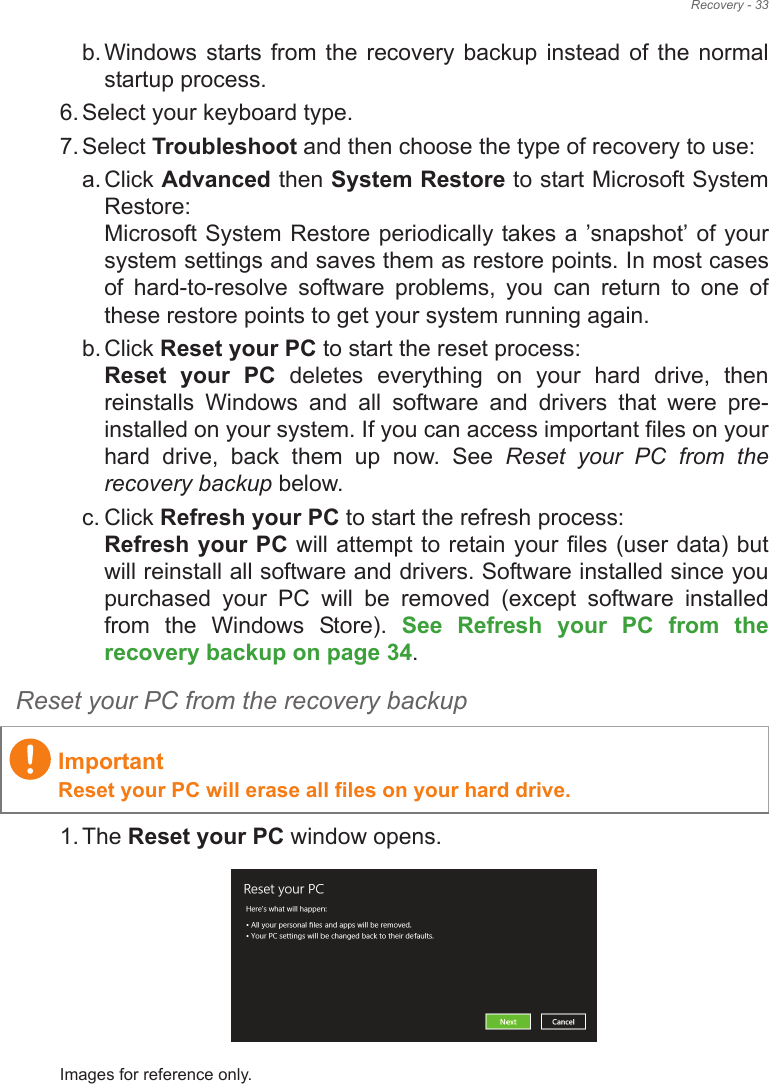
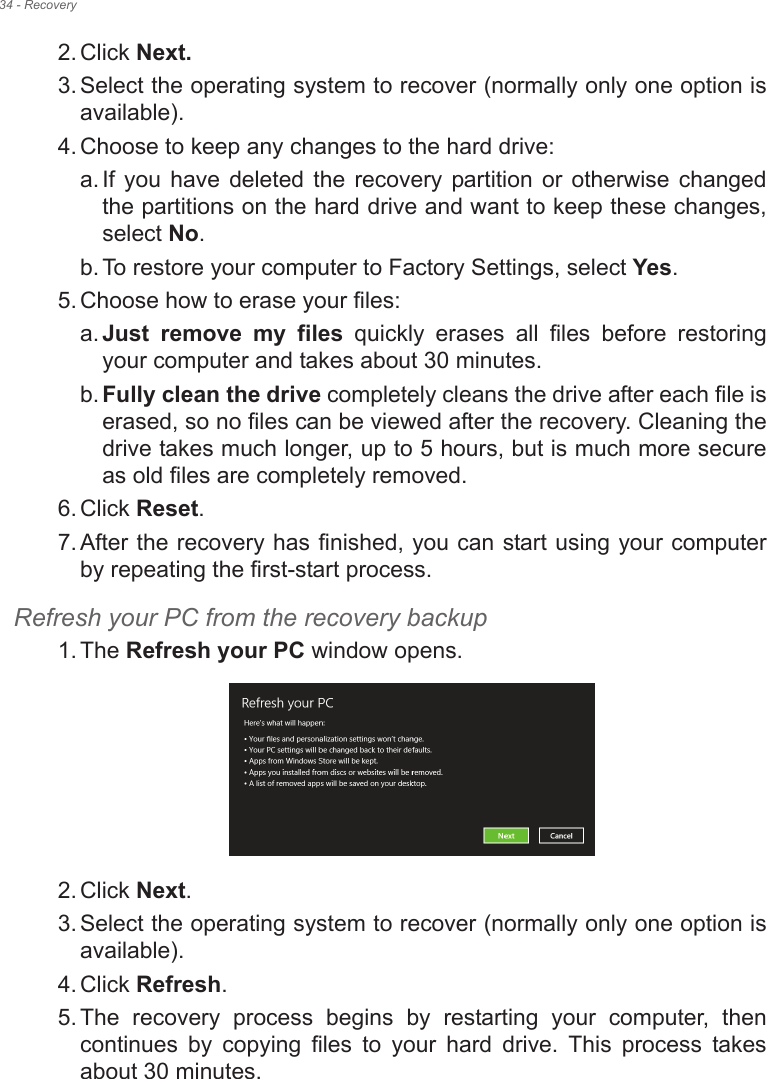
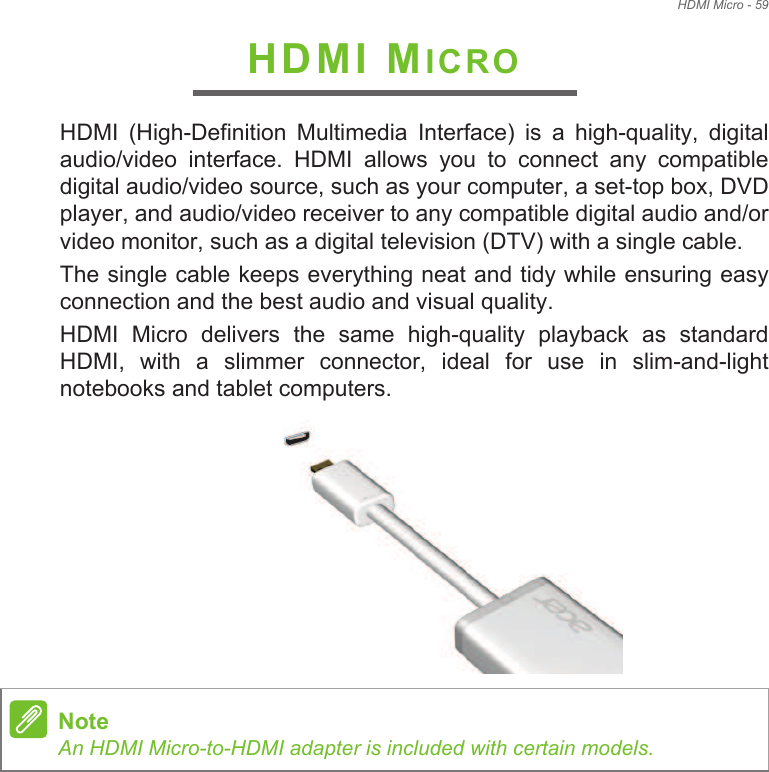
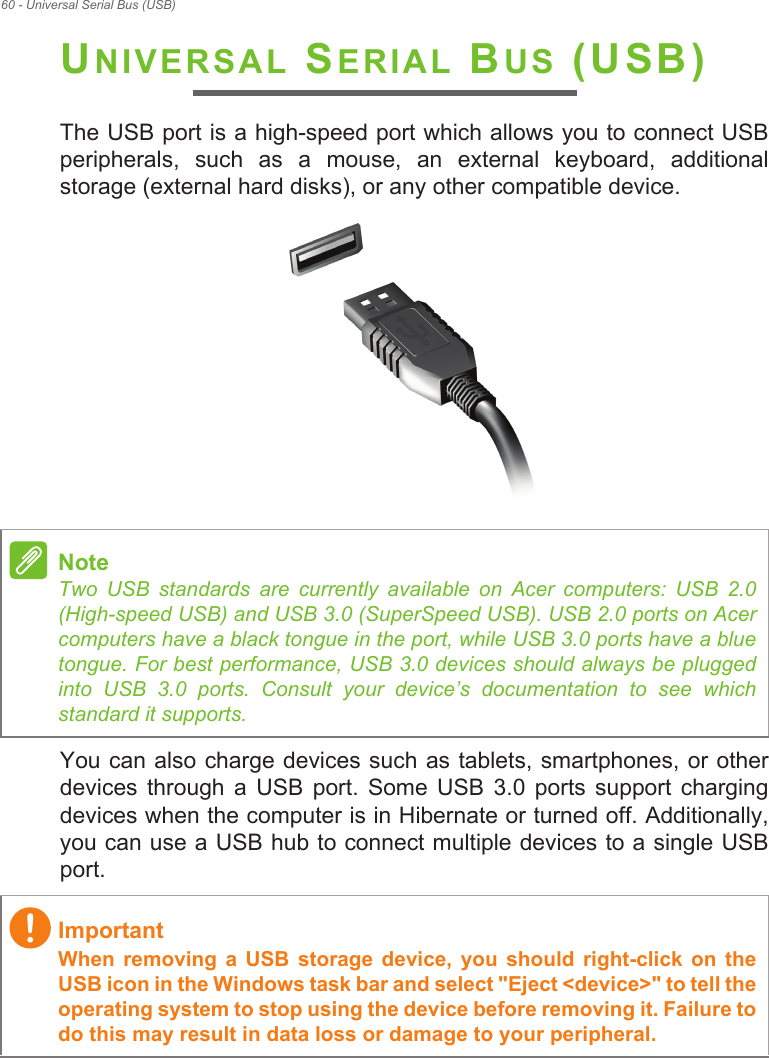
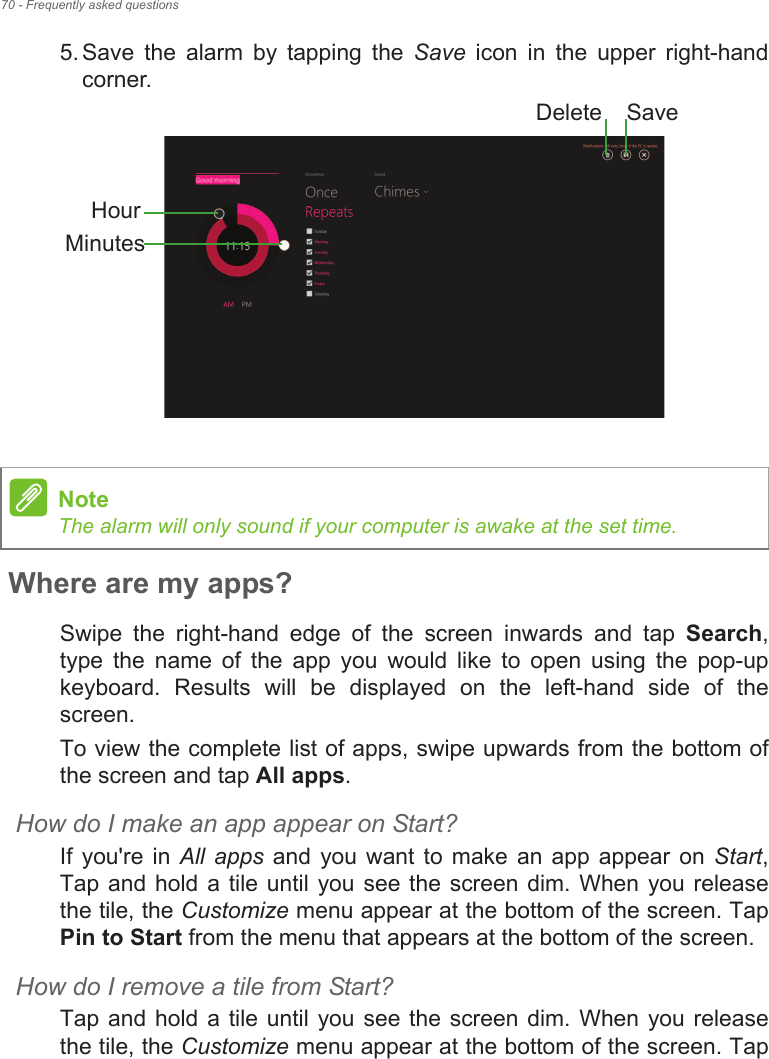
HON HAI PRECISION IND T77H462 802.11abgn+BT4.0 module User Manual 12 STC asSW5 011 Fendi w8 1 UM 20140409 EN

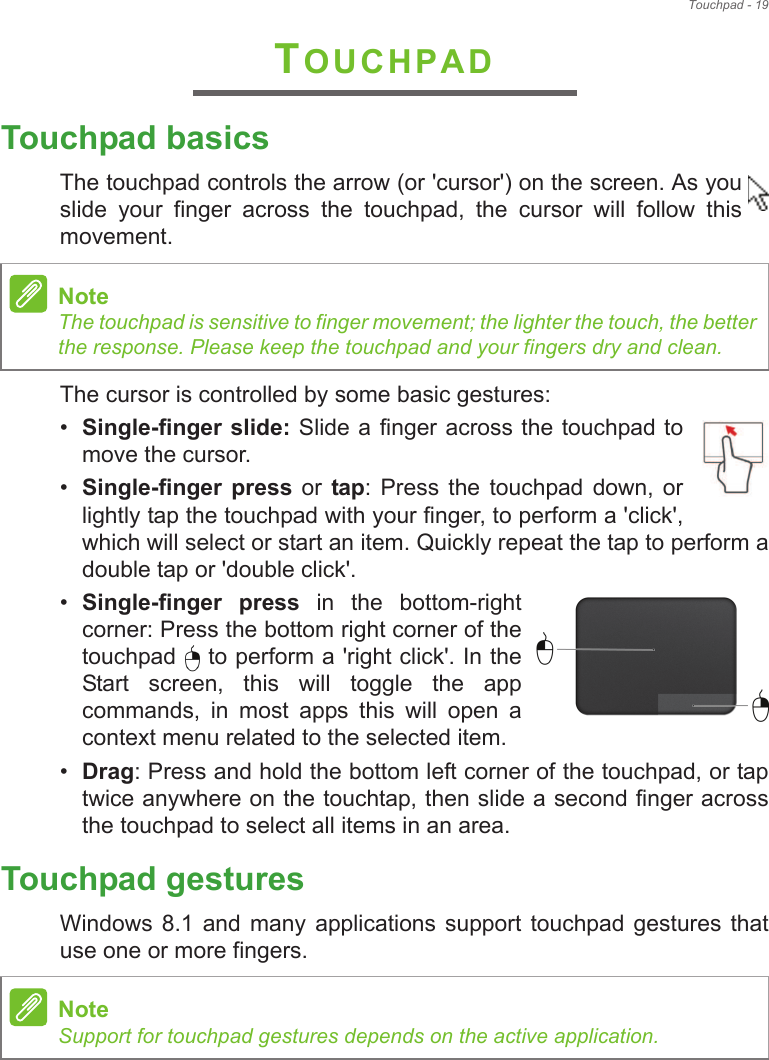
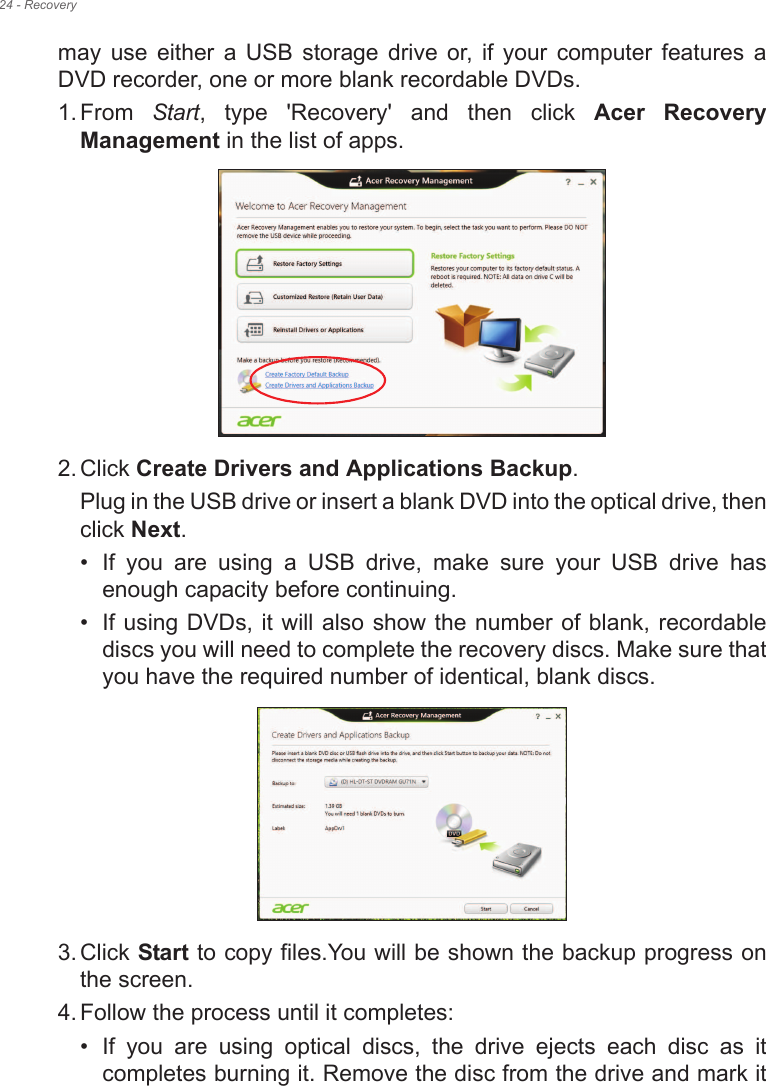
HON HAI Precision Ind. Co., Ltd. 802.11abgn+BT4.0 module 12 STC asSW5 011 Fendi w8 1 UM 20140409 EN
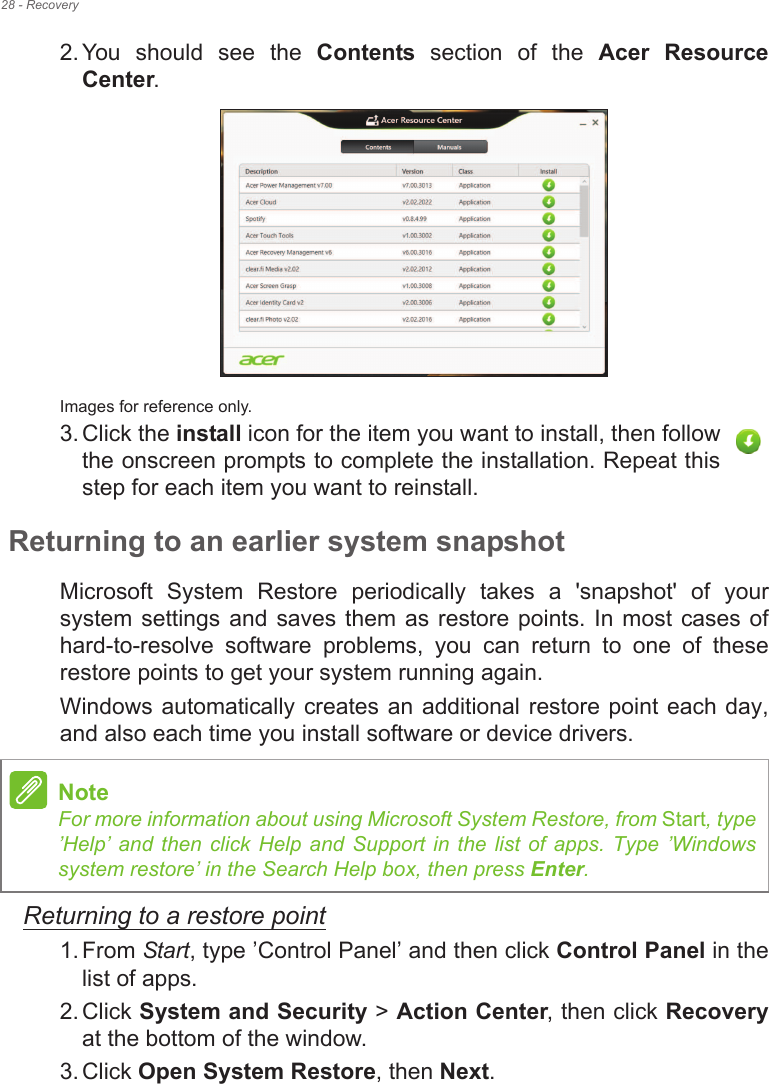
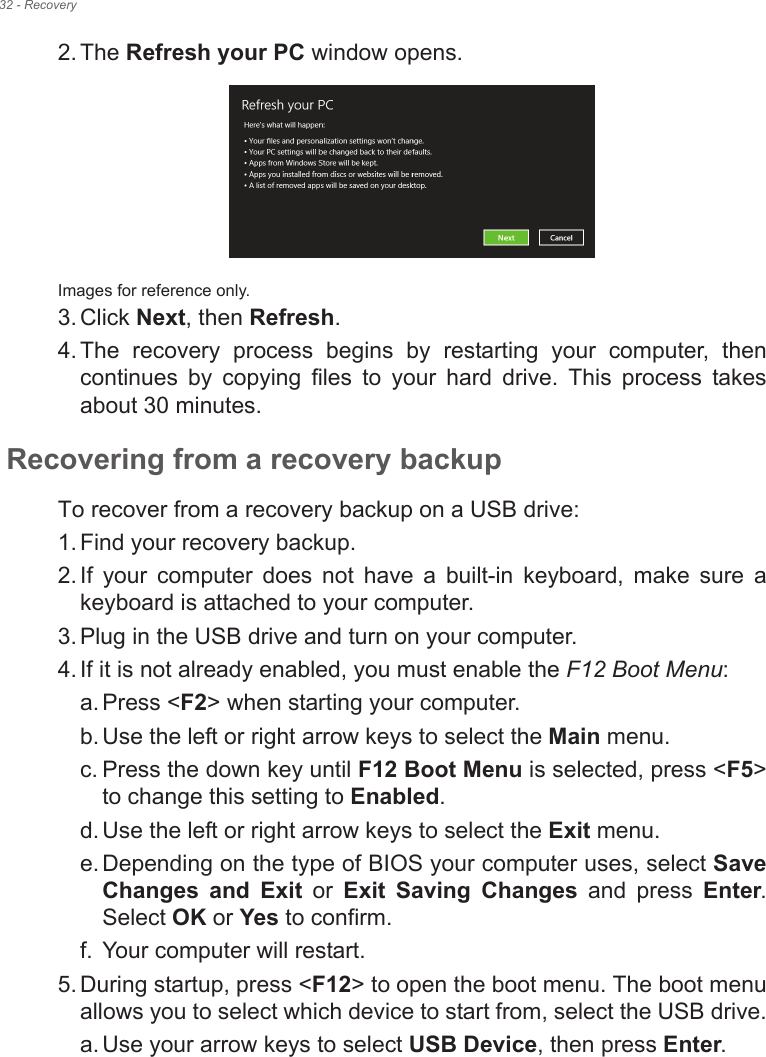
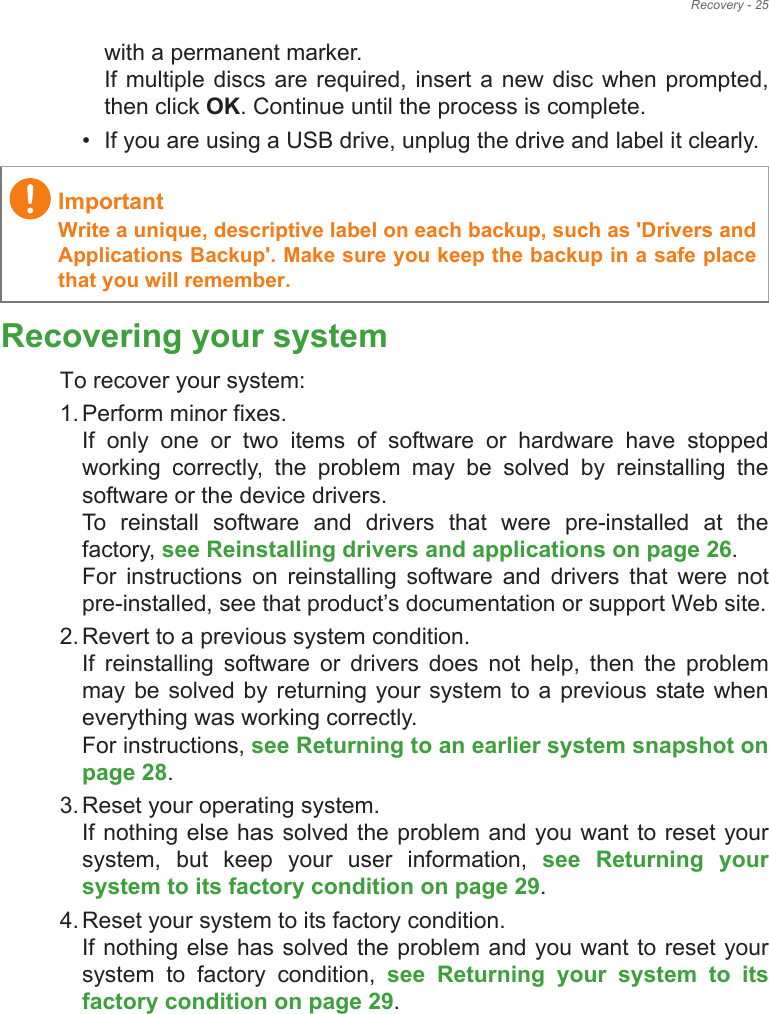
User manual_asSW5-011_(Fendi_w8-1)_UM_20140409_EN

 - 1Aspire Switch 10User•s Manual
2 - © 2014. All Rights Reserved.Aspire Switch 10Covers: SW5-011This revision: April 2014Regulatory model number: P0JACSign up for an Acer ID and enable Acer Remote FilesOpen the Acer Portal from the Start screen to sign up for an Acer ID or sign in if you already have an Acer ID.There are three great reasons for you to get an Acer ID:• Remotely access your PC from your other devices with our free Acer Remote Files app• Get the latest offers and product information• Register your device for warranty serviceFor more information, please visit the AcerCloud website:www.acer.com/acercloudModel number: _________________________________Serial number:  _________________________________Date of purchase:  ______________________________Place of purchase: ______________________________ImportantThis  manual  contains  proprietary  information  that  is  protected  by copyright laws. The information contained in this manual is subject to change without notice. Images provided herein are for reference only and  may  contain  information  or  features  that  do  not  apply  to  your computer. Acer Group shall not be liable for technical or editorial errors or omissions contained in this manual.
Table of contents - 3TABLE OF CONTENTSFirst things first  6Your guides .............................................  6Basic care and tips for using your computer..................................................  6Turning your computer off........................... 6Taking care of your computer ..................... 7Taking care of your AC adapter .................. 7Cleaning and servicing................................ 8Your Acer computer tour  9Computer.................................................  9Front view ................................................... 9Bottom view .............................................. 10Left/right views .......................................... 10LED Indicators .......................................... 11Keyboard ...............................................  12Keyboard front view .................................. 12Keyboard right view  ................................. 13Attaching and detaching the keyboard...... 14Using the keyboard  16Lock keys and embedded numeric keypad ...................................................  16Hotkeys ..................................................... 17Windows keys........................................  18Activate Microsoft 2013 .........................  18Touchpad  19Touchpad basics ...................................  19Touchpad gestures................................  19Recovery  21Creating a recovery backup...................  21Creating a drivers and applications backup ...................................................  23Recovering your system ........................  25Reinstalling drivers and applications......... 26Returning to an earlier system snapshot .. 28Returning your system to its factory condition.................................................... 29Recovering from Windows ........................ 29Recovering from a recovery backup ......... 32Connecting to the Internet  35Connecting wirelessly............................  35Connecting to a wireless LAN................... 35Using a Bluetooth connection  36Enabling and disabling Bluetooth ..........  36Enable Bluetooth and add a device .......... 36Acer Touch Tools  38Touch tool controls ................................  38Pointing ..................................................... 39Using AccuFinger...................................... 39RepliView .................................................. 40Settings ..................................................... 40Acer Screen Grasp  42Overview  ..............................................  42Adjusting the Settings ............................... 43The editing tool ......................................... 43 Acer Scrapboard  45BIOS utility  47Boot sequence.......................................  47Setting passwords .................................  47Securing your computer  48Using passwords ...................................  48Entering passwords .................................. 48Power management  50Saving power .........................................  50Battery pack  52Battery characteristics ...........................  52Charging the battery ................................. 52Optimizing battery life ............................... 53Checking the battery level......................... 54Battery-low warning .................................. 54Memory card reader  56Connectivity options...............................  56Video and audio connectors  58HDMI Micro  59Universal Serial Bus (USB)  60Micro USB  61Frequently asked questions  63Requesting service ................................  65Tips and hints for using Windows 8.1 ....  66How do I get to Start? ............................... 66What are "Charms?" ................................. 66Can I boot directly to the desktop? ........... 67How do I jump between apps?.................. 67How do I turn off my computer?................ 67How do I unlock my computer?................. 67How do I set the alarm? ............................ 69Where are my apps?................................. 70What is a Microsoft ID (account)?............. 72How do I add a favorite to Internet Explorer?................................................... 72How do I check for Windows updates?..... 72Where can I get more information?........... 72Troubleshooting .....................................  73Troubleshooting tips.................................. 73Error messages......................................... 73
4 - Table of contentsInternet and online security  75First steps on the net .............................  75Protecting your computer.......................... 75Choose an Internet Service Provider ........ 75Network connections................................. 77Surf the Net!.............................................. 79Security ..................................................... 79
 - 5Getting started...In this section you will find:• Useful information on caring for your computer and your health• Where to find the power button, ports and connectors• Tips and tricks for using the touchpad and keyboard• How to create recovery backups• Guidelines for connecting to a network and using Bluetooth• Information on using Acer•s bundled software
6 - First things firstFIRST THINGS FIRSTWe would like to thank you for making this Acer notebook your choice for meeting your mobile computing needs.Your guidesTo  help  you  use  your  Acer  notebook,  we  have  designed  a  set  of guides:First off, the Setup Guide helps you get started with setting up your computer.The Quick Guide introduces you to the basic features and functions of your new computer. For more on how your computer can help you to be more productive, please refer to the User!s Manual. This guide contains detailed information on such subjects as system utilities, data recovery,  expansion  options  and  troubleshooting.  In  addition  it contains general regulations and safety notices for your notebook. It is available  from  the  desktop;  double-click  the  Help  icon  and  click User!s Manual in the menu that opens.Basic care and tips for using your computerTurning your computer offTo turn the power off, do any of the following:• Use  the  Windows  shutdown  command:  Press  the  Windows  key  + <C>, click Settings > Power then click Shut Down.If you need to power down the computer for a short while, but don"t want  to  completely  shut  it  down,  you  can  put  it  into  Hibernate  by pressing the power button.
First things first - 7You can also put the  computer in sleep mode by pressing the sleep hotkey <Fn> + <F4>.Taking care of your computerYour computer will serve you well if you take care of it.• Do not expose the computer to direct sunlight. Do not place it near sources of heat, such as a radiator.• Do not expose the computer to temperatures below 0º C (32º F) or above 50º C (122º F).• Do not subject the computer to magnetic fields.• Do not expose the computer to rain or moisture.• Do not spill water or any liquid on the computer.• Do not subject the computer to heavy shock or vibration.• Do not expose the computer to dust or dirt.• Never place objects on top of the computer.• Do not slam the computer display when you close it.• Never place the computer on uneven surfaces.Taking care of your AC adapterHere are some ways to take care of your AC adapter:• Do not connect the adapter to any other device.• Do not step on the power cord or place heavy objects on top of it. Carefully route the power cord and any cables away from foot traffic.• When unplugging the power cord, do not pull on the cord itself but pull on the plug.• The  total  ampere  ratings  of  the  equipment  plugged  in  should  not exceed the ampere rating of the cord if you are using an extension NoteIf  you  cannot  power  off  the  computer  normally,  press  and  hold  the  power button for more than four seconds to shut down the computer. If you turn off the computer and want to turn it on again, wait at least two seconds before powering up.
8 - First things firstcord.  Also,  the  total  current  rating  of  all equipment  plugged into  a single wall outlet should not exceed the fuse rating.Cleaning and servicingWhen cleaning the computer, follow these steps:1. Turn off the computer.2. Disconnect the AC adapter.3. Use a soft, moist cloth. Do not use liquid or aerosol cleaners.If either of the following occurs:• The computer has been dropped or the body has been damaged;• The computer does not operate normallySee Frequently asked questions on page 63.
Your Acer computer tour - 9YOUR ACER COMPUTER TOURAfter  setting  up your  device  as  illustrated in  the  Setup  Guide,  let us show you around your new Acer computer. You can enter information into your new computer via the touchscreen.ComputerYour device has two components: the computer and the keyboard.The following set of  images  will describe all of these.  The  views are labeled  as  if  you  are  holding  the  computer  with  the  screen  towards you and the camera at the top.Front view# Icon Item Description1 Webcam Web camera for video communication.2 Speakers Delivers stereo audio output.12
10 - Your Acer computer tourBottom view# Icon Item Description1Keyboard connector Connects to the keyboard.2Keyboard hook slotsFasten to the keyboard.12Left/right views# Icon Item Description1Headset/speaker jackConnects to audio devices (e.g., speakers, headphones) or a headset with microphone.146578923
Your Acer computer tour - 11LED IndicatorsLED color State DescriptionBlue Steady The computer is fully charged and plugged in.Amber Steady The computer is charging and plugged in.Amber Blinking The battery is critically low or abnormal battery situation.Off The computer is off.2Power buttonPress to turn the computer on; press again to place the computer in Sleep mode. Press and hold to turn the computer off.3+ / - Volume control key Adjusts the system volume.4 Microphone Internal microphone for sound recording.5 Reset pinhole Insert a paperclip into the hole to reboot the computer.6MicroSD card slot Insert a microSD card into this slot.7Micro USB connectorConnects to USB devices. A micro USB to USB adapter is needed to connect to USB devices.When using a USB port, it is recommended to plug in the power adapter.8HDMI micro connectorSupports high-definition digital video connections.9DC-in jack Connects to an AC adapter.# Icon Item Description
12 - Your Acer computer tourKeyboardKeyboard front view# Icon Item Description1 Keyboard For entering data into your computer.2 TouchpadTouch-sensitive pointing device.The touchpad and selection buttons form a single surface.Press down firmly on the touchpad surface to perform a left click.Press down firmly on the lower right corner to perform a right click.Swipe the right-hand edge of the touchpad inward to access the charms.3 Keyboard hooks Fasten to the computer.4Keyboard connector Connects to the computer.1234d
Your Acer computer tour - 13Keyboard right view1 # Icon Item Description1USB port Connects to USB devices.
14 - Your Acer computer tourAttaching and detaching the keyboardThe Acer Smart Hinge makes attaching and  detaching the keyboard fast and easy.Attach  the  computer  with  the  keyboard  by  aligning  the  keyboard hooks and the keyboard hook slots to function as a laptop. Ensure the computer clicks into place.
Your Acer computer tour - 15Detach  the  computer  from  the  keyboard  by  lifting  one  corner  to release it from the keyboard to function as a tablet.You can also attach the computer to the keyboard facing outwards as a display. Ensure the computer clicks into place.
16 - Using the keyboardUSING THE KEYBOARDThe keyboard has full-sized keys and an embedded numeric keypad, separate cursor, lock, Windows, function and special keys.Lock keys and embedded numeric keypadThe keyboard has three lock keys which you can toggle on and off.The  embedded  numeric  keypad  functions  like  a  desktop  numeric keypad. It is indicated by small characters located on the upper right corner of the keycaps. To simplify the keyboard legend, cursor-control key symbols are not printed on the keys.Lock key DescriptionCaps Lock When Caps Lock is on, all alphabetic characters typed are in uppercase.Num Lock  <Fn> + <F11>When Num Lock is on, the embedded keypad is in numeric mode. The keys function as a calculator (complete with the arithmetic operators +, -, *, and /). Use this mode when you need to do a lot of numeric data entry. A better solution would be to connect an external keypad.Scroll Lock  <Fn> + <F12>When Scroll Lock is on, the screen moves one line up or down when you press the up or down arrow keys respectively. Scroll Lock does not work with some applications.Desired access Num Lock on Num Lock offNumber keys on embedded keypadType numbers in a normal manner.Cursor-control keys on embedded keypadHold <Shift> while using cursor-control keys.Hold <Fn> while using cursor-control keys.Main keyboard keysHold <Fn> while typing letters on embedded keypad.Type the letters in a normal manner.
Using the keyboard - 17HotkeysThe computer employs hotkeys or key combinations to access most of the computer's controls like screen brightness and volume output.To activate hotkeys, press and hold the <Fn> key before pressing the other key in the hotkey combination.Hotkey Icon Function Description<Fn> + <F3> Airplane modeTurns on / off the computer's network devices.  (Network devices vary by configuration.)<Fn> + <F4> Sleep Puts the computer in Sleep mode.<Fn> + <F5> Display toggleSwitches display output between the display screen, external monitor (if connected) and both.<Fn> + <F6> Display offTurns the display screen backlight off to save power. Press any key to return.<Fn> + <F7>Touchpad toggleTurns the built-in touchpad on and off.<Fn> + <F8> Speaker toggle Turns the speakers on and off.<Fn> + <F11>NumLkNumber Lock Turns the embedded numeric keypad on or off.<Fn> + <F12>Scr Lk Scroll Lock Turns Scroll Lock on or off.<Fn> + < > Brightness up Increases the screen brightness.<Fn> + < > Brightness downDecreases the screen brightness.<Fn> + < > Volume up Increases the sound volume.<Fn> + < > Volume down Decreases the sound volume.
18 - Using the keyboardWindows keysThe keyboard has two keys that perform Windows-specific functions.Activate Microsoft 2013Your Acer computer includes a Microsoft Product Identification (MPI) card  in  the  box,  which  contains  a  product  key  to  activate  the  full version of Microsoft Office 2013 Home and Student Edition.Key DescriptionWindows keyPressed alone it returns to the Start screen or to return to the last open app.  It can also be used with other keys for special functions, please check Windows Help.Application keyThis key has the same effect as clicking the right mouse button; it opens the application's context menu.
Touchpad - 19TOUCHPADTouchpad basicsThe touchpad controls the arrow (or 'cursor') on the screen. As you slide  your  finger  across  the  touchpad,  the  cursor  will  follow  this movement.The cursor is controlled by some basic gestures:•Single-finger slide: Slide a finger across the touchpad to move the cursor.•Single-finger  press or  tap:  Press  the  touchpad down,  or lightly tap the touchpad with your finger, to perform a 'click', which will select or start an item. Quickly repeat the tap to perform a double tap or 'double click'.•Single-finger  press  in  the  bottom-right corner: Press the bottom right corner of the touchpad   to perform a 'right click'. In the Start  screen,  this  will  toggle  the  app commands,  in  most  apps  this  will  open  a context menu related to the selected item. •Drag: Press and hold the bottom left corner of the touchpad, or tap twice anywhere on the touchtap, then slide a second finger across the touchpad to select all items in an area. Touchpad gesturesWindows  8.1  and many  applications  support touchpad gestures  that use one or more fingers.NoteThe touchpad is sensitive to finger movement; the lighter the touch, the better the response. Please keep the touchpad and your fingers dry and clean.NoteSupport for touchpad gestures depends on the active application.
20 - TouchpadThis  allows  you  to  control  applications  with  a  few  simple  gestures, such as: •Swipe in from edge: Access Windows tools by  swiping  into  the  center  of  the  touchpad from the right, top or left.•Swipe in from right edge: Toggle the charms.•Swipe in from top edge: Toggle the app commands.•Swipe in from left edge: Switch to the previous app.•Two-finger  slide:  Swiftly  scroll  through  web  pages, documents  and  playlists  by  placing  two  fingers  on  the touchpad and moving both in any direction.•Two-finger  pinch:  Zoom  in  and  out  of  photos,  maps  and documents with a simple finger-and-thumb gesture.
Recovery - 21RECOVERYIf you are having trouble with your computer, and the frequently asked questions (see Frequently asked questions on page 2) do not help, you can 'recover' your computer - i.e. return it to an earlier state.This section describes the recovery tools available on your computer. Acer  provides  Acer  Recovery  Management,  which  allows  you  to create a  recovery  backup, a drivers and  applications  backup, and to start  recovery  options,  either  using  Windows  tools,  or  the  recovery backup. Creating a recovery backupTo reinstall from a USB storage drive, you must first create a recovery backup. The recovery backup includes the entire original contents of your computer!s hard drive, including Windows and all factory-loaded software and drivers. Using this backup will restore your computer to the same state as when you purchased it, while giving you an option to retain all settings and personal data.NoteAcer Recovery Management is only available with a pre-installed Windows operating system.ImportantWe  recommend  that  you  create  a  Recovery  Backup  and  Drivers  and Applications Backup and as soon as possible. In certain situations a full recovery will require a USB recovery backup.NoteSince  the  recovery  backup  requires  at  least  16!GB  of  storage  after           formatting, it is recommended to use a USB drive with a capacity of 32!GB              or larger.
22 - Recovery1. From  Start,  type  'Recovery'  and  then  click  Acer  Recovery Management in the list of apps.2. Click Create Factory Default Backup. The Recovery Drive window opens.Make  sure  Copy  contents  from  the  recovery  partition  to  the recovery  drive  is  selected.  This  provides  the  most  complete  and safest recovery backup.3. Plug in the USB drive then click Next.
Recovery - 23•Since  the  recovery  backup  requires  at  least  16!GB  of  storage          after  formatting,  it  is  recommended  to  use  a  USB  drive  with  a capacity of 32!GB or larger.4. You will be shown the backup progress on the screen.5. Follow the process until it completes.6. After  creating  the  recovery  backup,  you  can  choose  to  delete  the recovery  information  on  your  computer.  If  you  delete  this information, you can only use the USB recovery backup to restore your  computer,  if  you  lose  or  erase  the  USB  drive,  you  cannot restore your computer.7. Unplug the USB drive and label it clearly.Creating a drivers and applications backupTo  create  a  Drivers  and  Applications  Backup,  that  contains  the factory-loaded  software  and  drivers  needed  by  your  computer,  you ImportantWrite  a  unique,  descriptive  label  on  the  backup,  such  as  'Windows Recovery Backup'. Make sure you keep the backup in a safe place that you will remember.
24 - Recoverymay  use  either  a  USB  storage  drive  or,  if  your  computer  features  a DVD recorder, one or more blank recordable DVDs.1. From  Start,  type  'Recovery'  and  then  click  Acer  Recovery Management in the list of apps.2. Click Create Drivers and Applications Backup. Plug in the USB drive or insert a blank DVD into the optical drive, then click Next.• If  you  are  using  a  USB  drive,  make  sure  your  USB  drive  has enough capacity before continuing.• If using DVDs, it will also  show the number  of blank, recordable discs you will need to complete the recovery discs. Make sure that you have the required number of identical, blank discs.3. Click Start to copy files.You will be shown the backup progress on the screen.4. Follow the process until it completes:• If  you  are  using  optical  discs,  the  drive  ejects  each  disc  as  it completes burning it. Remove the disc from the drive and mark it
Recovery - 25with a permanent marker. If multiple discs are required, insert a new disc when prompted, then click OK. Continue until the process is complete.• If you are using a USB drive, unplug the drive and label it clearly.Recovering your systemTo recover your system:1. Perform minor fixes. If  only  one  or  two  items  of  software  or  hardware  have  stopped working  correctly,  the  problem  may  be  solved  by  reinstalling  the software or the device drivers.  To  reinstall  software  and  drivers  that  were  pre-installed  at  the factory, see Reinstalling drivers and applications on page 26.  For  instructions  on  reinstalling  software  and  drivers  that  were  not pre-installed, see that product"s documentation or support Web site.2. Revert to a previous system condition. If  reinstalling  software  or  drivers  does  not  help,  then  the  problem may be solved  by  returning  your  system to a  previous  state when everything was working correctly.  For instructions, see Returning to an earlier system snapshot on page 28.3. Reset your operating system. If nothing else has solved the problem and you want to reset your system,  but  keep  your  user  information,  see  Returning  your system to its factory condition on page 29.4. Reset your system to its factory condition. If nothing else has solved the problem and you want to reset your system  to  factory  condition,  see  Returning  your  system  to  its factory condition on page 29.ImportantWrite a unique, descriptive label on each backup, such as 'Drivers and Applications Backup'. Make sure you keep the backup in a safe place that you will remember.
26 - RecoveryReinstalling drivers and applicationsAs a troubleshooting step, you may need to reinstall the applications and device drivers that came pre-installed on your computer from the factory.  You  can reinstall  using  either your hard  drive  or the backup you have created.• Other  applications  -  If  you  need  to  reinstall  software  that  did  not come  pre-installed  on  your  computer,  you  need  to  follow  that software•s installation instructions. • New device drivers - If you need to reinstall device drivers that did not  come  pre-installed  on  your  computer,  follow  the  instructions provided with the device.If  you  are  reinstalling  using  Windows  and  the  recovery information stored on your computer:1. From  Start,  type  'Recovery'  and  then  click  Acer  Recovery Management in the list of apps.2. Click Reinstall Drivers or Applications.
Recovery - 273. You  should  see  the  Contents  section  of  the  Acer  Resource Center. Images for reference only.4. Click the install icon for the item you want to install, then follow the  onscreen  instructions  to complete  the installation.  Repeat this step for each item you want to reinstall.If you are reinstalling from a Drivers and Applications Backup on a DVD or USB drive:1. Insert the Drivers and Applications Backup into the disc drive or connect it to a free USB port.• If you inserted a DVD wait for Acer Resource Center to start.• If  Acer  Resource  Center  does  not  start  automatically,  press the Windows key + <E>, then double-click on the optical drive icon. • If you are using a USB drive, press the Windows key + <E>, then double-click  on  the  drive  that  contains  the  backup.  Double-click on ResourceCenter.
28 - Recovery2. You  should  see  the  Contents  section  of  the  Acer  Resource Center. Images for reference only.3. Click the install icon for the item you want to install, then follow the onscreen prompts to complete the installation. Repeat this step for each item you want to reinstall.Returning to an earlier system snapshotMicrosoft  System  Restore  periodically  takes  a  'snapshot'  of  your system settings  and  saves them  as restore  points.  In most cases  of hard-to-resolve  software  problems,  you  can  return  to  one  of  these restore points to get your system running again.Windows automatically creates an additional restore point each day, and also each time you install software or device drivers.Returning to a restore point1. From Start, type !Control Panel! and then click Control Panel in the list of apps.2. Click System and Security > Action Center, then click Recoveryat the bottom of the window. 3. Click Open System Restore, then Next. NoteFor more information about using Microsoft System Restore, from Start, type !Help!  and  then click  Help  and  Support  in  the list  of apps.  Type !Windows system restore! in the Search Help box, then press Enter.
Recovery - 294. Click the  latest restore  point  (at  a  time  when  your  system  worked correctly), click Next, then Finish. 5. A confirmation window appears; click Yes. Your system is restored using the restore point you specified. This process may take several minutes, and may restart your computer.Returning your system to its factory conditionIf  your  computer  experiences  problems  that  are  not  recoverable  by other  methods,  you  may  need  to  reinstall  everything  to  return  your system to its factory condition. You can recover from either your hard drive or the recovery backup you have created.• If  you  can  still  run  Windows  and  have  not  deleted  the  recovery partition, see Recovering from Windows below.• If  you  cannot  run  Windows,  your  original  hard  drive  has  been completely  re-formatted  or  you  have  installed  a  replacement  hard drive, see Recovering from a recovery backup on page 32.Recovering from WindowsStart Acer Recovery Management:• From  Start,  type  "Recovery"  and  then  click  Acer  Recovery Management in the list of apps.Two options are available, Restore Factory Settings (Reset my PC) or Customized Restore (Refresh my PC). Restore Factory Settings deletes everything on your hard drive, then reinstalls Windows and all software and drivers that were pre-installed on your system. If you can access important files on your hard drive, back  them  up  now.  See  Restore  Factory  Settings  with  Acer Recovery Management on page 30.Customized Restore will attempt to retain your files (user data) but will  reinstall  all  software  and  drivers.  Software  installed  since  you purchased  your  PC  will  be  removed  (except  software  installed  from
30 - Recoverythe Windows Store). See Customized Restore with Acer Recovery Management on page 31.Restore Factory Settings with Acer Recovery Management1. Click Restore Factory Settings. 2. The Reset your PC window opens.Images for reference only.3. Click Next, then choose how to erase your files: a. Just  remove  my  files  quickly  erases  all  files  before  restoring your computer and takes about 30 minutes. b. Fully clean the drive completely cleans the drive after each file is erased, so no files can be viewed after the recovery. Cleaning the drive takes much longer, up to 5 hours, but is much more secure as old files are completely removed. 4. Click Reset. Important!Restore Factory Settings! will erase all files on your hard drive.
Recovery - 315. The  recovery  process  begins  by  restarting  your  computer,  then continues by copying files to your hard drive. 6. After the recovery has finished, you can start using your computer by repeating the first-start process.Recovering from the hard drive during startup1. Turn on your computer and press <Alt> + <F10> during startup. A screen appears asking you to choose the keyboard layout.2. Several options are now presented. Click Troubleshoot.3. Click either Refresh your PC or Reset your PC.4. Click Next. The process will take several minutes.Customized Restore with Acer Recovery Management1. Click Customized Restore (Retain User Data).Note"Refresh your PC" enables you to restore your computer to the default factory condition with files intact. "Reset your PC" completely removes all your files and resets your computer to factory settings.
32 - Recovery2. The Refresh your PC window opens.Images for reference only.3. Click Next, then Refresh.4. The  recovery  process  begins  by  restarting  your  computer,  then continues  by  copying  files  to  your  hard  drive.  This  process  takes about 30 minutes.Recovering from a recovery backupTo recover from a recovery backup on a USB drive:1. Find your recovery backup.2. If  your  computer  does  not  have  a  built-in  keyboard,  make  sure  a keyboard is attached to your computer. 3. Plug in the USB drive and turn on your computer.4. If it is not already enabled, you must enable the F12 Boot Menu:a. Press <F2> when starting your computer. b. Use the left or right arrow keys to select the Main menu.c. Press the down key until F12 Boot Menu is selected, press <F5> to change this setting to Enabled. d. Use the left or right arrow keys to select the Exit menu.e. Depending on the type of BIOS your computer uses, select Save Changes  and  Exit  or  Exit  Saving  Changes  and  press  Enter. Select OK or Yes to confirm. f. Your computer will restart.5. During startup, press <F12> to open the boot menu. The boot menu allows you to select which device to start from, select the USB drive.a. Use your arrow keys to select USB Device, then press Enter.
Recovery - 33b. Windows starts from  the  recovery backup  instead  of  the normal startup process.6. Select your keyboard type.7. Select Troubleshoot and then choose the type of recovery to use:a. Click Advanced then System Restore to start Microsoft System Restore: Microsoft System Restore periodically takes a !snapshot! of your system settings and saves them as restore points. In most cases of  hard-to-resolve  software  problems,  you  can  return  to  one  of these restore points to get your system running again.b. Click Reset your PC to start the reset process: Reset  your  PC  deletes  everything  on  your  hard  drive,  then reinstalls  Windows  and  all  software  and  drivers  that  were  pre-installed on your system. If you can access important files on your hard  drive,  back  them  up  now.  See  Reset  your  PC  from  the recovery backup below.c. Click Refresh your PC to start the refresh process: Refresh your PC will attempt to retain your files (user data) but will reinstall all software and drivers. Software installed since you purchased  your  PC  will  be  removed  (except  software  installed from  the  Windows  Store).  See  Refresh  your  PC  from  the recovery backup on page 34.Reset your PC from the recovery backup1. The Reset your PC window opens.Images for reference only.ImportantReset your PC will erase all files on your hard drive.
34 - Recovery2. Click Next.3. Select the operating system to recover (normally only one option is available).4. Choose to keep any changes to the hard drive:a. If you  have deleted  the  recovery  partition  or  otherwise  changed the partitions on the hard drive and want to keep these changes, select No. b. To restore your computer to Factory Settings, select Yes.5. Choose how to erase your files: a. Just  remove  my  files  quickly  erases  all  files  before  restoring your computer and takes about 30 minutes. b. Fully clean the drive completely cleans the drive after each file is erased, so no files can be viewed after the recovery. Cleaning the drive takes much longer, up to 5 hours, but is much more secure as old files are completely removed. 6. Click Reset. 7. After the recovery has finished, you can start using your computer by repeating the first-start process.Refresh your PC from the recovery backup1. The Refresh your PC window opens.2. Click Next.3. Select the operating system to recover (normally only one option is available).4. Click Refresh. 5. The  recovery  process  begins  by  restarting  your  computer,  then continues  by  copying  files  to  your  hard  drive.  This  process  takes about 30 minutes.
Connecting to the Internet - 35CONNECTING TO THE INTERNETThis chapter includes basic information on types of connections, and getting  connected  to  the  Internet.  For  detailed  information,  please refer to Network connections on page 77.Connecting wirelesslyConnecting to a wireless LANA wireless LAN (or WLAN) is a wireless local area network, which can link  two  or  more computers  without  using  wires.  Once  connected  to WLAN,  you  can access  the  Internet. You can  also  share files, other devices, and even your Internet connection itself.Your  computer's  wireless  connection  is  turned  on  by  default  and Windows  will  detect  and  display  a  list  of  available  networks  during setup. Select your network and enter the password if required.Acer notebook computers feature an Airplane mode hotkey that turns the  network  connection  on  or  off.  You  can  use  the  network management  options  to  turn  your  wireless  network  on/off  or  control what is shared  over  the network.  From  the Start screen,  start typing !wireless!  then  select  Connect  to  a  network  or  Change  Wi-Fi settings.  Otherwise,  open  Internet  Explorer  and  follow  the instructions.WarningUsing  wireless  devices  while  flying  in  aircraft  may  be prohibited.  All wireless devices must be switched off before boarding an aircraft and during  take-off,  as  they  may  be  dangerous  to  the  operation  of  the aircraft, disrupt communications, and even be illegal. You may turn on your computer!s wireless devices only when informed that it is safe to do so by the cabin crew.NotePlease refer to your Internet Service Provider (ISP) or router documentation for details on connecting to the Internet.
36 - Using a Bluetooth connectionUSING A BLUETOOTH CONNECTIONBluetooth is a technology enabling you to transfer data wirelessly over short  distances  between  many  different  types  of  devices.  Bluetooth-enabled  devices  include  computers,  cell  phones,  tablets,  wireless headsets, and keyboards.To use Bluetooth, you must ensure the following:1. Bluetooth is enabled on both devices.2. Your devices are "paired" (or connected).Enabling and disabling BluetoothThe  Bluetooth  adapter  must  be  enabled  on  both  devices.  For  your computer,  this  may  be  an  external  switch,  a  software  setting,  or  a separate Bluetooth dongle plugged into the computer!s USB port (if no internal Bluetooth adapter is available).Enable Bluetooth and add a deviceEvery  new  device  must  first  be  "paired"  with  your  computer’s Bluetooth  adapter.  This  means  it  must  first  be  authenticated  for security  purposes.  You  only  need  to  pair  once.  After  that,  simply turning on the Bluetooth adapter of both devices will connect them.Bluetooth  on  your  computer  is  disabled  by  default.  To  enable  your computer’s Bluetooth adapter, do the following:1. Open the Charms and select Settings > Change PC Settings > PC and  devices  >  Bluetooth, or press  the  Windows  key + <W>  and then type !Wireless!; in the results, click on Bluetooth settings.2. Click the toggle next to Bluetooth to enable/disable it.3. Your computer will automatically start searching for devices, as well as make itself visible to other devices.NotePlease check your devices owner!s manual to determine how to turn on its Bluetooth adapter.
Using a Bluetooth connection - 374. Tap the device you wish to add from the list of discovered devices, and tap Pair.A  code  displays  on  your  computer,  which  should  match  the  code displayed on your  device.  Select Yes. Then, accept the  pairing from your device.NoteSome devices using older versions of the Bluetooth technology require both devices to enter a PIN. In the case of one of the devices not having any inputs (as in a headset), the passcode is hardcoded into the device (usually "0000" or "1234"). Consult your device!s user manual for more information.
38 - Acer Touch ToolsACER TOUCH TOOLSAcer Touch Tools makes using your Windows device easier and more convenient.  You  can  select,  drag  or  tap  on  small  items  in  the  user interface.You  can  run  Acer  Touch  Tools,  from  Start  or  from  the  Desktoptaskbar.Touch tool controlsThe Touch Tools control panel has several icons:  No. Item Description1 Move Tap the Move tab and drag the Touch Tools panel to reposition it.2 AccuFingerDisplays or hides the AccuFinger pointer. Tap the icon to display the pointer, and again to hide it. The AccuFinger pointer will also hide automatically after a specified number of seconds, which you can set in the configuration window.1 2 3 4 5 6 78
Acer Touch Tools - 39PointingThe  AccuFinger  pointer's  fine  tip  allows  you  to  work  with  even  very small  screen  elements.  This  can  be  particularly  helpful  when  using operating  system  setting  and  configuration  windows  with  small buttons, boxes or other small items.Using AccuFinger With AccuFinger you can:•Point:  Place  your  fingertip  on  the  pointer  pad and  drag  it  around. The  pointer  direction  changes  automatically  as  you  move  around the screen.•Select:  Perform  all  standard  touch  screen  cursor  commands including tap, double-tap, drag, and drag-select, etc.•Drag:  To  drag  something,  position  the  AccuFinger  pointer  on  it, press briefly on the pointer pad to activate drag mode, then drag the selected item to a new position.•Display: Display a context-sensitive menu by holding your fingertip on the pointer pad for a moment until the menu appears, then stop touching the pad and select a menu command.3 Multi-selectTurns the multi-select feature on and off. Tap the multi-select icon to turn it on. Tap it again to turn multi-select off.4ESC simulationTap on the ESC icon to send an Escape command to the system.5Touch Tools configurationTap to open the Touch Tools configuration window. See Settings on page 40.6Gateway Screen GraspTap this icon to run the Acer Screen Grasp utility. See Acer Screen Grasp on page 42.7 Close Tap the X to close Acer Touch Tools. Both AccuFinger and the Touch Tools panel will close.8AccuFinger pointerNo. Item Description
40 - Acer Touch Tools•Text edit: You can select text in supported programs by tapping on a word  or  text block to  select  it or insert  the  cursor.  You  can  then type or perform other operations on the selected text.RepliViewYour touch  device!s  onscreen virtual  keyboard  can sometimes  block your view of where you are typing. RepliView displays a small pop-up window above the  onscreen  keyboard that  displays  a  view  of where you are typing so that you can see what you are doing. This feature operates automatically when Touch Tools is running.SettingsYou  can  adjust  the  settings  to  suit  your  needs,  including  setting  the AccuFinger pointer size and timeout. You can also select either right
Acer Touch Tools - 41or  left-hand  operation,  which  optimizes  pointer  orientation  for  the selected mode.
42 - Acer Screen GraspACER SCREEN  GRASPAcer Screen Grasp is a handy screen capture tool that allows you to capture  all  or  part  of  anything  that’s  displayed  on  your  computer’s screen. It works for both the desktop and Start screen applications.To  launch  Acer  Screen  Grasp,  press  <Ctrl>  +  <Shift>  +  <PrtSc>. Once  you  have  opened  the  application  you  can  activate  the  launch gesture: Tapping the screen with three fingers.Overview1 2 3 4 5 6  The  toolbar  at  the  top  of  the  screen  allows  you  to  change  screen capture options and settings.NoteThe  three-finger  gesture  is  disabled  by  default.  You  can  enable  it  from Settings.No. Description1 Capture: Capture a rectangular or circular area of the screen.2 Freeform capture: Capture a freeform part of the screen.3 Window capture: Capture all or part of an open window.4Webpage capture: Capture a whole webpage, including parts of the page that are not currently visible.5 Full screen capture: Capture the full screen.6 Settings: Change the defaults.
Acer Screen Grasp - 43Adjusting the SettingsTap the Settings icon to adjust the defaults for Acer Screen Grasp.  You  can  enable  or  disable  the  launch  gesture  (tap  the  screen  with three fingers), set the app to launch the editing tool after capturing, pin the program to the taskbar, view a short introduction tutorial, or view the Help content.The editing toolAfter you!ve captured the screen, you can edit the image. No. Description1 Undo.2 Redo.3 Pencil tool.1 2 3 4 5 6 7 8 10 119
44 - Acer Screen Grasp4 Marker tool.5 Text tool.6 Eraser.7 Mosaic effect.8 Lasso tool.9Share capture to...• Windows clipboard• Facebook• Acer Scrapboard• Word• PowerPoint• Outlook10 Save.11 Pin/unpin the toolbars.No. Description
Acer Scrapboard - 45 ACER SCRAPBOARDAcer  Scrapboard  is  a  useful  tool  to  manage  your  screen  captures. Screen captures are automatically sorted by date.Tap the   icon on the screen capture to open the website in Internet Explorer.  You can also create tags to assist in sorting your images.1. Tap and drag an image down to open the menu at the bottom of the screen.2. Tap Create tag to create a tag.3. Tap Tags to open the list of available tags, and check each tag that you would like to assign to the image.
46 - Keeping your computerand data safe...In this section you will find:• How to secure your computer• Setting passwords• What you need to prepare when you•re traveling• How to get the most out of your battery
BIOS utility - 47BIOS UTILITYThe  BIOS  utility  is  a  hardware  configuration  program  built  into  your computer's BIOS.Your computer is already properly configured and optimized, and you do  not  normally  need  to  run  this  utility.  However,  if  you  encounter configuration problems, you may need to run it.To  activate  the  BIOS  utility,  press  <F2>  during  the  POST  while  the computer logo is being displayed.Boot sequenceTo set the boot sequence in the BIOS utility, activate the BIOS utility, then select Boot from the categories listed at the top of the screen. Setting passwordsTo  set  a  password  on  boot,  activate  the  BIOS  utility,  then  select Security  from  the  categories  listed  at  the  top  of  the  screen.  Find Password on boot: and use the <F5> and <F6> keys to enable this feature.
48 - Securing your computerSECURING YOUR COMPUTERYour computer is a valuable investment that you need to take care of. Learn how to protect and take care of your computer.Using passwordsPasswords protect your computer from unauthorized access. Setting these passwords creates several different levels of protection for your computer and data:• Supervisor  Password  prevents  unauthorized  entry  into  the  BIOS utility. Once set, you must enter this password to gain access to the BIOS utility. See Setting passwords on page 47.• User  Password  secures  your  computer  against  unauthorized  use. Combine  the  use  of  this  password  with  password  checkpoints  on boot-up  and  resume  from  Hibernation  (if  available)  for  maximum security.• Password  on  Boot  secures  your  computer  against  unauthorized use. Combine the use of this password with password checkpoints on boot-up and resume from Hibernation (if available) for maximum security.Entering passwordsWhen a password is set, a password prompt appears in the center of the display screen.• When the Supervisor Password is set, a prompt appears when you enter the BIOS utility.• Type  the  Supervisor  Password  and  press  <Enter>  to  access  the BIOS  utility.  If  you  enter  the  password  incorrectly,  a  warning message appears. Try again and press <Enter>.• When  the  User  Password  is  set  and  the  password  on  boot parameter is enabled, a prompt appears at boot-up.ImportantDo not forget your Supervisor Password! If you forget your password, please get in touch with your dealer or an authorized service center.
Securing your computer - 49• Type the User Password and press <Enter> to use the computer. If you enter the password incorrectly, a warning message appears. Try again and press <Enter>.ImportantYou  have  three  chances  to  enter  a  password.  If  you  fail  to  enter  the password correctly after three tries, the system halts. Press and hold the power button for four seconds  to shut down  the computer.  Then turn on the computer again, and try again.
50 - Power managementPOWER MANAGEMENTThis  computer  has  a  built-in  power  management  unit  that  monitors system activity. System activity refers to any activity involving one or more  of  the  following  devices:  keyboard,  mouse,  hard  disk, peripherals  connected  to  the  computer,  and  video  memory.  If  no activity is detected for a period of time, the computer stops some or all of these devices in order to conserve energy.Saving powerDisable Fast startupYour computer uses Fast startup to start quickly, but also uses a small amount of power to check for signals to start. These checks will slowly drain your computer!s battery. If  you  prefer  to  reduce  your  computer!s  power  requirements  and environmental impact, turn off Fast startup:1. Open the desktop.2. Click Power Options in the Notification area.3. Select More Power Options.    4. Select Choose what the power buttons do.NoteIf Fast startup is off, your computer will take longer to start from Sleep. Your computer will also not start if it receives an instruction to start over a network (Wake on LAN).
Power management - 515. Select Change settings that are currently unavailable. 6. Scroll down and disable Turn on fast startup. 7. Select Save changes.
52 - Battery packBATTERY PACKThe computer uses an embedded Lithium battery that gives you long use between charges.Battery characteristicsThe battery is recharged whenever you connect the computer to the AC  adapter.  Your computer  supports  charge-in-use, enabling  you  to recharge  the  battery  while  you  continue  to  operate  the  computer. However,  recharging  with  the  computer  turned  off  significantly reduces charge time.The  battery  will  come  in  handy  when  you  travel  or  during  a  power failure. Charging the batteryPlug the AC adapter into the computer, and connect to a mains power outlet. You can continue to operate your computer on AC power while your  battery  is  charging.  However,  charging  the  battery  with  the computer turned off significantly reduces charge time.Conditioning a new battery packBefore you use a battery pack for the first time, there is a conditioning process that you should follow:1. Connect the AC adapter and fully charge the battery.2. Turn on the computer and complete setting up the operating system.3. Disconnect the AC adapter.4. Operate the computer using battery power.5. Reconnect the AC adapter and fully charge the battery again.Follow  these  steps  again  until  the  battery  has  been  charged  and discharged three times.NoteYou are advised to charge the battery before retiring for the day. Charging the battery overnight before traveling enables you to start the next day with a fully charged battery.
Battery pack - 53Use  this  conditioning  process  for  all  new  batteries,  or  if  a  battery hasn't been used for a long time. The  battery  conditioning  process  ensures  your  battery  accepts  the maximum possible charge. Failure to follow this procedure will prevent you from obtaining the maximum battery charge, and will also shorten the effective lifespan of the battery.In addition, the useful lifespan of the battery is adversely affected by the following usage patterns:• Using the computer on constant AC power.• Not  discharging  and  recharging  the  battery  to  its  extremes,  as described above.• Frequent use; the more you use the battery, the faster it will reach the end of its effective life. An embedded battery has a life span of more than 1,000 charge/discharge cycles.Optimizing battery lifeOptimizing battery life helps you get the most out of battery operation, prolonging  the  charge/recharge  cycle  and  improving  recharging efficiency. You are advised to follow the suggestions set out below:• Use AC power whenever possible, reserving battery for mobile use.• Remove  accessories  that  are  not  being  used  (e.g.  a  USB  disk drive), as they can continue to draw power.• Store your PC in a cool, dry place. The recommended temperature is  10°  C (50°  F) to  30°  C  (86°  F). Higher  temperatures cause  the battery to self-discharge faster.• Excessive recharging decreases the battery life.• Look after your AC adapter and battery. WarningDo  not  expose  battery  packs  to  temperatures  below  0°  C  (32°  F)  or above 45° C (113° F). Extreme temperatures may adversely affect the battery pack.
54 - Battery packChecking the battery levelThe power  meter  indicates  the current battery  level. Rest the  cursor over the battery/power icon on the taskbar to see the battery's present charge level.Battery-low warningWhen using battery power pay attention to the power meter.When the battery-low warning appears, the recommended course of action depends on your situation:ImportantConnect  the  AC  adapter  as  soon  as  possible  after  the  battery-low warning appears. Data may be lost if the battery is allowed to become fully depleted and the computer shuts down.Situation Recommended ActionThe AC adapter and a power outlet are available.1. Plug the AC adapter into the computer, and then connect to the main power supply.2. Save all necessary files.3. Resume work. Turn off the computer if you want to recharge the battery rapidly.The AC adapter or a power outlet is unavailable. 1. Save all necessary files.2. Close all applications.3. Turn off the computer.
 - 55Ports and connectors...In this section you will find:• Information on the ports and connectors fitted to your computer
56 - Memory card readerMEMORY CARD READERConnectivity optionsYour computer has a card reader and other ports/jacks that allow you to  connect  peripheral  devices  to  your  computer.  For  instructions  on how  to  connect  different  external  devices  to  the  computer,  read  the following section.Memory card readerMemory cards are used in a wide selection of digital cameras, PDAs, MP3 players and mobile phones. Inserting a memory card1. Align the card so that the connector points towards the port, with the connectors facing down.2. Carefully slide the card into the port. If you find you need to use any force to insert the card, try reorientating the card slightly.3. Push the card until it clicks into place. A few millimetres of the card will extend from beyond the slot.If the card contains some files, the Windows Auto Play window may appear (this depends on the contents of the card) and ask you if you wish to use a program to access the contents of the card. Select an option here if it is appropriate, otherwise select Cancel. If the card contains no files, or unknown files, a window will open showing the contents of the card.SD, SDHC and SDXC cardsDifferent types of SD cards cover different capacities, while using the same  overall  design.  SD  cards  contain  up  to  4 GB,  SDHC  cards contain  up  to  32 GB,  and  SDXC  cards  can  contain  up  to  2048 GB
Memory card reader - 57(2 TB). Your computer provides an SDHC or SDXC compatible card reader.Removing a card from a memory card reader1. Click  on  Show  hidden  iconsarrow in the Notification Area (next to the clock).2. Click  on  the  Safely  Remove Hardware icon.3. Click  on  Eject  SD  Card  (or  the name of the device).4. Wait  until  a  Safe  to  Remove Hardware message is displayed.5. Remove the card.NoteSDXC memory cards can only be used in an SDXC-compatible reader; SD and SDHC cards can be used in either type.321
58 - Video and audio connectorsVIDEO AND AUDIO CONNECTORSConnect to a monitor with a VGA or DVI port (the type of connection supported  depends  on  your  computer’s  configuration).  The appropriate cable is usually included with the monitor. Follow these steps to connect an monitor to your computer:1. Check  that  the  computer  is  powered  off  and  the  monitor  power switch is turned off.2. Attach the video cable to the monitor port on the computer. Secure the cable connection with the screws provided.3. Connect  the  monitor  power  cable  and  plug  it  into  a  properly grounded wall outlet.4. Follow any setup instructions in the monitor's user's guide.5. Turn on power to the monitor, then the computer.6. Make sure that the current resolution and refresh rate do not exceed the  specifications  of  the  monitor.  If  necessary  change  the  display settings used by the computer.Headphones and microphoneThese ports allow you to connect audio devices. Use the headphone port to plug in stereo headphones or powered speakers. Plugging an audio  device  to  the  headphone  port  disables  the  built-in  speakers. Use the microphone port to connect an external microphone for mono recording;  plugging  in  an  external  microphone  disables  the  built-in microphone.NoteTo  access  the  display  controls,  press  the  Windows  key  ( )  +  W,  type "Display" and then click on Display.NoteSome computers have a single "combo" port that allows you to use single-pin headsets  with  a  built-in  microphone.  These  headsets  are  most  commonly used with smartphones.
HDMI Micro - 59HDMI MICROHDMI  (High-Definition  Multimedia  Interface)  is  a  high-quality,  digital audio/video  interface.  HDMI  allows  you  to  connect  any  compatible digital audio/video source, such as your computer, a set-top box, DVD player, and audio/video receiver to any compatible digital audio and/or video monitor, such as a digital television (DTV) with a single cable.The single cable keeps everything neat and tidy while ensuring easy connection and the best audio and visual quality.HDMI  Micro  delivers  the  same  high-quality  playback  as  standard HDMI,  with  a  slimmer  connector,  ideal  for  use  in  slim-and-light notebooks and tablet computers. NoteAn HDMI Micro-to-HDMI adapter is included with certain models.
60 - Universal Serial Bus (USB)UNIVERSAL SERIAL BUS (USB)The USB port is a high-speed port which allows you to connect USB peripherals,  such  as  a  mouse,  an  external  keyboard,  additional storage (external hard disks), or any other compatible device.You can also charge devices such as tablets, smartphones, or other devices  through  a  USB  port.  Some  USB  3.0  ports  support  charging devices when the computer is in Hibernate or turned off. Additionally, you can use a USB hub to connect multiple devices to a single USB port.NoteTwo  USB  standards  are  currently  available  on  Acer  computers:  USB  2.0 (High-speed USB) and USB 3.0 (SuperSpeed USB). USB 2.0 ports on Acer computers have a black tongue in the port, while USB 3.0 ports have a blue tongue. For best performance, USB 3.0 devices should always be plugged into  USB  3.0  ports.  Consult  your  device•s  documentation  to  see  which standard it supports.ImportantWhen  removing  a  USB  storage  device,  you  should  right-click  on  the USB icon in the Windows task bar and select "Eject <device>" to tell the operating system to stop using the device before removing it. Failure to do this may result in data loss or damage to your peripheral.
Micro USB - 61MICRO USBThe USB (Universal Serial Bus) port is a high-speed serial bus which allows  you  to  connect  USB  peripherals  without  taking  up  system resources.The Micro USB port  provides  a compact port that is compatible with USB 2.0 devices. NoteA Micro USB-to-USB adapter is needed to connect to USB devices that use a full-sized connector. The adapter is only included with some models. If your computer is not supplied with one, you will need to purchase one separately.
62 - Got a question?In this section you will find:• Frequently asked questions• Tips for using Windows 8.1• Troubleshooting information• How to protect yourself while online• Where to find Acer service center contact information
Frequently asked questions - 63FREQUENTLY ASKED QUESTIONSThe following is a list of possible situations that may arise during the use of your computer. Easy solutions are provided for each one.I turned on the power, but the computer does not start or boot up.Look at the power indicator:• If it is not lit, no power is being supplied to the computer. Check the following:• If you are using on the battery, it may be low and unable to power the  computer.  Connect  the  AC  adapter  to  recharge  the  battery pack.• Make  sure  that  the  AC  adapter  is  properly  plugged  into  the computer and to the power outlet.• If it is lit, check the following:• Is a disc in the optical drive? Remove it and press <Ctrl> + <Alt> + <Del> to restart the system.• Do  you  have  a  USB  storage  device  (USB  disk  or  smartphone) plugged into your computer? Unplug it and press <Ctrl> + <Alt> + <Del> to restart the system.Nothing appears on the screen.The computer"s power management system automatically blanks the screen to save power. Press any key to turn the display back on.If pressing a key does not turn the display back on, three things might be the cause:• The brightness level might be too low. Press <Fn> + < > (increase) to adjust the brightness level.• The  display  device might  be  set to  an  external  monitor.  Press  the display toggle hotkey <Fn> + <F5> to toggle the display back to the computer.• If  the  power  LED  is  flashing,  the  computer  may  be  in  Sleep  or Hibernate mode. Press and release the power button to resume.No audio is heard from the computer.Check the following:
64 - Frequently asked questions• The  volume  may  be  muted.  Look  at  the  volume  control  (speaker) icon in the taskbar. If it is crossed-out, click the icon and deselect the Mute all option.• The  volume  level  may  be  too  low.  Check  the  volume  from  the volume control (speaker) icon in the taskbar. You can also use the volume control buttons to adjust the volume.• If  headphones,  earphones  or  external  speakers  are  connected  to the  headphone  jack  on  the  computer,  the  internal  speakers automatically turn off.The keyboard does not respond.Try attaching an external keyboard to a USB port on the computer. If it works,  contact  your  dealer  or  an  authorized  service  center  as  the internal keyboard cable may be loose.The printer does not work.Check the following:• Make sure that the printer is connected to a power outlet and that it is turned on.• Make sure that the printer cable is connected securely to a USB port and the corresponding port on the printer.I want to restore my computer to its original settings.This recovery process helps you restore the C: drive with the original software content that is installed when you purchased your computer.Before  performing  a  restore  operation,  please  check  the  BIOS settings.1. Check to see if Acer disk-to-disk recovery is enabled or not.NoteIf your system is the multilingual version, the operating system and language you choose when you first turn on the system will be the only option for future recovery operations.WarningYour  C:  drive  will  be  reformatted  and  all  data  will  be  erased.  It  is important to back up all data files before using this option.
Frequently asked questions - 652. Make sure the D2D Recovery setting in Main is Enabled.3. Exit the BIOS utility and save changes. The system will reboot.For more information, see Recovering your system on page 25.Requesting serviceInternational Travelers Warranty (ITW)Your  computer  is  backed  by  an  International  Travelers  Warranty (ITW)  that  gives you  security and  peace  of  mind when  traveling.  An ITW passport came with your computer and contains all you need to know  about  the  ITW  program.  A  list  of  available,  authorized  service centers is in this handy booklet. Read this passport thoroughly.Always have your ITW passport on hand, especially when you travel, to receive the benefits from our support centers. Attach your proof-of-purchase to the ITW passport.If the country you are traveling in does not have an Acer-authorized ITW service site, you can still get in contact with our offices worldwide. Please visit www.acer.com.Before you callPlease have the following information available when you call Acer for online  service,  and  please  be  at  your computer  when  you call.  With your support, we can reduce the amount of time a call takes and help solve your problems efficiently. If there are error messages or beeps reported  by  your  computer,  write  them  down  as  they  appear  on  the screen (or the number and sequence in the case of beeps).You are required to provide the following information: Name:  _______________________________________  Address: ______________________________________  Telephone number:  _____________________________  Machine and model type: _________________________  Serial number:  _________________________________  Date of purchase:  ______________________________NoteTo activate the BIOS utility, press <F2> when you see the Acer logo during boot up.
66 - Frequently asked questionsTips and hints for using Windows 8.1We  know  this  is a new  operating  system that will  take some  getting used to, so we've created a few pointers to help you get started.How do I get to Start?Press the Windows key; tap the Start button on the desktop taskbar; or swipe the right-hand edge of the screen inwards and tap the Startcharm.Where!s the Start button?The  Start  button  will  appear  in  the  desktop  taskbar.  Tapping  it  will open Start where you can launch apps.How do I see all of my apps?Swipe upwards from the bottom of Start.Can I make the "All apps" view the default for Start?Yes, you can, just follow these steps:1. Go to the desktop.2. Tap  and  hold  the  taskbar  until  you  see  the  square  outline.  Select Properties from the menu that opens when you remove your finger.3. From the Navigation tab, check Show the Apps view automatically when I go to Start.What are "Charms?"Charms  allow  you  to  perform  useful  functions,  such  as  sharing content, turning off your PC or changing settings. How do I access the charms?Swipe the right-hand edge of the screen inwards.Fr e quen tly   a sk
Frequently asked questions - 67Can I boot directly to the desktop?Yes, you can, just follow these steps:1. Go to the desktop.2. Tap  and  hold  the  taskbar  until  you  see  the  square  outline.  Select Properties from the menu that opens when you remove your finger.3. From the Navigation tab, check Go to the desktop instead of Start when I sign in.How do I jump between apps?Swipe the left-hand edge of the screen inwards to cycle through apps that are currently running.How do I turn off my computer?Swipe  the  right-hand  edge  of  the  screen  inwards,  tap  Settings  > Power and select the action you'd like to take.Can I just turn off notifications?You  can  turn  off  notifications  during  certain  hours  so  that  you  can leave your computer running, but not be disturbed by notifications.1. Swipe the right-hand edge of the screen inwards and tap Settings > Change PC settings > Search & apps > Notifications.2. Move the Quiet hours slider to On and select times to start and stop disabling notifications.How do I unlock my computer?Swipe the lock screen upwards and tap a user account icon to unlock the  computer.  If  your  account  has  a  password  set,  you  will  need  to enter the password to continue.Tap and hold the preview icon to see the characters you've entered to ensure the password is correct.
68 - Frequently asked questionsCan I personalize the Lock screen?You can personalize  the lock screen  with a different image, to run a slideshow of images, or to show you quick status and notifications to suit your personal needs.To change the background, swipe the right-hand edge of the screen inwards and tap Settings > Change PC settings > PC and devices> Lock screen. From here you can:• Select a background image for the lock screen• Turn the Slide show on or off• Select lock screen apps.How do I set up the lock screen slideshow?1. Swipe the right-hand edge of the screen inwards and tap Settings > Change PC settings > PC and devices > Lock screen.2. Move the slider to On and select if the slideshow should be played while the computer is running on battery power.3. Tap Add a folder and open the folder you wish to use (your Picturesfolder will open by default). Tap Use this folder > OK.4. You  can  see  the  list of  folders  under Add  a  folder.  Select  a  folder name and  tap  Remove  to remove  the  folder  from  the  lock screen slideshow.5. Change the other settings to suit your needs.How do I move tiles?Tap and hold a tile to select it, then drag it to the place on Start that you want it to appear. Other tiles will be moved to accommodate the tile in its new location.Can I arrange tiles in groups?Yes, you can. Tap and hold a tile until you see the screen dim. When you release the tile, the Customize menu appear at the bottom of the screen.  You  will  see  Name  group  appear  above  unnamed  groups. You  can  give  the  group(s)  a  name  and  arrange  the  tiles  within  the groups to suit your needs.
Frequently asked questions - 69Can I make tiles bigger or smaller?Swipe upwards from bottom of the screen and tap Customize, tap the tile(s) you wish to resize and tap Resize. Select a size from the menu that appears.How do I close an app?Swipe  the  window  downwards  from  the  top  to  the  bottom  of  the screen. You need to swipe the window past the half-way point of the screen.Can I change the screen resolution?Swipe the right-hand edge of the screen inwards and tap Search, tap the text box to open the onscreen keyboard and start typing 'Control Panel'  to  display  the  results;  tap  Control  Panel  >  Adjust  screen resolution.How do I set the alarm?Your  computer  can  act  as  an  alarm  clock.  Start  typing  !Alarms!  to search for the Alarms app.1. Set the time using the sliders on the left-hand side of the screen.2. Select AM or PM.3. Choose which days the alarm should go off.4. Select the notification.
70 - Frequently asked questions5. Save  the  alarm  by  tapping  the  Save  icon  in  the  upper  right-hand corner. Where are my apps?Swipe  the  right-hand  edge  of  the  screen  inwards  and  tap  Search, type  the  name  of  the  app  you  would  like  to  open  using  the  pop-up keyboard.  Results  will  be  displayed  on  the  left-hand  side  of  the screen.To view the complete list of apps, swipe upwards from the bottom of the screen and tap All apps.How do I make an app appear on Start?If  you're  in All  apps  and you  want  to make  an  app  appear on  Start, Tap and hold a tile until you see the screen dim. When you release the tile, the Customize menu appear at the bottom of the screen. Tap Pin to Start from the menu that appears at the bottom of the screen.How do I remove a tile from Start?Tap and hold a tile until you see the screen dim. When you release the tile, the Customize menu appear at the bottom of the screen. Tap HourMinutesSaveDeleteNoteThe alarm will only sound if your computer is awake at the set time.
Frequently asked questions - 71the  tile(s)  you  wish  to  remove  and  tap  Unpin  from  Start  from  the menu that appears at the bottom of the screen.How do I make an app appear on my taskbar?If  you're  in  All  apps  and  you  want  to  make  an  app  appear  on  the taskbar, tap  and  hold  a  tile  until you  see the screen  dim.  When  you release  the  tile,  the  Customize  menu  appear  at  the  bottom  of  the screen.  Select  Pin  to  taskbar  from  the  menu  that  appears  at  the bottom of the screen.How do I install apps?You can download Windows Store apps from Store. You will need to have a Microsoft ID to purchase and download apps from Store. I can't find apps like Notepad and Paint! Where are they?Swipe  the  right-hand  edge  of  the  screen  inwards  and  tap  Search, type  the  name  of  the  app  you  would  like  to  open  using  the  pop-up keyboard.  Alternatively,  open  All  apps  and  scroll  to  !Windows Accessories! to see the list of legacy programs.Can I use more than one app at a time?1. Tap on a tile to open an app from the Start screen.2. Return to the Start screen and repeat the process.3. Swipe right from the left edge of the screen to display the last app that was opened.4. Swipe right from the left edge of the screen until you see a column divider to display both apps simultaneously. Up to three apps may be displayed via three columns at the same time.Can I show my desktop apps first?Yes, you can, just follow these steps:1. Go to the desktop.2. Tap  and  hold  the  taskbar  until  you  see  the  square  outline.  Select Properties from the menu that opens when you remove your finger.3. From the Navigation tab, check List desktop apps first in the Apps view when it's sorted by category.
72 - Frequently asked questionsWhat is a Microsoft ID (account)?A Microsoft account is an email address and password that you use to sign in to  Windows.  You  can  use any email address, but  it  is  best if you choose the one you already use to communicate with friends and sign in to your favorite websites. When you sign in to your PC with a Microsoft  account,  you'll  connect  your  PC  to  the  people,  files,  and devices you care about.Do I need one?You do not need a Microsoft ID to use Windows 8.1, but it makes life easier because you can sync data across different machines you sign in to using a Microsoft ID. How do I get one?If  you've  already  installed  Windows  8.1  and  didn't  sign  in  with  a Microsoft account or you don't have a Microsoft account and want to get  one,  swipe  the  right-hand  edge  of  the  screen  inwards  and  tap Settings  >  Change  PC  settings  >  Accounts  >  Connect  to  a Microsoft account, and follow the onscreen instructions.How do I add a favorite to Internet Explorer?Internet Explorer 10 doesn't have traditional favorites, instead you can pin shortcuts to Start. Once you have the page open, swipe upwards from the bottom edge of the screen to open the menu at the bottom of the screen. Tap Pin to Start.How do I check for Windows updates?Swipe the right-hand edge of the screen inwards and tap Settings > Change PC settings > Update & recovery > Windows Update. Tap Check now.Where can I get more information?For more information please visit the following pages:• Windows 8 and 8.1 tutorials: www.acer.com/windows8-tutorial• Support FAQs: support.acer.com
Frequently asked questions - 73TroubleshootingThis chapter shows you how to deal with common system problems.  Read  it  before  calling  a  technician  if  a  problem  occurs. Solutions  to more  serious  problems  require  opening  up  the  computer.  Do  not attempt  to  open  the  computer  yourself;  contact  your  dealer  or authorized service center for assistance.Troubleshooting tipsThis  computer  incorporates  an  advanced  design  that  delivers onscreen error message reports to help you solve problems.If the system reports an error message or an error symptom occurs, see  "Error  messages"  below.  If  the  problem  cannot  be  resolved, contact your dealer.Error messagesIf  you  receive  an  error  message,  note  the  message  and  take  the corrective  action.  The  following  table  lists  the  error  messages  in alphabetical order together with the recommended course of action.Error messages Corrective actionCMOS battery bad Contact your dealer or an authorized service center.CMOS checksum errorContact your dealer or an authorized service center.Disk boot failure Insert a system (bootable) disk, then press <Enter> to reboot.Equipment configuration errorPress <F2> (during POST) to enter the BIOS utility, then press Exit in the BIOS utility to reboot.Hard disk 0 error Contact your dealer or an authorized service center.Hard disk 0 extended type errorContact your dealer or an authorized service center.I/O parity error Contact your dealer or an authorized service center.FREQUENTLY
74 - Frequently asked questionsIf  you  still  encounter  problems  after  going  through  the  corrective measures, please contact your dealer or an authorized service center for assistance.Keyboard error or no keyboard connectedContact your dealer or an authorized service center.Keyboard interface errorContact your dealer or an authorized service center.Memory size mismatchPress <F2> (during POST) to enter the BIOS utility, then press Exit in the BIOS utility to reboot.Error messages Corrective action
Internet and online security - 75INTERNET AND ONLINE SECURITYFirst steps on the netProtecting your computerIt is vital to  protect your computer from viruses and attacks over the Internet  (see  Security  on  page 79).  A  comprehensive  Internet security  program  is  offered  when  you  first  start  your  computer.  You should  activate  this  protection  as  soon  as  possible,  certainly  before you connect to the Internet.Choose an Internet Service ProviderUsing  the  Internet  has become a  natural  part of  daily computing. Just a few simple steps can connect you to a  vast  collection  of  knowledge  and  communication tools.  To  accomplish  these  steps  you  should  first select  an  Internet  Service  Provider  (ISP),  which supplies  the  connection  between  your  computer  and the Internet. You should research the ISPs available in your  region,  not  forgetting  to  talk  to  friends  and  family  about  their experiences or to check reviews and consumer reports. The ISP you select will provide instructions on how to connect to the Internet (you may need additional software or a special ‘box’ that connects to your phone line).Connection typesDepending  on  your  computer  model,  your  location  and  your communication  needs,  you  have  several  ways  to  connect  to  the Internet. Dial-upSome  computers  include  a  telephone  dial-up  (‘modem’)  connector. This allows you  to connect to the  Internet  using your telephone line. With  a  dial-up  connection,  you  cannot  use  the  modem  and  the telephone  simultaneously  on  a  single  phone  line.  This  type  of connection  is  recommended  only  if  you  have  limited  use  of  the
76 - Internet and online securityInternet  as  the  connection  speed  is  low  and  connection  time  is typically charged per hour. DSL (e.g. ADSL)DSL  (Digital  Subscriber  Line)  is  an  ‘always-on’  connection  that  runs over  the  phone  line.  As  DSL  and  phone  do  not  use  the  same frequencies,  you  can  use  your  telephone  at  the  same  time  you  are connected  to  the  Internet  (this  requires  a  ‘micro-filter’  on  each telephone  socket  to  avoid  interference).  To  be  eligible  for  DSL,  you must  be  located  near  an  DSL-equipped  phone exchange  (service is sometimes  unavailable  in  rural  areas).  Connection  speeds  vary depending on your location, but DSL generally provides very fast and reliable  Internet  connection.  As  the  connection  is  always-on,  it  is generally charged at fixed monthly rates.CableA cable connection provides fast and always-on Internet service via a cable television line. This service is generally available in large cities. You can use your telephone and watch cable TV at the same time you are connected to the Internet. 3G (WWAN or 'Wireless Wide-Area Network')A 3G connection allows  you to use cellular  networks  (such as those used by a mobile  phone) to connect to the Internet while away from home. The socket for a SIM card may be built in to your computer, or may  require  an  external  device,  such  as  a  USB  modem or  even  an appropriately equipped mobile phone.NoteA  DSL  connection  requires  an  appropriate  modem.  A  modem  is  usually provided by the ISP when you register. Many of these modems include an ‘router’ that provides network and Wi-Fi access.NoteIf your computer includes a SIM card slot, you require a compatible SIM card and a contract with a cellular provider.  Before using the 3G features, check with your service provider to see if any additional charges will be incurred, especially roaming charges.
Internet and online security - 77Network connectionsA  LAN  (Local  Area  Network)  is  a  group  of  computers  (for  example, within  an  office  building  or  home)  that  share  a  common communications line and resources. When you set up a network, you can share files, peripheral devices (such as a printer) and an Internet connection. You can set up a LAN using wired technologies (such as Ethernet) or wireless technologies (such as Wi-Fi or Bluetooth). Wireless networksA wireless LAN or WLAN is a wireless local area network, which may link two or more computers without using wires. Setting up a wireless network is easy and allows you to share files, peripheral devices and an Internet connection. What are benefits of a wireless network?MobilityWireless  LAN  systems  allow  you  and  other  users  of  your  home network  to  share  access  to  files  and  devices  connected  to  the network, for example a printer or scanner.Also  you  can  share  an  internet  connection  with  other  computers  in your home.Installation speed and simplicityInstalling a wireless LAN system can be fast and easy and eliminates the need to pull cables through walls and ceilings. Components of a wireless LANTo  set  up  your  Wireless  network  at  home  you  need  to  have  the following:Access point (router)Access points (routers) are two-way transceivers that broadcast data into  the  surrounding  environment.  Access  points  act  as  a  mediator between wired and wireless network. Most routers have a built-in DSL modem  that  will  allow  you  access  to  a  high  speed  DSL  internet connection.  The  ISP  (Internet  Service  Provider)  you  have  chosen normally  supplies  a  modem/router  with  the  subscription  to  their
78 - Internet and online securityservices. Read carefully the documentation supplied with your Access point/router for detailed setup instructions.Network cable (RJ45)A network cable (also called RJ45 cable) is used to connect the host computer to the access point (see illustration below); this type of cable may also be used to connect peripheral devices to the access point.Wireless adapterAn internal wireless adapter is normally already installed in your computer. A button or controls in Windows allow you to activate or deactivate the adapter.Diagram of a working network1. Access point/router2. Desktop computer3. Modem4. Printer5. Portable computer6. PDA/Smartphone7. Network cables (RJ45)Turning on/off a wireless network connectionMost  computers  feature  a  ‘Wi-Fi’  button  that  turns  the  network connection on or off. If your computer has wireless access, but does not  feature  a  Communication  button,  you  may  turn  your  wireless network on or off, or control what is shared over the network with the network management options. Press the Windows key ( ) + W, type "HomeGroup" and then click on HomeGroup.WarningUsing wireless devices while flying in aircraft is prohibited. Switch off all devices before boarding an aircraft; they may be dangerous to the operation of the aircraft, disrupt communications, and even be illegal.
Internet and online security - 79Surf the Net!To  surf  the  Internet,  you  need  a  program  called  an Internet  browser.  Internet  Explorer  provides  an  easy and secure web browsing experience. As soon as you have  your  Internet  access  installed  and  you  are connected, from Start, click the Internet Explorer tile or the icon located on the  desktop  and take your Internet experience to a new level!Acer websiteTo get you started why not visit our website, www.acer.com.Acer  is  dedicated  to  provide  you  with  on-going  personalied support. Check out our Support section to get help tailored to your needs.www.acer.com  is  your  portal  to  a  world  of  online  activities  and services: visit us regularly for the latest information and downloads! SecurityYou are probably eager to explore everything the Internet has to offer. In  order  for  you  to  be  safe  online,  Acer  has  pre-installed  McAfee Internet Security Suite on your computer. McAfee Internet Security Suite runs quietly in the background to block today"s  complex  threats  and  protect  your  identity  when  you  shop, bank, or browse online.McAfee Internet Security Suite blocks online identity theft, detects and eliminates  spyware,  removes  viruses  and  Internet  worms,  protects against hackers.DefinitionsWhat is a virus?Malicious software, typically called #viruses", are programs designed to infect and damage computers. Most viruses are transmitted over the Internet,  emails  or  malicious  Web  sites.  A  typical  virus  will  replicate and  pass  itself  undetected  to  multiple  computers.  Other  forms  of nuisance,  such  as  Trojan  horses,  worms  or  spam  can  infect  your
80 - Internet and online securitycomputer  in  various  ways,  using  up  resources  or  clogging  up  a network.What is spyware?Spyware refers to generally unwanted programs that are downloaded onto your computer while connected to the Internet, often without you knowing it. Once it has infected your computer, it can snoop on your browsing  activity,  collect  personal  information,  cause  pop-up  ads  to appear, or even change the configuration of your computer. Spyware consumes resources on your computer; it can slow down your Internet connection or entire computer system, and even cause crashes.Spyware  is  sometimes  used  by  unscrupulous  companies  to  monitor and  track  the sites  you visit on  the  Internet  so  as  to determine your web-surfing  habits  and  display  targeted  pop-up ads  on  your  screen. However,  some  kinds  of  spyware  go  beyond  simple  tracking  and actually monitor keystrokes and capture passwords, posing a serious security risk. What is malware?Malicious  software,  also  known  as malware,  is software  designed to deliberately  harm  your  computer.  For  example,  viruses,  worms,  and Trojan horses are malicious software. To help protect your computer against malware, make  sure it is using up-to-date  antivirus and anti-malware software.What is a personal firewall?A  personal  firewall  is  a  software  program  designed  to  prevent unauthorized access to or from a private network. It acts as a shield to protect your Internet connection from unwanted connections, some of which  may  attempt  to  take  control  of  your  computer  to  install  or  re-distribute  viruses  or  malicious  programs.  Each  connection  to  your computer is monitored - programs that attempt to receive information without  your  permission are  detected  and  the firewall  will  display an alert.  You  can  then  decide  if  you  will  allow  the  connection,  if  the connection is to a program you are currently using then normally you NoteAcer  guarantees  that  your  computer  was  100%  virus  free  at  the  time  of purchase and does not cover damages due to viruses.
Internet and online security - 81would allow  it  (i.e.  a  game connecting to  a  multi-player  server or an encyclopaedia making a content update).How to protect your computerCybercrime  prevention can  be  straight-forward  -  when armed  with a little  technical  advice  and  common  sense,  many  attacks  can  be avoided. In general, online criminals are trying to make their money as quickly and easily as possible. The more difficult you make their job, the more likely they are to leave you alone and move on to an easier target.  The  tips  below  provide  basic  information  on  how  you  can prevent online fraud.Keep your computer current with the latest patches and updatesOne of the best ways to keep attackers away from your computer is to apply patches and other software fixes when they become available. By regularly updating your computer, you block attackers from being able  to  take  advantage  of  software  flaws  (vulnerabilities)  that  they could otherwise use to break into your system. While keeping your computer up-to-date will not protect you from all attacks, it makes it much more difficult for hackers to gain access to your  system,  blocks  many  basic  and  automated  attacks  completely, and  might  be  enough  to  discourage  less-determined  attackers,  so they will give up and look for a more vulnerable computer elsewhere. More  recent  versions  of  Microsoft  Windows  and  other  popular software  can  be  configured  to  download  and  apply  updates automatically  so  that you do  not  have to  remember to check  for  the latest  software.  Taking  advantage  of  auto-update  features  in  your software is a great start toward keeping yourself safe online. Protect your computer with security softwareSeveral  types  of  security  software  are  necessary  for  basic  online security.  Security  software  essentials  include  firewall  and  antivirus programs. A firewall is usually your computer's first line of defense-it controls who and what  can  communicate with your computer online. You could think of a firewall as a sort of "policeman" that watches all the  data  attempting  to  flow  in  and  out  of  your  computer  on  the Internet, allowing communications that it knows are safe and blocking "bad" traffic such as attacks from ever reaching your computer.
82 - Internet and online securityThe next line of defense many times is your antivirus software, which monitors  all  online  activities  such  as  email  messages  and  Web browsing and protects an individual from viruses, worms, Trojan horse and  other  types  of  malicious  programs.  Your  antivirus  and antispyware  software  should  be  configured  to  update  itself,  and  it should do so every time you connect to the Internet. Integrated  security  suites  such  as  McAfee  Internet  Security  Suite, which combine firewall, antivirus, antispyware with other features such as antispam and parental controls, have become popular as they offer all  the  security  software  needed  for  online  protection  in  a  single package. Many people find using a  comprehensive  security suite an attractive  alternative  to  installing,  configuring  and  updating  several different types of security software. A complete version of McAfee Internet Security Suite is pre-installed on your Acer system. It includes a free trial subscription to protection updates. Make sure you Activate it!Choose strong passwords and keep them safePasswords  are  a  fact  of  life  on  the  Internet  today;  we  use  them  for everything  from  ordering  flowers  and  online  banking  to  logging  into our  favorite  airline  Web  site  to  see  how  many  miles  we  have accumulated.  The  following  tips  can  help  make  your  online experiences secure: • Selecting a password that cannot be easily guessed is the first step toward  keeping  passwords  secure  and  out  of  the  wrong  hands. Strong  passwords  have  eight  characters  or  more  and  use  a combination of letters, numbers and symbols (e.g., # $ % ! ?). Avoid using  any  of  the  following  as  your  password:  your  login  name, anything  based  on  your  personal  information  such  as  your  last name,  and  words  that  can  be  found  in  the  dictionary,  especially "password."  Try  to  select  especially  strong,  unique  passwords  for protecting activities like online banking. • Keep your passwords in a safe place and try not to use the same password for every service you use online. • Change passwords on a regular basis, at least every 90 days. This can limit the damage caused by someone who has already gained access to your account. If you notice something suspicious with one
Internet and online security - 83of  your  online  accounts,  one  of  the  first  steps  you  can  take  is  to change your password. Protect your personal informationExercise  caution  when  sharing  personal  information  such  as  your name,  home address,  phone  number,  and  email  address online.  To take  advantage  of  many  online  services,  you  will  inevitably  have  to provide personal information in order to handle billing and shipping of purchased  goods.  Since  not  divulging  any  personal  information  is rarely  possible,  the  following  list  contains  some  advice  for  how  to share personal information safely online: •Keep an eye out for phony email messages. Things that indicate a message may be fraudulent are misspellings, poor grammar, odd phrasing,  Web  site  addresses  with  strange  extensions,  Web  site addresses  that  are  entirely  numbers  where  there  are  normally words, and anything else out of the ordinary. Additionally, phishing messages will often tell you that you have to act quickly to keep your account  open,  update  your  security,  or  urge  you  to  provide information  immediately  or  else  something  bad  will  happen.  Don't take the bait. •Don't  respond  to  email  messages  that  ask  for  personal information. Legitimate companies will not use email messages to ask  for  your  personal  information.  When  in  doubt,  contact  the company by phone or by typing in the company Web address into your  Web  browser.  Don't  click  on  the  links  in  these  messages  as they make take you to fraudulent, malicious Web sites. •Steer  clear  of  fraudulent  Web  sites  used  to  steal  personal information.  When  visiting  a  Web  site,  type  the  address  (URL) directly into the Web browser rather than following a link within an email  or  instant  message.  Fraudsters  often  forge  these  links  to make them look convincing.  A  shopping,  banking  or  any  other  Web  site  where  sensitive information  should  have  an  "S"  after  the  letters  "http"  (i.e.  https://www.yourbank.com  not  http://www.yourbank.com).  The  "s"  stands for secure and should appear when you are in an area requesting you to login  or  provide  other sensitive data. Another sign that you have a secure connection is the small lock icon in the bottom of your web browser (usually the right-hand corner).
84 - Internet and online security•Pay attention to privacy policies on Web sites and in software.It is important to understand how an organization might collect and use your personal information before you share it with them. •Guard your email address. Spammers and "phishers" sometimes send millions of messages to email addresses that may or may not exist  in  hopes  of  finding  a  potential  victim.  Responding  to  these messages or even downloading images ensures you will be added to their lists for more of the same messages in the future. Also be careful  when  posting  your  email  address  online  in  newsgroups, blogs or online communities. Online offers that look too good to be true usually areThe old saying "there's no  such thing as a free lunch" still rings true today. Supposedly "free" software such as screen savers or smileys, secret  investment  tricks  sure  to  make  you  untold  fortunes,  and contests that you've surprisingly won without entering are the enticing hooks used by companies to grab your attention. While you may not directly pay for the software or service with money, the  free  software  or  service  you  asked  for  may  have  been  bundled with  advertising  software  ("adware")  that  tracks  your  behavior  and displays unwanted advertisements. You may have to divulge personal information  or  purchase  something  else  in  order  to  claim  your supposed  content  winnings.  If  an  offer  looks  so  good  it's  hard  to believe,  ask  for someone  else's  opinion, read  the  fine print,  or  even better, simply ignore it. Review bank and credit card statements regularly The impact of identity theft and online crimes can be greatly reduced if you can catch it shortly after your data is stolen or when the first use of your information is attempted. One of the easiest ways to get the tip-off  that  something  has  gone  wrong  is  by  reviewing  the  monthly statements  provided  by  your  bank  and  credit  card  companies  for anything out of the ordinary. Additionally, many banks and services use fraud prevention systems that call out unusual purchasing behavior (i.e. if you live in Texas and all  of  the  sudden  start  buying  refrigerators  in  Budapest).  In  order  to confirm these out of the ordinary purchases, they might call you and ask you to confirm them. Don't take these calls lightly; this is your hint
Internet and online security - 85that  something  bad  may  have  happened  and  you  should  take necessary action.Protect your computer with Windows security toolsWindows provides a variety of protection applications.Windows UpdatesIf  you  have  an  active  Internet  connection,  Windows  can  check  for important  updates  for  your  computer  and  install  them  automatically. These  updates  include  security  patches  and  program  updates  that can  improve  your  computing  experience  and  help  protect  your computer against new viruses and attacks.How do I know when my computer is at risk?If  the  Action  Center  reports  an  alert,  or  if  your  computer  behaves erratically, crashes unexpectedly or if some of your programs do not work correctly, your computer may be infected by malicious software. However,  do  not  blame  every  computer  problem  on  a  virus!  If  you suspect your computer is infected, the first thing to do is update, if you have  not  already  done  so,  and  run  your  antivirus  and  anti-spyware software.

Navigation menu