HONGJIA YUAN COMMUNICATION TECHNOLOGY W002 GSM/GPRS MOBILE PHONE-USB PORTION User Manual W002
SHENZHEN HONGJIA YUAN COMMUNICATION TECHNOLOGY CO.,LTD GSM/GPRS MOBILE PHONE-USB PORTION W002
Users Manual

1
Contents
1 BASIC INFORMATION ......................................................... 5
1.1
B
RIEF
I
NTRODUCTION
.................................................... 5
1.2
S
AFETY
I
NSTRUCTION
.................................................... 7
1.3
S
AFETY
A
LERTS AND
P
RECAUTION
................................ 7
1.3.1 General Precaution ................................................... 7
1.3.2 Precaution for the use of phone................................ 8
1.3.3 Precaution for the use of battery .............................. 9
1.3.4 Precaution for the use of charger ........................... 10
1.3.5 Cleaning and maintenance ...................................... 11
1.3.6 Common Precaution ................................................ 12
2 Before Use .............................................................................. 12
2.1
N
AME AND
D
ESCRIPTION OF
I
NDIVIDUAL
P
ART
........... 12
2.1.1 Technical Parameter ............................................... 12
2.1.2 Icon ........................................................................... 13
2.2
K
EYPAD
D
ESCRIPTION
: ................................................ 15
T
HE DISASSEMBLY AND INSTALLATION OF BATTERY
......... 15
2.4
C
HARGE FOR
B
ATTERY
................................................ 15
2.5
C
ONNECTING TO NETWORK
......................................... 17
2.6.1 SIM card ................................................................... 17
2.6.2 Insertion and Removal of SIM card ....................... 17
2.6.3 Power On and Power Off........................................ 18
2.6.4 Unlock of SIM card ................................................. 18
2.6.5 Unlock of the phone ................................................ 19
2.6.6 Connecting to Network ........................................... 19
2.6.7 Dial calls .................................................................. 20
2.6.8 Dial domestic calls .................................................. 20
2.6.9 Dial extensions of fixed phones .............................. 20

2
2.6.10 Dial international calls ......................................... 21
2.6.11 Dial Call in the List ............................................... 21
2.6.12 Emergency Calls.................................................... 22
2.6.13 Answer Calls .......................................................... 22
2.6.14 Call Register .......................................................... 22
2.6.15 Call Menu .............................................................. 22
3 Function Menu ....................................................................... 24
3.1
U
SE OF
F
UNCTION
M
ENU
............................................. 24
Scroll to select functions................................................... 24
Exit from menu .................................................................. 24
3.2
S
TRUCTURE OF
F
UNCTION
M
ENU
................................ 24
3.3
P
HONE BOOK
................................................................ 27
3.4
M
ESSAGE
...................................................................... 29
3.4.1 New Message ........................................................... 29
3.4.2 Create Message ....................................................... 29
3.4.3 View Received Messages and Saved Messages ..... 30
3.4.4 Operations of Common Phrase .............................. 32
3.4.5 Message Settings ..................................................... 32
3.5
MMS............................................................................. 33
3.6
C
HAT
............................................................................. 35
3.7
V
OICE
M
AILBOX
........................................................... 35
3.8
C
ELL
B
ROADCAST
........................................................ 35
3.9
C
ALL
R
EGISTER
........................................................... 35
3.10
S
ETTINGS
.................................................................... 38
3.10.1 Touch Screen Calibration: .................................... 38
3.10.2 Phone Settings ....................................................... 38
3.10.3 Call Settings........................................................... 39
3
3.10.4 Dual-Card Settings .......................................... 41
3.10.5 Network Settings .................................................... 42
3.10.6 Security Settings .................................................... 42
3.10.7 Restore Factory Settings ....................................... 44
3.10.8 Sound Effect ........................................................... 44
3.11
M
ULTIMEDIA
.............................................................. 44
3.11.1 TV............................................................................ 44
3.11.2 Functions of TV...................................................... 44
3.11.3 Camera ................................................................... 44
3.11.4 Album...................................................................... 45
3.11.5 Video Camera......................................................... 45
3.11.6 Video Player ........................................................... 46
3.11.7 Music Player .......................................................... 46
3.11.8 Audio Recording .................................................... 48
3.11.9 FM Radio ............................................................... 48
3.11.10 Custom Ring......................................................... 49
3.11.11 E-book .................................................................. 50
3.12
F
ILE
M
ANAGEMENT
................................................... 51
3.13
E
NTERTAINMENT AND
G
AME
...................................... 51
3.14
P
ROFILES
.................................................................... 53
General .............................................................................. 53
Meeting .............................................................................. 53
Outdoor ............................................................................. 53
Indoor Mode...................................................................... 53
Earphone ........................................................................... 53
Bluetooth ........................................................................... 53
3.15
T
OOLBOX
.................................................................... 53

4
3.15.1 Calendar ................................................................ 53
3.15.2 Memo...................................................................... 54
3.15.3 Alarm Clock ........................................................... 54
3.15.4 World Time ............................................................. 54
3.15.5 Incoming Call Show .............................................. 55
3.15.6 Stopwatch ............................................................... 55
3.16
N
ETWORK
S
ERVICE
.................................................... 55
3.16.1 STK Service ........................................................ 55
3.16.2 WAP ..................................................................... 56
3.16.3 Account Information ............................................. 57
3.17
A
DDITIONAL FUNCTION
.............................................. 57
3.17.1 Calculator ........................................................... 57
3.17.2 Unit Conversion ................................................. 58
3.17.3 Exchange Rate Conversion ................................... 59
3.17.4 Bluetooth ............................................................. 59
3.18
S
HORTCUT
F
UNCTION
................................................ 60
4 Input Method Instruction ................................................. 60
4.1
K
EYPAD
D
EFINITIONS
.................................................. 61
4.2
I
NPUT
M
ETHOD
I
NSTRUCTION
..................................... 61
4.2.1 Handwriting Input ................................................... 61
5. T-flash card Introduction ................................................... 61
5.1
T
AKEDOWN AND INSTALLATION OF
T-
FLASH CARD
...... 61
5.2
T-
FLASH
C
ARD
U
SE
...................................................... 62
5
1 Basic Information
1.1 Brief Introduction
Thank you for selecting our GSM/GPRS digital mobile phone.
You can fully understand the usage of this phone and enjoy the
sound functions and simple operation way after reading this
manual.
This color screen mobile phone is designed for GSM/GPRS
network environment. Besides basic call functions, it also
provides you with numerous functions, including dual-card mode,
Chinese & English input method, handwriting input, name card
holder phone book, personalized incoming call rings and images,
64 chord music ringtone, SMS and MMS, chatting, shooting,
video camera function, MP3, video player, audio recording, A8
music box, FM radio, alarm clock, calculator, auto power On/Off,
calendar, stock manager, memo, world time, incoming call show,
T-Flash, GPRS network, STK, keypad lock, etc. Additionally, it
offers personalized human-phone interface and satisfy your
different requirement with sound function design.
This color screen mobile phone conforms to GMS/GPRS technical
code and has passed attestation from authorities at home and
abroad.
Some services and functions described in this User Manual
depend on the network and subscribed services. So, not all menus
in the phone are available, and shortcut numbers of menus and
functions may be different due to different phones.
Our company reserves the right to make changes to the manual
without any further notification.
Radio Frequency (RF) Energy
The exposure standard for wireless mobile phones employs a
unit of measurement known as the Specific Absorption Rate,
or SAR. The SAR limit setby the FCC is 1.6W/kg.The highest
6
SAR value for the model phone as reported to the FCC when
tested for use at the ear is 0.289 W/kg(1g) and when worn on
the body, as described in this user guide, is 1.50W/kg (1g).
Caution: Changes or modifications not expressly approved by
the manufacturer could void the user’s authority to operate the
equipment.
This device complies with part 15 of the FCC Rules.
Operation is subject to the following two conditions: (1) This
device may not cause harmful interference, and (2) this device
must accept any interference received, including interference
that may cause undesired operation.
NOTE: This equipment has been tested and found to comply
with the limits for a Class B digital device, pursuant to part 15
of the FCC Rules. These limits are designed to provide
reasonable protection against harmful interference in a
residential installation. This equipment generates, uses and
can radiate radio frequency energy and, if not installed and
used in accordance with the instructions, may cause harmful
interference to radio communications. However, there is no
guarantee that interference will not occur in a particular
installation. If this equipment does cause harmful interference
to radio or television reception, which can be determined by
turning the equipment off and on, the user is encouraged to try
to correct the interference by one or more of the following
measures:
—Reorient or relocate the receiving antenna.
—Increase the separation between the equipment and receiver.
—Connect the equipment into an outlet on a circuit different
from that to which the receiver is connected.
—Consult the dealer or an experienced radio/ TV technician
for help
.
7
1.2 Safety Instruction
Please contact Telecom Sector or distribution agency to
disable your phone and SIM card once your phone is lost or
stolen, this way, it can avoid economic loss resulted from that
others use your phone.
You’re required to tell IMEI code of the phone (It’s a label at
the back of the phone. You can see it by disassembling battery)
when you contact Telecom Sector or distribution agency.
Please write down the code and keep it in safe for future
requirement.
In order to protect your phone against nuisance use, please
take some precautions, for example:
- Set PIN code of the phone and SIM card, and
change the code quickly before others know it.
- Do not put the phone in visible places when you
get out of the car. You’d better carry it with
yourself or put it in travel bag.
- Set call barring.
1.3 Safety Alerts and Precaution
In order to ensure to use the phone safely and correctly, please
read the precautions below carefully before your use.
1.3.1 General Precaution
Your phone is only allowed to use battery and charger
approved by our company, or else it can cause battery leakage,
overheat, explosion and fire.
Do not knock, vibrate or throw the phone heavily to avoid
malfunction and fire.
Do not put the battery, phone and charger to microwave oven
or high-pressure equipment, or else, it can cause such
accidents as circuit damage and fire.
Do not use the phone in where combustible and explosive gas
8
exists, or else it can cause phone malfunction and fire.
Do not put the phone to places with high temperature, high
humidity or heavy dust, or else, it can cause malfunction.
Please keep the phone out of the reach of children to avoid
personal injury as children may consider it as toy.
Do not put the phone on uneven or unsteady platform, or it
may drop and cause failure or damage.
1.3.2 Precaution for the use of phone
Please switch off the phone in hospitals, on the plane or in
places where mobile phone is forbidden, to avoid any
interference to the normal operation of electronic equipment
or medical instruments. Please follow relative regulations in
this place when you use the phone. Please check the Alarm
clock Settings and confirm if the phone will switch on
automatically when you are on the plane as the plane has
automatic power on function.
Do not use the phone in places with weak signal or near
electronic equipment with high precision. The interface of
radio wave may cause the fault operation of equipment and
other problems. Please be caution when using the phone near
the following equipment: hearing aids, heart pacemaker, other
medical electronic equipment, fire detector, automatic gate
and other automatic control devices. As to the influence on the
heart pacemaker and other medical electronic equipment,
please consult equipment manufacturer or local sales agent.
Do not knock the liquid crystal display in force or strike
something with the display heavily, or else it can cause the
damage of liquid crystal panel and liquid leakage. There may
be in danger of losing the sight once it contacts with eyes. If
in case contact with eyes, flush with plenty of clean water (do
not rub the eyes) immediately and go to hospital.
9
Do not disassemble or tamper the phone, or else it can cause
damage, electric leakage and circuit malfunction.
Under too few conditions, the phone may have a bad effect on
the electronic equipment in some model cars. Then, do not use
the phone to avoid the void of warranty.
Do not press the key with sharp things, like needle, pen head,
or it may cause damage or fault operation.
Do not use the phone once the antenna is damaged as it may
cause personal injury.
Keep the phone far away from magnetic objects, the radiation
wave emitted by the phone may clear the information saved in
floppy disks, stored-value cards, and credit cards.
Keep some metal pieces, like pin, far away from the handset,
the loudspeaker can emit magnetism and absorb small metal
pieces when working, so it may cause personal injury or
damage the phone.
Keep the phone away from exposure to moisture, water or
other liquid can go to the phone and cause it overheat, electric
leakage and malfunction.
1.3.3 Precaution for the use of battery
Do not throw the battery into fire, or it may cause the battery
to catch fire and explosion.
Do not press the battery in force when installing it, or it may
cause battery leakage, overheat, explosion and fire.
Do not cause short circuit to the battery with metal material,
like wire, needle, etc, and do not put the battery with metal
pieces, like necklace, together, as it may cause battery leakage,
overheat, explosion and fire.
Do not weld the ends of battery, or else, it may cause leakage,
overheat, explosion and fire.
There may be in danger of losing the sight once the liquid of
10
battery contacts with eyes. If in case contact with eyes, flush
with plenty of clean water (do not rub the eyes) immediately
and go to hospital.
Do not disassemble or tamper the battery, or else it may cause
leakage, overheat, explosion and fire.
Do no use or put the battery near or in places with high
temperature, like fire or heater, or else, it may cause battery
leakage, overheat, explosion and fire.
Once there’re abnormal phenomena, like temperature
increasing, color change, distortion during the usage, charging
or save of the battery, please stop using and replace with new
battery.
It may burn the skin once the liquid from battery touches skin
or clothes, please flush with plenty of clean water
immediately and go to hospital at once if necessary.
Please take the battery away from the fire to avoid fire and
explosion once the battery leaks or emits strange smell.
Do not place the battery exposure to moisture, or else it may
cause overheat, fume and corrosion.
Do not use or place the battery direct under sunlight, or in
high temperature places, like near the car, or else, it may cause
leakage and overheat, reduce the performance and shorten the
lifetime.
Do not charge the battery for over 24 hours continuously.
1.3.4 Precaution for the use of charger
Please use 220AC. It may cause leakage, fire and damage to
the phone and charger once other voltage is adopted.
Do not cause short circuit to the charger, or else it may cause
electric shock, fume and damage to the charger.
Do not use the charger if the power wire is broken, or it may
cause fire and electric shock.
11
Please remove accumulated dust on the power plug.
Do not put water container next to the charger, as the spilled
water can cause overheat, leakage and malfunction of charger.
Please disconnect the charger with the power to avoid
overheat, fire, electric shock and malfunction in case the
charger contacts with water or other liquid.
Do not disassemble or tamper the charger, or else it may cause
personal injury, electric shock, fire and the damage of charger.
Do not use the charger in places with high humidity, like
bathroom, or else it may cause electric shock, fire and damage
of charger.
Do not touch charger, power cord and power plug with wet
hand, or it can cause electric shock.
Do not put heavy objects on power cord or change the power
cord, or it may cause electric shock and fire.
Please unplug the power socket before cleaning and
maintenance.
Please hold the charger to unplug the socket, it may damage
power wire and cause electric shock and fire once pulling the
power cord.
1.3.5 Cleaning and maintenance
As phone, battery and charger don’t have waterproof function,
so do not use them in places with high humidity, as well as
avoid them being wetted by rain.
Please clean the phone, battery and charger with soft dry
cloth.
Never use alcohol, thinner or solutions, like benzene, to wipe
the phone.
Dirty socket can cause poor contact and power down, and
even recharging isn’t available. So, please clean it
periodically.
12
1.3.6 Common Precaution
Mobile Phone:
Please use the phone under the environment with temperature
of 5℃~40℃ and humidity of 35%~85%.
Please use the phone far away from regular telephones, TV
sets, radio sets and office automation equipment, to avoid
affecting the normal use of these equipment and mobile
phone.
Battery:
Place the battery in cool and ventilated place without direct
sunlight.
The battery has a limited lifetime. The use time of battery will
be shortened progressively due to frequent charging. Once the
battery is out of use after several charging, it means that the
lifetime of the battery is over, and you shall replace it with
approved model new battery.
Do not dispose old battery as household waste. Throw it to
specified old battery disposal place and follow stipulated
instructions for disposal.
Charger:
Do not charge under following conditions: places with direct
sunlight, places with ambient temperature less than 5℃ or
over 40℃, wet or dusty place or place with strong vibration (it
may cause malfunction); near electrical appliance (it may
affect the effect of image and sound) like TV set, radio, etc.
2 Before Use
2.1 Name and Description of Individual Part
2.1.1 Technical Parameter
Phone
Model
13
Size (Length x Wide x Thickness) 102mm×55mm×13mm
Weight: around100g (with one
battery)
Lithium battery
Model
Nominal voltage .7V
Limited charge voltage 4.2V
Rated capacity 700mAh
Duration of standby time Around 50 hr – 150hr
Duration of talk time Around 3hr – 5hr
Travel charger
Model
Input 100~240V 50/60Hz 450mA
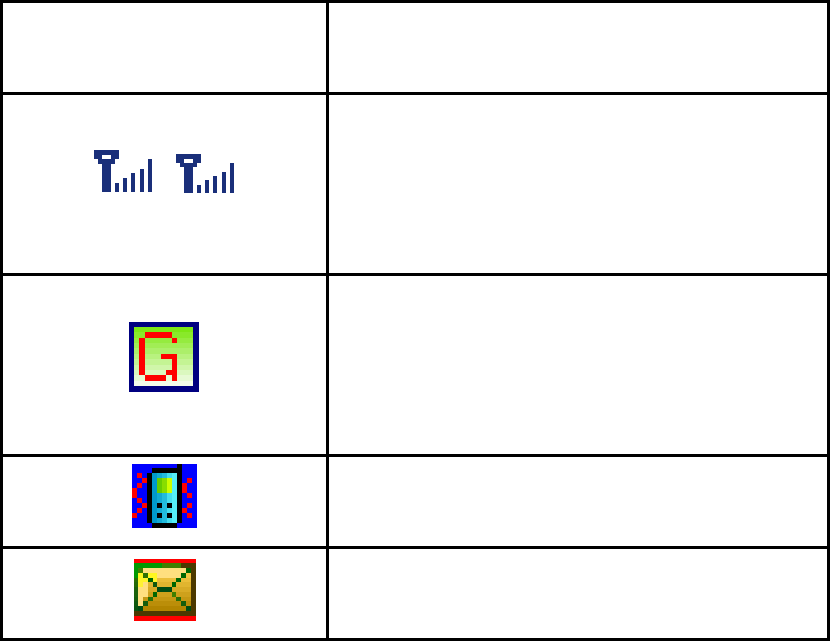
2.1.2 Icon
There may be some icons appearing under standby interface.
Please refer to the following for detailed description:
Icon Description
Represents the strength of
network signal.
Represents that you can use
GPRS service.
Enable vibration function.
Receive new SMS.
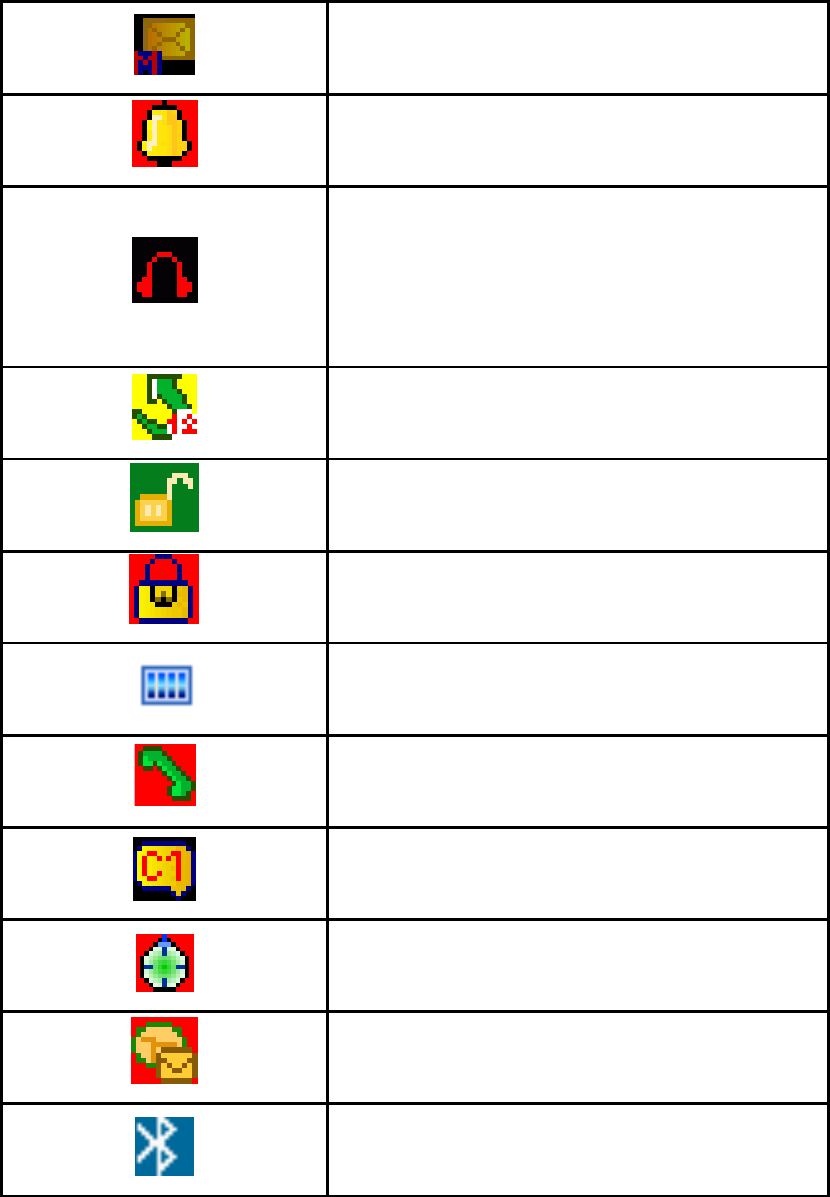
14
Receive new MMS.
Alarm clock is set to On.
It appears when headset is
inserted.
Enable call transfer function.
Keypad isn’t unlocked.
Keypad locked.
Indicates battery level.
Indicates missed calls.
Enable chat function.
Enable multi-stopwatch function.
Receive new service message.
Turn on bluetooth handset.

15
Bluetooth handset pairs
successfully.
2.2 Keypad Description:
1.
..
.Switch Key: On the top of mobilephone, press this key for a
moment to turn on or turn off the mobilephone.
2. End Key: It’s used to end calls or reject incoming calls. Press
this key to return to standby status under other conditions.
The description of every key and certain functions above depend
on specific models.
2.3 Battery
Battery under original status can be used afar charging by 50%
power. The full performance of a new battery is achieved only
after the first three complete charge and discharge cycles.
The disassembly and installation of battery
Please follow steps below to disassemble the battery: ①Open
the back cover of the phone; ②Remove the battery from left;
Please follow steps below to install the battery: ①Push down
the right end of the battery gently; ②Close the back cover of
the phone.
2.4 Charge for Battery
Connect the charger with power.
Insert the end of the charger into the right side of the phone
(Note: the arrowhead shall be upward).
Then, power indication icon on the screen flashes repeatedly.
If the phone is switched off during charging, there is power
indication image on the screen, which means that the battery
is under charging. If the phone is overused under low battery,
then charging indication icon will be displayed after the
16
charging has been done for some time.
If the power indication icon in the upper right corner is fully
displayed without flashing, it means the charging is complete.
If the phone is switched off during charging, there is image to
indicate that the charging is over. This process needs 3 –4
hours. It’s normal that the battery, phone and charger will be
heated slightly during charging.
Disconnect the mobile phone and charger with AC electrical
plug once the battery is fully charged.
Note:
Always keep the battery in ventilated place with the
temperature from +5℃ to +40℃ during charging, and
make sure to use the charger provided by manufacturer. It may
cause danger once unapproved charger is used and it may
invalidate any approval or warranty.
If the phone switches off automatically or there’s “Low
Battery” displayed on the phone, please charge to the battery
as quick as possible. The phone will reduce charging time
automatically if the battery power isn’t used up before
charging.
The duration of standby time and duration of talk time offered
by manufacturer are based on ideal working environment. In
actual use, however, the working time of battery changes
based on network condition, working environment and using
way.
g Make sure that the battery is installed properly before
charging and it’s forbidden to remove the battery during
charging.
g Please disconnect the charger and phone with power once
charging is over.
g If you don’t disconnect the charger with power and phone,
17
the phone begins charging again when the power loss reaches
certain extent after overcharging lasts for quite a long time
(about 5 – 8 hours). We suggest you don’t do this, as it will
influence the performance and lifetime of the battery
2.5 Connecting to network
2.6.1 SIM card
Make sure that you’ve inserted available SIM card to the phone
before your use. SIM card is the key to enter digital GSM
network.
All information related with establishing network connection and
calling record initiate are saved in metal area in SIM card.
Meanwhile, there’re other information saved in the SIM card,
including name and phone number saved in phone book and SMS.
The SIM card can be removed from your phone and inserted to
any GSM phone (the new phone will read SIM card
automatically).
Never touch metal area the SIM card to avoid information loss or
damaging the card. Keep SIM card far away from electricity and
magnet. You can’t enter GSM network once the SIM is broken.
Warning: Do switch off the phone before removing SIM card. It’s
forbidden to insert or remove SIM card if the phone is connected
to external power, or else, the SIM card will be damaged.
2.6.2 Insertion and Removal of SIM card
SIM card is placed in a card generally, so please take it out
carefully before installing in the phone.
Switch off the phone and remove the battery and other
external power.
This phone uses dual-card mode, the place of card A and card
B is decided by options in menu (please refer to “Settings” for
“Dual-card Settings”). Please follow the photo to insert the
SIM card to SIM card holder.
18
Once you need to remove the SIM card, please switch off the
phone first, disassemble the battery and remove the SIM card
from SIM card holder.
2.6.3 Power On and Power Off
Long press End Key to switch on the phone, and long press End
Key to switch off the phone.
If you switch on the phone and there’s no SIM card, the phone
will prompt you to insert SIM card. The phone will check if the
SIM card is available after SIM card is inserted.
Then, prompts below will appear on the screen on by
one:
Enter PIN1——It appears if you’ve set the password of
SIM card.
Enter phone password ——It appears if you’ve set
password to lock the phone.
Search for network——The phone will search for network till it
finds proper
network.
2.6.4 Unlock of SIM card
SIM card uses PIN1 (personal identity number) code for protection
against unauthorized use. You are required to key in PIN1 code to
unlock the SIM card every time the phone is switched on once your
phone enables this function, then you can make calls or answer
incoming calls. Users can also choose to remove SIM card protection
(please refer to Section 3.10.6 Security Settings); in this case, the
SIM card can’t be protected against unauthorized use.
Press End Key to switch on the phone.
Key in PIN1 code, press Right Soft Key to clear incorrect
input and press OK to enter. For example, if PIN1 code is set
as 1234, then you shall key in:
1 2 3 4
19
If incorrect code is keyed in for three times in succession, SIM
card will be locked. The phone will require you to key in PUK1
code for unlocking. Please do not key in at random if you don’
know PUK1 code. You shall send SIM card to network operator
for assistance. Please refer to Section 3.10.6 Security Settings.
Note: Your network supplier will set a standard PIN1 code (4 to 8
digits) for your SIM card. You shall change the code to your
personal password as soon as possible. Please refer to Section
3.10.6 Security Settings for details.
2.6.5 Unlock of the phone
You can set password protection for your phone against
unauthorized use. You are required to key in PIN1 code (if you’ve
set password protection) to unlock the phone every time the phone
is switched on once your pone enables this function, then you can
make calls or answer incoming calls. Users can also choose to
remove password protection (please refer to Section 3.10.6
Security Settings); in this case, the phone can’t be protected
against unauthorized use.
Key in phone password, press Right Soft Key to clear
incorrect input and press OK to enter. For example, if the
phone password is set as 1122, then you shall key in:
1 1 2 2
Please contact your retailer or local authorized maintenance
service center to unlock the phone password once you forget it.
2.6.6 Connecting to Network
The phone will search for available network automatically
(Searching for network is displayed on the screen) once the
SIM card is unlocked successfully. Name of network supplier
will appear on the screen once the phone searches for
available network.
Note: If EMERGENCY is displayed on the screen, it means that
20
your phone is out of the normal network coverage, but you can
also make emergency calls according to the signal strength.
2.6.7 Dial calls
You’re allowed to make calls or answer incoming calls once name
of network supplier appears on the screen. The signal bar in upper
left corner represents the strength of network signal. Moving in a
small range can improve your calling quality as the calling can be
interfered by barriers greatly.
2.6.8 Dial domestic calls
Press number keys to input phone number and press Dial Key to
make calls. Please press Right Soft Key to delete characters once
the phone number needs to be changed. Dialing animation will be
displayed on the screen when dialing. The call status information
will be displayed after the recipient answers the phone. There’s an
alert tone when the phone gets through (it needs network support)
if this function is enabled.
Please press End Key to end the call once it’s over.
Zip code Phone number Dial key
2.6.9 Dial extensions of fixed phones
Some extensions of fixed phones can’t be got through, and you
shall only dial the telephone exchange, and then dial the extension.
The phone can finish all dialing and dial the extension
automatically when you insert pause character “P” between
telephone exchange and extension number. The way of inputting
“P” is to long press * key, then symbol “P” appears on screen.
Zipcode Telephone exchange P Extension Dial
key
Example of the use of pause character:
For example, if there’s a voice mailbox system, which is used
through dialing way in 8880000 number, the number of mailbox is
6666 and the password is 8888, then you can follow the way
21
below to dial:
8880000 P 6666 P 8888
The first part of this number is used to dial voice mailbox
system.
It will send 6666 to select mailbox once the phone is
answered.
The second pause character will delay for 5 seconds before
password 8888 is sent out (the former “P” represents to get
through, the latter “P” represents to delay for 5 seconds).
2.6.10 Dial international calls
Long press *key under standby status till prefix symbol “+”
appears on the screen when dialing international calls. It allows
you to dial a number in any country once you don’t know the
international prefix symbol (e.g.: it’s 00 for China).
Key in the country code and complete phone number after prefix
symbol appears. The country codes follow general practices, the
country code of Germany is 49, Britain is 44, Swiss is 46, etc.
“0” before the area code shall be removed before dialing, just
as dialing international calls.
For example, you shall dial like this if you need to dial
service hotline from other countries:
+86 21 114
+ Country code Complete phone number Dial key
2.6.11 Dial Call in the List
Every phone number you dialed and received are saved in a list in
the phone, recent dialed and received phone numbers are placed
on the top of the list (Please refer to Section 3.9 Call Register).
Every phone number is classified based on Dialed Calls, Received
Calls and Missed Calls. The phone also provides you with All
Phone Items for you to view all calling record. Old phone
numbers will be deleted automatically once the phone number list
22
is full Please follow steps below to view the list:
Press Dial Key to view dialed calls records;
All phone numbers in the list can be dialed through Dial Key.
Press Enter to view details after phone number list appears.
You can press Save to store this number to the phone book after
entering.
2.6.12 Emergency Calls
You can call emergency services if you are within the network
coverage (you can check it by viewing the network signal strength
bar in the upper left corner). If the network supplier doesn’t
provide roaming service, then “EMERGENCY” appears on the
screen, which means you can only call these calls. You can dial
emergency calls within the network coverage even if there’s no
SIM card.
2.6.13 Answer Calls
You can press any key to answer the phone once Anykey Answer
is set to on, or you shall press Dial Key or Left Soft Key to enter
answer, and then press Left Soft Key again to speak on the phone.
You can also press the key on the headset to answer calls once the
headset is inserted. Hence, you can set Auto Answer to On once
it’s inconvenient for you to press keys, and the phone answers
automatically after vibration & ring or vibration lasts for 5
seconds once the headset is inserted.
2.6.14 Call Register
The phone saves the record of your last call and call duration since
the phone is used (Please refer to Section 3.9 Call Register).
2.6.15 Call Menu
Press Handsfree to enter handsfree function under call status. You
can press Options to enter call options. The operation way of call
options is the same as the operation way of function menus.
You can see Call Menu only during calling; besides, functions
23
like call waiting, call transfer and multiparty conversation, need
network support. So, please contact your network supplier.
You can perform following operations under call option menu:
(Note: As to multiparty conference, Card B doesn’t support
this function.)
Pause
Keep current call or restore saved call.
End
End current call.
New Call
Make a call to a new participant.
Phone book
Enter phone book to view.
SMS
Write message and send out the message.
Audio Recording
Record call voice.
Quiet / Restore
Do not send (or send) local voice.
Dual Tone Multi Frequency
Press Left Soft Key to open or close dual tone multi
frequency.
Handsfree
Enable loudspeaker to amplify call voice.
(Note: For the operations above, card B doesn’t support Pause
/ New Call / Audio Recording functions.)
You can perform following operations if there’s
incoming call in card B at the same time:
Answer Card A and Reject Card B
End card B and only answer card A.
Answer Card B and Reject Card A
24
End card A and only answer card B.
Answer All
Answer current calls in two cards at the same time.
You can perform following operations if there’s
incoming call in card B at the same time:
End Single Line
End current call you choose.
End Call
End current two calls.
Dual Tone Multi Frequency
Press Left Soft Key to turn on or turn off dual tone multi
frequency.
3 Function Menu
(※ Some part functions below depends on the function support
status of specific phones)
3.1 Use of Function Menu
Scroll to select functions
Select to enter main function menu under
standby status;
Press keys or click touch screen to follow
prompts to enter or exit from menu under main
menu or submenu.
Exit from menu
Generally, you can exit from some menu items by pressing Right
Soft Key. (If this phone supports touch function, you can use
touch pen to click small icon in the lower right corner to exit from
some menu items.) Press End Key to return o standby interface.
3.2 Structure of Function Menu
The default structure of function menu is as follows after SIM
card is inserted and the phone is power on:
1. Phone Book
25
1-1 Quick Search 1-2 Search Entry
1-3 Add New Entry 1-4 Copy All
1-5 Delete 1-6 Caller Group
1-6-1 Friends
1-6-2 Family
1-6-3 VIP
1-6-4 Business
1-6-5.Others
1-7 Extra Number
1-8 Settings
1-9 Caller Picture
1-10.Caller Ring Tone
1-11.Caller Video
2.Message
2-1 SMS 2-2 MMS*
2-3 Chat 2-4 Voice Mail Server *
2-5 Broadcast Message*
3. Call Center
3-1 Call History 3-2 General Call Setting
3-1-1 Missed Calls 3-2-1 Call Setup
3-1-2 Dialed Calls 3-2-2 Black List
3-1-3 Received Calls 3-2-3 Auto Redial
3-1-4 Delete Call Register 3-2-4 Speed Dial
3-1-5 Call Time 3-2-5 Call Time Display
3-1-6 Call Costs 3-2-6 Call Time Reminder
3-1-7 SMS Counter
3-1-8 GPRS Counter
4. Service
4-1*STK Service (It has something to do with network
operator)
4-2 WAP
26
4-3 Data account
5. Bluetooth
5-1 Power
5-2 Inquiry Audio Device
5-3 My Device
5-4 Active Device
5-5 Setting
5-6 About
6.Fun and Game
6-1 Games
6-2 Motion Game
7. Audio Player
8. Video Player
9. Camera
10. Video Recorder
11. Image Viewer
12. Multimedia
12-1 TV
12-2 Schedule TV Record
12-3 Sound Recorder
12-4 FM Radio
12-5 Schedule FM Record
12-6 E-Book Reader
13. To Do List
14. Stopwatch
14-1.Typical Stopwatch
14-2.nWay Stopwatch
15. Extra
15-1.Unit Ccnverter
15-1.Currency Ccnverter
15-1.Call Secretary
27
16. World Clock
17. Calendar
18. Shortcuts
19. Settings
19-1. Pen Calibration
19-2. Accelerometer Calibration
19-3. Accelerometer Settings
19-4. Rotate Screan Setting
19-5. Phone setup
19-5-1 Time and Date
19-5-2 Schedule Power On /Off
19-5-3 Language
19-5-4 Input Method Choose
19-5-5 Preferred Input Methods
19-5-6 Display Characteristic
19-5-7 Greeting Text
19-5-8 Dedicated Key
19-5-9 Handwriting
19-5-10 Misc Setting
19-6. Network Setup 19-7. Security Setup
19-8. Restore Factory Settings
20. User Profiles
20-1. General 20-2. Meeting
20-3. Out door 20-4. Indoor
20-5. Headset 20-6. Bluetooth
21. Calculator
22. File Manager
23. Dual-Card Settings
24. Alarm
Note: Menu with “*” appears only under certain conditions.
3.3 Phone book
You can use the phone book function to store the name card
information for some important persons, such as name, phone,
home phone and company phone etc. Select the phone book from
the main menu, and enter it.
28
Note: This phone can store 500 phone numbers.
You can see the following options in the phonebook: quick search,
name search, add number, copy all, delete, caller group, other
number, settings, full screen caller, caller ring and caller film etc.
■ Quick Search: Select this option to enter the phone book
browse interface, it will provide a search input box
below the window, and you can input the relative
information here to take the screening of the phone
records. The searching ways available for selection:
1. Pinyin; 2. Stroke; 3. English 4. Number.
■ Search Eetry: Find record by name in the phonebook.
■Add New Entry: Add a new phone record in the phonebook,
and you can select the storage way to SIM card
or the phone. There is little differentiation in the
storage format for SIM card and the phone.
■ Copy All: Copy all the records in the phone or SIM card, and it
can select copy from the phone to SIM card, or
from SIM card to the phone.
■ Delete: Select this option to delete the phone record; select
From SIM Card to delete all the phone records in
SIM card; select From Phone to delete all the
phone records in the phone; select Delete One by
One to delete the phone records one by one;
■ Caller Group: This phone provides 5 caller groups, you can
take the personalized settings of name changing,
ring tone, caller picture, caller animation and group
member for every group.
■Extra Number: Other numbers stored in SIM card (this phone
number/service number/emergency number). You
can view and change them.
■ Settings: The setting function of the phone book. Which is
classified into three menus: Capacity Inquiry,
Storage Location and Name Card Settings.
Capacity Inquiry: The storage sate of the phone records in
SIM card and the phone.
Storage Position: Select the preferential storage position:
29
phone, card A and card B.
Name Card Settings: Set the contents including the phone
book (10 settings of the home phone, company name and E-mail
etc.).
■ Full Screen Caller: Set the image that will display when having
incoming call.
■Caller Ring: Select the ring prompt when having incoming call.
■ Caller Film: Select the film that will display when having
incoming call.
3.4 Message
Select “Message” menu to enter the sub-menu.
If your network supports SMS, you have applied for this service to
the network supplier, then you can receive and send Chinese,
English SMS and MMS by the Short Messaging Service Center.
3.4.1 New Message
When you receive a SMS, the phone will sound the vibration (if it
has been turned on) or the prompt tone (if the prompt tone
function has been turned on), and the screen will display the
animation. If you don’t want to read it immediately, it will display
the prompt that have new message in the standby interface, and
will store this message into SIM card automatically.
The number of SMS (including the received and locally stored
SMS) that can be saved in SIM card depends on the capacity of
SIM card.
To read the new message, you can take the following operations:
enter the inbox sub-menu, and press OK to read the new SMS.
3.4.2 Create Message
SMS network service allows you to send the text message to the
other phones that can receive message.
Please confirm that you have set the Short Messaging Service
Center Number before creating message (please see “Message
Settings”).
Enter Create Message sub-menu to input SMS (please see
chapter 4.2 “Instructions on Input Method”).
- Finish: Selecting this option indicates that this message
has been inputted completely, and it can enter the
30
operation of the next step.
- Common Phrase: Insert the preset common phrases in
this SMS.
- Insert Object: Insert the picture, ring and animation
etc. in this SMS.
- Word Format: Define the word format of this SMS.
- Insert Phone Number: Insert the phone number of the
selected entry in the phone book.
- Insert Name of Phone Book: Insert the name of the
selected entry in the phone book.
- Input Method: Change the input method when editing
SMS.
Select Finish after writing, you can use the touch pen to select
Card A Send, Card B Send, Save and Send, Store, Send to
Many or Send by Group by scrolling to send this message to
other phone number.
Card A Send: To send this message, select this option to
enter the inbox edit box, you can touch the number small icon on
the lower of the interface to input number, or press Search to
provide the phone book, select the number of the receiver from the
phone book, and press OK to send.
Card B Send: The same as card A send, and it will send the
edited SMS as the card number of card B here.
Save and Send: Store this SMS into the outbox at the same
time of sending.
Store: Don’t send this SMS and store it into the outbox.
Send to Many: Send this SMS to the multiple phone
numbers.
Send by Group: Send a group, and send this SMS to all the
members of this group.
Note: The Short Messaging Service Center doesn’t
support the long and short message with over 70 Chinese
characters (or 160 English characters) in some cities and areas.
3.4.3 View Received Messages and Saved Messages
Enter the inbox sub-menu to view the received SMS; enter the
outbox to view the SMS that have been stored in the SIM
31
card.
It will display the message receiving date and time and the
number or name of the receiver when viewing the message list
of the inbox (when the number exists in the phone book).
It can select the previous message or the next message when
viewing the message list.
It can press OK to read the details of the message when
appearing the message list of the inbox. It can take the
following operations by option at this time:
- Reply: Send SMS to the sender of the current
SMS.
- Delete: Delete the current SMS.
- Edit: Extract the content of the SMS, and enter
the edit box.
- Forward: Forward this SMS.
- Copy to Phone (Copy to SIM Card): Copy the
current SMS on SIM card (or the phone) to the
phone (or SIM card) to store.
- Move to Phone (Move to SIM Card): Move the
current SMS on SIM card (or the phone) to the
phone (or SIM card) to store.
- Chat: Enter the chat room to chat by SMS.
- Delete All: Delete all the SMS in the inbox.
- Copy All: There are two available copy ways of
From SIM Card and From Phone.
- Move All: There are two available copy ways of
From SIM Card and From Phone.
- Use Number: Extract the phone number of the
sender of the SMS, and you can dial it or save it
into the phone book.
- Store Items: Extract the object in the SMS to take
storage (only effective for EMS).
It can press OK to read the details of the message when
appearing the message list of the outbox. It can take the
following operations by option at this time:
- Send: Send this SMS. You can select Card A
32
Send, Card B Send, Send to Many and Send by
Group to send this SMS to many persons.
- Edit: Extract the content of the current SMS to
take edit.
- Delete: Delete this SMS.
- Copy to Phone (Copy to SIM Card): Copy the
current SMS on SIM card (or the phone) to the
phone (or SIM card) to store.
- Move to Phone (Move to SIM Card): Move the
current SMS on SIM card (or the phone) to the
phone (or SIM card) to store.
- Delete All: Delete all the SMS in the outbox.
- Copy All: There are two available copy ways of
From SIM Card and From Phone.
- Move All: There are two available copy ways of
From SIM Card and From Phone.
- Use Number: Extract the phone number of the
receiver of the SMS, and you can dial it or save it
into the phone book.
3.4.4 Operations of Common Phrase
It can write some common sentences in the common phrases, to
avoid inputting repeatedly when sending SMS. You can select
to edit or delete after finishing writing.
3.4.5 Message Settings
You need to take the necessary settings before using the function
of SMS.
Enter the Message Settings sub-menu:
- Mode Setting: Select an appropriate mode for the
SMS of the phone. Enter to the individual mode
to take the settings for the corresponding name,
Short Messaging Service Center Number,
effective term and sending format.
- Status Setting: Set whether to turn on the
message report or reply path.
- Capacity Inquiry: View the space occupying
state of the mailbox in SIM card or the phone.
33
- Storage Location: Select the phone or SIM card.
- Message Transmission Setting: The selections
for the SMS transmission ways: GPRS Priority,
GSM Priority and Only Use GSM.
Set Short Messaging Service Center Number: Please
contact your network supplier to get the number of Short
Messaging Service Center. For example, the one Short
Messaging Service Center Number of China Mobile in
Shanghai is +8613800210500. The detailed operations are:
select any mode setting in the Message Settings sub-menu,
input your Short Messaging Service Center Number in the
second item, and press OK to save the settings.
Status Report: If you have set the message report to On, the
Short Messaging Service Center will send the status report
back when the receiver has received your SMS or has not
received it due to some reason. You can know whether the
receiver has received your SMS conveniently.
Note: The realization of this function needs to be supported by the
operator.
3.5 MMS
Note: This function is not supported by card B.
■ Create Message: Create a MMS message. You need to fill in
receiver, copy, BCC, subject and content.
■ Inbox: View the received multimedia messages. (The
detailed operations are the same as the ones for the inbox of
SMS)
- View: View the current MMS.
- Message Details: View the details of the current MMS.
- Extract Number: Extract the number of the sender
(store or dial it).
- MMS Reply: Send a MMS to the sender of the MMS.
- SMS Reply: Reply the sender in SMS.
- Forward: Forward the current MMS to others.
- Delete: Delete the current MMS.
- Delete All: Delete all the contents in the inbox.
g Outbox: Store the MMS that have not been sent successfully.
34
(The detailed operations are the same as the ones for the
outbox of SMS)
- View: View the current MMS.
- Message Details: View the details of the current MMS.
- Forward: Forward the current MMS to others.
- Send: Continue to send the current MMS.
- Disconnect: Disconnect the MMS that is being sent.
- Delete: Delete the current MMS.
- Delete All: Delete all the contents in the outbox.
g Draft Box: It can save the edited but not sent MMS here.
- View: View the content of the current MMS.
- Message Details: View the details of the current MMS.
- Edit: Edit the current MMS.
- Send: Send the current MMS.
- Delete: Delete the current MMS.
- Delete All: Delete all the contents in the draft box.
g Sent items: Save the messages that have been sent
successfully.
- View: View the sent MMS.
- Message Details: View the details of the current MMS.
- Forward: Forward the current MMS to others.
- Delete: Delete the current MMS.
- Delete All: Delete all the contents in the sent items.
g Settings: Set the relative parameters of MMS sending and
receiving.
- Sending Setting: Some relative parameter settings on
MMS sending. For example, Within Use Term, Send
Report, Read Report, Priority, Interval and Sending
Time etc.
- Receiving Setting: Some relative parameter settings
during MMS receiving. For example, Main Network,
Roaming Network, Send Read Report and Allowed to
Send Report etc.
- Filter Setting: Filter some MMS.
- Network Setting: Select the appropriate server.
- Storage Space: View the capacity information of the
35
MMS.
- Storage Setting: The MMS can be stored in the phone
or SIM card.
3.6 Chat
Note: This function is not supported by card B.
■ Chatting Room Setting: Select a chatting room, and set the
nickname and the concerned phone number who will chat with
you.
■ Start Chatting: Input the message, and start to chat with the
preset phone number.
3.7 Voice Mailbox
Note: This function is not supported by card B.
Your received voice messages will be stored in the network, and
you must dial the voice mailbox number in order to listen the
message.
■ Edit: You can add/edit the voice mailbox number, so
that it will be more convenient when using the function
of the voice mailbox.
Connect to Voice: Call the set voice mailbox number, and listen
the message.
3.8 Cell Broadcast
Note: This function is not supported by card B.
■ Receiving Way: Select to turn on the receiving mode, and turn
off rejecting receiving the messages of the cell broadcast.
■ Read Message: Enter this menu to read your tailored cell
broadcast message.
■ Language: Set the language in receiving cell broadcast.
■ Channel Setting: Set the channel of the cell broadcast.
Note: The services for the cell broadcast and the voice mailbox are
provided by the operator, please contact your operator.
3.9 Call Register
■ Missed Calls, press OK to view the list on the missed calls.
■ Dialed Calls, press OK to view the list on the dialed calls.
■ Received Calls, press OK to view the list on the received
calls.
In the interfaces of the lists on the missed calls, dialed calls and
36
received calls, you can press OK to view the details of this record,
including date, dialing time, number and dialing number.
In the details interface, you can take the following operations for
the currently selected phone record by option:
Delete Delete this record.
Save Save this number into SIM card or the
phone.
Dial Dial this phone number.
Card B Dial Dial this number by using card
B.
Send Message Send message to this number.
Send Message by Card B Use the number of
card B to send message to this number.
IP Dial by Card A Use the IP number
of card A to dial this number.
IP Dial by Card B Use the IP number
of card B to dial this number.
Edit Edit this phone number and save it into
the phone book.
Send MMS: Send MMS to this number.
Note: Press OK to realize the functions of IP
dial by card A and card B directly in
the lists on the received calls, dialed
calls and missed calls.
■ Delete Call Register
There are 4 sub-menus in Delete Call Register: Missed Calls,
Dialed Calls, Received Calls and Delete All.
The user can select to clear a certain call list, and select Delete All
to delete all the record lists in the call register.
■ Call Duration
There are 4 sub-menus in Call Duration: Last Call Duration,
Dialed Calls’ Duration and Received Calls’ Duration and Clear
Timers.
37
Last Call Duration View the duration value of the last call.
Dialed Calls’ Duration View the total duration value of the
dialed calls.
Received Calls’ Duration View the total duration value of the
received calls.
Clear Timers Clear the data in the timing
statistics, and start to time again.
■ Call Costs
It can store the accumulated cost of the calls by Call Costs.
Last Call Cost
Enter the Last Call Cost sub-menu, and view the last call cost.
Cost Summary
Enter the Cost Summary sub-menu, and view the accumulated call
costs.
Clear Cost
Input PIN2 code to clear the cost calculator, and start to cost
again.
Charge Restriction
Enter the Charge Restriction sub-menu to view, change or cancel
this function. It needs to input PIN2 code for changing and
canceling functions.
Price and Cost Rate
Enter the Price and Cost Rate sub-menu to view, change or cancel
this function. It needs to input PIN2 code for changing and
canceling functions.
Note: You need to input PIN2 code for some operations,
please contact your network supplier to get this password.
■ Message Counter
Sent: Record the number of the sent messages.
Received: Record the number of the received messages.
You can select to reset by the left soft key to clear the
two items respectively.
■ GPRS Counter
Note: This function is not supported by card B.
Last Transmit: Record the byte number of the last
transmission. 。
38
Last Receive: Record the byte number of the last receiving.
Transmit All: Record the total transmitted byte number.
Receive All: Record the total received byte number.
Clear Counter: Start to count again.
3.10 Settings
3.10.1 Touch Screen Calibration:
It will be more accurate when using the touch pen by calibrating
the touch screen.
3.10.2 Phone Settings
g Time and Date: Set time and date.
- Set City: Select a city for the time setting of this
phone.
- Time/Date Settings: Set the current time and date.
- Format Settings: Set the display format of the time
and date, 12-hour or 24-hour.
g Auto Power On/Off: Set the time, and the phone will
switch on or off automatically when reaching to the set time.
g Language: Set the language in displaying the phone
menus.
g Preset Input Method: Select a default input method.
g Standby Menu Display:
- Wallpaper: Select the wallpaper of the standby
interface.
- Screen Protection: Select a screen protection picture
for the standby interface of the main screen, and set the
waiting time.
- On Animation: It can select the picture of On
animation.
- Off Animation: It can select the picture of Off
animation.
- Display Date and Time: Select to turn on or off
Display the current time in the standby interface.
- Display My Phone Number:
Note: This function is not supported by card B.
- Select to turn on or off Display my phone number in
the standby interface.
39
- Clock Type: It can select the clock type displaying in
the standby interface.
g Welcome Note: Display the welcome note during the On
animation. Select Off to not display it.
g Speed Dial:
Note: This function is not supported by card B.
Set the speed dial. In the standby interface, long press the
corresponding number keys to call the set phone number.
g Specify Function Key: Specify the functions of the upper,
lower, left and right arrow keys in the standby interface.
g Auto-Update of Time: Select to turn on or off Auto-Update
of Time of the phone.
g Flight Mode: Include Normal Mode, Flight Mode
and Ask when Switching on.
About Flight Mode: Flight mode is used to close the phone
communication function, that it cannot receive, dial call and send
message, has no signal connection with the base station, and
doesn’t attempt to contact the base station.
The phone will turn off all the relative functions on the signal in
the mode, but it can still continue to use the other functions when
switching on the phone, for example, view the phone book, enjoy
the articles and films on the phone etc.
Note: Because now the civil aviation authority has not issued the
regulations on “Flight Mode”, the passenger shall still switch off
the phone before going on broad according to the related
regulations on the airplane; in the normal states (such night), it
can switch to this mode, and save power – because the signal
consumes most power of the phone, and it can save power greatly
for switching off signal in the flight mode.
g Handwriting Settings: Set the handwriting speed and the
color of the handwriting pen.
g Other Settings: Take settings for LCD brightness and
delay time.
g Power Saving Mode: Turn on or off it.
3.10.3 Call Settings
g Phone Number
40
Note: This function is not supported by card B.
- System Preset: Whether the number sending uses the
system default value.
- Hide Number: The other party will not see the number
when you calling. (Needed to be supported by the
operator)
- Send Number: The other party can see the number
when you calling.
g Call Waiting:
Note: This function is not supported by card B.
Turn on or off the call waiting function. Select View to
view the current call waiting status.
g Call Transfer:
Note: This function is not by card B.
- Unconditional Transfer: After turning on
Unconditional Transfer, and the incoming calls in any
state will be transferred to your set number.
- Transfer if unreachable: After turning on Transfer if
not unreachable, and the phone will transfer the
incoming call to your set number when the other party
cannot contact you.
- Transfer on no answer: After turning on Transfer on
no answer, and the phone will transfer the incoming
call to your set number when no answer.
- Transfer on busy: After turning on Transfer on busy,
and the phone will transfer the incoming all to your set
number when busy.
- Transfer all data calls: When the incoming call is a
data call, and the phone will transfer it automatically.
- Cancel Transfer: Cancel all the call transfer.
g Call Barring:
Note: This function is not supported by card B.
Take restriction for dialing calls.
- Outgoing Calls Barring: Restrict the
outgoing calls.
- Incoming Calls Barring: Restrict the
41
incoming calls.
- Cancel Barring: Cancel the set barring
(required to input the password).
- Change Password: Change the password.
g Line Switch:
Note: Card B is only available for line 1.
Select line 1 or line 2.
g Call Duration Prompt:
Note: This function is not supported by card B.
The phone will sound the prompt tone when reaching to
the time after setting the
frequency.
g Call Duration Display: Display the call duration,
select “Off’ will not display the call duration.
g Auto Redial
Note: This function is not supported by card B.
The phone will redial automatically for every
unsuccessful calling after turning on Auto Redial.
g Turn off Group: Turn off the group function.
g IP Dial: Set and turn on this item, and it can realize
the IP dial function by the number records in the phone book.
g Blacklist: The numbers listed in the blacklist will be
shielded.
Note: Some functions need to be supported by the network
operator.
3.10.4 Dual-Card Settings
g Auto Turning on Card B: Select to turn on or off
the functions of card B.
(For example “On”, when the phone is on, which will
turn on card B if you have inserted it in the location of card B).
g Turn on/off Card B: Select to turn on or off the
functions of card B.
(For example “Off”, when the phone is on, which will
not display card B even if you have inserted it in the location of
card A, and the realized functions are the same as the ones of one
card (card A)).
42
Note: If you only use one SIM card, please insert the holder of
card A preferentially, to ensure you can enjoy the individual
functions of this phone completely; if you set the SIM card
into the holder of card B (in the state of not inserting the card
in the holder of card A), the phone will be unable to identify
SIM card, so that you shall consider using the holder of card A
first. If you need to exchange the main card and card B, please
exchange the locations of the dual cards when the phone is off
and there is no external power supply.
3.10.5 Network Settings
Note: This function is not supported by card B.
g Network Selection:
- Re-search: Register the network again after
pressing OK.
- Select Network: Select the network to register in
the network list.
- Searching Way:
Auto: Search the network that SIM card belongs
to automatically.
Manual: Search all the available networks to
register manually.
g Preferential Network: Pre-store several favorite
networks.
g GPRS Connection: Connecting ways of GPRS:
Connection As Require and Permanent Connection
3.10.6 Security Settings
g SIM Lock:
Note: This function is not supported by card B.
You can set the security options of the phone under this menu, to
avoid the phone or SIM card from being used illegally.
- PIN Code
PIN code can prevent your SIM card from being used
illegally.
- If PIN code is off currently, select On to turn on the
PIN code protection, and the phone will ask you PIN
code when switching on next time; if PIN code is on
43
currently, select Off to turn off the PIN code protection,
select Change PIN Code to set the new PIN code,
please input the old PIN code, new PIN code and
repeatedly input the new PIN code in turn according to
the prompt.
Note: If the PIN code has been consecutively inputted for three
times, SIM card will be locked. At this point, you must unlock
SIM card using PUK code. The PIN code and PUK code may be
supplied with SIM card to you. If not, please contact the network
operator. The default PIN code is 1234. Please change it to your
own password as soon as possible.
g Phone Lock
The phone lock can prevent your mobile phone used by the other
without your permission.
Select Phone Lock to turn on the phone password protection, and
the phone will ask you the phone password when switching on
next time; press it again to turn off the phone password protection.
Note: The default phone lock password is 1122, and you shall
change it to your own password as soon as possible.
g Keypad Lock: Set the waiting time of the keypad lock.
The keypad will be locked automatically if the phone has not
been used within the specified time in the standby status after
being set.
g Fixed Dialing:
Note: This function is not supported by card B.
If your SIM card supports the fixed supporting, it can limit the
phone to only dial the selected phone numbers. When this function
is on, it can only dial the phone numbers in the fixed dialing list or
the ones starting with some numbers in the list.
Enter the “Fixed Dialing” sub-menu:
- Mode: Turn on or off the fixed dialing
function (required to input the PIN code).
- Fixed Dialing List: Input the phone numbers
for fixed dialing,
Note: Turning the Fixed Dialing function on or off requires you to
input PIN2 code. Please contact the network operator to obtain
44
PIN2 code. After the Fixed Dialing is on, the numbers in the Fixed
Dialing will be displayed after entering the name card holder
phonebook.
g Prohibit Dialing:
Note: This function is not supported by card B.
Opposite with the fixed dialing, and you can set Prohibit
Dialing for some phone numbers here.
g Change Password: Change the password. Including
the changes on PIN, PIN2 and the phone password.
Note: Some functions need to be supported by your network
operator.
3.10.7 Restore Factory Settings
The default password of restore factory settings is 1122.
3.10.8 Sound Effect
Adjust the effect of the sound play. The audio equalizers available
for selection: Normal, Bass, Dance, Classical, High, Banquet,
Pop and Rock.
3.11 Multimedia
The functions including in this item are: A8 Music Box, Camera,
Album, Video Camera, Animation Player, Music Player,
Recording, Custom Ring and E-book.
3.11.1 TV
3.11.2 Functions of TV
3.11.3 Camera
Your phone has been equipped with the function of camera, and
you can press the small shooting icon in the central on the lower
of the screen to shoot. Press the individual small icons in the view
finding interface of shooting to set the following, such as shooting
size, photo quality, shooting mode, continuous shooting setting,
delay shoot and special effect setting etc. You can also enter the
settings of the relative items by option.
Enter the following by option:
- To Album: Enter the album.
- Camera Settings: Settings for some relative
parameters on shooting
- Scence Switch: Switch between scene 1 and
45
scene 2.
- Photo Settings: Settings of photo size and photo
quality.
- White Balance: It can set the color of the
illumination for the photo.
- Profile Mode: It can set the shooting mode.
- Special Effect Settings: Set the style of view
finding.
- Frame: Select a picture box for the photo.
- Storage Path: Select to store the photo into the
phone or the memory card.
- Restore Default Settings: Set it to Restore to
Default Settings.
Note: In the view finding interface of shooting, press the
corresponding number keys to take the settings for the appropriate
image effect, and can also touch the certain position on the touch
screen to take settings.
3.11.4 Album
Enter the album to take the settings for the photo, such as browse,
send, delete and rename etc.
3.11.5 Video Camera
Your phone provides the function of the video recording, select
the Video Camera menu to enter it, and press Rocker key to enter
the recording.
Note: For the models supporting the touch screen function,
pressing the red round button on the lower of the screen to realize
recording. Press keys to adjust the brightness of the recording,
and press keys to adjust the focus of the recording.
Enter the following by option:
- To Player: Select this menu to enter the video player,
and it can play the just recorded video.
- Video Camera Settings: Select this menu to
enter the settings of some relative parameters of the
video camera.
- Film Settings: The settings of the relative
parameters of film size, format and recording time
46
etc.
- Scene Switch: Switch scene 1 or scene 2.
- Special Effect Settings: You can select a special
effect for this recording.
- Storage Path: Select to store into the phone or
the memory card.
- Restore Default Settings: Restore all the settings
to the default values.
Note: In the recording interface, press the corresponding number
keys to take the settings for the appropriate image effect.
3.11.6 Video Player
Enter the video play.
Enter the following by option.
Noun Explanation:
Play: Play the currently selected file.
Transmit: Transmit the currently selected file (can be
transmitted to the phone book, E-book).
Rename: Change the name of the currently selected file.
Delete: Delete the currently selected file.
Delete All Files: Delete all the current archives.
Sorting: Sort the archives (by name, type, time, size or no).
Storage Path: View the storage location of the file (can be
stored into the phone or the memory card).
Note: The default file name of the video player is Video (the
phone or the memory card).
3.11.7 Music Player
Select Music Player to enter the mp3 play interface. The functions
of the individual keys are as following:
Upper Key: Play/pause the current music.
Lower Key: Stop playing.
Left Key: Select the previous song.
Right Key: Select the next song.
The words displaying on the lower side of the music player screen:
List and Back. It can also select “Option” under the list to enter
the functions of Play, View Details, Add into Ring Library and
Settings etc.
47
Noun Explanation:
Play: Play the currently selected song.
Details: View the details of the song.
Add into Ring Library: Set the current song into the
ring store. Update Play List: Update the music in the
ring library.
Note: It can realize the following functions for the models
supporting the touch screen function:
- Instructions on Touch Keys: “+” and
“-”symbols indicate the volume up and volume
down.
- ► and Pressing the two symbols
indicates that turn on/off the music player and
pause.
- ■ Pressing this symbol indicates that
replay the music.
- and Press the two symbols to switch to
the previous song and the next song
respectively.
- Settings: Take the settings for the
multimedia play.
- 1. List: The phone space or the memory
card space.
2. Auto Generating List: Select to turn on or
off. 3. Replay: Turn on this option to replay song.
4. Random: Turn on this option, and the
songs will play at random.
5. Background Play: Turn on this option,
and the music will not stop with the menu exit.
6. Equalizer: Turn on this option, and it can
switch among the music effects.
7. Energy Display Style: Turn on this option,
and it can display the energy style in mp3 play.
8.Lyric Display: It will display lyric when
playing mp3 after turning on this option, and it will not display the
48
lyric if turning off it.
Note: The default file name of the music player is My music
(the phone or the memory card).
3.11.8 Audio Recording
Select this option to take audio recording. Select the following
options to enter:
- Audio Recording: Record a new voice.
- Play: Play the currently selected audio recording.
- Annex: Annex a new audio recording on the base
of the original not audio recording.
- Rename: Change the name of the current audio
recording file.
- Delete: Delete the current audio recording file.
- Delete All: Delete all the audio recording files.
- Settings: Set the audio recording format.
- Send: Send the current audio recording to the
profile mode or MMS or bluetooth.
3.11.9 FM Radio
It can use the FM radio only after inserting the handset.
Enter the FM Radio play interface, and it will display the
following words on the lower side of the FM radio screen: Option
and Back. Select “Option” to enter the functions of Channel List,
Manual Input, Auto Search and Set and Settings.
Noun Explanation:
Channel List: Channel list of the FM radio, press
“Option” key to Edit and Play the current channel. (It can save up
to 30 channels at most).
Manual Input: You can input any favorite channel of
the FM radio.
Auto Search and Set: Select this option to search
channel automatically and generate the list.
- Instructions on Icon Function:
- Instructions on the five icons from the left to
right:
- Search:
::
:Search channel (press Upper Negation
key to switch start or stop searching)
49
- The second icon: Enter the Setting Menu List.
- and Press the two icons to automatically
search to the previous channel and the next
channel (it can also use the left and right
navigation keys to switch among channels).
- The fifth small icon: Press this icon to play or
pause the FM radio (Note: pressing the navigation
keys can also realize this function).
- “+” and “-” Symbols: It can volume up and
down by using them.
Settings: Take settings for the FM radio.
- 1. Background Play: Select to turn
it on or off, and the music will not stop with
the menu exit after turning on this option.
2. Appearance: Select the
appearance background when playing
FM radio.
3. Phone Loudspeaker: The FM
radio can play outwards by the
loudspeaker after turning on this
option.
Note: Press the appropriate number keys in the FM radio
interface to enter the corresponding channel.
3.11.10 Custom Ring
Select Add to enter the ring edit interface, press the number keys
to edit ring, and it can also click Insert on the soft keypad to
insert the music notation, click Edit to edit the ring, and click
Play to listen the edited ring.
Click Option in the custom ring edit interface to enter the settings
of Play, Play Speed, Select Instrument and Storage.
Noun Explanation:
- Play: Play the currently edited bass.
- Play Speed: Select the speed when playing (Fast,
General and Slow).
- Select Instrument: Select an instrument to edit
ring.
50
Press “Option” to enter the following after saving the
custom ring:
- Play: Play the currently selected ring.
- Edit: Edit the current ring.
- Add: Add a customed ring again.
- Rename: Change the name of the current ring
file.
- Delete: Delete the currently customed ring.
- Delete All Files: Delete all the customed rings.
- Send: Send the ring to Profile Mode, MMS,
SMS and Bluetooth.
3.11.11 E-book
The storage location of E-book file is the memory card, and you
need to download by USB data line. You can store E-book into the
folder name “eBook”, and it needs to create a file folder named as
“eBook” if there is no folder in the memory card.
Enter the E-book cabinet list to select “Option”:
- On: It can read the content of E-book.
- Update: Update the E-book list.
- Settings: It can take the settings for the page
display of E-book (including: font, font style,
volume page, speed, full speed, encoding way and
storage settings etc.).
- Details: View the details of the current
E-book. 。
- Delete: Delete the current E-book.
- Delete All: Delete all the contents in the E-book
cabinet list.
- Sorting: Sort the E-book list (by name, type, time
and size, or not sort).
- Restore Default Settings: Restore the previous
settings to the default values.
- Help: Prompt the help information!
Note: Enter the E-book list, and press the corresponding
number keys to set (it can also use the touch pen to click
the soft keypad to set).
51
3.12 File Management
Store the files stored by user (the phone or the memory card).
Enter the options of the folder:
- On: Display the content of this folder.
- Create Material Folder: Create the new material
folder in the folder.
- Formatting: Format this folder.
3.13 Entertainment and Game
Entertainment Bible: This item provides the relative value-added
services. For the detailed information of this function, please
contact the network operator.
Mobile Phone QQ: The operations are the same as those for
Tencent QQ.
Game Player Simulator: This phone supports the simulating
game, and this function can be operated by the handle.
Instructions on Game Menu:
- Game List:
Display all the files with the extension name is *.nes stored onto
T-flash card.
- More Games:
It can download *.nes applications and other games by wap web
page etc.
- Game Settings:
Display Settings: Display the angle of the screen when
playing game (0°, 90°and 270°)
Sound Settings: It can simulate the game volume by this
setting.
Key Settings: The users can custom the keys in operating
the simulating games by this setting.
Network Settings: Whether to download. CMWAP
gateway proxy or use CMNET dialing under the more
game menus, the fees for the two ways are not identical.
The supports in the different areas are not same. It needs
to consult the local Mobile operator.
About Game: Here provides the operating instructions
on the simulating game.
52
Notes on Using this Game:
1. Game Placement Path:
The game running requires the external
storage card (such as T-flash card etc.). If
there is no T-flash card, it cannot enter the
simulating game.
It shall place the game file *.nes under
Game of T-flash card, otherwise, it will prompt
that not find game.
2. Supporting Type of Game:
It supports the files with the extension
name is *.nes, that FC simulator, or
called as NES simulator.
The size of the game file shall not
exceed 500K due to the small
memory, and it cannot load the
running. Some games with less than
300K may not be loaded due to the
game compatibility.
3. Game Source:
The user can download his own
favorite NES games from Internet,
and copy them under game directory
of the phone to play.
Game: This phone provides two games: Bejeweled and
Linklink.
Game Settings:
- Game Sound Effect: Turn it on or off.
- Game Vibration: Turn it on or off.
Subject: Three background colors available for selection: Amber
Orange, Sapphire and Techno-gray. When moving the selection
bar to the appropriate menu, and you can preview it. Enter the
following options:
- On: Apply the selected background color.
53
- Update Frequency: It will use the several
background colors in turn within the
corresponding time after being set frequency.
- Set Sequence: Set the sequence when changing
the background color in turn.
3.14 Profiles
The user can select the different profiles, meanwhile, and can
custom them. This phone provides 6 profiles: General, Meeting,
Outdoor, Indoor, Earphone and Bluetooth.
General
Here you can select to turn on or off your personal
settings.
g On Select Activate to enter the general environment.
g Personalize Select Personalize to custom the general mode.
The operating contents include: ring tone settings, volume, ringing
way, ring type, prompt tone and answering mode.
Meeting
The operations are the same as those for General.
Outdoor
The operations are the same as those for General.
Indoor Mode
The operations are the same as those for General.
Earphone
The phone will turn on this mode automatically when inserting
the earphone. The operations for Personalize are the same as those
for General.
Bluetooth
Open the bluetooth earphone and activate the bluetooth of the
phone at the same time, and it will turn on this mode automatically.
The operations for Personalize are the same as those for General.
3.15 Toolbox
This phone provides Calendar, Memo, Alarm Clock, World
Time, Incoming Call Show and Stopwatch,
3.15.1 Calendar
Enter the Schedule Management sub-menu, and press OK to
54
display date.
Touch the left and right arrow keys on the upper side of the touch
screen to select date and month. Pressing the arrow keys directly
can also realize this function.
Enter the following sub-menus by option:
■ Schedule: Create a schedule. Add an alarm
remind for it. You can select any one from the
five options of Once, Everyday, Custom,
Every week and Every month.
- Once: Indicate that this schedule will be
reminded once.
- Everyday: Indicate that this schedule will be
reminded at the set moment every day.
- Custom: Set the ringing time of the alarm clock
within one week.
- Every week: Indicate that this schedule will be
reminded at the set moment every week.
- Every month: Indicate that this schedule will be
reminded at the set moment every month.
■ Skip to the Specified Date: Skip from the
current date of the schedule to the specified
date.
■ Lunar Calendar: Turn on or off the lunar
calendar display.
3.15.2 Memo
This phone can store up to 50 memo messages. Select the memo
in the sub-menu, and you can take the following operations for the
memo: Browse, Add, Edit, Delete Record, Delete All and Send
Schedule.
3.15.3 Alarm Clock
This phone can set 5 alarm clocks. Select one alarm clock, and
you can edit and set it.
3.15.4 World Time
Touch the screen to select the corresponding times of the
individual countries in the world, and press Option to turn on or
off Start Daylight Saving Time in other cities.
55
3.15.5 Incoming Call Show
Input the number to be inquired, and the phone will display where
the number belongs to; it will also display the belonging place of
the number in the incoming call interface.
3.15.6 Stopwatch
Realize the functions of the stopwatch:
- General Stopwatch:
General stopwatch is classified into Split Timing and
Lap Timing, press the left soft key to start/stop
timing, and press the right soft key to take split
timing.
Split Timing: It will not clear the time after
recording the next record for the split
recording, which is applicable for recording
the test performance with not over 20
persons (for example, 1000m test for one
class).
Lap Timing: It will clear the time after
recording the next record for the lap timing,
which is applicable for recording the
performance per lap for one person (such as
professional athlete) who is running by lap
with long distance, and cannot be over 20
laps at most.
View Record: View the saved records in
splitting timing and lap timing.
- Multi-stopwatch: The multi-stopwatch has 4
directions, which is controlled by pressing the
up, down, left and right arrow keys
respectively.
Note: Method for clearing stopwatch: First pause the running
stopwatch, long press the left key, and it can clear it to zero;
3.16 Network Service
3.16.1 STK Service
Note: Card B doesn’t support this function.
This function including brand value-added service of Monternet,
56
M-zone and global surf is supplied by network supplier. This
function can’t be used if the SIM card and the network supplier
don’t support this service. Please contact your network supplier
for more information.
port of network operator. Please contact your network supplier for
more information.
3.16.2 WAP
Note: Card B doesn’t support this function.
Your phone supports the service on the base of WAP. You can
access the service your network operator supports. You can get the
information of news, weather forecast, scheduled flight and so on
through this service function list.
Note: GPRS service needs network support, it can
only be used after being activated and when it is at the cover
area of GPRS network.
- Home: log in home. The Home is WAP station
you set in the enabled connection settings. The
station preset by the manufacturer will be used if
you haven’t set.
- Bookmark: display each existing bookmark. You
can directly link to its corresponding website after
selecting one.
- Link: selecting this option you can input any
WAP or other websites.
- Website history: the websites you have accessed
before this record.
- Settings: set loading internet view.
Network settings: select setting groups
of service. Color settings: set the color of
character and
background color
when viewing
websites.
Senior settings: there are three
57
detailed options of
Cache settings,
Cookie settings and
display settings.
- Service inbox: used to store the messages
that service supplier sends.
3.16.3 Account Information
Note: Card B doesn’t support this function.
- GSM data:
::
:
Select one account to enter:
1. Name: the name of this account. You
can select edit to change it.
2. Number: the number of this account.
3. User account: the account of dial
dial-up server not WAP gateway.
4. Password: the password of dial-up
server not WAP gateway.
5. Line: select line type by analog or
figure.
6. Speed: select proper transmission
speed.
7. Network domain: IP address.
- GPRS data:
Select one account to enter:
1. Name: the name of the account. You
can select edit to change it.
2. GPRS connection point: input APN.
3. User account: the account of dial
dial-up server not WAP gateway.
4. Password: the password of dial-up
server not WAP gateway.
5. Authorization mode: select the cipher
mode of the authorization.
3.17 Additional function
3.17.1 Calculator
Your phone supplies you a calculator with four basic
58
functions with which you can do simple calculation.
Select one the options of calculator and press OK to
enter. - Input the figures to be calculated in the interface
at the touchable screen.
- Or input figures by 0-9 numeric keys.
- Press the right soft key to clear latest input or
result one by one and press the right soft key to
exit the calculator and press the left soft key to
confirm the calculation result.
Note: please understand us for the rounding error for a
limited precision of the calculator.
3.17.2 Unit Conversion
Your phone offers you unit conversion function with
which you can converse the units including weight units
and length units conveniently
- Weight: there are two kinds
of weight unit conversions
including kilogram < ->
pound and kilogram < ->
ounce. Input the figures to be
conversed in the
corresponding edit box and
press left soft key to confirm,
then the value you want will
be displayed in another edit
box.
- Length: there are four kinds
of length unit conversion
including kilometer<->mile,
meter < ->yard, meter <
->feet and centimeter <
->inch. Input the figures to
be conversed in the
corresponding edit box and
59
press left soft key to confirm,
then the value you want will
be displayed in another edit
box.
3.17.3 Exchange Rate Conversion
To carry put exchange rate conversion, you should input
exchange rate first and then input native or foreign monetary value
and press left soft key to confirm, then the value you want will be
displayed in another edit box.
3.17.4 Bluetooth
- Activate blue tooth:
You can activate or close blue tooth function through
this switch.
- Search handsfree device: the phone can automatically search
handsfree devices with this function. (Generally, the default
password of bluetooth is 0000, please see instruction of
bluetooth headset)
- My Device: Bluetooth device can be searched out
automatically through new device, and its name can be displayed
on the screen of the phone, then you can do suited settings as the
prompt.
- Online settings: menu settings after bluetooth is
successfully connected.
- Settings:
This phone can be searched: other bluetooth devices can
search out this phone after this function is on
which it can’t be searched by other bluetooth
devices when this function is off.
Name of this device: the name of this phone can be defined.
Authorization requirements: it will prompt to input bluetooth
password when this phone is searched if this
option is on, while it prompt nothing when this
phone is searched if this option is off.
(1) Hold in the phone: the communication can only be
carried out by phone not bluetooth if this option
is selected.
60
(2) Transfer to handsfree device: the communication can only
be carried out by the bluetooth not the phone if
this option is selected.
File transmission settings:
(1) Share contents: select the path to share the files.
(2) Contents authority: set the transmission authority.
- My bluetooth: the information about bluetooth will be
displayed after bluetooth is activated.
3.18 Shortcut Function
You can set the shortcut function you like in this function.
This phone offers shortcut functions. Select Shortcut to enter the
settings of shortcut function after opening main menu. The
settings method is as follows: select one piece of shortcut function
in the main interface of shortcut function, and press the left soft
key to enter edit (create, edit, delete, delete all and so on), then
press the left soft key to confirm, then the settings of this piece of
shortcut function is finished.
Use shortcut function:
Select settings, phone settings and specified function key in turn,
set the function of one arrow key (up key) as shortcut function,
and select OK.
At standby state, press the up key (the arrow key that have been
set with shortcut function) to enter Shortcut. Select corresponding
shortcut function to enter it directly.
4 Input Method Instruction
This phone supports Chinese simplified input method. The input
methods supplied to you include English input method (capital
case and lower case letter), number input method, Pinyin input
method, smart Pinyin, stroke input and punctuation mark
(common punctuation marks) input method.
The functions permit to input characters in the phone are:
- inputting and editing SMS;
- inputting and editing names in
phone book.
- looking for the name of telephone
number.
61
- self defining welcome notes and
name of phone owner.
- recording names in tool box.
4.1 Keypad Definitions
Common keypad definitions are as follows. Please refer
to section 4.2 input method instruction for detailed keypad
definitions at input method status.
Left soft key usually indicates confirmation while right soft
key usually denotes deleting one character.
# key: you can switch among different input method
through this key.
* key: symbol input can be called out by this key.
Numeric keys (1-9) represent the pinyin letter on them at
Pinyin input state, while they represent the letters on them at
English input method.
4.2 Input Method Instruction
4.2.1 Handwriting Input
Please use the attached touch pen to write characters at the place
the phone prompts you to input at character input function. Click
the middle at the bottom of the screen by touch pen to switch
input methods. ABC represents capital input method, abc
represents lower case input method, 123 represents number input
method and Pinyin represents pinyin input method. Error
characters can be cleared by right soft key or the touch pen. This
phone supports continuous stroke input.
5. T-flash card Introduction
This phone supports the storage function of T-Flash card and its
expanded storage function space. The detailed operations are as
follows:
5.1 Takedown and installation of T-flash card
T-flash card in this phone is under the battery. Insert it as the
mark on it. Please open the card buckle first before pulling out the
cared then take T-flash card out.
Note: this phone supports plug & play function. While it is
recommended to restart the phone after inserting or taking out
T-flash card at power on state to play the information normally.

62
It is recommended not to take out or insert T-flash in general
condition.
5.2 T-flash Card Use
As one of the memorizers in the phone, T-flash card is set as the
default memorizer. You can use it without doing any settings.
T-flash card is used as the memorizer of the phone: You should set
the default memorizers of music player, video player, video
recorder, camera and recorder as memory card for the first time to
insert T-flash card, then you can use the memory and the content
of T-flash card. (the corresponding settings methods have been
mentioned in the aforesaid functions.)
T-flash card is used as U disk: the data in the computer can be
directly copied after USB data line is connected. Please refer to
the use of U disk for detailed used methods.
6 Common Faults and Troubleshooting
Please remove the faults the phone happens as the following
table
Common
fault
Reason Troubleshooting
Poor
reception Using phone in poor
reception area such
as the vicinity of
high-rise buildings
or basement where
the radio wave can’t
reach.
To avoid it as
possible as you can.

63
Using phone in the
time of dense
communication such
as work began time
and closing time
when the line is in
congestion and
results in failure of
communication.
To avoid it as
possible as you can.
It may be resulted
by the distance with
network emission
base station
.
To require your
network service
suppler to supply
service
area map
Echo or
noise It is resulted by poor
network trunk line,
which is a territorial
problem.
Redial after ending
up, the trunk line may
change a better line.
The communication
line in some area is
poor.
Short
standby time
The standby time is
related with network
system settings.
The phone is at poor
reception area, please
power off it for a
while.
It is necessary to
change battery.
Change new battery.
The phone will
continue to emit to
search base station
if it can’t receive
signal, and then
large number of
electricity
will be
Please move to the
area with strong
signal or power off
the phone for a while.

64
consumed, which
short the standby
time
.
The phone
can’t be
powered on
The electricity in the
battery is run out. View the electricity or
charge it.
SIM card is
wrong The SIM card is
damaged.
Please contact your
network supplier.
The SIM card is not
installed in normal
state.
Please make sure the
SIM card has been
installed normally.
There is dirty on the
metal surface of the
SIM card.
Clean the metal
contact point of the
SIM card with clean
cloth.
It can’t
connect the
network.
The SIM card is
invalid.
Please contact your
network supplier.
Your phone is
beyond GSM
service area.
Please inquiry your
network supplier for
service
area.
The signal is poor. Please retry in the
area with strong
signal
.
Calls can’t
be dialed
out.
Call barring
function
is
enabled
.
Disable call barring.
Fixed dialing
function is enabled.
Disable fixed dialing
function.
PIN error PIN code is wrongly
input for three times
continuously
.
Please contact your
network supplier.
It can’t be
charged.
The battery or
charger is damaged.
Change new battery
or charger.

65
It is charged in the
environment with
temperature lower
than -10 ℃ or
higher than 55
℃
.
Change charge
environment.
It is not contacted
well. Check whether the
plug is connected
correctly.
New name
can’t be
added in the
phone book.
The phone book is
full. Delete some records
in the phone book.
Some
function
can’t be set
Your network
supplier doesn’t
support this function
or you haven’t apply
it.
Please contact your
network supplier.