HTC GREATWALLB Handheld PC with Bluetooth Transceiver User Manual H2200Series
HTC Corporation Handheld PC with Bluetooth Transceiver H2200Series
HTC >
Contents
- 1. users manual PartI
- 2. users manual Part 2
- 3. users manual Part 3
- 4. Safety Addendum to Manual
users manual PartI

DRAFT - Revised 10/01/02
Reference Guide
hp iPAQ h2200 Series Pocket PC
Document Part Number: 293146-001
February 2003

© 2002 Hewlett-Packard Company
Hewlett-Packard Company, in a continuing effort to improve the quality of
our products and solutions, technical and environmental information in this
document is subject to change without notice.
Microsoft, Windows, the Windows logo, Outlook, and ActiveSync are
trademarks of Microsoft Corporation in the U.S. and other countries.
SD Logo is a trademark.
All other product names mentioned herein may be trademarks of their
respective companies.
Hewlett-Packard Company shall not be liable for technical or editorial
errors or omissions contained herein or for incidental or consequential
damages in connection with the furnishing, performance, or use of this
material. The information in this document is provided “as is” without
warranty of any kind, including, but not limited to, the implied warranties
of merchantability and fitness for a particular purpose, and is subject to
change without notice. The warranties for HP products are set forth in the
express limited warranty statements accompanying such products. Nothing
herein should be construed as constituting an additional warranty.
This document contains proprietary information that is protected by
copyright. No part of this document may be photocopied, reproduced, or
translated to another language without the prior written consent of
Hewlett-Packard Company.
ÅWARNING: Text set off in this manner indicates that failure to
follow directions could result in bodily harm or loss of life.
ÄCAUTION: Text set off in this manner indicates that failure to follow
directions could result in damage to equipment or loss of information.
Reference Guide
hp iPAQ h2200 Series Pocket PC
First Edition (February 2003)
Document Part Number: 293146-001

DRAFT - Revised 10/10/02
Reference Guide iii
hp CONFIDENTIAL 10/17/02
File: H2200SeriesTOC.fm PN: 293146-001
Contents
1 Using Your hp iPAQ
h2200 Series
Customizing the Settings . . . . . . . . . . . . . . . . . . . . . . . . . 1–2
Setting the Time. . . . . . . . . . . . . . . . . . . . . . . . . . . . . 1–2
Setting the Date . . . . . . . . . . . . . . . . . . . . . . . . . . . . . 1–5
Customizing the Application Buttons . . . . . . . . . . . . 1–6
Managing the iPAQ h2200 Series . . . . . . . . . . . . . . . . . . 1–8
Backup Information. . . . . . . . . . . . . . . . . . . . . . . . . . 1–8
Using iPAQ File Store. . . . . . . . . . . . . . . . . . . . . . . 1–10
Performing a Normal Reset . . . . . . . . . . . . . . . . . . . 1–11
Performing a Full Reset. . . . . . . . . . . . . . . . . . . . . . 1–11
Realigning the Screen . . . . . . . . . . . . . . . . . . . . . . . 1–13
Managing the Battery. . . . . . . . . . . . . . . . . . . . . . . . . . . 1–15
Installing the Battery . . . . . . . . . . . . . . . . . . . . . . . . 1–15
Charging the Battery . . . . . . . . . . . . . . . . . . . . . . . . 1–17
Changing the Battery . . . . . . . . . . . . . . . . . . . . . . . . 1–21
Preserving Battery Time . . . . . . . . . . . . . . . . . . . . . 1–22
Manually Monitoring the Battery . . . . . . . . . . . . . . 1–24
Entering Information . . . . . . . . . . . . . . . . . . . . . . . . . . . 1–25
Changing Word Suggestion Options . . . . . . . . . . . . 1–25
Using the On-Screen Keyboard. . . . . . . . . . . . . . . . 1–28
Writing with the Stylus and the Letter Recognizer . 1–29
Writing with the Stylus and Microsoft Transcriber. 1–30
Writing with the Stylus and Block Recognizer . . . . 1–31
Drawing and Writing on the Screen . . . . . . . . . . . . 1–33
Using Applications. . . . . . . . . . . . . . . . . . . . . . . . . . . . . 1–36
Opening Applications . . . . . . . . . . . . . . . . . . . . . . . 1–36
Minimizing Applications. . . . . . . . . . . . . . . . . . . . . 1–37
Closing Applications . . . . . . . . . . . . . . . . . . . . . . . . 1–37
Installing Applications. . . . . . . . . . . . . . . . . . . . . . . 1–38

Reference Guide iv
DRAFT - Revised 10/10/02
hp CONFIDENTIAL 10/17/02
File: H2200SeriesTOC.fm PN: 293146-001
Recording Your Voice . . . . . . . . . . . . . . . . . . . . . . . . . . 1–39
Making a Recording . . . . . . . . . . . . . . . . . . . . . . . . 1–39
Listening to a Recording . . . . . . . . . . . . . . . . . . . . . 1–40
Deleting a Recording . . . . . . . . . . . . . . . . . . . . . . . . 1–41
Taking Notes . . . . . . . . . . . . . . . . . . . . . . . . . . . . . . . . . 1–41
Creating a note. . . . . . . . . . . . . . . . . . . . . . . . . . . . . 1–41
Viewing Images (This section may be removed). . . . . . 1–43
Locating an image (This program does not exist) . . 1–43
Viewing image information. . . . . . . . . . . . . . . . . . . 1–44
Changing the View . . . . . . . . . . . . . . . . . . . . . . . . . 1–45
Creating a Slide Show . . . . . . . . . . . . . . . . . . . . . . . 1–46
2Connecting
Connecting to a Computer . . . . . . . . . . . . . . . . . . . . . . . . 2–1
Synchronizing with Your Computer . . . . . . . . . . . . . 2–2
Changing Synchronization Settings. . . . . . . . . . . . . . 2–5
Moving Files . . . . . . . . . . . . . . . . . . . . . . . . . . . . . . . 2–7
Connecting to the Internet or your Network . . . . . . . . . . 2–8
Using a Modem Card. . . . . . . . . . . . . . . . . . . . . . . . . 2–8
Synchronizing Links . . . . . . . . . . . . . . . . . . . . . . . . 2–12
Entering an Internet address . . . . . . . . . . . . . . . . . . 2–13
Using a Favorites List . . . . . . . . . . . . . . . . . . . . . . . 2–14
3Communications
Using E-mail . . . . . . . . . . . . . . . . . . . . . . . . . . . . . . . . . . 3–1
Setting up E-mail . . . . . . . . . . . . . . . . . . . . . . . . . . . . 3–1
Receiving E-mail . . . . . . . . . . . . . . . . . . . . . . . . . . . . 3–7
Opening E-mail . . . . . . . . . . . . . . . . . . . . . . . . . . . . . 3–8
Deleting E-mail . . . . . . . . . . . . . . . . . . . . . . . . . . . . . 3–9
Moving E-mail. . . . . . . . . . . . . . . . . . . . . . . . . . . . . 3–11
Opening a Folder . . . . . . . . . . . . . . . . . . . . . . . . . . . 3–12
Managing Folders . . . . . . . . . . . . . . . . . . . . . . . . . . 3–13
Using the Contacts Application . . . . . . . . . . . . . . . . . . . 3–15
Creating a Contact . . . . . . . . . . . . . . . . . . . . . . . . . . 3–15

Reference Guide v
DRAFT - Revised 10/10/02
hp CONFIDENTIAL 10/17/02
File: H2200SeriesTOC.fm PN: 293146-001
Viewing a list of Contacts . . . . . . . . . . . . . . . . . . . . 3–17
Editing Contact Information . . . . . . . . . . . . . . . . . . 3–18
Categorizing Contacts . . . . . . . . . . . . . . . . . . . . . . . 3–18
Deleting Contacts . . . . . . . . . . . . . . . . . . . . . . . . . . 3–21
Using the Universal Remote . . . . . . . . . . . . . . . . . . . . . 3–23
Using Configuration Icons. . . . . . . . . . . . . . . . . . . . 3–24
Adding a Device . . . . . . . . . . . . . . . . . . . . . . . . . . . 3–24
Turning on a Device . . . . . . . . . . . . . . . . . . . . . . . . 3–29
Adding Activities. . . . . . . . . . . . . . . . . . . . . . . . . . . 3–29
4 Using Bluetooth
Getting Acquainted with Bluetooth . . . . . . . . . . . . . . . . . 4–2
Understanding Terms . . . . . . . . . . . . . . . . . . . . . . . . 4–3
Reviewing Supported Services . . . . . . . . . . . . . . . . . 4–4
Working with Bluetooth Settings . . . . . . . . . . . . . . . 4–5
Working with the Bluetooth Manager . . . . . . . . . . . . 4–7
Locating and Selecting a Device . . . . . . . . . . . . . . . . . . . 4–8
Understanding Profiles. . . . . . . . . . . . . . . . . . . . . . . . . . . 4–8
Creating a Profile. . . . . . . . . . . . . . . . . . . . . . . . . . . . 4–8
Activating a Profile . . . . . . . . . . . . . . . . . . . . . . . . . . 4–9
Renaming a Profile . . . . . . . . . . . . . . . . . . . . . . . . . 4–10
Deleting a Profile. . . . . . . . . . . . . . . . . . . . . . . . . . . 4–10
Saving Configuration Settings in a Profile . . . . . . . 4–10
Setting Accessibility Properties . . . . . . . . . . . . . . . . . . . 4–11
Entering a Device Name . . . . . . . . . . . . . . . . . . . . . 4–11
Allowing Others to Locate Your Device. . . . . . . . . 4–12
Pairing Devices . . . . . . . . . . . . . . . . . . . . . . . . . . . . 4–12
Unpairing Devices . . . . . . . . . . . . . . . . . . . . . . . . . . 4–14
Allowing Connections . . . . . . . . . . . . . . . . . . . . . . . 4–14
Enabling Bluetooth Services . . . . . . . . . . . . . . . . . . 4–15
Setting a Shared Folder . . . . . . . . . . . . . . . . . . . . . . 4–18
Selecting Business Card Information . . . . . . . . . . . 4–19
Connecting to Other Devices . . . . . . . . . . . . . . . . . . . . . 4–20
Identifying the Communications Port . . . . . . . . . . . 4–20
Establishing an ActiveSync Connection . . . . . . . . . 4–20

Reference Guide vi
DRAFT - Revised 10/10/02
hp CONFIDENTIAL 10/17/02
File: H2200SeriesTOC.fm PN: 293146-001
Establishing a Serial Connection. . . . . . . . . . . . . . . 4–21
Using Dial-Up Networking . . . . . . . . . . . . . . . . . . . 4–22
Establishing a Cell Phone Partnership. . . . . . . . . . . 4–23
Working with Files. . . . . . . . . . . . . . . . . . . . . . . . . . . . . 4–25
Creating a File Transfer Connection . . . . . . . . . . . . 4–25
Sending Files . . . . . . . . . . . . . . . . . . . . . . . . . . . . . . 4–25
Creating a Folder on a Remote Device . . . . . . . . . . 4–26
Receiving a File from a Remote Device . . . . . . . . . 4–26
Deleting a File from a Remote Device . . . . . . . . . . 4–26
Sending Information via Bluetooth . . . . . . . . . . . . . 4–27
Using Business Cards. . . . . . . . . . . . . . . . . . . . . . . . . . . 4–28
Sending Business Cards. . . . . . . . . . . . . . . . . . . . . . 4–29
Requesting Business Cards . . . . . . . . . . . . . . . . . . . 4–30
Exchanging Business Cards. . . . . . . . . . . . . . . . . . . 4–30
Working with Connections . . . . . . . . . . . . . . . . . . . . . . 4–31
Creating a Shortcut . . . . . . . . . . . . . . . . . . . . . . . . . 4–31
Deleting a Shortcut . . . . . . . . . . . . . . . . . . . . . . . . . 4–31
Viewing Shortcuts . . . . . . . . . . . . . . . . . . . . . . . . . . 4–32
Opening a Connection . . . . . . . . . . . . . . . . . . . . . . . 4–32
Viewing Connection Status . . . . . . . . . . . . . . . . . . . 4–32
Closing a Connection. . . . . . . . . . . . . . . . . . . . . . . . 4–33
Viewing Connection Information . . . . . . . . . . . . . . 4–33
5Scheduling
Using the Today Screen . . . . . . . . . . . . . . . . . . . . . . . . . . 5–1
Creating information . . . . . . . . . . . . . . . . . . . . . . . . . 5–1
Changing information . . . . . . . . . . . . . . . . . . . . . . . . 5–2
Changing Settings . . . . . . . . . . . . . . . . . . . . . . . . . . . 5–3
Using the Calendar. . . . . . . . . . . . . . . . . . . . . . . . . . . . . . 5–5
Looking at the Calendar . . . . . . . . . . . . . . . . . . . . . . 5–5
Changing the Calendar View. . . . . . . . . . . . . . . . . . . 5–6
Customizing the Calendar Appearance . . . . . . . . . . . 5–6
Scheduling Appointments . . . . . . . . . . . . . . . . . . . . . 5–7
Creating Reminders . . . . . . . . . . . . . . . . . . . . . . . . . . 5–8
Deleting Appointments . . . . . . . . . . . . . . . . . . . . . . . 5–9

Reference Guide vii
DRAFT - Revised 10/10/02
hp CONFIDENTIAL 10/17/02
File: H2200SeriesTOC.fm PN: 293146-001
Categorizing Appointments. . . . . . . . . . . . . . . . . . . . 5–9
Requesting Meetings . . . . . . . . . . . . . . . . . . . . . . . . 5–11
Using Tasks . . . . . . . . . . . . . . . . . . . . . . . . . . . . . . . . . . 5–12
Creating a Task . . . . . . . . . . . . . . . . . . . . . . . . . . . . 5–12
Creating a Task Quickly . . . . . . . . . . . . . . . . . . . . . 5–13
Deleting a Task . . . . . . . . . . . . . . . . . . . . . . . . . . . . 5–14
Sorting Tasks . . . . . . . . . . . . . . . . . . . . . . . . . . . . . . 5–14
Changing the Appearance of Tasks . . . . . . . . . . . . . 5–16
6 Using the Software
Using Pocket Word . . . . . . . . . . . . . . . . . . . . . . . . . . . . . 6–1
Creating a Word Document. . . . . . . . . . . . . . . . . . . . 6–2
Opening a Word Document. . . . . . . . . . . . . . . . . . . . 6–4
Changing Pocket Word options. . . . . . . . . . . . . . . . . 6–4
Finding more Help for Pocket Word . . . . . . . . . . . . . 6–6
Using Pocket Excel . . . . . . . . . . . . . . . . . . . . . . . . . . . . . 6–7
Creating a Workbook. . . . . . . . . . . . . . . . . . . . . . . . . 6–8
Opening a Document . . . . . . . . . . . . . . . . . . . . . . . . . 6–9
Changing Excel Options . . . . . . . . . . . . . . . . . . . . . . 6–9
Using Windows Media Player . . . . . . . . . . . . . . . . . . . . 6–11
Copying Music to Your iPAQ h2200 Series . . . . . . 6–13
Playing Music on Your iPAQ h2200 Series . . . . . . 6–14
Creating Playlists. . . . . . . . . . . . . . . . . . . . . . . . . . . 6–15
Playing a Playlist . . . . . . . . . . . . . . . . . . . . . . . . . . . 6–17
Playing Video . . . . . . . . . . . . . . . . . . . . . . . . . . . . . 6–18
Using Pocket Internet Explorer . . . . . . . . . . . . . . . . . . . 6–18
Using Pocket IE When Connected . . . . . . . . . . . . . 6–19
Using Pocket IE When Disconnected . . . . . . . . . . . 6–19
Using Microsoft Reader . . . . . . . . . . . . . . . . . . . . . . . . . 6–19
Activating Microsoft Reader . . . . . . . . . . . . . . . . . . 6–20
Copying eBooks . . . . . . . . . . . . . . . . . . . . . . . . . . . 6–20
Reading an eBook . . . . . . . . . . . . . . . . . . . . . . . . . . 6–21
Listening to an eBook . . . . . . . . . . . . . . . . . . . . . . . 6–22
Annotating your eBook . . . . . . . . . . . . . . . . . . . . . . 6–23
Deleting eBooks . . . . . . . . . . . . . . . . . . . . . . . . . . . 6–24

Reference Guide viii
DRAFT - Revised 10/10/02
hp CONFIDENTIAL 10/17/02
File: H2200SeriesTOC.fm PN: 293146-001
Changing Microsoft Reader options . . . . . . . . . . . . 6–26
7 Expansion Cards
Viewing the Content of Memory Cards . . . . . . . . . . . . . . 7–2
Wireless Connection with an
Optional 802.11 CF or SD Card. . . . . . . . . . . . . . . . . . . . 7–3
Installing an 802.11 CF or SD Card . . . . . . . . . . . . . 7–3
Removing an 802.11 CF or SD card . . . . . . . . . . . . . 7–3
Finding Information. . . . . . . . . . . . . . . . . . . . . . . . . . 7–4
Using an Optional Modem Card . . . . . . . . . . . . . . . . . . . 7–4
Installing a Modem Card . . . . . . . . . . . . . . . . . . . . . . 7–4
Removing a Modem Card . . . . . . . . . . . . . . . . . . . . . 7–4
Finding information about modem cards. . . . . . . . . . 7–5
Using an Optional CF Card . . . . . . . . . . . . . . . . . . . . . . . 7–5
Inserting a CF Card . . . . . . . . . . . . . . . . . . . . . . . . . . 7–5
Removing a CF card . . . . . . . . . . . . . . . . . . . . . . . . . 7–5
Finding information. . . . . . . . . . . . . . . . . . . . . . . . . . 7–6
Using an Optional SD Memory Card. . . . . . . . . . . . . . . . 7–6
Installing an SD Card . . . . . . . . . . . . . . . . . . . . . . . . 7–6
Removing an SD Card. . . . . . . . . . . . . . . . . . . . . . . . 7–6
Finding information. . . . . . . . . . . . . . . . . . . . . . . . . . 7–6
8Troubleshooting
A Regulatory Notices
Federal Communications Commission Notice. . . . . . . . . A–1
Declaration of Conformity for products marked with the
FCC logo—United States only . . . . . . . . . . . . . . . . . A–2
Canadian Notice . . . . . . . . . . . . . . . . . . . . . . . . . . . . A–3
Avis Canadien . . . . . . . . . . . . . . . . . . . . . . . . . . . . . . A–3
Japanese Notice . . . . . . . . . . . . . . . . . . . . . . . . . . . . . . . . A–3
Battery Warning . . . . . . . . . . . . . . . . . . . . . . . . . . . . . . . . A–3
Equipment Warning . . . . . . . . . . . . . . . . . . . . . . . . . . . . . A–4
Airline Travel Notice . . . . . . . . . . . . . . . . . . . . . . . . . . . . A–4

Reference Guide ix
DRAFT - Revised 10/10/02
hp CONFIDENTIAL 10/17/02
File: H2200SeriesTOC.fm PN: 293146-001
Wireless Notices. . . . . . . . . . . . . . . . . . . . . . . . . . . . . . . . A–4
U.S. Regulatory Wireless Notice. . . . . . . . . . . . . . . . A–5
Canadian Regulatory Wireless Notice. . . . . . . . . . . . A–5
European Union Notice . . . . . . . . . . . . . . . . . . . . . . . A–6
Japanese Regulatory Wireless Notice . . . . . . . . . . . . A–7
Brazilian Regulatory Wireless Notice . . . . . . . . . . . . A–7
B Hardware Specifications
System Specifications . . . . . . . . . . . . . . . . . . . . . . . . . . . B–1
Physical Specifications. . . . . . . . . . . . . . . . . . . . . . . . . . . B–2
Operating Environment . . . . . . . . . . . . . . . . . . . . . . . . . . B–2
C Routine Care and Battery Guidelines
Routine Care. . . . . . . . . . . . . . . . . . . . . . . . . . . . . . . . . . . C–1
Battery Guidelines . . . . . . . . . . . . . . . . . . . . . . . . . . . . . . C–2
Index

DRAFT - Revised 10/16/02
Reference Guide 1–1
hp CONFIDENTIAL 12/3/02
File: ch1-UsingtheH2200.fm PN: 293146-001
1
Using Your hp iPAQ
h2200 Series
Congratulations on purchasing an HP iPAQ h2200 Series Pocket
PC. This Reference Guide will help you set up your Pocket PC
and familiarize you with how it works.
To use your iPAQ h2200 Series most effectively, start by learning
how to:
■Customize the settings
■Manage your iPAQ h2200 Series
■Manage the battery
■Enter information
■Work with applications
■Record your voice
■Take notes
■View images

1–2 Reference Guide
Using Your hp iPAQ h2200 Series
DRAFT - Revised 10/16/02
hp CONFIDENTIAL 12/3/02
File: ch1-UsingtheH2200.fm PN: 293146-001
Customizing the Settings
To navigate through the iPAQ h2200 Series interface, use one or
all of the following three ways:
■Tap the screen with the pointed tip of your stylus to open
applications and make selections. For example, tap the Start
menu to see a list of Start Menu options available.
■Tap and hold an area on the screen to see a pop-up menu.
■Press an application button on the front panel to quickly
turn on the screen and launch an application mapped to the
application button.
Setting the Time
When you turn on your iPAQ h2200 Series for the first time, you
are guided through setting the time. You will need to reset the
time if:
■The time needs to be adjusted
■The location time (Home or Visiting) needs to be changed
■All power to the h2200 Series is lost which removes all saved
settings
Shortcut: From the Today screen, tap the Clock icon to set
the time.
Using Your hp iPAQ h2200 Series
Reference Guide 1–3
DRAFT - Revised 10/16/02
hp CONFIDENTIAL 12/3/02
File: ch1-UsingtheH2200.fm PN: 293146-001
Setting the Time for Home
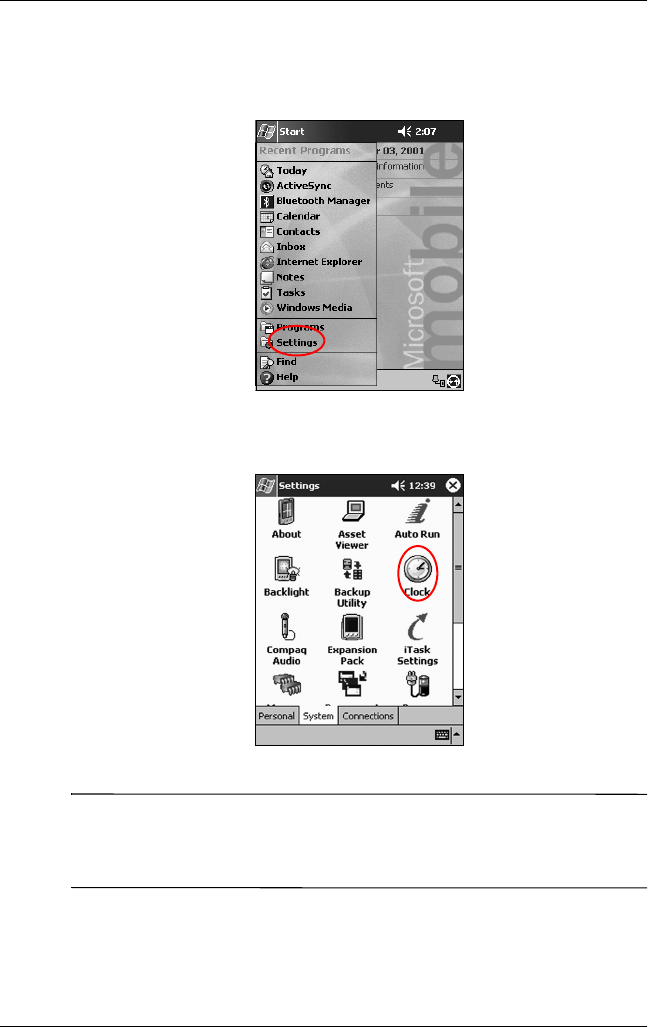
1. From the Start menu, tap Settings.
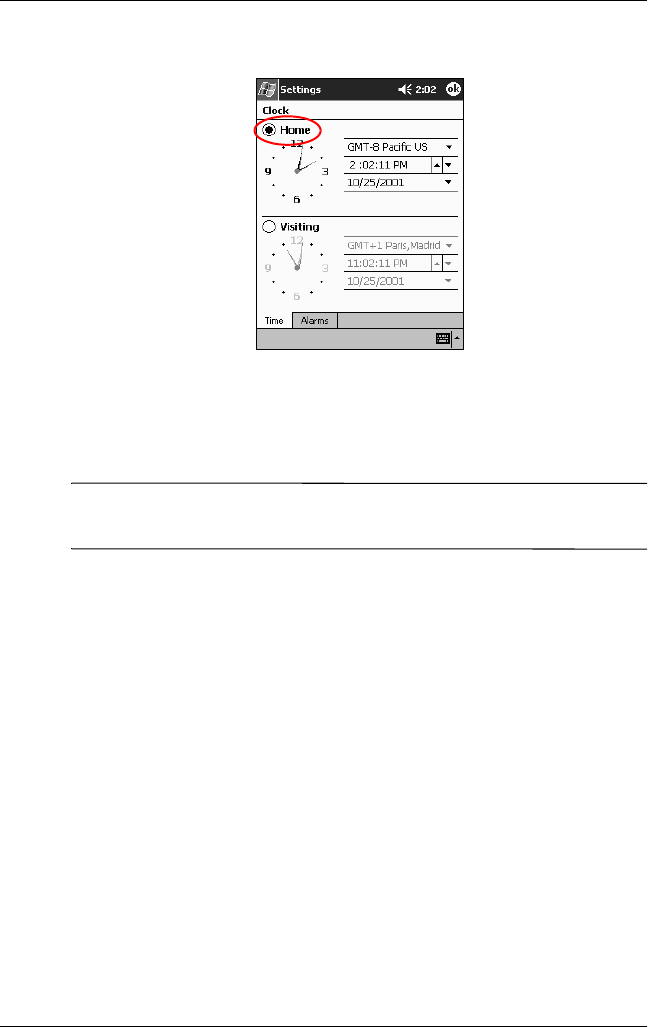
2. Tap the System tab.
3. Tap the Clock icon.
✎By default, the time on the host computer is synchronized with
the h2200 Series each time the two devices connect using
ActiveSync.
1–4 Reference Guide
Using Your hp iPAQ h2200 Series
DRAFT - Revised 10/16/02
hp CONFIDENTIAL 12/3/02
File: ch1-UsingtheH2200.fm PN: 293146-001
4. Verify Home is selected or Tap Home.
5. Tap the time-zone down arrow, then select your home
time zone.
6. Tap the hour, minutes, or seconds, then use the up and down
arrows to adjust the time.
✎You can adjust the time by moving the hands of the clock with the
stylus.
7. Tap AM or PM.
8. Tap OK.
9. Tap Ye s to save the time.
Setting the Time for a Location You are Visiting
To set the time for a location you are visiting:
1. From the Start menu, tap Settings > System tab > Clock
icon.
Shortcut: From the Today screen, tap the Clock icon to set
the time.
Using Your hp iPAQ h2200 Series
Reference Guide 1–5
DRAFT - Revised 10/16/02
hp CONFIDENTIAL 12/3/02
File: ch1-UsingtheH2200.fm PN: 293146-001
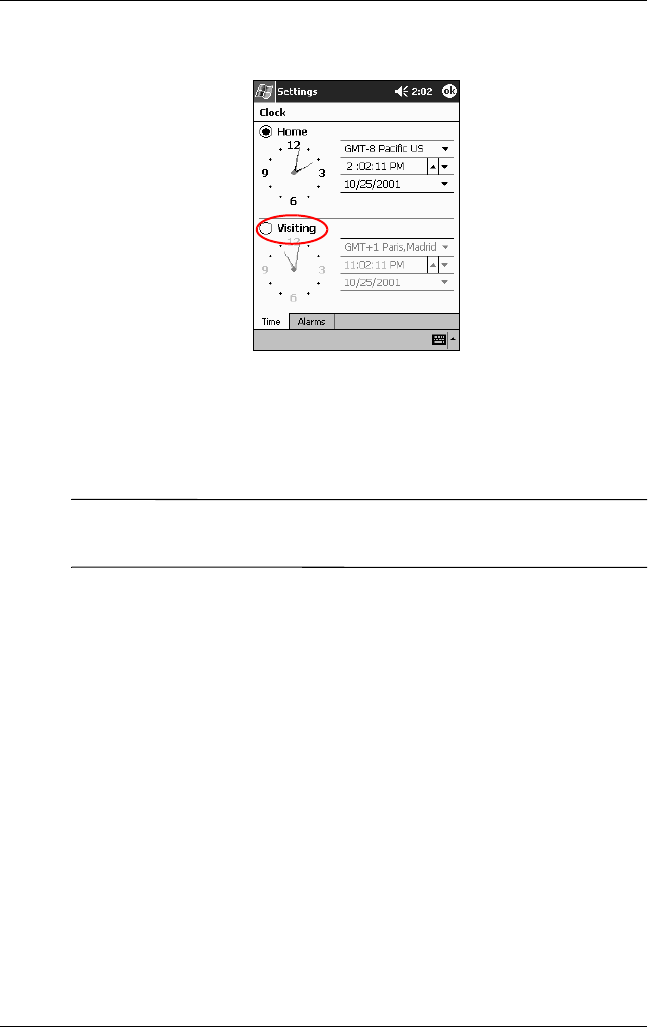
2. Tap Visiting.
3. Tap the time-zone down arrow, then select the time zone you
are visiting.
4. Tap the hour, minutes, or seconds, then use the up and down
arrows to adjust the time.
✎You can also adjust the time by moving the hands of the clock
with the stylus.
5. Tap AM or PM.
6. Tap OK.
7. Tap Ye s to save the time.
Setting the Date
When you turn on your iPAQ h2200 Series for the first time, you
must set the date. You must reset the date again if:
■The battery discharges completely
■The location date (Home or Visiting) needs to be changed
■You perform a full reset of your h2200 Series
1–6 Reference Guide
Using Your hp iPAQ h2200 Series
DRAFT - Revised 10/16/02
hp CONFIDENTIAL 12/3/02
File: ch1-UsingtheH2200.fm PN: 293146-001
SHORTCUT: From the Today screen, tap the Clock icon to set
the date.
1. From the Start menu, tap Settings > System > Clock.
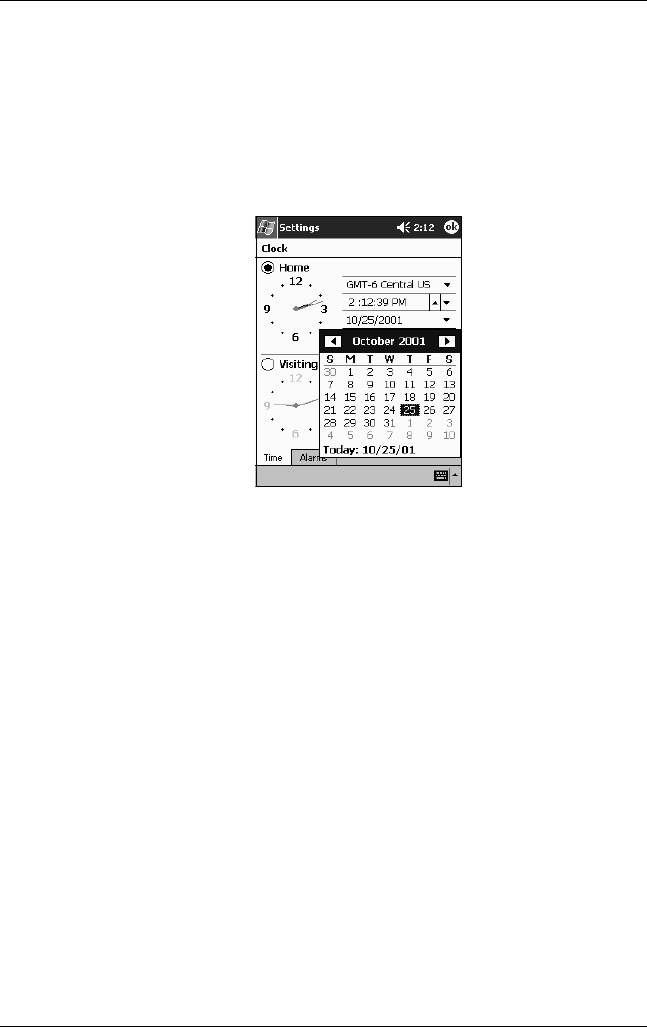
2. Tap the down arrow by the date.
3. Tap the left or right arrow to select a month and year.
4. Tap a day.
5. Tap OK.
6. Tap Ye s to save the date settings.
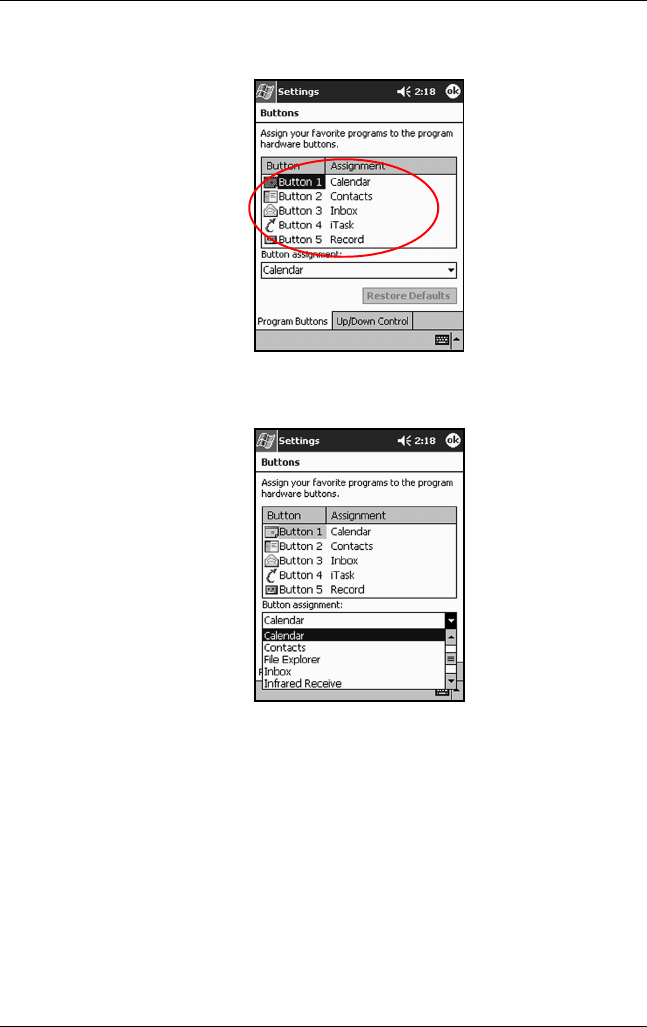
Customizing the Application Buttons
To quickly open the Calendar, Contacts, Inbox, or iTask
applications, press the appropriate application button on the front
panel of your iPAQ h2200 Series. These applications are default
assignments of the buttons.
To change or customize the default assignments to suit your
personal preference:
1. From the Start menu, tap Settings > Buttons.
Using Your hp iPAQ h2200 Series
Reference Guide 1–7
DRAFT - Revised 10/16/02
hp CONFIDENTIAL 12/3/02
File: ch1-UsingtheH2200.fm PN: 293146-001
2. Tap the button you want to change.
3. Tap the button-assignment down arrow.
4. Tap an application.
5. Tap OK.

1–8 Reference Guide
Using Your hp iPAQ h2200 Series
DRAFT - Revised 10/16/02
hp CONFIDENTIAL 12/3/02
File: ch1-UsingtheH2200.fm PN: 293146-001
Managing the iPAQ h2200 Series
To effectively manage your iPAQ h2200 Series, learn how to:
■Back up and restore information
■Use iPAQ File Store
■Execute full and normal resets
■Align the screen
Backup Information
Use either HP Backup or Microsoft ActiveSync Backup to back
up information to your computer and restore information from
your computer to your iPAQ h2200 Series.
✎HP Backup and ActiveSync are both included on the HP iPAQ
h2200 Series Companion CD and must be downloaded to your
computer before executing an iPAQ h2200 Series backup.
To help reduce the chance of losing information, you should back
up information regularly to your computer.
Backup/Restore using HP Backup
Close all applications on your h2200 unit before backing up or
restoring your information.
ÅWARNING: Restoring your information replaces the current
information on your iPAQ h2200 Series with the information saved in
your backup.
To backup/restore using HP Backup:
1. Make sure the h2200 Series is connected to your computer.
2. BILL WILL GIVE ME THE REST OF THIS INFO.
Using Your hp iPAQ h2200 Series
Reference Guide 1–9
DRAFT - Revised 10/16/02
hp CONFIDENTIAL 12/3/02
File: ch1-UsingtheH2200.fm PN: 293146-001
Backup/Restore Using ActiveSync 3.5
Close all applications on your h2200 unit before backing up or
restoring your information.
ÅWARNING: Restoring your information replaces the current
information on your iPAQ h2200 Series with the information saved in
your backup.
To backup/restore using ActiveSync:
1. Make sure the h2200 Series is connected to your computer.
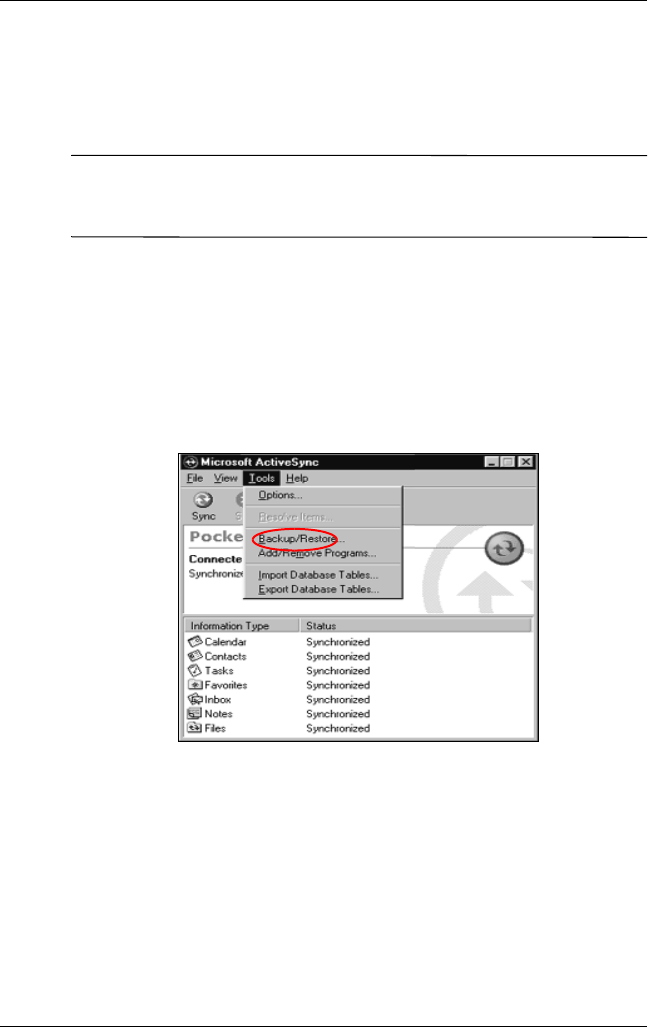
2. From your computer, open Microsoft ActiveSync. From the
Start menu, click Programs > Microsoft ActiveSync.
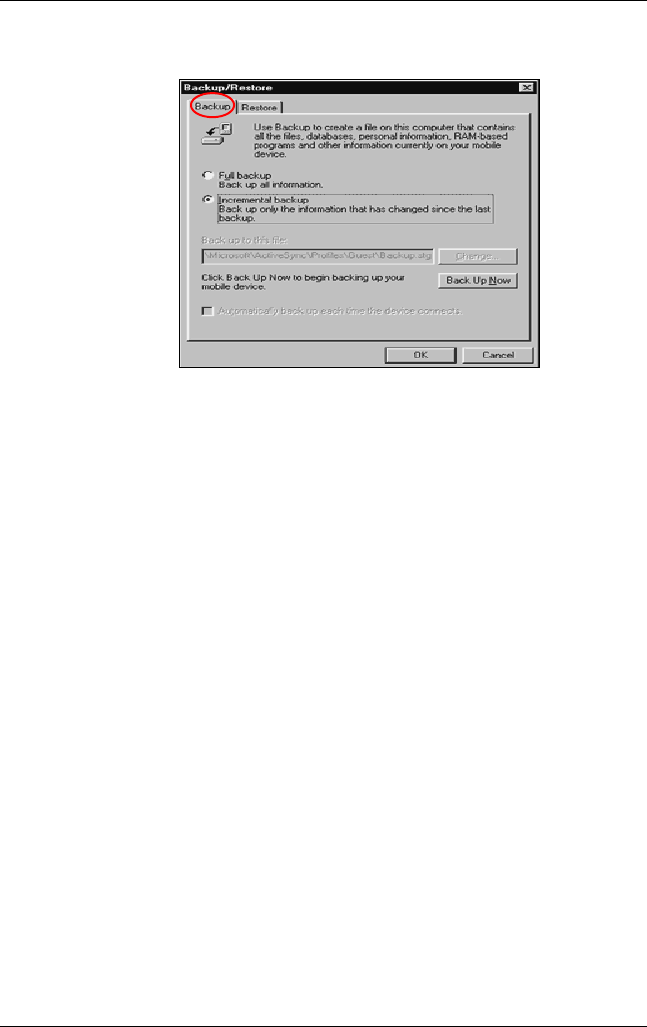
3. From the Tools menu, click Backup/Restore.
1–10 Reference Guide
Using Your hp iPAQ h2200 Series
DRAFT - Revised 10/16/02
hp CONFIDENTIAL 12/3/02
File: ch1-UsingtheH2200.fm PN: 293146-001
4. Click the Backup or Restore tab, then select your options.
5. Click Backup Now or Restore Now.
Using iPAQ File Store
You can install aplications and save files to the iPAQ File Store
folder. iPAQ File Store is accessed from File Explorer on your
iPAQ h2200 Series.
Applications and files stored in iPAQ File Store are held in
read-only memory (ROM) and are saved if you perform a full
reset of your iPAQ h2200 or if the battery discharges completely.
The amount of memory storage available in iPAQ File Store will
vary depending on the Pocket PC model.
Saving to iPAQ File Store
1. Copy the files to be saved to the iPAQ File Store folder.
2. From the Start menu, tap Programs > File Explorer > My
Device > iPAQ File Store.
3. Paste the selected files.

Using Your hp iPAQ h2200 Series
Reference Guide 1–11
DRAFT - Revised 10/16/02
hp CONFIDENTIAL 12/3/02
File: ch1-UsingtheH2200.fm PN: 293146-001
Performing a Normal Reset
A normal reset is sometimes referred to as a “soft reset.” Perform
a normal reset to stop all running applications. A normal reset
will not erase any programs or data stored in RAM or ROM.
ÄCAUTION: Be sure to save any unsaved data before performing a
normal reset since normal reset erases all unsaved data.
To perform a normal reset:
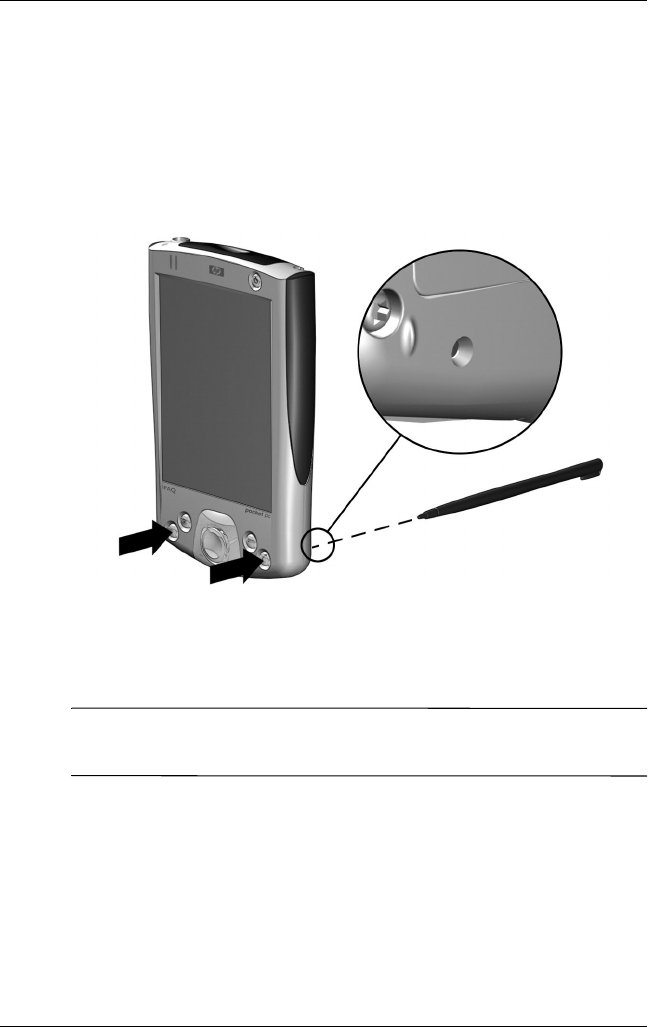
1. Locate the reset button on the back of the iPAQ h2200 Series.
2. Using the stylus, lightly press the reset button for two
seconds.
✎The iPAQ h2200 Series will restart in approximately five seconds
and display the Today screen.
Performing a Full Reset
A full reset is sometimes referred to as a “hard reset.” Perform a
full reset when you want to clear all settings, programs, and data
from RAM.
A full reset deactivates the battery. The power button will not
function until the battery is reactivated.
ÄCAUTION: If you perform a full reset, your h2200 unit will return to
its default settings and lose all information that is not recorded in
ROM.
1–12 Reference Guide
Using Your hp iPAQ h2200 Series
DRAFT - Revised 10/16/02
hp CONFIDENTIAL 12/3/02
File: ch1-UsingtheH2200.fm PN: 293146-001
To perform a full reset:
1. Press and hold the 3A(Calendar) and 3D (iTask) (or first and
third )application buttons on the front of the unit and, at the
same time, press the Reset button on the back of the h2200
unit with the stylus.
2. Hold all buttons until the displayed image begins to fade
(approximately four seconds).
3. Release the application buttons and stylus.
✎To verify a full reset, press the power button. If the iPAQ h2200
Series has been fully reset, it will not power on.
4. Reactivate the battery by:
❏Removing and reinstalling the battery
❏Connecting the iPAQ h2200 to AC power
❏Pressing the Reset button with the stylus
5. Set up your iPAQ h2200 Series Pocket PC.
Using Your hp iPAQ h2200 Series
Reference Guide 1–13
DRAFT - Revised 10/16/02
hp CONFIDENTIAL 12/3/02
File: ch1-UsingtheH2200.fm PN: 293146-001
Realigning the Screen
When turning on the iPAQ h2200 Series for the first time, you are
guided through a screen alignment process. You must realign
your screen if:
■The iPAQ h2200 Series does not respond accurately to your
taps
■You perform a restore following a data backup
■You perform a full reset of your iPAQ h2200 Series by
pressing the application buttons and the Reset button on the
back of the unit
To realign the h2200 Series screen:
SHORTCUT: IS THERE ONE?
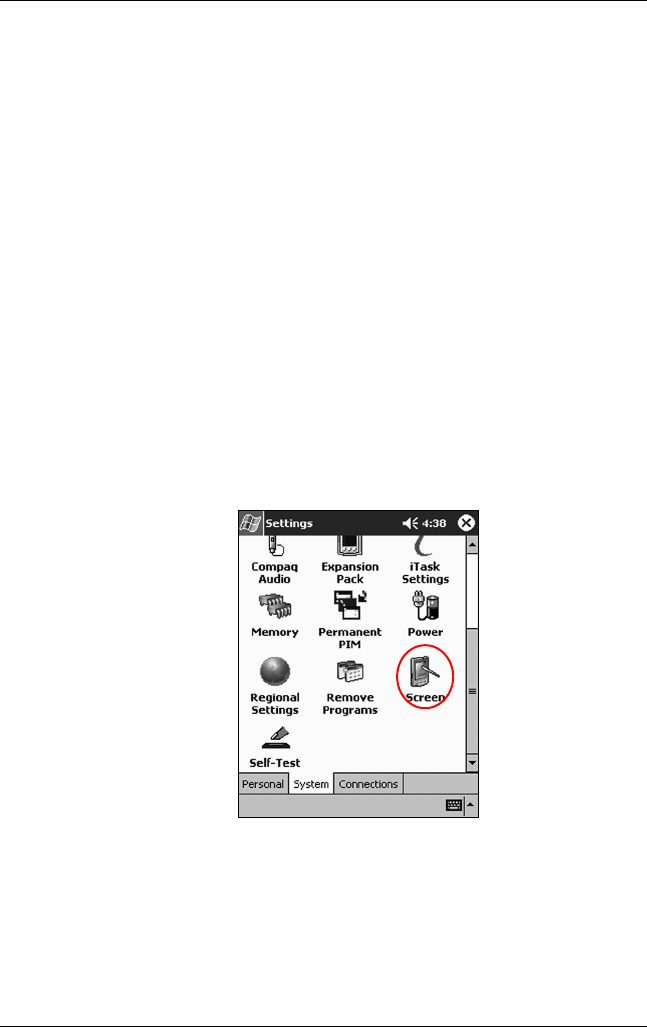
1. From the Start menu, tap Settings > System tab > Screen
icon.
1–14 Reference Guide
Using Your hp iPAQ h2200 Series
DRAFT - Revised 10/16/02
hp CONFIDENTIAL 12/3/02
File: ch1-UsingtheH2200.fm PN: 293146-001
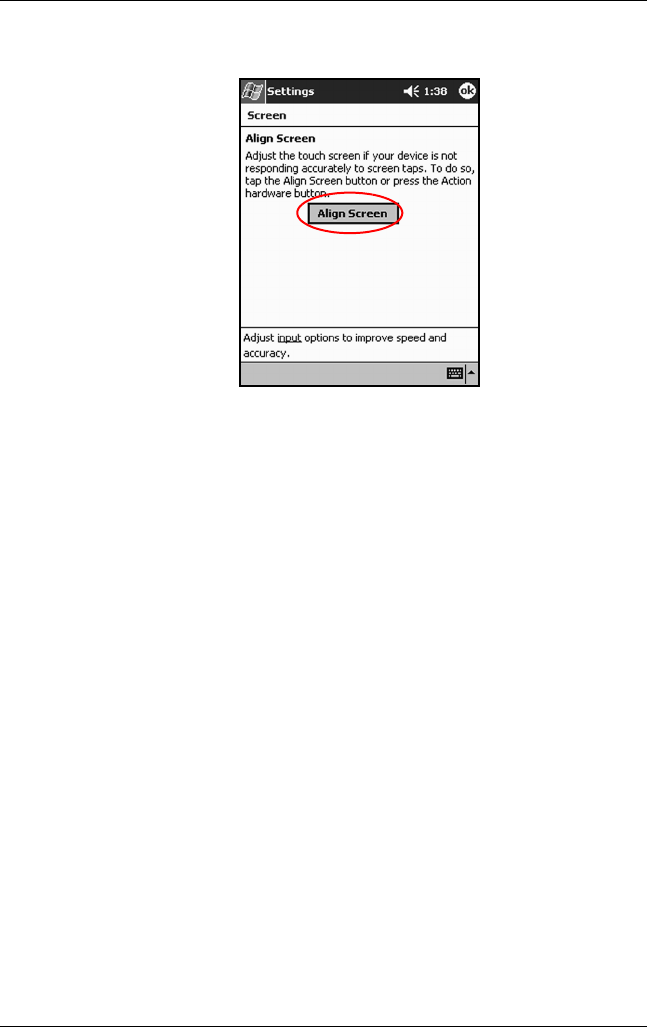
2. Tap the Align Screen button.
3. Tap the cross-hair object at each location. Be precise when
tapping the cross-hair object.
4. Tap OK.
Using Your hp iPAQ h2200 Series
Reference Guide 1–15
DRAFT - Revised 10/16/02
hp CONFIDENTIAL 12/3/02
File: ch1-UsingtheH2200.fm PN: 293146-001
Managing the Battery
Installing the Battery
To install the removeable/rechargeable battery:
1. Locate the battery.
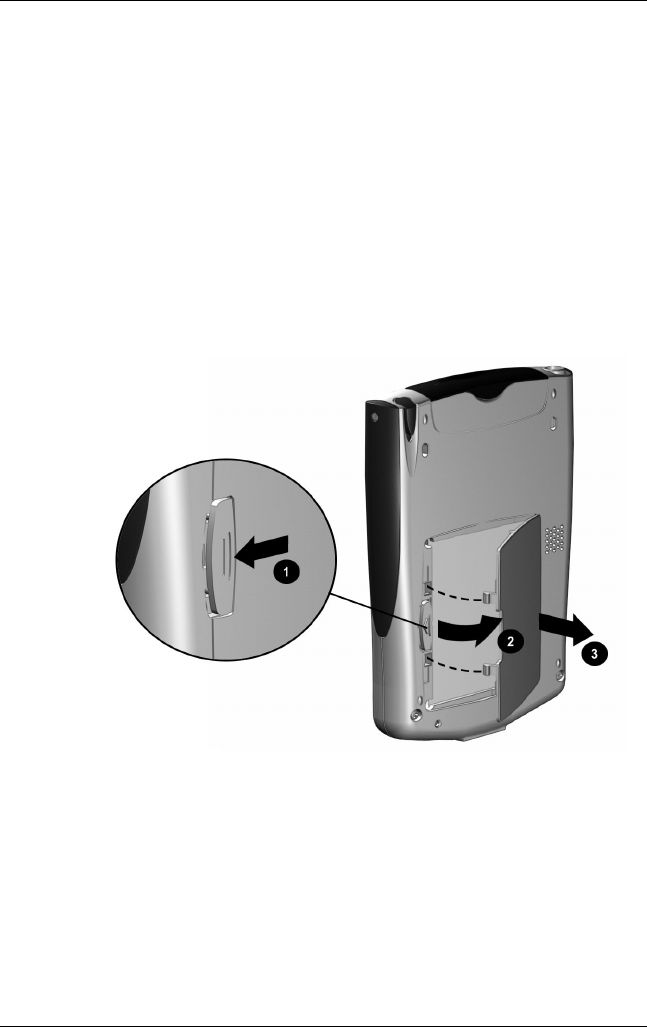
2. On the back of the h2200 Series, push down on the latch 1 to
open the battery door, then pull the door out 2 and away
from the unit.
1–16 Reference Guide
Using Your hp iPAQ h2200 Series
DRAFT - Revised 10/16/02
hp CONFIDENTIAL 12/3/02
File: ch1-UsingtheH2200.fm PN: 293146-001
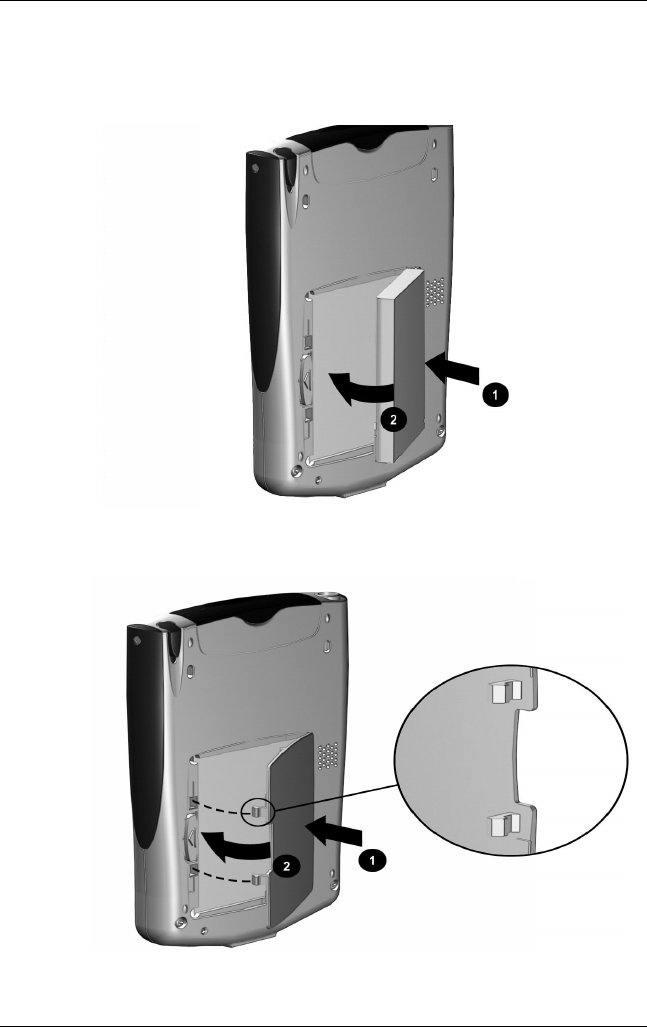
3. Insert the battery into the battery slot so that the connectors
on the right side of the battery are seated on the pins 1, then
push the left side of the battery in place 2.
4. Replace the battery door by inserting it back into the tabs on
the battery door area, then close and latch it.

Using Your hp iPAQ h2200 Series
Reference Guide 1–17
DRAFT - Revised 10/16/02
hp CONFIDENTIAL 12/3/02
File: ch1-UsingtheH2200.fm PN: 293146-001
ÄCAUTION: The battery door must be tightly latched in order to
power the battery.
5. Activate the h2200 Series by inserting the stylus into the reset
button on the back for about two seconds. (CHECK AGAIN)
✎The iPAQ h2200 Series will power on once the battery has been
inserted and the unit has been reset. However, if the battery is not
fully charged, you must connect the AC adapter to the h2200 unit
to fully charge it before continuing further. It takes about four
hours to fully charge it.
ÄCAUTION: Because most of the applications and data you install on
your iPAQ h2200 Series are held in memory (RAM), you will need to
reinstall them if the battery completely discharges or if the battery is
removed from the unit for extended periods of time. Applications and
data installed in the iPAQ File Store folder are saved in ROM and will
not have to be reinstalled.
Charging the Battery
The iPAQ h2200 battery needs to be fully charged before setting
it up, and recharged regularly as your iPAQ h2200 Series uses
some power to maintain files in RAM and the clock. While
working at your desk, keep the iPAQ h2200 Series connected to
the AC adapter. When traveling, carry the AC adapter and charger
adapter plug with you.
Your iPAQ h2200 Series is shipped with a partial charge on the
battery. You may want to ensure that it is fully charged before
synchronizing.
1–18 Reference Guide
Using Your hp iPAQ h2200 Series
DRAFT - Revised 10/16/02
hp CONFIDENTIAL 12/3/02
File: ch1-UsingtheH2200.fm PN: 293146-001
To recharge the battery, use one of the following items:
■AC adapter with the charger adapter
■Synchronization cable combined with the AC adapter
■Synchronization cradle combined with the AC adapter
Charging with the AC Adapter
The standard AC adapter works in any household outlet. You can
also purchase one that works in your car’s cigarette lighter or a
12-volt power outlet.
ÄCAUTION: Use only HP recommended AC adapters.
To charge the iPAQ h2200 Series using the AC adapter:
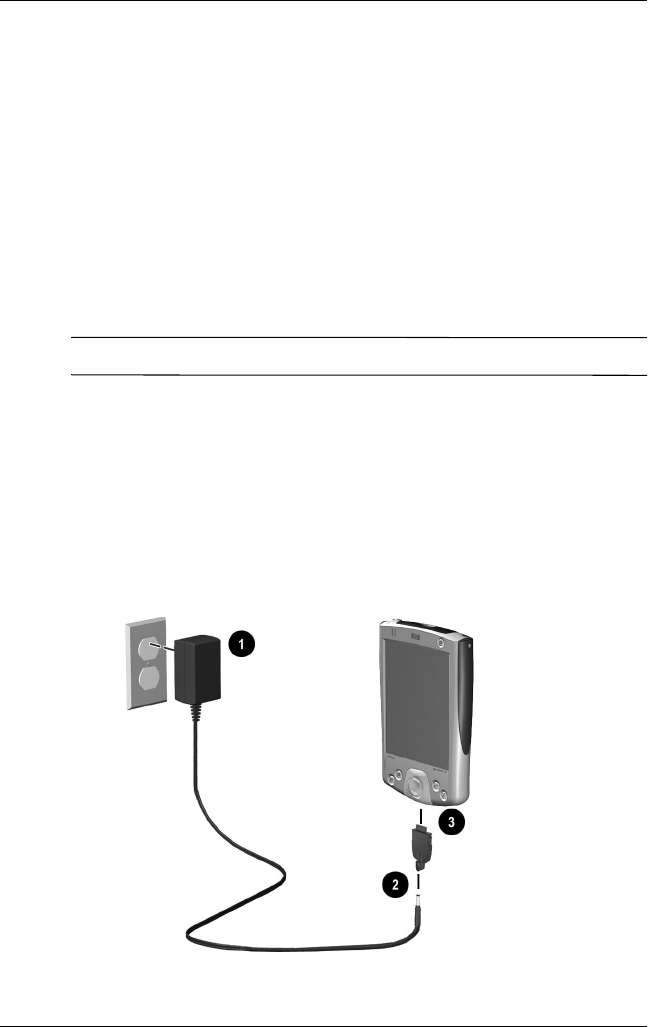
1. Insert the charger adapter 3 into the charging port on the
bottom of the h2200 unit.
2. Plug one end of the AC adapter into an electrical outlet 1 and
plug the other end into the charger adapter 2 on the bottom
of the h2200 unit.
Using Your hp iPAQ h2200 Series
Reference Guide 1–19
DRAFT - Revised 10/16/02
hp CONFIDENTIAL 12/3/02
File: ch1-UsingtheH2200.fm PN: 293146-001
3. When the power indicator on the top of the h2200 turns solid
amber, the h2200 unit is fully charged and you may
disconnect the AC adapter. The approximate time to fully
charge a unit is four hours.
✎The amber charge light blinks while the battery is recharging, and
turns solid (nonblinking) when the battery is fully charged.
Charging with the Synchronization Cable
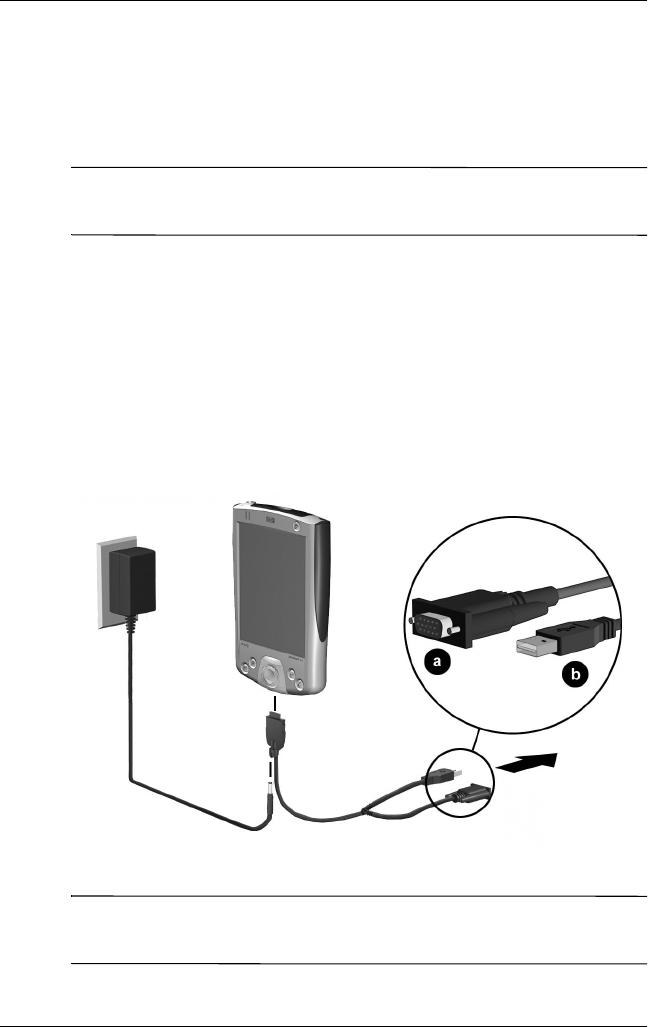
1. Plug one end of the synchronization cable into the
communications port on the bottom of your iPAQ h2200 unit.
2. Plug the AC adapter into an electrical outlet and connect the
other end of the AC adapter to the AC connector on the
synchronization cable.
✎The amber charge light blinks while the battery is recharging, and
turns solid (nonblinking) when the battery is fully charged.
1–20 Reference Guide
Using Your hp iPAQ h2200 Series
DRAFT - Revised 10/16/02
hp CONFIDENTIAL 12/3/02
File: ch1-UsingtheH2200.fm PN: 293146-001
✎To prevent loss of power to the h2200, always connect the AC
adapter to the h2200 when synchronizing with a host computer.
Charging with the Synchronization Cradle
Use the synchronization cradle to:
■Charge the iPAQ h2200 Series
■Synchronize the iPAQ h2200 Series with your computer (for
information on synchronizing, refer to the previous section in
this chapter, “Setting up the iPAQ h2200 Series”)
■Recharge the battery of an optional battery pack, if you have
purchased one
To charge the iPAQ h2200 Series using the synchronization
cradle:
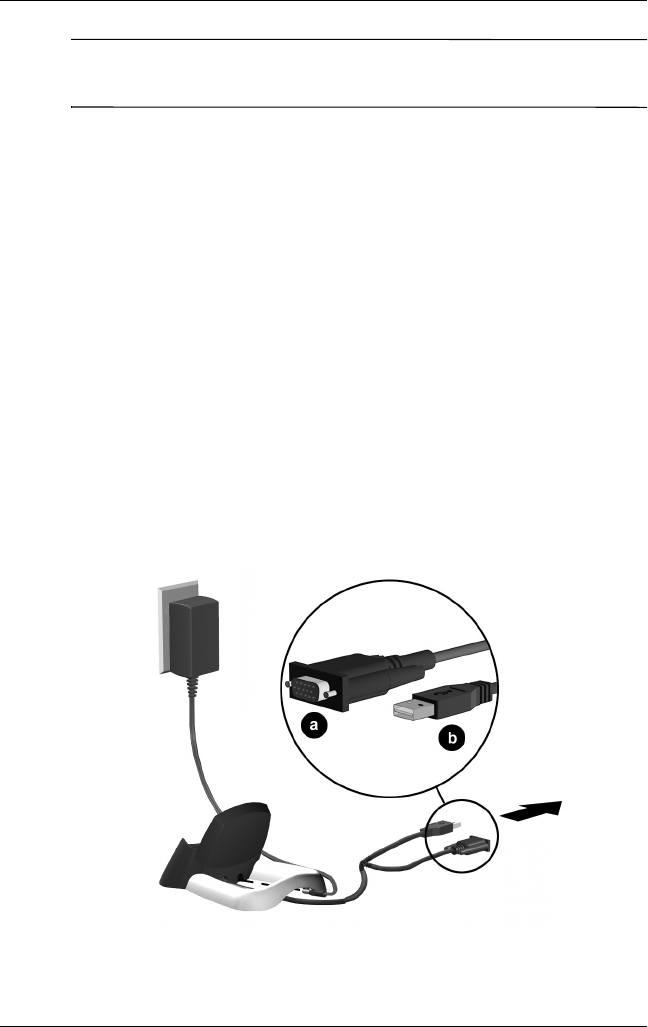
1. Plug the AC adapter into an electrical outlet and connect the
other end of the AC adapter to the AC connector on the
synchronization cradle.
Using Your hp iPAQ h2200 Series
Reference Guide 1–21
DRAFT - Revised 10/16/02
hp CONFIDENTIAL 12/3/02
File: ch1-UsingtheH2200.fm PN: 293146-001
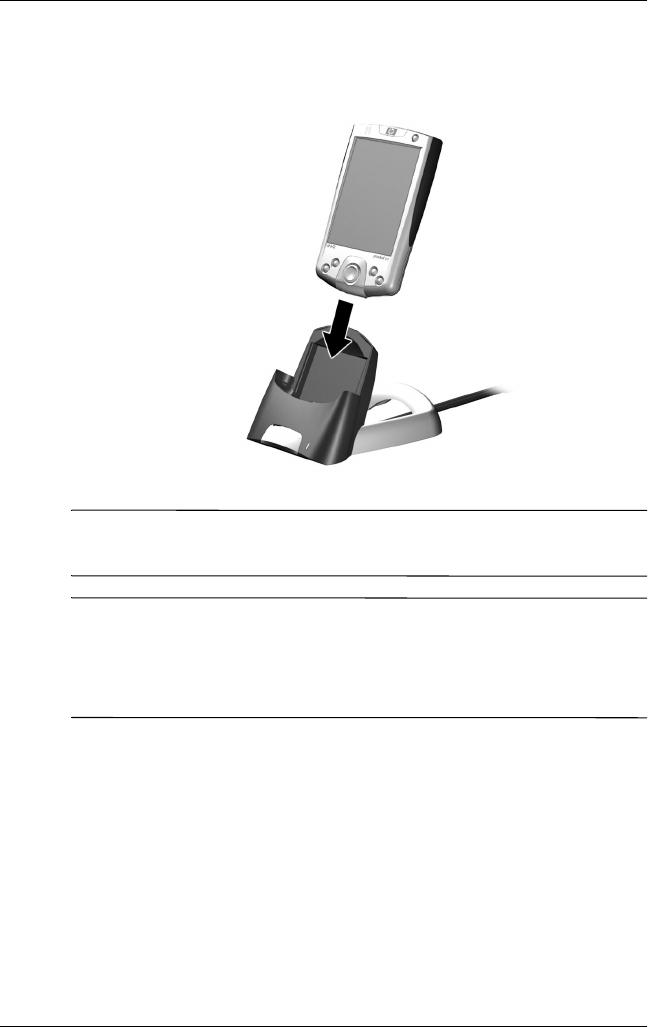
2. Slide the bottom of your iPAQ h2200 Series into the cradle
and push firmly to seat it.
✎The amber charge light blinks while the battery is recharging, and
turns solid (nonblinking) when the battery is fully charged.
✎To charge an optional battery pack at the same time as the h2200,
insert the battery pack into the cradle first, then insert the h2200
Series on top of the battery pack. It may take longer to charge the
h2200 than if it is recharged separately.
Changing the Battery
If the main battery for your Pocket PC is removed, your device
will not operate even if you try to use AC power. However, the
Pocket PC has a small bridge battery which allows you to change

1–22 Reference Guide
Using Your hp iPAQ h2200 Series
DRAFT - Revised 10/16/02
hp CONFIDENTIAL 12/3/02
File: ch1-UsingtheH2200.fm PN: 293146-001
the main battery without losing RAM data as long as it is replaced
within 10 minutes. If the battery is removed from the unit for
longer than 10 minutes, you will lose unsaved RAM data and
need to reset the unit.
✎Before removing the battery, be sure to save or backup any
unsaved data.
Preserving Battery Time
Adjusting the Standby Setting
Adjusting the Standby setting can preserve battery time. During
Standby, the unit turns off so very little power is being consumed.
This helps to preserve programs and data stored in RAM.
■Lower Standby Period—Increases the usable battery time. If
you use the h2200 Pocket PC for extended periods of time, it
is recommended that you select a lower Standby Period.
■Higher Standby Period—Decreases the usable battery time
and allocates it for standby usage. If you leave your h2200
Pocket PC off for extended periods of time without
recharging it, it is recommended that you select a higher
Standby Period.
For more information on using the Standby setting, tap Help from
the Start menu.
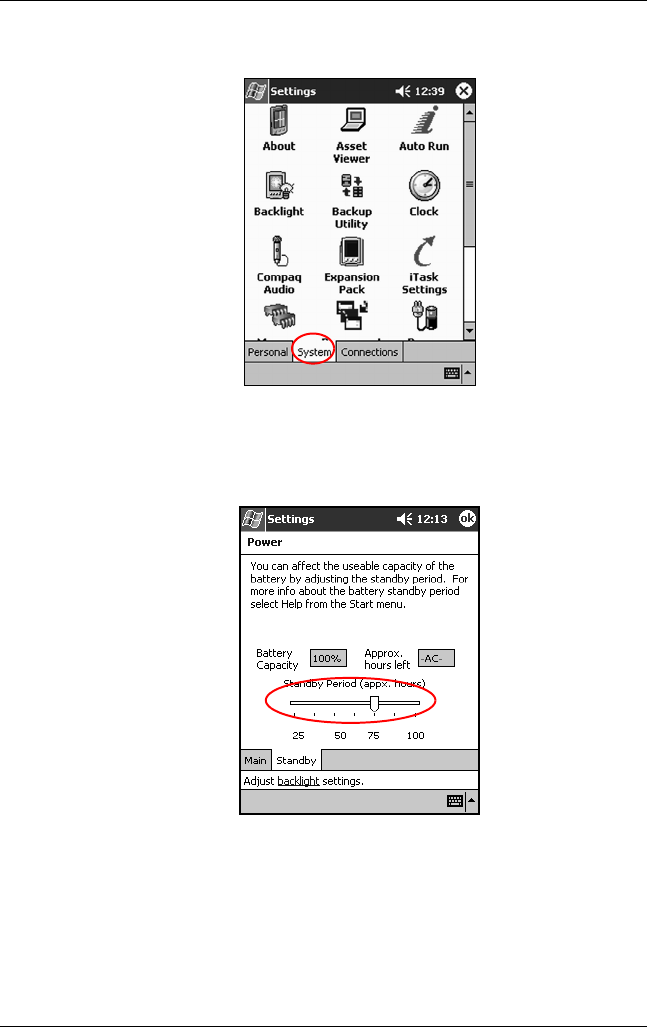
To adjust the Standby setting:
1. From the Start menu, tap Settings.
Using Your hp iPAQ h2200 Series
Reference Guide 1–23
DRAFT - Revised 10/16/02
hp CONFIDENTIAL 12/3/02
File: ch1-UsingtheH2200.fm PN: 293146-001
2. Tap the System tab.
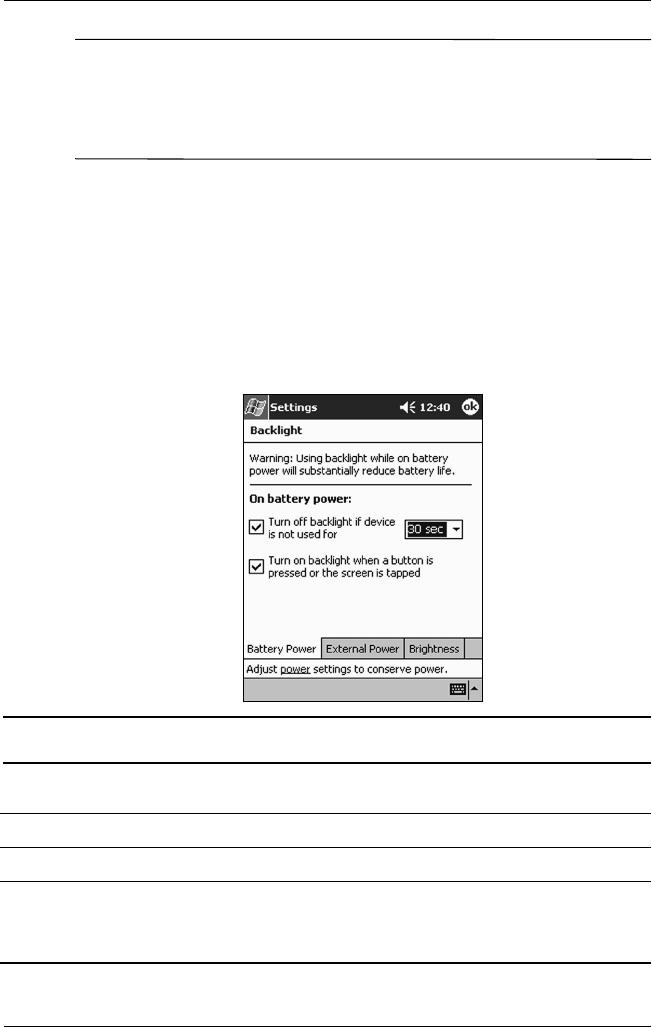
3. Tap the Power icon.
4. Drag the pointer to adjust the standby period.
NEED NEW SCREENSHOT
1–24 Reference Guide
Using Your hp iPAQ h2200 Series
DRAFT - Revised 10/16/02
hp CONFIDENTIAL 12/3/02
File: ch1-UsingtheH2200.fm PN: 293146-001
✎A lower Standby Period setting increases the usable battery time.
A higher Standby Period setting decreases the usable battery time
and increases the Standby power to help preserve programs and
data in RAM.
Changing the Backlight Settings
To conserve more battery power, change the backlight settings by
completing the following instructions:
1. From the Start menu, tap Settings > System tab >
Backlight.
2. Select the backlight settings.
Changing the Backlight Settings
On the... Select when to use the...
Battery Power tab Backlight on battery power.
External Power tab Backlight on external power.
Brightness tab Appropriate level of backlight.
Slide the bar to the lowest level to conserve the
most power.

Using Your hp iPAQ h2200 Series
Reference Guide 1–25
DRAFT - Revised 10/16/02
hp CONFIDENTIAL 12/3/02
File: ch1-UsingtheH2200.fm PN: 293146-001
Manually Monitoring the Battery
To manually monitor the battery power:
1. From the Start menu, tap Settings.
2. Tap the System tab, then tap Power.
3. Tap OK.

1–26 Reference Guide
Using Your hp iPAQ h2200 Series
DRAFT - Revised 10/16/02
hp CONFIDENTIAL 12/3/02
File: ch1-UsingtheH2200.fm PN: 293146-001
Entering Information
To enter information such as letters, symbols, and numbers on the
iPAQ h2200 Series screen:
■Tap the Keyboard
■Write with the stylus and use the Letter Recognizer,
Microsoft Transcriber (See Note below), or Block
Recognizer to create text
■Draw and write with the stylus
✎The Microsoft Transcriber program is included on the HP iPAQ
h2200 Companion CD and must be installed on the h2200 unit
before it can be used.
You can tap the keyboard or write with the Letter Recognizer,
Microsoft Transcriber, or Block Recognizer in any application.
Use the stylus to draw and write on the screen in the Notes
application and from any Notes tab in the Calendar, Contacts, and
Tasks applications.
✎As you type or write, the iPAQ h2200 Series suggests words for
you in a box above the Keyboard, Letter Recognizer, or Block
Recognizer but not in Transcriber. You can determine when the
suggestions occur (for example, decide how many letters you
must enter before suggestions are made) and how many words are
suggested.
Changing Word Suggestion Options
You can determine:
■If words are suggested
■The number of letters you must enter before a word is
suggested
Using Your hp iPAQ h2200 Series
Reference Guide 1–27
DRAFT - Revised 10/16/02
hp CONFIDENTIAL 12/3/02
File: ch1-UsingtheH2200.fm PN: 293146-001
■The number of words that are suggested per entry
■If you do not want any words suggested, remove the
checkmark by tapping the check box next to “Suggest Words
When Entering Text.”
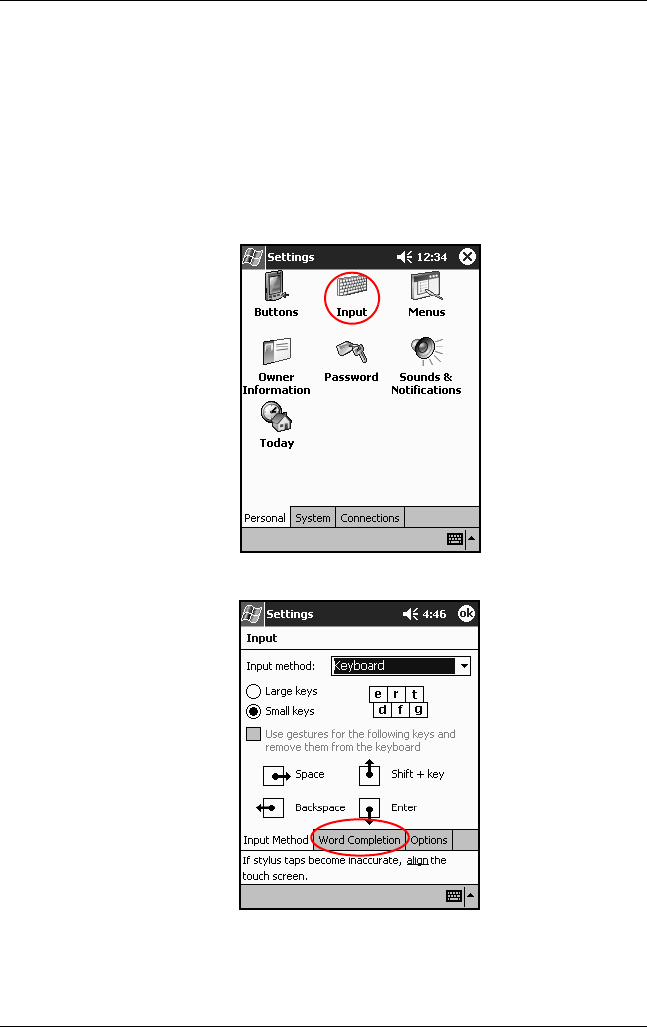
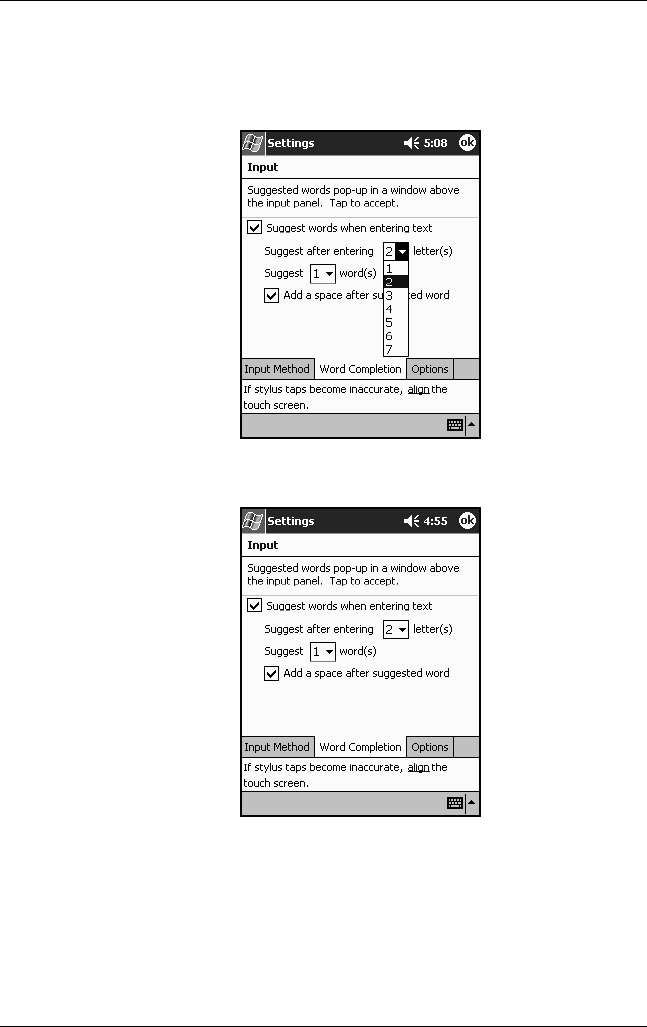
To change word suggestions:
1. From the Start menu, tap Settings > Input.
2. Tap the Word Completion tab.
1–28 Reference Guide
Using Your hp iPAQ h2200 Series
DRAFT - Revised 10/16/02
hp CONFIDENTIAL 12/3/02
File: ch1-UsingtheH2200.fm PN: 293146-001
3. Determine how many letters to type before a suggestion is
made, then tap the down arrow associated with letters and
select the number.
4. Determine how many words to be suggested, then tap the
down arrow associated with words and select the number.
5. Tap OK.
Using Your hp iPAQ h2200 Series
Reference Guide 1–29
DRAFT - Revised 10/16/02
hp CONFIDENTIAL 12/3/02
File: ch1-UsingtheH2200.fm PN: 293146-001
Using the On-Screen Keyboard
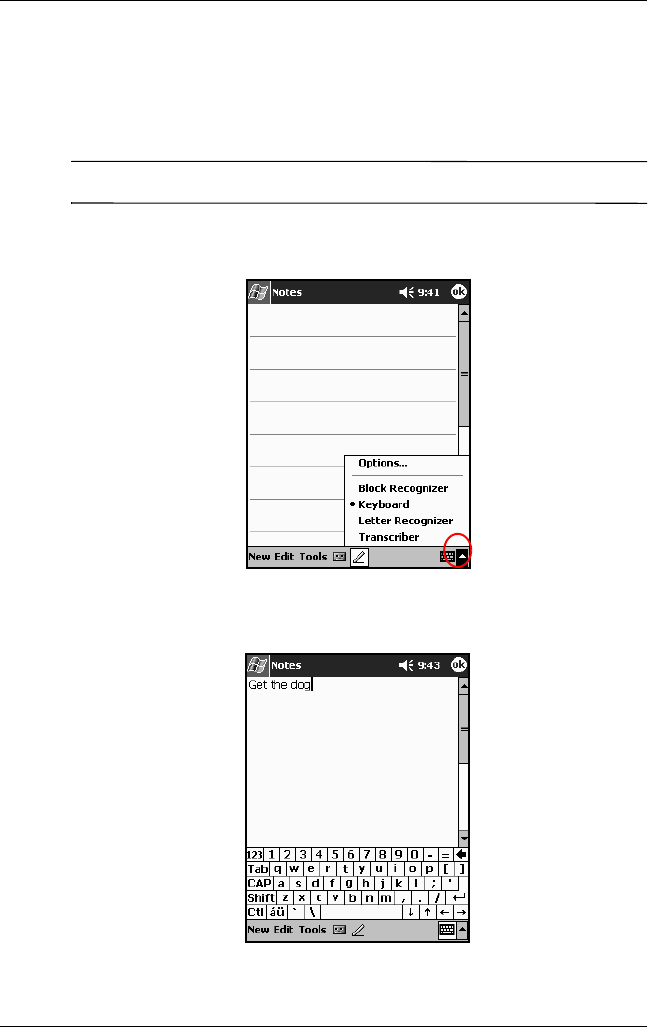
Use the stylus to tap letters, numbers, and symbols on the
on-screen keyboard to enter typed text directly on the screen.
✎To see the symbols, tap the 123 or Shift key.
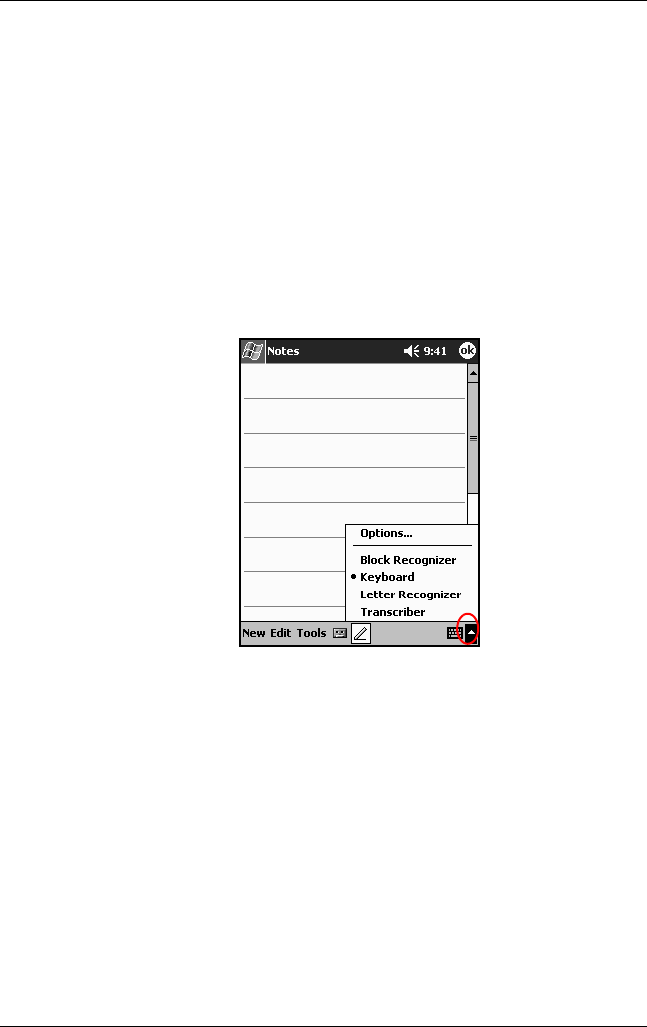
1. From any application, tap the up arrow next to the Input
Panel icon.
2. Tap the Keyboard to display a keyboard on the screen.
3. Tap a letter, symbol, or number to enter information.
4. Tap OK.
1–30 Reference Guide
Using Your hp iPAQ h2200 Series
DRAFT - Revised 10/16/02
hp CONFIDENTIAL 12/3/02
File: ch1-UsingtheH2200.fm PN: 293146-001
Writing with the Stylus and the Letter
Recognizer
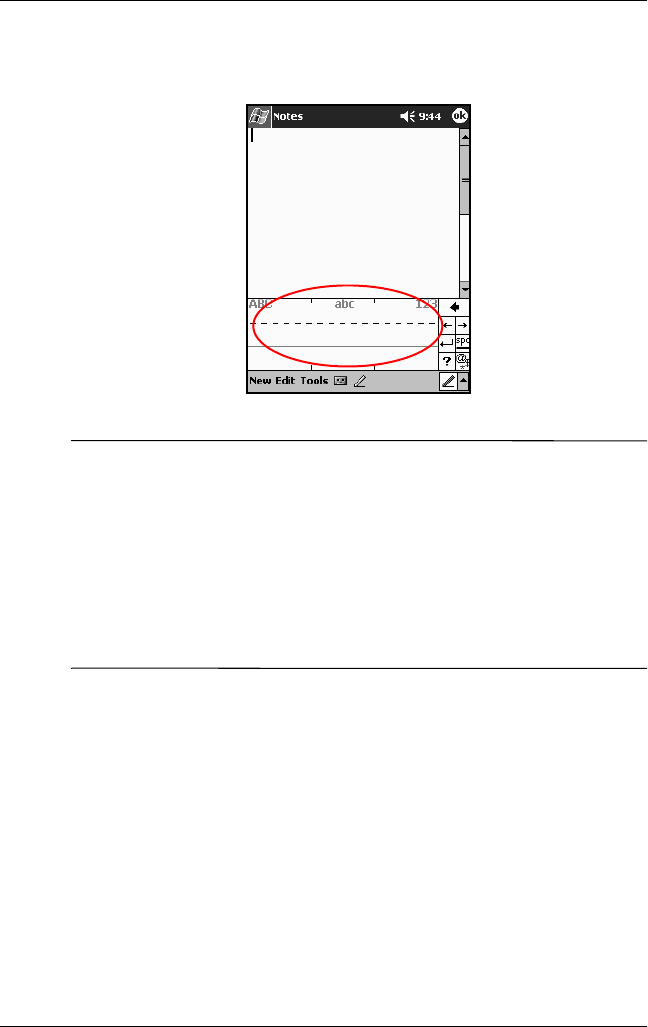
Use the stylus and Letter Recognizer to write letters, numbers,
and symbols on the screen. Create words and sentences by
writing in upper case (ABC), lower case (abc), and symbols (123)
in specific areas.
To write with the stylus and letter recognizer:
1. From any application, tap the up arrow next to the Input
Panel button.
2. Tap Letter Recognizer.
3. Write a letter or symbol between the dashed line and
baseline.
a. Write a letter between the hatch marks labeled ABC to
display in upper case.
b. Write a letter between the hatch marks labeled abc to
display in lower case.
Using Your hp iPAQ h2200 Series
Reference Guide 1–31
DRAFT - Revised 10/16/02
hp CONFIDENTIAL 12/3/02
File: ch1-UsingtheH2200.fm PN: 293146-001
c. Write a number or symbol between the hatch marks
labeled 123.
✎For the character recognizer to work effectively, write characters
between the dashed line and baseline.
■If you are writing a letter like “p,” write the top portion
within the dashed line and baseline, and the tail portion
below the baseline.
■If you writing a letter like “b,” write the bottom portion
within the dashed line and baseline, and the top portion
above the dashed line.
4. What you write will be converted to text.
Writing with the Stylus and
Microsoft Transcriber
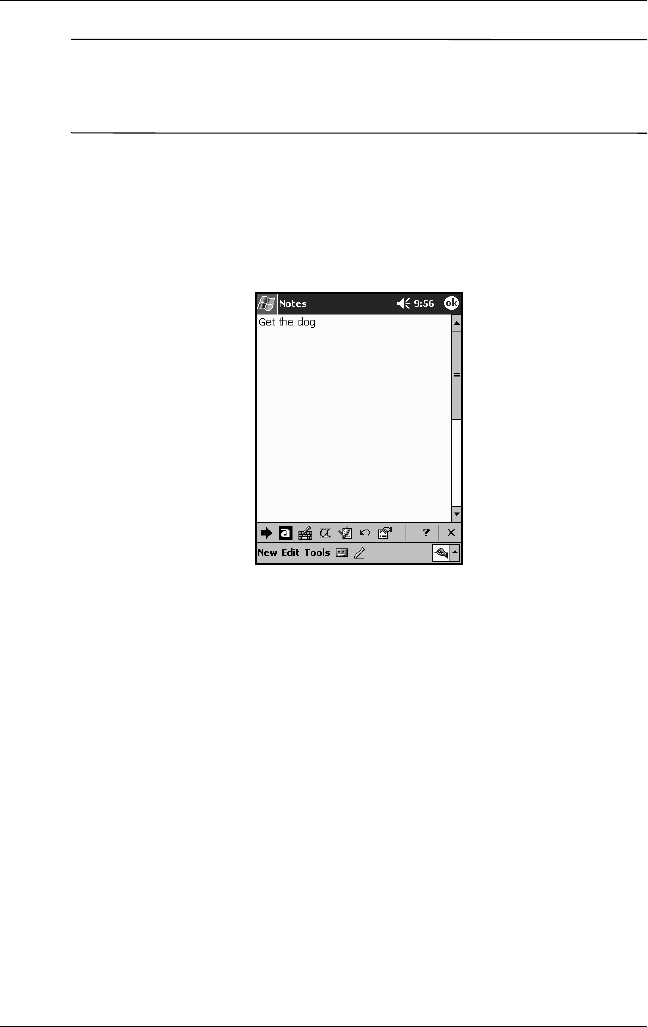
Use the stylus and Microsoft Transcriber to write words, letters,
numbers, and symbols anywhere on the screen.
1–32 Reference Guide
Using Your hp iPAQ h2200 Series
DRAFT - Revised 10/16/02
hp CONFIDENTIAL 12/3/02
File: ch1-UsingtheH2200.fm PN: 293146-001
✎The Microsoft Transcriber program is included on the HP iPAQ
h2200 Series Companion CD and must be installed on the h2200
unit before it can be used.
1. From any application, tap the up arrow next to the Input
Panel button.
2. Tap Transcriber.
3. Write on the screen. What you write will be converted to text.
Writing with the Stylus and Block
Recognizer
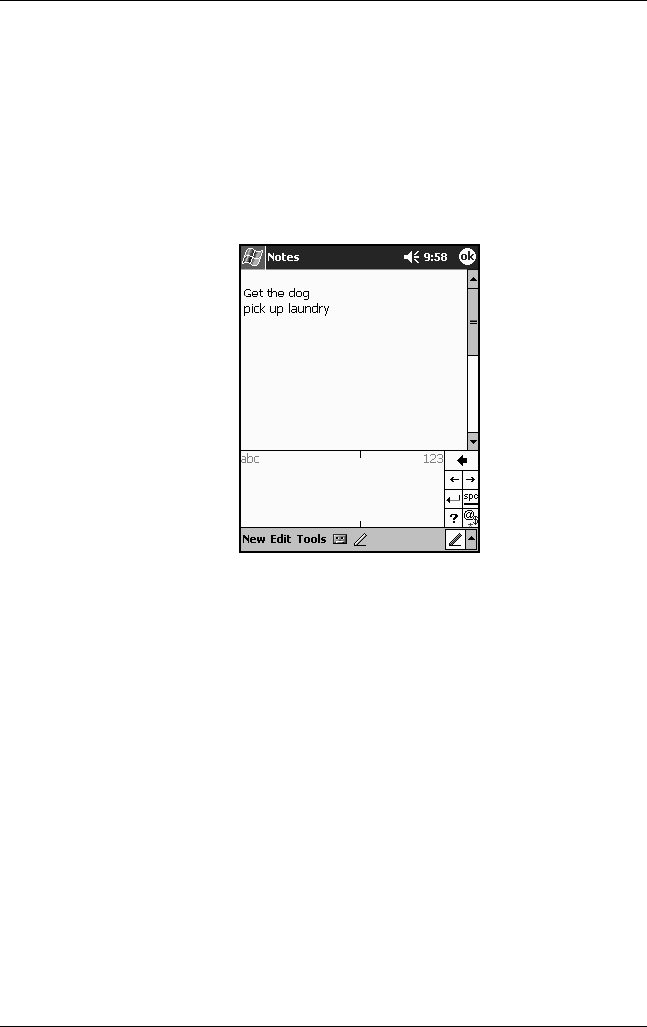
Write letters, numbers, and symbols using the stylus and Block
Recognizer. Create words and sentences by writing letters and
numbers in specific areas.
1. From any application, tap the up arrow next to the Input
Panel button.
2. Tap Block Recognizer.
Using Your hp iPAQ h2200 Series
Reference Guide 1–33
DRAFT - Revised 10/16/02
hp CONFIDENTIAL 12/3/02
File: ch1-UsingtheH2200.fm PN: 293146-001
3. Write a word, letter, or symbol between the hatch marks.
a. Write a letter between the hatch marks labeled “abc” to
type text.
b. Write a number or symbol between the hatch marks
labeled “123” to type numbers or symbols.
What you write will be converted to text.
1–34 Reference Guide
Using Your hp iPAQ h2200 Series
DRAFT - Revised 10/16/02
hp CONFIDENTIAL 12/3/02
File: ch1-UsingtheH2200.fm PN: 293146-001
Drawing and Writing on the Screen
Use the stylus as a pen to draw and write on the screen in the
Notes application or from the Notes tab in Calendar, Contacts, or
Tasks.
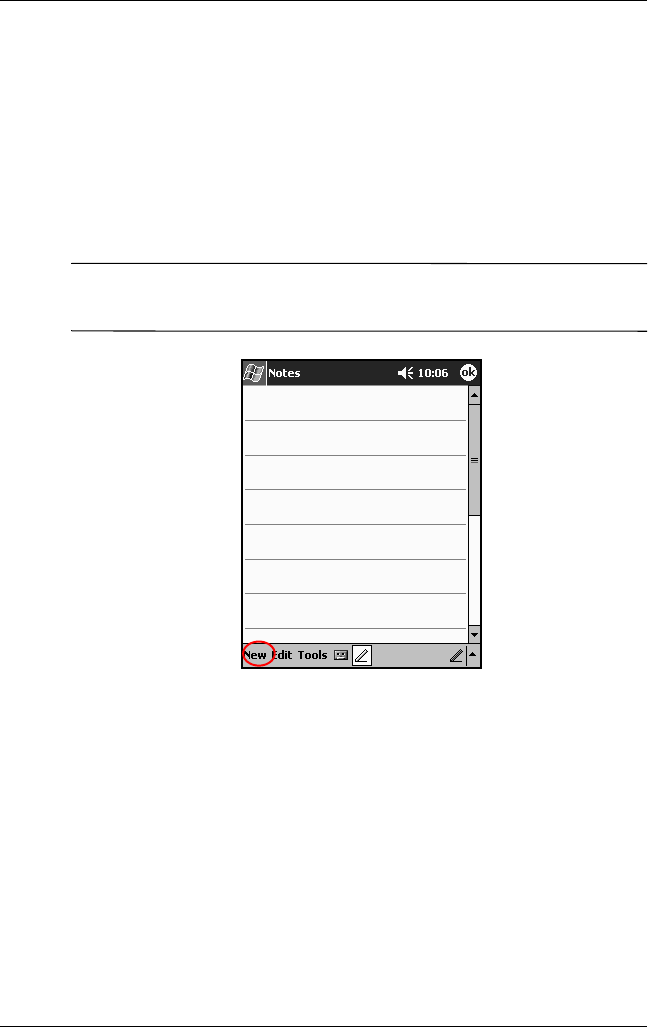
1. From the Start menu, tap Notes.
2. Tap New.
✎Otherwise, tap the Notes tab in Calendar, Contacts, or Tasks, then
tap the Pen icon.

Using Your hp iPAQ h2200 Series
Reference Guide 1–35
DRAFT - Revised 10/16/02
hp CONFIDENTIAL 12/3/02
File: ch1-UsingtheH2200.fm PN: 293146-001
3. Draw and write on the screen.
4. Tap the Pen icon.
5. Tap OK.
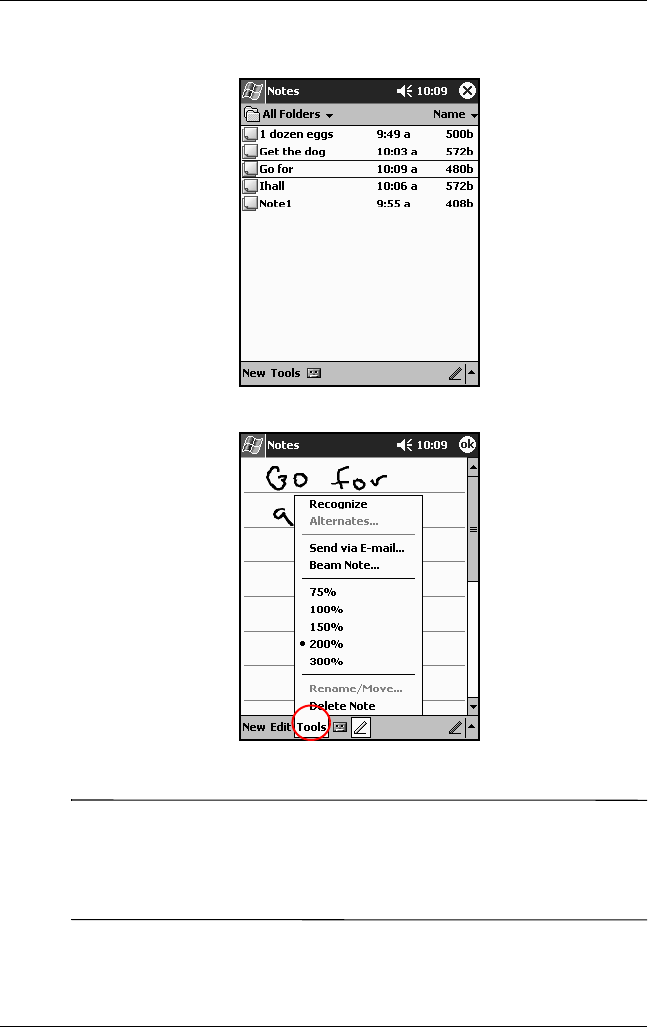
Converting Writing to Text
Convert your writing to text when you write with the stylus in the
Notes application or from the Notes tab in:
■Calendar
■Contacts
■Tasks
To convert writing to text:
1. From the Start menu, tap Notes.
✎Otherwise, tap the Notes tab in Calendar, Contacts, or Tasks.
1–36 Reference Guide
Using Your hp iPAQ h2200 Series
DRAFT - Revised 10/16/02
hp CONFIDENTIAL 12/3/02
File: ch1-UsingtheH2200.fm PN: 293146-001
2. Tap a note to open it.
3. Tap Tools.
4. Tap Recognize.
✎To convert a particular word or phrase, highlight it before you tap
Recognize. If you select more than one word and one is not
recognized, all the other words will be converted. The
unrecognized word will remain written.

Using Your hp iPAQ h2200 Series
Reference Guide 1–37
DRAFT - Revised 10/16/02
hp CONFIDENTIAL 12/3/02
File: ch1-UsingtheH2200.fm PN: 293146-001
.
5. Tap OK.
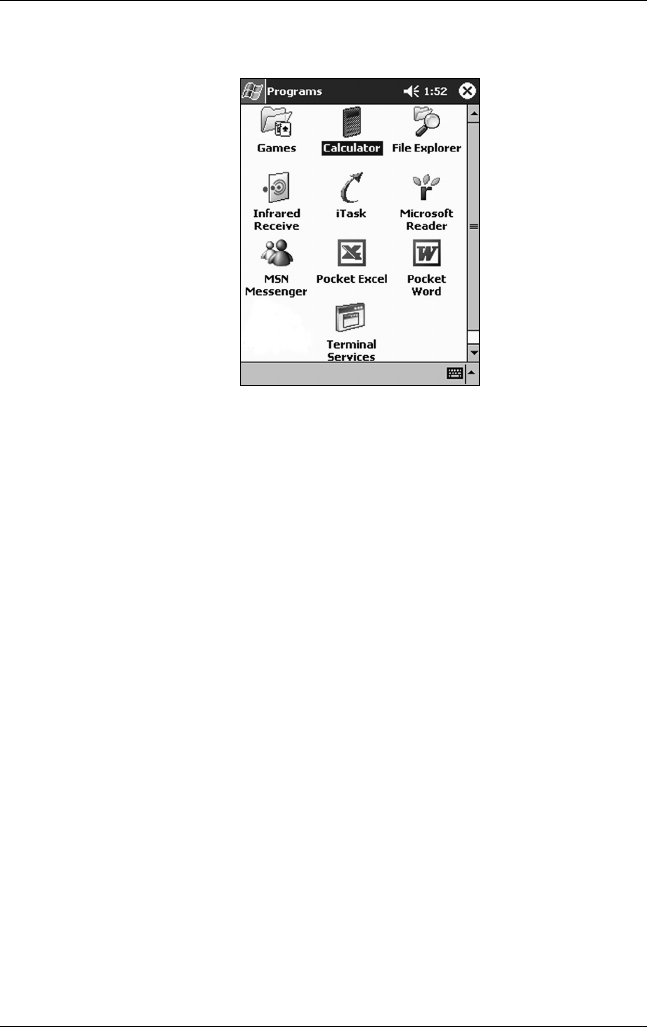
Using Applications
Opening Applications
Open any application on your iPAQ h2200 Series from the Start
menu.
✎You can also open an application by assigning it to an application
button.
To open an application:
1. Tap Start or the Microsoft logo.
2. Tap Programs.
1–38 Reference Guide
Using Your hp iPAQ h2200 Series
DRAFT - Revised 10/16/02
hp CONFIDENTIAL 12/3/02
File: ch1-UsingtheH2200.fm PN: 293146-001
3. Tap the desired application title or icon.
Minimizing Applications
To minimize an open application, tap the x at the top right of the
screen.
Closing Applications
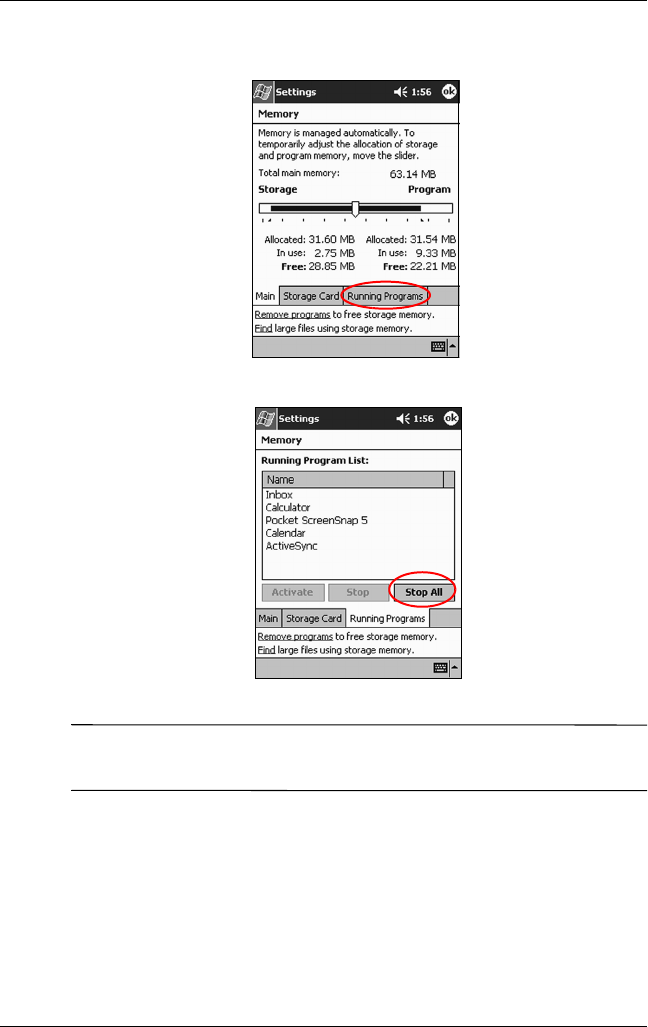
Applications automatically close based on available memory.
However, if your iPAQ h2200 Series is running slowly, you can
manually close applications by completing the following
instructions:
1. From the Start menu, tap Settings > System tab > Memory.
Using Your hp iPAQ h2200 Series
Reference Guide 1–39
DRAFT - Revised 10/16/02
hp CONFIDENTIAL 12/3/02
File: ch1-UsingtheH2200.fm PN: 293146-001
2. Tap Running Programs.
3. Tap Stop All or select a particular application, then tap Stop.
✎To reactivate the programs, repeat the procedure and tap Activate
instead of Stop or Stop All.
Installing Applications
Install applications on your iPAQ h2200 Series from your:
■Computer by using Microsoft ActiveSync
■iPAQ h2200 Series if the application file has a .cab extension

1–40 Reference Guide
Using Your hp iPAQ h2200 Series
DRAFT - Revised 10/16/02
hp CONFIDENTIAL 12/3/02
File: ch1-UsingtheH2200.fm PN: 293146-001
■ iPAQ h2200 Series or your computer by copying an
application file that has an .exe or .cef extension
When installing applications, look for the correct version for the
iPAQ h2200 Series.
■Follow the instructions provided with the application and by
the installation Wizard to install applications from your
computer.
■Tap the application file in File Explorer on your h2200 Series
and follow the instructions by the installation Wizard to
install applications from your h2200 Series.
Recording Your Voice
Record your voice or any other sound as a note within the
Calendar, Contacts, Notes, and Tasks applications. In the Notes
application, you can create stand-alone recordings, which are
stored as separate .wav files in File Explorer.
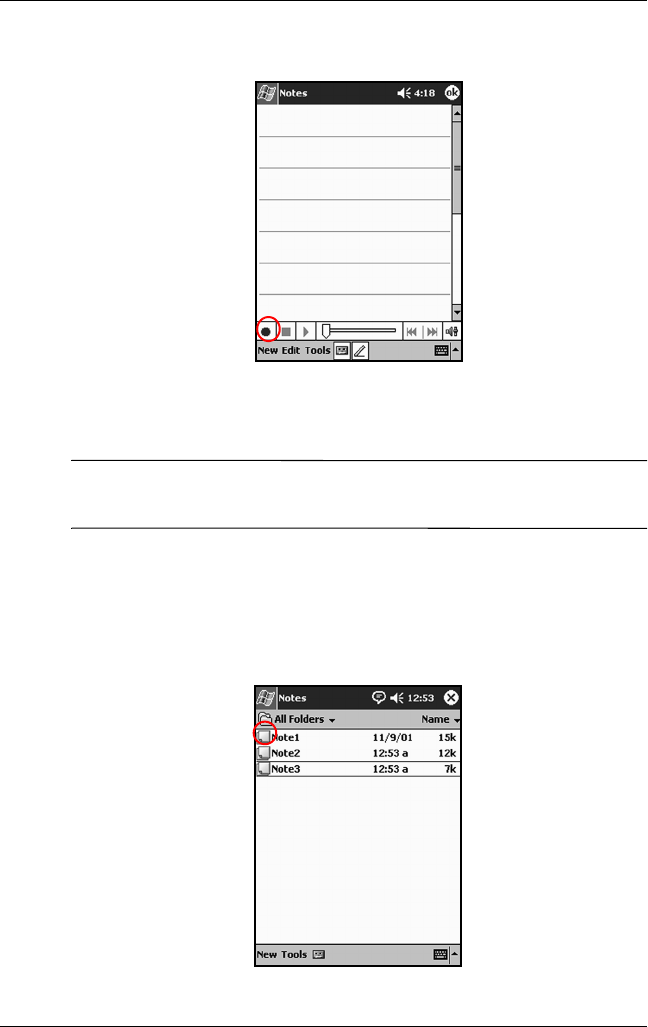
Making a Recording
1. From the Start menu, tap Notes.
2. Tap the cassette tape icon to see the recording controls.
Using Your hp iPAQ h2200 Series
Reference Guide 1–41
DRAFT - Revised 10/16/02
hp CONFIDENTIAL 12/3/02
File: ch1-UsingtheH2200.fm PN: 293146-001
3. Tap the Record icon to start recording.
4. Position the microphone to record your voice or other sound.
5. Tap the Stop icon to finish recording.
✎To adjust the recording volume, tap the Speaker icon in the upper
right corner of the screen.
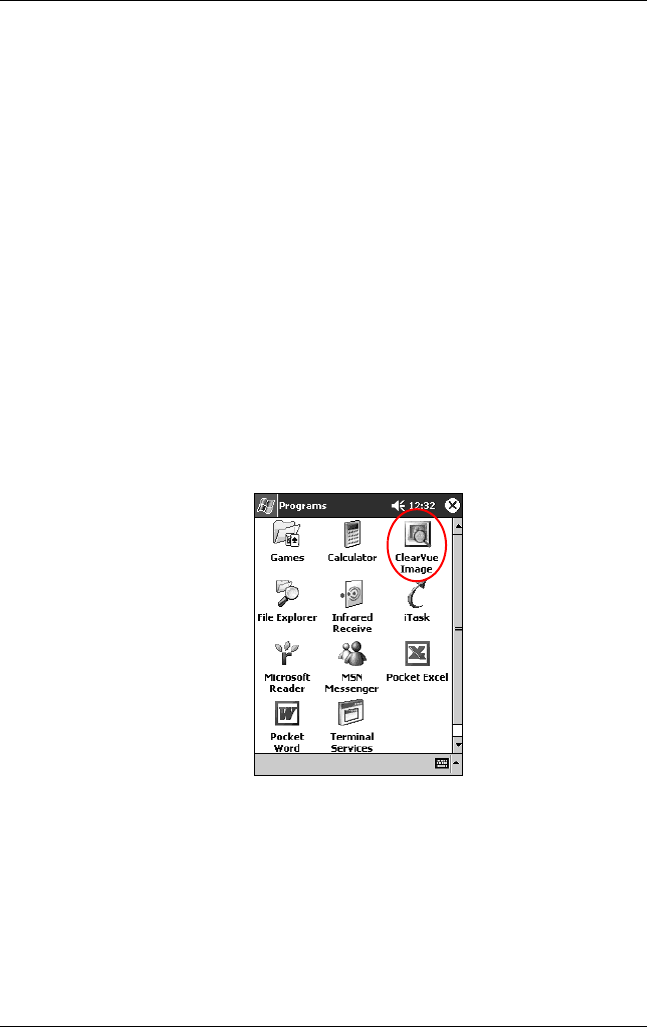
Listening to a Recording
1. From the Start menu, tap Notes.
2. Tap the appropriate Recording icon to listen to the recording.

1–42 Reference Guide
Using Your hp iPAQ h2200 Series
DRAFT - Revised 10/16/02
hp CONFIDENTIAL 12/3/02
File: ch1-UsingtheH2200.fm PN: 293146-001
3. When the recording is finished, tap OK.
Deleting a Recording
1. From the Start menu, tap Notes.
2. Tap and hold down on the recording to be deleted until a
screen menu displays under the note.
3. Tap Delete from the displayed screen menu.
Taking Notes
You can make notes in the Calendar, Contacts, Notes, and Tasks
applications. You can type, write, or draw in your note. In the
Notes application, you can create from a blank note or a note
based on a template.
You can create a note from the Start menu or Today screen.
Creating a note
1. From the Start menu, tap Notes.
2. Tap New.

Using Your hp iPAQ h2200 Series
Reference Guide 1–43
DRAFT - Revised 10/16/02
hp CONFIDENTIAL 12/3/02
File: ch1-UsingtheH2200.fm PN: 293146-001
3. Tap anywhere and use the keyboard to enter your note.
4. Tap OK to save your note and place it in the list of notes.
1–44 Reference Guide
Using Your hp iPAQ h2200 Series
DRAFT - Revised 10/16/02
hp CONFIDENTIAL 12/3/02
File: ch1-UsingtheH2200.fm PN: 293146-001
Viewing Images (This section may be
removed)
Use the Image Viewer to view BMP, JPEG, and PNG images.
Using the Image Viewer, you can:
■Create a slide show of images
■Sort and rotate images
■Adjust the timing between images in a show
■Set a variety of transition effects
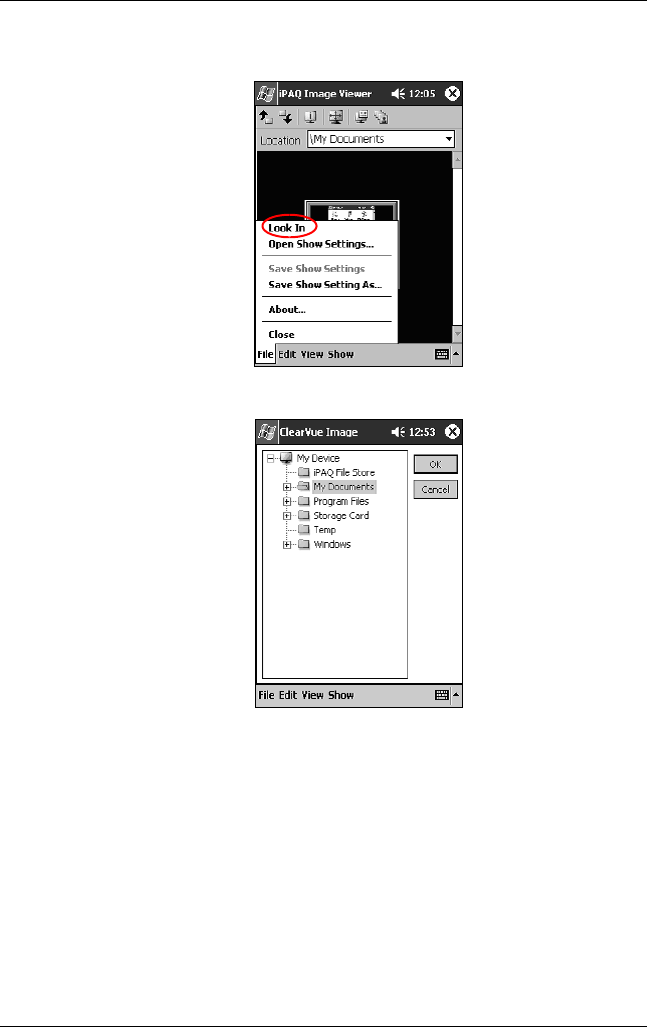
Locating an image (This program does not
exist)
1. From the Start menu, tap Programs > ClearVue Image.
Using Your hp iPAQ h2200 Series
Reference Guide 1–45
DRAFT - Revised 10/16/02
hp CONFIDENTIAL 12/3/02
File: ch1-UsingtheH2200.fm PN: 293146-001
2. Tap File, then Look In.
3. Select a file from the tree structure, then tap OK.
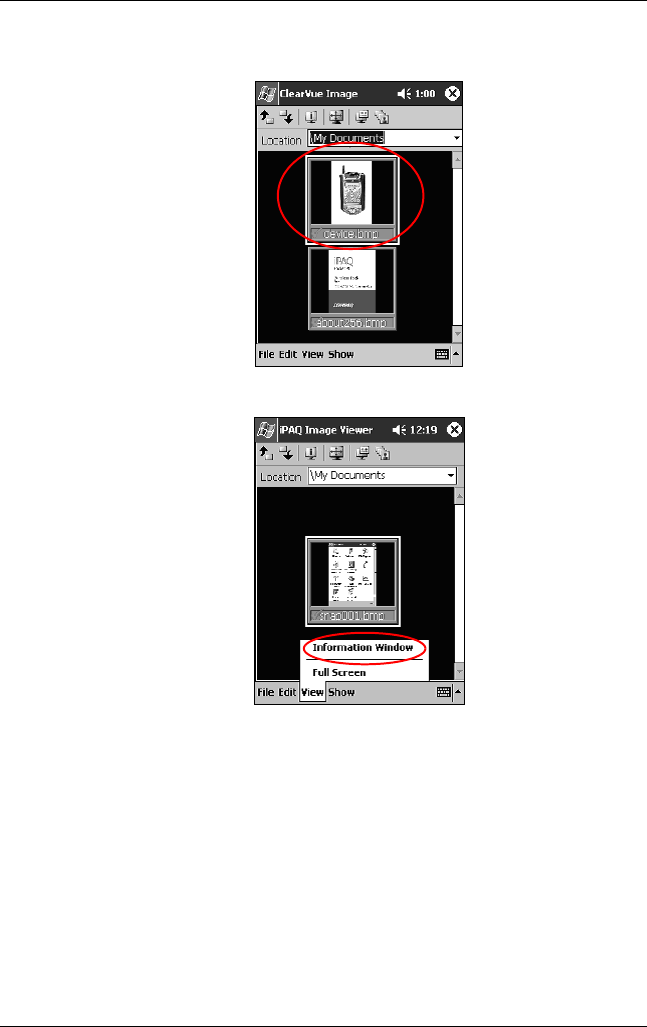
Viewing image information
To view the image size and type, date taken and modified, color,
and file size of an image:
1. Locate an image (see the section “Locating an image”).
1–46 Reference Guide
Using Your hp iPAQ h2200 Series
DRAFT - Revised 10/16/02
hp CONFIDENTIAL 12/3/02
File: ch1-UsingtheH2200.fm PN: 293146-001
2. Tap the image to select it.
3. Tap View, then Information Window.
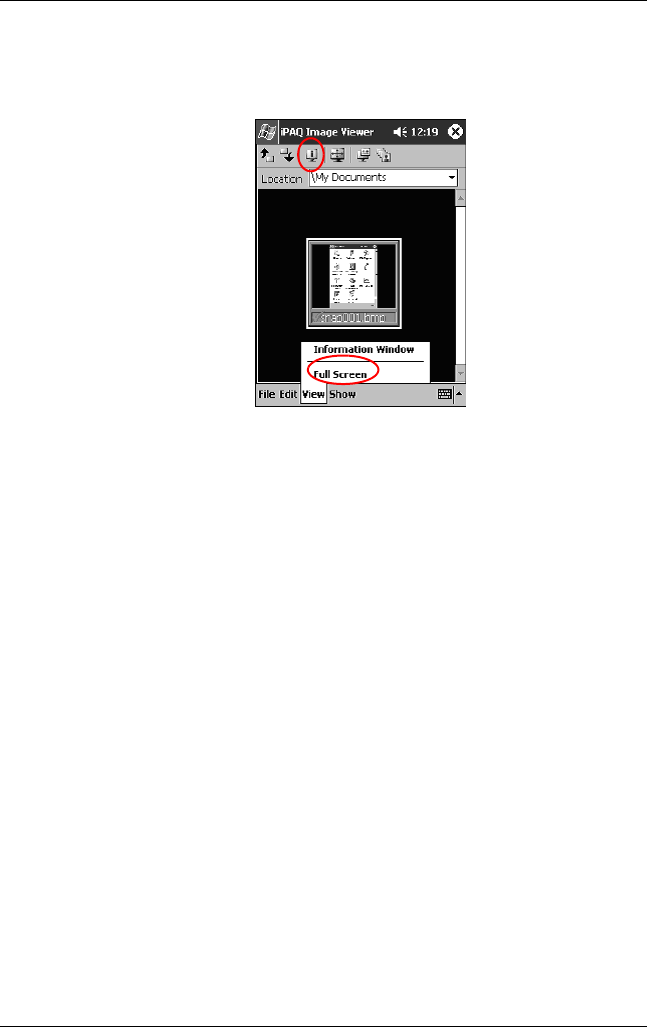
Changing the View
Images are displayed in the thumbnail view by default. The
Image Viewer opens showing the images in the Thumbnail
View. This is the default setting when opening images in the
Image Viewer.
Change the view to full screen by:
■Double-clicking a thumbnail
Using Your hp iPAQ h2200 Series
Reference Guide 1–47
DRAFT - Revised 10/16/02
hp CONFIDENTIAL 12/3/02
File: ch1-UsingtheH2200.fm PN: 293146-001
■Tapping View, then Full Screen
■Tapping the View Full Screen icon
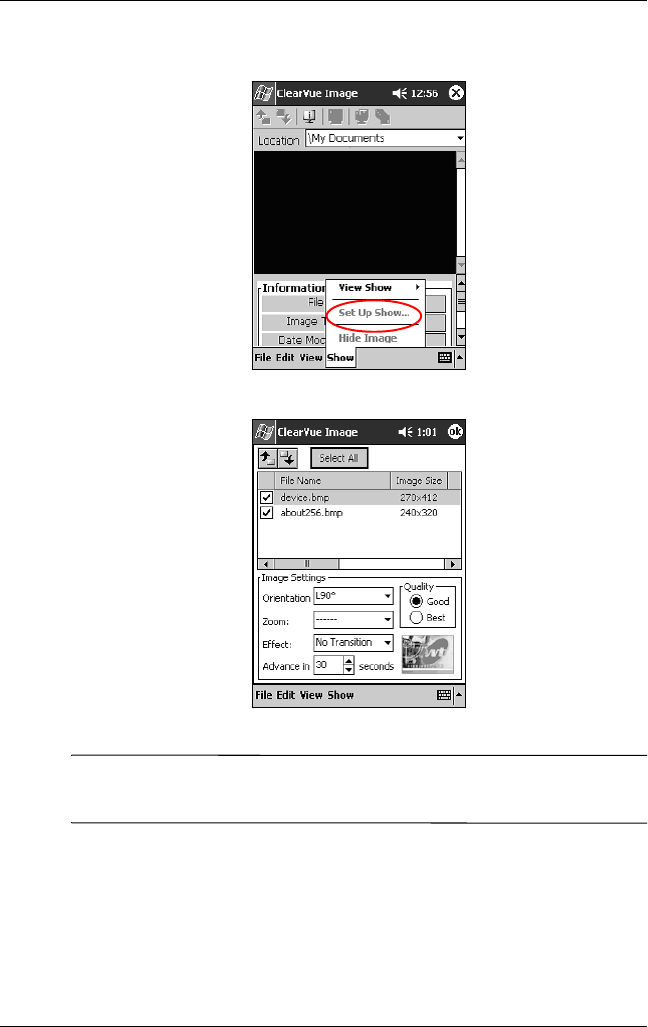
Creating a Slide Show
You can put images together to create a slide show and control
display options like:
■Orientation
■Zoom
■Image Quality
■Transition Effect
■Timing
1. From the Start menu, tap Programs > ClearVue Image.
1–48 Reference Guide
Using Your hp iPAQ h2200 Series
DRAFT - Revised 10/16/02
hp CONFIDENTIAL 12/3/02
File: ch1-UsingtheH2200.fm PN: 293146-001
2. Tap Show, then Set up Show....
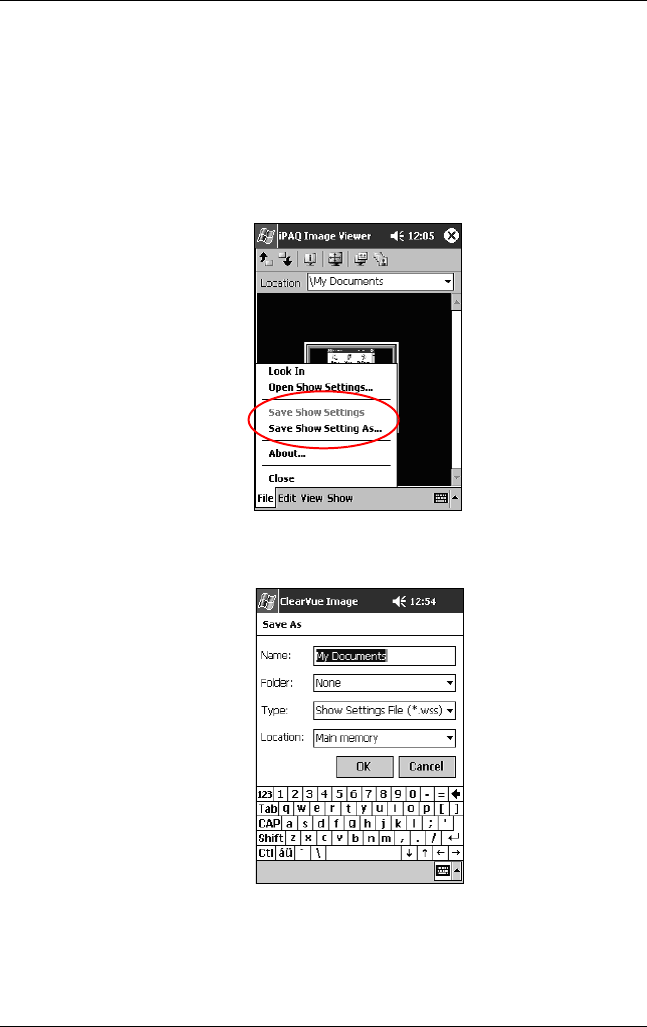
3. Select images for the show and modify any image settings.
✎To change settings for all images in the show, click the Select All
button.
4. Tap OK.
Using Your hp iPAQ h2200 Series
Reference Guide 1–49
DRAFT - Revised 10/16/02
hp CONFIDENTIAL 12/3/02
File: ch1-UsingtheH2200.fm PN: 293146-001
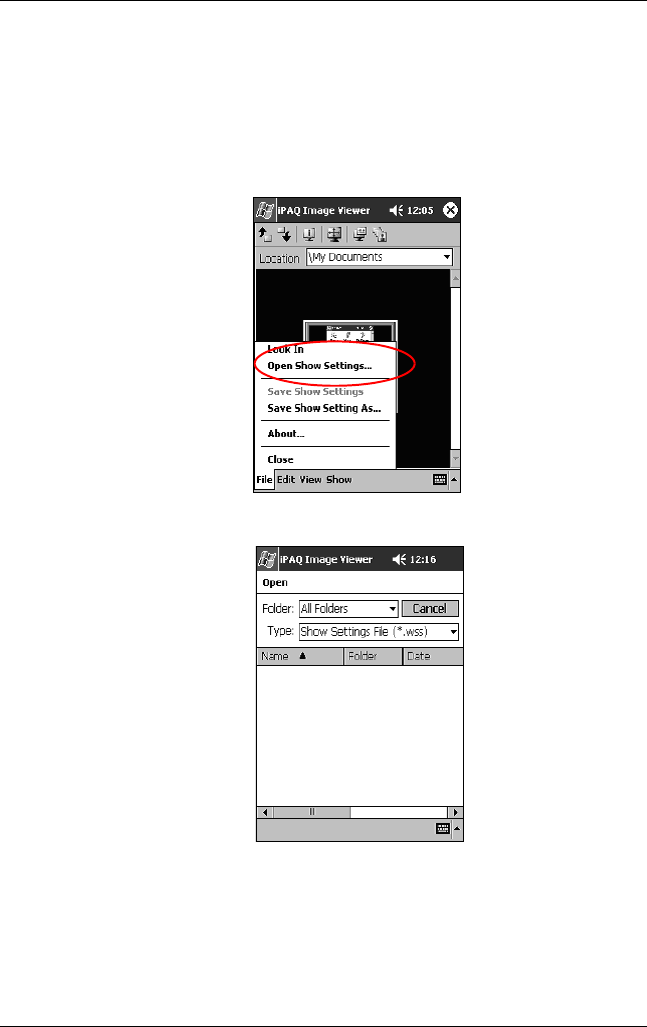
Saving a Slide Show
To save the show settings and use them again.
1. From the Start menu, tap Programs > ClearVue Image.
2. Tap File, then tap Save Show Settings or Save Show
Settings As.
3. Enter the Name and Location where you want to save the
settings.
4. Tap OK.
1–50 Reference Guide
Using Your hp iPAQ h2200 Series
DRAFT - Revised 10/16/02
hp CONFIDENTIAL 12/3/02
File: ch1-UsingtheH2200.fm PN: 293146-001
Opening a Slide Show
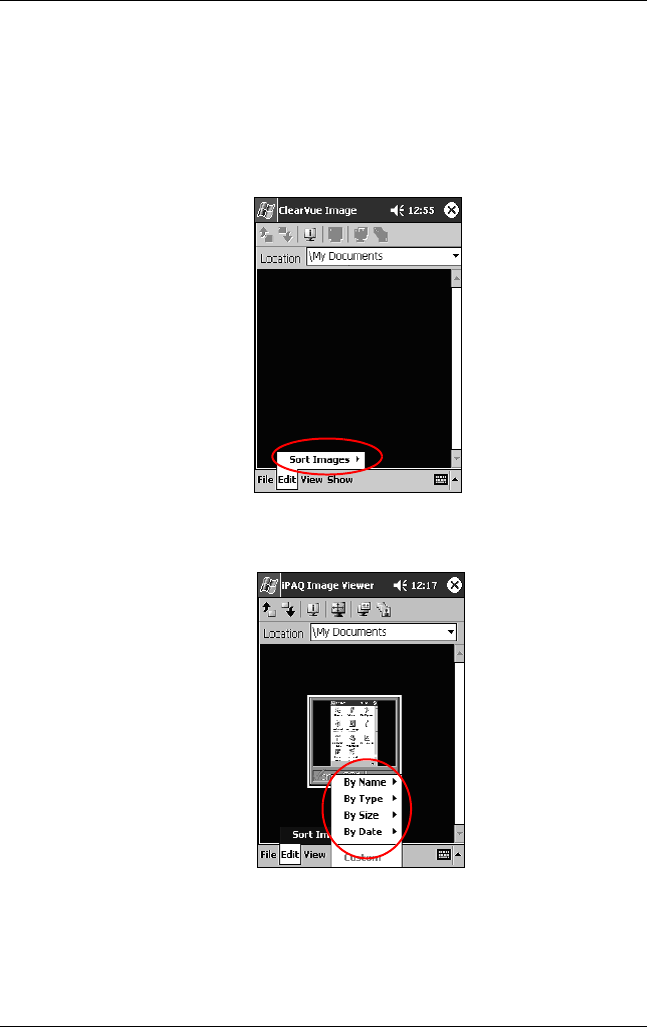
To open a previously saved slide show:
1. From the Start menu, tap Programs > ClearVue Image.
2. Tap File, then Open Show Settings...
3. Select the show setting.
Using Your hp iPAQ h2200 Series
Reference Guide 1–51
DRAFT - Revised 10/16/02
hp CONFIDENTIAL 12/3/02
File: ch1-UsingtheH2200.fm PN: 293146-001
Sorting Image Files
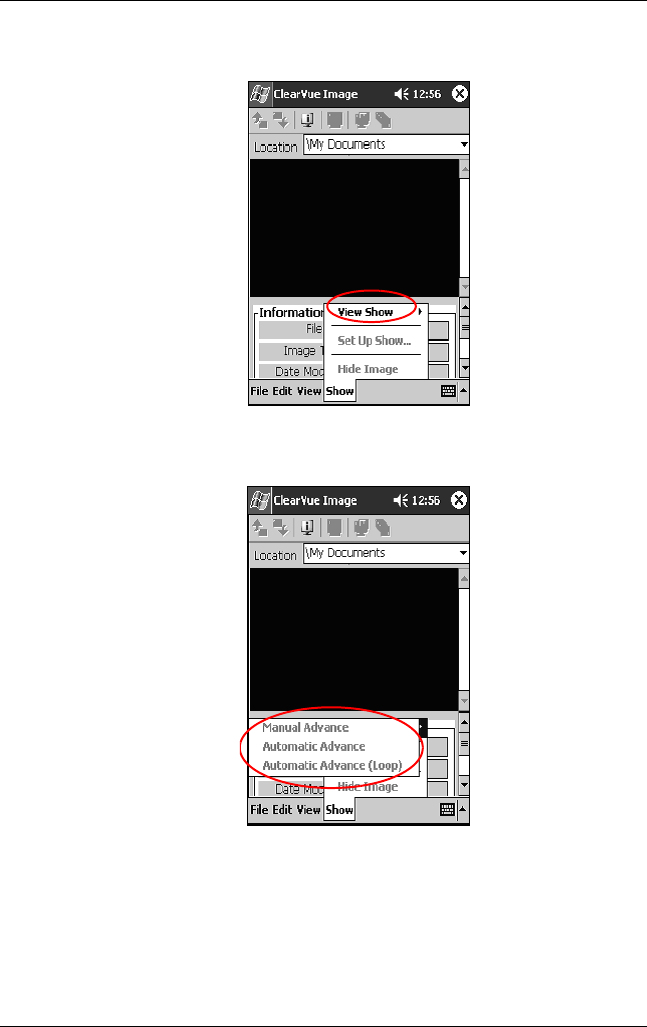
To sort images in the show:
1. From the Start menu, tap Programs > ClearVue Image.
2. Tap Edit, then Sort Images.
3. Select sort order. You can sort by ascending or descending
Name, Type, Size, or Date.
Viewing a Slide Show
1. From the Start menu, tap Programs > ClearVue Image.
1–52 Reference Guide
Using Your hp iPAQ h2200 Series
DRAFT - Revised 10/16/02
hp CONFIDENTIAL 12/3/02
File: ch1-UsingtheH2200.fm PN: 293146-001
2. Tap Show, then View Show.
3. Select how to advance the images in the show. You can select
to manually advance, automatically advance, or use a loop.

DRAFT - Revised 10/16/02
Reference Guide 2–1
hp CONFIDENTIAL 11/27/02
File: ch2-Connecting.fm PN: 293146-001
2
Connecting
Use your HP iPAQ h2200 Series to:
■Connect to a computer
■Communicate with other devices
■Connect to the Internet or your network
✎Use Microsoft Pocket PC Connection Wizard to help set up your
connection preferences. The wizard is located on the companion
CD or at http://www.pocketpc.com .
The wizard installs on your personal computer desktop and
guides you through the setup process for several different types of
connections (for example, modem or Virtual Private Network.
Connecting to a Computer
Connect the iPAQ h2200 Series to your computer using Microsoft
ActiveSync and the synchronization cable, the synchronization
cradle, or a wireless infrared connection.
✎You must have Microsoft Outlook 2000 to operate your h2200
Series Pocket PC using Microsoft ActiveSync on your computer.
If you do not have Outlook, install the Microsoft Outlook
software from the HP iPAQ h2200 Series Companion CD.
Microsoft Outlook Express will not work with the iPAQ h2200
Series and ActiveSync.

2–2 Reference Guide
Connecting
DRAFT - Revised 10/16/02
hp CONFIDENTIAL 11/27/02
File: ch2-Connecting.fm PN: 293146-001
Use Microsoft ActiveSync to:
■Synchronize information manually or automatically with
applications on your computer
■Synchronize information on your server while connected to
your computer
■Move files to and from your computer
■Install applications on your iPAQ h2200 unit
■Back up and restore information on your computer using the
Microsoft ActiveSync Backup/Restore utility
Synchronizing with Your Computer
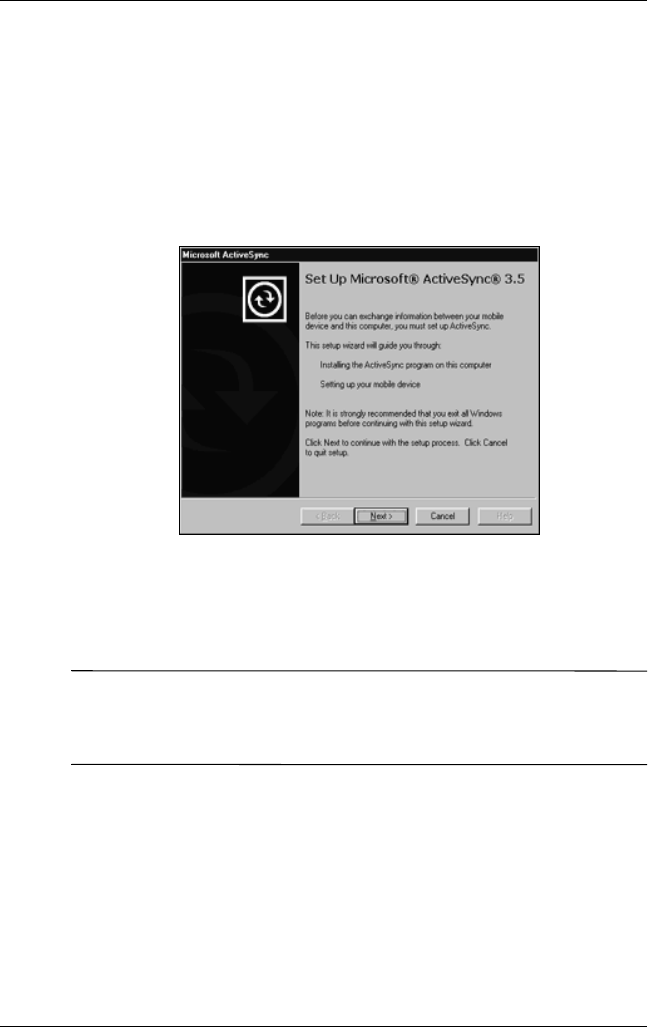
ÄCAUTION: For synchronization to work properly, install Microsoft
ActiveSync on your host computer before you connect your iPAQ
h2200 unit to your computer.
During ActiveSync installation, you can:
■Create partnerships which enable you to synchronize
information with multiple computers.
■Select information to be synchronized with your iPAQ h2200
(for example, Contacts, Calendar, Inbox, Tasks, Favorites,
Files, Notes, and AvantGo).
✎If you select to synchronize files, you can drag and drop the
selected files from your computer to the synchronized folder on
your iPAQ h2200 desktop. If you named your h2200 unit “PC1”
when you created your partnership, then the synchronized folder
is named “PC1.” When you synchronize, the files move to your
iPAQ h2200.
Connecting
Reference Guide 2–3
DRAFT - Revised 10/16/02
hp CONFIDENTIAL 11/27/02
File: ch2-Connecting.fm PN: 293146-001
To install Microsoft ActiveSync to your host computer:
1. Insert the iPAQ h2200 Companion CD into the CD tray or
slot on your computer.
2. Select the link to install Microsoft ActiveSync.
3. Follow the instructions in the installation wizard. For more
help, click the ActiveSync Help button during installation.
The information you select will automatically synchronize
when your installation is complete.
Synchronizing Options
✎Be sure Microsoft ActiveSync has been installed on your host
computer before you connect your iPAQ h2200 Series to your
host computer.
After installing ActiveSync on your host computer, connect the
h2200 Series to the host computer using one of the following
options:
■Synchronization cable
■Synchronization cradle

2–4 Reference Guide
Connecting
DRAFT - Revised 10/16/02
hp CONFIDENTIAL 11/27/02
File: ch2-Connecting.fm PN: 293146-001
Using the Serial Infrared (IR) Connection
After setting up a connection with the USB/serial connector on
the synchronization cable or synchronization cradle, synchronize
your iPAQ h2200 and your computer using an infrared
connection if you have an infrared port or an infrared USB
adapter installed on your computer. The infrared connection
option works only on computers that have Microsoft Windows
98SE, Me, or 2000 operating systems installed.
To set up an infrared connection to a computer:
1. Synchronize with your computer using the synchronization
cable or cradle.
2. Follow your computer manufacturer’s instructions to install
and set up an infrared port.
3. From your computer, open Microsoft ActiveSync.
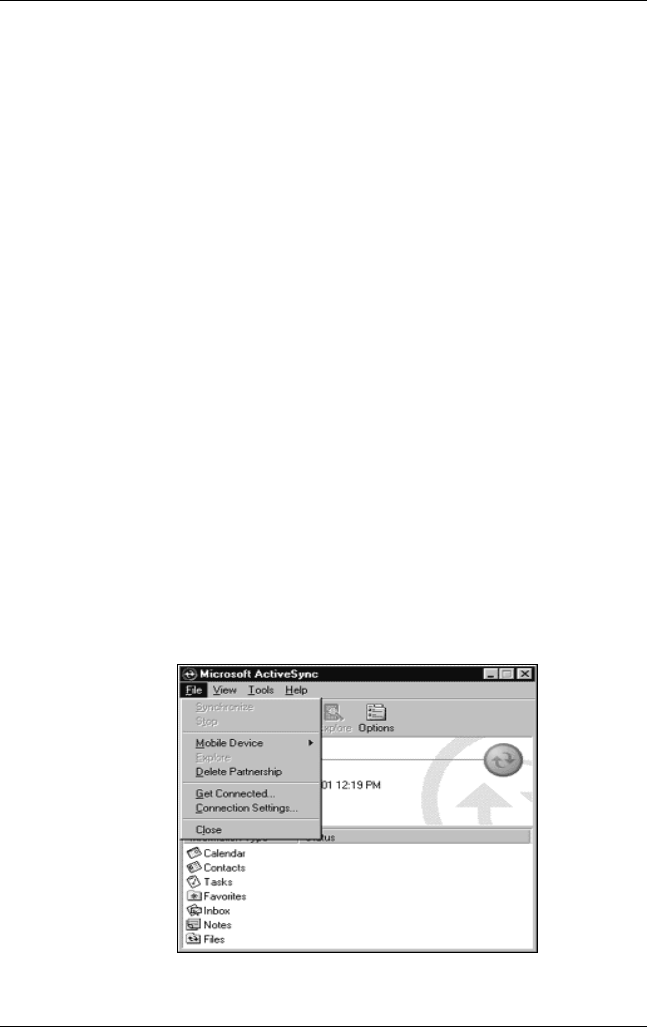
4. From the File menu, select Connection Settings.
5. Click “Allow serial cable or infrared connection to this COM
port.”
6. Click the OK button.
7. Click the down arrow and choose Infrared Port (IR).
✎Place your iPAQ h2200 infrared port next to the computer
infrared port so they are unobstructed and within 12 inches of
each other.
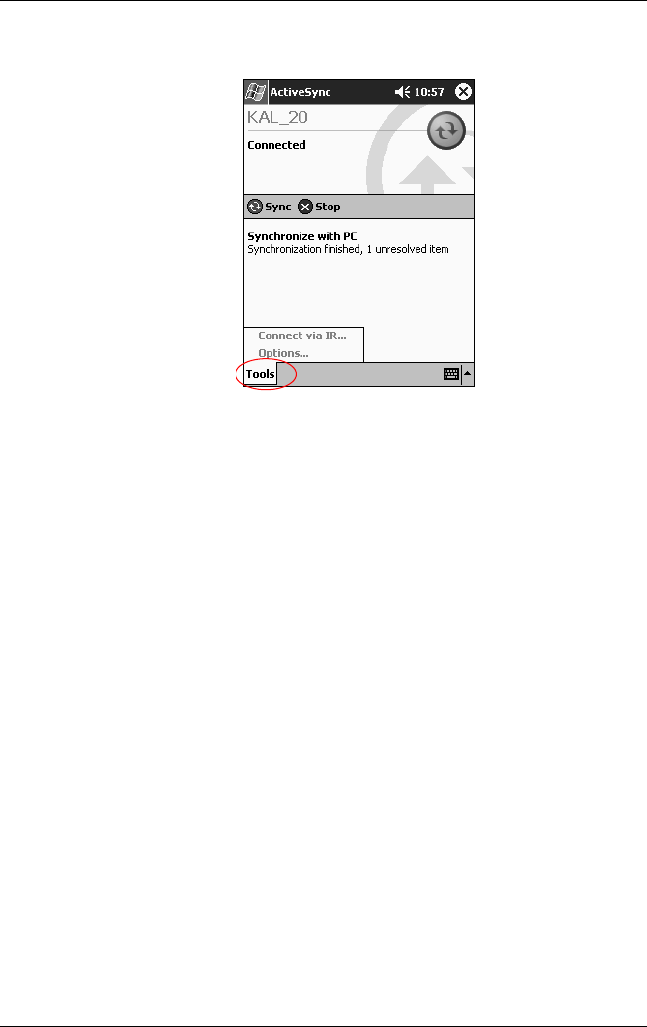
8. From the Start menu on your iPAQ h2200, tap ActiveSync.
Connecting
Reference Guide 2–5
DRAFT - Revised 10/16/02
hp CONFIDENTIAL 11/27/02
File: ch2-Connecting.fm PN: 293146-001
9. Tap Tools.
10. Tap Connect via IR.
11. Align the IR ports to establish a connection.
12. Move the devices away from each other to disconnect.
Changing Synchronization Settings
You can modify your synchronization settings for Microsoft
ActiveSync to:
■Change when your iPAQ h2200 synchronizes with your
computer
■Change when your iPAQ h2200 synchronizes with your
server
■Change the type of connection from your iPAQ h2200 to
your computer (for example, serial, USB, infrared
connections, or Bluetooth)
■Select the files and information to synchronize with your
computer
2–6 Reference Guide
Connecting
DRAFT - Revised 10/16/02
hp CONFIDENTIAL 11/27/02
File: ch2-Connecting.fm PN: 293146-001
■Select the files and information you do not want to
synchronize with your computer (for example, e-mail
attachments)
■Determine how conflicts between information on your
iPAQ h2200 and information on your computer are handled
To change synchronization settings:
1. From the Start menu on your computer, click Programs >
Microsoft ActiveSync.
2. From the Tools menu, click Options.
a. On the Sync Options tab, select the files and information
to synchronize with your computer.
b. On the Sync Mode tab, select when your iPAQ h2200
synchronizes with your computer.
c. On the Rules tab, determine how conflicts between
information on your iPAQ h2200 and information on
your computer are handled.
3. From the File menu, click Connection Settings. Select the
type of connection that will be allowed between the
iPAQ h2200 and the computer.
Connecting
Reference Guide 2–7
DRAFT - Revised 10/16/02
hp CONFIDENTIAL 11/27/02
File: ch2-Connecting.fm PN: 293146-001
Moving Files
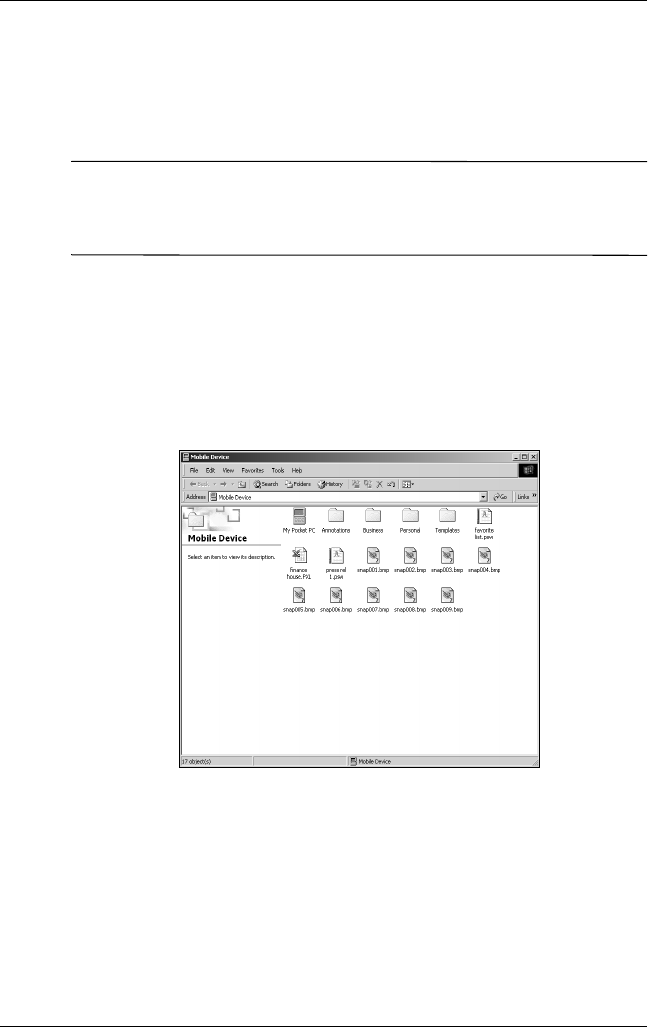
You can move files to and from your computer using Explore in
ActiveSync and Windows Explorer.
✎It is recommended that you store important information to the
iPAQ File Store folder located in File Explorer on your iPAQ
h2200 Series.
To move files:
1. From the Start menu on your computer, click Programs >
Microsoft ActiveSync.
2. Click Explore.
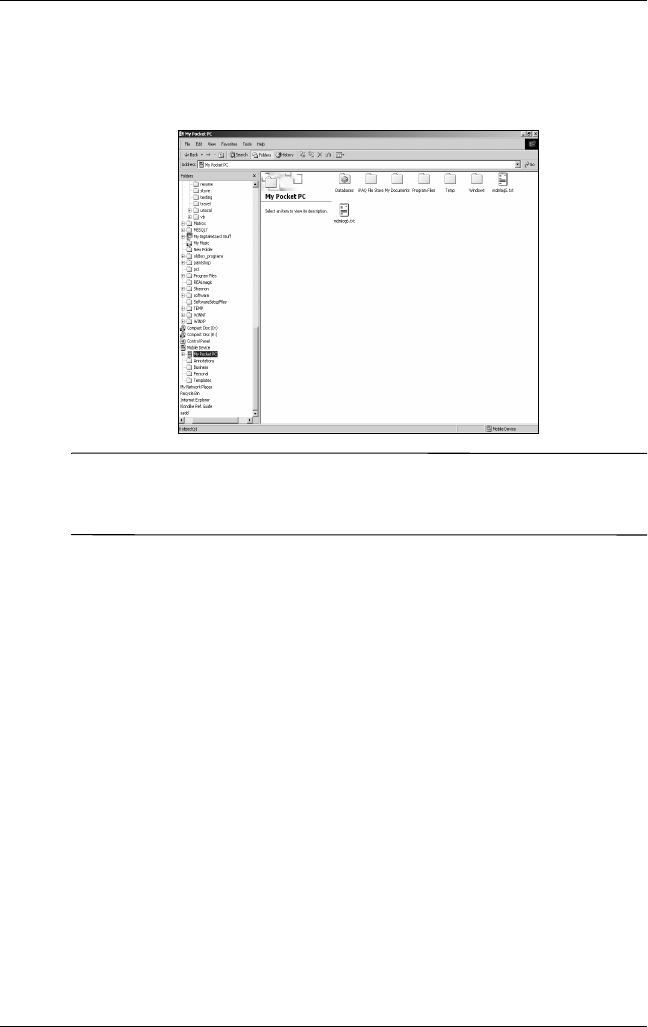
3. Double-click the My Pocket PC icon.
4. On your host computer, right-click the Start menu, then
select Explore.
5. Locate the file to be moved.
2–8 Reference Guide
Connecting
DRAFT - Revised 10/16/02
hp CONFIDENTIAL 11/27/02
File: ch2-Connecting.fm PN: 293146-001
6. Drag and drop your files between your h2200 Series and your
computer. ActiveSync converts the files, so that they can be
used by the Pocket Office applications if necessary.
ÄCAUTION: Move your files directly into My Documents or into a
folder inside your My Documents folder, so the applications on your
iPAQ h2200 can locate them.
Connecting to the Internet or your
Network
To send and receive e-mail with Inbox and to view Web sites with
Pocket Internet Explorer, you must set up a remote connection
using a modem card, ethernet card (IS THERE A CF
ETHERNET CARD?), 802.11X card or a Bluetooth enabled
device.
Using a Modem Card
To connect to the Internet with a modem card, you need a phone
line, a dial-up Internet Service Provider (ISP), and a
CompactFlash (CF) Expansion Slot.
Connecting
Reference Guide 2–9
DRAFT - Revised 10/16/02
hp CONFIDENTIAL 11/27/02
File: ch2-Connecting.fm PN: 293146-001
✎Insert your modem card into the CF expansion slot on top of the
h2200 Series unit before trying to set up a modem connection.
1. Remove the plastic cover from the CF expansion slot on top
of your h2200 Series.
2. Insert your modem card into the CF expansion slot.
a. Most of the popular modem card drivers are included on
your iPAQ h2200, so your modem card should be
recognized.
b. If your modem card is not recognized, follow your
modem manufacturer’s instructions to install the modem
card driver on your h2200 Series.
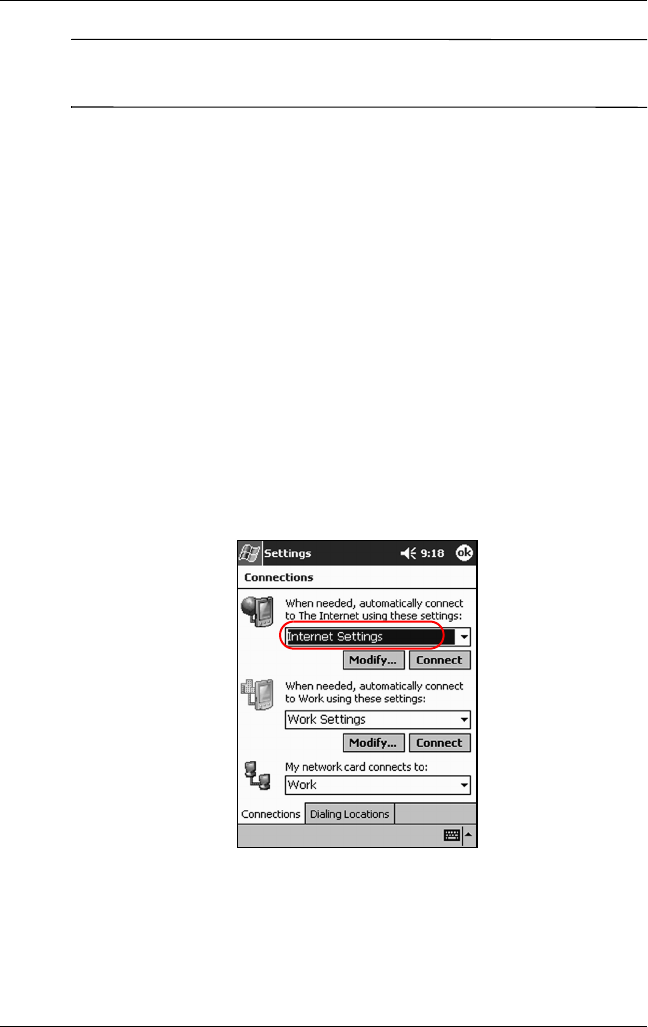
3. From the Start menu, tap Settings.
4. Tap the Connections tab, then tap the Connections icon.
5. Make sure Internet Settings is selected.
6. Tap Modify > New.
2–10 Reference Guide
Connecting
DRAFT - Revised 10/16/02
hp CONFIDENTIAL 11/27/02
File: ch2-Connecting.fm PN: 293146-001
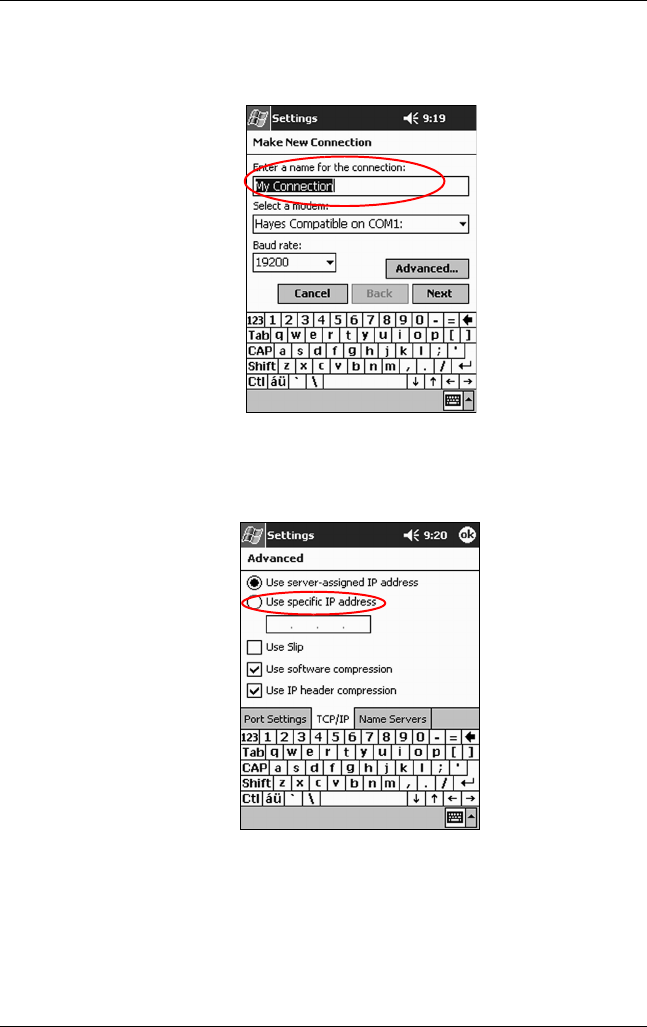
7. Enter a name for the connection, select the modem type, then
select the correct baud rate for that modem.
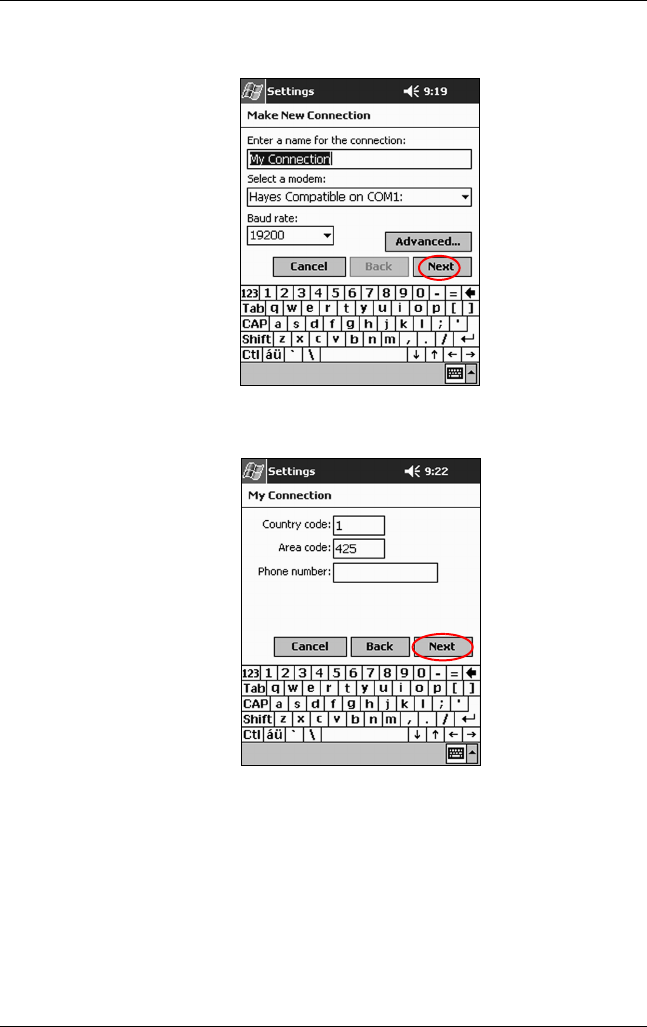
8. If you need to enter the specific TCP/IP settings, tap
Advanced, then tap TCP/IP.
9. Select “Use specific IP address.”
10. Enter your IP address.
Connecting
Reference Guide 2–11
DRAFT - Revised 10/16/02
hp CONFIDENTIAL 11/27/02
File: ch2-Connecting.fm PN: 293146-001
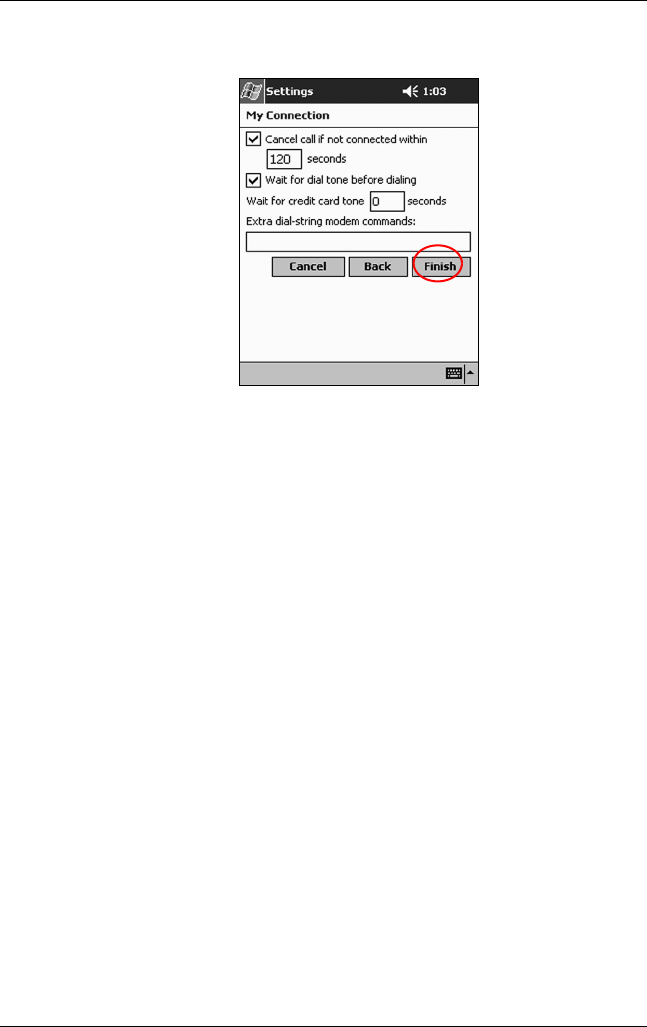
11. Tap OK > Next.
12. Enter the phone number for your Internet Service Provider,
then tap Next.
2–12 Reference Guide
Connecting
DRAFT - Revised 10/16/02
hp CONFIDENTIAL 11/27/02
File: ch2-Connecting.fm PN: 293146-001
13. Tap Finish to set up the modem connection.
14. Tap OK to return to the Connections window.
15. Tap OK to return to Settings.
Synchronizing Links
You can synchronize links to Web sites from your Favorites list
on your computer to view them offline with Pocket Internet
Explorer.
1. From the Start menu on your computer, click Programs and
double-click the Internet Explorer icon.
2. Click Favorites to see the list of links to your favorite
Web sites.
3. To save a Web site link to Mobile Favorites, open the Web
site, then click Create Mobile Favorite.
If you selected “Favorites” as an information type to be
synchronized, ActiveSync will copy your mobile favorite to
your iPAQ h2200 Series the next time you synchronize.
4. Follow the instructions in Synchronize information to
manually synchronize your favorite links.