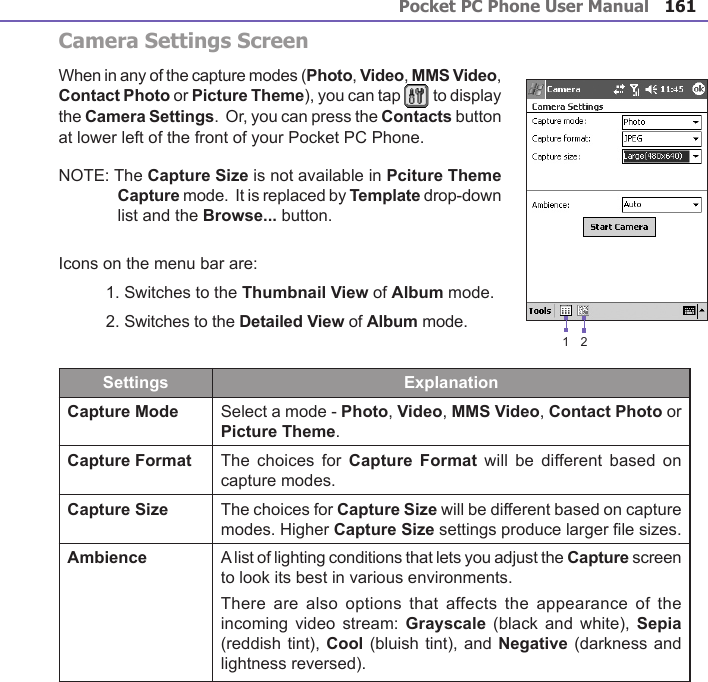
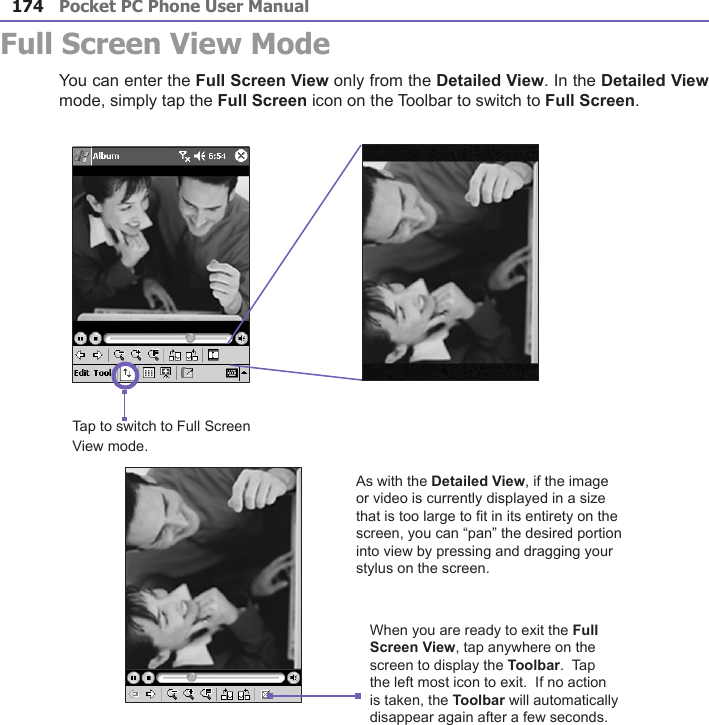
HTC MAGICIAN Dual Mode GSM850/1900 & 2.4 GHz FHSS PDA Phone User Manual Magician CDL Manual English Book indb

HTC Corporation Dual Mode GSM850/1900 & 2.4 GHz FHSS PDA Phone Magician CDL Manual English Book indb

Contents

Users Manual Part II
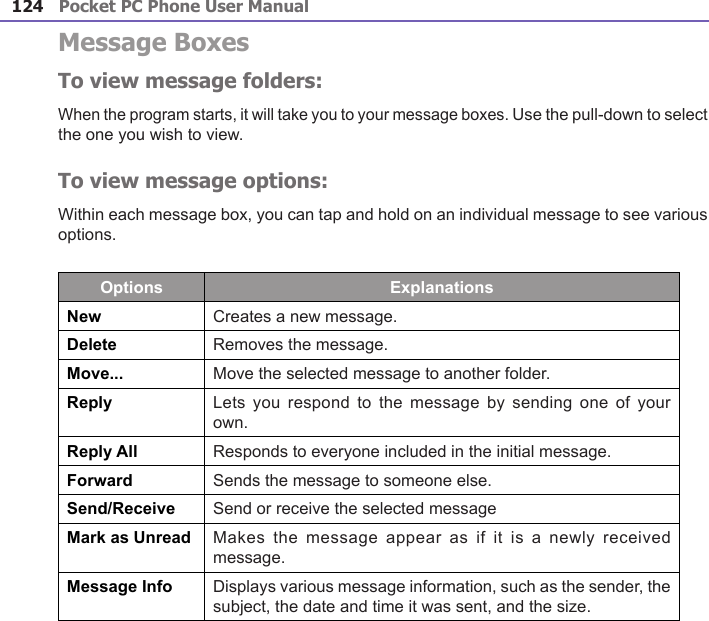
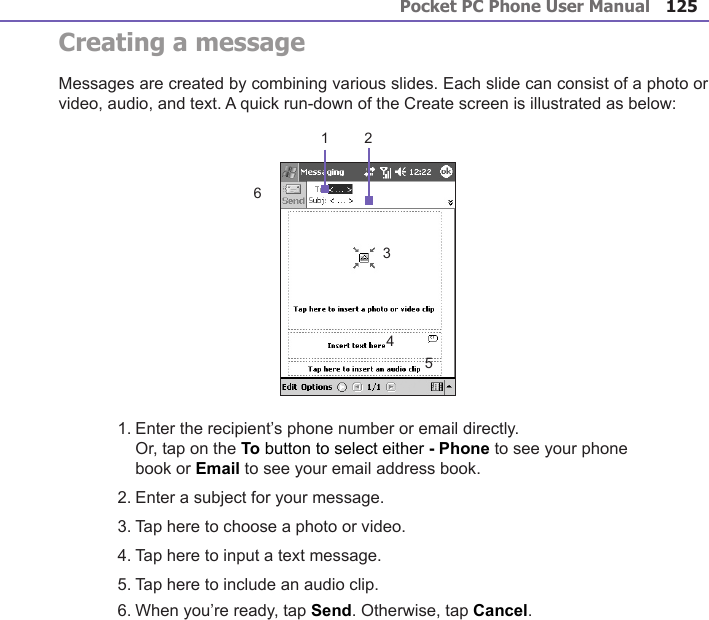
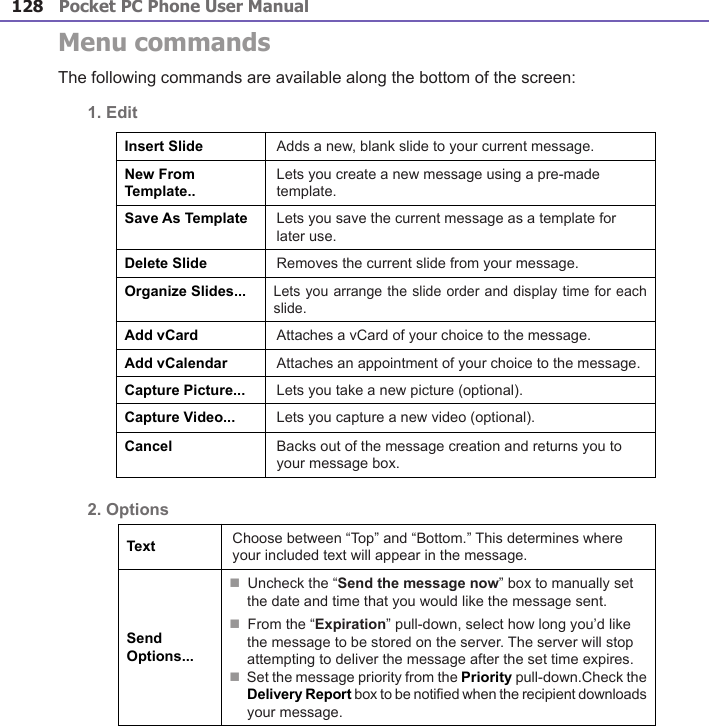
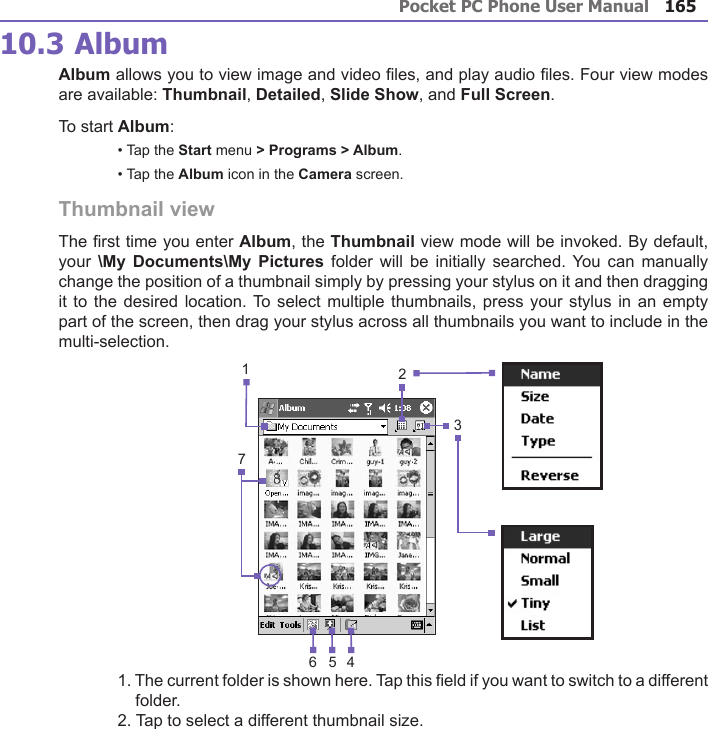
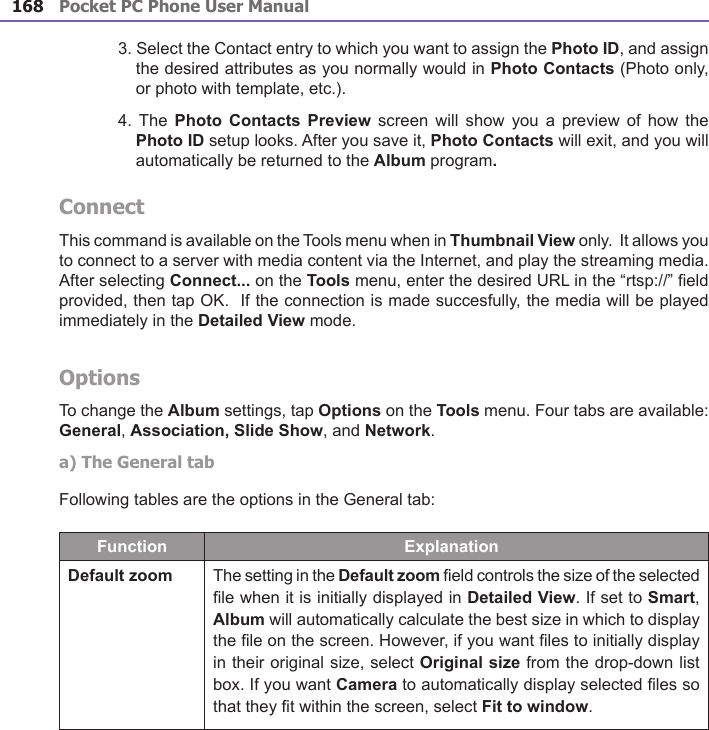
Pocket PC Phone User Manual64Pocket PC Phone User Manual 65 3.9 Securing Your Pocket PC Phone You can customize the level of security you want to have on your Pocket PC Phone  by locking the keypad, the entire device, or the SIM card.Locking the keypadThe keypad lock turns off the keypad functionality. This is a helpful feature if, for example, your Pocket PC Phone  is turned off and in your pocket, and you want to prevent acci-dental keypress.1. Tap the Start menu > Settings > System tab > Button Lock.2. Select Lock all buttons except Power button.3. To unlock your keypad, tap Do not lock buttons.Locking your Pocket PC Phone Locking your Pocket PC Phone  prevents access to personal data. When you enable this feature, your Pocket PC Phone  will automatically lock after a specied time of inactivity. A screen will be displayed requiring your Pocket PC Phone  "lock password" to be entered before access is granted.1. Tap the Start menu > Settings > Personal > Password.2. To enable this function, select how long your mobile device must be turned off before the password is required for using the device, by tapping Prompt if device unused for.3. Select the type of password you would like to use: Simple 4 digit or Strong alphanumeric. A strong password must have at least 7 characters that are a combination of uppercase and lowercase letters, numerals, and punctuation.4. Enter the password, and if necessary, conrm the password.NOTE: To unlock your Pocket PC Phone , uncheck Prompt if device unused for.
Pocket PC Phone User Manual66Locking the SIM cardYou can protect your Pocket PC Phone  from unauthorized use by assigning a PIN (Personal Identication Number). Your rst PIN is assigned by your operator.1. On the Pocket PC Phone  keypad, tap Tools > Options > Phone tab.2. Select Require PIN when phone is used.3. To change the PIN at any time, tap Change PIN.
Chapter 4Synchronizing Information4.1 Using ActiveSync4.2 Synchronizing Information4.3  Infrared and Bluetooth Connection4.4 ActiveSync Errors
Pocket PC Phone User Manual68Pocket PC Phone User Manual 694.1 Using ActiveSyncWith ActiveSync  on  both your PC  and  your  Pocket PC Phone,  you  can  exchange information between a PC or server and your Pocket PC Phone. This process is called "synchronization." To synchronize your Pocket PC Phone with your PC, you must install ActiveSync on the PC. Using ActiveSync, you can:nSynchronize information between your Pocket PC Phone and PC or server so that you have the latest information in all locations.nChange synchronization settings and synchronization schedule.nCopy les between your Pocket PC Phone and PC.nBack up and restore information saved on your Pocket PC Phone.nAdd and remove programs on your Pocket PC Phone.By default, ActiveSync does not automatically synchronize all types of information. Use ActiveSync options to turn synchronization on and off for specic information types.You can synchronize information between your mobile device and a server if your company is running Microsoft Exchange Server with Exchange ActiveSync.Installing ActiveSyncBefore you begin synchronization, install ActiveSync on your PC from the Application CD. ActiveSync is already installed on your Pocket PC Phone. Once ActiveSync is installed on your PC, you will be prompted to connect and create a partnership with your Pocket PC Phone by using a cable, cradle, infrared, or Bluetooth connection.
Pocket PC Phone User Manual68Pocket PC Phone User Manual 69Connecting to a PC via a cable or cradlePlease see the Quick Start Guide for information about ActiveSync installation.1.  Connect your Pocket PC Phone and PC via a cable or cradle to start synchronization.2.  Your rst synchronization will automatically begin when you nish the installation wizard. After the rst synchronization, you will notice that your Outlook information now appears on your Pocket PC Phone.3.  To  disconnect,  remove  your Pocket  PC  Phone from  the  cradle or detach  it  from the cable.Connecting to a PC by InfraredYou can use an infrared connection to create a direct connection between your Pocket PC Phone and another IR-enabled mobile device or PC quickly. This method is ideal for quickly switching between multiple devices since there are no cables or adapters to change. When creating a partnership, you must connect using infrared, a cable, or a cradle connection.Synchronize via IR or change synchronization settingsView connection statusConnect and synchronize              Stop sync
Pocket PC Phone User Manual70Pocket PC Phone User Manual 711.  Set up an infrared connection. (Install and congure an infrared port on your PC according to the manufacturer's instructions).2.  Switch to the infrared port on your desktop computer: On the File menu of the ActiveSync on your PC, click Connection Settings. In the Allow serial cable or infrared connection to this COM port list, select Infrared Port (IR). 3.  Align  the infrared  ports on your PC  and your  Pocket PC Phone so  that they  are un-obstructed and within close range.4.  On your Pocket PC Phone, tap the Start menu > ActiveSync > Tools > Connect via IR.4.2 Synchronizing InformationThis section provides an overview of the types of Outlook information you can synchronize. By default, ActiveSync does not automatically synchronize all types of Outlook information. Use  ActiveSync options on  your  PC  to turn synchronization  on  and  off for  specic information types.Synchronizing Outlook E-mailAfter selecting Inbox for synchronization in ActiveSync, Outlook E-mail messages are synchronized as part of the general synchronization process. During synchronization:nMessages are copied from the Inbox folder on your PC or the Microsoft Exchange server to the Inbox folder of the Outlook E-mail account on your device. You can only synchronize information directly with an Exchange Server if your company is running Microsoft Mobile Information Server 2002 or later. By default, you’ll receive messages from the last three days only, the rst 100 lines of each new message, and le attachments of less than 100KB in size.nMessages in the Outbox folder on your device are transferred to Exchange or Outlook and then sent from those programs.nThe messages on the two computers are linked. When you delete a message on your device, it’s deleted from your PC the next time you synchronize.nMessages in subfolders in other E-mail folders in Outlook are synchronized only if they have been selected for synchronization in ActiveSync.
Pocket PC Phone User Manual70Pocket PC Phone User Manual 71For information on initiating Outlook E-mail synchronization or changing synchronization settings, see ActiveSync Help on the PC or Connections Help. Text messages (SMS) and Media messages (MMS) are not received through synchronization. Instead, they are sent to your device via your service provider.Synchronizing CalendarnCalendar items stored on your Pocket PC Phone can be synchronized with calendar items on your PC or Microsoft Exchange Server. You can only synchronize information directly with an Exchange Server if your company is running Microsoft Mobile Information Server 2002 or later. Calendar synchronization is automatically selected in ActiveSync.nCalendar items entered on one computer are copied to the other during synchronization. Handwritten notes and drawings are saved as metales (pictures).Synchronizing ContactsnContacts stored on your Pocket PC Phone can be synchronized with Outlook contacts stored on your PC or with Mobile Information Server 2002 or later.nNew  items entered  in one  location are  copied to  the other  during synchronization. Handwritten notes and drawings are saved as pictures when synchronizing with your PC,  but are  removed when  synchronizing with  a server.  For more  information on synchronization, see ActiveSync Help on the PC.
Pocket PC Phone User Manual72Pocket PC Phone User Manual 73Synchronizing TasksnTasks  stored on  your device  can be  synchronized with  Outlook  on your  PC. Task synchronization is automatically selected in ActiveSync.nNew items  entered on one  computer are copied  to the other  during synchronization. Handwritten notes and drawings are saved as metales (pictures). For more information on synchronization, see ActiveSync Help on the PC.Synchronizing NotesNotes can be synchronized between your PC and Pocket PC Phone either through notes synchronization or le synchronization. Notes synchronization synchronizes the notes on your Pocket PC Phone with Outlook Notes on your PC. File synchronization synchronizes all notes on your Pocket PC Phone with the My Documents folder on your PC.To synchronize your notes through notes synchronization, rst select the Notes information type for synchronization in ActiveSync. The next time you synchronize, all notes in My Documents and its subfolder on your device will appear in Outlook Notes on your PC. Notes that contain only text will appear as regular notes in Outlook on your PC, while notes containing written text or drawings will appear in the device format. In addition, all notes in the Notes group in Outlook on the PC will appear in Notes on the device.To  synchronize  your notes as  les,  in  ActiveSync,  select the Files information  type for synchronization and  clear  the Notes information  type.  When you select  Files,  the My Documents folder is created on your PC’s desktop. All .pwi les placed in the My Documents folder on your device and all .doc les placed in the \My Documents folder on  your PC will  be  synchronized.  Password-protected les cannot  be  synchronized. ActiveSync converts documents during  synchronization.  For more information on synchronization or le conversion, see ActiveSync Help on the PC.NOTE: When you delete or change an item on either your PC or device, the item is changed or deleted in the other location the next time you synchronize.If you synchronize your notes using le synchronization and then later decide to use notes synchronization, all of your notes will be synchronized with Outlook on your PC and will no longer be stored in the My Documents folder.
Pocket PC Phone User Manual72Pocket PC Phone User Manual 734.3 Infrared and Bluetooth ConnectionInfraredYou can use infrared (IR) to send and receive information and les between mobile devices. If an IR port is installed on your PC, you can send and receive information and les between your Pocket PC Phone and PC. On your Pocket PC Phone, tap the Start menu > Settings > the Connections tab > Beam.By default your device detects incoming infrared (IR) and Bluetooth beams and prompts you to accept them. If you do not want your Pocket PC Phone to detect or receive beams, clear the Receive all incoming beams check box.NOTE: If someone attempts to send you an IR beam from an older device, you may not be prompted to accept it. In this case, before the beam is sent from the other device, tap Receive an infrared beam at the bottom of the Beam screen.Bluetooth1.  Make sure that your Pocket PC Phone is congured to receive incoming beams.2.  Make sure that your Pocket PC Phone is turned on, discoverable, and within 10 metres (about 30 feet) of the other device beaming the information.3.  When prompted to receive an incoming beam, tap Yes to accept the beam.For more information about Bluetooth and its settings, please see Chapter 6.
Pocket PC Phone User Manual744.4 ActiveSync ErrorsWhenever ActiveSync cannot successfully synchronize your information, it displays an error on your Pocket PC Phone.Viewing error informationPress the Action button when the error text is displayed. ActiveSync will then display more information about the error that occurred.Some types of errors can interfere with automatic synchronization. If you suspect that a scheduled automatic synchronization has not occurred, you should attempt to manually synchronize your information. Successfully completing manual synchronization will reset automatic synchronization. For more information, see the Synchronizing  Information section of ActiveSync Help on your PC.
Chapter 5Personalizing Your Pocket PC Phone5.1 Device Settings5.2 Phone Settings
Pocket PC Phone User Manual76Pocket PC Phone User Manual 775.1 Device SettingsYou can adjust the device settings to suit the way you work. To see available options, tap the Start menu > Settings > the Personal tab or System tab located at the bottom of the screen.The Personal tab Icon ProgramButton                                                                Assigns an application program to a hardware button.Input                                                                    Sets up the input portion of your device.Menus                                                                 Customizes the menu appearance and enables a pop up menu from the New button.Owner Information                                            Displays your contact information.Password                                                            Limits access to your device.Phone                                                                  Sets up the phone function of your wireless feature.Sounds & Notications                                    Sets the notication type, event and volume. Today                                                                    Customizes the look and the information that appears on the Today screen.
Pocket PC Phone User Manual76Pocket PC Phone User Manual 77The System tab Icon ProgramAboutDisplays important device information.Add Ring ToneTo listen to and select new ring tones.Backlight                                                             Customizes the backlight and brightness for power saving purposes.Button Lock                                                        Enables you to lock the buttons on your device except Power button when device is off.CerticatesDisplays the name of the certicate issuer and the expiration date.Clock & AlarmsChanges the time and sets alarms.Device informationFind information about version, hardware, identity, and call duration.KeyboardAllows you to customize the keyboard settings, e.g., to switch on/off the keyboard backlight when a time limit is reached.Memory                                                               Displays the memory allocation status and current running programs.Microphone AGCAdjusts the volume automatically when you are recording.Permanent SaveSaves contacts to permanent ash memory.Power             Maximizes battery life.Regional Settings                                              Customizes the region and relative format for the region you use.
Pocket PC Phone User Manual78Pocket PC Phone User Manual 79Icon ProgramRemove Programs                                             Creates more memory by removing programs.Screen           Re-calibrates the screen and enables/disables Clear Type feature. ButtonsTo  customize  the  program  hardware  buttons  to  open  your  most  frequently-used programs:1. Tap the Start menu > Settings > the Personal tab > Buttons > the Program Buttons tab.2. Under Select a button, tap the button you want to assign a program, and then select a program from Assign a program.     Default settings:    1 - Contacts    2 - Calendar  3 - Camera  4 - Record   In the Up/Down Control tab, Delay before rst repeat changes the time elapsed before scrolling begins. Repeat rate changes the time it takes to scroll from one item to the next. Press and hold the Up/Down control to scroll through the items in a list to adjust. Input1. Tap the Start menu > Settings > the Personal tab > Input.2. On the Input Method tab, select an input method and change desired options. On the Word Completion tab, select the desired settings for word completion. On the Options tab, select the desired options for writing and recording. These options apply to any program on the 2134
Pocket PC Phone User Manual78Pocket PC Phone User Manual 79device where you can record or write. These options do not apply to text you enter using the input panel.You can also change input options by tapping the   arrow and Options. MenusOnly 7 programs are allowed in the Start Menu. To add the programs you use most often to the Start menu:1. Tap the Start menu > Settings > the Personal tab > Menus.2. Select the programs you want, then tap OK.3. On the New Menu tab, you can select Turn on New button menu and then select the items to appear on the menu. When you do this, an arrow appears next to New in the command bar of certain programs such as Pocket Word, Pocket Excel, Contacts, Calendar and Tasks. You can tap this arrow and then tap a new item to create.You can create subfolders and shortcuts to appear under the Start menu. In ActiveSync on your PC, click Explore > My Pocket PC Phone > Windows > Start Menu. Owner Information1. Tap the Start menu > Settings > the Personal tab > Owner Information.2. On the Identication tab, enter your personal information.   On the Notes tab, enter any additional text you want to display when the device is turned on, such as: "Reward if found."   On the Options tab, select Identication Information so that if you lose your device, it can be returned to you.PasswordA strong password must have at least 7 characters that are a combination of uppercase and lowercase letters, numerals, and punctuation.1. Tap the Start menu > Settings > the Personal tab > Password.
Pocket PC Phone User Manual80Pocket PC Phone User Manual 812. To enable this function, select how long your mobile device must be turned off before the password is required for using the device by tapping Prompt if device unused for.3. Select  the type  of password  you  would like  to use:  Simple 4  digit  or  Strong alphanumeric.4. Enter  the password  and, if  necessary, confirm  the password.n If your device is congured to connect to a network, use a strong password to help protect network security.n If you forget your password, you must clear the memory before you can access your device. This will erase all les and data you have created and programs you have installed. For more information about clearing memory, please see Appendix A.n If you've used ActiveSync to create a backup le, all of your program data can be restored.  For more information on  creating a backup le,  also see Appendix A. Sounds and NoticationsTurning off sounds and the notication light helps conserve battery power. To change the ring type and volume:1. Tap the Start menu > Settings > the Personal tab > Sounds & Notications.2. On the Sounds tab, you can select the desired actions.3. On the Notications tab, you can customize how you are notied about different events. Select the event name and then select the type of reminder. You can select a special sound, a message, or a ashing light. TodayChanging the background:1. Tap the Start menu > Settings > the Personal tab > Today.
Pocket PC Phone User Manual80Pocket PC Phone User Manual 812. On the Appearance tab, select the desired theme for the background. To use your own background, select Use this picture as the background then tap Browse to locate the desired le. 3. Choose a folder and tap the le you want, then tap OK.NOTE: The recommend picture size for  the background is 240x320 pixels in jpeg  le format. To beam a favorite theme to a friend, select the desired theme, and tap Beam on the Appearance tabCustomizing the displayed information:1. Tap the Start menu > Settings > the Personal tab > Today > the Items tab.2.  Select the information you want displayed on the Today screen.3. To customize the information further, select an information type, and then tap Options (not available for all information types). AboutThe Version tab displays important device information, including the amount of memory installed. On the Device  ID  tab, you may need to change the device name if you  are unable to connect to a network because another device with the same name is already connected.
Pocket PC Phone User Manual82Pocket PC Phone User Manual 83 BacklightUsing the backlight on battery power substantially reduces battery life. Tap the Start menu > Settings > the System tab > Backlight.n Tap the Battery power tab to turn ON/OFF the backlight when using battery power.n Tap the External power tab to turn ON/OFF the backlight when using external power.n Tap the Brightness tab to adjust the brightness level. Clock & AlarmsTap the Start menu > Settings > the System tab > Clock & Alarms.n If you visit a particular time zone often, select it as your Visiting time zone on the  Time tab so that you can quickly see the correct date and time.n You can use your device as a travel alarm clock by setting a wake-up alarm on the  Alarms tab. Tap the alarm icon to select the type of alarm you want. n To change the way the date or time is displayed on your Pocket PC Phone, go to Regional Settings by tapping the Start menu > Settings > the System tab > Regional Settings. MemoryYou may need to stop a program if it becomes unstable or the program memory is low. Tap the Start menu > Settings > the System tab > Memory.n The Main tab displays the amount of memory the system has allocated to le and data storage versus program storage. This tab also displays the amount of memory in use versus the available memory. For information about making memory available, see Appendix A.
Pocket PC Phone User Manual82Pocket PC Phone User Manual 83n The Storage Card tab displays how much memory is available on the storage card that is inserted into your device. If you have more than one card inserted, tap the list box and then the name of the storage card whose information you want to view.n The Running Programs tab displays the list of currently active programs. You can stop a program by selecting it in the list and then tapping Stop or just tap Stop All to stop all the running programs.You may need to stop a program if it becomes unstable or the program memory is low. PowerTap the Start menu > Settings > the System tab > Power.n The Battery tab displays the amount of battery power remaining. Battery power depends on the battery type and how the device is being used. n On the Advanced tab, you can select options for turning off your device to conserve battery power. To conserve the most power, select the option that turns off the device after 3 minutes or less. Permanent SaveYou can choose to back up Contacts and Appointments, Tasks, and Connection Set-ting to non-volatile memory. Backing them up in this way means they will not be lost in the event your device loses all power and you have to perform a full reset.To back up to FlashROM:1. Tap the Start menu > Settings > the System tab > Permanent Save.2. Select the desired item by checking the boxes. Tap OK.When you elect to back up Contacts  and Appointments, your Pocket PC Phone will automatically back up newly added contacts, appointments or tasks items. This will not happen for connection settings if you add new connections you will need to back it up manually.
Pocket PC Phone User Manual84Pocket PC Phone User Manual 85To restore to FlashROM:1. Tap the Start menu > Settings > System tab > Permanent Save.2. Select the desired item by checking the boxes > OK. 5.2 Phone SettingsYou can easily view and change settings, such as the ring type and ring tone to be used for incoming calls, and the keypad tone to be used when entering phone numbers. You can also protect your phone from unauthorized use. There are two ways to change phone settings:n Tap the Start menu > Settings > the Personal tab > Phone.n To change the phone settings from the Phone keypad, tap Tools > Options.Ring typeYou can change the way that you are notied of incoming calls. For example, you can choose to be notied by a ring, a vibration, or a combination of both. Tap the Ring type list, and select the desired option.Ring toneTap the Ring tone list, then select the sound you want to use.n To set .wav or .mid les as ring tones, use ActiveSync on your PC to copy the le to the \Windows\Rings folder on your device. Select the sound from the Ring tone list. n To download ring tones, you can make a connection to the Internet and then download ring tones that are compatible with the .wav or .mid formats.
Pocket PC Phone User Manual84Pocket PC Phone User Manual 85 Add ring toneAdd Ring Tone allows you to quickly nd and display all the ring tones stored on your device, gives you the option to listen, add, or remove them from the Phone Settings list mentioned above.1. To display all ring tones on your device, you can tap the Start menu > Settings > System > Add Ring Tone. The program will automatically list and display all the .wav and .mid les on your Pocket PC Phone.2. After the ring tones have loaded, you can see that some are already selected. These ones are presently listed in the phone settings.3. To play a ring tone, select one by tapping it, and then tap play. If you don’t like the ring tone, deselect it. This will add/remove the selected/deselected ring tones from the list in your phone settings.Keypad toneYou can change the tone you hear when entering a phone number on the keypad. If set to Tones, the tone is heard continuously for as long as the number on the keypad is pressed. If set to Beep, the tone is heard only for one or two seconds.1. Tap the Keypad list, then select the option you want.2. To prevent tones from being heard when entering a phone number, select Off.NetworkWith network settings, you can view available networks, determine the order in which your Pocket PC Phone accesses another network if the current one is unavailable, and specify whether you want to change networks manually or automatically. The current network will remain active until you change it, lose your signal, or change your SIM card.n The network currently in use will be listed at the top of the screen.n When your current network is unavailable, tap Select Network to select an alternate.
Pocket PC Phone User Manual86ServicesThe Services tabs are primarily used to set options for incoming calls, such as Call Forwarding, Call Waiting, and Caller ID. To change service settings from the phone dial screen, tap Tools > Options > the Services tab > select a service > Get Settings.Feature  FunctionCall Barring Blocks incoming and/or outgoing calls.Caller ID Identies caller by displaying their name and/or phone number.Call Forwarding Forwards all or selected incoming calls to a different number.Call Waiting Noties of an incoming call while you are on the phone.Voice Mail/SMS Shows the correct numbers in the phone settings.MoreOn the More tab, you can access the settings for Automatic Pickup, and Broadcast Channels.You can choose to receive real time news and information such as trafc and weather reports by enabling the Broadcast Channels. This service is dependent on your mobile service operator.
Chapter 6Getting Connected6.1 About Connections6.2 Connecting to the Internet6.3 CSD Line Type6.4 Pocket Internet Explorer6.5 Network Cards Settings6.5 Terminal Services Client6.7 Bluetooth6.8 Wireless Modem
Pocket PC Phone User Manual88Pocket PC Phone User Manual 89 6.1 About ConnectionsThis device is equipped with powerful networking functions that allow you to connect to the Internet through a GPRS network or a Bluetooth modem. You can also use an external modem with this device to access the Internet.You can set up connections to the Internet and to a corporate network at work to browse the  Internet, send and  receive  E-mail,  use instant messages,  and  synchronize   with ActiveSync.Your Pocket PC Phone has two groups of connection settings: My  ISP and My Work Network. My ISP settings are used to connect to the Internet, and My Work Network settings can be used to connect to any private network, such as a corporate network. Fill in the settings and you are ready to connect to the Internet.6.2 Connecting to the InternetYou can use My ISP settings to connect to the Internet and use different connection methods to send and receive E-mail  messages and surf the Internet.
Pocket PC Phone User Manual88Pocket PC Phone User Manual 89 Connect to the Internet via an ISP:1. Obtain the following information from your ISP (Internet Service Provider): n ISP server phone number.n User name.n Password. n Access point name. (Required for GPRS connection).2. Tap the Start menu > Settings > the Connections tab > Connections.3. To create a new connection in My ISP, tap Add a new modem connection, and follow the instructions in the Make New Connection wizard.4. Wireless connections can be made via a mobile phone network or GPRS. If you are using a mobile phone network to connect, tap Cellular Line in the Select a modem list. If you are using GPRS, tap Cellular Line (GPRS).n To view additional information for any screen, tap  .n To start the connection, switch to Pocket Internet Explorer and browse to a Web page. Your device will automatically connect.To change modem connection settings, in either My ISP or My Work Network, tap Manage existing connections. Select the desired modem connection, tap Settings, and follow the instructions on the screen.Connecting to a private network1. Obtain the following information from your network administrator: n Server phone number.n User name. n Password. 2. Tap the Start menu > Setting > the Connections tab > Connections.3. In My Work Network, follow the instructions for each type of connection.4. To start  the connection,  start using  a related  program. For example,  switch to  Pocket Internet Explorer and browse to a Web page. Your device will automatically connect.
Pocket PC Phone User Manual90Pocket PC Phone User Manual 91 6.3 CSD Line TypeThis program allows you to choose the line type when you make a circuit switch data connection.To change a CSD Line type:1.  Tap the Start menu > Settings > Connections > CSD Line Type.2.  In Data rate, select a value. In Connection element, choose a type from that drop-down menu. Tap OK. NOTE: The default setting on your Pocket PC Phone is set for the most optimal use. Do not change this setting unless you have trouble using the circuit switch data connection.GPRS SettingsThis program allow you to choose the GPRS setting method when you make a GPRS connection. Choose between these two required authentication methods:nPAP  authentication:  Password Authentication Protocol is a  simple authentication protocol used to authenticate a user to a remote access server of an ISP (Internet Service Provider).nCHAP  authentication:  Challenge  Handshake  Authentication  Protocol is  used to negotiate the most secure form of encrypted authentication supported by both server and client.NOTE: Changing these settings may cause your data communications to no longer operate. Please consult your service provider before altering these settings.
Pocket PC Phone User Manual90Pocket PC Phone User Manual 91 6.4 Pocket Internet ExplorerOnce connected, you can use Pocket Internet Explorer to surf the Internet. While surng, you can also download les and programs to be installed on your device from the Internet or intranet. During synchronization with your PC, download your favorite links and mobile favorites that are stored in the Mobile Favorites folder in Internet Explorer on the PC. To synchronize and download your favorite links from your PC, in your PC's ActiveSync, select, Favorites in the Tools Menu > Options > Sync Options.Browsing the Internet Open the Pocket  Internet  Explorer screen  by  tapping the Start  menu  > Internet Explorer.1. In  the address  bar that  appears at  the top  of the screen, enter the Web address you want to connect to. Tap the down arrow to choose from previously entered addresses.2. Tap   to go to the web address you entered. 3. Tap   to go back to the previous page.4. Tap   to refresh the web page on the screen.5. Tap   to go back to the Home page.6. Tap    (the  Favorites  button),  then  tap  the favorite  address you  want to  view. To  add a favorite link while using your Pocket PC Phone, go to the page you want to add, tap and hold on the page, and tap Add to Favorites on the pop-up menu.234 5 61
Pocket PC Phone User Manual92Pocket PC Phone User Manual 93 6.5 Network Cards SettingsUse a network (Ethernet) card to connect directly to a network. Once connected, you can view the Internet or intranet, or download e-mail. Make sure to purchase and congure a network card that is compatible with your Pocket PC Phone.To setup your network card:1. Insert the network card into your Pocket PC Phone. 2. The rst time you insert the card.  Network Settings will appear automatically. Or to change later, tap the Start menu > Setting > the Connections tab > Network Cards.3. To enter specic server information, tap the appropriate adapter.To start a connection, insert the network card, and begin using a desired program.To change network card settings:1. Tap the Start menu > Setting > the Connections tab > Network Cards. 2. In the My network card connects to: drop-down box, tap either The Internet or Work. If you are connecting to your ISP at home, tap The Internet. If you are connecting to a private network such as a corporate network at work, tap Work.3. Tap the appropriate adapter in the Tap an adapter to modify settings: box, the IP address will now appear in the IP Address box on the IP Address tab.4. To change TCP/IP settings if your ISP or private network does not use dynamically-assigned IP addresses, tap Use specic IP address and enter the requested information. Contact your ISP or network administrator to get the IP address, subnet mask, and/or default gateway (if needed).5. To change DNS and WINS settings if your ISP or private network does not use dynamically-assigned IP addresses, tap the Name Servers tab and enter the requested information. Servers that require an assigned IP address may also require a way to map computer names to IP address. DNS and WINS are the resolution options supported on your Pocket PC Phone.
Pocket PC Phone User Manual92Pocket PC Phone User Manual 93 6.6 Terminal Services ClientUsing the Terminal Services Client, you can log onto a PC running Terminal Services or Remote Desktop and use all of the programs available on that PC from your mobile device. For example, instead of running Pocket Word, you can run the PC version of Word and access all of the .doc les on that PC from your Pocket PC Phone.Connecting to a Terminal ServerStart a remote connection to the server via a GPRS or Wireless LAN connection:1. Tap the Start menu > Programs > Terminal Services Client.2. To connect to a server you have previously connected to, in Recent Servers, tap a server. To connect to a new server, enter the server’s name in the Server box. Select the Limit size of server desktop to t on this screen check box only when using applications that have been specically sized for use with the Pocket PC Phone.3. Tap Connect.NOTE: If the network administrator has congured Terminal Services Client to reconnect to disconnected sessions, and you previously disconnected from a Terminal Server without ending the session, the Terminal Services Client reconnects to that session.Navigating within Terminal Services ClientOnce connected to the server, the PC’s screen may more than ll your mobile device’s screen. If scroll bars are displayed on the server’s screen, you will see more than one set of scroll bars on your Pocket PC Phone: one to scroll information on the PC, and one to scroll the PC display through the Terminal Services window in Terminal Services Client.To ensure you are scrolling the PC display through Terminal Services Client, use the ve directional buttons at the bottom of the Terminal Services Client screen. To better t
Pocket PC Phone User Manual94Pocket PC Phone User Manual 95 information on your mobile device’s screen, select Limit size of server desktop to t on this screen. For best effect, programs on the desktop computer should be maximized. Disconnecting without ending a sessionThe following commands must be accessed from the Start menu in the Terminal Services window used to access the PC’s commands. Do not use the Start menu on your Pocket PC Phone.1. In the Terminal Services window, tap Start > Shutdown.2. Tap Disconnect.If your administrator has congured Terminal Services Client to reconnect to disconnected sessions,  you will be  reconnected  to  this session the  next  time  you connect to  this server.Disconnecting and ending a session:1. In the Terminal Services Client window, tap Start > Shutdown.2. Tap Log Off.6.7 Bluetooth Bluetooth is a short-range wireless communications technology. Devices with Bluetooth capabilities can exchange information over a distance of about 10 metres without requiring a physical connection. Unlike infrared, you don't need to line up the devices to beam information with Bluetooth. The devices only need to  be within a range  of about 10 metres. You can even beam information to a device in a different room, as long as it's within range. The software included with your Pocket PC Phone allows you to use Bluetooth in the following ways :
Pocket PC Phone User Manual94Pocket PC Phone User Manual 95 n Beam  information, such as  les,  appointments,  tasks, and contact  cards, between devices that have Bluetooth capabilities. For example, if you and a co-worker each have a device with Bluetooth, you can beam items between your devices, such as les, contact cards, appointments, tasks, and so forth. n Create a dial-up modem connection between your device and a Bluetooth phone. You can then use the Bluetooth phone as a modem.To access to the Bluetooth settings screen :1.  To turn on/off the Bluetooth mode and create a new bond with other device, tap  Start  menu > Settings > Connections tab >Bluetooth.  Alternatively, you can also tap the small icon for Bluetooth connection settins in the right lower corner on Today screen.2. To add an extra layer of security when beaming information with others or to set a Bluetooth syncronization tap Start  menu > Settings > System tab > Bluetooth Settings.Bluetooth modesTo turn on Bluetooth OnCheck Turn on Bluetooth option. To turn off Blue tooth OffUncheck Turn on Bluetooth option.In this mode, you can neither send nor receive information by using Bluetooth. You might want to turn the radio off at times in order to conserve battery power, or in situations where radio use is prohibited, for example on airplanes and in hospitals. By default the Bluetooth radio is turned off.  If you turn it on, and then turn off your device, the Bluetooth radio also turns off.  When you turn on your device again, the Bluetooth radio automatically turns on .
Pocket PC Phone User Manual96Pocket PC Phone User Manual 97 NOTE:  In a situation where Bluetooth is on but radio is off, it is not possible to turn on radio. If you wish to turn on radio, turn off Bluetooth rst, and then turn on radio.To make your device discoverableCheck Make this device discoverable to other devices option. The Bluetooth radio is turned on, and all of the other Bluetooth devices within range (about 10 metres) can detect your device and attempt to beam information to it, establish a bond, or use a Bluetooth service. In this mode, other devices can detect your device whether or not a bond has been created; however, in order to receive a beam from another device, you must accept it on your device. Other Bluetooth devices can now detect your device and attempt to beam information to it, establish a bond, or use a Bluetooth service.  Note that to receive beamed information, you must accept it on your device.Selecting Discoverable also turns on your Bluetooth radio.If you no longer want your device to be discoverable, uncheck Turn on Bluetooth option or Make this device discoverable to other devices option to leave the radio on, but not allow detection by other devices.BondsA bond is a relationship that you create between your Pocket PC Phone and another Bluetooth device in order to exchange information in a secure manner. Creating a bond involves entering the same personal identication number (PIN) on the two devices you want to bond. You need only create a bond once between two devices. Once a bond is created, the devices recognize the bond and are able to exchange information without your entering a PIN again.
Pocket PC Phone User Manual96Pocket PC Phone User Manual 97 a. To create a Bond:You can create a bond between your device and another device that has Bluetooth. Once you do this, Bluetooth doesn’t need to be in discoverable mode in order for you to beam information between the two devices; the Bluetooth radio only needs to be turned on.1. Make sure that the two devices are within 10 metres of one another and that Bluetooth is in discoverable mode on both devices.2. Tap Start  menu > Settings > Connections tab.3. Tap Bluetooth > Devices tab > New. Your device searches for other Bluetooth devices and displays them in the list.4. Tap the name of the other device in the list, and then Next.5. In PIN, enter a PIN of between 1 and 16 characters and tap Next. 6. Enter the same PIN on the other device. 7. If you want, in Name, edit the name of the other device.8. Tap Finish. b. To accept a Bond:1. Make sure that Bluetooth is turned on and in discoverable mode.2. When prompted to bond with the other device, tap OK.3. In PIN, enter a PIN of between 1 and 16 characters, and tap Next. You must enter the same PIN that was entered on the device requesting the bond.4. If you want, in Name, edit the name of the device requesting the bond.5. Tap Finish. The bond is created. You can now exchange information with the other device.
Pocket PC Phone User Manual98Pocket PC Phone User Manual 99 c. To rename a Bond :1. Tap Start  menu > Settings > Connections tab.2. Tap Bluetooth > Devices tab.3. Tap the bond to rename.4. In Name, enter a new name for the bond.5. Tap Finish.d. To delete a Bond :1. Tap Start  menu > Settings > Connections tab.2. Tap Bluetooth > Devices tab.3. Tap and hold the bond to delete.4. Tap Delete. Beaming Information with Bluetooth1. Tap and hold an item to beam, such as an appointment in Calendar, a task in Tasks, a contact card in Contacts, or a le in File Manager.2. Tap Beam [type of item].3. Tap the device to which you want to send the beam. The item is beamed to the device you selected.If the device that you want to beam to doesn’t appear in the list, make sure that it is turned on, in discoverable mode, and within 10 metres of your device. Also, make sure that your Bluetooth radio is turned on.
Pocket PC Phone User Manual98Pocket PC Phone User Manual 99 Receiving a Bluetooth Beam1. Make sure that your device is congured to receive incoming beams and that Bluetooth is in discoverable mode.2. Make sure that your device is within 10 metres of the device beaming the information.3. When prompted to receive an incoming beam, tap Yes. The information is now stored on your device.Using a Bluetooth Phone as a ModemYou can use a phone that has Bluetooth capabilities as a modem for your device. To do this, you create a Bluetooth modem connection on your device and then send information to the phone by using Bluetooth. The phone relays the information over the phone line and then sends back to your device any information that you had requested over the connection. Once you create a modem connection to the Bluetooth phone, you can reuse it whenever you want to use the phone as a modem.  1. Make sure  that the  Bluetooth phone is  turned on,  that your device’s  and the phone’s Bluetooth radios are turned on, and that your device and the phone are within 10 metres  of one another.  2. If you have not already done so, create a Bluetooth phone connection by following   3. Tap Start  menu > Settings > Connections tab.  4. Tap Connections > Add a new modem connection.  5.  Enter a name for the connection.  6. In the Select a modem list, tap Bluetooth > Next.  7. Make sure  that the  phone is  discoverable. Some  phones may also  need to  be pairable in  order to  accept a  bonding request.  For more  information, see your  phone documentation.
Pocket PC Phone User Manual100Pocket PC Phone User Manual 101   8. If the phone appears in the My Connections list, skip to step 14. If not, tap New and follow the remaining steps.   9. In the list, tap the phone and then Next.10. In PIN, enter a PIN of between 1 and 16 characters, and tap Next. 11. Enter the same PIN on the phone. 12. If you want, in Name, edit the name of the phone.13. Tap Finish.14. In the My Connections list, tap the phone, and then Next.15. Enter the phone number to dial for this connection and tap Next.16. In User name, Password, and Domain, enter the logon information for this connection and tap Finish.17. Start using the program that uses the Bluetooth phone connection; for example Inbox to send and receive e-mail, or Internet Explorer to browse the Web. 6.8 Wireless ModemThis utility will simulate your device as a wireless modem, and let your PC/Notebook be connected to a wireless network. Before creating a new modem via selected connection type, you still need to install the drivers on your PC/Notebook.  For more details about the drivers installation and the minimum requirements of your PC/Notebook, please refer to Application CD.1. Tap Start  menu > Programs > then tap Wireless Modem.2. Select a connection type. 3. Connect your device via infrared to a note-book or PC, and then tap Start.Before you press the Start button, please make sure your device is with a GPRS SIM card and you have connected this device to your PC/Notebook by IrDA connection and disabled the Activesync.
Pocket PC Phone User Manual100Pocket PC Phone User Manual 101 Settings on your PCContact your ISP  to get the  APN  (Access  Point Name). Before  you start using  your Wireless Modem with a IrDA connection, you need to create a new modem on your PC rst:  1. Click Start menu > Settings > Control Panel > Phone and Modem Options.  2. Add a new modem by selecting the Modem tab.  3. Enable the checkbox Don't detect my modem; I will select it from a list.  4. Select Standard Modem Types in the Manufacturers eld, select Standard 33600 bps Modem, then select Next.  5. Select your modem port and click Next.  6. When a Modem installation is nished! screen appears, click Finish to go back to the Modem tab mentioned in Step 2. Now you can see a Standard 33600 bps Modem in the modem list.  7. Highlight the modem you just created, click the Properties button, and select the Advanced tab.  8. Enter the complete string in the Extra initialization commands: eld: AT+CGDCONT=1,"IP","APN","",0,0.  9. Remember to click the Change Default Preferences button after entering the required string as mentioned above.10. Click the General tab and set the Float control by selecting None from the drop-down list. Keep pressing OK until the modem installation wizard exits.A new standard modem is now set up successfully on your PC, but you still need to create a new dial-up connection:  1. Click Start > Settings > Control Panel > Network and Dial-up Connections > Make New Connection.  2. To continue, tap Next.
Pocket PC Phone User Manual102Pocket PC Phone User Manual 103   3. Select Dial-up to the Internet. Tap Next.  4. Enable the option  I want  to set  up my  Internet connection  manually, or  I want to connect through a local area network (LAN) button, and Next.  5. Select I connect through a phone line and a modem option, and then Next.  6. Enable the Use area code and dialing rules checkbox and enter the telephone number *99#, and then Next.  7. Enter the username and password you use to log on to your ISP, and then click Next.  8. Enter a name for this connection, and then Next.  9. Select No when the installation wizard asks you to set up an Internet mail account, and then click Next.10. After the installation is completed, click Finish.Connecting via USB PortAs with the connection via IrDA, you need to check the following below before you start using the Wireless Modem on your Pocket PC Phone via USB connection:n A GPRS enabled SIM card is inserted in your Pocket PC Phone.n Disable the ActiveSync com port connection of your PC.n Disable the Infrared function by tapping the Start menu > Settings > the Connections tab > Beam, and then uncheck Receive all incoming beams.n Insert your Pocket PC Phone to your PC USB connection (using the USB sync cable or cradle).Before setting up an USB modem, you must verify that you have the two les, USBMDM and USBModem_Dialer, on the Application CD. Insert the Application CD into the CD-Rom of your PC and perform the settings as follows:  1. Tap the Start menu > Programs > Wireless Modem.
Pocket PC Phone User Manual102Pocket PC Phone User Manual 103   2. Select  the USB  connection type  from the  drop-down list  and  insert the  USB cable adapter.  3. Tap the Start button on the Wireless Modem screen of your Pocket PC Phone.  4. A Found New Hardware message will pop up on your desktop PC.  5. Select the Display a list of the known drivers for this device so that I can choose a specic driver option, and then click Next.  6. Select Modem from the Hardware types list, and then Next.  7. Click the Have Disk button, and then Next.  8. Select the recognized USB Modem in the Models list, and then Next. After the installation is completed, select Finish.  9. After the installation, a new USB modem will be found in the Modem list by tapping Start > Settings > Control Panel > Phone and Modem Options on your PC.10. Double click the USBModem_Dialer le on the Application CD and set the GPRS settings (enter the APN assigned by your ISP) in the blank text box and press Dial to start the connection.Connect via BluetoothBefore starting to use your Pocket PC Phone as a Bluetooth modem, you must be sure that your PC is a Bluetooth-enabled device. In addition, you still need to check the following:n A GPRS enabled SIM card is inserted in your Pocket PC Phone.n Disable the ActiveSync BT port connection of your PC.n Disable the Infrared function by tapping the Start menu > Settings > the Connections tab > Beam. Uncheck Receive all incoming beams.1. To begin, select the Start menu > Programs > Wireless Modem.2. Select the Bluetooth connection type from the drop-down list, and tap the Start button.3. Open your Pocket PC Phone from the Bluetooth application installed on your PC.
Pocket PC Phone User Manual104The interface of the Bluetooth application installed on your PC will vary, depending on the Bluetooth module embedded or attached in your PC when you purchased it. Follow the installation instructions of the connected Bluetooth device's manual.
Chapter 7Using Outlook7.1 Calendar7.2 Contacts7.3 Tasks7.4 Notes
Pocket PC Phone User Manual106Pocket PC Phone User Manual 107 7.1 CalendarUse Calendar to schedule appointments, including meetings and other events. You can check your appointments in one of several views (Day, Week, Month, and Agenda) and set Calendar to remind you of appointments with a sound or other method. Appointments for the day can be displayed on the Today screen. If you use Outlook on your PC, you can synchronize appointments between your Pocket PC Phone and PC. See Using ActiveSync in Chapter 4.1. Tap to go back to view today's appointment.2. Tap to display or edit the appointment details.3. Tap to create a new appointment.4. Tap  to change  the appointments  in various displayed views.Create or change an appointment:1. To create an appointment, tap New. To select a new date from a pop-up calendar, tap the display date. To enter or select a new time, tap the display time. Enter the  appointment details, and when nished, tap OK to return to the calendar. 2. If you are working in Day view, tap the time slot for the new appointment and then New to have the time automatically entered for you. 3. To change an appointment, tap it in the calendar, and then tap Edit. Change any appointment detail by tapping it and entering the new information. When entering a time, you can type military and abbreviated time forms, such as 2300 (becomes 11:00 PM), 913pm (becomes 9:13 PM), 911 (becomes 9:11 AM), and 9p (becomes 9:00 PM).3142
Pocket PC Phone User Manual106Pocket PC Phone User Manual 107 Send a meeting requestYou can use Calendar to set up meetings with users of Outlook or Pocket Outlook. The meeting request will be created automatically and sent either when you synchronize Inbox or when you connect to your E-mail server. 1. Create an appointment and enter the meeting information.2. Tap Attendees (you will need to hide the input panel to see this box).3. Select the meeting attendees from the list of E-mail addresses you’ve entered in Contacts. Only those contacts with E-mail addresses will be displayed.4. Select other desired options and then tap OK.5. Messaging automatically creates a meeting request and sends it to the attendees the next time you synchronize with your PC. Any textual notes entered in the Notes tab (excluding writing or recordings) will also be sent.If you are sending the meeting request through a connection to an ISP or the network, rather than through synchronization with your PC, tap the Tools > Options > Appointments tab. In Send meeting requests via, tap the service you want to use to send the meeting request.Tap the service you want to use to send the meeting request.
Pocket PC Phone User Manual108Pocket PC Phone User Manual 109 Use the summary screenWhen you tap an appointment in Calendar, a summary screen is displayed. To change the appointment, tap Edit.Set a reminder for an appointment:1. In the Calendar, tap the appointment, and then tap the upper portion of the summary screen when editing the appointment.2. Tap Reminder and select Remind me.3. To change how many minutes before the appointment you are to be reminded, tap the minutes displayed.To automatically set a reminder for all new appointments, in the calendar, tap the Tools > Options > the Appointments tab > Set reminders for new items.Beam an appointmentTo beam an appointment, in the calendar list, tap and hold the appointment. On the pop-up menu, tap Beam Appointment. When using infrared (IR), align the IR ports between the devices so that they are unobstructed and within close range of each other.7.2 ContactsContacts maintains a list of your friends and colleagues so that you can easily nd the information you’re looking for, whether you’re at home or on the road. You can enter both personal and business information.If you use Outlook on your PC, you can synchronize contacts between your device and PC. See ActiveSync in Chapter 4.
Pocket PC Phone User Manual108Pocket PC Phone User Manual 109 View contacts:1. Select the category of contacts you want displayed in the list.2. Tap and enter part of a name to quickly nd it in the list.3. Tap letters, such as h (home), w (work), or m (mobile) to the right of the contact to see additional phone numbers and E-mail addresses.4. Tap to display or edit the contact details.5. Tap and hold to display a pop-up menu of available actions.To change the way information appears in the list, tap Tools and then Options.Create or change a contact:1. Tap the Start menu > Programs > Contacts > New.2. Using the input panel, enter a name and other contact information. You will need to scroll down to see all available elds.3. To assign the contact to a category, scroll to and tap Categories and select a category from the list. In the contact list, you can display contacts by category.4. To add notes, tap the Notes tab. You can enter text, draw, or create a recording.5. To change a contact, tap it in the contact list, and then tap Edit. To cancel edits, tap Edit > Undo. When nished, tap OK to return to the contact list.If you enter a name with more than 2 words, the middle word will be recorded as a middle name. If your contact has a double rst or last name, tap the Name arrow and enter the names in the proper box.
Pocket PC Phone User Manual110Pocket PC Phone User Manual 111 Find a contact:n  Tap the Start menu > Programs > Find, enter the contact name (rst, last, or middle), phone number, or address, select Contacts for the type, and then tap Go.n  From Contacts, start typing a contact name until you see it displayed on the screen. To show all contacts again, tap the text box at the top of the screen and clear the text, or tap the arrow icon to the right of the text box.n  Tap one of the sets of letters displayed at the top of the contact list. This takes you to the contact names beginning with those letters.n  In the contact list, tap the category list (labeled All Contacts by default) and tap the category to which you’ve assigned a contact. To show all contacts again, select All Contacts. To view a contact not assigned to a category, select No Categories. n  To view the names of companies your contacts work for, in the contact list, tap View > By Company. The number of contacts that work for that company will be displayed to the right of the company name. n  Press and hold the top of the navigation pad until alphabetical letters appear on the screen in large type. Then use the navigation pad to scroll through the alphabet and select a letter.Beam a contact:1. To beam a contact, in the contact list, tap and hold the contact. On the pop-up menu, tap Beam Contact. 2. To beam multiple contacts, tap and drag to select the contacts. Then, tap Tools > Beam Contacts.When  using infrared (IR),  align  the  IR  ports  between the devices  so  that  they are unobstructed and within close range.
Pocket PC Phone User Manual110Pocket PC Phone User Manual 111 Change options:1. In the contact list, tap Tools > Options.2. To increase the available space for displaying contacts in the list, clear Show ABC tabs. 3. The area code and country/region for new contacts are automatically entered based on the information in Country/Region settings.Using the summary screenWhen you tap a contact in the contact list, a summary screen is displayed. To change the contact information, tap Edit.7.3TasksUse Tasks to keep track of things you need to do. A variety of task information can be displayed on the Today screen. If you use Outlook on your PC, you can synchronize tasks between your device and PC. See ActiveSync in Chapter 4.Create or change a task:1. To create a task with detailed information, such as start and due dates, tap the Start menu > Programs  > Tasks > New.2. In the task list, you can display tasks by category.3. To assign the task to a category, tap Categories and select a category from the list. To create a new category, tap the Add/Delete tab, enter the category name, and then tap Add. The new category is automatically selected in the Select tab.4. To add notes, tap the Notes tab. You can enter text, draw, or create a recording. When nished, tap OK to return to the task list.5. To change a task, tap it in the task list, and then tap Edit. To quickly create a task, enter text in the Tap here to add a new task box at the top of the screen. If you don't see this box, tap Tools > Entry Bar.
Pocket PC Phone User Manual112Pocket PC Phone User Manual 113 Set a reminder for a task:1.  In the task list, tap the task, and then tap Edit.2.  Tap the Due eld and set a due date if you have not already done so.3.  Tap the  Reminder eld and select  Remind me. You  will be reminded  at 8:00 in  the morning on the due date.4.  To change the reminder date, tap the date displayed.    To be automatically reminded of new tasks with a due date, in the task list, tap Tools > Options and select Set reminders for new items.    To choose how you are reminded, for example by a sound, tap the Start menu > Settings > the Personal tab > Sounds & Notications.Using the summary screenWhen you tap a task in the task list, a summary screen is displayed. To change the task, tap Edit.Beam a taskTo beam a task, in the task list, tap and hold the task. On the pop-up menu, tap Beam Task. 7.4 NotesNotes help you quickly capture ideas, notes, and thoughts. You can create a note using written and typed  text,  drawings, and recordings. You  can also share  your  notes with others through E-mail, infrared, and synchronization with your PC. Please see Chapter 4 for more information.To create documents with advanced formatting or templates, such as bulleted lists and tabs, use word processing software developed for your device, such as Pocket Word.
Pocket PC Phone User Manual112Pocket PC Phone User Manual 113 Create a note:1. Tap the Start menu > Prgrams >  Notes > New.2. Create your note by writing, drawing, typing, and recording, see Entering Information in Chapter 2 for more information about using the input panel, writing and drawing on the screen, and creating recordings.You can insert the date in a note. First, deselect   and make sure that no drawings are selected. Next, tap and hold anywhere on the note and then tap Insert Date.Send a note by E-mail:1. If you haven’t already set up Messaging to send and receive messages, please do so now. See Chapter 8.2. In the note list, tap and hold the note or recording. To select multiple notes or recordings, tap and drag. Then, tap and hold the selected items.3. On  the pop-up  menu, tap Send  via  E-mail. A new  message  is  created  with  the item attached.Beam a noteTo beam a note, in the note list, tap and hold the note. On the pop-up menu, tap Beam File.Change options:1. In the note list, tap Tools > Options.2. From the Default template list, you can select a pre-designed template to use with all new notes. 2. If you store most of your notes and recordings on a storage card, in Save to, tap Storage card to have new items automatically stored on your storage card.
Pocket PC Phone User Manual114
Chapter 8Messaging Features8.1 E-Mail and Text Messages8.2 MSN Messenger8.3 MMS Messages
Pocket PC Phone User Manual116Pocket PC Phone User Manual 117 8.1 E-Mail and Text MessagesYou can receive E-mail and text messages in Messaging. E-mail messages are sent by using an address you receive from your Internet service provider (ISP), an E-mail service provider,  or your employer. Text messages are sent and received through your phone service provider by using a phone number as the message address.You can also send and receive E-mail by synchronizing with your PC, or by connecting to a Post Ofce Protocol 3 (POP3) or Internet Message Access Protocol 4 (IMAP4) mail server. You need to set up an E-mail account for each method that you use except for an Outlook E-mail account, which is set up by default. The Outlook E-mail account on your Pocket PC Phone is used to store messages that you send and receive through synchronization with a PC. Account names appear when you open the folder list, which is located on the left, under the navigation bar, in the message list view.How you download copies of messages depends on how you are receiving messages:n  If you receive E-mail messages through a remote E-mail server, follow the instruction as described on the next page, under "Downloading messages from a server."n If you  receive E-mail  messages through ActiveSync, begin  synchronization. For  more information, please refer to Chapter 4.n  Text messages  are automatically  received when your  phone is  turned on.  Otherwise, messages are held by your service provider until the next time your phone is turned on.With synchronization, messages are synchronized between the Pocket PC Phone Inbox folder for the Outlook E-mail account and the PC Inbox by using ActiveSync and Microsoft Exchange or Outlook. For more information, see Chapter 4.
Pocket PC Phone User Manual116Pocket PC Phone User Manual 117 Setting up an account:Open Messaging on your Pocket PC Phone by tapping the Start menu > Messaging. Select Outlook E-mail in Accounts. Tap Accounts, New Account to set up an account. Accounts > New Account. The E-mail Setup wizard will prompt you to ll in the necessary information to complete the setup.1. Fill in your E-mail address, then tap Next.2. The Auto conguration will attempt to connect your Pocket PC Phone to your E-mail server and automatically download the necessary connection settings. If Auto conguration is unsuccessful, contact your ISP or network administrator.3. Enter Your  name, User  name and  Password, then  tap Next.  If you  check the  Save password box, your device will not ask for your password the next time you log in to an E-mail account. However, other people can access your account if you lose the device.4. Select the appropriate Account type that your E-mail provider supports (POP3 or IMAP4). Enter a Name for your E-mail account, then tap Next.5. Enter your E-mail provider’s server name information for Incoming mail and Outgoing mail, then tap Finish. When nished, tap Accounts. Your new E-mail account will be displayed under this menu. You can start connecting to your E-mail server at this point.You can set up several E-mail accounts, including your Outlook E-mail account. A Text Messages account and an MMS account is already pre-congured in Messaging.Changing options for an account:1. Tap Accounts > Accounts.....2. Tap the name of the account, and follow the instructions on the screen.
Pocket PC Phone User Manual118Pocket PC Phone User Manual 119 Deleting an account:1. Tap Accounts > Accounts....2. Tap and hold the name of the account > and then tap Delete.You cannot delete the text messages and MMS account.Downloading messages from a serverIn Messaging, tap Accounts > Connect to open a connection to the Internet or your corporate network, depending on the account. For more information, see Chapter 6.1. Tap Accounts and ensure  that the  account you  want to  use is selected (marked  by a bullet).2. Tap Connect. The messages on your device and E-mail server are synchronized. New messages are downloaded to your Pocket PC Phone Inbox folder, messages in your Pocket PC Phone Outbox folder are sent, and messages that have been deleted from the server are removed from your Pocket PC Phone Inbox. Tap a message in the message list to open it.3. If you read a message and decide that you need the full copy, tap Edit > Mark for Download while in the message window. If you are in the message list, tap and hold the message, and then tap Mark for Download. This will also download message attachments if you selected those options when you set up the E-mail account. You can also choose to download full copies of messages by default.4. When nished, tap Accounts > Disconnect.Receiving attachmentsAn attachment sent with an E-mail message or downloaded from the server appears as an icon at the bottom of the message in its own window pane. Tapping the attachment icon opens the attachment if it has been fully downloaded. You can mark an attachment for downloading (IMAP4 account only) the next time you connect.
Pocket PC Phone User Manual118Pocket PC Phone User Manual 119 Through synchronization:1. Start ActiveSync on your PC.2. Click File > Mobile Device > and then select your mobile device.3. Click Tools > and then click Options.4. Select the message account > Settings, and then select Include File Attachments.Through a remote IMAP4 E-mail server:1. From Messaging, tap Accounts > Accounts... > IMAP4.2. Tap Next until you reach Server Information > and then tap Options.3. Tap  Next  twice > Get  full  copy  of  messages  and When  getting  full  copy  get attachments. Embedded images and objects cannot be received as attachments. An embedded message can be viewed as an attachment when using IMAP4 to receive E-mail. However, this feature does not work if TNEF (Transport Neutral Encapsulated Format) is enabled so that you can receive meeting requests.Composing and sending a message:Text Messages (SMS) cannot be used to send E-mail messages. You can tap the double arrows next to the Subj. eld to show the complete header. From the Account list, select an E-mail account.If you are sending a text message (SMS) and want to know if it was received, before sending the message, tap Tools > Options > Request message delivery notication.You can also send a text message from the Phone Dialer Screen by tapping Tools > Send Text Message. A new message screen will appear in Messaging.
Pocket PC Phone User Manual120Pocket PC Phone User Manual 121 1. In the message list, tap Accounts and select Outlook E-Mail, Text Messages (SMS), or the desired E-mail account.2. Tap New.3. Enter the E-mail address or text message address of one or more recipients, separating them with a semicolon. To access addresses and phone numbers from Contacts, tap To. or tap the Address Book button.4. Enter your message. To quickly add common messages, tap My Text and tap a desired message.5. To check spelling, tap Tools > Spell Check.6. Tap Send. If you are working ofine, the message is moved to the Outbox folder and will be sent the next time you connect.Managing Messages and FoldersEach E-mail  account and text message account has its own folder  hierarchy with ve default folders: Inbox, Outbox, Deleted Items, Drafts, and Sent Items. The messages you receive and send through the mail account are stored in these folders. You can also create additional  folders within each hierarchy. The behavior of the folders you  create depends on whether you are using an Outlook E-Mail, Text Messages, POP3, MMS, or IMAP4 account.If you use an Outlook E-Mail account, E-mail messages in the Inbox folder in Outlook E-Mail will automatically be synchronized with your device. You can elect to synchronize additional folders by designating them for ActiveSync. The folders you create and the messages you move will then be mirrored on the server. If you use a Text Messages account, messages are stored in the Inbox folder.If you use a POP3 account and you move E-mail messages to a folder you created, the link is broken between the messages on the device and their copies on the mail server. The next time you connect, the mail server will see that the messages are missing from
Pocket PC Phone User Manual120Pocket PC Phone User Manual 121 the device Inbox folder and delete them from the server. This prevents you from having duplicate copies of a message, but it also means that you will no longer have access to messages that you move to folders created from anywhere except the device.If you use an IMAP4 account, the folders you create and the E-mail messages you move are mirrored on the server. Therefore, messages are available to you anytime you connect to your mail server, whether it is from your device or PC. This synchronization of folders occurs whenever you connect to your mail server, create new folders, or rename/delete folders when connected.For all accounts except Outlook E-Mail, you can access folder options by tapping Tools > Manage Folders.8.2 MSN MessengerMSN Messenger features include:n  Seeing who is online.n  Sending and receiving instant messages.n  Having instant message conversations with groups of contacts.n  Notifying contacts of your on-line status.n  Blocking contacts from seeing your status or sending you messages.To  use  MSN Messenger, you need a  Microsoft  Passport  account, or a Microsoft Exchange  E-mail account that  your  employer  provides. Once you  have  one  of these accounts, you will need to:n  Set up an account on MSN Messenger.n  Sign in to MSN Messenger.
Pocket PC Phone User Manual122Pocket PC Phone User Manual 123 Setting up an account Before you can use MSN Messenger, you must set up the instant messaging account(s) to use. For MSN Messenger Service, you must have a Microsoft Passport or Hotmail account. For Exchange Instant Messaging, you must have an Exchange account. 1. To use MSN Messenger Service, set up a connection to the Internet; to use Exchange Instant Messaging, set up a connection to your corporate network. 2. Tap the Start menu > Program > MSN Messenger.3. In MSN Messenger, tap Tools > Options > the Accounts tab.4. Select Enable MSN Messenger Service and/or Enable Exchange Instant Messaging.5. Enter your sign-in name and password for the selected account(s). Your sign-in name is usually in the form: username@domain.com.6. If you selected both accounts, tap Settings, and select which account to sign in to rst.n  To set up a Microsoft Passport account, go to http://www.passport.com.n  To set up a Hotmail account, go to http://www.hotmail.com.n  To set up an Exchange account, see your network administrator.Signing In and Signing Out1. To sign in, tap anywhere on the screen. Follow the directions on the screen. 2. To sign out, tap Tools > Sign out.To sign in as your device is connected to the Internet, tap Tools > Options > the General tab > and select the Run this program upon connection box.Signing in to an  Exchange account may  take  several minutes depending  upon  your connection speed. Reducing the number of Exchange contacts will decrease your sign-in time.
Pocket PC Phone User Manual122Pocket PC Phone User Manual 123 8.3 MMS MessagesWith the Pocket PC Phone, you can create and share your own MMS messages, complete with photos, videos, text, and audio to  your friends  and family. You  can even  use the Pocket PC Phone’s camera to snap photos and immediately send them by composing an MMS message.Launching the MMS composer screenMMS is incorporated into the Pocket PC Phone’s Messaging function. You can access MMS directly by selecting the Start menu > Messaging > Accounts > MMS. Your device also allows you several ways to launch the MMS composer screen:n  From Album: Select any picture in Album, tap on Tools > Send via MMS. At this point you will be directed to the MMS composer screen in Messaging. n  From Camera (Optional): Capture a picture or a video clip. A Review mode pop-up menu will let you select from the four icons after you have captured an image or video clip, one of which will be Send via MMS. Creating an MMS MessageMMS messages are created by combing various slides. Each slide can consist of a photo, an audio or video clip, audio, or text. To begin select the Start  menu >  Messaging > Accounts > MMS. In the MMS Inbox, tap New. You may not automatically be taken to a blank message, but to a page that displays pre-made templates, choose the template you want. If you would prefer to create a blank message next time, check the “Always choose custom” box.
Pocket PC Phone User Manual124Pocket PC Phone User Manual 125 Message BoxesTo view message folders:When the program starts, it will take you to your message boxes. Use the pull-down to select the one you wish to view. To view message options:Within each message box, you can tap and hold on an individual message to see various options.Options ExplanationsNew  Creates a new message.Delete Removes the message.Move... Move the selected message to another folder.Reply Lets you respond to  the  message by sending  one  of your own.Reply All Responds to everyone included in the initial message.Forward Sends the message to someone else.Send/Receive Send or receive the selected messageMark as Unread Makes the  message  appear as if  it  is a newly received message.Message Info Displays various message information, such as the sender, the subject, the date and time it was sent, and the size.
Pocket PC Phone User Manual124Pocket PC Phone User Manual 125 Creating a messageMessages are created by combining various slides. Each slide can consist of a photo or video, audio, and text. A quick run-down of the Create screen is illustrated as below:1. Enter the recipient’s phone number or email directly.Or, tap on the To button to select either - Phone to see your phone book or Email to see your email address book.2. Enter a subject for your message.3. Tap here to choose a photo or video.4. Tap here to input a text message.5. Tap here to include an audio clip.6. When you’re ready, tap Send. Otherwise, tap Cancel.1 23456
Pocket PC Phone User Manual126Pocket PC Phone User Manual 127 To add a picture or video clip:You can add either a still image or a video clip to each individual slide. After you’ve tapped the area to add a photo or video, you’ll be allowed to select exactly what you want to include.1. This pull-down lets you select a specic location that contains photos/videos.2. Choose either Photos or Videos from this pull-down. You can only add either a single photo or video clip to each individual slide.3. Tap the specic photo or video clip that you want to add.4. Tap  the specic photo or  video  clip that you want  to  add, then tap    to select.5. To take a new picture or video clip press the Camera icon The picture or video clip will be automatically inserted.Tap and hold on a le to see the File Info and Delete options. File Info displays the le name,  resolution, date, and  size  of  a photo. When  viewing  video  le information, the duration of the video is also listed. Delete deletes the le.15423
Pocket PC Phone User Manual126Pocket PC Phone User Manual 127 To add text:You can add text to any slide. You can either enter in new text with the keyboard, or use Canned Text. Canned Text are previously saved words or phrases:1. Tap the Insert text here box, then enter the text you want to send.2. To insert Canned Text, tap the small icon on the right upper corner of the      Insert text here box, and then select a phrase from the list and tap        to select.3. To add new, edit or delete existing canned text, tap and hold on the     canned text screen.To add audio clips:Single audio clips can be added to each slide. You can either include an existing sound le, or record a new one.1. From the drop-down menu, select a location that contains audio les.2. Tap the le you'd like to use.3. Preview the audio les by tapping on them. Use the toolbar below to Stop and Play the le.4. To insert the clip tap   Otherwise, tap  .5. To record a new audio clip, tap the Record   icon, then tap   to start recording and   to nish. The clip will be automatically inserted.
Pocket PC Phone User Manual128Pocket PC Phone User Manual 129 Menu commandsThe following commands are available along the bottom of the screen:1. EditInsert Slide Adds a new, blank slide to your current message.New From Template..Lets you create a new message using a pre-made template.Save As Template Lets you save the current message as a template for later use.Delete Slide Removes the current slide from your message.Organize Slides...Lets you arrange the slide order and display time for each slide.Add vCard Attaches a vCard of your choice to the message.Add vCalendar Attaches an appointment of your choice to the message.Capture Picture... Lets you take a new picture (optional).Capture Video... Lets you capture a new video (optional).Cancel Backs out of the message creation and returns you to your message box.2. OptionsText Choose between “Top” and “Bottom.” This determines where your included text will appear in the message. Send Options...n  Uncheck the “Send the message now” box to manually set the date and time that you would like the message sent.n  From the “Expiration” pull-down, select how long you’d like the message to be stored on the server. The server will stop attempting to deliver the message after the set time expires.n  Set the message priority from the Priority pull-down.Check the Delivery Report box to be notied when the recipient downloads your message.
Pocket PC Phone User Manual128Pocket PC Phone User Manual 129 Viewing a messageYou have several options when viewing a message that you receive:1. Use the playback controls (Play/Pause, Stop) to view the message. You can pause it anytime during playback.2. Tap Objects to see a list of each le. If you want to save a particular le, tap it, then choose Save from the Tools menu.3. You  can also view  the slides manually.  Use  the navigation  buttons  to scroll through the message.MMS SettingsTo view and edit your MMS Messages, tap on the Tools menu which is located at the bottom of the screen, and then select MMS Settings. In the Preferences tab: n Connect Via: Select your type of network connection from the pull-down.n Retrieve Messages Immediately: Typically, you receive a notication whenever a new message is available. Checking this box downloads new messages automatically. You can also choose to download messages while roaming.n Save Sent Messages: Check this option to save a copy of messages that you send.n Attempts Before Giving Up: This value sets the number of times the program will attempt to send your message before stopping.n Photo Resolution: Choose the resolution  for images that  you send. You may  want to decrease below the original resolution to help the send/receive time.In the Servers tab, it lists all available servers that you can use, or alternatively, you can set up a new one.In  the About  tab, it lists  various  program  information, such as  the  End  User Licence Agreement,etc.
Pocket PC Phone User Manual130
Chapter 9Applications9.1 Pocket Word9.2 Pocket Excel9.3 Windows Media Player9.4 Pictures9.5 Truefax9.6 MIDlet Manager
Pocket PC Phone User Manual132Pocket PC Phone User Manual 133 9.1 Pocket WordYou can create and edit documents and templates in Pocket Word just as you would do in Word on your PC. Pocket Word documents can be saved as .psw, .doc, .rtf, or .txt les. You can enter information in a document by typing, writing, drawing, or recording. After you close a document and name it, the document is automatically placed in the Pocket Word document list.Synchronizing Pocket Word documentsPocket Word documents  can be synchronized with Word documents  on your PC. To synchronize les, select the Files type for synchronization in ActiveSync Options settings on your PC. When you select Files, a \My Documents folder is created on your PC’s desktop. Place all the les you want to synchronize with the device in this folder. Please note that password-protected les cannot be synchronized.All Pocket Word les that are stored in \My Documents and its subfolders are synchronized with the PC. ActiveSync will convert the documents during synchronization. When you delete a le on your PC or your device, the le will be deleted in the other location the next time you synchronize. For more information on synchronization, or le conversion, see ActiveSync Help on the PC.Document conversionThe Word documents (.doc) and templates (.dot), created in Word 6.0 or later on the PC, are converted to Pocket Word documents (.psw) and templates (.psw). The conversion takes place during the following:n During le synchronization.n When you copy a Word le from the PC to your Pocket PC Phone.n When you open an E-mail message with an attached Word le on your device.
Pocket PC Phone User Manual132Pocket PC Phone User Manual 133 Pocket Word documents are converted to Word documents when they are synchronized or copied back to the PC. During the conversion from Word to Pocket Word, most simple text and paragraph formatting will be retained and displayed, but some formatting attributes could be changed or lost.9.2 Pocket ExcelYou can create and edit workbooks and templates in Pocket Excel just as you would do in  Excel on your PC. Pocket Excel workbooks are usually saved as .pxl les, but you can also save them in the .xls format. When you close a workbook, it is automatically named and placed in the Pocket Excel workbook list. You can attach a password to a workbook to ensure privacy.Synchronizing Pocket Excel workbooksPocket  Excel workbooks can  be  synchronized  with Excel workbooks  on  your  PC. To synchronize les, select the Files type for synchronization in ActiveSync Options settings on your PC. When you select Files, a \My Documents folder is created on your PC’s desktop. Place all the les you want to synchronize with the device in this folder. Password-protected les cannot be synchronized.All Pocket Excel les that are stored in \My Documents and its subfolders are synchronized with the PC. ActiveSync converts documents during synchronization.When you delete a le on your PC or your device, the le will be deleted in the other location the next time you synchronize. For more information on synchronization or le conversion, see ActiveSync Help on the PC.
Pocket PC Phone User Manual134Pocket PC Phone User Manual 135 Workbook conversionThe Excel les (.xls) and templates (.xlt), created in Excel version 5.0/95 or later on the PC, are converted to Pocket Excel workbook (.pxl) or template (.pxt) les. The conversion takes place during the following:n During le synchronization. n When you copy an Excel le to your device from the PC.n When you open an E-mail message with an Excel le as an attachment.Pocket Excel workbooks are converted to Excel workbooks when they are synchronized or copied back to the PC.During the conversion from  Excel  to  Pocket  Excel, most  simple  text and paragraph formatting will be retained and displayed, but some formatting attributes could be changed or lost.9.3 Windows Media PlayerUse Windows Media Player to play audio and video les that are stored on your Pocket PC Phone, a network, or the Internet.You can play les in either Windows Media or MP3 format (this includes les with the extensions .asf, .wma, .wmv, and .mp3.) To nd contents in the Windows Media Format for your Pocket PC Phone, please go to http://www.windowsmedia.com.To  turn on  Windows  Media  Player on your  Pocket PC  Phone, tap the Start menu  > Programs > Windows Media.
Pocket PC Phone User Manual134Pocket PC Phone User Manual 135 About the playlistA playlist is a list of digital media les that play in a specied order. By using playlists, you can group audio and video les together for convenient playback. For example, you can create a playlist of your favorite songs by a particular artist or a playlist of work-related video clips.For more information about creating and editing a playlist on your Pocket PC Phone, select Help from the Start menu.Play a le on a network:To play streaming media, your device must be connected to a network. See the remote connection settings in Chapter 6 for more information.1. In Player Screen, tap Menu > Open URL.2. Enter a URL in the Location to Open: eld.9.4 PicturesPictures collects, organizes and sorts .jpg picture les on your device. With Pictures, you can download images to your PC, use ActiveSync to copy the les to your Pocket PC Phone, and view the images as a slide show.Pictures can also be  stored  and transferred to  your  device from a MMC,  SD,  or any storage form factor supported by your digital camera. Insert a card into the memory card slot and then copy or drag the pictures from your PC to the My Documents directory on the memory card. (If the memory card does not have a My Documents directory you must create one rst).
Pocket PC Phone User Manual136Pocket PC Phone User Manual 137 Transferring picturesPictures stored on your PC can be synchronized with Pictures on your device. Picture synchronization is not automatically selected in ActiveSync; you need to tap the sync option Files in ActiveSync on your desktop PC to activate this function.Finding and listing pictures:1. Tap the Start menu > Programs > Pictures.2. Tap My Pictures and select a folder from the drop-down menu.Viewing pictures:1. In Pictures, tap   to view pictures as a slide show.2. Tap   to view pictures stored in your My Pictures folder.3. Tap   to view pictures stored on a storage card.n During the Slide Show, tap anywhere on the screen to display the Slide show toolbar, which you can use to pause the Slide Show and rotate the view.n  Press the Left/Right controls to move forward or backward through the slides.Tap to select a folder from the drop-down menu123
Pocket PC Phone User Manual136Pocket PC Phone User Manual 137 Sorting pictures:1. Tap the Start menu > Programs > Pictures.2. Tap to select a sorting option such as Name, Date, Size, and Type from the drop-down menu.Deleting an imageHold the stylus rmly on the le name of the picture you want to delete. Select Delete from the pop-up menu.Edit picturesYou can rotate, crop, zoom and adjust the brightness and color contrast of your .jpg pictures. Tap the desired picture, then:n Tap   to rotate a picture 90 degrees counter-clockwise.n Tap   to crop a picture by dragging and selecting the crop area. Tap outside of the box to stop cropping.n Tap   to display the Zoom panel, from which you can zoom in or out of a picture, or return a picture to full-screen size.n  Tap Edit > Brightness and Contrast to adjust the brightness and contrast of a picture. n  Tap Edit > Undo to undo an edit, or Redo to redo an edit.
Pocket PC Phone User Manual138Pocket PC Phone User Manual 139 Set pictures as backgroundYou can use one of your own .jpg pictures as the background on the Today screen, and specify how you  want it displayed  on  the screen, such  as  adjusting the transparency level.1. In Pictures, tap the picture you want to set as the background.2. Tap Tools > Set as Today Wallpaper.The default setting for the transparency level of the background picture is 65%. This can be adjusted in the Set as Today Wallpaper screen.Customizing picturesYou can launch Pictures automatically when a digital camera storage card is inserted. You can also set the length of the time delay between slides for a slide show.To select launch automatically:1. Tap the Start menu > Programs > Pictures.2. Tap Tools > Options > the General tab.3. Check the Detect digital camera storage cards box.To select the time delay between slides:1. Tap the Start menu > Programs > Pictures.2. Tap Tools > Options > the Slide Show tab.3. Select a number of seconds, then tap OK.
Pocket PC Phone User Manual138Pocket PC Phone User Manual 139 9.5 TruefaxTruefax  is  a  software that allows  you  to  send and receive  faxes  on  your Pocket PC Phone.Before you send or receive a fax, make sure that the device is connected to a GPRS network. The GPRS network status is conrmed by an antenna symbol G on the status bar. Please note that the performance of fax communication is determined by the relative strength of the GPRS network signal.Sending a fax:1. Tap the Start menu > Programs > Truefax > New.2. In the Recipient dialog screen, enter the recipient's name and fax number. Alternatively, you can also choose a contact from Contacts by tapping   next to the To: eld. As a shortcut, Truefax enables the user to access the Contacts to compose the recipient's data. While working on Contacts, you can select up to 10 names to send the fax to. Check the Multiple recipients box to list the selected contacts with the multiple recipient mode.3. To attach a cover page on your fax document, choose the available type of cover pages from the drop-down list and tap Next. A Note dialog box will appear if you choose a coverage template.4. Enter a subject of the fax in the Subject eld. Entering a subject in the Subject eld may help you to manage your faxes later on. In the lower edit eld, you can enter more text that will also appear on the cover page. Tap Next to continue, or tap Back to modify settings in a previous dialog. A warning message will appear if you didn't enter the Owner Information on your device. This information will show in the cover page if you entered your contact information on the Today screen.5. To attach a document, tap the Add button, which will display all available documents stored on your device. Find the le you want to attach, tap OK. Repeat this procedure until you have completed your selection. Or, you can create a new fax note by tapping New. You can modify the order in which the documents are to be attached. Tap the Up or Down arrow next to the attachment list to move the document you have selected. To remove an item from the list, select the document and tap Delete.
Pocket PC Phone User Manual140Pocket PC Phone User Manual 141 6. After  you have  completed the  selection of  your attachment(s)  and tapped Next,  a summarized Preview screen will list all the settings of this fax document. A small window will show you a preview of the fax. Tap this window to open a larger preview screen, which also enables you to write a note on the documents.7. Tap Send to connect to your internal modem to send all composed faxes. A duplicate copy will be stored in the Outbox folder. As soon as the fax sending dialog is opened, the device will automatically switch to Flight mode. Once the fax is successfully sent, the Flight mode is automatically switched off and the device will return to normal connectivity status.Receiving a faxTo receive faxes with Truefax via your Pocket PC Phone, you need a special fax number assigned by your mobile Pocket PC Phone operator. Currently, it's not possible to receive faxes through your Pocket PC Phone with a standard mobile phone number. Contact your mobile operator for the availability of this service. To receive a fax:1. Tap the Start menu > Programs > Truefax.2. Tap   in the menu bar to open the receipt dialog and to activate the modem. Truefax will then wait for incoming faxes.3. After the fax has been received, Truefax will switch to Waiting for incoming call. To close the receipt dialog, tap the Cancel button and wait until the button changes to Close, which could take some time.4. You will nd the document in the fax Inbox folder when a fax has been received.FinishingAfter a fax has been sent or received, the phone module has to be re-activated.1. Tap the antenna symbol   on the task bar to open the connectivity screen of your Pocket PC Phone.2. Tap Turn off ight mode in the appearing window.3. After a while the "x" at the antenna symbol will be replaced by a "!" and the antenna symbol with the signal bars will reappear.
Pocket PC Phone User Manual140Pocket PC Phone User Manual 141 In certain situations it is necessary to reenter the PIN code in order to reconnect to a GPRS network.Using the Fax ViewerThe fax viewer allows you to look at a fax and draw text or sketches on an existing document or on a newly created document.n  You can zoom a document by tapping   on the tool bar and choosing the zoom factor from the opening list.n  With   you can choose the pen width, choose between a white or black pen, and select Clear Page to clear all previous modications on the fax document.n  Tap the Undo or Redo button   to reverse what you have done with the pen or to reverse a rejected action.n  Tap   to view your fax documents page by page.n With   , you can:  -  Invert to show the actual page inverted. All black points will be white and all white     points will be black.  -  Rotate by 180 deg. so that a fax received upside down can be viewed without     rotating the device.  -  Show Margins that can be thin borders, drawn in the fax viewer dialog.  -  Page Info to display information about the chosen page.Customized templatesTruefax allows you to customize your documents to tailor a personal or corporate identity for your faxes. The identication dialog consists of three edit elds to display additional information  about the sender. Tap  the  Start menu  > Programs  > Truefax  > Tools  > Identify....Banner Name and Banner Number are both shown in the banner on the top of each page of the fax, if you have activated the Send Banner checkbox.
Pocket PC Phone User Manual142Pocket PC Phone User Manual 143 The fax device of the receiver will show the Station ID as the sender number.Properties:1.  Tap the Start menu > Programs > Truefax > Tools > Properties....In Logo graphic, you can tap the File button to choose a bitmap that will be used as a logo representing the sender on the cover page. 2. Units option enable you to choose the unit you are most familiar with. You can specify inch or cm (centimetre).3. The last and bottom part of the properties dialog is for the Fax Viewer customization. In the properties dialog you can customize the Fax Viewer by selecting: n    Text size: Enlarge the text font when viewing the document. n Caption word break: make the text break if it does not t into a single line. n Keep graphics of sent faxes feature: faxes that were already will not be        saved.Assigning every fax a subject should better help you to identify your        sent faxes without storing the fax documents.4. Tap OK to save the new settings.LayoutYou can customize the appearance of your fax by modifying the settings in the Layout dialog.Tap the Start menu > Programs > Truefax > Tool > Layout.n In the Font tab, dene the font that will be used for the fax. The only text that won’t be shown with this font is the text you have written with the quick note feature of the fax viewer, because this text will be handled as a graphic.n The Margins tab shows the actual height and width of the margins used for the fax. Modify these values by choosing one of the given values from the list. The standard measurement unit can be set in the Properties options.
Pocket PC Phone User Manual142Pocket PC Phone User Manual 143 Fax OptionsTap the Start menu > Programs > Truefax > Tool > Faxn The Fax options dialog lets you choose the Resolution of your fax. Select the Fine resolution to generate high-quality faxes, or choose the Normal resolution for optimal transmission rates.n Activate  the Play  sounds after  send  checkbox  to hear  a sound  prompt after  a completed send or receive action.9.6  MIDlet ManagerYour Pocket PC Phone supports Java 2 Edition, J2ME. The MIDlet Manager allows you to download Java applications such as games and tools specically designed for mobile devices. You will nd that some Java applications and games may have already been installed on your device. The Java MIDlet Manager gives you the exibility of installing and managing additional J2ME applications from the Internet.Installing MIDlets directly from the InternetYou can install MIDlets/MIDlet suites directly from the Internet using Internet Explorer in conjunction with the MIDlet Manager. 1. Connect to the Internet and locate a MIDlets/MIDlet suite you wish to download (this is normally a .jad and a .jar le). 2. Select the MIDlets/MIDlet suite and download it.3. You will be asked to conrm before the download begins. 4. A progress screen is displayed while the les are being downloaded. You may cancel the download at any time.Once your download is completed, the MIDlet Manager will automatically start and prompt you to install your new MIDlets/MIDlet suite. You must conrm that you want to proceed
Pocket PC Phone User Manual144Pocket PC Phone User Manual 145 and the installation of your MIDlets/MIDlet suite is completed. Alternatively, you can cancel the installation at any time.Installing MIDlets from a PCYou can install MIDlets/MIDlet suite onto your Pocket PC Phone from your PC using the USB sync cable, the optional cradle, infrared or Bluetooth. MIDlets transferred to your Pocket PC Phone using infrared, Bluetooth, or as E-mail attachments are automatically saved in the My Documents directory. To install MIDlets via a physical connection (such as USB sync cable or cradle) use Win-dows Explorer to copy your MIDlet le(s) from your PC to any of the following temporary directories, from where they can be installed by the MIDlet Manager.n Device memory: Mobile Device\My Pocket PC Phone\My Documents\My MIDletsn Storage card: Mobile Device\My Pocket PC Phone\Storage Card\If the folder My MIDlets not exist in My Documents, you need to create one with exactly the same folder name. The folder Storage Card will automatically appear once you insert the SD card to your Pocket PC Phone.Once the le(s) have been copied to your Pocket PC Phone or to your storage card, you must install the MIDlet/MIDlets suite:1. Tap the Start menu > Programs > MIDlet Manager > Menu > Install. 2. The Install screen will open, containing a list of all available MIDlets/MIDlet suites. 3. Select one and choose Install from the pop-up menu. You will be prompted to conrm your choice.Optionally, you can remove the MIDlet les from the temporary folder you used by tapping Delete from the pop-up menu.
Pocket PC Phone User Manual144Pocket PC Phone User Manual 145 Running MIDletsThe MIDlet Manager enables you to run MIDlets/MIDlet on your Pocket PC Phone. You can leave MIDlets running in the background while you perform other tasks on your Pocket PC Phone. You can have multiple MIDlets running at the same time, depending on the total amount of memory available on your Pocket PC Phone.1. Tap the Start menu > Programs > MIDlet Manager. 2. Select a suite and tap to run the MIDlet. The MIDlets/MIDlet suite you selected will open within the MIDlet Manager window.You can tap Show > Running to display the MIDlets/MIDlet suite currently running on your Pocket PC Phone. You can also return to a running MIDlet by selecting it from this screen.You can also tap the Show > Recent option to display up to the 9 most recently used MIDlets.Stopping MIDletsSome MIDlets have an  exit  or stop command  within  their  menu structure, which  are determined by the specic software developer.Stopping a MIDlets/MIDlet suite:To stop an individual MIDlet, navigate to the Running MIDlets screen:1. Tap the Start menu > Programs > MIDlet Manager. 2. Tap Show > Running.3. Tap and hold the MIDlet you want to stop and then select Stop from the pop up menu.
Pocket PC Phone User Manual146Pocket PC Phone User Manual 147 Stopping all MIDletsTo  stop  all the MIDlets running  on  your  Pocket PC Phone,  navigate  to  the  Running MIDlets screen:1. Tap the Start menu > Programs > MIDlet Manager. 2. Tap Show > Running.3. Tap Menu > Stop All. Once your MIDlets  have been stopped,  you  will be returned  to the MIDlet  Manager window.Managing your MIDlets/MIDlet suitesYou can organize your MIDlets into groups and dene custom groups. You can manage the default settings for MIDlets, including security settings.Customizing your display settings:1. Tap Sort By menu on the up-right corner of the MIDlet Manager screen to personalize your display options.2. You can choose your MIDlets/MIDlet suite to be sorted by Name (A to Z) or by Size (small to large).Changing the display name of your MIDletsYou can change the displayed name of any MIDlet on your Pocket PC Phone. However, you cannot change the names of MIDlet suites. 1. Tap and hold the MIDlet you wish to change the name of and the then select Rename from the pop-up menu.2. Enter the new name for your MIDlet in the dialogue box and press OK to conrm, or Cancel to abort.
Pocket PC Phone User Manual146Pocket PC Phone User Manual 147 Un-installing MIDlets/MIDlet suitesYou can remove MIDlets/MIDlet suites from your Pocket PC Phone’s memory. To do this, ensure that the MIDlets/MIDlet suite is not running.1. Select the MIDlets/MIDlet suite in the MIDlet Manager window and choose Un-install.2. You will be asked to conrm your decision by selecting the OK option. The MIDlet is then erased from your device's memory.You cannot un-install a single MIDlet from a MIDlet suite. You must un-install the complete MIDlet suite.To assign a group to a MIDlets/MIDlet suite1. Tap and hold on a MIDlet you wish and choose Group from the pop up menu in the MIDlet Manager window.2. The MIDlet Manager window contains a drop down box with a list of group names. Choose one of these and tap OK.You can adapt existing groups to meet your needs. Once a MIDlet has been assigned to a group, that group’s name will appear on the Show menu, and you can choose any group and view the MIDlets in it.System InfoYou can see the information about the currently used space of the MIDlets/MIDlet suite you have selected by tapping Menu > System Info. If the manufacturer has limited the total storage space for MIDlets, the limit and the amount currently available is also shown.Network TypeTapping Menu > Choose  Network  Type enables you to choose your connection from the available list.
Pocket PC Phone User Manual148Pocket PC Phone User Manual 149 MIDlet SecurityYou can adjust security settings for each MIDlets/MIDlet suite by selecting a MIDlet and choosing Security. Note that some features may not be available for all MIDlets/MIDlet suites.Security OptionDescriptionNet Access Determines whether a MIDlets/MIDlet suite can access the Internet.Local ConnectivityEnables a MIDlets/MIDlet suite to access services such as RDA and Bluetooth. Refer to your Pocket PC Phone's manual for the features available on your handset.App Auto Run Enables a MIDlets/MIDlet suite to run at specied times, or any time.Messaging Determines whether a MIDlets/MIDlet suite can send and/or receive SMS messages.Multimedia RecordingEnables a MIDlets/MIDlet suite to record sounds and images. Refer to your Pocket PC Phone's manual for the features available on your handset.
Pocket PC Phone User Manual148Pocket PC Phone User Manual 149 Error MessagesMessage MeaningEither RAM shortage, or insufcient space on the le systemInsufcient memory available on your Pocket PC Phone.Network out No network connection available.The jar size does not match that specied in the jadThe installation information provided by the MIDlet manufacturer is inaccurate.The jar manifest does not match the jadThe installation information provided by the MIDlet manufacturer is inaccurate.Invalid Java application descriptor (jad)There is a problem with the installation le provided by the MIDlet manufacturer.Invalid Java archive (jar) There is a problem with the installation le provided by the MIDlet manufacturer.This Java application is not compatible with this deviceOne of more features required by this MIDlet is not available on your Pocket PC Phone.
Pocket PC Phone User Manual150
Chapter 10Using Camera and Album10.1 About Camera and Album10.2 Camera 10.3 Album
Pocket PC Phone User Manual152Pocket PC Phone User Manual 15310.1 About Camera and AlbumWith Camera Wizard, you can use the attached camera on the back of your device to snap new photos or shoot video clips with accompanying audio.  Album provides many powerful features to manage, organize, and manipulate the image, video, and audio les.When in Photo Capture mode, you can capture standard still images.  In Video or MMS Video Capture mode, you can capture “live” video streams (with audio if desired), then share them with  others  or play them  on your own  Pocket  PC Phone, or  desktop  PC.    In  Contact  Photo Capture  mode,  you  can caputre images for  your  contacts.  Or, in Picture Theme Capture mode, you can place your captured images into attractive frames (templates).  You can even send the captured les via E-mail, or via MMS.  Just Snap and Send a newly-captured image, or Select and Send an existing image.Of course, you can also get image, video, and audio les from received E-mail, a Storage Card, infrared beaming, or synchronized from a PC via ActiveSync, and organize them into albums and Slide Shows.  File formats supportedFile formats that you can browse and view / play in Album include:File Type FormatsStill-image formats BMPGIF JPEGAnimation format Animated GIFVideo formats Motion-JPEG AVI (.avi)MPEG-4  Simple prole (.mp4)3GPP-H.263 baseline (.3gp)Audio formats MPEG-4 AAC (Advanced Audio Coding in .mp4 format)WAVMIDI (standard MIDI type 0,1, and SP-MIDI)
Pocket PC Phone User Manual152Pocket PC Phone User Manual 153NOTE: You can set an audio le to be used as your Pocket PC Phone’s ring tone. For more information about ring tone settings, please see Chapter 5.File formats that Camera supports includes:File Type FormatsStill-image formats BMPJPEGVideo formats Motion-JPEG AVI (.avi)MPEG-4  Simple prole (.mp4)MMS Video formats 3GPP-H.263 baseline (.3gp)MPEG-4  Simple prole (.mp4)10.2  CameraThere are two ways to enter the Camera mode :n Tap the Start menu > Programs > Camera.n Or just press the uppermost button on the left side of your device.When you initially enter Camera mode, the Photo Capture mode will be active.  The title at the right lower side of the LCD Display area indicates the current mode.  After starting one capture mode, you can easily switch to another, if desired.Capture mode FunctionPhoto capture still imagesVideo capture video clipsMMS Video capture video clips and send via MMSContact Photo take a photo to be used as a Photo ID for a contact entryPicture Theme capture still images and place in frame
Pocket PC Phone User Manual154Pocket PC Phone User Manual 155Usage of Buttons in Camera ModeWhen in Camera mode, you can press the following buttons on your Pocket PC Phone as a shortcut Orientation ToggleBy default, the orientation is in a Portrait display.  Press this button to change to a Landscape orientation.Camera Settings ScreenPress to toggle the Camera Settings screen open and closed.  If the screen is open and you have made changes to the settings, press to save the settings before closing the screen.Capture/Action ButtonCapture - Press to take a picture in still image capture modes. If in video capture modes, press this button to start recording the incoming video stream, and press it again to stop the recording process.Action - Conrm the selection you made.Navigation PadUp/Down - Increase/decrease the zoom levels.Left/Right - Switch between capture modes.Camera/Capture ButtonPress to launch Camera.  Press again to take a picture or to record a video.
Pocket PC Phone User Manual154Pocket PC Phone User Manual 155Photo Capture ModeIn Photo Capture mode, you can capture a single still image by pressing the Capture button on your Pocket PC Phone, or the Action button on navigation pad.  For the information on setting output format, resolution and ambience, please see Camera Settings Screen section.NOTE: Most of the settings in the LCD Display Panel can be changed using theCamera Settings screen.  Tap on the Camera Settings icon to display the Camera Settings screen (explained later).Incoming video stream is shown using the entire Pocket PC Phone screen.  (Icons superimposed on the screen are not saved with your captured images/videos.)The Camera automatically calculates the number of photos you can capture, based on the current settings and the space available.  In this example, 5019 more photos can be captured.  The counter updates automatically after a photo taking or the capture size changing.Capture Sizes are:n XL = Extra Large (960x1280)n L = Large (480x640)n M = Medium (240x320)n S = Small (120x160) The current capture size is small.Exits Camera mode and returns to the previous screen.The word Photo indicates that you are currently in Photo Capture mode.  Tap the left or right arrow icon to change capture mode.Tap to switch to Thumbnail View of Album mode.Tap to open the Camera Settings screen.The current zoom is 4x, indicating viewing 4x of normal size.The current Ambience setting is shown at this position. This icon indicates it has been set to Daylight.Tap the upward-pointing triangular icon to Zoom IN, or the downward-pointing triangular icon to Zoom Out.This icon indicates a ready state.  It changes to a red dot during image capture
Pocket PC Phone User Manual156Pocket PC Phone User Manual 157Video Capture ModeTo start video recording :1. Switch to Video Capture mode by tapping   or   icons, or using Left/Right navigational pad.2. Press the Action button, or the Capture button on the left side of your Pocket PC Phone.To stop recording, press Action or Capture button again.  The rst frame of the newly-captured video le will be displayed, and Review Screen described earlier will be available.  Output format is either Motion-JPEG AVI or MPEG4, based on the Camera Settings.The Camera automatically calculates the available duration for a video recording, based on the current settings and the space available.  When recording in progress, it changes to recording timer.  Camera automatically updates the available duration after a video taking or the capture size changing.The green “lmstrip” icon indicates the camera is in idle/ready state.  A blinking red circle indicates recording in progress.In this example, recording has been in progress for a duration of 21.55 seconds thus far.Capture Sizes are:n L = Large (240x320)n M = Medium (144x176)n S = Small (96 x128)The current size is large.Exits Camera mode and returns to the previous screen.The word Video indicates that you  are currently  in Video  Capture  mode.  Tap the left or right arrow to change capture mode.Left icon: Tap to open the Camera Settings screen.Right icon: Tap to switch to Thumbnail View of Album mode.The current zoom is 2x, indicating viewing 2x of normal sizeThe current Ambience setting is shown at this location.  This icon indicates it has set to Auto.Incoming video stream is shown using the entire Pocket PC Phone screen. Tap the upward-pointing/downward-pointing triangular icons to Zoom In/Out.
Pocket PC Phone User Manual156Pocket PC Phone User Manual 157MMS Video Capture ModeThe MMS Video capture mode is convenient if you want to capture a video le and then send it via MMS.To start the video recording, press the Action button, or the Capture button on the left side of Pocket PC Phone. To stop recording manually, press the Action or Capture button again.When  you select H.263  as  the  Capture  Format, only  Landscape  orientation  is available.Ambience has been set to Auto.In this example, MPEG-4 is selected as the Capture Format. When recording in MPEG-4, you have a choice of either Portrait or Landscape orientation. Portrait orientation is shown here.Capture Sizes for MPEG-4 video format are: n L= Large (240 x 320)n M= Medium (144 x 176)n S= Small (96 x 128)This example is medium size.Capture Sizes for H.263 video format are: n M = Medium (176 x 144)n S = Small (128 x 96)This example is medium size.
Pocket PC Phone User Manual158Pocket PC Phone User Manual 159Picture Theme Capture ModeThe Picture Theme Capture mode lets you choose a template in which your captured still image(s) will be placed.  You can think of a template as a kind of frame in which you would insert a photograph.  Several templates are included with Camera Wizard, in the subfolder named \My Documents\Templates\.To browse and select different templates, do one of the following:n Tap   buttons to display the previous or next template.n Tap  , select a template from the Template eld.n Tap  , then tap Browse... button to display detailed information of templates.  Tap Previous or Next button to browse the selection under the current folder.  To change the folder, tap Change... button.This example template requires two captured images.  “2/2” indicates that one image has already been caputred.Tap these icons to browse templates.
Pocket PC Phone User Manual158Pocket PC Phone User Manual 159Review ScreenIf the Review after capture checkbox is currently checked in the Gerenal tab of Options screen, then immediately after you capture an image, it will be displayed on the screen along with four icons.  1. To return to the previous screen, tap the Camera icon.2. To immediately send a captured image/video, tap the mail icon then select an option from the Send File dialog box.  If in the Contact Photo mode, display    instead.  Tap this icon to assign the captured image to a contact.3. To delete the image press the rubbish bin option.4. To view and edit the picture tap, the Album icon (for edit options see Album.)Send via MMSThe MMS composer screen will open, with the newly-captured le already attached. Simply compose the MMS message as you normally would and send. Review Screen:1 432
Pocket PC Phone User Manual160Pocket PC Phone User Manual 161Send via E-MailThis command invokes the compose screen of Inbox, with the newly-captured le already attached. Just compose and send the E-mail as you normally would.Zooming In/OutIn all modes, you can press the Up navigational button on your Pocket PC Phone to Zoom In the incoming video stream.  Each time you press the Up button, the enlargement doubles.  When the zoom reaches its limit, a beep will sound.Maximum zoom limit is different for each capture mode and capture size.  The table below summarizes the Zoom function availability. Capture Mode Capture Size Setting Zoom AvailableVideo and MMS VideoLarge (240 x 320) 1.0x to 2.0xMedium (144 x 176) 1.0x to 4.0xSmall (96 x 128) 1.0x to 4.0xPhoto and Contact PhotoXL (960x1280) 1.0x (no zoom available)Large (480 x 640) 1.0x to 2.0xMedium (240 x 320) 1.0x to 4.0xSmall (120 x 160) 1.0x to 8.0xPicture Theme  Determined by the current template.Depends on the size of the currently loaded template.Notes: n MMS Video Capture mode in H.263 le format only has Medium and     Small sizes.  n 1x = normal size (no zoom)2x = double enlargement4x = quadruple enlargement8x = octuple enlargement
Pocket PC Phone User Manual160Pocket PC Phone User Manual 161Camera Settings ScreenWhen in any of the capture modes (Photo, Video, MMS Video, Contact Photo or Picture Theme), you can tap   to display the Camera Settings.  Or, you can press the Contacts button at lower left of the front of your Pocket PC Phone.NOTE: The Capture Size is not available in Pciture Theme Capture mode.  It is replaced by Template drop-down list and the Browse... button.Icons on the menu bar are:1. Switches to the Thumbnail View of Album mode.2. Switches to the Detailed View of Album mode.Settings ExplanationCapture Mode Select a mode - Photo, Video, MMS Video, Contact Photo or Picture Theme.Capture Format The choices for  Capture  Format  will  be different based on capture modes.Capture Size The choices for Capture Size will be different based on capture modes. Higher Capture Size settings produce larger le sizes.Ambience A list of lighting conditions that lets you adjust the Capture screen to look its best in various environments.There  are also options  that  affects the appearance  of  the incoming  video stream: Grayscale  (black  and white), Sepia (reddish tint), Cool (bluish tint), and Negative (darkness and lightness reversed).12
Pocket PC Phone User Manual162Pocket PC Phone User Manual 163Tools MenuThe Tools  Menu  provides  many more settings that let you customize the behavior  of Camera mode functionsAdjust...Adjust... enables you to adjust the display properties: Contrast, Brightness, Saturation, Hue, and Sharpness.To open Adjust... screen, tap   > Tools > Adjust....To adjust a display propertye: select a property from Property eld and use the Slider Bar to adjust the value.NOTE: The incoming video stream displayed on your screen will immediately show the effect of any changes you make.To use original default values, tap Reset buttonOptions...The Options screen contains three tabs:  General, Image, and Video.a) General TabThe General tab includes the following options: n Disable shutter soundn Keep backlight on while in viewndern Review after capturen Flicker adjustment (Auto, 50Hz, or 60Hz)NOTE: Flicker Adjustment refers to the electrical voltage used in your country.
Pocket PC Phone User Manual162Pocket PC Phone User Manual 163b) Image tabHere are the options that affects on still image captures.Options FunctionPrex Type and Prex StringBy default, the lename of each new captured image le will be “image” followed by a sequential number, for  example:  image_00001.jpg.   If  you  wish to change  this prex  to  a different arbitrary text string, select String in the Prex Type eld and type the desired characters into the Prex String eld.  For example, entering “party” in the Prex String eld would produce the lename party_00001.jpg. Alternatively, you can choose Date or Date and Time as the Prex Type.  Counter Index By default, sequential numbers are automatically incorporated into each lename for all new image les you capture, such as 00001, 00002, 00003, etc.  The number follows the prex (explained above). To reset the numbering to “00001” for your captured image les, tap Reset counter.Save to By default, your captured image les will be saved to your \My Documents\ folder.
Pocket PC Phone User Manual164Pocket PC Phone User Manual 165c) Video tabThe options on the Video tab affect only your captured video les.Options FunctionPrex Type and Prex StringBy default,  the lename of each new captured video  le will be “video”  followed by a  sequential  number,  for  example:  video_00001.avi.  If you wish to change this prex to a different arbitrary text string, select String in the Prex Type eld and type the desired characters into the Prex String eld.  For example, entering “vacation” in the Prex String eld would produce the lename vacation_00001.jpg.  Alternatively, you can choose Date or Date and Time as the Prex Type.Counter Index By default, sequential numbers are automatically incorporated into each lename for  all  new video les  you  capture,  such as 00001, 00002, 00003, etc.  The number follows the Prex (explained above).  To reset the numbering to “00001” for your captured video les, tap Reset counter.Recording with AudioWhen this  checkbox is checked, audio will be recorded with your captured video clips.  It is checked by default.  Any videos captured when the checkbox is not checked would be silent (no accompanying audio).Save to By default, your captured video les will be saved to your \My Documents\ folder.
Pocket PC Phone User Manual164Pocket PC Phone User Manual 16510.3 Album Album allows you to view image and video les, and play audio les. Four view modes are available: Thumbnail, Detailed, Slide Show, and Full Screen.To start Album: • Tap the Start menu > Programs > Album.• Tap the Album icon in the Camera screen.Thumbnail viewThe rst time you enter Album, the Thumbnail view mode will be invoked. By default, your  \My  Documents\My  Pictures folder  will  be initially searched. You  can manually change the position of a thumbnail simply by pressing your stylus on it and then dragging it to the desired location. To select multiple thumbnails, press your stylus in an empty part of the screen, then drag your stylus across all thumbnails you want to include in the multi-selection.1. The current folder is shown here. Tap this eld if you want to switch to a different folder.2. Tap to select a different thumbnail size.1765423
Pocket PC Phone User Manual166Pocket PC Phone User Manual 1673. Tap to change the way thumbnails are sorted.4. Tap to switch to Camera mode.5. Tap to switch to Slide Show view.6. Tap to switch to Detailed view. (Or, tap directly on a thumbnail to load that le into Detailed view.) Audio or video les will begin playing.7. An  icon  in  the lower left  or  right  corner of a thumbnail indicates the following:     -  indicates that text  annotation  has been associated with this le.   G - indicates an animated GIF le.   V - indicates a video le.    - this speaker  icon  indicates that audio annotation has been associated with this le.To open a pop-up menu that contains frequently used commands, tap and hold your stylus on the thumbnail you want to operate on. To view an image in an enlarged view, or to play a video or audio le, tap the desired thumbnail.To make an annotation on your le:The Annotate... command lets you add and remove text or audio annotation for a le. The particular text and audio recording can then be set to display or play during a slide show. In the Thumbnail view mode screen, tap on Edit and then select Annotate..., or select it from the pop-up menu.To make a text annotation:If you wish to associate text with the le, enter it in the text box. After text annotation has been added,   will be shown on the le in the thumbnail. A separate text le will be created for that text.List View:
Pocket PC Phone User Manual166Pocket PC Phone User Manual 167To make an audio annotation:To create an audio recording (either voice or music) as an annotation using your built-in Pocket PC Phone microphone, tap   to begin recording, tap   to stop recording. After audio annotation has been added,   will be shown in the thumbnail. A separate .WAV audio le will be created.There is no warning when you record over an existing le. Your previous recording will be overwritten by the new recording. If you have tapped Remove Voice by accident, tap Cancel.NOTE: You cannot record an audio annotation for a video le that has sound. This function is automatically disabled when you work with a video le with sound.Sending a le via E-mail or MMS1. Select the desired le, tap Tools, and then select Send via MMS or Send via E-mail... from the menu.2. Follow the relevant procedures for sending that type of message.To set audio les as Ringtones:Select the desired audio le, then select Set as Ringtone from the Tools Menu (or the menu that pops up when you tap and hold on a thumbnail). The previous ringtone will be immediately replaced. A message will display the lename and conrm that the operation was successful.Assign to ContactThis command allows you to assign an image as a Photo ID to a Contact entry in your Pocket Contacts.1. Choose the image you want to use as a Photo ID.2. Select Assign to Contact. The Photo Contacts application will be invoked. The Contact entries in your Pocket Contacts will be displayed.
Pocket PC Phone User Manual168Pocket PC Phone User Manual 1693. Select the Contact entry to which you want to assign the Photo ID, and assign the desired attributes as you normally would in Photo Contacts (Photo only, or photo with template, etc.).4. The Photo Contacts  Preview  screen will show  you  a  preview of how  the Photo ID setup looks. After you save it, Photo Contacts will exit, and you will automatically be returned to the Album program.ConnectThis command is available on the Tools menu when in Thumbnail View only.  It allows you to connect to a server with media content via the Internet, and play the streaming media.  After selecting Connect... on the Tools menu, enter the desired URL in the “rtsp://” eld provided, then tap OK.  If the connection is made succesfully, the media will be played immediately in the Detailed View mode.OptionsTo change the Album settings, tap Options on the Tools menu. Four tabs are available: General, Association, Slide Show, and Network.a) The General tabFollowing tables are the options in the General tab:Function ExplanationDefault zoom The setting in the Default zoom eld controls the size of the selected le when it is initially displayed in Detailed View. If set to Smart, Album will automatically calculate the best size in which to display the le on the screen. However, if you want les to initially display in their original size, select Original size from the drop-down list box. If you want Camera to automatically display selected les so that they t within the screen, select Fit to window.
Pocket PC Phone User Manual168Pocket PC Phone User Manual 169Full screen rotateIf  None  is  selected, no automatic  rotation  will take place  when a  file is displayed  in  Detailed  View (but  you  can still rotate the  display manually using  the  Rotate  Clockwise and Rotate Counterclockwise icons on the toolbar in Detailed View). Select Left to automatically rotate images 90 degrees to the left in Detailed View, or Right if you want to rotate 90 degrees to the right.Animation speedThe setting in the Animation speed eld controls the speed at which animated GIF les are played. By default, this is set to Normal. You can select Faster, Slower, or No Delay from the drop-down list.Keep backlight on while playing videoIf you have  set your  Backlight to dim  after a  certain number of seconds, you can override it by checking this checkbox. This ensures that the Backlight will not dim during the video playbacks.Keep system powered on during video and audio playbackOverriding your system's power settings ensures that the system will not automatically power off your device whenever a video playback or audio playback is in progress.Adjust Gamma The Adjust Gamma setting controls image brightness/darkness. The minimum setting of 0.01 will cause images to display very dark. The maximum setting of 3.00 will cause them to display very light (“wash out”). If you change this setting, you can conveniently reset it to 1.00 by tapping the Reset button. This feature assists you in viewing an image more easily under different lighting conditions.The Association tabYou can associate any or all of the supported le types with Album. When selecting a le of the associated type in the File Explorer, it will automatically open using Album.
Pocket PC Phone User Manual170Pocket PC Phone User Manual 171The Slide Show tabThese settings control only the behavior of Slide Show view mode. These options are mostly self-explanatory, just choose the item you need and follow the relevant procedures for the way you want the Slide Show to work.The Network tabThe settings in this tab are used in conjuction with the Connect... command on the Tools menu. From the drop-down list in the Connect via eld, specify the network to be used in conjunction with the Tool Menu’s Connect... command. In UDP port range, the values in these two elds refer to the range of the protocol used to transfer data through the Internet. These are already assigned to the optimal values by your operator and normally will not be changed.Detailed View ModeDetailed View mode displays the selected le in an enlarged view,  and you  can further  manipulate the  view in various ways (zoom, rotate, pan, etc.).1. Toolbar.2. Command Bar.3. Hide or display the Toolbar.4. Switch to Thumbnail view.5. Switch to Slide Show view.6. Switch to Camera mode.123456
Pocket PC Phone User Manual170Pocket PC Phone User Manual 171Icons on the ToolbarNOTE: Full Screen View will hide the Title Bar, Toolbar, and Command Bar, so the full screen is utilized for image/video display.Images too big for the screen1. Whenever the image is too large to be shown in the display area in its entirety, you can press your stylus anywhere in the display area and drag to interactively quick-pan the image to any desired position.2. Alternatively, you can open the Quick View window, by tapping the Quick View icon on the Toolbar. The dotted outline within the Quick View window shows the currently displayed portion, in relation to the entire image. Drag the outline within the Quick View window to the desired position, or tap within the Quick View window to jump the outline to a different position. When satised with the position, tap the Quick View icon again to close the Quick View window.To set as Today wallpaper:This command allows you to change the background image of the Today screen on your Pocket PC Phone to any image you want.1. In Album, tap to open a video le or image you want to use as the image for the wallpaper.Switch to Full Screen view.Rotate Counterclockwise (90 degrees each time tapped)ZoomOutPrevious le Next le RotateClockwiseZoomInFit to windowToggles the Quick View window open and closed. Available only when current le is an image le.
Pocket PC Phone User Manual172Pocket PC Phone User Manual 1732. If desired, you can manipulate it in any way you wish: Zoom In or Out, Rotate, Pan, etc. The exact state of the image as displayed on your screen will be used as the Today screen image. Likewise, if you have chosen a video le and do not wish to use the rst frame of the video as the wallpaper, you can start playing the video and then open the Tools Menu at the frame you want to use. (The video is paused when the menu is open.)3. Select Set  as Today  Wallpaper. The message  “The  ‘Today’  background image has been successfully changed” will display.To Reset the Today Screen back to the Default Wallpaper:If you later decide that you want to re-set the Today screen back to the original default background:1. Tap the Start menu > Settings > Today icon in the Personal tab. 2. Select Windows Default in the list, then make sure the Use this picture as the background checkbox is checked.3 Tap OK.
Pocket PC Phone User Manual172Pocket PC Phone User Manual 173Tap once (or repeatedly) to Fast Forward to the next sequential les.Tap to resume playing a Slide Show that has been stopped.Exits the Slide Show and enters the Detailed view.Exits Slide Show mode and enters Thumbnail View mode Slide Show Properties. Lets you set Transition Effects, Rotation, Text display, Audio, Delay Time between slides (for image les), Random or forward-sequential display, etc. in the Slide Show Options screen.Tap to stop playback and stay on the current slide, but does not exit the Slide Show mode.Tap to re-display the previous le. Tap repeatedly to quickly Rewind to the desired le. (The three leftmost icons become available after Stop has been tapped.)Slide Show ViewWhen in the Thumbnail view or Detailed view, you can tap the icon in the Command Bar to enter Slide Show mode.
Pocket PC Phone User Manual174Full Screen View ModeYou can enter the Full Screen View only from the Detailed View. In the Detailed View mode, simply tap the Full Screen icon on the Toolbar to switch to Full Screen.Tap to switch to Full Screen View mode.As with the Detailed View, if the image or video is currently displayed in a size that is too large to t in its entirety on the screen, you can “pan” the desired portion into view by pressing and dragging your stylus on the screen.When you are ready to exit the Full Screen View, tap anywhere on the screen to display the Toolbar.  Tap the left most icon to exit.  If no action is taken, the Toolbar will automatically disappear again after a few seconds.
Appendix AMaintaining your Pocket PC Phonen Adding or Removing Programsn Managing Memoryn Backing Up Filesn Resetting Your Pocket PC Phone
Pocket PC Phone User Manual176Pocket PC Phone User Manual 177 Adding or Removing ProgramsBy default, programs added to your device at the factory are stored in the ROM (read only memory). You cannot remove these programs, and you will never accidentally lose them. You can install any other programs created for your device, as long as your device has enough memory. The most popular web site to nd software for Pocket PC Phone devices is http://www.microsoft.com/mobile/pocketpc.To add programs using ActiveSync:You will need to save the appropriate software to the hard drive of your PC before installing it on your device.1. Download the program to your PC (or insert the CD or disk that contains the program into your PC). Be sure that the program is compatible with your Pocket PC Phone before installing it.2.  Read any installation instruction or documentation that came with the program. Many programs  provide their own installation instructions.3.  Connect your device to a PC.4.  Double click on the program's .exe le. n If the le is an installer, the installation wizard will begin. Follow the        directions on the screen. Once the software has been installed on your PC,            the installer will automatically transfer the software to your device. n If the le is not an installer, you will see an error message stating that the        program is valid but was designed for a different type of PC. You will need        to move this le to your device. If you cannot nd any installation         instructions for the program in the Read Me le or documentation, use        the Explore command in ActiveSync to explore the program le         to the Program Files folder on your device.Once installation is completed, tap the Start menu > Programs > program icon.
Pocket PC Phone User Manual176Pocket PC Phone User Manual 177 To add a program directly from the Internet:1. Determine that your device and processor type meets the requirement of the software that you want to install.2. Download  the program to  your device directly  from the Internet  using Pocket  Internet Explorer. You should see a single *.xip, *.exe or *.zip le, a setup.exe le, or several versions of the les for different device types and processors. Be sure to select the program designed for the Pocket PC Phone.3. Read the installation instructions, readme les, or documentation that came with the program. 4. Tap the le, such as a *.xip or *.exe le. The installation wizard will begin. Follow the directions on the screen.To remove a program:Tap the Start menu > Settings > System > Remove Programs.You can only  remove  programs  installed in storage  memory.  Programs  that came with your device cannot be removed. You can quickly return your device to the factory default conguration by clearing all memory. All data, except the installed ROM application, will be lost.
Pocket PC Phone User Manual178Pocket PC Phone User Manual 179 Managing MemoryMemory  on your Pocket  PC  Phone  is shared between the  storage  memory  and the program memory. Storage  memory  is used to  store the information  you have created and the programs you have installed. Program memory is used to run programs on your Pocket PC Phone. The Pocket PC Phone automatically manages the allocation between the storage memory and the program memory.To view memory allocation and availability:Tap the Start menu > Settings > the System tab > Memory.Finding space in storage memoryUnder certain situations, such as when the memory is low, your Pocket PC Phone may not be able to automatically adjust the memory allocation. When you receive a message stating that storage or program memory is unavailable, try the following solutions:Move data to a SD storage card1.  Tap the Start menu > Programs > File Explorer.2.  Tap and hold the le you want to move, and tap Cut. Open the My Documents folder in the storage card folder, tap Edit, and then tap Paste. Files stored in folders other than My Documents (or in folders under the sub-folders in My Documents) may not show up in the list view of some programs. When you use Notes, Pocket Word, or Pocket Excel, move les by opening the item and tapping Tools or Edit and then Rename/Move.
Pocket PC Phone User Manual178Pocket PC Phone User Manual 179 Move E-mail attachments1.  Tap Messaging > Tools > Options.2.  On the Storage tab, select Store attachments on storage card, and then tap OK. All existing and future attachments will be automatically stored on the storage card.Save new items on a storage cardSet programs such as Notes, Pocket Word, and Pocket Excel to automatically save new items on the storage card. 1.  In Notes, Pocket Word, or Pocket Excel > Tools > Options.2.  In the Save to: eld select Storage Card.Delete unnecessary les1. Tap the Start menu > Programs > File Explorer.2. Tap and hold the le, and then tap Delete on the pop-up menu. To nd your largest les, tap the Start menu and then Find. In the Type list, tap Larger than 64 KB, and then tap Go.Delete all les and clear the history in Internet Explorer:From Internet Explorer > Tools > Options > the Memory tab > Delete Files > Clear History.
Pocket PC Phone User Manual180Pocket PC Phone User Manual 181 Backing Up FilesBecause any new programs or data are stored in RAM, and therefore will be lost if your device loses power for any reason, it is critical that you back up the device's les to your PC or a memory card. You can back up les by synchronization while working on a PC. However, if you are unable to access your PC, you will need to back up les to a SD or MMC card. Your device enables you to back up individual les in Word or Excel. All les could be saved on a SD. Furthermore, you can also back up and restore Contacts, Calendar, Internet and Messaging Settings.SD and MMC CardsYour device has an expansion slot compatible with a range of SD and MMC Memory cards, which are primarily used to back up or transfer les and data. To insert a memory card:Push the memory card into its slot until it clicks into place. The card is secure when it is not protruding from the base.To remove a memory cardTo remove the card, push it in and then release, letting the card spring out.Backing up or restoring your system using xBackup:1.  Tap the Start menu > Programs > xBackup > then the Backup or Restore tab.2. If you have inserted the SD card properly, it will appear next to Target. Tap Open and select Storage Card under the task bar.3. Make sure that no applications are running, tap Start.
Pocket PC Phone User Manual180Pocket PC Phone User Manual 181 Backing up or restoring your system via ActiveSync1.  Double click on  in the task bar of your PC.2.  Select the Backup/Restore option in the drop-down menu of Tools in ActiveSync.3.  Select the Backup tab to back up your system. If necessary, select the Restore tab to restore your system.Resetting Your Pocket PC Phone You can perform a soft reset or a full reset. During a soft reset, the device is restarted and only some data in opened programs may be lost. However, a full reset turns the battery off, returns the device to its original factory settings, and deletes all programs, les, contacts and other information you have saved to the device. Therefore, it is extremely important to back up data to a storage card or your computer on a regular basis in the event that a full reset has to be performed.To perform a soft resetIf your Pocket PC Phone responds slowly, stops responding, or freezes, you can soft reset it. A soft reset causes the Pocket PC Phone to restart and re-adjust memory allocation. Unsaved data in any opened applications may be lost. Use the stylus to press and hold the Reset button, as shown on the next page.
Pocket PC Phone User Manual182 Pocket PC Phone User Manual 183 To perform a full resetA full device reset clears memory, deletes all data and restores the Pocket PC Phone to its default settings. Programs installed at the factory remain, erasing all data that you have created and programs you have installed. Press and hold the power button, and then use the stylus to press the soft reset button at the same time. Be sure you have backed up all your data in a SD card or on your PC before performing a full reset.
Pocket PC Phone User Manual182 Pocket PC Phone User Manual 183 Appendix BRegulatory Noticesn Regulatory Agency Identicationn European Union NoticeFCC Compliance Statementn Important Health and Safety Informationn Troubleshooting
Pocket PC Phone User Manual184Pocket PC Phone User Manual 185 Regulatory Agency IDsFor regulatory identication purposes your product is assigned a model number PM10C.The following accessories have been approved for use with your device. Their assigned model numbers listed below can identify these approved accessories. To ensure continued reliable and safe operation of your Pocket PC Phone, use only the accessories listed below with your PM10C.Accessories Model NumberCradle PM15xThe above x may be any alphanumeric character or blank denoting external cosmetic changes.This product is intended for use with certied Class 2 Limited Power Source, rated 5 VDC, maximum 2A power supply unit.European Union NoticeProducts with CE marking comply with the R&TTE Directive (1999/5/EC), the EMC Directive (89/336/EEC) and the Low Voltage Directive (73/23/EEC) issued by the Commission of the European Community. Compliance with these directives implies conformity to the following European Norms (in brackets are the equivalent international standards): nEN 60950 (IEC 60950)Safety of InformationTechnology Equipment.n ETSI EN 301 511 Global system for mobile communications (GSM); Harmonized EN for mobile stations in the GSM 900 and GSM 1800 bands covering essential requirements of article 3.2 of the R&TTE directive (1995/5/EC ).
Pocket PC Phone User Manual184Pocket PC Phone User Manual 185 n ETSI EN 301 489-1 Electromagnetic compatibility and Radio spectrum Matters (ERM); ElectroMagnetic Compatibility (EMC) standard for radio equipment and services; Part 1: Common technical requirements.n ETSI EN 301 489-7 Electromagnetic compatibility and Radio spectrum Matters (ERM); ElectroMagnetic Compatibility (EMC) standard for radio equipment and services; Part 7: Specic conditions for mobile and portable radio and ancillary equipment of digital cellular radio telecommunications systems (GSM and DCS).n ETSI EN 301 489-17 Electromagnetic compatibility and Radio spectrum Matters (ERM); ElectroMagnetic Compatibility (EMC) standard for radio equipment and services; Part 17: Specic conditions for 2.4 GHz wideband transmission systems and 5 GHz high performance RLAN equipment.n ETSI EN 300 328 Electromagnetic compatibility and Radio spectrum Matters (ERM); Wideband Transmission systems; data transmission equipment operating in the 2.4 GHz ISM band and using spread spectrum modulation techniques.nGSM11.10nANSI/IEEE C.95.1-1992Specic absorption rate in mobile phone emission condition for body health nEN50360, EN50361 for SAR
Pocket PC Phone User Manual186Pocket PC Phone User Manual 187 FCC Compliance StatementnFCC part 15, 22 and part 24This device complies with Part 15 of the FCC Rules. Operation is subject to the following two conditions : (1) this device may not cause harmful interference, and (2) this device must accept any interference received, including interference that may cause undesired operation.n FCC ID : NM8MAGICIANn Statement according to FCC part 15.105This equipment has been tested and found to comply with the limits for a Class B digital device, pursuant to Part 15 of the FCC Rules. These limits are designed to provide reasonable protection against harmful interference in a residential installation. This equipment generates, uses and can radiate radio frequency energy and, if not installed and used in accordance with the instructions, may cause harmful interference to radio communications. However, there is no guarantee that interference will not occur in a particular installation. If this equipment does cause harmful interference to radio or television reception, which can be determined by turning the equipment off and on, the user is encouraged to try to correct the interference by one or more of the following measures.n Reorient or relocate the receiving antenna.n Increase the separation between the equipment and receiver.
Pocket PC Phone User Manual186Pocket PC Phone User Manual 187 n Consult the dealer or an experienced radio/TV technician for help.n Connect the equipment into an outlet on a circuit different from that to which the receiver is connected.n  Changes  or  modifications not  expressly  approved  by  the  party responsible  for compliance could void the user’s authority to operate the equipment.nRF EXPOSURESTests for SAR are conducted using standard operating positions specied by the FCC with the phone transmitting at its highest certied power level in all tested frequency bands. Although the SAR is determined at the highest certied power level, the actual SAR level of the phone during operation can be well below the maximum value. This is because the phone is designed to operate at multiple power levels so as to use only the power required to reach the network. In general, the closer you are to a wireless base station antenna, the lower the power output. Before a phone model is available for sale to the public, it must be tested and certied to the FCC that  it does not exceed the limit established by the government-adopted requirement for safe exposure. The tests are performed in positions and locations (e.g., at the ear and worn on the body) as required by the FCC for each model. (Body-worn measurements may differ among phone models, depending upon available accessories and FCC requirements). While there may be differences between the SAR levels of various phones and at various positions, they all meet the government requirement for safe exposure. For body worn operation, to maintain compliance with FCC  RF exposure guidelines, use  only High Tech computer, Corp. approved accessories. When carrying the phone while it is on, use the specic High Tech Computer Corp. supplied or approved carrying case, holster, or other body-worn accessory.Use  of non High  Tech  Computer  Corp. approved accessories  may  violate  FCC RF exposure guidelines and should be avoided.
Pocket PC Phone User Manual188Pocket PC Phone User Manual 189 Important Health and Safety InformationRetain and follow all product safety and operating instructions. Observe all warnings in the operating instructions on the product.To reduce the risk of bodily injury, electric shock, re, and damage to the equipment, observe the following precautions.General PrecautionsnHeed service markings      Except as explained elsewhere in the Operating or Service documentation, do not service any product yourself. Service needed on components inside these compartments should be done by an authorized service technician or provider.nDamage requiring service      Unplug  the product from the  electrical  outlet  and refer servicing  to  an  authorized service technician or provider under the following conditions:lLiquid has been spilled or an object has fallen into the product.lThe product has been exposed to rain or water.lThe product has been dropped or damaged.lThere are noticeable signs of overheating.lThe product does not operate normally when you follow the operating instructions.nAvoid hot areas      The product should be placed away from heat sources such as radiators, heat registers, stoves, or other products (including ampliers) that produce heat.nAvoid wet areas      Never use the product in a wet location.nAvoid pushing objects into product      Never push objects of any kind into cabinet slots or other openings in the product. Slots and openings are provided for ventilation. These openings must not be blocked or covered.nMounting Accessories      Do not use the product on an unstable table, cart, stand, tripod, or bracket. Any mounting of the product should follow the manufacturer's instructions, and should use a mounting accessory recommended by the manufacturer.
Pocket PC Phone User Manual188Pocket PC Phone User Manual 189 nAvoid unstable mounting      Do not place the product with an unstable base. nUse product with approved equipment      This product should be used only with personal computers and options identied as suitable for use with your equipment.nAdjust the volume      Turn down the volume before using headphones or other audio devices.nCleaning      Unplug the product from the wall outlet before cleaning. Do not use liquid cleaners or aerosol cleaners. Use a damp cloth for cleaning, but NEVER use water to clean the LCD screen. Safety Precautions for Power Supply UnitnUse the correct external power source A product should be operated only from the type of power source indicated on the electrical ratings label. If you are not sure of the type of power source required, consult your authorized service provider or local power company. For a product that operates from battery power or other sources, refer to the operating instructions that are included with the product.nHandle battery packs carefully This product contains a Li-ion Polymer battery. There is a risk of re and burns if the battery pack is handled improperly. Do not attempt to open or service the battery pack.        Do not disassemble, crush, puncture, short external contacts or circuits, dispose of in re or water, or expose a battery pack to temperatures higher than 60oC (140oF).Warning: DANGER OF EXPLOSION IF BATTERY IS INCORRECTLY REPLACED. TO REDUCE RISK OF FIRE OR BURNS, DO NOT DISASSEMBLE, CRUSH, PUNCTURE, SHORT EXTERNAL CONTACTS, HEAT ABOVE 60oC (140oF), OR DISPOSE OF IN FIRE OR WATER. REPLACE ONLY WITH SPECIFIED BATTERIES. RECYCLE OR DISPOSE OF USED BATTERIES ACCORDING TO THE LOCAL REGULATIONS OR REFERENCE GUIDE SUPPLIED WITH YOUR PRODUCT.
Pocket PC Phone User Manual190 Pocket PC Phone User Manual 191 Exposure to Radio Frequency (RF) SignalsYour wireless phone is a radio transmitter and receiver. It is designed and manufactured not to exceed the emission limits for exposure to radio frequency (RF) energy set by the Federal Communications Commission of the U.S. Government. These limits are part of comprehensive guidelines and establish permitted levels of RF energy for the general population. The guidelines are  based on the  safety  standards  previously set by  both  U.S.  and international standards bodies:n American National Standards Institute  (ANSI) IEEE. C95.1-1992.n National Council on Radiation Protection and Measurement (NCRP). Report 86. 1986.n International Commission on Non-Ionizing Radiation Protection (ICNIRP) 1996.n   Ministry of Health (Canada), Safety Code 6. The standards include a substantial safety margin designed to assure the safety of all persons, regardless of age and health. SAR InformationnSAR :  10g @ 0.413 mW/g (Europe); 10g @ 0.773 mW/g (Taiwan).                 10g @ 0.413 mW/g (Australia); 1g @ 0.740 W/kg (USA).THIS MODEL DEVICE MEETS THE GOVERN-MENT'S REQUIREMENTS FOR EXPOSURE TO RADIO WAVES.For body worn operation, this phone has been tested and meets the FCC RF exposure guidelines when used with an accessory that contains no metal, and that positions the antenna of the GSM phone a minimum of 1.0 cm from the body. The SAR values of this GSM phone are 0.740 W/g (body) and 0.532 W/g (head). Use of other accessories may not ensure compliance with the FCC RF exposure guidelines.The FCC has granted an Equipment Authorization for this model device with all reported SAR levels evaluated as in compliance with the FCC RF exposure guidelines. SAR information on this model device is on le with the FCC and can be found under the Display Grant section of http://www.fcc.gov/oet/fccid  after  searching  on  FCC  ID:  NM8MAGICIAN. Additional  information  on Specic Absorption Rates (SAR) can be found  on the Cellular Telecommunications & Internet Association (CTIA) web-site at http://www.devicefacts.net.* In the U.S. and Canada, the SAR limit for mobile GSM phones used by the public is 1.6 Watts/kg (W/kg) averaged over one gram of tissue. The standard incorporates a substantial margin of safety to give additional protection for the public and to account for any variations in usage.
Pocket PC Phone User Manual190 Pocket PC Phone User Manual 191 TroubleshootingIf you still  encounter  problems after reviewing  this troubleshooting guide,  contact your mobile operator or an authorized Technical Support center in your area.Operating ProblemsProblem Solutionn My Pocket PC Phone keeps turning itself off.Your Pocket PC Phone is designed by default to turn itself off if not used for 3 minutes. This period can be adjusted to a maximum of 5 minutes. Refer to the Power setting in Chapter 5 for more information.n My Pocket  PC Phone  is not making any sound. 1  Tap   at the right side of the Title Bar to check the volume status.2  Check  the settings  of Sound  and Notifications  on  the Personal tab by tapping the Start menu > Settings.n My Pocket PC Phone does not vibrate when the phone rings or alarms occur.1  Tap   at the right side of the Title Bar to check if the vibrate function is activate.2  Check  the settings  of Sound  and Notifications  on  the Personal tab by tapping the Start menu > Settings.3  Check the event note in your Calendar to see if the Reminder has been activated.n The screen freezes or the device is not responding.Reset your device. See the Resetting your Pocket PC Phone in Appdendix A.
Pocket PC Phone User Manual192 Pocket PC Phone User Manual 193 Problem Solutionn The screen is dark. 1  Check the Brightness setting by tapping the Start menu > Settings > the System tab > the Backlight > Brightness tab.2  Prolonged exposure to direct sunlight may also cause your Pocket PC Phone screen to temporarily darken. This is normal for LCD screens and is not permanent.n A  Running  out  of  memory warning  message pops  up on the screen.Memory on your Pocket PC Phone is shared between storage memory and program memory: 1  Delete any unnecessary information you have entered to release more storage memory space. 2  Delete the unnecessary programs you have installed to release more program memory space.See the Managing Memory section in Appendix A.n The  Battery  low  warning message  pops  up  on  the screen.Plug the AC power in to your device to charge it.n The  screen is  hard to  read, or the  text on  the screen is  too  small for you.If  you  are having  a hard time  viewing a  document  in  Notes,  try changing the size of the view by tapping a zoom percentage on the Tools menu.1   For Pocket Word and Pocket Excel, on the View menu, tap Zoom and then select a zoom percentage.2   For Pocket Internet Explorer, on the View menu, tap Text Size and then select a size.3  For Pocket Outlook data, try enlarging the display font. To do this within Calendar, Tasks or Contacts, tap Tools, then Options, and then select Use large font.
Pocket PC Phone User Manual192 Pocket PC Phone User Manual 193 Tapping and Writing ProblemsProblemn Device buttons do not re-spond, or bring up the wrong program.n Inaccurate  response to  stylus taps. n Pocket  PC  Phone  does  not recog-nize handwriting.SolutionCheck the Buttons setting to see if the program assignment for each function button is set as you wanted. Tap the Start menu > Settings > the Personal tab > Buttons. For detailed information about Button settings, see Chapter 5.Adjust the  touchscreen to respond more  accurately to  screen taps. Tap the Start menu > Settings > the System tab > Screen > Align Screen.For your Pocket PC Phone to recognize your handwriting input with the stylus, you need to use Transcriber writing. To learn how to write in Transcriber, see Chapter 2.
Pocket PC Phone User Manual194Pocket PC Phone User Manual 195 ActiveSync ProblemsProblemn ActiveSync operation cannot be performed or connected.Solution1     Make  sure the ActiveSync cradle/cable  is  connected securely.2     Make sure  you have  installed the  ActiveSync  software included on the Companion CD.3     Make sure you selected the appropriate local USB from File Menu Connection  Settings in the ActiveSync Manager window on your desktop computer.4     If ActiveSync  still doesn't  work, remove and  re-install the ActiveSync software on your PC.n ActiveSync  is connected,  but data cannot be synchronized. On your desktop computer, check the Tools Menu > Options > the Sync Options tab in the ActiveSync Manager window to see if the information type for the program you want has been selected  for synchronizing.  See more  details about synchronizing information in Chapter 4.
Pocket PC Phone User Manual194Pocket PC Phone User Manual 195 Connection ProblemsProblemn Unable to use Infrared (IR) port to transfer information.n Cannot connect to Internet, web surng doesn't work.Solution1     Line up the IR ports so that they are unobstructed and within a close 20cm range.2     Make sure that nothing is obstructing the two IR ports.3     Adjust the room lighting. Some light sources interfere with IR connections. Try moving to a different location or turn out some lights.4     Transfer only one le, or no more than 25 contact cards, at a time.1     Check that you have set up and connected to an Internet service provider.2     Check that the wireless connection to your mobile service provider is switched on and the signal is un-obstructed.3     Verify with your Internet service provider that your username and password are correct.See Chapter 7,  Getting Connected. Additional  information is also available in Connections Help on the Pocket PC Phone and ActiveSync Help on the PC.
Pocket PC Phone User Manual196Pocket PC Phone User Manual 197 Problemn Problems  with the  cable  and cradle connection.Solution1     Make sure that your Pocket PC Phone is turned on.2     Make sure that you do not have any other active connections. Tap the Start menu > Today, and then tap   or   at the bottom of the screen, and then Disconnect.3     Make sure that the cable is securely plugged into the COM or USB ports on the back of your PC. Use the cable that came with the Pocket PC Phone without any extra cables or extenders attached.4     Plug the other end of the cable securely into the correct port on your Pocket PC Phone. If you are using a cradle, push your Pocket PC Phone securely into the cradle.
Pocket PC Phone User Manual196Pocket PC Phone User Manual 197 SpecicationsSystem InformationProcessor  Intel Bulverde CPU at 416MHzMemory  - ROM : 64 MB      - RAM : 64 MBOperating System  Windows Mobile2003TM                                   2003 Second EditionDisplayLCD Type 2.8" transective TFT-LCD   with back-light LEDs,   touch-sensitive screenResolution  240 x 320 at 65,536 colorsGSM/GPRS (Tri-band) ModuleGSM 900  880 ~ 915, 925 ~960 MHzGSM1800  1710 ~ 1785, 1805 ~ 1880 MHzGSM1900  1850 ~ 1910, 1930 ~ 1990 MHzInternal antenna  YesCamera ModuleType  Color CMOS camera module                                    with dust-proof coverResolution 1.3M with JPEG encoderCamcorder  QCIF, Min 15 fps (in live mode),   Max. 15 seconds per clipPhysicalDimensions 58 mm (w) x 108.2 mm (h) x 18.2 mm(l)Weight                     150g (with battery)AC Adaptor    Delta                        Type ADP-5FHX   Phihong                   Type PSC05R-050 Controls and LightsNavigation            5-way navigation padButtons                 -  4 program buttons :                                    Calendar, Contacts, Camera,                               Voice record.                          - 2 phone function: Call, End                                - Volume control button                              (Up/ Down)                              - Power on/off                              - Reset buttonLED                       - Event notication                              - Charge status                              - GSM/GPRS signals                              - Bluetooth, system                                 notication AudioAudio controller  AGCMicrophone/  Built-inSpeakerHeadphone  WAV/WMA/AMR/MARWB//                                   AAC/AAC+/MP3 stereoConnectionInfrared  SIRI/O port  Mini-USB individual port for                                   signals   (for USB, and power) Audio  Stereo headphone jack Expansion SlotsSDIO/MMC  Yessupports
Pocket PC Phone User Manual198Pocket PC Phone User Manual 199 IndexAAbout  81Accessories  15ActiveSync  68ActiveSync Errors  74AC Adapter  15Add programs  176Add ring tone  85Album  165BBackground  138Backing Up Files  180Backlight  11,82Battery  13Beam  98Block Recognizer  28Bluetooth  94Bluetooth Connection  73Bluetooth modes  95Bluetooth Settings  95Bonds  96Buttons  78CCalendar  10,106Call barring  86Call forwarding  86Call History  47,56Call on hold  53Call waiting  86Camera  10,153Camera Lens  11Car Antenna Connector  11Clock & Alarms  82Command bar  23Conference call  53Connection  44Connections  88Contacts  10,46,108Contacts information  55CSD Line Type  90DData retention  13Detailed View Mode  170Device Settings  76Dialer screen  42Drawing  35EE-Mail  116E-mail attachments  179Earphone Plug  11Editing and selecting text  29Emergency call  64End  10Entering Information  25FFCC compliance  186Finding Information  38Flight Mode  45Full reset  181Full Screen View Mode  174GGPRS Settings  90HHeadset  15IIndicators  21Infrared  73Infrared Port  11Input  78Input Panel  26International call  64Internet  88
Pocket PC Phone User Manual198Pocket PC Phone User Manual 199 KKeypad tone  85LLetter Recognizer  27Locking the keypad  65Locking the SIM card  66Locking your Pocket PC Phone  65MManaging Memory  178Memory  82Memory card  180Menus  79Microphone  11MIDlet Manager  143Mini USB Connector  11MMC/SD or SDIO slot  10MMS Messages  123MMS Settings  129MMS Video Capture Mode  157More  86MSN Messenger  121Muting a call  54NNavigation bar  23Navigation Pad  10Network  85Network card  92Network Cards Settings  92Normal Viewer  140Notes  112Notications  22Notication LEDs  10OOwner Information  79PPermanent Save  83Personal tab  76Phone dialer screen  42Phone Pad  30Phone Settings  84Phone volume  45Photo Capture Mode  155Photo Contacts  57Pictures  135Picture Theme Capture Mode  158PIN  44Pocket Excel  133Pocket Internet Explorer  91Pocket Word  132Pop-Up menus  22Power  83Power Button  11Programs  24RRecord  10Recording  36Remove a program  177Review Screen  159Ring tone  84Ring type  84SScreen Orientation  19SD and MMC Cards  180SD storage card  179Secure your phone  65Self-portrait mirror  11Services  86SIM Card  12
Pocket PC Phone User Manual200SIM contact  55SIM Manager  55SIM Tool Kit  64Slide show  173Smart Dialing  49Soft Keyboard  26Soft Reset  11,181Sounds and Notications  80Speakerphone  54Speed Dial  48Stylus and Stylus Slot  11Synchronizing Information  70System tab  77TTalk/Send  10Tasks  111Terminal Services Client  93Text Messages  116Thumbnail view  165Today  80Today screen  20Today wallpaper  171Today wallpaper  138Touch Screen  10Transcriber  28Transferring pictures  136Truefax  139UUSB Cable  15VVibrate mode  45Video Capture Mode  156Voice Mail  48Volume  10WWallpaper  172Windows Media Player  134Wireless Modem  100Writing  33

Navigation menu