HTC PB PHOE100 User Manual Book JUNO TMOUS Manual indb
HTC Corporation PHOE100 Book JUNO TMOUS Manual indb
HTC >
Contents
- 1. User manual 1
- 2. User manual 2
- 3. User manual 3
User manual 2

Chapter 4
Managing your Phone
4.1 Personalizing Your Phone
4.2 Adding and Removing Programs
4.3 Using Task Manager and Managing Memory
4.4 Managing and Backing Up Files
4.5 Protecting Your Phone
4.6 Restarting Your Phone
4.7 Resetting Your Phone
4.8 Windows Update

68 Managing your Phone
4.1 Personalizing Your Phone
Set up the Home screen
The Home screen is your starting place for most tasks. You can gain access
to all features and programs from the Home screen.
To customize the Home screen
1. On the Home screen, select Start > Settings > Home Screen.
2. In Home screen layout, Color scheme, Background image, and
Time out, choose the options you want, and select Done.
Tip If you only want to change the background image, you can do it from the
Shortcuts Bar. On the Home screen, scroll down to on the Shortcuts Bar,
then select Background Image.
To set a picture as the background
1. On the Home screen, select Start > Pictures & Videos.
2. Select the picture you want to set as the background. Select View or
press CENTER SELECT for a larger view of the image.
3. Select Menu > Use as Home Screen.
4. Use the NAVIGATION WHEEL to select the portion of the picture you
want to use, and select Next. If the picture fits the screen, this step is
skipped.
5. In Adjust the transparency, select a higher percentage for a more
transparent picture and then select Finish.
Set date, time, language, and other regional options
Your phone should already be set up with the regional settings that are
appropriate for your locale.
To change regional settings
You can specify the language, locale, date and time style, as well as number
and currency formatting options.
1. On the Home screen, select Start > Settings > More > Regional
Settings.
2. In Language, select your preferred language.

Managing your Phone 69
3. In Locale, select the locale for the language you selected. The Locale
option automatically changes the format of the remaining options
(such as date, time, and currency) according to the locale you specify.
4. Select Done.
To set the date and time
1. On the Home screen, select Start > Settings > Clock & Alarm >
Date and Time.
2. Set the Time zone, Date, and Time, and then select Done.
Choose how to be notified about events or actions
A profile is a group of settings that determine how your phone will alert you
to phone events such as incoming calls and notifications.
To change the current profile
1. On the Home screen, scroll down to on the Shortcuts Bar, then
select Profile.
2. Choose a new profile, and select Done.
Tip To quickly change the profile, press and hold the HOME key to display the
Quick List, and choose a profile.
To edit a profile
1. On the Home screen, scroll down to on the Shortcuts Bar, then
select Profile.
2. Select the profile to edit.
3. Select Menu > Edit.
4. Modify the settings, and select Done. To cancel without saving
changes, select Cancel.
Tip To revert to the default profile settings, select Menu > Reset to default.

70 Managing your Phone
To specify the sound for an event
1. On the Home screen, scroll down to on the Shortcuts Bar, then
select Ringtone.
2. For the desired event, select a sound. Select None if you do not want
to hear a sound.
3. Select Done.
Note For ring tones, you can use sound files in either the .wav, .mid, .wma, or .mp3
file format. For notifications or reminders, you can use .wav or .mid files.
Tip When you select a sound, the sound plays. To hear it again, select Menu >
Play.
To set sound for the keyboard
1. On the Home screen, scroll down to on the Shortcuts Bar, then
select Ringtone.
2. In Keypad control, select a sound. Select None if you do not want to
hear any sound while pressing a key.
3. Select Done.
To copy a sound to your phone
After a sound file is located on your phone, you can use it for a ring tone,
notification, or reminder. Sound files in either .wav, .mid, .wma, or .MP3
formats can be used.
1. Connect the phone to your PC using a USB connection.
2. On your PC, copy the sound file you want.
3. In Windows Mobile Device Center, click File Management > Browse
the contents of your device.
Or
In ActiveSync on your PC, click Explore and double-click My
Windows Mobile-Based Device.
4. Save the sound file on your phone by going to Application Data >
Sounds, and pasting the file into that folder.
Managing your Phone 71
To set an alarm
1. On the Home screen, select Start > Settings > Clock & Alarm >
Alarm.
2. In Alarm time, enter the time for the alarm to go off.
2. In Alarm, choose when you want the alarm to go off.
4. Select Done.
Set personal information
Entering and displaying owner information are best practices; they allow
someone to return the phone to you in case it is lost.
To enter owner information
1. On the Home screen, select Start > Settings > More > Owner
Information.
2. Enter the necessary information and select Done.
Set performance and maintenance options
To change accessibility settings
1. On the Home screen, select Start > Settings > More > Accessibility.
2. Select your preference for the following:
• In System font size, set the size of the font that is displayed on the
screen.
• In Multipress time out, set the length of time between keypresses
when entering text in Multipress mode.
• In Confirmation time out, set the delay before an unconfirmed
action times out.
• In In-call alert volume, set the volume for incoming call or
receiving new message alerts while you are in a call.
3. Select Done.

72 Managing your Phone
To change power management settings
You can use Power Management to check the battery, and configure
settings that prolong battery life.
1. On the Home screen, scroll down to on the Shortcuts Bar, then
select Battery.
2. Adjust the following settings:
• In Backlight time out on battery / AC, select the amount of time
for the phone to be idle before the backlight turns off when using
the battery or AC power.
• In Display time out on battery, select the time limit for the
phone to be idle before the screen turns off when using the
battery or AC power.
3. Select Done.
Tip Main battery indicates the amount of battery life remaining.
To find the operating system version number
On the Home screen, select Start > Settings > About.
To find the phone specification
On the Home screen, select Start > Settings > System Information.
4.2 Adding and Removing Programs
Before you purchase additional programs for your phone, make sure that
they are compatible with your phone.
To add programs
1. Download the program to your PC (or insert the disc that contains
the program into your PC). You may see a single *.exe file, a *.zip file, a
Setup.exe file, or several versions of files for different device types and
processors. Be sure to select a program designed for your phone and
processor type.
2. Read the installation instructions that comes with the program.
3. Connect your phone to the PC and then double-click the *.exe file.

Managing your Phone 73
To remove a program
1. On the Home screen, select Start > Settings > More > Remove
Programs.
2. Scroll to the program to remove and then select Menu > Remove.
4.3 Using Task Manager and Managing Memory
To check how much memory is available
1. On the Home screen, select Start > Settings > More > About.
2. Scroll down to Available Memory.
To close running programs in Task Manager
Task Manager allows you to close programs currently running on your
phone to free up storage space.
1. On the Home screen, scroll down to
on the Shortcuts Bar, then select
Manage Memory.
2. On the Task Manager screen, select
Menu to open a list that lets you
go to a specific program, stop
running programs, and view system
information.
3. Choose a program on the list and
select Menu > Stop.
74 Managing your Phone
4.4 Managing and Backing Up Files
You can back up files to your PC using Windows Mobile Device Center or
ActiveSync or copy files to a storage card that is installed on your phone.
You can also efficiently manage your files and folders using File Explorer
installed on your phone.
Copy files using Windows Mobile Device Center/
ActiveSync to the PC
1. Connect your phone to your PC.
2. In Windows Mobile Device Center, click File Management > Browse
the contents of your device.
Or
In ActiveSync on your PC, click Explore. This opens the Mobile Device
folder for your phone.
3. Browse your phone for files that you want to copy to your PC.
4. Select and copy the files [Ctrl + C] and then paste them [Ctrl+V] to
the destination folder in the PC.
Copying a file results in separate versions of a file on your phone and PC.
Changes made to one file will not affect the other since the files are not
synchronized.
Use File Explorer
File Explorer provides many easy-to-use features for file and folder
management.
To start File Explorer
On the Home screen, select Start > File Explorer.
File Explorer operates in the following two views:
• List View
• Icons View
File Explorer displays the entire file structure in your phone’s memory. The
functions focus primarily on folder management. When initially started, File
Explorer is in List View by default. To switch between views, select Menu >
View > Icons or List.
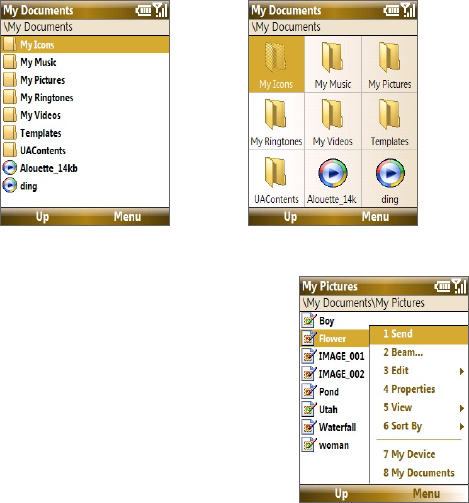
Managing your Phone 75
File Explorer - List View File Explorer - Icons View
In File Explorer, select Menu to open a
list that lets you send or beam the file,
view the file’s properties, sort the files,
and more.
To send a file as an e-mail attachment
1. In File Explorer, select a file and select Menu > Send.
2. On the Messaging screen, select an e-mail account.
3. The file will automatically be attached to the new message. Specify
the recipient and subject, and type your message.
4. Select Send.
Note You can also send the file via Picture Message.

76 Managing your Phone
4.5 Protecting Your Phone
You can protect your phone from unauthorized use by requiring a PIN
(personal identification number) in order to make calls. Your default PIN is
1234. Additionally, you can also lock the entire phone.
To enable the SIM PIN
1. On the Home screen, select Start > Settings > Security >
Enable SIM PIN.
2. Enter the PIN, and select Done.
Note To cancel without enabling the SIM PIN, press HOME.
To disable the SIM PIN
1. On the Home screen, select Start > Settings > Security >
Disable SIM PIN.
2. Enter the PIN, and select Done.
To change the SIM PIN
Be sure to make a note of your personal identification number (PIN). When
the SIM PIN is enabled, you must provide this PIN to unlock the phone.
1. Select Start > Settings > Security > Change SIM PIN.
2. In Old PIN, enter the current PIN.
3. Enter and confirm the new PIN, and select Done.
To lock the phone
Locking the phone turns off its functionality. This is a helpful feature if,
for example, the phone is turned on and in your pocket, and you want to
prevent accidental keypresses. Once the phone is locked, the left SOFT KEY
label changes to Unlock.
You can lock the phone by:
• Press and hold for about 2 seconds.
• Close the keyboard.
• Press and hold the HOME key to open the Quick list, then select Lock.
Note You can still receive calls and make emergency calls when the phone is
locked.
Managing your Phone 77
To automatically enable phone lock
1. On the Home screen, select Start > Settings > Security > Device
lock.
2. Select Prompt if device unused for then select the amount of time
for the phone to be inactive before automatically locking.
3. Select the Password type, then enter and confirm your password.
4. Select Done.
To unlock the phone
Depending on whether the keyboard is opened or closed, you can unlock
the phone by:
• Select Unlock and press the HOME key.
• If the keyboard is closed, open the keyboard.
Note If a password has been enabled, you will be prompted for the password
when you unlock the phone.
To disable the phone lock
Select Unlock and then enter the password you have set to unlock your
phone.
To set keyboard lock options
1. Select Start > Settings > Slide and Key Lock.
2. Choose to enable or disable Auto lock timeout and/or Manual lock.
• Enabling Auto lock timeout locks the device the same time
the backlight goes off, if set in Power Management, when the
keyboard is closed.
• Enabling Manual lock prompts a message if you want to lock the
device or not when you close the keyboard.
To encrypt files on the microSD card
Select Start > Settings > Security > Encryption and choose Encrypt files
placed on storage cards.
78 Managing your Phone
4.6 Restarting Your Phone
Restart your phone when a program is not performing properly or the
phone is not responding to any keypresses.
To restart the phone
1. Remove the battery.
2. Wait 3 seconds, then reinsert the battery and turn on your phone.
WARNING! If the phone is restarted while a program is running, unsaved work will
be lost.
4.7 Resetting Your Phone
Resetting your phone will remove all the data from its memory and restore
the phone back to the factory default settings.
WARNING! All your data will be deleted, it is recommended that you back up your
data first before resetting your phone.
To reset your phone
1. Select Start > Accessories > Clear Storage.
2. Follow the on-screen instructions to reset the phone.
The phone will restart after it has been reset.
Note If Encrypt files placed on storage cards is or was enabled before, then
backup all files from the storage card before using Clear Storage, hard reset
or updating the ROM system software. Otherwise you will no longer be able
to access the encrypted files on the storage card. Use ActiveSync or Windows
Mobile Device Center to transfer files between your storage card and
computer. After the procedure, copy your files back to the storage card.
Managing your Phone 79
4.8 Windows Update
Link to Microsoft’s Web site and update Windows Mobile® on your phone
with the latest security patches or fixes.
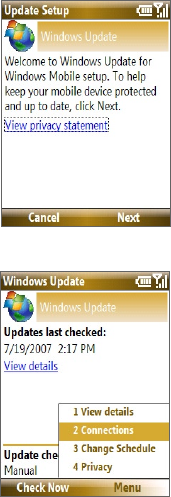
To set up Windows Update
The first time you run Windows Update, you need to set up how you want
Windows Update to check for patches on the Microsoft Web site.
1. Select Start > Settings > More >
Windows Update.
2. On the Update Setup screen, select
Next.
3. Select how you want to check for
updates, Manual or Automatic, then
select Next.
Note If you select Automatic, choose whether
or not to use your data plan to check for
updates.
4. Select Finish.
To change Windows Update options
1. Select Start > Settings > More >
Windows Update.
2. Select Menu and choose the option you
want to change.
• Choose Connections to change how
the device connects to the Internet
when checking for updates.
• Choose Change Schedule to
change how Windows Update
checks for patches on the Microsoft
Web site.
Tip You can check for updates whenever you want by selecting Check Now on
the Windows Update screen.
80 Managing your Phone

Chapter 5
Organizing Phone Information
5.1 Contacts
5.2 SIM Manager
5.3 T-Mobile® myFavesSM
5.4 Calendar
5.5 Tasks
5.6 Voice Recorder
5.7 Voice Notes
82 Managing your Phone
5.1 Contacts
Contacts is your address book and information storage for the people and
businesses you communicate with.
If you use Outlook on your PC, you can synchronize contacts between your
phone and PC.
Create a contact on your phone
To create a new contact on your phone
1. On the Home screen, Start > Contacts > New > Outlook Contact.
To create a new contact on your SIM card, select SIM Contact. You
can also use SIM Manager to add contacts to your SIM card. For more
information about SIM Manager, see “SIM Manager” in this chapter.
2. Enter information for the new contact.
• To easily identify who is calling you, you can assign a custom ring
tone to each Outlook contact. To assign a custom ring tone, scroll
down to and select Custom ring tone and select the ring tone
you want.
• To assign a picture to a contact, scroll down to Pictures and select
Select a picture and choose the picture you want. To remove the
picture, select Menu > Remove Picture.
3. Select Done.
Tip If someone who is not in your list of contacts calls you or sends you a
message, you can quickly create a contact from Call History or from the
message by selecting Menu > Save to Contacts.
Edit and call a contact
To view and edit a contact information
1. On the Home screen, select Start > Contacts.
2. Select the contact whose information you want to view or edit and
select Menu > Edit.
3. When finished making changes, select Done.

Managing your Phone 83
To call a contact from the contact list
1. On the Home screen, select Start > Contacts.
2. Select the contact to call and press . The contact’s default phone
number is dialed.
Tip To call a phone number other than the default, select the contact, scroll to
the number you want to dial, and press .
Find a contact
To find a contact
1. On the Home screen, select Start > Contacts.
Note If you are not in Name view, select Menu > View By > Name.
2. Do one of the following:
• Begin entering a name or phone number of the contact until
the contact is displayed. When you press a key, such as 5, you
find names that begin with G and H, as well as phone numbers
that start with 5. The next key you press continues to narrow the
search.
• If you have assigned categories (e.g. Business) to your Outlook
contacts, you can filter the contact list by categories. In the contact
list, select Menu > Filter and then select a category. To show all
contacts again, select All Contacts.
• If you have entered information under Company for your Outlook
contacts, you can quickly locate the contacts that work for a
specific on your phone. In the contact list, select Menu > View By
> Company. Select the company to see the contacts who work
there.
84 Managing your Phone
Share contact information
To beam contact information to another device via Bluetooth
1. On the Home screen, select Start > Contacts and then select the
contact whose information you want to beam.
2. Select Menu > Send Contact > Beam.
3. Select the device where you want to beam the contact details to and
select Beam.
Note Before you can beam, make sure Bluetooth is turned on and set to Visible
mode on your phone and the target mobile device. For more information,
see “Bluetooth” in Chapter 8.
To send contact information via a text message
1. On the Home screen, select Start > Contacts and then select the
contact whose information you want to send.
2. Select Menu > Send Contact > Text/Multimedia. Select the contact
information that you want to send and select Done.
3. In the new text message, enter the mobile phone number of the
person to whom you are sending the contact information to and
select Send.
To send contact information via Picture Message
1. On the Home screen, select Start > Contacts.
2. Select a contact, then select Menu > Send as vCard.
3. Enter the recipient in To of the Picture Message, then select Send.
If the recipient accepts the beam, text message, or Picture Message, the
contact information you sent are automatically saved in that person’s
Contacts list.
Managing your Phone 85
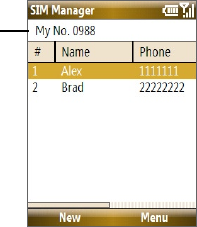
5.2 SIM Manager
SIM Manager allows you to view the contents of your SIM card and transfer
contacts from your SIM card to your phone and vice versa.
To create a contact on your SIM card
1. Select Start > Accessories > SIM Manager.
2. Select New and enter the contact name and phone number.
3. Select Save.
Tip To change contact information on your SIM card, select a contact and edit it.
After modifying, select Save.
To copy SIM contacts to your phone
1. Select Start > Accessories > SIM Manager.
2. Select a SIM contact or select all SIM contacts by selecting Menu >
Select All.
3. Select Menu > Save to Contacts.
To copy phone contacts to the SIM card
Only one phone number per contact name can be stored on a SIM card.
When you copy a contact that has several phone numbers to your SIM card,
SIM Manager saves each number under a separate name.
To save each number under a different contact name on the SIM card, SIM
Manager appends an indicator at the end of each name. You can edit this
indicator first before you start copying contacts to your SIM card.
1. Select Start > Accessories > SIM Manager > Menu > Tools >
Options.
2. On the Options screen, select the check boxes of the types of phone
numbers that you want to be added to the SIM card.
3. Under the Mark column, you can change the indicator that will be
appended to the SIM contact names for each phone number type. To
do so, select a phone type, select Edit, enter your desired indicator,
then select Save.
86 Managing your Phone
4. After modifying, select OK.
5. Select Menu > Contacts to SIM.
6. Select the check boxes of the contact’s phone numbers that you want
to copy to your SIM card, then select Save.
To display your phone number in SIM Manager
1. On the SIM Manager screen, select Menu > Tools > List of Own
Numbers.
2. Select Edit.
3. Change the name, if desired, then enter your mobile phone number.
4. Select Save.
When your phone number is stored
on the SIM card, it will appear on
the SIM Manager screen.
5.3 T-Mobile® myFavesSM
T-Mobile® myFavesSM helps you stay connected to the people who matter
most in your life. Simply choose any five U.S. phone numbers* you call most
often, on any network, and have them displayed on your phone’s main
screen.
For more information about the benefits of using T-Mobile® myFavesSM and
how to subscribe to this service, visit http://www.t-mobile.com.
Managing your Phone 87
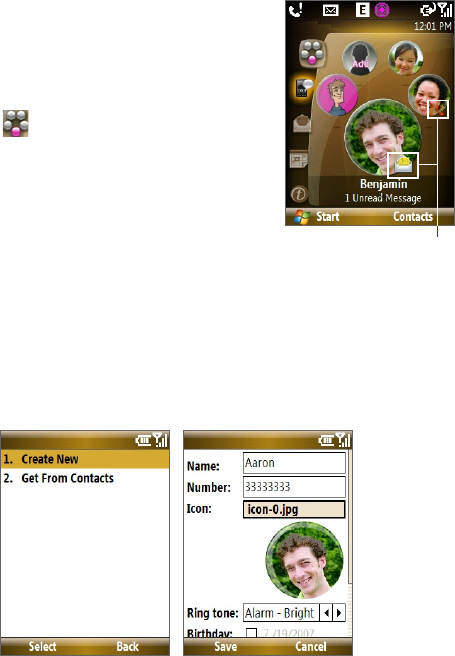
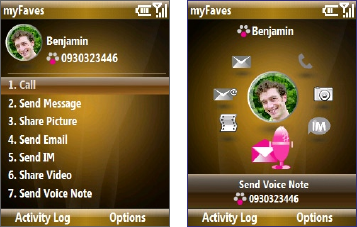
T-Mobile myFavesSM on the Home screen
Once your subscription to T-Mobile®
myFavesSM service has been activated,
myFaves will show on your phone’s Home
screen. You can add and call contacts by
simply selecting the circles you see on the
Home screen when you have the myFavesSM
icon ( ) selected. You can also associate
your contacts with preset icons or their
actual photos.
Note A notification icon appears on the bottom-
right side of the myFaves contact if there is
a new message and/or missed call from that
myFaves contact. Notification icons
Scroll or press left or right NAVIGATION to go through your myFaves
contacts and then press CENTER SELECT to add, call, edit or view a contact.
Add myFaves contacts
To add myFaves contacts, you can create new contacts or add existing
contacts from your phone or SIM card.
1. Select an empty circle on the Home screen.
2. Choose whether to create a new contact or use an existing contact.
Note If you choose Create New, you need to fill in the Name and Number.
88 Managing your Phone
3. Under Icon, select Change icon to associate the contact with an
image. You can choose to take a picture, download from the T-Mobile
site or use an existing image or icon on your phone.
4. Set a Ring tone for the contact.
5. Select the Birthday and/or Anniversary reminder check boxes
according to your preference and enter the date.
6. Set a Reminder for each event. On the day of the reminder, a screen
will open letting you quickly call, send a text message, or buy a gift for
the contact.
7. Select Save. In the Confirmation screen, select Yes.
8. Select OK in the two succeeding screens.
Call a myFaves contact
1. On the Home screen, select the myFaves contact you want to call.
2. On the Profile screen, select Call.
You can also choose to send the contact an e-mail, text message, instant
message, multimedia message, or voice note.
Menu Style: List Menu Style: Circle
You can change the menu style by selecting Options > myFaves Settings
> Menu Style.
Managing your Phone 89
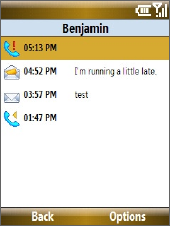
To view the activity log of the contact
Select Activity Log on the Profile
screen to view the activity log of
the selected contact. From the Log
screen, you can read a new text
message, view/reply a missed call,
play a voice note, and more.
To open the item, press CENTER
SELECT.
Edit a myFaves contact
1. On the Home screen, select the myFaves contact you want to edit
then select Options.
2. In the Options menu, select one of the following:
• Edit Profile. Modify the contact’s name, phone number or photo.
• Edit Email. Add or change the e-mail address of the selected
contact.
• Replace Contact. Replace with another contact.
• Set as Favorite. Set the current contact as your primary myFaves
contact. It will appear as your first myFaves contact on the Home
screen, and will also be selected automatically whenever you
launch the myFaves program.
• myFaves Settings. Set myFaves options such as the display mode
and menu style. You can also download myFaves icons and refresh
the myFaves page.
Tip You can also access the myFaves Settings option by selecting Start >
myFaves on the Home screen.

90 Managing your Phone
5.4 Calendar
Use Calendar to schedule appointments, including meetings and
other events. If you use Microsoft® Office Outlook® on your PC, you can
synchronize appointments between your phone and PC.
Create a personal appointment
To set Calendar options
1. On the Home screen, select Start > Calendar.
2. Select Menu > Tools > Options.
3. Scroll through the available settings and set your desired default
options.
4. Select Done.
To schedule an appointment
1. On the Home screen, scroll down to on the Shortcuts Bar, then
select New Appointment.
2. Enter information about the appointment.
• To schedule an all-day event, in End time, select All day event.
• To make the appointment recurring, select Occurs.
3. Select Done.
Note All-day events do not occupy blocks of time in Calendar; instead, they
appear in banners at the top of the calendar.
View your appointments
To view your schedule
You can view your schedule in three different views: Month, Week, and
Agenda.
1. On the Home screen, select Start > Calendar.
2. Press the left SOFT KEY or select Menu and choose the view you
want.
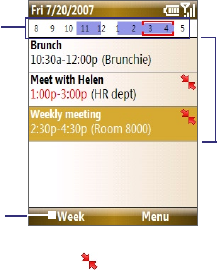
Managing your Phone 91
Highlighted areas
represent time
segments that
have scheduled
appointments.
Select to change
the view.
Select an item to
view the details of
the appointment.
Agenda View
An appointment with the icon indicates that the scheduled appointment
has a conflict with one or more existing appointments.
Send appointments
To send a meeting request
You can send meeting requests via e-mail to persons that use Microsoft®
Office Outlook® or Microsoft® Office Outlook® Mobile.
1. Select Start > Calendar.
2. Schedule a new appointment and then scroll down to Attendees and
select No Attendees.
Select Add Required Attendee or Add Optional Attendee to add
the contacts you want to send the meeting request to.
Note You can only specify if an attendee is required or optional if your
phone is connected to a Microsoft Exchange 2007 server. Otherwise, all
attendees are designated as required. For more information,
see Chapter 7.
3. Choose the contact(s) you want to send the meeting request to and
select Select.
Note To remove an attendee from the list, select the attendee and select
Menu > Remove Attendee.
4. On the New Appointment screen, select Done. The meeting request is
sent out.
92 Managing your Phone
Note When attendees accept your meeting request, the meeting is automatically
added to their schedules. When their response is sent back to you, your
calendar is updated as well.
To send a calendar appointment
You can send a calendar appointment to another phone over Picture
Message.
1. On the Home screen, select Start > Calendar.
2. Select an appointment, then select Menu > Send as vCalendar.
3. Enter the recipient in the To line of the Picture Message, then select
Send.
5.5 Tasks
Use Tasks to keep track of things you need to do.
To create a task
1. On the Home screen, select Start > Tasks.
2. Select Menu > New Task.
3. Enter the necessary task information and select Done.
• Set a Priority for the task. This item can be referenced when
sorting tasks.
• Enter a Start date and Due date if the task starts and ends at a
specific time.
• Enter a Reminder if you want to be notified if the task is due.
• Enter the Categories (you can set more than one) that best
describes the task. This item can be referenced when filtering
tasks.
Notes
• You can synchronize information on your phone with your PC to keep your task
list up to date in both locations.
• If you create a new task with a reminder on your PC and then synchronize tasks
with your phone, the reminder will play at the time that was set on your PC.
Managing your Phone 93
To locate a task
1. On the Home screen, select Start > Tasks.
2. In the task list, do one of the following:
• To sort the list, select Menu > Sort by, and select a sort option.
• To filter the list by category, select Menu > Filter, and choose the
category you want displayed.
To mark a task as completed
1. On the Home screen, select Start > Tasks.
2. Select the task, and select Complete.
5.6 T-Mobile Address Book
T-Mobile Address Book is a tool that lets you back up and synchronize your
Contacts, Tasks, and Calendar items on your phone with the T-Mobile web
site. You need an active connection (e.g. EDGE) for you to use T-Mobile
Address Book.
To set up T-Mobile Address Book
1. Select Start > T-Mobile Address Book.
2. Select Yes to begin the setup process.
You will then be asked to copy SIM contacts to your phone first, since
T-Mobile Address Book only allows contacts that are stored on your
phone to be synchronized with the T-Mobile web site. Select Yes to
copy.
Note If your phone has existing contact entries, you will be asked if you want
to replace the them with the SIM card contact entries or merge the SIM
card contact entries with the phone contact entries.
4. To include calendar appointments and tasks when synchronizing with
the T-Mobile web site, select Menu > Sync Options and then check
the Calendar and Tasks boxes.
5. Select OK.
94 Managing your Phone
To synchronize with the T-Mobile Web site
On the T-Mobile Address Book screen, select Sync.
To view synchronization history
On the T-Mobile Address Book screen, select Menu > History.
5.7 Voice Recorder
Use Voice Recorder to create short voice recordings. Voice recordings are
included in the All Notes list and are named consecutively (Recording1,
Recording2, and so on).
To create a voice recording
1. On the Home screen, select Start > Accessories > Voice Recorder.
2. Hold the phone’s microphone near your mouth.
3. Select Record and say your voice recording.
4. Select Stop to stop recording a voice recording.
To delete a voice recording
1. On the Home screen, select Start > Accessories > Voice Recorder.
2. Select the voice recording to delete and select Menu > Delete.
3. Select Yes.
Tip If you delete a voice recording that has a default name, such as Recording1,
this name becomes available for a new voice recording.
To listen to a voice recording
1. On the Home screen, select Start > Accessories > Voice Recorder.
2. Select the voice recording to play, and press CENTER SELECT.
Tip To stop listening to the voice recording, select Stop while the voice recording
is playing.
To use a voice recording as a ring tone
1. On the Home screen, select Start > Accessories > Voice Recorder.
2. Select the voice recording, and select Menu > Set As Ringtone.

Managing your Phone 95
5.8 Voice Notes
Voice Notes lets you record a voice clip and quickly send it via Multimedia
Messages.
To record a voice clip
1. On the Home screen, scroll down to on the Shortcuts Bar, then
select Voice Notes > New Voicenote.
2. Hold the phone’s microphone near your mouth.
3. Select Record to start recording your voice clip. You can select Pause
to temporarily stop recording. When you want to continue recording,
select Resume.
4. Select Stop to stop recording.
Note Select Menu > Play to play back the recorded voice clip. If you are not
satisfied with the recording, select Menu > Record Again.
5. Select Send to automatically open the Multimedia Message program
with the voice note file automatically inserted as the audio file for the
Picture Message.
96 Managing your Phone

Chapter 6
Exchanging Messages
6.1 Messaging
6.2 Text Messages
6.3 Picture Messages
6.4 Using Instant Messaging
6.5 Set Up E-Mail
6.6 Using E-mail
6.7 Using Keyboard Shortcuts
98 Exchanging Messages
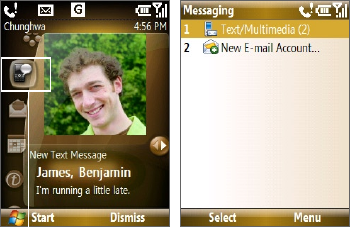
6.1 Messaging
Messaging is where all of your e-mail, text message, and Picture Message
accounts are located. When you receive a new message, you can open
that particular message from the Home screen. Simply scroll down to the
Notifications icon on the Shortcuts Bar then select the message.
To access your message accounts, select Start > Messaging and then select
the account you want to open.
Notifications icon on the
Shortcuts Bar.
Messaging screen
While in a messaging account’s main screen, select Menu > Tools > Switch
Accounts to switch to another message account.
To change message account settings
• On the Messaging screen, select the message account whose settings
you want to change and select Menu > Settings.
• On a message account’s message list, select Menu > Tools > Options.

Exchanging Messages 99
6.2 Text Messages
Send short text messages to your contacts.
Compose and send text messages
To compose and send a text message
1. On the Home screen, scroll down to on the Shortcuts Bar, then
select Text Messages > New Message. .
2. Enter the mobile phone number of one or more recipients, separating
them with a semicolon (;). To access phone numbers from Contacts, in
To, press CENTER SELECT and select a recipient from the list.
3. Enter your message. You can enter up to 160 characters in one
message.
4. Select Send.
Tips
• To cancel the text message, select Menu > Cancel Message.
• If you want to know if your text message was received, before sending the
message, select Menu > Message Options and select Request message
delivery notification.
Receive text messages
Text messages are automatically received when the phone function is
turned on. When the phone is turned off, text messages are held by T-
Mobile until the next time the phone is turned on.
• Save your SMS messages to your SIM card by selecting Menu >
Copy to SIM.
• Copy SMS messages saved on your SIM card to the Inbox by selecting
Menu > Copy to Inbox. Copying them to your phone results in
duplicate messages in the Inbox folder when the SIM card is in use.
• The icon next to a message indicates that it is saved on the SIM
card.
100 Exchanging Messages
6.3 Picture Messages
Sending Picture Messages (MMS) to your friends and family is fun and easy.
You can include pictures, video, and an audio clip in a picture message.
To access Picture Messages
On the Home screen, scroll down to on the Shortcuts Bar, then select
Picture Messages.
Note When you purchase your phone, it is already preset with T-Mobile’s Picture
Message setings. If you accidentally lost the preset settings or you want to
add another wireless service provider, you can configure the settings while
composing a Picture Message.
Create and send Picture Messages
You can compose Picture Messages in a combination of various slides,
where each slide can consist of a photo, audio or video clip, and/or text.
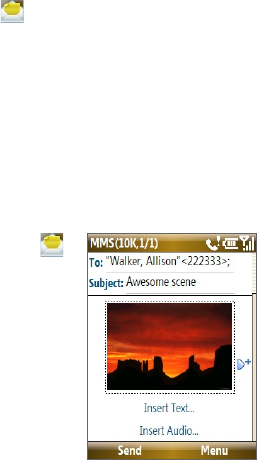
To start composing a Picture Message
1. On the Home screen, scroll down to
on the Shortcuts Bar, then select Picture
Messages > New Message.
2. In To, enter the recipient’s phone
number or e-mail address .
3. In Subject, enter a subject for your
message.
4. Select Insert Picture/Video to select
a photo or video clip from the Select
Media screen and insert it.
To capture a new photo or video, select
Menu > Capture Picture/Video.
Tip After inserting a Picture message element, press NAVIGATION right to
add a new slide.
5. Select Insert Text to enter text for your Picture message.
• To insert predefined text or emoticons, select Menu > My Text or
Insert Emoticon.
Exchanging Messages 101
• To insert contact details of a contact or appointment details, select
Menu > Insert Contact or Insert Calendar. You can then choose
the details that you want to insert.
6. Select Insert Audio to insert an audio clip. Select an audio clip on the
Select Audio screen.
To record a new audio clip, select Menu > Capture Audio
7. Select Send to send the message.
Notes
• To send a copy of this message to others, access Cc and Bcc by selecting
Menu > Options > Send Options.
• To remove the photo, text, or audio, select the item and press the BACK key.
View, reply to and block Picture Messages
To receive Picture Messages
On any Picture message folder screen, select Menu > Send/Receive. By
default, messages are automatically downloaded to your phone.
To view a Picture Message
You can view Picture Messages in several ways.
• Press CENTER SELECT to view and play the message on your phone.
Select Pause or Menu > Stop to pause or stop the playback of the
message.
• Select Menu > Object View to see a list of files included in the
message. To open a file, select it and select Open. To save a file, select
it, and select Save, Menu > Save Audio, or Menu > Save Photo.
• View each slide included in the message by selecting Menu > Next.
To reply to a Picture Message
Select Menu > Reply > Reply to reply to the sender of the message, or
select Menu > Reply > Reply All to reply to all persons listed in the To and
CC boxes of the message. Select Menu > Reply > Forward to forward the
message to someone else.

102 Exchanging Messages
To block a phone number from sending you Picture Messages
You can choose to block a phone number from sending you Picture
messages if you do not want to receive future Picture messages from that
number.
1. View the Picture Message then select Menu > Show Message
Details.
2. In the MMS Details screen, select the contact in the From field then
select Menu > Open.
3. Select the number on the screen and press CENTER SELECT. On the
menu that opens, select Save to Blacklist.
Note By adding the number to the Blacklist, you will not receive future Picture
messages from that number. To edit the MMS Blacklist, on a Picture Message,
select Menu > Options > Message Options > Menu > Edit Blacklist. Here
you can remove a number from the Blacklist.
6.4 Using Instant Messaging
AIM®
You will need an AIM® account to use instant messaging. To set up an
account, go to http://www.aim.com/t-mobile.
To sign on
1. On the Home screen, select Start > Instant Messaging.
2. Select AOL Instant Messenger.
3. Type your screen name and password. Note that your password is
case-sensitive.
4. Scroll to Save password and Auto-Sign On and press CENTER
SELECT to place checks in the check boxes, if desired.
5. Select Sign On.
To sign off
1. At Buddy List®, select Menu > Sign Off.
2. Select Yes.

Exchanging Messages 103
To add a buddy
1. At Buddy List®, select Menu > Add Buddy.
2. Type your buddy’s screen name and select Add.
To delete buddy
1. At Buddy List®, scroll to the buddy you want to delete.
2. Select Menu > Delete Buddy.
3. Select Yes.
To send message to buddy
1. At Buddy List®, scroll to and select the buddy you want to send a
message.
2. Select Menu > Send IM.
3. Type your message and select Menu > Send IM.
To send message to unlisted buddy
1. At Buddy List®, select Menu > Send IM to.
2. Type your buddy’s screen name and select OK.
3. Type your message and Menu > Send IM.
To block buddy
1. At Buddy List®, scroll to the buddy you want to block.
2. Select Menu > Block.
3. Select Yes.
To set away status
1. At Buddy List®, select Menu > My Status.
2. Scroll to and select Away.
ICQ®
You will need an ICQ account to use instant messaging. To set up an
account, go to http://www.icq.com.
To sign on
1. On the Home screen, select Start > Instant Messaging.
2. Scroll to and select ICQ®.
104 Exchanging Messages
3. Type your ICQ® number and password. Note that your password is
case-sensitive.
4. Scroll to Save password and Auto-Sign On and press CENTER
SELECT to place checks in the check boxes, if desired.
5. Select Connect.
To sign off
1. At contact list, select Menu > Disconnect.
2. Select Yes.
To add contact
1. At contact list, select Menu > Add User.
2. Type the contact’s ICQ® number and nickname.
3. Select Add.
To delete contact
1. At contact list, scroll to the contact.
2. Select Menu > Delete User.
3. Select Yes.
To send message to a contact
1. At contact list, scroll to the contact.
2. Select Menu > Send message.
3. Type your message and select Menu > Send message.
To send message to unlisted contact
1. At contact list, select Menu > Send message to.
2. Type the contact’s ICQ® number and select OK.
3. Type your message and select Menu > Send message.
To block contact
1. At contact list, scroll to the contact you want to block.
2. Select Menu > Block.
3. Select Yes.

Exchanging Messages 105
To set away status
1. At contact List, select Menu > My Status.
2. Scroll to and select Away.
Yahoo!®
You will need a Yahoo!® account to use instant messaging. To set up an
account, go to http://messenger.yahoo.com.
To sign in
1. On the Home screen, select Start > Instant Messaging.
2. Scroll to and select Y! Messenger.
3. Type your Yahoo! ID and password. Note that your password is case-
sensitive.
4. Scroll to Save password and Auto-Sign On and press CENTER
SELECT to place checks in the check boxes, if desired.
5. Select Sign In.
To sign out
1. At contact list, select Menu > Sign Out.
2. Select Yes.
To add contact
1. At contact list, select Menu > Add Contact.
2. Type the contact’s Yahoo! ID and select Add.
To delete contact
1. At contact list, scroll to the contact you want to delete.
2. Select Menu > Delete Contact.
3. Select Yes.
To send message to contact
1. At contact list, scroll to the contact you want to send a message.
2. Select Menu > Send a Message.
3. Type your message and select Menu > Send Message.
106 Exchanging Messages
To send message to unlisted contact
1. At contact list, select Menu > Send a Message to.
2. Type the contact’s Yahoo! ID and select OK.
3. Type your message and select Menu > Send Message.
To set away status
1. At contact List, select Menu > My Status.
2. Scroll to and select Away.
6.5 Set Up E-Mail
Set Up E-Mail provides you unlimited access to your work and personal
email. Instantly access your e-mail from AOL®, Yahoo!® , Gmail®, Microsoft®
Exchange and many more, including any POP3 or IMAP4 e-mail server.
Note Restrictions may apply. Contact your e-mail provider for additional
information.
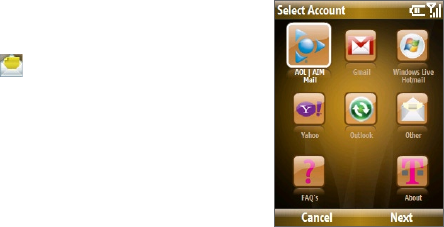
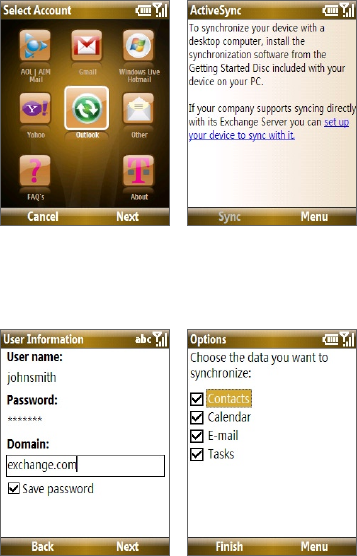
To add e-mail accounts using
Set Up E-mail
1. On the Home screen, scroll down to
on the Shortcuts Bar, then select
Set Up E-mail.
2. On the Select Account screen, select
the type of e-mail accounts you want
to add to your device.
Exchanging Messages 107
To set up AOL/AIM Mail, Yahoo! or Gmail
Select AOL/AIM Mail, Yahoo!, or Gmail, then simply enter your e-mail
address and password.
To set up Windows Live Mail
Select Windows Live, then sign in using your Windows Live ID.
See Chapter 8 for details.
To set up Outlook E-mail
1. On the Select Account screen, select Outlook E-mail.
2. To send and receive personal e-mail on your phone:
• Check if the synchronization software has been installed on your
PC and a sync partnership has been created with your phone. If
these have been done, then just connect your phone to your PC to
send and receive Outlook e-mails.
If you have not yet installed the synchronization software nor
created a partnership, please do so by following the procedures in
Chapter 3.
3. To set up your company e-mail account on your phone:
• Set up your phone to synchronize via a wireless LAN or over-the-
air connection with your company’s Exchange Server. For more
information about synchronizing with the Exchange Server, see
Chapter 7.
To set up a POP3 or IMAP4 e-mail account
If you have an e-mail account from an ISP and other Web-based accounts
such as Gmail®, add them as POP3 or IMAP4 accounts on your device.
1. On the Select Account screen, select Other.
2. Enter your e-mail address and password, then select Next.
Note If your e-mail provider settings cannot be found, you will be prompted
to enter settings such as the incoming and outgoing server names. Ask
from your provider about these settings.
To access your e-mail accounts
Select Start > Messaging. You will see your e-mail accounts in the
Messaging screen.
108 Exchanging Messages
6.6 Using E-mail
After setting up e-mail accounts on your phone, you can start sending and
receiving e-mail messages.
Create and reply to e-mails
To compose and send an e-mail
1. Select Start > Messaging then select an e-mail account.
2. Select Menu > New.
3. Enter the e-mail address of one or more recipients, separating them
with a semicolon. To access e-mail addresses stored in Contacts,
select To.
4. Enter a subject and compose your message. To quickly add common
messages, select Menu > My Text and select a desired message.
5. Select Send.
Tips
• To set the priority, select Menu > Message Options.
• If you are working offline, e-mail messages are moved to the Outbox folder and
will be sent the next time you connect.
To add an attachment to an e-mail
1. In the message that you are composing, select Menu > Insert and
select the item you want to attach: Picture, Voice Note, or File.
2. Select the file you want to attach, or record a voice note.
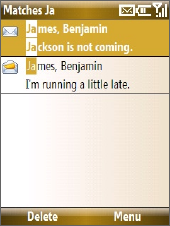
Filter the Inbox message list
Filter the e-mail messages in your Inbox to only display the e-mails that
contain the sender or e-mail subject you are searching for.
Enter the sender name or e-mail subject you want to look for using the
keyboard. As you press keys, the list narrows down to the conditions you
set.
For example, pressing “J” then “A” narrows the list to only the e-mails that
contain sender names, e-mail subjects, and/or message body that start with
“JA.”
Exchanging Messages 109
Note This feature works for all Messaging accounts.
View and reply to e-mails
To read incoming messages
By default, only the first few kilobytes of a message are shown when you
open and read an incoming message. To read the whole message, do one of
the following:
• Scroll down to the end of the message and select Get the rest of this
message; or
• Select Menu > Download Message.
To download an attachment
In an open message with an attachment to download, select the
attachment. If there is more than one attachment, select the other
attachments to download them. You can directly open the file in the
associated program after you download them by selecting the attachment
again.
To reply to or forward an e-mail
1. Open the message and select Menu > Reply > Reply, Reply All, or
Forward.
2. Enter your response. To quickly add common messages, select Menu
> My Text and select a desired message.
3. Select Send.
110 Exchanging Messages
Tips
• To see more header information, scroll up.
• To always include the original message, from the list view, select
Menu > Tools > Options > Sending, and select the Include copy of original
message when replying to e-mail check box.
• In the Outlook E-mail account, you will send less data if you do not edit the
original message. This may reduce data transfer costs based on your rate plan.
To view and reply to HTML e-mails
You can receive, view and reply to HTML e-mails from any type of e-mail
account. The HTML format is retained, without layout shifting or resizing.
Note HTML e-mail support in Outlook Mobile is available only if your company is
using Microsoft Exchange Server 2007.
1. Set the message format to HTML. To find out how to set the message
format, see “Customize e-mail settings”.
2. Select Start > Messaging, select your e-mail account, and open an
HTML e-mail that you received.
3. Select Get the rest of this message that’s shown at the bottom of
the message to download the whole message.
4. Scroll up (if needed) and select Click to scroll right to be able to
scroll sideways and get a complete horizontal view of the message.
Note If images do not immediately appear, select Internet pictures blocked
> Download Internet pictures.
5. Select Reply or select Menu > Reply and choose whether to reply to
the sender(s) or forward the message.
6. Enter your response and select Send.
Tip E-mail can contain hyperlinks to Web pages.
Send and download e-mails
The manner in which you send and receive e-mails depends on the type of
e-mail account you have.
Exchanging Messages 111
To send and receive e-mail for an Outlook account
1. Select Start > ActiveSync.
2. Connect your phone to your PC.
Otherwise, connect wirelessly if you are synchronizing Outlook e-mail
with your company e-mail server. See Chapter 7 for details.
3. Synchronization automatically begins, and your phone sends and
receives Outlook e-mail.
Tip You can also manually synchronize anytime by selecting Sync in ActiveSync
or Menu > Send/Receive in Outlook Mobile.
To send and receive e-mail for a POP3/IMAP4 account
If you have an e-mail account with an ISP or a work account that you access
using a VPN server connection, you send and receive messages through a
remote e-mail server. Before sending and downloading messages, you first
need to connect to the Internet or your corporate network.
1. Select Start > Messaging and select your POP3/IMAP4 e-mail
account.
2. Select Menu > Send/Receive. The messages on your phone and e-
mail server are synchronized: new messages are downloaded to the
phone Inbox folder, messages in the phone Outbox folder are sent,
and messages that have been deleted from the server are removed
from the phone Inbox folder.
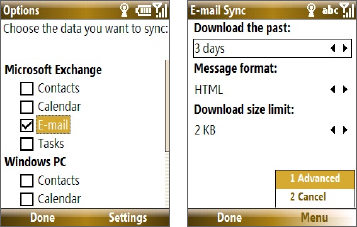
Customize e-mail settings
To change the download size and format for Outlook e-mail
1. Disconnect your phone from the computer.
2. Select Start > ActiveSync.
3. Select Menu > Options, select E-mail, then select Settings.
4. On the E-mail Sync screen, set the Download size limit
and Message format.
5. Close ActiveSync and reconnect your phone to the computer.

112 Exchanging Messages
To change the download size, e-mail format and other settings for
POP3/IMAP4 e-mail
1. Select Start > Messaging.
2. Use the up/down NAVIGATION to select your POP3 or IMAP4
e-mail account, then select Menu > Settings.
3. You can make changes to your e-mail address, user name, password,
etc., and customize the following settings:
Options Description
Automatic Send/Receive You can select a time interval for
connecting to the Internet automatically
to send and receive messages.
Download messages Set the number of days of messages
that you want to be downloaded to your
phone.
Send/receive when I click
Send
By default, messages are immediately
delivered when you select Send. If you
prefer to save outgoing messages to the
Outbox folder first, clear the check box.
(In this case, you will need to manually
send messages by selecting Menu >
Send/Receive).
Use automatic send/
receive schedule when
roaming
This allows your phone to data roam when
there is a set time interval for connecting
to the Internet automatically. Since this
may result in higher connection costs, you
may want to leave the check box cleared.
When deleting messages Choose whether to delete messages from
the mail server when you delete them on
your phone.
Message format Select HTML or Plain Text.
Message download limit Select the e-mail download size. If you
have large volumes of e-mail, use a lower
size or select to download headers only.
4. When you have finished customizing settings, select Finish.
Exchanging Messages 113
To exclude your e-mail address when replying to all
When you reply to all the recipients of an Outlook e-mail, your own e-mail
address will also be added to the recipient list. Customize ActiveSync so that
your e-mail address will be excluded from the recipient list.
1. In ActiveSync on your phone, select Menu > Options.
2. Select the E-mail information type and select Settings.
3. Select Menu > Advanced.
4. In the My e-mail addresses text box, enter your e-mail address.
5. Select Done.
6.7 Using Keyboard Shortcuts
You can use keyboard shortcuts to quickly access messaging functions, such
as reply, forward, etc.
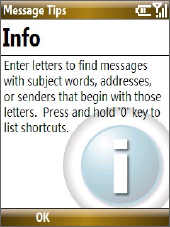
To see the list of keyboard shortcuts
1. Select Start > Messaging and select a messaging account (Text/
Multimedia or any e-mail account).
2. While on a message list, press any key.
3. If this is your first time to use keyboard shortcuts, the following
Message Tips screen will appear first:
Select OK to close the screen.
114 Exchanging Messages
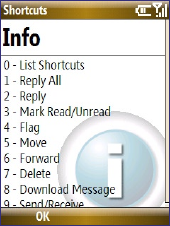
4. Press and hold the “0” key until the shortcuts list is displayed. Scroll up
or down to view the whole list.
To use a keyboard shortcut
Press and hold the respective key. For instance, to reply to a message, press
and hold 2.

Chapter 7
Working with Company E-mails
and Meeting Appointments
7.1 Synchronizing Your Phone with
the Exchange Server
7.2 Working with Company E-mails
7.3 Managing Meeting Requests
7.4 Finding Contacts in the
Company Directory
7.5 E-mail Security

116 Working with Company E-mails and Meeting Appointments
7.1 Synchronizing Your Phone with the
Exchange Server
To keep up-to-date with your company e-mails and meeting schedules
while you’re out of the office, you can connect your phone to the Internet
wirelessly and synchronize these information with your company’s
Exchange Server. You can also access your company address book anytime.
Your company must have a mail server that is running Microsoft Exchange
Server with Exchange ActiveSync.
Before you can start to synchronize with or access information from the
Exchange Server, you need to set up an Exchange Server connection on
your phone. You need to get the following information from your network
administrator and enter them on your phone: Exchange Server name (must
be the Outlook Web Access server name), domain name, and the user name
and password that you use at work.
You can set up the Exchange Server connection either from your phone or
your PC.
Set up an Exchange Server connection from your phone
If you have not synchronized your phone with your PC, follow these steps to
set up an Exchange Server connection.
1. On the Home screen, scroll down to on the Shortcuts Bar, then
select Set Up E-mail.
2. On the Select Account screen, select Outlook E-mail then
select Next.
3. On the ActiveSync screen, select set up your device to sync with it.
Note If you have previously created an ActiveSync partnership between your
phone and PC, skip this step.
Working with Company E-mails and Meeting Appointments 117
4. In Server address, enter the Exchange Server name, and select Next.
5. Enter your user name, password, and domain, and select Next.
6. Select the check boxes of the types of information items that you
want to synchronize with the Exchange Server.
Tip To change the rules for resolving synchronization conflicts, select Menu
> Advanced.
7. To change synchronization settings of an information type, for
example, E-mail, select the type of information, and select Menu >
Settings.
8. Select Finish.
118 Working with Company E-mails and Meeting Appointments
Note If you synchronized e-mails with your PC before, open ActiveSync on your
phone and select Menu > Add Server Source to set up an Exchange
Server connection. When you're prompted to select information types for
synchronization, you need to clear the E-mail check box under the Windows
PC item first before you can select the E-mail check box under Exchange
Server.
Tip To change Exchange Server settings, open ActiveSync on your phone and
select Menu > Configure Server.
Set up an Exchange Server connection from your PC
On a Windows Vista PC
1. Set up synchronization between your PC and phone. See “Set up
synchronization in Windows Mobile Device Center” in Chapter 3 for
details.
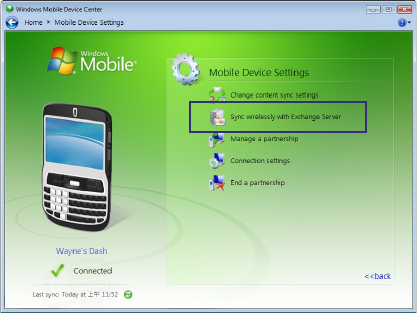
2. Click Start > All Programs > Windows Mobile Device Center on
your PC.
3. On Windows Mobile Device Center’s Home screen, mouse over
Mobile Device Settings, click >>more, then click Sync wirelessly
with Exchange Server.
Working with Company E-mails and Meeting Appointments 119
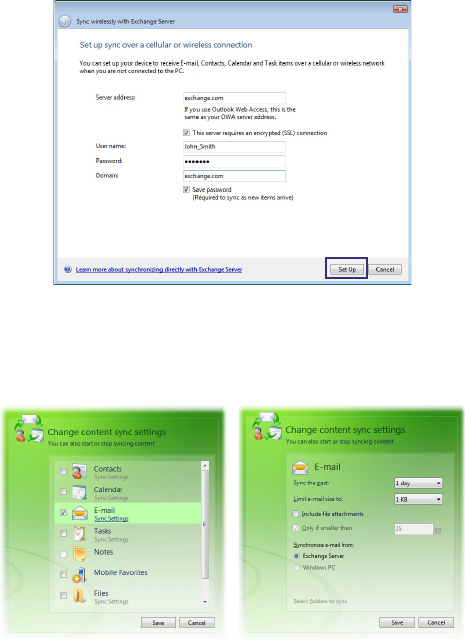
4. Enter your company’s Exchange Server address, your username,
password, and domain.
5. Click Set Up.
6. On Windows Mobile Device Center’s Home screen, click Change
content sync settings.
7. Select the check box of items you want to synchronize with the
Exchange Server. Click Sync Settings to choose synchronization
settings for the selected items. Click Save.
120 Working with Company E-mails and Meeting Appointments
On a Windows XP PC
1. Install Microsoft ActiveSync on your PC if you have not yet done so.
See “Install ActiveSync” in Chapter 3 for details.
2. Connect your phone to the PC.
3. If you have not set up synchronization with your PC before, follow
the steps in “Set up synchronization in ActiveSync” in Chapter 3 and
make sure to select the Synchronize directly with a server running
Microsoft Exchange option in the Synchronization Setup Wizard.
4. If you have synchronized your phone with your PC before, do the
following steps to set up synchronization with the Exchange Server:
a. Right-click the ActiveSync icon ( ) at the bottom right side of
your PC, then click Open Microsoft ActiveSync.
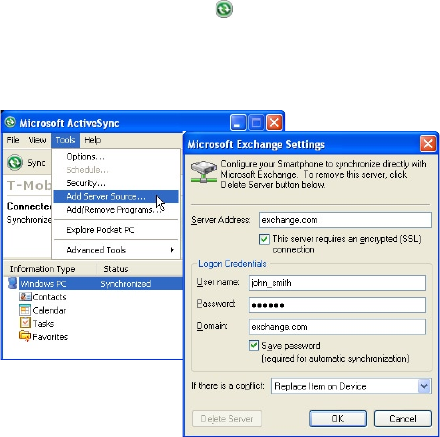
b. In ActiveSync on your PC, click Tools > Add Server Source then
enter your company’s Exchange Server address, your username,
password, and domain, then click OK.
Working with Company E-mails and Meeting Appointments 121
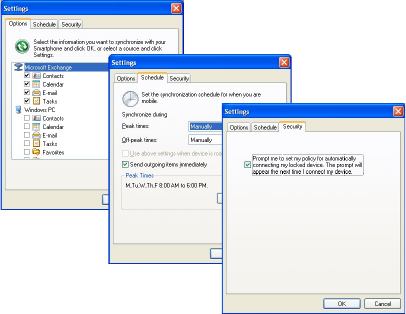
c. Choose the items to be synchronized and other settings in the
Options, Schedule and Security tabs, then click OK.
Options tab
Schedule tab
Security tab
Start synchronization
Before you start synchronizing with the Exchange Server, make sure your
phone has been set up with a data connection to the Internet so that you
can synchronize wirelessly. For more information about connecting to the
Internet, see Chapter 8.
After you finish setting up an Exchange Server connection, your phone
automatically starts synchronization.
You can manually start synchronization anytime by selecting Sync in
ActiveSync.
Notes
• You need a T-Mobile data plan to be able to synchronize with the Exchange
Server.
• If you connect your phone to your office computer via a USB or Bluetooth
connection, you can use this connection to the PC to “pass through” to the
network and download Outlook e-mails and other information to your phone.
122 Working with Company E-mails and Meeting Appointments
7.2 Working with Company E-mails
Your phone gives you instant access to your company e-mails and lets you
manage your messages easier. Messaging features such as Direct Push,
Fetch Mail, and Filtering messages are just some of the tools you can use to
manage your e-mails.
Note Some messaging features depend on the MIcrosoft Exchange Server version
used. Please check with your network administrator for the availability of
Exchange Server features.
Automatic synchronization through Direct Push
Direct Push technology (push e-mail feature) enables you to receive new
e-mails on your phone as soon as they arrive in your Inbox on the Exchange
Server. With this feature, items such as contacts, calendar and tasks are
also immediately updated onto your phone when these items have been
changed or new entries have been added on the Exchange Server. To make
Direct Push work, you need to have a GPRS connection on your phone.
You need to perform a full synchronization between your phone and the
Exchange Server first before Direct Push can be enabled.
Requirement The Direct Push feature works for your phone only if your company
is using Microsoft Exchange Server 2003 Service Pack 2 (SP2)
with Exchange ActiveSync or higher version or an equivalent
push e-mail solution.
To enable Direct Push via Comm Manager
1. On the Home screen, scroll down to on the Shortcuts Bar, then
select Manage Connections.
2. On the Comm Manager screen, select the Microsoft Direct Push
button. The button will turn to , which indicates that
you will receive e-mails as they arrive.
When the button is in the state, you need to manually
retrieve your e-mails.
Working with Company E-mails and Meeting Appointments 123
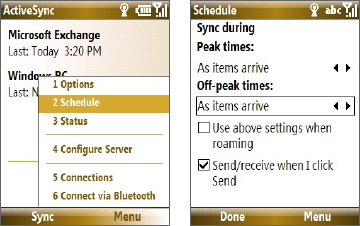
To enable Direct Push via ActiveSync
1. In ActiveSync on your phone, select Menu > Schedule.
2. Select As items arrive in the Peak times and Off-peak times boxes.
Note When both the GPRS/EDGE and Wi-Fi connections are turned on at the same
time, the Direct Push feature will always opt for GPRS/EDGE, for which you
could be charged per your T-Mobile’s service plan.
Scheduled synchronization
If you do not want to use Direct Push, you can set a regular schedule for
synchronizing Outlook e-mail and information.
1. In ActiveSync on your phone, select Menu > Schedule.
2. Select a shorter time interval in the Peak times box for you to be able
to receive e-mails more frequently.
3. Select a longer interval in the Off-peak times box.
Tip Select Menu > Peak Times to set the peak and off-peak times.
124 Working with Company E-mails and Meeting Appointments
Instant download through Fetch Mail
Fetch Mail downloads an entire e-mail immediately without the need for
you to perform a full Send/Receive action.
Requirement Fetch Mail works for your phone only if your company is using
Microsoft Exchange Server 2007 or higher.
1. Select Start > Messaging > Outlook E-mail.
2. Select an e-mail message to open it.
3. By default, only the first few kilobytes of the message is shown. To
download the whole e-mail, scroll to the bottom of the message then
select Get the rest of this message.
4. A “Downloading message” status appears. Wait for the remainder of
the message body to be downloaded.
Tip For information about changing e-mail sync options such as the initial
download size limit for e-mail, see "Customize e-mail settings" in Chapter 6.
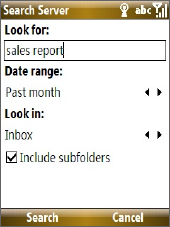
Search for e-mails on the Exchange Server
You can access messages that are not available on your phone by searching
your Microsoft Exchange Server mailbox. The search results will be
downloaded and displayed in a Search Results folder.
Requirement Your company must be using Microsoft Exchange Server 2007
or higher.
1. Select Start > Messaging >
Outlook E-mail.
2. Select Menu > Tools > Search
Server.
3. In the Look for text box, enter
the search keyword.
4. Choose the Date range of
messages to search from and
where to search in Look in.
5. Select Search.
Working with Company E-mails and Meeting Appointments 125
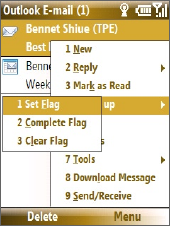
Flag your messages
Flags serve as a reminder to yourself to follow-up on important issues or
requests that are indicated in the messages.
Requirement Flags are enabled only if e-mails are synchronized with Microsoft
Exchange Server 2007 or higher. Flags are disabled or hidden
if e-mails are synchronized with earlier versions of Microsoft
Exchange Server.
To flag or unflag a message
1. Select Start > Messaging > Outlook E-mail.
2. Select a message, or open a message.
3. Select Menu > Follow Up and select one of the following options:
• Set Flag Mark the message
with a red flag to indicate that it
needs follow up.
• Complete Flag Mark the
message with a check mark
to indicate that the issue or
request in the e-mail is already
completed.
• Clear Flag Remove the flag to
unmark the message.
Note E-mail message reminders are displayed on your phone if the messages are
flagged with reminders and synchronized from the Exchange Server
Out-of-office auto-reply
Outlook Mobile allows you to retrieve and change your out-of-office status.
Just like desktop Outlook E-mail, Outlook Mobile automatically sends an
auto-reply message when you’re not available.
Requirement Your company must be using Microsoft Exchange Server 2007 or
higher.
126 Working with Company E-mails and Meeting Appointments
To send out-of-office auto-reply messages
1. Select Start > Messaging > Outlook E-mail.
2. Select Menu > Tools > Out of Office.
3. From the I am currently list, select Out of the Office.
4. Enter your auto-reply message then select Done.
View a document linked to an e-mail message
When you receive an e-mail that contains a link to a document such as a
PDF or Microsoft® Office document located on SharePoint or an internal file
server, you can view the document on your phone.
Requirement You can view the document only if you have a Microsoft Outlook
account that synchronizes with Microsoft Exchange Server 2007
or later. Exchange Server must also be set up to allow access to
SharePoint document libraries or internal file servers.
1. On the Home screen, select Start > Messaging.
2. Select an e-mail account, then open a message with a link to a
SharePoint document.
3. Select the link to open and view the document.
7.3 Managing Meeting Requests
When you schedule and send meeting requests from your phone, you
can invite attendees to your meeting and check their status to know their
availability.
When you receive a meeting request, you can reply by accepting or
declining the request. The meeting request also clearly indicates whether or
not there are conflicting or adjacent meetings.
Note You can still accept meeting requests on your phone if your company is
using an earlier version of Microsoft Exchange Server, but some features will
not be enabled. To use the features mentioned in this section, your company
must be using Microsoft Exchange Server 2007 or higher.
Working with Company E-mails and Meeting Appointments 127
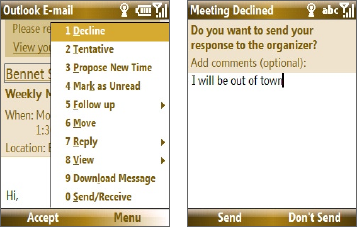
To reply to a meeting request
1. When there’s an incoming e-mail with a meeting request, a
notification message will be displayed on your phone’s Home screen.
Scroll to Outlook e-mail and select it.
2. In the Outlook message list, select the e-mail to open it.
3. Select Accept to reply and accept the meeting request, or select
Menu > Decline if you cannot attend the meeting.
Tips
• Before responding, you can check your availability during the time of
the requested meeting by selecting View your calendar.
• If the time of the meeting conflicts with your other appointments, a
“Scheduling Conflict” status appears on top of the e-mail.
3. Choose whether or not to edit the response e-mail before sending
and then select OK:
4. If you accepted the meeting request, it will automatically be added as
an appointment in Calendar on your phone.
To view the list of meeting participants
1. Select Start > Calendar.
2. Open a meeting request that you previously sent, then select
Attendees. The list of required and optional attendees will be listed.
128 Working with Company E-mails and Meeting Appointments
Notes
• For information about creating a meeting request, see “To send a meeting
request” in Chapter 5.
• If you select a meeting that you have organized, the list shows who has
accepted or declined the meeting.
• To view an attendee’s contact information, select the attendee’s name. If the
attendee is included in your contacts list, you will see the contact information
immediately. If the attendee is not in your contacts list, select Company
Directory to view the contact information.
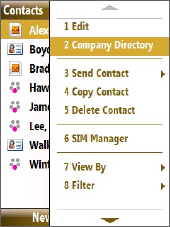
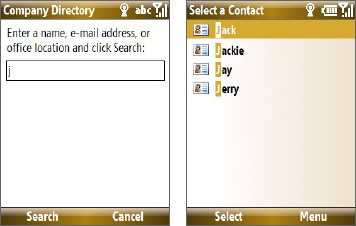
7.4 Finding Contacts in the Company Directory
In addition to having contacts on your phone, you can access contact
information from your organization’s Company Directory.
Requirement Access to the Company Directory is available only if your
organization is running Microsoft Exchange Server 2003 SP2 or
higher, and you have completed your first synchronization with
the Exchange Server.
1. Synchronize with Exchange Server if you have never done so.
2. Do any of the following:
• In Contacts, select Menu > Company
Directory.
• In a new e-mail, select the To box
and then select Company Directory
at the top of the list or select Menu >
Company Directory.
• In a new meeting request using
Calendar, scroll to Attendees
and select No attendees > Add
Required Attendee or Add
Optional Attendee and then select
Company Directory at the top of
the list. In Contacts
Working with Company E-mails and Meeting Appointments 129
3. Enter the part or full contact name and select Search. In the search
results list, select a contact to select it.
Notes
• You can save the contact from the Company Directory to your phone by
selecting the contact then selecting Menu > Save to Contacts.
• You can search on the following information as long as that information is
included in your organization’s Company Directory: First name, Last name, E-
mail name, Display name, E-mail address, or Office location.
7.5 E-mail Security
Windows Mobile® on your phone protects your Outlook e-mails through
Secure/Multipurpose Internet Mail Extension (S/MIME), which allows you to
digitally sign and encrypt your messages.
Requirement S/MIME encryption and digital signatures for Windows Mobile®
powered smartphones are available only with Exchange Server
2003 SP2 or a later version that supports S/MIME. If you are not
using one of these products, or have not yet synchronized, these
options are unavailable.
Note You can encrypt a message with or without a certificate. However, to read an
encrypted message, you need a valid certificate to decrypt it.
130 Working with Company E-mails and Meeting Appointments
Encrypt and sign messages
To individually sign and encrypt a new message
1. Select Start > Messaging > Outlook E-mail.
2. Select Menu > New to create a new message.
3. Select Menu > Message Options.
4. From the Security list, select whether to encrypt only, sign the
message only, or do both.
5. Select Done.
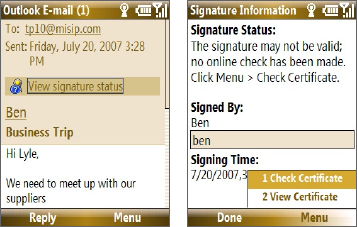
To verify the digital signature on a signed message you receive
1. Open the Outlook e-mail message that has been digitally signed.
2. At the top of the message, select View signature status.
Note You may need to download the rest of the message in order for you to
see the name of the person who signed the e-mail.
3. Select Menu > Check Certificate.
To view the details of the certificate in the message, select Menu > View
Certificate.
Note There can be several reasons why a digital signature is not valid. For example,
the sender’s certificate may have expired, it may have been revoked by the
certificate authority, or the server that verifies the certificate is unavailable.
Contact the sender to report the problem.
Working with Company E-mails and Meeting Appointments 131
To digitally sign and encrypt all messages
You can set up ActiveSync to digitally sign and encrypt all outgoing
messages. You must obtain a valid certificate to sign and encrypt e-mail
messages successfully.
1. Select Start > ActiveSync.
2. Select Menu > Options.
3. Select the E-mail information type, and select Settings. On the E-mail
Sync Options screen, select Menu > Advanced.
4. Select Encrypt messages to protect your e-mails from being viewed
except by the intended recipients. Select Sign messages so that
recipients are certain that e-mails are sent by you and have not been
altered.
5. Select Menu > Choose Certificate to select a certificate for signing or
encrypting outgoing e-mail messages.
Set permissions on an e-mail message
Another way of protecting your e-mail messages is to send messages with
restricted permissions using Information Rights Management (IRM).
Requirement This works only with a Microsoft Outlook e-mail account and if your
company is using RMS Server SP1.
1. Select Start > Messaging > Outlook E-mail.
2. Create a message, then select Menu > Message Options.
132 Working with Company E-mails and Meeting Appointments
3. In Permissions, do one of the following:
• To allow anyone to read the message, select Unrestricted Access.
• To prevent the message from being forwarded, printed, or copied,
select Do Not Forward.
4. Select Done.
Tip An IRM-protected message received on your phone can only be replied to or
forwarded if the message permits it.