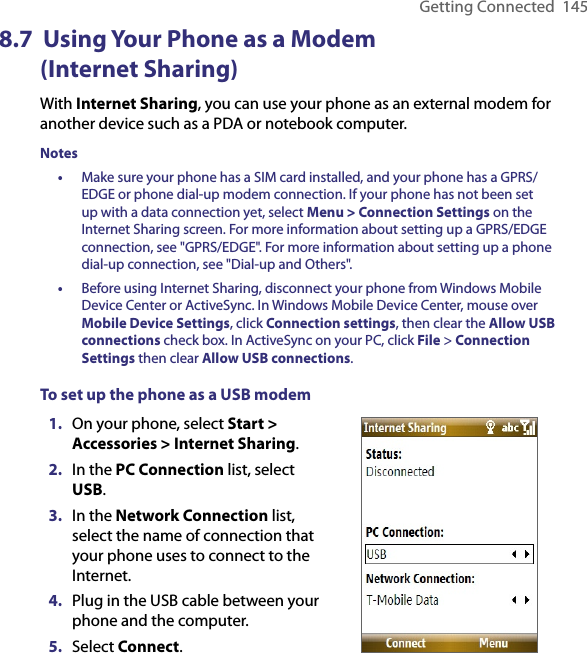
HTC PB PHOE100 User Manual Book JUNO TMOUS Manual indb
HTC Corporation PHOE100 Book JUNO TMOUS Manual indb
UserManual.wiki
>
HTC
>
PB User Manual
>
User manual 3
Contents
1.
User manual 1
2.
User manual 2
3.
User manual 3
User manual 3
Navigation menu
Upload a User Manual
Namespaces
Wiki Guide
HTML
PDF
Info
Views
User Manual
Discussion / Help
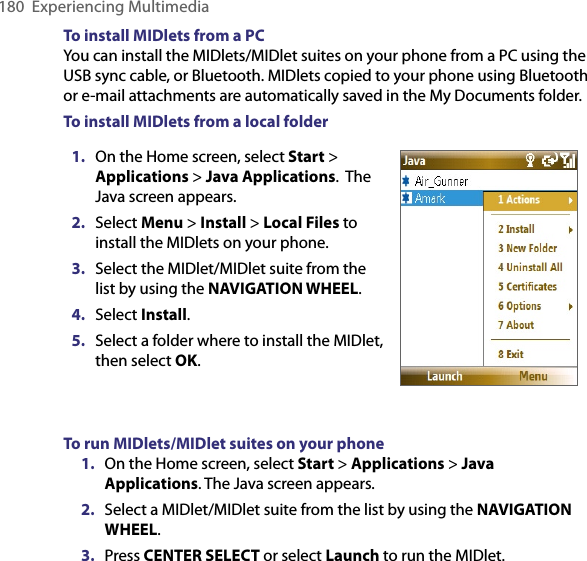
Navigation

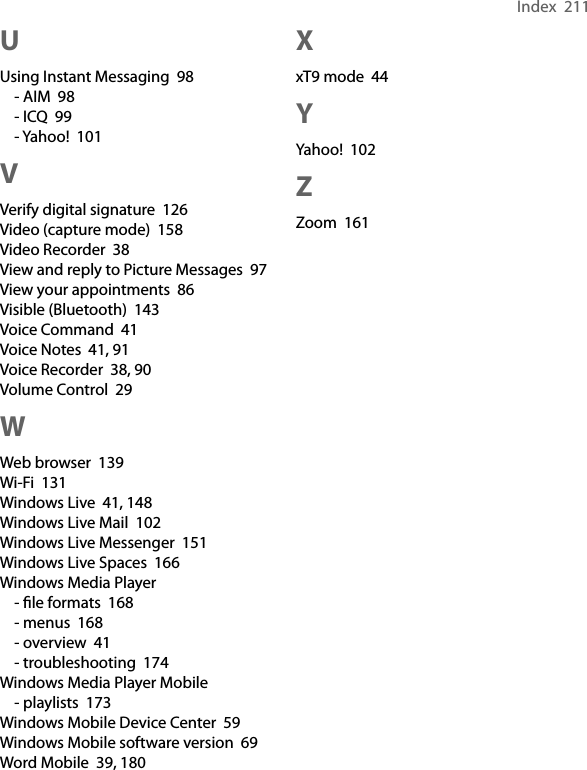
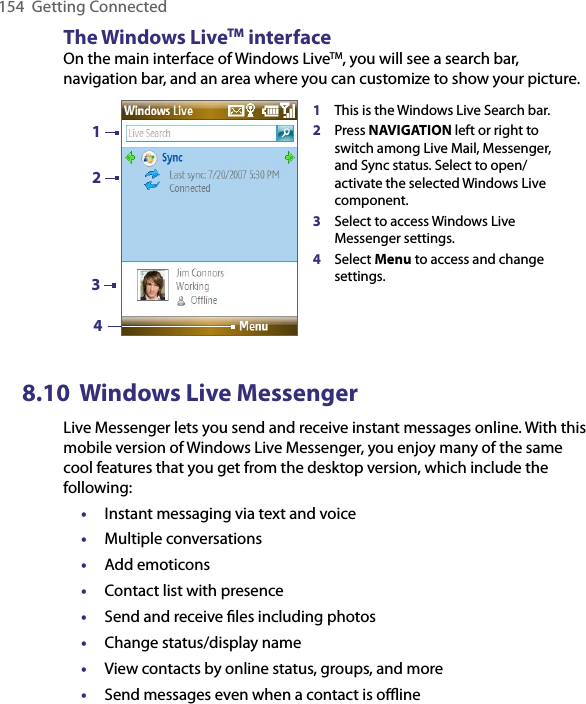
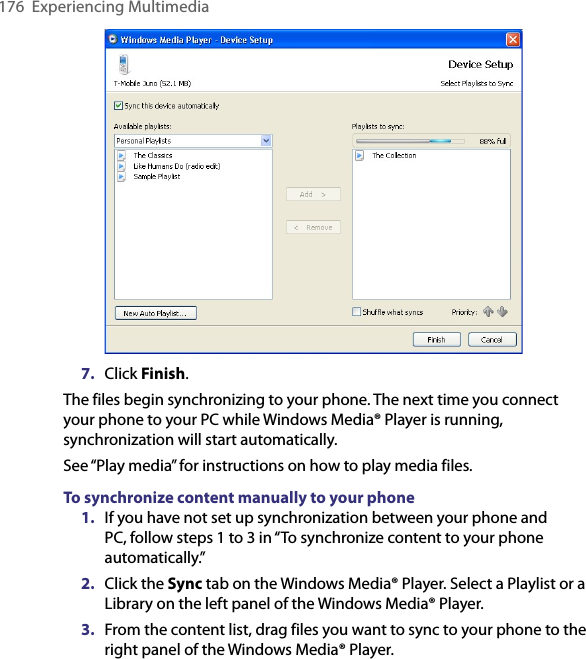
![152 Getting Connected3. Now you are ready to beam. On your phone, select an item to beam. The item can be an appointment in your calendar, a task, a contact card, or a file.4. Select Menu > Beam [type of item].5. Select the device name to which you want to beam to.6. Select Beam.7. If you beamed a calendar, task, or contact item to your computer and it is not automatically added to Outlook, select File > Import and Export to import it to Microsoft Outlook on your computer.To beam information to a Bluetooth-enabled device such as another phone, create a Bluetooth partnership then do steps 3 to 6 in the above procedure.Tip The default folder on your computer where beamed items are stored may be Windows XP: C:\Documents and Settings\your_username\My Documents Windows Vista: C:\users\your_username\My Documents8.9 Windows LiveTMWindows LiveTM gives you full Internet experience on your phone. It helps you to find information, pursue your interests, and get in touch with friends and family on the Internet easier.Windows Live offers the following key features:• Live Search Bar, which lets you search for information on the Web.• Live Messenger, the next generation of MSN Messenger Mobile.• Live Mail, the next generation of Hotmail.• Live Search, which lets you find locations, browse maps, and check for directions.• Live Contacts, address book for storing Live Mail, Live Messaging, and Hotmail contacts.Set up Windows LiveTMThe first time you use Windows LiveTM, sign in by using your Windows Live ID, which is your Windows Live Mail or Hotmail address, and password.](https://usermanual.wiki/HTC/PB.User-manual-3/User-Guide-826467-Page-20.png)
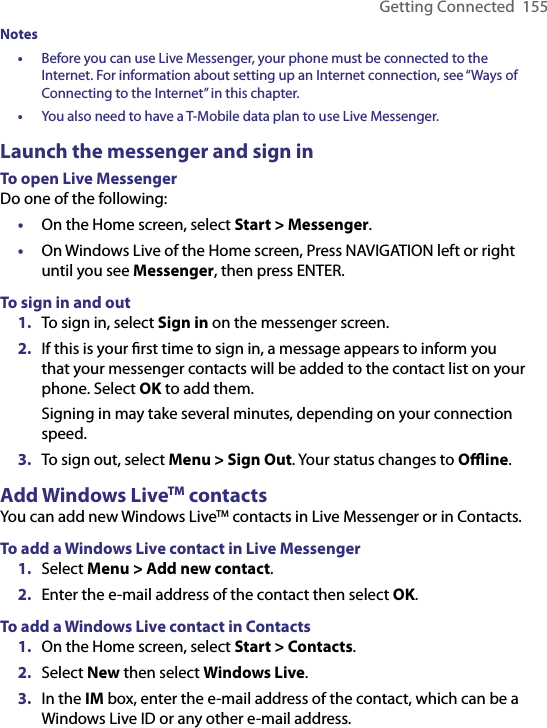
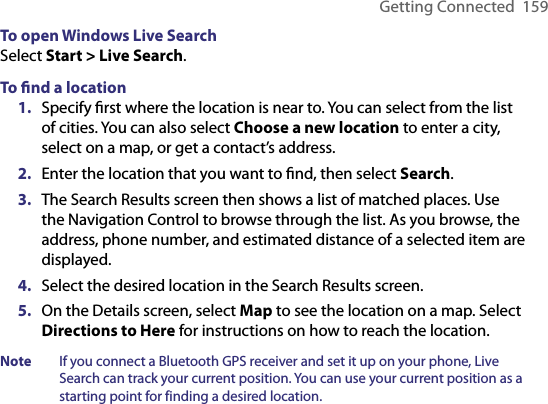
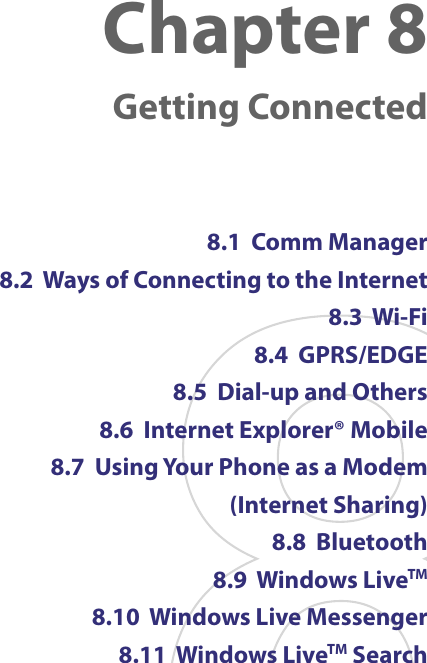
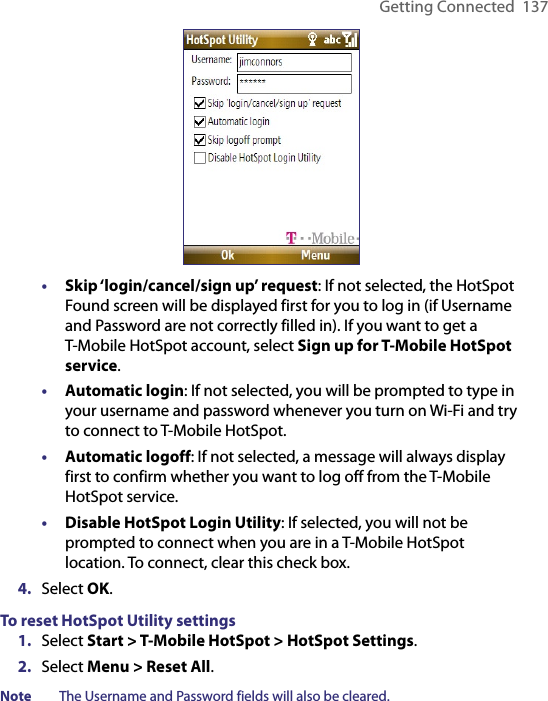
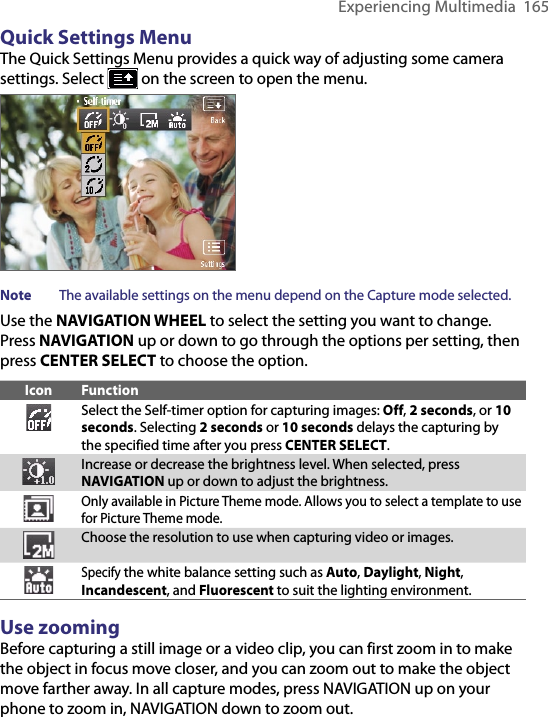
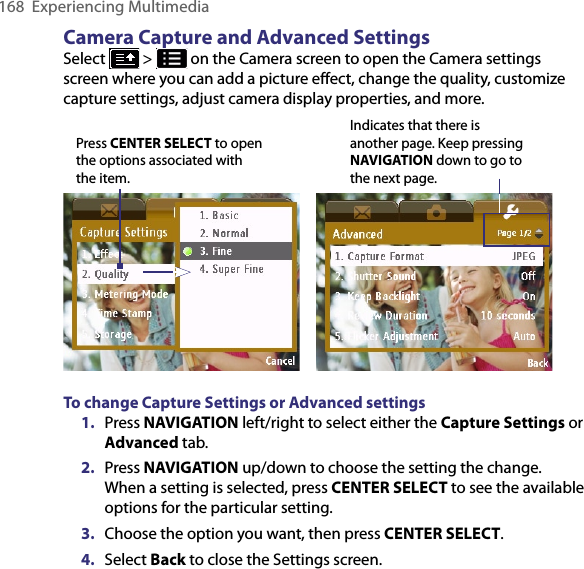
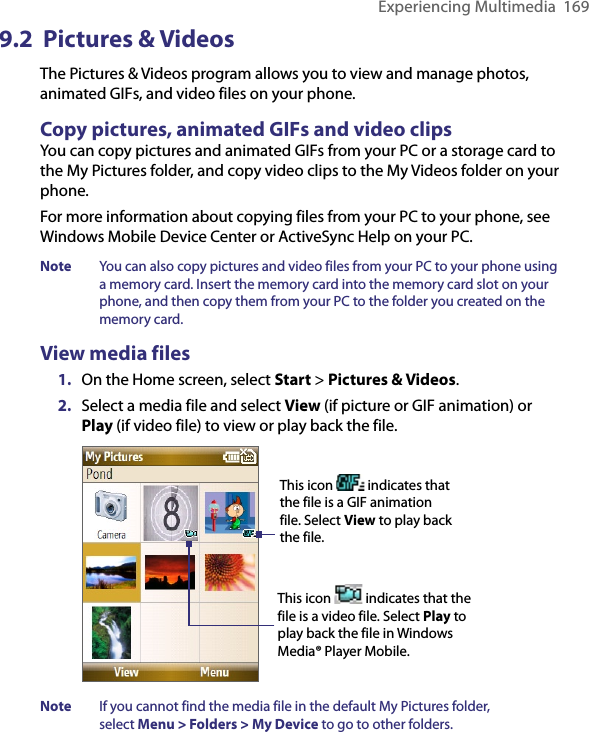
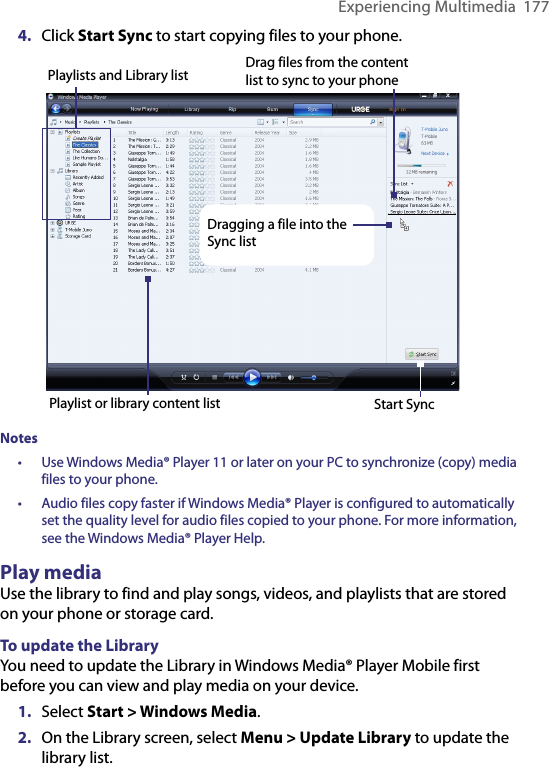
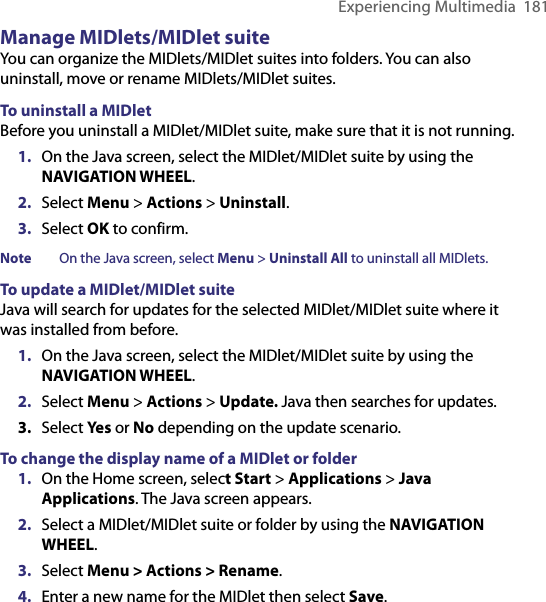
![Experiencing Multimedia 163Picture Theme ( ) Captures still images and places them within frames.Sports ( )Captures a sequence of still images (3 or 5 frames) automatically for a short duration at a defined frequency.Using the above capture modes, the camera captures files in the following formats:Capture type FormatStill Image JPEGVideo Motion-JPEG AVI (.avi)MPEG-4 (.mp4)H.263 baseline (.3gp)MMS Video MPEG-4 (.mp4)H.263 baseline (.3gp)To change the capture modeOn the Camera screen, press NAVIGATION right until you see the capture mode icon you want to use on the upper-left part of the screen. Camera mode icons and indicatorsThe camera icons and indicators disappear from the screen after 3 seconds. Press one of the SOFT KEYs to make them reappear. The Camera [Photo] screen 214351 Indicates the current capture mode.2 Indicates the current zoom ratio. Press NAVIGATION up or down (Landscape orientation) to increase or decrease the zoom level.](https://usermanual.wiki/HTC/PB.User-manual-3/User-Guide-826467-Page-31.png)
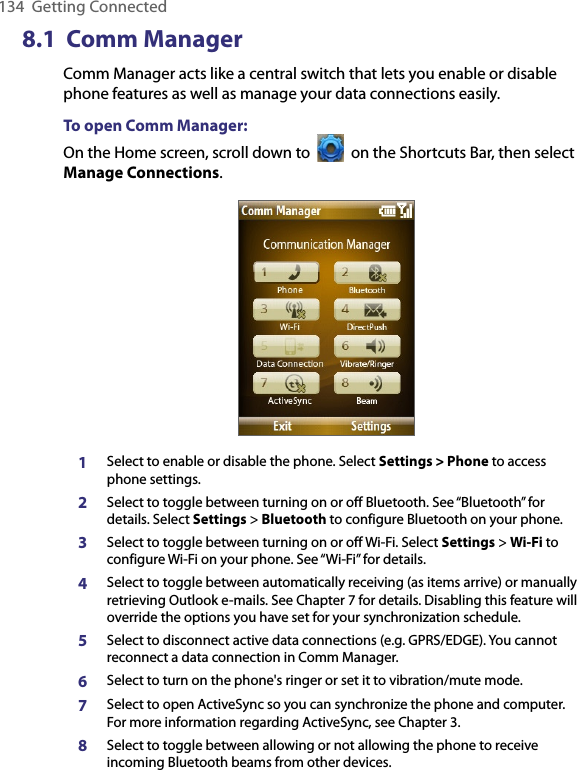
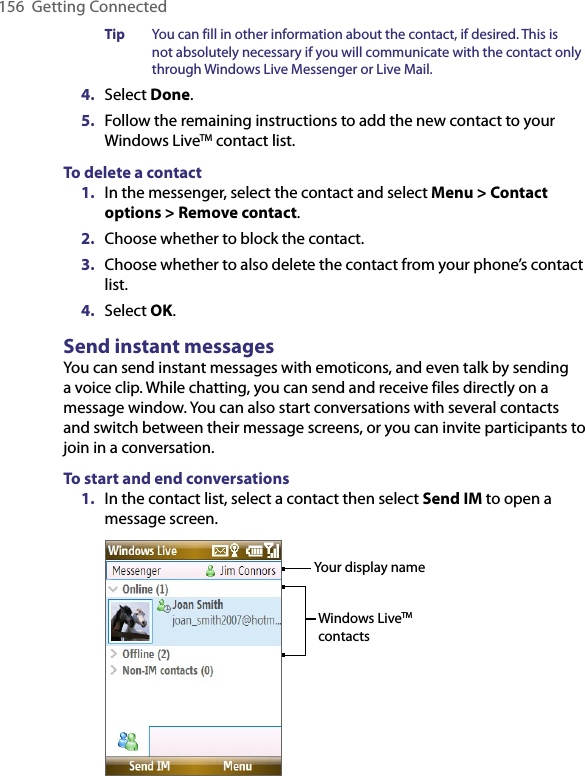
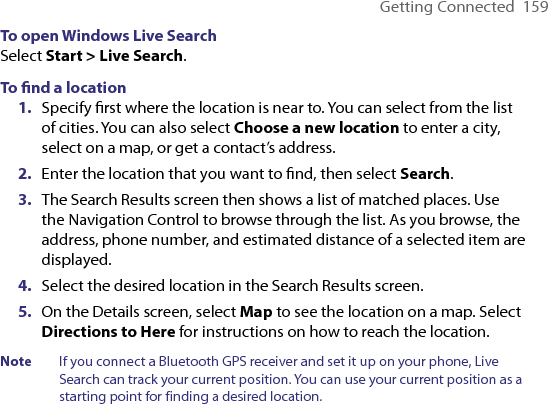
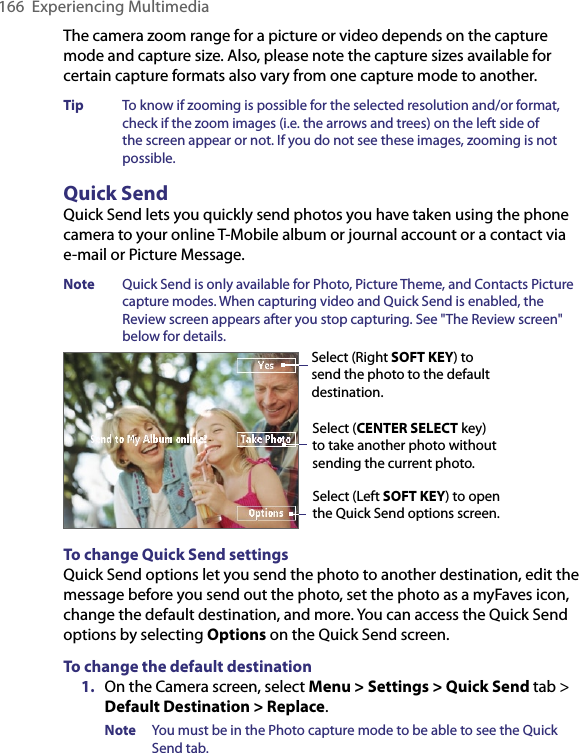
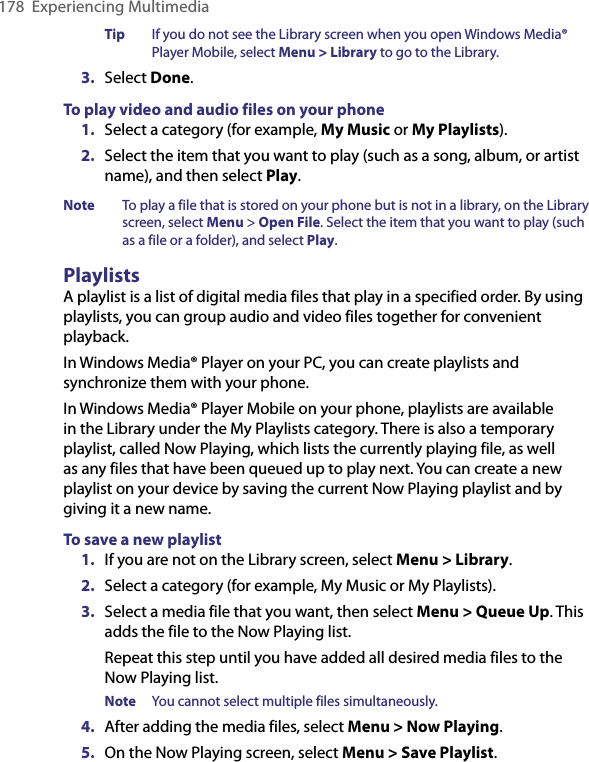
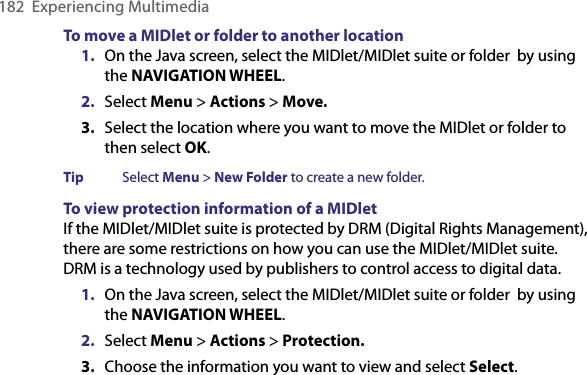
![164 Experiencing Multimedia3 Select to open the Camera Settings screen. 4 Depending on the capture mode, this shows the remaining, available shots of pictures that you can take or remaining duration that can be recorded. While recording video, this shows the recorded duration.5 Select to open Pictures & Videos.The Camera [Video] screen The Recording Status indicator blinks while video recording is in progress.The Camera [Picture Theme] screen Displays the current and total number of photos that can be taken using the selected template.](https://usermanual.wiki/HTC/PB.User-manual-3/User-Guide-826467-Page-32.png)
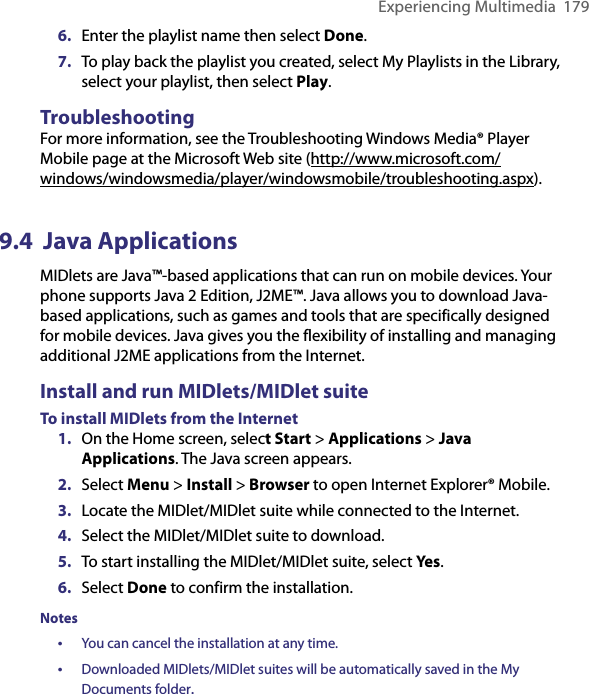
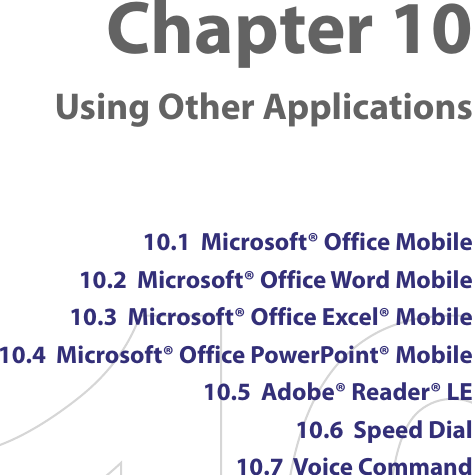


![Using Other Applications 189To go to a cell Select Menu > Tools > Go To and then enter the Cell reference or name. Select OK.Tip You can also sort and find text in the worksheet by selecting Menu > Tools > Sort or Find. To undo and redo an actionSelect Menu > Undo [Action] or Redo [Action].To save the worksheet1. Select Menu > File > Save As.2. Type in the Name you want to use for the edited worksheet and select the Location where you want to save the worksheet. 3. Select Save.To send the document through e-mail1. Select Menu > File > Send. 2. In the Messaging screen, select the E-mail account you want to use to send the worksheet.3. In the e-mail, the file is automatically appended as an attachment.4. Enter the recipient name and select Send.](https://usermanual.wiki/HTC/PB.User-manual-3/User-Guide-826467-Page-57.png)

![Using Other Applications 19510.8 Voice CommandVoice Command lets you call your contacts, open applications, play back music, and get calendar information just by using your voice. Voice Command only responds to a set of predefined commands, you cannot create your custom commands in Voice Command. To learn more about the commands that you can use, select Start > Voice Command > Menu > Help. To set the Voice Command buttonYou need to set a button on your phone as the Voice Command button for you to enable and disable it. The default button to activate Voice Command is to press and hold the SHORTCUT KEY.When Voice Command is activated, the icon will appear on top of the screen. 1. Select Start > Voice Command. 2. In Voice Button, select the button you want to use and select Done. You can set other options in the Voice Command screen. To learn about the different options, consult the Voice Command help. To call a contact1. Hold the phone a few inches away from your mouth.2. Press the button you set as the Voice Command button. 3. In a clear voice, say “Call [Contact Name].” 4. Voice Command will confirm with you the contact you want to call. After the Voice Command confirmation, say “Yes” or “Correct.” Note If Voice Command is wrong about the contact to call, say "No" or "Incorrect" to try again. 5. The phone starts to call the contact. To request information from your calendar1. Hold the phone a few inches away from your mouth.2. Press the button you set as the Voice Command button.3. In a clear voice, say the information you want to retrieve. For example,](https://usermanual.wiki/HTC/PB.User-manual-3/User-Guide-826467-Page-63.png)
![196 Using Other Applications“What’s my next appointment?” or “What’s my next meeting?”Consult the Voice Command help file to learn the other commands that you can use to retrieve other Calendar information.To open a program1. Hold the phone a few inches away from your mouth.2. Press the button you set as the Voice Command button.3. In a clear voice, say “Open [Program Name].” Tip You can also say "Show [Program Name]" or "Start [Program Name]" to open programs.. Use the phrase that you are most comfortable with. To request phone status information1. Hold the phone a few inches away from your mouth.2. Press the button you set as the Voice Command button.3. In a clear voice, say the phone status information you want to retrieve. For example, say “What time is it?” or “What date is it?”Consult the Voice Command help file to learn the other commands that you can use to retrieve other phone status information.To use Voice Command with a Bluetooth headsetActivate Voice Command from your Bluetooth headset by pressing the voice dial button on the Bluetooth headset.](https://usermanual.wiki/HTC/PB.User-manual-3/User-Guide-826467-Page-64.png)