Contents
- 1. Manual Part 1
- 2. Manual Part 2
- 3. Manual
- 4. Manual Statements
Manual Part 2
120 Getting Connected
Tap Disconnect & unpair if you want the phone to erase all pairing
information with the hands-free headset or car kit. You will be
prompted to enter the passcode again when you connect to that
Bluetooth device.

7.1 Using Camera and Camcorder
Use Camera or Camcorder to take and share pictures and videos. Your
phone comes with a 5.0 megapixel camera with auto-focus feature
that lets you capture sharp pictures and videos.
Important You must install a storage card before you use Camera or
Camcorder. All pictures or videos that you capture on your phone
are stored on the storage card. For more information on how to
install a storage card on your phone, refer to Chapter 1.
Opening Camera
Press HOME, then tap > Camera if you want to capture photos
or Camcorder if you want to shoot videos. When you open Camera,
the screen orientation will depend on how you are holding the phone.
For camcorder, the screen automatically switches to landscape
orientation.
Tip You can easily switch to the other capture mode while you are in
Camera or Camcorder. Refer to “Changing capture modes” in this
chapter for details.
Chapter 7
Camera and Multimedia
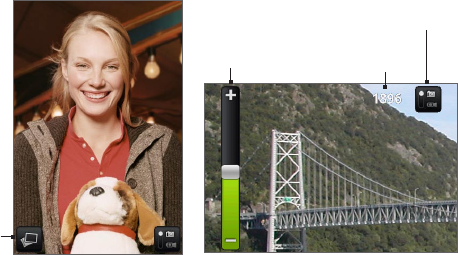
122 Camera and Multimedia
Zoom
control
Remaining
available shots*
Current capture mode.
Tap to switch between
Photo and Video modes.
Opens the
Albums
program. See
“Albums” in
this chapter
for details.
Camera screen when
phone is held upright.
Camera screen when phone is held
horizontally.
* In Video mode, this shows the recording duration.
To show the Zoom control and the remaining available shots or
recording duration, slide your finger up or down on the Camera
screen. The Zoom control will disappear after a few seconds.
Tip You can also roll the TRACKBALL to show the Zoom control. When the
Zoom control is showing, roll the TRACKBALL up to zoom in or roll the
TRACKBALL down to zoom out.
Closing Camera
On the Camera screen, press HOME or BACK.

Camera and Multimedia 123
Changing capture modes
The phone offers two capture modes: Photo and Video. On the screen,
tap to switch between Photo and Video modes.
Taking pictures
1. Switch to Photo capture mode.
2. Frame your subject on the screen.
Tip Hold the phone upright when taking portrait shots or hold the
phone horizontally when taking landscape shots. By doing this, you
do not need to rotate the photo after capturing it.
3. Tap an area on the screen you want to focus. The auto-focus
indicator appears and starts to focus on the selected area.
4. Press the TRACKBALL to take the shot.
Auto-focus
indicator
Tip Slide your finger up or down on the Camera screen to show the Zoom
control. Drag the Zoom control slider up or down to zoom in or out. You
can also roll the TRACKBALL up or down to zoom in or out.
124 Camera and Multimedia
Shooting videos
1. Switch to the Video capture mode.
2. Frame your subject on the screen.
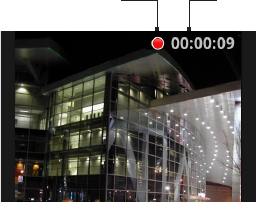
3. Press the TRACKBALL button to start capturing video. Press the
TRACKBALL again to stop capturing video.
Recording indicator Capture duration
Camera and Multimedia 125
Review screen
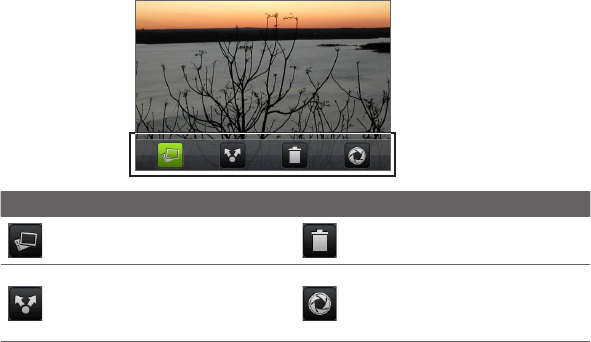
After capturing a photo or video, the review screen lets you save, view,
send, or delete the picture or video by tapping a button at the bottom
of the screen.
Review screen
buttons
Icon Function Icon Function
View View the captured image
or video in Albums.
Delete Delete the captured
image or video.
Send Send the captured image
or video via email or MMS or
set the captured image as your
Home screen wallpaper.
Back Return to the live
Camera or Camcorder screen.
Camera menu panel
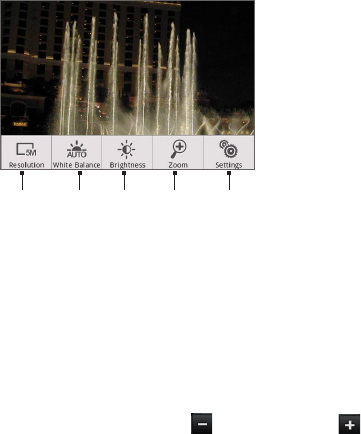
The Camera menu panel lets you adjust basic camera settings and
access advanced camera settings.
126 Camera and Multimedia
1 2 3 4 5
To open the menu panel
While on the Camera screen, press MENU.
1 Resolution Tap to change the resolution (capture size).
2 White Balance Tap to adjust the white balance. White balance
enables the camera to capture colors more accurately by
adjusting to the current lighting environment. White balance
settings include: Auto, Daylight, Cloudy, Incandescent, and
Fluorescent.
3 Brightness Tap to open the Brightness bar so you can adjust the
brightness. On the Brightness bar, tap to decrease, or to
increase the brightness level. Tap outside the Brightness bar to
apply the change.
4 Zoom Tap to show the Zoom control.
5 Advanced Tap to open the advanced camera settings.
Camera and Multimedia 127
7.2 Using Albums
Albums lets you view photos and play back videos. You can also view
your photos or your friends’ photos on Facebook or Flickr. For photos,
you can also do basic editing tasks, set them as your wallpaper or
contact picture, and share to your friends.
Opening Albums
Press HOME, then tap > Albums.
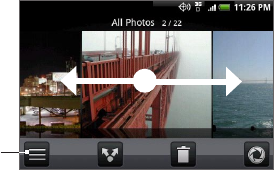
If you stored your files in folders (directories) on the storage card,
Albums will display these folders as separate albums.
Tap to view the
files inside the
album.
This album
contains all the
pictures inside
all the albums.
Album name
and number of
files inside.
This album
contains all the
videos inside all
the albums.
Tap to view pictures
in Albums or pictures
in your Facebook or
Flickr account.
When viewing pictures in Albums, scroll up the screen or roll the
TRACKBALL down to view more albums.
Notes • Depending on the number of pictures stored on the storage card, it
may take a while for Albums to load all your photos on the screen.
• You need to be signed in to your Facebook and Flickr accounts to
view the pictures in those accounts.
128 Camera and Multimedia
Working with pictures
Once you have taken a picture, you can view it or share it with friends.
You can also view your pictures or your friends’ pictures on your
Facebook or Flickr account.
To view pictures in Albums
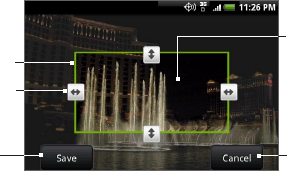
1. On the Albums screen, go to the Albums tab, and then tap an
album to view the pictures inside the album.
2. Slide your finger onscreen to go through the pictures. Tap the
thumbnail to view it in full screen.
Tap to go back
to the Albums
screen.
Tip You can choose to display the photos as thumbnails. To view the
photos inside the album as thumbnails, press MENU and then tap
Grid view.
To view pictures in your Facebook or Flickr account
1. On the Albums screen, go to the Facebook or Flickr tab.
Note When you switch to the Flickr tab, you may be asked to give
authorization for the HTC Flickr client to connect to the Flickr web
site. You need to give authorization to access your Flickr account.
2. Tap your account name or your friend’s account on the list to
view the pictures in the account.

Camera and Multimedia 129
When viewing pictures in full screen, you can:
Slide your finger from right to left or left to right to view the next
or previous picture.
Roll the TRACKBALL left to view the previous picture, or roll it
right to view the next picture in the album or in the pictures list.
Press MENU to let you view the pictures as a slideshow, share,
delete, or rotate the picture, and more.
To zoom in or out on a picture
Tap the screen twice quickly to zoom in, then tap the screen twice
quickly again to zoom out. You can also use your fingers to pinch or
spread the screen to zoom in and out.
Use your thumb and index fingers to
‘spread’ the picture to zoom in.
Use your thumb and index fingers to
‘pinch’ the picture to zoom out.
To view a picture in landscape orientation
Turn your phone sideways to view the picture in landscape mode. The
picture orientation automatically adjusts to how you hold the phone.
Note The Orientation check box in HOME > MENU > Settings > Sound &
display needs to be selected for the screen orientation to automatically
change.
•
•
•
130 Camera and Multimedia
If you want to rotate the picture and save the rotated state, see “To
rotate and save the rotated state” below.
To rotate and save the rotated state
1. View the picture you want to rotate in full screen
2. Press MENU, then tap Rotate, and then select either Rotate left
or Rotate right.
Note The Picture rotates 90 degrees counter-clockwise (Rotate left) or 90
degrees clockwise (Rotate right) each time you tap one of the Rotate
options.
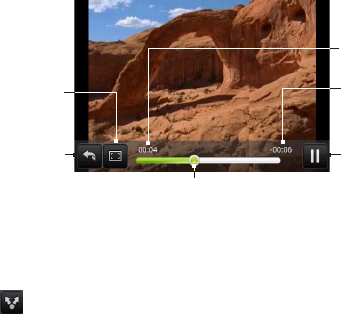
To crop a picture
1. While viewing a picture in full screen, press MENU and then tap
More > Crop. The cropper tool appears.
2. Do one of the following:
To adjust the cropper size, press and hold the edge of the
cropper tool. When the cropper arrows appear, drag your finger
inward to or outward from the centre of the cropper to resize it.
To move the cropper to another area on the picture, press and
hold inside the cropper, then drag it with your finger to the
desired position.
Cropper tool
Tap to save
the photo. Tap to discard
your changes.
Cropper arrow
Press and hold
inside the
cropper, then
drag it to any
area of the photo.
3. Tap Save to apply the changes to the picture.
•
•

Camera and Multimedia 131
Note The cropped picture is saved in the storage card as a copy. The original
picture remains unedited.
To share pictures on Facebook
You need to be logged in to your Facebook account to be able to
upload pictures.
1. In the Albums screen, open the album where the pictures you
want to share are in.
2. Tap and then on the Share options menu, tap Facebook.
3. Select the pictures you want to share and then tap Next.
4. Add a caption for each picture (if you want) and then tap
Upload.
5. Select which album to upload to and set privacy settings for the
uploaded pictures. Tap Done.
To share pictures on Flickr
You need to be logged in to your Flickr account to be able to upload
pictures.
1. In the Albums screen, open the album where the pictures you
want to share are in.
2. Tap and then on the Share options menu, tap Flickr.
3. Select the pictures you want to share and then tap Next.
4. Edit the file name and/or add a description for each picture (if
you want) and then tap Upload.
5. Select which album to upload to and set privacy settings for the
uploaded pictures. Tap Done.

132 Camera and Multimedia
To share a picture on Picasa
You need to be signed in to a Google Account to be able to upload
pictures to the Picasa™ photo organizing service.
1. In the Albums screen, open the album where the pictures you
want to share are in.
2. Tap and then on the Share options menu, tap Picasa.
3. Tap the picture you want to share
4. Enter a Caption for the picture and select the Album where you
want to upload the picture.
Tip Tap to create a new album where you can upload the picture.
5. Tap Upload. You can view the photos online at http://picasaweb.
google.com.
To send pictures using a messaging application
1. In the Albums screen, open the album where the pictures you
want to share are in.
2. Tap and then on the Share options menu, tap Messages,
Gmail, or Mail.
3. Select the pictures you want to share and then tap Next.
Note For Gmail and Messages, tap the picture you want to send. You can
only send one picture.
4. The pictures are automatically added as an attachment to the
email or added into the MMS message.
Note If you selected Mail and you have multiple email accounts, the
default email account will be used.
5. Compose your message and then tap Send.
Camera and Multimedia 133
Working with videos
Once you have taken a video, you can view it or share it with friends.
To watch videos
1. On the main Albums screen, tap a video album and then tap the
video you want to watch to start playing back the video.
2. Slide your finger onscreen to go through the videos. Tap the
thumbnail to view it in full screen. The screen automatically
switches to landscape mode when you play back a video.
Tap to toggle
between playing
and pausing the
video.
Tap to go back
to video album.
Elapsed time
Time remaining
Tap to view the
video in full
screen. Tap again
to revert to the
original size.
Drag to the left or right to go
back or forward in the video.
To send a video using email
1. In the Albums screen, open the album where the videos you want
to share are in.
2. Tap and then on the Share options menu, tap Gmail or Mail.
3. Select the videos you want to send and then tap Next.
Note For Gmail, tap the video you want to send. You can only send one
video.
4. The videos are automatically added as an attachment to the
email.

134 Camera and Multimedia
Note If you selected Mail and you have multiple email accounts,
the default email account will be used.
5. Compose your message and then tap Send.
To send a video using Messages
1. In the Albums screen, open the album where the videos you want
to share are in.
2. Tap and then on the Share options menu, tap Messages.
3. Tap the video you want to send and then tap Next.
4. The video is automatically added into the MMS message.
5. Compose your message and then tap Send.
To share videos on YouTube
You can share your videos by uploading them to YouTube™. Before
you do this, you must create a YouTube account and sign in to that
account on your phone.
1. While viewing videos in a list, press and hold the video, and then
tap Share on the options menu.
2. When prompted, tap YouTube.
3. Enter a Title, Description, and Tags for your video. Select the
Public check box if you want to share the video with everyone.
4. Tap Upload.
Tip You can view the upload progress by opening the Notifications panel
and then tapping YouTube. Refer to “To open the Notifications panel” in
Chapter 1 to learn how to open the Notifications panel.
Camera and Multimedia 135
Adding the Photo album or Photo frame widget
Add the Photo frame or Photo album widget to let you view a single
photo or a whole album on the Home screen. To learn how to add
widgets, refer to “To add an HTC widget” in Chapter 1.
Closing Albums
While in the Albums screen, press HOME or BACK to close the
application.
7.3 Using Music
Music plays digital audio files from the phone’s storage card. Since
Music only plays audio files saved on the storage card of your phone,
you must copy your audio files to the storage card before you open
Music.
Copying music on to the storage card
1. Set the phone’s storage card as a USB drive. See “Using the
Phone’s Storage Card as a USB Drive” in Chapter 1 for details.
2. On the computer, navigate to the USB drive and open it.
3. Create a folder on the root folder of the storage card
(for example, Music).
Tip You can also create and use folders to organize your music inside
the Music folder you have created.
4. Copy the music into the folder you have created.
5. After copying music, unmount or eject the drive as required by
your computer’s operating system to safely remove the phone.
6. Disconnect the phone from the computer.
136 Camera and Multimedia
Opening Music
Press HOME, then tap > Music. The Playback screen displays.
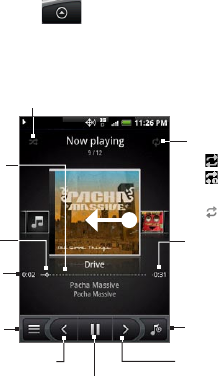
Playing music
Press and drag
to jump to any
part of the song.
Tap to turn shuffle on and off.
(Shuffle is off when button is gray.)
Tap to cycle through
the repeat modes:
Repeat all songs
Repeat current
song
Don’t repeat
•
•
•
Remaining time
Tap to pause or to
resume playing the
song.
Elapsed time
Progress bar
Tap to go to
the Library.
Tap to go to the
previous song in the
Now playing list.
Tap to go to the next song
in the Now playing list.
Tap to toggle
between showing the
Now playing list and
Playback screen.
Tip You can also swipe your finger from right to left or left to right to go to
the next or previous song in the Now playing list.
Notes • Press the VOLUME UP or VOLUME DOWN button to adjust the
playback volume.
• If you are using the wired headset to listen to music, press the center
button to toggle between playing and pausing playback. Press the
previous or next buttons to go to the previous or next song.
Camera and Multimedia 137
Listening to music on the Lock screen
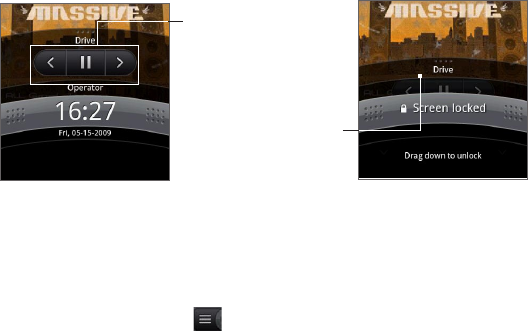
When you are playing back music and the screen turns off, you can
control the music playback from the Lock screen when you “wake up”
the phone by pressing END/POWER.
Tap to go to the
previous song, play/
pause music, or go to
the next song in the
Now playing list.
If you do not see the
playback controls,
tap to show the
playback controls.
Library
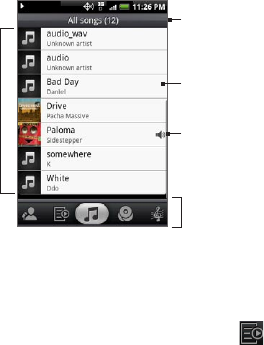
Your music is organized into different categories such as Albums,
Artists, Genre, Composers, and more. Select a category by tapping
one of the category tabs at the bottom of the screen. Tap a song in
the category to play it back.
To go to the Library, tap at the bottom-left of the Playback screen
or the Now playing screen.
138 Camera and Multimedia
Indicates the song
currently being
played back.
Tap a music category
to open the music file
you want to play.
Tap to play back.
List songs in
the category.
Category name
Creating playlists
Use playlists to organize your music files. You can create as many
playlists as you want on your phone.
In the Library, go to the Playlist category ( ).
Tap Add playlist.
Enter the Playlist name and then tap Add songs to playlist.
Select a category from where to add songs to the playlist.
Tip Go to the Select music track category to show all the available
songs.
5. Select the songs you want to add to the playlist and then tap
Add.
6. Tap Save.
1.
2.
3.
4.

Camera and Multimedia 139
Managing your playlists
To play the songs in a playlist
In the Playlists screen, tap the playlist name and then tap a song.
To add songs to a playlist
1. In the Playlists screen, tap the playlist where you want to add
songs.
2. Press MENU and then tap Add songs.
3. Select a category to add songs from to the playlist.
Tip Go to the Select music track category to show all the available
songs.
4. Select the songs you want to add to the playlist and then tap
Add.
Tip While playing back a song, press MENU and then tap Add to playlist to
add the current song to a playlist.
To rearrange the songs in a playlist
1. In the Playlists screen, tap the playlist you want to edit.
2. Press MENU and then tap Change order.
3. Press and hold at the end of the song title you want to move.
When the row is highlighted in green, drag it to its new position,
then release.
4. Tap OK.
To delete a song in a playlist
1. In the Playlists screen, tap the playlist you want to edit.
2. Press MENU and then tap Delete songs.
3. Select the songs you want to delete and then tap Delete.
140 Camera and Multimedia
To delete a playlist
1. In the Playlists screen, press and hold the playlist you want to
delete.
2. In the options menu, tap Delete playlist.
Tip To delete multiple playlists, in the Playlist screen, press MENU and then
tap Delete playlists.
Setting a song as ringtone
You can use songs as your phone ringtone.
1. In the Library, select the song that you want to use as ringtone
and then play it back.
2. In the Playback screen, press MENU and then tap Set as ringtone.
3. In the Set as ringtone options menu, tap Phone ringtone or
Contact ringtone.
Note If you select Contact ringtone, you need to select the contacts you
want to associate the song with in the next screen.
To check if the song was added as a ringtone
1. On the Home screen, press MENU and then tap Settings.
2. On the Settings screen, tap Sound & display > Phone ringtone.
The song should be listed as an option.
Adding the Music widget
Add the Music widget to control music playback on the Home screen.
To learn how to add widgets, refer to “To add an HTC widget” in
Chapter 1.

8.1 Signing In to Your Google Account
Signing in to your Google Account lets you synchronize Gmail,
Calendar, and contacts between your phone and the web. You also
need to sign in to a Google Account to use Google Apps such as
Google Talk™ and Android Market.
When you turn on the phone for the first time, you are given the
option to sign in to your Google Account.
1. In the Setup accounts screen, tap Google account > Yes > Next.
2. Tap Sign in. Enter your user name and password, and then tap
Sign in. After signing in, all emails, contacts, and calendar events
on your Google Account will automatically synchronize with your
phone.
Note Tap Create if you do not have a Google Account yet.
Retrieving your Google Account password
If you forgot your Google Account password, you can retrieve it by
doing the following:
1. On your computer, open your browser and go to http://google.
com/accounts.
2. On the right side of the page, click I cannot access my account.
Chapter 8
Google Apps

142 Google Apps
3. In the Please select your issue section, select I forgot my
password.
4. Click Reset your password now, and then follow the procedure
on how to recover your password.
8.2 Using Gmail
Gmail is Google’s web-based email service. Gmail is configured when
you first set up your phone. Depending on your synchronization
settings, Gmail on your phone is automatically synchronized with
your Gmail account on the web. For more information about
synchronization, see “Synchronizing Google Apps” in this chapter.
To open Gmail
Press HOME, then tap > Gmail.
To scroll through the
message list:
Slide your finger up/
down on the screen.
Roll the TRACKBALL
up/down.
•
•
Checked email.
Select one or more
emails to apply an
action.
Note: Batch
operations needs to
be enabled.
Message label.
Starred message.
Tap to add or
remove the star.
Folder (or Label) and
number of unread email
messages.
Actions for checked
email(s). This will not
show if there is no item
selected in the inbox.
Unread messages
are displayed in
bold.
Google Apps 143
The Inbox conversations list (hereinafter referred to as Inbox) is your
default Gmail view. All your received emails are delivered to your
Inbox.
To refresh Gmail
Press MENU and then tap Refresh to send or receive new emails and
to synchronize your emails with your Gmail account on the web.
Creating and sending emails
To create and send an email
In the Inbox, press MENU and then tap Compose.
Enter the message recipient’s email address in the To field. If
you are sending the email to several recipients, separate the
email addresses with a comma. You can add as many message
recipients as you want.
Note If you want to send a carbon copy (Cc) or a blind carbon copy
(Bcc) of the email to other recipients, press MENU and then tap
Add Cc/Bcc.
3. Enter the email subject, and then compose your email.
Tip If you want to add a picture attachment, press MENU and then tap
Attach. Select the picture you want to attach, and then tap OK.
1.
2.
144 Google Apps
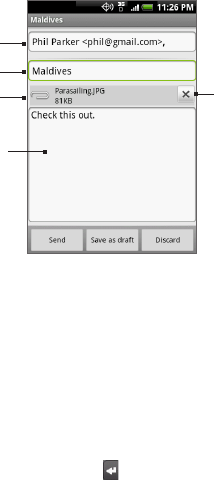
Enter your
message here.
Tap to
remove the
attachment.
Recipient
Subject
Attachment
4. After composing your email, tap Send.
Note While composing the message, tap Save as draft or press the BACK
button to save it as a draft. To view your draft email messages, in
the Inbox, press MENU and then tap View labels > Drafts.
To add a signature to emails
You can add a signature to email messages that you send.
In the Inbox, press MENU and then tap Settings > Signature.
Enter your signature in the text box, and then tap OK.
Tip You can create a signature consisting of multiple lines of text. At the
end of each line of text, tap on the onscreen keyboard to create
another line.
To view your sent messages
In the Inbox, press MENU and then tap View labels > Sent.
1.
2.

Google Apps 145
Receiving and reading emails
Depending on your notification settings, the phone plays a ring
tone, vibrates, or displays the email message briefly in the status bar
when you receive a new email. A new email message ( ) icon also
appears on the notifications area of the status bar to notify you of a
new email.
Note For more information on email notification settings, refer to the “Setting
Gmail settings” section later in this chapter.
Gmail groups each message you send with all the responses you
receive. This conversation list continues to grow as new replies arrive,
so you can always see your messages in context. Conversations are
also referred to as message threads. A new message or a change to
the subject of a current message will begin a new thread.
To view emails
Do one of the following:
Press HOME, then press and hold the status bar, and then slide
down your finger on the screen to open the Notifications panel.
Tap the new email to view it.
While in the Inbox, tap the unread email or the conversation with
the unread email to view it.
•
•
146 Google Apps
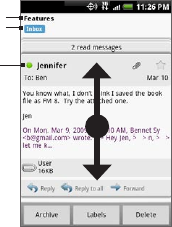
To scroll through the
message:
Slide your finger up/
down on the screen.
Roll the TRACKBALL
up/down.
•
•
Online status. Appears
when the contact is a
Google Talk friend and
you are signed in to
Google Talk.
Message subject
Message label
To search for email messages
You can search for a specific email message by sender, word in a
subject, or label.
In the Inbox, press MENU and then tap Search.
Enter the search keyword in the box, and then tap Search.
1.
2.
Google Apps 147
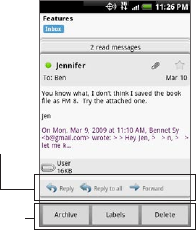
Replying to or forwarding emails
In the message thread, scroll
down to the end of the
conversation.
2. Tap Reply, Reply to all, or
Forward.
3. Do one of the following:
If you selected Reply or
Reply all, enter your reply
message.
If you selected Forward,
specify the message
recipients.
4. Scroll down to the end of the
message, and then tap Send.
1.
•
•
Message
options
Thread
options
Managing conversations and emails
Conversations
In the Inbox, press and hold the conversation, and then tap:
Read to open the email.
Archive to archive the conversation.
Tip To display your archived messages, in the Inbox, press MENU and
then tap View labels > All Mail.
Mute to mute the entire conversation.
Tip If you’re part of a long message conversation that isn’t relevant, you
can ‘mute’ the conversation to keep all future additions out of your
Inbox.
•
•
•
148 Google Apps
Mark read or Mark unread as desired. Unread messages are
displayed in bold in the Inbox.
Delete to delete the conversation.
Add star or Remove star to assign a star or remove the star on
the conversation.
Change labels to add or change the label of the conversation.
Note You cannot use the phone to create labels; do that on the Gmail
web site.
Report spam to report the conversation as spam.
Email messages
In the message thread, navigate to the email header or message using
the TRACKBALL, press MENU and then tap:
Archive to archive the email message.
Tip To display your archived messages, in the Inbox, press MENU, and
then tap View labels > All Mails.
Add star or Remove star to assign a star or remove the star on
the conversation.
Mark read or Mark unread as desired. Unread messages or
threads with unread messages display in bold in the Inbox.
Change labels to add or change the label of the conversation.
Note You cannot use the phone to create labels; do that on the Gmail
web site.
Delete to delete the email message.
More >
Back to Inbox to return to your Inbox.
Mute to mute the entire conversation.
•
•
•
•
•
•
•
•
•
•
•
•
•
Google Apps 149
Tip If you’re part of a long message conversation that isn’t relevant, you
can ‘mute’ the email to keep all future additions out of your Inbox.
Report spam to report the email message as spam.
Setting Gmail settings
1. In the Inbox, press MENU and then tap Settings.
2. Set the following options:
Signature Tap to enter a signature that is appended at the end
of your emails.
Confirm delete Select the check box to show a confirmation
box when you delete a conversation.
Batch operations Select the check box to show the batch
operations feature. The Batch operations feature lets you
archive, delete, or apply a label to multiple emails at once.
Labels Tap to select which Gmail labels to synchronize.
Email notifications Select the check box to show a notification
icon on the status bar when you receive a new email.
Tap Select ringtone if you want your phone to ring when a
new email message arrives. On the ring tone menu, select a
ring tone specific to new email messages. The ring tone plays
briefly when selected. If you don’t want a ring tone to play
when you receive a new email message, tap Silent. Then tap
OK to confirm your ringtone selection.
Select Vibrate if you want your phone to vibrate when you
receive a new email message.
•
•
•
•
•
•
•
•
150 Google Apps
8.3 Using Google Talk
Google Talk is Google’s instant messaging program. It lets you
communicate with other people that also use Google Talk.
Note The Google Talk account that is set up is based on the Google Account
that you used when you set up the phone.
Signing in and chatting online
To open Google Talk
Press HOME, then tap > Google Talk.
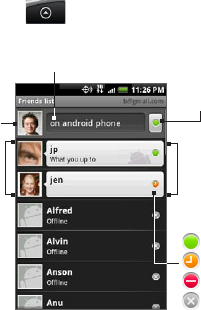
Online status:
Available
Idle
Busy
Offline
Opened chats. Tap a
callout to open the
chat screen and start
chatting with your
friend.
Friends list
Tap to
change your
picture
Tap to change your online
status message.
Tap to change your
online status.

Google Apps 151
To add a new friend
You can only add people who have a Google Account.
In the Friends list, press MENU and then tap Add friend.
Enter the Google Talk instant messaging ID or Google email
address of the friend you want to add.
Note When you add a friend with an instant messaging ID and has been
saved in your contacts list, matching contacts will display on the
screen as you enter information. You can tap the contact or continue
entering the IM information.
3. Tap Send invitation.
To view and accept an invitation
In the Friends list, press MENU and then tap Invites. All chat
invitations you have sent or received are listed on the pending
invitations screen.
Tap a pending invitation, and then tap Accept or Decline.
Note When someone you invite to chat accepts your invitation, the pending
invitation disappears from the list.
To change your online status and message
1. Tap the online status icon ( ) beside your name, and then
select the status you want on the menu.
2. Tap the text box on the left of your online status icon and then
enter your status message using the onscreen keyboard.
3. Tap .
To start a chat
Do one of the following:
Tap a friend in the Friends list.
1.
2.
1.
2.
1.
•
152 Google Apps
Navigate to a friend using the TRACKBALL, and then press
the TRACKBALL.
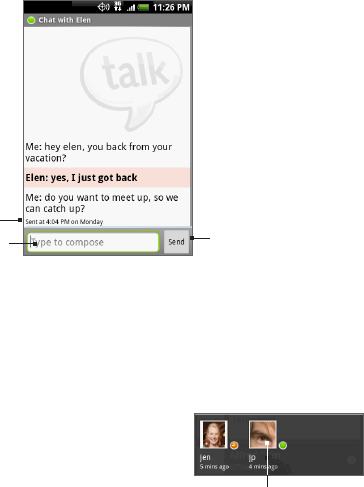
Tap to
send your
message.
Enter your
message here.
Timestamp.
Appears after
every minute of
inactivity.
2. Chat with your friend by entering text using the onscreen
keyboard.
Note To insert a smiley, press MENU and then tap Insert smiley. Tap a
smiley to insert it into your message.
3. After entering your message, tap Send.
To switch between active chats
You can switch between chats if you have
more than one chat going.
1. While on a chat screen or in the
friends list, press MENU and then tap
Switch chats.
2. On the panel that opens, tap the
friend you want to chat with.
Tap to switch chat
with this friend.
•
Google Apps 153
To close a chat
Do one of the following:
In your Friends list, press and hold a friend with an active chat
and then tap End chat on the menu.
While on a chat screen, press MENU and then tap End chat.
Managing your friends
Friends in your friends list is sorted by their online status — active
chats, online, busy, and offline. Within the status groupings, friends are
listed alphabetically.
By default, only the friends that you frequently communicate with
— the most popular — are in the Friends list. If you want to display all
your friends, press MENU and then tap All friends.
Tip To switch back to displaying only your most popular friends, press
MENU and then tap Most popular.
To block a friend
You can block a friend from sending you messages. When blocked,
your friend is also removed from your Friends list.
1. In the Friends list, locate the friend you want to block.
Note If you cannot see the friend, Press MENU and then tap All friends.
2. Press and hold the friend’s name, and then tap Block friend.
Your friend is removed from your friends list and is added to the
blocked friends list.
Note To unblock a friend, in the Friends list, press MENU and then tap
Blocked. In the Blocked friends list, tap the name of the friend you want
to unblock, and then tap OK when prompted.
•
•

154 Google Apps
To pin a friend
You can pin a friend to make sure that friend always appears in your
Most popular friends list.
In the Friends list, press and hold the friend’s name to open the
options menu.
Note If you cannot see the friend, Press MENU and then tap All friends.
2. Tap Pin friend.
Note To unpin a friend, in the Friends list, press and hold the friend you want
to unpin and then tap Unpin friend on the options menu.
To show a friend in the Most popular list
In the Friends list, press and hold the friend’s name to open the
options menu.
Note If you cannot see the friend, Press MENU and then tap All friends.
2. Tap Show friend.
Note To keep a friend from appearing in the most popular list, press and hold
the friend’s name, and then tap Hide friend on the menu. If you pinned
the friend, the pin will be removed when you hide the friend.
Mobile indicators
You can check what type of device your friend is using to chat in
Google Talk. In the friends list, check the image that appears to the
right of your friend’s name.
Indicates that
the friend
is using an
Android phone.
When you do not see an image, it indicates that your friend signed in
last from a computer.
1.
1.

Google Apps 155
You can also choose to show a mobile indicator. To show:
In the Friends list, press MENU and then tap More > Settings.
Select the Mobile indicator option, and then press BACK. The
mobile indicator icon will display along with your name in other
people’s Friends list and will let your friends know what type of
mobile device you are using.
Adjusting instant messaging settings
To set notifications for new instant messages
You can set the phone to play a sound, vibrate, or display a
notification icon in the status bar each time you receive a new instant
message.
In the Friends list, press MENU and then tap More > Settings.
Do one or all of the following:
Select the IM notifications check box to receive a notification
( ) in the status bar when a new instant message arrives.
Tap Select ringtone to select the ring tone to use when a
new instant message arrives. The ring tone briefly plays when
selected. If you don’t want a ring tone to play when you
receive a new instant message, select Silent.
Select the Vibrate check box to vibrate your phone when you
receive a new instant message.
To sign in automatically
You can sign in to your Google Talk account automatically every time
you turn on your phone.
In the Friends list, press MENU and tap More > Settings.
Select the Automatically sign in check box.
Press BACK to save your setting.
1.
2.
1.
2.
•
•
•
1.
2.
3.
156 Google Apps
Signing out
In the friends list, press MENU and then tap More > Sign out when you
want to sign out from Google Talk.
8.4 Using Google Maps
Google Maps lets you track your current location, view real-time traffic
situations, and receive detailed directions to your destination. It also
provides a search tool where you can locate places of interest or an
address on a vector or aerial map, or view locations in street level.
Notes • You need an active data or Wi-Fi connection to use Google Maps.
• The Google Maps application does not cover every country or city.
To enable Location source
Before you open Google Maps and find your location or search for
places of interest, you must enable My location sources.
Press HOME > MENU and then tap Settings > Location.
Select Use wireless networks, Enable GPS satellites, or both.
Note Selecting Enable GPS satellites lets you locate places of interest in
street-level. However, this requires a clear view of the sky and more
battery power.
1.
2.
Google Apps 157
To open Google Maps
Press HOME, then tap >
Google Maps.
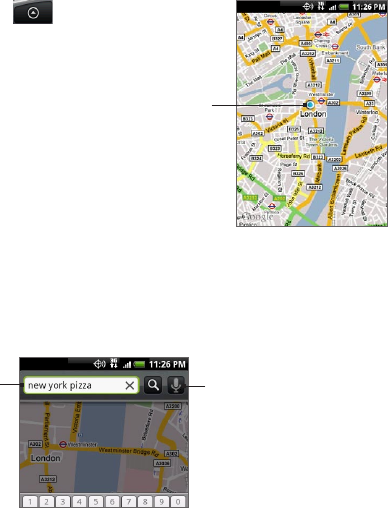
To find your location on the map
On the Google Maps screen, press
MENU and then tap My Location. Your
location is shown on the map as a
blinking blue dot.
Your
current
location
Searching for places of interest
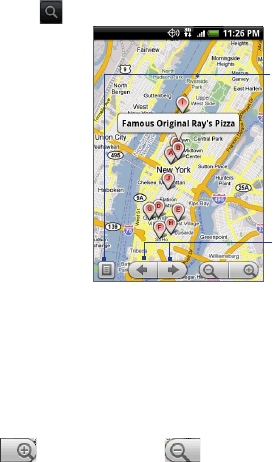
On the Google Maps screen, press SEARCH.
Enter the place you want to search in the search box. You can
enter an address, a city, or type of business or establishment (for
example, museums in london).
Enter the place
you want to
search here.
Tap to search
the place you
entered.
Tip As you enter information, a list of all the places which you have
searched or visited before appears on the screen. You can also tap
an address on the menu to show its location on the map.
1.
2.
158 Google Apps
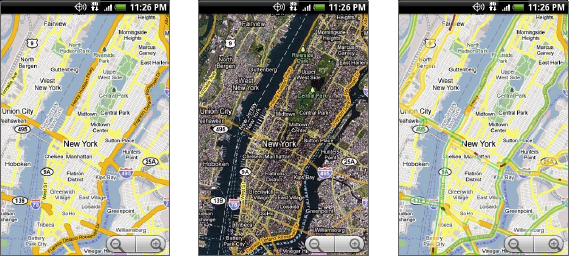
3. Tap . The search results are displayed on the map.
Tap to go to the
previous or next
search item on the
map if there are
multiple search
results.
Tap to show the
search results as
a list.
4. Tap the callout to show the Address, Details (if available), and
Reviews (if available) for the search item.
Viewing maps
While viewing a map, take advantage of the following zoom and
navigation techniques.
To zoom in or out on a map
Tap to zoom in; tap to zoom out.
To navigate on a map
Roll the TRACKBALL or slide your finger on the screen in any direction
to view other areas of the map.
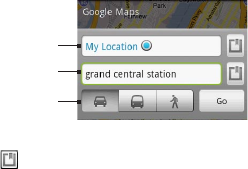
To change map modes
When viewing a map, you can switch to another map mode. Press
MENU and then tap Map mode. Select from Map, Satellite, or Traffic.
Google Apps 159
Traffic modeMap mode Satellite mode
Map mode This is the default view and displays a map, complete
with names of streets, rivers, lakes, mountains, parks, and
boundaries.
Satellite mode Google Maps uses the same satellite data
as Google Earth™. Satellite images are not real-time. Google
Earth acquires the best imagery available, most of which is
approximately one to three years old.
Traffic mode (available only in selected areas) Real-time traffic
conditions are displayed over roads as color-coded lines. Each
color represents how fast the traffic is moving.
•
•
•
160 Google Apps
To view a map in Street View
Street View mode (available only in selected areas) provides a street-
level view of the location.
1. Search for the place you want to view in Street View. See
“Searching for places of interest” for details.
2. On the location details screen, tap Street view.
Tip While viewing a Street View of a location, press MENU and then tap
Compass mode to turn Compass mode on. Tilt, pan, or turn your
phone to view the area around the selected location.
Getting directions
Use Google Maps to get detailed directions to your destination.
While viewing a map in any mode, press MENU and then tap
Directions.
Enter the starting point in the first text box, then enter your
destination in the second text box. By default, your current
location is entered in the Starting point box.
Choose how you
want to get to
your destination.
Starting point
Destination
You can also tap to open the location source menu and select
a starting point and destination address.
3. Choose how you want to get to your destination: Driving, Public
transit, or Walking.
1.
2.
Google Apps 161
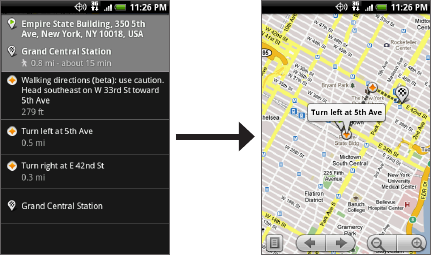
4. Tap Go. The directions to your destination appears in a list. Tap a
direction instruction on the list to show the map.
When you are finished viewing or following the directions, press MENU
and then tap More > Clear map to reset the map. Your destination is
automatically saved in the Google Maps history.
8.5 Using Google Latitude
Google Latitude™ user location service lets you and your friends share
locations and status messages with each other. It also lets you send
instant messages and emails, make phone calls, and get directions to
your friends’ locations.
Your location is not shared automatically. You must join Latitude,
and then invite your friends to view your location or accept their
invitations.

162 Google Apps
Opening Latitude
To join Latitude
1. While viewing a map in any mode, press MENU and then tap Join
Latitude.
2. Read the privacy policy. If you agree with it, tap Agree & share.
To open Latitude after joining
While viewing a map in any mode, press MENU and then tap Latitude.
Sharing your locations
After you join Latitude, you can start sharing your locations with your
friends. Only friends that you have explicitly invited or accepted can
see your location.
Inviting friends
To share your location with friends and request to see their locations
1. In Latitude, press MENU and then tap Add friends.
2. Choose how to add friends:
Select from Contacts. Select any number of friends from your
Contacts. Friends who already use Latitude have a icon
next to their names.
Add via email address. Enter an email address.
3. Tap Add friends.
4. Tap OK. If your friends already use Latitude, they receive an email
request and a notification on Latitude. If they have not yet joined
Latitude, they receive an email request that tells them to sign in
to Latitude with their Google Account.
•
•
Google Apps 163
Accepting an invitation
When you get a sharing request from a friend, you can:
Accept and share back. You can see your friend’s location, and
your friend can see yours.
Accept, but hide my location. You can see your friend’s location,
but they can’t see yours.
Don’t accept. No location information is shared between you and
your friend.
You can change how your location is shared with each friend at any
time. Refer to “To share your location with friends and request to see
their locations” earlier in this chapter for more details.
Showing your friends
You can show your friends using the map view or the list view.
Map view
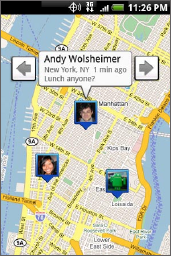
When you open Google Maps, it shows
your friends’ locations. Each friend is
represented by a photo icon with an
arrow pointing at his or her approximate
location. If a friend has opted to enable
city-level sharing, his or her icon will
not have an arrow and it appears in the
middle of the city. Refer to “To share your
location with friends and request to see
their locations” earlier in this chapter for
more details.
•
•
•
164 Google Apps
To see your friend’s profile and connect with him or her, tap the
photo. This will display your friend’s name, then tap the balloon right
above his or her icon. To see other friends, tap either one of the arrow
buttons next to the balloon.
List view
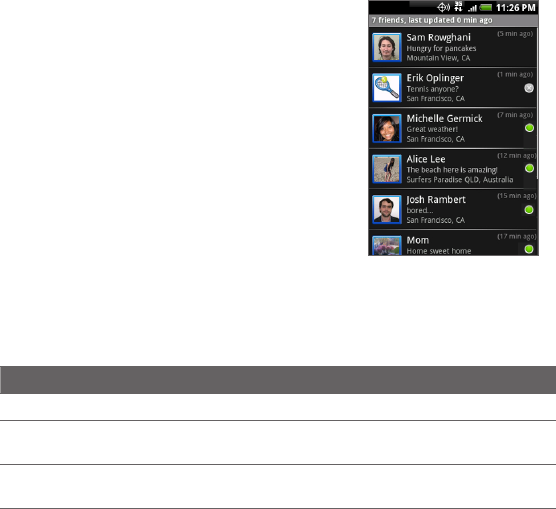
To show a list of your friends, in Google
Maps, press MENU and then tap Latitude.
To see a friend’s profile and connect with
him or her, select your friend’s name from
the list.
Connecting with your friends
Tap a friend’s contact details balloon in map view or tap a friend in
list view to open the friend’s profile. In the profile screen, you can
communicate with your friend and set privacy options.
Options Description
Show on map Find a friend’s location on the map.
Chat using Google
Talk
Send an instant message. Google Talk opens a chat
window with that friend.
Send email Send an email. Gmail opens an email addressed to that
friend.

Google Apps 165
Options Description
Directions Get directions to the friend’s location.
Hide from this friend Stop sharing your location with this friend. Your friend
cannot see your photo icon on the map. To share your
location with this friend again, tap Unhide from this
friend.
Share only city level
location
Share only the city you are in, not the street-level
location. Your friend can see your photo icon in the
middle of the city you are in. To share more precise
location again, tap Best available location.
Remove Remove the friend from your list and stop sharing
locations with him or her altogether.
Controlling what you share
You have control over how and when you can be found by your
friends. Only the last location sent to Latitude is stored with your
Google Account. If you turn off Latitude or are hiding, no location is
stored.
To change your public profile
1. In Google Maps, press MENU, tap Latitude, and then tap your
contact details balloon.
2. Set the following options to your preferences.
Options Description
Show on map See your location on a map.
Change your
status
Change the status message, which is shared across other
Google products and features, such as Google Talk and
Gmail. After you tap Change your status, type your new
status in the dialog box, and then tap OK.

166 Google Apps
Options Description
Change your
photo
Change the picture, which is also shared across other
Google products and features.
After you tap Change your photo, you can either take a
picture of yourself with the phone or select a picture from
Albums. Refer to “Using Camera and Camcorder” and
“Using Albums” in Chapter 7 for more details.
Edit privacy
setting
Manage how your location is shared with all your friends.
Select one of the following options:
Detect your location. Let Latitude automatically detect
and update your location as you move around. The update
frequency is determined by several factors, such as your
phone’s battery charge level and how recently your
location has changed.
Note You must have My location sources enabled. To learn
how to enable My location sources, refer to “Using Google
Maps” in this chapter.
Set your location. Manually select a location on the map.
Hide your location. Hide your location from all your
friends. They will not be able to see your location on their
maps. You can also hide your location only to certain
individuals.
Turn off Latitude. Disable Latitude and stop sharing. Your
friends cannot see your location. You can always join
Latitude again.
Google Apps 167
8.6 Using YouTube
YouTube is an online video streaming service that allows you to view
videos that have been uploaded by YouTube members.
Notes • You do not need a YouTube account to browse and view videos.
However, to use all the features of YouTube (such as viewing “My
account”), you must create a YouTube account from your computer
and sign in to that account from your phone.
• You must have an active data or Wi-Fi connection to access YouTube.
To open YouTube
Press HOME, then tap >
YouTube.
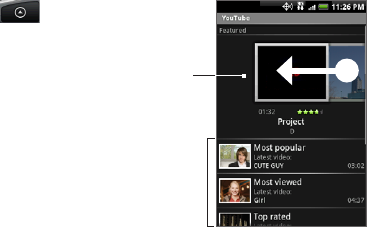
The YouTube screen appears
with the videos grouped into
categories, such as Featured,
Most popular, Most viewed,
Top rated, and more.
To close YouTube
While on the YouTube screen,
press HOME or BACK to close
YouTube.
Video
categories
Featured
videos. Scroll
your finger to
the left to view
more featured
videos.
Watching videos
On the YouTube screen, select a video to watch from the
available categories. Tap a category to see the available videos
for that category.
Tap a video to play it.
1.
2.
168 Google Apps
Note The screen automatically switches to landscape orientation when
you play a video.
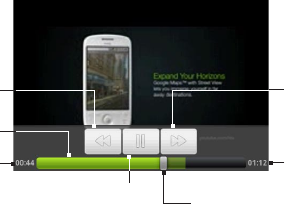
3. Tap the screen to display the playback controls.
Tap to toggle between
playing and pausing
the video.
Drag to the left or right to
go backward or forward in
the video.
Progress bar
Elapsed time
Total playback
time
Press and hold
to fast forward
the video.
Press and hold
to rewind the
video.
4. Press BACK to stop playback and return to the videos list.
Searching for videos
On the YouTube screen, press SEARCH.
Enter a search keyword, and then press SEARCH again.
The number of search results appears below the status bar. Scroll
through the results and tap a video to watch it.
To clear the search history
1. Press MENU and then tap Settings.
2. Tap Clear search history and then tap OK when prompted.
1.
2.
3.

Google Apps 169
Sharing videos
You can share a video by sending its link to your contacts.
Do one of the following:
While viewing videos in a list, press and hold the video, and
then tap Share on the options menu.
While watching a video, press MENU and then tap Share.
Note If you have set up an external email account in addition to your
Gmail account, you will be prompted to select the email account to
use to send the video link.
A new email message appears with the video link automatically
added to the email message.
2. Compose your email then send it. For more information about
composing and sending emails, refer to Chapter 5.
8.7 Using Android Market
Android Market provides direct access to useful applications and fun
games which you can download and install on your phone. Android
Market also allows you to send feedback and comments about an
application, or flag an application that you find objectionable or
incompatible with your phone.
Opening Android Market
1. Press HOME, then tap > Market.
2. When you open Android Market for the first time, the Terms of
Service window will appear. Tap Accept to continue.
1.
•
•
170 Google Apps
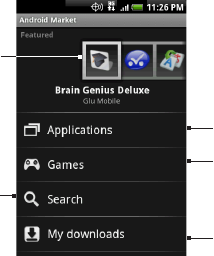
Tap to open
the application
details screen.
Tap a category
to open a sub-
category and view
more applications.
Tap to search
Android Market.
Tap to view your
downloads.
Getting help
If you ever need help or have questions about Android Market, press
MENU and tap Help. The Browser will take you to the Android Market
Help webpage.
Finding applications
The Android Market home page provides several ways to find
applications. It showcases featured applications and includes a list of
item applications by category, a list of games, a link to search, and a
link to My downloads.
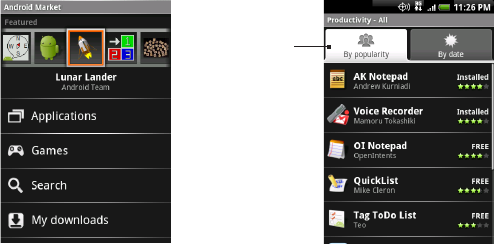
Scroll horizontally through the featured items or select a category
to browse its contents, then select a subcategory. Within each
subcategory you can select to view items sorted By popularity
or By date.
Google Apps 171
Tap the tab
to sort by
popularity or
date.
Note All items in a subcategory are listed in each tab; those in the By
popularity tab are sorted from most popular to least popular, and those
in the By date tab are sorted from newest to oldest
Installing and opening an application
1. Navigate to the item you want to download, and select it.
2. In the item details screen, read more about the application,
including its overall rating, and comments by users. If you scroll
down to the About the developer section, you can view more
applications by this developer, visit the developer’s website, and
send the developer an email message.
Important Press MENU and select Security permissions to view the functions
and data this item can access on your phone.

172 Google Apps
Scroll down to
view more of
this developer’s
applications or to
email the developer.
User comments
about item.
More info about item.
Press and hold
a comment to
let you report a
comment as spam.
3. On any application details screen, tap Install.
Important If the application requires either access to any of your data or
control of any functions on your phone, Market tells you what the
application can access.
Read it carefully! Be especially cautious with applications that have access to
many functions or a significant amount of your data. Once
you tap OK on this screen, you are responsible for the results
of using this item on your phone. Tap OK if you agree to the
conditions of the application.
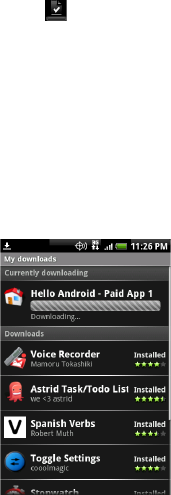
4. To check the progress of the download, open the Notifications
panel. Most applications are installed within seconds. If you want
to stop downloading the item, tap Cancel download.
Download progress appears
in the Ongoing section of
the notifications window.
Once downloaded and
installed, a notification
appears.
Google Apps 173
5. After the item is downloaded and installed on your phone, the
content download icon ( ) appears in the notification area of
the status bar.
6. On the Android Market screen, tap My downloads.
7. Tap the installed application in the list, then tap Open.
Tip You can also find the icon of the installed application on the All
programs screen.
Managing applications
From the Android Market Home, tap My downloads to view your
downloaded items. From any of the Android Market screens, press
MENU and tap My downloads to go to the screen.
174 Google Apps
Uninstalling an application
You can uninstall any application that you have downloaded and
installed from Android Market.
1. On the My downloads screen, tap the application you want to
uninstall, then tap Uninstall.
2. When prompted, tap OK to remove the application on your
phone.
3. Choose the reason for removing the application, then tap OK.
8.8 Synchronizing Google Apps
Google Apps on your phone, such as Gmail, Calendar, and Contacts,
give you access to the same personal information (emails, events,
and contacts) that you add, view, and edit on your computer using
Gmail or Calendar. Synchronize the Google Apps you want to keep
information up-to-date.
To select which application to synchronize
Press HOME > MENU.
Tap Settings > Data synchronization > Google.
Note By default, all personal information in Gmail, Calendar, and Contacts
will sync whenever you make a change or receive a new message.
1.
2.
Google Apps 175
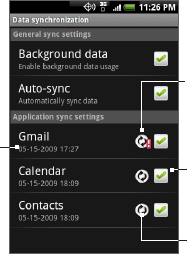
Date and
time of last
synchronization
Tap to include or
exclude the application
from automatic
synchronization.
The arrows move
clockwise when data is
being synchronized.
Indicates that there is
a problem with data
synchronization. Check
your data connection
and try again.
3. Select the Google Apps you want to synchronize.
Tip Select Auto-sync to automatically synchronize all applications. When
Auto-sync is disabled, you can synchronize individual applications
manually by selecting their respective check boxes.
To stop synchronization
During synchronization, press MENU, then tap Cancel sync to stop
synchronization.

9.1 Using Calendar
Use Calendar to create and manage events, meetings, and
appointments. Depending on your synchronization settings, the
Calendar on your phone stays in sync with your Calendar on the web,
Exchange ActiveSync calendar, and Outlook calendar.
Opening Calendar
Press HOME, then tap > Calendar.
Creating events
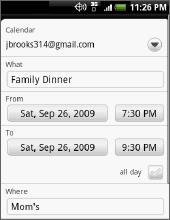
1. On any Calendar view, press MENU and then tap New to open
the Event details screen.
Tip If you are in the Agenda or Monthly view, tap at the bottom-
right of the screen.
2. If you have more than one calendar, select the Calendar where
you want to save the event.
3. Enter the event name using the keyboard.
Chapter 9
Other Applications
Other Applications 177
4. Do one of the following:
If there is a time frame for the event,
tap the From and To date and time
to set them.
If it is a special occasion such as a
birthday or a whole-day event, set
the From and To date, then select
the all day check box.
5. Enter the event location and
description.
•
•
Notes • You can create multiple calendars, such as Personal, Business,
or Family, using Calendar on the web. Depending on your
synchronization settings, these calendars are added to your phone
when you synchronize the Calendar. For more information on how to
create calendars, go to http://www.google.com/support/calendar/bin/
answer.py?answer=37095&topic=15281.
• If you have synchronize your phone with an Exchange ActiveSync
account or Outlook on your PC, you can also select these calendars.
6. Set the event reminder time in Reminders, then select whether
the event is recurring in Repeat.
Note Press MENU and then tap Add reminder to add another reminder.
7. When finished, tap Add.
178 Other Applications
Calendar views
You can display the Calendar in daily, weekly, monthly, or agenda view.
To change the Calendar view, press MENU, then tap Day, Agenda, or
Month.
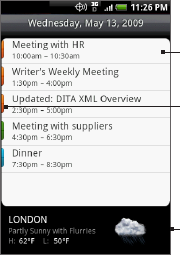
Day view
Shows the weather information.
To show the weather information, in
any calendar view, press MENU, then
tap Settings > Views and then select
the Include weather check box.
Choose the city to display in City.
Colored bars indicate
which calendar the event
was created in.
Tap to open
event details.
Notes • The weather information appears only if the appointment is within the
5-day forecast of the Weather application.
• Weather information only appears when using Event list view.
To check, in any calendar view, press MENU, and then tap Settings >
Views > Day views.
Other Applications 179
Agenda and Month views
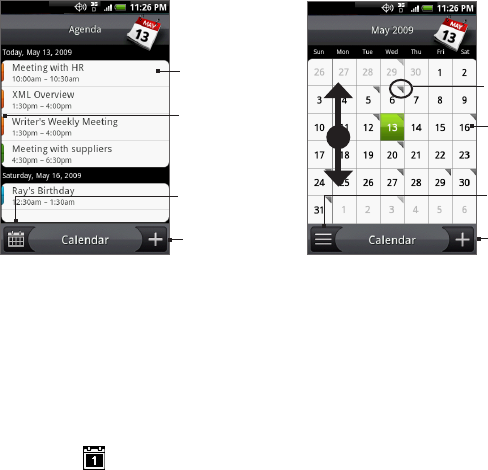
Tap to add a
new event.
Tap to switch
to Agenda
view.
Tap to view
events for
that day.
Indicates
there are
events for
that day.
Tap to
open event
details.
Tap to add a
new event.
Tap to switch
to Month view.
Agenda view Month view
Colored bars
indicate which
calendar the
event was
created in.
Swipe your finger up or down to view more events in Agenda
view or to go to the previous or next month in Month view.
In Month view, press and hold a day to open a menu to let you
quickly create an event, show the day’s events, or switch to
Agenda view.
Event reminders
If you have set at least one reminder for an event, the upcoming event
icon ( ) will appear in the notifications area of the status bar to
remind you of the upcoming event.
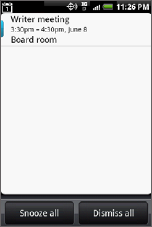
To view, dismiss, or snooze the reminder
1. Tap the status bar, then slide your finger down the screen to
open the Notifications panel.
•
•
180 Other Applications
2. Tap the upcoming event name to
display the event.
Note If you have other pending event
reminders, these events will also
appear on the screen.
3. Do one of the following:
Tap Snooze all to snooze all event
reminders for five minutes.
Tap Dismiss all to dismiss all event
reminders.
Press BACK to keep the reminders
pending in the notifications area of
the status bar.
•
•
•
Synchronizing Exchange ActiveSync Calendar
If you have set up a Microsoft Exchange ActiveSync account on your
phone, you can also synchronize Exchange ActiveSync calendar
events on your phone. Calendar events on your Exchange ActiveSync
will also show in Calendar if you chose to synchronize with the
Exchange ActiveSync Server.
To check if Exchange ActiveSync items are set to be synchronized,
go to the Home screen, press MENU, and then tap Settings > Data
synchronization > Exchange ActiveSync.
Synchronizing Outlook Calendar
See “HTC Sync” in this chapter for details.
Other Applications 181
Adding the Calendar widget
Add the Calendar widget to let you view your calendar and access
your appointments on the Home screen. To learn how to add widgets,
refer to “To add an HTC widget” in Chapter 1.
9.2 Using Clock
Clock lets you view the date and time of cities around the world. You
can also set alarms and use the stopwatch and timer.
Opening Clock
Tap the clock on the Home screen.
Note You can also press HOME, then tap > Clock.
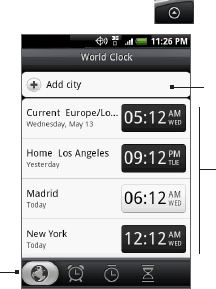
List of the local time,
home city time, and
other cities that
you have added. By
default, the local,
home city, and most
major cities’ date and
time are listed.
Tap to add a city to
the world clock list.
Slide your finger
to switch to the
World Clock,
Alarms, Stopwatch
or Timer tab.
182 Other Applications
Setting the local date, time zone, and time
By default, your phone automatically uses the network-provided
date, time zone, and time. You can set the date, time zone, and time
manually.
1. In Clock, go to the World Clock tab, press MENU, and then tap
Local time settings.
Tip You can also press HOME > MENU, and then tap Settings > Date &
time.
2. Clear the Automatic check box.
3. Tap Set date. On the Change date window, adjust the date by
scrolling the date wheel. Tap Done when finished.
4. Tap Select time zone, then select the time zone in the list. Scroll
down the list to view more time zones.
5. Tap Set time. On the time window, adjust the time by scrolling
the time wheel. Tap Done when finished.
6. Select the Use 24-hour format check box to toggle between
using a 12-hour or a 24-hour format.
7. Tap Select date format then select how you want dates to display
on your phone. The selected date format also applies to the date
displayed in the Alarm Clock.
Adding cities to the world clock list
Keep track of the date and time of cities around the world.
1. In Clock, go to the World Clock tab, and then tap Add city.
2. Enter the city name you want to add. As you enter letters, the list
is filtered to show matching cities and countries.
3. Tap the city when it appears on the list.
Other Applications 183
Setting your home city’s date and time
1. In Clock, go to the World Clock tab, then press MENU, and then
tap Home settings.
2. Enter your home city name. As you enter letters, the list is filtered
to show matching cities and countries.
3. Tap the city when it appears on the list.
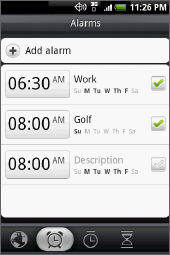
Setting an alarm
1. In Clock, go to the Alarms tab.
2. Tap one of the default alarms on the
screen.
3. In the Set alarm screen, set the alarm
time by sliding your finger up or down
on the numbers and AM/PM.
4. Enter the alarm Description, set the
Alarm sound and Repeat, and select
the Vibrate checkbox if you want the
phone to also vibrate when the alarm
goes off.
Note Scroll up the screen to see all the
Alarm options.
5. Tap Done.
Note If you need to set more than 3 alarms, you can add more alarms by
tapping Add alarm.
You can temporarily disable an alarm by clearing the check box
(by tapping it) of the alarm on the Alarms tab.

184 Other Applications
Deleting an alarm
On the Alarms tab, press MENU and
then tap Delete.
Select the alarms you want to delete
and then tap Delete.
1.
2.
Using Stopwatch and Timer
In Clock, go to the Stopwatch or Timer tab to use these functions.
Adding the Clock widget
Add another clock with the time of another city in the world on the
Home screen. To learn how to add widgets, refer to “To add an HTC
widget” in Chapter 1.
9.3 Using HTC Sync
HTC Sync™ lets you synchronize Outlook and Windows Address Book
(Outlook Express), contacts and calendar events on your PC with your
phone. It also lets you install third-party Android applications on the
phone.
Requirement For HTC Sync Sync Manager, you need Outlook
2000/2002/2003/2007 or Windows Address Book (Outlook
Express) and Windows XP Service Pack 2 (SP2) or higher or
Windows Vista to synchronize contacts and calendar events.
Notes • The USB debugging check box in HOME > MENU > Settings >
Applications > Development needs to be selected for the phone to
be able to synchronize with the PC using HTC Sync.
• If you have a Microsoft Exchange account, you can set up an
Exchange email account and synchronize emails, contacts, and

Other Applications 185
calendar items from the Exchange account.
To set up a Microsoft Exchange email account, see “Adding a
Microsoft Exchange ActiveSync account” in Chapter 5 for details.
Installing HTC Sync on your PC
1. Download the HTC Sync installer from the HTC website
(http://www.htc.com/us/support.aspx) to your computer.
2. Double-click HTCSync.exe and then follow the installation
instructions on the screen.
Setting up HTC Sync to synchronize Outlook items
Use Sync Manager to synchronize PC Outlook contacts and calendar
events between the phone and PC.
1. On your computer, run HTC Sync.
2. Connect the phone to the computer using the provided USB
cable.
Notes • On your phone, check Notifications on the status bar for the icon
to confirm if HTC Sync recognizes the phone.
• The first time you connect the phone to the PC using HTC Sync, the
Phone Connection Wizard runs. Follow the instructions to finish the
wizard.
186 Other Applications
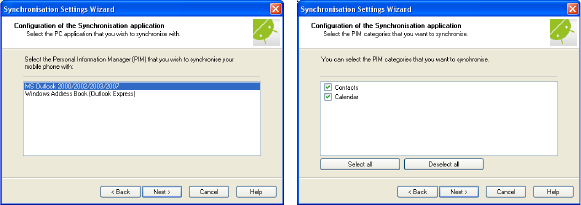
3. The first time you synchronize the phone, the Synchronization
Settings Wizard starts automatically to help you set up HTC
Sync.
Note If the Synchronization Settings Wizard does not start, click
Synchronize Now.
4. On the Synchronization Settings Wizard screen, click Next.
5. Select the PC application you want to synchronize with and then
click Next.
6. Select the categories you want to synchronize and then click
Next.
Note After clicking Next, you may be asked to select additional
categories. This page will only appear if any additional categories
are supported by the connected phone.
7. Select when to synchronize data and then click Next.
8. Check the settings that you have chosen and then click Finish.
If you want to have more customization features when setting up HTC
Sync, you can use Manual settings. To learn how to set up HTC Sync
using Manual settings, consult the HTC Sync help on your PC. To learn
how to open the help, see “Opening Sync Manager help” later in this
chapter.
Other Applications 187
Synchronizing Outlook items
When you set up HTC Sync, you were asked to set when you want to
synchronize with the PC. Depending on the option you have selected,
you may need to manually start synchronization or it will automatically
start synchronization when you connect the phone to the PC.
If you chose I want to synchronize automatically each time I
connect my mobile phone or Automatic start of synchronization,
every time mobile phone is connected, follow this procedure:
On your PC, open HTC Sync.
Connect the phone to the PC using the USB cable.
Synchronization will automatically start.
If you chose I want to start the synchronization manually or Do
not synchronize automatic, manual start, follow this procedure:
On your PC, open HTC Sync.
Connect the phone to the PC using the USB cable.
On the HTC Sync window, Click Synchronize Now.
If you chose Schedule automatic synchronization, follow this
procedure:
On your PC, open HTC Sync.
Connect the phone to the PC using the USB cable.
Synchronization will start depending on the date and time you set.
•
1.
2.
3.
•
1.
2.
3.
•
1.
2.
3.

188 Other Applications
Resolving conflicts between the phone and PC
1. On your PC, open HTC Sync.
2. On the HTC Sync window, click Sync Manager > Settings >
Conflict Policy.
3. Select the option you want and then click OK.
Opening Sync Manager help
Open the HTC Sync Sync Manager comprehensive help file to learn
more about the advanced features of Sync Manager.
1. On your PC, open HTC Sync.
2. On the HTC Sync window, click Sync Manager.
3. On Sync Manager menu bar, click Help > Sync Manager Help.
Installing Android applications
Use Application Installer to install Android applications (.apk) that are
on your PC to the phone.
Important The Unknown sources check box in Settings needs to be selected
to be able install Android applications from the PC. To check, press
HOME > MENU, and then tap Settings > Applications.
1. On your computer, run HTC Sync.
2. Connect the phone to the computer using the provided USB
cable.
Notes On your phone, check Notifications on the status bar for the
icon to confirm if HTC Sync recognizes the phone.
3. Click Application Installer.
4. On the Application Installer screen, click Next.
5. Click Browse to select the file to install. After selecting the file,
click Next.

Other Applications 189
6. Click Finish. Check the phone if there are additional instructions
to complete the installation.
9.4 Using HTC Footprints
HTC Footprints™ provides an easy way to record favorite places and
revisit those places. A footprint consists of a photo you take of a
location such as a restaurant, a sightseeing destination, etc., stored
together with a precise GPS position and other information about that
location such as the street address and phone number.
The next time you want to visit the same place, simply access the
footprint. You can then dial the phone number or view the location in
Google Maps.
Creating a Footprint
1. Press HOME, then tap > Footprints.
2. Tap New Footprint.
Note My Location sources options in Settings need to be selected to be
able to determine your GPS location. You will be asked to turn them
on if the options are turned off.
3. Point the camera at the scene you want to show the location.
Footprints starts to use GPS to search for your position.
Tip To change brightness and white balance settings before you take a
photo, press MENU, then tap Brightness or White Balance, and then
choose a setting.
4. Press the TRACKBALL to capture the photo.
Notes • If your GPS position has not been found yet, you are asked whether
to find the position on Google Maps, continue the GPS search, or stop
the GPS search.
190 Other Applications
• You may be asked if you want HTC Footprints to automatically
determine the address for the location.
5. Tap Done.
Note Before pressing Done, you can press MENU, and then tap Edit to
change the name, category, or address of the Footprint, enter the
phone and website, and add a voice memo to the Footprint.
Revisiting a Footprint
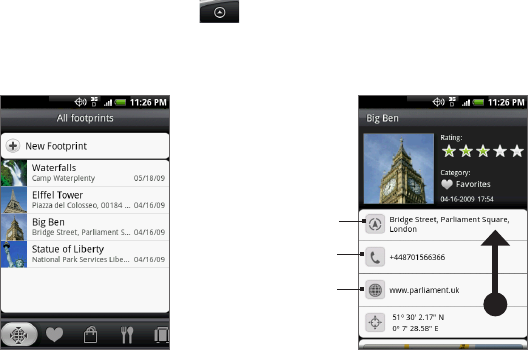
1. Press HOME, then tap , and then tap Footprints.
2. At the bottom of the screen, slide your finger to select the
Footprint category.
3. Tap the Footprint you want to revisit.
Tap to show
the address in
Google Maps.
Tap to open the
URL in Browser.
Tap to call the
phone number.
Scroll up the
screen to see more
information.
Editing or deleting a Footprint
On a category screen, press and hold the Footprint you want to edit
or delete, and then tap Edit or Delete on the options menu.

Other Applications 191
Backing up your Footprints
You can back up all your footprints by exporting them to a storage
card. When you import the backup from the storage card, any new
footprints you have added on the device are kept.
To back up your Footprints, on a category screen, press MENU
and then tap Export.
To import the backup file to the phone, press MENU and then tap
Import. If any footprints on the device are the same as footprints
on the card, you are asked whether you want to overwrite
them. You can also use Import to use a picture in Albums as a
Footprint.
Adding the Footprint widget
Add the Footprint widget to view and access your Footprints on the
Home screen. To learn how to add widgets, refer to “To add an HTC
widget” in Chapter 1.
9.5 Using PDF Viewer
Use PDF Viewer to view PDF files that you have copied to the phone’s
storage card.
Viewing a PDF file
1. Press HOME, then tap > PDF Viewer.
2. On the Open file screen, tap the file you want to view.
3. Slide your finger on the screen to pan or go through the pages
of the PDF file. While viewing a PDF file, press MENU to let you
open another PDF file, zoom in, search the file, and more.
•
•
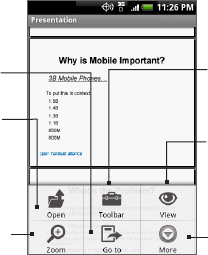
192 Other Applications
Tap to zoom in on the
page. You can also
tap the screen quickly
twice to zoom in or
out of the page.
Tap to search the
PDF file, view
file properties or
information about the
PDF Viewer.
Tap to toggle
between showing
and hiding the page
toolbar.
Tap to open
another PDF
file.
Tap to go to a
specific page
on the PDF file.
Tap to let you change
the view: Continuous
or Reflow.
Turn your phone sideways (turn to the left) to view the PDF file
in landscape mode. The screen orientation automatically adjusts
depending on how you hold the phone.
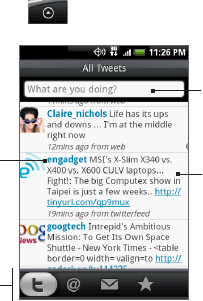
Other Applications 193
9.6 Using Peep
Peep™ is a Twitter client that lets you enjoy “twittering’’ on your
phone. Send out tweets, read and receive tweets from people, search
for new Twitter users to follow, all from your phone.
Note You need to be signed in to your Twitter account to use Peep.
Opening Peep
Press HOME, then tap > Peep. Peep opens in the All Tweets tab.
Slide your finger on the bottom row to go to the tab you want.
Slide your finger to
select whether to show
All Tweets, Replies,
Direct Message, or
Favorites.
Tap to view the
Twitter user’s profile.
This also shows you
all tweets from this
Twitter user.
Press and hold an
item to open the
options menu to
let you reply, send
a direct message,
Retweet, add to
favorite, and view
the profile.
Tap to enter a
tweet to send out.
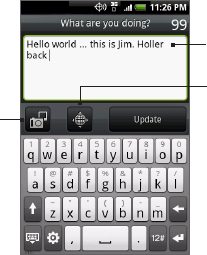
194 Other Applications
Sending a tweet
1. On the All Tweets tab, tap the text field with the words “What are
you doing?”.
2. Enter your tweet and then tap Update.
Tap to post a
picture from
Albums or Camera
to your default
photo hosting site
and add the link to
the picture into the
tweet.
Tap to insert your
location into the
tweet. You can
choose to add a
map link, insert
your location
name, or insert
your position
coordinates.
Enter your
tweet here.
On the Peep screen, press MENU and then tap Settings > Services to
check or change your photo hosting site, location options, and URL
shortening host.
Sending a direct message
Do one of the following:
On the Peep screen, press MENU and then tap New message.
On the All Tweets or Direct Message tab, press and hold the
person you want to send the direct message to, and then tap
Send direct message on the options menu.
To view your direct messages, go to the Direct Message tab.
•
•
Other Applications 195
Searching for Twitter users to follow
1. While on the Peep screen, press SEARCH.
2. Tap the text field with the words “Twitter Search” and then enter
the search criteria. Press SEARCH again or tap Search on the
screen.
3. On the Search result screen, scroll through the list to look for the
twitter user you want to follow.
Note The search results will also list down tweets that contain the search
word.
4. Press and hold the user name of the Twitter user you want to
follow and then on the options menu, tap Show profile > Follow.
To stop following a Twitter user
1. On the All Tweets tab, press and hold the Twitter user you want
to stop following.
2. On the options menu, tap Show profile > Unfollow.
Adding the Twitter widget
Add the Twitter widget to let you follow your tweets right on the
Home screen.
To learn how to add widgets, refer to “To add an HTC widget” in
Chapter 1.
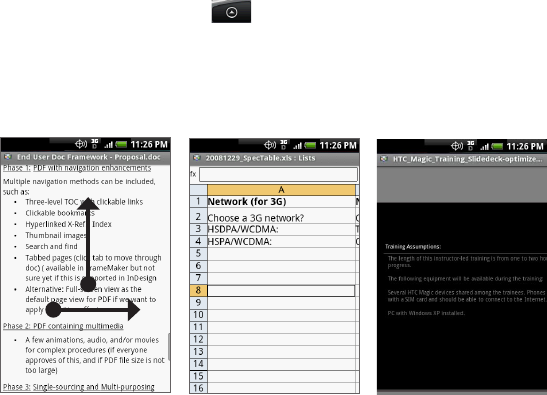
196 Other Applications
9.7 Using Quickoffice
Quickoffice lets you view Microsoft Office Word, Microsoft Office
Excel, and Microsoft PowerPoint files on your phone. Quickoffice
supports viewing of Microsoft Office 2003 Word (.doc), Excel (.xls),
PowerPoint (.ppt) and text (.txt) files.
Viewing documents, presentations and spreadsheets
Make sure you have copied the files to the phone’s storage card before
you open Quickoffice.
1. Press HOME, then tap > Quickoffice.
2. Tap the file you want to open.
Tip In the Open file screen, press MENU and then tap Sort to let you
sort the list by Name or Date.
3. Slide your finger on the screen to pan or go through the pages of
the file.
Other Applications 197
4. While viewing a file, you can:
Slide your finger on the screen to bring up the zoom controls.
For Excel files, press MENU and then tap Worksheet to view
other worksheets on the file.
For Word and PowerPoint files, tap a URL link to open the
web page in Browser.
When you open Word documents, Quickoffice reflows the text
to make it fit the width of the screen. Double-tap the screen to
switch to continuous view so you can view the page layout.
Note Quickoffice does not reflow text in tables.
When you view PowerPoint files, after your zoom in on a slide,
you can double-tap the screen to zoom out automatically and
fit the slide to the width of the screen.
•
•
•
•
•
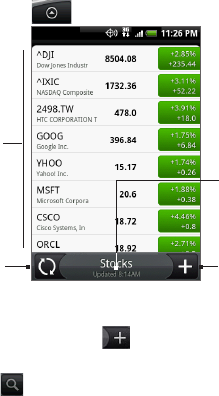
198 Other Applications
9.8 Using Stocks
Stocks lets you to add, view, and analyze stocks and stock market
movements using updated financial information.
Opening Stocks
Press HOME, then tap > Stocks.
Tap to add a stock
quote or stock
market index.
Tap to update the
stock information.
List of your stock
quotes and stock
market indices. Tap
an item to view its
intraday chart and
other details.
Shows the time
the information
was last updated.
Adding a stock quote or stock market index
1. On the Stocks screen, tap .
2. Enter the stock quote or stock market index on the text field
and then tap .
3. On the results list, tap the stock quote or stock market index you
want to add.

Other Applications 199
Changing the list order
1. On the stocks screen, press MENU and then tap Rearrange.
2. Press and hold at the end of the item you want to move.
When the row is highlighted in green, drag it to its new position,
then release.
3. Tap Done.
Deleting an item
1. On the Stocks screen, press MENU and then tap Delete.
2. Select the items you want to delete and then tap Delete.
Adding the Stocks widget
Add the Stocks widget to the Home screen to let you follow your
stock quotes on the Home screen. To learn how to add widgets,
refer to “To add an HTC widget” in Chapter 1.
9.9 Using Weather
Weather lets you view the current weather as well as the weather
forecast for the next four days of the week. You can display the
weather conditions in your current location and the weather in up to
ten cities.
Opening Weather
Press HOME, then tap > Weather.
If you enabled location service when you are setting the phone for the
first time, the weather in your current location displays the first time
you open Weather.
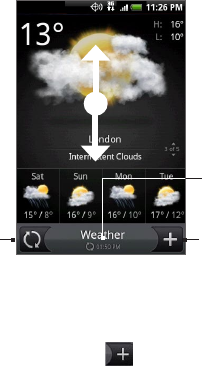
200 Other Applications
Add a location.
Shows the last
weather update.
To view the weather
in other cities, swipe
your finger upward/
downward on the
screen.
Download the
latest weather
information.
Displaying weather in your location
If location service is disabled, you can set your current location and
add it to Weather.
1. On the Weather screen, tap , and then tap My location.
2. When prompted to enable location source, tap Enable, select
the Use wireless networks check box, and then tap Agree on the
confirmation box.
3. Press BACK. A blinking dot shows your approximate location on
a map.
Tip If you want to adjust your location on the map, press and hold the
push pin, and then drag it to your desired location.
4. Tap Done. Your location information displays on the screen.
5. Tap Add. The weather in your current location displays on the
screen.

Other Applications 201
Adding a city
1. On the Weather screen, tap .
2. Enter the location you want to add on the text field. As you enter
text, the list is filtered to show the possible locations based on
the letters you entered.
3. Tap the desired city to select it.
Changing Weather options
1. On the Weather screen, tap Menu > Settings.
2. Do the following:
Select the Update automatically check box to automatically
download weather updates after a period of time.
Tap Temperature scale to change the temperature scale to
use.
Changing the order of cities
1. On the Weather screen, press MENU and then tap Rearrange.
2. Press and hold at the end of the item you want to move.
When the row is highlighted in green, drag it to its new position,
then release.
3. Tap Done.
Deleting a city
1. On the Weather screen, swipe your finger up or down to select
the city you want to delete.
2. Press MENU and then tap Delete. On the confirmation box,
tap Delete.
•
•

202 Other Applications
Adding the Weather widget
Add the Weather widget to let you view the weather conditions of the
cities you have set on the Home screen. To learn how to add widgets,
refer to “To add an HTC widget” in Chapter 1.
9.10 Using Voice Recorder
Voice Recorder is useful for quickly recording thoughts. You can also
record your voice and set it as a ringtone.
Note You need to have a microSD card installed on your phone to use Voice
Recorder.
Recording your voice
1. Press HOME, then tap > Voice Recorder.
2. Hold the device’s microphone near your mouth.
3. Tap to start recording a voice clip. Tap to stop recording.
4. Enter a name for the voice clip and then tap Save.
5. Tap to play back the voice recording.
Setting a voice clip as a ringtone
1. On the Voice Recorder screen, tap or to select the voice
clip you want to set as the ringtone.
2. Press MENU and then tap Set as ringtone.

Other Applications 203
Renaming a voice clip
1. On the Voice Recorder screen, tap or to select the voice
clip you want to rename.
2. Press MENU and then tap Rename.
3. Enter the new name and then tap Save.

10.1 Changing Basic Settings
Setting the date and time
See “Using Clock” in Chapter 9 for details.
Display settings
To adjust the screen brightness
1. Press HOME > MENU, then tap Settings.
2. Tap Sound & display > Brightness.
Note The Disable auto backlight check box needs to be selected for you
to be able to manually adjust screen brightness.
3. Drag the brightness slider to the left to decrease or to the right
to increase the screen brightness. Tap OK.
To adjust the time before the screen turns off
After a period of inactivity, the phone screen turns off to conserve
battery power. You can set the idle time before the screen turns off.
1. Press HOME > MENU, then tap Settings > Sound & display >
Screen timeout.
2. Tap the time before the screen turns off.
Tip To turn off the screen quickly, press END/POWER.
Chapter 10
Managing Your Phone
Managing Your Phone 205
To prevent the screen orientation from automatically changing
By default, the screen orientation automatically adjusts depending on
how you hold the phone.
Note Not all application screens support automatic rotation.
1. Press HOME > MENU, then tap Settings.
2. Tap Sound & display and then clear the Orientation check box.
To keep the screen on while charging the phone
You can keep the phone screen from turning off while you are
charging the phone.
1. Press HOME > MENU, then tap Settings.
2. Tap Applications > Development and then select the Stay awake
check box.
To recalibrate the screen
Recalibrate the screen if you feel that the screen orientation does not
respond properly to the way you hold the phone.
1. Press HOME > MENU, then tap Settings.
2. Tap Sound & display > G-Sensor calibration.
3. Place the phone on a flat surface and then tap Calibrate.
4. After the recalibration process, tap OK.
Ringer settings
To change the ring tone
1. Press HOME > MENU, then tap Settings.
2. Tap Sound & display > Phone ringtone.
3. Tap the ring tone you want to use, then tap OK. The ring tone
briefly plays when selected.
206 Managing Your Phone
Tip You can use *.wav, *.mid, *.mp3, *.wma, or other types of sound files that
you downloaded from the Internet or copied from your computer as
ring tones. For a complete list of supported audio file formats for ring
tones, see “Specifications” in the Appendix.
To enable touch tones
You can set the phone to play a sound when you are using the phone
pad and/or tapping the screen.
1. Press HOME > MENU, then tap Settings.
2. Tap Sound & display, then scroll down the screen.
3. Select the Audible touch tones and/or Audible selection
option(s).
To choose the notification ring tone
You can select the ring tone to play when your phone receives new
notifications.
1. Press HOME > MENU, then tap Settings.
2. Tap Sound & display > Notification sound.
3. Select your preferred notification sound in the list and then tap
OK.
Phone services
Your phone can directly link to the mobile phone network, and enable
you to access and change the settings of various phone services for
your phone. Phone services may include Call Forwarding, Call Waiting,
Voicemail, and more. Contact your service provider to find out about
the availability of phone services for your phone.
To access and change the phone services settings
Press HOME > MENU, then tap Settings > Call settings.
Managing Your Phone 207
Note For more information about the phone services on your phone, refer to
the “Adjusting Phone Settings” in Chapter 2.
To enable data roaming
Data roaming lets you connect to other operator’s networks and
access data services when you are out of the current coverage area.
1. Press HOME > MENU, then tap Settings.
2. Tap Wireless controls > Mobile network settings and then select
the Data roaming check box.
Important Accessing data services while roaming may incur significant
charges. Inquire the data roaming tariffs with your service provider
before enabling data roaming.
Language settings
You can change the platform language of the phone.
To change the language of the operating system
1. Press HOME > MENU, then tap Settings.
2. Tap Locale & text > Select Locale and then select the language
you want to use.
Social network settings
You can quickly sign in or sign out from your Facebook, Flickr, and
Twitter accounts.
1. Press HOME > MENU, then tap Settings > Social networks.
2. Tap the account you want to sign in to or sign out from in the list.
Tip Press MENU to let you quickly log out from all accounts or adjust
account settings.
208 Managing Your Phone
10.2 Protecting Your Phone
Protecting your phone with a screen lock
You can further secure your data by locking the screen and/or
requiring a screen unlock pattern every time your phone is turned on
or every time it wakes up from sleep mode (screen is off).
To lock the screen
Press END/POWER. Locking the screen prevents accidental screen
touches when the phone is in your bag, purse, or pocket.
To unlock the screen, see “To unlock the screen” in Chapter 1.
To create and enable the screen unlock pattern
You can increase the security of your phone by creating a screen
unlock pattern. When enabled, you have to draw the correct unlock
pattern on the screen to unlock the phone’s control buttons and touch
screen.
1. Press HOME > MENU, then tap Settings.
2. Tap Security > Set unlock pattern.
3. Read the information on the screen, then tap Next.
4. Study the example pattern on the screen, then tap Next.
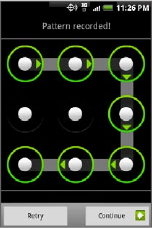
Managing Your Phone 209
5. Draw the screen unlock pattern by
connecting at least four dots in a vertical,
horizontal and/or diagonal direction.
Lift your finger from the screen when
finished.
Note You must slide your finger on the
screen to create the pattern and not tap
individual dots.
6. The phone records the pattern. Tap
Continue.
7. When prompted, draw the screen unlock
pattern again, then tap Confirm.
Tip Clear the Use visible pattern check box, if you do not want the
unlock pattern to display on the screen when you unlock it.
Note To change your unlock screen pattern, press HOME > MENU, then
tap Settings > Security > Change unlock pattern.
When you fail to draw the correct unlock pattern on the screen after
five attempts, you will be prompted to wait for 30 seconds before you
can try again. If you forgot your screen unlock pattern, tap Forgot
pattern. You will be prompted to sign in using your Google Account
name and password, and create a new screen unlock pattern before
the Home screen displays.
210 Managing Your Phone
10.3 Managing Memory
To see how much phone memory is available for use
Press HOME > MENU, then tap Settings > SD card & phone storage.
The available phone memory is displayed in the Internal phone
storage section.
To see the available storage card space
Press HOME > MENU, then tap Settings > SD card & phone storage.
The total and available storage card space is displayed in the SD card
section.
To clear application cache and data
1. Press HOME > MENU, then tap Settings > Applications > Manage
applications.
2. In the Manage applications list, tap the application whose cache
and/or data you want to delete.
Tip Press MENU to bring up sort and filter options.
3. In the Application info screen, tap Clear data and/or Clear cache.
To uninstall third-party applications
You cannot uninstall applications that are pre-installed on the phone.
1. Press HOME > MENU, and then tap Settings > Applications >
Manage applications.
2. On the Manage applications screen, tap the application you want
to uninstall. On the Application info screen, tap Uninstall.
To free up more phone memory or storage card space
If your phone is running low on memory, try the following:
In Browser, clear all temporary Internet files and Browser
history information. See “Using Browser” in Chapter 6 for more
information.
•
Managing Your Phone 211
Uninstall downloaded programs from Android Market you no
longer use. See Chapter 8 for details.
10.4 Resetting the Phone
Resetting the phone deletes all data, including downloaded
applications, and resets the phone back to its initial state—the state
before you turned on the phone for the first time.
Important Make sure to back up important data you have on the phone
before you reset your phone.
To reset the phone
1. Press HOME > MENU, then tap Settings > Security > Factory data
reset.
2. On the Factory data reset screen, tap Reset phone and then tap
Erase everything.
To reset the phone using phone buttons
1. With the phone turned off, press and hold the VOLUME DOWN
and SEND buttons
2. Press the END/POWER button. You will see a screen with 3
Android images at the bottom of the screen.
3. Follow the instructions onscreen to reset your phone.
Tip If your phone hangs or freezes, remove the battery then wait for a few
seconds, and then re-install it. After re-installing the battery, turn on the
phone.
•

Appendix
A.1 Specifications
Processor Qualcomm® QSD8650™, 768 MHz
Platform Android™
Memory ROM: 512 MB
RAM: 448 MB
Dimensions
(LxWxT)
4.63 X 2.3 X 0.47 inches (117.5 X 58.5 X 11.9 mm)
Display 3.7-inch OLCD touch-sensitive screen with 480x800
WVGA resolution
Network Dual-band (800 and 1900 MHz)
CDMA2000 1xRTT/1xEVDO/1xEVDO rev. A and IS-
95A/B voice or data with up to 1.8 Mbps uplink and 3.1
Mbps downlink speeds
•
•
Device Control Trackball with Enter button
GPS Internal GPS antenna
Connectivity Bluetooth® 2.1 with Enhanced Data Rate and A2DP for
wireless stereo headsets
Wi-Fi®: IEEE 802.11 b/g
12-pin micro-USB
3.5 mm audio jack
•
•
•
•
Camera 8.0 megapixel color camera with auto focus
Audio supported
formats
MP3, AAC(AAC, AAC+), eAAC+, AMR-NB, AMR-WB,
WAV, and Windows Media Audio 9

Appendix 213
Video supported
formats
MPEG-4, H.263, H.264 and Windows Media Video 9
Battery Rechargeable battery
Capacity: 1300 mAh
•
•
Talk time: Up to 229 minutes
Standby time: Up to 300 hours
(The above are subject to network and phone usage.)
•
•
Expansion Slot microSD™ memory card (SD 2.0 compatible)
AC Adapter Voltage range/frequency: 100 - 240V AC, 50/60 Hz
DC output: 5V and 1A
Special Features G-sensor
Digital Compass
•
•
Operating
Temperature
Range
32°F to 104°F (0°C to 40°C)
Note Specifications are subject to change without prior notice.
A.2 Regulatory Notices
For regulatory identification purposes, your product is assigned a
model number of PB31200.
To ensure continued reliable and safe operation of your device, use
only the accessories listed below with your PB31200.
The Battery Pack has been assigned a model number of BB96100,
BB96200, BTR6300B, BTE6300B.
Operating temperature range: 32°F to 104°F (0°C to 40°C)
Note This product is intended for use with a certified Class 2 Limited Power
Source, rated 5 Volts DC, maximum 1 Amp power supply unit.
214 Appendix
Federal Communication Commission Interference
Statement
This equipment has been tested and found to comply with the limits
for a Class B digital device, pursuant to Part 15 of the FCC Rules.
These limits are designed to provide reasonable protection against
harmful interference in a residential installation. This equipment
generates, uses and can radiate radio frequency energy and, if not
installed and used in accordance with the instructions, may cause
harmful interference to radio communications. However, there is no
guarantee that interference will not occur in a particular installation. If
this equipment does cause harmful interference to radio or television
reception, which can be determined by turning the equipment off and
on, the user is encouraged to try to correct the interference by one of
the following measures:
Reorient or relocate the receiving antenna.
Increase the separation between the equipment and receiver.
Connect the equipment into an outlet on a circuit different from
that to which the receiver is connected.
Consult the dealer or an experienced radio or television
technician for help.
FCC Caution: Any changes or modifications not expressly approved
by the party responsible for compliance could void the user’s
authority to operate this equipment.
This device complies with Part 15 of the FCC Rules. Operation is
subject to the following two conditions: (1) This device may not cause
harmful interference, and (2) this device must accept any interference
received, including interference that may cause undesired operation.
IMPORTANT NOTE
Radiation Exposure Statement:
•
•
•
•
Appendix 215
This equipment complies with FCC radiation exposure limits set forth
for an uncontrolled environment. End users must follow the specific
operating instructions for satisfying RF exposure compliance. To
maintain compliance with FCC RF exposure compliance requirements,
please follow operation instruction as documented in this manual.
This transmitter must not be co-located or operating in conjunction
with any other antenna or transmitter, except the transmitters built-in
with the device.
FCC Hearing-Aid Compatibility (HAC) Regulations for
Wireless Devices
On July 10, 2003, the U.S. Federal Communications Commission (FCC)
Report and Order in WT Docket 01- 309 modified the exception of
wireless phones under the Hearing Aid Compatibility Act of 1988
(HAC Act) to require digital wireless phones be compatible with
hearing-aids. The intent of the HAC Act is to ensure reasonable
access to telecommunications services for persons with hearing
disabilities. While some wireless phones are used near some hearing
devices (hearing aids and cochlear implants), users may detect a
buzzing, humming, or whining noise. Some hearing devices are more
immune than others to this interference noise, and phones also vary
in the amount of interference they generate. The wireless telephone
industry has developed a rating system for wireless phones, to assist
hearing device users find phones that may be compatible with their
hearing devices. Not all phones have been rated. Phones that are
rated have the rating on their box or a label located on the box. The
ratings are not guarantees. Results will vary depending on the user’s
hearing device and hearing loss. If your hearing device happens to be
vulnerable to interference, you may not be able to use a rated phone
successfully. Trying out the phone with your hearing device is the best
way to evaluate it for your personal needs.
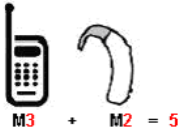
216 Appendix
M-Ratings: Phones rated M3 or M4 meet FCC requirements and are
likely to generate less interference to hearing devices than phones that
are not rated. M4 is the better/higher of the two ratings. PB31200 is
rated M4.
T-Ratings: Phones rated T3 or T4 meet FCC requirements and are
likely to be more usable with a hearing aid’s telecoil than phones that
are not rated. T4 is the better/higher of the two ratings. PB31200 is
rated T3.
Please power off the Bluetooth function while using hearing aid
devices with your PB31200.
Hearing devices may also be rated.
Your hearing device manufacturer or
hearing health professional may help
you find this rating. Higher ratings
mean that the hearing device is
relatively immune to interference noise.
The hearing aid and wireless phone rating values are then added
together. A sum of 5 is considered acceptable for normal use. A sum
of 6 is considered for better use. A sum of 8 is considered for best
use. In the above example, if a hearing aid meets the M2 level rating
and the wireless phone meets the M3 level rating, the sum of the two
values equal M5. This should provide the hearing aid user with “normal
usage” while using their hearing aid with the particular wireless phone.
“Normal usage” in this context is defined as a signal quality that is
acceptable for normal operation.
This methodology applies equally for T ratings. The M mark is
intended to be synonymous with the U mark. The T mark is intended
to be synonymous with the UT mark. The M and T marks are
recommended by the Alliance for Telecommunications Industries

Appendix 217
Solutions (ATIS). The U and UT marks are referenced in Section 20.19
of the FCC Rules. The HAC rating and measurement procedure are
described in the American National Standards Institute (ANSI) C63.19
standard.
For information about hearing aids and digital wireless phones
FCC Hearing Aid Compatibility and Volume Control:
http://www.fcc.gov/cgb/dro/hearing.html
Gallaudet University, RERC:
https://fjallfoss.fcc.gov/oetcf/eas/reports/GenericSearch.cfm
SAR Information
1.39 mW/g @ 1g (HEAD)
0.693 mW/g @ 1g (BODY)
THIS MODEL DEVICE MEETS THE GOVERNMENT’S REQUIREMENTS
FOR EXPOSURE TO RADIO WAVES. For body worn operation, this
phone has been tested and meets the FCC RF exposure guidelines
when used with the HTC Corporation. Accessories supplied or
designated for this product. Use of other accessories may not ensure
compliance with the FCC RF exposure guidelines.
Your wireless mobile phone is a radio transmitter and receiver. It
is designed and manufactured not to exceed the emission limits
for exposure to radio frequency (RF) energy set by the Federal
Communications Commission of the U.S. Government. These limits
are part of comprehensive guidelines and establish permitted levels
of RF energy for the general population. The guidelines are based
on the safety standards previously set by both U.S. and international
standards bodies:
American National Standards Institute (ANSI) IEEE. C95.1-1992.•

218 Appendix
National Council on Radiation Protection and Measurement
(NCRP). Report 86. 1986.
International Commission on Non-Ionizing Radiation Protection
(ICNIRP) 1996.
Ministry of Health (Canada), Safety Code 6. The standards
include a substantial safety margin designed to assure the safety
of all persons, regardless of age and health.
The exposure standard for wireless mobile phone employs a unit of
measurement known as the Specific Absorption Rate, or SAR. The
SAR limit set by the FCC is 1.6 W/kg*.
The FCC has granted an Equipment Authorization for this model
device with all reported SAR levels evaluated as in compliance
with the FCC RF exposure guidelines. SAR information on this
model device is on file with the FCC and can be found under the
Display Grant section of https://fjallfoss.fcc.gov/oetcf/eas/reports/
GenericSearch.cfm after searching on FCC ID: NM8PB31200.
Additional information on Specific Absorption Rates (SAR) can be
found on the Cellular Telecommunications & Internet Association
(CTIA) Web-site as http://www.phonefacts.net.
* In the U.S. and Canada, the SAR limit for mobile phone used by the
public is 1.6 Watts/kg (W/kg) averaged over one gram of tissue. The
standard incorporates a substantial margin of safety to give additional
protection for the public and to account for any variations in usage.
Normal condition only to ensure the radiative performance and
safety of the interference. As with other mobile radio transmitting
equipment, users are advised that for satisfactory operation of the
equipment and for the safety of personnel, it is recommended that no
part of the human body be allowed to come too close to the antenna
during operation of the equipment.
•
•
•
Appendix 219
Body-worn Operation
This device was tested for typical body-worn operations. To comply
with RF exposure requirements, a minimum separation distance
of 1.5 cm must be maintained between the user’s body and the
handset, including the antenna. Third-party belt-clips, holsters,
and similar accessories used by this device should not contain any
metallic components. Body-worn accessories that do not meet these
requirements may not comply with RF exposure requirements and
should be avoided.
Use only the supplied or an approved antenna. Unauthorized
antennas, modifications, or attachments could impair call quality,
damage the phone, or result in violation of regulations. Do not use the
phone with a damaged antenna. If a damaged antenna comes into
contact with the skin, a minor burn may result. Please contact your
local dealer for replacement antenna.
220 Appendix
Telecommunications & Internet Association (TIA) Safety
Information
Pacemakers
The Health Industry Manufacturers Association recommends that a
minimum separation of six inches be maintained between a handheld
wireless phone and a pacemaker to avoid potential interference
with the pacemaker. These recommendations are consistent with
the independent research by and recommendations of Wireless
Technology Research. Persons with pacemakers:
Should ALWAYS keep the phone more than six inches from their
pacemaker when the phone is turned ON.
Should not carry the phone in a breast pocket.
Should use the ear opposite the pacemaker to minimize the
potential for interference. If you have any reason to suspect that
interference is taking place, turn the phone OFF immediately.
Hearing Aids
Some digital wireless phones may interfere with some hearing aids. In
the event of such interference, you may want to consult your service
provider, or call the customer service line to discuss alternatives.
Other Medical Devices
If you use any other personal medical device, consult the
manufacturer of your device to determine if they are adequately
shielded from external RF energy. Your physician may be able to assist
you in obtaining this information.
Turn the phone OFF in health care facilities when any regulations
posted in these areas instruct you to do so. Hospitals or health care
facilities may be using equipment that could be sensitive to external
RF energy.
•
•
•

Appendix 221
WEEE Notice
The Directive on Waste Electrical and Electronic Equipment (WEEE),
which entered into force as European law on 13th February 2003,
resulted in a major change in the treatment of electrical equipment at
end-of-life.
The purpose of this Directive is, as a first priority, the prevention of
WEEE, and in addition, to promote the reuse, recycling and other
forms of recovery of such wastes so as to reduce disposal.
The WEEE logo (shown at the left) on the product or on
its box indicates that this product must not be disposed
of or dumped with your other household waste. You are
liable to dispose of all your electronic or electrical waste
equipment by relocating over to the specified collection
point for recycling of such hazardous waste. Isolated
collection and proper recovery of your electronic and
electrical waste equipment at the time of disposal will allow
us to help conserving natural resources. Moreover, proper
recycling of the electronic and electrical waste equipment
will ensure safety of human health and environment. For
more information about electronic and electrical waste
equipment disposal, recovery, and collection points, please
contact your local city center, household waste disposal
service, shop from where you purchased the equipment, or
manufacturer of the equipment.
RoHS Compliance
This product is in compliance with Directive 2002/95/EC of the
European Parliament and of the Council of 27 January 2003, on the
restriction of the use of certain hazardous substances in electrical and
electronic equipment (RoHS) and its amendments.
222 Appendix
A.3 Additional Safety Information
This section provides more safety information in addition to the
information at the beginning of the user manual.
When Driving
Do Not Use The PC Functions Of Your Pocket PC While Driving Or
Walking
Never use the personal computer functions of your device while
driving an automobile or any other moving vehicle. Always pull out
of traffic and come to a stop in a legally permissible and safe location
before using your device. Failure to do so could result in serious bodily
injury in a traffic accident.
When driving:
Always secure your device in its leather pouch.
Never place your device on the passenger seat or anyplace else
in the car where it can become a projectile during a collision or
stop.
An air bag inflates with great force. DO NOT place objects,
including either installed or portable wireless equipment, in the
area over the air bag or in the air bag deployment area. If in-
vehicle wireless equipment is improperly installed and the air bag
inflates, serious injury could result.
Never store or transport flammable liquids, gases or explosive
materials in the same compartment of your automobile as the device
or any of its accessories, as possible sparking in the device could
cause ignition or explosion.
Never use your device while walking. Usage while walking could result
in bodily injury caused by inattention to automobile traffic or other
pedestrian hazards.
•
•
•
Appendix 223
Using The Phone Function Of Your Pocket PC While Driving Is
Extremely Dangerous
Talking on or using your device while driving is extremely dangerous
and is illegal in some states. Remember, safety comes first. Check the
laws and regulations on the use of phones in the areas where you
drive. Always obey them.
If you must use the phone function while driving, please:
Give full attention to driving. Driving safely is your first
responsibility.
Use hands-free operation and/or one-touch, speed dialing, and
auto answer modes.
Pull off the road and park before making or answering a call.
WARNING! Failure to follow these instructions could lead to serious personal
injury and possible property damage.
When Using Your Device Near Other Electronic Devices
Your wireless handheld portable device is a low power radio
transmitter and receiver. When it is ON, it receives and also sends out
radio frequency (RF) signals.
Most modern electronic equipment is shielded from RF energy.
However, certain electronic equipment may not be shielded against
the RF signals from your wireless device; therefore, use of your device
must be restricted in certain situations.
In addition, the computer portion of your device produces low levels
of RF energy due to the generation of digital timing pulses by its
clock oscillator circuits. Your device has been equipped with internal
shielding to minimize stray emissions of RF energy. However, use of
the computer functions of your device must be restricted in certain
situations.
•
•
•
224 Appendix
PACEMAKERS
The Health Industry Manufacturers Association recommends that
a minimum separation of six (6”) inches be maintained between
a handheld wireless phone and a pacemaker to avoid potential
interference with the pacemaker. These recommendations are
consistent with the independent research by and recommendations of
Wireless Technology Research.
Never come closer than six (6) inches to a person with a heart
pacemaker implant when using your device. Doing so could result in
interference with the function of the pacemaker.
Persons with pacemakers:
Should ALWAYS keep the phone more than six inches from their
pacemaker when the phone is turned ON.
Should not carry the phone in a breast pocket.
Should use the ear opposite the pacemaker to minimize the
potential for interference.
Note This is not necessary if the device is not held to the ear.
If you have any reason to suspect that interference is taking
place, turn the phone OFF immediately.
HEARING AIDS
Some digital wireless phones may interfere with some hearing aids. In
the event of such interference, you may want to consult your service
provider, or call the customer service line to discuss alternatives.
For more regulatory information about hearing devices, see “FCC
Hearing-Aid Compatibility (HAC) Regulations for Wireless Devices”.
•
•
•
•
Appendix 225
OTHER MEDICAL DEVICES
If you use any other personal medical device, consult the manufacturer
of your device to determine if it is adequately shielded from external
RF energy. Your physician may be able to assist you in obtaining this
information.
HOSPITALS AND HEALTH CARE FACILITIES
Turn your device OFF in health care facilities when any regulations
posted in these areas instruct you to do so. Hospitals or health care
facilities may be using equipment that could be sensitive to external
RF energy.
ELECTRONIC DEVICES IN VEHICLES
RF signals may affect improperly installed or inadequately shielded
electronic systems in motor vehicles. Check with the manufacturer or
its representative regarding your vehicle. You should also consult the
manufacturer of any equipment that has been added to your vehicle.
POSTED FACILITIES
Turn your device OFF where posted notices so require.
Turn Off Your Device Before Flying
AIRCRAFT
FCC regulations prohibit using the transmitting and phone functions
of your device while in the air. In addition, most airline regulations
prohibit the on-board use of portable PCs (and all other portable
electronic devices that could potentially emit stray RF energy),
particularly during take-offs and landings, to prevent any possible
interference with the reception of signals by airborne electronic
navigational devices.
Turn your device OFF before boarding an aircraft. Always request
and obtain prior consent and approval of an authorized airline
226 Appendix
representative before using your device aboard an aircraft. Always
follow the instructions of the airline representative whenever using
your device aboard an aircraft, to prevent any possible interference
with airborne electronic equipment.
Turn Off Your Device in Dangerous Areas
BLASTING AREAS
To avoid interfering with blasting operations, turn your device OFF
when in a “blasting area” or in areas posted “Turn off two-way radio”.
Obey all signs and instructions.
POTENTIALLY EXPLOSIVE ATMOSPHERES
Turn your device OFF when in any area with a potentially explosive
atmosphere and obey all signs and instructions. Sparks in such areas
could cause an explosion or fire resulting in bodily injury or even
death.
Areas with a potentially explosive atmosphere are often, but not
always, clearly marked. They include fueling areas such as gas stations;
below deck on boats; fuel or chemical transfer or storage facilities;
vehicles using liquefied petroleum gas (such as propane or butane);
areas where the air contains chemicals or articles, such as grain, dust,
or metal powders; and any other area where you would normally be
advised to turn off your vehicle’s engine.
General Safety
Your pocket PC is a high quality piece of equipment. Before operating,
read all instructions and cautionary markings on the product, battery
and adapter/charger.
Failure to follow the directions below could result in serious bodily
injury and/or property damage due to battery liquid leakage, fire or
rupture.
Appendix 227
DO NOT use or store this equipment in a place where it will be
exposed to high temperatures, such as near an open flame or heat-
emitting equipment.
DO NOT drop your device or subject it to severe shock. When not
using, lay down the unit to avoid possible damage due to instability.
DO NOT expose this equipment to rain or spilled beverages.
DO NOT use unauthorized accessories.
DO NOT disassemble the device or its accessories. If service or repair
is required, return unit to an authorized cellular service center. If the
unit is disassembled, the risk of electric shock or fire may result.
Never allow metallic objects, such as staples and paper clips, to get
into the inside of your device.
Never touch the liquid that might leak from a broken liquid crystal
display. Contact with this liquid could cause a skin rash. If the crystal
display liquid should come into contact with the skin or clothing, wash
it immediately with clean water.
In the event that the device emits an unusual odor or sound or
generates smoke, immediately disconnect the AC adapter from the
power outlet, then detach the battery.
Antenna Safety
Use only the supplied or an approved replacement antenna.
Unauthorized antennas, modifications, or attachments could impair
call quality, damage your device, or result in violation of FCC
regulations. Please contact your local dealer for replacement antenna.
Do not use the device with a damaged antenna. If a damaged antenna
comes into contact with the skin, a minor burn may result. Please
contact your local dealer for replacement antenna.
228 Appendix
Battery Safety
Your device uses a removable and rechargeable lithium ion battery.
Please contact customer service for assistance should you need a
replacement battery.
DOs
Only use the battery and charger approved by the manufacturer.
Only use the battery for its original purpose.
Try to keep batteries in a temperature between 41°F (5°C) and
95°F (35°C).
If the battery is stored in temperatures above or below the
recommended range, give it time to warm up or cool down
before using.
Completely drain the battery before recharging. It may take one
to four days to completely drain.
Store the discharged battery in a cool, dark, and dry place.
Purchase a new battery when its operating time gradually
decreases after fully charging.
Properly dispose of the battery according to local regulations.
DON’Ts
Don’t attempt to disassemble the battery – it is a sealed unit with
no serviceable parts.
Don’t expose the battery terminals to any other metal object
(e.g., by carrying it in your pocket or purse with other metallic
objects such as coins, clips and pens). This can short circuit and
critically damage the battery.
Don’t leave the battery in hot or cold temps. Otherwise, it could
significantly reduce the capacity and lifetime of the battery.
Don’t dispose of the battery into a fire.
•
•
•
•
•
•
•
•
•
•
•
•
Appendix 229
Lithium ion batteries are recyclable. When you replace the removable
battery, please request the repair center to recycle the battery in
accordance with RBRC standards. When disposing of the battery by
yourself, please call RBRC at (800) 822-8837 for proper disposal tips.
Never touch any fluid that might leak from the built-in battery. Such
liquid when in contact with the eyes or skin, could cause injury to the
skin or eyes. Should the liquid come into contact with the eyes, irrigate
the eyes thoroughly with clean water and immediately seek medical
attention. In the event the liquid comes into contact with the skin or
clothing, wash it away immediately with clean water.
Adapter/Charger
Use the Correct External Power Source
A product should be operated only from the type of power source
indicated on the electrical ratings label. If you are not sure of the type
of power source required, consult your authorized service provider or
local power company. For a product that operates from battery power
or other sources, refer to the operating instructions that are included
with the product.
The AC Adapter/Charger designed for this unit requires the use of a
standard 120 V AC power source for device operation.
Never attempt to disassemble or repair an AC adapter/charger. Never
use an AC adapter/charger if it has a damaged or worn power cord
or plug. Always contact an authorized service center, if repair or
replacement is required.
Never alter the AC cord or plug on an AC adapter/charger. If the plug
will not fit into the available outlet, have a proper outlet installed by a
qualified electrician.
Never allow any liquids or water to spill on an AC adapter/charger
when it is connected to an AC power source.
230 Appendix
Always use the authorized AC adapter/charger to avoid any risk of
bodily injury or damage to your cellular phone or battery.
Never attempt to connect or disconnect the AC adapter/charger
with wet hands. Always unplug the AC adapter/charger from the
power source before attempting any cleaning. Always use a soft
cloth dampened with water to clean the equipment, after it has been
unplugged.
Handling the cord on this product or cords associated with
accessories sold with this product, will expose you to lead, a chemical
known to the State of California to cause birth defects or other
reproductive harm. Wash hands after handling.
Always disconnect the travel charger or desktop charger from the
power source when it is not in use.
Appendix 231
Index
A
Add an Exchange ActiveSync
account 99
Airplane Mode 66
Alarm clock 183
Albums 127
- opening 127
- widget 135
- working with pictures 128
- working with videos 133
Android Market 169
- finding applications 170
- getting help 170
- installing an application 171
- managing applications 173
- uninstalling an application 174
Android widget 43
Applications
- on your phone 50
- tab 50
B
Back cover
- remove 29
Backlight
- adjust brightness 204
Basic settings 204
Battery 29
- charge battery 32
- install 30
- remove 31
Bluetooth
- about 116
- modes 116
Bookmarks 115
- a web page 115
- edit 115
- open 115
Browser 109
- browsing classic views (not mobile
version) 110
- changing the screen
orientation 110
- finding text 112
- going to a web page 109
- links 113
- navigating 110
- opening 109
- opening a new browser window 111
- settings 116
- setting your home page 109
- switching windows 112
- zooming in or out 110
Index 233
C
Calendar 176
- create events 176
- Exchange ActiveSync 180
- open 176
- Outlook Calendar 180
- widget 181
Calendar views 178
Call History 63
- clear 64
Calling using the phone dialer 55
Call settings
- adjust the call settings 65
Camcorder 121
Camera 121
- changing capture modes 123
- menu panel 125
- Review screen 125
- shoot videos 124
Chat
- close 153
- sign out 156
- switch chats 152
Clock 181
- adding cities to the world clock
list 182
- setting home city date and
time 183
- widget 184
Compact QWERTY 84
Conference call 61
Connect phone to Internet
- ways of connecting 106
Contact details 79
Contacts 70
- add new 68, 72
- edit 72
- search 72
Creating another email account 100
D
Data Connection 106
Data roaming 207
Date 182
Disconnecting a Bluetooth hands-free
headset or car kit 119
Display settings 204
E
Editing email account settings 104
Email
- create and send 143
- open 145
- receive and read 145
- search 146
Emergency call 58
Events
- create 176
Extended Home screens 42
External email accounts
- add 99
- compose and send emails 101
- delete a message 104
- sort 103
234 Index
F
Facebook and Flickr 69, 76
Favorite contacts 73
Folders 43
Footprints 189
- backing up 191
- creating 189
- deleting 190
- editing 190
- Revisiting 190
- widget 191
Friends list 153
- pin 154
G
Getting around your phone 35
Gmail 142
- create and send emails 143
- open 142
Google Maps 156
- find your location 157
- location source 156
- navigate 158
- open 157
- search 157, 158
- view 158
- zoom in or out 158
Google password 141
Google Talk 150
- add a friend 151
- change the settings 155
- change your status 151
- friends list 153
- sign in automatically 155
- sign out 156
- view and accept invitations 151
GPS satellites 156
Groups 74
H
Home page 109
Home screen 41
- customize 42
- extended Home screens 42
HTC Sync 184, 185
- installing Android applications 188
- installing HTC Sync 185
- setting up 185
- synchronizing Outlook contacts
and calendar events 187
HTC widget 43
I
Inside the box 28
Internet 106
L
Landscape onscreen keyboard 82
Language settings 207
Location Setting 51
Location source 156
Index 235
M
Mail 99
- deleting an account 105
- widget 105
Making Calls 55
Map mode 158
- Map mode 159
- Satellite mode 159
- Street View 160
- Trac mode 159
Memory 210, 212
Memory card
- install 31
- remove 32
- remove while the phone is on 54
Message draft 94
Messages 89
- open 89
- widget 98
Message signature 144
Message threads 95
- delete 97
- open 95
Microsoft Exchange ActiveSync 99
- Calendar 180
- Synchronizing 100
Missed call 64
MMS settings 98
Mobile indicators 154
Music
- creating playlists 138
- Library 137
- managing your playlists 139
- opening 136
- playing 136
- setting a song as ringtone 140
- widget 140
Mute the microphone 62
My contact card 70
N
Notification LED 49
Notification ring tone 206
Notifications Panel 48
O
Onscreen keyboard 82
- Compact QWERTY 84
- Phone keypad 85
- QWERTY 83
P
PDF Viewer 191
Peep 193
- opening 193
- searching for Twitter users to
follow 195
- sending a direct message 194
- sending a tweet 194
- widget 195
People 67
- contact details 79
- contacts 70
- Facebook and Flickr 69, 76
- favorite contacts 73
- groups 74
236 Index
- My contact card 70
- People widget 67
Phone controls 33
Phone keypad 85
Phone services 206
Phone views
- back panel 27
- bottom panel 28
- front panel 26
- left panel 27
Picture message 89
- reply 96
- settings 98
- view 95
Proximity Sensor 49
Q
Quickoffice 196
QWERTY 83
R
Regulatory notices 213
Ringer settings 205
Ring tone 140
- change 205
Roaming 207
S
Safety information 7
Screen lock 208
Screen unlock pattern 208
Search contacts 72
Sending a meeting request 105
Settings 51
Shortcut 42
SMS settings 97
Social network account settings 207
Speakerphone 62
Specifications 212
Status icons 46
Stocks 198
Stopwatch 184
Synchronizing Google Apps 174
T
Take pictures 123
Text message 89
- create and send 90
- reply 96
- settings 97
Time 182
Timer 184
Time zone 182
Touch Input Settings 87
Touch tones 206
Trackball 37
Turn off the display 39
Turn phone function on and off 66
Turn power on and off 37
U
USB drive 54
Index 237
V
Videos 167
Viewing and replying to emails 102
Voice call
- answer call 59
- end call 62
Voice Dialer 57
Voice Recorder 202
Voice search 35
Volume
- adjust 52
- media volume 53
- ringer volume 52
W
Wallpaper 45
Weather 199
Web applications 114
Wi-Fi 106
Y
YouTube
- about 167
- open 167
- search videos 168
- share videos 169
- watch videos 167
238 Index