HTC PC36100 Smart Phone User Manual Sprint UG 9a HTC Evo 4G
HTC Corporation Smart Phone Sprint UG 9a HTC Evo 4G
HTC >
Contents
- 1. User Manual 1 of 2
- 2. User Manual 2 of 2
User Manual 1 of 2

User Guide
www.sprint.com
©2010 Sprint. SPRINT and the logo are trademarks of Sprint.
Other marks are the property of their respective owners.
4/19/10

Note: Para encontrar esta guía para usuarios en español, por
favor visita a www.sprint.com y haz clic en Support >
Phones & Devices.
To find this user guide in Spanish, please visit
www.sprint.com and click Support > Phones & Devices.
Important Privacy Message – Sprint’s policies often do not
apply to third-party applications. Third-party applications
may access your personal information or require Sprint to
disclose your customer information to the third-party
application provider. To find out how a third-party
application will collect, access, use, or disclose your
personal information, check the application provider’s
policies, which can usually be found on their website.
If you aren’t comfortable with the third-party application’s
policies, don’t use the application.

Table of Contents
Introduction. . . . . . . . . . . . . . . . . . . . . . . . . . . . . . . . . . . . . . . . . . . . . . . . . . . . . . . . . . i
Your Device’s Menu . . . . . . . . . . . . . . . . . . . . . . . . . . . . . . . . . . . . . . . . . . . . . . . . . . i
Section 1: Getting Started. . . . . . . . . . . . . . . . . . . . . . . . . . . . . . . . . . . . . . . . . . . . 1
1A. Setting Up Service . . . . . . . . . . . . . . . . . . . . . . . . . . . . . . . . . . . . . . . . . . . . . . . . . . . . . . . . . 2
Setting Up Your Device . . . . . . . . . . . . . . . . . . . . . . . . . . . . . . . . . . . . . . . . . . . . . . . . . . . . . . . . . . . . . . 2
Activating Your Device . . . . . . . . . . . . . . . . . . . . . . . . . . . . . . . . . . . . . . . . . . . . . . . . . . . . . . . . . . . . . . 2
Setting Up Your Voicemail . . . . . . . . . . . . . . . . . . . . . . . . . . . . . . . . . . . . . . . . . . . . . . . . . . . . . . . . . . . 3
Sprint Account Passwords . . . . . . . . . . . . . . . . . . . . . . . . . . . . . . . . . . . . . . . . . . . . . . . . . . . . . . . . . . . 3
Getting Help . . . . . . . . . . . . . . . . . . . . . . . . . . . . . . . . . . . . . . . . . . . . . . . . . . . . . . . . . . . . . . . . . . . . . . . 4
Section 2: Your Device. . . . . . . . . . . . . . . . . . . . . . . . . . . . . . . . . . . . . . . . . . . . . . . 5
2A. Device Basics . . . . . . . . . . . . . . . . . . . . . . . . . . . . . . . . . . . . . . . . . . . . . . . . . . . . . . . . . . . . . . 6
Your Device . . . . . . . . . . . . . . . . . . . . . . . . . . . . . . . . . . . . . . . . . . . . . . . . . . . . . . . . . . . . . . . . . . . . . . . . 6
Turning Your Device On and Off . . . . . . . . . . . . . . . . . . . . . . . . . . . . . . . . . . . . . . . . . . . . . . . . . . . . . . 8
Viewing the Display Screen . . . . . . . . . . . . . . . . . . . . . . . . . . . . . . . . . . . . . . . . . . . . . . . . . . . . . . . . . . 9
Battery and Charger . . . . . . . . . . . . . . . . . . . . . . . . . . . . . . . . . . . . . . . . . . . . . . . . . . . . . . . . . . . . . . . 12
Getting Around Your Device . . . . . . . . . . . . . . . . . . . . . . . . . . . . . . . . . . . . . . . . . . . . . . . . . . . . . . . . 13
Displaying Your Phone Number . . . . . . . . . . . . . . . . . . . . . . . . . . . . . . . . . . . . . . . . . . . . . . . . . . . . . 14
Making and Answering Calls . . . . . . . . . . . . . . . . . . . . . . . . . . . . . . . . . . . . . . . . . . . . . . . . . . . . . . . 15
Speed Dialing . . . . . . . . . . . . . . . . . . . . . . . . . . . . . . . . . . . . . . . . . . . . . . . . . . . . . . . . . . . . . . . . . . . . . 19
Dialing Sprint Services . . . . . . . . . . . . . . . . . . . . . . . . . . . . . . . . . . . . . . . . . . . . . . . . . . . . . . . . . . . . . 19
Entering Text . . . . . . . . . . . . . . . . . . . . . . . . . . . . . . . . . . . . . . . . . . . . . . . . . . . . . . . . . . . . . . . . . . . . . . 19
Home Screen . . . . . . . . . . . . . . . . . . . . . . . . . . . . . . . . . . . . . . . . . . . . . . . . . . . . . . . . . . . . . . . . . . . . . 22
2B. Settings . . . . . . . . . . . . . . . . . . . . . . . . . . . . . . . . . . . . . . . . . . . . . . . . . . . . . . . . . . . . . . . . . . 26
Personalization Settings . . . . . . . . . . . . . . . . . . . . . . . . . . . . . . . . . . . . . . . . . . . . . . . . . . . . . . . . . . . . 26
Sound Settings . . . . . . . . . . . . . . . . . . . . . . . . . . . . . . . . . . . . . . . . . . . . . . . . . . . . . . . . . . . . . . . . . . . . 27
Display Settings . . . . . . . . . . . . . . . . . . . . . . . . . . . . . . . . . . . . . . . . . . . . . . . . . . . . . . . . . . . . . . . . . . . 29
Location Settings . . . . . . . . . . . . . . . . . . . . . . . . . . . . . . . . . . . . . . . . . . . . . . . . . . . . . . . . . . . . . . . . . . 30
Messaging Settings . . . . . . . . . . . . . . . . . . . . . . . . . . . . . . . . . . . . . . . . . . . . . . . . . . . . . . . . . . . . . . . . 31
Airplane Mode . . . . . . . . . . . . . . . . . . . . . . . . . . . . . . . . . . . . . . . . . . . . . . . . . . . . . . . . . . . . . . . . . . . . 32
TTY Use With Sprint Service . . . . . . . . . . . . . . . . . . . . . . . . . . . . . . . . . . . . . . . . . . . . . . . . . . . . . . . . 32
Security Settings . . . . . . . . . . . . . . . . . . . . . . . . . . . . . . . . . . . . . . . . . . . . . . . . . . . . . . . . . . . . . . . . . . 33
Data Synchronization Settings . . . . . . . . . . . . . . . . . . . . . . . . . . . . . . . . . . . . . . . . . . . . . . . . . . . . . . . 34
Social Network Settings . . . . . . . . . . . . . . . . . . . . . . . . . . . . . . . . . . . . . . . . . . . . . . . . . . . . . . . . . . . . 35
Application Settings . . . . . . . . . . . . . . . . . . . . . . . . . . . . . . . . . . . . . . . . . . . . . . . . . . . . . . . . . . . . . . . . 36
Tip: Looking for something? If you don’t see it in the headings listed here, try the Index on page 185.
Date & Time Settings . . . . . . . . . . . . . . . . . . . . . . . . . . . . . . . . . . . . . . . . . . . . . . . . . . . . . . . . . . . . . . 37
Locale & Text Settings . . . . . . . . . . . . . . . . . . . . . . . . . . . . . . . . . . . . . . . . . . . . . . . . . . . . . . . . . . . . . . 37
Power-Saving Tips . . . . . . . . . . . . . . . . . . . . . . . . . . . . . . . . . . . . . . . . . . . . . . . . . . . . . . . . . . . . . . . . . 37
2C. History . . . . . . . . . . . . . . . . . . . . . . . . . . . . . . . . . . . . . . . . . . . . . . . . . . . . . . . . . . . . . . . . . . . 39
Viewing History . . . . . . . . . . . . . . . . . . . . . . . . . . . . . . . . . . . . . . . . . . . . . . . . . . . . . . . . . . . . . . . . . . . . 39
Making a Call From History . . . . . . . . . . . . . . . . . . . . . . . . . . . . . . . . . . . . . . . . . . . . . . . . . . . . . . . . . 39
Saving a Number From History . . . . . . . . . . . . . . . . . . . . . . . . . . . . . . . . . . . . . . . . . . . . . . . . . . . . . . 40
Prepending a Number From History . . . . . . . . . . . . . . . . . . . . . . . . . . . . . . . . . . . . . . . . . . . . . . . . . 40
Erasing History . . . . . . . . . . . . . . . . . . . . . . . . . . . . . . . . . . . . . . . . . . . . . . . . . . . . . . . . . . . . . . . . . . . . 40
2D. People . . . . . . . . . . . . . . . . . . . . . . . . . . . . . . . . . . . . . . . . . . . . . . . . . . . . . . . . . . . . . . . . . . . . 41
About People . . . . . . . . . . . . . . . . . . . . . . . . . . . . . . . . . . . . . . . . . . . . . . . . . . . . . . . . . . . . . . . . . . . . . 41
Using the People Screen . . . . . . . . . . . . . . . . . . . . . . . . . . . . . . . . . . . . . . . . . . . . . . . . . . . . . . . . . . . 42
Adding a New People Entry . . . . . . . . . . . . . . . . . . . . . . . . . . . . . . . . . . . . . . . . . . . . . . . . . . . . . . . . 43
Saving a Phone Number . . . . . . . . . . . . . . . . . . . . . . . . . . . . . . . . . . . . . . . . . . . . . . . . . . . . . . . . . . . 44
Using the Contact Details Screen . . . . . . . . . . . . . . . . . . . . . . . . . . . . . . . . . . . . . . . . . . . . . . . . . . . . 44
Merging Entries in People . . . . . . . . . . . . . . . . . . . . . . . . . . . . . . . . . . . . . . . . . . . . . . . . . . . . . . . . . . 45
Editing an Entry in People . . . . . . . . . . . . . . . . . . . . . . . . . . . . . . . . . . . . . . . . . . . . . . . . . . . . . . . . . . 45
Finding Entries in People . . . . . . . . . . . . . . . . . . . . . . . . . . . . . . . . . . . . . . . . . . . . . . . . . . . . . . . . . . . 47
Backing Up and Importing Entries in People . . . . . . . . . . . . . . . . . . . . . . . . . . . . . . . . . . . . . . . . . . 48
Working with Groups . . . . . . . . . . . . . . . . . . . . . . . . . . . . . . . . . . . . . . . . . . . . . . . . . . . . . . . . . . . . . . 48
Using the People Widget . . . . . . . . . . . . . . . . . . . . . . . . . . . . . . . . . . . . . . . . . . . . . . . . . . . . . . . . . . . 49
Connecting with Your Social Networks . . . . . . . . . . . . . . . . . . . . . . . . . . . . . . . . . . . . . . . . . . . . . . . 50
Using Friend Stream . . . . . . . . . . . . . . . . . . . . . . . . . . . . . . . . . . . . . . . . . . . . . . . . . . . . . . . . . . . . . . . 52
2E. Calendar and Tools . . . . . . . . . . . . . . . . . . . . . . . . . . . . . . . . . . . . . . . . . . . . . . . . . . . . . . . . 54
Calendar . . . . . . . . . . . . . . . . . . . . . . . . . . . . . . . . . . . . . . . . . . . . . . . . . . . . . . . . . . . . . . . . . . . . . . . . . 54
Calculator . . . . . . . . . . . . . . . . . . . . . . . . . . . . . . . . . . . . . . . . . . . . . . . . . . . . . . . . . . . . . . . . . . . . . . . . 59
Clock . . . . . . . . . . . . . . . . . . . . . . . . . . . . . . . . . . . . . . . . . . . . . . . . . . . . . . . . . . . . . . . . . . . . . . . . . . . . 59
Quickoffice . . . . . . . . . . . . . . . . . . . . . . . . . . . . . . . . . . . . . . . . . . . . . . . . . . . . . . . . . . . . . . . . . . . . . . . 63
PDF Viewer . . . . . . . . . . . . . . . . . . . . . . . . . . . . . . . . . . . . . . . . . . . . . . . . . . . . . . . . . . . . . . . . . . . . . . . 64
HTC Sync . . . . . . . . . . . . . . . . . . . . . . . . . . . . . . . . . . . . . . . . . . . . . . . . . . . . . . . . . . . . . . . . . . . . . . . . 65
Updating Your Device . . . . . . . . . . . . . . . . . . . . . . . . . . . . . . . . . . . . . . . . . . . . . . . . . . . . . . . . . . . . . . 68
2F. Voice Services . . . . . . . . . . . . . . . . . . . . . . . . . . . . . . . . . . . . . . . . . . . . . . . . . . . . . . . . . . . . 69
Automatic Speech Recognition (ASR) . . . . . . . . . . . . . . . . . . . . . . . . . . . . . . . . . . . . . . . . . . . . . . . . 69
Managing Voice Memos . . . . . . . . . . . . . . . . . . . . . . . . . . . . . . . . . . . . . . . . . . . . . . . . . . . . . . . . . . . 70
2G. microSD Card . . . . . . . . . . . . . . . . . . . . . . . . . . . . . . . . . . . . . . . . . . . . . . . . . . . . . . . . . . . . . 72
Your Device’s microSD Card . . . . . . . . . . . . . . . . . . . . . . . . . . . . . . . . . . . . . . . . . . . . . . . . . . . . . . . . 72
Using the Device’s microSD Card as a USB Drive . . . . . . . . . . . . . . . . . . . . . . . . . . . . . . . . . . . . . 74
2H. Camera and Multimedia . . . . . . . . . . . . . . . . . . . . . . . . . . . . . . . . . . . . . . . . . . . . . . . . . . . 75
Taking Pictures and Shooting Videos . . . . . . . . . . . . . . . . . . . . . . . . . . . . . . . . . . . . . . . . . . . . . . . . 75
Viewing Pictures and Videos Using Gallery . . . . . . . . . . . . . . . . . . . . . . . . . . . . . . . . . . . . . . . . . . . 81
Sharing Live Videos with Qik . . . . . . . . . . . . . . . . . . . . . . . . . . . . . . . . . . . . . . . . . . . . . . . . . . . . . . . . 88
Listening to Music . . . . . . . . . . . . . . . . . . . . . . . . . . . . . . . . . . . . . . . . . . . . . . . . . . . . . . . . . . . . . . . . . 88
Listening to the Radio . . . . . . . . . . . . . . . . . . . . . . . . . . . . . . . . . . . . . . . . . . . . . . . . . . . . . . . . . . . . . . 92
2I. Bluetooth . . . . . . . . . . . . . . . . . . . . . . . . . . . . . . . . . . . . . . . . . . . . . . . . . . . . . . . . . . . . . . . . . 94
Using Bluetooth . . . . . . . . . . . . . . . . . . . . . . . . . . . . . . . . . . . . . . . . . . . . . . . . . . . . . . . . . . . . . . . . . . 94
Section 3: Sprint Service . . . . . . . . . . . . . . . . . . . . . . . . . . . . . . . . . . . . . . . . . . . 99
3A. Sprint Service: The Basics . . . . . . . . . . . . . . . . . . . . . . . . . . . . . . . . . . . . . . . . . . . . . . . . 100
Voicemail . . . . . . . . . . . . . . . . . . . . . . . . . . . . . . . . . . . . . . . . . . . . . . . . . . . . . . . . . . . . . . . . . . . . . . . . 100
Text Messaging (SMS) and Multimedia Messaging (MMS) . . . . . . . . . . . . . . . . . . . . . . . . . . . . . 102
Caller ID . . . . . . . . . . . . . . . . . . . . . . . . . . . . . . . . . . . . . . . . . . . . . . . . . . . . . . . . . . . . . . . . . . . . . . . . . 108
Call Waiting . . . . . . . . . . . . . . . . . . . . . . . . . . . . . . . . . . . . . . . . . . . . . . . . . . . . . . . . . . . . . . . . . . . . . . 108
Making a 3-Way Call . . . . . . . . . . . . . . . . . . . . . . . . . . . . . . . . . . . . . . . . . . . . . . . . . . . . . . . . . . . . . . 108
Call Forwarding . . . . . . . . . . . . . . . . . . . . . . . . . . . . . . . . . . . . . . . . . . . . . . . . . . . . . . . . . . . . . . . . . . 108
Roaming . . . . . . . . . . . . . . . . . . . . . . . . . . . . . . . . . . . . . . . . . . . . . . . . . . . . . . . . . . . . . . . . . . . . . . . . 109
3B. Web and Data Services . . . . . . . . . . . . . . . . . . . . . . . . . . . . . . . . . . . . . . . . . . . . . . . . . . . 111
Ways of Connecting to the Internet . . . . . . . . . . . . . . . . . . . . . . . . . . . . . . . . . . . . . . . . . . . . . . . . . 111
Connecting Using Wi-Fi . . . . . . . . . . . . . . . . . . . . . . . . . . . . . . . . . . . . . . . . . . . . . . . . . . . . . . . . . . . 111
Connecting Using Sprint 4G . . . . . . . . . . . . . . . . . . . . . . . . . . . . . . . . . . . . . . . . . . . . . . . . . . . . . . . 113
Getting Started With Data Services . . . . . . . . . . . . . . . . . . . . . . . . . . . . . . . . . . . . . . . . . . . . . . . . . 114
Connecting to a Virtual Private Network (VPN) . . . . . . . . . . . . . . . . . . . . . . . . . . . . . . . . . . . . . . . 115
Using the Device’s Web Browser . . . . . . . . . . . . . . . . . . . . . . . . . . . . . . . . . . . . . . . . . . . . . . . . . . . 116
Accessing Email Messages . . . . . . . . . . . . . . . . . . . . . . . . . . . . . . . . . . . . . . . . . . . . . . . . . . . . . . . . 122
Google Talk . . . . . . . . . . . . . . . . . . . . . . . . . . . . . . . . . . . . . . . . . . . . . . . . . . . . . . . . . . . . . . . . . . . . . . 131
Downloading Applications and Games From Android Market . . . . . . . . . . . . . . . . . . . . . . . . . . 136
Peep . . . . . . . . . . . . . . . . . . . . . . . . . . . . . . . . . . . . . . . . . . . . . . . . . . . . . . . . . . . . . . . . . . . . . . . . . . . . 138
Stocks . . . . . . . . . . . . . . . . . . . . . . . . . . . . . . . . . . . . . . . . . . . . . . . . . . . . . . . . . . . . . . . . . . . . . . . . . . 140
Weather . . . . . . . . . . . . . . . . . . . . . . . . . . . . . . . . . . . . . . . . . . . . . . . . . . . . . . . . . . . . . . . . . . . . . . . . . 141
News Feeds . . . . . . . . . . . . . . . . . . . . . . . . . . . . . . . . . . . . . . . . . . . . . . . . . . . . . . . . . . . . . . . . . . . . . 143
Sprint Mobile Hotspot . . . . . . . . . . . . . . . . . . . . . . . . . . . . . . . . . . . . . . . . . . . . . . . . . . . . . . . . . . . . . 145
Using Your Device as a Modem (Internet Sharing) . . . . . . . . . . . . . . . . . . . . . . . . . . . . . . . . . . . . 147
Data Services FAQs . . . . . . . . . . . . . . . . . . . . . . . . . . . . . . . . . . . . . . . . . . . . . . . . . . . . . . . . . . . . . . . 147
3C. Entertainment: TV and Music . . . . . . . . . . . . . . . . . . . . . . . . . . . . . . . . . . . . . . . . . . . . . . 148
TV . . . . . . . . . . . . . . . . . . . . . . . . . . . . . . . . . . . . . . . . . . . . . . . . . . . . . . . . . . . . . . . . . . . . . . . . . . . . . . 148
Music - MP3 Store . . . . . . . . . . . . . . . . . . . . . . . . . . . . . . . . . . . . . . . . . . . . . . . . . . . . . . . . . . . . . . . . 150
Streaming Music . . . . . . . . . . . . . . . . . . . . . . . . . . . . . . . . . . . . . . . . . . . . . . . . . . . . . . . . . . . . . . . . . 150
YouTube . . . . . . . . . . . . . . . . . . . . . . . . . . . . . . . . . . . . . . . . . . . . . . . . . . . . . . . . . . . . . . . . . . . . . . . . . 151
NASCAR Sprint Cup Mobile . . . . . . . . . . . . . . . . . . . . . . . . . . . . . . . . . . . . . . . . . . . . . . . . . . . . . . . 152
3D. GPS Navigation . . . . . . . . . . . . . . . . . . . . . . . . . . . . . . . . . . . . . . . . . . . . . . . . . . . . . . . . . . 155
GPS Services . . . . . . . . . . . . . . . . . . . . . . . . . . . . . . . . . . . . . . . . . . . . . . . . . . . . . . . . . . . . . . . . . . . . 155
Sprint Navigation . . . . . . . . . . . . . . . . . . . . . . . . . . . . . . . . . . . . . . . . . . . . . . . . . . . . . . . . . . . . . . . . . 155
Google Maps . . . . . . . . . . . . . . . . . . . . . . . . . . . . . . . . . . . . . . . . . . . . . . . . . . . . . . . . . . . . . . . . . . . . 156
Google Latitude . . . . . . . . . . . . . . . . . . . . . . . . . . . . . . . . . . . . . . . . . . . . . . . . . . . . . . . . . . . . . . . . . . 160
Footprints . . . . . . . . . . . . . . . . . . . . . . . . . . . . . . . . . . . . . . . . . . . . . . . . . . . . . . . . . . . . . . . . . . . . . . . . 163
Section 4: Safety and Warranty Information . . . . . . . . . . . . . . . . . . . . . . . . . 165
4A. Important Safety Information . . . . . . . . . . . . . . . . . . . . . . . . . . . . . . . . . . . . . . . . . . . . . . 166
Important Health Information and Safety Precautions . . . . . . . . . . . . . . . . . . . . . . . . . . . . . . . . . . 166
General Precautions . . . . . . . . . . . . . . . . . . . . . . . . . . . . . . . . . . . . . . . . . . . . . . . . . . . . . . . . . . . . . . 170
Additional Safety Information . . . . . . . . . . . . . . . . . . . . . . . . . . . . . . . . . . . . . . . . . . . . . . . . . . . . . . . 172
4B. Regulatory Notices . . . . . . . . . . . . . . . . . . . . . . . . . . . . . . . . . . . . . . . . . . . . . . . . . . . . . . . 176
Regulatory Agency Identifications . . . . . . . . . . . . . . . . . . . . . . . . . . . . . . . . . . . . . . . . . . . . . . . . . . 176
Federal Communication Commission Interference Statement . . . . . . . . . . . . . . . . . . . . . . . . . . 176
SAR Information . . . . . . . . . . . . . . . . . . . . . . . . . . . . . . . . . . . . . . . . . . . . . . . . . . . . . . . . . . . . . . . . . . 178
Telecommunications & Internet Association (TIA) Safety Information . . . . . . . . . . . . . . . . . . . . 179
WEEE Notice . . . . . . . . . . . . . . . . . . . . . . . . . . . . . . . . . . . . . . . . . . . . . . . . . . . . . . . . . . . . . . . . . . . . . 180
RoHS Compliance . . . . . . . . . . . . . . . . . . . . . . . . . . . . . . . . . . . . . . . . . . . . . . . . . . . . . . . . . . . . . . . . 180
4C. Manufacturer’s Warranty . . . . . . . . . . . . . . . . . . . . . . . . . . . . . . . . . . . . . . . . . . . . . . . . . . 181
Manufacturer’s Warranty . . . . . . . . . . . . . . . . . . . . . . . . . . . . . . . . . . . . . . . . . . . . . . . . . . . . . . . . . . . 181
Privacy Restrictions . . . . . . . . . . . . . . . . . . . . . . . . . . . . . . . . . . . . . . . . . . . . . . . . . . . . . . . . . . . . . . . 182
Weather Disclaimer . . . . . . . . . . . . . . . . . . . . . . . . . . . . . . . . . . . . . . . . . . . . . . . . . . . . . . . . . . . . . . . 183
Warranty Disclaimer . . . . . . . . . . . . . . . . . . . . . . . . . . . . . . . . . . . . . . . . . . . . . . . . . . . . . . . . . . . . . . 183
Limitation of Damages . . . . . . . . . . . . . . . . . . . . . . . . . . . . . . . . . . . . . . . . . . . . . . . . . . . . . . . . . . . . 183
4D. Copyright, Trademark, and Proprietary Notices . . . . . . . . . . . . . . . . . . . . . . . . . . . . . 184
Index . . . . . . . . . . . . . . . . . . . . . . . . . . . . . . . . . . . . . . . . . . . . . . . . . . . . . . . . . . . . . 185
i
Introduction
This User Guide introduces you to Sprint® service and all the features of your new device. It’s divided into four
sections:
ࡗSection 1: Getting Started
ࡗSection 2: Your Device
ࡗSection 3: Sprint Service
ࡗSection 4: Safety and Warranty Information
Your Device’s Menu
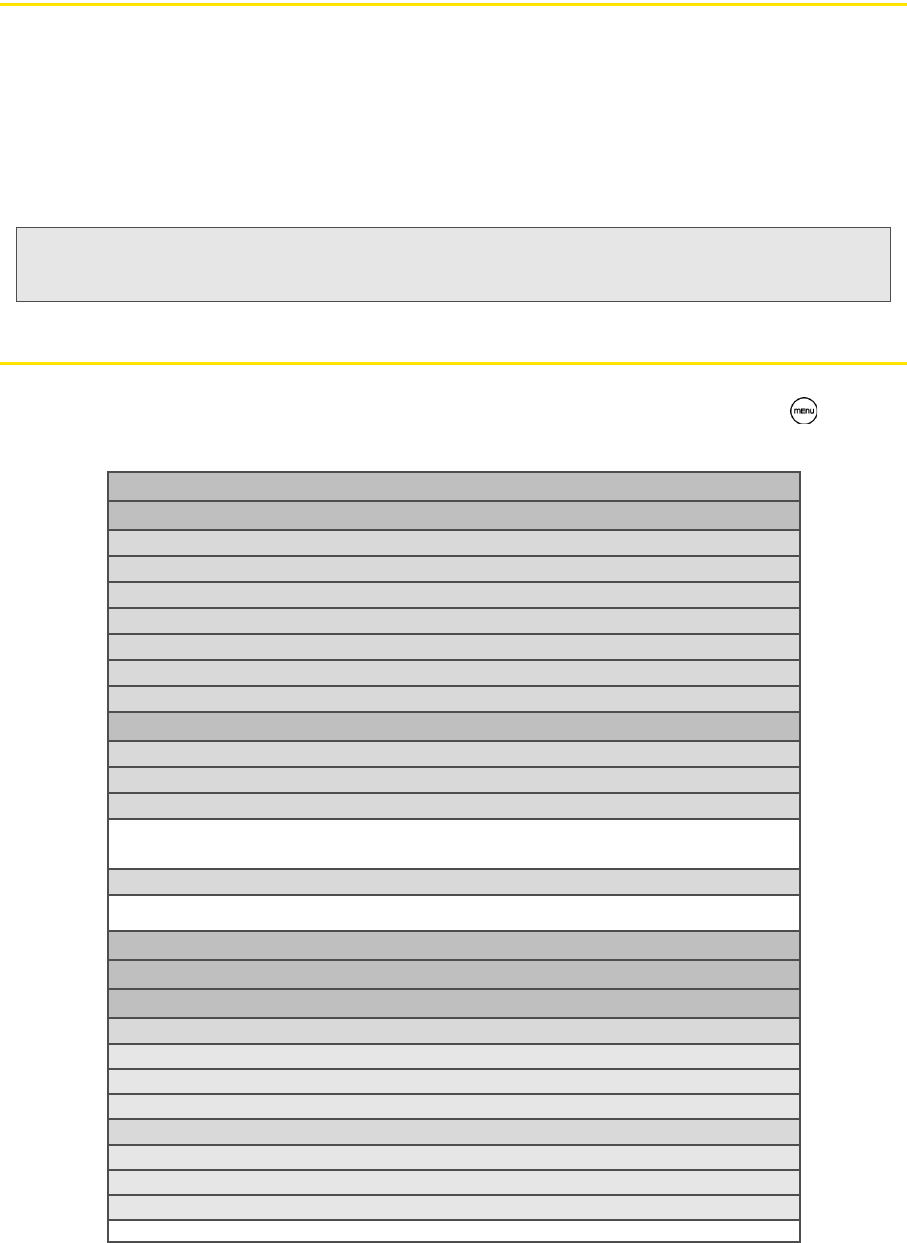
The following table outlines your device’s main menu structure. From the Home screen, press to open
the menu.
WARNING: Please refer to the Important Safety Information section on page 166 to learn about information that will help
you safely use your device. Failure to read and follow the Important Safety Information in this device guide may
result in serious bodily injury, death, or property damage.
All apps
Scenes
1: Sprint Scene
2: HTC
3: Social
4: Work
5: Play
6: Travel
7: Clean Slate
Add to Home
1: Widget
2: Program
3: Shortcut
1: Bookmark 2: Direct Dial 3: Direct Message 4: Directions & Navigation
5: Gmail label 6: Mail Inbox 7: Music playlist 8: Person
9: Settings
4: Folder
1: New Folder 2: All People 3: Bluetooth Received 4: Facebook Phonebook
5: Phones 6: Starred
Wallpaper
Notifications
Settings
1: Personalize
1: Scenes
2: Home wallpaper
3: Default ringtone
2: Wireless & networks
1: Airplane mode
2: Wi-Fi
3: Wi-Fi settings
1: Wi-Fi 2: Network notification 3: Add Wi-Fi network

ii
4: Bluetooth
5: Bluetooth settings
1: Bluetooth 2: Device name 3: Discoverable 4: Advanced Settings
5: Scan for devices
6: Sprint Hotspot
7: Sprint Hotspot settings
8: 4G
9: 4G settings
1: 4G 2: Network notification 3: Network provider 4: Signal strength
5: IP address
10: VPN settings
1: Add VPN
11: Mobile network
12: Mobile networks
1: Data roaming 2: Data Roam Guard 3: Data roaming sound 4: Enable always-on mobile data
5: Roaming 6: Call guard
13: Internet sharing
3: Call
1: Voicemail service
2: Voicemail settings
3: Clear voicemail notification
4: TTY mode
1: TTY Off 2: TTY Full 3: TTY HCO 4: TTY VCO
5: Hearing aids
6: Phone settings
1: Edit default message2: Edit message 3: Save to contacts
7: DDT M mode
8: Voice Privacy
9: Automatic prepend
10: Plus code dialing
1: North American dialing2: International dialing
4: Sound & display
1: Sound profile 2: Ringer volume 3: Media volume 4: Phone ringtone
5: Phone vibrate 6: Notification sound 7: Quiet ring on pickup 8: Audible touch tones
9: Audible selection 10: Haptic feedback 11: SD card notifications 12: Roaming ringtone
13: Emergency tone 14: Orientation 15: Animation 16: Brightness
17: Screen timeout 18: Notification flash 19: G-Sensor calibration
5: Accounts & sync
1: Background data
2: Auto-sync
3: Exchange ActiveSync (if you have set up an Exchange ActiveSync email account)
1: Account settings 2: Schedule 3: Mail 4: Contacts
5: Calendar
4: Facebook for HTC Sense (if you have logged in to your Facebook account)
1: Account settings 2: Sync Contacts
5: Google (if you have set up a Google Account)
1: Sync Contacts 2: Sync Gmail 3: Sync Calendar
6: Twitter (if you have logged in to your Twitter account)
1: Account settings 2: Sync Peep 3: Sync Friend
7: We ather
1: Account settings 2: Sync weather data
6: Location
1: Use wireless networks 2: Location setting 3: Use GPS satellites
7: Search
1: Google search settings 2: Searchable items 3: Clear search shortcuts

iii
8: Privacy
1: Use My Location 2: Factory data reset
9: Connect to PC
1: Default connection type2: Ask me
10: Security
1: Set unlock pattern
2: Require pattern
3: Use visible pattern
4: Use tactile feedback
5: Visible passwords
6: Set password
7: Use secure credentials
8: Install from SD card
9: Clear storage
11: Applications
1: Unknown sources 2: Manage applications 3: Running services 4: Development
12: SD & phone storage
1: Total space 2: Available space 3: Unmount SD card 4: Format SD card
5: Available space
13: Date & time
1: Automatic 2: Set date 3: Select time zone 4: Set time
5: Use 24-hour format 6: Select date format
14: Language & keyboard
1: Select locale
2: Touch Input
1: Keyboard types 2: Keyboard language 3: Text input 4: Tutorial
5: User Dictionary
15: Accessibility
16: Text-to-speech
1: Listen to an example 2: Install voice data 3: Always use my settings 4: Speech rate
5: Language
17: System updates
1: Firmware update 2: Update profile 3: Update PRL 4: HTC software update
18: About phone
1: Network
1: Operator name 2: Signal strength 3: Mobile network type 4: Service state
5: Roaming 6: Current username
2: Phone identity
1: Model number 2: MEID 3: Phone number 4: IMSI
3: Battery
1: Battery status 2: Battery level 3: Battery use 4: Up time
5: Awake time
4: Hardware information
1: Hardware version 2: Wi-Fi MAC address 3: Bluetooth address 4: 4G MAC address
5: Software information
1: Firmware version 2: Baseband version 3: Kernel version 4: Build number
5: Software number 6: Browser version 7: PRI Version 8: PRL Version
6: Legal information
1: HTC legal 2: Sprint legal 3: Google legal 4: Open source licenses
Tip: For most programs or games on the device, pressing brings up options available for the application or game.

Section 1
Getting Started
2 1A. Setting Up Service
ࡗSetting Up Your Device (page 2)
ࡗActivating Your Device (page 2)
ࡗSetting Up Your Voicemail (page 3)
ࡗSprint Account Passwords (page 3)
ࡗGetting Help (page 4)
Setting Up Your Device
1. Install the battery:
ⅢInsert your fingernail into the slot at the top left of the battery compartment cover and lift gently to
remove.
ⅢAlign the battery’s exposed copper contacts with the battery connectors inside the battery
compartment.
ⅢInsert the contact end of the battery first then gently push the battery into place.
ⅢReplace the back cover making sure all the locking tabs are seated and there are no gaps around the
cover.
2. Press ( ) to turn the device on (black button located at the top of the device and on the right).
ⅢIf your device is activated, it will turn on, search for Sprint service, and enter standby mode.
ⅢIf your device is not yet activated, see “Activating Your Device” on page 2 for more information.
3. Make your first call.
ⅢTap .
ⅢUse the onscreen keypad to enter a phone number.
ⅢTap .
Activating Your Device
ⅷIf you purchased your device at a Sprint Store, it is probably activated and ready to use.
ⅷIf you received your device in the mail and it is for a new Sprint account or a new line of service, it is designed
to activate automatically. To confirm your activation, make a phone call.
ⅷIf you received your device in the mail and you are activating a new device for an existing number on your
account, you will need to go online to activate your new device.
ⅢFrom your computer’s Web browser, go to www.sprint.com/activate and complete the onscreen
instructions to activate your device.
When you have finished, make a phone call to confirm your activation. If your device is still not activated or
you do not have access to the Internet, contact Sprint Customer Service at 1-888-211-4727 for assistance.
Note: When you turn on your device for the first time, you will be given options to let you quickly set up various accounts,
such as Google™ account, Facebook™, Flickr®, Twitter™, Microsoft® Exchange ActiveSync, and other email
accounts. We recommend that you skip these.
Note: Your device’s battery should have enough charge for your device to turn on and find a signal, set up your voicemail,
and make a call. You should fully charge your battery as soon as possible. See “Charging the Battery” on page 13 for
details.
1A. Setting Up Service
Setting Up Service
1A. Setting Up Service 3
Setting Up Your Voicemail
Your device automatically transfers all unanswered calls to your voicemail, even if your device is in use or
turned off. You should set up your Sprint Voicemail and personal greeting as soon as your device is
activated.
1. Press and tap > Voicemail.
2. In the Personalize your Voicemail window, tap Personalize now.
3. Your device will automatically connect with Sprint Voicemail service. Follow the voice prompts to:
ⅢCreate your passcode.
ⅢRecord your name announcement.
ⅢRecord your greeting.
For more information about using your voicemail, see “Voicemail” on page 100.
Sprint Account Passwords
As a Sprint customer, you enjoy unlimited access to your personal account information, your voicemail
account, and your data services account. To ensure that no one else has access to your information, you will
need to create passwords to protect your privacy.
Account Username and Password
If you are the account owner, you will create an account username and password when you sign on to
www.sprint.com. (Click Need to register for access? to get started.) If you are not the account owner (if
someone else receives the bill for your Sprint service), you can get a sub-account password at
www.sprint.com.
Voicemail Password
You’ll create your voicemail password (or passcode) when you set up your voicemail. See Setting Up Your
Voicemail for more information on your voicemail password.
Data Services Password
With your Sprint device, you may elect to set up an optional data services password to control access and
authorize Premium Service purchases.
For more information, or to change your passwords, sign on to www.sprint.com or call Sprint Customer
Service at 1-888-211-4727.
Tip: Do not press while the device is being activated. Pressing cancels the activation process.
Note: If you are having difficulty with activation, contact Sprint Customer Service by dialing 1-888-211-4727 from any other
phone.
Note: Voicemail Passcode
Sprint strongly recommends that you create a passcode when setting up your voicemail to protect against
unauthorized access. Without a passcode, anyone who has access to your handset is able to access your voicemail
messages.
4 1A. Setting Up Service
Getting Help
Managing Your Account
Online: www.sprint.com
ⅷAccess your account information.
ⅷCheck your minutes used (depending on your Sprint service plan).
ⅷView and pay your bill.
ⅷEnroll in Sprint online billing and automatic payment.
ⅷPurchase accessories.
ⅷShop for the latest Sprint phones.
ⅷView available Sprint service plans and options.
ⅷLearn more about data services and other products like Sprint Picture Mail, games, ringers, screen savers,
and more.
From Your Sprint Device
1. From the Home screen, tap .
2. Do any of the following:
ⅷTap to check minute usage and account balance.
ⅷTap to make a payment.
ⅷTap to access a summary of your Sprint service plan or get answers to
other questions.
From Any Other Phone
ⅷSprint Customer Service: 1-888-211-4727.
ⅷBusiness Customer Service: 1-800-927-2199.
Sprint 411
Sprint 411 gives you access to a variety of services and information, including residential, business, and
government listings; movie listings or showtimes; driving directions, restaurant reservations, and major local
event information. You can get up to three pieces of information per call, and the operator can automatically
connect your call at no additional charge.
There is a per-call charge to use Sprint 411, and you will be billed for airtime.
ᮣTap .
Sprint Operator Services
Sprint Operator Services provides assistance when you place collect calls or when you place calls billed to
a local telephone calling card or third party.
ᮣTap .
For more information or to see the latest in products and services, visit us online at www.sprint.com.

Section 2
Your Device
62A. Device Basics
ࡗYour Device (page 6)
ࡗTurning Your Device On and Off (page 8)
ࡗViewing the Display Screen (page 9)
ࡗBattery and Charger (page 12)
ࡗGetting Around Your Device (page 13)
ࡗDisplaying Your Phone Number (page 14)
ࡗMaking and Answering Calls (page 15)
ࡗSpeed Dialing (page 19)
ࡗDialing Sprint Services (page 19)
ࡗEntering Text (page 19)
ࡗHome Screen (page 22)
Your Device
Tip: Device Software Upgrades – Updates to your device’s software may become available from time to time.
Sprint will automatically upload critical updates to your device. You can also check for and download updates by
pressing > , and then tapping Settings > System updates > Firmware update to search for and download
available updates.
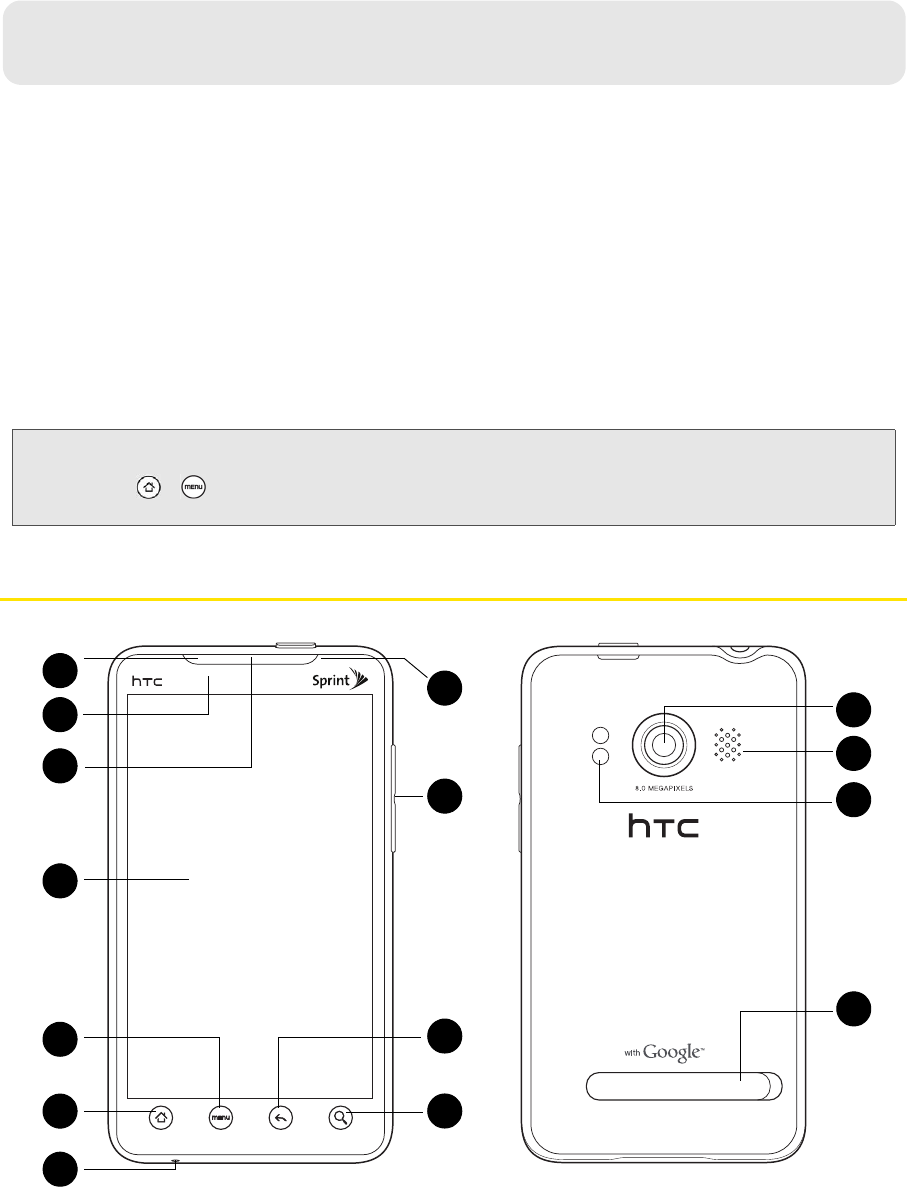
2A. Device Basics
1
6
4
2
3
5
13
12
8
15
14
7
9
10
11
Front View Rear View

Device Basics
2A. Device Basics 7
Key Functions
1. Front Indicator Light (LED) shows your device’s connection status at a glance.
2. Proximity Sensor automatically switches the display screen off when you hold the device near your face
during a call. When activated, the proximity sensor does not reduce transmission power for WiMAX,
CDMA, or Wi-Fi.
3. Earpiece lets you hear the caller and automated prompts.
4. Display Screen displays all the information needed to operate your device, such as the call status, the
People list, the date and time, and the signal and battery strength.
5. Menu Key allows you to open a list of actions that you can do on the current screen.
6. Home Key takes you back to the Home screen. When in standby mode, press and hold to open the
recently-used applications window.
7. Microphone allows other callers to hear you clearly when you are speaking to them.
8. Search Key allows you to search information on the current screen or application. For example, while in
People, press to search for a contact in the device.
9. Back Key allows you to go back to the previous screen, or close a dialog box, options menu, the
Notifications panel, or onscreen keyboard.
10. Volume Button allows you to adjust the ringer or media volume or adjust the voice volume during a call.
11. Front Camera lets you capture a self-portrait or a video.
12. Camera Lens as part of the built-in camera, lets you take pictures and videos.
13. Speaker lets you hear the different ringers and sounds. The speaker also lets you hear the caller’s voice
in speakerphone mode.
14. Dual Flash helps illuminate subjects in low-light environments when the camera is focusing and
capturing a photo or video.
15. Kickstand lets you prop up the device on a desk or other flat surface for more comfortable viewing.
16. 3.5 mm Headset Jack allows you to plug in either a stereo headset or an optional headset for convenient,
hands-free conversations. CAUTION! Inserting an accessory into the incorrect jack may damage the
device.
17. Power Button lets you turn the device on or off or turn on/off the screen. While in standby mode and the
screen is unlocked, press and hold to open a menu to let you turn on/off the device, turn on/off your
mobile network connection, or switch your device to silent mode, vibration mode, or airplane mode.
18. Charger/Accessory Jack allows you to connect the device charger or the USB cable (included).
CAUTION! Inserting an accessory into the incorrect jack may damage the device.
19. HDMI Jack allows you to use an HDMI cable to connect to an HDMI-capable external display, such as an
LCD TV. You can then display photos and videos on your device to the connected external display.
CAUTION! Inserting an accessory into the incorrect jack may damage the device.
18 19
End View
16 17
Top View
82A. Device Basics
Turning Your Device On and Off
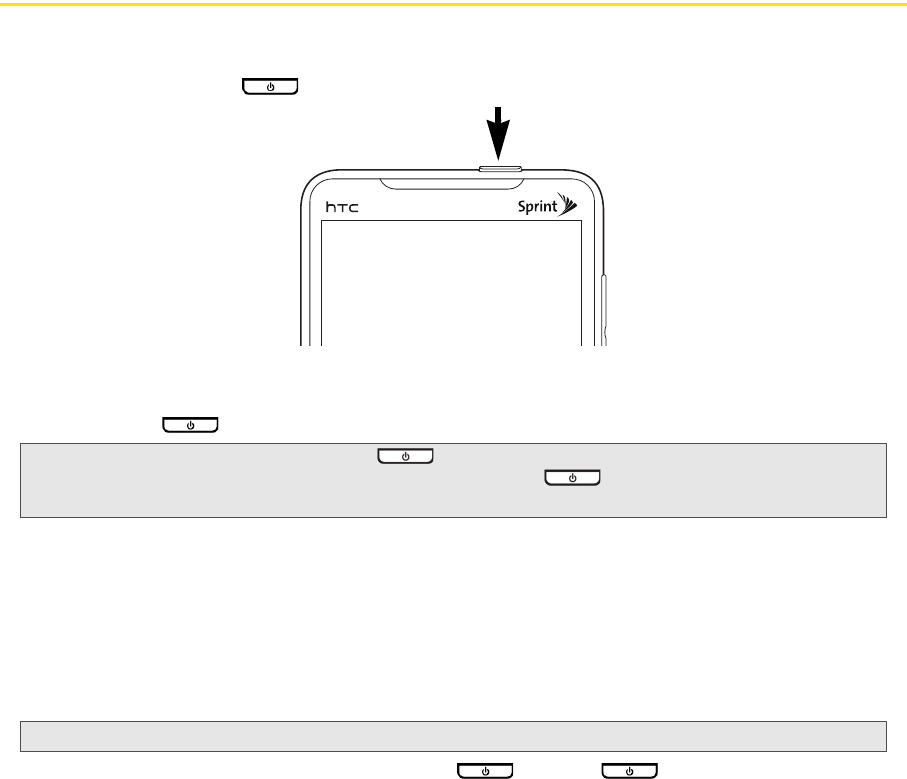
Turning Your Device On
ᮣPress the power button ( ) at the top panel of the device.
Turning Your Device Off
1. Press and hold for about two seconds.
2. On the Phone options menu, tap Power off.
3. On the Power off confirmation box, tap OK.
Turning Off the Screen When Not in Use
To save battery power, the device automatically turns off the screen when you leave it idle after a certain
period of time. You will still be able to receive messages and calls while the device’s screen is off.
You can also turn off and lock the screen by pressing . Pressing again or incoming calls will
turn on your device screen and show the lock screen.
Note: When the screen is locked and you press , it will only turn off the screen and not the device.
You will need to unlock the screen first before you press and hold . See “Turning Off the Screen When Not
in Use” for details.
Tip: For information on how to adjust the time before the screen turns off, see “Display Settings” on page 29.
Device Basics
2A. Device Basics 9
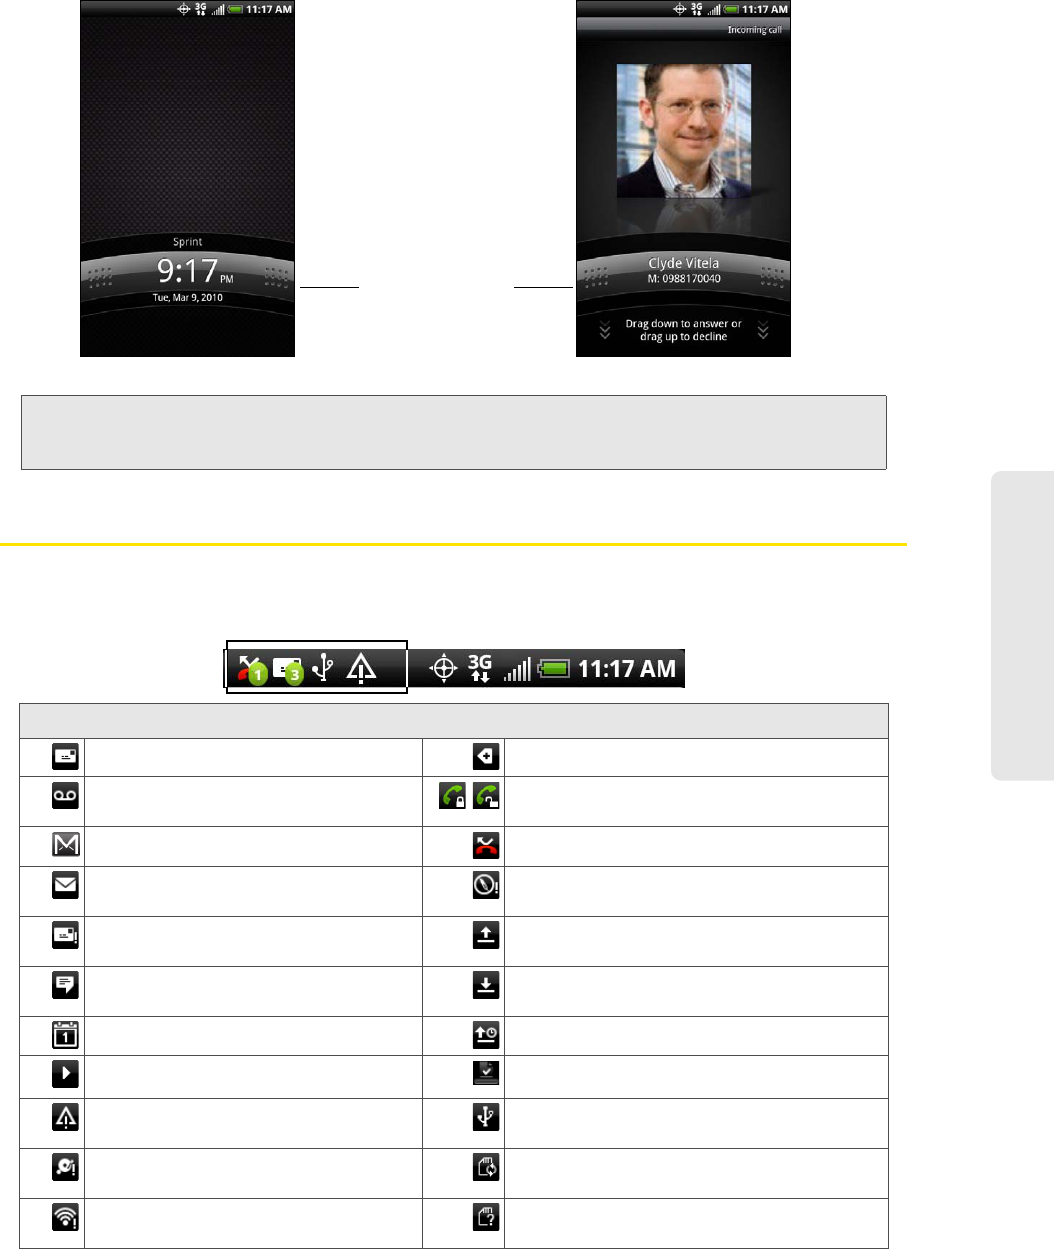
To unlock the screen:
Viewing the Display Screen
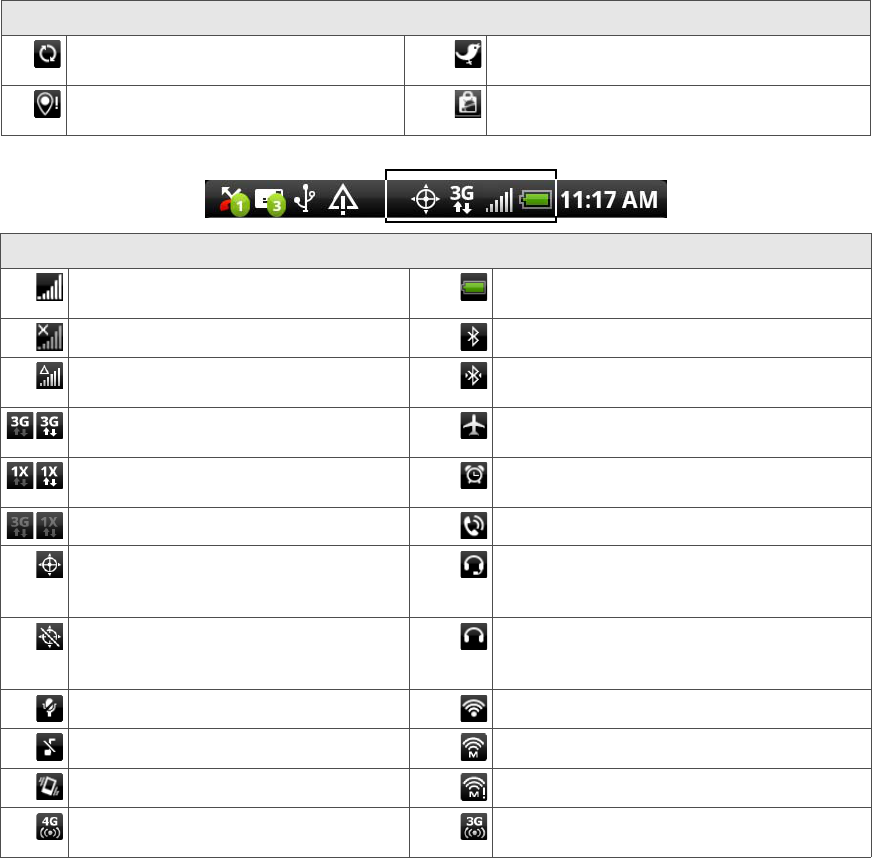
Your device’s display screen provides information about notifications and your device’s status. This list
identifies the symbols you’ll see on your device’s display screen:
Note: If you have set up a screen unlock pattern, you will be prompted to draw the pattern on the screen before it unlocks.
For more information on how to create and enable the screen unlock pattern, see “Protecting Your Device with a
Screen Lock” on page 33.
Status Bar – Notification Icons
New Text or Multimedia Message More (undisplayed) notifications
New Voicemail
Call in progress (Voice Privacy locked/
unlocked)
New Gmail message Missed call
New Microsoft Exchange ActiveSync
or POP3/IMAP email message
Compass needs orientation
Problem with Text/Multimedia
Message delivery
Uploading data (animated)
New instant message from
Google Talk
Downloading data (animated)
Upcoming event Waiting to upload
Music is playing Content downloaded
General notification (for example, sync
error)
Device connected to computer via USB
cable
Storage card is low on free space Storage card is safe to remove or storage
card is being prepared
Wi-Fi is on and wireless networks are
available
No storage card installed on the device.
Press and hold the lock
screen bar and then slide
your finger down to
unlock the screen or
answer an incoming call.
Lock screen bar
10 2A. Device Basics
Data synchronizing – connected to
HTC Sync
New tweet
New location detected Updates available for an application
downloaded from Android Market
Status Bar – Device Status Icons
Signal Strength
(More bars = stronger signal)
Shows current battery charge level
(Icon shown is fully charged)
No Service Bluetooth on
Device is “roaming” off the Nationwide
Sprint Network
Connected to Bluetooth device
Sprint 3G data service (EVDO)
available (when active, icon animated)
Airplane mode
Sprint 1xRTT network available (when
active, icon animated)
Alarm set
Data service is currently unavailable Speakerphone on
Device’s location feature is on and
available for location-based services
such as GPS Navigation
Wired microphone headset connected
Device’s location feature off and your
location available only for 911
(page 17)
Wired headset connected
Device microphone muted Connected to Wi-Fi network
Device speaker muted Connected to a 4G network
Vibrate mode 4G is on and 4G networks are available
Sprint Mobile Hotspot is on and is
ready to share its 4G connection
Sprint Mobile Hotspot is on and is ready to
share its 3G connection
Status Bar – Notification Icons
Device Basics
2A. Device Basics 11
Notifications Panel
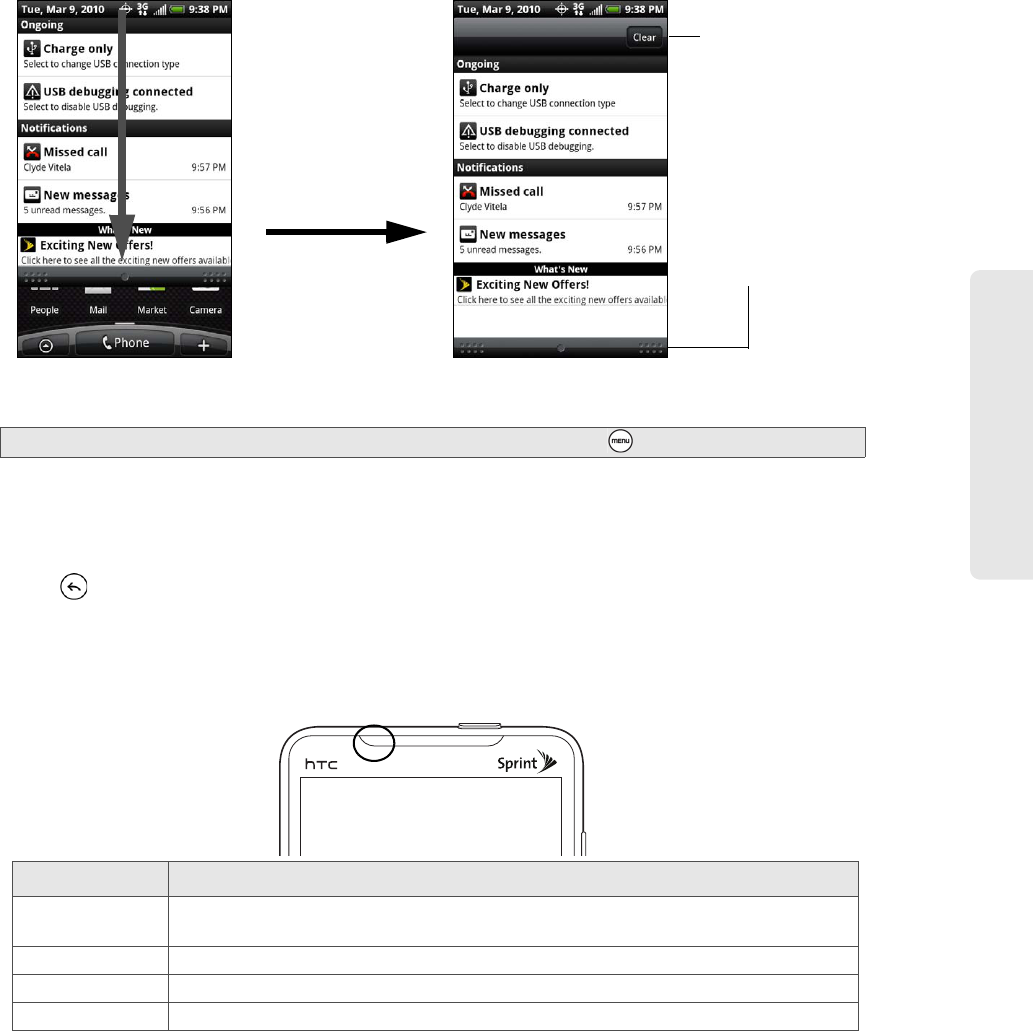
Notification icons report the arrival of new messages, calendar events, alarms being set and ongoing
settings such as call forwarding being on or the current call status. You can open the Notifications panel to
access message, reminder, or event notification tabs.
To open the Notifications panel:
When a new notification icon displays in the status bar, press and hold the status bar, and then slide your
finger downward to open the Notifications panel.
If you have several notifications, you can scroll down the screen to view more notifications.
To close the Notifications panel:
ᮣPress and hold the bottom bar of the Notifications panel, and then slide your finger up the screen.
– or –
Press .
Notification LED
The Notification LED located at the right corner of the earpiece provides information on the device status or
pending notifications.
Tip: You can also open the Notifications panel from the Home screen by pressing and then tapping Notifications.
LED Status Indication
Solid green Battery is fully charged.
(When the device is connected to the AC adapter/computer.)
Solid amber Battery is charging.
Flashing amber Battery is low. (Battery power is below 14%.)
Flashing green You have a pending notification (for example, a new message or a missed call).
Tap a notification to
open the related
application.
Tap to clear all
notifications.
Press and hold,
and then slide up
to close the
Notifications panel.
12 2A. Device Basics
Battery and Charger
Sprint-approved or HTC-approved batteries and accessories can be found at Sprint Stores or through HTC;
or call 1-866-866-7509 to order. They’re also available at www.sprint.com.
Battery Capacity
Your device is equipped with a Lithium Ion (Li-Ion) battery. It allows you to recharge your battery before it is
fully drained. The battery provides up to 6 hours of continuous talk time. For battery-saving tips, see “Power-
Saving Tips” on page 37.
Installing the Battery
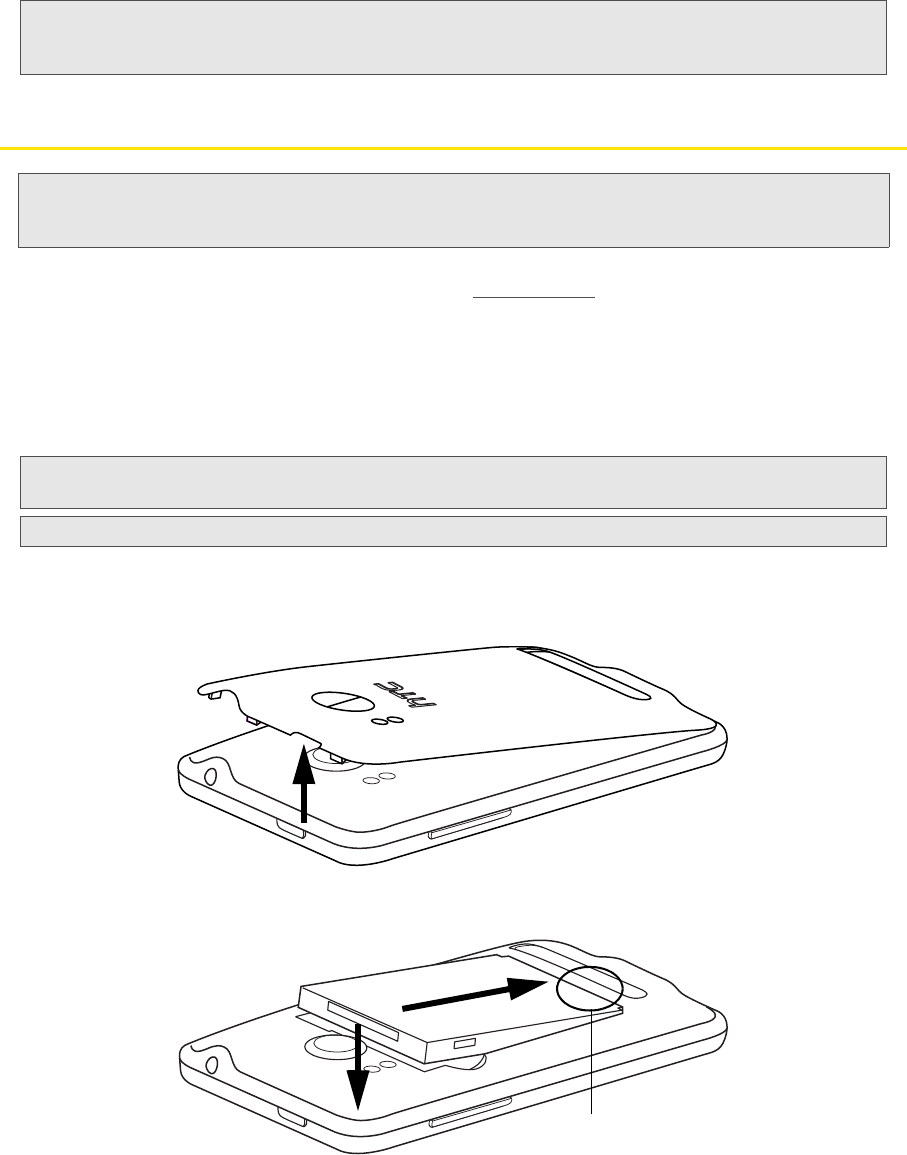
1. With the device turned off, insert your fingernail into the slot at the top left of the battery compartment
cover and lift gently to remove.
2. Align the battery’s exposed copper contacts with the battery connectors inside the battery compartment.
3. Insert the contact end of the battery first then gently push the battery into place.
4. Replace the back cover, making sure all the locking tabs are seated and there are no gaps around the
cover.
Note: The indicators are listed in order of priority. For example, if your device is connected to a power adapter and is
charging the battery, the LED will be solid amber and will not switch to a flashing green light even if there is a
pending notification.
WARNING: Use only Sprint-approved or HTC-approved batteries and chargers with your device. The failure to use an
Sprint-approved or HTC-approved battery and charger may increase the risk that your device will overheat,
catch fire, or explode, resulting in serious bodily injury, death, or property damage.
Note: Long backlight settings, searching for service, vibrate mode, browser use, and other variables may reduce the
battery’s talk and standby times.
Tip: Watch your device’s battery level indicator and charge the battery before it runs out of power.
Copper contacts
Device Basics
2A. Device Basics 13
Removing the Battery
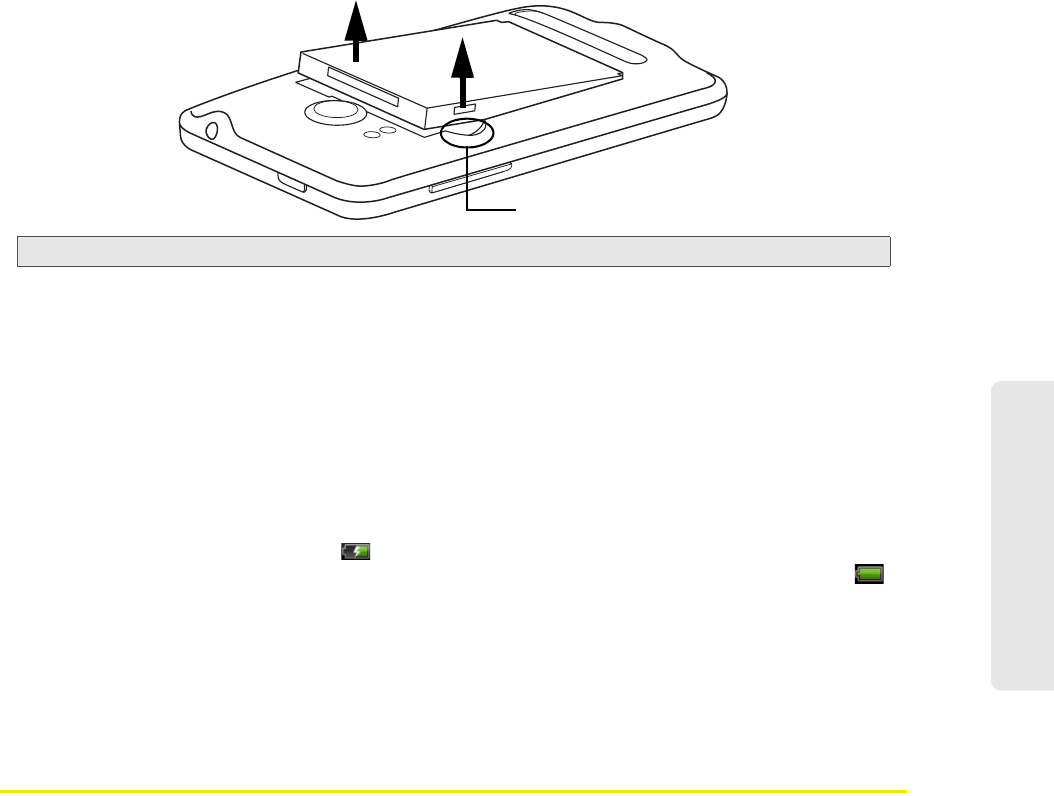
1. Make sure the power is off so that you don’t lose any stored numbers or messages.
2. Remove the back cover. (See step 1 of “Installing the Battery.”)
3. Lift the battery from the notches on the upper left and right sides of the battery compartment.
Charging the Battery
Keeping track of your battery’s charge is important. If your battery level becomes too low, your device
automatically turns off, and you will lose any information you were just working on.
Always use a Sprint-approved or HTC-approved desktop charger, travel charger, or vehicle power adapter to
charge your battery.
1. Plug the USB connector of the AC adapter into the charger/accessory jack at the bottom of your device.
2. Plug in the AC adapter to an electrical outlet to start charging the battery.
Charging is indicated by a solid amber light in the Notification LED. As the battery is being charged while the
device is on, the charging battery icon ( ) is displayed in the status bar of the Home screen. After the
battery has been fully charged, the Notification LED shows a solid green light and a full battery icon ( )
displays in the status bar of the Home screen.
For more information about Notifications, see “Notification LED” for more details.
With the Sprint-approved Li-Ion battery, you can recharge the battery before it becomes completely run
down.
Getting Around Your Device
There are different ways to navigate around the your device’s Home screen, menus, and application screens.
Tap
When you want to type using the onscreen keyboard, select items onscreen such as application and settings
icons, or press onscreen buttons, simply tap them with your finger.
Press and hold
To open the available options for an item (for example, contact or link in a Web page), simply press and hold
the item.
Swipe or slide
To swipe or slide means to quickly drag your finger vertically or horizontally across the screen.
WARNING: Do not handle a damaged or leaking Li-Ion battery as you can be burned.
Notch
14 2A. Device Basics
Drag
To drag, press and hold your finger with some pressure before you start to move your finger. While dragging,
do not release your finger until you have reached the target position.
Flick
Flicking the screen is similar to swiping, except that you need to swipe your finger in light, quick strokes. This
finger gesture is always in a vertical direction, such as when flicking the contacts or message list.
Rotate
For most screens, you can automatically change the screen orientation from portrait to landscape by turning
the device sideways. When entering text, you can turn the device sideways to bring up a bigger keyboard.
See “Using the Onscreen Keyboard” for more details.
Pinch
The device screen supports multi-touch. On the Home screen, you can “pinch” the screen using two fingers
(for example, thumb and index fingers) to switch to thumbnail view and see all the Home screens. For some
applications, like Gallery or the browser, pinch the screen to zoom in or zoom out when viewing a picture or
a Web page.
Navigation keys
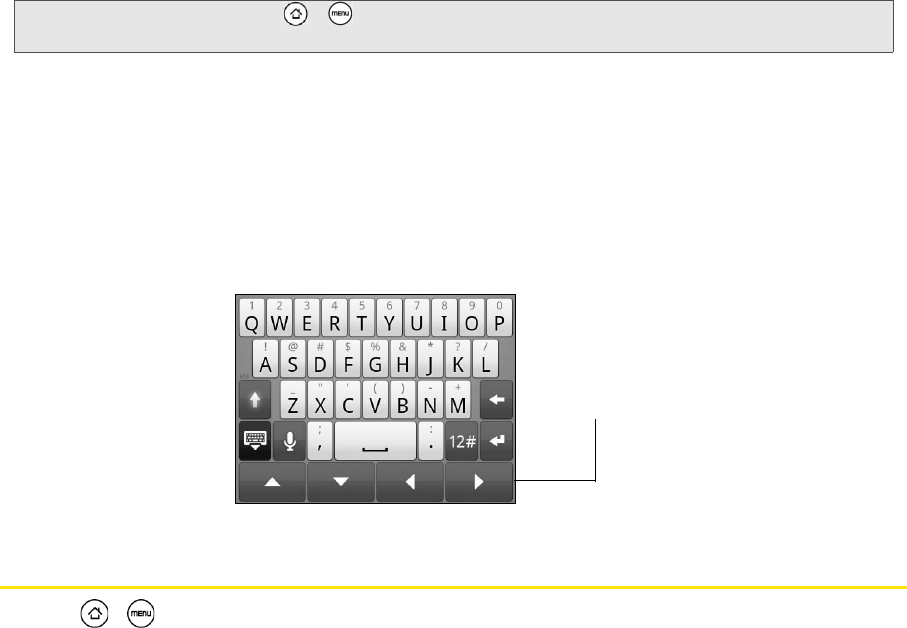
If the onscreen keyboard is open, tap the navigation keys to go to a text box or an area on the screen.
Displaying Your Phone Number
ᮣPress > and tap Settings > About phone > Phone identity. (Your phone number and other
information about your device and account will be displayed.)
Note: The Orientation check box in > > Settings > Sound & display needs to be selected for the screen orientation
to automatically change.
Navigation keys
Device Basics
2A. Device Basics 15
Making and Answering Calls
Making Calls
There are several convenient methods to make a call from your device.
Calling Using the Phone Dialer
In the Phone’s dialer, you can either dial a number directly, or you can use the Smart Dial feature to search
and call a contact in People or a number from Call History.
When you enter the first letter of the name or number of a contact, Smart Dial searches for contact phone
numbers and the first character of a contact name as well as from the character that appears after a space,
dash, or underscore in a contact name. As you enter more letters or numbers, the list shows only the
corresponding matches.
1. Press and tap .
2. Begin entering the first few digits or characters by tapping the keys on the Phone keypad. As you enter
digits or letters, the Smart Dial panel displays matches found. If you enter a wrong digit, tap to erase
that digit. To erase the entire number, press and hold .
3. Tap to close the Phone keypad and to see if there are more matching numbers or contacts. To
browse through the filtered list, flick through the list or slide your finger up or down the list slowly.
4. Tap the phone number or contact from the list.
– or –
To call a different phone number associated with the contact, tap the contact card icon at the right side of
the contact name. On the contact details screen, tap the number you want to call.
Calling a Phone Number in a Text Message
While viewing a text message, you can place a call to a number that is in the body of the message.
1. Press , and then tap > Messages.
2. Tap the message with the phone number, and then tap the phone number.
3. On the Select link screen, tap the number you want to call.
4. The Phone screen then opens, with the phone number automatically filled in and ready to be dialed.
To place the call, tap Call.
For more information about text messages, see “Text Messaging (SMS) and Multimedia Messaging (MMS)”
on page 102.
Calling a Phone Number in an Email Message
While viewing a received email message, tap a phone number that is displayed in the body of the email
message to open the Phone screen so you can call that number.
Calling a Speed Dial Number
To call a stored speed dial number, press and hold a number button. For information on setting up speed
dial numbers, see “Speed Dialing” on page 19.
You can also place calls from your device using your History listings (page 39) and Automatic Speech
Recognition (page 69).

16 2A. Device Basics
Receiving Calls
When you receive a phone call from a contact, the Incoming call screen appears and displays the caller ID
icon, name, and phone number of the calling party. When you receive a phone call from someone who is
not stored in People, only the default caller ID icon and phone number appear on the Incoming call screen.
Answering an Incoming Call
ᮣIf the display is on, tap Answer.
ᮣIf the display is off, the display will turn on showing the Lock screen. Drag the bar down to answer the call.
Muting the Ringing Sound
To mute the ring without rejecting the call, you can do any of the the following:
ᮣPress the volume down button.
ᮣPress and tap Mute. (You can do this even on the Lock screen.)
ᮣPlace the device face down on a level surface.
Using the Quiet Ring on Pickup Feature
Your device automatically scales down the ring volume when you pick up the device to answer calls.
1. Press > , and then tap Settings > Sound & display.
2. Scroll down the screen, and then select the Quiet ring on pickup check box.
3. Press .
Rejecting an Incoming Call
ᮣIf the display is on, tap Decline.
ᮣIf the display is off, the display will turn on showing the Lock screen. Press and then tap Decline to
reject and send the call to your voicemail.
Rejecting a Call and Sending a Text Message
You can automatically send a default text message to the caller and reject the incoming voice call.
Press and tap
Send message when you have an incoming call to send the text message.
You can change the default text message by pressing and tapping Phone settings > Edit default message
while on the Phone screen.
Answering a Roam Call With Call Guard Enabled
Call Guard is an option that helps you manage your roaming charges when making or receiving calls while
outside the Nationwide Sprint Network. See “Roaming” on page 109 for more information.
ᮣTap Answer to answer the call. (See “Call Guard” on page 110 for more information.)
Ending a Call
ᮣTap End call.
Note: Make sure your device is on. (If your device is off, incoming calls go to voicemail.)
Note: When your device is off, calls go directly to voicemail.
Device Basics
2A. Device Basics 17
Missed Call Notification
When you do not answer an incoming call, you will see the missed call icon in the status bar when you
miss a call.
To check who the caller was, press and hold the status bar, and then slide your finger downward on the
screen to open the Notifications panel. The missed call number or contact name is displayed.
Tap the missed call number or contact name to open the Call history. Missed calls are indicated by the
missed call icon ( ).
Calling Emergency Numbers
You can place calls to 911 (dial ), even if the device’s screen is locked
with a pattern or your account is restricted.
To call the 911 emergency number when the device’s screen is locked with a pattern:
1. Unlock the screen. For more information, see “Turning Off the Screen When Not in Use.”
2. Tap Emergency call on the screen.
3. Tap , and then tap .
To call the 911 emergency number normally or when your account is restricted:
1. Unlock the screen. For more information, see “Turning Off the Screen When Not in Use.”
2. Tap on the Home screen.
3. Tap , and then tap .
Enhanced 911 (E911) Information
This device features an embedded Global Positioning System (GPS) chip necessary for utilizing E911
emergency location services where available.
When you place an emergency 911 call, the GPS feature of your device seeks information to calculate your
approximate location. Depending on several variables, including availability and access to satellite signals,
it may take up to 30 seconds or more to determine and report your approximate location.
In-Call Options
Pressing during a call displays a list of available in-call features. To select an option, tap the option.
The following options may be available through the Options menu:
ⅷAdd call to initiate a three-way call.
ⅷPeople to display your contacts list.
ⅷFlash to accept another incoming call and put the first caller on hold. Tap Flash again to talk to the first
caller.
ⅷMute to mute the microphone. Tap Unmute to unmute the microphone.
ⅷSpeaker on or Speaker off to route the device’s audio through the speaker or through the earpiece.
Important: Always report your location to the 911 operator when placing an emergency call.
Some designated emergency call takers, known as Public Safety Answering Points (PSAPs) may not be
equipped to receive GPS location information from your device.
Note: When the device is completing a call, only the People, Flash and Speaker on options are available.
18 2A. Device Basics
ᮣTap Speaker On to route the device’s audio through the speaker. (You can adjust the speaker volume
using the volume button on the side of the device.)
ᮣTap Speaker Off to use the device’s earpiece.
End-of-Call Options
After you receive a call from or make a call to a phone number that is not in your People list, you can choose
to save the number to People. On the Phone screen, tap at the right side of the number to add the new
number to People. (See “Saving a Phone Number” on page 18.)
Saving a Phone Number
Store contacts entries in your device. Your device automatically sorts People entries alphabetically. (For more
information, see “People” on page 41.)
To save a number from standby mode:
1. Press and tap .
2. Enter the phone number by tapping the keys on the keypad.
3. Tap Save to People. (This button appears after tapping six digits.)
4. Tap Create new contact or Save to existing contact.
5. Use the keyboard to enter the new contact name and tap Save to save the new entry.
– or –
Tap an existing contact name and tap Save to save the new number.
Finding a Phone Number
You can search People for entries by name.
1. Press , tap > People, and then press .
2. Enter the first letter or letters of an entry. (The more letters you enter, the more specific the search.)
3. Tap the contact to display his/her contact information.
Dialing From the People List
1. Press , tap > People.
2. Tap the entry you want to call.
3. Tap Call [Type of Number]. (For example, Call mobile.)
WARNING: Because of higher volume levels, do not place the device near your ear during speakerphone use.
Tip: After receiving a call from a phone number that is not in your People list, an options menu is briefly displayed to
allow you to save the number to People. On the options menu, tap Yes, create new contact.
Device Basics
2A. Device Basics 19
Speed Dialing
Your device can store up to nine phone numbers in speed dial locations.
To assign a speed dial number to a People entry:
1. Press , tap > People, and then tap an entry in People.
2. Press and tap More > Set speed dial.
3. Tap the list menu under Number to select a number from the contact to assign to speed dial.
4. Tap the list menu under Location to assign the number to a speed dial location.
5. Tap Save.
To call using Speed Dial:
ᮣPress and hold the appropriate key on the Phone keypad for approximately two seconds.
The display confirms that you have dialed the number when it shows “Dialing” on the upper right side of
the screen.
Finding Speed Dial Numbers
1. Press and tap .
2. Press and tap Speed dial.
3. Tap a speed dial entry to call the contact.
Dialing Sprint Services
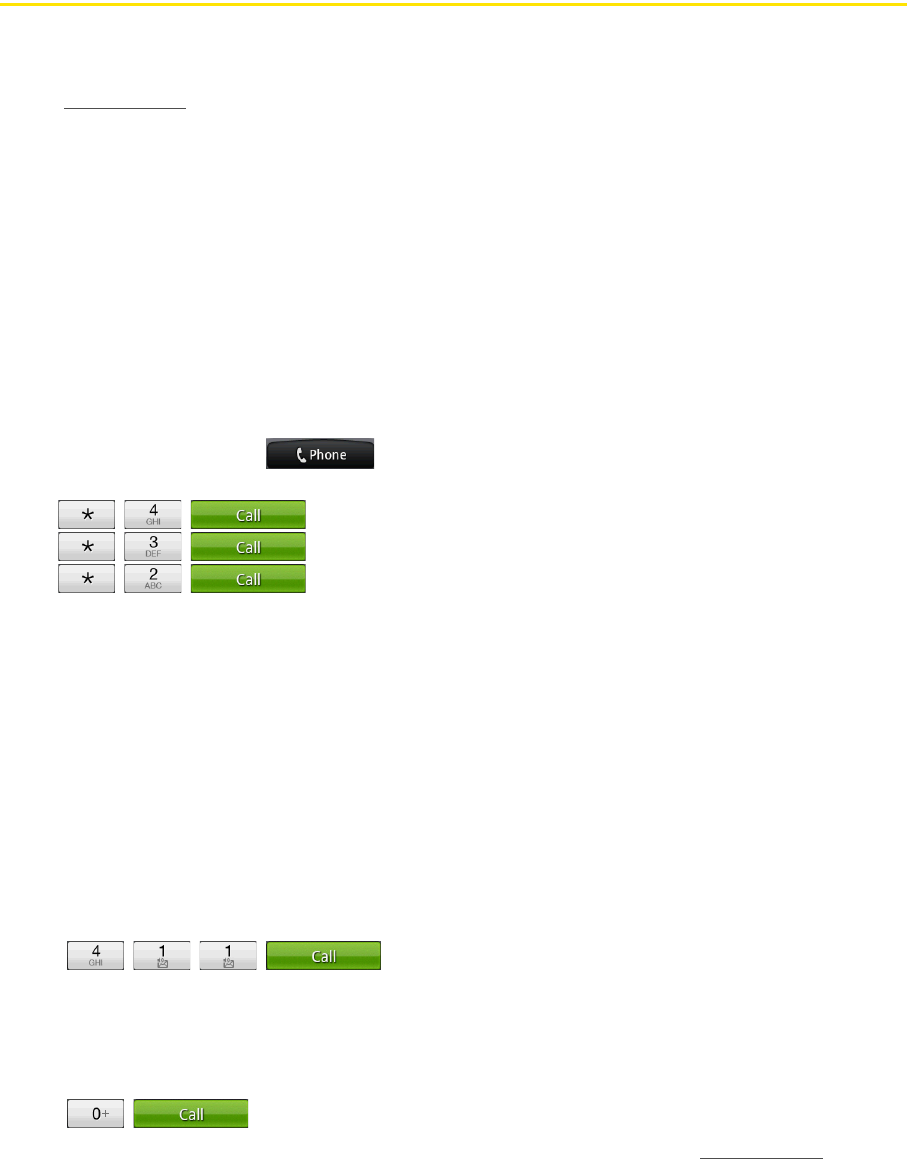
ᮣDial the appropriate service number:
ⅢCustomer Service –
ⅢSprint 411 –
ⅢAccount Info. –
ⅢSprint Operator –
Entering Text
Using the Onscreen Keyboard
When you start a program or select a box that requires text or numbers, the onscreen keyboard becomes
available. You can choose from three keyboard layouts: QWERTY, Compact QWERTY, and Phone Keypad.
Note: If you assign a number to an already in-use speed dial location, the new phone number will automatically replace
the previous speed dial assignment.
Note: Speed dialing is not available when you are roaming; when you are roaming off the Nationwide Sprint Network, you
must always dial using eleven digits (1 + area code + number).
Tip: While on the Speed dial screen, press and tap Add to add new speed dial entries from People.
20 2A. Device Basics
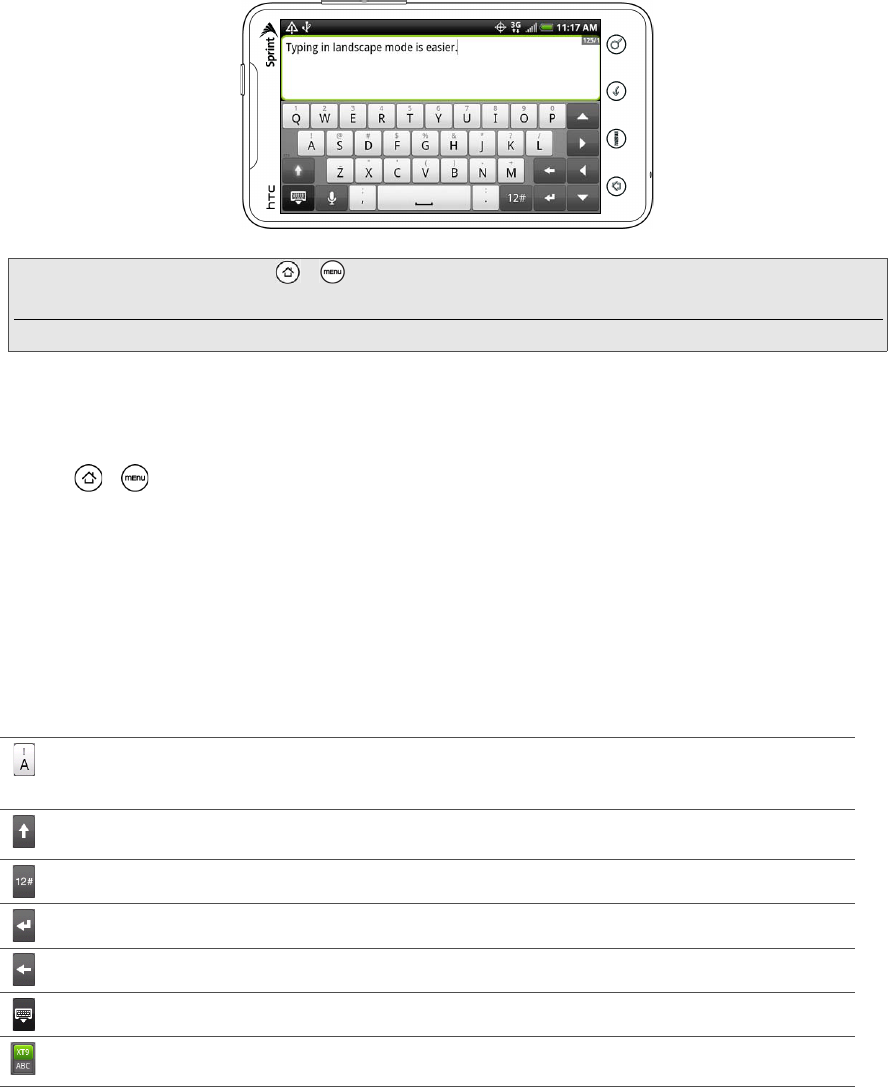
Using the Landscape Onscreen Keyboard
When entering text, you can choose to use the landscape orientation of the onscreen keyboard, by turning
the device sideways, to use a larger keyboard that lets you type easily using two thumbs.
Changing the Onscreen Keyboard Layout
You can choose from three different keyboard layouts to suit your typing style. To change the keyboard
layout, do the following:
1. Press > , and then tap Settings > Language & keyboard > Touch Input.
2. Tap Keyboard types, and then select the keyboard layout that you want to use. Choose from the following:
ⅢQWERTY. This layout is similar to a desktop computer keyboard. This is the default keyboard layout.
ⅢPhone Keypad. This layout resembles the traditional wireless phone keypad.
ⅢCompact QWERTY. This layout features two letters on each key. The key size is slightly bigger than on
the Full QWERTY layout.
Entering Text
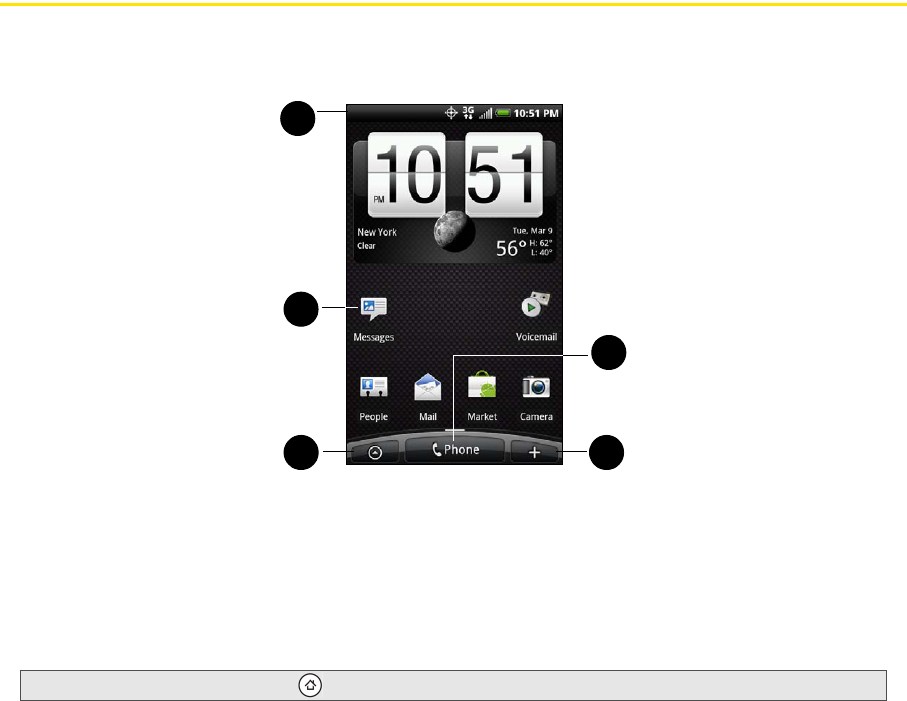
Use the following keys while entering text using the onscreen keyboard:
Note: The Orientation check box in > , > Settings > Sound & display needs to be selected for the screen orientation
to automatically change.
The landscape orientation keyboard is not supported in all applications.
Press and hold keys with gray characters at the top to enter numbers, symbols, or accented
letters. The gray character displayed on the key is the character that will be inserted when you
press and hold that key. Some keys have multiple characters or accents associated with them.
Shift key. Tap to enter an uppercase letter. The next letter you type will be uppercase. Tap twice
to turn on caps lock.
Tap to switch to the numeric and symbol keyboard.
Enter key. Tap to create a new line.
Backspace key. Tap to delete the previous character.
Tap to hide the onscreen keyboard.
Tap to toggle between Multitap and XT9 predictive modes when using the Compact QWERTY
or Phone Keypad layout. (See “Entering Words with Predictive Text” for details.)

Device Basics
2A. Device Basics 21
Entering Words with Predictive Text
The onscreen keyboard has predictive text to help you type quickly and accurately. Predictive text input is
enabled by default, and word suggestions are displayed as you type.
To enter a word in predictive mode, do any of the following:
ⅷIf you see the word you want highlighted in green or orange, you can simply tap the space bar to insert
the word into your text.
ⅷIf you see the word you want shown in the suggestions before you have finished typing the entire word, tap
the word to insert it into your text.
ⅷIf an arrow is shown to the right of the suggestion list, tap the arrow to see more suggestions.
Adding a Word to the Predictive Text Dictionary
Your device comes with a list of words that it references for predictive text suggestions. Sometimes you may
need to add a word to the predictive text dictionary, for example a name or a specialized technical word.
While entering text using the QWERTY keyboard layout, if you tap any word on the suggestion list, it is
automatically added to the predictive text dictionary if it was not in the dictionary already.
To manually add a word to the predictve text dictionary:
1. Press > , and then tap Settings > Language & keyboard > Touch Input > User Dictionary.
2. Tap Add new.
3. Enter the word to add, and then tap OK.
Editing or Deleting a Word in the User Dictionary
You can edit or remove words that you previously added to the predictive text dictionary.
1. Press > , and then tap Settings > Language & keyboard > Touch Input > User Dictionary.
2. Do any of the following:
ⅢTo edit a word, tap the word, enter your changes, and then tap OK.
ⅢTo delete a word, tap the X icon to the right of the word.
Adjusting Touch Input Settings
ᮣPress > , and tap Settings > Language & keyboard > Touch Input.
Touch Input Settings
ⅷKeyboard types lets you select the keyboard layout to use. You can choose from QWERTY, Phone Keypad,
or Compact QWERTY.
ⅷKeyboard language lets you select the language layout of the keyboard.
ⅷText input lets you set text input options when entering text, calibrate the keyboard, and set a sound or
vibration feedback whenever you tap a key.
ⅢQWERTY
●Prediction: Enable the word prediction feature.
●Spell correction: Correct typographical errors by selecting from a list of possible words that reflect the
characters of the keys you have tapped as well as characters of nearby keys.
22 2A. Device Basics
ⅢPhone keypad & compact QWERTY
●Spell correction: Correct typographical errors by selecting from a list of possible words that reflect the
characters of the keys you have tapped as well as characters of nearby keys.
●Word completion: Select from a list of possible combinations based on the characters that appear on
the keys that you tapped.
ⅢOther settings
●Sound feedback: Make a clicking sound whenever you tap a key on the keyboard.
●Vibrate when typing: Enable vibration feedback whenever you tap a key on the keyboard.
ⅢFinger touch precision
●Calibration tool: Recalibrate the keyboard touch accuracy. Recalibrate the keyboard if you feel that the
keyboard keys are not responding accurately to your taps.
●Reset calibration: Reset the calibration back to factory default.
ⅷTutorial lets you go through tutorials to learn how to use the onscreen keyboard features.
ⅷUser Dictionary lets you add, edit, or remove words in the predictive text dictionary. For more information,
see “Adding a Word to the Predictive Text Dictionary” and “Editing or Deleting a Word in the User
Dictionary.”
Home Screen
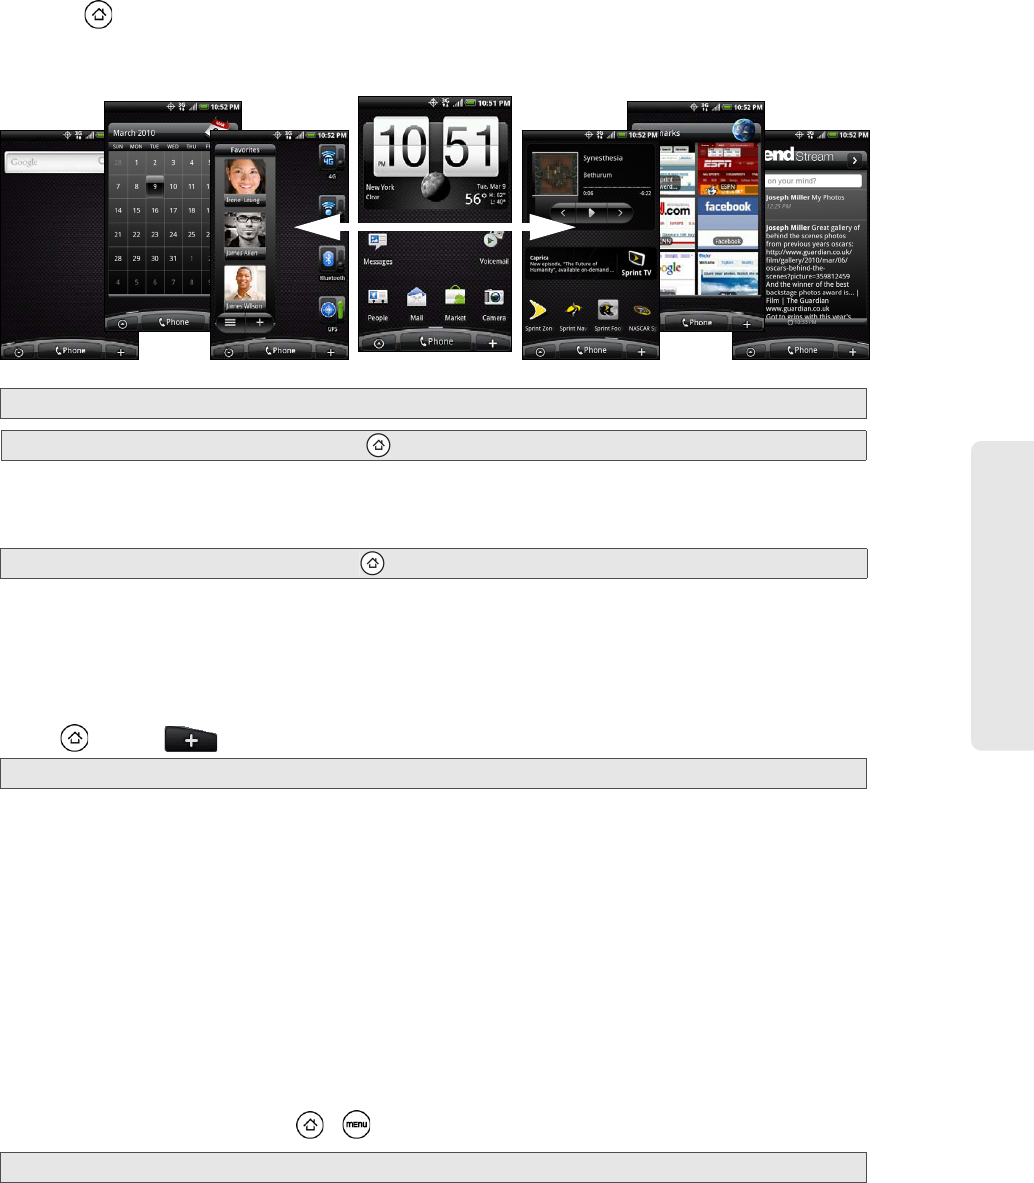
The Home screen is the starting point for many applications and functions, and it allows you to add items
like application icons, shortcuts, folders, and HTC or Google widgets to give you instant access to
information and applications.
1. Status Bar: Displays device status and notification icons. See “Viewing the Display Screen” for a list of
icons you will see on the status bar.
2. Application icon: Tap to open the related application.
3. All apps: Tap to open the All apps screen. The All apps screen holds all applications on your device.
4. Add to Home: Tap to add shortcuts, widgets, and folders on the Home screen.
5. Phone: Tap to open the Phone screen to make calls.
Tip: While in any application, press to go back to the Home screen.
5
43
2
1
Device Basics
2A. Device Basics 23
Extended Home Screen
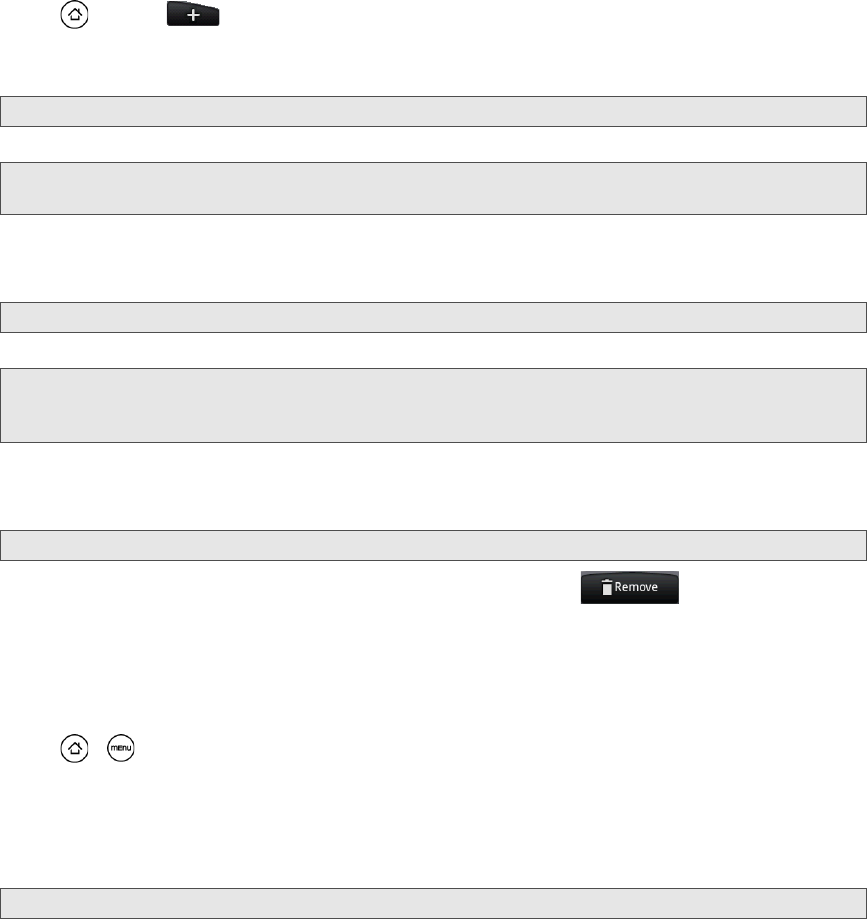
The Home screen extends beyond the screen width to provide more space for adding icons, widgets, and
more. Press , and then slide your finger horizontally across the screen to go to the left or right side of the
extended Home screen. There are six “additional” screens apart from the main Home screen.
Your Home screen may look like this:
To directly go to a particular Home screen:
1. On any Home screen, pinch the screen to bring up a snapshot of the Home screen.
2. Tap the screen you want to open.
Customizing the Home Screen
To add a Home screen item:
1. Press and tap .
2. In the Add to Home options menu, tap the item you want to add to the Home screen:
ⅢWidget: Add HTC or Android™ widgets to the Home screen such as a clock, calendar, mail, people,
Footprints, and more.
ⅢProgram: Add shortcuts to applications on your phone. To quickly add an application shortcut that is on
the All apps screen to the Home screen, press and hold an application icon. When the device vibrates,
drag the icon on an empty area on the Home screen, and then release it.
ⅢShortcut: Add shortcuts to bookmarked Web page, a favorite contact, a Gmail™ label, a music playlist,
and more.
ⅢFolder: Add a folder where you can organize Home screen items. Add a shortcut to all your contacts,
contacts with phone numbers, or starred contacts. Contact details are automatically updated when
there are changes in the source.
Customize your Home screen by adding application shortcuts and widgets. You can also use preset widgets
from a Scene. To use a Scene, press > and tap Scenes.
Note: You cannot add more screens.
Tip: While on an extended Home screen, press to return to the main Home screen.
Tip: On the main Home screen, you can press to show the snapshot of the Home screen.
Note: You can also press and hold an empty area on the Home screen.
Tip: You can also create and save your custom scene. (See “Creating and Saving a Custom Scene” for details.)
24 2A. Device Basics
To add a widget:
1. Press and tap .
2. In the Add to Home options menu, tap Widget.
3. Select a widget to add to the Home screen, and then select a layout to use, when available.
4. Tap Select.
To reposition a Home screen item:
1. Press and hold the item on the Home screen you want to reposition to activate Edit mode.
2. Without lifting your finger, drag the icon to the position you want on the screen, and then release it.
To remove a Home screen item:
1. Press and hold the item on the screen you want to remove to activate Edit mode.
2. Drag the icon to the Phone button (The Phone button changes into .)
3. When the icon and the Remove button turn red, release pressure.
To create a folder and add items to it:
You can create folders on the Home screen to hold application icons or shortcuts.
1. Press > and tap Add to Home > Folder > New folder. A new folder appears on the screen.
2. Press and hold an application icon or a shortcut on the Home screen to activate Edit mode, and then
drag it on top of the folder.
To access the items inside a folder, tap the folder to open it and then tap the icon of the application or
shortcut you want to open.
To rename a folder:
1. Tap the folder to open it.
2. Press and hold the folder’s title bar to open the Rename folder dialog box.
3. Enter the Folder name and then tap OK.
Note: Most HTC widgets offer various layouts and sizes to fit your needs.
Note: You may need to slide to another screen or remove a widget on the Home screen first if there is no space to place
the new widget.
Note: When Edit mode is activated, the item expands and the device vibrates.
Note: To move an item from the Home screen to an extended Home screen, press and hold the item and then drag it to
the left or right edge of the screen until the display shifts to the extended Home screen. Position the item on the
screen, and then release it.
Note: When Edit mode is activated, the item expands and the device vibrates.
Note: To delete a folder, follow the same procedure as you would for removing a Home screen item.

Device Basics
2A. Device Basics 25
Creating and Saving a Custom Scene
Create your own custom scene and save it on your device.
1. Customize the Home screen by adding or removing widgets or application shortcuts, repositioning items,
or changing the wallpaper.
2. After customizing, press and tap Scenes.
3. On the Choose a scene options menu, select Current (unsaved) and tap Save.
4. Enter the Scene name and tap Done.
26 2B. Settings
ࡗPersonalization Settings (page 26)
ࡗSound Settings (page 27)
ࡗDisplay Settings (page 29)
ࡗLocation Settings (page 30)
ࡗMessaging Settings (page 31)
ࡗAirplane Mode (page 32)
ࡗTTY Use With Sprint Service (page 32)
ࡗSecurity Settings (page 33)
ࡗData Synchronization Settings (page 34)
ࡗSocial Network Settings (page 35)
ࡗApplication Settings (page 36)
ࡗDate & Time Settings (page 37)
ࡗLocale & Text Settings (page 37)
ࡗPower-Saving Tips (page 37)
Personalization Settings
Scenes
Selecting a Scene
Customize your device’s Home screen appearance by selecting a scene to reflect your lifestyle. Scenes are
preset Home screen layouts that you can quickly apply.
ᮣPress > , tap Scenes, and then tap a scene to apply it to the Home screen.
To save a custom scene:
ᮣCustomize the Home screen by changing the wallpaper and adding widgets, press , and then tap
Scenes > Current (unsaved) > Save. Enter the Scene name and then tap Done.
Renaming or Deleting a Scene
You can rename or delete a custom scene. To learn how to create a custom scene, see “Creating and
Saving a Custom Scene” on page 25.
1. Press > and tap Settings > Personalize > Scenes.
2. Press and hold the custom scene (under My scenes) and tap Rename or Delete.
3. Tap Rename, enter the new Scene name, and then tap Done.
– or –
Tap Delete > OK.
Tip: You can rename or delete a custom scene in the Settings screen. On the Settings screen, tap
Personalize > Scenes, and then press and hold a custom scene.
Note: You cannot rename or delete a preset scene.
2B. Settings
Settings
2B. Settings 27
Home Screen Wallpaper
See “Changing the Display Screen” for details.
Default Ring Tone
See “Phone Ring Tone” for details.
Sound Settings
Phone Ring Tone
Select a default ring tone for incoming calls.
Selecting the Default Ring Tone
Your device provides a variety of ring tones that you can set as the default ring tone of your device.
1. Press > and tap Settings > Sound & display > Phone ringtone.
2. Tap the ring tone you want to use, and then tap OK. The ring tone briefly plays when selected.
Notification Sound
Select a default sound for notifications.
Selecting the Default Notification Sound
Your device provides a variety of sounds that you can set as the default sound for notifications.
1. Press > and tap Settings > Sound & display > Notification sound.
2. Tap the sound you want to use, and then tap OK. The sound plays when selected.
Adjusting the Device’s Volume Settings
Adjust your device’s volume settings to suit your needs and your environment.
1. Press > and tap Settings > Sound & display.
2. Tap Ringer volume or Media volume.
3. Drag the volume slider on the screen to adjust the volume and then tap OK.
Note: You can use *.wav, *.mid, *.mp3, *.wma, or other types of sound files that you downloaded from the Internet or
copied from your computer as ring tones.
Note: You can adjust the ringer volume in standby mode (or the earpiece volume during a call) by using the volume
buttons on the right side of your device.
28 2B. Settings
Vibrate
To set your device to vibrate instead of making any sounds:
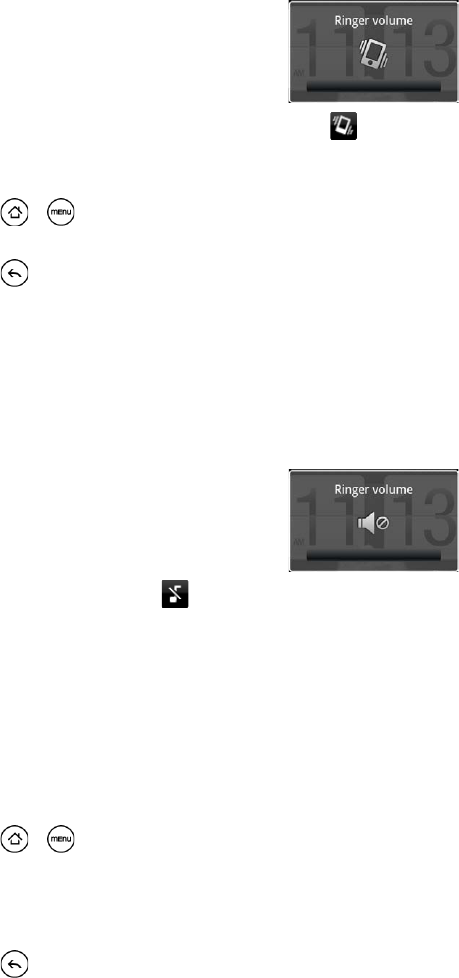
ᮣPress the volume button down in standby mode until you see the image below on the screen.
The device vibrates and the vibrate mode icon ( ) appears on the status bar.
To set your device to always vibrate in addition to any ringer settings:
1. Press > and tap Settings > Sound & display.
2. Select the Phone vibrate check box.
3. Press .
Silence All
The Silence All option allows you to mute all sounds without turning your device off.
To activate Silence All:
ᮣPress the volume button down in standby mode until you see the image below on the screen.
The Silence All mode icon ( ) appears on the status bar.
To deactivate Silence All:
ᮣPress the volume button up repeatedly to select a volume level.
Alert Notification
Set your device to alert you with an audible tone when you are not within the Sprint coverage area or when
you make an emergency call.
1. Press > and tap Settings > Sound & display.
2. Do any or all of the following:
ⅢSelect the Roaming ringtone check box.
ⅢTap Emergency tone, and then tap Alert.
3. Press .
Settings
2B. Settings 29
Enabling Touch Tones
You can set the device to play a sound when you are using the phone keypad or tapping the screen.
1. Press > and tap Settings > Sound & display.
2. Do any or all of the following:
ⅢSelect the Audible selection check box to set the device to play a sound every time you tap the screen.
ⅢTap Audible touch tones, and then tap Long tones or Short tones to set the device to play a sound when
you are using the phone keypad.
3. Press .
Display Settings
Changing the Screen Timeout Period
After a period of inactivity, the device screen turns off to conserve battery power. You can set the idle time
before the screen turns off.
1. Press > and tap Settings > Sound & display > Screen timeout.
2. Tap the time before the screen turns off.
Changing the Display Screen
Changing the device’s display screen wallpaper with preset wallpapers or your favorite photo is a quick and
easy way to change the feel of your device and give it a fresh look. Browse the collection of wallpapers
included in your device or choose from photos that you have taken with the camera. You can also change
your Home screen to use an animated wallpaper.
1. Press > and tap Wallpaper.
2. Do one of the following:
ⅢTap HTC wallpapers or Android wallpapers to use preset images.
ⅢTap Live wallpapers to choose from preset animated wallpapers.
ⅢTap Gallery to use a picture that you have captured using the camera or copied to your device as a
wallpaper. You can crop the picture before setting it as a wallpaper.
3. Tap Save or Set wallpaper.
After changing the wallpaper, remember to save it to the scene that you created or save it as a new scene.
For more information, see “Creating and Saving a Custom Scene.”
Note: Extended screen timeout periods reduce the battery’s talk and standby times.
Tip: To turn off and lock the screen quickly, press the ( ) key.
30 2B. Settings
Adjusting the Brightness
By default, the screen brightness automatically adjusts depending on the surrounding lighting conditions.
To manually adjust screen brightness
1. Press > and tap Settings > Sound & display.
2. Tap Brightness and then clear the Automatic brightness check box.
3. Drag the slider to adjust the brightness.
4. Tap OK.
Changing the Screen Orientation
By default, the screen orientation automatically changes when the device is rotated. To disable automatic
screen orientation:
1. Press > and tap Settings > Sound & display.
2. Clear the Orientation check box and press .
Recalibrating the Screen
Recalibrate the screen if you feel that the screen orientation does not respond properly to the way you hold
the device.
1. Press > and tap Settings > Sound & display > G-Sensor calibration.
2. Place the device on a flat surface and then tap Calibrate.
3. After the recalibration process, tap OK.
Location Settings
Your device is equipped with a Location feature for use in connection with location-based services.
The Location feature allows the network to detect your position. Turning Location off will hide your location
from everyone except 911.
To enable your device’s Location setting feature:
1. Press > and tap Settings > Location > Location setting.
2. Read the Location disclaimer and then tap ON.
3. Press .
When you turn the Location setting feature on, the device displays the icon on the status bar. When you
turn Location setting off, the device displays the icon.
Note: Not all application screens support automatic rotation.
The screen orientation automatically changes to landscape mode when you turn the device counterclockwise 90
degrees. If you turn the device clockwise 90 degrees, the screen orientation will not change to landscape mode.
Note: Turning Location on will allow the network to detect your position using GPS technology, making some Sprint
applications and services easier to use. Turning Location off will disable the GPS location function for all purposes
except 911, but will not hide your general location based on the cell site serving your call. No application or service
may use your location without your request or permission. GPS-enhanced 911 is not available in all areas.

Settings
2B. Settings 31
Messaging Settings
Your device’s advanced messaging capabilities let you send and receive many different kinds of text
messages without placing a voice call. (For more information, see “Accessing Email Messages” on page
122.)
Messaging settings allow you to decide how you would like to be notified of new messages and create your
own preset messages.
Setting Message Notification
When you receive a message, your device notifies you by displaying an icon on your display screen. You
can also choose to vibrate the device and have the screen flash when you receive a message.
To display a notification and vibrate the device when you receive a message:
1. Press and tap > Messages.
2. Press and then tap Settings.
3. Scroll down the screen and select the Play notification sound and Vibrate check boxes.
4. Press .
To flash the screen when you receive a message:
1. Press > and tap Settings > Sound & display > Notification flash.
2. Select the SMS/MMS check box and then press .
Managing Preset Messages
Your device is loaded with nine preset messages to help make sending text messages easier. Customize or
delete these messages, such as “Where are you?,” “Let’s catch up soon,” and “Just checking in” to suit your
needs, or add your own messages to the list.
To edit or delete a preset message:
1. Press and tap > Messages > New message.
2. Tap the text box with the text “Tap to compose.”
3. Press and tap Quick text. (You will see the list of preset messages.)
4. Press and:
Tap Edit, tap the message you want to edit, edit the message (see “Entering Text” on page 19),
and then tap .
– or –
Tap Delete, select the message you want to delete, and tap OK. (Tap Cancel to cancel the deletion.)
To add a new preset message:
1. Press and tap > Messages > New message.
2. Tap the text box with the text “Tap to compose.”
3. Press and tap Quick text. (You will see the list of preset messages.)
4. To add a new message, press and tap Insert.
5. Enter your message and tap . (Your new message will be added to the beginning of the list.)
Note: Tap Notification sound to choose a notification sound.
32 2B. Settings
Airplane Mode
Airplane Mode allows you to use many of your device’s features, such as Gallery, camera, and Music, when
you are on an airplane or in any other area where making or receiving calls or data is prohibited. When you
set your device to Airplane Mode, it cannot send or receive any calls or access online information.
To quickly turn Airplane Mode on or off:
ᮣPress and hold the power button ( ), and then tap Airplane mode in Phone options.
While in Airplane Mode, the status bar will display .
To turn Airplane Mode on or off in Settings:
1. Press > and tap Settings > Wireless & networks.
2. Select the Airplane mode check box and press .
While in Airplane Mode, the status bar will display .
TTY Use With Sprint Service
A TTY (teletypewriter, also known as a TDD or Text Telephone) is a telecommunications device that allows
people who are deaf, hard of hearing, or who have speech or language disabilities, to communicate by
telephone.
Your device is compatible with select TTY devices. Please check with the manufacturer of your TTY device to
ensure that it supports digital wireless transmission. Your device and TTY device will connect using a special
cable that plugs into your device’s headset jack. If this cable was not provided with your TTY device, contact
your TTY device manufacturer to purchase the connector cable.
When establishing your Sprint service, please call Sprint Customer Service using the state
Telecommunications Relay Service (TRS) by first dialing . Then provide
the state TRS with this number: 866-727-4889.
To turn TTY Mode on or off:
1. Press > and tap Settings > Call > TTY mode.
2. Tap TTY Full, TTY HCO, or TTY VCO to turn TTY mode on.
– or –
Tap TTY Off to turn TTY mode off.
Note: When enabled, TTY mode may impair the audio quality of non-TTY devices connected to the headset jack.
WARNING: 911 Emergency Calling
Sprint recommends that TTY users make emergency calls by other means, including Telecommunications
Relay Services (TRS), analog cellular, and landline communications. Wireless TTY calls to 911 may be
corrupted when received by public safety answering points (PSAPs), rendering some communications
unintelligible. The problem encountered appears related to TTY equipment or software used by PSAPs. This
matter has been brought to the attention of the FCC, and the wireless industry and the PSAP community are
currently working to resolve this.
Settings
2B. Settings 33
Security Settings
Protecting Your Device with a Screen Lock
You can increase the security of your device by creating a screen unlock pattern. When enabled, you have to
draw the correct unlock pattern on the screen to unlock the device’s control keys and buttons
and touch screen.
To create and enable the screen unlock pattern:
1. Press > and tap Settings > Security > Set unlock pattern.
2. Read the information on the screen and tap Next.
3. Study the example pattern on the screen, and then tap Next.
4. Draw the screen unlock pattern by connecting at least four dots in a vertical, horizontal or diagonal
direction. Lift your finger from the screen when finished.
5. The device records the pattern. Tap Continue.
6. When prompted, draw the screen unlock pattern again, and then tap Confirm.
When you fail to draw the correct unlock pattern on the screen after five attempts, you will be prompted to
wait for 30 seconds before you can try again.
Updating Your Device’s System Software
From time to time, system software updates for your device may be available. Your device can automatically
check and then notify you if an update is available. You can then download and install the update to your
device. Depending on the type of update, the update may erase all your personal data and customized
settings, and also remove any programs you have installed. Make sure that you have backed up the
information and files you want to keep.
To check for phone system software updates manually
1. Press > and then tap Settings > System updates > HTC software update.
2. On the System software updates screen, tap Check now.
Note: You must slide your finger on the screen to create the pattern and not tap individual dots.
Tip: Clear the Use visible pattern check box if you do not want the unlock pattern to display on the screen when you
unlock it.
If you want to disable the unlock screen pattern, clear the Require pattern check box. You will be prompted to
draw the unlock screen pattern.
Note: To change your unlock screen pattern, press > , and then tap Settings > Security >
Change unlock pattern.
Note: Checking and downloading system software updates may incur additional data transfer fees.
34 2B. Settings
Resetting Your Device
Resetting the device deletes all data, including downloaded applications, and resets the device back to its
initial state—the state before you turned on the device for the first time.
ᮣPress > and tap Settings > Privacy > Factory data reset > Reset phone.
To reset the device using the device keys:
1. With the device turned off, press and hold the volume down button (located at the right panel of the
device), and then press the power button.
2. When the device’s display turns on, release the volume down button.
3. Use the volume buttons to select CLEAR STORAGE, and then press the power button. (All data will be
deleted from the device.)
Security Features for Data Services
Enabling and Disabling Data Services
You can disable data services without turning off your device; however, you will not have access to all data
services, including Web and messaging. Disabling data services will avoid any charges associated with
these services. While signed out, you can still place or receive phone calls, check voicemail, and use other
voice services. You may enable data services again at any time.
To enable or disable data services:
1. Press > and tap Settings > Wireless & networks.
2. Select the Mobile network check box to enable data services.
– or –
Clear the Mobile network check box to disable data services
Data Synchronization Settings
Synchronizing Google Apps
Your device’s Google Apps™, such as Gmail, Calendar, and Contacts, give you access to the same personal
information (emails, events, and contacts) that you add, view, and edit on your computer using Gmail or
Calendar. Synchronize the Google Apps you want to keep information up-to-date.
To select which Google Apps to synchronize:
1. Press > and then tap Settings > Accounts & sync.
2. Tap Google.
3. Select the Google Apps you want to synchronize.
Important: Make sure to back up important data you have on the device before you reset it.
Note: You need to be signed in to your Google account to synchronize Google Apps.
Tip: Select the Auto-sync check box to automatically synchronize all applications. When the Auto-sync check box is
cleared, you can synchronize individual applications manually by selecting their respective check boxes.
Settings
2B. Settings 35
To stop synchronization:
ᮣWhen the device is synchronizing, tap Cancel sync to stop synchronization.
Synchronizing Exchange ActiveSync
You can synchronize your device with your company’s Microsoft Exchange Server to let you access your
your device’s Exchange Server account’s email, contacts, and calendar events.
To select which Exchange ActiveSync items to synchronize:
1. Press > and tap Settings > Accounts & sync > Exchange ActiveSync.
2. Select the Exchange ActiveSync items you want to synchronize.
To change the synchronization schedule:
1. Press > and tap Settings > Accounts & sync > Exchange ActiveSync > Schedule.
2. Tap the time interval the device will check for new data.
To manually start synchronization:
ᮣOn the Microsoft Exchange ActiveSync screen, tap Sync now.
To change account settings:
1. Press > and tap Settings > Accounts & sync > Exchange ActiveSync > Account settings.
2. Change the general settings, mail, and calendar settings according to your preference.
3. Press .
Social Network Settings
Logging in to and Synchronizing Your Social Network Accounts
If you have set up a Facebook for HTC Sense, Flickr, or Twitter account when you first turn on your device,
you can quickly login and synchronize information such as status messages and friends list between your
device and your social network accounts on the Web.
To log in to your Facebook or Twitter account:
1. Press > and tap Settings > Accounts & sync.
2. Tap Facebook for HTC Sense or Twitter.
3. Enter your username and password and then tap Sign in.
To log in to your Flickr account:
1. Press > and tap Settings > Accounts & sync.
2. Tap Add account > Flickr.
3. Enter your Yahoo! ID and password and tap Sign in.
4. Follow the screen instructions to log in to your Flickr account.
Note: You need to have an Exchange ActiveSync account set up on your device. See “Email” on page 122.
Note: You need to have an existing Facebook, Flickr, or Twitter account.
36 2B. Settings
To synchronize your Facebook or Twitter account:
1. Press > and tap Settings > Accounts & sync.
2. Tap Facebook for HTC Sense or Twitter.
3. Tap Sync now.
To remove a social network account:
1. Press > and tap Settings > Accounts & sync.
2. Tap the account you want to remove.
3. Tap Remove account.
Application Settings
Allowing Third-Party Programs to be Installed
By default, you can only install programs and games downloaded from Android Market™.
To install third-party programs on the device:
ᮣPress > , tap Settings > Applications, and then select the Unknown sources check box.
To uninstall third-party programs on the device:
You cannot uninstall programs that are preinstalled on the device.
1. Press > and tap Settings > Applications > Manage applications.
2. On the Manage applications screen, tap the application you want to uninstall.
3. On the Application info screen, tap Uninstall.
Clearing Application Cache and Data
Free up storage space and device memory by deleting application cache and data.
1. Press > and tap Settings > Applications > Manage applications.
2. In the Manage applications list, tap the application whose cache or data you want to delete.
3. In the Application info screen, tap Clear data or Clear cache.
Tip: On the Social Networks screen, press and tap Log out all to log out from all the social network accounts.
Tip: Press to bring up sort and filter options.

Settings
2B. Settings 37
Date & Time Settings
Setting Local Date, Time Zone, and Time
By default, your device automatically uses the network-provided date, time zone, and time. However, you can
set the date, time zone, and time manually if you need to.
1. Press > and tap Settings > Date & time.
2. Clear the Automatic check box.
3. Tap Set date. On the Change date window, adjust the date by scrolling the date wheel. Tap Done when
finished.
4. Tap Select time zone, and then select the time zone in the list. Scroll down the list to view more time
zones.
5. Tap Set time. On the time window, adjust the time by scrolling the time wheel. Tap Done when finished.
6. Select the Use 24-hour format check box to toggle between using a 12-hour or 24-hour format.
7. Tap Select date format, and then select how you want dates to display on your device. The selected date
format also applies to the date displayed in the Alarm Clock.
Locale & Text Settings
Setting Onscreen Keyboard Settings
8. Press > and tap Settings > Language & keyboard > Touch Input. (See “Adjusting Touch Input
Settings” on page 21 for details.)
Power-Saving Tips
Adjusting the Display Brightness and Screen On-Time
ⅷPress > , tap Settings > Sound & display > Brightness, and then modify the backlight setting as
desired. For more information, see “Display Settings.”
– or –
Add the Power Control widget to the home screen to easily adjust the screen brightness.
Press and then tap > Add to Home > Widget > Power Control.
ⅷSet a shorter time before the screen turns off when the device is idle. Press > , tap Settings >
Sound & display > Screen timeout, and then select a timeout value.
ⅷTo turn off the screen, press the power button. The device will continue to function.
38 2B. Settings
Managing Your Device’s Wireless Functions
Disable the 4G, Sprint Mobile Hotspot, Wi-Fi, Bluetooth, and GPS functions of the device when not in use.
ᮣPress > , and then tap Settings > Wireless & networks. Disable any wireless functions (for example,
Bluetooth or Wi-Fi) that are not in use.
– or –
ᮣAdd a Bluetooth, GPS, and Wi-Fi widget to the home screen. Press and then tap >
Add to Home > Widget > Settings.
Setting the Email Synchronization Schedule
If you use the device to send and receive email, you can set your email account to download email more or
less frequently as desired.
1. Press and tap > Mail.
2. If you have set up multiple email accounts on your device, switch to the email account that you want to
edit by tapping .
3. In the Inbox, press and tap More > Settings > Send & Receive > Schedule.
4. In the Frequency section, tap Peak times or Off-peak times, and then select an email download frequency.
|
Note: The more frequently your device checks for new messages, the more quickly the battery will run down.
Tip: You can also close applications that are not in use to conserve battery power. To do so, you will need to download
and install a third-party application called a task manager from the Android Market. For more information, see
“Downloading Applications and Games From Android Market” on page 136.
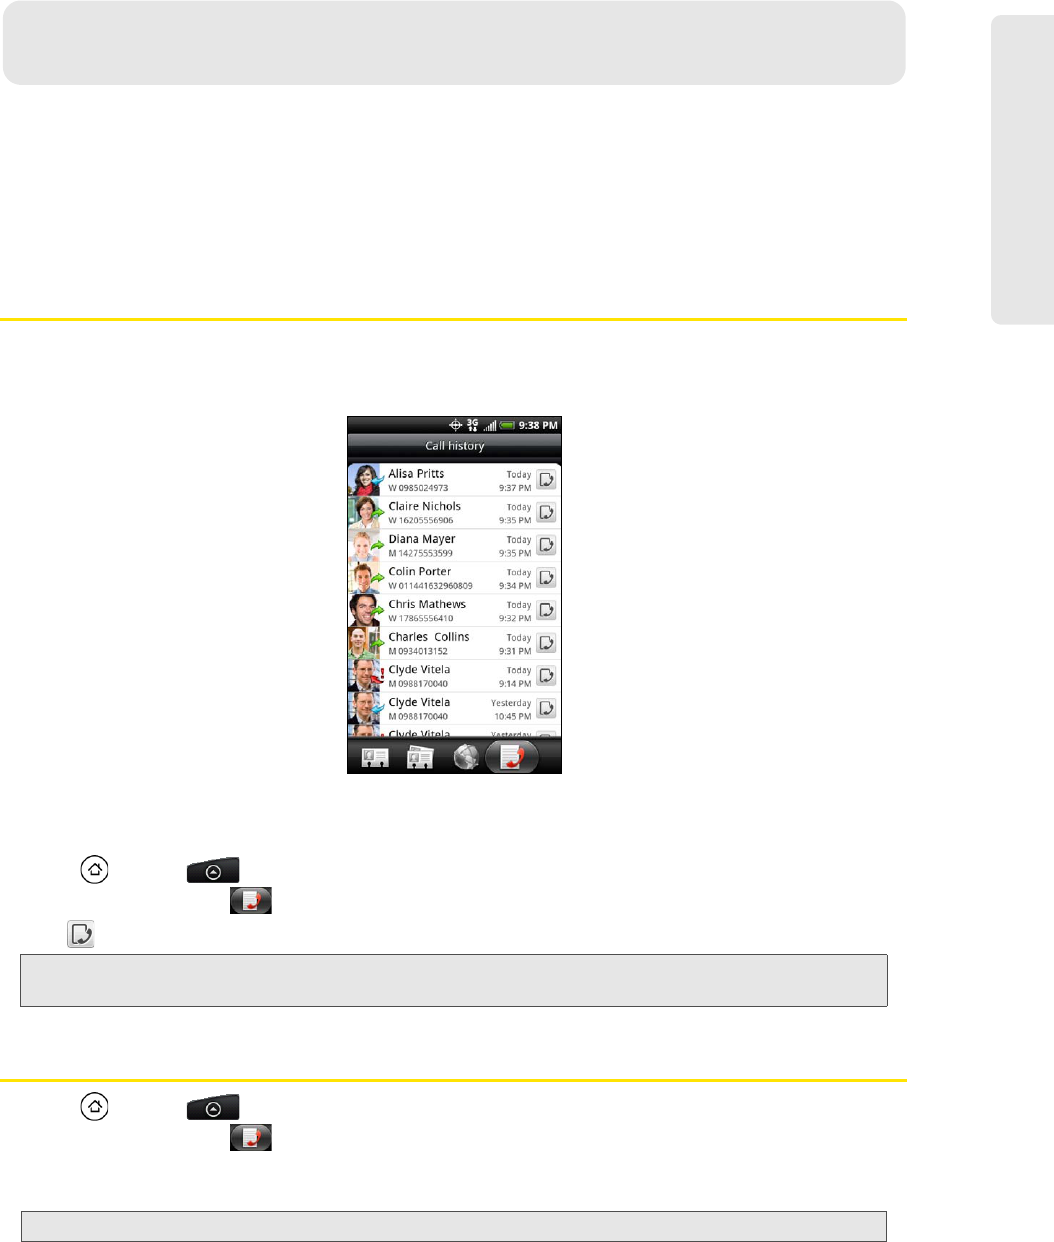
History
2C. History 39
ࡗViewing History (page 39)
ࡗMaking a Call From History (page 39)
ࡗSaving a Number From History (page 40)
ࡗPrepending a Number From History (page 40)
ࡗErasing History (page 40)
Viewing History
History is a list of phone numbers (or People entries) for calls you placed, accepted, or missed. History
makes redialing a number fast and easy. It is continually updated as your device automatically adds new
numbers to the beginning of the list.
Each entry contains the phone number (if it is available) and People entry name (if the number is in People).
Duplicate calls (same number and type of call) may only appear once on the list.
1. Press and tap > People.
2. Tap the Call history tab .
3. Tap at the right side of a number of contact to view the call history for that number or contact.
Making a Call From History
1. Press and tap > People.
2. Tap the Call history tab .
3. Tap an entry on the Call history list to place a call to that entry.
Note: History records only calls that occur while the device is turned on. If a call is received while your device is turned off,
it will not be included in history.
Note: You cannot make calls from History to entries identified as No ID or Restricted.
2C. History
40 2C. History
Saving a Number From History
If the phone number of a person who called is not in People, you can choose to save the number after you
hang up.
1. Press and tap > People.
2. Tap the Call history tab .
3. Press and hold the received call and then tap Save to contacts on the options menu.
4. The phone number is automatically added to the Mobile box in the Number section. Enter the name and
other contact information.
5. Scroll down the screen and tap Save.
After you have saved the number, your device displays the new People entry. (See “Displaying an Entry in
People” on page 45.)
Prepending a Number From History
If you need to make a call from History and you are outside your local area code, you can add the
appropriate prefix by prepending the number.
1. Press and tap > People.
2. Tap the Call history tab .
3. Press and hold the entry you want to call and tap Edit number before calling.
4. Enter the prefix and tap to call the number.
Erasing History
To erase a History entry:
1. Press and tap > People.
2. Tap the Call history tab .
3. Press and hold the entry you want to delete and tap Delete from call history.
To erase all History entries:
1. Press and tap > People.
2. Tap the Call history tab .
3. Press and tap Delete all.
Tip: Press and hold an entry in the Call history list to open the options menu where you can select to view the contact
information (if number is stored in People), edit the number before you redial, send a text message, or delete the
entry from the Call history list.
Tip: To store the number as another type (for example, home number), tap the Mobile button.
Note: You cannot save phone numbers already in People or from calls identified as No ID or Restricted.

People
2D. People 41
ࡗAbout People (page 41)
ࡗUsing the People Screen (page 42)
ࡗAdding a New People Entry (page 43)
ࡗSaving a Phone Number (page 44)
ࡗUsing the Contact Details Screen (page 44)
ࡗMerging Entries in People (page 45)
ࡗEditing an Entry in People (page 45)
ࡗFinding Entries in People (page 47)
ࡗBacking Up and Importing Entries in People (page 48)
ࡗWorking with Groups (page 48)
ࡗUsing the People Widget (page 49)
ࡗConnecting with Your Social Networks (page 50)
ࡗUsing Friend Stream (page 52)
About People
In People, you can easily manage your communications with contacts through phone, messaging, and
email. You can also view updates on their Facebook, Flickr, and Twitter accounts.
If you are synchronizing contacts with your Google account, with your PC, or with an Exchange Server, any
contacts stored in those accounts are displayed in People. You can also synchronize contacts from your
Facebook account in People.
Ways of Getting Contacts Into Your Device
You can add contacts to your device from:
ⅢGmail contacts that are imported to your device after you set up a Google Account.
(For more information, see “Gmail” on page 126 for details.)
ⅢPhone contacts (For more information, see “Adding a New People Entry” for details.)
ⅢExchange ActiveSync Server (For more information, see “Email” on page 122 for details.)
ⅢContacts on your computer (For more information, see “HTC Sync” on page 65 for details.)
ⅢFacebook (For more information, see “Your Contacts List” for details.)
To open People:
ᮣPress and tap > People. (You may need to scroll down the screen to see the icon.)
2D. People
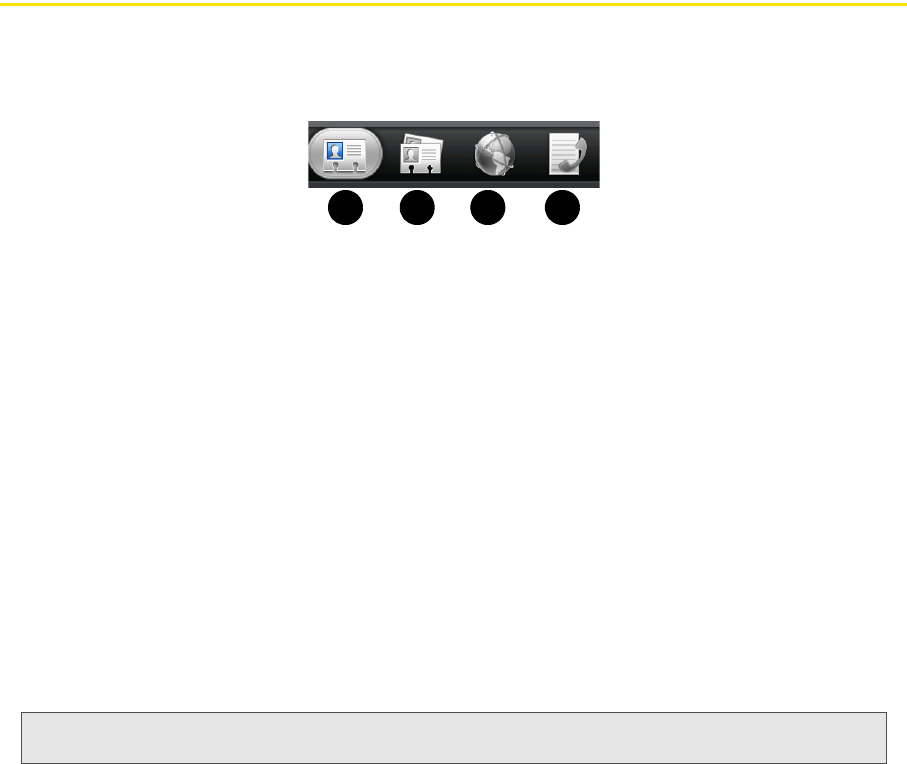
42 2D. People
Using the People Screen
The People screen gives you easy access to all your contacts, as well as even faster access to the people
and groups of people you contact most often.
The People screen has the following tabs:
1. All gives you access to all contacts on your device, including Google contacts, Exchange ActiveSync
contacts, Phone contacts, and Facebook contacts. You can also use this tab to open or update My
contact card. For more information, see “Setting Up My Contact Card” in this chapter.
2. Groups lets you assign contacts to groups so you can easily send an SMS, MMS, or email message to a
whole group. (For more information, see “Working with Groups” for details.)
3. Online directories lets you search for contacts on your online directories such as your Exchange
ActiveSync or Facebook account to copy to your device. (For more information, see “Connecting with
Your Social Networks.”)
4. Call history lists all your dialed numbers and received and missed calls. (See “History” on page 39 for
details.)
Setting Up My Contact Card
My contact card provides a convenient way to store your personal contact information so that you can easily
send it using MMS, email, or Bluetooth.
To set up My contact card:
1. On the All tab of the People screen, tap Me.
2. Enter your name and contact details.
3. Tap Save.
Tip: If you are logged in to your Facebook account through Facebook for HTC Sense, instead of Me, you will see the
name you use in Facebook.
1 2 3 4
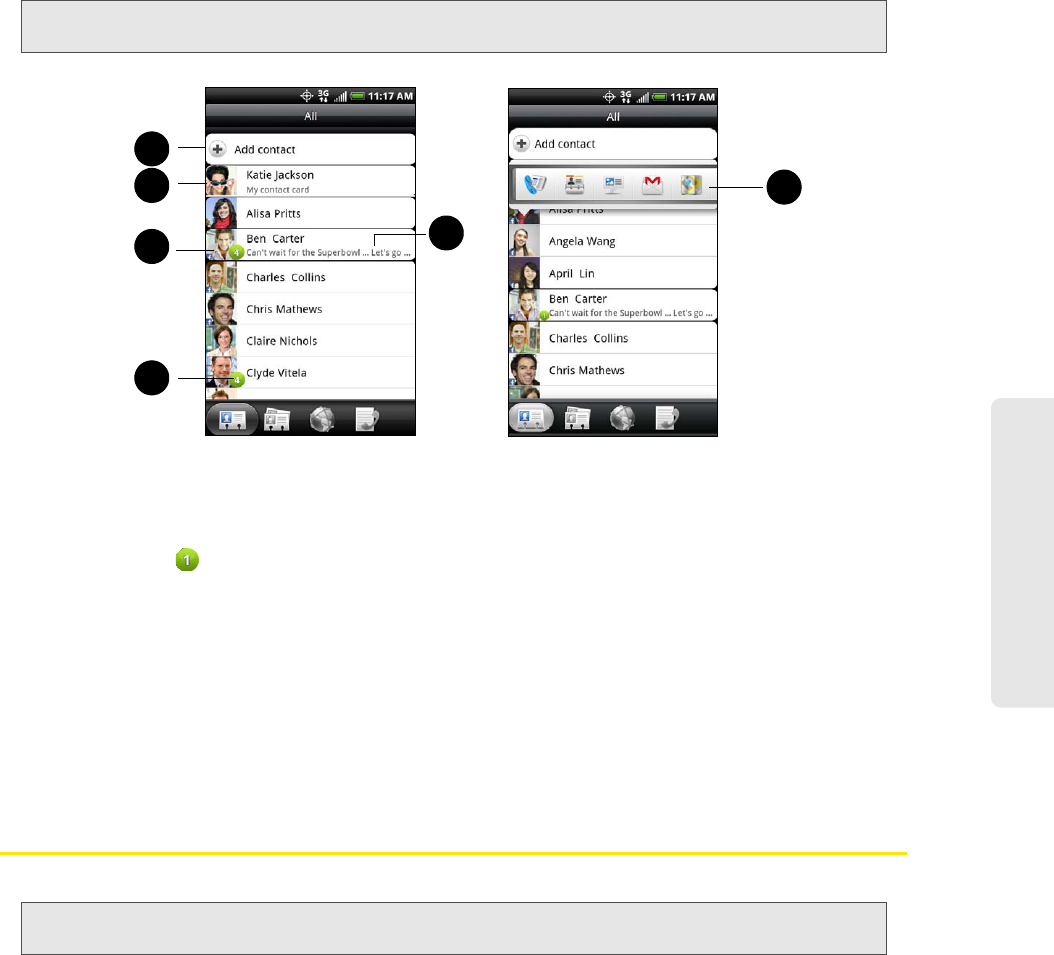
People
2D. People 43
Your Contacts List
The All tab of the People screen shows all your contacts, including Google contacts, Exchange ActiveSync
contacts, Phone contacts, and Facebook contacts.
1. Add a contact.
2. Edit or update My Contact Card.
3. Tap a contact to open the contact details for that contact.
4. The green icon ( ) appears when the contact:
ⅢHas sent you a new text or email message, or tried to call you but you missed the call.
ⅢHas updated his or her Facebook profile or has added photos on Flickr or Facebook.
ⅢHas upcoming Facebook events.
5. The Facebook status appears when you link the contact to their Facebook account.
6. Tap the photo or icon to open a menu where you can quickly choose how to communicate with the
contact. Depending on the contact information stored, you can call, send a message or email, see the
contact’s Facebook profile, and locate the contact’s address in Google Maps.
Adding a New People Entry
1. On the All tab, tap Add contact at the top of the screen.
2. Tap the Name box, enter the first and last name of the contact, and choose the order in which to display
the names. Tap OK.
3. Enter the contact information in the boxes provided.
4. Scroll to the bottom of the screen and tap Save.
After saving the number, your device displays the new entry in the contacts list.
Note: If you signed in to your Google Account and Facebook account when you first set up the device, your contacts from
those accounts will appear in the contacts list when you open People.
Note: If you have set up a Google Account or an Exchange ActiveSync email account, the Contact type option appears to
determine which account the contact will sync with.
2
3
1
4
5
6
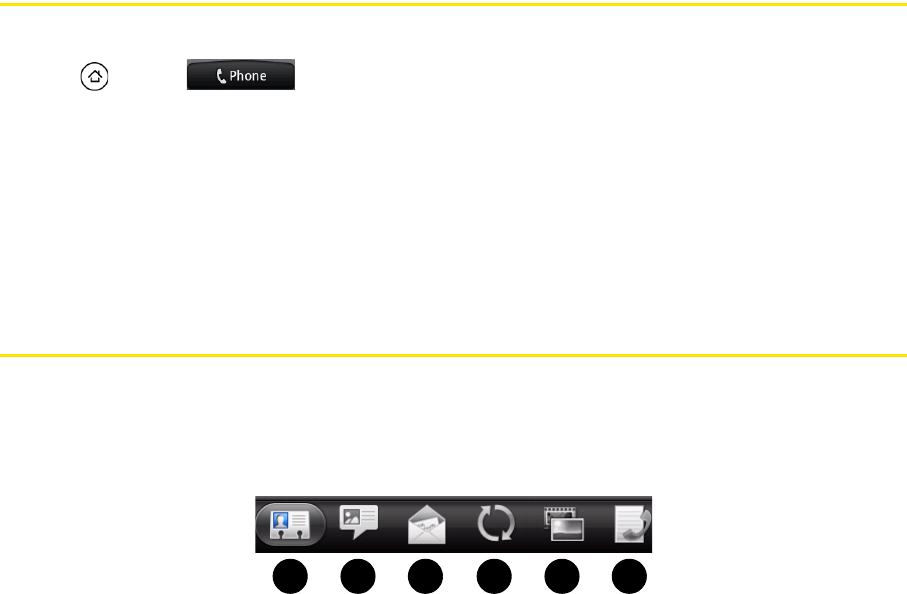
44 2D. People
Saving a Phone Number
To save a number from standby mode:
1. Press and tap .
2. Enter the phone number by tapping the keys on the keypad.
3. Tap Save to People. (This button appears after tapping six digits.)
4. Tap Add contact or Save to existing contact.
5. Use the keyboard to enter the new contact name and tap Save to save the new entry.
– or –
Tap an existing contact name and tap Save to save the new number.
Using the Contact Details Screen
When you tap a contact on the People screen, the Contact Details screen opens, showing you the
information stored for that contact, exchanged messages and phone calls with that contact, Facebook
notifications, and more.
The Contact Details screen has the following tabs:
1. Details shows the information you have stored for the contact, and allows you to get in touch with the
contact directly by tapping any of the displayed methods. For example, if the contact has a stored work
phone number, tap Call Work to call that number. You can also add one of the contact’s phone numbers
as a speed dial number. For more information, see “Speed Dialing” on page 19.
2. Messages shows your exchanged SMS messages with the contact. Tap a message to view it. To send a
new message, tap New message. For more information about messages, see “Text Messaging (SMS) and
Multimedia Messaging (MMS)” on page 102.
3. Mail shows email messages you have received from the contact. Tap an email message to view it.
To send a new email, tap New mail. For more information about email, see “Email” on page 122.
4. Updates and events shows the contact’s Facebook status, updates, and events, and shows when he or
she uploads new photos to Flickr. When there is a notification of the contact’s birthday, you can tap the
notification to call the contact directly or send a message greeting.
5. Gallery shows the contact’s Facebook and Flickr photo albums. For more information, see “Viewing
Photos in Your Social Networks.”
6. Call history lists all your incoming, outgoing, and missed calls to and from the contact. Tap a list item to
call the contact using the displayed number.
21 53 4 6
People
2D. People 45
Merging Entries in People
Merge duplicated entries in People to avoid clutter and confusion. If you have the same contact appear in
your Phone, Google, and Facebook accounts, you can merge the contact information into one entry.
The device automatically merges entries that it finds to have similar data. If you need to manually merge
entries or break the link between entries, follow the procedures below.
Manually Merging Entries in People
1. Press and tap > People.
2. On the All tab, tap the entry (not the icon or photo) you want to merge with another entry on your device.
3. On the upper right corner of the screen, tap or (if there are suggested links.)
4. On the screen, you can:
ⅢIf there are suggested links, tap to link the entry to the selected account.
ⅢTap one of the options available in the Add contact section.
5. Tap Done.
Breaking the Contact Information Link Between Entries
1. Press and tap > People.
2. On the All tab, tap the entry (not the icon or photo) whose contact information link you want to break.
3. On the upper right corner of the screen, tap .
4. On the Linked contacts section, tap beside the entry to break the link.
5. Tap Done.
Editing an Entry in People
Displaying an Entry in People
ᮣPress and tap > People, and then tap an entry.
Adding a Number to an Entry in People
1. Display an entry in People. (See “Displaying an Entry in People” for details.)
2. Scroll down the screen and tap Edit.
3. Scroll down the screen and tap Add > Phone.
4. Tap the type of phone number you want to add. (For example, Home or Work.)
5. Enter the phone number and tap Save. (Scroll down the screen to see the Save button.)
Editing an Entry in People
1. Display an entry in People. (See “Displaying an Entry in People” for details.)
2. Scroll down the screen and tap Edit.
3. Under the Phone section, tap the number you want to edit.
4. Edit the number using the keypad.
46 2D. People
5. Tap Save. (Scroll down the screen to see the Save button.)
Selecting a Ringer Type for an Entry
Assign a ringer type to an entry in People so you can identify the caller by the ringer type.
(See “Sound Settings” on page 27.)
1. Display an entry in People. (See “Displaying an Entry in People” for details.)
2. Scroll down the screen, and then tap Ringtone.
3. Select a ring tone (the ring tone plays back) from the menu and tap OK.
Assigning a Picture to an Entry
Assign a picture to display each time a certain contact calls you.
1. Display an entry in People. (See “Displaying an Entry in People” for details.)
2. Scroll down the screen and tap Edit.
3. Tap at the top-left corner of the screen.
4. Tap Gallery or Camera.
ⅢIf you selected Gallery, select an album to find the picture, tap the picture you want to use, crop the
picture, and tap Save.
ⅢIf you selected Camera, the camera will launch and you will use it to take a new picture.
(See “Camera and Multimedia” on page 75.)
5. Tap Save. (Scroll down the screen to see the Save button.)
Adding an Email Address to an Entry
1. Display an entry in People. (See “Displaying an Entry in People” for details.)
2. Scroll down the screen and tap Edit.
3. Under the Email section, tap the box after .
4. Enter the email address and tap Save. (Scroll down the screen to see the Save button.)
Adding Additional Information to an Entry
You can add additional information to an entry in People.
1. Display an entry in People. (See “Displaying an Entry in People” for details.)
2. Scroll down the screen and tap Edit.
3. Scroll down the screen and tap Add.
4. Tap the type of information you want to add such as Phone, Email, or Postal address.
Tip: Tap the Number type (for example, ), to change the type of number.
Tap X at the right side of a number to delete it.
People
2D. People 47
Sending an Entry as a vCard Using MMS
1. Press and tap > People.
2. On the All tab, press and hold the name of the contact (not the icon or photo) whose contact information
you want to send, and then tap Send contact as vCard.
3. Select the type of information you want to send, and then tap Send.
4. Enter the recipient’s number or email address, and then tap Send.
You can also send the vCard using Bluetooth. To learn how to send files through Bluetooth, see “Bluetooth”
on page 94.
Deleting an Entry
1. Press and tap > People.
2. Tap a contact you wish to delete.
3. Press and then tap Delete.
4. Tap OK to confirm the deletion.
Deleting Multiple Entries
1. Press and tap > People.
2. On the All tab, press , and then tap Delete.
3. Select the entries you want to delete, and then tap Delete.
4. Tap OK to confirm the deletions.
Finding Entries in People
Finding Contacts by Name
1. Press and tap > People.
2. Scroll through all the entries.
– or –
Press and enter the first letter or letters of a name (such as “dav” for “Dave”). (The more letters you
enter, the more your search narrows.)
3. To display an entry, tap an entry.
4. To dial the entry’s default phone number (Primary), tap the number under Action.
Finding Group Entries
1. Press and tap > People.
2. Scroll to the Groups tab.
3. Scroll through the group titles. To display entries belonging to a group, tap the group name.
4. To display an entry within the group, tap the entry.
5. To dial the entry’s default phone number (Primary), tap the number under Action.
See “Working with Groups” for more details.
Note: You cannot send a vCard using SMS.
48 2D. People
Backing Up and Importing Entries in People
Backing Up People Entries to the Storage Card
1. Press and tap > People.
2. Press , and then tap Import/Export > Export to SD card.
3. When asked to confirm, tap OK.
Importing Entries From the Storage Card
You can only import contacts that were exported to the storage card using the Export to SD card feature on
the device. See “Backing Up People Entries to the Storage Card”.
1. Press and tap > People.
2. Press , and then tap Import/Export > Import from SD card.
3. If you have Google or Exchange ActiveSync accounts set up on your device, tap the type for the
imported contacts.
Working with Groups
On the Groups tab, you can assign contacts to groups so you can easily send SMS, MMS, or email
messages to a whole group. You can also sync your device’s groups with the groups in your Google
account, accessible using your computer’s Web browser.
Creating a Group and Adding Entries
1. Press and tap > People > Groups tab > Add group.
2. Enter a name for the group and tap Add contact to group.
3. Select the entries you want in the group. You can use the search bar to search for entries quickly.
4. Tap Save.
Adding or Removing Entries From a Group
1. Press and tap > People > Groups tab.
2. Press and hold a group and tap Edit group.
3. To add entries to the group, tap Add contact to group, tap the entries you want to add, and tap Done.
– or –
To remove entries from the group, tap at the right side of the entry you want to remove.
4. Tap Save. (Tap to close the keyboard if you do not see the Save button.)
Tip: Press to stop importing contacts from the storage card.

People
2D. People 49
Sending a Text or Multimedia Message to All Entries in a Group
1. Press and tap > People > Groups tab.
2. Tap the group you want to send a message to.
3. Go to the Group action tab, and then tap Send group message to send a message to the group.
For instructions on composing and sending your message, see “Composing Text Messages” on page 102.
Sending an Email Message to All Entries In a Group
1. Press and tap > People > Groups tab.
2. Tap the group you want to send an email to.
3. Go to the Group action tab, and then tap Send group mail to send an email to the group.
4. Tap Compose to use Gmail to send the email message. (You need to be signed in to your Google
account to use Gmail.)
– or –
Tap Mail to use your Exchange ActiveSync or POP3/IMAP email account to send the email message.
(You need to have an email account set up on your device.)
For instructions on composing and sending your message, see “Composing and Sending Email” on page 123.
Deleting a Group
1. Press and tap > People > Groups tab.
2. Press and hold a group and tap Delete group.
Using the People Widget
Put the group of people you contact most right on the Home screen of your device by adding them as the
People widget. Using the People widget, you can instantly place a call, send a message, or view details of a
favorite contact with a single tap.
Adding the People Widget
1. Press and tap > Widget > People.
2. Choose the widget style, and then tap Select.
3. Select the group you want to add as a widget.
4. Drag the widget to a blank Home screen, and then release.
Setting the Default Communication Method
1. Press , and then go to the People widget.
2. Tap a contact on the widget.
3. On the Select default action screen, tap the communication method you want for the contact.
Note: You will be charged per group member for each message sent. For example, if you send a message to a group of
five people, you will be charged for five messages.
Tip: The People widget requires a whole screen.
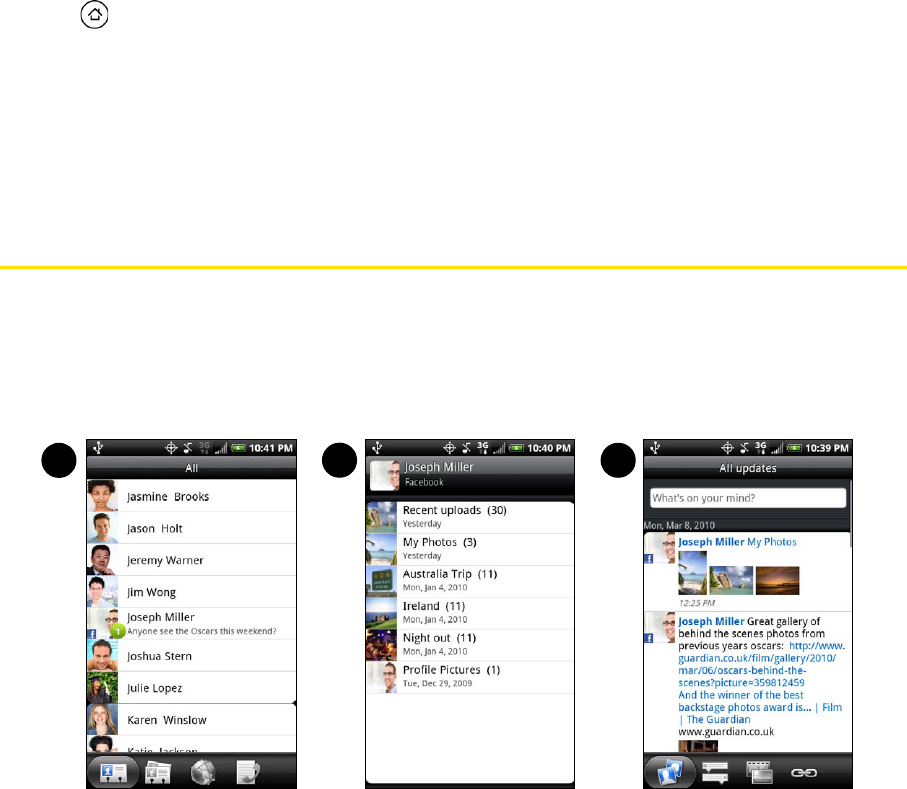
50 2D. People
Changing the Default Communication Method
If you want to change the default action for communicating with a contact on the People widget, you must
first remove this contact from the group. Add this contact back to the group, and then choose the new
communication method.
1. Remove the contact from the group. See “Adding or Removing Entries From a Group” on page 48 for
details.
2. Add the contact back to the group. See “Adding or Removing Entries From a Group” on page 48 for
details.
3. Choose the default communication method See “Setting the Default Communication Method” for details.
Getting In Touch with a Contact
1. Press , and then go to the People widget.
2. Do any of the following:
ⅢTap a contact’s icon or photo on the widget. The default communication method will be performed.
If you have not set a default communication method, the Select default action screen will open.
See “Setting the Default Communication Method” for details.
ⅢTap the name of the contact to open the contact details screen. On the contact details screen, choose
how you want to communicate with the contact by tapping an option under Action.
Connecting with Your Social Networks
Facebook for HTC Sense
View your Facebook® updates in supported applications on the device. See “Logging in to and
Synchronizing Your Social Network Accounts” on page 35 to learn how to sign in to Facebook for HTC Sense.
After signing in to Facebook for HTC Sense, you can:
1. Download your Facebook contacts and their contact details to People on your device. Your Facebook
contacts’ status updates display on your contacts list.
2. Browse through Facebook photo albums in Gallery. For more information, see “Viewing Photos in Your
Social Networks” on page 83
132
Gallery
People Friend Stream
People
2D. People 51
3. Read Facebook status updates in Friend Stream. For more information, see “Using Friend Stream”.
Updating Your Facebook Status
1. Press and tap > People > All tab.
2. Tap Me or [Your Name] > Facebook.
3. Enter your status in the “What’s on your mind” text box and tap Share.
Synchronizing Facebook for HTC Sense
See “Social Network Settings” on page 35.
Changing Facebook for HTC Sense Update Settings
1. Press > and tap Settings > Accounts & sync.
2. Tap Facebook for HTC Sense.
3. Tap Account settings > Update schedule, and then select the time interval.
Facebook for Android
The Facebook® application on your phone lets you keep up and stay close with your friends in Facebook.
It offers most of the features that you are familiar with when using Facebook on your computer.
If you have more than one Facebook account, you can sign in to the Facebook application using your other
Facebook account.
Opening Facebook
1. Press and then tap > Facebook.
2. If this is your first time to use Facebook, follow the onscreen instructions to sign into your Facebook
account. Your Facebook profile is then displayed on the screen.
3. Press to go to the Facebook home screen and access other functions.
With the Facebook application, you can:
ⅢShare your thoughts and check other people’s status updates.
ⅢView your friends list and write on someone’s wall.
ⅢComment on and like a friend’s post.
ⅢView someone’s personal information, including photo albums.
ⅢCheck your Facebook notifications.
ⅢTake a photo and upload it straight to your Facebook account.
Adding the Facebook Widget
Add the Facebook widget to the Home screen to let you quickly share your thoughts and view your friends’
status updates.
1. Press and then tap > Widget > Facebook.
2. Choose the widget style, and then tap Select.
3. Drag the widget to a blank space on the Home screen, and then release.
Note: While on the Facebook home screen, press , and then tap Settings to set refresh and notification options.
On some Facebook screens, you can press and hold an item to open an options menu.
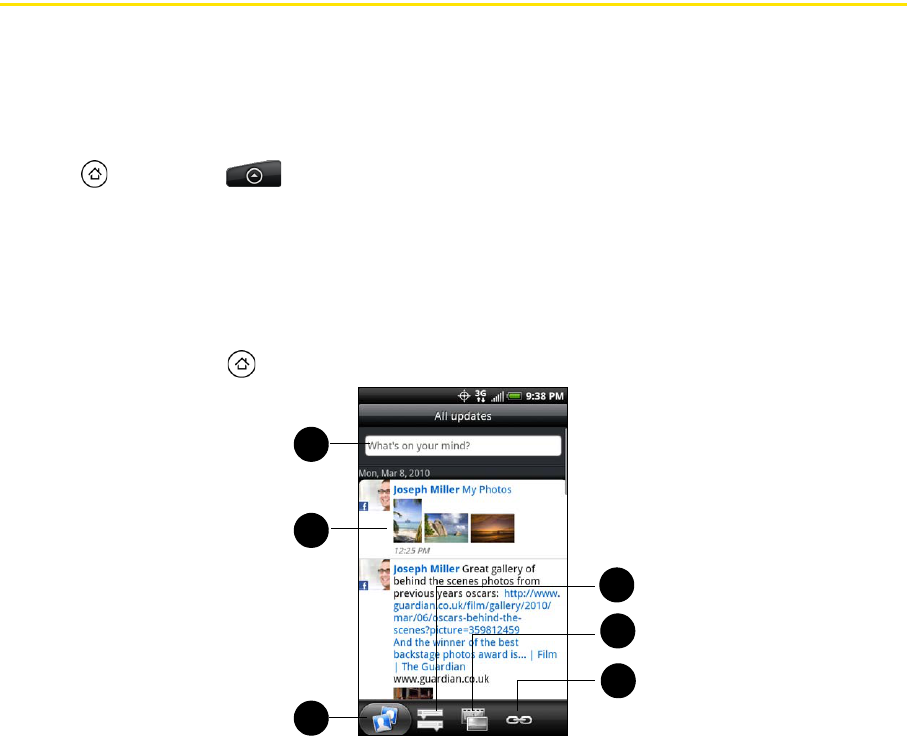
52 2D. People
Facebook FAQ
What are the differences Between Facebook for HTC Sense and Facebook for Android Application?
ⅷFacebook for HTC Sense is not a standalone application. It is integrated into People, Friend Stream, and
Gallery to give you up-to-date information about your Facebook contacts (their status updates and new
photos) in these applications.
ⅷThe Facebook for Android application is a standalone application. Use this application to do most of the
things that you would do when you’re using your computer’s Web browser to access your Facebook
account, such as adding a friend and adding captions to photos you upload.
ⅷThe two do not share the same login credentials. Signing in to Facebook for HTC Sense does not sign you
in to the Facebook application and vice versa. If you want to use the same Facebook account for both,
you’ll have to sign in to both using the same login credentials.
Using Friend Stream
Streamline your social network accounts through Friend Stream. Update your status simultaneously, view
status updates, and look through photo updates from your Facebook, Twitter, and other social network
accounts using Friend Stream.
Opening Friend Stream
1. Press and then tap > Friend Stream.
2. If you are not signed in to a social network account, you will be asked to sign in to at least one of the
social network accounts.
3. Friend Stream opens in the All updates tab. Slide your finger on the bottom row to go to the tab you want.
The Friend Stream Screen
Only updates from accounts that you are signed in to will be shown. You can filter the updates that show in
Friend Stream by pressing , and then tapping Settings > Show updates.
1. Tap to enter and send a status update.
2. Depending on the type, tap to open Peep, post a Facebook comment, look at the Flickr album, or open
the link in the Web browser.
3. Shows all the messages from the social network accounts that you are signed in to.
4. Shows only links posted on Facebook.
2
3
1
4
5
6
People
2D. People 53
5. Shows only photo updates from Facebook and Flickr.
6. Shows only status updates from Facebook and Twitter.
Updating Your Status
1. Press and then tap > Friend Stream.
2. On the All Updates tab, tap the text field with the words “What’s on your mind?”.
3. Tap , and then on the Update dialog box, select which accounts you want the status update to be
posted. Tap Done.
4. Enter your status update, and then tap Share.
Adding the Friend Stream Widget
Add the Friend Stream widget so you can update your status simultaneously and view status updates from
your social network accounts right on the Home screen.
1. Press and tap > Widget > Friend Stream.
2. Choose the widget style, and then tap Select.
3. Drag the widget to a blank space on the Home screen, and then release.
Note: Only the accounts that you are signed in to will be shown on the dialog box.
54 2E. Calendar and Tools
ࡗCalendar (page 54)
ࡗCalculator (page 59)
ࡗClock (page 59)
ࡗQuickoffice (page 63)
ࡗPDF Viewer (page 64)
ࡗHTC Sync (page 65)
ࡗUpdating Your Device (page 68)
Calendar
Use Calendar to create and manage events, meetings, and appointments. Your Calendar helps organize
your time and reminds you of important events. Depending on your synchronization settings, your device’s
Calendar stays in sync with your Calendar on the Web, Exchange ActiveSync calendar, and Outlook
calendar.
Adding an Event to the Calendar
1. Press and tap > Calendar.
2. On any Calendar view, press and tap New event to open the Event details screen.
3. If you have more than one calendar, select a calendar in which to add the event:
ⅢSelect My Calendar to create an event that will appear only on your device.
ⅢSelect your Google Account to create a Google Calendar event. If you have several Google Calendars
on the Web, select one in which to add your event.
ⅢSelect PC Sync to create an Outlook Calendar event to sync with your computer.
ⅢSelect Exchange to create an Exchange ActiveSync calendar event.
4. Enter a name for the event.
5. To specify the date and time of the event, do one of the following:
ⅢIf there is a time frame for the event, tap the From and To dates and times to set them.
ⅢIf the event is a special occasion such as a birthday or an all-day event, set the From and To dates, and
then select the All Day check box.
6. Enter the event location and description.
Note: If you are in Agenda or Month view, you can also tap at the bottom-right of the screen.
If you are in Day view, tap Add event.
Note: You can create multiple Google Calendars only in Google Calendar on the Web. After creating them in Google
Calendar on the Web, you’ll be able to see them in the Calendar application on your device. For more information
about creating and managing multiple Google Calendars, visit the Google website at the following URL:
http://calendar.google.com.
If you have synchronized your device with an Exchange ActiveSync account or Outlook on your computer, you can
also select these calendars.
2E. Calendar and Tools

Calendar and Tools
2E. Calendar and Tools 55
7. Set the event reminder time.
8. If the event occurs on a regular basis, tap the Repetition box and then choose how often the event
occurs.
9. Scroll to the bottom of the screen and then tap Save.
Inviting Guests to Your Event (Google Account Only)
If you want to invite guests to your event, you need to create and add the event in your Google Calendar.
An invitation email will be sent to your guests using your Google Account.
1. Open Calendar and create a new event. Tap the Calendar field and then select your Google Account (or
one of your other Google Calendars). For the steps, see “Adding an Event to the Calendar.”
2. Add details about the event, such as date and time, location, and more.
3. In the Guests field, enter the email addresses of everyone you want to invite to the event. Separate
multiple addresses with commas ( , ).
4. Tap Save to add the event to your Google Calendar.
If the people to whom you send invitations use Google Calendar, they’ll receive an invitation in Calendar and
by email.
Sending a Meeting Request (Exchange ActiveSync only)
If you have an Exchange ActiveSync account set up on your device, you can use Calendar to create a
meeting appointment and send a meeting request email to the people you want to invite to your meeting.
1. Open Calendar and create a new event. Tap the Calendar field and then select Exchange. For the steps,
see “Adding an Event to the Calendar.”
2. Add details about the meeting, such as date and time, location, and more.
3. Press and then tap Meeting Invitation.
4. Tap and choose attendees from your contacts or Company Directory.
5. Enter the email subject and your message, and then tap Send.
6. Tap Save to add the meeting appointment to your Exchange ActiveSync Calendar.
Event Alerts
When your device is turned on and you have an event alarm scheduled, your device alerts you and displays
the event summary. There are several ways your device alerts you to scheduled events:
ⅷBy playing the assigned ringer type.
ⅷBy showing the icon on the status bar.
ⅷBy showing the Alert screen.
Event Reminders
If you have set at least one reminder for an event, the upcoming event icon ( ) will appear in the
notifications area of the status bar to remind you of the upcoming event.
Note: You can add another reminder time in a Google Calendar event. Press and then tap Add reminder to add
another reminder.
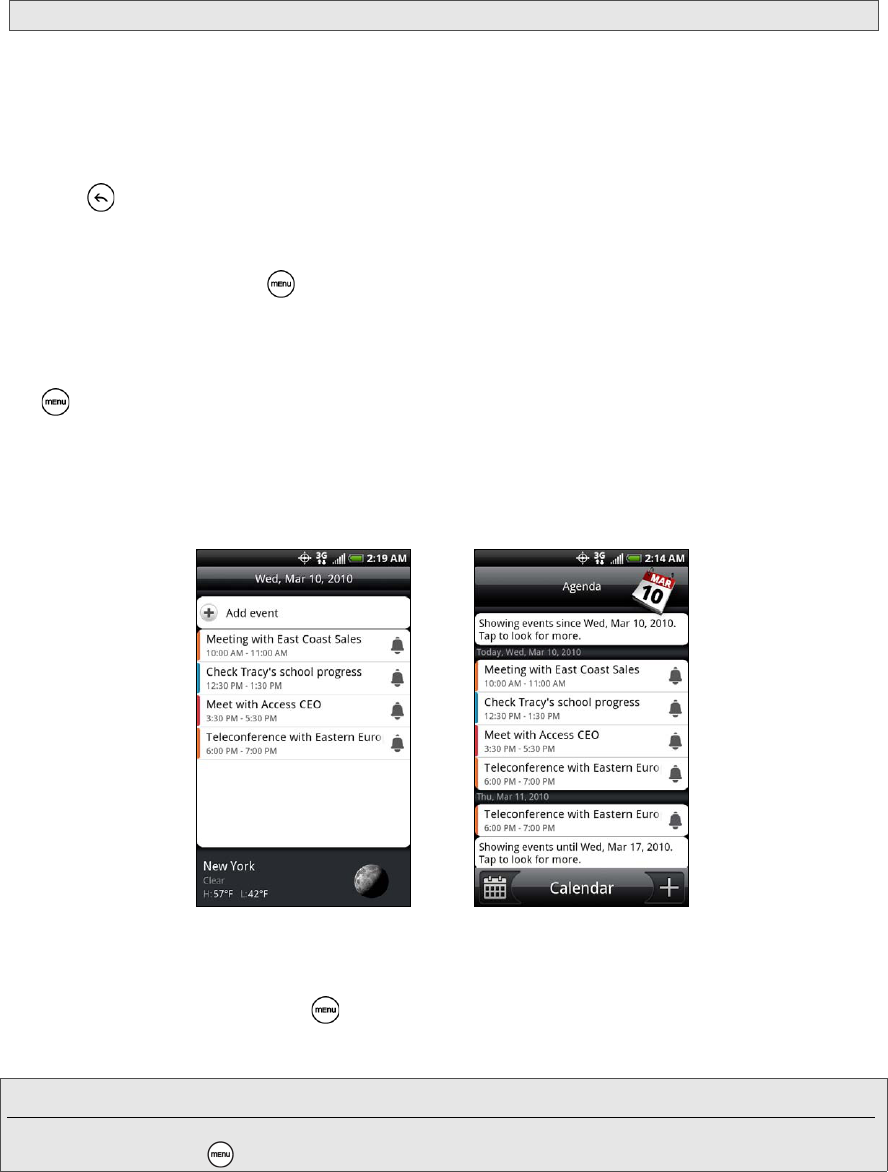
56 2E. Calendar and Tools
To view, dismiss, or snooze the reminder:
1. Press the status bar, and then slide your finger down the screen to open the Notifications panel.
2. Tap the upcoming event name to display the event.
3. Do one of the following:
ⅢTap Snooze all to snooze all event reminders for five minutes.
– or –
ⅢTap Dismiss all to dismiss all event reminders.
– or –
ⅢPress to keep the reminders pending in the notifications area of the status bar.
To set reminder settings:
ᮣOn any Calendar view, press and tap More > Settings > Reminder settings.
Viewing Events
You can display the Calendar in daily, weekly, monthly, or agenda view. To change the Calendar view,
press and tap
Day, Agenda, Week, or Month.
Day and Agenda Views
Day view displays a list of the events of one day and also shows weather information at the bottom of the
screen when you’re viewing events of the current day. Agenda view shows a list of all your events in
chronological order.
The color bars on the left side of the events indicate the type of calendar in which the event is part of. To find
out what each color represents, press and then tap More > Calendars.
When in Day view, slide left or right across the screen to view earlier or later days.
Note: If you have other pending event reminders, these events will also appear on the screen.
Note: In Day view, the weather information appears only if the event is within the five-day forecast of the Weather application.
Weather information does not appear in Day view when you change Day view to display as a time list. To check, in any
calendar view, press , and tap More > Settings > Calendar view setting > Day views.
Day view Agenda view
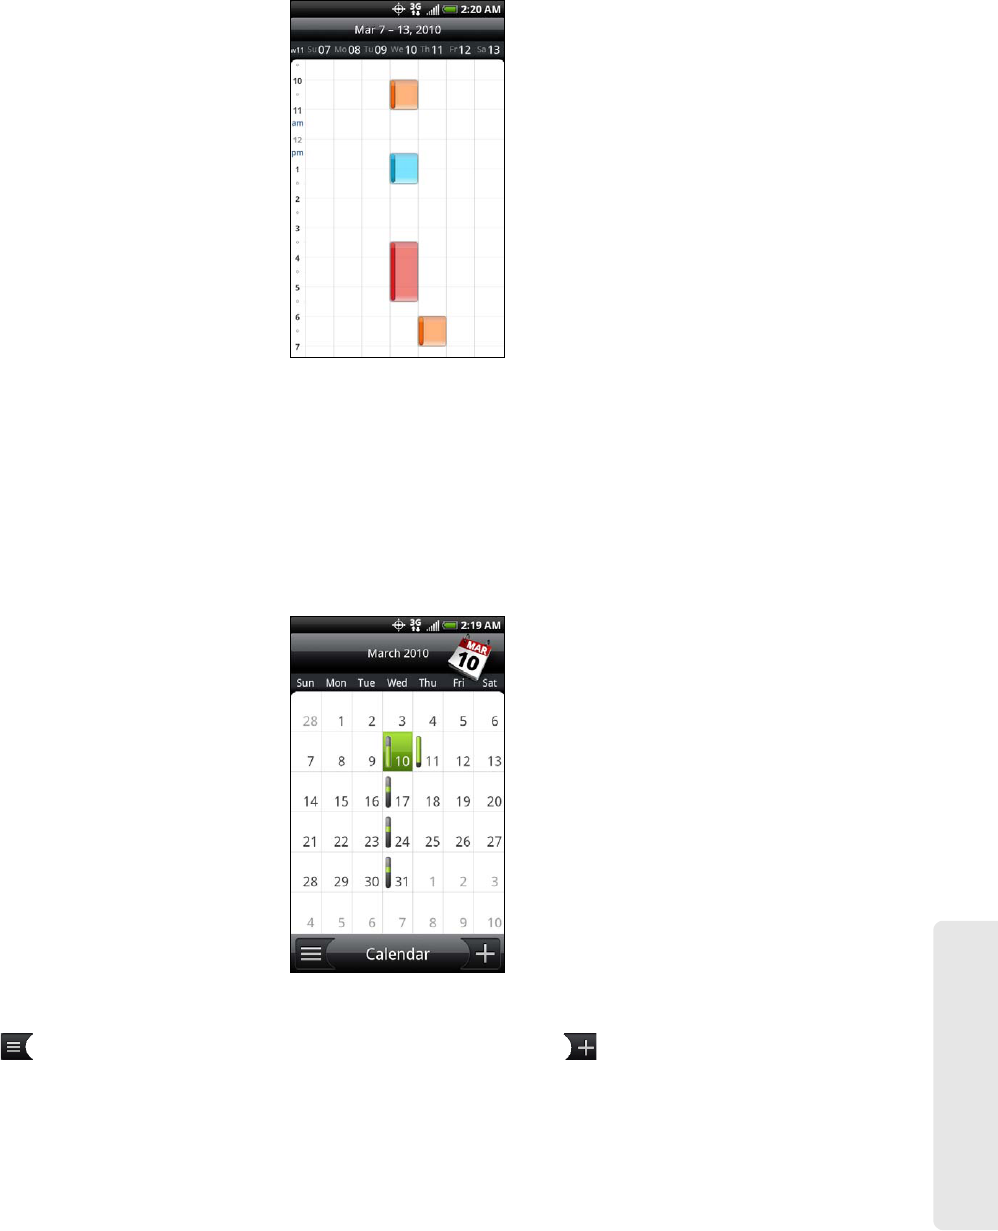
Calendar and Tools
2E. Calendar and Tools 57
Week View
Week view displays a chart of the events of one week.
When in Week view:
ⅷYou can press and hold on a time slot to create a new event at that time.
ⅷTap an event to view its details.
ⅷSlide left or right across the screen to view earlier or later weeks. Swipe your finger left or right to go to the
earlier or later week.
Month View
In Month view, you’ll see markers on days that have events.
When in Month view:
ⅷTap on the bottom left of the screen to switch to Agenda view. Tap on the bottom right to create
a new event.
ⅷTap a day to view the events of that day.
ⅷPress and hold a day to open an options menu from which you can also choose to create an event or
switch to either Day or Agenda view.
ⅷSlide your finger up or down the screen to view earlier or later months.

58 2E. Calendar and Tools
Erasing Events
1. Press and tap > Calendar.
2. Open the calendar event details by:
ⅢIn Agenda, Day, and Week views, tap the calendar event you want to delete.
ⅢIn Month view, tap the date where the calendar event occurs, and tap the calendar event.
3. Press and tap Delete event.
4. In the Delete confirmation box, tap OK.
– or –
If the calendar event is recurring, select Only this event or All events, and tap OK.
Showing or Hiding Calendars
In any Calendar view, press , tap More > Calendars, and then select or clear a calendar to show or hide it.
Tap All calendars to display all calendars.
The calendars are kept synchronized on your device, whether or not you hide them.
Choosing Google Calendars to Synchronized with Your Device
You can choose which Google Calendars to keep synchronized on your phone or which ones to stop
synchronizing.
Stop Synchronizing a Google Calendar
1. In any Calendar view, press and tap More > Calendars.
2. Press and tap Remove calendars.
3. Select a Google Calendar to remove from your calendars list, and then tap OK.
4. Press to update Calendar with the new changes and return to the Calendar view you were viewing.
The calendars that you remove from your calendars list will no longer be synchronized on your device, but
you remain subscribed to them and can work with them in Google Calendar on the Web.
Adding a Google Calendar to Synchronize
Only the calendars that you’ve created or subscribed to on the Web, but previously removed from your
calendars list, are shown in the list of calendars that you can add.
1. In any Calendar view, press and tap More > Calendars.
2. Press and tap Add calendars.
3. Select a Google Calendar to add to your calendars list, and then tap OK.
4. Press to update Calendar with the new changes and return to the Calendar view you were viewing.
Synchronizing Exchange ActiveSync Calendar
If you have set up a Microsoft Exchange ActiveSync account on your device, you can also synchronize
Exchange ActiveSync calendar events on your device. Calendar events on your Exchange ActiveSync will
also show in Calendar if you chose to synchronize with the Exchange ActiveSync Server.
ᮣTo check if Exchange ActiveSync items are set to be synchronized, go to the Home screen, press ,
and tap Settings > Accounts & sync > Exchange ActiveSync.
Calendar and Tools
2E. Calendar and Tools 59
Synchronizing Outlook Calendar
See “HTC Sync” on page 65 for details.
Sending a vCalendar
You can send a calendar event as a vCalendar to someone’s phone or your computer using Bluetooth.
You can also send it as a file attachment with your message.
1. Press and tap > Calendar.
2. Press and hold the calendar event you want to send, and then tap Share vCalendar. In Month view, you
need to tap the day when the event takes place before you can press and hold the event.
3. Choose whether to send the event using Bluetooth, Mail (email), or Message (Multimedia message or
MMS).
4. Do one of the following:
ⅢIf you chose to send using Bluetooth, in the next few steps, you’ll be asked to turn on Bluetooth on your
device and connect to the receiving Bluetooth device so the vCalendar can be sent. For more
information, see “Using Bluetooth” on page 94.
ⅢIf you chose to send by email, a new message window opens and automatically includes the
vCalendar as an attachment. Your default email account that’s selected in the Mail application will be
used to send. For more information, see “Composing and Sending Email” on page 123.
ⅢIf you chose to send by multimedia messaging (MMS), a new multimedia message window opens and
automatically includes the vCalendar as an attachment. Enter your message recipients, compose your
MMS message, and then tap Send. For more information, see “Sending a Multimedia Message (MMS)”
on page 103.
Calculator
Your device comes with a built-in calculator.
1. Press and tap > Calculator.
2. Enter numbers or formulas using the onscreen keys.
3. Tap for the result.
Clock
The Clock application is more than just a regular date and time clock. It functions as a desk clock that shows
the date, time, and weather information, and it can turn into a night clock or screensaver. It has a world clock
that shows you the current time in several locations across the globe. There’s also an alarm clock, stopwatch,
and countdown timer.
To open the Clock application:
ᮣPress and tap > Clock.
Tip: To switch to a scientific calculator, turn your device sideways to your left. The scientific calculator lets you perform
more complex calculations with square roots, logarithmic, and trigonometric functions.
Tap to remove one digit at a time. Press and hold to delete the entire number.
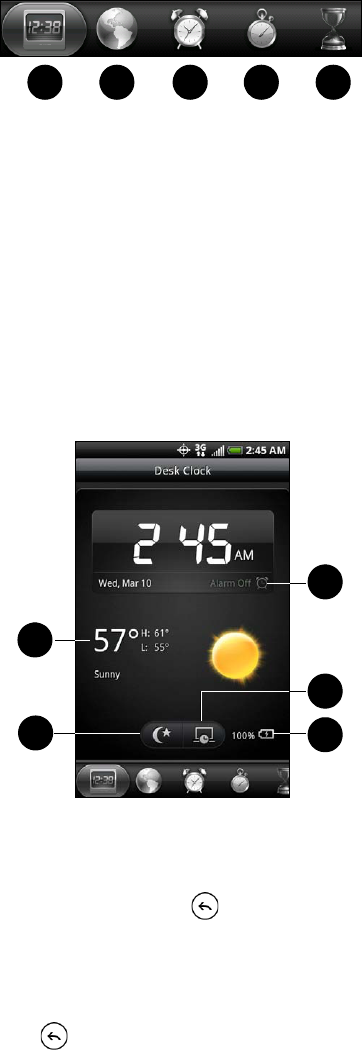
60 2E. Calendar and Tools
Tap the tabs at the bottom row or slide your finger across the tabs to switch between the different functions
of the Clock application.
1. Desk Clock For more information, see “Clock.”
2. World Clock For more information, see “World Clock.”
3. Alarms For more information, see “Alarm Clock.”
4. Stopwatch lets you use the clock as a stopwatch.
5. Timer lets you use the clock as a timer.
Desk Clock
Opening the Clock application brings you directly to the Desk Clock screen.
The Desk Clock displays the current date, time, and weather, an alarm clock indicator, and a battery
charging indicator. You can dim the screen to show only the time and date on the Desk Clock.
1. Weather information of your current location. Tap the weather information to open the Weather application
where you can see weather forecasts of the next few days. For more information, see “Weather” on page 141.
2. Dim button dims the screen and displays only the time and date on the Desk Clock. To light up the
screen again, tap anywhere on the screen or press .
3. Alarm clock indicator shows whether the alarm clock is on or off. To find out how to turn on and set the
alarm clock, see “Alarm Clock.”
4. Screensaver button dims the screen and go into screensaver mode. When in screensaver mode, the time
and date will change position on the screen after every few minutes. To light up the screen again, tap
anywhere on the screen or press .
5. Battery charging indicator shows the battery charge level. You’ll see it only when your device is plugged
with the power adapter or connected to your computer.
You can change the Desk Clock screen to display the date and time of another time zone. For more
information, see “World Clock.”
21 53 4
2
3
1
4
5

Calendar and Tools
2E. Calendar and Tools 61
World Clock
Use the Clock application’s World Clock screen to check the current time in several places around the globe
simultaneously. You can also set your home city, add more cities to the world clock list, and manually set
your time zone, date, and time.
To view the time in different locations:
ᮣPress and tap > Clock > World Clock tab.
To add cities to the World Clock list:
1. Press and tap > Clock > World Clock tab > Add city.
2. Enter the city name you want to add. A list of matching cities and countries based on the letters you
entered appear on the screen.
3. Tap the city.
To designate your home city:
1. Press , tap > Clock > World Clock tab, and then press > Home settings.
2. Enter your home city name. A list of matching cities and countries based on the letters you entered
appear on the screen.
3. Tap your city when it appears on the list. Your home city will appear at the top of the list of cities.
To delete a city on the World Clock list:
1. Press , tap > Clock > World Clock tab, and then press > Delete.
2. Tap the cities you want to remove and tap Delete.
To manually set the time zone, date, and time:
To set the time zone, date, and time on your device manually, you need to turn off auto time synchronization
first.
1. Press and then tap the HTC Clock widget on the Home screen.
2. Tap the World Clock tab.
3. Press and then tap Local time settings to open the Date & time settings screen.
4. Clear the Automatic check box.
5. Tap Select time zone. Scroll through the list and then tap the time zone that you want.
6. To change the date, tap Set date. Adjust the date by sliding your finger up or down on the day, month,
and year, and then tap Done.
7. To change the time, tap Set time. Adjust the time by sliding your finger up or down on the hour and
minute, and then tap Done.
8. Tap the Use 24-hour format check box to switch between using a 12-hour or a 24-hour time format.
9. Tap Select date format then select how you want dates to be displayed. (The selected date format also
applies to the date displayed in the alarm clock.
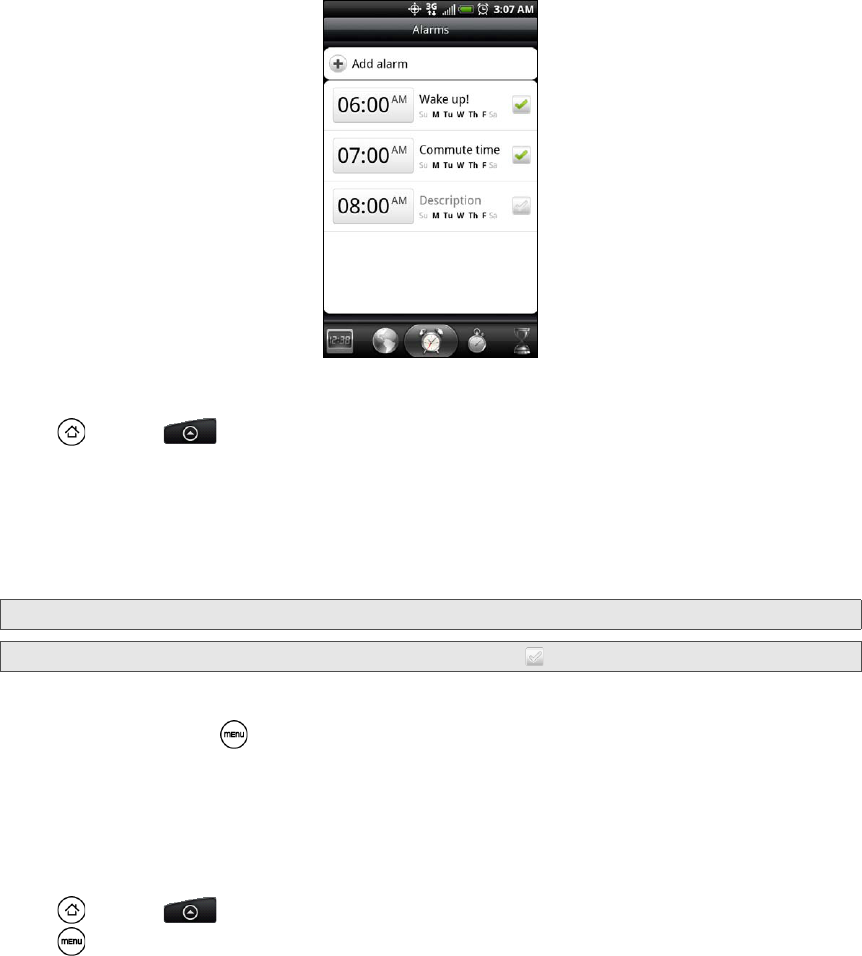
62 2E. Calendar and Tools
Alarm Clock
Your device comes with a built-in alarm clock that has multiple alarm capabilities.
Setting an Alarm
1. Press and tap > Clock > Alarms tab.
2. Tap one of the default alarms on the screen.
3. In the Set alarm screen, set the alarm time by sliding your finger up or down on the numbers and AM/PM.
4. Enter the alarm Description, set the Alarm sound and Repeat, and select the Vibrate check box if you want
the device to also vibrate when the alarm goes off.
5. Tap Done.
Deleting an Alarm
1. On the Alarms tab, press and tap Delete.
2. Select the alarms you want to delete and then tap Delete.
Changing Alarm Sound Settings
If you’ve set one or more alarms, you can change their settings such as the alarm volume, how long to
snooze the alarm, and more.
1. Press and tap > Clock > Alarms tab.
2. Press and tap Settings. You can change the following settings:
ⅢAlarm in silent mode This option is selected by default, which allows the alarm to sound even when your
device’s volume is set to silent mode. Clear this check box if you want to silence the alarm when the
volume is in silent mode.
ⅢAlarm volume Set the volume level that you want for the alarm.
ⅢSnooze duration Set how long to snooze between alarms.
ⅢSide button behavior Choose what happens to the alarm when pressing the volume buttons of your
device. You can set the button to snooze, dismiss the alarm, or disable the button.
The side button works only when the device’s screen is not locked. While on the lock screen, tap the
onscreen Snooze button to snooze, or slide down the screen to dismiss the alarm.
Tip: If you need to set more than 3 alarms, you can add more alarms by tapping Add alarm.
Note: You can temporarily disable an alarm by clearing the check box ( ) of the alarm on the Alarms tab.
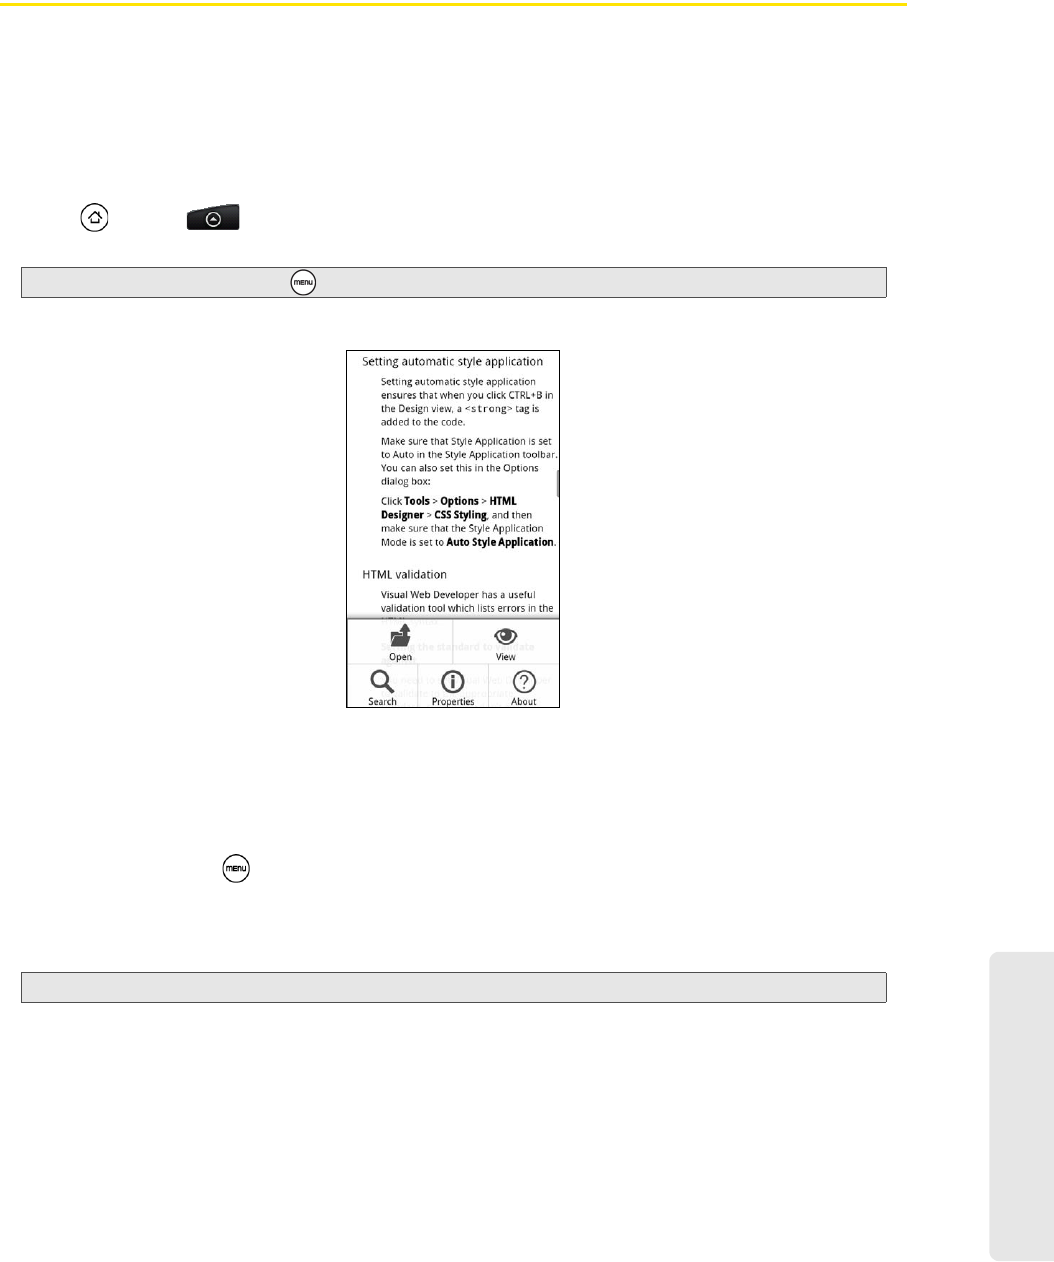
Calendar and Tools
2E. Calendar and Tools 63
Quickoffice
Quickoffice lets you view Microsoft Office Word, Microsoft Office Excel, and Microsoft PowerPoint files on your
device. Quickoffice supports viewing of Microsoft Office 2003 and 2007 Word (.doc), Excel (.xls), PowerPoint
(.ppt) and text (.txt) files.
Viewing Documents, Presentations, and Spreadsheets
Make sure you have copied the files to the device’s microSD card before you open Quickoffice.
1. Press and tap > Quickoffice. (You may need to scroll down the screen to see the icon.)
2. Tap the file you want to open.
3. Slide your finger on the screen to scroll horizontally or to flip through the pages of the file.
4. While viewing a file:
ⅢPinch the screen to zoom in or out or use the zoom controls on the screen to zoom in or out.
ⅢFor Excel files, press and then tap Worksheet to view other worksheets on the file.
ⅢFor Word and PowerPoint files, tap a URL link to open the Web page in the browser.
ⅢWhen you open Word documents, Quickoffice reflows the text to make it fit the width of the screen.
Double-tap the screen to switch to continuous view so you can view the page layout.
ⅢWhen you view PowerPoint files, after your zoom in on a slide, you can double-tap the screen to zoom
out automatically and fit the slide to the width of the screen.
Tip: In the Open file screen, press and tap Sort to let you sort the list by name or date.
Note: Quickoffice does not reflow text in tables.
Quickoffice while viewing
a Word document
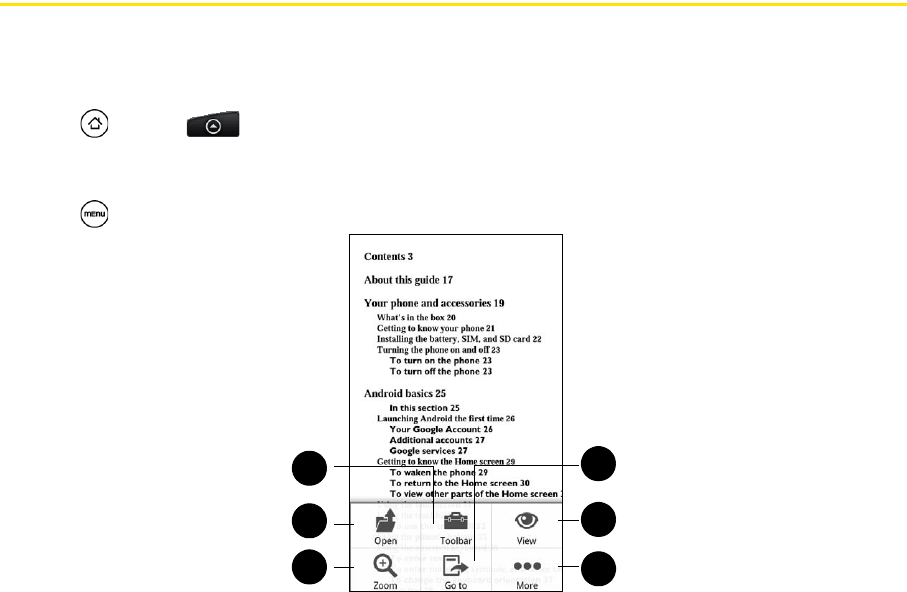
64 2E. Calendar and Tools
PDF Viewer
Use PDF Viewer to view PDF files that you have copied to the device’s microSD card.
Viewing a PDF File
1. Press and tap > PDF Viewer. (You may need to scroll down the screen to see the icon.)
2. On the Open file screen, tap the file you want to view.
3. Slide your finger on the screen to pan or go through the pages of the PDF file. While viewing a PDF file,
press to let you open another PDF file, zoom in, search the file, and more.
1. Zoom to zoom in on the page. You can also tap the screen quickly twice to zoom in or out of the page.
2. Open to open another PDF file.
3. Toolbar to toggle between showing and hiding the page toolbar.
4. Go to to go to a specific page on the PDF file.
5. View to let you change the view: Continuous or Reflow.
6. More to search for text in the PDF file, and view properties or information about PDF Viewer.
1
2
3
6
5
4

Calendar and Tools
2E. Calendar and Tools 65
HTC Sync
HTC Sync™ lets you synchronize Outlook and Windows Address Book (Outlook Express) contacts and
calendar events on your computer with your device. It also lets you back up and sync these information from
your device back to your computer before you do a factory reset or a software (ROM) upgrade of your
device. HTC Sync also enables you to install third-party Android applications on the device.
Here’s what you’ll need to do to install, set up, and use HTC Sync on your computer:
1. Use the HTC Sync installer that’s in the supplied microSD card to install. For the steps on how to install,
see “Installing HTC Sync From the microSD Card.”
You can also download and install HTC Sync from the HTC support website. See “Downloading the
Latest HTC Sync Upgrade” for details.
2. Connect your device to your computer using the supplied USB cable and set up HTC Sync to recognize
your device. Follow the steps in “Setting Up HTC Sync to Recognize Your Device.”
3. Choose what information to sync between your computer and your device and how you want to sync
them.
ⅢTo easily set up synchronization using HTC Sync’s guided wizard, follow the steps in “Setting Up
Synchronization.”
ⅢTo choose from more sync options, see “Setting up More Sync Options.”
4. Sync your computer with your device automatically or manually. See “Synchronizing Your Device” for
details.
Installing HTC Sync From the microSD Card
The HTC Sync version in the microSD card that came with your device can be installed in Windows 7,
Windows Vista, and Windows XP.
Make sure that the microSD card is inserted on your device. Copy the HTC Sync installer from the microSD
card to your computer and use it to install.
1. Connect your device to your computer using the USB cable that came with your device.
2. On the Connect to PC screen on your device, tap Disk drive and then tap Done.
3. After you’ve selected disk drive mode on your device, your computer will treat your device as a
removable disk (just like any USB drive). Open this removable disk so you can see what’s inside the
microSD card.
4. Copy HTCSync.exe to your computer.
5. After copying, unmount the removable disk (that is, the connected device) as required by your
computer’s operating system to safely remove your device.
6. On your computer, double-click HTCSync.exe and follow the onscreen instructions to install HTC Sync.
Important: HTC Sync requires USB 2.0 on your computer to connect and sync with your device. To see a complete list of
the computer and software requirements, you can check them in the HTC Sync software download page on
the HTC support website:
http://www.htc.com/www/SupportViewNews.aspx?dl_id=847&news_id=471
For trouble-free installation, first quit all running programs and temporarily disable your anti-virus program
before you start installing HTC Sync.
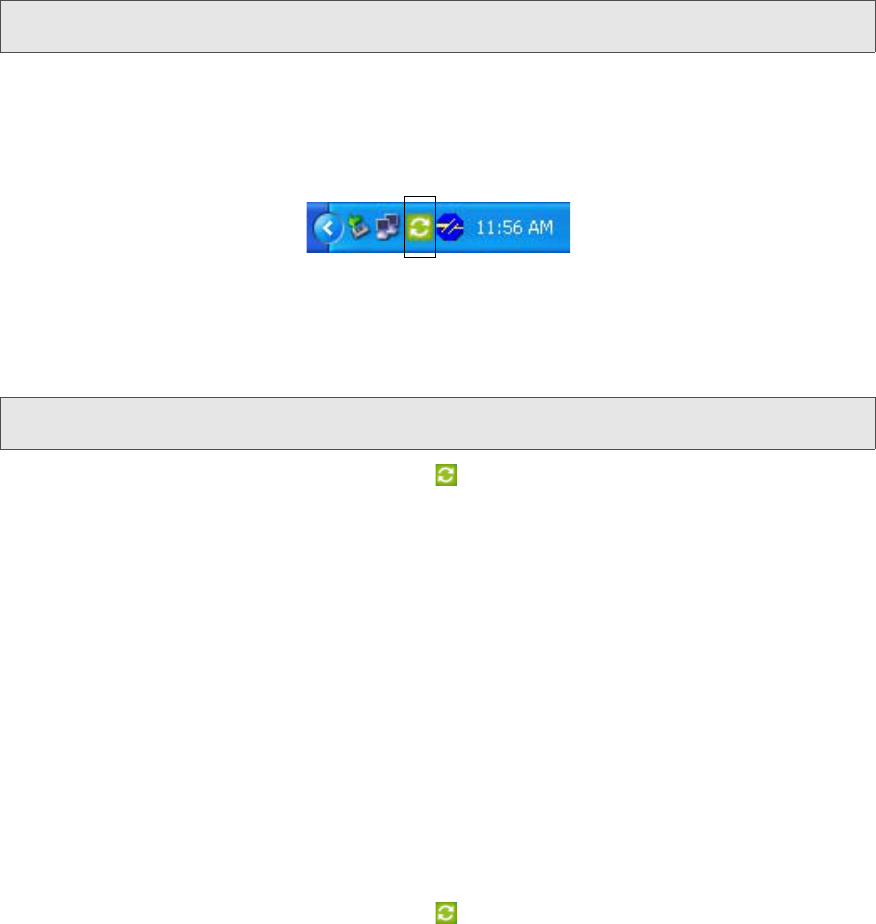
66 2E. Calendar and Tools
Setting Up HTC Sync to Recognize Your Device
After installing, set up HTC Sync to recognize your device.
1. Connect your device to the computer with the supplied USB cable. Or, if your device is already
connected, press and hold the status bar and drag your finger down to open the Notifications panel.
Then tap the status that shows Select to change USB connection type.
2. On the Connect to PC screen in your device, tap HTC Sync and then tap Done.
3. Your device attempts to find HTC Sync on your computer. Wait for a few seconds for the process to finish
4. When your device finds HTC Sync, your computer will display the Phone Connection Wizard. Click Next.
5. Enter the name you want for your device, and then click Finish.
6. Check the HTC Sync icon at the bottom-right side of your computer screen. If it appears green in color,
that means your device has successfully connected with your computer and HTC Sync recognizes your
device.
Setting Up Synchronization
You can set up HTC Sync to synchronize your computer’s Outlook contacts and calendar events with your
device. If you’re using Outlook Express on your computer, you can only sync contacts with your device.
1. On your computer, make sure the HTC Sync icon at the bottom-right side of the screen appears in
green, which means that your device is connected to HTC Sync.
2. Double-click the green HTC Sync icon on your computer to open HTC Sync.
3. Click Synchronize Now. (You can also click Sync Manager > Settings.)
4. In the Synchronization Settings Wizard, click Next.
5. In the next few dialog boxes, choose whether to sync Outlook or Outlook Express, select the type of
information to sync (contacts or calendar), and choose to sync them automatically or manually with your
device.
6. Click Finish.
HTC Sync then starts to sync your device and your computer. Wait for the synchronization to finish.
7. A summary report is then displayed. Click Close.
Setting up More Sync Options
HTC Sync gives you the flexibility to set many options, such as setting a sync schedule, choosing how to
resolve conflicts when the same items are found on both the device and the computer, and more.
1. On your computer, make sure the HTC Sync icon at the bottom-right side of the screen appears in
green, which means that your device is connected to HTC Sync.
2. If HTC Sync is not open, double-click the green HTC Sync icon to open it.
3. Click Sync Manager > Settings.
4. In the Synchronization Settings Wizard dialog box, click Manual settings.
Note: If your device displays a message indicating that it’s unable to find HTC Sync, try disconnecting and reconnecting
the USB cable, and then repeat step 2.
Important: Before you begin setting up synchronization, make sure you have set up HTC Sync to recognize your device.
If you have not yet done so, follow the steps in “Setting Up HTC Sync to Recognize Your Device.”

Calendar and Tools
2E. Calendar and Tools 67
5. From the left side of the Sync Manager Settings dialog box, click the type of setting you want to change,
and then choose from the available options on the right. Settings that can be changed include the
following:
ⅢContacts or Calendar folder to sync with Change this only if you have personal folders created in your
Outlook and you need to sync with a personal folder. Click Contacts or Calendar on the left side of the
dialog box, click the Properties button, and then choose the personal folder to sync with.
ⅢCalendar events to sync with Choose the number of days of calendar events to sync. Click Calendar on
the left side of the dialog box, click Properties, and then set the days under Date range.
ⅢConflict policy In cases when the same contacts or calendar items exist in both your device and your
computer, choose whose data you want to keep when a conflict occurs.
ⅢWhen to sync Click Automatic sync on the left side of the dialog box. Then choose whether to sync
manually, auto sync everytime you connect your device to your computer, or sync at a set schedule.
6. Click Apply to save the sync options you’ve selected, and then click OK.
Synchronizing Your Device
After you’ve installed and set up HTC Sync, you can sync your device with your computer.
Synchronizing Your Device Automatically with Your Computer
Do the following first to make sure your device will sync automatically with your computer:
1. Press > , and then tap Settings > Applications > Development.
2. Make sure the USB debugging check box is selected.
3. Whenever you connect your device to your computer, synchronization starts automatically. Wait for the
sync process to finish.
Synchronizing Your Device Manually with Your Computer
1. Connect your device to the computer with the supplied USB cable. Or, if your device is already
connected, press the status bar and drag your finger down to open the Notifications panel. Then tap the
status that shows Select to change USB connection type.
2. On the Connect to PC screen in your device, tap HTC Sync and then tap Done.
3. On your computer, make sure that the HTC Sync icon at the bottom-right side of the screen appears
in green, which means that your device is connected to HTC Sync.
4. On your device, tap Sync now.
Downloading the Latest HTC Sync Upgrade
Visit the HTC support website (www.htc.com/support ) from time to time to check for the most recent HTC Sync
upgrade so you can download and install it on your computer.
After installing the latest upgrade, set up HTC Sync again to recognize and sync with your device. Follow the
steps in “Setting Up HTC Sync to Recognize Your Device” and “Setting Up Synchronization.”
68 2E. Calendar and Tools
Installing Apps From Your Computer to Your Device
If you have applications (.apk files) on your computer, you can use HTC Sync to install them to your device.
We strongly recommend you install only applications that you trust.
1. On your device, press > , tap Settings > Applications, and then select the Unknown sources check
box to allow applications from your computer to be installed to your device.
2. Connect your device to the computer with the supplied USB cable. Or, if your device is already
connected, press the status bar and drag your finger down to open the Notifications panel. Tap the status
that shows Select to change USB connection type.
3. On the Connect to PC screen in your device, tap HTC Sync and then tap Done.
4. On your computer, double-click the green HTC Sync icon to open HTC Sync.
5. In HTC Sync, click Application Installer.
6. In the Application Installer file types dialog box, make sure that the Android OS installer file (apk) check
box is selected, and then click OK.
7. Click Next.
8. Click Browse, locate the application (.apk) on your computer, and then click Open.
9. After selecting the application, click Next.
10. Click Finish. Check your device’s screen to see if there are additional instructions to complete the
installation.
Updating Your Device
To download software updates to your device:
ᮣPress > > Settings > System updates > Firmware update. (Your device automatically downloads
and installs any available updates. You may be required to power your device off and back on to
complete the software upgrade.)
Note: You only have to do this step once. You do not need to do this step again next time you install another application
from your computer to your device.
Note: This dialog box only appears the first time you use the Application Installer.
Voice Services
2F. Voice Services 69
ࡗAutomatic Speech Recognition (ASR) (page 69)
ࡗManaging Voice Memos (page 70)
Automatic Speech Recognition (ASR)
You can use your device’s built-in automatic speech recognition (ASR) software to dial a phone number in
People or to launch device functions. All you have to do is to talk into the device, and ASR will recognize
your voice and complete tasks by itself.
Activating ASR
ᮣPress and tap > Voice Dialer. (You may need to scroll down the screen to see the icon.)
The screen displays “Listening...” and the device prompts you to say the name of the command you want to
use. To complete your task, simply follow the voice prompts.
Available ASR commands include:
ⅷCall <Name or Voicemail> to call an entry in your People list or voicemail. (See “Making a Voice Call With
ASR.”)
ⅷDial <Number> to dial a spoken phone number.
ⅷRedial to dial the last outgoing call.
ⅷOpen <Application Name> to open an application in your device. (See Opening Applications With ASR)
Making a Voice Call With ASR
1. Press and tap > Voice Dialer.
2. Wait until you hear a tone and the word “Listening...” appears on the screen.
3. Say “Call [contact name]” to call a person stored in your People list.
– or –
Say “Dial [contact number]” to dial a spoken phone number.
4. Tap YES to confirm or CANCEL to cancel the command; or choose from a menu if ASR is not sure what
you would like to do.
Tip: Use ASR in a quiet environment so it can accurately recognize your commands.
Note: Regardless of which command you use, you will be asked to confirm your choice, or choose from a menu if ASR is
not sure what you would like to do.
Note: When dialing a phone number, numbers can be three digits (for example, 911), seven digits (for example,
555-1234), or ten digits (for example, 222-555-1234).
2F. Voice Services
70 2F. Voice Services
Opening Applications With ASR
You can jump directly to many applications by saying “Open” followed by the application name.
1. Press and tap > Voice Dialer.
2. Wait until you hear a tone and the word “Listening...” appears on the screen.
3. Say “Open [application name]” to open an application in your device.
4. Tap YES to confirm or CANCEL to cancel the command; or choose from a menu if ASR is not sure what
you would like to do.
Managing Voice Memos
Use your device’s Voice Recorder to record brief memos to remind you of important events, phone numbers,
grocery list items, or create a ring tone.
Recording Voice Memos
1. Press and tap > Voice Recorder. (You may need to scroll down the screen to see the icon.)
2. Tap and speak into the device’s microphone.
To end the recording of your memo:
ᮣTap .
Voice Memo Options
To play the voice memos you have recorded:
ᮣAfter recording a voice memo, tap .
– or –
Tap and then tap the file you want to play.
To share a voice memo:
1. Press and tap > Voice Recorder.
2. On the Voice Recorder screen, tap .
3. On the All recordings screen, press and hold the voice memo you want to share, and then tap Share on
the options menu.
4. On the Share options menu, select how you want to share the voice memo.
To learn how to send files using Bluetooth, see “Bluetooth” on page 94.
To set a voice clip as a ring tone
1. Press and tap > Voice Recorder.
2. On the Voice Recorder screen, tap .
3. On the All recordings screen, press and hold the voice memo you want to set as a ring tone, and then
tap Set as ringtone on the options menu.

Voice Services
2F. Voice Services 71
Renaming Voice Memos
1. Press and tap > Voice Recorder.
2. On the Voice Recorder screen, tap .
3. On the All recordings screen, press and hold the voice memo you want to rename, and then tap Rename
on the options menu.
4. Enter the new name and tap Save.
Erasing Voice Memos
1. Press and tap > Voice Recorder.
2. On the Voice Recorder screen, tap .
3. On the All recordings, press and then tap Delete.
4. Do any of the following:
ⅢTo erase one or more voice memos, select the check boxes at the right side of the voice memo names,
and then tap Delete.
ⅢTo erase all voice memos, press , tap Select All, and then tap Delete.
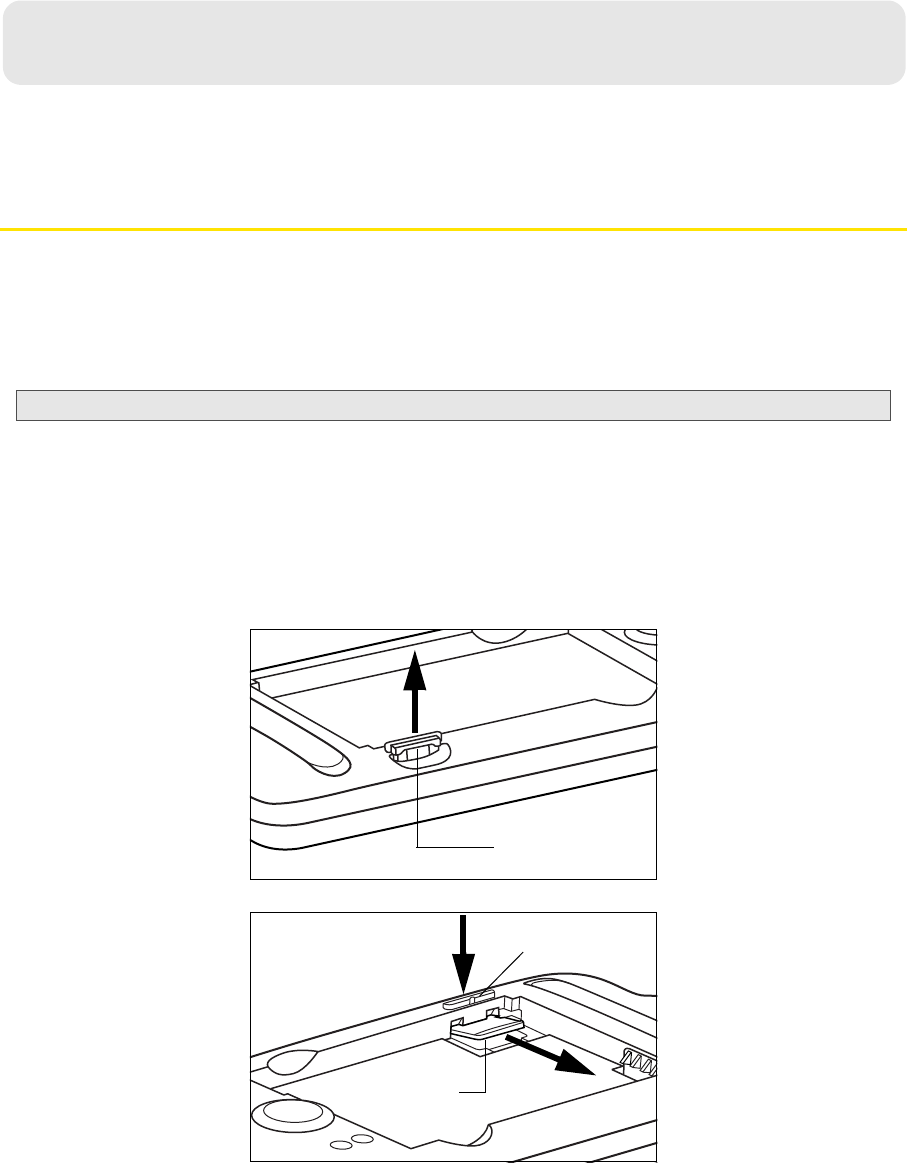
72 2G. microSD Card
ࡗYour Device’s microSD Card (page 72)
ࡗUsing the Device’s microSD Card as a USB Drive (page 74)
Your Device’s microSD Card
The microSD Card
Your device is equipped with a 2 GB microSDTM (Secure Digital) memory card to expand the device’s
available memory space. It allows you to store images, videos, music, documents, and voice data in your
device.
Removing the microSD Card
1. With the device turned off, insert your fingernail into the slot at the top left of the battery compartment
cover and lift gently to remove.
2. Lift the battery from the notches on the upper left and right sides of the battery compartment, and then
set it aside.
3. Locate the latch at the bottom-right corner of the battery compartment, and then lift the latch to unlock
the microSD card slot.
4. Gently pull the microSD card out from the slot, and then press the latch back to lock position.
5. Re-install the battery and the back cover. For more information on how to remove and re-install the back
cover and battery, see “Battery and Charger” on page 12.
Important: Your device comes with the microSD card preinstalled.
2G. microSD Card
Latch
microSD card
Latch
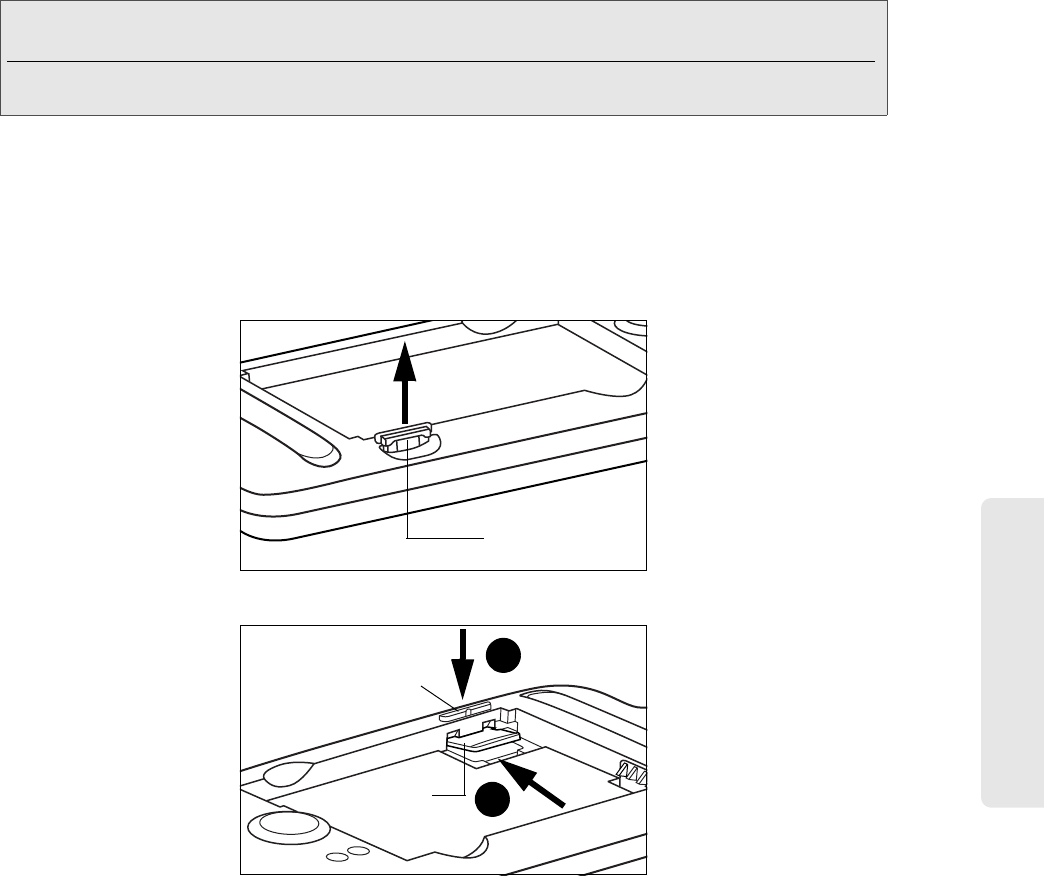
microSD Card
2G. microSD Card 73
Inserting the microSD Card
1. With the device turned off, insert your fingernail into the slot at the top left of the battery compartment
cover and lift gently to remove.
2. Lift the battery from the notches on the upper left and right sides of the battery compartment, and then
set it aside.
3. Locate the latch at the bottom-right corner of the battery compartment, and then lift the latch to unlock
the microSD card slot.
4. Carefully insert the microSD card into the slot (a), and then press the latch (b) to lock the slot and secure
the card in place.
5. Re-install the battery and the back cover. For more information on how to remove and re-install the back
cover and battery, see “Battery and Charger” on page 12.
Note: You can easily damage the microSD card by improper operation. Please be careful when inserting, removing, or
handling the microSD card.
Make sure your battery is fully charged before using the microSD card. Your data may become damaged
or unusable if the battery runs out while using the microSD card.
Latch
microSD card
Latch
a
b
74 2G. microSD Card
Viewing the microSD Card Memory
ᮣWith the microSD card inserted, press > and tap Settings > SD & phone storage.
(The total and available memory space will be displayed.)
Formatting the microSD Card
Formatting a microSD card permanently removes all files stored on the card.
1. Press > and tap Settings.
2. Scroll down the screen, tap SD & phone storage > Unmount SD card > Format SD card >
Format SD card > Erase everything.
Unmounting the microSD Card
When you need to remove the microSD card, you must unmount the microSD card first to prevent corrupting
the data inside or damaging the microSD card. Since you will remove the battery first before you can
remove the microSD card, close all running applications on your device and save any data before doing this.
1. Press > and tap Settings.
2. Scroll down the screen, tap SD & phone storage > Unmount SD card.
3. Remove the microSD card by following the instructions in “Removing the microSD Card” on page 72.
Using the Device’s microSD Card as a USB Drive
To transfer music, pictures, and other files from your computer to your device’s microSD card, you need
to set the device’s microSD card as a USB drive.
1. Connect the device to your computer using the supplied USB cable.
2. When the Connect to PC dialog box appears, tap Disk drive, and then tap Done.
3. On your computer, the connected device is recognized as a removable disk. Navigate to this removable
disk and open it.
4. Do one of the following:
ⅢCopy files from the computer to the device’s storage card’s root folder.
ⅢCopy files from the device’s storage card to a folder in your computer or computer desktop.
5. After copying the files, unmount the removable disk (that is, the connected device) as required by your
computer’s operating system to safely remove your device.
6. Do one of the following:
ⅢDisconnect the device from the computer.
ⅢIf you want to keep the device connected to the computer but want the device to be able to access and
use the storage card, open the Notifications panel, tap Disk drive, select an option except Disk drive,
and then tap Done.
Note: The formatting procedure erases all the data on the microSD card, after which the files CANNOT be retrieved.
To prevent the loss of important data, please check the contents before you format the card.
When you unmount the SD card, you need to remove and then reinsert the microSD card or turn the device off and
then on for the device to recognize the microSD card again.
Note: The device will not recognize the microSD card when it is connected to a computer as a disk drive. You will not be able
to use some of the device’s applications such as the camera or Music.
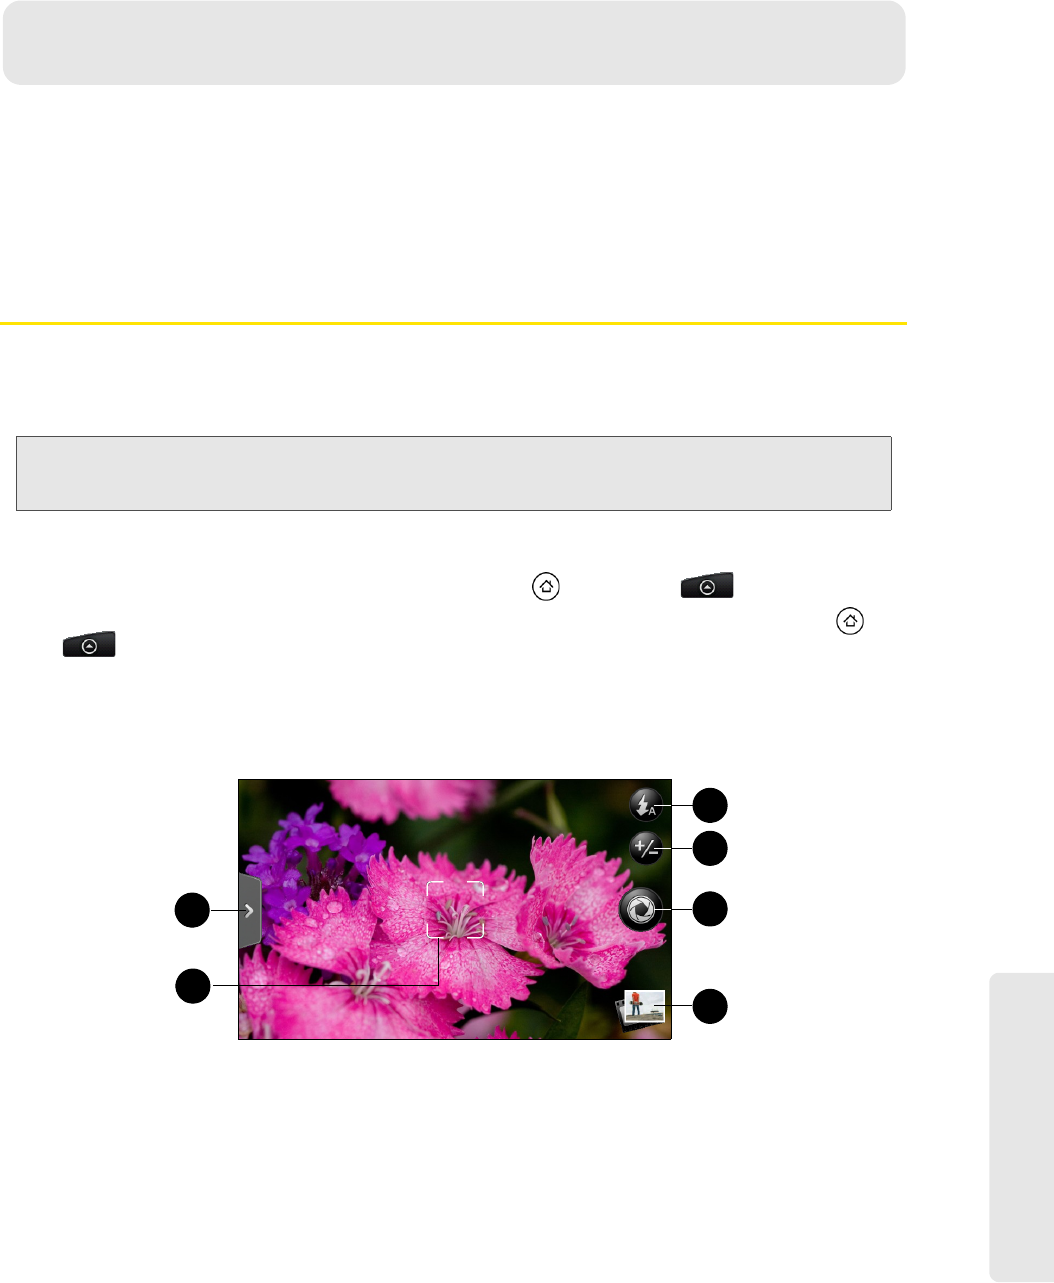
Camera and Multimedia
2H. Camera and Multimedia 75
ࡗTaking Pictures and Shooting Videos (page 75)
ࡗViewing Pictures and Videos Using Gallery (page 81)
ࡗSharing Live Videos with Qik (page 88)
ࡗListening to Music (page 88)
ࡗListening to the Radio (page 92)
Taking Pictures and Shooting Videos
You can use the camera or camcorder to take and share pictures and videos. Your device comes with a
8.0 megapixel main camera with autofocus feature that lets you capture sharp pictures and videos.
A 1.3 megapixel front camera is also available for self-portrait and video capture.
Opening the Camera
ᮣTo open the camera in photo mode and take photos, press and then tap > Camera.
ᮣTo open the camera directly in video mode so you can immediately start capturing videos, press and
tap
> Camcorder.
Viewfinder Screen
The camera controls are oriented to landscape view, although you take pictures in portrait format also.
You’ll find the following controls on the Viewfinder screen:
1. Menu tab opens the menu panel and lets you change the camera settings. For more information, see
“Camera Settings.”
2. Autofocus indicator Whenever you point the camera at a different subject or location, the screen shows
the autofocus indicator at the center as the camera automatically focuses on the center of the screen.
When you tap another area on the screen, the indicator will move to where you tapped and the camera
will automatically focus on that area. The autofocus indicator is not available when you are using the
second (front) camera.
3. Flash button Tap to switch between various camera flash modes.
Important: Make sure the microSD card is installed before you use the camera or camcorder. All pictures or videos that
you capture using your device are stored on the microSD card. For more information on how to install a
microSD card on your device, see “Inserting the microSD Card” on page 73.
2H. Camera and Multimedia
1
2
3
4
5
6
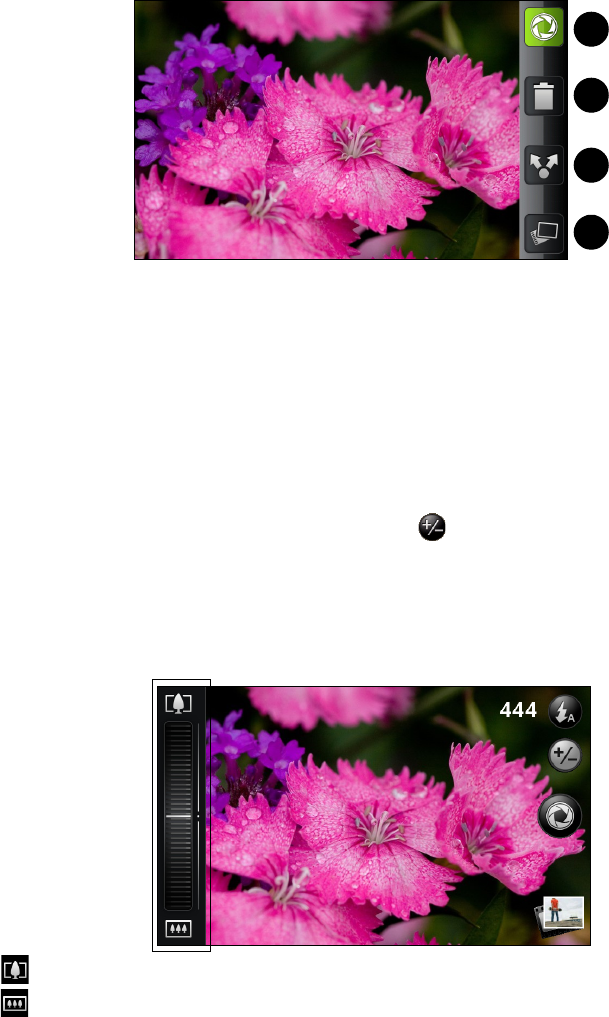
76 2H. Camera and Multimedia
4. Zoom button displays or hides the onscreen zoom bar. For more information, see “Zooming.” The zoom
button is not available when you are using the second (front) camera.
5. Shutter release button Tap this button to take a photo or begin capturing video. Tap it again to stop
capturing video.
6. View button Opens the Gallery application so you can browse through and view the photos and videos in
your storage card. For more information, see “Viewing Pictures and Videos Using Gallery.”
Review Screen
After capturing a photo or video, the review screen lets you save, view, send, or delete the picture or video by
tapping a button at the bottom of the screen.
1. Go Back to the live camera or camcorder screen.
2. Delete the captured image or video.
3. Share the captured photo or video to another phone or your computer using Bluetooth, send it by email
or multimedia message, or select a social network where you want to upload it to.
4. View the captured image or video in Gallery.
Zooming
Before taking a photo or video, you can first use the onscreen zoom bar to zoom in or out of your subject.
1. To display the onscreen zoom bar, tap the zoom button . You can also slide your finger up or down
the viewfinder screen. While the zoom bar is shown on the viewfinder screen, you will also see the
remaining photo shots or remaining video recording duration on the upper-right side of the screen.
2. You can do the following:
ⅢTo slowly zoom in or out, slide your finger up or down the viewfinder screen. You can also drag your
finger along the zoom bar.
ⅢTap to zoom in to the highest magnification.
ⅢTap to zoom out to the actual size.
1
2
3
4
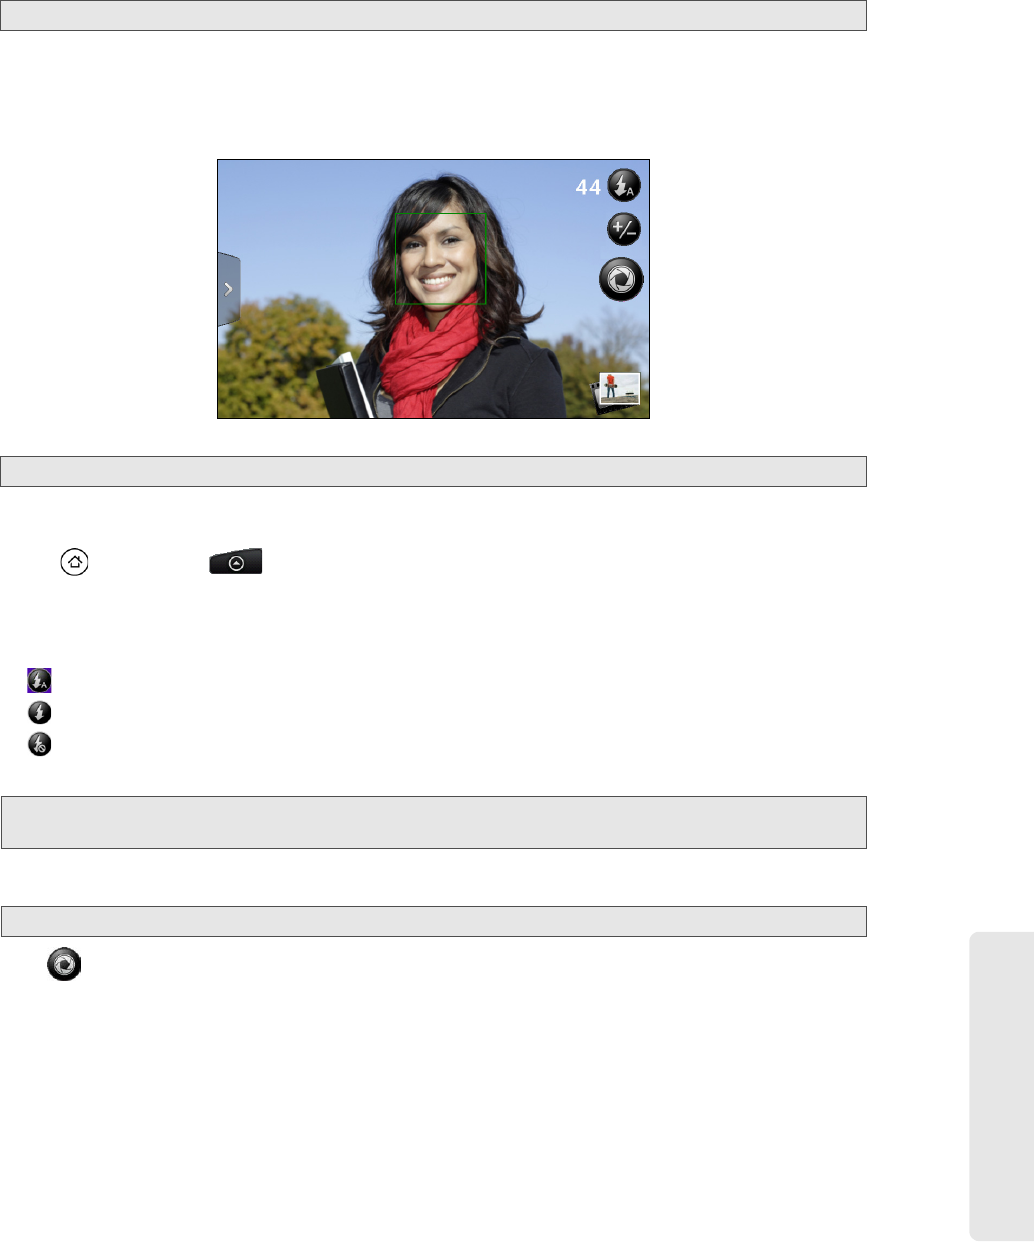
Camera and Multimedia
2H. Camera and Multimedia 77
3. After you’re done, wait for a few seconds for the zoom bar to automatically disappear from the screen.
You can also tap the zoom button again or tap the viewfinder screen to hide it.
Face Detection
When you’re autofocusing the device’s camera to take photos of people, the camera can automatically
recognize faces and adjust the focus.
Taking Pictures
1. Press and then tap > Camera.
2. Before taking the photo, you can zoom in on your subject. For more information, see “Zooming.”
3. On the Viewfinder screen, tap the flash button repeatedly to select a camera flash mode depending on
your lighting conditions:
Ⅲ Auto flash
Ⅲ Flash on
Ⅲ Flash off
4. Frame your subject on the screen.
5. You can either let the camera autofocus on the center of the screen, or you can touch another area on
the screen that you want to focus on.
6. Tap to take the photo.
7. Choose what you want to do with the photo you’ve just taken. See “Review Screen” for details.
Note: Zooming is not available when you are using the second (front) camera.
Note: Face detection does not work in video mode and is not available when you are using the second (front) camera.
Tip: Hold the device vertically when taking portrait shots or hold the device horizontally when taking landscape shots. By
doing this, you do not need to rotate the photo after capturing it.
Note: The second camera (front) is fixed-focus and does not support zooming and face detection.
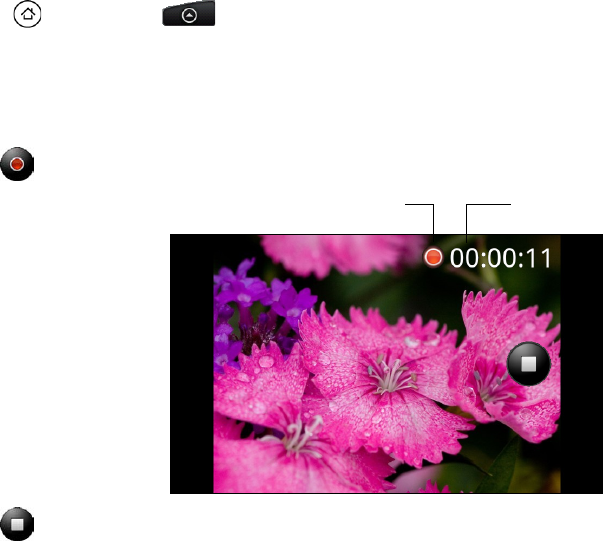
78 2H. Camera and Multimedia
Camera Flash FAQ
Camera flash light doesn’t turn on?
The flash light quickly consumes battery power. To save battery power, the camera disables the flash light or
locks it to Flash off mode (even when you have set it to Auto flash or Flash on) when one of the following
occurs:
ⅷYou have an incoming call. If you have set the flash light to Flash on, it turns back on after you answer and
end the call.
ⅷYour device’s battery level reaches 20% or lower. Recharge the battery so that the camera can have
enough battery power to use the flash light.
ⅷCold weather lowers battery performance and affects the flash light. To make sure the camera has
enough battery life to power up the flash light, keep your device warm. When not in use, put the device
inside your jacket to keep it warm, and try to avoid sudden temperature changes that may affect battery
performance.
Capturing Videos
1. Press and then tap > Camcorder.
2. Before capturing the video, you can zoom in on your subject. For more information, see “Zooming.”
3. Frame your subject on the screen.
4. You can either let the camcorder autofocus on the center of the screen, or you can touch another area on
the screen that you want to focus on.
5. Tap to start capturing video.
6. Tap again to stop capturing.
7. Choose what you want to do with the video you’ve just captured. See “Review Screen” for details.
Recording indicator Capture
duration
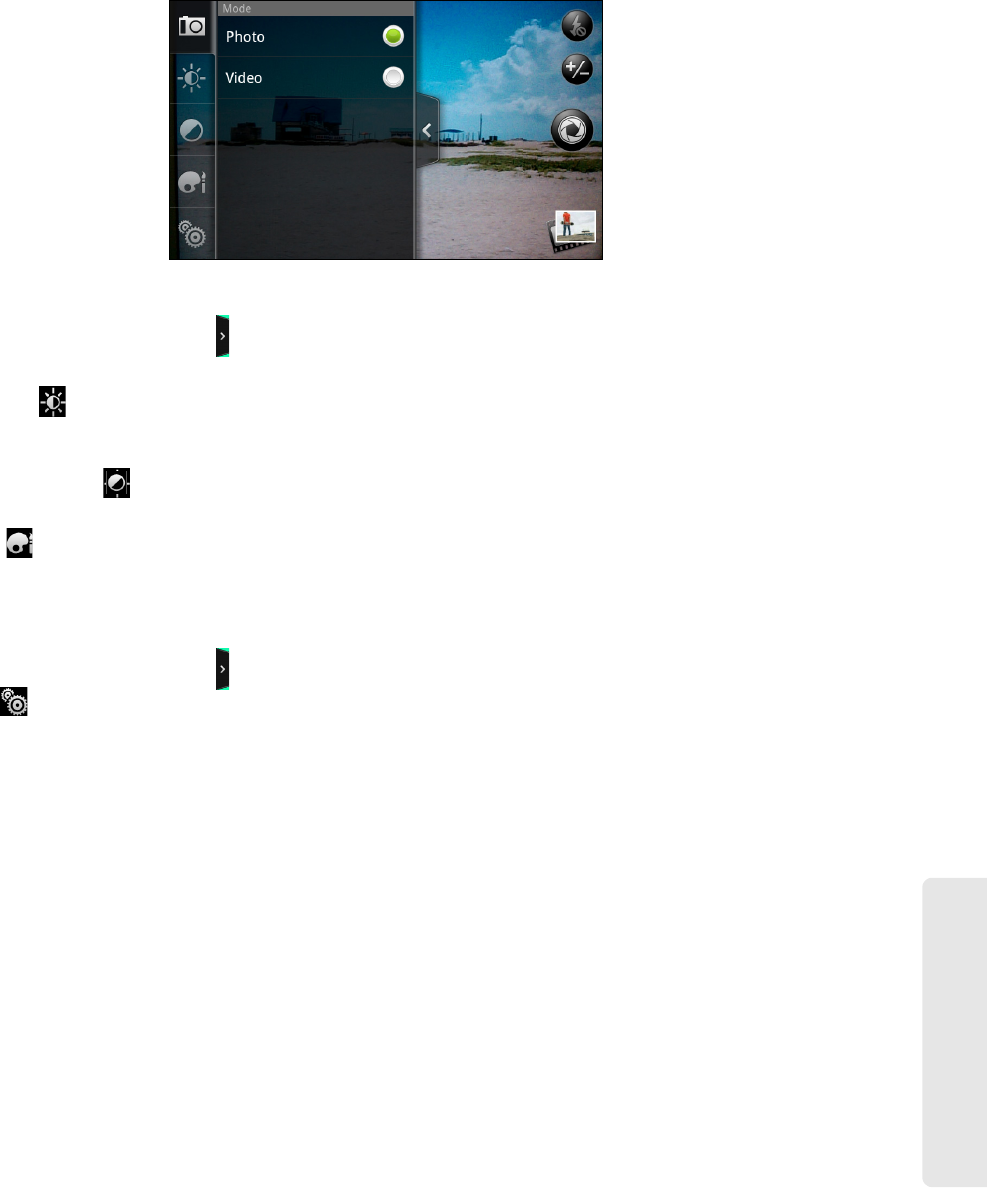
Camera and Multimedia
2H. Camera and Multimedia 79
Camera Settings
Open the menu panel to change basic camera settings and access more camera settings. You can also
switch between photo and video modes from the menu panel.
Changing Basic Settings
1. On the viewfinder screen, tap to open the menu panel.
2. To change basic camera settings, tap one of these icons in the menu panel:
ⅷExposure
There’s a brightness bar that allows you to adjust the brightness level. Slide your finger up or down the
brightness bar to increase or decrease brightness.
ⅷImage properties
Slide your finger across each of the slider bars to adjust the contrast, saturation, and sharpness.
ⅷEffect
You can apply a special effect to photos and videos that you will capture. Scroll through the Effect
menu and choose from effects such as adding a sepia tone, solarization, and posterizing.
Changing Advanced Settings
1. On the viewfinder screen, tap to open the menu panel.
2. Tap in the menu panel to display the Settings menu and access more camera settings. You can
change the following settings from the Settings menu:
ⅷSwitch camera: Lets you switch between the main camera and the second (front) camera.
ⅷWhite balance: Lets you change the white balance to enable the camera to capture colors more accurately
by adjusting to your current lighting environment. White balance settings include: Auto, Incandescent,
Fluorescent, Daylight, and Cloudy.
ⅷISO (photo mode only): Lets you choose an ISO level or set it back to Auto. Higher ISO numbers are better
for taking pictures in low light conditions. This option is not available when you are using the second
(front) camera.
ⅷResolution: Lets you select a photo or video resolution to use for capturing.
ⅷWidescreen (photo mode only): Lets you change the ratio between the width and height of your pictures.
When this check box is selected (default), photo resolutions available for selection are in a 3:2 ratio and
you can use the entire viewfinder screen to frame your subject. When not selected, photo resolutions
available for selection are in a standard 4:3 ratio. This option is not available when you are using the
second (front) camera.
ⅷStorage: Lets you select where to save captured photos or videos. You can select the storage card or
internal memory, if available.
ⅷQuality (photo mode only): Lets you select the quality level to use for capturing photos.

80 2H. Camera and Multimedia
ⅷSelf-timer (photo mode only): Lets you select take a self-portrait or group photo; you can set the self-timer
to either 2 seconds or 10 seconds.
ⅷGeo-tag photos (photo mode only): Lets you store the GPS location in your captured photos.
ⅷEncoding type (video mode only): Lets you choose the type of compression to use when capturing video.
ⅷRecording length (video mode only): Lets you set the maximum duration or file size for capturing video.
ⅷRecord with audio (video mode only): Lets you choose whether to record audio when capturing videos.
ⅷMetering mode: Lets you set how the camera measures the amount of light to calculate the best exposure:
ⅢSpot metering mode allows the camera to measure light around the focus point.
ⅢCenter area mode allows the camera to measure light in the center.
ⅢAverage mode allows the camera to measure light in the whole image.
This option is not available when you are using the second (front) camera.
ⅷReview duration: Lets you specify how long a captured photo or video is displayed on the review screen
before the camera changes back to the viewfinder screen.
ⅷFlicker adjustment: Lets you reduce flicker when taking indoor shots under fluorescent lighting. Keep this
setting on Auto or manually set it to match the frequency (50Hz or 60Hz) of the electrical power used for
the country you are in.
ⅷAuto Focus: Enables or disables centered autofocus. Autofocus is enabled by default. This option is not
available when you are using the second (front) camera.
ⅷFace detection: Allows the camera to recognize faces and automatically adjust the focus.
Face detection is turned off when you disable Auto Focus and is not available when you are using the
second (front) camera.
ⅷShutter sound: Allows you to select whether the camera plays a shutter sound when you press the shutter
release.
ⅷTime stamp (photo mode only): Lets you add the date and time to captured photos.
ⅷGrid (photo mode only): Allows you to display a grid on the viewfinder screen so you can easily frame and
center your subject before taking the photo.
ⅷReset to default: Lets you change the camera back to default settings.
Closing Camera
On the camera screen, press or .
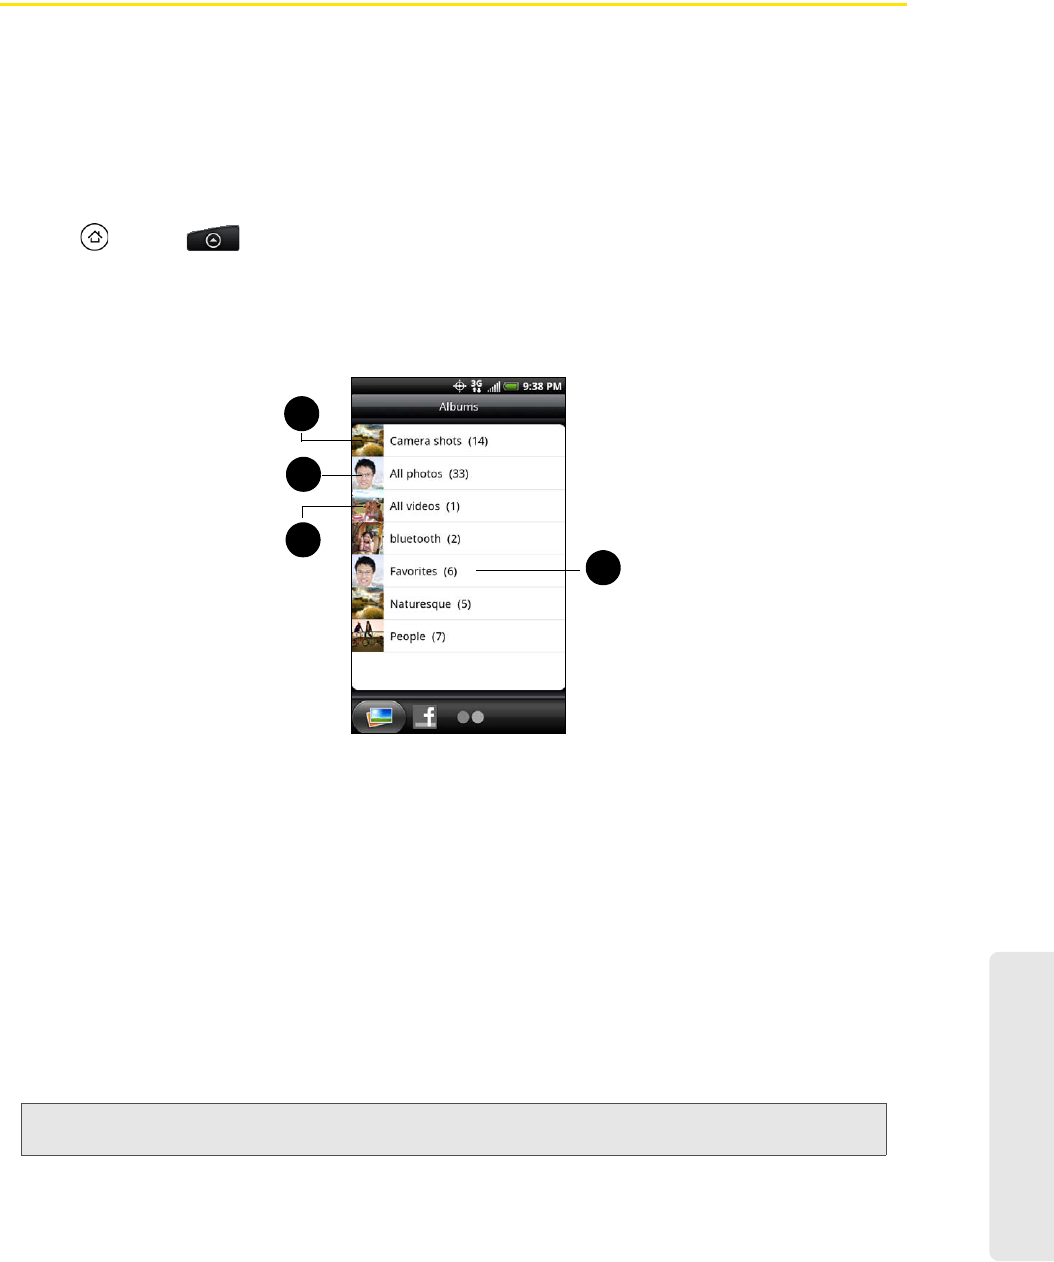
Camera and Multimedia
2H. Camera and Multimedia 81
Viewing Pictures and Videos Using Gallery
Using the Gallery application, you can view photos and watch videos that you’ve taken with your device’s
camera, downloaded, or copied onto your storage card. You can also take a look at your photos and your
friends’ photos that are on your social networks (Facebook and Flickr only).
For photos that are in your storage card, you can do basic editing such as rotating and cropping. You can
also easily make a photo as your contact picture or wallpaper and share photos with your friends.
Opening Gallery
ᮣPress and tap > Gallery.
The Gallery application opens in the Albums tab where your photos and videos are organized by albums for
easy viewing.
If you stored your files in folders (directories) on the microSD card, Gallery will display these folders as
separate albums.
1. Camera shots lets you view photos and videos that are stored in the camera’s folder.
2. All photos lets you view all photos that are stored in all the folders on the storage card.
3. All videos lets you view all videos that are stored in all the folders on the storage card.
4. Photos and videos that you set as your favorites will be grouped under Favorites.
Photos or videos that are under the root path of your storage card (that are not contained in folders) are
grouped in Others.
Folders in your storage card that contain photos and videos will also be treated as albums and will be listed
below the preset albums. The actual folder names will be used as the album names. If you have
downloaded any photos and videos, these will be placed in the All downloads album.
When viewing pictures in Gallery, scroll up the screen to view more albums. Simply tap an album to view the
photos or videos in that album.
Note: Depending on the number of pictures stored on the microSD card, it may take awhile for Gallery to load all your
photos on the screen.
1
2
3
4
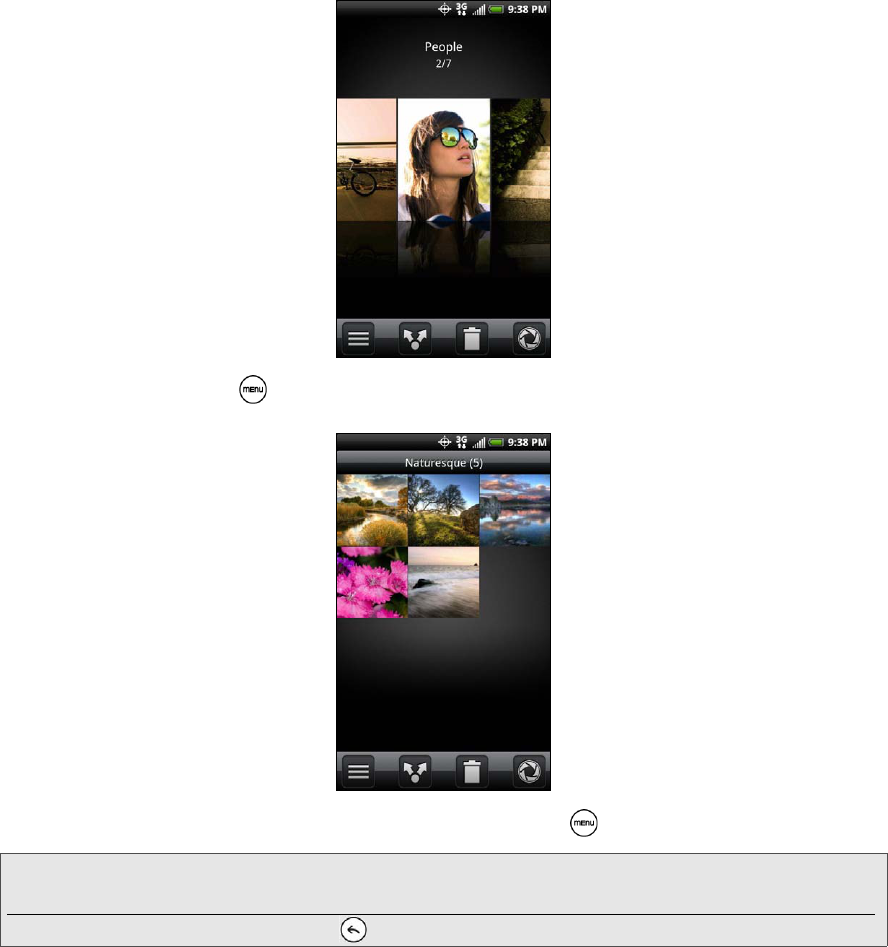
82 2H. Camera and Multimedia
Viewing Photos and Videos
After selecting an album from the Albums tab, you can browse through the photos and videos of that album
either in filmstrip or grid view. Tap a photo or video to view it in full screen.
By default, photos and videos are presented in a horizontal filmstrip. Slide your finger left or right across the
filmstrip to go through the photos and videos.
From the filmstrip view, press and then tap Grid view to browse photos and videos by thumbnails.
Slide your finger up or down to scroll through the thumbnails.
To change back to displaying photos and videos in a filmstrip, press and then tap Filmstrip view.
Note: Whether you’re in filmstrip or grid view, you can press and hold on a photo or video to open a selection menu and
choose what to do with the photo or video.
If you want to select another album, tap to return to the Albums tab.

Camera and Multimedia
2H. Camera and Multimedia 83
Zooming In or Out on a Photo
There are two ways you can zoom in or out of a photo:
ᮣTap the screen twice quickly to zoom in, then tap the screen twice quickly again to zoom out.
– or –
You can also use pinch zooming. Press your thumb and index finger on the screen and then spread your
fingers apart to zoom in. Pinch your fingers together to zoom out.
Watching Video
The screen automatically switches to landscape mode when you play a video. Use the onscreen controls to
play, pause, or stop the video.
The video is displayed in full screen size. You can tap to make it best fit on the screen based on the
video size. Tap the button again to change back to full screen size.
You can play these high-definition MP4 video formats in Gallery:
ⅢH.263 profile 0 @ 30 fps, WVGA (800x480), max 2 Mbps
ⅢMPEG-4 simple profile @ 30 fps, 720p (1280x720), max 6 Mbps
ⅢH.264 baseline profile @ 30 fps, 720p (1280x720), max 6 Mbps
Viewing Photos in Your Social Networks
Using Gallery, you can view your photos and your friends’ photos that are in your social networks (Facebook
and Flickr only).
Viewing Photos on Facebook
You need to be logged in to your Facebook account to view Facebook photos.
1. Press and tap > Gallery.
Zooming in Zooming out
84 2H. Camera and Multimedia
2. Tap the Facebook tab.
3. Tap your account name or your friend’s account on the list to view the pictures in the account.
You can view photos in your online albums the same way as how you view photos in your storage card.
Viewing Photos on Flickr
You need to be logged in to your Flickr account to view Flickr photos.
1. Press and tap > Gallery.
2. Tap the Flickr tab.
You may be asked to give authorization for the application to connect to the Flickr website. If this
happens, you need to give authorization to access your Flickr account.
3. Tap your account name or your friend’s account on the list to view the photos in the account.
You can view photos in your online albums the same way as how you view photos in your storage card.
Viewing Photos and Videos on Another Display Device
An HDMI jack at the bottom panel of your device lets you connect it with an HDMI-compliant external display
device such as an LCD TV.
1. Connect one end of the HDMI cable to the HDMI jack at the bottom panel of your device.
CAUTION! Inserting an accessory into the incorrect jack may damage the device.
2. Make sure the external display device is turned off, and then connect the other end of the HDMI cable to
the HDMI jack on the external display device.
3. Turn on the external display device and then select the HDMI video input. Refer to the display’s
documentation for details.
4. On your device, press and tap > Gallery.
5. Open a photo or video album, and then do any of the following:
ⅢStart a photo slideshow by pressing and tapping Slideshow.
ⅢTap a video to start playing it on the screen.
The device screen should show on the external display device.
Working with Photos
Whether you’re browsing photos in filmstrip or grid view in the Gallery application, you can press and hold
on a photo to open a selection menu and choose what to do with it. You can choose to delete the photo,
rotate or crop it, and more.
Rotating and Saving a Photo
1. Press and tap > Gallery.
2. On the Albums tab, tap an album.
3. Choose whether to browse photos and videos in the album in filmstrip or grid view. For more information,
see “Viewing Photos and Videos.”
4. Press and hold on the photo that you want to rotate.
5. In the menu that opens, tap Rotate, and then select either Rotate left or Rotate right.
Note: An HDMI cable must be purchased separately. It is not included with your device. (An HTC-approved HDMI cable
may be purchased at www.sprint.com/accessories.)
Tip: You can also rotate a photo while you’re viewing it in full screen. Press , tap Rotate, and then select either
Rotate left or Rotate right.
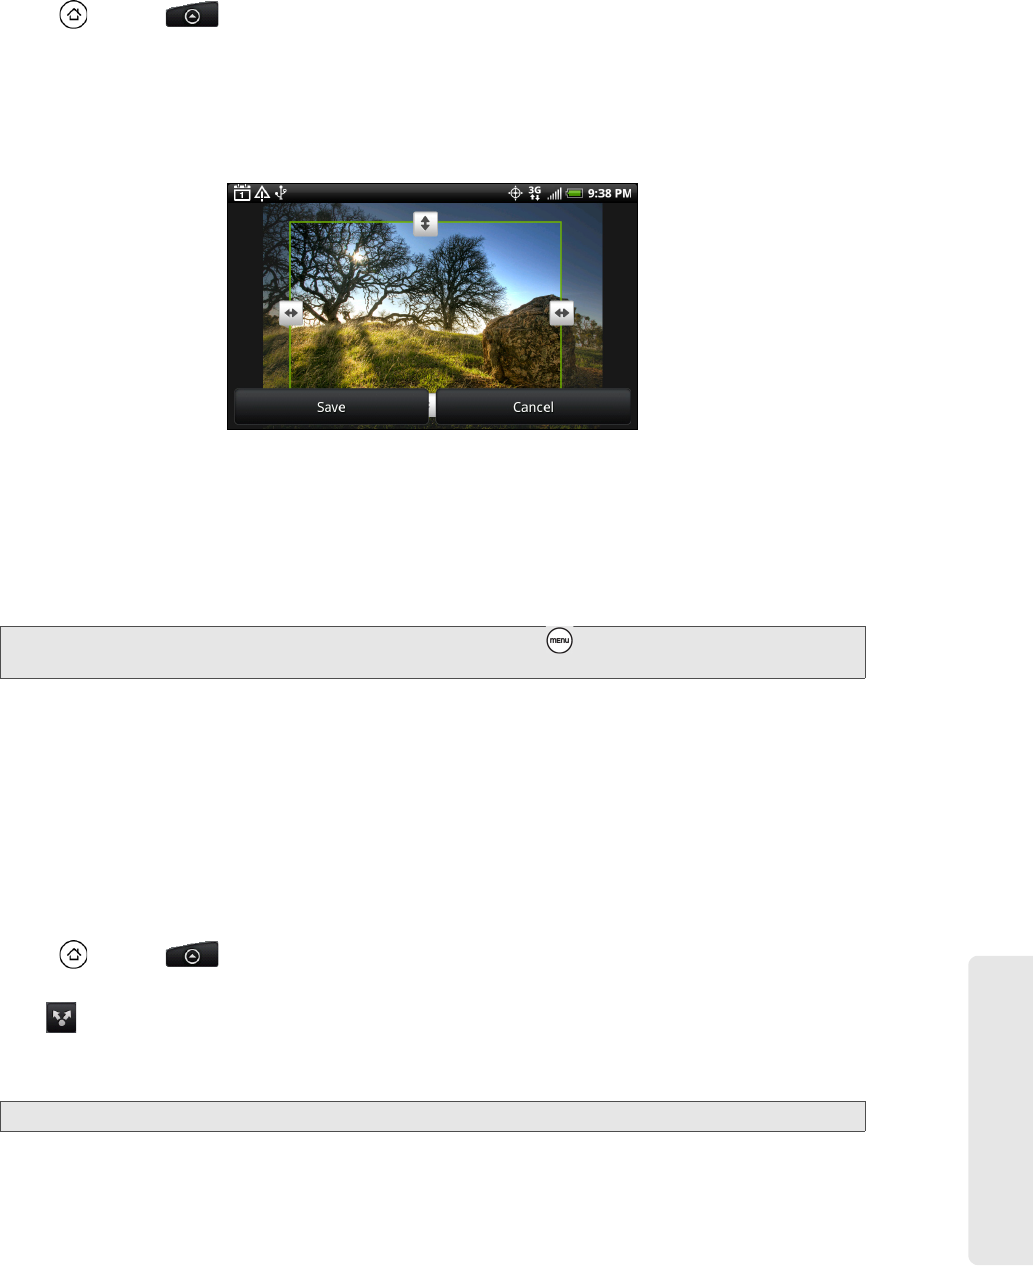
Camera and Multimedia
2H. Camera and Multimedia 85
Cropping a Photo
1. Press and tap > Gallery.
2. On the Albums tab, tap an album.
3. Choose whether to browse photos and videos in the album in filmstrip or grid view. For more information,
see “Viewing Photos and Videos.”
4. Press and hold on the photo that you want to rotate.
5. In the menu that opens, tap Crop. A crop box then appears on the photo.
6. To adjust the crop box size, press and hold the edge of the box. When directional arrows appear, drag
your finger inward to or outward to resize the crop box.
7. To move the crop box to the part of the photo that you want to crop, drag the crop box to the desired
position.
8. Tap Save to apply the changes to the picture.
The cropped picture is saved in the storage card as a copy. The original picture remains unedited.
Sharing Photos and Videos
The Gallery application lets you send photos and videos using email or multimedia message. You can share
photos on your social networks (such as Facebook, Flickr, Picasa, and Twitter) and share videos on YouTube
or Qik. You can also send them to another phone or your computer using Bluetooth.
Sending Photos or Videos by Email
You can send several photos, videos, or both in an email message. They are added as file attachments in
your email.
1. Press and tap > Gallery.
2. Tap the album where the photos or videos you want to share are in.
3. Tap and then on the Share options menu, tap Gmail or Mail.
4. Select the photos or videos you want to share and then tap Next.
5. Compose your message and then tap Send.
Tip: You can also crop a photo while you’re viewing it in full screen. Press , tap More > Crop, and follow the same
cropping steps as above.
Note: If you selected Mail and you have multiple email accounts, the default email account will be used.

86 2H. Camera and Multimedia
Sending a Photo or Video by Multimedia Message
Although you can send several photos or videos in a multimedia message, it may be better to just send one
at a time, especially if the files are big in size.
1. Press and tap > Gallery.
2. Tap the album where the photos or videos you want to share are in.
3. Tap and then on the Share options menu, tap Messages.
4. Tap the photo or video you want to send. The photo or video is automatically added into the multimedia
message.
5. Compose your message and then tap Send.
Sending Photos or Videos Using Bluetooth
You can select several photos, videos, or both and send them to someone’s phone or your computer using
Bluetooth.
1. Press and tap > Gallery.
2. Tap the album where the photos or videos you want to share are in.
3. Tap and then on the Share options menu, tap Bluetooth.
4. Select the photos or videos you want to share and then tap Next.
In the next few steps, you’ll be asked to turn on Bluetooth on your device and connect to the receiving
Bluetooth device so the files can be sent. For more information, see “Bluetooth” on page 94.
Sharing Photos on Facebook for HTC Sense
You need to be logged in to your Facebook account to be able to upload photos.
1. Press and tap > Gallery.
2. Tap the album where the photos you want to share are in.
3. Tap and then on the Share options menu, tap Facebook for HTC Sense.
4. Select the photos you want to share and then tap Next.
5. Add a caption for the photos and then tap Upload.
6. Select which album to upload to and set privacy settings for the uploaded pictures. Tap Done.
Sharing Photos on Facebook for Android
You need to be logged in to your Facebook account to be able to upload photos. When using Facebook for
Android, you can only upload one photo at a time.
1. Press and tap > Gallery.
2. Tap the album where the photos you want to share are in.
3. Tap and then on the Share options menu, tap Facebook.
4. Select the photo you want to share and then tap Next.
5. Add a caption for the photo and then tap Upload.
6. Check the status bar for the upload information.
Camera and Multimedia
2H. Camera and Multimedia 87
Sharing Photos on Flickr
You need to be logged in to your Flickr account to be able to upload pictures.
1. Press and tap > Gallery.
2. Tap the album where the photos or videos you want to share are in.
3. Tap and then on the Share options menu, tap Flickr.
4. Select the pictures you want to share and then tap Next.
5. Add a description for the photos and then tap Upload.
6. Select which album to upload to and set privacy settings for the uploaded pictures. Tap Done.
Sharing Photos on Picasa
You need to be signed in to a Google Account to be able to upload pictures to the Picasa™ photo organizing
service.
1. Press and tap > Gallery.
2. Tap the album where the photos or videos you want to share are in.
3. Tap and then on the Share options menu, tap Picasa.
4. Select the pictures you want to share and then tap Next.
5. Select the online album where you want to upload the pictures, or tap to create a new album.
6. Tap Upload. You can view the photos online at http://picasaweb.google.com.
Sharing Videos on YouTube
You can share your videos by uploading them to YouTube™. Before you do this, you must create a YouTube
account and sign in to that account on your device.
1. Press and tap > Gallery.
2. Tap the album where the photos or videos you want to share are in.
3. Tap and then on the Share options menu, tap YouTube.
4. Select the videos you want to share and then tap Next.
5. Enter the prompted information, such as description and tags, and select a privacy option.
6. Tap Upload.
Closing Gallery
ᮣWhile in the Gallery screen, press to close the application.
Note: If you are not logged in to your Flickr account, you will be prompted to do so and download the HTC Flickr
Downloader application. Follow screen instructions to proceed.
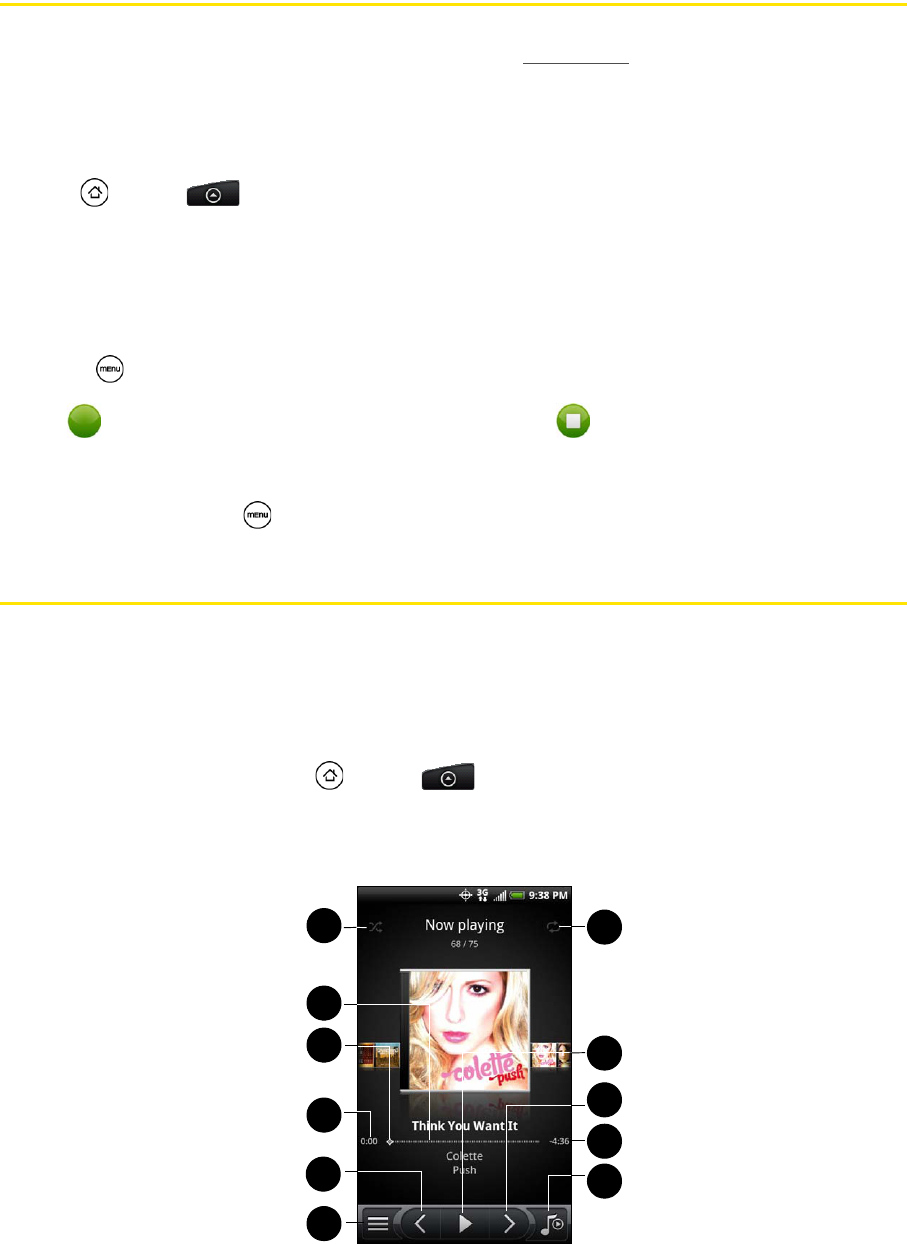
88 2H. Camera and Multimedia
Sharing Live Videos with Qik
Use Qik to share live videos from your device. Before you start sharing live videos in Qik, you must create
and sign in to your Qik account. To create a Qik account, visit http://qik.com and click Sign Up.
Sharing a Live Video in Qik
Qik lets you stream live video from your device to your Qik account where your friends can view it.
1. Press and tap > Qik.
2. When prompted, sign in to your Qik account.
3. On the Qik screen, do any of the following:
ⅢTap Share to share the video with specific contacts.
ⅢTap Title to specify a title for the live video.
ⅢTap Public to set the video privacy settings to Private or Public.
ⅢPress and tap Settings to set up your sharing preferences, video quality, the camera to use, and
more.
4. Tap to start streaming live video to your Qik account. Tap to stop streaming live video.
Closing Qik
ᮣOn the Qik screen, press and tap Exit.
Listening to Music
Enjoy listening to songs and music on your device using the Music application. You need to copy music files
to your storage card first to use the Music application to play music. To find out how to copy files to the
storage card, see “Using the Device’s microSD Card as a USB Drive” on page 74.
Playing Music
To open the Music application, press and tap > Music.
The Music application opens in the Playback screen. Use the onscreen controls to control music playback,
select a song to play, repeat songs, and more. On the Playback screen, you can also swipe your finger from
right to left or left to right to go to the next or previous music album.
3
2
1
5
410
6
8
7
9
11
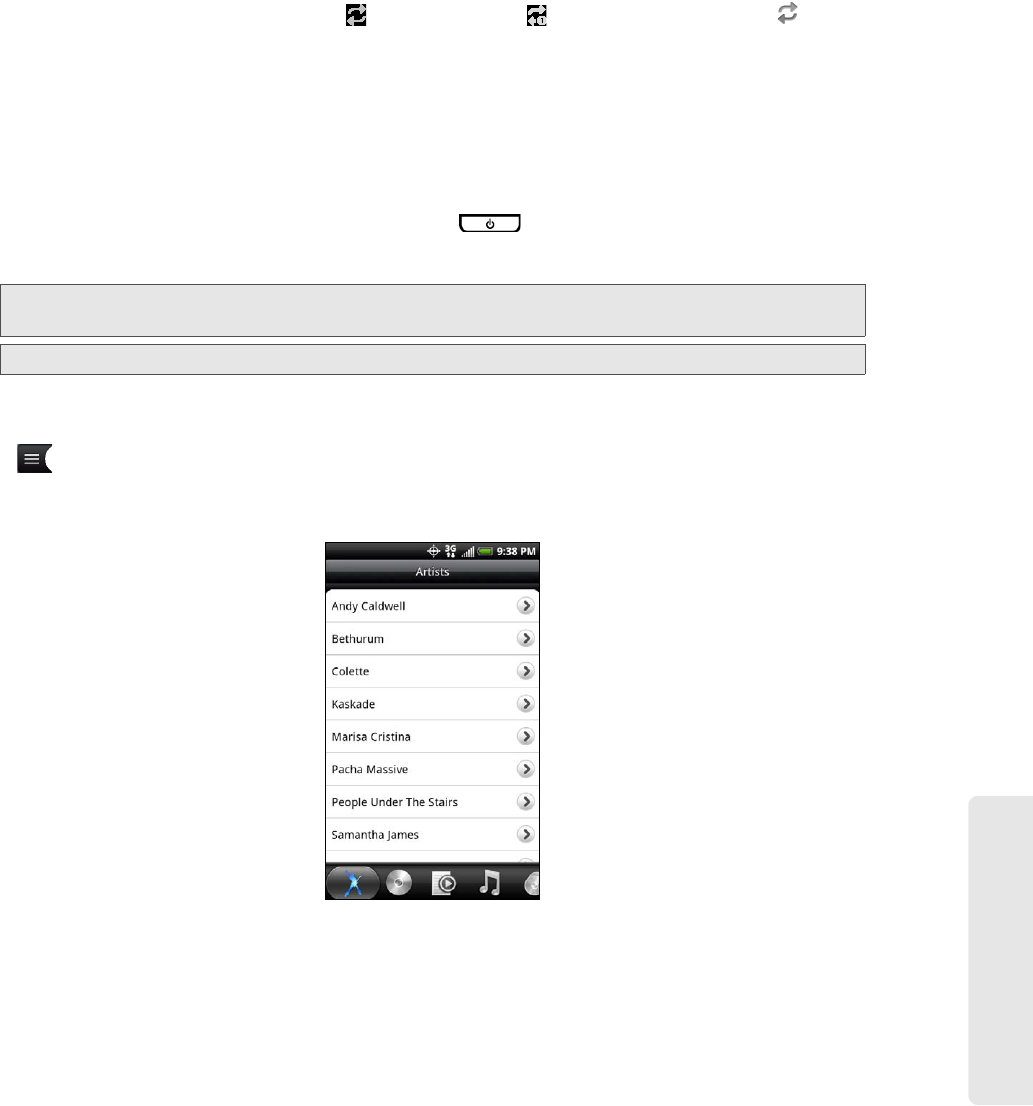
Camera and Multimedia
2H. Camera and Multimedia 89
1. Tap to turn shuffle on or off. (Shuffle is off when button is gray.)
2. Shows the progress bar.
3. Press and drag to jump to another part of the song.
4. Shows the elapsed time.
5. Tap to go to the previous song in the Now playing list.
6. Tap to go to the Library.
7. Tap to cycle through the repeat modes: Repeat all songs, Repeat current song, and don’t
repeat.
8. Tap to pause or resume playing the song.
9. Tap to go to the next song in the Now playing list.
10. Shows the remaining time.
11. Tap to toggle between showing the Now playing list and Playback screen.
When you are playing music and the screen turns off, you can control the music playback right from the
Lock screen when you “wake up” the device by pressing . If you do not see the playback controls on
the Lock screen, tap anywhere on the screen to display the playback controls.
Browsing Music in the Library
Tap at the bottom-left corner of the Playback screen or the Now playing list screen to go to the Library.
In the Library, your music is organized into different categories such as Artists, Albums, Playlists, Genres,
Composers, and more. Select a category by tapping one of the category tabs at the bottom of the screen.
When you tap a song in a category to play it, the Now playing list is updated with the song list from your
selected category.
Tip: You can also swipe your finger from right to left or left to right to go to the next or previous song in the
Now playing list.
Note: Press the volume up or down button to adjust the playback volume.

90 2H. Camera and Multimedia
Creating Playlists
Personalize your music experience by creating music playlists. Make a playlist containing just your favorite
songs or create one to match your mood for the day. You can make as many playlists as you like.
1. Press and tap > Music.
2. Tap at the bottom-left corner of the screen to go to the Library.
3. In the Library, tap or slide your finger on the bottom row to go to the Playlists category.
4. Tap Add playlist.
5. Enter a playlist name, and then tap Add songs to playlist.
6. Tap or slide your finger on the bottom row to change among the different categories. If you go to the
Songs category, you can see a complete list of songs on your storage card.
7. Select the check boxes of songs you want to add to the playlist and then tap Add.
8. Tap Save.
Playing the Songs in a Playlist
1. In the Library, tap or slide your finger on the bottom row to go to the Playlists category.
2. Tap a playlist to open it.
3. Tap the first song or any song in the playlist.
When you tap a song in the list to play it, the Now playing list is updated with the song list from your playlist.
Managing Your Playlists
After creating a playlist, you can add more songs to it, rearrange their order, and more.
To add songs to a playlist:
1. In the Library, tap or slide your finger on the bottom row to go to the Playlists category.
2. Tap a playlist to open it.
3. Press and then tap Add songs.
4. Go to the Songs category or any other category.
5. Select the songs you want to add to the playlist and then tap Add.
To rearrange the songs in a playlist:
1. In the Library, tap or slide your finger on the bottom row to go to the Playlists category.
2. Tap a playlist to open it.
3. Press and then tap Change order.
4. Press and hold at the end of the song title you want to move. When the row is highlighted, drag it to
its new position, and then release.
5. Tap Done.
Tip: While playing back a song, press and then tap Add to playlist to add the current song to a playlist.