Contents
- 1. user manual 1 of 5
- 2. user manual 2 of 5
- 3. user manual 3 of 5
- 4. user manual 4 of 5
- 5. user manual 5 of 5
user manual 2 of 5
Turning off Home dialing
If you prefer to manually enter complete phone numbers to call while roaming, you
can turn off Home dialing.
1. From the Home screen, press , and then tap Settings > Call.
2. Select the Home country check box.
Call services
HTC Wildfire S can directly link to the mobile phone network, and enable you to
access and change the settings of various phone services. Call services may include
call forwarding, call waiting, voicemail, and more. Contact your mobile operator to find
out about the availability of call services.
To open call services, press from the Home screen, and then tap Settings > Call.
Fixed Dialing
Numbers
Restrict outgoing calls to a fixed set of numbers. To enable this
feature, you must know your SIM card’s PIN2 code.
Voicemail service Shows the current voicemail service being used.
Voicemail settings Specify another voicemail number aside from the voice mail
number on your SIM card.
Clear voicemail
notification
If you have a notification of a new voicemail, you can clear the
notification with this option.
Phone settings Edit the call reject message, choose whether to open the
message editor when you reject a call with a message, and
choose whether to allow automatic saving of an unknown
contact number when a call with that number ends.
Cell broadcast Enable or disable receipt of cell broadcast messages from your
service provider.
Cell broadcast
settings
Configure channels and language for cell broadcast messages.
Call forwarding Select how you want to handle busy, unanswered, and
unreachable calls. You can also set the call forwarding option for
all incoming calls.
Call barring
settings
Choose whether to block various categories of incoming and
outgoing calls.
Additional call
settings
Enable or disable operator services such as caller ID and call
waiting.
Home country Enable or disable the Home dialing feature.
Home dialing Set the country code to be automatically added before the
phone numbers you dial while you're roaming.
47 Phone calls
Only
Only
Only
Cell broadcast
Only
Cell broadcast
Only
Cell broadcast
Only
Cell broadcast
settings
Only
settings
Only
Call forwarding
Only
Call forwarding
Only
Only
Only
for
for
Clear voicemail
for
Clear voicemail
for
Phone settings
for
Phone settings
Edit the call reject message, choose whether to open the
for
Edit the call reject message, choose whether to open the
for
Cell broadcast
for
Cell broadcast
for
for
for
certification
Call
certification
Call
.
certification
.
HTC Wildfire S can directly link to the mobile phone network, and enable you to
certification
HTC Wildfire S can directly link to the mobile phone network, and enable you to
access and change the settings of various phone services. Call services may include
certification
access and change the settings of various phone services. Call services may include
call forwarding, call waiting, voicemail, and more. Contact your mobile operator to find
certification
call forwarding, call waiting, voicemail, and more. Contact your mobile operator to find
from the Home screen, and then tap
certification
from the Home screen, and then tap
certification
Restrict outgoing calls to a fixed set of numbers. To enable this
certification
Restrict outgoing calls to a fixed set of numbers. To enable this
feature, you must know your SIM card’s PIN2 code.
certification
feature, you must know your SIM card’s PIN2 code.
Shows the current voicemail service being used.
certification
Shows the current voicemail service being used.
Specify another voicemail number aside from the voice mail
certification
Specify another voicemail number aside from the voice mail
number on your SIM card.
certification
number on your SIM card.
certification
If you have a notification of a new voicemail, you can clear the
certification
If you have a notification of a new voicemail, you can clear the
notification with this option.
certification
notification with this option.
certification
certification
certification
certification
certification
2011/03/07
choose whether to allow automatic saving of an unknown
2011/03/07
choose whether to allow automatic saving of an unknown
contact number when a call with that number ends.
2011/03/07
contact number when a call with that number ends.
Enable or disable receipt of cell broadcast messages from your
2011/03/07
Enable or disable receipt of cell broadcast messages from your
service provider.
2011/03/07
service provider.
2011/03/07
2011/03/07
Configure channels and language for cell broadcast messages.
2011/03/07
Configure channels and language for cell broadcast messages.
2011/03/07
Select how you want to handle busy, unanswered, and
2011/03/07
Select how you want to handle busy, unanswered, and
unreachable calls. You can also set the call forwarding option for
2011/03/07
unreachable calls. You can also set the call forwarding option for
all incoming calls.
2011/03/07
all incoming calls.
2011/03/07
2011/03/07
Choose whether to block various categories of incoming and
2011/03/07
Choose whether to block various categories of incoming and
outgoing calls.
2011/03/07
outgoing calls.
2011/03/07
2011/03/07
2011/03/07
2011/03/07
2011/03/07
2011/03/07
Additional call
2011/03/07
Additional call
settings
2011/03/07
settings
Enable or disable operator services such as caller ID and call
2011/03/07
Enable or disable operator services such as caller ID and call
waiting.
2011/03/07
waiting.
2011/03/07
2011/03/07
Home country
2011/03/07
Home country
2011/03/07
2011/03/07
Home dialing
2011/03/07
Home dialing
2011/03/07
2011/03/07
2011/03/07
2011/03/07

Accounts Add, modify, or remove Internet calling accounts. You can also
choose whether to receive incoming Internet calls.
Use Internet
calling
Select whether to use Internet calling for all calls you make or
for Internet address calls only, or to be asked which you prefer
for each call you make.
Turning Airplane mode on or off
In many countries, you are required by law to turn off the phone while on board an
aircraft. A way to turn off the phone function is to switch your phone to Airplane
mode.
When you enable Airplane mode, all wireless radios on your phone are turned off,
including the call function, data services, Bluetooth, and Wi-Fi. When you disable
Airplane mode, the call function is turned back on and the previous state of Bluetooth
and Wi-Fi is restored.
To turn Airplane mode on or off, press and hold POWER, and then tap Airplane mode.
When enabled, the Airplane mode icon is displayed in the status bar.
48 Phone calls
Only
for
certification
certification
certification
Turning Airplane mode on or off
certification
Turning Airplane mode on or off
In many countries, you are required by law to turn off the phone while on board an
certification
In many countries, you are required by law to turn off the phone while on board an
aircraft. A way to turn off the phone function is to switch your phone to Airplane
certification
aircraft. A way to turn off the phone function is to switch your phone to Airplane
When you enable Airplane mode, all wireless radios on your phone are turned off,
certification
When you enable Airplane mode, all wireless radios on your phone are turned off,
certification
including the call function, data services, Bluetooth, and Wi-Fi. When you disable
certification
including the call function, data services, Bluetooth, and Wi-Fi. When you disable
Airplane mode, the call function is turned back on and the previous state of Bluetooth
certification
Airplane mode, the call function is turned back on and the previous state of Bluetooth
To turn Airplane mode on or off, press and hold POWER, and then tap
certification
To turn Airplane mode on or off, press and hold POWER, and then tap
When enabled, the Airplane mode icon
certification
When enabled, the Airplane mode icon
certification
2011/03/07
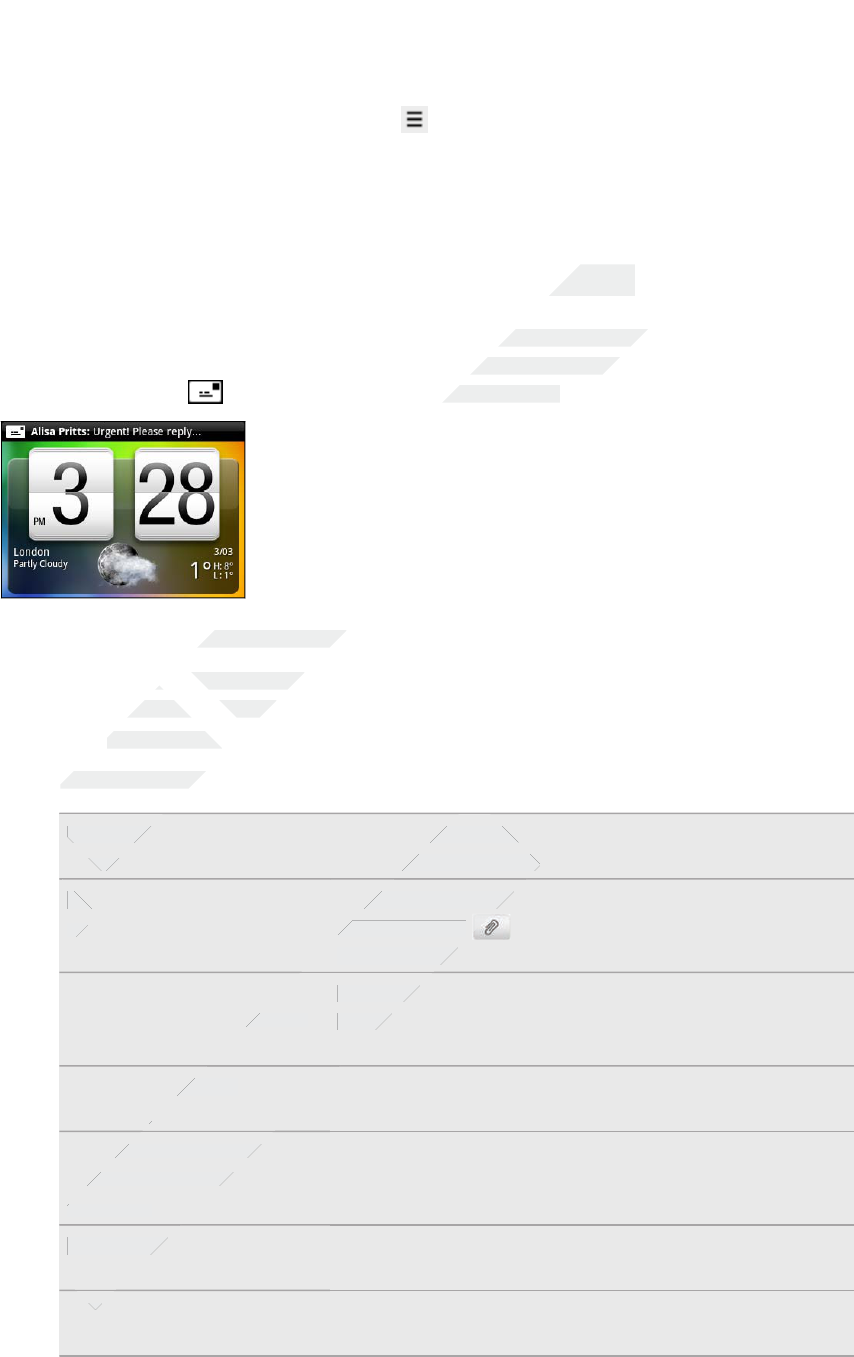
Messages
Opening Messages
Keep in touch with important people in your life. Use the Messages app to compose
and send text (SMS) and multimedia messages (MMS).
From the Home screen, tap > Messages. The All messages screen opens, where
all your sent and received messages are neatly grouped into conversations, by
contact name or phone number.
§Scroll up or down the list of conversations by
swiping your finger on the screen.
§Tap a contact name or number to view the exchange
of messages.
You can also view your messages on the Home screen with the Messages widget.
Sending a text message (SMS)
1. From the Home screen, tap > Messages.
2. Tap Compose message.
3. Fill in one or more recipients. You can:
§Enter the first few letters of a contact name or starting digits of a mobile
number. As you type, matching names with phone numbers from your
stored contacts are displayed. Tap a name or one of the contact’s numbers.
§Tap , and then select the phone numbers of the contacts to whom you
want to send the message. You can also select contact groups as
recipients. When you have selected all the message recipients, tap OK.
§Enter the complete phone numbers directly in the To field.
49 Messages
Only
Only
Only
Only
Only
Only
Only
Only
Only
You can also view your messages on the Home screen with the Messages widget.
Only
You can also view your messages on the Home screen with the Messages widget.
Sending a text message (SMS)
Only
Sending a text message (SMS)
for
for
for
for
You can also view your messages on the Home screen with the Messages widget.
for
You can also view your messages on the Home screen with the Messages widget.
certification
Keep in touch with important people in your life. Use the Messages app to compose
certification
Keep in touch with important people in your life. Use the Messages app to compose
and send text (SMS) and multimedia messages (MMS).
certification
and send text (SMS) and multimedia messages (MMS).
. The All messages screen opens, where
certification
. The All messages screen opens, where
all your sent and received messages are neatly grouped into conversations, by
certification
all your sent and received messages are neatly grouped into conversations, by
certification
certification
Scroll up or down the list of conversations by
certification
Scroll up or down the list of conversations by
swiping your finger on the screen.
certification
swiping your finger on the screen.
Tap a contact name or number to view the exchange
certification
Tap a contact name or number to view the exchange
of messages.
certification
of messages.
2011/03/07
2011/03/07
You can also view your messages on the Home screen with the Messages widget.
2011/03/07
You can also view your messages on the Home screen with the Messages widget.
Sending a text message (SMS)
2011/03/07
Sending a text message (SMS)
From the Home screen, tap
2011/03/07
From the Home screen, tap
2011/03/07
Compose message
2011/03/07
Compose message
.
2011/03/07
.
Fill in one or more recipients. You can:
2011/03/07
Fill in one or more recipients. You can:
Enter the first few letters of a contact name or starting digits of a mobile
2011/03/07
Enter the first few letters of a contact name or starting digits of a mobile
number. As you type, matching names with phone numbers from your
2011/03/07
number. As you type, matching names with phone numbers from your
stored contacts are displayed. Tap a name or one of the contact’s numbers.
2011/03/07
stored contacts are displayed. Tap a name or one of the contact’s numbers.
§
2011/03/07
§
Tap
2011/03/07
Tap
2011/03/07
want to send the message. You can also select contact groups as
2011/03/07
want to send the message. You can also select contact groups as
recipients. When you have selected all the message recipients, tap
2011/03/07
recipients. When you have selected all the message recipients, tap
4. Tap the box that says Add text, and then enter your message.
§There is a limit on the number of characters for a single text message (displayed
above the Send button). If you exceed the limit, your text message will be
delivered as one but will be billed as more than one message.
§Your text message automatically becomes a multimedia message if you enter an
email address as the recipient, add a message subject, attach an item, or compose
a very long message.
5. Tap Send, or press to save the message as a draft.
Sending a multimedia message (MMS)
1. From the Home screen, tap > Messages.
2. Tap Compose message.
3. Fill in one or more recipients. You can:
§Enter the first few letters of a contact name or starting digits of a mobile
number. As you type, matching names with phone numbers and email
addresses from your stored contacts are displayed. Tap a contact’s number
or email address. Email addresses will be displayed when Show email
address is selected in Recipient list settings.
§Tap , and then select the phone numbers of the contacts to whom you
want to send the message. You can also select contact groups as
recipients. When you have selected all the message recipients, tap OK.
§Enter the complete phone numbers or email address directly in the To field.
4. To add a subject line, press and then tap Add subject.
5. Tap the box that says Add text, and then enter your message.
50 Messages
Only
2.
Only
2.
Tap
Only
Tap
3.
Only
3.
Fill in one or more recipients. You can:
Only
Fill in one or more recipients. You can:
for
Send
for
Send
, or press
for
, or press
Sending a multimedia message (MMS)
for
Sending a multimedia message (MMS)
From the Home screen, tap
for
From the Home screen, tap
Tap
for
Tap
Compose message
for
Compose message
certification
certification
There is a limit on the number of characters for a single text message (displayed
certification
There is a limit on the number of characters for a single text message (displayed
button). If you exceed the limit, your text message will be
certification
button). If you exceed the limit, your text message will be
delivered as one but will be billed as more than one message.
certification
delivered as one but will be billed as more than one message.
Your text message automatically becomes a multimedia message if you enter an
certification
Your text message automatically becomes a multimedia message if you enter an
email address as the recipient, add a message subject, attach an item, or compose
certification
email address as the recipient, add a message subject, attach an item, or compose
a very long message.
certification
a very long message.
, or press
certification
, or press
certification
to save the message as a draft.
certification
to save the message as a draft.
2011/03/07
Messages
2011/03/07
Messages
.
2011/03/07
.
Fill in one or more recipients. You can:
2011/03/07
Fill in one or more recipients. You can:
Enter the first few letters of a contact name or starting digits of a mobile
2011/03/07
Enter the first few letters of a contact name or starting digits of a mobile
number. As you type, matching names with phone numbers and email
2011/03/07
number. As you type, matching names with phone numbers and email
addresses from your stored contacts are displayed. Tap a contact’s number
2011/03/07
addresses from your stored contacts are displayed. Tap a contact’s number
or email address. Email addresses will be displayed when
2011/03/07
or email address. Email addresses will be displayed when
is selected in Recipient list settings.
2011/03/07
is selected in Recipient list settings.
2011/03/07
, and then select the phone numbers of the contacts to whom you
2011/03/07
, and then select the phone numbers of the contacts to whom you
want to send the message. You can also select contact groups as
2011/03/07
want to send the message. You can also select contact groups as
recipients. When you have selected all the message recipients, tap
2011/03/07
recipients. When you have selected all the message recipients, tap
Enter the complete phone numbers or email address directly in the
2011/03/07
Enter the complete phone numbers or email address directly in the
2011/03/07
To add a subject line, press
2011/03/07
To add a subject line, press
Tap the box that says
2011/03/07
Tap the box that says
6. Tap and then choose the type of attachment.
Picture Select Camera to take a photo and attach it, or Gallery
to attach a photo from your storage card.
Video Select Camcorder to capture a video and attach it, or
Videos to attach a video from your storage card.
Audio Select Voice Recorder to make a voice recording and
attach it, or Music & sounds to attach a music file or
voice recording from your storage card.
App
recommendation
Choose an app you’ve installed from Android Market
that you want to share with others. The URL from which
the app can be downloaded will be inserted to your
message.
Location Add your current location (requires GPS to be turned
on), or a location you pick on a map to your message.
Contact (vCard) Select a contact, and then select the information to
attach.
Appointment
(vCalendar)
Select the calendar event you want to attach.
7. To see options for replacing or reviewing your attachment, tap . You can also
press , then tap Remove to start over.
8. Tap Send, or press to save the message as a draft.
Creating a slideshow
1. After you've added either a photo, video, or audio in the multimedia message
you’re composing, tap > Slideshow.
2. Do any of the following:
Add a slide Tap , and then choose to add a photo or a
video.
Add music or a voice
recording to a slide
Right after adding a slide, tap > Audio.
Add a caption to a slide Tap the box that says Add text.
Edit a slide Tap , and then choose to replace, remove, or
set the duration of the slide.
Preview the slideshow Press , and then tap More > Preview. Tap once
on the preview screen to see playback controls.
3. When finished, tap Send, or press to save the message as a draft.
51 Messages
Only
2.
Only
2.
Do any of the following:
Only
Do any of the following:
Only
Only
for
for
, then tap
for
, then tap
Send
for
Send
, or press
for
, or press
Creating a slideshow
for
Creating a slideshow
for
for
for
After you've added either a photo, video, or audio in the multimedia message
for
After you've added either a photo, video, or audio in the multimedia message
you’re composing, tap
for
you’re composing, tap
certification
certification
to capture a video and attach it, or
certification
to capture a video and attach it, or
to attach a video from your storage card.
certification
to attach a video from your storage card.
to make a voice recording and
certification
to make a voice recording and
to attach a music file or
certification
to attach a music file or
voice recording from your storage card.
certification
voice recording from your storage card.
Choose an app you’ve installed from Android Market
certification
Choose an app you’ve installed from Android Market
that you want to share with others. The URL from which
certification
that you want to share with others. The URL from which
the app can be downloaded will be inserted to your
certification
the app can be downloaded will be inserted to your
Add your current location (requires GPS to be turned
certification
Add your current location (requires GPS to be turned
on), or a location you pick on a map to your message.
certification
on), or a location you pick on a map to your message.
Select a contact, and then select the information to
certification
Select a contact, and then select the information to
attach.
certification
attach.
Select the calendar event you want to attach.
certification
Select the calendar event you want to attach.
certification
certification
certification
certification
certification
certification
certification
To see options for replacing or reviewing your attachment, tap
certification
To see options for replacing or reviewing your attachment, tap
, then tap
certification
, then tap
Remove
certification
Remove
certification
2011/03/07
2011/03/07
2011/03/07
After you've added either a photo, video, or audio in the multimedia message
2011/03/07
After you've added either a photo, video, or audio in the multimedia message
Slideshow
2011/03/07
Slideshow
.
2011/03/07
.
2011/03/07
Tap
2011/03/07
Tap
2011/03/07
, and then choose to add a photo or a
2011/03/07
, and then choose to add a photo or a
video.
2011/03/07
video.
Add music or a voice
2011/03/07
Add music or a voice
recording to a slide
2011/03/07
recording to a slide
Right after adding a slide, tap
2011/03/07
Right after adding a slide, tap
2011/03/07
2011/03/07
2011/03/07
2011/03/07
Add a caption to a slide
2011/03/07
Add a caption to a slide
2011/03/07
Edit a slide
2011/03/07
Edit a slide
2011/03/07
2011/03/07
Preview the slideshow
2011/03/07
Preview the slideshow
2011/03/07
2011/03/07
2011/03/07
2011/03/07
2011/03/07
2011/03/07
When finished, tap
2011/03/07
When finished, tap
Resuming a draft message
1. On the All messages screen, press , and then tap Drafts.
2. Tap the message and then resume editing it.
3. Tap Send.
Viewing and replying to a message
Depending on your notification settings, the phone plays a ringtone, vibrates, or
displays the message briefly in the status bar when you receive a new message. A
new message icon is also displayed in the status bar.
1. To open and read the message, you can:
§Press and hold the status bar, and then slide your finger down to open the
Notifications panel. Then tap the new message notification.
§Open the Messages app to access and read the message.
2. While reading the message, you can:
Reply with a text
message
Tap the box that says Add text, enter your reply
message, and then tap Send.
Reply with a multimedia
message
Tap the box that says Add text, enter your reply
message, tap to choose an attachment for
your message, and then tap Send.
Call or save a phone
number contained in the
message
Tap the phone number. Then choose whether to
dial the number or add it to your contacts.
Open a link in the
message
Tap the link to open it in the web browser.
Send to or save an email
address contained in the
message
Tap the email address. Then choose whether to
send an email, send a multimedia message, or save
the email address to your contacts.
Forward a message Press and hold the message to open the options
menu, and then tap Forward.
Check message details Press and hold the message to open the options
menu, and then tap View message details.
52 Messages
Only
Only
Reply with a multimedia
Only
Reply with a multimedia
message
Only
message
Only
for
Press and hold the status bar, and then slide your finger down to open the
for
Press and hold the status bar, and then slide your finger down to open the
Notifications panel. Then tap the new message notification.
for
Notifications panel. Then tap the new message notification.
Open the Messages app to access and read the message.
for
Open the Messages app to access and read the message.
While reading the message, you can:
for
While reading the message, you can:
for
Reply with a text
for
Reply with a text
message
for
message
for
certification
Viewing and replying to a message
certification
Viewing and replying to a message
Depending on your notification settings, the phone plays a ringtone, vibrates, or
certification
Depending on your notification settings, the phone plays a ringtone, vibrates, or
displays the message briefly in the status bar when you receive a new message. A
certification
displays the message briefly in the status bar when you receive a new message. A
is also displayed in the status bar.
certification
is also displayed in the status bar.
To open and read the message, you can:
certification
To open and read the message, you can:
Press and hold the status bar, and then slide your finger down to open the
certification
Press and hold the status bar, and then slide your finger down to open the
Notifications panel. Then tap the new message notification.
certification
Notifications panel. Then tap the new message notification.
2011/03/07
2011/03/07
Tap the box that says
2011/03/07
Tap the box that says
message, and then tap
2011/03/07
message, and then tap
Tap the box that says
2011/03/07
Tap the box that says
message, tap
2011/03/07
message, tap
2011/03/07
your message, and then tap
2011/03/07
your message, and then tap
number contained in the
2011/03/07
number contained in the
Tap the phone number. Then choose whether to
2011/03/07
Tap the phone number. Then choose whether to
dial the number or add it to your contacts.
2011/03/07
dial the number or add it to your contacts.
Open a link in the
2011/03/07
Open a link in the
message
2011/03/07
message
2011/03/07
2011/03/07
2011/03/07
2011/03/07
2011/03/07
2011/03/07
2011/03/07
2011/03/07
Send to or save an email
2011/03/07
Send to or save an email
address contained in the
2011/03/07
address contained in the
message
2011/03/07
message
Forward a message
2011/03/07
Forward a message
2011/03/07
2011/03/07
2011/03/07
Check message details
2011/03/07
Check message details
2011/03/07
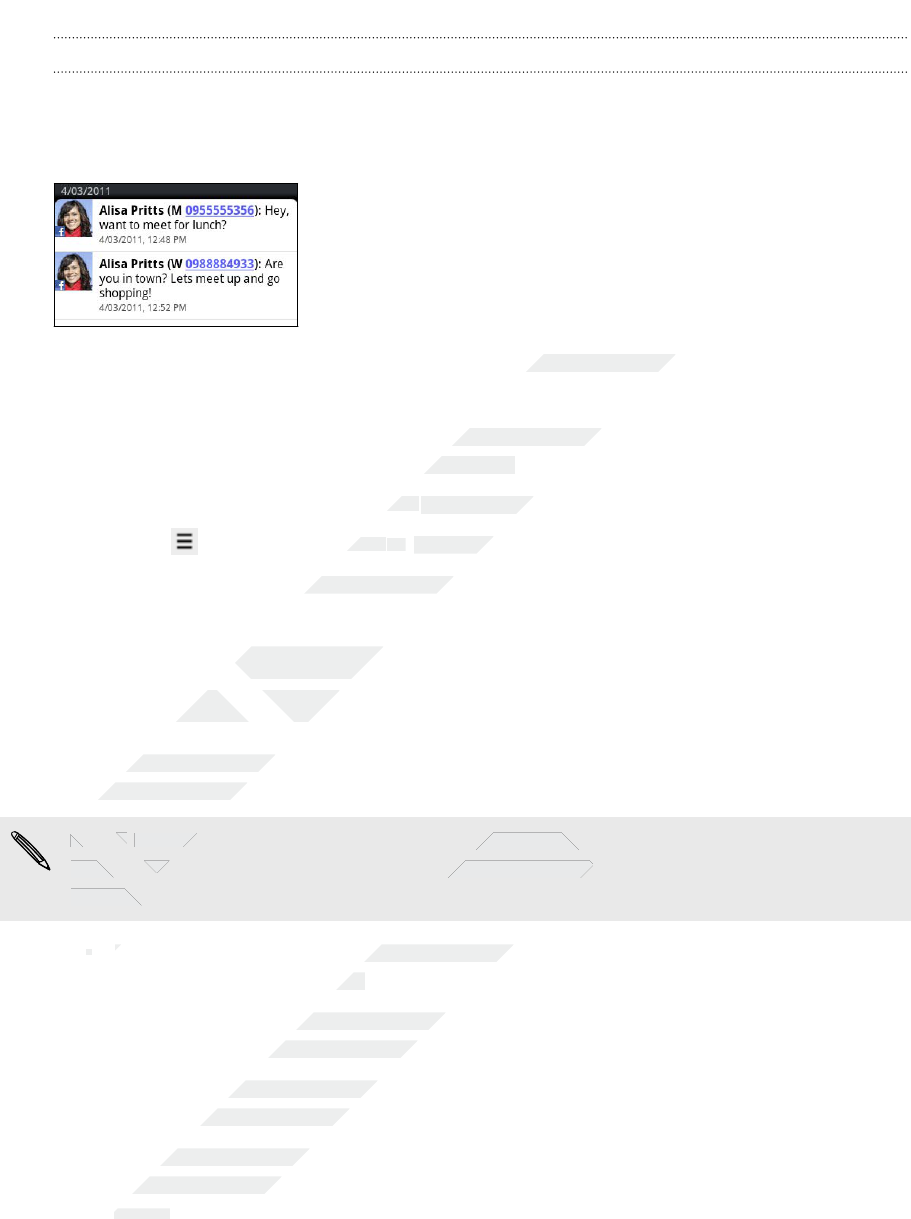
Replying to another phone number of the contact
When a contact has multiple phone numbers stored on your phone, you’ll see the
particular phone number used within the message. There’s also a bold letter before
the phone number to indicate the number type (for example, M stands for Mobile).
Keep in mind that your response will be sent to the phone number of the latest
message you’ve received from this contact.
1. On the All messages screen, tap a contact (or phone number) to display the
exchange of messages with that contact.
2. Tap the box that says Add text, then enter your reply message
3. Press and then tap More > Recipient phone number.
4. Select another phone number of this contact, and then tap OK.
Viewing and saving an attachment from a
multimedia message
If you are concerned about the size of your data downloads, check the multimedia
message size first before you download it.
When Auto-retrieve in MMS settings is disabled, only the message header is
downloaded. To download the entire message, tap the Download button at the
right side of the message.
§If there’s a media attachment such as a photo or video in a received message,
tap it to view the content.
§If the attachment is a contact (vCard), tap it to view the contact information,
then tap Save to add to your contacts.
§If the attachment is an appointment or event (vCalendar), tap it to choose the
calendar where to save it, and then tap Import.
§To save the attachment to your storage card, press and hold the multimedia
message, and then choose to save the type of attachment from the options
menu.
53 Messages
Only
Only
Only
Only
Only
Only
Only
Only
Only
When
Only
When
downloaded. To download the entire message, tap the
Only
downloaded. To download the entire message, tap the
right side of the message.
Only
right side of the message.
§
Only
§
If there’s a media attachment such as a photo or video in a received message,
Only
If there’s a media attachment such as a photo or video in a received message,
for
multimedia message
for
multimedia message
If you are concerned about the size of your data downloads, check the multimedia
for
If you are concerned about the size of your data downloads, check the multimedia
message size first before you download it.
for
message size first before you download it.
for
When
for
When
Auto-retrieve
for
Auto-retrieve
downloaded. To download the entire message, tap the
for
downloaded. To download the entire message, tap the
certification
Keep in mind that your response will be sent to the phone number of the latest
certification
Keep in mind that your response will be sent to the phone number of the latest
On the All messages screen, tap a contact (or phone number) to display the
certification
On the All messages screen, tap a contact (or phone number) to display the
exchange of messages with that contact.
certification
exchange of messages with that contact.
Add text
certification
Add text
, then enter your reply message
certification
, then enter your reply message
More
certification
More
>
certification
>
Recipient phone number
certification
Recipient phone number
Select another phone number of this contact, and then tap
certification
Select another phone number of this contact, and then tap
Viewing and saving an attachment from a
certification
Viewing and saving an attachment from a
multimedia message
certification
multimedia message
2011/03/07
2011/03/07
2011/03/07
2011/03/07
2011/03/07
in MMS settings is disabled, only the message header is
2011/03/07
in MMS settings is disabled, only the message header is
downloaded. To download the entire message, tap the
2011/03/07
downloaded. To download the entire message, tap the
If there’s a media attachment such as a photo or video in a received message,
2011/03/07
If there’s a media attachment such as a photo or video in a received message,
tap it to view the content.
2011/03/07
tap it to view the content.
If the attachment is a contact (vCard), tap it to view the contact information,
2011/03/07
If the attachment is a contact (vCard), tap it to view the contact information,
to add to your contacts.
2011/03/07
to add to your contacts.
If the attachment is an appointment or event (vCalendar), tap it to choose the
2011/03/07
If the attachment is an appointment or event (vCalendar), tap it to choose the
calendar where to save it, and then tap
2011/03/07
calendar where to save it, and then tap
To save the attachment to your storage card, press and hold the multimedia
2011/03/07
To save the attachment to your storage card, press and hold the multimedia
message, and then choose to save the type of attachment from the options
2011/03/07
message, and then choose to save the type of attachment from the options
menu.
2011/03/07
menu.
Push messages
Push messages contain a web link. Often, the link will be to download a file that you
have requested, for example a ringtone.
When you receive a push message, a notification icon is displayed in the status
bar.
Opening and reading a new push message
1. Press and hold the status bar, and then slide the status bar down to open the
Notifications panel.
2. Tap the new message.
3. Tap Visit website.
Viewing all your push messages
1. From the Home screen, tap > Messages.
2. Press , and then tap Push messages.
You can only see this option if you've previously received push messages.
Managing message conversations
Protecting a message from deletion
You can lock a message so that it will not be deleted even if you delete the other
messages in the conversation.
1. On the All messages screen, tap a contact (or phone number) to display the
exchange of messages with that contact.
2. Tap the message that you want to lock.
3. Tap Lock message on the options menu. A lock icon is displayed at the right
hand side of the message.
Copying a message to your SIM card
1. On the All messages screen, tap a contact (or phone number) to display the
exchange of messages with that contact.
2. Tap the message, and then tap Copy to SIM. A SIM card icon is displayed at
the right hand side of the message.
54 Messages
Only
You can lock a message so that it will not be deleted even if you delete the other
Only
You can lock a message so that it will not be deleted even if you delete the other
messages in the conversation.
Only
messages in the conversation.
1.
Only
1.
On the All messages screen, tap a contact (or phone number) to display the
Only
On the All messages screen, tap a contact (or phone number) to display the
exchange of messages with that contact.
Only
exchange of messages with that contact.
2.
Only
2.
for
Managing message conversations
for
Managing message conversations
Protecting a message from deletion
for
Protecting a message from deletion
for
for
You can lock a message so that it will not be deleted even if you delete the other
for
You can lock a message so that it will not be deleted even if you delete the other
messages in the conversation.
for
messages in the conversation.
certification
is displayed in the status
certification
is displayed in the status
certification
certification
Press and hold the status bar, and then slide the status bar down to open the
certification
Press and hold the status bar, and then slide the status bar down to open the
Viewing all your push messages
certification
Viewing all your push messages
certification
certification
From the Home screen, tap
certification
From the Home screen, tap
certification
>
certification
>
Messages
certification
Messages
, and then tap
certification
, and then tap
Push messages
certification
Push messages
certification
You can only see this option if you've previously received push messages.
certification
You can only see this option if you've previously received push messages.
Managing message conversations
certification
Managing message conversations
2011/03/07
2011/03/07
You can lock a message so that it will not be deleted even if you delete the other
2011/03/07
You can lock a message so that it will not be deleted even if you delete the other
On the All messages screen, tap a contact (or phone number) to display the
2011/03/07
On the All messages screen, tap a contact (or phone number) to display the
exchange of messages with that contact.
2011/03/07
exchange of messages with that contact.
Tap the message that you want to lock.
2011/03/07
Tap the message that you want to lock.
Lock message
2011/03/07
Lock message
on the options menu. A lock icon
2011/03/07
on the options menu. A lock icon
hand side of the message.
2011/03/07
hand side of the message.
Copying a message to your SIM card
2011/03/07
Copying a message to your SIM card
2011/03/07
2011/03/07
2011/03/07
On the All messages screen, tap a contact (or phone number) to display the
2011/03/07
On the All messages screen, tap a contact (or phone number) to display the
exchange of messages with that contact.
2011/03/07
exchange of messages with that contact.
Tap the message, and then tap
2011/03/07
Tap the message, and then tap
the right hand side of the message.
2011/03/07
the right hand side of the message.
Deleting a single message
1. On the All messages screen, tap a contact (or phone number) to display the
exchange of messages with that contact.
2. Tap the message that you want to delete.
3. If the message is locked, tap Unlock message on the options menu, and then tap
the message to display the options menu again.
4. Tap Delete message on the options menu.
5. When prompted to confirm, tap OK.
Deleting several messages within a conversation
1. On the All messages screen, tap a contact (or phone number) to display the
exchange of messages with that contact.
2. Press and then tap More > Delete.
3. Tap Delete by selection.
You can also tap Delete by phone number if the contact used multiple phone
numbers throughout the conversation and you want to delete the messages sent
from a particular number.
4. Select the messages you want to delete and then tap Delete.
Deleting a conversation
1. Do any of the following:
§On the All messages screen, press and hold a contact (or phone number)
whose messages you want to delete, and then tap Delete
§While looking at the exchange of messages in a conversation, press and
then tap More > Delete > Delete thread.
Any locked messages in the conversation thread will not be deleted unless
you select the Delete locked messages check box.
2. When prompted to confirm, tap OK to delete the entire thread.
Deleting several conversations
1. On the All messages screen, press and then tap Delete.
2. Select the conversation threads you want to delete.
3. Tap Delete. Any locked messages will not be deleted.
55 Messages
Only
§
Only
§
for
Select the messages you want to delete and then tap
for
Select the messages you want to delete and then tap
Deleting a conversation
for
Deleting a conversation
for
for
Do any of the following:
for
Do any of the following:
§
for
§
On the All messages screen, press and hold a contact (or phone number)
for
On the All messages screen, press and hold a contact (or phone number)
whose messages you want to delete, and then tap
for
whose messages you want to delete, and then tap
certification
on the options menu, and then tap
certification
on the options menu, and then tap
Deleting several messages within a conversation
certification
Deleting several messages within a conversation
certification
certification
On the All messages screen, tap a contact (or phone number) to display the
certification
On the All messages screen, tap a contact (or phone number) to display the
exchange of messages with that contact.
certification
exchange of messages with that contact.
>
certification
>
Delete
certification
Delete
.
certification
.
certification
Delete by phone number
certification
Delete by phone number
numbers throughout the conversation and you want to delete the messages sent
certification
numbers throughout the conversation and you want to delete the messages sent
from a particular number.
certification
from a particular number.
Select the messages you want to delete and then tap
certification
Select the messages you want to delete and then tap
2011/03/07
On the All messages screen, press and hold a contact (or phone number)
2011/03/07
On the All messages screen, press and hold a contact (or phone number)
whose messages you want to delete, and then tap
2011/03/07
whose messages you want to delete, and then tap
While looking at the exchange of messages in a conversation, press
2011/03/07
While looking at the exchange of messages in a conversation, press
>
2011/03/07
>
Delete thread
2011/03/07
Delete thread
Any locked messages in the conversation thread will not be deleted unless
2011/03/07
Any locked messages in the conversation thread will not be deleted unless
Delete locked messages
2011/03/07
Delete locked messages
When prompted to confirm, tap
2011/03/07
When prompted to confirm, tap
Deleting several conversations
2011/03/07
Deleting several conversations
2011/03/07
2011/03/07
2011/03/07
On the All messages screen, press
2011/03/07
On the All messages screen, press
Select the conversation threads you want to delete.
2011/03/07
Select the conversation threads you want to delete.
Tap
2011/03/07
Tap
Delete
2011/03/07
Delete
. Any locked messages will not be deleted.
2011/03/07
. Any locked messages will not be deleted.
Setting message options
On the All messages screen, press and then tap Settings.
Notifications §Receive a notification in the status bar and set your phone to
vibrate or play a sound when a message arrives or when a message
is not sent successfully, and choose a notification sound.
§Allow your phone to show pop-up notifications on the screen when
messages are sent successfully or not, or disable this option.
Text
messages
(SMS)
§Receive a report on the delivery status of your message.
§View or change the message service center number used. (We
recommend that you don't change the number here as it may
cause problems in receiving and sending messages.)
§View or delete text messages stored on your SIM card, or copy SIM
card messages to your phone's memory.
Multimedia
messages
(MMS)
§Receive a report on the delivery status of your message.
§Receive a report whether each recipient has read the message or
deleted it without reading.
§Automatically download complete MMS messages including the
message body and attachments in your service area and when
roaming.
§Set the message priority and maximum file size of MMS messages.
If the MMS message file size is exceeded, the message won't be
sent.
General §Search and display the sent message history, call history, and email
addresses of stored contacts when you’re adding message
recipients.
§Choose the maximum number of text or MMS messages to store in
each conversation thread (excluding locked messages), and enable
automatic deletion of unlocked older messages when set limits are
reached.
§Forward received text and MMS messages to another phone
number or email address. (This may incur extra fees from your
mobile operator.)
56 Messages
Only
Only
General
Only
General
Only
for
message body and attachments in your service area and when
for
message body and attachments in your service area and when
roaming.
for
roaming.
§
for
§
Set the message priority and maximum file size of MMS messages.
for
Set the message priority and maximum file size of MMS messages.
for
for
certification
Receive a notification in the status bar and set your phone to
certification
Receive a notification in the status bar and set your phone to
vibrate or play a sound when a message arrives or when a message
certification
vibrate or play a sound when a message arrives or when a message
is not sent successfully, and choose a notification sound.
certification
is not sent successfully, and choose a notification sound.
Allow your phone to show pop-up notifications on the screen when
certification
Allow your phone to show pop-up notifications on the screen when
messages are sent successfully or not, or disable this option.
certification
messages are sent successfully or not, or disable this option.
certification
Receive a report on the delivery status of your message.
certification
Receive a report on the delivery status of your message.
View or change the message service center number used. (We
certification
View or change the message service center number used. (We
recommend that you don't change the number here as it may
certification
recommend that you don't change the number here as it may
cause problems in receiving and sending messages.)
certification
cause problems in receiving and sending messages.)
View or delete text messages stored on your SIM card, or copy SIM
certification
View or delete text messages stored on your SIM card, or copy SIM
card messages to your phone's memory.
certification
card messages to your phone's memory.
certification
Receive a report on the delivery status of your message.
certification
Receive a report on the delivery status of your message.
Receive a report whether each recipient has read the message or
certification
Receive a report whether each recipient has read the message or
deleted it without reading.
certification
deleted it without reading.
Automatically download complete MMS messages including the
certification
Automatically download complete MMS messages including the
message body and attachments in your service area and when
certification
message body and attachments in your service area and when
certification
certification
2011/03/07
If the MMS message file size is exceeded, the message won't be
2011/03/07
If the MMS message file size is exceeded, the message won't be
2011/03/07
Search and display the sent message history, call history, and email
2011/03/07
Search and display the sent message history, call history, and email
addresses of stored contacts when you’re adding message
2011/03/07
addresses of stored contacts when you’re adding message
Choose the maximum number of text or MMS messages to store in
2011/03/07
Choose the maximum number of text or MMS messages to store in
each conversation thread (excluding locked messages), and enable
2011/03/07
each conversation thread (excluding locked messages), and enable
automatic deletion of unlocked older messages when set limits are
2011/03/07
automatic deletion of unlocked older messages when set limits are
reached.
2011/03/07
reached.
§
2011/03/07
§
Forward received text and MMS messages to another phone
2011/03/07
Forward received text and MMS messages to another phone
number or email address. (This may incur extra fees from your
2011/03/07
number or email address. (This may incur extra fees from your
mobile operator.)
2011/03/07
mobile operator.)
2011/03/07
2011/03/07
2011/03/07
2011/03/07

People
Transferring contacts from your old phone
Easily transfer contacts from your old phone to your new HTC phone through
Bluetooth. Depending on your old phone’s model, you may also transfer other types
of data such as calendar events and text messages to your new phone.
1. From the Home screen, tap > Transfer Data.
2. Tap Next to begin.
3. Choose your old phone's name and model.
4. On your old phone, turn Bluetooth on and set it to discoverable mode.
5. On your new HTC phone, tap Next to continue. Your new phone automatically
turns Bluetooth on and searches for Bluetooth devices.
6. From the device list, choose your old phone and then tap Next. Your new HTC
phone then tries to pair with your old phone. You’ll see a security passkey on
the screen.
7. On your old phone, enter this passkey or simply confirm it.
8. Select the Contacts check box (and other supported types of data you want to
import), and then tap Next.
9. When your new HTC phone finishes importing data, tap Done.
57 People
Only
for
the screen.
for
the screen.
On your old phone, enter this passkey or simply confirm it.
for
On your old phone, enter this passkey or simply confirm it.
Select the
for
Select the
Contacts
for
Contacts
import), and then tap
for
import), and then tap
for
When your new HTC phone finishes importing data, tap
for
When your new HTC phone finishes importing data, tap
certification
Transferring contacts from your old phone
certification
Transferring contacts from your old phone
Easily transfer contacts from your old phone to your new HTC phone through
certification
Easily transfer contacts from your old phone to your new HTC phone through
Bluetooth. Depending on your old phone’s model, you may also transfer other types
certification
Bluetooth. Depending on your old phone’s model, you may also transfer other types
of data such as calendar events and text messages to your new phone.
certification
of data such as calendar events and text messages to your new phone.
Transfer Data
certification
Transfer Data
.
certification
.
Choose your old phone's name and model.
certification
Choose your old phone's name and model.
On your old phone, turn Bluetooth on and set it to discoverable mode.
certification
On your old phone, turn Bluetooth on and set it to discoverable mode.
On your new HTC phone, tap
certification
On your new HTC phone, tap
Next
certification
Next
to continue. Your new phone automatically
certification
to continue. Your new phone automatically
turns Bluetooth on and searches for Bluetooth devices.
certification
turns Bluetooth on and searches for Bluetooth devices.
From the device list, choose your old phone and then tap
certification
From the device list, choose your old phone and then tap
phone then tries to pair with your old phone. You’ll see a security passkey on
certification
phone then tries to pair with your old phone. You’ll see a security passkey on
On your old phone, enter this passkey or simply confirm it.
certification
On your old phone, enter this passkey or simply confirm it.
2011/03/07
When your new HTC phone finishes importing data, tap
2011/03/07
When your new HTC phone finishes importing data, tap
About the People app
With the People app, easily manage your communications with your contacts via
phone, messaging, and email. You can also link your contacts to their social network
accounts like Facebook and Twitter to see their updates and events from these
accounts all in one place.
And that's not all. If you have the same contacts from different sources, People lets
you merge their contact information so you won't have duplicated entries in your
contacts list.
1. From the Home screen, tap > People.
2. Tap one of the following tabs:
All
Gives you access to all contacts on HTC Wildfire S, online accounts, and
more.
Groups
Lets you assign contacts to groups so you can easily send an SMS,
MMS, or email message to a whole group.
Call History
Lists all your dialed numbers and received and missed calls.
Your contacts list
The People app's All tab shows all contacts on your phone and from the online
accounts you're logged in to.
Your contacts list also displays the contacts stored on your SIM card (usually marked
with the SIM card icon ).
From the All tab, you can:
§Open or update your contact information.
§Create, edit, or find contacts.
§View instant status updates when you’ve linked
the contact to his or her social network account.
§Tap the contact's name to open the contact
details screen for that contact.
§See a notification icon when the contact has
sent you a new message, tried to call you,
updated his or her social network accounts, or
when it's the contact's birthday.
58 People
Only
The People app's All tab
Only
The People app's All tab
accounts you're logged in to.
Only
accounts you're logged in to.
Your contacts list also displays the contacts stored on your SIM card (usually marked
Only
Your contacts list also displays the contacts stored on your SIM card (usually marked
with the SIM card icon
Only
with the SIM card icon
Only
Only
Only
for
for
Lists all your dialed numbers and received and missed calls.
for
Lists all your dialed numbers and received and missed calls.
for
for
Your contacts list
for
Your contacts list
for
for
for
The People app's All tab
for
The People app's All tab
accounts you're logged in to.
for
accounts you're logged in to.
certification
accounts like Facebook and Twitter to see their updates and events from these
certification
accounts like Facebook and Twitter to see their updates and events from these
And that's not all. If you have the same contacts from different sources, People lets
certification
And that's not all. If you have the same contacts from different sources, People lets
you merge their contact information so you won't have duplicated entries in your
certification
you merge their contact information so you won't have duplicated entries in your
certification
Gives you access to all contacts on HTC Wildfire S, online accounts, and
certification
Gives you access to all contacts on HTC Wildfire S, online accounts, and
Lets you assign contacts to groups so you can easily send an SMS,
certification
Lets you assign contacts to groups so you can easily send an SMS,
MMS, or email message to a whole group.
certification
MMS, or email message to a whole group.
Call History
certification
Call History
Lists all your dialed numbers and received and missed calls.
certification
Lists all your dialed numbers and received and missed calls.
certification
certification
certification
2011/03/07
2011/03/07
2011/03/07
shows all contacts on your phone and from the online
2011/03/07
shows all contacts on your phone and from the online
Your contacts list also displays the contacts stored on your SIM card (usually marked
2011/03/07
Your contacts list also displays the contacts stored on your SIM card (usually marked
2011/03/07
2011/03/07
From the All tab, you can:
2011/03/07
From the All tab, you can:
§
2011/03/07
§
Open or update your contact information.
2011/03/07
Open or update your contact information.
§
2011/03/07
§
Create, edit, or find contacts.
2011/03/07
Create, edit, or find contacts.

Setting up your profile
Store your personal contact information in My profile to easily send it to other people.
1. From the Home screen, tap > People.
2. On the All tab, tap Me.
If you're logged in to your Facebook account through Facebook for HTC Sense,
instead of Me, you'll see your Facebook name. Tap your name, press , then tap
Edit.
3. Enter your name and contact details.
4. Tap Save.
Importing contacts from your SIM card
You can copy all your SIM contacts to HTC Wildfire S. Import them as phone contacts,
Google contacts, or Exchange ActiveSync contacts, if you have set up the relevant
accounts.
1. From the Home screen, tap > People.
2. On the All tab, press , and then tap Import/Export > Import from SIM card.
3. If you have Google or Exchange ActiveSync accounts set up on HTC Wildfire S,
tap the type for the imported contacts.
4. Do one of the following:
§Tap one or more SIM contacts you want to import.
§To import all contacts, press , and then tap Select all.
5. Tap Save.
Adding a new contact
1. From the Home screen, tap > People.
2. On the All tab, tap Add contact.
3. Select the Contact type, for example Google or Microsoft® Exchange
ActiveSync. This determines which account the contact will sync with.
Some fields may not be supported when you’re adding contacts to your SIM card.
4. Tap the Name field, enter the first and last name of the contact, then tap OK.
5. Enter the contact information in the fields provided. Press if you want to
close the onscreen keyboard first and easily scroll through the other fields.
6. Tap Save.
59 People
Only
5.
Only
5.
Tap
Only
Tap
Adding a new contact
Only
Adding a new contact
for
If you have Google or Exchange ActiveSync accounts set up on HTC Wildfire S,
for
If you have Google or Exchange ActiveSync accounts set up on HTC Wildfire S,
tap the type for the imported contacts.
for
tap the type for the imported contacts.
Do one of the following:
for
Do one of the following:
§
for
§
Tap one or more SIM contacts you want to import.
for
Tap one or more SIM contacts you want to import.
§
for
§
To import all contacts, press
for
To import all contacts, press
certification
certification
If you're logged in to your Facebook account through Facebook for HTC Sense,
certification
If you're logged in to your Facebook account through Facebook for HTC Sense,
, you'll see your Facebook name. Tap your name, press
certification
, you'll see your Facebook name. Tap your name, press
certification
Importing contacts from your SIM card
certification
Importing contacts from your SIM card
You can copy all your SIM contacts to HTC Wildfire S. Import them as phone contacts,
certification
You can copy all your SIM contacts to HTC Wildfire S. Import them as phone contacts,
Google contacts, or Exchange ActiveSync contacts, if you have set up the relevant
certification
Google contacts, or Exchange ActiveSync contacts, if you have set up the relevant
From the Home screen, tap
certification
From the Home screen, tap
certification
On the All tab, press
certification
On the All tab, press
certification
, and then tap
certification
, and then tap
If you have Google or Exchange ActiveSync accounts set up on HTC Wildfire S,
certification
If you have Google or Exchange ActiveSync accounts set up on HTC Wildfire S,
2011/03/07
Tap one or more SIM contacts you want to import.
2011/03/07
Tap one or more SIM contacts you want to import.
2011/03/07
, and then tap
2011/03/07
, and then tap
Adding a new contact
2011/03/07
Adding a new contact
From the Home screen, tap
2011/03/07
From the Home screen, tap
2011/03/07
On the All tab, tap
2011/03/07
On the All tab, tap
Add contact
2011/03/07
Add contact
Select the Contact type, for example Google or Microsoft
2011/03/07
Select the Contact type, for example Google or Microsoft
ActiveSync. This determines which account the contact will sync with.
2011/03/07
ActiveSync. This determines which account the contact will sync with.
2011/03/07
2011/03/07
2011/03/07
2011/03/07
Some fields may not be supported when you’re adding contacts to your SIM card.
2011/03/07
Some fields may not be supported when you’re adding contacts to your SIM card.
Tap the
2011/03/07
Tap the
Name
2011/03/07
Name
Enter the contact information in the fields provided. Press
2011/03/07
Enter the contact information in the fields provided. Press
Importing a contact from an Exchange
ActiveSync account
You can search for a work contact from your Exchange ActiveSync account, and then
copy it on HTC Wildfire S.
You need to have your Exchange ActiveSync account set up on HTC Wildfire S first.
1. From the Home screen, tap > People.
2. Press , and then enter the name.
3. Tap . Under Company contacts, matching names are listed.
4. Tap the name of the contact you want copied on HTC Wildfire S, and then tap
Save to People.
Merging contact information
If you have the same contacts on HTC Wildfire S, Google Account, and social network
accounts such as Facebook and Twitter, HTC Wildfire S will try to combine them
automatically or let you decide which contacts to combine. Combining the same
contacts avoids duplicated entries in your contacts list.
Accepting matched contacts suggestions
When your phone finds contacts that can be merged, you’ll see a link icon in the
notifications area of the status bar.
1. Slide the Notifications panel down, and then tap Matched contacts suggestion.
Your phone displays all suggested contacts that you can merge.
2. To merge, tap .
3. Tap OK.
60 People
Only
Only
Only
for
Accepting matched contacts suggestions
for
Accepting matched contacts suggestions
for
for
When your phone finds contacts that can be merged, you’ll see a link icon
for
When your phone finds contacts that can be merged, you’ll see a link icon
notifications area of the status bar.
for
notifications area of the status bar.
Slide the Notifications panel down, and then tap
for
Slide the Notifications panel down, and then tap
Your phone displays all suggested contacts that you can merge.
for
Your phone displays all suggested contacts that you can merge.
certification
You can search for a work contact from your Exchange ActiveSync account, and then
certification
You can search for a work contact from your Exchange ActiveSync account, and then
You need to have your Exchange ActiveSync account set up on HTC Wildfire S first.
certification
You need to have your Exchange ActiveSync account set up on HTC Wildfire S first.
. Under Company contacts, matching names are listed.
certification
. Under Company contacts, matching names are listed.
Tap the name of the contact you want copied on HTC Wildfire S, and then tap
certification
Tap the name of the contact you want copied on HTC Wildfire S, and then tap
Merging contact information
certification
Merging contact information
If you have the same contacts on HTC Wildfire S, Google Account, and social network
certification
If you have the same contacts on HTC Wildfire S, Google Account, and social network
accounts such as Facebook and Twitter, HTC Wildfire S will try to combine them
certification
accounts such as Facebook and Twitter, HTC Wildfire S will try to combine them
automatically or let you decide which contacts to combine. Combining the same
certification
automatically or let you decide which contacts to combine. Combining the same
contacts avoids duplicated entries in your contacts list.
certification
contacts avoids duplicated entries in your contacts list.
Accepting matched contacts suggestions
certification
Accepting matched contacts suggestions
certification
certification
2011/03/07
Slide the Notifications panel down, and then tap
2011/03/07
Slide the Notifications panel down, and then tap
Your phone displays all suggested contacts that you can merge.
2011/03/07
Your phone displays all suggested contacts that you can merge.
2011/03/07
2011/03/07
2011/03/07
2011/03/07
2011/03/07
2011/03/07
To merge, tap
2011/03/07
To merge, tap
Tap
2011/03/07
Tap
If you don’t want to merge any of your contacts, tap Dismiss all.
Viewing a list of all your linked contacts
1. From the Home screen, tap > People.
2. On the All tab, press , and then tap More > Linked contacts. The All linked
contacts screen then opens where you can see the account types and
information merged.
3. You can choose to break the link of an account type or relink.
4. When you're done, tap OK.
Manually merging contact information
1. From the Home screen, tap > People.
2. On the All tab, tap the name of the contact (not the icon or photo) you want to
link.
3. On the upper-right corner of the screen, tap or (if there are suggested
links).
4. On the screen, you can:
§Under Suggest links, tap to link the contact to an account.
§Under Add contact, tap one of the options to link to another contact.
5. Tap Done.
Breaking the link
1. From the Home screen, tap > People.
2. On the All tab, tap the name of the contact (not the icon or photo) whose link
you want to break.
3. On the upper-right corner of the screen, tap .
4. Under the Linked contacts section, tap beside an account type to break
the link.
5. Tap Done.
Filtering your contacts list
After adding a new account to sync with HTC Wildfire S, you'll be asked whether to
add contacts from that account the next time you open the People app. You can
choose to only display contacts from particular account types (for example, Google
contacts or Facebook contacts).
1. From the Home screen, tap > People.
2. On the All tab, press , then tap View.
61 People
Only
Breaking the link
Only
Breaking the link
Only
1.
Only
1.
From the Home screen, tap
Only
From the Home screen, tap
2.
Only
2.
On the All tab, tap the name of the contact (not the icon or photo) whose link
Only
On the All tab, tap the name of the contact (not the icon or photo) whose link
you want to break.
Only
you want to break.
3.
Only
3.
for
Under
for
Under
Suggest links
for
Suggest links
Under
for
Under
Add contact
for
Add contact
Tap
for
Tap
Done
for
Done
.
for
.
Breaking the link
for
Breaking the link
for
for
From the Home screen, tap
for
From the Home screen, tap
certification
certification
Linked contacts
certification
Linked contacts
. The All linked
certification
. The All linked
contacts screen then opens where you can see the account types and
certification
contacts screen then opens where you can see the account types and
You can choose to break the link of an account type or relink.
certification
You can choose to break the link of an account type or relink.
Manually merging contact information
certification
Manually merging contact information
certification
certification
certification
certification
>
certification
>
People
certification
People
.
certification
.
On the All tab, tap the name of the contact (not the icon or photo) you want to
certification
On the All tab, tap the name of the contact (not the icon or photo) you want to
On the upper-right corner of the screen, tap
certification
On the upper-right corner of the screen, tap
On the screen, you can:
certification
On the screen, you can:
Suggest links
certification
Suggest links
Add contact
certification
Add contact
2011/03/07
2011/03/07
2011/03/07
2011/03/07
>
2011/03/07
>
People
2011/03/07
People
.
2011/03/07
.
On the All tab, tap the name of the contact (not the icon or photo) whose link
2011/03/07
On the All tab, tap the name of the contact (not the icon or photo) whose link
On the upper-right corner of the screen, tap
2011/03/07
On the upper-right corner of the screen, tap
Linked contacts
2011/03/07
Linked contacts
section, tap
2011/03/07
section, tap
Filtering your contacts list
2011/03/07
Filtering your contacts list
After adding a new account to sync with HTC Wildfire S, you'll be asked whether to
2011/03/07
After adding a new account to sync with HTC Wildfire S, you'll be asked whether to
add contacts from that account the next time you open the People app. You can
2011/03/07
add contacts from that account the next time you open the People app. You can
2011/03/07
choose to only display contacts from particular account types (for example, Google
2011/03/07
choose to only display contacts from particular account types (for example, Google
contacts or Facebook contacts).
2011/03/07
contacts or Facebook contacts).
3. Select the types of contacts you want to show in your contacts list.
You can also choose how you want to display and sort your contacts.
4. Tap Done.
Searching for a contact
1. From the Home screen, tap > People.
2. Press , then enter the first few letters of a contact’s name. Matching contacts
are displayed.
3. Tap the contact to open his or her contact details screen.
Backing up your contacts to the storage card
1. From the Home screen, tap > People.
2. Press , and then tap Import/Export > Export to SD card.
3. Select an account or type of contacts to export, then tap OK.
Importing contacts from the storage card
You can only import contacts that were exported to the storage card using the
Export to SD card feature.
1. From the Home screen, tap > People.
2. Press , and then tap Import/Export > Import from SD card.
3. If you have Google or Exchange ActiveSync accounts set up on HTC Wildfire S,
tap the type for the imported contacts.
Contact information and conversations
When you tap a contact on the People screen, the contact details screen opens,
showing you the information you've stored or linked for that contact.
The contact details screen has the following tabs:
Details
Shows the information you have stored for the contact. Get in touch with the
contact directly by tapping any of the displayed methods. For example, if the
contact has a stored work phone number, tap Call work.
Messages
Shows your exchanged SMS messages with the contact. You can reply to the
contact’s message directly from this tab.
62 People
Only
Contact information and conversations
Only
Contact information and conversations
When you tap a contact on the People screen, the contact details screen opens,
Only
When you tap a contact on the People screen, the contact details screen opens,
showing you the information you've stored or linked for that contact.
Only
showing you the information you've stored or linked for that contact.
for
Export to SD card
for
Export to SD card
From the Home screen, tap
for
From the Home screen, tap
Press
for
Press
for
, and then tap
for
, and then tap
If you have Google or Exchange ActiveSync accounts set up on HTC Wildfire S,
for
If you have Google or Exchange ActiveSync accounts set up on HTC Wildfire S,
tap the type for the imported contacts.
for
tap the type for the imported contacts.
certification
certification
certification
, then enter the first few letters of a contact’s name. Matching contacts
certification
, then enter the first few letters of a contact’s name. Matching contacts
Tap the contact to open his or her contact details screen.
certification
Tap the contact to open his or her contact details screen.
Backing up your contacts to the storage card
certification
Backing up your contacts to the storage card
certification
>
certification
>
People
certification
People
.
certification
.
Import/Export
certification
Import/Export
>
certification
>
Export to SD card
certification
Export to SD card
Select an account or type of contacts to export, then tap
certification
Select an account or type of contacts to export, then tap
Importing contacts from the storage card
certification
Importing contacts from the storage card
certification
certification
certification
You can only import contacts that were exported to the storage card using the
certification
You can only import contacts that were exported to the storage card using the
feature.
certification
feature.
2011/03/07
If you have Google or Exchange ActiveSync accounts set up on HTC Wildfire S,
2011/03/07
If you have Google or Exchange ActiveSync accounts set up on HTC Wildfire S,
tap the type for the imported contacts.
2011/03/07
tap the type for the imported contacts.
Contact information and conversations
2011/03/07
Contact information and conversations
When you tap a contact on the People screen, the contact details screen opens,
2011/03/07
When you tap a contact on the People screen, the contact details screen opens,
showing you the information you've stored or linked for that contact.
2011/03/07
showing you the information you've stored or linked for that contact.
The contact details screen has the following tabs:
2011/03/07
The contact details screen has the following tabs:
2011/03/07
Shows the information you have stored for the contact. Get in touch with the
2011/03/07
Shows the information you have stored for the contact. Get in touch with the
contact directly by tapping any of the displayed methods. For example, if the
2011/03/07
contact directly by tapping any of the displayed methods. For example, if the
2011/03/07
contact has a stored work phone number, tap
2011/03/07
contact has a stored work phone number, tap
2011/03/07
Messages
2011/03/07
Messages
Shows your exchanged SMS messages with the contact. You can reply to the
2011/03/07
Shows your exchanged SMS messages with the contact. You can reply to the
2011/03/07
2011/03/07
2011/03/07
2011/03/07

Mail
Shows all the email you have received from the contact. Tap an email to view
it.
Updates and events
Shows the contact’s updates and events from social network accounts you've
linked like Facebook, Twitter, and Flickr.
Gallery
Shows the linked contact’s Facebook and Flickr albums and photos.
Call History
Lists all your incoming, outgoing, and missed calls to and from the contact.
Editing a contact’s information
1. From the Home screen, tap > People.
2. On the All tab, press and hold the contact, and then tap Edit contact.
You cannot edit the contact information of a Facebook friend.
3. Enter the new information for the contact.
4. Tap Save.
Deleting contacts
1. From the Home screen, tap > People.
2. On the All tab, press , and then tap Delete.
3. Select the contacts you want to remove, and then tap Delete.
4. When prompted, tap OK.
Sending contact information as a vCard
Easily share your own contact information or any contact on HTC Wildfire S.
1. From the Home screen, tap > People.
2. On the All tab, do the following:
To send Do this
Someone's contact
information
Press and hold the name of the contact (not the icon or
photo) whose contact information you want to send, and
then tap Send contact as vCard.
63 People
Only
1.
Only
1.
2.
Only
2.
On the All tab, press
Only
On the All tab, press
3.
Only
3.
Select the contacts you want to remove, and then tap
Only
Select the contacts you want to remove, and then tap
4.
Only
4.
for
Enter the new information for the contact.
for
Enter the new information for the contact.
Save
for
Save
.
for
.
Deleting contacts
for
Deleting contacts
for
for
for
From the Home screen, tap
for
From the Home screen, tap
certification
certification
Shows the contact’s updates and events from social network accounts you've
certification
Shows the contact’s updates and events from social network accounts you've
Shows the linked contact’s Facebook and Flickr albums and photos.
certification
Shows the linked contact’s Facebook and Flickr albums and photos.
Lists all your incoming, outgoing, and missed calls to and from the contact.
certification
Lists all your incoming, outgoing, and missed calls to and from the contact.
certification
certification
certification
Editing a contact’s information
certification
Editing a contact’s information
certification
certification
From the Home screen, tap
certification
From the Home screen, tap
certification
>
certification
>
People
certification
People
On the All tab, press and hold the contact, and then tap
certification
On the All tab, press and hold the contact, and then tap
certification
You cannot edit the contact information of a Facebook friend.
certification
You cannot edit the contact information of a Facebook friend.
Enter the new information for the contact.
certification
Enter the new information for the contact.
2011/03/07
2011/03/07
2011/03/07
People
2011/03/07
People
.
2011/03/07
.
, and then tap
2011/03/07
, and then tap
Delete
2011/03/07
Delete
.
2011/03/07
.
Select the contacts you want to remove, and then tap
2011/03/07
Select the contacts you want to remove, and then tap
OK
2011/03/07
OK
.
2011/03/07
.
Sending contact information as a vCard
2011/03/07
Sending contact information as a vCard
2011/03/07
Easily share your own contact information or any contact on HTC Wildfire S.
2011/03/07
Easily share your own contact information or any contact on HTC Wildfire S.
From the Home screen, tap
2011/03/07
From the Home screen, tap
On the All tab, do the following:
2011/03/07
On the All tab, do the following:
2011/03/07
2011/03/07
To send
2011/03/07
To send
Someone's contact
2011/03/07
Someone's contact
information
2011/03/07
information
2011/03/07
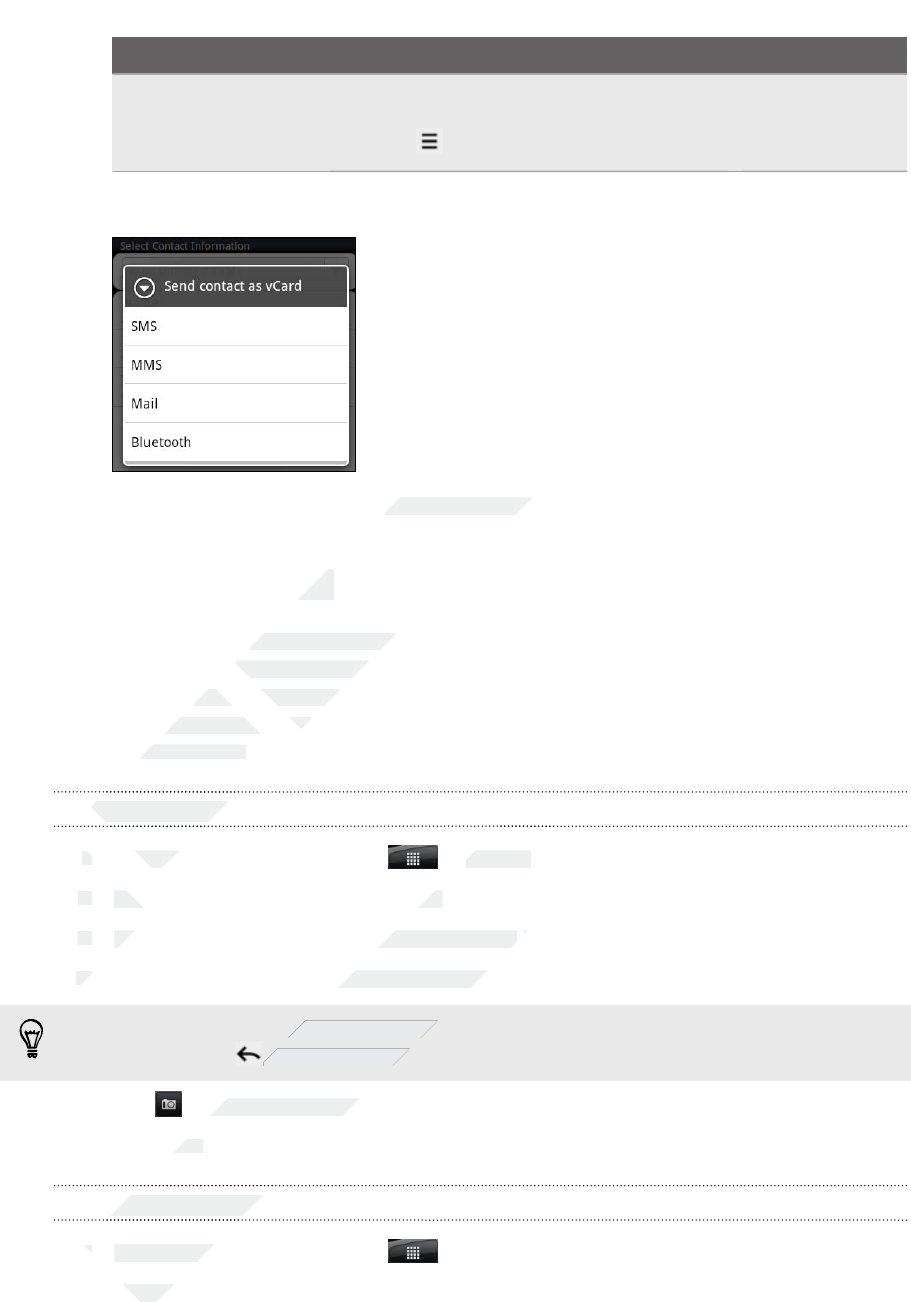
To send Do this
Your contact
information 1. Tap [Your name] My profile.
2. Press , and then tap Send my profile.
3. Choose how you want to send it.
4. Select the type of information you want to send, and then tap Send.
Contact groups
Assign contacts to groups so you can easily send a message or email to a whole
group. You can also sync groups on HTC Wildfire S with the groups in your Google
account, accessible via your computer’s web browser. We’ve also added the Frequent
group as a special group type that automatically stores the contacts you dial or get
calls from the most.
Creating a group
1. From the Home screen, tap > People.
2. On the Group tab, tap Add group.
3. Enter a name for the group, and then tap Add contact to group.
4. Select the contacts you want to add to the group, and then tap Save
If your contacts list is long, you can use the search bar to search for contacts
quickly, or press to hide the onscreen keyboard and scroll through the list.
5. Tap to select a photo for the group.
6. Tap Save.
Editing a contact group
1. From the Home screen, tap > People.
2. On the Group tab, press and hold the group, and then tap Edit group.
64 People
Only
1.
Only
1.
2.
Only
2.
On the Group tab, tap
Only
On the Group tab, tap
3.
Only
3.
Enter a name for the group, and then tap
Only
Enter a name for the group, and then tap
4.
Only
4.
Only
Only
Only
for
account, accessible via your computer’s web browser. We’ve also added the Frequent
for
account, accessible via your computer’s web browser. We’ve also added the Frequent
group as a special group type that automatically stores the contacts you dial or get
for
group as a special group type that automatically stores the contacts you dial or get
calls from the most.
for
calls from the most.
Creating a group
for
Creating a group
for
for
From the Home screen, tap
for
From the Home screen, tap
certification
certification
certification
Select the type of information you want to send, and then tap
certification
Select the type of information you want to send, and then tap
Contact groups
certification
Contact groups
Assign contacts to groups so you can easily send a message or email to a whole
certification
Assign contacts to groups so you can easily send a message or email to a whole
group. You can also sync groups on HTC Wildfire S with the groups in your Google
certification
group. You can also sync groups on HTC Wildfire S with the groups in your Google
account, accessible via your computer’s web browser. We’ve also added the Frequent
certification
account, accessible via your computer’s web browser. We’ve also added the Frequent
group as a special group type that automatically stores the contacts you dial or get
certification
group as a special group type that automatically stores the contacts you dial or get
2011/03/07
2011/03/07
People
2011/03/07
People
.
2011/03/07
.
Add group
2011/03/07
Add group
.
2011/03/07
.
Enter a name for the group, and then tap
2011/03/07
Enter a name for the group, and then tap
Add contact to group
2011/03/07
Add contact to group
Select the contacts you want to add to the group, and then tap
2011/03/07
Select the contacts you want to add to the group, and then tap
2011/03/07
If your contacts list is long, you can use the search bar to search for contacts
2011/03/07
If your contacts list is long, you can use the search bar to search for contacts
2011/03/07
to hide the onscreen keyboard and scroll through the list.
2011/03/07
to hide the onscreen keyboard and scroll through the list.
to select a photo for the group.
2011/03/07
to select a photo for the group.
Save
2011/03/07
Save
.
2011/03/07
.
Editing a contact group
2011/03/07
Editing a contact group
2011/03/07
2011/03/07
2011/03/07
1.
2011/03/07
1.
From the Home screen, tap
2011/03/07
From the Home screen, tap
On the Group tab, press and hold the group, and then tap
2011/03/07
On the Group tab, press and hold the group, and then tap

3. You can:
§Tap the group name to change the name. You can only change the name
for groups that you have created.
§Tap the icon to the left of the group name to change or remove the group
photo.
§To add contacts to the group, tap Add contact to group, select the
contacts you want to add, and then tap Save.
§To remove a contact from the group, tap at the right side of the contact
name.
4. Tap Save.
Sending a message or email to a group
You will be charged by your mobile provider for each message sent. For example, if
you send a message to a group of five people, you will be charged for five
messages.
1. From the Home screen, tap > People.
2. On the Group tab, tap the group you want to send a message or email to.
3. Go to the Group action tab, and then do one of the following:
§Tap Send group message to send a message to the group.
§Tap Send group mail to send an email to the group.
Rearranging your contact groups
1. From the Home screen, tap > People.
2. On the Groups tab, press , and then tap Rearrange.
3. Press and hold at the end of the group you want to move. When the row is
highlighted, drag it to its new position.
4. Tap Save.
65 People
Only
2.
Only
2.
3.
Only
3.
Press and hold
Only
Press and hold
highlighted, drag it to its new position.
Only
highlighted, drag it to its new position.
for
Send group message
for
Send group message
Tap
for
Tap
Send group mail
for
Send group mail
Rearranging your contact groups
for
Rearranging your contact groups
for
for
for
From the Home screen, tap
for
From the Home screen, tap
On the Groups tab, press
for
On the Groups tab, press
certification
Add contact to group
certification
Add contact to group
, select the
certification
, select the
at the right side of the contact
certification
at the right side of the contact
Sending a message or email to a group
certification
Sending a message or email to a group
certification
certification
certification
You will be charged by your mobile provider for each message sent. For example, if
certification
You will be charged by your mobile provider for each message sent. For example, if
you send a message to a group of five people, you will be charged for five
certification
you send a message to a group of five people, you will be charged for five
From the Home screen, tap
certification
From the Home screen, tap
certification
>
certification
>
People
certification
People
On the Group tab, tap the group you want to send a message or email to.
certification
On the Group tab, tap the group you want to send a message or email to.
Go to the Group action tab, and then do one of the following:
certification
Go to the Group action tab, and then do one of the following:
Send group message
certification
Send group message
Send group mail
certification
Send group mail
2011/03/07
People
2011/03/07
People
.
2011/03/07
.
, and then tap
2011/03/07
, and then tap
Rearrange
2011/03/07
Rearrange
at the end of the group you want to move. When the row is
2011/03/07
at the end of the group you want to move. When the row is
highlighted, drag it to its new position.
2011/03/07
highlighted, drag it to its new position.
2011/03/072011/03/07
2011/03/07
2011/03/07
2011/03/07
2011/03/07
2011/03/07
Tap
2011/03/07
Tap
Save
2011/03/07
Save
Rearranging the members of a contact group
1. From the Home screen, tap > People.
2. On the Groups tab, tap the group to see its members.
3. Press , and then tap Rearrange.
4. Press and hold at the end of the contact’s name you want to move. When
the row is highlighted, drag it to its new position.
5. Tap Save.
Deleting a group
You can only delete groups that you have created.
1. From the Home screen, tap > People.
2. On the Groups tab, press and hold the group you want to delete, and then tap
Delete group.
Adding People widgets
Stay in touch with different circles of friends or colleagues in your life. Using the
People widget, you can instantly place a call, send a message, view details of a
favorite contact, and even check Facebook and Twitter updates. You can add several
People widgets on the Home screen, with a different group of contacts on each
widget.
1. From the Home screen, tap > Widget > People.
2. Choose the widget style, and then tap Select.
3. Select the group you want to add as a widget.
66 People
Only
Only
Only
for
Stay in touch with different circles of friends or colleagues in your life. Using the
for
Stay in touch with different circles of friends or colleagues in your life. Using the
People widget, you can instantly place a call, send a message, view details of a
for
People widget, you can instantly place a call, send a message, view details of a
favorite contact, and even check Facebook and Twitter updates. You can add several
for
favorite contact, and even check Facebook and Twitter updates. You can add several
People widgets on the Home screen, with a different group of contacts on each
for
People widgets on the Home screen, with a different group of contacts on each
widget.
for
widget.
for
for
certification
at the end of the contact’s name you want to move. When
certification
at the end of the contact’s name you want to move. When
certification
certification
certification
certification
You can only delete groups that you have created.
certification
You can only delete groups that you have created.
certification
>
certification
>
People
certification
People
.
certification
.
On the Groups tab, press and hold the group you want to delete, and then tap
certification
On the Groups tab, press and hold the group you want to delete, and then tap
Adding People widgets
certification
Adding People widgets
Stay in touch with different circles of friends or colleagues in your life. Using the
certification
Stay in touch with different circles of friends or colleagues in your life. Using the
People widget, you can instantly place a call, send a message, view details of a
certification
People widget, you can instantly place a call, send a message, view details of a
2011/03/07
2011/03/07
2011/03/07
2011/03/07
2011/03/07
1.
2011/03/07
1.
From the Home screen, tap
2011/03/07
From the Home screen, tap
Choose the widget style, and then tap
2011/03/07
Choose the widget style, and then tap
Select the group you want to add as a widget.
2011/03/07
Select the group you want to add as a widget.
4. Drag the widget to a blank space on a Home screen. When the widget is where
you want it, lift your finger.
5. Repeat the above steps to add another People widget.
Setting the default communication method
1. On the Home screen, go to the People widget.
2. Tap a contact on the widget.
3. On the Select default action screen, tap the communication method you want
for the contact.
Changing the default communication method
1. On the Home screen, go to the People widget.
2. Tap the name of a contact on the widget to open the person’s contact card.
3. Press , and then tap More > Set default action.
4. On the Select default action screen, tap the communication method you want
for the contact.
Getting in touch with a contact
1. On the Home screen, go to the People widget.
2. Tap a contact (photo not the name) on the widget. The default communication
method will be performed.
Tap the name of the contact to open the contact details screen for that contact.
67 People
Only
Only
for
On the Home screen, go to the People widget.
for
On the Home screen, go to the People widget.
Tap a contact (photo not the name) on the widget. The default communication
for
Tap a contact (photo not the name) on the widget. The default communication
method will be performed.
for
method will be performed.
for
for
for
Tap the name of the contact to open the contact details screen for that contact.
for
Tap the name of the contact to open the contact details screen for that contact.
certification
certification
On the Select default action screen, tap the communication method you want
certification
On the Select default action screen, tap the communication method you want
Changing the default communication method
certification
Changing the default communication method
certification
certification
certification
On the Home screen, go to the People widget.
certification
On the Home screen, go to the People widget.
Tap the name of a contact on the widget to open the person’s contact card.
certification
Tap the name of a contact on the widget to open the person’s contact card.
More
certification
More
>
certification
>
Set default action
certification
Set default action
On the Select default action screen, tap the communication method you want
certification
On the Select default action screen, tap the communication method you want
Getting in touch with a contact
certification
Getting in touch with a contact
certification
certification
certification
On the Home screen, go to the People widget.
certification
On the Home screen, go to the People widget.
Tap a contact (photo not the name) on the widget. The default communication
certification
Tap a contact (photo not the name) on the widget. The default communication
2011/03/07
2011/03/07
2011/03/07
Tap the name of the contact to open the contact details screen for that contact.
2011/03/07
Tap the name of the contact to open the contact details screen for that contact.
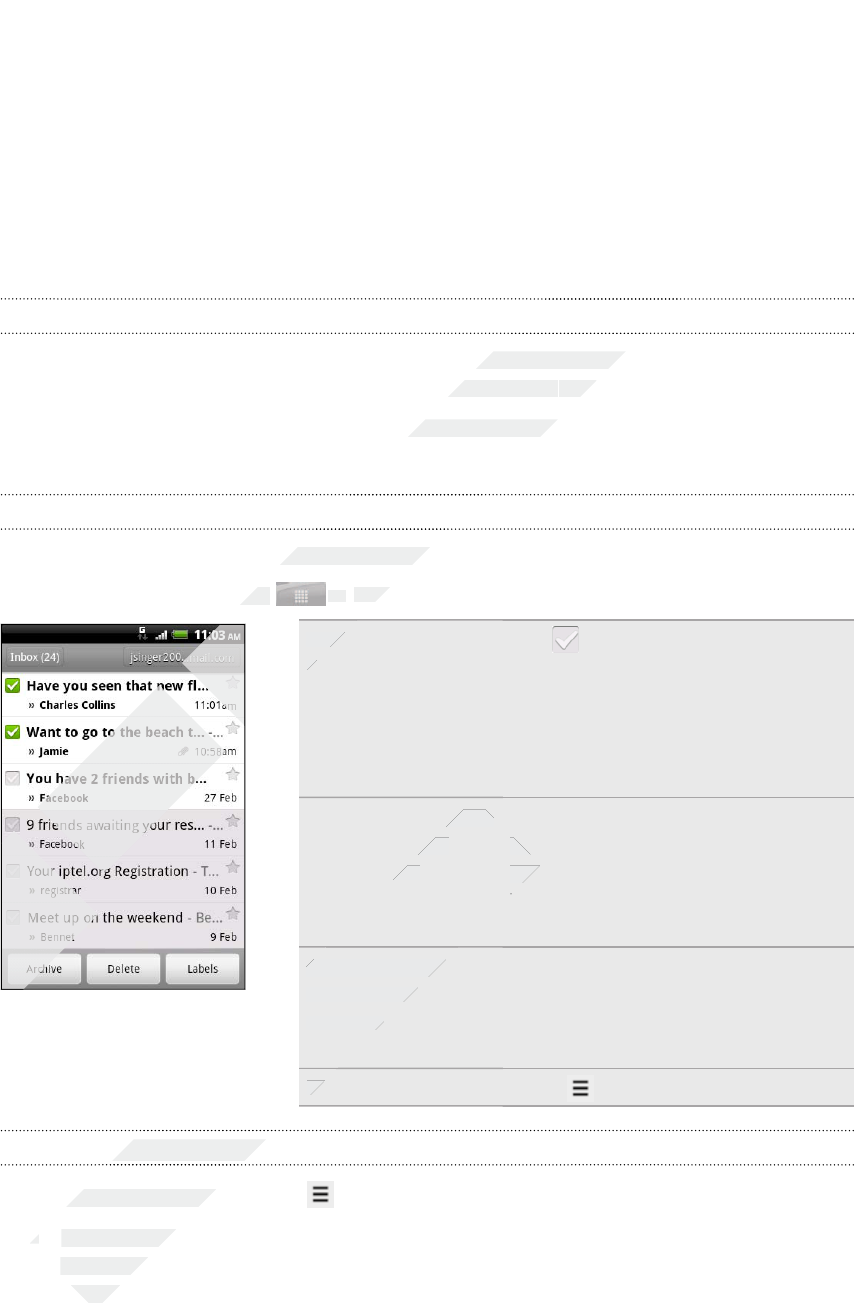
Email
Gmail
Using Gmail
When you first set up HTC Wildfire S, make sure you sign into your Google Account to
use Gmail. If you didn’t do so, go to the Accounts & sync setting to sign in.
You can also set up more than one Google Account on HTC Wildfire S, and then
switch between accounts in Gmail.
Viewing your Gmail Inbox
All your received emails are delivered to your Inbox.
From the Home screen, tap > Gmail. Your Gmail inbox then opens.
Archive or delete
multiple
conversations
Tap before the email or
conversation. Then tap the
onscreen buttons at the bottom
to choose what to do with the
selected messages or
conversations.
Display drafts, sent
messages, and
other labels
Tap Inbox at the top left of the
screen, and then tap another label
(such as Sent, Drafts, or your
created label) to view its
messages and conversations.
Switch to your
other Gmail
account
Tap the current account at the
top right of the screen, and then
tap another account you want to
switch to.
Refresh the Inbox Press , and then tap Refresh.
Sending a new message
1. In the Gmail inbox, press and then tap Compose.
2. If you’ve set up multiple Google Accounts on your phone, choose which Gmail
address you want to use for sending your email. Tap the box that shows your
current Gmail address, and then tap another address that you want to use for
sending.
68 Email
Only
Only
Only
Only
for
certification
certification
certification
When you first set up HTC Wildfire S, make sure you sign into your Google Account to
certification
When you first set up HTC Wildfire S, make sure you sign into your Google Account to
Accounts & sync
certification
Accounts & sync
setting to sign in.
certification
setting to sign in.
You can also set up more than one Google Account on HTC Wildfire S, and then
certification
You can also set up more than one Google Account on HTC Wildfire S, and then
certification
certification
certification
All your received emails are delivered to your Inbox.
certification
All your received emails are delivered to your Inbox.
From the Home screen, tap
certification
From the Home screen, tap
certification
>
certification
>
Gmail
certification
Gmail
certification
certification
certification
certification
certification
Archive or delete
certification
Archive or delete
multiple
certification
multiple
certification
2011/03/07
2011/03/07
2011/03/07
Display drafts, sent
2011/03/07
Display drafts, sent
messages, and
2011/03/07
messages, and
other labels
2011/03/07
other labels
screen, and then tap another label
2011/03/07
screen, and then tap another label
(such as
2011/03/07
(such as
created label) to view its
2011/03/07
created label) to view its
2011/03/07
Switch to your
2011/03/07
Switch to your
other Gmail
2011/03/07
other Gmail
account
2011/03/07
account
2011/03/07
Refresh the Inbox
2011/03/07
Refresh the Inbox
2011/03/07
2011/03/07
2011/03/07
Sending a new message
2011/03/07
Sending a new message
2011/03/07
2011/03/07
2011/03/07
In the Gmail inbox, press
2011/03/07
In the Gmail inbox, press
2.
2011/03/07
2.
If you’ve set up multiple Google Accounts on your phone, choose which Gmail
2011/03/07
If you’ve set up multiple Google Accounts on your phone, choose which Gmail
address you want to use for sending your email. Tap the box that shows your
2011/03/07
address you want to use for sending your email. Tap the box that shows your
2011/03/07
current Gmail address, and then tap another address that you want to use for
2011/03/07
current Gmail address, and then tap another address that you want to use for
3. Enter the message recipient’s email address in the To field. If you are sending
the email to several recipients, separate the email addresses with a comma.
If you want to send a carbon copy (Cc) or a blind carbon copy (Bcc) of the email to
other recipients, press and then tap Add Cc/Bcc.
4. Enter the email subject, and then compose your email.
5. If you want to attach a picture, press and then tap Attach.
6. Locate and then tap the picture you want to attach.
7. After composing your message, tap .
While composing the message, tap to save it as a draft. Or press to discard
the message.
Replying to or forwarding an email message
1. In the Gmail inbox, tap the email message or conversation.
2. To reply to the sender, tap . Or, tap and choose whether to Reply all or
Forward.
3. Do one of the following:
§If you selected Reply or Reply all, enter your reply message.
§If you selected Forward, specify the message recipients.
Tap Respond inline if you want to interleave your new message with the received
email. But this removes any attachments or formatting in the original email.
4. Tap .
Getting help
To find out more about using Gmail, press , and then tap More > Help. The web
browser will take you to the Google Mobile Help site.
Mail
About the Mail app
Use the Mail app to add your webmail and other POP3 or IMAP email accounts. You
can also set up and use your Exchange ActiveSync email on your phone.
You can add the Mail widget to view your POP3/IMAP or Exchange ActiveSync
emails on the Home screen.
69 Email
Only
Getting help
Only
Getting help
Only
Only
To find out more about using Gmail, press
Only
To find out more about using Gmail, press
browser will take you to the Google Mobile Help site.
Only
browser will take you to the Google Mobile Help site.
for
If you selected
for
If you selected
for
Respond inline
for
Respond inline
if you want to interleave your new message with the received
for
if you want to interleave your new message with the received
email. But this removes any attachments or formatting in the original email.
for
email. But this removes any attachments or formatting in the original email.
Tap
for
Tap
for
.
for
.
for
certification
certification
Attach
certification
Attach
.
certification
.
Locate and then tap the picture you want to attach.
certification
Locate and then tap the picture you want to attach.
certification
to save it as a draft. Or press
certification
to save it as a draft. Or press
Replying to or forwarding an email message
certification
Replying to or forwarding an email message
certification
certification
In the Gmail inbox, tap the email message or conversation.
certification
In the Gmail inbox, tap the email message or conversation.
To reply to the sender, tap
certification
To reply to the sender, tap
certification
. Or, tap
certification
. Or, tap
Do one of the following:
certification
Do one of the following:
If you selected
certification
If you selected
Reply
certification
Reply
If you selected
certification
If you selected
Forward
certification
Forward
2011/03/07
2011/03/07
2011/03/07
2011/03/07
2011/03/07
To find out more about using Gmail, press
2011/03/07
To find out more about using Gmail, press
2011/03/07
, and then tap
2011/03/07
, and then tap
browser will take you to the Google Mobile Help site.
2011/03/07
browser will take you to the Google Mobile Help site.
About the Mail app
2011/03/07
About the Mail app
2011/03/07
2011/03/07
2011/03/07
Use the Mail app to add your webmail and other POP3 or IMAP email accounts. You
2011/03/07
Use the Mail app to add your webmail and other POP3 or IMAP email accounts. You
can also set up and use your Exchange ActiveSync email on your phone.
2011/03/07
can also set up and use your Exchange ActiveSync email on your phone.
2011/03/07
You can add the Mail widget to view your POP3/IMAP or Exchange ActiveSync
2011/03/07
You can add the Mail widget to view your POP3/IMAP or Exchange ActiveSync
2011/03/07
2011/03/07
emails on the Home screen.
2011/03/07
emails on the Home screen.
Adding a POP3/IMAP email account
1. From the Home screen, tap > Mail.
2. Do one of the following:
§If this is your first time to add an email account in Mail, tap Other (POP3/
IMAP) on the Choose a mail provider screen.
§If you’ve already added an email account in Mail, press , and then tap
More > New account. If the Choose a mail provider screen is displayed, tap
Other (POP3/IMAP).
3. Enter the email address and password for your email account and then tap
Next.
4. If the account type you want to set up is not in the phone database, you’ll be
asked to enter more details.
5. Enter the account name and your name and then tap Finish setup.
Adding a Microsoft Exchange ActiveSync account
You can add one or more Microsoft Exchange ActiveSync accounts on your phone.
You can sync with Microsoft Exchange Server 2003 Service Pack (SP2) or later.
You can add up to 15 Exchange ActiveSync accounts on your phone.
1. From the Home screen, tap > Mail.
2. Do one of the following:
§If this is your first time to add an email account in Mail, tap Microsoft
Exchange ActiveSync on the Choose a mail provider screen.
§If you’ve already added an email account in Mail, press , and then tap
More > New account. If the Choose a mail provider screen is displayed, tap
Microsoft Exchange ActiveSync.
3. Enter the Exchange ActiveSync account details, and then tap Next. Your
corporate Exchange Server must support auto-detect for the phone to
automatically set up the Exchange ActiveSync account. If your corporate
Exchange Server does not support auto-detect, you’ll need to enter your
Exchange Server settings after you tap Next. Ask your Exchange Server
administrator for details.
4. Choose the types of information you want to sync. Also choose how often you
want to update and sync email to your phone, then tap Next.
5. Enter the account name, then tap Finish setup.
70 Email
Only
3.
Only
3.
for
for
From the Home screen, tap
for
From the Home screen, tap
Do one of the following:
for
Do one of the following:
§
for
§
If this is your first time to add an email account in Mail, tap
for
If this is your first time to add an email account in Mail, tap
Exchange ActiveSync
for
Exchange ActiveSync
If you’ve already added an email account in Mail, press
for
If you’ve already added an email account in Mail, press
certification
If this is your first time to add an email account in Mail, tap
certification
If this is your first time to add an email account in Mail, tap
Other (POP3/
certification
Other (POP3/
If you’ve already added an email account in Mail, press
certification
If you’ve already added an email account in Mail, press
certification
, and then tap
certification
, and then tap
. If the Choose a mail provider screen is displayed, tap
certification
. If the Choose a mail provider screen is displayed, tap
Enter the email address and password for your email account and then tap
certification
Enter the email address and password for your email account and then tap
If the account type you want to set up is not in the phone database, you’ll be
certification
If the account type you want to set up is not in the phone database, you’ll be
Enter the account name and your name and then tap
certification
Enter the account name and your name and then tap
Adding a Microsoft Exchange ActiveSync account
certification
Adding a Microsoft Exchange ActiveSync account
certification
certification
certification
You can add one or more Microsoft Exchange ActiveSync accounts on your phone.
certification
You can add one or more Microsoft Exchange ActiveSync accounts on your phone.
You can sync with Microsoft Exchange Server 2003 Service Pack (SP2) or later.
certification
You can sync with Microsoft Exchange Server 2003 Service Pack (SP2) or later.
certification
You can add up to 15 Exchange ActiveSync accounts on your phone.
certification
You can add up to 15 Exchange ActiveSync accounts on your phone.
From the Home screen, tap
certification
From the Home screen, tap
2011/03/07
If this is your first time to add an email account in Mail, tap
2011/03/07
If this is your first time to add an email account in Mail, tap
on the Choose a mail provider screen.
2011/03/07
on the Choose a mail provider screen.
If you’ve already added an email account in Mail, press
2011/03/07
If you’ve already added an email account in Mail, press
. If the Choose a mail provider screen is displayed, tap
2011/03/07
. If the Choose a mail provider screen is displayed, tap
Microsoft Exchange ActiveSync
2011/03/07
Microsoft Exchange ActiveSync
.
2011/03/07
.
Enter the Exchange ActiveSync account details, and then tap
2011/03/07
Enter the Exchange ActiveSync account details, and then tap
2011/03/07
corporate Exchange Server must support auto-detect for the phone to
2011/03/07
corporate Exchange Server must support auto-detect for the phone to
automatically set up the Exchange ActiveSync account. If your corporate
2011/03/07
automatically set up the Exchange ActiveSync account. If your corporate
Exchange Server does not support auto-detect, you’ll need to enter your
2011/03/07
Exchange Server does not support auto-detect, you’ll need to enter your
Exchange Server settings after you tap
2011/03/07
Exchange Server settings after you tap
administrator for details.
2011/03/07
administrator for details.
Choose the types of information you want to sync. Also choose how often you
2011/03/07
Choose the types of information you want to sync. Also choose how often you
want to update and sync email to your phone, then tap
2011/03/07
want to update and sync email to your phone, then tap
Enter the account name, then tap
2011/03/07
Enter the account name, then tap
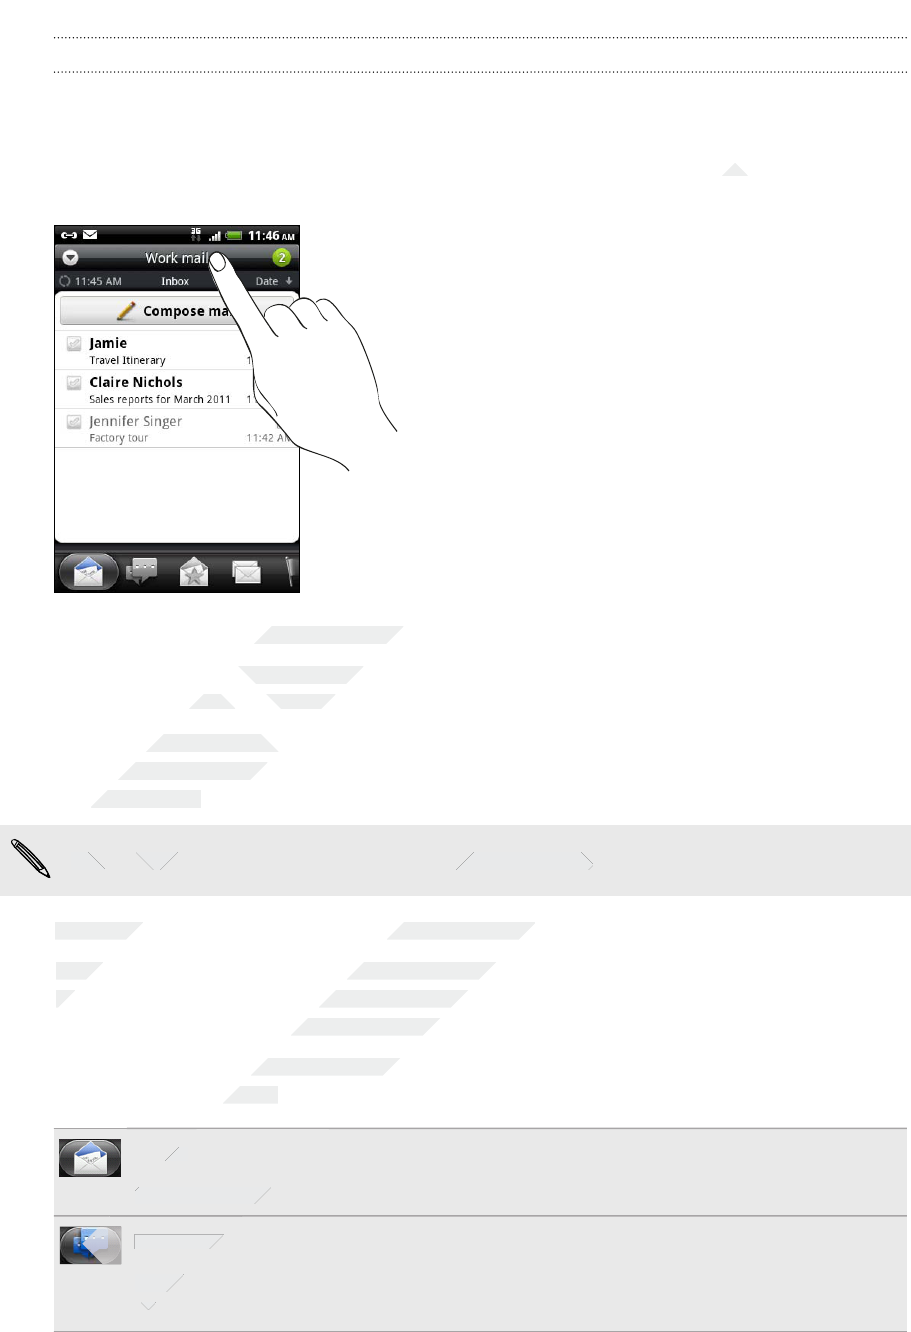
Checking your Mail inbox
When you open the Mail app, it displays the inbox of one of your email accounts that
you’ve set up on your phone.
To switch between email accounts, tap the bar that shows the current email account,
and then tap another account.
Viewing the unified inbox of all your email accounts
You can view email messages from all your accounts just in one place without having
to switch to different accounts.
Just tap the bar that shows the current email account, and then tap All accounts.
Email messages are color coded so you can easily distinguish which email accounts
they belong to.
Up to 15 email accounts can be shown in the unified inbox.
Switching between different views of your inbox
If you have lots of email messages, it may take you some time to browse through the
long list and find a single email or related email messages. Use the tabs of the Mail app
to sort your emails into different categories.
To skim through your email messages easier, tap one of the following tabs to change
the view of your inbox:
Inbox
Displays email messages as individual items.
Conversations
Displays email messages as conversations, grouped according to the subject
line. Tap a subject in the list to show the email conversation.
71 Email
Only
Only
Only
Only
Only
Only
Only
Only
Only
Up to 15 email accounts can be shown in the unified inbox.
Only
Up to 15 email accounts can be shown in the unified inbox.
Switching between different views of your inbox
Only
Switching between different views of your inbox
If you have lots of email messages, it may take you some time to browse through the
Only
If you have lots of email messages, it may take you some time to browse through the
long list and find a single email or related email messages. Use the tabs of the Mail app
Only
long list and find a single email or related email messages. Use the tabs of the Mail app
for
to switch to different accounts.
for
to switch to different accounts.
Just tap the bar that shows the current email account, and then tap
for
Just tap the bar that shows the current email account, and then tap
Email messages are color coded so you can easily distinguish which email accounts
for
Email messages are color coded so you can easily distinguish which email accounts
they belong to.
for
they belong to.
for
Up to 15 email accounts can be shown in the unified inbox.
for
Up to 15 email accounts can be shown in the unified inbox.
certification
To switch between email accounts, tap the bar that shows the current email account,
certification
To switch between email accounts, tap the bar that shows the current email account,
Viewing the unified inbox of all your email accounts
certification
Viewing the unified inbox of all your email accounts
You can view email messages from all your accounts just in one place without having
certification
You can view email messages from all your accounts just in one place without having
to switch to different accounts.
certification
to switch to different accounts.
2011/03/07
2011/03/07
Up to 15 email accounts can be shown in the unified inbox.
2011/03/07
Up to 15 email accounts can be shown in the unified inbox.
Switching between different views of your inbox
2011/03/07
Switching between different views of your inbox
If you have lots of email messages, it may take you some time to browse through the
2011/03/07
If you have lots of email messages, it may take you some time to browse through the
long list and find a single email or related email messages. Use the tabs of the Mail app
2011/03/07
long list and find a single email or related email messages. Use the tabs of the Mail app
to sort your emails into different categories.
2011/03/07
to sort your emails into different categories.
To skim through your email messages easier, tap one of the following tabs to change
2011/03/07
To skim through your email messages easier, tap one of the following tabs to change
the view of your inbox:
2011/03/07
the view of your inbox:
2011/03/07
Inbox
2011/03/07
Inbox
Displays email messages as individual items.
2011/03/07
Displays email messages as individual items.
2011/03/07
Conversations
2011/03/07
Conversations
Displays email messages as conversations, grouped according to the subject
2011/03/07
Displays email messages as conversations, grouped according to the subject
line. Tap a subject in the list to show the email conversation.
2011/03/07
line. Tap a subject in the list to show the email conversation.
2011/03/07
2011/03/07
2011/03/07
Group
Displays all email messages from a contact group. To choose which contact
group to display, press , tap View, and then select a group.
Unread
Displays unread messages.
Marked (Exchange ActiveSync only)
Displays all flagged messages.
Invites (Exchange ActiveSync only)
Displays meeting invitations which you have not yet accepted or declined.
Attachments
Displays all messages that have attachments.
Refreshing an email account
Whatever your automatic synchronization settings are, you can also synchronize your
sent and received emails manually at any time.
§While in the account you want to synchronize, press , and then tap Refresh.
§If you have several email accounts, you can refresh them all at the same time.
Go to the unified inbox first. Then press and tap Refresh.
Sorting email messages
You can sort email messages by date received, priority, subject, sender, or size.
On the inbox, press , tap Sort, and select from the sorting options.
Quickly browsing your inbox
If you have a long list of email messages in your inbox, it may not be easy to browse
the list and find an email that you want. You can quickly browse through your inbox
by using finger gestures.
1. Choose a sorting order for displaying your email messages.
2. Press and hold two fingers on any email message, and then drag upward or
downward without lifting your fingers. Your screen then jumps to the set of
email messages based on your chosen sorting order.
Managing email messages
Deleting an email message
1. On the inbox, press and hold the message you want to delete.
2. On the options menu, tap Delete.
72 Email
Only
On the inbox, press
Only
On the inbox, press
Quickly browsing your inbox
Only
Quickly browsing your inbox
If you have a long list of email messages in your inbox, it may not be easy to browse
Only
If you have a long list of email messages in your inbox, it may not be easy to browse
the list and find an email that you want. You can quickly browse through your inbox
Only
the list and find an email that you want. You can quickly browse through your inbox
by using finger gestures.
Only
by using finger gestures.
for
If you have several email accounts, you can refresh them all at the same time.
for
If you have several email accounts, you can refresh them all at the same time.
Go to the unified inbox first. Then press
for
Go to the unified inbox first. Then press
Sorting email messages
for
Sorting email messages
You can sort email messages by date received, priority, subject, sender, or size.
for
You can sort email messages by date received, priority, subject, sender, or size.
On the inbox, press
for
On the inbox, press
certification
certification
Displays meeting invitations which you have not yet accepted or declined.
certification
Displays meeting invitations which you have not yet accepted or declined.
Displays all messages that have attachments.
certification
Displays all messages that have attachments.
certification
certification
certification
certification
Whatever your automatic synchronization settings are, you can also synchronize your
certification
Whatever your automatic synchronization settings are, you can also synchronize your
sent and received emails manually at any time.
certification
sent and received emails manually at any time.
While in the account you want to synchronize, press
certification
While in the account you want to synchronize, press
If you have several email accounts, you can refresh them all at the same time.
certification
If you have several email accounts, you can refresh them all at the same time.
Go to the unified inbox first. Then press
certification
Go to the unified inbox first. Then press
2011/03/07
You can sort email messages by date received, priority, subject, sender, or size.
2011/03/07
You can sort email messages by date received, priority, subject, sender, or size.
, and select from the sorting options.
2011/03/07
, and select from the sorting options.
If you have a long list of email messages in your inbox, it may not be easy to browse
2011/03/07
If you have a long list of email messages in your inbox, it may not be easy to browse
the list and find an email that you want. You can quickly browse through your inbox
2011/03/07
the list and find an email that you want. You can quickly browse through your inbox
Choose a sorting order for displaying your email messages.
2011/03/07
Choose a sorting order for displaying your email messages.
Press and hold two fingers on any email message, and then drag upward or
2011/03/07
Press and hold two fingers on any email message, and then drag upward or
downward without lifting your fingers. Your screen then jumps to the set of
2011/03/07
downward without lifting your fingers. Your screen then jumps to the set of
email messages based on your chosen sorting order.
2011/03/07
email messages based on your chosen sorting order.
Managing email messages
2011/03/07
Managing email messages
2011/03/07
2011/03/07
2011/03/07
Deleting an email message
2011/03/07
Deleting an email message
On the inbox, press and hold the message you want to delete.
2011/03/07
On the inbox, press and hold the message you want to delete.

Selecting several email messages
1. Tap the check boxes of email messages to select them.
2. Choose what you want to do with the selected messages: Mark read (or mark
Mark unread), Delete, or Move to another folder.
You cannot move email messages when you’re in the unified (All accounts) inbox.
Moving several email messages to another folder
1. Switch to the email account you want to use.
2. Tap the check boxes of email messages you want to move.
3. Tap Move to, and then tap the folder where to move the email messages.
Moving an email message after reading
1. In the open message, press , and then tap More > Move to.
2. Tap the folder where you want to move the email message.
Deleting all messages
1. First tap the check box of any email message.
2. Press , and then tap Select all.
3. Tap Delete.
Switching to other mail folders
1. Press , and then tap Folders.
2. Tap the mail folder whose messages you want to view.
Sending an email message
1. From the Home screen, tap > Mail.
2. Switch to the email account that you want to use for sending email.
3. On the email account inbox, tap Compose mail.
73 Email
Only
1.
Only
1.
2.
Only
2.
Tap the mail folder whose messages you want to view.
Only
Tap the mail folder whose messages you want to view.
Sending an email message
Only
Sending an email message
Only
Only
for
First tap the check box of any email message.
for
First tap the check box of any email message.
for
, and then tap
for
, and then tap
Tap
for
Tap
Delete
for
Delete
.
for
.
Switching to other mail folders
for
Switching to other mail folders
Press
for
Press
for
certification
Mark read
certification
Mark read
certification
You cannot move email messages when you’re in the unified (All accounts) inbox.
certification
You cannot move email messages when you’re in the unified (All accounts) inbox.
Switch to the email account you want to use.
certification
Switch to the email account you want to use.
Tap the check boxes of email messages you want to move.
certification
Tap the check boxes of email messages you want to move.
, and then tap the folder where to move the email messages.
certification
, and then tap the folder where to move the email messages.
Moving an email message after reading
certification
Moving an email message after reading
In the open message, press
certification
In the open message, press
certification
, and then tap
certification
, and then tap
Tap the folder where you want to move the email message.
certification
Tap the folder where you want to move the email message.
Deleting all messages
certification
Deleting all messages
First tap the check box of any email message.
certification
First tap the check box of any email message.
, and then tap
certification
, and then tap
2011/03/07
Tap the mail folder whose messages you want to view.
2011/03/07
Tap the mail folder whose messages you want to view.
Sending an email message
2011/03/07
Sending an email message
2011/03/07
2011/03/07
2011/03/07
From the Home screen, tap
2011/03/07
From the Home screen, tap
2011/03/07
>
2011/03/07
>
Mail
2011/03/07
Mail
Switch to the email account that you want to use for sending email.
2011/03/07
Switch to the email account that you want to use for sending email.
On the email account inbox, tap
2011/03/07
On the email account inbox, tap
4. Fill in one or more recipients. You can:
§Enter email addresses directly in the To field, separating them with a
comma. As you enter email addresses, any matching addresses from your
contacts list are displayed. Tap a match to enter that address directly.
§Tap the icon, and then choose the contacts to whom you want to send
the message. You can also select contact groups as recipients, or search
and add contacts from the company directory if you have set up an
Exchange ActiveSync account on your phone.
If you want to send a carbon copy (Cc) or a blind carbon copy (Bcc) of the email to
other recipients, press , and then tap Show Cc/Bcc.
5. Enter the subject, and then compose your message.
6. To add an attachment, press , tap Attach, and choose from the following
options:
Picture Select Camera to take a photo and attach it, or Gallery
to attach a photo from your storage card.
Video Select Camcorder to capture a video and attach it, or
Videos to attach a video from your storage card.
Audio Select Voice Recorder to make a voice recording and
attach it, or Files to attach a music file or voice
recording from your storage card.
App
recommendation
Choose an app you’ve installed from Android Market
that you want to tell other people about. The URL from
which the app can be downloaded will be inserted in
your email.
Location You can attach location information. Send your current
location (requires GPS to be turned on) or a location
you pick on a map.
Document Attach a PDF file or an Office document such as a text
file or a spreadsheet.
Contact (vCard) Attach someone’s contact information.
Appointment
(vCalendar)
Attach a calendar event.
File Attach any file from your storage card.
7. Tap Send to send the message immediately, or tap Save as draft to send it later.
If there’s no Wi-Fi or data connection available or Airplane mode is on when you
send your email, the email will be saved to the Outbox folder. Once there’s Wi-Fi or
data connection available, the saved email will be sent automatically next time your
phone syncs.
74 Email
Only
Only
Only
for
for
App
for
App
recommendation
for
recommendation
Location
for
Location
for
for
certification
icon, and then choose the contacts to whom you want to send
certification
icon, and then choose the contacts to whom you want to send
the message. You can also select contact groups as recipients, or search
certification
the message. You can also select contact groups as recipients, or search
and add contacts from the company directory if you have set up an
certification
and add contacts from the company directory if you have set up an
certification
If you want to send a carbon copy (Cc) or a blind carbon copy (Bcc) of the email to
certification
If you want to send a carbon copy (Cc) or a blind carbon copy (Bcc) of the email to
Show Cc/Bcc
certification
Show Cc/Bcc
.
certification
.
Enter the subject, and then compose your message.
certification
Enter the subject, and then compose your message.
, tap
certification
, tap
Attach
certification
Attach
, and choose from the following
certification
, and choose from the following
certification
Select
certification
Select
Camera
certification
Camera
to take a photo and attach it, or
certification
to take a photo and attach it, or
to attach a photo from your storage card.
certification
to attach a photo from your storage card.
Select
certification
Select
Camcorder
certification
Camcorder
Videos
certification
Videos
to attach a video from your storage card.
certification
to attach a video from your storage card.
Select
certification
Select
attach it, or
certification
attach it, or
certification
certification
certification
certification
certification
certification
2011/03/07
which the app can be downloaded will be inserted in
2011/03/07
which the app can be downloaded will be inserted in
You can attach location information. Send your current
2011/03/07
You can attach location information. Send your current
location (requires GPS to be turned on) or a location
2011/03/07
location (requires GPS to be turned on) or a location
you pick on a map.
2011/03/07
you pick on a map.
Attach a PDF file or an Office document such as a text
2011/03/07
Attach a PDF file or an Office document such as a text
file or a spreadsheet.
2011/03/07
file or a spreadsheet.
Attach someone’s contact information.
2011/03/07
Attach someone’s contact information.
(vCalendar)
2011/03/07
(vCalendar)
Attach a calendar event.
2011/03/07
Attach a calendar event.
2011/03/07
2011/03/07
2011/03/07
2011/03/07
2011/03/07
2011/03/07
2011/03/07
2011/03/07
2011/03/07
2011/03/07
2011/03/07
Tap
2011/03/07
Tap
Send
2011/03/07
Send
to send the message immediately, or tap
2011/03/07
to send the message immediately, or tap
2011/03/07
If there’s no Wi-Fi or data connection available or Airplane mode is on when you
2011/03/07
If there’s no Wi-Fi or data connection available or Airplane mode is on when you
send your email, the email will be saved to the Outbox folder. Once there’s Wi-Fi or
2011/03/07
send your email, the email will be saved to the Outbox folder. Once there’s Wi-Fi or
data connection available, the saved email will be sent automatically next time your
2011/03/07
data connection available, the saved email will be sent automatically next time your
Resuming a draft email message
1. In the email account inbox, press , and then tap Folders > Drafts.
2. Tap the message.
3. When you finish editing the message, tap Send.
Reading and replying to an email message
1. From the Home screen, tap > Mail.
2. Switch to the email account you want to use.
3. On the email account inbox, tap the email you want to read.
4. Do any of the following:
Reply to the message Tap Reply or Reply all.
Forward the message Press , and then tap More > Forward.
Delete the message Press , and then tap Delete.
Mark the message as unread Press , and then tap Mark unread.
Setting the priority for an email message
You can set the priority for an email message that you send.
1. While composing the message, press .
2. Tap Set priority.
3. Select the priority for the message.
If you selected High or Low priority, the priority appears below the subject line of the
message.
Working with Exchange ActiveSync email
If you sync HTC Wildfire S with your work Exchange ActiveSync account, you can
read, reply, send, and manage email in the same easy way as with a POP3/IMAP
account. In addition, you can also use some powerful Exchange features.
Flagging an email
§While viewing the inbox, tap the white flag icon that appears on the right of
an email message. The icon turns red after you flagged the email.
§While reading an email, you can also tap the flag icon in the email.
75 Email
Only
If you selected
Only
If you selected
message.
Only
message.
Working with Exchange ActiveSync email
Only
Working with Exchange ActiveSync email
Only
Only
If you sync HTC Wildfire S with your work Exchange ActiveSync account, you can
Only
If you sync HTC Wildfire S with your work Exchange ActiveSync account, you can
for
You can set the priority for an email message that you send.
for
You can set the priority for an email message that you send.
While composing the message, press
for
While composing the message, press
Tap
for
Tap
Set priority
for
Set priority
Select the priority for the message.
for
Select the priority for the message.
If you selected
for
If you selected
certification
certification
certification
Switch to the email account you want to use.
certification
Switch to the email account you want to use.
On the email account inbox, tap the email you want to read.
certification
On the email account inbox, tap the email you want to read.
certification
Tap
certification
Tap
Reply
certification
Reply
or
certification
or
Press
certification
Press
certification
Press
certification
Press
Mark the message as unread
certification
Mark the message as unread
certification
certification
certification
certification
certification
certification
certification
certification
certification
Setting the priority for an email message
certification
Setting the priority for an email message
certification
certification
certification
You can set the priority for an email message that you send.
certification
You can set the priority for an email message that you send.
2011/03/07
priority, the priority appears below the subject line of the
2011/03/07
priority, the priority appears below the subject line of the
Working with Exchange ActiveSync email
2011/03/07
Working with Exchange ActiveSync email
2011/03/07
2011/03/07
2011/03/07
If you sync HTC Wildfire S with your work Exchange ActiveSync account, you can
2011/03/07
If you sync HTC Wildfire S with your work Exchange ActiveSync account, you can
read, reply, send, and manage email in the same easy way as with a POP3/IMAP
2011/03/07
read, reply, send, and manage email in the same easy way as with a POP3/IMAP
account. In addition, you can also use some powerful Exchange features.
2011/03/07
account. In addition, you can also use some powerful Exchange features.
Flagging an email
2011/03/07
Flagging an email
While viewing the inbox, tap the white flag icon
2011/03/07
While viewing the inbox, tap the white flag icon
an email message. The icon turns red
2011/03/07
an email message. The icon turns red
While reading an email, you can also tap the flag icon in the email.
2011/03/07
While reading an email, you can also tap the flag icon in the email.
Setting your Out of the office status
You can set your Out of office status and auto-reply message right from HTC Wildfire
S.
1. Switch to your Exchange ActiveSync account.
2. Press and then tap More > Out of the office.
3. Tap the box, and then select Out of the office.
4. Set the dates and times for the period when you will be out of the office.
5. Enter the auto-reply message.
6. Tap Save.
Sending a meeting request
1. Switch to your Exchange ActiveSync account.
2. Go to the Invites tab, and then tap New meeting invitation.
3. Enter the meeting details.
4. Tap Send.
Changing email account settings
1. Switch to the email account whose settings you want to change.
2. Press , and then tap More > Settings.
3. Select from the following:
Account settings Change the email account settings such as the name,
email address, password, and description.
General settings Set the font size when reading emails, enable, disable or
set the signature, set the account as the default email
account, and set where to save email attachments.
Send & Receive Set the sync settings for incoming and outgoing emails
such as maximum size limit, update schedule, and more.
Notification
settings
Set email notification settings.
Delete account Tap to delete the email account.
4. Press to save your changes.
Deleting an email account
1. Switch to the email account you want to delete.
2. Press , and then tap More > Settings > Delete account.
76 Email
Only
Only
General settings
Only
General settings
Only
for
Switch to the email account whose settings you want to change.
for
Switch to the email account whose settings you want to change.
Press
for
Press
for
, and then tap
for
, and then tap
Select from the following:
for
Select from the following:
for
Account settings
for
Account settings
for
certification
Set the dates and times for the period when you will be out of the office.
certification
Set the dates and times for the period when you will be out of the office.
Switch to your Exchange ActiveSync account.
certification
Switch to your Exchange ActiveSync account.
Go to the Invites tab, and then tap
certification
Go to the Invites tab, and then tap
New meeting invitation
certification
New meeting invitation
Enter the meeting details.
certification
Enter the meeting details.
Changing email account settings
certification
Changing email account settings
certification
certification
certification
Switch to the email account whose settings you want to change.
certification
Switch to the email account whose settings you want to change.
2011/03/07
2011/03/07
Change the email account settings such as the name,
2011/03/07
Change the email account settings such as the name,
email address, password, and description.
2011/03/07
email address, password, and description.
Set the font size when reading emails, enable, disable or
2011/03/07
Set the font size when reading emails, enable, disable or
set the signature, set the account as the default email
2011/03/07
set the signature, set the account as the default email
account, and set where to save email attachments.
2011/03/07
account, and set where to save email attachments.
2011/03/07
2011/03/07
2011/03/07
Set the sync settings for incoming and outgoing emails
2011/03/07
Set the sync settings for incoming and outgoing emails
such as maximum size limit, update schedule, and more.
2011/03/07
such as maximum size limit, update schedule, and more.
2011/03/07
Set email notification settings.
2011/03/07
Set email notification settings.
2011/03/07
Delete account
2011/03/07
Delete account
Tap to delete the email account.
2011/03/07
Tap to delete the email account.
2011/03/07
2011/03/07
2011/03/07
2011/03/07
2011/03/07
2011/03/07
2011/03/07
2011/03/07
Press
2011/03/07
Press
2011/03/07
to save your changes.
2011/03/07
to save your changes.
Deleting an email account
2011/03/07
Deleting an email account
2011/03/07
Switch to the email account you want to delete.
2011/03/07
Switch to the email account you want to delete.

Calendar
About Calendar
Never miss an important date again. Use the Calendar app to schedule your events,
meetings, and appointments.
You can set up HTC Wildfire S to stay in sync with the following types of calendars:
§On HTC Wildfire S, sign in to your Google Account so you’ll be able to sync the
Calendar app with your Google Calendar online. You can add multiple Google
Accounts.
§If you’re using Microsoft Outlook® on your computer, you can set up HTC Sync
on your computer to sync Outlook Calendar with the Calendar app.
§If you have a Microsoft Exchange ActiveSync account and you've added it on
HTC Wildfire S, you can sync the Calendar app with your Exchange ActiveSync
calendar events.
If you’ve signed in to your social network accounts such as Facebook, birthdays and
events of friends will appear in Calendar.
Creating an event
You can create events that sync with your Google Calendar, your computer’s Outlook
Calendar, or Exchange ActiveSync calendar, as well as events that appear on HTC
Wildfire S only.
1. From the Home screen, tap > Calendar.
2. On any Calendar view, press , and then tap New event.
When you are in the month or agenda view, you can also tap to create a new
event.
3. If you have more than one calendar, select a calendar in which to add the event:
§Select your Google Account to create a Google Calendar event. If you have
several Google calendars on the Web, select one in which to add your
event.
§Select PC Sync to create calendar events on your phone. You can sync
them with your computer's Outlook Calendar using HTC Sync.
§Select your Exchange ActiveSync account to create an Exchange
ActiveSync calendar event.
4. Enter a name for the event.
77 Calendar
Only
You can create events that sync with your Google Calendar, your computer’s Outlook
Only
You can create events that sync with your Google Calendar, your computer’s Outlook
Calendar, or Exchange ActiveSync calendar, as well as events that appear on HTC
Only
Calendar, or Exchange ActiveSync calendar, as well as events that appear on HTC
Wildfire S only.
Only
Wildfire S only.
1.
Only
1.
From the Home screen, tap
Only
From the Home screen, tap
2.
Only
2.
Only
Only
Only
Only
for
events of friends will appear in Calendar.
for
events of friends will appear in Calendar.
Creating an event
for
Creating an event
You can create events that sync with your Google Calendar, your computer’s Outlook
for
You can create events that sync with your Google Calendar, your computer’s Outlook
Calendar, or Exchange ActiveSync calendar, as well as events that appear on HTC
for
Calendar, or Exchange ActiveSync calendar, as well as events that appear on HTC
certification
Never miss an important date again. Use the Calendar app to schedule your events,
certification
Never miss an important date again. Use the Calendar app to schedule your events,
You can set up HTC Wildfire S to stay in sync with the following types of calendars:
certification
You can set up HTC Wildfire S to stay in sync with the following types of calendars:
On HTC Wildfire S, sign in to your Google Account so you’ll be able to sync the
certification
On HTC Wildfire S, sign in to your Google Account so you’ll be able to sync the
Calendar app with your Google Calendar online. You can add multiple Google
certification
Calendar app with your Google Calendar online. You can add multiple Google
If you’re using Microsoft Outlook
certification
If you’re using Microsoft Outlook
®
certification
®
on your computer, you can set up HTC Sync
certification
on your computer, you can set up HTC Sync
on your computer to sync Outlook Calendar with the Calendar app.
certification
on your computer to sync Outlook Calendar with the Calendar app.
If you have a Microsoft Exchange ActiveSync account and you've added it on
certification
If you have a Microsoft Exchange ActiveSync account and you've added it on
HTC Wildfire S, you can sync the Calendar app with your Exchange ActiveSync
certification
HTC Wildfire S, you can sync the Calendar app with your Exchange ActiveSync
calendar events.
certification
calendar events.
If you’ve signed in to your social network accounts such as Facebook, birthdays and
certification
If you’ve signed in to your social network accounts such as Facebook, birthdays and
events of friends will appear in Calendar.
certification
events of friends will appear in Calendar.
2011/03/07
You can create events that sync with your Google Calendar, your computer’s Outlook
2011/03/07
You can create events that sync with your Google Calendar, your computer’s Outlook
Calendar, or Exchange ActiveSync calendar, as well as events that appear on HTC
2011/03/07
Calendar, or Exchange ActiveSync calendar, as well as events that appear on HTC
From the Home screen, tap
2011/03/07
From the Home screen, tap
2011/03/07
>
2011/03/07
>
Calendar
2011/03/07
Calendar
On any Calendar view, press
2011/03/07
On any Calendar view, press
2011/03/07
, and then tap
2011/03/07
, and then tap
2011/03/07
2011/03/07
2011/03/07
2011/03/07
When you are in the month or agenda view, you can also tap
2011/03/07
When you are in the month or agenda view, you can also tap
If you have more than one calendar, select a calendar in which to add the event:
2011/03/07
If you have more than one calendar, select a calendar in which to add the event:
Select your Google Account to create a Google Calendar event. If you have
2011/03/07
Select your Google Account to create a Google Calendar event. If you have
several Google calendars on the Web, select one in which to add your
2011/03/07
several Google calendars on the Web, select one in which to add your
event.
2011/03/07
event.
§
2011/03/07
§
Select
2011/03/07
Select
PC Sync
2011/03/07
PC Sync
them with your computer's Outlook Calendar using HTC Sync.
2011/03/07
them with your computer's Outlook Calendar using HTC Sync.
§
2011/03/07
§
Select your Exchange ActiveSync account to create an Exchange
2011/03/07
Select your Exchange ActiveSync account to create an Exchange
5. To specify the date and time of the event, do one of the following:
§If there is a time frame for the event, tap the From and To date and time to
set them.
§If it is a whole-day event, such as a birthday, set the From and To date, then
select the All day check box.
6. Enter the event location and description.
7. Set the reminder time.
You can add another reminder time in a Google Calendar event. Press and then
tap Add reminder.
8. If the event occurs on a regular basis, tap the Repetition box and then choose
how often the event occurs.
9. Tap Save.
Inviting guests to your event (Google Calendar only)
After you invite guests to your event, an invitation email will be sent using your
Google Account.
If you want to invite guests to your event, you need to create and add the event in
your Google Calendar.
1. Open Calendar and create a new event. Tap the Calendar field and then select
your Google Account (or one of your other Google Calendars).
2. Add details about the event, such as date and time, location, and more.
3. In the Guests field, enter the email addresses of everyone you want to invite to
the event. Separate multiple addresses with commas (,). If the people to whom
you send invitations use Google Calendar, they’ll receive an invitation in
Calendar and by email.
4. Tap Save to add the event to your Google Calendar.
Sending a meeting request using Calendar (Exchange ActiveSync only)
If you have an Exchange ActiveSync account set up on HTC Wildfire S, you can use
Calendar to create a meeting appointment and send a meeting request email to the
people you want to invite to your meeting.
1. Open Calendar and create a new event. Tap the Calendar field and then select
your Exchange ActiveSync account.
2. Add details about the meeting, such as date and time, location, and more.
3. Press and then tap Meeting invitation.
4. Tap and choose attendees from your contacts or the company directory.
5. Enter your message and then tap Send.
78 Calendar
Only
Calendar and by email.
Only
Calendar and by email.
4.
Only
4.
Tap
Only
Tap
Sending a meeting request using Calendar (Exchange ActiveSync only)
Only
Sending a meeting request using Calendar (Exchange ActiveSync only)
Only
Only
for
Open Calendar and create a new event. Tap the
for
Open Calendar and create a new event. Tap the
your Google Account (or one of your other Google Calendars).
for
your Google Account (or one of your other Google Calendars).
Add details about the event, such as date and time, location, and more.
for
Add details about the event, such as date and time, location, and more.
3.
for
3.
In the Guests field, enter the email addresses of everyone you want to invite to
for
In the Guests field, enter the email addresses of everyone you want to invite to
the event. Separate multiple addresses with commas (,). If the people to whom
for
the event. Separate multiple addresses with commas (,). If the people to whom
you send invitations use Google Calendar, they’ll receive an invitation in
for
you send invitations use Google Calendar, they’ll receive an invitation in
certification
certification
You can add another reminder time in a Google Calendar event. Press
certification
You can add another reminder time in a Google Calendar event. Press
If the event occurs on a regular basis, tap the
certification
If the event occurs on a regular basis, tap the
Repetition
certification
Repetition
Inviting guests to your event (Google Calendar only)
certification
Inviting guests to your event (Google Calendar only)
certification
certification
After you invite guests to your event, an invitation email will be sent using your
certification
After you invite guests to your event, an invitation email will be sent using your
If you want to invite guests to your event, you need to create and add the event in
certification
If you want to invite guests to your event, you need to create and add the event in
your Google Calendar.
certification
your Google Calendar.
Open Calendar and create a new event. Tap the
certification
Open Calendar and create a new event. Tap the
your Google Account (or one of your other Google Calendars).
certification
your Google Account (or one of your other Google Calendars).
2011/03/07
In the Guests field, enter the email addresses of everyone you want to invite to
2011/03/07
In the Guests field, enter the email addresses of everyone you want to invite to
the event. Separate multiple addresses with commas (,). If the people to whom
2011/03/07
the event. Separate multiple addresses with commas (,). If the people to whom
you send invitations use Google Calendar, they’ll receive an invitation in
2011/03/07
you send invitations use Google Calendar, they’ll receive an invitation in
to add the event to your Google Calendar.
2011/03/07
to add the event to your Google Calendar.
Sending a meeting request using Calendar (Exchange ActiveSync only)
2011/03/07
Sending a meeting request using Calendar (Exchange ActiveSync only)
2011/03/07
2011/03/07
2011/03/07
If you have an Exchange ActiveSync account set up on HTC Wildfire S, you can use
2011/03/07
If you have an Exchange ActiveSync account set up on HTC Wildfire S, you can use
Calendar to create a meeting appointment and send a meeting request email to the
2011/03/07
Calendar to create a meeting appointment and send a meeting request email to the
people you want to invite to your meeting.
2011/03/07
people you want to invite to your meeting.
Open Calendar and create a new event. Tap the
2011/03/07
Open Calendar and create a new event. Tap the
your Exchange ActiveSync account.
2011/03/07
your Exchange ActiveSync account.
Add details about the meeting, such as date and time, location, and more.
2011/03/07
Add details about the meeting, such as date and time, location, and more.
3.
2011/03/07
3.
Press
2011/03/07
Press
2011/03/07
and then tap
2011/03/07
and then tap
Tap
2011/03/07
Tap
2011/03/07
and choose attendees from your contacts or the company directory.
2011/03/07
and choose attendees from your contacts or the company directory.
Changing Calendar views
When you open Calendar, it displays the month view by default. You can also use
agenda, day, or week view. To change between views, press , and then choose the
type of view that you want.
Using month view
In month view, you will see markers on days that have events.
Do any of the following in month view:
§Tap a day to view the events for that day.
§Press and hold a day to open an options menu from which you can also choose
to create an event or switch to either day or agenda view.
§Slide your finger up or down the screen to view earlier or later months.
Using day and agenda views
Day view displays a list of the events of one day and also shows weather information
at the bottom of the screen when you’re viewing events of the current day.
§In day view, the weather information appears only if the event is within the five-
day forecast of the Weather app.
§Weather information does not appear in day view when you change day view to
display as a time list.
Agenda view shows a list of all your events in chronological order.
§The colored bars on the left side of the events indicate the type of calendar the
event is part of. To find out what each color represents, press and then tap
More > Calendars.
§When in day view, slide left or right across the screen to view earlier or later
days.
Using week view
Week view displays a chart of the events of one week.
When in week view, you can:
§Press and hold on a time slot to create a new event at that time.
§Tap an event (shown as colored blocks) to view its details.
§Slide left or right across the screen to view earlier or later weeks.
79 Calendar
Only
§
Only
§
When in day view, slide left or right across the screen to view earlier or later
Only
When in day view, slide left or right across the screen to view earlier or later
days.
Only
days.
Using week view
Only
Using week view
Only
Only
for
for
Weather information does not appear in day view when you change day view to
for
Weather information does not appear in day view when you change day view to
display as a time list.
for
display as a time list.
Agenda view shows a list of all your events in chronological order.
for
Agenda view shows a list of all your events in chronological order.
The colored bars on the left side of the events indicate the type of calendar the
for
The colored bars on the left side of the events indicate the type of calendar the
event is part of. To find out what each color represents, press
for
event is part of. To find out what each color represents, press
More
for
More
>
for
>
certification
certification
certification
In month view, you will see markers on days that have events.
certification
In month view, you will see markers on days that have events.
Press and hold a day to open an options menu from which you can also choose
certification
Press and hold a day to open an options menu from which you can also choose
to create an event or switch to either day or agenda view.
certification
to create an event or switch to either day or agenda view.
Slide your finger up or down the screen to view earlier or later months.
certification
Slide your finger up or down the screen to view earlier or later months.
Using day and agenda views
certification
Using day and agenda views
certification
certification
certification
Day view displays a list of the events of one day and also shows weather information
certification
Day view displays a list of the events of one day and also shows weather information
at the bottom of the screen when you’re viewing events of the current day.
certification
at the bottom of the screen when you’re viewing events of the current day.
certification
In day view, the weather information appears only if the event is within the five-
certification
In day view, the weather information appears only if the event is within the five-
day forecast of the Weather app.
certification
day forecast of the Weather app.
Weather information does not appear in day view when you change day view to
certification
Weather information does not appear in day view when you change day view to
display as a time list.
certification
display as a time list.
2011/03/07
The colored bars on the left side of the events indicate the type of calendar the
2011/03/07
The colored bars on the left side of the events indicate the type of calendar the
event is part of. To find out what each color represents, press
2011/03/07
event is part of. To find out what each color represents, press
When in day view, slide left or right across the screen to view earlier or later
2011/03/07
When in day view, slide left or right across the screen to view earlier or later
2011/03/07
2011/03/07
2011/03/07
Week view displays a chart of the events of one week.
2011/03/07
Week view displays a chart of the events of one week.
When in week view, you can:
2011/03/07
When in week view, you can:
Press and hold on a time slot to create a new event at that time.
2011/03/07
Press and hold on a time slot to create a new event at that time.
Tap an event (shown as colored blocks) to view its details.
2011/03/07
Tap an event (shown as colored blocks) to view its details.
2011/03/07
Slide left or right across the screen to view earlier or later weeks.
2011/03/07
Slide left or right across the screen to view earlier or later weeks.
Managing Calendar events
Viewing an event
You can view your own events as well as events that other people have shared with
you.
1. In day view or agenda view, tap an event. The Event details screen then opens
and shows the summary of the event.
2. Depending on the event information, do any of the following:
§Find the event’s location in Maps.
§Call any phone number included in the event location or description.
§Check the participants of the event.
§If the event was sent as a meeting invitation, respond to the invitation.
§If it’s an Exchange ActiveSync calendar event, reply by email to the
organizer or to all the guests. Press , and then either tap Reply or Reply
all.
§Select any text and look it up on the Web.
§Tap the reminder time to change it. Press to save changes.
Editing an event
You can edit events that you have created.
1. While viewing an event, press , and then tap Edit event.
2. Make your changes to the event.
3. When you’re done editing, tap Save.
Deleting an event
Do any of the following:
§While viewing the summary of an event on the Event details screen, press and
then tap Delete event.
§In day, agenda or week view, press and hold an event and then tap Delete event.
§When editing an event, tap Delete.
If the event repeats, you’ll be asked whether you want to delete just that occurrence,
this and all future occurrences, or all past and future occurrences in your Calendar.
80 Calendar
Only
Deleting an event
Only
Deleting an event
Only
Only
Do any of the following:
Only
Do any of the following:
§
Only
§
While viewing the summary of an event on the Event details screen, press
Only
While viewing the summary of an event on the Event details screen, press
for
You can edit events that you have created.
for
You can edit events that you have created.
While viewing an event, press
for
While viewing an event, press
Make your changes to the event.
for
Make your changes to the event.
When you’re done editing, tap
for
When you’re done editing, tap
Deleting an event
for
Deleting an event
for
certification
You can view your own events as well as events that other people have shared with
certification
You can view your own events as well as events that other people have shared with
In day view or agenda view, tap an event. The Event details screen then opens
certification
In day view or agenda view, tap an event. The Event details screen then opens
Depending on the event information, do any of the following:
certification
Depending on the event information, do any of the following:
Call any phone number included in the event location or description.
certification
Call any phone number included in the event location or description.
Check the participants of the event.
certification
Check the participants of the event.
If the event was sent as a meeting invitation, respond to the invitation.
certification
If the event was sent as a meeting invitation, respond to the invitation.
If it’s an Exchange ActiveSync calendar event, reply by email to the
certification
If it’s an Exchange ActiveSync calendar event, reply by email to the
organizer or to all the guests. Press
certification
organizer or to all the guests. Press
certification
Select any text and look it up on the Web.
certification
Select any text and look it up on the Web.
Tap the reminder time to change it. Press
certification
Tap the reminder time to change it. Press
Editing an event
certification
Editing an event
certification
certification
You can edit events that you have created.
certification
You can edit events that you have created.
2011/03/07
2011/03/07
2011/03/07
2011/03/07
While viewing the summary of an event on the Event details screen, press
2011/03/07
While viewing the summary of an event on the Event details screen, press
In day, agenda or week view, press and hold an event and then tap
2011/03/07
In day, agenda or week view, press and hold an event and then tap
When editing an event, tap
2011/03/07
When editing an event, tap
Delete
2011/03/07
Delete
If the event repeats, you’ll be asked whether you want to delete just that occurrence,
2011/03/07
If the event repeats, you’ll be asked whether you want to delete just that occurrence,
this and all future occurrences, or all past and future occurrences in your Calendar.
2011/03/07
this and all future occurrences, or all past and future occurrences in your Calendar.
Sharing an event (vCalendar)
You can share a calendar event as a vCalendar using Bluetooth or by sending it as a
file attachment with your email or message.
1. While viewing an event, press , and then tap Share vCalendar.
2. Do one of the following:
§Tap Bluetooth. You’ll be asked to turn on Bluetooth on HTC Wildfire S and
connect to the receiving Bluetooth device.
§Tap Mail. A new message window opens and automatically includes the
vCalendar as an attachment. Your default email account will be used to
send the message.
§Tap Message. A new message window opens and automatically includes
the vCalendar as a multimedia attachment.
Dismissing or snoozing event reminders
If you have set at least one reminder for an event, the upcoming event icon will
appear in the notifications area of the status bar to remind you of the upcoming
event.
1. Tap the status bar, then slide your finger down the screen to open the
Notifications panel.
2. Do one of the following:
§Tap Clear to dismiss event reminders and all other notifications. Other
types of notifications such as new messages and missed calls will also be
deleted.
§After sliding open the Notifications panel, tap the calendar event reminder.
You’ll then see a list of all pending event reminders. Tap Snooze all to
snooze all event reminders for five minutes, or tap Dismiss all to dismiss all
event reminders.
§Press to keep the reminders pending in the notifications area of the
status bar.
Displaying and synchronizing reminders
You can select which calendars to show or hide, and which ones to keep
synchronized.
81 Calendar
Only
for
Notifications panel.
for
Notifications panel.
Do one of the following:
for
Do one of the following:
§
for
§
Tap
for
Tap
Clear
for
Clear
to dismiss event reminders and all other notifications. Other
for
to dismiss event reminders and all other notifications. Other
types of notifications such as new messages and missed calls will also be
for
types of notifications such as new messages and missed calls will also be
deleted.
for
deleted.
After sliding open the Notifications panel, tap the calendar event reminder.
for
After sliding open the Notifications panel, tap the calendar event reminder.
certification
Share vCalendar
certification
Share vCalendar
.
certification
.
. You’ll be asked to turn on Bluetooth on HTC Wildfire S and
certification
. You’ll be asked to turn on Bluetooth on HTC Wildfire S and
. A new message window opens and automatically includes the
certification
. A new message window opens and automatically includes the
vCalendar as an attachment. Your default email account will be used to
certification
vCalendar as an attachment. Your default email account will be used to
. A new message window opens and automatically includes
certification
. A new message window opens and automatically includes
the vCalendar as a multimedia attachment.
certification
the vCalendar as a multimedia attachment.
Dismissing or snoozing event reminders
certification
Dismissing or snoozing event reminders
If you have set at least one reminder for an event, the upcoming event icon
certification
If you have set at least one reminder for an event, the upcoming event icon
appear in the notifications area of the status bar to remind you of the upcoming
certification
appear in the notifications area of the status bar to remind you of the upcoming
Tap the status bar, then slide your finger down the screen to open the
certification
Tap the status bar, then slide your finger down the screen to open the
Notifications panel.
certification
Notifications panel.
Do one of the following:
certification
Do one of the following:
2011/03/07
types of notifications such as new messages and missed calls will also be
2011/03/07
types of notifications such as new messages and missed calls will also be
After sliding open the Notifications panel, tap the calendar event reminder.
2011/03/07
After sliding open the Notifications panel, tap the calendar event reminder.
You’ll then see a list of all pending event reminders. Tap
2011/03/07
You’ll then see a list of all pending event reminders. Tap
snooze all event reminders for five minutes, or tap
2011/03/07
snooze all event reminders for five minutes, or tap
to keep the reminders pending in the notifications area of the
2011/03/07
to keep the reminders pending in the notifications area of the
2011/03/07
Displaying and synchronizing reminders
2011/03/07
Displaying and synchronizing reminders
You can select which calendars to show or hide, and which ones to keep
2011/03/07
You can select which calendars to show or hide, and which ones to keep
synchronized.
2011/03/07
synchronized.
Showing or hiding calendars
In any Calendar view, press , tap More > Calendars, and then select or clear a
calendar to show or hide it.
§Calendars are kept synchronized on your phone, whether or not you hide them.
§Tap All calendars to display all calendars.
Adding a Google calendar to sync with
You can choose which Google calendars to keep synchronized on HTC Wildfire S.
You can't create a new Google calendar on HTC Wildfire S. You can only sync with
Google calendars that you created or subscribed to on the Web.
1. In any Calendar view, press and then tap More > Calendars.
2. Press again and then tap Add calendars.
3. Select a Google calendar to add to your calendars list, and then tap OK.
4. Press to update Calendar.
Stop synchronizing a Google calendar
You can choose which Google calendars to stop synchronizing.
1. In any Calendar view, press and then tap More > Calendars.
2. Press again and then tap Remove calendars.
3. Select a Google calendar to remove from your calendars list, and then tap OK.
4. Press to update Calendar.
The calendars that you remove from your calendars list will no longer be synchronized
on HTC Wildfire S, but you remain subscribed to them and can work with them in
Google Calendar on the Web.
Changing Calendar settings
You can change Calendar settings to specify how it displays events and how it notifies
you of upcoming events.
In any Calendar view, press and then tap More > Settings.
Reminder settings
All calendars Select this check box to use the same event reminder settings
for all types of calendars. If you clear this check box, you can
set different reminder settings for each calendar.
Set alerts &
notifications
Configure event reminders to open an alert, send you a
notification, or turn off event notifications on HTC Wildfire S.
82 Calendar
Only
4.
Only
4.
The calendars that you remove from your calendars list will no longer be synchronized
Only
The calendars that you remove from your calendars list will no longer be synchronized
on HTC Wildfire S, but you remain subscribed to them and can work with them in
Only
on HTC Wildfire S, but you remain subscribed to them and can work with them in
Google Calendar on the Web.
Only
Google Calendar on the Web.
for
You can choose which Google calendars to stop synchronizing.
for
You can choose which Google calendars to stop synchronizing.
In any Calendar view, press
for
In any Calendar view, press
Press
for
Press
for
again and then tap
for
again and then tap
3.
for
3.
Select a Google calendar to remove from your calendars list, and then tap
for
Select a Google calendar to remove from your calendars list, and then tap
Press
for
Press
for
certification
certification
Calendars are kept synchronized on your phone, whether or not you hide them.
certification
Calendars are kept synchronized on your phone, whether or not you hide them.
certification
certification
You can choose which Google calendars to keep synchronized on HTC Wildfire S.
certification
You can choose which Google calendars to keep synchronized on HTC Wildfire S.
certification
You can't create a new Google calendar on HTC Wildfire S. You can only sync with
certification
You can't create a new Google calendar on HTC Wildfire S. You can only sync with
Google calendars that you created or subscribed to on the Web.
certification
Google calendars that you created or subscribed to on the Web.
and then tap
certification
and then tap
More
certification
More
again and then tap
certification
again and then tap
Add calendars
certification
Add calendars
Select a Google calendar to add to your calendars list, and then tap
certification
Select a Google calendar to add to your calendars list, and then tap
to update Calendar.
certification
to update Calendar.
Stop synchronizing a Google calendar
certification
Stop synchronizing a Google calendar
certification
certification
certification
You can choose which Google calendars to stop synchronizing.
certification
You can choose which Google calendars to stop synchronizing.
In any Calendar view, press
certification
In any Calendar view, press
2011/03/07
Select a Google calendar to remove from your calendars list, and then tap
2011/03/07
Select a Google calendar to remove from your calendars list, and then tap
The calendars that you remove from your calendars list will no longer be synchronized
2011/03/07
The calendars that you remove from your calendars list will no longer be synchronized
on HTC Wildfire S, but you remain subscribed to them and can work with them in
2011/03/07
on HTC Wildfire S, but you remain subscribed to them and can work with them in
Changing Calendar settings
2011/03/07
Changing Calendar settings
You can change Calendar settings to specify how it displays events and how it notifies
2011/03/07
You can change Calendar settings to specify how it displays events and how it notifies
you of upcoming events.
2011/03/07
you of upcoming events.
In any Calendar view, press
2011/03/07
In any Calendar view, press
Reminder settings
2011/03/07
Reminder settings
2011/03/07
2011/03/07
2011/03/07
All calendars
2011/03/07
All calendars
2011/03/07
Default reminder
time
Choose how soon before an event you want to be notified.
Select ringtone Choose a ringtone to sound when you receive an event
reminder.
Vibrate Choose whether you want HTC Wildfire S to vibrate when you
receive an event notification.
Hide declined
events
Choose whether to show or hide events for which you've
declined invitations.
Calendar view settings
Start in Choose the default view to display when you open Calendar.
Day views Choose whether to display day view in the form of an event list or
time list.
First day of
week
Set the month and week views to start on a Sunday or Monday.
Include weather Select this check box to show weather information in the day view
events list.
City If weather is included, by default, day view displays your current
location's weather. You can change it to display the weather of
another city.
About the Calendar widget
You can add a Calendar widget to your Home screen. The widgets offer different
calendar views.
Tapping a day or event on the widget brings you to the Calendar app.
83 Calendar
Only
You can add a Calendar widget to your Home screen. The widgets offer different
Only
You can add a Calendar widget to your Home screen. The widgets offer different
calendar views.
Only
calendar views.
Tapping a day or event on the widget brings you to the Calendar app.
Only
Tapping a day or event on the widget brings you to the Calendar app.
for
for
for
About the Calendar widget
for
About the Calendar widget
You can add a Calendar widget to your Home screen. The widgets offer different
for
You can add a Calendar widget to your Home screen. The widgets offer different
calendar views.
for
calendar views.
certification
certification
Choose whether you want HTC Wildfire S to vibrate when you
certification
Choose whether you want HTC Wildfire S to vibrate when you
Choose whether to show or hide events for which you've
certification
Choose whether to show or hide events for which you've
certification
certification
certification
certification
certification
certification
Choose the default view to display when you open Calendar.
certification
Choose the default view to display when you open Calendar.
Choose whether to display day view in the form of an event list or
certification
Choose whether to display day view in the form of an event list or
Set the month and week views to start on a Sunday or Monday.
certification
Set the month and week views to start on a Sunday or Monday.
Select this check box to show weather information in the day view
certification
Select this check box to show weather information in the day view
events list.
certification
events list.
certification
certification
certification
certification
certification
If weather is included, by default, day view displays your current
certification
If weather is included, by default, day view displays your current
location's weather. You can change it to display the weather of
certification
location's weather. You can change it to display the weather of
another city.
certification
another city.
certification
certification
certification
2011/03/07
You can add a Calendar widget to your Home screen. The widgets offer different
2011/03/07
You can add a Calendar widget to your Home screen. The widgets offer different
Tapping a day or event on the widget brings you to the Calendar app.
2011/03/07
Tapping a day or event on the widget brings you to the Calendar app.
Search and Web browser
Searching HTC Wildfire S and the web
You can search for information on HTC Wildfire S and on the web by using Google
Search. Some applications, such as People or Mail, have their own search box, which
you can use to search within those applications (the application’s icon is at the left of
the search box.)
Setting search options
1. From the Home screen, press , and then tap Settings.
2. Scroll down the screen, and then tap Search.
3. Tap Google search, and then do the following:
§Select Show web suggestions if you want to include suggestions from
Google when doing a search.
§Select Search history to enable personalized search history. You need to
sign in to your Google Account to use this feature. The Show web
suggestions check box needs to be selected for this option to be enabled.
4. Press .
5. Tap Searchable items, and then select the items you want included when doing
a search.
Performing searches on the web and your phone
1. From the Home screen, press .
2. Enter the search item in the search box. As you type, matching items on your
phone and suggestions from Google web search are shown as a list.
3. Do one of the following
§To narrow your search, tap , select another search location (for example,
Apps), and then tap .
§If what you’re searching for is in the list of suggestions, tap it in the list. The
item opens in the appropriate application.
§To edit an item in the list, tap . The item will appear in the search box,
where you can edit it.
§If what you’re searching for is not in the list, tap to search the web. The
web browser opens, displaying the results of a Google search.
84 Search and Web browser
Only
Performing searches on the web and your phone
Only
Performing searches on the web and your phone
Only
Only
1.
Only
1.
From the Home screen, press
Only
From the Home screen, press
2.
Only
2.
for
sign in to your Google Account to use this feature. The
for
sign in to your Google Account to use this feature. The
suggestions
for
suggestions
Press
for
Press
for
.
for
.
5.
for
5.
Tap
for
Tap
Searchable items
for
Searchable items
a search.
for
a search.
certification
Searching HTC Wildfire S and the web
certification
Searching HTC Wildfire S and the web
You can search for information on HTC Wildfire S and on the web by using Google
certification
You can search for information on HTC Wildfire S and on the web by using Google
Search. Some applications, such as People or Mail, have their own search box, which
certification
Search. Some applications, such as People or Mail, have their own search box, which
you can use to search within those applications (the application’s icon is at the left of
certification
you can use to search within those applications (the application’s icon is at the left of
certification
certification
From the Home screen, press
certification
From the Home screen, press
certification
, and then tap
certification
, and then tap
Scroll down the screen, and then tap
certification
Scroll down the screen, and then tap
Search
certification
Search
, and then do the following:
certification
, and then do the following:
Show web suggestions
certification
Show web suggestions
Google when doing a search.
certification
Google when doing a search.
Search history
certification
Search history
to enable personalized search history. You need to
certification
to enable personalized search history. You need to
sign in to your Google Account to use this feature. The
certification
sign in to your Google Account to use this feature. The
check box needs to be selected for this option to be enabled.
certification
check box needs to be selected for this option to be enabled.
2011/03/07
, and then select the items you want included when doing
2011/03/07
, and then select the items you want included when doing
Performing searches on the web and your phone
2011/03/07
Performing searches on the web and your phone
2011/03/07
2011/03/07
2011/03/07
From the Home screen, press
2011/03/07
From the Home screen, press
2011/03/07
.
2011/03/07
.
Enter the search item in the search box. As you type, matching items on your
2011/03/07
Enter the search item in the search box. As you type, matching items on your
phone and suggestions from Google web search are shown as a list.
2011/03/07
phone and suggestions from Google web search are shown as a list.
Do one of the following
2011/03/07
Do one of the following
To narrow your search, tap
2011/03/07
To narrow your search, tap
Apps
2011/03/07
Apps
), and then tap
2011/03/07
), and then tap
If what you’re searching for is in the list of suggestions, tap it in the list. The
2011/03/07
If what you’re searching for is in the list of suggestions, tap it in the list. The
item opens in the appropriate application.
2011/03/07
item opens in the appropriate application.
§
2011/03/07
§
To edit an item in the list, tap
2011/03/07
To edit an item in the list, tap
where you can edit it.
2011/03/07
where you can edit it.
§
2011/03/07
§
If what you’re searching for is not in the list, tap
2011/03/07
If what you’re searching for is not in the list, tap
web browser opens, displaying the results of a Google search.
2011/03/07
web browser opens, displaying the results of a Google search.
Quickly looking up information on the Web
Quick Lookup helps you learn about something right on the spot. When you enter a
new word or phrase, you can easily look it up in popular websites or search services
such as Google Search, Wikipedia, YouTube, Google Translate, and Google Dictionary.
1. From the Home screen, tap > Quick Lookup.
2. If the onscreen keyboard is open, press to close it first so you’ll see the
bottom tabs.
3. Slide across the tabs to pick where you want to look up information. Then in the
search box, enter what you want to search for.
4. Tap .
After looking up the item on one tab, you can slide to other tabs to automatically
look up the same term there.
Translating words to other languages
1. From the Home screen, tap > Quick Lookup.
2. If the onscreen keyboard is open, press to close it first so you’ll see the
bottom tabs.
3. Slide to the Google Translate tab.
4. Under From language, choose the original language, then enter the word or
phrase you want to translate.
5. Under To language, choose from the languages available for translation.
6. Tap Translate.
Using the web browser
You must have an active data connection or Wi-Fi connection to access the
Internet.
Do one of the following to open the web browser and start surfing the Web:
§On the Home screen, tap Internet.
§From the Home screen, tap > Internet.
85 Search and Web browser
Only
Using the web browser
Only
Using the web browser
Only
Only
Only
You must have an active data connection or Wi-Fi connection to access the
Only
You must have an active data connection or Wi-Fi connection to access the
for
Slide to the Google Translate tab.
for
Slide to the Google Translate tab.
Under From language, choose the original language, then enter the word or
for
Under From language, choose the original language, then enter the word or
phrase you want to translate.
for
phrase you want to translate.
Under To language, choose from the languages available for translation.
for
Under To language, choose from the languages available for translation.
Tap
for
Tap
Translate
for
Translate
certification
such as Google Search, Wikipedia, YouTube, Google Translate, and Google Dictionary.
certification
such as Google Search, Wikipedia, YouTube, Google Translate, and Google Dictionary.
to close it first so you’ll see the
certification
to close it first so you’ll see the
Slide across the tabs to pick where you want to look up information. Then in the
certification
Slide across the tabs to pick where you want to look up information. Then in the
search box, enter what you want to search for.
certification
search box, enter what you want to search for.
certification
After looking up the item on one tab, you can slide to other tabs to automatically
certification
After looking up the item on one tab, you can slide to other tabs to automatically
Translating words to other languages
certification
Translating words to other languages
certification
certification
certification
From the Home screen, tap
certification
From the Home screen, tap
certification
>
certification
>
If the onscreen keyboard is open, press
certification
If the onscreen keyboard is open, press
Slide to the Google Translate tab.
certification
Slide to the Google Translate tab.
Under From language, choose the original language, then enter the word or
certification
Under From language, choose the original language, then enter the word or
2011/03/07
Under To language, choose from the languages available for translation.
2011/03/07
Under To language, choose from the languages available for translation.
Using the web browser
2011/03/07
Using the web browser
2011/03/07
2011/03/07
2011/03/07
2011/03/07
You must have an active data connection or Wi-Fi connection to access the
2011/03/07
You must have an active data connection or Wi-Fi connection to access the
Do one of the following to open the web browser and start surfing the Web:
2011/03/07
Do one of the following to open the web browser and start surfing the Web:
On the Home screen, tap
2011/03/07
On the Home screen, tap
2011/03/07
Internet
2011/03/07
Internet
From the Home screen, tap
2011/03/07
From the Home screen, tap
Going to a webpage
1. From the browser screen, press and then tap the URL field on top of the
screen.
2. Enter the webpage address using the keyboard. As you enter the address,
matching webpage addresses will appear on the screen.
3. Do one of the following:
§Tap an address to go directly to that webpage.
§Continue typing in the webpage address, then tap .
Changing the screen orientation
The screen orientation automatically changes depending on how you’re holding HTC
Wildfire S.
Turn HTC Wildfire S sideways to display the web browser in landscape orientation.
If the screen orientation doesn’t change automatically, turn on automatic screen
orientation. From the Home screen, press , tap Settings > Display, and then
select the Auto-rotate screen check box.
Navigating and zooming on a webpage
§You can swipe your finger on the screen to navigate and view other areas of the
webpage.
§Tap the screen twice quickly to zoom in, then tap the screen twice quickly again
to zoom out. You can also use your fingers to spread or pinch the screen to
zoom in and out.
Selecting a link on a webpage
You can tap a link to open it, or press and hold a link for more options.
Link What to do
Webpage
address
(URLs)
§Tap the link to open the webpage.
§Press and hold the link to open a menu that allows you to open,
bookmark, copy to the clipboard, or share the link.
Email address §Tap to send an email message to the email address.
§Press and hold, then tap Copy on the menu to copy the email
address to the clipboard. You can paste the email address later
when creating a new contact or sending a new email message.
86 Search and Web browser
Only
Selecting a link on a webpage
Only
Selecting a link on a webpage
Only
Only
You can tap a link to open it, or press and hold a link for more options.
Only
You can tap a link to open it, or press and hold a link for more options.
Only
Only
Link
Only
Link
Only
for
You can swipe your finger on the screen to navigate and view other areas of the
for
You can swipe your finger on the screen to navigate and view other areas of the
webpage.
for
webpage.
Tap the screen twice quickly to zoom in, then tap the screen twice quickly again
for
Tap the screen twice quickly to zoom in, then tap the screen twice quickly again
to zoom out. You can also use your fingers to spread or pinch the screen to
for
to zoom out. You can also use your fingers to spread or pinch the screen to
zoom in and out.
for
zoom in and out.
for
certification
Enter the webpage address using the keyboard. As you enter the address,
certification
Enter the webpage address using the keyboard. As you enter the address,
Tap an address to go directly to that webpage.
certification
Tap an address to go directly to that webpage.
Continue typing in the webpage address, then tap
certification
Continue typing in the webpage address, then tap
certification
.
certification
.
certification
certification
The screen orientation automatically changes depending on how you’re holding HTC
certification
The screen orientation automatically changes depending on how you’re holding HTC
Turn HTC Wildfire S sideways to display the web browser in landscape orientation.
certification
Turn HTC Wildfire S sideways to display the web browser in landscape orientation.
certification
If the screen orientation doesn’t change automatically, turn on automatic screen
certification
If the screen orientation doesn’t change automatically, turn on automatic screen
orientation. From the Home screen, press
certification
orientation. From the Home screen, press
certification
Auto-rotate screen
certification
Auto-rotate screen
check box.
certification
check box.
Navigating and zooming on a webpage
certification
Navigating and zooming on a webpage
certification
certification
certification
You can swipe your finger on the screen to navigate and view other areas of the
certification
You can swipe your finger on the screen to navigate and view other areas of the
2011/03/07
to zoom out. You can also use your fingers to spread or pinch the screen to
2011/03/07
to zoom out. You can also use your fingers to spread or pinch the screen to
2011/03/07
2011/03/07
2011/03/07
You can tap a link to open it, or press and hold a link for more options.
2011/03/07
You can tap a link to open it, or press and hold a link for more options.
2011/03/07
2011/03/07
Tap the link to open the webpage.
2011/03/07
Tap the link to open the webpage.
Press and hold the link to open a menu that allows you to open,
2011/03/07
Press and hold the link to open a menu that allows you to open,
bookmark, copy to the clipboard, or share the link.
2011/03/07
bookmark, copy to the clipboard, or share the link.
2011/03/07
Email address
2011/03/07
Email address
§
2011/03/07
§
Tap to send an email message to the email address.
2011/03/07
Tap to send an email message to the email address.
§
2011/03/07
§
Press and hold, then tap
2011/03/07
Press and hold, then tap
address to the clipboard. You can paste the email address later
2011/03/07
address to the clipboard. You can paste the email address later
2011/03/07
2011/03/07
2011/03/07
2011/03/07
2011/03/07
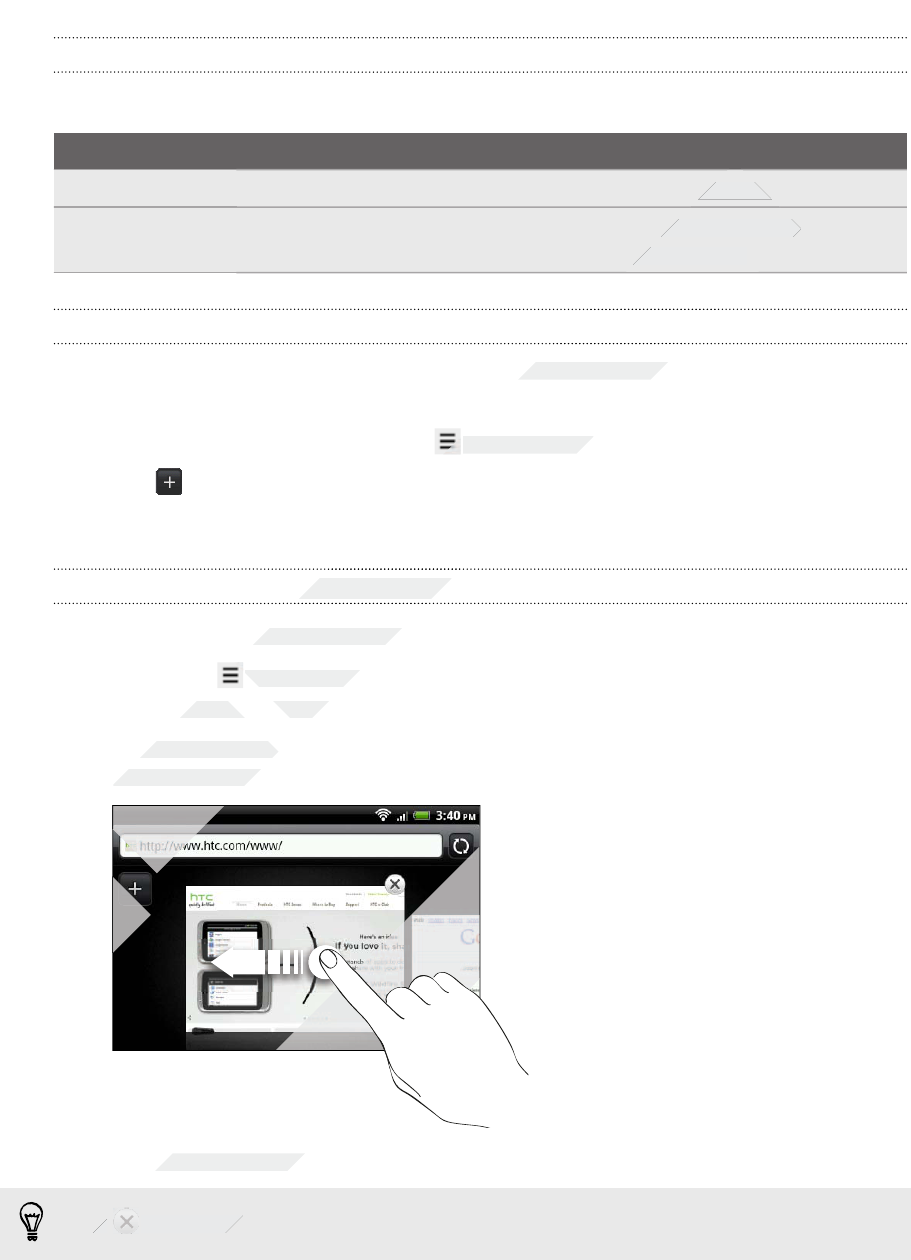
Selecting an address or phone number on a webpage
You can map an address or call a phone number on a webpage.
Link What to do
Location address Tap the address to copy it or map it using Google Maps.
Phone number Tap the phone number to copy, call, send a text message to that
number, or save the number to a contact in People.
Opening a new browser window
Open multiple browser windows to make it easier for you to switch from one website
to another.
1. While viewing a webpage, press and then tap Windows.
2. Tap .
A new browser window opens.
Switching between browser windows
1. While viewing a webpage, do one of the following:
§Press and then tap Windows.
§Pinch the screen (zoom out) until you see the other browser windows.
2. Select the browser window you want to view by sliding your finger on the
screen from right to left.
3. Tap a webpage to display it in full screen.
Tap to close a webpage.
87 Search and Web browser
Only
Only
Only
for
Pinch the screen (zoom out) until you see the other browser windows.
for
Pinch the screen (zoom out) until you see the other browser windows.
Select the browser window you want to view by sliding your finger on the
for
Select the browser window you want to view by sliding your finger on the
screen from right to left.
for
screen from right to left.
for
for
certification
certification
certification
Tap the address to copy it or map it using Google Maps.
certification
Tap the address to copy it or map it using Google Maps.
Tap the phone number to copy, call, send a text message to that
certification
Tap the phone number to copy, call, send a text message to that
number, or save the number to a contact in People.
certification
number, or save the number to a contact in People.
certification
certification
certification
certification
certification
Open multiple browser windows to make it easier for you to switch from one website
certification
Open multiple browser windows to make it easier for you to switch from one website
certification
and then tap
certification
and then tap
Switching between browser windows
certification
Switching between browser windows
certification
certification
certification
While viewing a webpage, do one of the following:
certification
While viewing a webpage, do one of the following:
certification
and then tap
certification
and then tap
Pinch the screen (zoom out) until you see the other browser windows.
certification
Pinch the screen (zoom out) until you see the other browser windows.
2011/03/07
2011/03/07
2011/03/07
2011/03/07
2011/03/07
2011/03/07
2011/03/07
2011/03/07
2011/03/07
2011/03/07
2011/03/07
2011/03/07
Tap a webpage to display it in full screen.
2011/03/07
Tap a webpage to display it in full screen.
2011/03/07
Tap
2011/03/07
Tap
2011/03/07
to close a webpage.
2011/03/07
to close a webpage.
Downloading from the Web
Do more than just browsing the Web. You can download web files such as photos and
apps then save them on your storage card.
Downloading apps from the Web
You can download apps directly from your favorite websites. Apps downloaded from
the Web can be from unknown sources. To protect your phone and personal data, we
strongly recommend that you download and install only apps you trust.
All downloaded files will be saved to your storage card. Before downloading apps
from the Web, be sure that you have your storage card on your phone. The app
you want to download should also be compatible with your phone.
1. Open your web browser, then go to the website where you can download the
app you want.
2. Follow the website's instructions for downloading the app.
Before you can install the downloaded app, you need to set your phone to allow
installation of third-party apps. From the Home screen, press , then tap Settings >
Applications > Unknown sources.
Viewing your downloads
While viewing a webpage, press and then tap More > Downloads.
Viewing bookmarks and previously visited
pages
You can store as many bookmarks as you want on your phone. You can also access a
convenient list of the sites you have visited, or quickly view the pages that you access
most often.
Bookmarking a webpage
1. While viewing a webpage, press , and then tap Add bookmark.
2. Edit the bookmark name if needed, and then tap Add.
Opening a bookmark
1. While viewing a webpage, press , and then tap Bookmarks.
2. On the Bookmarks tab , navigate to the bookmark you want to open, and
then tap it.
88 Search and Web browser
Only
pages
Only
pages
You can store as many bookmarks as you want on your phone. You can also access a
Only
You can store as many bookmarks as you want on your phone. You can also access a
convenient list of the sites you have visited, or quickly view the pages that you access
Only
convenient list of the sites you have visited, or quickly view the pages that you access
most often.
Only
most often.
Only
for
Viewing your downloads
for
Viewing your downloads
for
While viewing a webpage, press
for
While viewing a webpage, press
Viewing bookmarks and previously visited
for
Viewing bookmarks and previously visited
pages
for
pages
certification
certification
certification
You can download apps directly from your favorite websites. Apps downloaded from
certification
You can download apps directly from your favorite websites. Apps downloaded from
the Web can be from unknown sources. To protect your phone and personal data, we
certification
the Web can be from unknown sources. To protect your phone and personal data, we
strongly recommend that you download and install only apps you trust.
certification
strongly recommend that you download and install only apps you trust.
certification
All downloaded files will be saved to your storage card. Before downloading apps
certification
All downloaded files will be saved to your storage card. Before downloading apps
from the Web, be sure that you have your storage card on your phone. The app
certification
from the Web, be sure that you have your storage card on your phone. The app
you want to download should also be compatible with your phone.
certification
you want to download should also be compatible with your phone.
Open your web browser, then go to the website where you can download the
certification
Open your web browser, then go to the website where you can download the
Follow the website's instructions for downloading the app.
certification
Follow the website's instructions for downloading the app.
Before you can install the downloaded app, you need to set your phone to allow
certification
Before you can install the downloaded app, you need to set your phone to allow
installation of third-party apps. From the Home screen, press
certification
installation of third-party apps. From the Home screen, press
Unknown sources
certification
Unknown sources
.
certification
.
Viewing your downloads
certification
Viewing your downloads
certification
certification
While viewing a webpage, press
certification
While viewing a webpage, press
2011/03/07
Viewing bookmarks and previously visited
2011/03/07
Viewing bookmarks and previously visited
You can store as many bookmarks as you want on your phone. You can also access a
2011/03/07
You can store as many bookmarks as you want on your phone. You can also access a
convenient list of the sites you have visited, or quickly view the pages that you access
2011/03/07
convenient list of the sites you have visited, or quickly view the pages that you access
Bookmarking a webpage
2011/03/07
Bookmarking a webpage
2011/03/07
2011/03/07
While viewing a webpage, press
2011/03/07
While viewing a webpage, press
Edit the bookmark name if needed, and then tap
2011/03/07
Edit the bookmark name if needed, and then tap
Opening a bookmark
2011/03/07
Opening a bookmark
2011/03/07
2011/03/07
2011/03/07
While viewing a webpage, press
2011/03/07
While viewing a webpage, press
2.
2011/03/07
2.
On the Bookmarks tab
2011/03/07
On the Bookmarks tab
then tap it.
2011/03/07
then tap it.
Editing a bookmark
1. While viewing a webpage, press , and then tap Bookmarks.
2. On the Bookmarks tab , press and then tap Edit.
3. Tap the bookmark you want to edit.
4. Enter your changes, and then tap Edit.
Viewing a previously visited page
1. While viewing a webpage, press , and then tap Bookmarks.
2. On the History tab , navigate to the page you want to view and then tap the
page.
Clearing the list of previously visited pages
1. While viewing a webpage, press , and then tap Bookmarks.
2. On the History tab , press , and then tap Clear history.
Viewing a page that you often visit
1. While viewing a webpage, press , and then tap Bookmarks.
2. On the Most visited tab , navigate to the page you want to view, and then
tap the page.
Clearing the list of most visited pages
1. While viewing a webpage, press , and then tap Bookmarks.
2. On the Most visited tab , press , and then tap Clear all.
Changing the view of bookmarks or most visited pages
1. While viewing a webpage, press , and then tap Bookmarks.
2. On the Bookmarks tab or the Most visited tab , press , and then tap
Thumbnails, List, or Grid to change the view.
For example, if you are in Thumbnails view and you want to view bookmarks in
a grid, press and tap List, then press and tap Grid.
89 Search and Web browser
Only
2.
Only
2.
Changing the view of bookmarks or most visited pages
Only
Changing the view of bookmarks or most visited pages
Only
Only
1.
Only
1.
for
On the Most visited tab
for
On the Most visited tab
tap the page.
for
tap the page.
Clearing the list of most visited pages
for
Clearing the list of most visited pages
for
for
for
While viewing a webpage, press
for
While viewing a webpage, press
On the Most visited tab
for
On the Most visited tab
certification
certification
certification
, and then tap
certification
, and then tap
Bookmarks
certification
Bookmarks
, navigate to the page you want to view and then tap the
certification
, navigate to the page you want to view and then tap the
Clearing the list of previously visited pages
certification
Clearing the list of previously visited pages
certification
certification
While viewing a webpage, press
certification
While viewing a webpage, press
certification
, and then tap
certification
, and then tap
, press
certification
, press
certification
, and then tap
certification
, and then tap
Viewing a page that you often visit
certification
Viewing a page that you often visit
certification
certification
While viewing a webpage, press
certification
While viewing a webpage, press
On the Most visited tab
certification
On the Most visited tab
certification
2011/03/07
, and then tap
2011/03/07
, and then tap
, press
2011/03/07
, press
2011/03/07
, and then tap
2011/03/07
, and then tap
Changing the view of bookmarks or most visited pages
2011/03/07
Changing the view of bookmarks or most visited pages
2011/03/07
2011/03/07
2011/03/07
While viewing a webpage, press
2011/03/07
While viewing a webpage, press
2011/03/07
, and then tap
2011/03/07
, and then tap
On the Bookmarks tab
2011/03/07
On the Bookmarks tab
2011/03/07
or the Most visited tab
2011/03/07
or the Most visited tab
, or
2011/03/07
, or
Grid
2011/03/07
Grid
to change the view.
2011/03/07
to change the view.
For example, if you are in Thumbnails view and you want to view bookmarks in
2011/03/07
For example, if you are in Thumbnails view and you want to view bookmarks in
a grid, press
2011/03/07
a grid, press
2011/03/07
and tap
2011/03/07
and tap
List
2011/03/07
List
Setting browser options
Customize the web browser to suit your browsing lifestyle. Set display, privacy, and
security options when using the web browser.
From the browser screen, press , and then tap More > Settings.
Setting your home page
1. From the browser screen, press , and then tap More > Settings > Set home
page.
2. Select the home page you want to use.
Browsing full versions of all websites
Some websites display a mobile version of their pages on phone web browsers. You
can choose to view the full version of all pages, even for these sites.
From the browser screen, press , tap More > Settings, and then clear the Mobile
view check box.
Choosing when to show Flash content
Choose which Flash® content you want to see on a webpage, and when you want to
view it.
1. From the browser screen, press , and then tap More > Settings > Enable
plugins.
2. Tap On demand.
After selecting On demand, you can show the Flash content by tapping on the
webpage.
90 Search and Web browser
Only
After selecting
Only
After selecting
webpage.
Only
webpage.
for
From the browser screen, press
for
From the browser screen, press
plugins
for
plugins
.
for
.
Tap
for
Tap
On demand
for
On demand
for
After selecting
for
After selecting
webpage.
for
webpage.
certification
certification
certification
More
certification
More
>
certification
>
Settings
certification
Settings
Browsing full versions of all websites
certification
Browsing full versions of all websites
certification
certification
certification
Some websites display a mobile version of their pages on phone web browsers. You
certification
Some websites display a mobile version of their pages on phone web browsers. You
can choose to view the full version of all pages, even for these sites.
certification
can choose to view the full version of all pages, even for these sites.
From the browser screen, press
certification
From the browser screen, press
certification
, tap
certification
, tap
More
certification
More
>
certification
>
Choosing when to show Flash content
certification
Choosing when to show Flash content
certification
certification
Choose which Flash
certification
Choose which Flash
®
certification
®
content you want to see on a webpage, and when you want to
certification
content you want to see on a webpage, and when you want to
From the browser screen, press
certification
From the browser screen, press
2011/03/07
, you can show the Flash content by tapping
2011/03/07
, you can show the Flash content by tapping
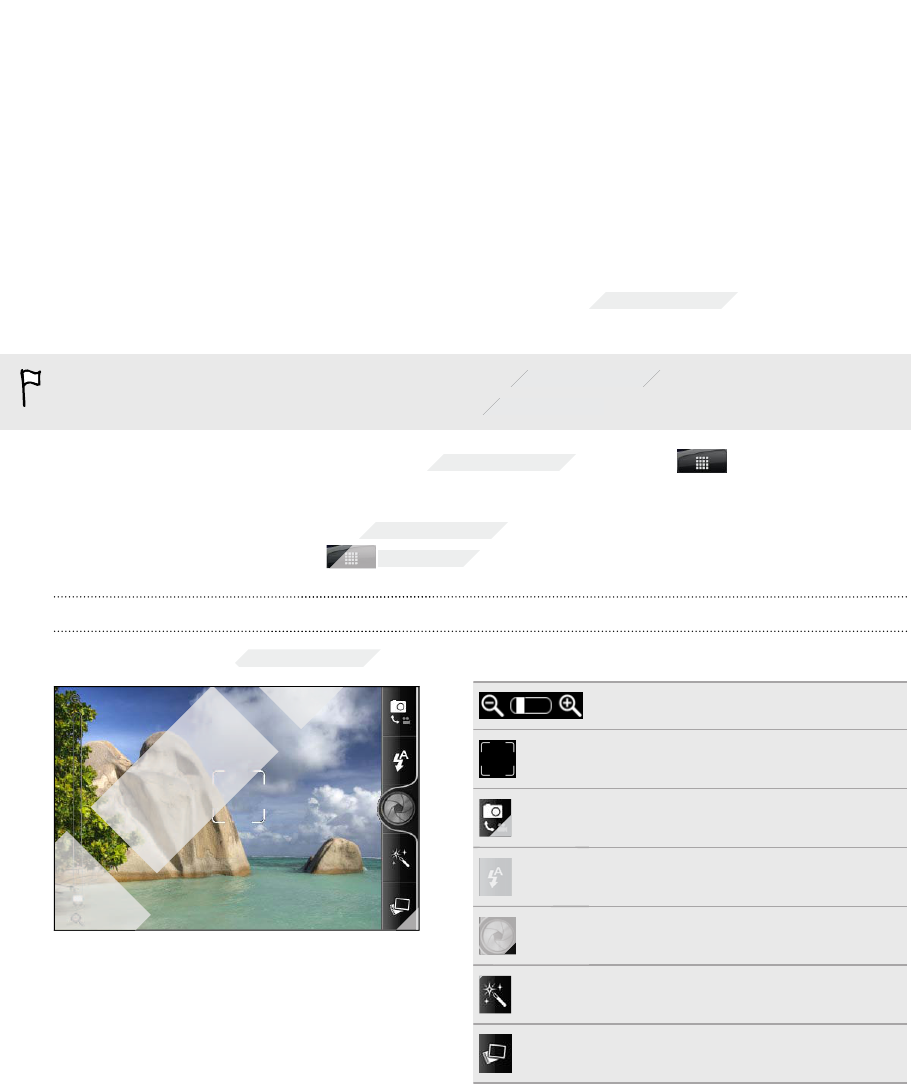
Camera
Camera basics
Whether traveling for business or fun, enjoy taking photos and videos of your trip and
encounters with HTC Wildfire S.
Be sure to plug in your storage card before you start. Photos and videos captured
with the camera will be stored onto your storage card.
§To open the camera in photo mode and take photos, tap from the Home
screen, and then tap Camera.
§To open the camera directly in video mode so you can immediately start
capturing videos, tap from the Home screen, and then tap Camcorder.
Viewfinder screen
You’ll find the following onscreen controls on the Viewfinder screen:
Zoom bar
Auto focus indicator
Photo/Video mode switch
Flash button
Shutter release/Record button
Effects button
Gallery button
91 Camera
Only
Only
Only
Only
for
for
for
certification
Whether traveling for business or fun, enjoy taking photos and videos of your trip and
certification
Whether traveling for business or fun, enjoy taking photos and videos of your trip and
certification
Be sure to plug in your storage card before you start. Photos and videos captured
certification
Be sure to plug in your storage card before you start. Photos and videos captured
with the camera will be stored onto your storage card.
certification
with the camera will be stored onto your storage card.
To open the camera in photo mode and take photos, tap
certification
To open the camera in photo mode and take photos, tap
To open the camera directly in video mode so you can immediately start
certification
To open the camera directly in video mode so you can immediately start
certification
from the Home screen, and then tap
certification
from the Home screen, and then tap
certification
certification
certification
You’ll find the following onscreen controls on the Viewfinder screen:
certification
You’ll find the following onscreen controls on the Viewfinder screen:
certification
certification
2011/03/07
2011/03/07
2011/03/07
2011/03/07
2011/03/07
2011/03/07
2011/03/07
2011/03/07
2011/03/07
2011/03/07
2011/03/07
2011/03/07
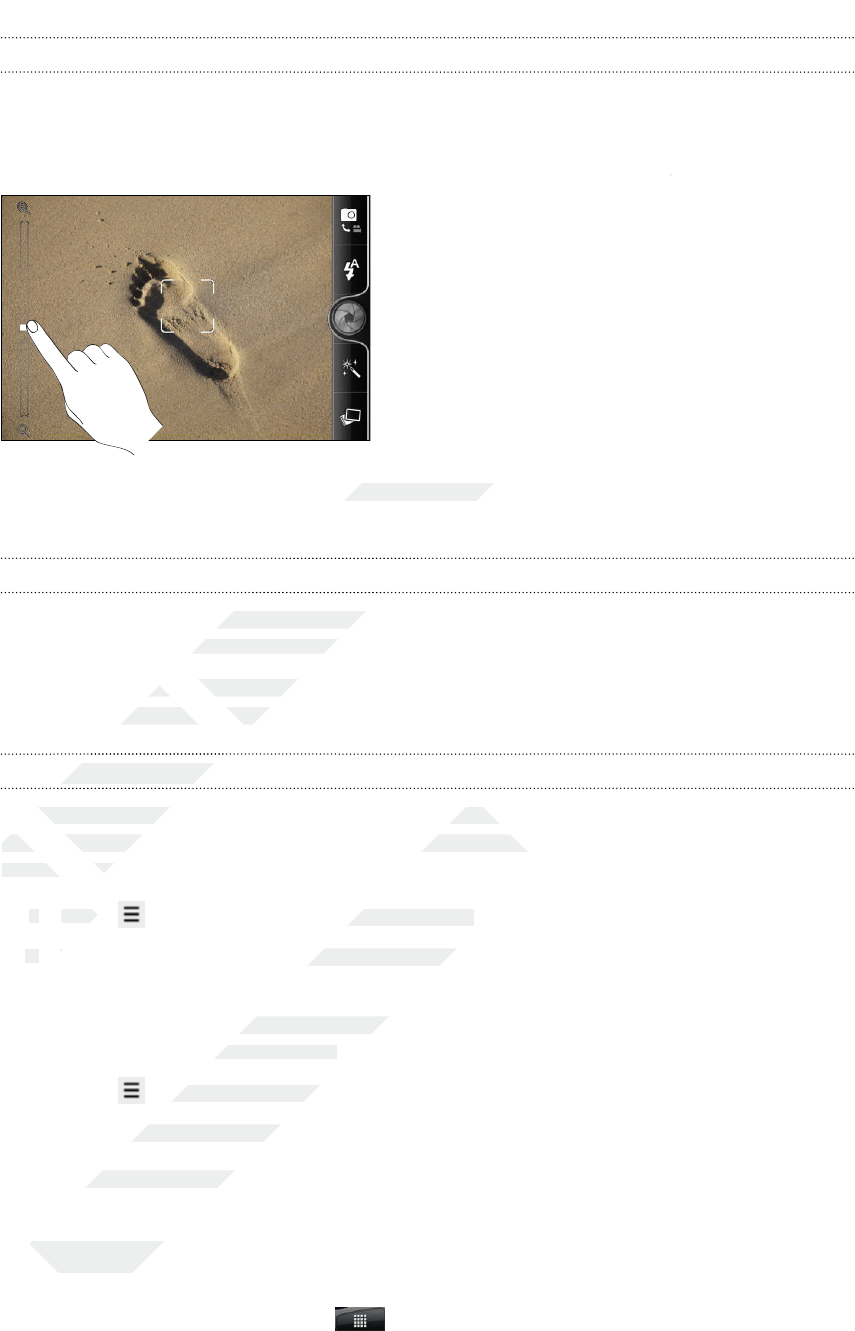
Zooming
Before taking a photo or video, you can first use the onscreen zoom bar to zoom in or
out of your subject.
Simply slide your finger up or down the zoom bar to zoom in or out.
When you're recording video, the zoom bar is always shown onscreen. You can freely
zoom in or out while recording.
Auto focusing
Whenever you point the camera at a different subject or location, it shows the auto
focus indicator at the center of the Viewfinder screen.
Let the camera auto focus on the center of the screen. Or you can tap another area on
the screen that you want to focus on.
Taking your closeup shot
Having a hard time taking your own closeup shot? With your phone's camera, it's
easy. Just set it to automatically take your self portrait. You won't even need to tap
the shutter release button.
1. Press to open the settings menu panel.
2. Tap Self-portrait. Then choose whether you want the camera to identify 1 or 2
faces in the shot.
3. To set a time delay before the camera takes the shot, tap Self-timer. Then set
the timer to 2 or 10 seconds.
4. Press to close the settings menu panel.
5. Turn the camera to face you.
Once the camera detects your face, it automatically focuses and takes your photo.
Taking a photo
1. From the Home screen, tap > Camera.
2. Before taking the photo, you can zoom in or out first on your subject.
92 Camera
Only
easy. Just set it to automatically take your self portrait. You won't even need to tap
Only
easy. Just set it to automatically take your self portrait. You won't even need to tap
the shutter release button.
Only
the shutter release button.
1.
Only
1.
Press
Only
Press
2.
Only
2.
Tap
Only
Tap
for
Let the camera auto focus on the center of the screen. Or you can tap another area on
for
Let the camera auto focus on the center of the screen. Or you can tap another area on
the screen that you want to focus on.
for
the screen that you want to focus on.
Taking your closeup shot
for
Taking your closeup shot
for
for
for
Having a hard time taking your own closeup shot? With your phone's camera, it's
for
Having a hard time taking your own closeup shot? With your phone's camera, it's
easy. Just set it to automatically take your self portrait. You won't even need to tap
for
easy. Just set it to automatically take your self portrait. You won't even need to tap
the shutter release button.
for
the shutter release button.
certification
Simply slide your finger up or down the zoom bar to zoom in or out.
certification
Simply slide your finger up or down the zoom bar to zoom in or out.
When you're recording video, the zoom bar is always shown onscreen. You can freely
certification
When you're recording video, the zoom bar is always shown onscreen. You can freely
certification
certification
Whenever you point the camera at a different subject or location, it shows the auto
certification
Whenever you point the camera at a different subject or location, it shows the auto
focus indicator at the center of the Viewfinder screen.
certification
focus indicator at the center of the Viewfinder screen.
Let the camera auto focus on the center of the screen. Or you can tap another area on
certification
Let the camera auto focus on the center of the screen. Or you can tap another area on
the screen that you want to focus on.
certification
the screen that you want to focus on.
2011/03/07
Having a hard time taking your own closeup shot? With your phone's camera, it's
2011/03/07
Having a hard time taking your own closeup shot? With your phone's camera, it's
easy. Just set it to automatically take your self portrait. You won't even need to tap
2011/03/07
easy. Just set it to automatically take your self portrait. You won't even need to tap
to open the settings menu panel.
2011/03/07
to open the settings menu panel.
. Then choose whether you want the camera to identify 1 or 2
2011/03/07
. Then choose whether you want the camera to identify 1 or 2
To set a time delay before the camera takes the shot, tap
2011/03/07
To set a time delay before the camera takes the shot, tap
the timer to 2 or 10 seconds.
2011/03/07
the timer to 2 or 10 seconds.
to close the settings menu panel.
2011/03/07
to close the settings menu panel.
Turn the camera to face you.
2011/03/07
Turn the camera to face you.
Once the camera detects your face, it automatically focuses and takes your photo.
2011/03/07
Once the camera detects your face, it automatically focuses and takes your photo.
Taking a photo
2011/03/07
Taking a photo