HUBSAN INTELLIGENT FPV1TX FPV Transmitter User Manual
SHENZHEN HUBSAN INTELLIGENT COMPANY LIMITED FPV Transmitter Users Manual
Contents
- 1. User manual part 1
- 2. User manual part 2
User manual part 1
REAL TIME FPV
THE HUBSAN X4 PRO
®
ITEM NO.:H109S
X4 PRO WITH FPV TRANSMITTER
Ages 14+
Read the instruction manual carefully
02 ©2015 Hubsan
ֻӰ೨ሙNjྠిਫ਼ద
IMPORTANT SAFETY NOTES
OPERATION:
Flight:
Be responsible for your safety and the safety of others when you fly X4 Pro!
Do not fly the X4 Pro in a crowded place, it needs plenty of space to operate.
Do not fly it in bad weather.
Never try to catch the X4 Pro while it is in flight.
Only recommended for ages 14+.
Power off X4 Pro after flight, to prevent the propellers from causing injuries.
Always remove the battery after you stop flying to avoid injuries from accidentally powering on the motors.
Always use great caution to protect yourself when near the propellers. The flight system can automatically
operate after power on with the transmitter is power on/ off. The high speed rotating propellers are
very dangerous.
Hubsan X4 PRO
2015.01
Read the instruction manual carefully!
V1.0
SYMBOL EXPLANATION
No operating Important Notice Instruction Explanation, reference
USAGE ADVICE
Hubsan provides you three files for X4 Pro:
1. Disclaimer”
2. Hubsan X4 Pro Instruction Manual”
View the instruction videos and Disclaimer first, then read the manuals.
READING INSTRUCTION
Be extremely careful and responsible when use the X4 Pro. There are delicate electronic components,
which can be damaged if you crash the X4 Pro or submerge it in water. Do not attempt to fly a damaged X4
Pro. Always inspect propellers for damage and proper tightness. Do not fly with damaged propellers!

03 ©2015 Hubsan
ֻӰ೨ሙNjྠిਫ਼ద
CATALOG
IMPORTANT SAFETY NOTES
READING INSTRUCTION
symbol explanation
usage advice
CATALOG
GENERAL INTRODUCTION
1 ACCESSORIES INCLUDED
2 INTRODUCTION
PREPAR FOR USE
1 PREPARE THE LI-PO BATTERY
1.1 Li-Po battery in the X4 Pro
1.2 Charging
1.3 Power on/ off the X4 Pro Li-Po battery
1.4 Check The Li-po Battery Power
2 SAFETY NOTES
2.1 Important Notes
2.2 Li-Po battery Safety Notes
3 PREPARE THE X4 PRO
3.1 Introduction the X4 Pro
3.2 Prepare the Camera
3.3 Prepare the 3 Axis Stable Gimbal
3.4 Prepare the Parachute
3.5 Prepare the Propeller set
4 PREPARATION FOR THE SMART TX
4.1 Introduction
4.2 The installation of TX Battery
4.3 Start the transmitter.
4.4 Method to bind the Transmitter
and x4 pro
4.5 Introduction of the LCD
4.6 Introduction of Antenna
PREPARATION FOR FLY
1.COMPASS CALIBRATION
1.1 calibration
1.2 Check the GPS
2 POWER ON/OFF THE X4 PRO
3 BASIC FLIGHT
4 LOSE CONTROL PROTECTION FUNCTION
--RTH MODE
4.1 The condition which can enter into
the RTH Mode
4.2 Exit the RTH Mode
5 INTELLIGENT BATTERY ALARM FUNCTION
FAQ
16
17
18
18
19
19
19
20
21
21
21
22
23
24
24
24
25
02
02
03
04
04
05
06
06
07
07
08
08
09
09
12
13
15
CATALOG
04 ©2015 Hubsan
ֻӰ೨ሙNjྠిਫ਼ద
FPV Transmitter, equipped
with 8 X AA battery(EXCLUDED)
9 Li-Po Balance charger 1PC
10 4PCS
Propeller guard Ensure the safety of the X4 Pro
use to recharge the Li-Po battery
GENERAL INTRODUCTION
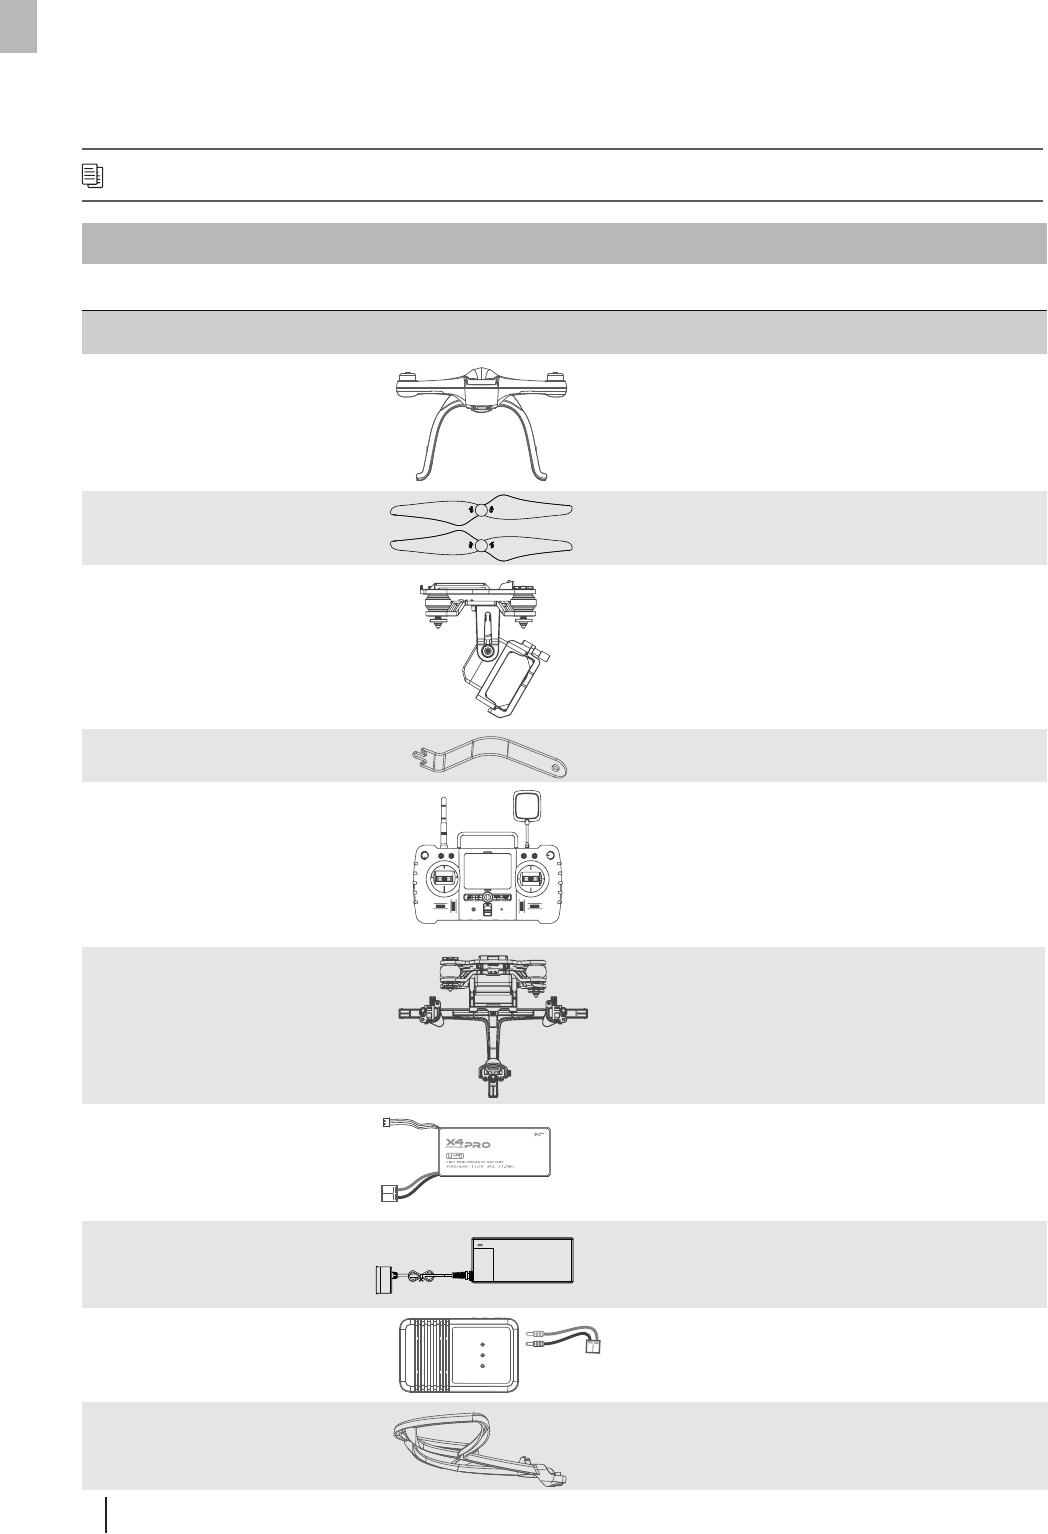
1. ACCESSORIES INCLUDED
ACCESSORIES INCLUDED
Check all the accessories in the package before use.
S/N Part Name Photos Q'ty Remarks
1 The X4 Pro 1PC Equipped with smart flight
controller,GPS and compass
Propeller A 2pcs, Propeller B 2pcs
2 Propellers
1-axis stablized gimbal
4PCS
3 1PC
4 Propeller removal wrench 1PC
5 Transmitter 1PC
1-axis stablized gimbal
For removing propellers
6Smart Phone Clip 1PC Hold the smart phone
7 Li-Po battery for X4 Pro 1PC Insert in the X4 Pro
8 Li-Po Charger Adapter 1PC 110-240V
Hubsan X4 Pro is a high-tech aerial video and photography quadcopter. It is equipped with a highly accurate
and stable 3 axis gimbal, 1080P HD aerial photography camera, and advanced smart flight control system.
The highly-integrated Android transmitter is capable of long distance camera control, video transmission,
ground station auto flight, FPV flight, and social network sharing, etc. functions. The Hubsan X4 Pro will help
you to easily shoot stable HD videos and photos.
FPV: First Person View provides a realistic inflight cockpit view experience.
05 ©2015 Hubsan
ֻӰ೨ሙNjྠిਫ਼ద
ACCESSORIES INCLUDED
[Propeller]
[Brushless motor]
[1 axis gimbal]
[1080P camera]
[Parachute]
[Battery compartment]
[Undercarriage]
[Terrestrial magnetism]
[non-slip mat]
[LED light]
11 Micro-USB cable 1PC
12 4PCS
2. INTRODUCTION
13 1PC
1080P camera HD camera module
To read the camera data
Disclaimer
Hubsan X4 Pro Instruction Manual
Camera Instruction Manual
Parachute Instruction Manual
User Manuals
The Hubsan X4 Pro system consists of the quadcopter, camera, gimbal, parachute, propeller
guard, power system, flight control system, and radio transmission system.
Transmitter equipment: dual data transmission, map and track display, waypoints set/auto-flight,
FPV transmitter operates video and picture shooting
X4 Pro equipment: 3-axis gimbal, camera, power system(brushless motors and propellers),
parachute, propeller guard
X4 Pro working Mode: Altitude Hold Mode, Position-hold Mode, Waypoint Mode, RTH Mode,
Headless Mode
14 1PC
Transmitter Antenna 5.8 GHz Transmitter Antenna
15 1PC
Video glasses
Video glasses (Not included. Purchase
this optional accessory from Hubsan)
16 Parachute 1PC
Stand-alone system, can help
provide some safety after a loss of
control. (Not included. Purchase this
optional accessory from Hubsan)

06 ©2015 Hubsan
ֻӰ೨ሙNjྠిਫ਼ద
FPV Transmitter, equipped
with 8 X AA battery(EXCLUDED)
PREPAR FOR USE
EQUIPMENT SUPPLIED POWER
3.7 V 650mAh rechargeable Li-Po batteryCamera
3.7 V 380mAh rechargeable Li-Po batteryParachute
X4 Pro with gimbal 11.1V 7000mAh rechargeable Li-Po battery
+
-
PREPARATIONS FOR USE
1 PREPARE THE LI-PO BATTERY
Make sure the following equipment is fully-charged before flight.
1.1 LI-PO BATTERY IN THE X4 PRO
BATTERY SPECIFICATIONS
Charging temperature: 0°C~40°C Discharging temperature: - 20°C~50°C
Charging/ Discharging humidity:< 80%
Thanks for buying HUBSAN products!
1.2 CHARGING
Connect battery to balance charger and wall charger, the two LED lights will turn red when
charging and turn green when charging is finished. The charging time is about 180 min.
The X4 Pro is equipped with a 11.1V, 3 cells, 7000mAh rechargeable Li-Po battery. Always
charge the Li-Po battery with Hubsan provided charger.
07 ©2015 Hubsan
ֻӰ೨ሙNjྠిਫ਼ద
BATTERY
BATTERY POWER
LiPo Battery Disposal & Recycling
Lithium-Polymer(LiPo) batteries must not be placed in with household trash. Please
contact your environmental or waste agency or the supplier of your model for local
regulations and the location of your nearest LiPo battery recycling center.
1.3 POWER ON/ OFF THE X4 PRO LI-PO BATTERY
(1) Overcharge protection
(2) Over-discharge protection
(3) Short circuit protection
Overcharging will damage the battery, charging will
stop when the battery charge to 12.8V.
Over-discharging will damage the battery. The X4 Pro
will cut off power when the battery power is 8.4V.
Short circuit detection. The X4 Pro will power off to
protect the battery.
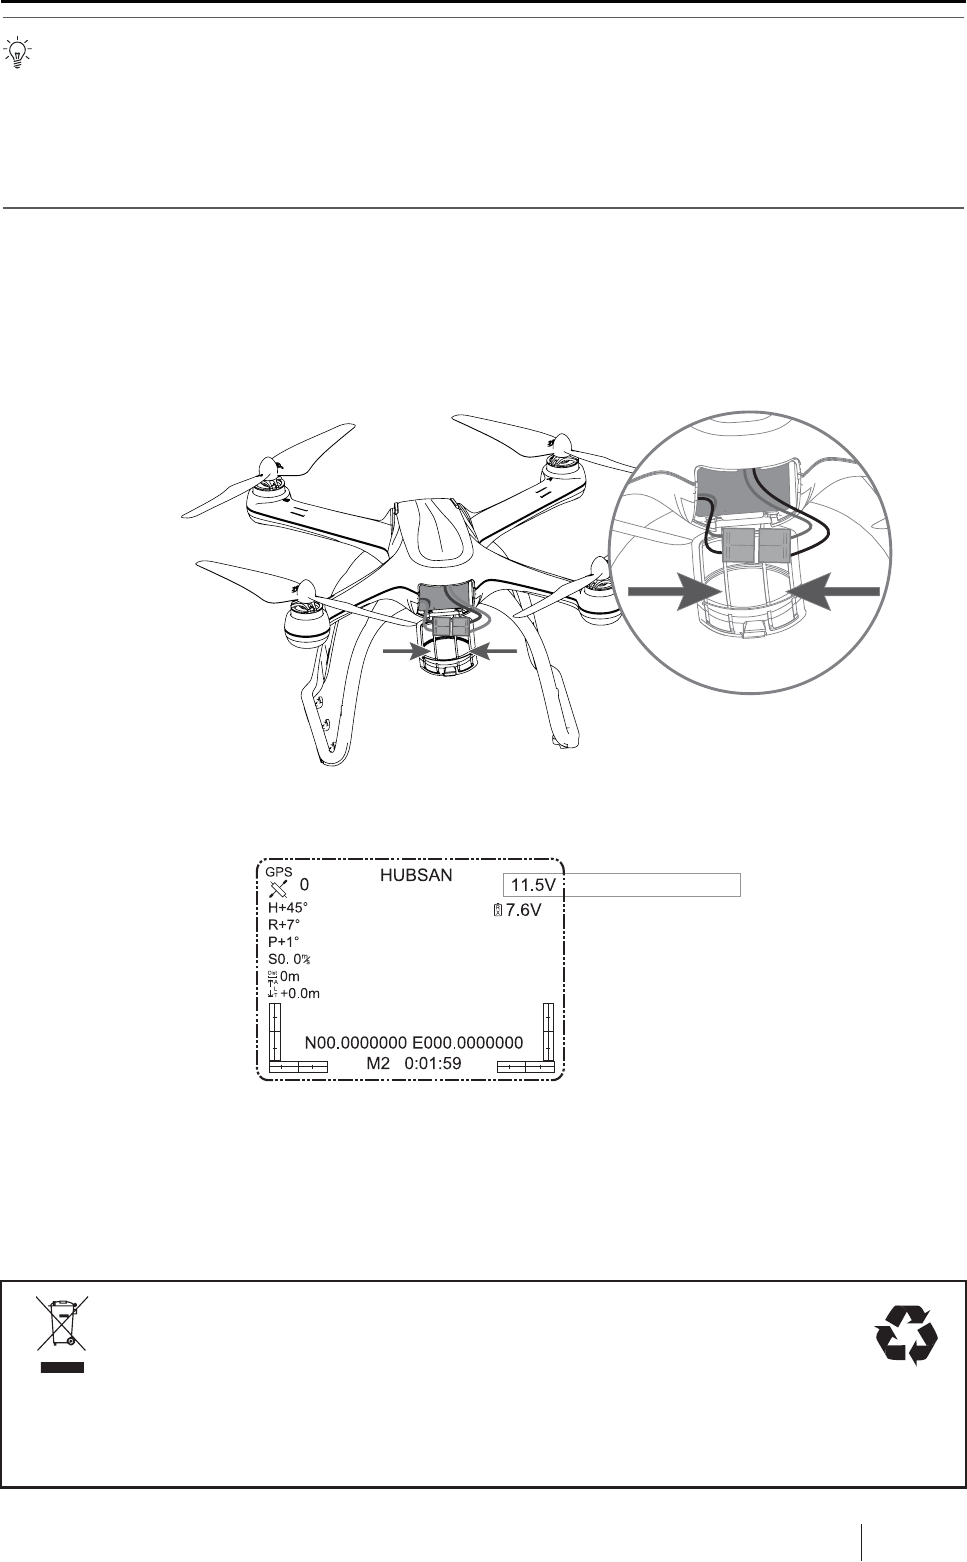
Power on: Put the battery into the battery compartment, connect the battery plug with correct
polarity. When the X4 Pro is power on, the blue LEDs on X4 Pro will blink in a rotating pattern.
Power off: Disconnect the battery connector plug to remove power from the X4 Pro. The LEDs
will turn off.
Always partially charge your lipo battery before storage.
1.4 CHECK THE LI-PO BATTERY POWER
After the X4 Pro and the Transmitter finish pairing, the battery power will display on the tablet.
LiPo batteries retain a charge over a long period at about a 50% or 3.85v per cel storage
charge. It is not normally necessary to recharge stored LiPo batteries unless stored for periods
longer than 3-6 months.
If your LiPo battery has been over-discharged, it will not be possible to recharge it again.
08 ©2015 Hubsan
ֻӰ೨ሙNjྠిਫ਼ద
BATTERY
Charge and store LiPo batteries in a location where a battery fire or explosion
(including smoke hazard) will not endanger life or property.
Keep LiPo batteries away from children and animals.
Never charge the LiPo battery that has ballooned or swelled .
Never charge the LiPo battery that has been punctured or damaged.
After a crash, inspect the battery pack for the sign of damage. Discard in
accordance with your countrys recycling laws.
Never charge the LiPo battery in a moving vehicle.
Never overcharge the LiPo battery.
Never leave the LiPo battery unattended during recharging.
Do not charge LiPo batteries near flammable materials or liquids.
Ensure that charging leads are connected correctly. Reverse polarity charging can
lead to battery damage or a fire or explosion.
Have a suitable fire extinguisher (electrical type) OR a large bucket of dry sand near
the charging area . Do not try to extinguish electrical (LiPo) battery fires with water.
Reduce risks from fire/explosion by storing and charging LiPo batteries inside a
suitable container.
Protect your LiPo battery from accidental damage during storage and transportation.
(Do not put battery packs in pockets or bags where they can short circuit or can
come into contact with sharp or metallic objects.).
If your LiPo battery is subjected to a shock (such as a crash), place it in a metal
container and observe for signs of swelling or heating for at least 30 minutes.
Do not attempt to disassemble or modify or repair the LiPo battery.
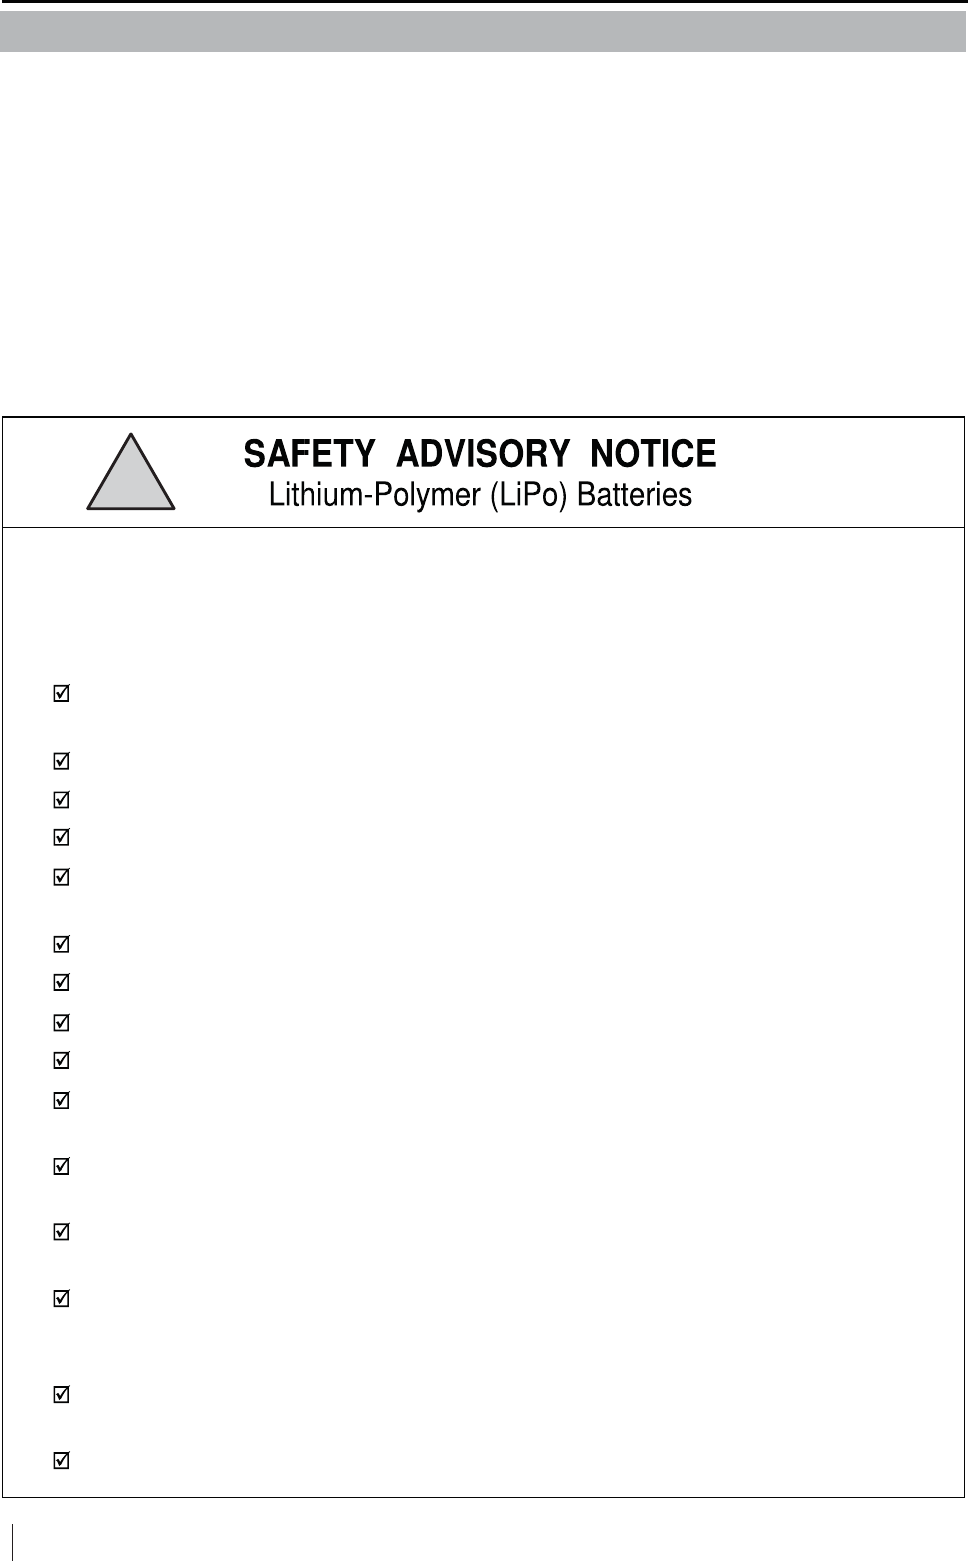
LiPo batteries are different from conventional batteries in that their chemical contents
are encased in a relatively lightweight foil packaging. This has the advantage of
significantly reducing their weight, but does make them more susceptible to damage if
roughly or inappropriately handled. As with all batteries, there is a risk of fire or
explosion if safety practices are ignored:
!
2 SAFETY NOTES
This X4 Pro is not a toy. Any improper use of this product will result in serious injury. Be aware
of your personal safety, the safety of others and your surrounding environment. We strongly
recommend that beginners learn to fly with proper instruction from more experienced pilots
before attempting to fly the X4 Pro for the first time. It is your responsibility to comply with
your country's remote controlled and Unmanned Aerial Vehicle flight regulations!
2.2 LI-PO BATTERY SAFETY NOTES
The X4 Pro is powered by a lithium-polymer(Li-Po) battery. To avoid risk of fire or damage,
never recharge your battery while it is inserted in the plane. If you do not plan to fly the plane for
a week or more, store the battery approximately 50% charged to maintain battery performance
and life.
2.1 IMPORTANT NOTES
09 ©2015 Hubsan
ֻӰ೨ሙNjྠిਫ਼ద
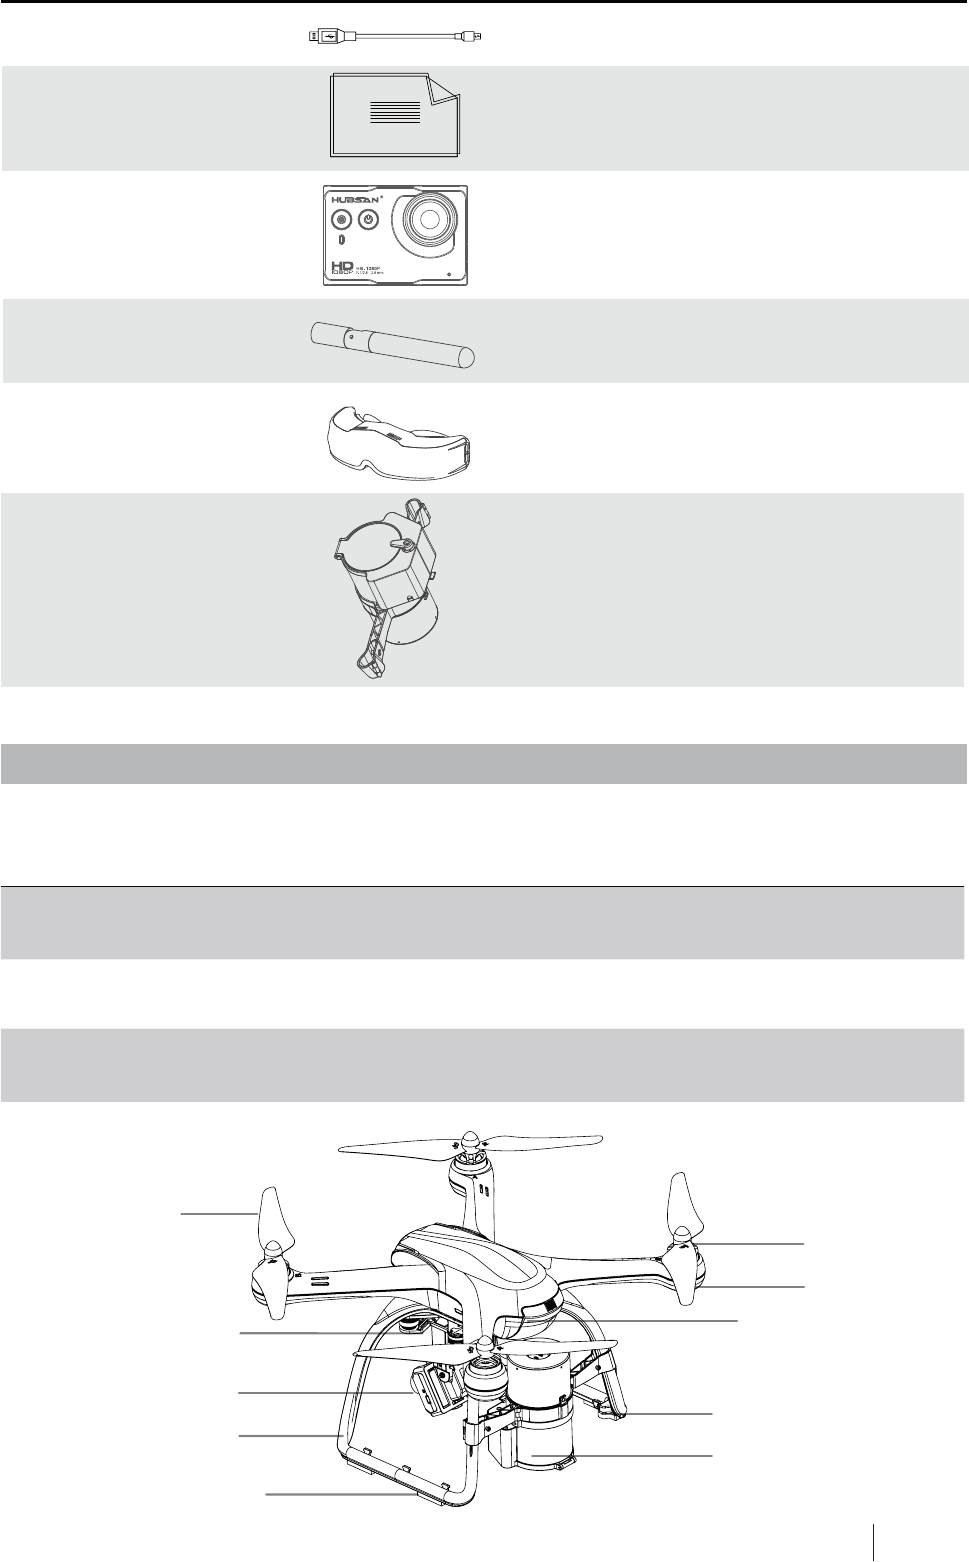
3 PREPARE THE X4 PRO
PREPARE THE X4 PRO
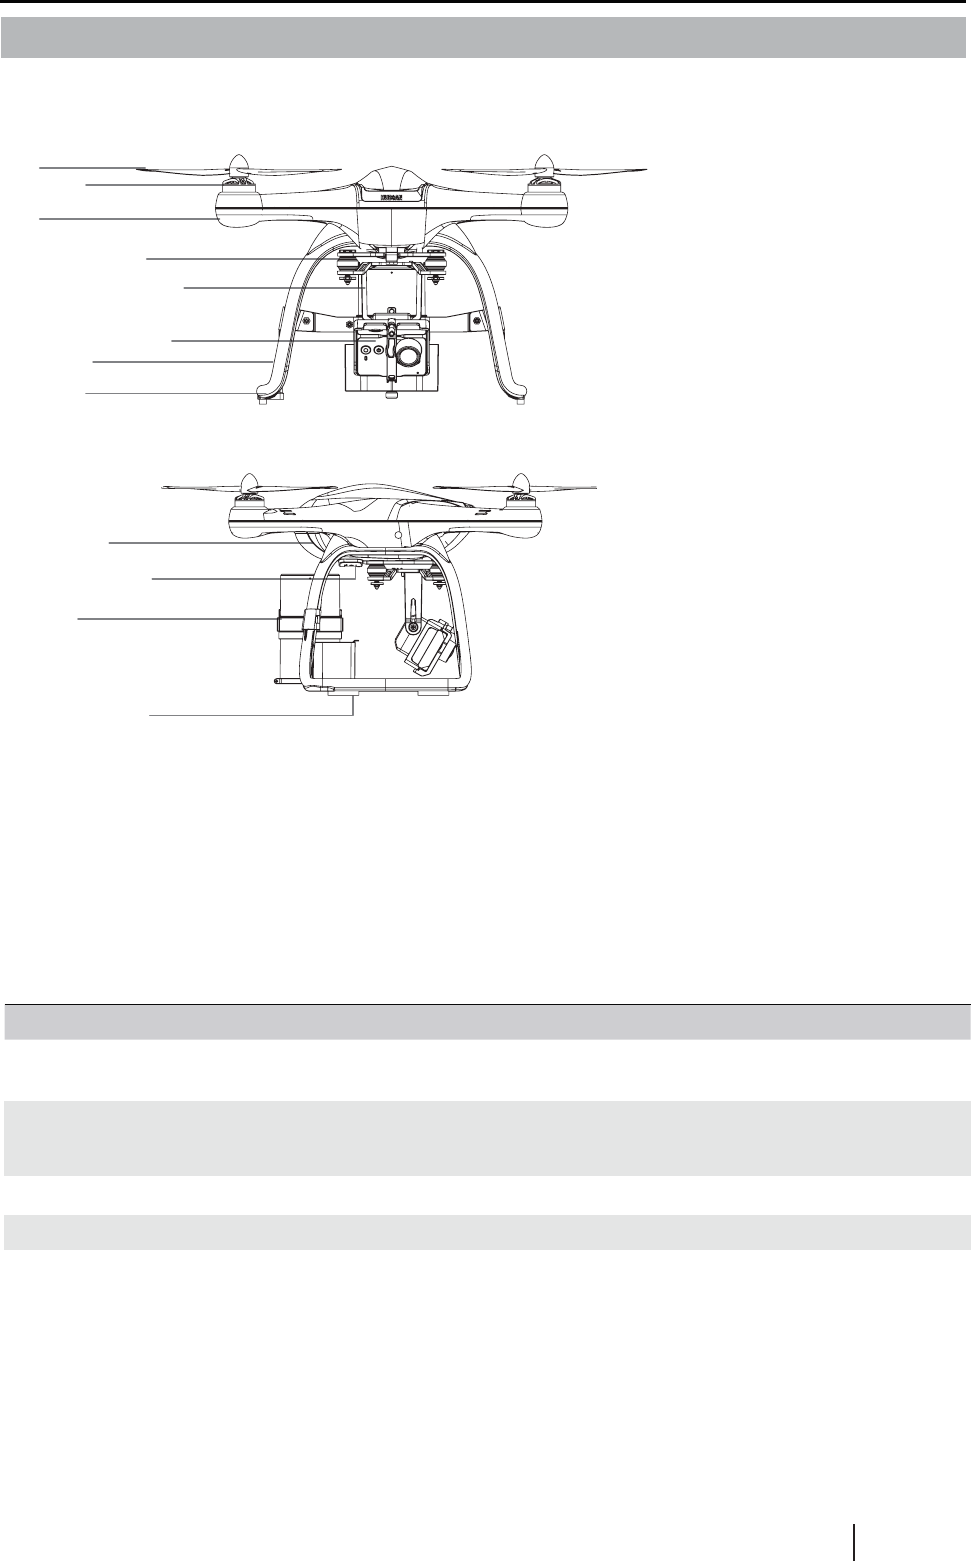
3.1 INTRODUCTION THE X4 PRO
[1] Propeller
[2] Brushless motor
[3] LED light
[4] Shock resistance equipment
[5] 1-axis gimbal
[6] 1080P camera
[7] Undercarriage
[8] Terrestrial magnetism
[9] Battery compartment
[10] External interface
[11] Parachute
[12] non-slip mat
[1]
[3]
[4]
[5]
[6]
[7]
[8]
[9]
[10]
[11]
[12]
[2]
3.2 PREPARE THE CAMERA
3.1.1 FLIGHT CONTROL SYSTEM INTRODUCTION
Modules on flight control system Function
Main control Module CPU of the flight control system, connects to all the modules for
central control processes.
IMU Module Includes inertial sensor, stabilizes flight; includes a barometer to
measure the flight altitude.
GPS & Compass Module Position hold and Navigation.
LED indicating lights Indicating the flight control system's condition.
Insert battery into the camera and attach the camera onto the gimbal. Power on the
camera. You can press the buttons on the camera to record pictures and videos. You can
also use H7000 transmitter for recording and playing the videos.
Hubsan X4 Pro is easy to operate and very stable, it supports moving forward/backward,
left/right, ascending and descending, basic flight performance, and also supports lost control
protection, power alarming and IOC functions.
10 ©2015 Hubsan
ֻӰ೨ሙNjྠిਫ਼ద
Camera specifications
Recording resolution
Recording frame rate
Video format
Image Sensor
Image pixel
Lens format
Lens FOV
Battery
Working temperature
Working humidity
Working power
Standby power
Storage temperature
Storage humidity
1920*1080 Full HD
30FPS
MOV
3 million pixel MJPG
2048*1536 pixel
1/3”
170 ᶮMAXᶯ
1.9W
1.33W
- 40Ḅ+125Ć
30%-90%
3.7VNj650mAh
10Ḅ+70Ć
30%Ḅ80%
CAMERA
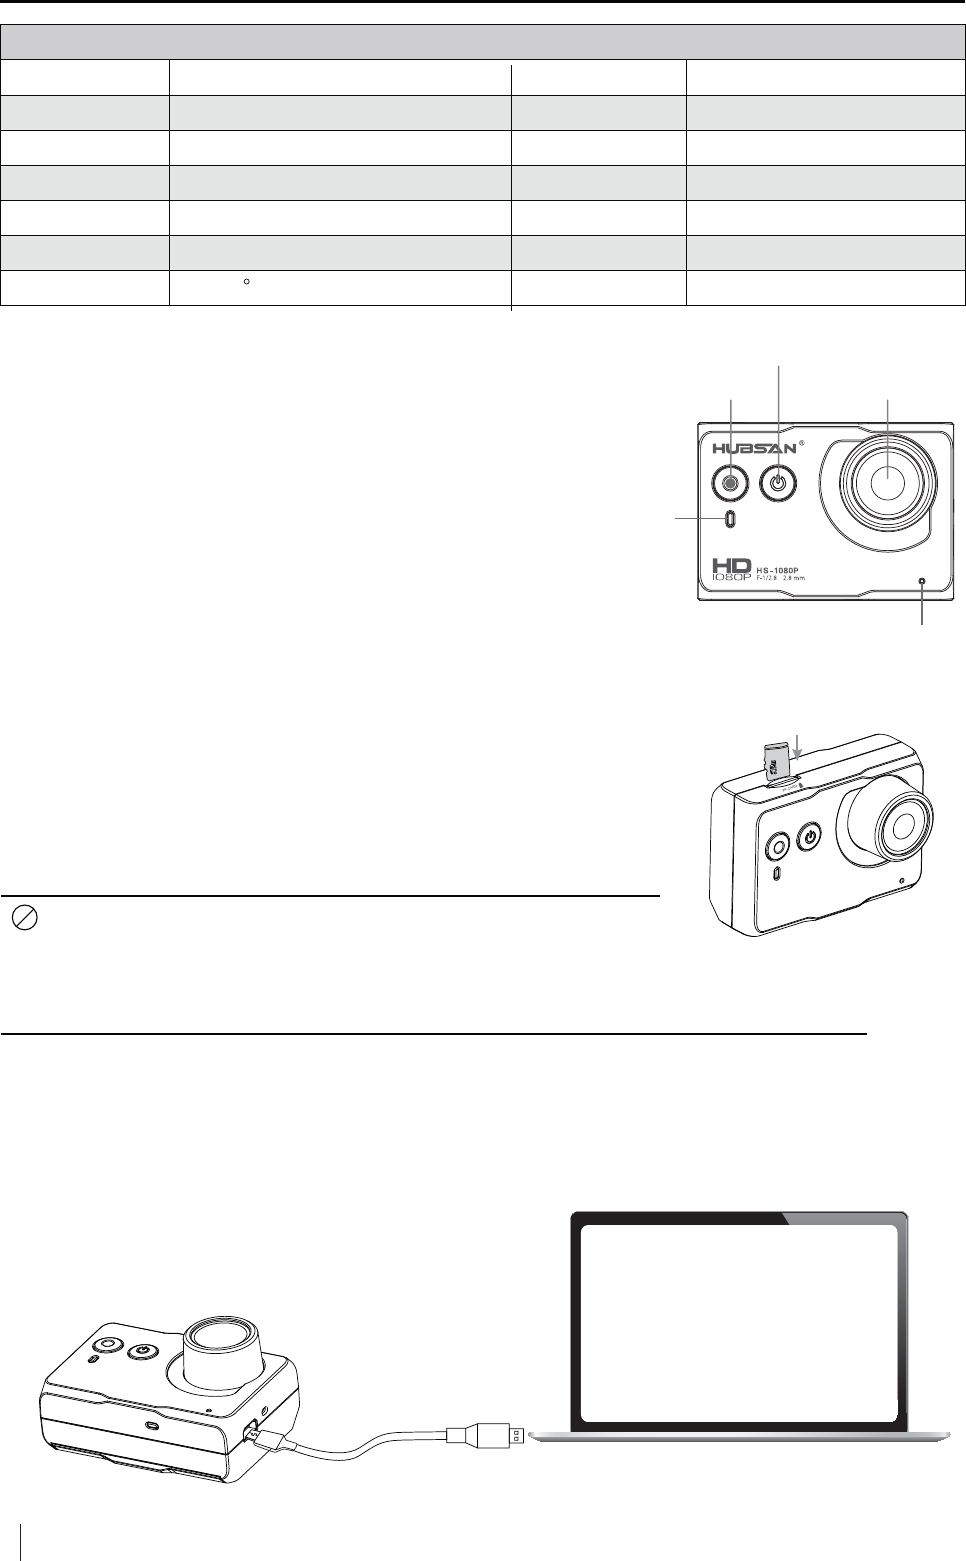
Power on/off: Press the power button(<2sec), power on;
Hold down the power button(2sec ), power off.
Video shooting: Press the video button(<2sec), start recording;
Hold down the video button(2sec), recording stops.
3.2.2 MICRO-SD CARD
3.2.3 READING DATA AND CHARGING THE CAMERA
[108&3]
[3FDPSEJOH][$BNFSBDBQ]
[*OEJDBUJOHMJHIU]
[.JDSPQIPOF]
Ɣ'RQRWLQVHUWUHPRYHWKH0LFUR6'FDUGZKHQWKHFDPHUDLV
powered on. Doing so can corrupt the SD card and files.
USB
Insert the Micro-SD card into the camera before shooting as the
picture shows, always insert/remove the Micro-SD card after
power off.
The Micro-SD card is not included. You must source and format
a name brand Micro-SD card. The camera supports using a
4-32GB Class 4-6 Micro-SD card. You must format the
Micro-SD card before use.
Use the Micro-USB cable to connect to the PC when the camera is powered on. This will
allow you to copy the pictures/videos from the camera and charge the camera at the same
time.
Reading data and Charging the camera......
3.2.1 CAMERA BUTTONS INSTRUCTION
Ɣ)RUPDWWKH6'FDUGRQWKHFRPSXWHUILUVW<RXQHHGWRVHOHFW
32KB for the size of the allocation unit, or the card will not work in the camera.
11 ©2015 Hubsan
ֻӰ೨ሙNjྠిਫ਼ద
CAMERA
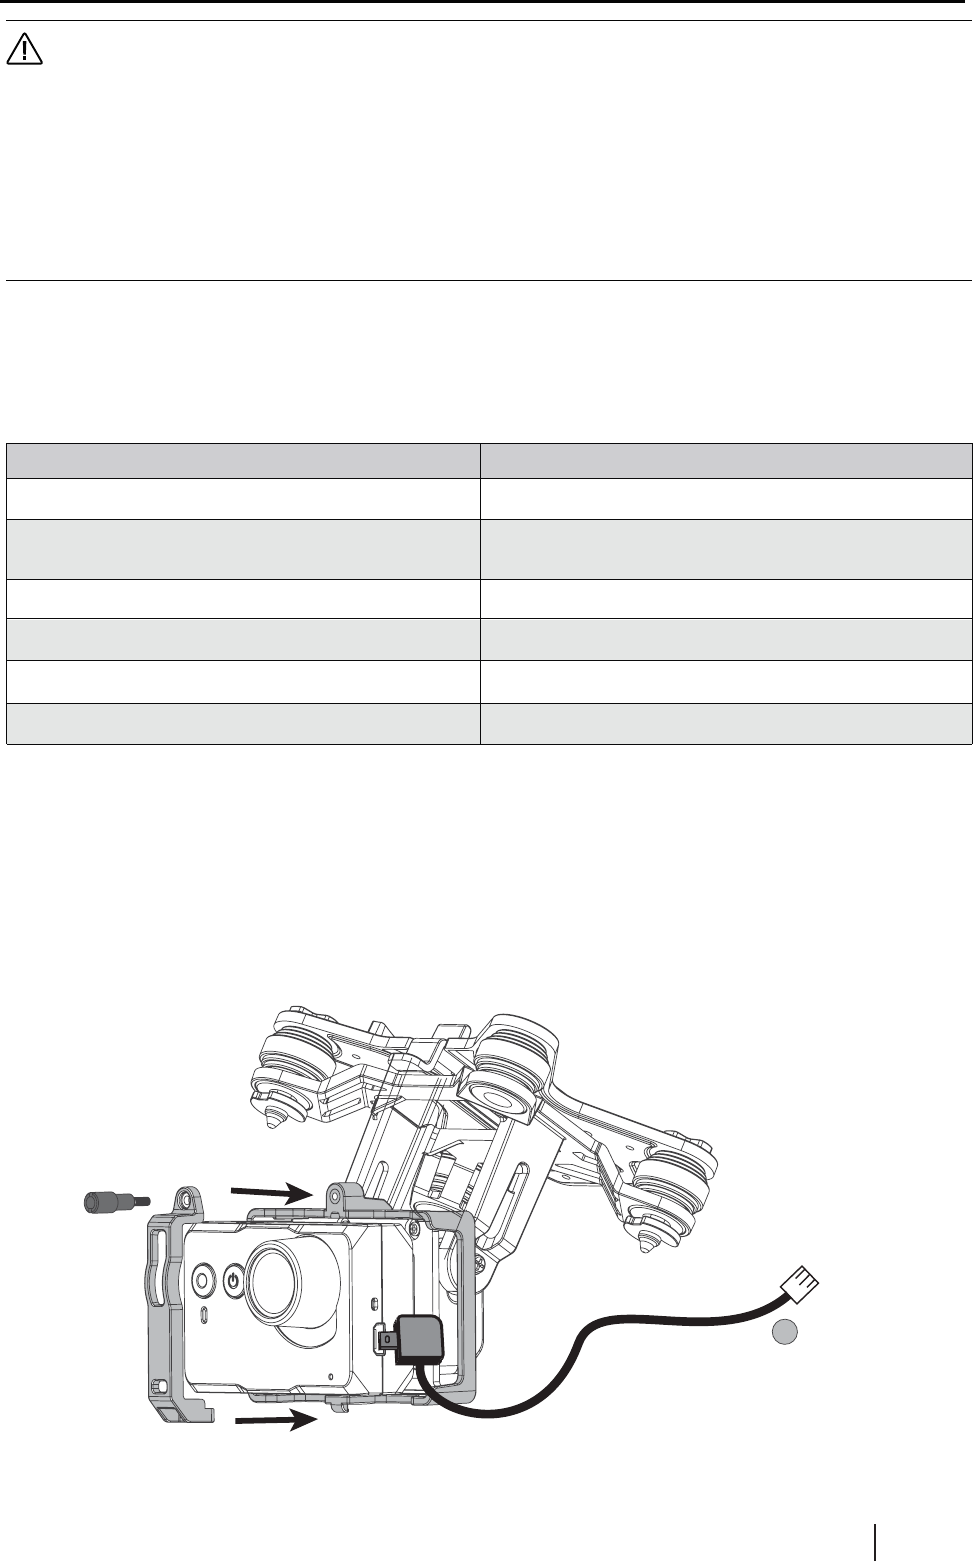
Method: 1. Unscrew the fix set for camera, remove the fix set.
2. Put the camera on the slot(camera facing outside), install the fix set, fix it with screws.
3. Plug the camera data wire into the USB interface, plug the other end into the X4 Pro
external interface(see more details on 2.3.1).
2.2.5 INSTALL THE CAMERA
EXTERNAL INTERFACE
3.2.4 CAMERA LIGHTS
ƔPower on the camera to copy from the SD card. The camera is only charging when the
power is off and it is connected to the PC. The camera cannot record video when it is
connected to a PC.
ƔWhen you remove the camera USB connector from the camera when it is taking video,
the camera will continue taking video. If not taking video the camera will automatically
power off if USB connector disconnected from the camera.
ƔThe camera will be charging when connected to the X4 Pro or the PC, charging circuit
is about 500mAh, the camera battery is 3.7V/ 670mAh.
Camera LIGHT Camera condition
Blue light turns on Standby
Blue light turns on, red light blinks once every
second Recording
Camera module is faulty
Blue light turns on, red light turns on
Blue light blinks every second
Micro-SD card will be full/ no SD card/ faulty SD card
Blue light blinks quickly
Red light blinks quickly
Micro-SD card is full
Battery power is low
Use a Micro-USB connect to the PC. Power on the camera to copy the pictures/videos from the
camera and charge the camera at the same time.
12 ©2015 Hubsan
ֻӰ೨ሙNjྠిਫ਼ద
3.3 PREPARE THE 1-AXIS STABLE GIMBAL
PREPARE THE 1 AXIS STABLE GIMBAL
Features of the gimbal
Control accuracy ±0.03°
Control range Pitch angle:+90°~~ -90°
Stabilized design Rotate automatically when the X4 Pro tilted to
ensure stable shooting
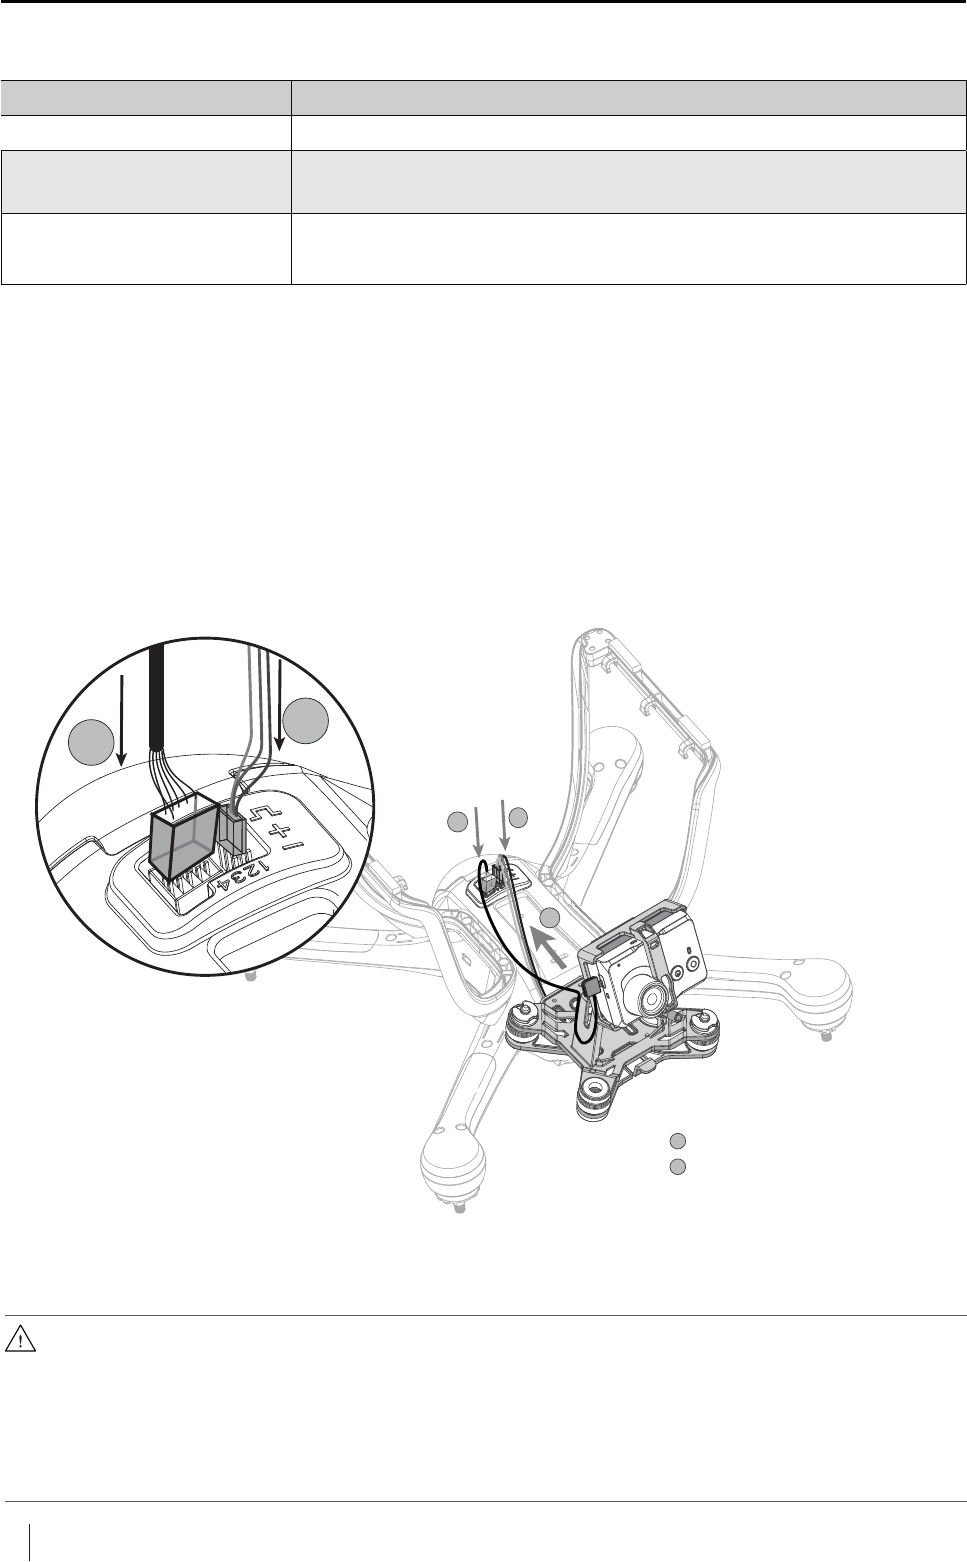
3.3.1 INSTALL THE 1-AXIS GIMBAL
Step 1: Take out the 1-axis gimbal from the box, position and connect the vibration damper
with its mate.
Step 2: Insert the gimbal signal wire into the right slot.
Step 3: Insert the camera signal plug into the left slot.
After the installation, power on the X4 Pro on a level surface. The 1-axis gimbal will power on
and adjust automatically. The Transmitter's side rotary switch will control the gimbal rotation.
Gimbal signal wire
Camera image transmission wire
Ɣ$EQRUPDOJLPEDORSHUDWLRQFDQEHFDXVHGE\LQLWLDOL]LQJWKHSRZHURQDQXQOHYHOVXUIDFH
an impact, or from a crash. Put the X4 Pro on a level surface before powering on and flight.
Do not cause impact to, or immobilize the gimbal after it is powered on.
Ɣ)O\LQJLQIRJRUFORXGVZLOOFDXVHGHZIRUPDWLRQZKLFKFDQFDXVHIDXOW\JLPEDORSHUDWLRQ
The gimbal will operate normally again after it is dry.
3.3.2 GIMBAL INSPECTION AND ABNORMAL OPERATION
13 ©2015 Hubsan
ֻӰ೨ሙNjྠిਫ਼ద
PARACHUTE
[turn buckle]
[screw]
[slot]
[direction arrow]
3.4 PREPARE THE PARACHUTE
Refer to THE PARACHUTE INSTRUCTION MANUAL
The Hubsan X4 Pro has an optional automatic parachute system. The parachute is self-powered
which means even when the X4 Pro Li-Po battery power is low, the parachute will still work.
There is a sensor inside the parachute system that detects when the X4 Pro goes into an
abnormal attitude and then immediately commands the parachute to open. Potentially the X4
Pro can then land safely and avoid causing damages.
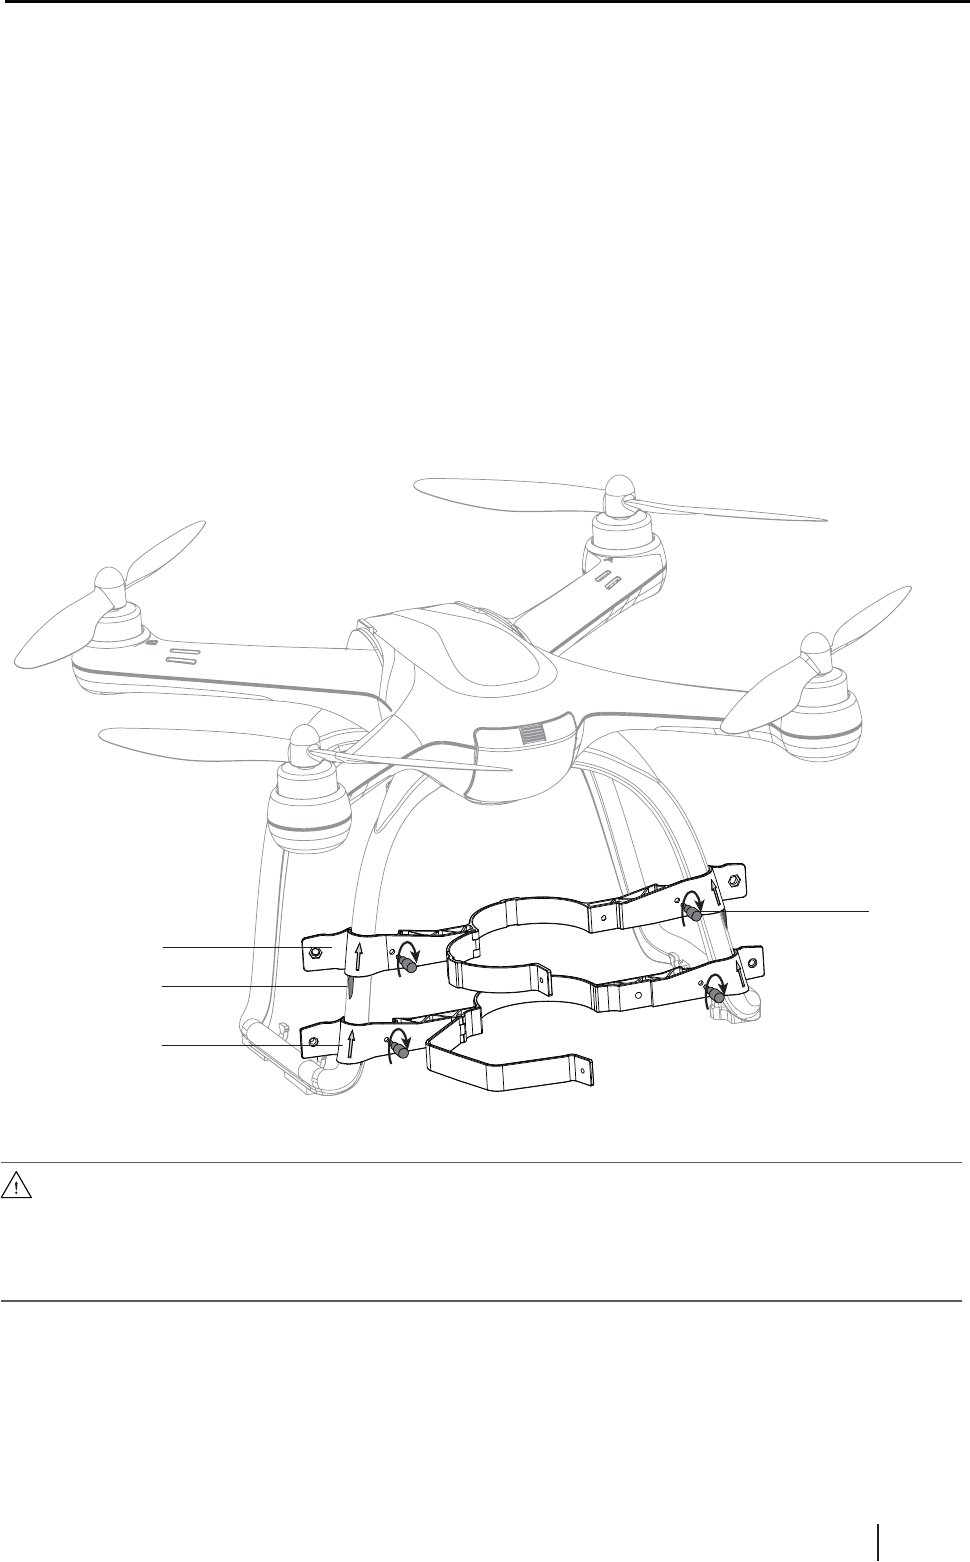
Step 1: Install the bracket:
Take the parachute set from the box, remove the screws from the bracket and open the buckle.
Make sure the direction of the bracket is up as the arrows show. Put the bracket onto the landing
gear until it is positioned in the slot. Tighten the screws to the brackets as the picture shows.
3.4.1 INSTALL THE PARACHUTE SYSTEM (OPTIONAL PURCHASE FROM HUBSAN)
Ɣ3D\DWWHQWLRQWRWKHGLUHFWLRQRIEUDFNHWV'RQRWLQVWDOOWKHPLQFRUUHFWO\7KHDUURZRQWKH
brackets should be up!
Ɣ0DNHVXUHWKHEUDFNHWVDUHLQWKHVORWSRVLWLRQEHIRUHWLJKWHQLQJWKHVFUHZVRUWKH
parachute system will be unstable during flight.
14 ©2015 Hubsan
ֻӰ೨ሙNjྠిਫ਼ద
PARACHUTE
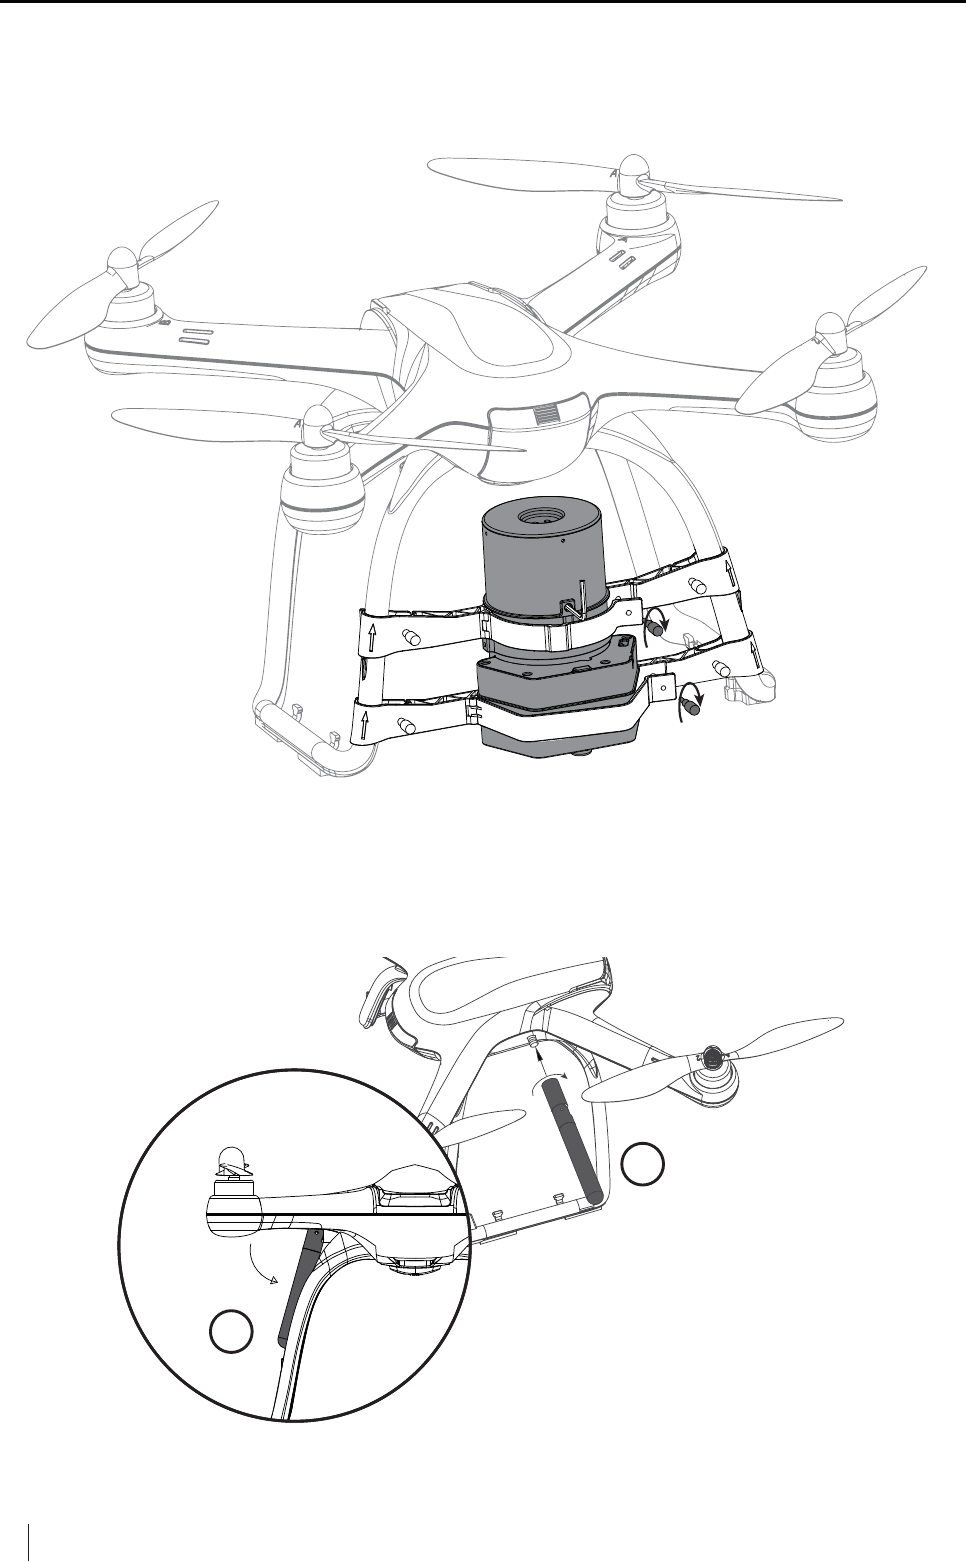
3.5 INSTALL 5.8 GHZ TRANSMITTER ANTENNA
Method: 1) aim to the antenna connector on the X4 Pro, fasten it in clockwise direction;
2) make sure the antenna is straight and in line with the undercarriage.
Step 2: Install the parachute canister:
Position the parachute canister into the brackets and tighten the screws.
After the parachute set is positioned, open the middle screws to re-install the parachute cloth.
(Refer to the Parachute Instruction Manual for more information)
15 ©2015 Hubsan
ֻӰ೨ሙNjྠిਫ਼ద
PROPELLER
PROPELLER
Ɣ7KHSURSHOOHUVDUHGHVLJQHGWRDXWRPDWLFDOO\WLJKWHQXSGRQRWVFUHZLWWRRWLJKW'RQRW
use any type of screw glue.
Ɣ0DNHVXUHWKHEODFNDQGJUH\SURSHOOHUVDUHLQVWDOOHGFRUUHFWO\,WZLOOQRWIO\LIWKH
propellers are installed wrong.
ƔWear gloves when installing the propellers to avoid injury. The propellers are thin and sharp.
3.6 PREPARE THE PROPELLER SET
Hubsan X4 Pro equipped with 9 inch propellers--black and grey colors. The propellers are easily
damaged. Please purchase spare propellers from Hubsan.
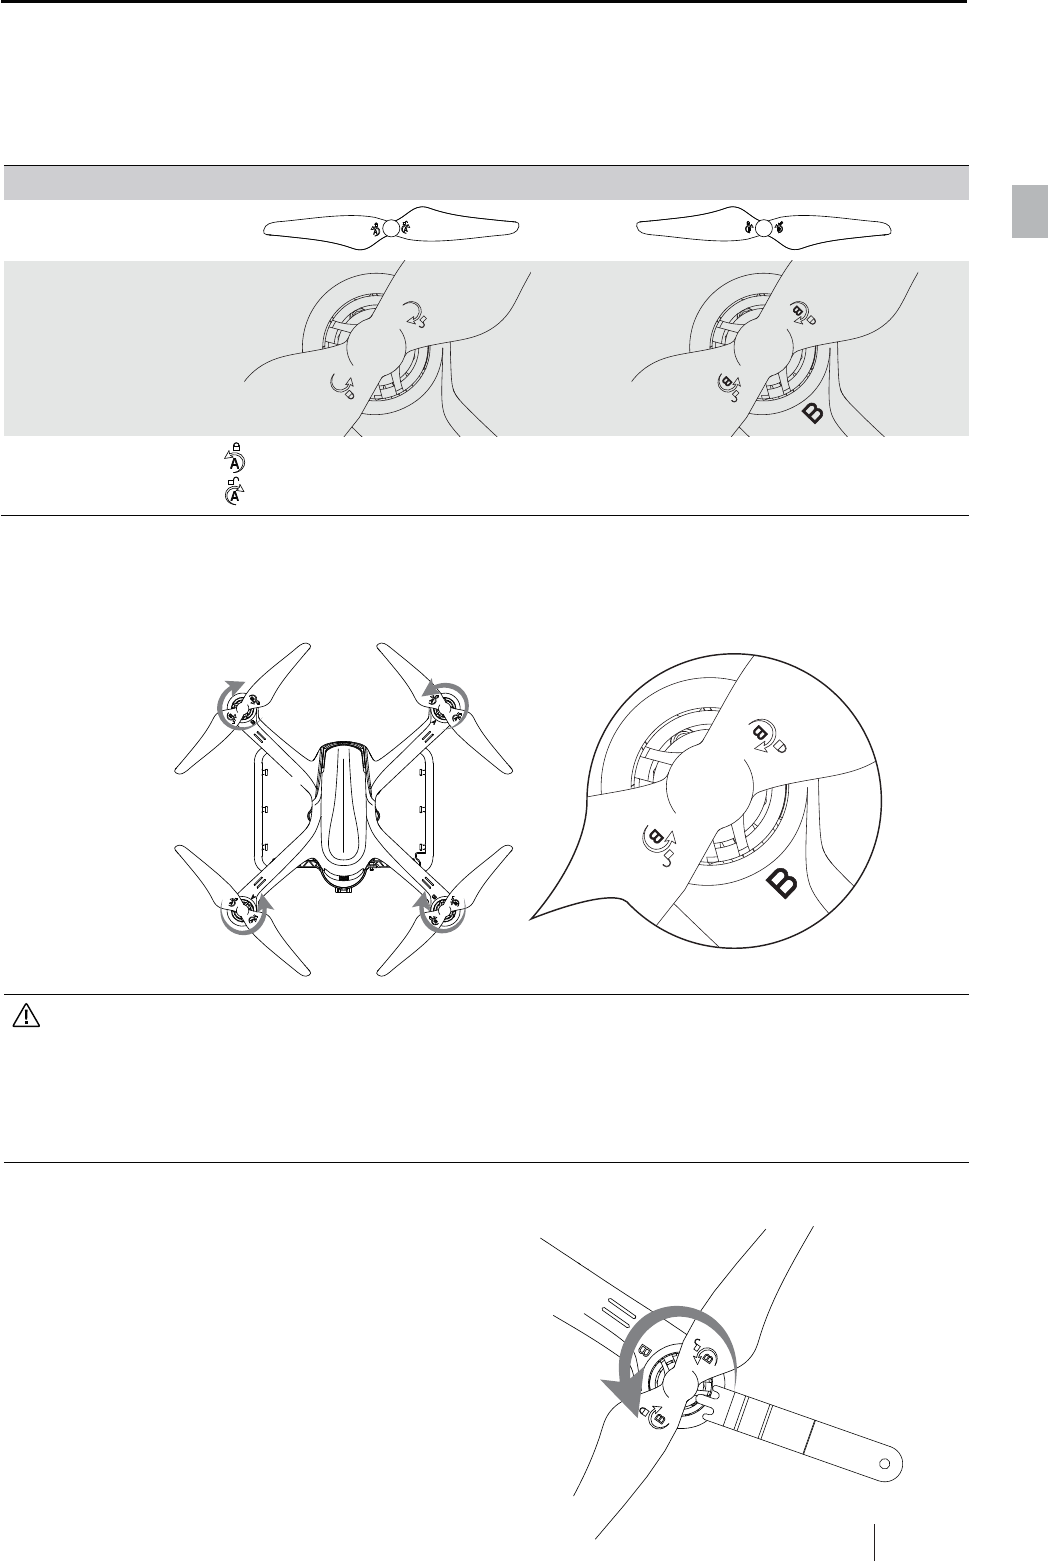
3.6.1 INTRODUCTION
propeller A propeller B
Diagram
Installation Position
Symbol explanation LOCK: In this direction, tighten the propeller onto the motor shaft
UNLOCK: In this direction, remove the propeller from the motor shaft
3.6.2 METHOD
3.6.3 REMOVE PROPELLER
Hold the motor with the Propeller removal wrench,
rotate the propellers in unlock direction to remove
the propeller.
A
A
A
Take out the 4 propellers. Install them hand-tight onto the proper A and B motor shafts.
4 PREPARE THE 2.4GHZ & 5.8GHZ TRANSMITTER
FPV TRANSMITTER
16 ©2015 Hubsan
ֻӰ೨ሙNjྠిਫ਼ద
PROPELLER
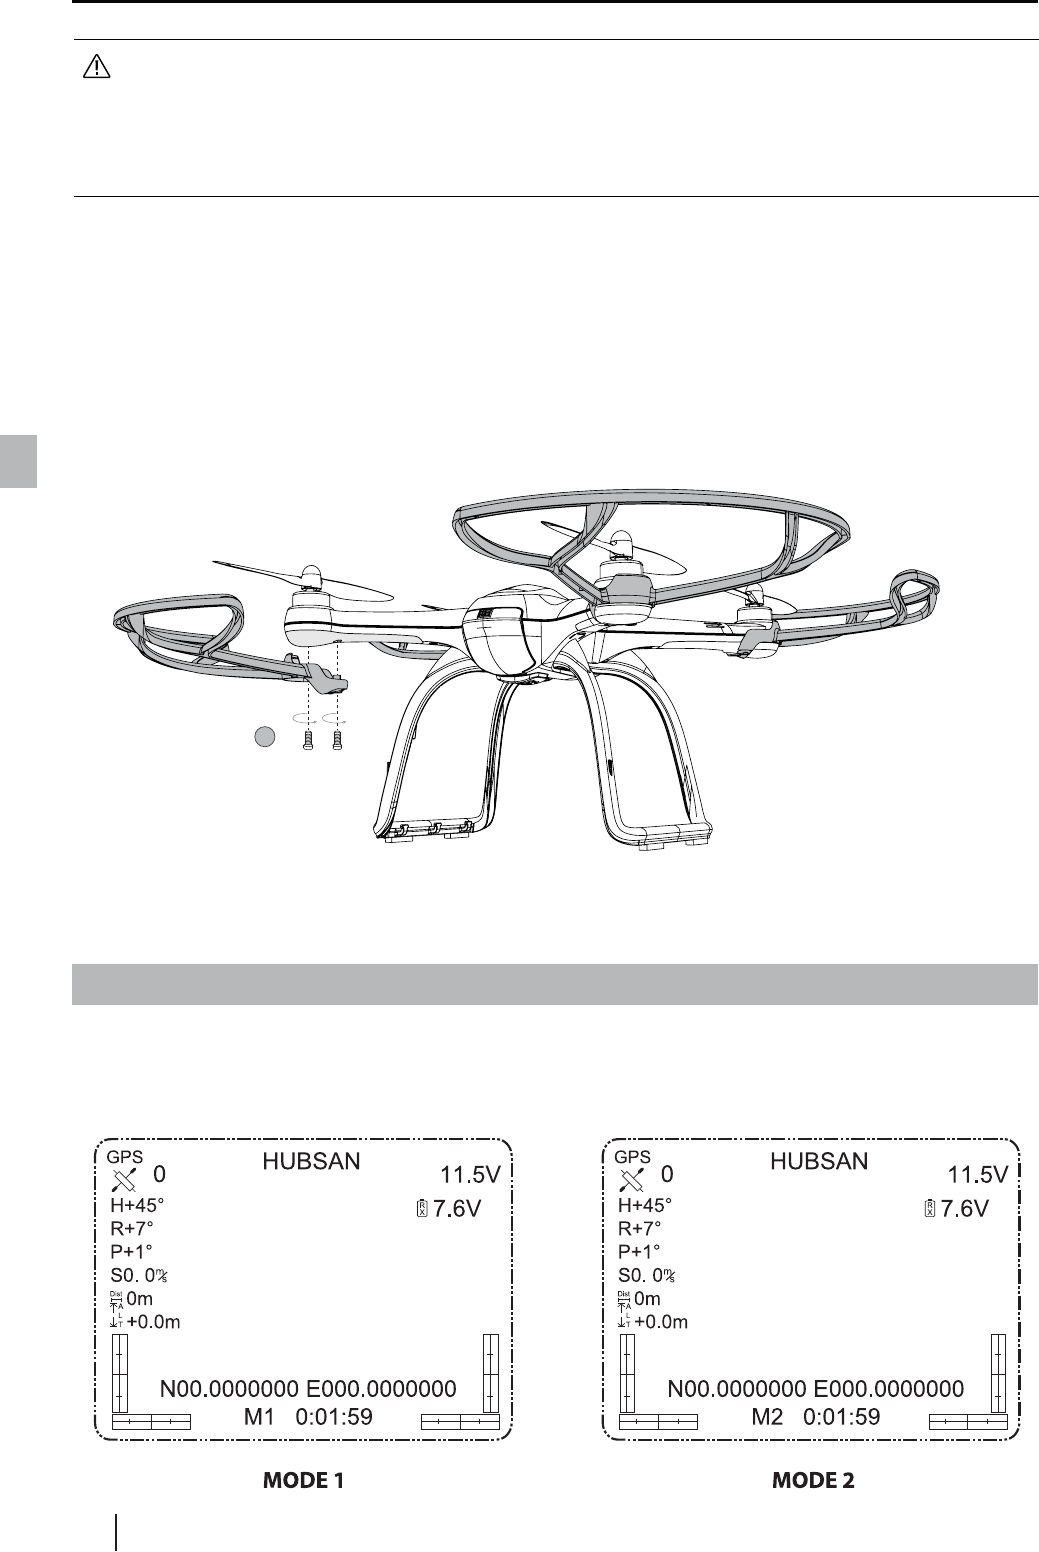
4.1 INTRODUCTION AND FUNCTIONS
1
4.1.1 MAIN MENU
3.6.4 PREPARE THE PROPELLER GUARD
For beginners, we recommend that using the Hubsan X4 Propeller Guard to enhance flying
safety. The Propeller Guard is optional.
Ɣ&KHFNWKDWWKHSURSHOOHUVDUHFRUUHFWO\LQVWDOOHGDQGWLJKWEHIRUHHYHU\IOLJKW
Ɣ&KHFNWRVHHWKDWWKHSURSHOOHUVDUHLQJRRGFRQGLWLRQ5HSODFHWKHSURSHOOHUVLIWKH\
DUHEURNHQEHQWQLFNHGRUFKLSSHG
Ɣ'RQRWWRXFKRUEHFORVHWRVSLQQLQJSURSHOOHUVRUPRWRUVWRDYRLGLQMXULHV
Ɣ$OZD\VXVH+XEVDQSURSHOOHUVWRHQVXUHEHVWIOLJKWH[SHULHQFH
Method:Fasten the screws to install the propeller guard as the below picture shows.