HUIZHOU FORYOU GENERAL ELECTRONICS DV7B01 CAR DVD PLAYER User Manual
HUIZHOU FORYOU GENERAL ELECTRONICS CO.,LTD. CAR DVD PLAYER
UserManual.wiki
>
HUIZHOU FORYOU GENERAL ELECTRONICS
>
DV7B01 User Manual
User Manual
Navigation menu
Upload a User Manual
Namespaces
Wiki Guide
HTML
PDF
Info
Views
User Manual
Discussion / Help
Navigation
![Precautions1. Never disassemble or adjust the unit without any professional guide. For details, please consult any professional car shop / dealer for inquiry.2. If the front panel or TFT monitor is squalid, please use a clean silicone cloth and neutral detergent to wipe off the spot. Using a rough cloth and non-neutral detergent such as alcohol for cleaning may result in scratching or decoloration to the applicant.3. If any abnormal behavior of the unit is found, please refer to trouble shooting guide of this manual. If no relevant information is found,please press the [RESET] key on the front panel to resume factory default.4. If you have parked the car in hot or cold weather for a long time, please wait until the temperature in the car becomes normal before operating the unit.5. Using in-car heater in low temperature environment may result in beads coagulate inside the unit, Do not use the unit in this situation, eject the disc and wipe off the bead on the disc. If the unit still doesn't work after a few hours, please contact with after-sales service center.6. No erce impact to the LCD monitor when it is in open position for preventing the damage to any mechanisms inside.7. To prevent the damage to the screen, avoid touching it with sharp objects.8. The monitor employs auto motorizing mechanism, please don't push, pull, or swivel the monitor manually to prevent damage to the core mechanism.9. To provide a clear demonstration and an alternative for easy understanding to the operation of this unit, graphic illustrations areused.However, these illustrations are some different from the actual images displayed on the screen.10.During operating the unit, “ ” will display if the current operation is not available or illegal.11.Operate the unit correctly according to this manual to prevent unnecessary problem. The guarantee won't be valid if the problem is caused by inappropriate operation.DeclarationThis product incorporates copyright protection technology that is protected by U.S patents and other intellectual property rights. Use of this copyright protection technology must be authorized by Macrovision, and is intended for home and other limited viewing uses only unless otherwise authorized by Macrovision. Reverse engineering or disassembly is prohibited.Cautions of disc using1. DO NOT use irregular shaped disc2. Disc Cleaning Use a dry, soft cloth to wipe the disc from center to edge, only neutral detergent can be used.3. When playing a new disc New disc may have some rough spots around the inner and outer edges. If such a disc is used, remove these rough spots with a pencil or ball-point pen, etc.](https://usermanual.wiki/HUIZHOU-FORYOU-GENERAL-ELECTRONICS/DV7B01/User-Guide-2158732-Page-3.png)
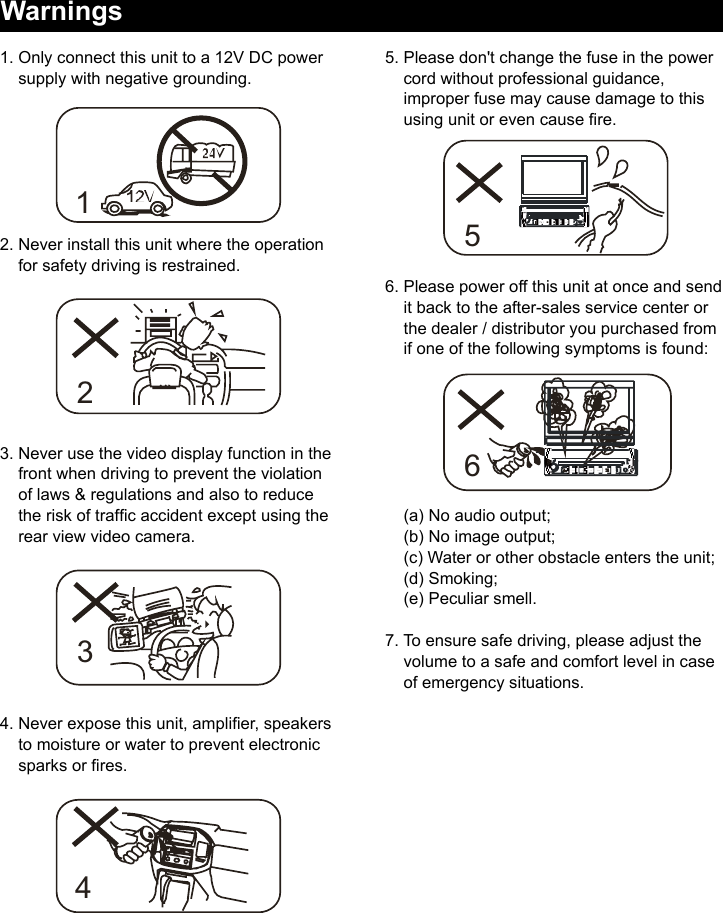
![EN - 1Before usingFront panel1. Disc slot 2. Reset the unit 3. [VOL / / ] Knob: Unit power / Adjust volume / Mute audio outputs4. [SRC] Key: Switch to the current source and the main menu 5. [ ] Key: Auto search / Next / Move cursor to the right6. [TILT+] Knob: Increase the display angle7. [OPEN/CLOSE] Key: Open / Close the TFT monitor 8. [TILT-] Knob: Decrease the display angle 9. [ ] Key: Auto search / Previous / Move cursor to the left 10.USB Slot 11. AV IN jack12.Eject discཱཱིི ུ ཱུ ྲྀ ཷ ླྀ ཹ ེཻ](https://usermanual.wiki/HUIZHOU-FORYOU-GENERAL-ELECTRONICS/DV7B01/User-Guide-2158732-Page-5.png)
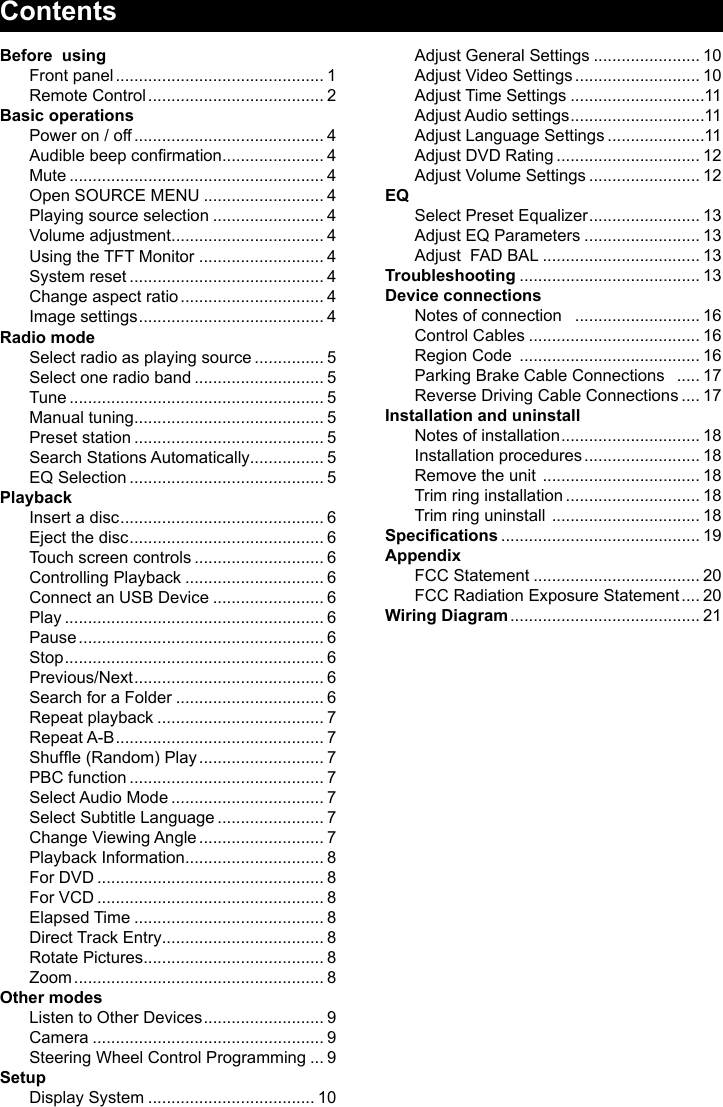
![EN - 2Note:Your remote control may differ slightly from the one pictured here. The above diagram is for illustrative purpose only.Before usingRemote Control1. [SRC]Key:select playing source 2. [EJECT]Key: Eject disc3. [AUDIO] Key: Select audio channel 4. [VOL+/-] Key: Adjust volume 5. [ZOOM] Key: Image zoom in/out 6. [ /BAND] Key: Select radio band / Fast playback / Slow playback 7. [WIDE] Key: Change display mode 8. [PRESET / ] Key: Select preset radio station9. [EQ] Key: Enter/Exit the EQ setting 10.[GOTO] Key: GOTO search11.[OPEN/CLOSE] Key: Open / Close the TFT monitor 12.[TILT / ] Key: Adjusting display tilting angle 13.[RPT A-B] Key: A-B repeat14.[RPT] Key: Repeat playback 15.[MUTE] Key: Mute audio outputs 16.[POWER] Key: Unit power17.[SUBTITLE] Key: Select DVD subtitle language 18.[ANGLE] Key: Select view angle 19.[MENU] Key: DVD MENU / PBC 20.[TITLE] Key: DVD TITLE21.[SETUP] Key: Setup menu22.[ ] Key: Fast Forward / Move cursor up23.[ ] Key: Auto search / Next / Move cursor to the right 24.[ ] Key: Play / Pause / Enter 25.[ ] Key:Auto search / Previous / Move cursor to the left26.[PIC] Key: Image setting27.[ ] Key: Fast Reverse/ Move cursor down 28.[ ] Key: Stop Playback29.[DISP/CLEAR] Key: Display information /Clear information30.[0~9] Key: Numeric keys 31.[RDM] Key: Random playback32.[INT] Key: Intro playback](https://usermanual.wiki/HUIZHOU-FORYOU-GENERAL-ELECTRONICS/DV7B01/User-Guide-2158732-Page-6.png)
![EN - 4Basic operationsPower on / offPress the [ ] key to turn the unit on. The buttons on the front of the unit light up and the current mode status appears on the LCD. Press the [ ] key to power off the unit.Audible beep conrmationAn audible beep tone conrms each function selection. The Beep tone can be disabled through the Setup menu. MutePress the volume knob on the front panel or press the [MUTE] key on the remote control to mute the volume from the unit.Open SOURCE MENUPress the [SRC] key on the front panel or remote control or touch the top left corner of the screen to open the SOURCE MENU. Do the above operation again to return to the original source.Playing source selectionOpen the SOURCE MENU, and then touch the source you desired or select one source by moving the cursor and then conrm.Volume adjustmentVolume Increase/DecreaseTo increase or decrease the volume level, turn the rotary encoder on the front panel. When the volume level reaches "0" or "50", a beep sounds, indicating that the adjustment limit has been reached. The TFT screen displays the volume level for 3 seconds.Programmable turn-on volume This feature allows the user to select a turn-on volume setting regardless of the volume setting prior to turning the unit off. To program a specic turn-on volume level, turn the rotary encoder to adjust the volume to the desired turn-on volume. Push and hold the rotary encoder while the blue speaker icon and level indication is displayed on the screen. The unit will beep to conrm your turn-on volume setting. Using the TFT MonitorOpen / Close monitor Press the [OPEN/CLOSE] key on the front panel or remote control topush the display panel out or in.Change the monitor tilt angleDue to the inherent character of LCD, you will get different vision impressions when you watch it from different angles.The display angle of this unit can be changed; hence you can select the best angle where you can get the best vision impression.Press the [TILT] key on the display panel or the remote control to adjust the tilt angle one step at a time.Press and hold the [TILT] key on the display panel or the remote control to adjust the tilt angle continuously.System resetTo correct a system halt or other illegal operation, use the tip of a pen to press the [RESET] key located on the panel. After a system reset, the unit restores all factory default settings.Note: If the unit is reset while a DVD is playing, the DVD resumes play once the reset is complete.Change aspect ratioPress the [WIDE] key on the remote control to adjust the aspect ratio.Image settings1. Enter image setting modePress the [PIC] key on the remote control.2. Select one item to adjust Touch the [ ]/[ ] icon on the user interface to adjust the value.3. Exit image setting modeTo exit image setting mode, repeat the rst step or stop operation for some seconds.](https://usermanual.wiki/HUIZHOU-FORYOU-GENERAL-ELECTRONICS/DV7B01/User-Guide-2158732-Page-8.png)
![EN - 5Radio modeSelect radio as playing sourceOpen the SOURCE MENU and then touch [Radio].Select one radio bandPress the [BAND] key on the remote control or touch the [ ] icon on the user interface to select one radio band among FM1, FM2, FM3, AM1 and AM2.TuneAuto tuningPress the [ ] / [ ] key on the remote control or touch the [ ] / [ ] icon on the user interface to seek a higher / lower station.To stop searching, repeat the operation above or press other keys having radio functions.Note:When a station is received, searching stops and the station is played.Manual tuningMethod 1:During manual tuning, the frequency will be changed in steps.Touch the [ ] / [ ] icon on the user interface to tune in a higher / lower station.Method 2:1. Touch the numeric keypad icon [ ]. Numeric keyboard is displayed, touch numbers to input frequency.2. Touch [ ] to delete the input numbers step by step.3. Touch [ OK ] to enter.Preset stationThe unit has 5 bands, such as FM1, FM2, FM3, AM1, AM2, and each band can store 6 stations; hence the unit can store 30 stations in total.Manual store1. Tune to a station.2. Touch and hold one of the channels 1 to 6 to save the selected band.Search Stations AutomaticallyTouch [ ] to search station and store the 6 strongest stations in the current band automatically.Recalling a station1. Select a band (if needed).2. Touch an on-screen preset button to select the corresponding stored station.Local radio station seeking (LOC)When the Local function is on, only radio stations with a strong local radio signal are played. To activate the Local function in the AM/FM tuner mode, touch [ ] on the screen. The Options tab is revealed. Touch [ ] icon and choose the Radio Local or Distance. When the Local function is active, the LOC indicator at the top of the screen is illuminated. When the Distant function is active, the DX indicator at the top of the screen is illuminated.EQ SelectionTouch the [ ] icon and enter the EQ setup.](https://usermanual.wiki/HUIZHOU-FORYOU-GENERAL-ELECTRONICS/DV7B01/User-Guide-2158732-Page-9.png)
![EN - 6PlaybackInsert a discUpon inserting a disc, the unit will switch to [DISP] mode automatically. Notes:1. Please confirm whether there is a disc in the unit before you insert another one.2. Some recorded discs, such as CD-R, CD-RW, DVD-R, DVD+R, DVD-RW, DVD+RW cannot be played back because of different recording status. Otherwise, the discs without being closed could not be played back.3. About the cautions of disc using, please refer to the appendix.4. Don’t pledge to be compatible with all disc.Eject the discPress the [ ] key on the front panel or remote control to eject the disc.Touch screen controlsThe touch key areas for DVD playback are outlined below:A: Return to the main menuB: Disc typeC: Time displayD: Play the video and display playback informationE: Display onscreen control menuControlling PlaybackTo access the on-screen controls, touch the screen anywhere except for the upper left corner and touch again to cancel display. Connect an USB Device1. Open the USB door.2. Connect an USB device into the USB connector. Play starts automatically.Notes:1. If there are audio files supported in the USB stick, the system will enter the audio les menu automatically.If there are no audio files, but there are video files supported in the USB stick, the system will enter the video les menu automatically.If there are no audio or video files, but there are picture les supported in the USB stick, the system will enter the picture les menu automatically.If there no above audio/video/picture les supported in the USB stick, the screen will display: There are no audio/video/picture les supported.2. Not all kinds of USB devices are compatible with the unit.PlayOnce a disc, or a USB device is inserted, play starts automatically.PauseWhen play the audio/vedio file, press the [ ] key on the remote control or open the on-screen control icons menu and then touch the [ ] icon, press the [ ] again and continue to play.StopFor audio les or video les, press the [■] key on the remote control or open the on-screen control icons menu and then touch the [■] icon to stop. Press the [ ] to resume from the pausing point.Touch the [■] icon again to stop entirely, and press the [■] key on the remote control. Press the [ ] to playback from the top le.Previous/NextTouch [ ] / [ ] key on the screen to skip to previous / next track / chapter.Search for a FolderFor Folder Control1. Touch [ ] to display all available folders.2. Touch a folder, then touch the desired le. 3. Touch the le again to start play.DE](https://usermanual.wiki/HUIZHOU-FORYOU-GENERAL-ELECTRONICS/DV7B01/User-Guide-2158732-Page-10.png)
![EN - 7PlaybackFor Audio Files1. Touch [ ] to display all available audio folders.2. Touch a folder, then touch the desired le. 3. Touch the le again to start play.For Video Files1. Touch [ ] to display all available video folders.2. Touch a folder, then touch the desired le. 3. Touch the le again to start play.For Picture Files1. Touch [ ] to display all available picture folders2. Touch a folder, then touch the desired le. 3. Touch the le again to start play.Repeat playbackPress the [RPT] key on the remote control or open the on-screen control icons menu and then touch the [ ] icon to switch the repeat modes as below:Note:When play the VCD disc,open the [PBC] function and the [repeat] function is abated.Repeat A-BWhen a DVD, VCD is played back, you can play back the contents between the time points from A to B repeatedly:Shufe (Random) PlayYou can play audio tracks/files in random order.During play CD,press the [RDM] key on the remote control repeatedly to turn shufe play on or off.Note:when the [shuffle] turn off,the unit resume natural play from the current sequence.PBC functionThis function is available for the VCD discs with PBC function (Ver 2.0 or higher).Press the [MENU] key on the remote control or open the on-screen control icons menu and then touch the [ ] icon repeatedly to activate this function.Press again to cancel.Notes:1. When PBC is on, playback goes back to the track list and starts from the rst track.2. When PBC is on, fast motion playback, slow motion playback or skip search is available but repeat playback and searching for a particular chapter or track is prohibited.3. If you do the operation of random playback, scan playback or searching playback when PBC is on, PBC will be off automatically.Select Audio ModeWhen you play VCDs, you can select an audio mode (R/L/Stereo).1. During play, touch bottom half of the screen to display menu on the screen, if necessary.2. Touch [ ] to display the 2nd menu. Touch [ ] repeatedly until the audio mode is selected.Select Subtitle LanguageFor DVD discs that contain two or more subtitle languages.1. During play, touch the screen to display menu on the screen, if necessary.2. Touch [ ] to display the 2nd menu.3. Touch [ ] repeatedly to select a language. The selected language is displayed.Change Viewing AngleSome DVDs contain alternate scenes, such as scenes recorded from different camera angles. For such DVDs, you can select from the Repeat chapter ė Repeat title ėDVDVCD(PBC off) Repeat one ė Repeat all ėRepeat offMP3/WMADisctype RepeatmodePictureCDMPEGRepeat one ėRepeat all ėRepeat offRepeat allėRepeat offRepeat one ė Repeat folder ėRepeat allėRepeat offRepeat one ė Repeat folder ėRepeat allėRepeat offRepeat one ė Repeat folder ėRepeat allėRepeat offRepeat A- ėRepeat A-B RepeatA-B Offė](https://usermanual.wiki/HUIZHOU-FORYOU-GENERAL-ELECTRONICS/DV7B01/User-Guide-2158732-Page-11.png)
![EN - 8Playbackavailable alternate scenes. 1. During play, touch the screen to display menu on the screen, if necessary.2. Press [ ] repeatedly on the remote control. The viewing angle is changed.Playback InformationTouch the screen when playing back DVD and VCD discs and the playback information will be displayed on the top area of the TFT.For DVD1. Disc type.2. Return to the main menu.3. DVD Title information. “1/6” indicates that this DVD has 6 titles and the title playing back now is the first title.4. DVD Chapter information. “2/9” indicates that current title has 9 chapters and the chapter playing back now is the fifth chapter.5. Time display.For VCD1. Disc type.2. Return to the main menu.3. VCD Track information. “1/16” indicates that this VCD has 16 tracks and the track playing back now is the first title.4. Time display.Elapsed Time1. Elapsed time of the current track.2. Total time of the current track.Title: 1/6Chapter: 2/9DVD 02:35Title: 1/16VCD 02:35 Direct Track EntryTo select a track directly, touch the [ ] icon on screen control to display the direct entry menu. Enter the desired track using the on-screen number pad. Press [ OK ] to the selected track.Rotate Pictures1. When you view pictures, touch the screen to display menu on the screen, if necessary. 2. Touch [ ] repeatedly to rotate the picture.ZoomYou can zoom in pictures for a close view.1. When you view pictures, touch the screen to display menu on the screen, if necessary.2. Touch [ ] repeatedly to zoom in the picture.](https://usermanual.wiki/HUIZHOU-FORYOU-GENERAL-ELECTRONICS/DV7B01/User-Guide-2158732-Page-12.png)
![EN - 9Listen to Other DevicesYou can connect an external audio/video device to the unit.1. Connect the external device with the supplied AV cable.2. Touch the upper left corner to display the main menu.3. Touch [Aux 1] / [Aux 2] to access external device.CameraThis player is "camera ready". Before accessing any camera features, you must purchase and install a rear video camera. Once the rear camera is connected and operating properly, the CAMERA source mode will become active. While the camera is not installed, the CAMERA option appears gray, indicating the function is not available.The playing source will change to "CAMERA" mode automatically when you reverse your car.Steering Wheel Control Programming1. Touch the upper left corner to display home menu.2. Touch [ SWC ], the SWC menu will display.3. Adjust each key with an individual function.4. Touch [ Program ] to program.5. Press each individual steering wheel control button for each corresponding function.6. Oncethenalsteering wheelcontrolbuttonisprogrammed,thefunctionsaresavedandtheprogramming will end. 7. Touch and hold [ Reset ] to reset the programming.Other modes](https://usermanual.wiki/HUIZHOU-FORYOU-GENERAL-ELECTRONICS/DV7B01/User-Guide-2158732-Page-13.png)
![EN - 10SetupDisplay System1. Touch the upper left corner to display the main menu. 2. Touch [ ]. The settings menu is displayed.Adjust General Settings1. Touch [ General ], if necessary.2. Touch to highlight a setting.3. Touch to display/select an option.4. Touch blank area of the screen to exit. General settings Options DescriptionRadio region USA/China/Japan/Europe/Europe (LW)/OIRT Select one that matches your location.Radio range Local Select Local to receive only stations with extremely strong signal.DistanceBeep On Turn on the beep sound. Each time you press a button, the unit beeps.Off Turn off the beep sound.Calibration Start Calibrate the touch screen.CalibrationWhen the touch operation is not sensitive or valid, you should calibrate the touch screen using the calibration setting function.Adjust the response positions of the touch panel as followings:1. Press the [ Calibration ] option on the setup menu to enter.2. Touch [ Yes ] to enter.3. Press and hold the center of [ + ] for 5 seconds, the [ + ] will move automatically.4. Aim at center of [ +],followthepathasshowninthegure.Oncesteps1-4arecompletethesystem will automatically exit calibrating mode.Adjust Video Settings1. Touch [Video].2. Touch an option repeatedly to select.Video settings Options DescriptionAspect Ratio Full Adjust aspect ratio.NormalRear Camera Mirror Reverse the camera image as if looking through a rear-view mirror.NormalParking On Disable video when driving.Off Enable video when driving.When in Park “On” mode, the screen will display WARNING information if you play the video. The arning screen will prevent the driver from watching videos for safety.](https://usermanual.wiki/HUIZHOU-FORYOU-GENERAL-ELECTRONICS/DV7B01/User-Guide-2158732-Page-14.png)
![EN - 11Adjust Time Settings1. Touch [ Time ].2. Touch an option repeatedly to select:3. Touch blank area of the screen to exit.Sound settings Options DescriptionDate Year / Mon / Day Touch [ ] or [ ] to set year, month and day.Clock mode 12Hr/24Hr Touch [12Hr] or [24Hr] to switch clock mode.Time Hour / Min / AM / PM Touch [ ] or [ ] to set hour and minutes.Touch [ ] or [ ] to set AM/PM (only for 12Hr).Adjust Audio settings1. Touch [ Audio ].2. Touch an option repeatedly to select.3. Touch blank area of the screen to exit. Audio settings Options DescriptionSub woofer On Turn on the subwoofer.Off Turn off the subwooferSub woofer lter80Hz Select a crossover frequency to set a cut-off frequency for the subwoofer’s LPF (low-pass lter).120Hz160HzLoudness SwitchOffSelect low frequency boost only or high and low frequency boost.Lo BoostHiGLoLoudness Center400HzSelect loudness center frequency.800Hz2.4KHzAdjust Language Settings1. Touch [ Language ].2. Touch an option repeatedly to select.3. Touch blank area of the screen to exit. Language settings DescriptionOSD Select on-screen display language.DVD audio Select DVD audio language. Options available depending on DVD disc.DVD subtitle Select DVD subtitle language. Options available depending on DVD disc.Disc menu Select DVD menu language. Options available depending on DVD disc.Setup](https://usermanual.wiki/HUIZHOU-FORYOU-GENERAL-ELECTRONICS/DV7B01/User-Guide-2158732-Page-15.png)
![EN - 12Adjust DVD Rating1. Touch [ DVD ].2. Touch an option repeatedly to select.3. Touch blank area of the screen to exit. DVD rating Options DescriptionSet password Set password to restrict the play of discs. The default password is 1234.Rating levelKid safe Acceptable for children.GAcceptable for general viewers.PG Parental guidance suggested.PG-13 Unsuitable for children under age 13.PG-R Recommend parents to restrict viewing for children under 17.R Restricted re-parental guidance is advised for children under the age of 17.NC-17 Unsuitable for children under age 17.Adult Acceptable for adults only.Load factory Restore to default settings.Version Info The Version Sub-menu is used to identify the model and resident operation system as well as the hardware and software versions.Adjust Volume SettingsYou can set different volumes for different modes. 1. Touch [Volume]. The volume setting sub-menu is displayed.2. Touch to select a source.3. Touch [ ] or [ ] to assign value: 0 to 12. When switching to the source, the volume increases automatically.4. Touch blank area to close the sub-menu and touch top left of the screen to exit setting menu.Setup](https://usermanual.wiki/HUIZHOU-FORYOU-GENERAL-ELECTRONICS/DV7B01/User-Guide-2158732-Page-16.png)
![EN - 13Select Preset Equalizer1. Enter the EQ setup mode Touch the [ ] icon in the user interface and the EQ setup interface will display on the screen. 2. Select EQ mode Touch the desired EQ selection: [ POP ] / [ TECHNO ] / [ ROCK ] / [ CLASSIC ] / [ JAZZ ] / [ OPTIMAL ] / [ USER ], and the EQ mode will change.Adjust EQ ParametersTouch [ ] / [ ] to adjust the level of Bass / Mid / Treb. Adjust FAD BALYou can adjust front/back/left/right balance of the speaker and the subwoofer volume to get balanced listening effect according to the surroundings and your interest. 1. Enter the EQ setup mode Touch the [ ] icon in the EQ interface.2. Adjust subwoofer volume Touch [ ] / [ ]“SUBVOL”toadjustsubwoofervolumefrom-12to+12.3. Adjust fader / balance value Touch [ ] / [ ] / [ ] / [ ]toadjustfader/balancevaluefrom-12to+12. [ ]: Front speaker [ ]: Rear speaker [ ]: Left speaker [ ]: Right speakerNotes:1. The EQ mode will change to ‘User’ automatically when you adjust the frequency value in all modes besides ‘User’.2. The value of Sub is independent of EQ mode and can be adjusted separately.EQ](https://usermanual.wiki/HUIZHOU-FORYOU-GENERAL-ELECTRONICS/DV7B01/User-Guide-2158732-Page-17.png)