HUIZHOU FORYOU GENERAL ELECTRONICS DVA6 Car Multimedia Receiver User Manual 9480AN6Q01448A EN manual FCC indd
HUIZHOU FORYOU GENERAL ELECTRONICS CO.,LTD. Car Multimedia Receiver 9480AN6Q01448A EN manual FCC indd
UserManual.wiki
>
HUIZHOU FORYOU GENERAL ELECTRONICS
>
DVA6 User Manual
Users Manual
Navigation menu
Upload a User Manual
Namespaces
Wiki Guide
HTML
PDF
Info
Views
User Manual
Discussion / Help
Navigation

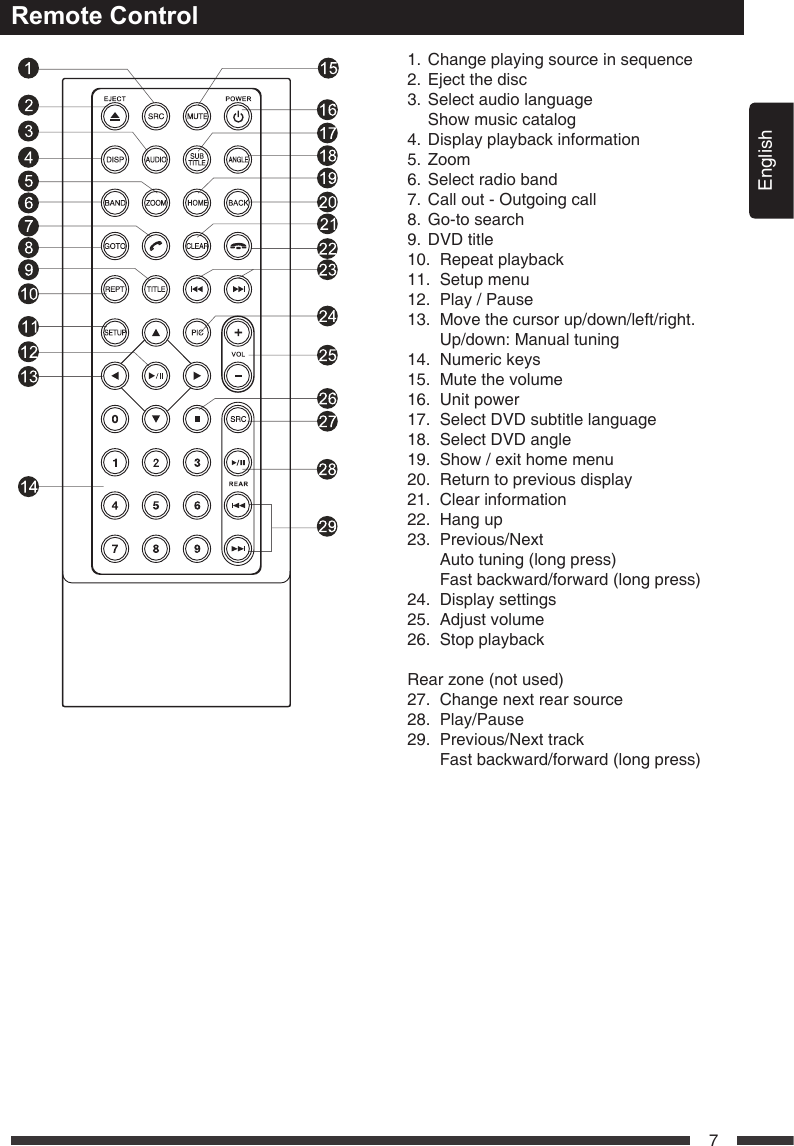
![English6Control Panel Press[ ]knob(5)toturnontheunit.1. RemoteSensor2. HOMEButton Show main menu3. MENUButton Show MENU options4. BACKButton Back to previous MENU.5. VOLKnob > Power “ON” / “Standby Mode” (Press) > Adjust Volume (rotate) > Mute the Volume (press when on) > Power “OFF” (long press)6. Reset Load factory settings7. AUXinJack8. MiniUSBConnector9. SDCardSlot10. MicroSDCardSlot11. DiscSlot Insert the disc with label side facing up.12. Microphone (BuiltinandExternalMicrophone) We recommend to use External Microphone for better Quality. Internal Mic. is just for urgent use, in case of External Mic. broken.13. Eject Eject disc (when disc inserted)* DefaultPath:1. Path of SD Card(È): /sdcard/sd_media2. Path of USB(Ç): /sdcard/external_usb3. Path of Micro SD Card(É): /sdcard/external_sd To install a new map, please install the apklerst,thenstarttheapplicationandset the path.](https://usermanual.wiki/HUIZHOU-FORYOU-GENERAL-ELECTRONICS/DVA6/User-Guide-2382095-Page-6.png)

![English9Basic OperationsTurnOn/OffthePower1. Press the [ VOL ] knob to turn on the unit. The unit will go back to the last source used prior to the radio being powered off.2. When on, press the [ VOL ] knob to “Standby Mode” the unit.3. When on, long press the [ VOL ] knob to turn off the unit.MutePress the [ VOL ] knob to mute the sound. Note: • Pressing the[VOL] knobagainoradjustingvolumewillunmute.AdjusttheVolumeRotate the [ VOL ] knob to increase or decrease the volume level.The adjustable range of volume is 0 to 50.PlayingSourceSelection1. Press the [ ] button on the panel to show main source menu.2. Touch desired icon on the bottom of the screen to enter corresponding working mode, such as Disc, Navi, Radio, etc. Drag left/right to scroll.WhenVehicleisPutinReverseIf the rear view video camera is connected, the unit automatically switches to CAMERA source during reverse driving. The unit returns to the previous source after the vehicle has been taken out of reverse.WhenParkingBrakeApplied1.If'PRKSW'cableisconnectedtohandbrake switch, the video display of the TFT monitor will be controlled by driving status, system setup and input video sources.2. When the car is moving forward, and a video source is being played, the screen will display a warning disclaimer and a blank screen. The warning screen will prevent the driver from watching images. Wallpaper1. Long press the blank area of the main menu. 2. Select a source from: [Gallery]:tovisitthegalleryofmobilestorage. [Live wallpapers]: to show the wallpapers with animation stored in the unit. Drag up/down to scroll. [Wallpapers]: to show the wallpapers stored in the unit. Drag left/right to scroll.3. Select desired picture to view, touch [Set wallpaper]or[OK]toconrmselection.](https://usermanual.wiki/HUIZHOU-FORYOU-GENERAL-ELECTRONICS/DVA6/User-Guide-2382095-Page-9.png)
![English10Main menuMainMenuPress the[ ] button on the panel to enter main source menu. 1467582 31. Indicator of mobile storages.2. Hold and drag down to show the notications.3. Wireless signal and time indicator.4. Enter settings menu5. Show applications list.6. Access web browser.7. AV Off8. Car AV system source bar: Touch and hold the center of the bar and drag left/right to show more icons. Touch desired icon to enter corresponding mode.ApplicationsMenuTouch [ ] to enter applications menu. 1. IN-CAR Show the Car AV applications.2. APPS Show the Android applications installed.3. WIDGETS Show the widget applications. In the list menu, drag left/right to scroll. Touch and hold an icon for more than 2 seconds to add shortcut to the desktop. To delete the shortcut, hold it and drag to the [ ] on the bottom, and release after it turns red. Touch the [ ] button on the panel to exit.Disc OperationInsertaDiscInsert a disc into the slot, and the unit will change to disc mode automatically. Notes:• Pleaseconfirmwhetherthereisadiscinthe unit before you insert another one.• Theunitwillexitcurrentplayingsourceandenter DVD mode when one disc is inserted.• Thefollowingdiscformatsaresupported:CD-R, CD-RW, DVD-R, DVD+R, DVD-RW, DVD + RW .EjecttheDiscPress [ ] on the panel to eject the disc. Notes:• Afterejectingthedisc,theunitrevertstoanother source automatically.• Ifthediscisnotremovedfromtheunitwithin 10 seconds, the disc will be reloaded to prevent accidental damage.DiscPlaybackWhen a disc is inserted, the display will show “Loading...”. For MP3/WMA or a disc with mixed files, reading time may exceed 1 minute.DVDPlaybackMenuDuring playback, touch the screen (except top left corner) to show control buttons.12 3 4 5 6 71. Return to home menu2. Show more control buttons3. Stop playback4. Previous chapter Fast backward (long press)5. Play/Pause](https://usermanual.wiki/HUIZHOU-FORYOU-GENERAL-ELECTRONICS/DVA6/User-Guide-2382095-Page-10.png)
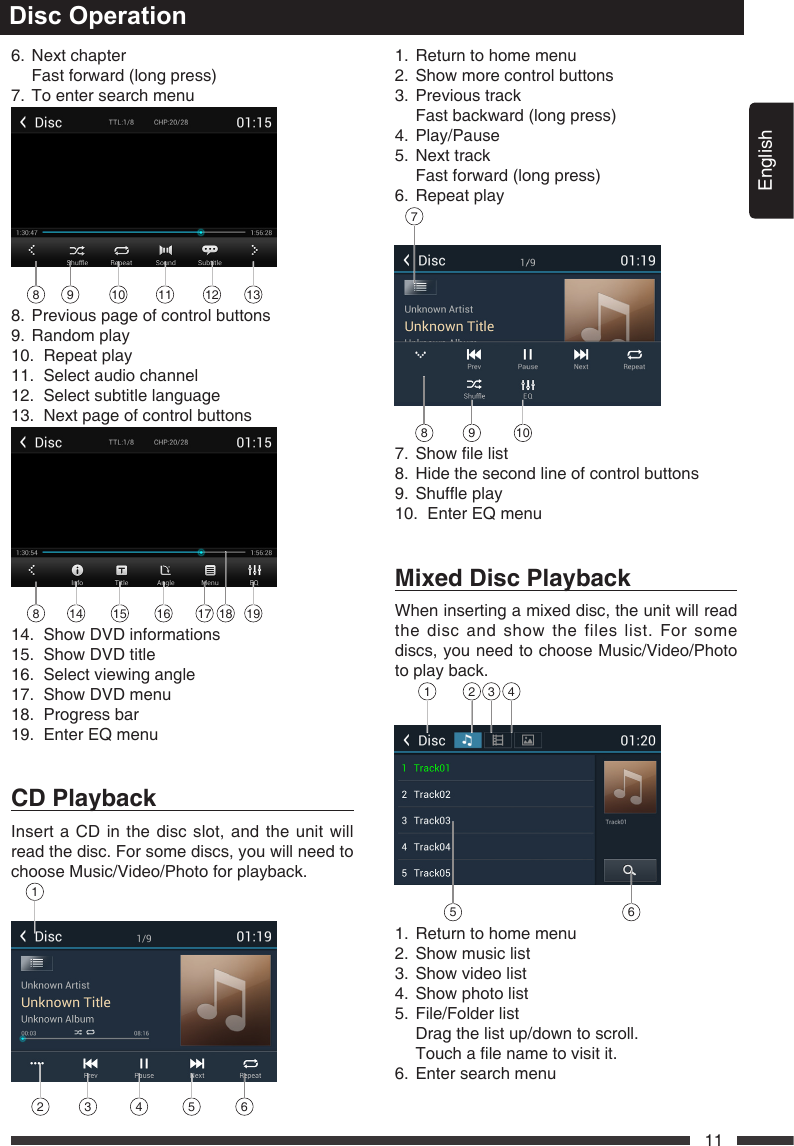
![English12When viewing a picture, touch the screen (except top left corner) to show control buttons.12 3 4 5 61. Return to home menu2. Play/Pause3. Zoomout4. Zoomin5. Rotate counterclockwise6. Rotate clockwise* Video/Audio playback reference DVD/CD playback.StopPlaybackTemporarily1. During playback, press to pause playback. The sound will be muted.2. Press to continue playback. SelectDesiredTrack/ChapterPress or to skip to the previous or next track/chapter.FastForward/BackwardDuringPlaybackPress and hold or button to fast backward or forward during playback.During the fast forward or backward operation, the volume will be muted.RepeatDuring playback, press button on screen to select repeat playback.• Defaultsettingisoff.Disc Operation Note:If you do not select Repeat on, when the entire disc or TITLE playback has finished, the system will stop. If no other control, after 5 minutes the unit will turn into standby mode.RandomTrackPlayback(forCD/VCD/MP3/WMAOnly)You can play all the tracks in random order.1. During playback, press [ ] button on the screen to select random playback. 2. Press again to select normal playback.SearchFor DVD/VCD:1. Touch[Go-to]onthecontrolbar.2. Input the chapter number.3. Touch[OK]toconrm.For Mixed disc:1. Touch [ ] icon.2. Inputthelename.3. Touch[Done]toconrm.DVDAudioSelectPress [ ] button to select audio language to listen if the DVD has multiple audio languages.VCDAudioSelectPress [ ] button to select audio channel to listen (L, R, Stereo).DVDSubtitleSelectPress [ ] button to select the subtitle language to show if the DVD has multiple language subtitles.DVDTitleSelectTouch [ T ] button to display title or chapter list, touch desired title to play.](https://usermanual.wiki/HUIZHOU-FORYOU-GENERAL-ELECTRONICS/DVA6/User-Guide-2382095-Page-12.png)
![English13Radio OperationsSelect [Radio] on the main menu to enter radio mode.1 2 354 6 7 8 91. Return to home menu2. Preset stations list3. Current frequency4. Preset stations of current band Touch 1~6 to listen to preset station.5. Show more control buttons6. Tune backward Auto tune backward. (long press)7. Search and store preset stations automatically8. Tune forward Auto tune forward. (long press)9. Band switch10 11 12 13 14 1510. Hide the second line of control buttons11. Show RDS options12. Save stations manually13. To receive local / distant radio stations14. Gotostationbyinputtingfrequency15. Enter EQ menuSelectOneRadioBandTouch the [ ] button to select one radio band among FM1, FM2, FM3, AM1 and AM2.ManualTuningDuring manual tuning, the frequency will be changed in steps.Touch the [ ] or [ ] button on the operation bar to tune in a lower/higher station.AutoTuningHold the [ ] or [ ] button on the operation bar for more than 2 seconds to seek a lower/higher station.To stop searching, repeat the operation above or press other buttons having radio functions.Note:Whenastationisreceived,searchingstopsandthestationisplayed.AutoStoreOnlystationswithsufcientsignalstrengthwillbe detected and stored in the memory.To start automatic station search, touch the [ ] button on the operation bar.To stop auto store, press other buttons having radio functions.Note:Afterautostore,thepreviousstoredstationswillbeoverwritten.ManualStore1. When one expected radio station has been detected, touch [ ] button on the operation bar to show the preset station store list.2. Touch to select an item on the list to store the current station in the memory.3. Touch top left of the screen to exit.](https://usermanual.wiki/HUIZHOU-FORYOU-GENERAL-ELECTRONICS/DVA6/User-Guide-2382095-Page-13.png)
![English14Radio OperationsRecalltheStoredStationsMethod 1:Touch the 1~6 on the left of screen to listen to the preset station of current band.Method 2:1. Touch [ ] button on the screen to show the preset stations list.2. Select a band3. Touch a station on the list to listen to.4. Touch top left of the screen to exit.LocalSeekingWhen LOCAL seeking is on, only radio stations with strong radio signal will be be received.To open LOCAL function, touch [ ] button on the operation bar, then touch the [ ] button to select “Loc” or “DX”. NoteThenumberofradiostationsthatcanbereceivedwilldecreaseaftertheLocseekingmodeison.KeySearchTouch [ ] button on the operation bar to show key search menu.Touch the keypad to input the frequency, touch[OK]togotothestationdirectly.Touch [ ] to clear all the digits.SD/USB OperationsUsinganSDCard1. Open the card slot cap, insert an SD card into the corresponding slot, the unit will load thelesautomatically.2. Toremovethecard,youshouldrstselectanother source, in order to avoid damaging the card, press the card slightly, and take off the card after it pops out.UsingUSBDevice1. Connect your USB device to the USB cable. When connecting a USB device, the unit willreadthelesautomatically.2. To remove the USB device, you should rstselectanothersource,inordertoavoiddamaging the USB device.MusicPlaybackSelect [Music] on the applications menu, the unit will display all the music on the mobile storages. 1 263457 81. Return to home menu2. Selectlesource3. Listthelesbysongname Touch a song to start play.4. Listthelesbyartist5. Listthelesbyalbum6. Show the folders7. List window Drag up/down to scroll. Touch an item to select.8. Enter search menu.](https://usermanual.wiki/HUIZHOU-FORYOU-GENERAL-ELECTRONICS/DVA6/User-Guide-2382095-Page-14.png)
![English15SD/USB Operations9 1011 12 13 14 159. Return to home menu10. Show list menu11. Show more control buttons12. Previous track Fast backward (long press)13. Play/Pause14. Next track Fast forward (long press)15. Repeat play16 17 1816. Hide the second line of control buttons.17. Shufeplay18. Enter EQ menu.Play/PauseWhen playing, press [ ] button to pause, and the sound will be mute.Press [ ] button to play.Previous/NextTrack Press or button to go to previous or next track.FastForwardingorReversing Press and hold or button to fast backward / forward.SelectMusicbyArtist1. Touch [Artists] on the left of the screen.2. Touch an artist shown on the list.3. Select a song to play.SelectMusicbyAlbum1. Touch [Albums] on the left of the screen.2. Touch an album shown on the list.3. Select a song to play.SelectMusicbySongName1. Touch [Songs] on the left of the screen.2. Select a song to play.VideoPlaybackSelect [Video] on the applications menu, the unit will display all the video files on the storages.During playback, touch the screen(except top left corner) to show control buttons.1 231. Return to home menu2. Back3. Folder/File list Drag up/down to scroll, touch to access.4 5 6 7 8 9](https://usermanual.wiki/HUIZHOU-FORYOU-GENERAL-ELECTRONICS/DVA6/User-Guide-2382095-Page-15.png)
![English16SD/USB Operations4. Show more control buttons5. Stop playback6. Previous chapter Fast backward (long press)7. Play/Pause8. Next chapter Fast forward (long press)9. Enter EQ menu10 11 12 1310. Show previous page of control buttons11. Enter search menu12. Repeat play13. Random play Notes• DisconnectUSBstoragedevicesfromtheunitwhennotinuse.• UseanoptionalcabletoconnecttheUSBaudioplayer/USBmemoryasanydeviceconnecteddirectlytothe unitwillprotrudeoutfromtheunitandmaybedangerous.• Donotuseunauthorizedproducts.UsinganAndroidmobilephoneasaUSBstoragedeviceIf you want to use your Android mobile phone as a USB storage device.1. Connect your Android mobile phone to the unit with a USB cable.2. Set USB connection type of your mobile phone to “Mount SD card”. * If you select “Charge only”, it won’t be recognized by the unit. 3. In the setting menu of the unit, select “Storage”, then “Mount USB disk”. GalleryOperations1. Select[Gallery]ontheAPPSmenu.2. Select one gallery to show the picture list. 3. Touch to view it. Drag left/right to scroll. Touch the top right corner to delete the photo. Touch top left corner to back.](https://usermanual.wiki/HUIZHOU-FORYOU-GENERAL-ELECTRONICS/DVA6/User-Guide-2382095-Page-16.png)
![English17The Bluetooth allows you to utilize your car’s built-in audio system for handsfree wireless mobile phone or music communication. Some Bluetooth mobile phones have the audio features, and some portable audio players support Bluetooth feature. This system can play audio data stored in a Bluetooth audio device. The car stereo with Bluetooth will be able to retrieve phonebook contacts, received calls, dialed calls, missed calls, incoming calls, outgoing call and listen to music. Notes:• Thissystemwillnotoperateormayoperateimproperlywith someBluetoothaudioplayers.• Theunitcannotguaranteethecompatibilityofallmobilephonestogetherwiththeunit.• Audioplaybackwillbesettothesamevolumelevelassetduringtelephonecall.Thiscancauseproblems,ifextremevolumelevelissetduringthetelephonecall.Touch [BT Phone] on the main menu to enter Bluetooth Phone mode.1. If the Bluetooth function of the unit is off, the unit will ask you to turn it on. (Default setting is on)2. Turn on Bluetooth function of your mobile phone.3. Search for new Bluetooth devices on your phone. Select the model name from the pairing list on the mobile phone, and enter password (Default password: 0000) Or touch [ ] button on the screen to search mobile Bluetooth devices. After connect successfully, the unit show following menu.Bluetooth OperationsMakingaCall• DialNumber1. Input numbers by digit-keys on the screen. Touch [ ] to clear the digits.2. Touch [ ] button to dial out.3. Touch [ ] button to terminate call.• AnsweringacallYou can answer an incoming call by pressing the [ ] button.Touch [ ] button to reject an incoming call.• DisconnectTo disconnect a paired device, touch [Disconnect] button.CallfromPhonebook1. Touch [ ] button to show your phone book.2. Select a number to select and touch [ ] button to dial out.3. Touch [ ] to search a contact name.](https://usermanual.wiki/HUIZHOU-FORYOU-GENERAL-ELECTRONICS/DVA6/User-Guide-2382095-Page-17.png)
![English18Bluetooth OperationsCallHistoryAccess Call History by touching [ ] button.Then select a number from Dialled/Missed/Received calls.BluetoothAudioStreamingWhatisaudiostreaming?Audio streaming is a technique for transferring audio data such that it can be processed as a steady and continuous stream. Users can stream music from their external audio player to their car stereo wirelessly and listen to the tracks through the car’s speakers. Please consult your nearest dealer for more information on the product of wireless audio streaming transmitter offered.CAUTIONPleaseavoidoperatingyourconnectedmobilephonewhileaudiostreamingasthismaycausenoiseorthesoundtocutinandoutonplayback.Audiostreamingmayormay notresumeaftertelephoneinterruptasthisisdependentonyourmobilephone.Touch [BT Music] button to play music on your mobile phone.: Previous track: Play/Pause: Next trackBluetoothSettingsTouch [ ] button to show Bluetooth setting menu.](https://usermanual.wiki/HUIZHOU-FORYOU-GENERAL-ELECTRONICS/DVA6/User-Guide-2382095-Page-18.png)
![English193GAPNSettingsNote:Contact the manufacturer for latest compatible 3Gdevices.User set the APN to access the internet.1. Insertthe3Gdongle.2. Select [ ] on the main menu to enter the setting interface.3. Click the [Wireless & networks] to enter the Wireless & network settings and click [more...]. 4. Click [Mobile network] to enter the Mobile network settings. 5. Click the [Access Point Names]. 6. Press the [ ] button on the front panel, then click the [New APN]. Internet7. Must setup following options: Name, APN, MCC, MNC. Touch the dialogue box to show keypad, and input your desired name. APN according to the operator to determine. Theunitwilldetectyour3Gmoduletodetermine the MCC and MNC.8. Then press the [ ] button and click the “Save” button. 9. SelecttheAPN,3Giconappearsonthetop right corner of the taskbar.](https://usermanual.wiki/HUIZHOU-FORYOU-GENERAL-ELECTRONICS/DVA6/User-Guide-2382095-Page-19.png)
![English20InternetWi-FiSettingsThis unit generally supports the following: realtek 8188cu, 8188eu.1. Connect the WiFi dongle to the unit. Touch the [ ] icon on the main menu to enter setting menu, and turn on Wi-Fi (if necessary). 2. Touch [ ] to enter WiFi setting menu. 3. Touch an available WiFi hotspot. 4. Touch [ ] and input the password,touch[Connect]toconrm. 5. After successfully connected, the [ ] icon appears on the top right corner of the screen. Now you can access internet.CreateWi-FiHotspotUser can use the unit to create a personal Wi-Fi hotspot. All your other Wi-Fi enabled devices will then be able to connect to this hotspot and share the primary internet connection.1. ConnecttheWiand3GdongletotheUSBslots on the rear of the unit. Refer to “Device Connections”.2. Touch the [ ] icon on the main menu, and drag down to “WIRELESS & NETWORKS”. 3. Select “More...”. 4. Touch “Tethering & portable hotspot”. 5. Touch “Portable Wi-Fi hotspot”. After setting done, you can touch “Set up Wi-Fi hotspot” to modify the settings.](https://usermanual.wiki/HUIZHOU-FORYOU-GENERAL-ELECTRONICS/DVA6/User-Guide-2382095-Page-20.png)
![English21InternetVisitWebsiteTo access the internet, you must setup “wireless & network” in system settings menu.Select [ ] on the main menu to view a website.Touch the dialog box on the upper side of the screen to show keypad. Input the website address,andtouch[Go]tovisitit.Dragtheweb page to scroll.E-mailSelect [Email] or other mail software on the applications menu.First you must setup an account, or sign into an existing account. Enter your Email address and password. Then you can send/receive E-mails through the unit.NavigationOperationsTo navigate by the unit, simply select the desired navigation application on the main menu. Then navigate by the touch screen. AUXOperationsSelect [Aux In 1] on the main menu to visit front auxiliary device, and select [AUX IN 2] to enter rear auxiliary device. SteeringWheelControlSelect [SWC] on the main menu to enter SWC setting menu.1. Touch number button to select a SWC button. 2. Select a function.3. Press each individual steering wheel control button for each corresponding function.4. Touch [Study] to program.5. Oncethenalsteeringwheelcontrolbuttonis programmed, the functions are saved and the programming will end.6. Touch [ Reset ] to reset the programming.Other ModeIf your device can’t connect to the Wi-Fi hotspot:1. Check the Wi-Fi network. The icon will appear on the top left of the screen after setting successfully. If not, check your Wi-Fi dongle connection and the Hotspot settings.2. Checkthe3Gnetwork. If the signal indicator on the top taskbar turns grey, the network is unavailable, checkyour3Gdongleconnectionand3Gsettings.3. Be sure to input the correct password.4. There may be too many devices connected to the hotspot.](https://usermanual.wiki/HUIZHOU-FORYOU-GENERAL-ELECTRONICS/DVA6/User-Guide-2382095-Page-21.png)
![English22i-Mode(Siri)Function1. Turn on the bluetooth function of both the unit and smartphone. Make sure the smartphone has internet access (iPhone 4S, iPhone 5, iPhone 5S, iPad,SamsungGalaxy,etc.).2. Turn on the ‘Siri’ application of iPhone/iPad or ‘Talk Assistant’ application of Android phones.3. Pair your phone to the unit through the Bluetooth module.4. Touch [ ] to select i-Mode on.5. When speaking through the external microphone of the unit, voice signals will be transferred to the phone. The phone will process the data and search the relative information on local memory or the internet, then transfer the result back to the unit. Other ModeGoogleCalendarConguration1. Ensure the network is available, refer to the <Internet>.2. Touch [ ] icon on the main menu, select [Date & time] in the settings menu, then set the correct local time. 3. Touch [ ] icon on the main menu to enter applications menu and select “APPS”. Select the Calendar icon to show the following menu. Touch the icon on the top right corner, the unit will pop up the following menu when youusetheCalendarforthersttime. Touch "Add account". Select“Google”.](https://usermanual.wiki/HUIZHOU-FORYOU-GENERAL-ELECTRONICS/DVA6/User-Guide-2382095-Page-22.png)
![English23 If you want to establish a new account, please touch [New]. If you want to use an existing account, please touch [Existing]. After select “Existing”, input your mail account and password. Then touch [ ]. Touch[OK]buttontoconrm Touch [ ]tonishsetting. 4. Select Calendar in APPS menu to show the calendar and the arrangements. You can select a date to view the details. To add a new event, touch the icon on the top right corner, or touch [ + ] icon on the blank area. DeleteGmailAccount1. Touch [ ] icon on the main menu to enter settings menu, slide down the screen tond"Google". 2. Touch[Google],ifyouloggedonagoogleaccount before, the address appears. Select the mail address to show the details. Press the [ ] button on the front panel to pop up the sub-menu. Select "Remove account" to delete this account.Other Mode](https://usermanual.wiki/HUIZHOU-FORYOU-GENERAL-ELECTRONICS/DVA6/User-Guide-2382095-Page-23.png)
![English24Select [ ] on the main menu to enter settings mode.Drag up/down to scroll the options.CARVideo Video input option: Choose video input mode Rear camera option: Choose rear camera display mode.General Lighting: Choose button backlight. Radio region: Choose radio region. Radio range: Choose radio Frequency: local or distance. Blackout: Choose screen blackout off, 10s or 20s. Beep:Turn on or off button beep sound. Calibration: To calibrate the screen.DVDrating DVD audio: Choose DVD audio language. DVD subtitle: Choose DVD subtitle language. Disc menu: Choose DVD menu language. Set password: To set password for rating. Input4-digitpassword,touch[√]toconrm,touch [DEL] to delete a number inputted. Touch [X] to exit. Rating level:To setup the rating level. Kidsafe,G,PG,PG-13,PG-R,R,NC-17,Adult.InputGainChoose input volume gain of each source.System settingsWIRELESS&NETWORKSTo setup the wireless configuration, such as Wi-Fi,VPN,3Gnetwork.* For3GAPNsettings,referto“Internet”.DEVICETo setup the Sound, Display, and Storage, Applications management.PERSONALTo Setup Location services, Security and Language & keyboard, etc.ACCOUNTSAccounts management.SYSTEMTo setup Date, time and Accessibility, etc.](https://usermanual.wiki/HUIZHOU-FORYOU-GENERAL-ELECTRONICS/DVA6/User-Guide-2382095-Page-24.png)
![English25Select [EQ] on the menu to enter sound setting mode.Touch to select a preset EQ on upper side of the screen from Flat, Pop, User, Techno, Rock,ClassicandJazz.Touch [ ] or [ ] to adjust the level, Center Frequency and Q for Bass/Mid/Treb.Touch [ ] to enter Fader/Balance/Subwoofer setting menu.Touch [ ] or [ ] to setup Balance, touch [ ] or [ ] to setup Fader.SubWoofer Sub woofer: Turn on/off the sub woofer playback.Subwooferlter:Touch [ ] or [ ] to select subwoofer Filter. Sub woofer Level: Touch [ ] or [ ] to adjust subwoofer Level.Sound setting](https://usermanual.wiki/HUIZHOU-FORYOU-GENERAL-ELECTRONICS/DVA6/User-Guide-2382095-Page-25.png)