HYUNDAI MOBIS AM943DMAN CAR AUDIO User Manual 1
HYUNDAI MOBIS CO., LTD. CAR AUDIO 1
UserManual.wiki
>
HYUNDAI MOBIS
>
AM943DMAN User Manual
Users Manual
Navigation menu
Upload a User Manual
Namespaces
Wiki Guide
HTML
PDF
Info
Views
User Manual
Discussion / Help
Navigation
![RADIOMEDIAPHONE89101314651711 12No. Name Description1EJECT Press to insert or eject disc2DISC-IN LED LED that indicates whether a disc is inserted3DISP Turns the monitor display on/off4RESET Forced system termination and system restart5RADIO • Converts to Radio (FM/AM) mode• Each time this key is pressed, the mode is changed inorder of FM1 FM2 FMA AM AMA6MEDIA• Starts Media mode • Each time this key is pressed, the mode is changed inorder of CD →USB(iPod) →AUX →My Music →BT Audio → CD7PHONE Converts to Phone mode8CLOCK Displays the time/date/day9SCAN • In Radio mode, previews all receivable broadcasts for 5 seconds each• In CD/USB/iPod/My Music mode, previews each song (file) for 10 seconds each 10 SETUP Converts to Setup mode11 POWER/VOL • Press to turn power on/off• Turn left/right to control volume12 SEEK/TRAC KWhen [SEEK(<)/TRACK(>)] keys are pressed shortly(under 0.8 seconds)• In FM/AM mode, plays previous/next frequency• In CD/USB/iPod/My Music modes changes the track, file or chapterWhen [SEEK(<)/TRACK(>)] keys are pressed shortly(over 0.8 seconds)• In FM/AM mode, continuously changes the frequency until the key is released and plays the current frequency.• In CD/USB/iPod/My Music modes, rewinds or fast forwards the track or file• During a Handsfree call, controls the call volume.13 PTY/FOLDE R•In CD/USB/MP3 modes, searches folders•In RDS Radio mode, searches RDS program types14 TUNE/FILE • In FM/AM mode, turn to change broadcast frequencies• In CD, MP3, USB, and iPod modes, turn to search tracks/channels/files.CLOCKSCANSETUPSEEKTRACKV Λ CATEGORYV ΛVOLUMEPOWER(PUSH)FILE TUNEENTER24DISP3Component Names and FunctionsHead Unit1 BasicThis device supports touch screen operations. You can conveniently select desired features by pressing corresponding buttons on the touch screen.](https://usermanual.wiki/HYUNDAI-MOBIS/AM943DMAN/User-Guide-1658947-Page-5.png)
![Steering Remote ControllerHG 이미지로 교체 필요6No. Name Description1[MODE ]• Each time this key is pressed, the mode is changed in order of FM1→FM2→ FMA→AM→AMA→USB or iPod→AUXMy Music →BT Audio • If the media is not connected or a disc is not inserted,corresponding modes will be disabled.2[Vol] Used to control volume3V, ΛWhen, V, Λ keys are pressed shortly (under 0.8 seconds)• In FM/AM mode, searches broadcast frequencies saved topresets.• In CD/USB/iPod/My Music/BT Audio modes, changes thetrack, file or chapterWhen, V, Λ keys are pressed shortly (over 0.8 seconds)• In FM/AM mode, automatically searches broadcast frequencies and channels• In CD/USB/iPod/My Music/BT Audio modes, rewinds or fastforwards the track or file* BT Audio mode may not be supported in some mobile phones.4When pressed shortly (under 0.8 seconds)• Starts voice recognition• When selecting during a voice prompt, stops the prompt and converts to voice command waiting stateWhen pressed and held (over 0.8 seconds)• Ends voice recognition 5When pressed shortly (under 0.8 seconds)• When pressed in the phone screen, displays call history screen• When pressed in the dial screen, makes a call• When pressed in the incoming call screen, answers the call• When pressed during call waiting, switches to waiting call (Call Waiting)When pressed and held (over 0.8 seconds)• When pressed in the Bluetooth® Handsfree wait mode,redials the last call• When pressed during a Bluetooth® Handsfree call,switches call back to mobile phone (Private)• When pressed while calling on the mobile phone, switchescall back to Bluetooth® Handsfree• (Operates only when Bluetooth® Handsfree is connected)6Ends phone call7Mute Mutes audio volume1 Basic](https://usermanual.wiki/HYUNDAI-MOBIS/AM943DMAN/User-Guide-1658947-Page-6.png)
![2 AudioSwitching between Radio/Media ModeSwitching to Radio Mode Switching to Media ModePressing the [RADIO] key will change the operating mode in order of FM1 →FM2 → FMA →AM →AMA. If [Pop-up Mode] is turned on within [Setup] ▶ [Display], then pressing the [RADIO] key will display the Radio Pop-up Mode screen.Turn the [TUNE/FILE] knob to move the focus. Press the [OK] key to select. Pressing the [MEDIA] key will change the operating mode in order of CD USB(iPod) AUX My Music BT Audio. If [Pop-up Mode] is turned on within [Setup] ▶ [Display], then pressing the [MEDIA] key will display the Media Pop-up Mode screen.Turn the [TUNE/FILE] knob to move the focus. Press the [OK] key to select.](https://usermanual.wiki/HYUNDAI-MOBIS/AM943DMAN/User-Guide-1658947-Page-8.png)
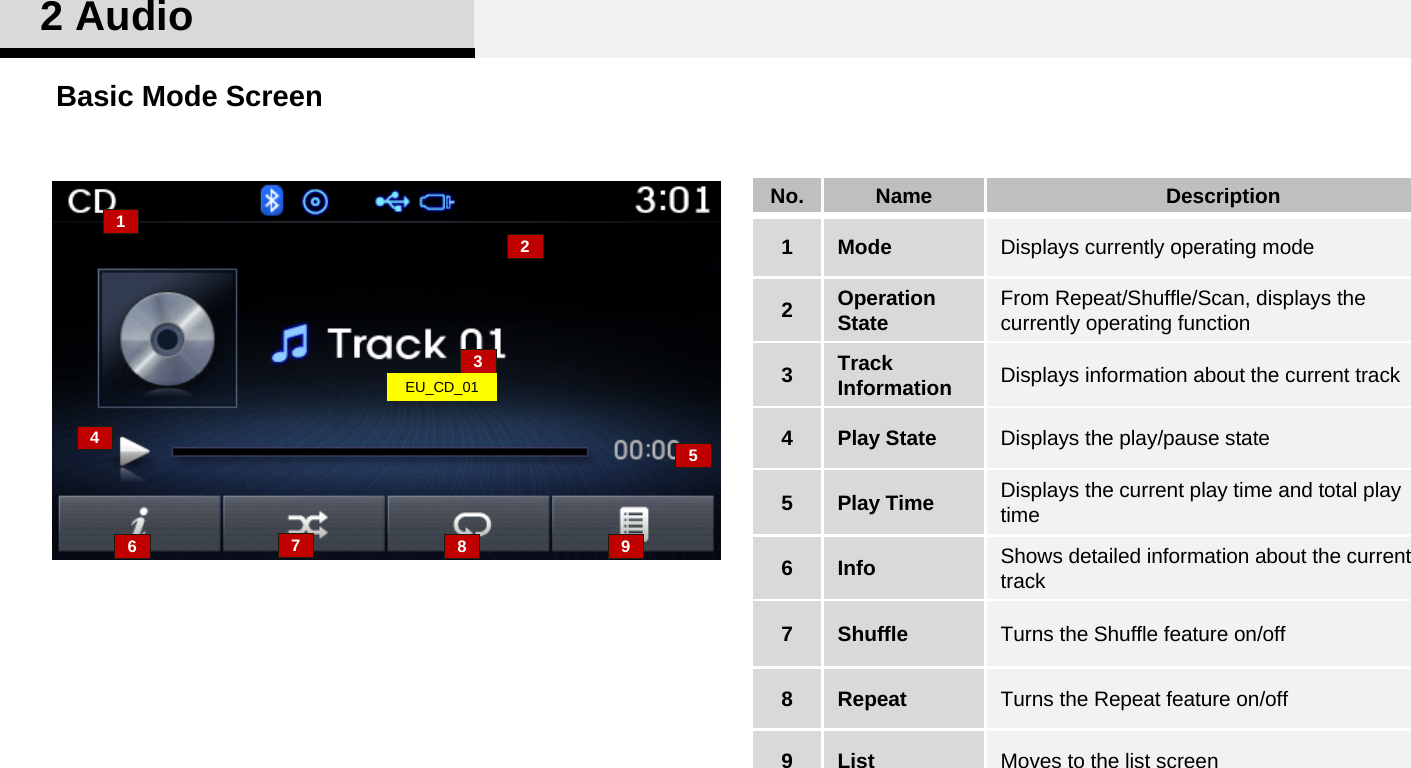
![2 Audio12346No. Name Description1Mode Display Displays currently operating mode2Frequency current frequency3Preset Displays current preset number [1] ~ [6]4Preset Display Displays saved presets5Autostore Automatically saves frequencies with superior reception to Preset buttons6RDS Menu Displays the RDS Menu 7RDS Info Displays RDS broadcast information12:05FM1PS Name87.90Preset AST RDS MenuPTY Name12345675RDS_01Radio ModeBasic Mode Screen](https://usermanual.wiki/HYUNDAI-MOBIS/AM943DMAN/User-Guide-1658947-Page-9.png)
![10Press the [SEEK(<)],[TRACK(>)] keys to play the previous/next frequency.Turn the [TUNE/FILE] knob to select the desired frequency.FM : Increases/decreased by 50kHzAM : Increases/decreased by 9kHzUsing SeekPress the [Preset] button to display the broadcast information for the frequency saved to each button.Selecting /Saving PresetsUsing TUNEAuto StorePress the [Autostore] button to automatically save receivable frequencies to Preset buttons.Searching Radio Frequencies Using Radio ModePress the [1]~[6] buttons to play the desired preset. RDS_01RDS_02While listening to a frequency you want to save as a preset, press and hold one of the [1] ~ [6] preset buttons (over 0.8 seconds) to save the current frequency to the selected preset.EU_Radio_AS T• While Auto Store is operating, pressing the [Cancel] button again will cancel Auto Store and restore the previous frequency.Information2 Audio](https://usermanual.wiki/HYUNDAI-MOBIS/AM943DMAN/User-Guide-1658947-Page-10.png)
![11RDS MenuPress the [RDS Menu] button to set the AF (Alternative Frequency), Region and News features.• The RDS Menu is not supported within AM or AMA mode.InformationPress and hold the [TA/SCAN] key (over 0.8 seconds) to preview frequencies with superior reception for 5 seconds each.Scan• Once scan is complete, the previous frequency will be restored. • While Scan is operating, pressing and holding the [TA/SCAN] key (over 0.8 seconds) will cancel the scan operation. InformationRDS_032 Audio](https://usermanual.wiki/HYUNDAI-MOBIS/AM943DMAN/User-Guide-1658947-Page-11.png)
![2 AudioProgram Type TA (Traffic Announcement)RDS_04Press the [PTY/FOLDER] key to search for the desired Program type.Turn the [TUNE/FILE] knob left/right to search for the desired program type. Once you find the desired program type, press the [TUNE/FILE] knob.After selecting the desired Program Type and while the Program Type is blinking (approximately 5 seconds), pressing the [(∨)SEEK], [TRACK(∧)] key will allow you to select a different Program Type broadcast. Press the [TA/SCAN] key to turn the TA (Traffic Announcement) feature On/Off. (Icon)RDS_05](https://usermanual.wiki/HYUNDAI-MOBIS/AM943DMAN/User-Guide-1658947-Page-12.png)

![While playing, press the key to pause and press [ key to play.Press the [(∨)SEEK], [TRACK(∧)] keys to move to the previous or next track.2 AudioInformation• Only genuine audio CDs are supported.Other discs may result in recognition failure (e.g. copy CD-R, CDs with labels)• The artist and title information are displayed on the screen if track information is included within the audio CD.Playing/Pausing CD Tracks Changing TracksOnce an audio CD is inserted, the mode will automatically start and begin playing.While playing, press and hold the [(∨)SEEK], [TRACK(∧)] keys (over 0.8 seconds) to rewind or fast-forward the current track.Turn the [TUNE/FILE] knob left/right to search for the desired track.Selecting from the ListRewinding / Fast-forwarding TracksOnce you find the desired track, press the [TUNE/FILE] knob to start playing.Using Audio CD ModePress the [TA/SCAN] key to play the first 10 seconds of each track.ScanEU_CD_0 3EU_CD_02Information• Pressing the [(∨)SEEK] key after the track has been playing for 3 seconds will start the current track from the beginning.• Pressing the [SEEK(<)] key before the track has been playing for 3 seconds will start the previous track.](https://usermanual.wiki/HYUNDAI-MOBIS/AM943DMAN/User-Guide-1658947-Page-17.png)
![Press the [Repeat] button to repeat the current track. Press the button again to turn the repeat feature off.Press the [List] button to display the track list screen.Turn the [TUNE/FILE] knob left/right to search for tracks. Once the desired track is displayed, press the knob to select and play.Press the [Shuffle] button to play tracks in random order. Press the button again to turn the shuffle feature off.2 AudioRepeatShuffle ListInfoEU_CD_0 1EU_CD_04EU_CD_0 3Press the [Info] button to display details about the current disc.Audio CD Mode MenuWithin this mode, you will have access to the Info, Shuffle, Repeat and List features. Shuffle: Plays all tracks in random order.Repeat: Repeats the current track.](https://usermanual.wiki/HYUNDAI-MOBIS/AM943DMAN/User-Guide-1658947-Page-18.png)
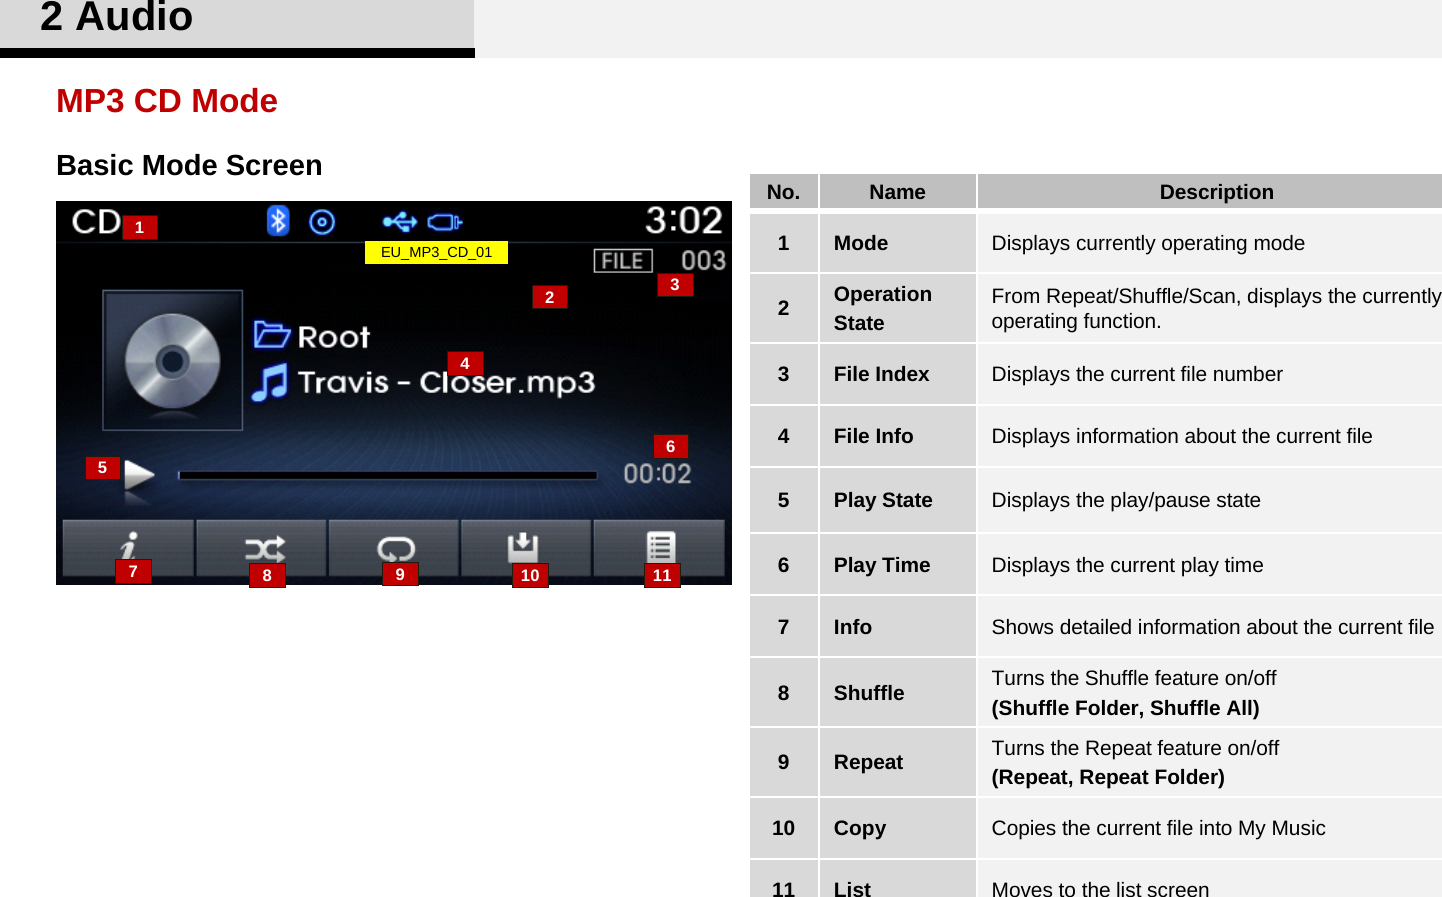
![Information• If there are numerous songs and folders within the disc, reading time could take more than 10 seconds and the list may not be displayed or song searches may not operate. Once loading is complete, try again.2 AudioWhile playing, press and hold the [(∨)SEEK], [TRACK(∧)] keys (over 0.8 seconds) to rewind or fast-forward the current file.Rewinding / Fast-forwarding FilesPlaying/Pausing MP3 FilesSelecting from the ListOnce an MP3 disc is inserted the mode will automatically start and being playing. Searching FoldersTurn the [TUNE/FILE] knob left/right to search for the desired file.Press the [PTY/FOLDER] key to select and search folders.Using MP3 CD ModeWhile playing, press the key to pause and press key to play.ScanPress and hold the [TA/SCAN] key (over 0.8 seconds) to play the first 10 seconds of each file.Once you find the desired file, press the [TUNE/FILE] knob to start playing.Once the desired folder is displayed, press the [TUNE/FILE] knob to select. The first file within the selected folder will begin playing.EU_MP3_CD_ 02EU_MP3_CD_03EU_MP3_CD_ 04Press the [(∨)SEEK], [TRACK(∧)] keys to move to the previous or next file.Changing FilesInformation• Pressing the [(∨)SEEK] key after the file has been playing for 3 seconds will start the current file from the beginning.• Pressing the [(∨)SEEK] key before the file has been playing for 3 seconds will start the previous file.](https://usermanual.wiki/HYUNDAI-MOBIS/AM943DMAN/User-Guide-1658947-Page-20.png)
![2 AudioRepeatShuffleCaution• The title, artist and album info are displayed only when such information are recorded within the MP3 file ID3 tag.Information• When the ‘Folder File’ option is set as the default display within Display setup, the album/artist/file information are displayed as detailed file information.• When the ‘Album Artist Song’ option is set as the default display, the folder name/file name are displayed as detailed file information. MP3 CD Mode MenuWithin this mode, you will have access to the Info, Shuffle, Repeat, Copy and List features. Press the [Repeat] button to repeat the current file or folder. Press the [Info] button to display details about the current file.InfoPress the [Shuffle] button to play files in random order. Press the [Copy] button to copy the current file into My Music.• Selecting another feature during copying will display a pop-up asking whether you wish to cancel copying. To cancel, select 'Yes’.InformationCopying FilesEU_MP3_CD_0 1Each time the button is pressed, the feature changes in order of Shuffle Folder Shuffle All Off.Shuffle Folder : Plays all files within the current folder in random order. Shuffle All : Plays all files in random order.Repeat: Repeats the current file.Repeat Folder: Repeats all files within the current folder.Each time the button is pressed, the feature changes in order of Repeat →Repeat Folder →Off.EU_MP3_CD_0 5](https://usermanual.wiki/HYUNDAI-MOBIS/AM943DMAN/User-Guide-1658947-Page-21.png)
![2 AudioListPress the [List] button to display the file list screen.Turn the [TUNE/FILE] knob left/right to search for files. Once the desired file is displayed, press the knob to select and play.EU_MP3_CD_0 3](https://usermanual.wiki/HYUNDAI-MOBIS/AM943DMAN/User-Guide-1658947-Page-22.png)
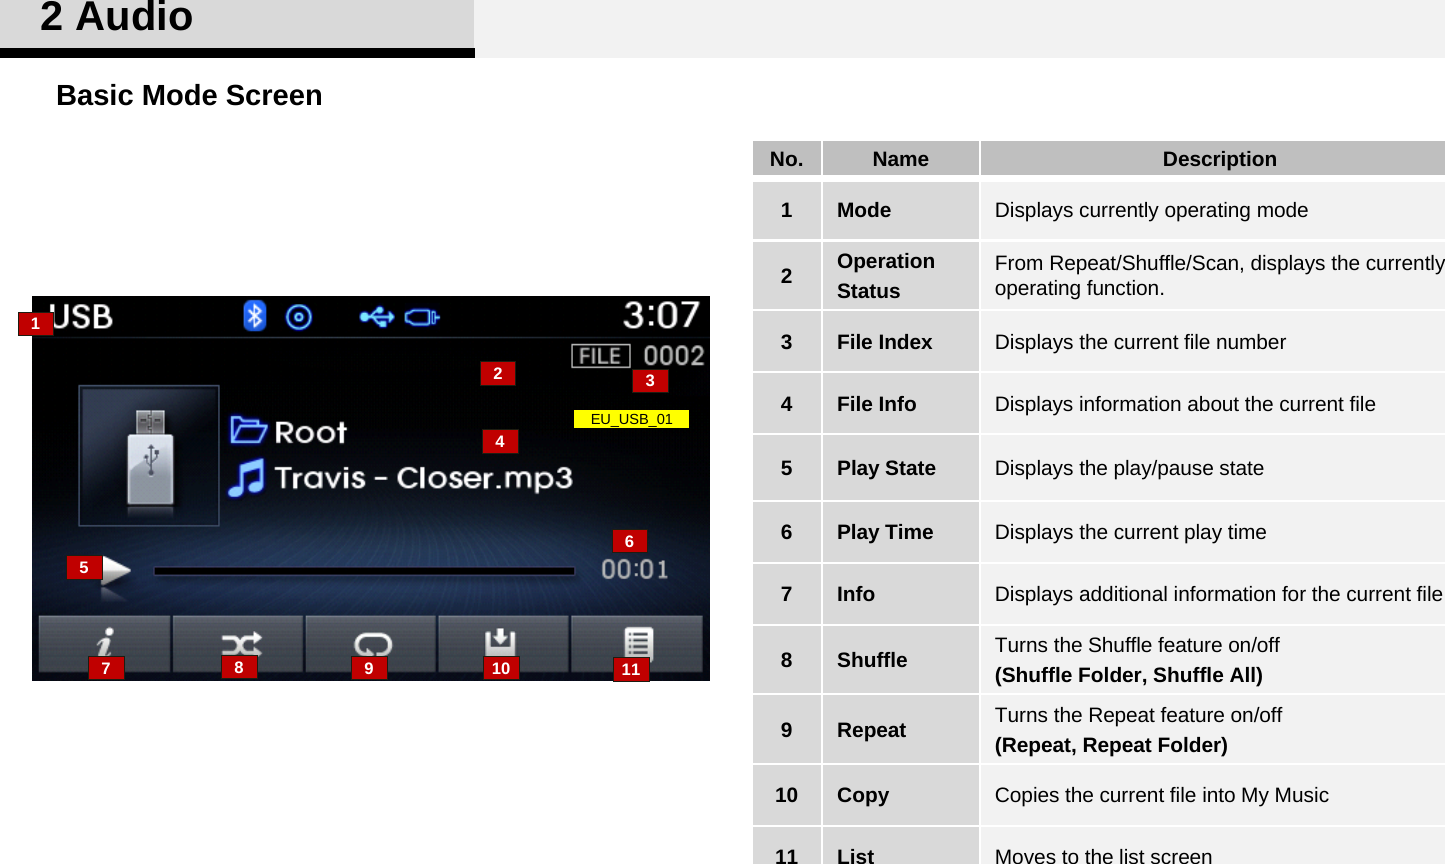
![2 AudioPlaying/Pausing USB Files• Loading may require additional time if there are many files and folders within the USB and result in faulty list display or file searching. Normal operations will resume once loading is complete. • The device may not support normal operation when using a USB memory type besides (Metal Cover Type) USB Memory.InformationOnce a USB is connected, the mode will automatically start and begin playing a USB file.While playing, press and hold the [(∨)SEEK], [TRACK(∧)] keys (over 0.8 seconds) to rewind or fast-forward the current file.Turn the [TUNE/FILE] knob left/right to search for the desired file. Selecting from the ListRewinding / Fast-forwarding FilesOnce you find the desired file, press the [TUNE/FILE] knob to start playing.Press the [PTY/FOLDER] key to select and search folders. Searching Folders12:05USB 폴더 1▶폴더2 폴더 3▲▼ 최상위 폴더Using USB ModeWhile playing, press the key to pause and press key to play.ScanOnce the desired folder is displayed, press the [TUNE/FILE] knob to select. The first file within the selected folder will begin playing.EU_USB_05EU_USB_02USB_03Press and hold the [TA/SCAN] key (over 0.8 seconds) to play the first 10 seconds of each file.Press the [(∨)SEEK], [TRACK(∧)] keys to move to the previous or next file.Changing FilesInformation• Pressing the [(∨)SEEK] key after the file has been playing for 3 seconds will start the current file from the beginning.• Pressing the [SEEK(<)] key before the file has been playing for 3 seconds will start the previous file.](https://usermanual.wiki/HYUNDAI-MOBIS/AM943DMAN/User-Guide-1658947-Page-26.png)
![2 AudioRepeatCautions• The title, artist and album info are displayed only when such information are recorded within the MP3 file ID3 tag.Press the [Info] button to display details about the current file.InfoShuffleInformation• When the ‘Folder File’ option is set as the default display within Display setup, the album/artist/file information are displayed as detailed file information.• When the ‘Album Artist Song’ option is set as the default display, the folder name/file name are displayed as detailed file information. USB Mode MenuPress the [Copy] button to copy the current file into My Music.• Selecting another feature during copying will display a pop-up asking whether you wish to cancel copying. To cancel, select 'Yes’.InformationCopying FilesPress the [Shuffle] button to play files in random order. Each time the button is pressed, the feature changes in order of Shuffle Folder →Shuffle All →Off.Shuffle Folder : Plays the files in the current folder in random order.Shuffle All : Plays all files in random order.Press the [Repeat] button to repeat the current file or folder. Repeat (Icon) : Repeats the current file.Repeat Folder (Icon) : Repeats all files within the current folder.Each time the button is pressed, the feature changes in order of Repeat →Repeat Folder →Off.EU_USB_01EU_USB_04Within this mode, you will have access to the Info, Shuffle, Repeat, Copy and List features.](https://usermanual.wiki/HYUNDAI-MOBIS/AM943DMAN/User-Guide-1658947-Page-27.png)
![2 AudioPress the [List] button to display the file list screen.Turn the [TUNE/FILE] knob left/right to search for files. Once the desired file is displayed, press the knob to select and play.ListEU_USB_02](https://usermanual.wiki/HYUNDAI-MOBIS/AM943DMAN/User-Guide-1658947-Page-28.png)
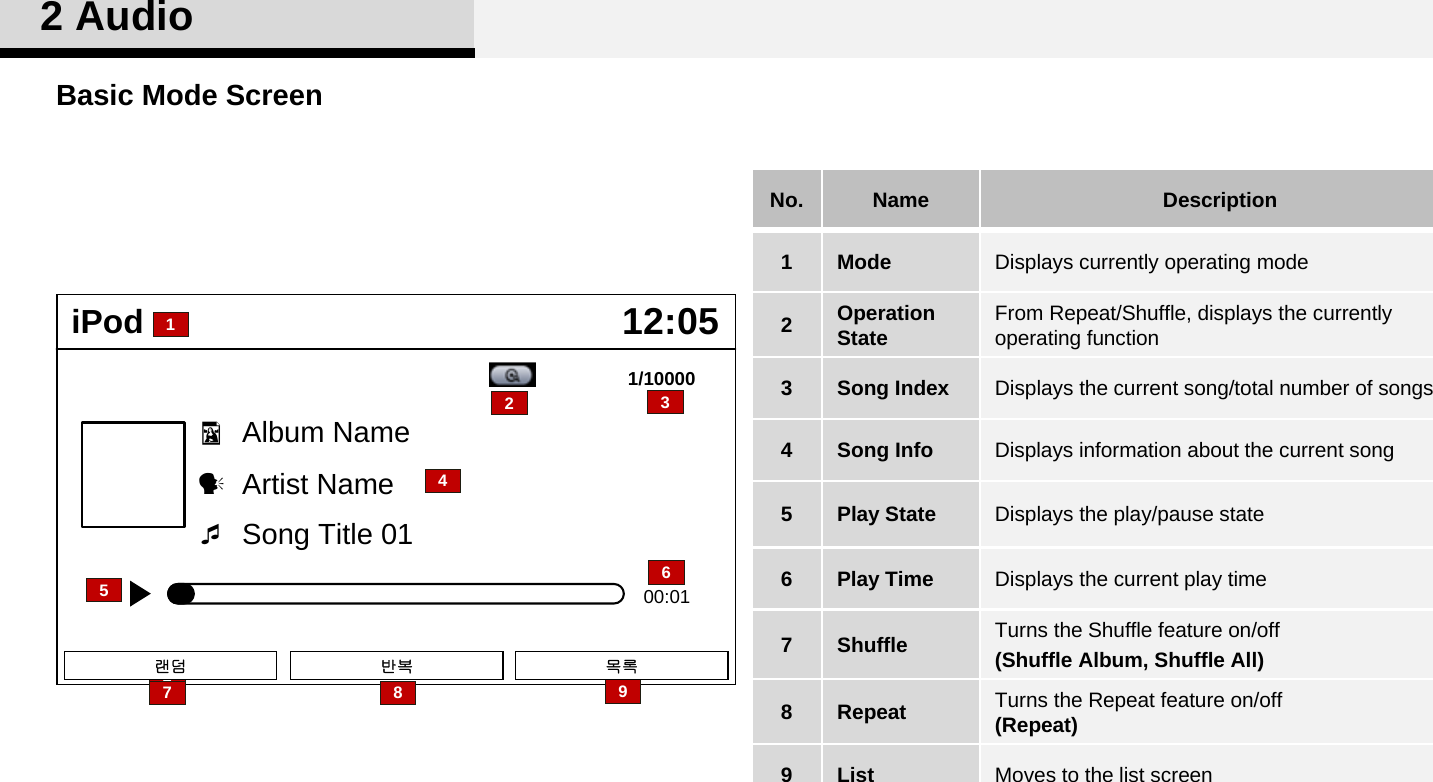
![12:05iPod00:011/10000 Song Title 01 Artist Name Album Name목록반복랜덤• Some iPods with unsupported communication protocols may not properly operate in the audio system.Playing/Pausing iPod Songs• There are eight categories that can be searched, including Playlists, Artists, Albums, Songs, Genres, Composers, Audiobooks and Podcasts.Searching Categories2 AudioInformation InformationOnce an iPod is connected, the mode will automatically start and begin playing an iPod song.Turn the [TUNE/FILE] knob left/right to search for the desired category.Using iPod ModeOnce you find the desired category, press the [TUNE/FILE] knob to select and play.12:05iPod 재생목록 아티스트 앨범최상위 폴더 1/3최상위 폴더▲▼While playing, press the key to pause and press key to play.Press the [(∨)SEEK], [TRACK(∧)] keys to move to the previous or next song.Changing SongsInformation• Pressing the [(∨)SEEK] key after the song has been playing for 3 seconds will start the current song from the beginning.• Pressing the [SEEK(<)] key before the song has been playing for 3 seconds will start the previous song.• Slight time differences may exist depending your iPod product.](https://usermanual.wiki/HYUNDAI-MOBIS/AM943DMAN/User-Guide-1658947-Page-31.png)
![RepeatShuffle2 AudioPress the [Shuffle] button to play songs in random order. iPod Mode Menu12:05iPod00:011/10000 Song Title 01 Artist Name Album Name목록반복랜덤ListPress the [List] button to display the Category Menu. • If the search mode is accessed while playing a song, the most recently searched category is displayed.• Search steps upon initial connection may differ depending on the type of iPod device. InformationCategory Menu12:05iPod 재생목록 아티스트 앨범최상위 폴더 1/3최상위 폴더▲▼1 2 3Name Description1. Displays the play screen2. 최상위 폴더 Moves to the iPod root category screen 3. Moves to the previous categoryWithin the iPod Category menu, you will have access to the [], [Home], and [] features.Shuffle Album : Plays songs within thecurrent category in random order.Shuffle All : Plays all songs in random orderRepeat : Repeats the current songWithin this mode, you will have access to the Shuffle, Repeat and List features. Each time the button is pressed, the feature changes in order of Shuffle Album Shuffle All Off.Press the [Repeat] button to repeat the current song. Press the button again to turn the repeat feature off.](https://usermanual.wiki/HYUNDAI-MOBIS/AM943DMAN/User-Guide-1658947-Page-32.png)
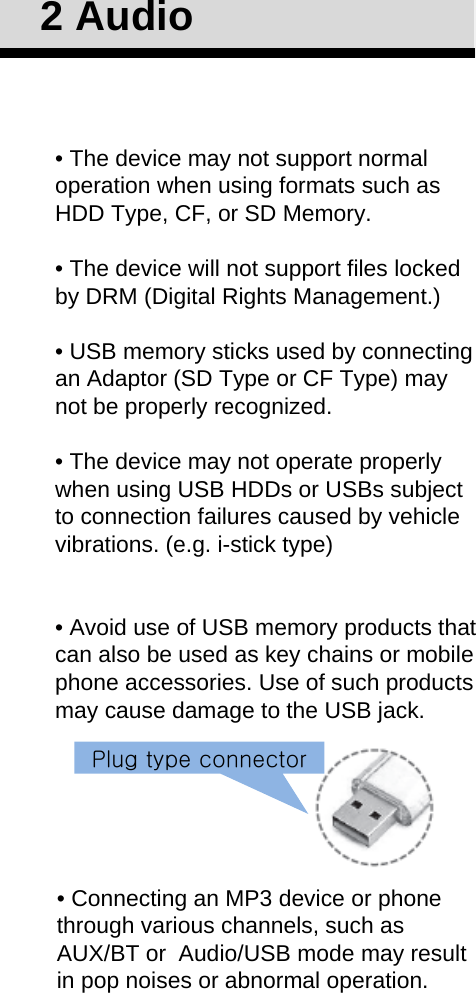
![• If an external device connector is connected with the AUX terminal, then AUX mode will automatically operate. Once the connector is disconnected, the previous mode will be restored.• AUX mode can be used only when an external audio player (camcorder, car VCR, etc.) has been connected. • The AUX volume can be controlledseparately from other audio modes.• Connecting a connector jack to theAUX terminal without an externaldevice will convert the system to AUXmode, but only output noise. When anexternal device is not being used, alsoremove the connector jack.• When the external device power isconnected to the power jack, playingthe external device may output noise.In such cases, disconnect the powerconnection before use.• Fully insert the AUX cable to the AUX jack upon use. AUX ModeConnecting an External Device2 AudioInformationCautionExternal audio players(Camcorders, car VCR, etc.) can beplayed through a dedicated cable. Press the [MEDIA] key ▶Select [AUX]An external device can be connected to play music. Using AUX ModeEU_AUX_01](https://usermanual.wiki/HYUNDAI-MOBIS/AM943DMAN/User-Guide-1658947-Page-33.png)
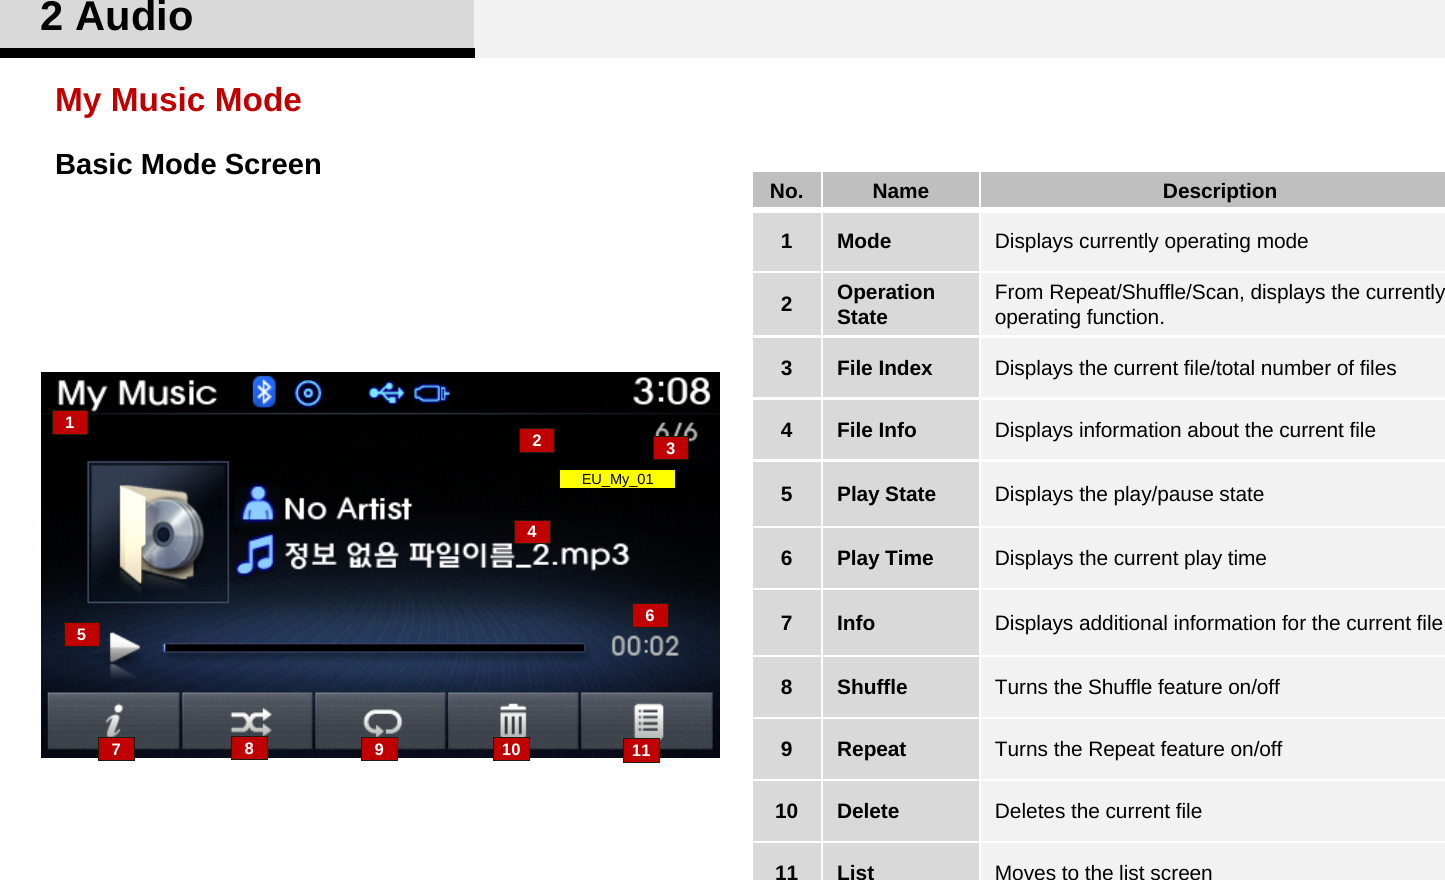
![Playing/Pausing My Music Files• If there are no files saved within My Music, the [My Music] button will be disabled. 2 AudioInformationRewinding / Fast-forwarding FilesTurn the [TUNE/FILE] knob left/right to search for the desired file.Selecting from the ListOnce you find the desired file, press the [TUNE/FILE] knob to start playing.While playing, press and hold the [(∨)SEEK], [TRACK(∧)] keys (over 0.8 seconds) to rewind or fast-forward the current file.Using My Music ModeEU_My_05EU_My_02While playing, press the key to pause and press key to play.Press and hold the [TA/SCAN] key (over 0.8 seconds) to play the first 10 seconds of each file.ScanPress the [(∨)SEEK], [TRACK(∧)] keys to move to the previous or next file.Changing FilesInformation• Pressing the [(∨)SEEK] key after the file has been playing for 3 seconds will start the current file from the beginning.• Pressing the [SEEK(<)] key before the file has been playing for 3 seconds will start the previous file.](https://usermanual.wiki/HYUNDAI-MOBIS/AM943DMAN/User-Guide-1658947-Page-35.png)
![RepeatShuffle2 AudioListPress the [List] button to display the file list screen.Turn the [TUNE/FILE] knob left/right to search for files. Once the desired file is displayed, press the knob to select and play.Press the [Repeat] button to repeat the current song. Press the button again to turn the repeat feature off.Press the [Shuffle] button to play files in random order. Press the button again to turn the shuffle feature off.• The title, artist and album info are displayed only when such information is recorded within the MP3 file ID3 tag.InfoPress the [Delete] button to delete the current file. Deleting FilesCautionMy Music Mode MenuEU_My_01EU_My_03My_02Within this mode, you will have access to the Info, Shuffle, Repeat, Delete and List features. Press the [Info] button to display details about the current file.Shuffle : Plays all files in random order.Repeat : Repeats the current file.](https://usermanual.wiki/HYUNDAI-MOBIS/AM943DMAN/User-Guide-1658947-Page-36.png)
![From the List screen, it is possible to delete files you previously saved into My Music. 2 AudioAfter selecting the files you want to delete, press the [Delete] button to delete the selected files.Name Description1. Moves to the previous screen2. Mark All Selects all files3. Unmark All Deselects all selected files4. Delete Deletes selected files •If there is memory available, up to 6,000 files can be saved. • Identical files cannot be copied more than 1,000 times. • To check memory information, go to [SETUP] ▶[System] ▶Memory Information.InformationList MenuPress the [Mark All] button or individually select the files you want to delete. Once files are selected, the [Unmark All] and [Delete] buttons will be enabled. My_041234](https://usermanual.wiki/HYUNDAI-MOBIS/AM943DMAN/User-Guide-1658947-Page-37.png)
![Changing FilesPlaying/Pausing Bluetooth® AudioThe play/pause feature may operatedifferently depending on the mobilephone.Setting ConnectionIf a Bluetooth® device has not been connected, press the [SETUP] key ▶[Phone] button to display the Bluetooth®connection screen. • If the Bluetooth® audio is not operating properly, check whether the feature is turned off at [SETUP] ▶[Phone] ▶ [Audio streaming]. If the feature is off, turn back on and try again. • If music is not yet playing from yourmobile device after converting toBluetooth® Audio mode, pressing the play button once may start playing the mode. Check to see that music is playing from the Bluetooth® device after converting toBluetooth® Audio Mode. Press the [(∨)SEEK], [TRACK(∧)] keys to move to the previous or next file.It is possible to use the pair phone, connect/disconnect and delete features from your Bluetooth® phone. While playing, press the [▶ll]key to pause and press [▶ll] key to play.2 AudioInformationInformationUsing Bluetooth® Audio Mode12:05Setup신규 폰 등록등록 폰 목록(1/5)전화번호부 다운로드1/3▲▼폰▶▶▶12:05BT Audio▶llOnce a Bluetooth® device is connected, the mode will automatically start. BT_Audio](https://usermanual.wiki/HYUNDAI-MOBIS/AM943DMAN/User-Guide-1658947-Page-39.png)
![Cautions upon Connecting Bluetooth® PhonesBefore connecting the head unit with the mobile phone, check to see that the mobile phone supports Bluetooth® features. Even if the phone supports Bluetooth®, the phone will not be found during device searches if the phone has been set to hidden state or the Bluetooth® power is turned off. Disable the hidden state or turn on the Bluetooth® power prior to searching/connecting with the Head unit.If you do not want to automatically connect your Bluetooth® phone, try the following.1. Turn off the Bluetooth® feature in your mobile phone- For more information on Bluetooth® features within your mobile, refer to your mobile phone user’s manual. 2. Turn off the Bluetooth® feature in your car audio system- To turn off the Bluetooth® feature in your car audio system, go to [SETUP] > Phone and turn off the Bluetooth® feature.Park the vehicle when connecting the car audio system with your mobile phone. Bluetooth® connection may become intermittently disconnected in some mobile phones. Follow these steps to try again. 1. Turn the Bluetooth® function within the mobile phone off/on and try again.2. Turn the mobile phone power Off/On and try again.3 Completely remove the mobile phone battery, reboot, and then again.4. Reboot the audio system and try again.5. Delete all paired devices, pair and try again.The Handsfree call volume and quality may differ depending on the mobile phone. • Bluetooth® features supported within the vehicle are as follows. Some features may not be supported dependingon your Bluetooth® device. - Answering and placing Bluetooth® Handsfree calls- Menu operation during call (Switch to Private, Switch to call waiting, Outgoing volume)- Download Call History-Download Mobile Contacts- Contacts/ Call History Auto Download- Bluetooth® device auto connection- Bluetooth® Audio • It is possible to pair up to five Bluetooth® devices to the car system.• Only one Bluetooth® device can be connected at a time. • Other devices cannot be paired while a Bluetooth® device is already connected.• When a Bluetooth® device is being connected, the connection process cannot be canceled.• Only Bluetooth® Handsfree and Bluetooth® audio related features will operate within this system.• Normal operation is possible only for devices that support Handsfree or audio features, such as a Bluetooth® mobile phone or a Bluetooth® audio device. • Only one function can be used at a time between the Bluetooth® Handsfree and Bluetooth® audio. (While playing Bluetooth® audio, streaming will end upon entering theBluetooth® phone screen.) • If a connected Bluetooth® device becomes disconnected for various reasons, such as being out of range, turning the device OFF, or a Bluetooth® communication error, Bluetooth® devices are automatically searched and connected.3 Bluetooth®](https://usermanual.wiki/HYUNDAI-MOBIS/AM943DMAN/User-Guide-1658947-Page-42.png)
![Pairing a Bluetooth® Device1. Press the [PHONE]] key or the [] key on the steering remote controller. The following screen is displayed. 2. Press the [OK] button to enter the Pair Phone screen.12:05Setup트랙 01블루투스 폰에서 기기이름을검색 후 등록하여 주십시오.OK12:05Setup트랙 01Phone>Pair PhoneDevice : Santa FeCancel3. From your Bluetooth® device (i.e. Mobile Phone), search and select your car audio system. 4. After a few moments, a screen is displayed where the passkey is entered. Here, enter the passkey “0000” to pair your Bluetooth® device with the car audio system. 5. Once pairing is complete, the following screen is displayed. 3 Bluetooth®12Pairing [PHONE] Key / [] Key on the Steering Remote ControllerName Description1. Device Name of device as shown when searching from your Bluetooth® device2. Passkey Passkey used to pair the devicePairing refers to the process of synchronizing your Bluetooth® phone or device with the car audio system for connection. Pairing is necessary to connect and use the Bluetooth® feature.Customarily, pairing Bluetooth® devices can be done by either searching and pairing from the car audio system or searching and pairing from the Bluetooth® phone. The car audio system can be searched and paired from your Bluetooth® device.What is Bluetooth® Pairing? When No Devices have been PairediPasskey : 000012:05Setup트랙 01폰>폰등록확인Phone name등록되었습니다.i](https://usermanual.wiki/HYUNDAI-MOBIS/AM943DMAN/User-Guide-1658947-Page-43.png)
![3 Bluetooth®Pairing through [PHONE] SetupPress the [SETUP] key ▶Select [Phone] ▶Select [Pair Phone] ▶Select [OK]• The waiting period during phone pairing will last for one minute. The pairing process will fail if the device is not paired within the given time. If the pairing process fails, you must start the process from the beginning.• Generally, most Bluetooth® devices will automatically connect once pairing is complete. However, some devices may require a separate verification process to connect. Check to see whether Bluetooth® has been properly connected within your mobile phone.• List of paired Bluetooth® devices can be viewed at [SETUP] ▶[Phone] ▶ [Paired Phone List].Information• If Bluetooth® devices are paired but none are currently connected, pressing the [PHONE] key or the [] key on the steering remote controller displays the following screen. Press the [Pair] button to pair a new device or press the [Connect] to connect a previously pair device. Information12:05TitleYou need to pair or connect a phoneTo use Bluetooth® calling.Pair Connect Cancel?12:05Setup신규폰 등록등록 폰 목록(1/5)전화번호부 다운로드1/3▲▼폰▶▶▶1. The following steps are the same as the steps described in the “When No Devices have been Paired” section.](https://usermanual.wiki/HYUNDAI-MOBIS/AM943DMAN/User-Guide-1658947-Page-44.png)
![Press the [SETUP] key ▶Select [Phone] ▶Select [Paired Phone List]3 Bluetooth®Connecting Bluetooth®Connecting a DeviceFrom the paired phone list, select thedevice you want to connect and pressthe [Connect] button.Name Description1. Device Device that is paired but not connected2. Connected Phone Device that is currently connected • When a device is currently connected, even if you change the priority to a different device, the currently connected phone will always be set as the highest priority.Press the [SETUP] key ▶Select [Phone] ▶Select [Paired Phone List]12:05트랙 01연결순서가 변경되었습니다.확인iFrom the paired phone list, select the phone you want to change to the highest priority, then press the [Change Priority] button from the Menu. The selected device will be changed to the highest priority.InformationIt is possible to pair up to five Bluetooth® devices with the car audio system. As a result, the “Change Priority’ feature is used to set the connection priority of paired phones. However, the most recently connected phone will always be set as the highest priority.What is Priority?Changing Priority12:05Setup신규폰 등록등록 폰 목록(1/5)전화번호부 다운로드1/3▲▼폰▶▶▶12:05SetupPhone name 1Phone name 2▲▼폰>등록 폰 목록▶▶폰연결 삭제 연결 순서 변경1212:05SetupPhone name 1Phone name 2▲▼폰>등록 폰 목록▶▶폰연결 삭제 연결 순서 변경12:05트랙 01Phone name연결되었습니다.확인i](https://usermanual.wiki/HYUNDAI-MOBIS/AM943DMAN/User-Guide-1658947-Page-45.png)
![3 Bluetooth®From the paired phone list, select thecurrently connected device and press the [Disconnect] button.Disconnecting a Device• When deleting the currently connected device, the device will automatically be disconnected to proceed with the deleting process. • If a paired Bluetooth® device is deleted, the device’s call history and contacts data will also be deleted.• To re-use a deleted device, you must pair the device again. From the paired phone list, select thedevice you want to delete and press the[Delete] button.InformationDeleting a DevicePress the [SETUP] key ▶Select [Phone] ▶Select [Paired Phone List]Press the [SETUP] key ▶Select [Phone] ▶Select [Paired Phone List]12:05SetupPhone name 1Phone name 2▲▼폰>등록 폰 목록▶▶폰연결해제 삭제 연결 순서 변경12:05SetupPhone name 1Phone name 2▲▼폰>등록 폰 목록▶▶폰연결 삭제 연결 순서 변경12:05트랙 01Phone 삭제되었습니다.확인i12:05트랙 01Phone name 연결 해제되었습니다.확인i](https://usermanual.wiki/HYUNDAI-MOBIS/AM943DMAN/User-Guide-1658947-Page-46.png)
![Using Bluetooth®With a Bluetooth® device connected, press the [PHONE] to display the Phone menu screen. Phone MenusPress the [PHONE] key ▶Select [Dial Number] • If you press the [Call History] button but there is no call history data, a prompt is displayed which asks whether to download call history data. • If you press the [Contacts] button but there is no contacts data, a prompt is displayed which asks whether to download contacts data. . • This feature may not be supported insome mobile phones. For more information on download support, refer to your mobile phone user’s manual.3 Bluetooth®12:05Phone01234567890412 3Information12:05Phone번호로전화걸기 최근통화목록 전화번호부폰설정 닫기1 2 34Name Description1. Dial NumberDisplays the dial screen where numbers can be dialed to make calls2. Call History Displays the call history screen3. Contacts Displays the contacts list screen4. Setup Displays Phone related settingsName Description1. Dial Pad Used to enter phone number2. • If a number has been entered, calls the number.•If no number has been entered, switches to callhistory screen.3. Deletes the entered phone number4. Delete Deletes entered numbers one digit at a time.Phone Menu ScreenCalling by Dialing a Number](https://usermanual.wiki/HYUNDAI-MOBIS/AM943DMAN/User-Guide-1658947-Page-47.png)
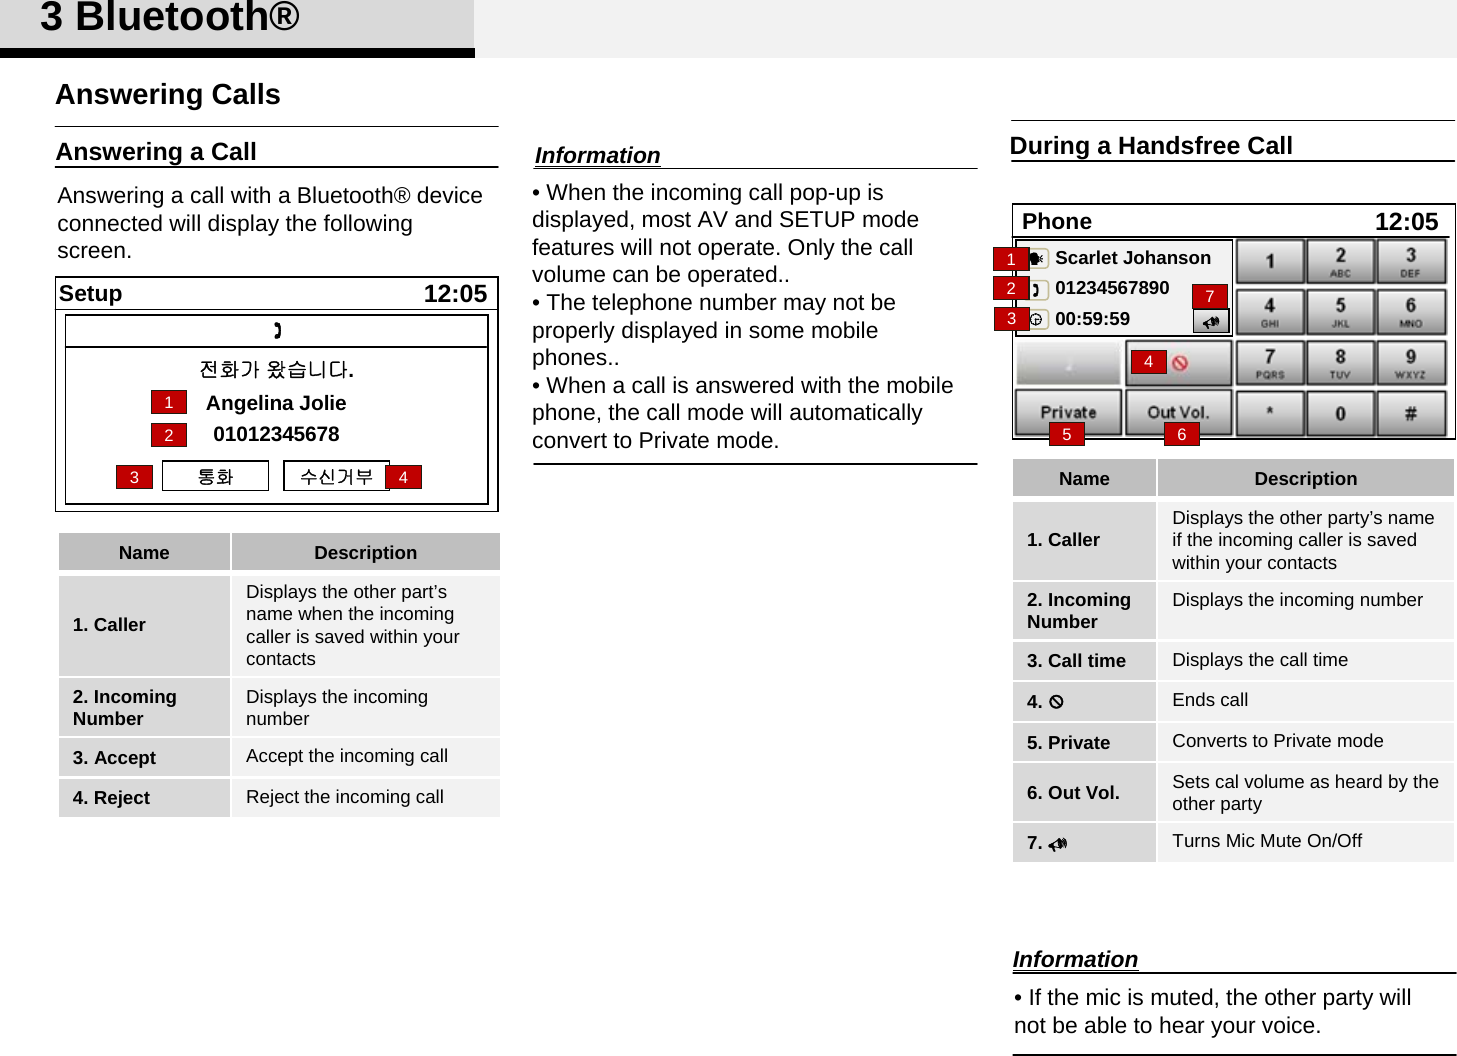
![Press the [PHONE] key ▶Select [Call History] 12:05Phone최근통화목록 01234567890 Scarlet Johanson? Angelina Jolie▲▼3 Bluetooth®12:05Phone전화번호부Name 1Name 2Name 31/3Press the [PHONE] key ▶Select [Contacts] 1InformationName Description1. Call HistoryDisplays recent calls (call history) Connects call upon selection2. Download Download Recent Call HistoryName Description1. Contact ListDisplays downloaded contactsConnects call upon selection2. Download Download ContactsCall History Contacts다운로드12A list of incoming, outgoing and missed calls is displayed. Press the [Download] button to download the call history.▲▼다운로드 2The list of saved contacts is displayed. Press the [Download] button to download the call history.• The call history list will display up to 30 outgoing, incoming, and missed calls. • Upon downloading call histories, previously saved histories are deleted. • Incoming calls with hidden caller IDs will not be saved in the call history list. • Previously saved contacts are stored even if a device is disconnected and re- connected.• The download feature may not be supported in some mobile phones. Check to see that the Bluetooth® device supports the download feature.](https://usermanual.wiki/HYUNDAI-MOBIS/AM943DMAN/User-Guide-1658947-Page-49.png)

![Phone related voice commands can be used only when a Bluetooth® device is connected. When making calls by stating a name, the corresponding contact must be downloaded and stored within the audio system. After downloading the Bluetooth® contacts, it takes some times to convert the contacts into voice information. During this time, voice recognition may not properly operate. Pronounce the voice commands naturally and clearly as if in a normal conversation. When using the voice recognition feature, only commands listed within the user's manual are supported. Be aware that during the operation of the voice recognition system, pressing any key other than the [VR] key or touching the screen will terminate voice recognition mode. For superior voice recognition performance, position the microphone used for voice recognition above the head of the driver’s seat and maintain a proper position when saying commands. Within the following situations, voice recognition may not function properly due to external sound. • When the windows and sunroof are open • When the wind of the cooling / heating device is strong • When entering and passing through tunnels • When driving on rugged and uneven roads • During severe rain (heavy rains, windstorms)Before Using Voice Recognition4 Voice Recognition](https://usermanual.wiki/HYUNDAI-MOBIS/AM943DMAN/User-Guide-1658947-Page-52.png)
![• If voice recognition is in [Expert Mode], then the system will only say a “Beep~”• To change the Normal Mode/Expert Mode setting, go to [SETUP] ▶[System] ▶[Prompt Feedback]. Starting Voice RecognitionUsing Voice RecognitionShortly press the [VR] key on the steering remote controller ▶Say a commandThe prompt message is immediately ended and the beep tone will sound. After the “beep”, say the voice command.If voice recognition is in [Normal Mode], then the system will say “Please say a command. Beep~”While prompt message is being stated▶ Shortly press the [VR] key on the steering remote controller (under 0.8 seconds)The command wait state is immediately ended and the beep ton will sound. After the “beep”, say the voice command.While system waits for a command ▶ Shortly press the [VR] key on the steering remote controller (under 0.8 seconds)• For proper recognition, say the command after the voice instruction and beep tone.Skipping Prompt MessagesRe-starting Voice Recognition이미지이미지4 Voice RecognitionInformationCautionStarting Voice Recognition](https://usermanual.wiki/HYUNDAI-MOBIS/AM943DMAN/User-Guide-1658947-Page-53.png)
![Illustration on Using Voice RecognitionStarting Voice RecognitionPlease say a command DING~More HelpYou can say Radio, FM, AM, Media, CD, USB, Aux, My Music, iPod, Bluetooth® Audio, Phone, Call History or Phone book. Please say a command.Skipping PromptsPlease.....DING~More HelpYou can say Radio, FM, AM, Media, CD, USB, Aux, My Music, iPod, Bluetooth® Audio, Phone, Call History or Phone book. Please say a command.4 Voice RecognitionEnding Voice RecognitionPlease say a command DING~PhonebookPhone book.Please say the name of the phone book you want to call.DING~CancelDi-Ding~ (Cancel Sound)While Voice Recognition is operating ▶Press and hold the [VR] key on the steering remote controller (over 0.8 seconds)• While using voice command, pressing a steering wheel remote control or a different key will end voice command.▪ In a state where the system is waiting for a voice command, say “cancel” or “end” to end voice command.▪ In a state where the system is waiting for a voice command, press and hold the [VR] key on the steering remote controller to end voice command.InformationEnding Voice Recognition](https://usermanual.wiki/HYUNDAI-MOBIS/AM943DMAN/User-Guide-1658947-Page-54.png)

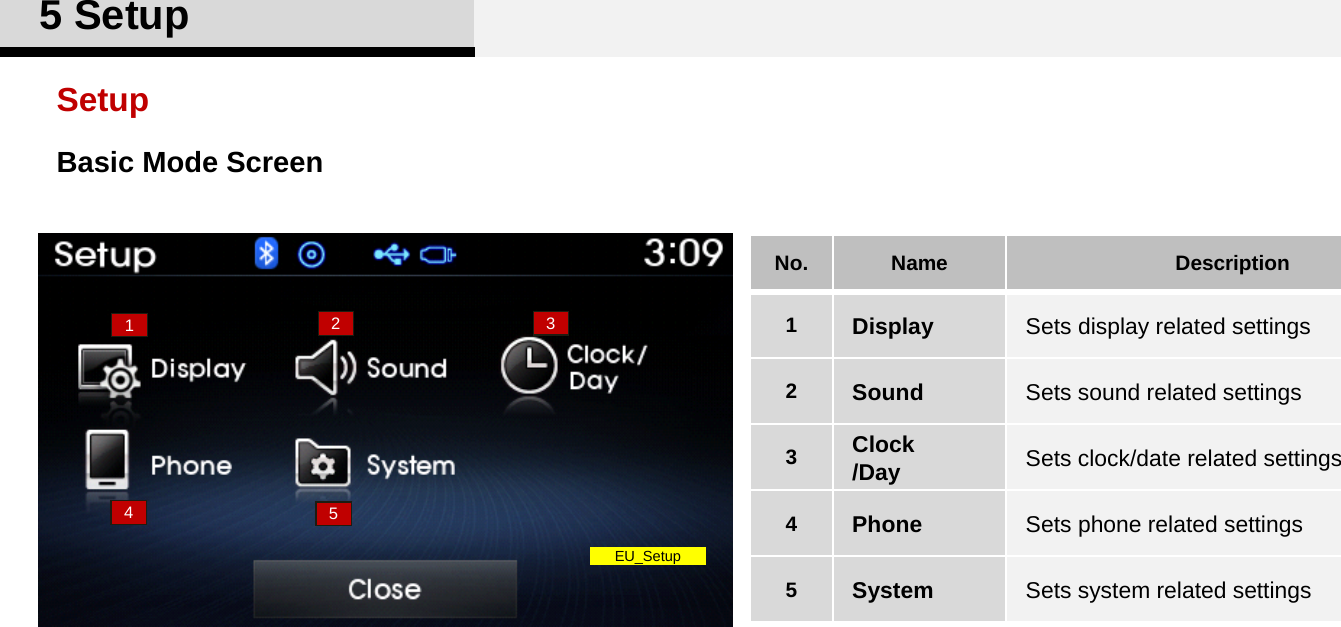
![Press the [SETUP] key to display the Setup screen. Display SettingsAdjusting the BrightnessYou can select and control options related to [Display], [Sound], [Clock/Day], [Phone] and [System].Use the [◀], [▶] buttons to adjust the screen brightness or set the Brightness on Automatic, Day, or Night mode. Press the [Default] button to reset.Pop-up ModePress the [SETUP] key ▶Select [Display] ▶Select [Pop-up Mode]This feature is used to display the Pop-up Mode screen when entering radio and media modes. When this feature is turned on, pressing the [RADIO] or [MEDIA] key will display the Pop-up Mode screen.• The media Pop-up Mode screen can be displayed only when two or more media modes have been connected.Using Setup5Setup• Once settings have been changed, press the [] key to return to the previous menu.Starting ModeInformation Information Name Description1. Automatic Adjusts the brightness automatically2. Day Always maintains the brightness on max3. Night Always maintains the brightness on minPress the [SETUP] key ▶Select [Display] ▶Select [Brightness]EU_Setup123EU_Setup_0 2EU_Setup_0 3](https://usermanual.wiki/HYUNDAI-MOBIS/AM943DMAN/User-Guide-1658947-Page-62.png)
![Text ScrollPress the [SETUP] key ▶Select [Display] ▶Select [Scroll text]This feature is used to scroll text displayed on the screen when it is too long to be displayed at once. When turned on, the text is repeatedly scrolled. When turned off, the text is scrolled just once. MP3 Information DisplayPress the [SETUP] key ▶Select [Display] ▶Select [Song Info]This feature is used to change the information displayed within USB and MP3 CD modes.5SetupName Description1. Folder File Displays file name and folder name2. AlbumArtistSongDisplays album name/artist name/songEU_Setup_0 412EU_Setup_0 5](https://usermanual.wiki/HYUNDAI-MOBIS/AM943DMAN/User-Guide-1658947-Page-63.png)
![Sound SettingsPress the [SETUP] key ▶Select [Sound] ▶Select [Sound Setting] Sound Settings SDVC (Speed Dependent Volume Control) Press the [SETUP] key ▶Select [Sound] ▶Select [Speed Dependent Vol]The volume level is controlled automatically according to the vehicle speed. SDVC can be set by selecting from Off/Low/Mid/High. Virtual SoundThis feature is used to set the Power Treble and Surround sound options.5SetupUse the [▲],[▼],[◀],[▶] buttons to adjust the Fader/Balance settings. Use the [◀],[▶] buttons to adjust the Bass/Middle/Treble settings. Press the [Default] button to reset. Press the [SETUP] key ▶Select [Sound] ▶Select [Virtual Sound] EU_Setup_0 6EU_Setup_0 7EU_Setup_0 8EU_Setup_0 912:05SetupSound>Variable EQNormal Dynamic ConcertNatural sound optimizedfor front seatsVariable EQThis is a premium sound feature in which the acoustical mode can be selected according to musical preferences.❈May differ depending on the selectedaudio.](https://usermanual.wiki/HYUNDAI-MOBIS/AM943DMAN/User-Guide-1658947-Page-64.png)
![Clock SettingPress the [SETUP] key ▶Select [Clock/Day] ▶Select [Clock Settings] Clock/Date SettingCalendar SettingPress the [SETUP] key ▶Select [Clock/Day] ▶Select [Calendar Settings] 5SetupTouch Screen BeepPress the [SETUP] key ▶Select [Sound] ▶Select [Touch Screen Beep]This feature is used to turn the touch screen beep on/off.Voice Recognition SettingPress the [SETUP] key ▶Select [Sound] ▶Select [Volume Dialog]Use the [-],[+] buttons to adjust the Volume Dialog volume. • Press and hold the [CLOCK[ key (over 0.8 seconds) to display the Clock/Day screen. InformationEU_Setup_1 0EU_Setup_1 1EU_Setup_1 2EU_Setup_1 3Use the [▲],[▼] buttons to set the Hour, Minutes and AM/PM setting.Use the [▲],[▼] buttons to set the Month, Day, and Year setting.](https://usermanual.wiki/HYUNDAI-MOBIS/AM943DMAN/User-Guide-1658947-Page-65.png)
![Clock/Date Setting5SetupClock DisplayPress the [SETUP] key ▶Select [Clock/Day] ▶Select [Clock Display (Power off)]This feature is used to display a clock on the screen when the audio system is turned off. Time FormatPress the [SETUP] key ▶Select [Clock/Day] ▶Select [Time Format]Automatic RDS TimePress the [SETUP] key ▶Select [Clock/Day] ▶Select [Automatic RDS Time]This feature is used to set time automatically by synchronizing with RDS.EU_Setup_Clock_0 1EU_Setup_Clock_0 2EU_Setup_Clock_0 3This feature is used to change the clock format between 12hr or 24hr.](https://usermanual.wiki/HYUNDAI-MOBIS/AM943DMAN/User-Guide-1658947-Page-66.png)
![12:05SetupPhone name 1Phone name 2▲▼폰>등록 폰 목록폰연결 삭제 연결 순서 변경Pairing a New DevicePress the [SETUP] key ▶Select [Phone] ▶Select [Pair Phone]Bluetooth® devices can be paired with the audio system. For more information, refer to the “Pairing through Phone Setup” section within Part 3 Bluetooth®. Bluetooth® Setting Viewing Paired Phone ListPress the [SETUP] key ▶Select [Phone] ▶Select [Paired Phone List]This feature is used to view mobile phones that have been paired with the audio system. Upon selecting a paired phone, the setup menu is displayed. 5Setup1234Downloading ContactsContacts are downloaded from the mobile phone and the download progress is displayed.Press the [SETUP] key ▶Select [Phone] ▶Select [Contacts Download] Information• Up to 1,000 contacts can be copied into car contacts.* Up to 1,000 contacts can be saved for each paired device.* Upon downloading contacts, previously saved contacts will be deleted. However, contacts saved to other paired phones are not deleted.Name Description1. Moves to the previous screen2. Connect Connect/disconnects currently selected phone3. Delete Deletes the currently selected phone 4. Change PrioritySets currently selected phone to highest connection priorityFor more information, refer to the “Setting Bluetooth® Connection” section within Part 3 Bluetooth®. 12:05Setup트랙 01블루투스 폰에서 기기이름을검색 후 등록하여 주십시오.확인 12:05Setup트랙 01다운로드중전화번호부(최대 : 1000개)폰>다운로드중지Before Downloading Contacts• Only contacts within connected phones can be downloaded. Also check to see that your mobile phone supports the download feature.• To learn more about whether your mobile phone supports contacts downloads, refer to your mobile phone user’s manual.• Contacts for only the connected phone can be downloaded. Before downloading, check to see whether your phone supports the download feature.](https://usermanual.wiki/HYUNDAI-MOBIS/AM943DMAN/User-Guide-1658947-Page-67.png)
![Auto Download (Contacts)Press the [SETUP] key ▶Select [Phone] ▶Select [Auto Download]When Audio Streaming is turned on, you can play music files saved in your Bluetooth® device from the car. Audio StreamingPress the [SETUP] key ▶Select [Phone] ▶Select [Audio Streaming]5SetupThis feature is used to automatically download mobile phone contacts once a Bluetooth® phone is connected. Information• The Auto Download feature will download mobile phone contacts every time the phone is connected. The download time may differ depending on the number of saved contacts and the communication state. • Bluetooth® audio streaming may not be supported in some Bluetooth® phones. Outgoing VolumePress the [SETUP] key ▶Select [Phone] ▶Select [Outgoing Volume]Use the [-],[+] buttons to adjust the outgoing volume levelTurning Bluetooth® System OffPress the [SETUP] key ▶Select [Phone] ▶Select [Bluetooth® System Off]Once Bluetooth® is turned off, Bluetooth® related features will not be supported within the audio system.CautionInformation• To turn Bluetooth® back on, go to [SETUP] ▶[Phone] and press “Yes”. 12:05Setup폰블루투스 오디오 스트리밍마이크 음량 설정 ▶2/3전화번호부 자동 다운로드 ▲▼12:05Setup폰블루투스 오디오 스트리밍마이크 음량 설정 ▶2/3전화번호부 자동 다운로드▲▼[SETUP] 키를 누른 후 ▶ [화면] 선택 ▶ [밝기조정] 선택12:05Setup폰>마이크음량설정-+ㅣㅣㅣ ㅣㅣ312:05트랙 01블루투스 기능 사용을 해제하시겠습니까?NoYes?](https://usermanual.wiki/HYUNDAI-MOBIS/AM943DMAN/User-Guide-1658947-Page-68.png)
![Voice Recognition Mode SettingPress the [SETUP] key ▶Select [System] ▶Select [Voice Recognition System]This feature is used to select the desired prompt feedback option from Normal and Expert. Memory Information[Press the [SETUP] key ▶Select [System] ▶ Select [Memory Information]This feature displays information related to system memory. System Setting5SetupName Description1. Normal When using voice recognition, provides detailed guidance prompts2. Expert When using voice recognition, omits some guidance prompts Name Description1. Using Displays capacity currently in use2. Capacity Displays total capacity12Setup_1512EU_Setup_1 7LanguagePress the [SETUP] key ▶Select [System] ▶Select [Language]This feature is used to change the system and voice recognition language. If the language is changed, the system will restart and apply the selected language.EU_Setup_Lang](https://usermanual.wiki/HYUNDAI-MOBIS/AM943DMAN/User-Guide-1658947-Page-69.png)
![9-17APPENDIXM & SOFT AMERICA MAP CENTERTEL : 888-757-0010WEBSITE : www.mapnsoft.comMAP DATABASE HOTLINEThis equipment has been tested and found to comply with the limits for a Class A digital device, pursuant to part 15 of the FCC Rules. These limits are designed to provide reasonable protection against harmful interference in a residential installation. This equipment generates, uses and can radiate radio frequency energy and, if not installed and used in accordance with the instructions, may cause harmful interference to radio communications. However, there is no guarantee that interference will not occur in a particular installation. If this equipment does cause harmful interference to radio or television reception, which can be determined by turning the equipment off and on, the user is encouraged to try to correct the interference by one or more of the following measures: ˍ Reorient or relocate the receiving antenna. ˍ Increase the separation between the equipment and receiver. ˍ Connect the equipment into an outlet on a circuit different from that to which the receiver is connected. ˍ Consult the dealer or an experienced radio/TV technician for help. Caution: Any changes or modifications to this device not explicitly approved by manufacturer could void your authority to operate this equipment. This device complies with part 15 of the FCC Rules. Operation is subject to the following two conditions: (1) This device may notcause harmful interference, and (2) this device must accept any interference received, including interference that may cause undesired operation. ,&:DUQLQJ7KLVGHYLFHFRPSOLHVZLWK,QGXVWU\&DQDGDOLFHQFHH[HPSW566VWDQGDUGV2SHUDWLRQLVVXEMHFWWRWKHIROORZLQJWZRFRQGLWLRQVWKLVGHYLFHPD\QRWFDXVHLQWHUIHUHQFHDQGWKLVGHYLFHPXVWDFFHSWDQ\LQWHUIHUHQFHLQFOXGLQJLQWHUIHUHQFHWKDWPD\FDXVHXQGHVLUHGRSHUDWLRQRIWKHGHYLFH/HSUpVHQWDSSDUHLOHVWFRQIRUPHDX[&15G,QGXVWULH&DQDGDDSSOLFDEOHVDX[DSSDUHLOVUDGLRH[HPSWVGHOLFHQFH/H[SORLWDWLRQHVWDXWRULVpHDX[GHX[FRQGLWLRQVVXLYDQWHVODSSDUHLOQHGRLWSDVSURGXLUHGHEURXLOODJHHWOXWLOLVDWHXUGHODSSDUHLOGRLWDFFHSWHUWRXWEURXLOODJHUDGLRpOHFWULTXHVXELPrPHVLOHEURXLOODJHHVWVXVFHSWLEOHGHQFRPSURPHWWUHOHIRQFWLRQQHPHQW7KLVHTXLSPHQWFRPSOLHVZLWK)&&UDGLDWLRQH[SRVXUHOLPLWVVHWIRUWKIRUDQXQFRQWUROOHGHQYLURQPHQW7KLVHTXLSPHQWVKRXOGEHLQVWDOOHGDQGRSHUDWHGZLWKPLQLPXPFPEHWZHHQWKHUDGLDWRUDQG\RXUERG\7KLVWUDQVPLWWHUPXVWQRWEHFROORFDWHGRURSHUDWLQJLQFRQMXQFWLRQZLWKDQ\RWKHUDQWHQQDRUWUDQVPLWWHUXQOHVVDXWKRUL]HGWRGRVRE\WKH)&&](https://usermanual.wiki/HYUNDAI-MOBIS/AM943DMAN/User-Guide-1658947-Page-70.png)