HYUNDAI MOBIS AN310DHGG CAR AVN User Manual 1
HYUNDAI MOBIS CO., LTD. CAR AVN 1
UserManual.wiki
>
HYUNDAI MOBIS
>
AN310DHGG User Manual
Users Manual
Navigation menu
Upload a User Manual
Namespaces
Wiki Guide
HTML
PDF
Info
Views
User Manual
Discussion / Help
Navigation


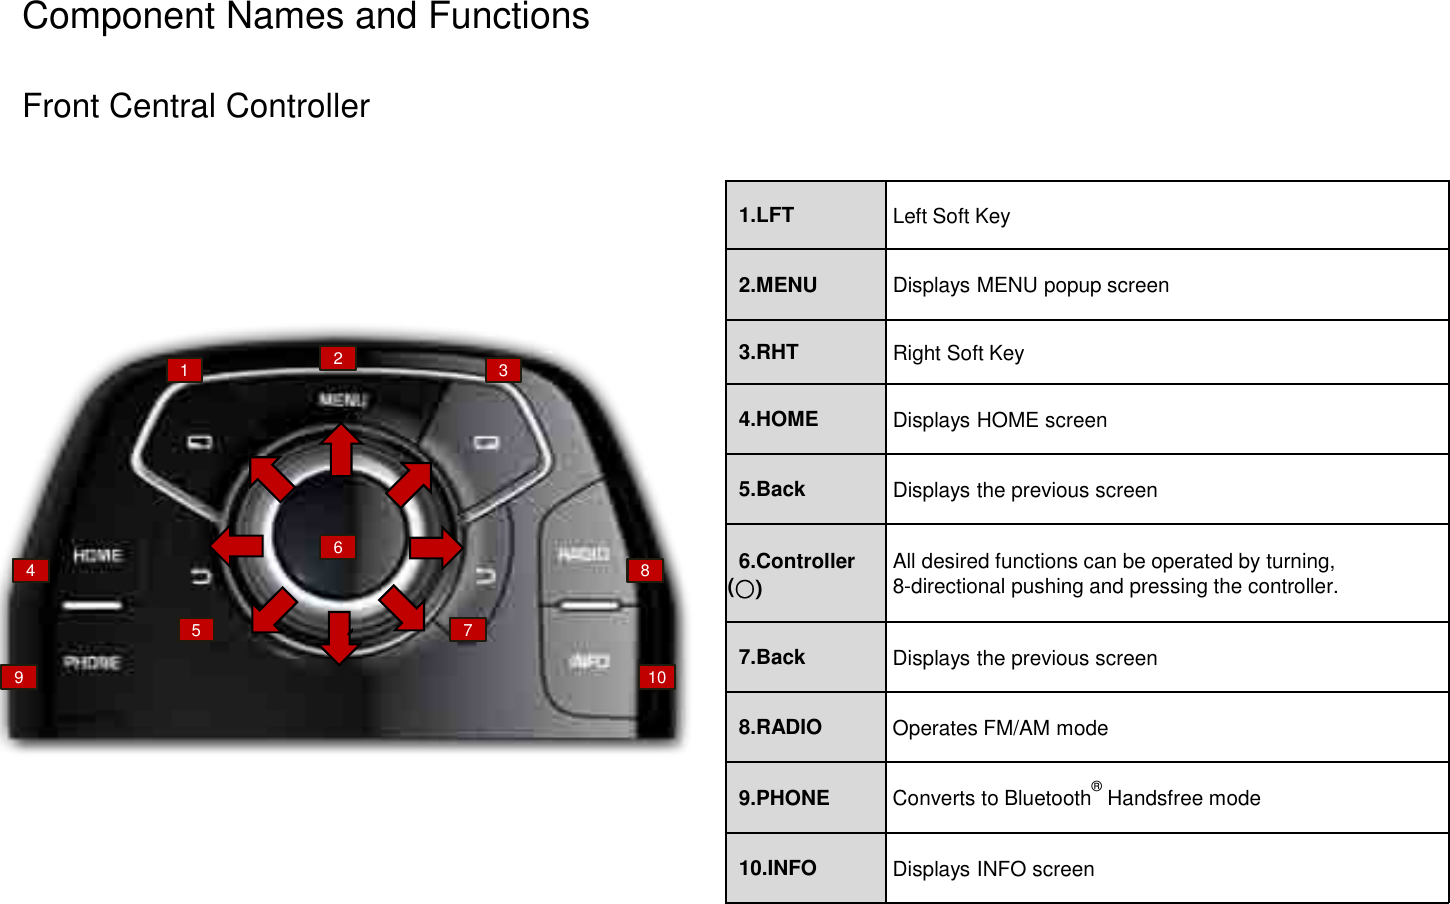
![1.CD-IN LED DISC LED2.DISC IN/OUT DISC insert/eject key 3.DISC Insert Slot DISC insert/eject slot 4.DISP Displays current date and time 5.RESET Resets and restarts the system 6.Power/Volume knob• Used to turn device power ON/OFF and control volume • When power is off, press to turn power on • When power is on, press and hold (over 0.8 seconds) to turn power off • When power is on, press shortly (under 0.8 seconds) to turn AV off• Turn left/right to adjust volume 7/ 8. SEEK/TRACKWhen the [ SEEK] [TRACK ] keys are pressed shortly (under 0.8 seconds) • In FM/AM mode, searches broadcast frequencies saved to presets• In DVDP CD/MP3/DVD and USB/iPod modes, changes the track, file or chapterWhen the [ SEEK] [TRACK ] keys are pressed and held (over 0.8 seconds) • In FM/AM mode, automatically searches broadcast frequencies and channels• In DVDP CD/MP3/DVD and USB/iPod modes, rewinds or fast forwards the track or file9.FM/AM • Operates FM/AM mode • Each time the key is pressed, mode is changed in order of FM1→FM2→AM10.MEDIA • Operates CD, MP3, DVD, VCD, USB, iPod, AU, Bluetooth Streaming Audio modes• If the media is not connected or a disc is not inserted, corresponding modes will be disabled11.TUNE/FILE knob• In FM/AM mode, turn to change broadcast frequencies• In CD, MP3, USB, and iPod modes, turn to search tracks/channels/files. When the desired channel or filename is displayed, press to operate the corresponding track/channel/fileComponent Names and FunctionsHead Unit](https://usermanual.wiki/HYUNDAI-MOBIS/AN310DHGG/User-Guide-1601902-Page-6.png)
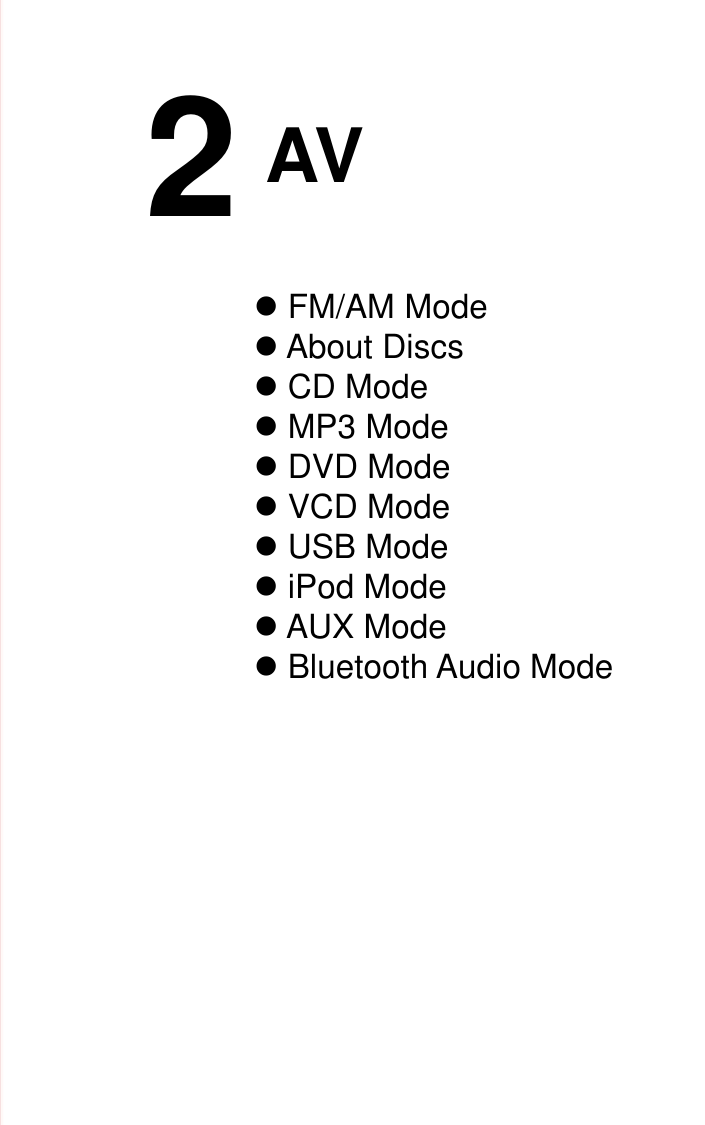
![1. SEEK/TRACKWhen the [ SEEK] [TRACK ] keys are pressed shortly (under 0.8 seconds) • In FM/AM mode, searches broadcast frequencies savedto presets• In DVDP CD/MP3/DVD and USB/iPod modes, changes the track, file or chapterWhen the [ SEEK] [TRACK ] keys are pressed and held (over 0.8 seconds) • In FM/AM mode, automatically searches broadcast frequencies and channels• In DVDP CD/MP3/DVD and USB/iPod modes, rewinds or fast forwards the track or file2. LFT Left Soft Key3. MENU Displays MENU popup screen 4. RHT Right Soft Key5. VOL Adjusts Volume6. L PWR Turns left screen ON/OFF7. MUTE Mutes sound8. BACK Displays the previous screen9. Controller ( ) Move / select menus 10. HOME Displays HOME screen11. MAP Displays the map for the current position12. R PWR Turns right screen ON/OFFComponent Names and FunctionsRear Central Controller](https://usermanual.wiki/HYUNDAI-MOBIS/AN310DHGG/User-Guide-1601902-Page-8.png)
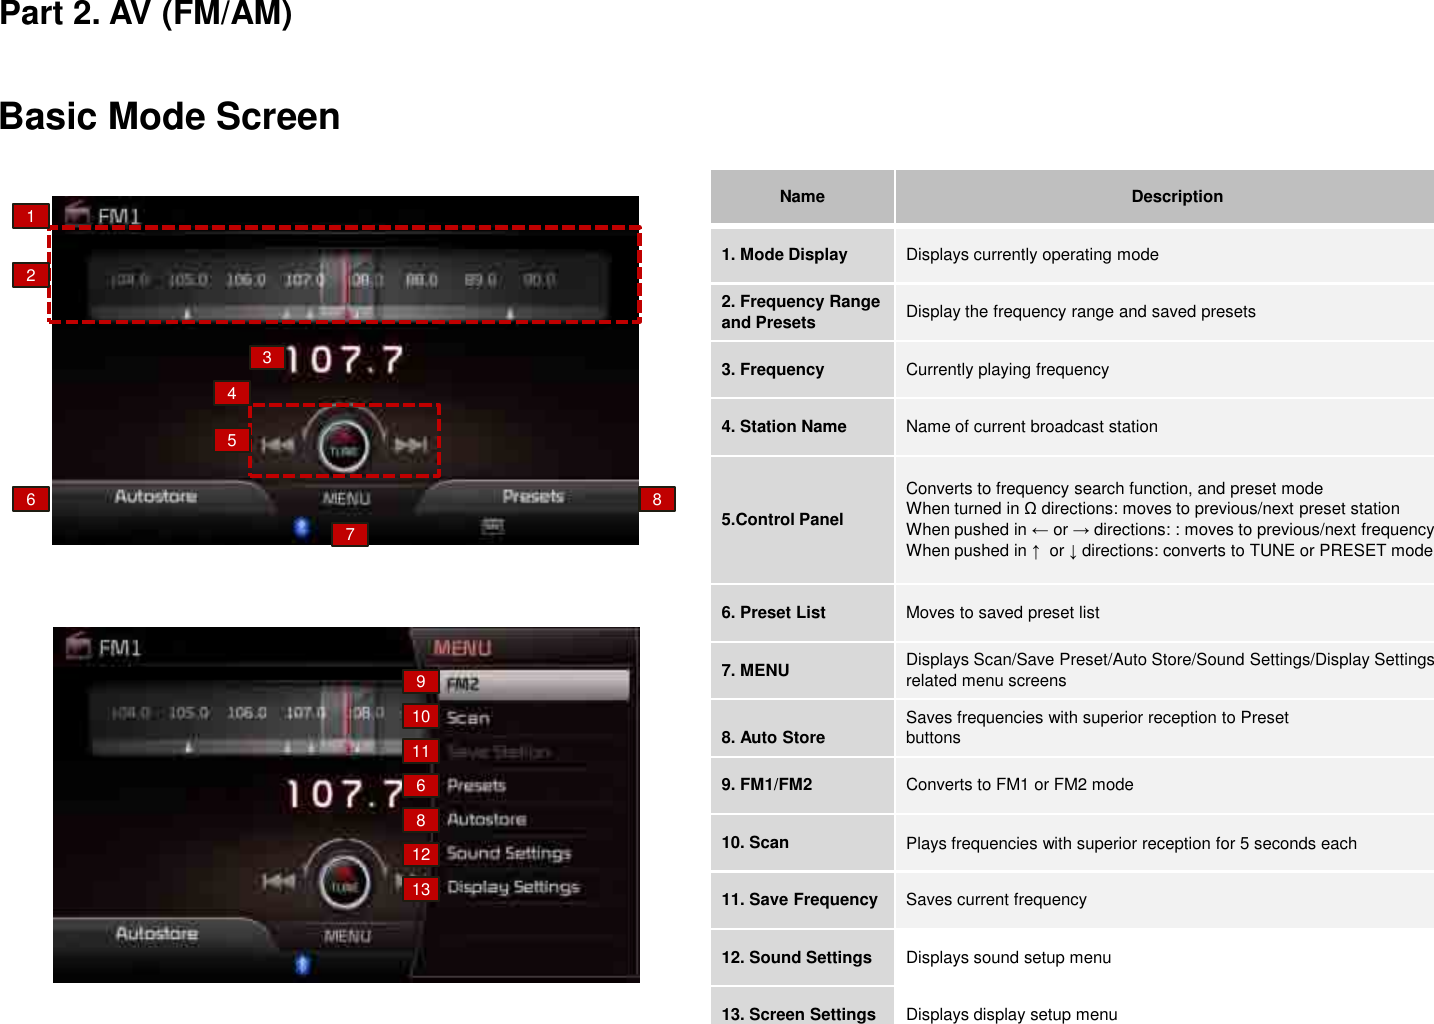
![Using the ModePress the [HOME] key Select the desired FM or AM modePress the [FM/AM] key on the head unit to change the mode in order of FM1-> FM2-> AM.Part 2. AV (FM/AM)Information•Pressing the [FM/AM] key while the power is off will automatically turn the device on and start radio mode.Push the [ ] in ↓ direction to enter Preset mode.-If the [SEEK/TRACK] keys are shortly pressed (under 0.8 seconds): Plays previous/next frequency-If the [SEEK/TRACK] keys are pressed and held (over 0.8 seconds): changes the frequency while pressed and receives the next frequency upon release.-When turning the controller in Ω direction: receives previous/next preset stationWhen pushed in ← or →directions: : Changes the frequency while pressed and receives the next frequency upon release.• FM1 / FM2: Increases/decreased by100kHz• AM: Increases/decreased by 9kHz Push the [ ] in ↑ direction to enter Tune mode. Push the [ ] or turn the [TUNE/FILE] knob in Ω direction to select the desired frequency.Using AutostoreUsing TUNESaving Automatically (Autostore)Press the [LFT] and select the Autostore feature to automatically save receivable frequencies with superior reception to preset buttons • A total of 36 frequencies with 12 presetfrequencies each for FM1/FM2/AM modes can be saved.InformationWhile Autostore is operating, pressing the [ ] will cancel the function and return to the previous frequency.Saving Radio Frequencies](https://usermanual.wiki/HYUNDAI-MOBIS/AN310DHGG/User-Guide-1601902-Page-11.png)
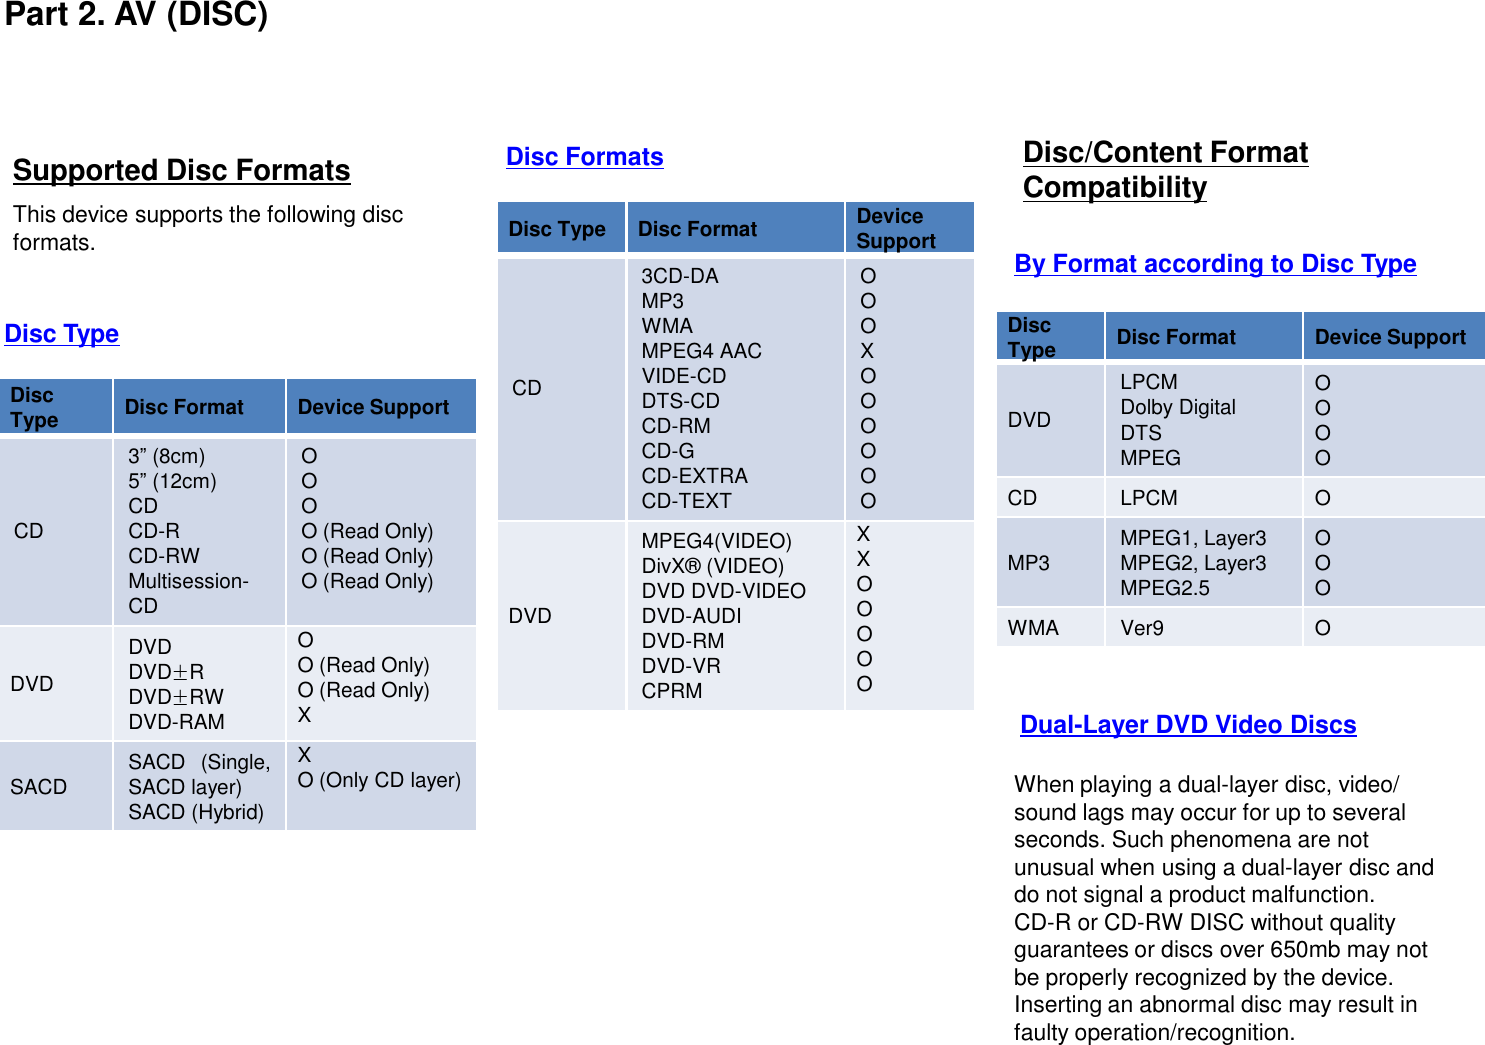
![Part 2. AV (FM/AM)Selecting Stations ManuallyTurn the [ ] in Ω direction and select the desired frequency Press and hold the [ ] Select position to save presetAfter selecting the desired preset, press and hold (over 0.8 seconds) the [ ]. A „beep‟ will sound and the frequency is saved to the selected preset button. InformationStations can also be saved manually by pressing the [MENU] key Pressing [Save Preset].Press the [MENU] key Press [Scan]Starting from the current frequency,frequencies with superior reception arescanned for 5 seconds and the previousfrequency is restored.InformationWhile Scan is operating, pressing the [ ] will cancel the function and return to the previous frequency.Scanning Radio FrequenciesPress the [RHT] or the [MENU] key Press [Presets]Turn the [ ] to select and play the selected preset stations. Presets](https://usermanual.wiki/HYUNDAI-MOBIS/AN310DHGG/User-Guide-1601902-Page-12.png)


![Starting ModeCD mode will automatically start once aCD is insertedWhile playing Push and hold the [ ] in ← or → direction (under 0.8 seconds) or press and hold the [SEEK]TRACK] key to fast-forward/rewind the track.CD will automatically play once a CD is inserted, press the [ ] button to pause the track.Playing a CDPress the [HOME] Key Select [Disc] MenuFast-forwarding or Rewinding CD TracksWhile the [ ] or [SEEK] [TRACK] key is being operated, the track will rewind or fast-forward at 20x speed. Once released, the track will begin playing at normal speed.Selecting a TrackWhile playing Shortly push the [ ] in ← or → direction (under 0.8 seconds) or shortly press the [SEEK]TRACK] key to select the previous/next track.Part 2. AV (CD)NOTICE•Only genuine audio CDs are supported. Other discs may result in recognition failure (e.g. copy CD-R, CDs with labels](https://usermanual.wiki/HYUNDAI-MOBIS/AN310DHGG/User-Guide-1601902-Page-20.png)
![Turn the [ ] or [TUNE/FILE] knob to search tracksFrom the searched tracks, once the desired track name is displayed, press the [ ] or[TUNE/FILE] knob to play the corresponding track.Press the [Menu] button to set theShuffle, Repeat, Scan, Auto Playlist options as well as Sound Settings and Display Settings.Searching CD Tracks Using the Menu ButtonsShufflePress the [MENU] key Select [Shuffle] Set Shuffle All to On.RepeatPress the [MENU] key Select [Repeat] Set Repeat to On.The current track is repeated.Part 2. AV (CD)Information•When searching, the track info is displayed in red. •Pressing the [ ] or [TUNE/FILE] knob will play the selected track and display the basic display specification.InformationSelect the [Off] button to turn off repeat.InformationSelect the [Off] to turn the shuffle option off.Songs within the current playlist are playedin random order.](https://usermanual.wiki/HYUNDAI-MOBIS/AN310DHGG/User-Guide-1601902-Page-21.png)
![The beginning (approx 10 seconds) of all tracks within the CD are scanned.ScanTrack Info/Play InformationPress the [MENU] key Press [Auto Playlist]Press [Play Info] to restore the previousdisplayAuto PlaylistPress the [MENU] key Press [Scan] Press [Scan All]List of songs within the CD similar with the current song is displayed.Ejecting DiscPress the [ ] key to eject the disc.Part 2. AV (CD)Information•Press the [Off] button again to turn the scan option off.Information•For more information on Sound and Display settings, refer to the Info/Setup section.Information•Artist/album info are supported within Text CDs.](https://usermanual.wiki/HYUNDAI-MOBIS/AN310DHGG/User-Guide-1601902-Page-22.png)
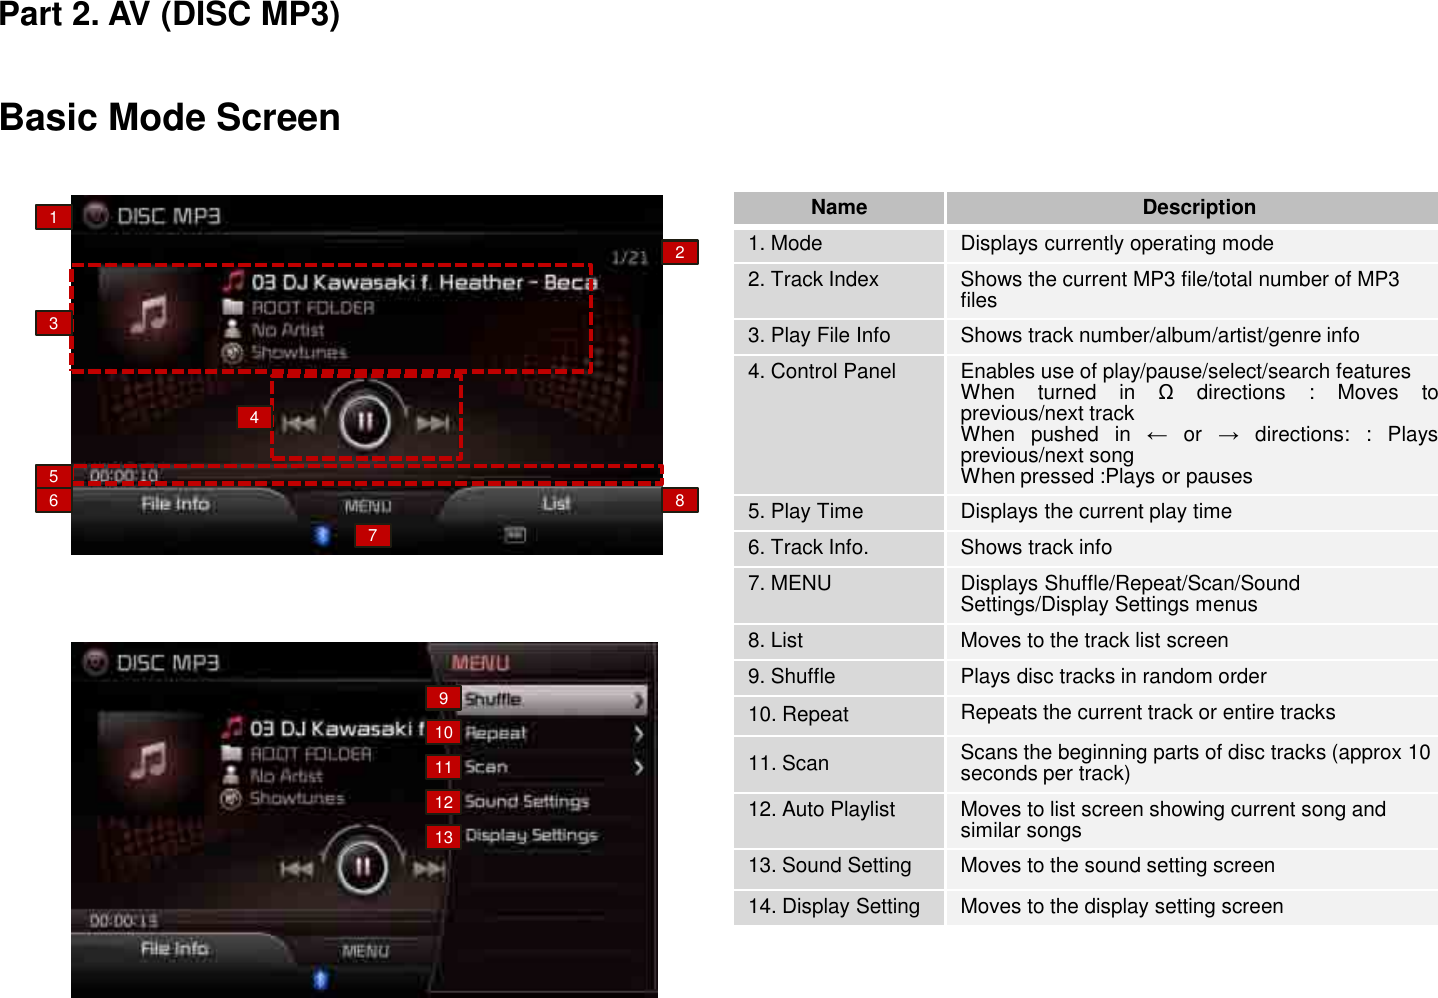
![Starting ModeMP3 mode automatically starts when anMP3 disc is inserted.While playing Push and hold the [ ] in ← or → direction (under 0.8 seconds) or press and hold the [SEEK]TRACK] key to fast-forward/rewind the file.Playing DISC MP3Selecting DISC MP3 filesWhile playing Shortly push the [ ] in ← or → direction (under 0.8 seconds) or shortly press the [SEEK]TRACK] key to select the previous/next file.Part 2. AV (DISC MP3)Information• If there are numerous songs and folders within the disc, reading time could take more than 10 seconds and the list may not be displayed or song searches may not operate. Once loading is complete, try again.• Only genuine audio CDs are supported. Other discs may result in recognition failure (e.g. copy CD-R, CDs with labels)Press the [HOME] Key Select [Disc] MenuOnce a CD is inserted, the DISC MP3 will automatically being playing. Pressing the [ ]again will pause the current song. Fast-forwarding or Rewinding DISC mp3 Tracks](https://usermanual.wiki/HYUNDAI-MOBIS/AN310DHGG/User-Guide-1601902-Page-24.png)
![Turn the [ ] or [TUNE/FILE] knob in Ω directions to search for files.During search, the file name is displayed in red. Press the [ ] or [TUNE/FILE] knob to play the selected file and display the basic display info. Press the [MENU] key to use the Shuffle, Repeat, Scan, Sound Settings and Display Settings.Searching DISC MP3Using the Menu ButtonsWhile the [ ] or [SEEK] [TRACK] key is being operated, the file will rewind or fast-forward at 20x speed. Once released, the track will begin playing at normal speed. Press the [RHT] to select the list and check the playlist.Searching DISC MP3 ListTurn the [ ] in Ω direction to select and play the desired file.From the searched files, once the desired file name is displayed, press the [ ] or [TUNE/FILE] knob to play the corresponding file.Part 2. AV (DISC MP3)](https://usermanual.wiki/HYUNDAI-MOBIS/AN310DHGG/User-Guide-1601902-Page-25.png)
![Name Description1. ShuffleFolder Plays current folder inrandom order2. Shuffle All Plays all files in randomorderRepeatPress the [MENU] key Select [Repeat] Press [Repeat Song] or [Repeat Folder]The current song or the all files within the folder can be repeated.Name Description1. Repeat Song Repeat current song2. Repeat Folder Repeat current folderScanPress the [MENU] key Press [Scan] [Scan All] or [Folder Scan] Name Description1. Scan All Scans the beginning parts(approx 10 seconds) of allfiles2. Folder ScanScans the beginning parts(approx 10 seconds) of allfiles within the currentfolderPart 2. AV (DISC MP3)Information•Press [Off] to turn the Shuffle feature off. Information•Press [Off] to turn the Repeat feature off. Information•Press [Off] to turn the Scan feature off.ShufflePress the [MENU] key select [Shuffle] Select [Shuffle Folder] or [Shuffle All]12All songs or songs within the current folder can be played in random order.1212](https://usermanual.wiki/HYUNDAI-MOBIS/AN310DHGG/User-Guide-1601902-Page-26.png)
![File Info/Play InfoPress the [LFT] to select File Info to display file information, such as the title, album, artist, genre, file name, and folder location.To return to the previous screen, press the [LFT] to select Play Info.Part 2. AV (DISC MP3)Information• No information are shown for MP3 files without file information.• For more information on Sound and Display settings, refer to the Info/Setup section.](https://usermanual.wiki/HYUNDAI-MOBIS/AN310DHGG/User-Guide-1601902-Page-27.png)
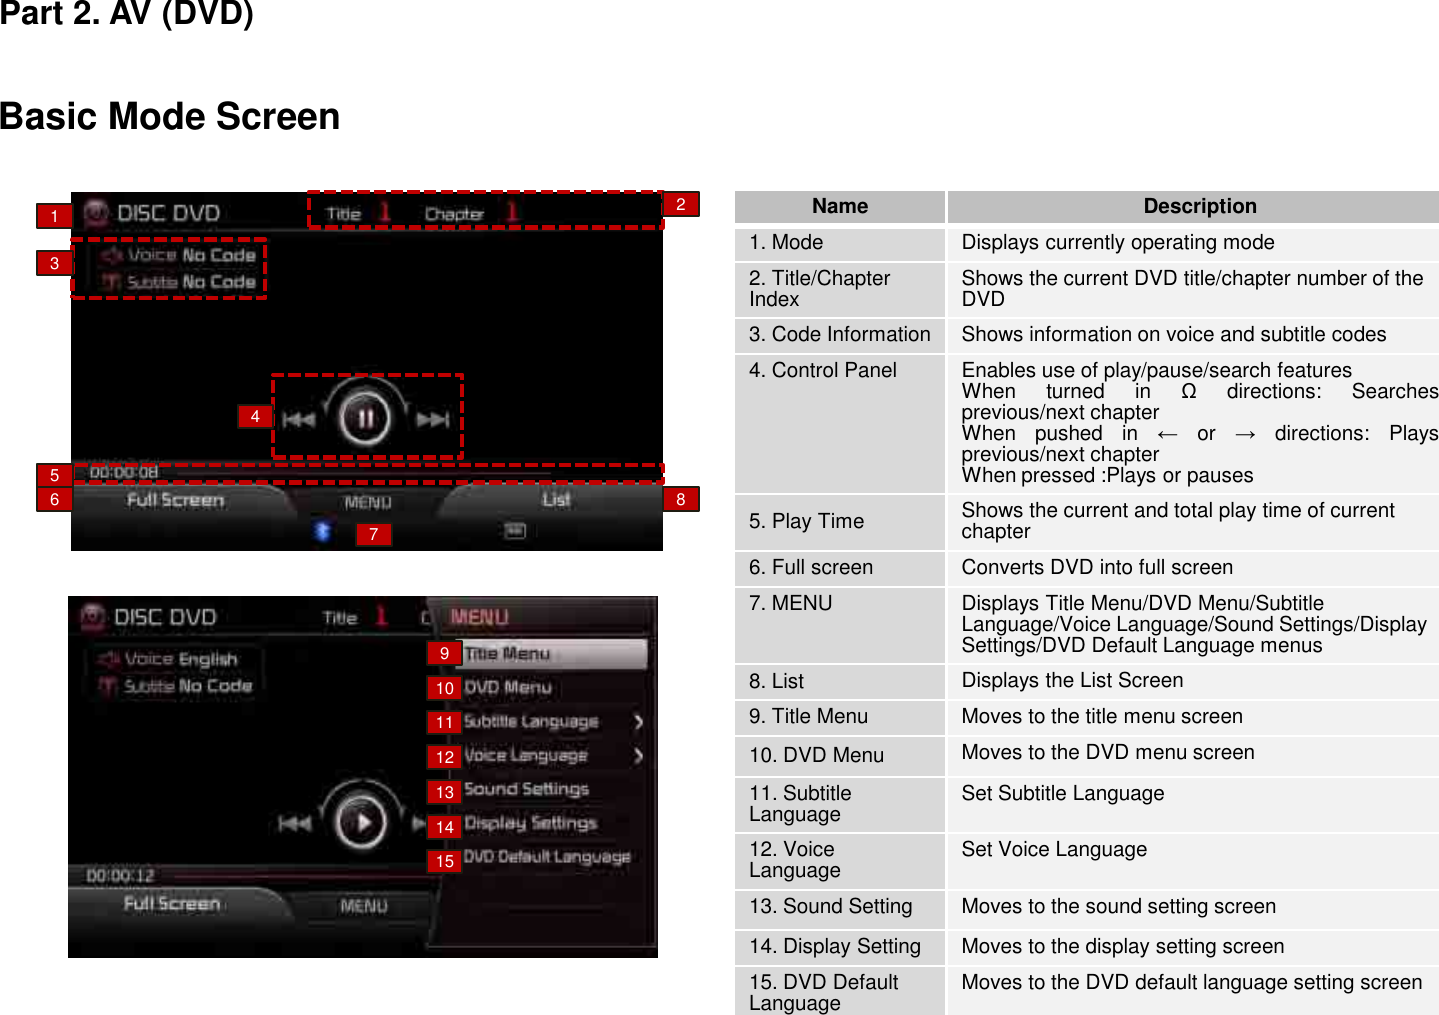
![Starting ModeThe mode will be disabled when a DVD disc has not been inserted.While playing Push and hold the [ ] in ← or → direction (under 0.8 seconds) or press and hold the [SEEK]TRACK] key to fast-forward/rewind the current DVD.Once a DVD is inserted, the DVD will automatically begin playing. Pressing the [ ] again will pause the DVD.Playing a DVD Searching ChapterSelecting a ChapterWhile playing Shortly push the [ ] in ← or → direction (under 0.8 seconds) or shortly press the [SEEK]TRACK] key to select the previous/next chapter.While the [ ] or [SEEK] [TRACK] key is being operated, the DVD will rewind or fast-forward at 20x speed. Once released, the DVD will begin playing at normal speed.Part 2. AV (DVD)Information•Only genuine DVDs are supported. Other discs may result in recognition failure (e.g. copy DVD-R, DVDs with labels)Press the [HOME] Key Select [Disc] Menu](https://usermanual.wiki/HYUNDAI-MOBIS/AN310DHGG/User-Guide-1601902-Page-29.png)
![Searching TitlesSearching Titles/ChaptersPress the [List] button to search DVD titles and chapters.Press the [LFT] and [RHT] to change to the previous or next title.Searching ChaptersTurn the [ ] in Ω direction or shortly press the [SEEK]TRACK] key (under 0.8 seconds) to select the previous/next chapter.Press the [MENU] key to use the Title Menu, DVD Menu, Subtitle Language, Voice Language, Sound Settings, Display Settings and DVD Default Language.Using the Menu ButtonsPart 2. AV (DVD)Information• The 1 displays the total number of titles within the current DVD disc.• The 2 displays the total number of chapters within the title.• The title/chapter search feature can only be used while the DVD is playing. The feature will not operate during the initial DVD screen or when menus are being displayed.Information•The DVD Menu and DVD Title options can only be used within DVDs that support these features. For DVD Menus, different DVD titles may have different menu organizations.](https://usermanual.wiki/HYUNDAI-MOBIS/AN310DHGG/User-Guide-1601902-Page-30.png)
![Push the [ ] in up/down/left/right directions to select the desired menu and press the [OK] button.Title/DVD MenuPress the [MENU] key Select [Title Menu] or [DVD Menu]Select the desired language and press the [ ] to change the subtitle language.Subtitle LanguagePress the [MENU] key Select[Subtitle Language]Voice LanguagePress the [MENU] key Select [Voice Language]Select the desired language and press the [ ] to change the voice language.Part 2. AV (DVD)Information•This is supported only for DVD titles that support this feature.Information•Supported languages may differ according to DVD title.Information•Supported languages may differ according to DVD title.](https://usermanual.wiki/HYUNDAI-MOBIS/AN310DHGG/User-Guide-1601902-Page-31.png)
![Viewing in Full ScreenPress the [LFT] and select [Full Screen]to view the DVD in full screen.DVD Default LanguagePress the [MENU] key Select [DVD Default Language]Part 2. AV (DVD)Information•If there are no operations for 10 seconds, the DVD menu will automatically disappear. •Press the [MENU] key or [ ] to display the menu again.](https://usermanual.wiki/HYUNDAI-MOBIS/AN310DHGG/User-Guide-1601902-Page-32.png)
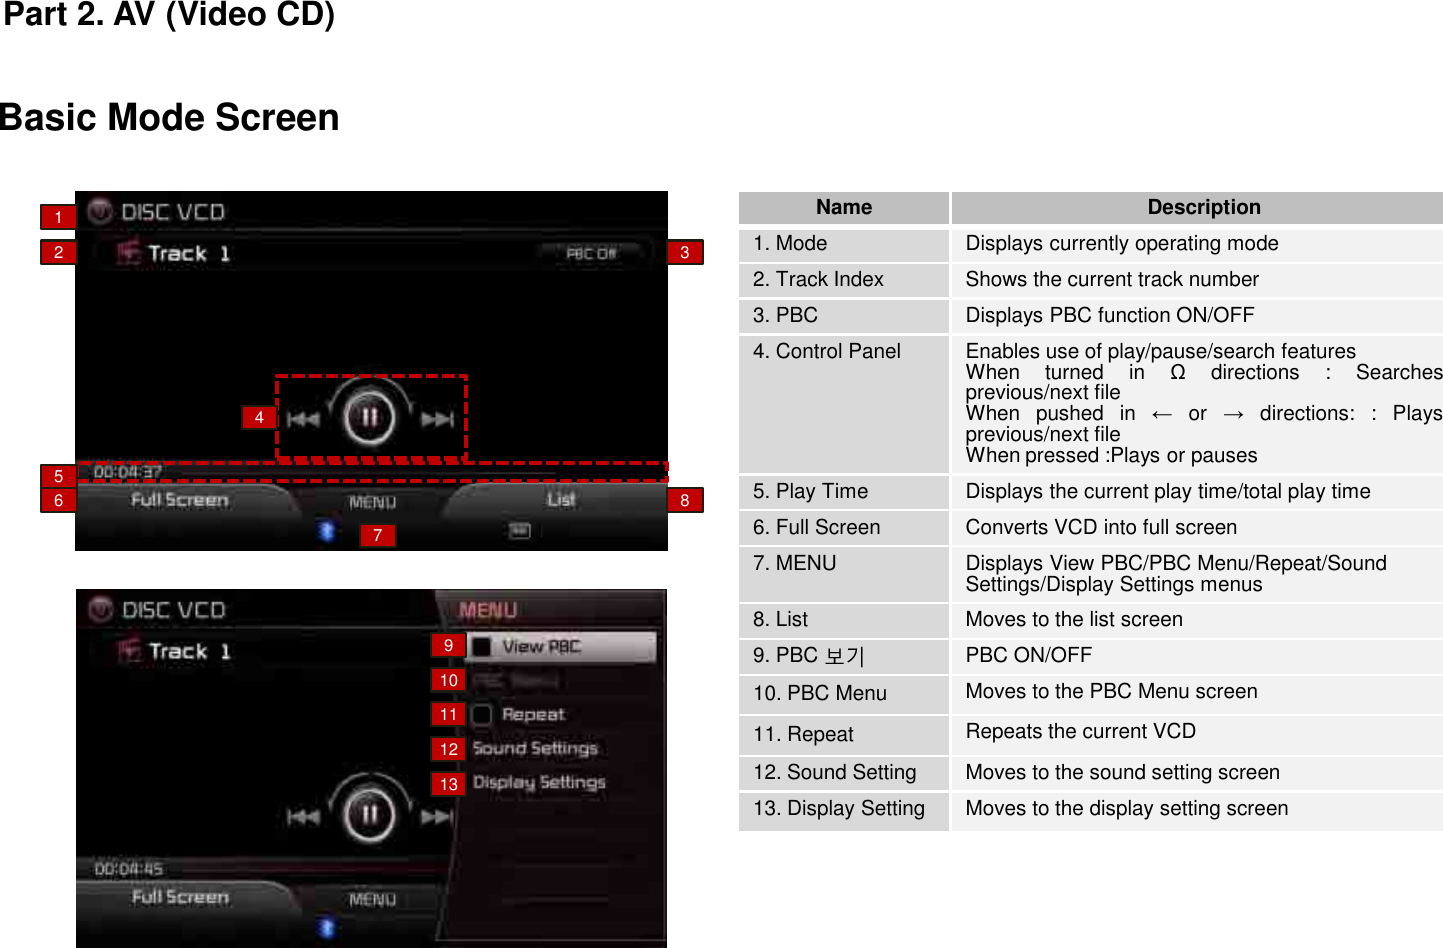
![Starting ModeThe mode will be disabled when a VCD disc has not been inserted.Playing a VCDFast-forwarding or Rewinding VCD tracksSelecting VCD tracksInformation•Only genuine VCDs are supported. Other discs may result in recognition failure . (e.g. Copied CD-R, CDs with labels)Press the [HOME] Key Select [Disc] MenuPart 2. AV (Video CD)](https://usermanual.wiki/HYUNDAI-MOBIS/AN310DHGG/User-Guide-1601902-Page-34.png)
![Turn the [ ] or [TUNE/FILE] knob in Ω directions to search for tracks. From the searched tracks, once the desired file name is displayed, press the [ ] or [TUNE/FILE] knob to play the corresponding track.During search, the track name is displayed in red. Press the [ ] or [TUNE/FILE] knob to play the selected track and display the basic display info. Press the [MENU] key to use the View PBC, PBC Menu, Repeat, Sound Settings and Display Settings.Searching VCD tracks Using the Menu ButtonsPBCPress the [MENU] key Press [View PBC] Press the [0]~[9] buttons Set and press [Done]Press the [List] button to view the play list.Searching VCD ListSelect track you want to play.Part 2. AV (Video CD)](https://usermanual.wiki/HYUNDAI-MOBIS/AN310DHGG/User-Guide-1601902-Page-35.png)
![Within PBC ON state, press the [PBC MENU] button to display the PBC menu screen.Viewing in Full ScreenPress the [LFT] and select [Full Screen] to view the VCD in full screen.RepeatPress the [MENU] key Press [Repeat] The current track is repeated. Information• Press the [PBC OFF] button to turn the PBC setting OFF. The play screen will be displayed and the first track is displayed.• Press the [<<] [>>] buttons to move to the previous/next list menu page.• While in PBC ON mode state, turning the power or ignition ON/OFF will return the VCD to PBC OFF state. Information•Press the [Repeat] button again to turn off shuffle.Information•If there are no operations for 10 seconds, the VCD menu will automatically disappear. •Press the [MENU] key or [ ] to display the menu again.•For more information on Sound and Display settings, refer to the Info/Setup section.Part 2. AV (Video CD)](https://usermanual.wiki/HYUNDAI-MOBIS/AN310DHGG/User-Guide-1601902-Page-36.png)
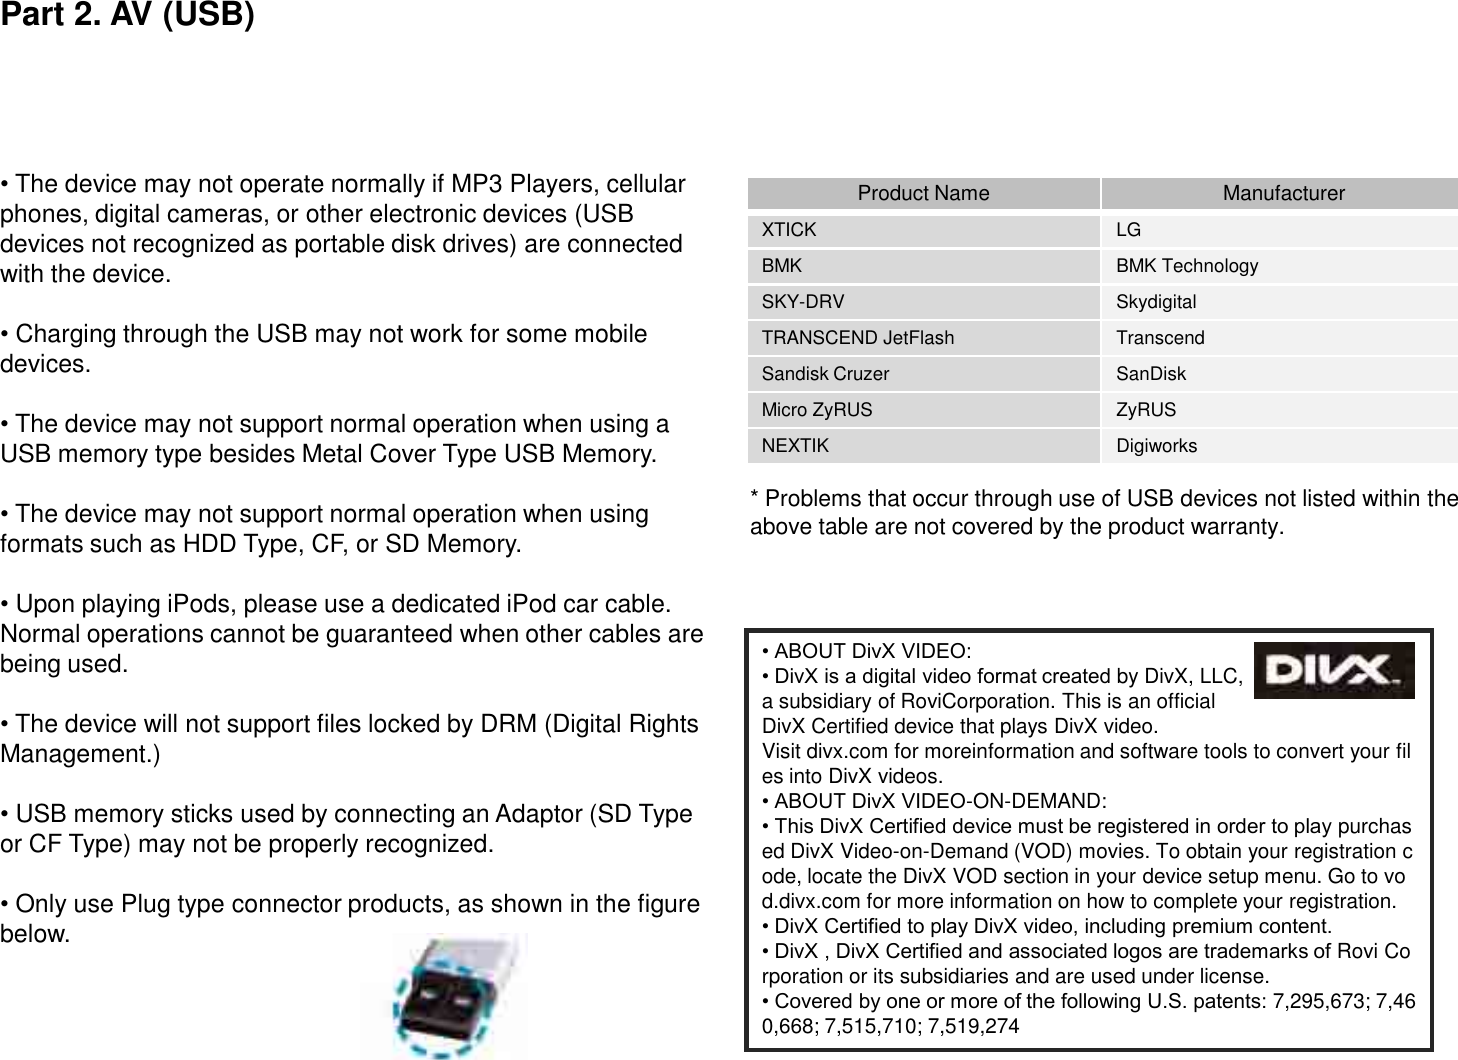
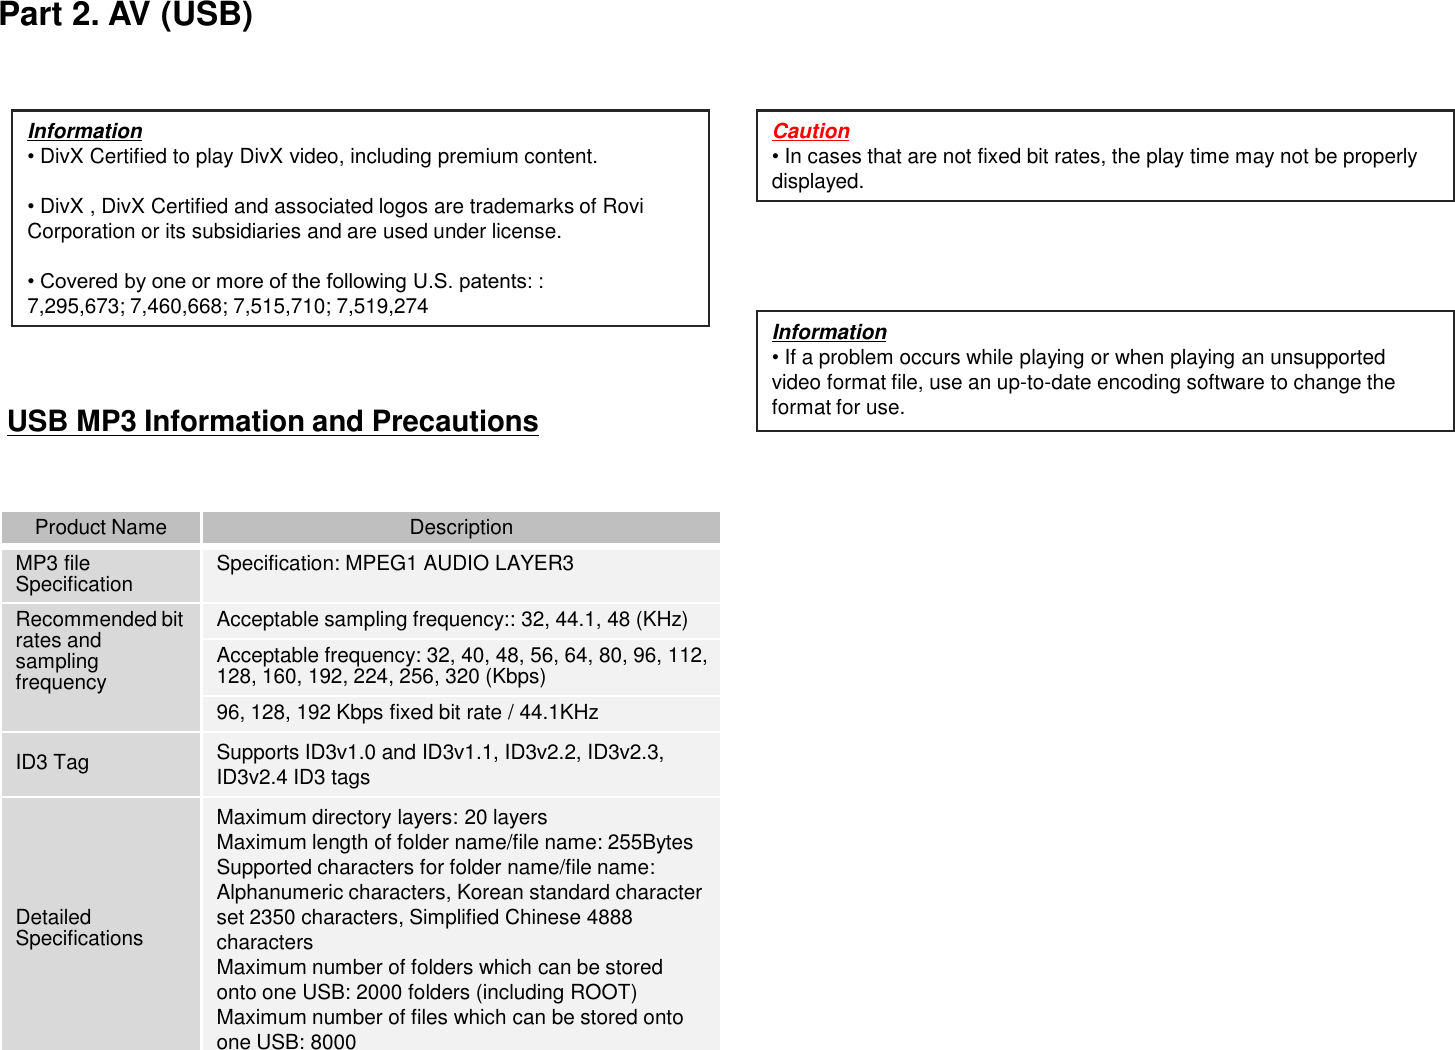
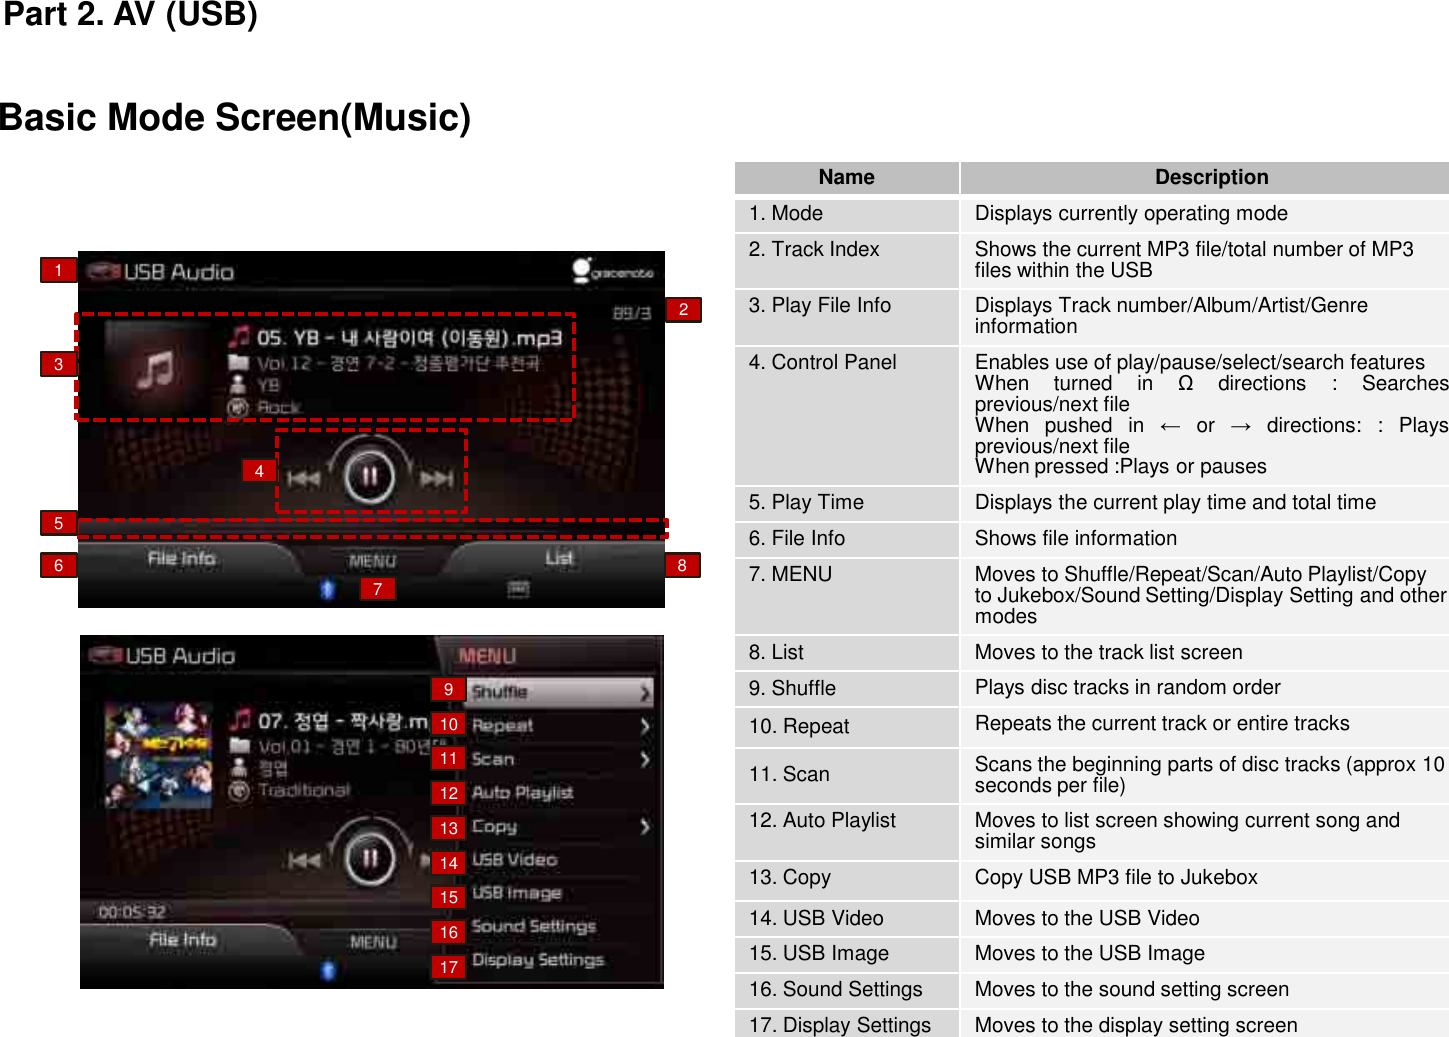
![Starting Mode(Music Mode)Once a USB is connected, the USB Music will automatically begin playing. Pressing the [ ] again will pause USB Music.Playing USB MusicPress the [HOME] button Select[USB]Selecting USB Music FilesWhile playing Shortly push the [ ] in ← or → direction (under 0.8 seconds) or shortly press the [SEEK]TRACK] key to select the previous/next track.Part 2. AV (USB)Information• If the USB is not connected, then the USB button will be disabled.• If a previously played USB is reconnected, then the song after the most recently played song is played. However, if a different USB is connected or the file information within the USB was changed, then the USB file order information is deleted and will start playing from the first song within the USB.Once a USB is connected, USB Music mode will operate automatically.](https://usermanual.wiki/HYUNDAI-MOBIS/AN310DHGG/User-Guide-1601902-Page-43.png)
![While playing Push and hold the [ ] in ← or → direction (under 0.8 seconds) or press and hold the [SEEK]TRACK] key to fast-forward/rewind the current file.While the [ ] or [SEEK] [TRACK] key is being operated, the file will rewind or fast-forward at 20x speed. Once released, the file will begin playing at normal speed.Turn the [ ] or [TUNE/FILE] knob in Ω directions to search for tracks.Searching USB Music FilesDuring search, the file name is displayed in red. Press the [ ] or [TUNE/FILE] knob to play the selected file and display the basic display info. Press the [MENU] key to use the Shuffle, Repeat, Scan, Auto Playlist, Copy, Sound Settings and Display Settings. This menu is also used to move to other USB play modes.Using the Menu ButtonsShufflePress the [MENU] key Select [Shuffle] [Shuffle Folder] or [Shuffle All]From the searched files, once the desired file name is displayed, press the [ ] or [TUNE/FILE] knob to play the corresponding file.Part 2. AV (USB)Fast-forwarding or Rewinding USB Music FilesName Description1. Shuffle Folder Plays files within the currentfolder in random order.2. Shuffle All Plays files within the USB inrandom order.12](https://usermanual.wiki/HYUNDAI-MOBIS/AN310DHGG/User-Guide-1601902-Page-44.png)
![RepeatPress the [MENU] key Select [Repeat] Select [Repeat] or [Repeat Folder]The current song or the all files within the folder can be repeated.Name Description1. Repeat Once Repeats play of currentlyplaying file.2. Repeat Folder Repeats the files in thecurrent folder.ScanPress the [MENU] key Select [Scan] Select [Scan All] or [Scan Folder]Name Description1. Scan All Scans files within the USBin random order.2. Folder Scan Searches files within thecurrent folder.Auto PlaylistPress the [MENU] key Select [Auto Playlist]Part 2. AV (USB)Information•Press [Off] to turn the Shuffle feature off.Information•Press [Off] to turn the Repeat feature off.1212Information•Press [Off] to turn the Repeat feature off.](https://usermanual.wiki/HYUNDAI-MOBIS/AN310DHGG/User-Guide-1601902-Page-45.png)
![Copy to Jukebox This feature is used to copy songs within the USB into the JUKEBOX. Press the [MENU] key Select [Copy]Set copy options Name Description1. Now Playing Copy currently playing fileinto the Jukebox2. CurrentSelection Copy currently selected fileinto the Jukebox3. Select Files Select files toMove to the USB Video ModePress the [MENU] key Select [USB Video]Move to the USB Image ModePress the [MENU] key Select [USB Image]File Info/Play InfoPress the [LHT] to select File Info to view file information, such as title, album, artist, genre, fie name, and folder location.To return to the previous screen, press the [LFT] to select Play Info.Part 2. AV (USB)Information•Copying will be canceled if you move to a different mode while copying is in progress.Information•The title, artist and album info are displayed only when such information is recorded within the MP3 file ID3 tag.•For more information on Sound and Display settings, refer to the Info/Setup section.123](https://usermanual.wiki/HYUNDAI-MOBIS/AN310DHGG/User-Guide-1601902-Page-46.png)
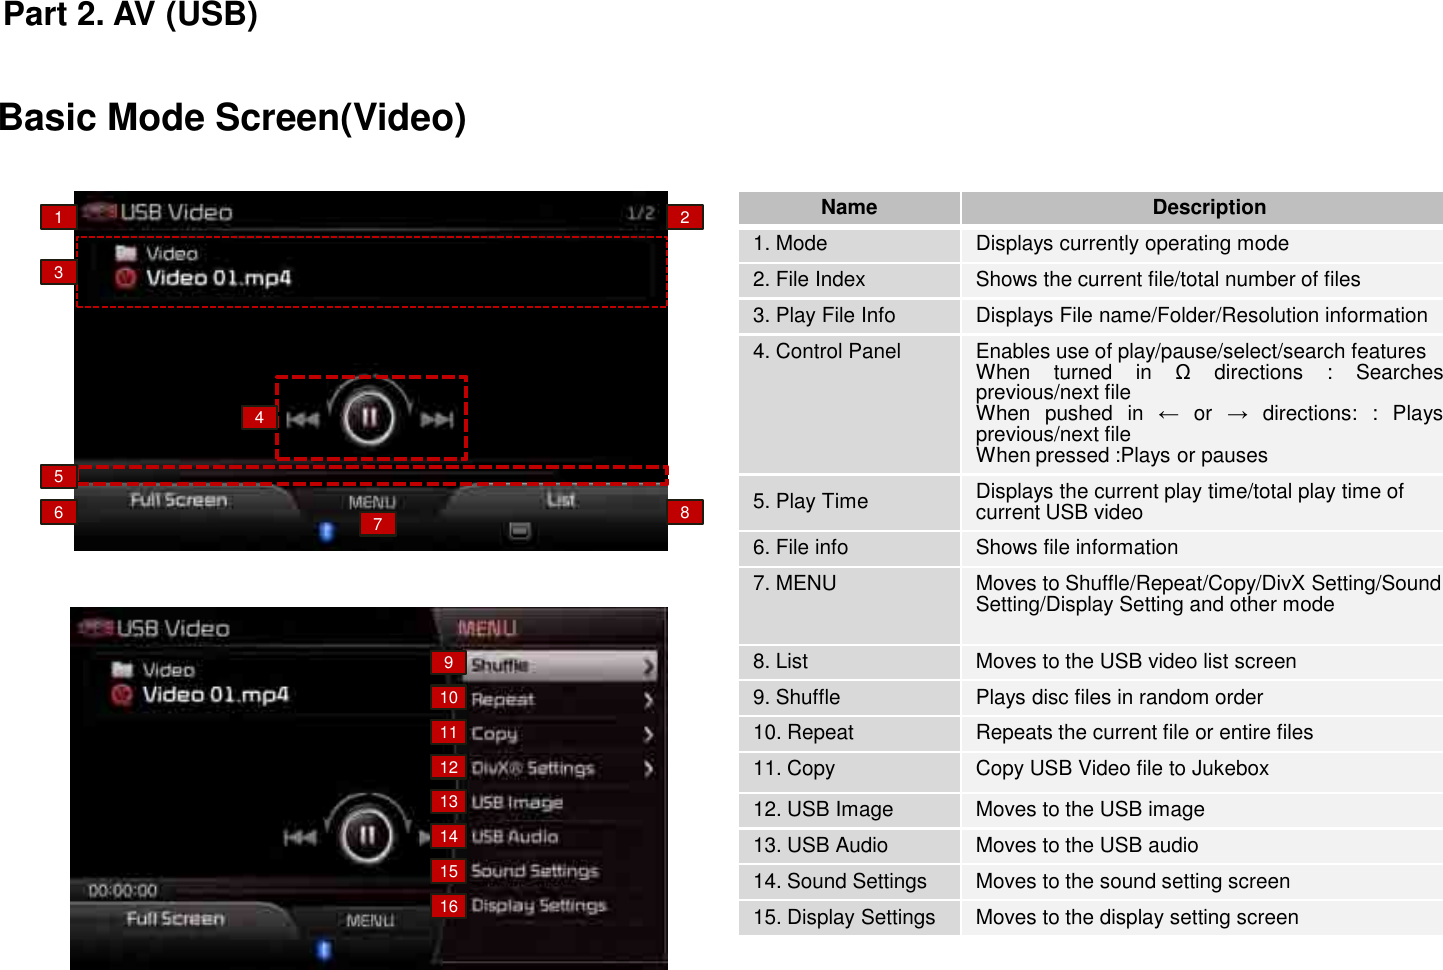
![Starting Mode(Video Mode)Once a USB is connected, the USB Video will automatically begin playing. Pressing the [ ] again will pause USB Video.Playing USB VideoSelecting USB Video FilesWhile playing Shortly push the [ ] in ← or → direction (under 0.8 seconds) or shortly press the [SEEK]TRACK] key to select the previous/next file.Part 2. AV (USB)Press the [HOME] button Select[USB]Once a USB is connected, USB Video mode will operate automatically.Information• If the USB is not connected, then the USB button will be disabled.• If a previously played USB is reconnected, then the video after the most recently played video is played. However, if a different USB is connected or the file information within the USB was changed, then the USB file order information is deleted and will start playing from the first video within the USB.](https://usermanual.wiki/HYUNDAI-MOBIS/AN310DHGG/User-Guide-1601902-Page-47.png)
![While playing Push and hold the [ ] in ← or → direction (under 0.8 seconds) or press and hold the [SEEK]TRACK] key to fast-forward/rewind the current file.While the [ ] or [SEEK] [TRACK] key is being operated, the file will rewind or fast-forward at 20x speed. Once released, the file will begin playing at normal speed.Turn the [ ] or [TUNE/FILE] knob in Ω directions to search for files.Searching USB Video FilesFrom the searched files, once the desired file name is displayed, press the [ ] or [TUNE/FILE] knob to play the corresponding file.Press the [MENU] key to use the Shuffle, Repeat, Copy, DivX, Sound Settings and Display Settings. This menu is also used to move to other USB play modes.ShufflePress the [MENU] key Select [Shuffle] [Shuffle Folder] or [Shuffle All]During search, the file name is displayed in red. Press the [ ] or [TUNE/FILE] knob to play the selected file and display the basic display info. Part 2. AV (USB)Fast-forwarding or Rewinding USB Video FilesUsing the Menu Buttons12](https://usermanual.wiki/HYUNDAI-MOBIS/AN310DHGG/User-Guide-1601902-Page-48.png)
![Name Description1. Shuffle Folder Plays files within the currentfolder in random order.2. Shuffle All Plays files within the USB inrandom order.RepeatPress the [MENU] key Select [Repeat] Select [Repeat] or [Repeat Folder]The current song or the all files within the folder can be repeated.Name Description1. Repeat Once Repeats play of currentlyplaying file.2. Repeat Folder Repeats the files in thecurrent folder.Copy to JukeboxPress the [MENU] key Select [Copy]Set copy optionsName Description1. Now Playing Copy currently playingfile into the Jukebox2. CurrentSelection Copy currently selectedfile into the Jukebox3. Select Files Select files toPart 2. AV (USB)Information•Press [Off] to turn the Shuffle feature off. Information•Press [Off] to turn the Repeat feature off.Information•12123](https://usermanual.wiki/HYUNDAI-MOBIS/AN310DHGG/User-Guide-1601902-Page-49.png)
![Press the [MENU] key Select [USB Image]Press the [MENU] key Select [USB Audio]Press the [LFT] and select [Full Screen] to view the USB in full screen.DivX SettingPress the [MENU] key Select [DivX Setting]When using DivX for the first time, you must register the product through the DivX website.Name Description1. DivX VOD Set DivX VOD features2.SubtitleLanguage Set subtitle language3.VoiceLanguage Set Voice languagePart 2. AV (USB)Information•For more information on Sound and Display settings, refer to the Info/Setup section.Move to the USB Image ModeMove to the USB Audio ModeViewing in Full Screen123](https://usermanual.wiki/HYUNDAI-MOBIS/AN310DHGG/User-Guide-1601902-Page-50.png)
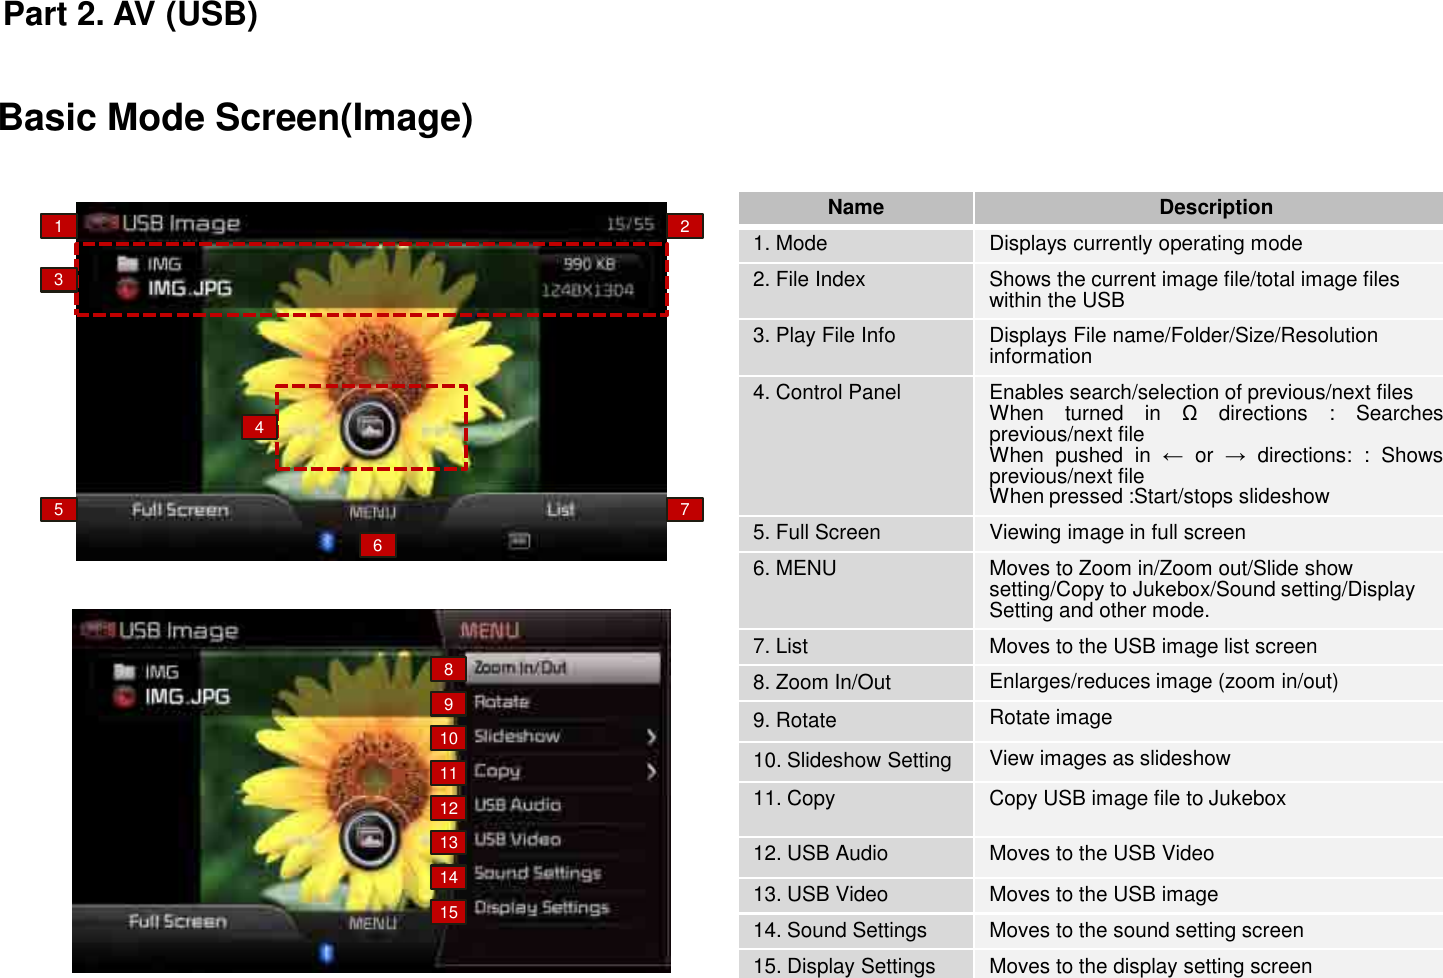
![Starting Mode (Image Mode)Selecting USB Image FilesWhile playing Shortly push the [ ] in ← or → direction (under 0.8 seconds) or shortly press the [SEEK]TRACK] key to select the previous/next file.Turn the [ ] or [TUNE/FILE] knob in Ω directions to search for files.Searching USB Image FilesDuring search, the image name is displayed in red. Press the [ ] or [TUNE/FILE] knob to play the selected image and display the basic display info. From the searched files, once the desired file name is displayed, press the [ ] or [TUNE/FILE] knob to play the corresponding image.Part 2. AV (USB)Press the [HOME] button Select[USB]Once a USB is connected, USB Image mode will operate automatically.Information• If the USB is not connected, then the USB button will be disabled.• If a previously played USB is reconnected, then the image after the most recently played image is played. However, if a different USB is connected or the file information within the USB was changed, then the USB file order information is deleted and will start playing from the first image within the USB.](https://usermanual.wiki/HYUNDAI-MOBIS/AN310DHGG/User-Guide-1601902-Page-51.png)
![Press the [MENU] key to use the Zoom In/Out, Rotate, Slideshow, Copy, Sound Settings and Display Settings options. This menu is also used to move to other USB play modes.Zoom In/OutPress the [MENU] key Select [Zoom In/Out]Turn the [ ] in Ω direction to enlarge or reduce the image size. The scale can be changed to 1/4, 1/2, 1x, 2x, and 4x. RotatePress the [MENU] key Select [Rotate]Each time the [ ] is rotated, the image is rotated from 0 → 90 → 180 → 270 degrees.Slideshow SettingPress the [MENU] key Select [Slideshow]Image slideshow intervals can be set at[5secs], [10secs], [20secs], [30secs] intervals.Part 2. AV (USB)Information• Press the [ ] to restore the original image size.• When images are not all displayed on the screen, pushing the [ ] in up/down/left/right directions will display other images. Information• Press the [ ] to restore the original image size.Using the Menu Buttons](https://usermanual.wiki/HYUNDAI-MOBIS/AN310DHGG/User-Guide-1601902-Page-52.png)
![Move to the USB Audio ModePress the [MENU] key Select [USB Image]Move to the USB Video ModePress the [MENU] key Select [USB Audio]Viewing in Full ScreenPress the [LFT] and select [Full Screen] to view the file in full screen.Copy to JukeboxPress the [MENU] key Select[Copy] Set copy optionsThis option is used to copy image files within the USB to the JUKEBOX Name Description1. Now Playing Copy currently playing file2. Select Files Copy by selecting desiredfiles from listPart 2. AV (USB)Information•Copying will be canceled if you move to a different mode while copying is in progress.Information•If there are no operations for 10 seconds, the menu will automatically disappear. •Press the [MENU] key or [ ] to display the menus again.•For more information on Sound and Display settings, refer to the Info/Setup section.12](https://usermanual.wiki/HYUNDAI-MOBIS/AN310DHGG/User-Guide-1601902-Page-53.png)
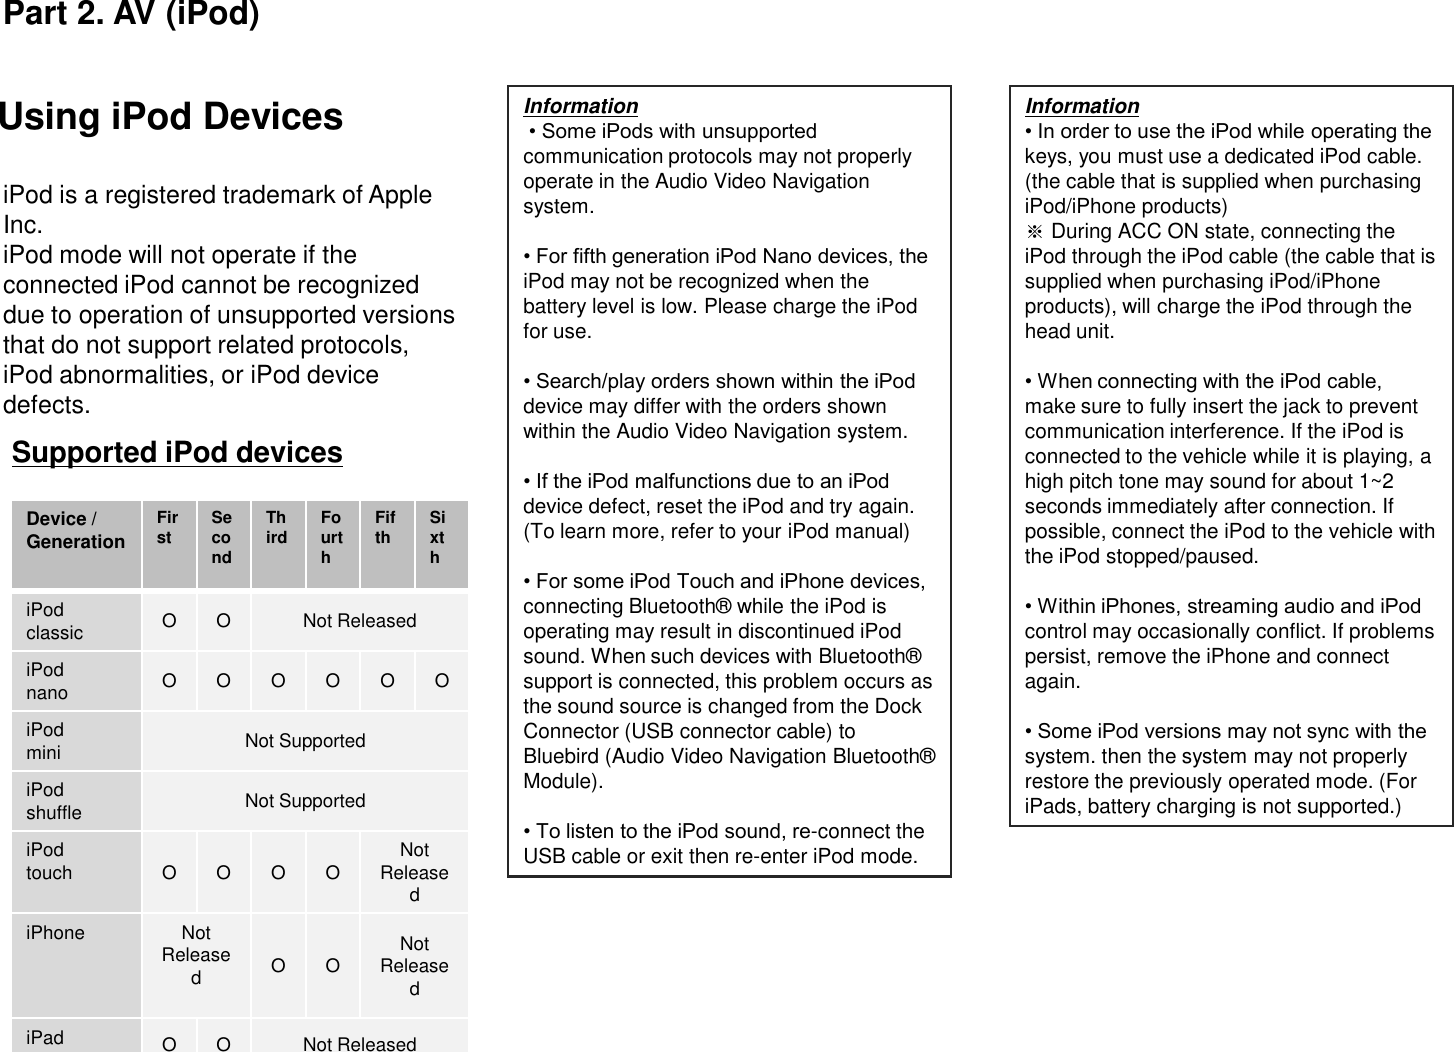

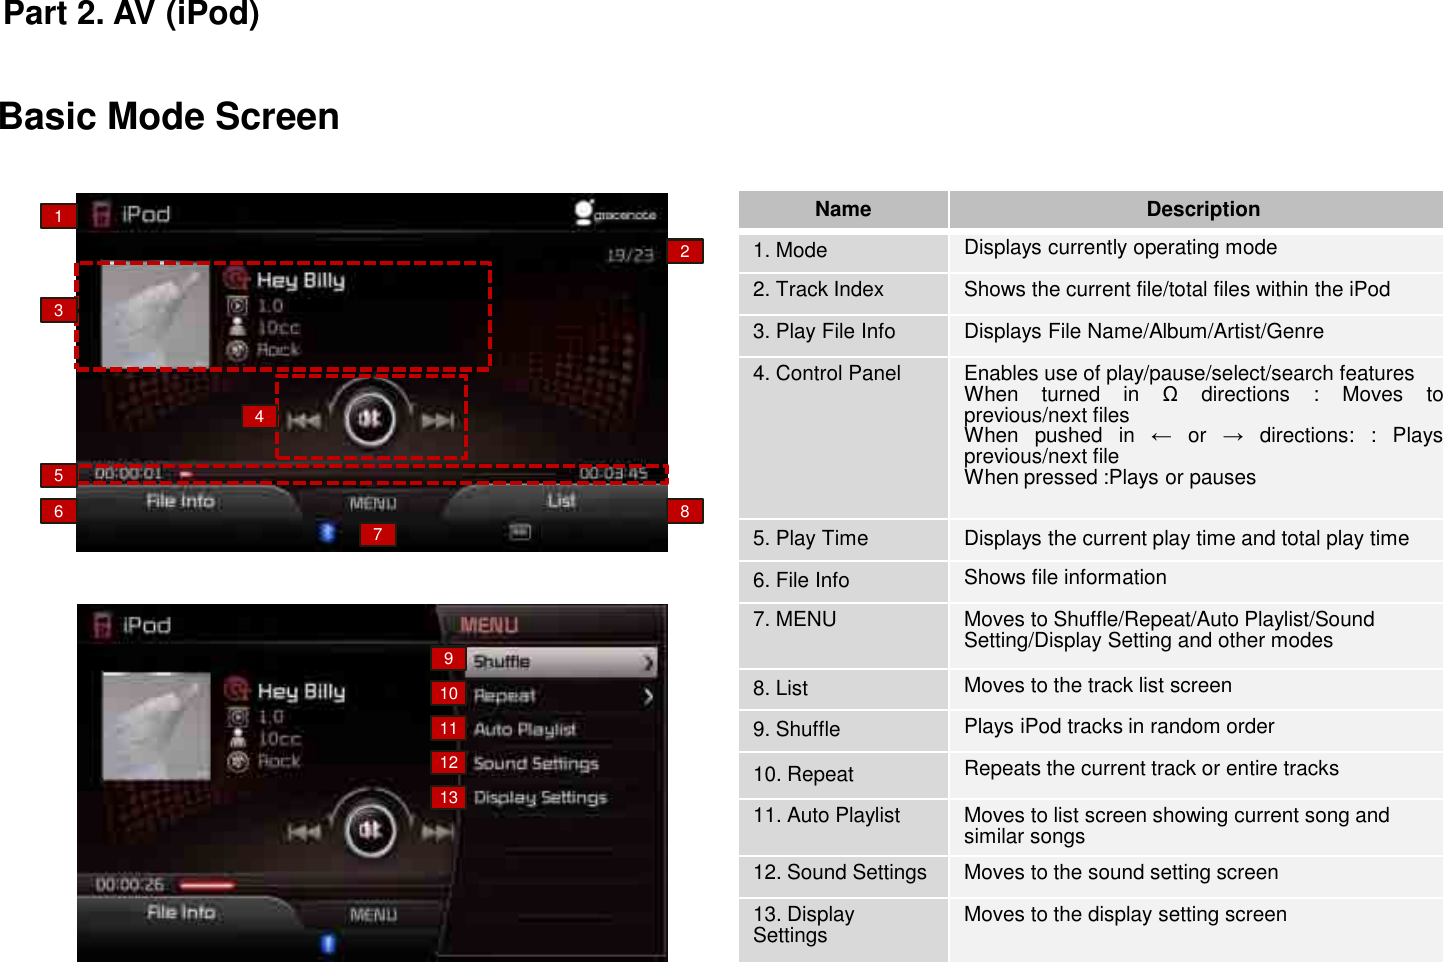
![Starting ModePress the [HOME] button Select [iPod]Once an iPod is connected, iPod mode will operate automatically.While playing Push and hold the [ ] in ← or → direction (under 0.8 seconds) or press and hold the [SEEK]TRACK] key to fast-forward/rewind the current song.Once an iPod is connected, the iPod will automatically begin playing. Pressing the [ ] again will pause the iPod.Playing iPod1 3 42Fast-forwarding or Rewinding iPod FilesWhile the [ ] or [SEEK] [TRACK] key is being operated, the songs will rewind or fast-forward at 20x speed. Once released, the song will begin playing at normal speed.Selecting iPod FileWhile playing Shortly push the [ ] in ← or → direction (under 0.8 seconds) or shortly press the [SEEK]TRACK] key to select the previous/next song.Part 2. AV (iPod)NOTICE•Some iPods with unsupported communication protocols may not properly operate in the Audio Video Navigation system.](https://usermanual.wiki/HYUNDAI-MOBIS/AN310DHGG/User-Guide-1601902-Page-57.png)
![Press the [List] button to display the initial iPod menu screen.When searching iPod, it is possible to search by Play list, artist, album, song, genre, composer, audiobook, and Podcast.Press the [MENU] key to use the Shuffle, Repeat, Auto Playlist, Sound Settings and Display Settings.Searching iPod List Using the Menu ButtonsShufflePress the [MENU] key Select [Shuffle] Select [Shuffle] or [Shuffle Album]Turn the [ ] or [TUNE/FILE] knob in Ω directions to search for songs.During search, the song name is displayed in red. Press the [ ] or [TUNE/FILE] knob to play the selected song and display the basic display info. Searching iPod FilesFrom the searched songs, once the desired song name is displayed, press the [ ] or [TUNE/FILE] knob to play the corresponding song.Part 2. AV (iPod)Information• If the search mode is accessed while playing a song, the most recently searched step will become displayed.• Upon initial connection, the search steps may differ depending on the type of iPod device.12](https://usermanual.wiki/HYUNDAI-MOBIS/AN310DHGG/User-Guide-1601902-Page-58.png)
![Name Description1. Shuffle Plays songs within playlist in random order2. Shuffle Album Plays files within thecurrent album in randomorderRepeatPress the [MENU] key Select [Repeat] Select [Repeat]Name Description1. Repeat Repeats play of currentlyplaying file.Auto PlaylistPress the [MENU] key Select [Auto Playlist]File Info/Play InfoPart 2. AV (iPod)Information•Press [Off] to turn the Shuffle feature off.Information•Press [Off] to turn the Repeat feature off.Information• No information are shown for MP3 files without file information.• For more information on Sound and Display settings, refer to the Info/Setup section.1](https://usermanual.wiki/HYUNDAI-MOBIS/AN310DHGG/User-Guide-1601902-Page-59.png)
![Starting ModePress the [HOME] button Select[AUX]External AUDIO and VIDEO players (Camcorders, car VCR, etc.) can be played through a dedicated cable. The position of the AUX jack is at the top of the gear box located between the driver and passenger seats.Part 2. AV (AUX)Information• If an external device connector is connected with the AUX terminal, then AUX mode will automatically operate. Once the connector is disconnected, the previous mode will be restored.• AUX mode can be used only when an external audio/video player (camcorder, car VCR, etc.) has been connected.• The AUX volume can be controlled separately from other AV modes.Information• Connecting a connector jack to the AUX terminal without an external device will convert the system to AUX mode, but only output noise. When an external device is not being used, also remove the connector jack.• When the external device power is connected to the power jack, playing the external device may output noise. In such cases, disconnect the power connection before use.Information•The color saturation option is not supported when using the PAL color system within this device.](https://usermanual.wiki/HYUNDAI-MOBIS/AN310DHGG/User-Guide-1601902-Page-60.png)
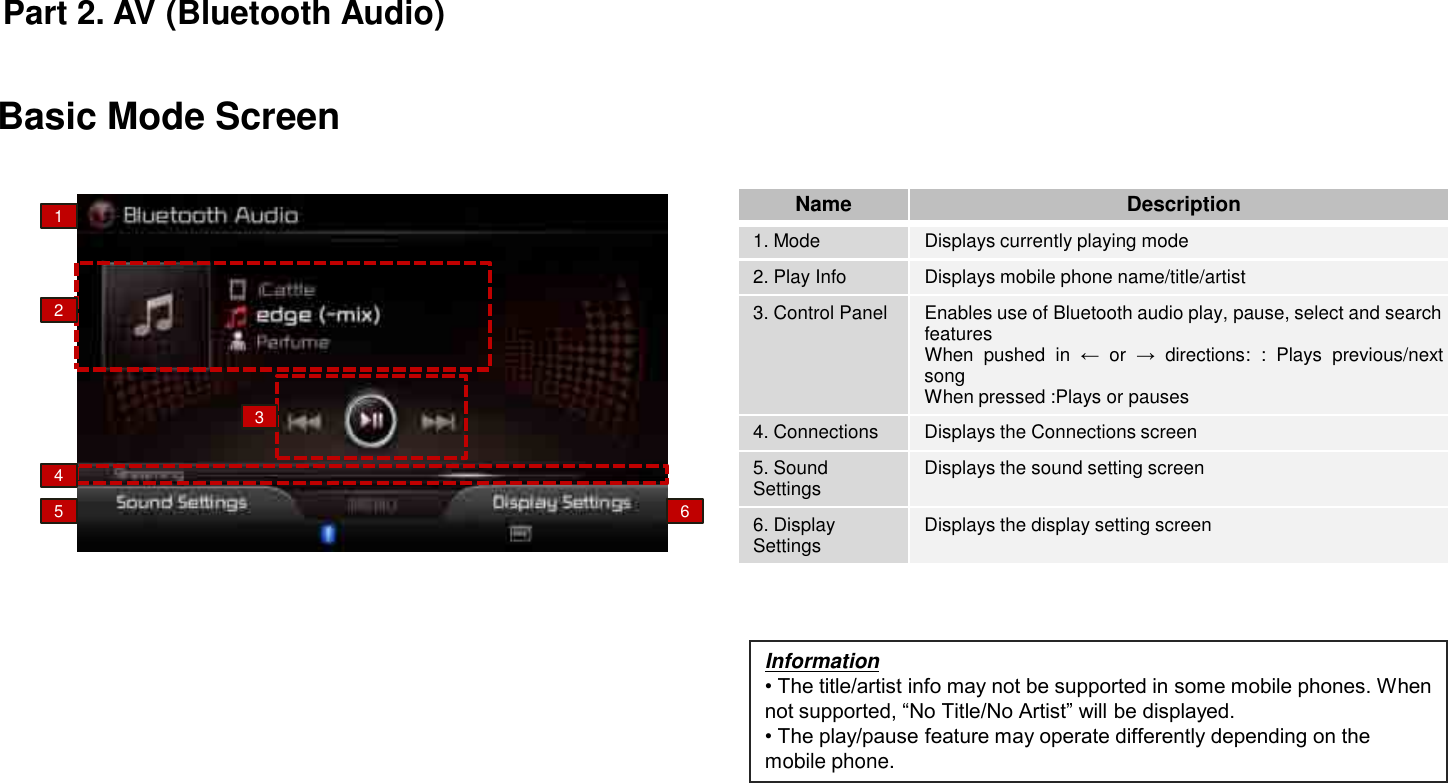
![Starting ModePress the [HOME] button Select[Bluetooth Audio]Playing Bluetooth AudioSelecting Bluetooth AudioPart 2. AV (Bluetooth Audio)Information• The title/artist info may not be supported in some mobile phones.• For more information on Sound and Display settings, refer to the Info/Setup section.Information•If the Bluetooth® device is not connected, then the [Bluetooth Audio] button will be disabled.](https://usermanual.wiki/HYUNDAI-MOBIS/AN310DHGG/User-Guide-1601902-Page-63.png)

![When no phones have been pairedInformation• Press the [Help] button within the pop-up to view the help section with information related to pairing and connecting Bluetooth devices, and using Handsfree related features.• To learn more about searching from Bluetooth devices and pairing, refer tothe user's manual for your Bluetooth device.If the system becomes unstable or the authentication popup is not displayed due to some communication error, please wait or reset the Bluetooth device and try again.Pairing and Connecting a PhonePress the [PHONE] button Select [Connections] Select [Add New] Enter passkey from the Bluetooth deviceWhen a phone is already pairedPress the [PHONE] button Select [Connections] Select the device from the device list Select ConnectSelect the device you want to connect and press the [Connect] button.If the phone you want to connect does not exist, press the [Add New] button to pair a new Bluetooth device.When the Waiting to Pair screen is displayed, search for your mobile device and enter the passkey. The default passkey is set to 0000 .Part 3. Bluetooth](https://usermanual.wiki/HYUNDAI-MOBIS/AN310DHGG/User-Guide-1601902-Page-67.png)
![Pairing Additional DevicesInformation• When a Bluetooth device is connected, a new device cannot be paired. If you want to pair a new phone, first disconnect the connected Bluetooth device.Press the [Add New] button to pair a new Bluetooth device.For more information on pairing, refer to the When no phones have been paired section.Information• Bluetooth features supported within the vehicle are as follows. Some features may not be supported depending on your Bluetooth device. - Answering and making Bluetooth Handsfree calls -Menu operation during a call (Switch to Private, Switch to call waiting, Outgoing volume) - Download Call History - Download Mobile Contacts - Download USIM Contacts - Download contacts to vehicle - Contacts/ Call History Auto Download - Bluetooth device auto connection Bluetooth Audio Streaming • It is possible to pair up to five Bluetooth devices to the car system. • Only one Bluetooth device can be connected at a time. • Other devices cannot be paired while a Bluetooth device is connected.• While connecting a Bluetooth device, the cancel operation is not supported. • Only Bluetooth Handsfree and Bluetooth audio related features are supported.Information• Normal operation is possible only within devices that support Handsfree or audio features, such as a Bluetooth mobile phone or a Bluetooth audio device.• Only one function can be used at a time between the Bluetooth Handsfree and Bluetooth audio. (While playing Bluetooth audio, streaming will end upon entering the Bluetooth phone screen.) • If a connected Bluetooth device becomes disconnected due to being out of communication range, turning the device OFF, or a Bluetooth communication error, corresponding Bluetooth devices are automatically searched and connected. • If the system becomes unstable due to communication errors between the vehicle and the Bluetooth device, reset the Bluetooth and try again. Upon resetting Bluetooth, the system is restored to its factory release state. Part 3. Bluetooth](https://usermanual.wiki/HYUNDAI-MOBIS/AN310DHGG/User-Guide-1601902-Page-68.png)
![Information•If a paired phone is deleted, the call history and phone book lists will also be deleted. Disconnecting a Device A device cannot be deleted when it is connected. To delete a paired device, first disconnect the Bluetooth connection. Press [Delete All] to delete all paired Bluetooth devices.Select the device you want to disconnectPress [Disconnect] Press [Yes]Deleting DevicePress the [MENU] key Press [Delete] Press [Yes]Part 3. Bluetooth](https://usermanual.wiki/HYUNDAI-MOBIS/AN310DHGG/User-Guide-1601902-Page-69.png)
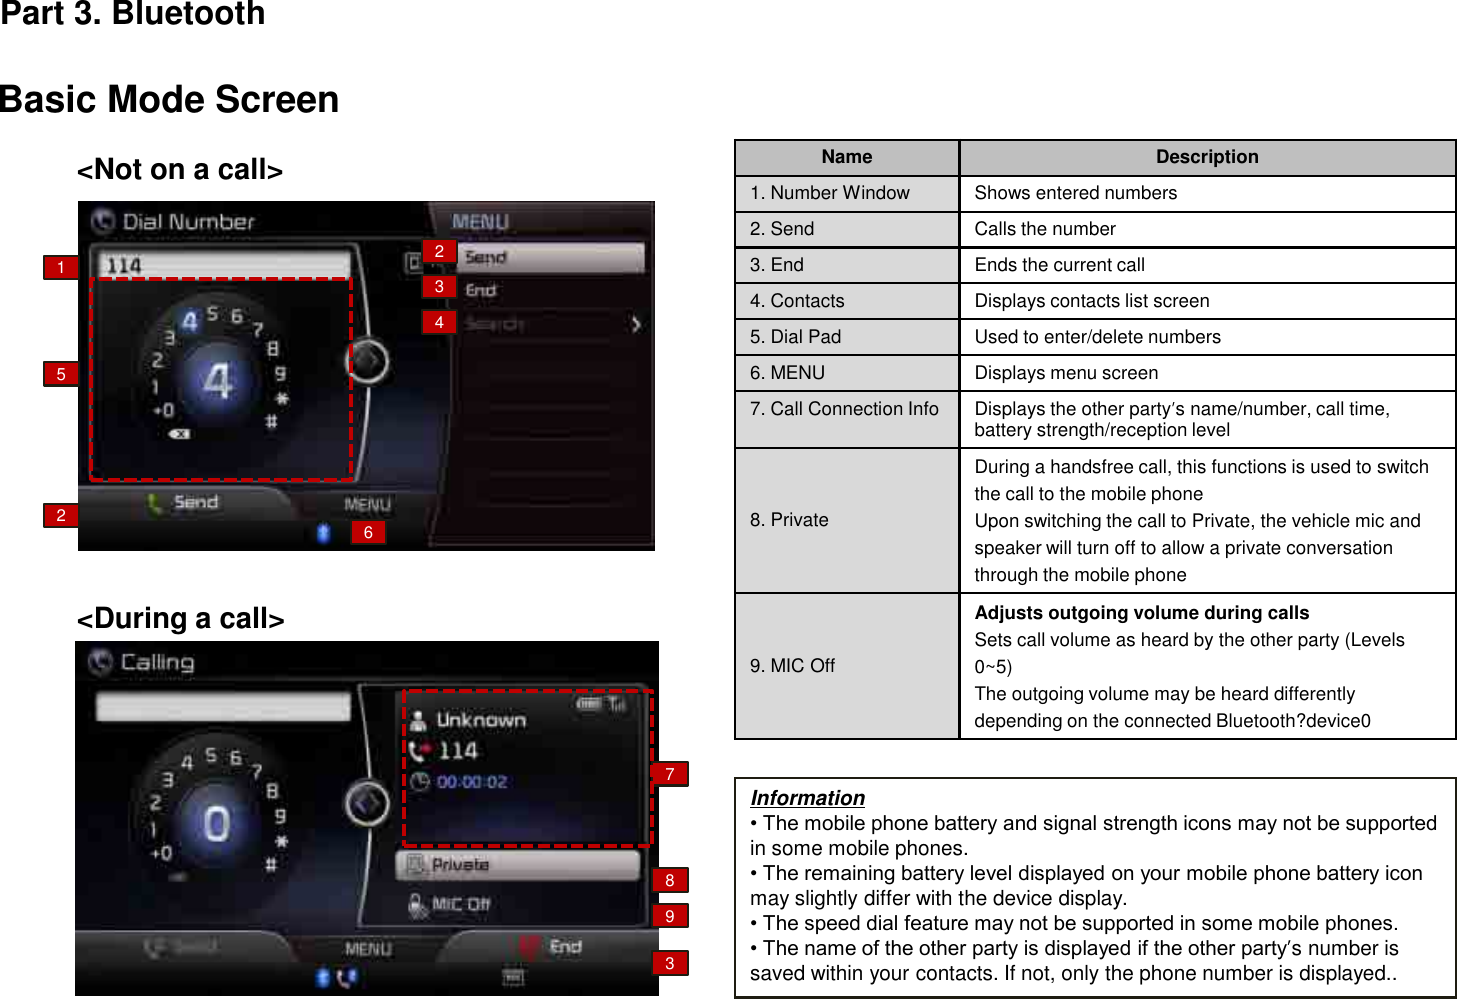
![Making/Answering CallsInformationMost functions within AV mode and INFO will not operate during a Bluetooth Handsfreecall. Only the call volume and Navigation screens can be operated.Starting ModeEnter number on the dial pad Press the [Send] button or the [] key on the steering remote controller.Calling by dialing a numberIf you press the Send button without entering a number, the Call History screen is displayed.Press and hold the dial pad 0 + (over 0.8 seconds) to enter a "+".Making a call from Speed DialEnter the 1 or 2 digit speed dial number with the Dial Pad Press and hold the last number.Information• For speed dials saved within mobile phones, up to 2 digits are supported.• Saving or changing speed dial numbers through the head unit.Calling through RedialPress the hold (over 0.8 seconds) the [Send] button or the key on the steering remote controller.InformationRedialing is not possible when there is no call history or the Bluetooth phone has not been connected.Part 3. Bluetooth](https://usermanual.wiki/HYUNDAI-MOBIS/AN310DHGG/User-Guide-1601902-Page-71.png)
![Information• Calling through the call history is not possible when there is no call history or the Bluetooth phone has not been connected.Making a call from Call history Answering a callWhen a call is received on the connected phone, the bell will sound and the phone number of the other party will be displayed on the incoming call pop-up, as shown here.Information• When the incoming call pop-up is displayed, most functions within AV mode and SETUP will not operate. Only the call volume and Navigation screens can be operated.• The telephone number may not be displayed in some mobile phones.Rejecting a callPress the [Send] button or the Key on the steering remote controller Select the call list Press [Call]Information• The reject call function may not be supported in some mobile phones.Incoming call notice Press the [Accept] button or the [] key on the steering remote controller.Incoming call notice Press the [Reject] button or the [] key on the steering remote controller.Part 3. Bluetooth](https://usermanual.wiki/HYUNDAI-MOBIS/AN310DHGG/User-Guide-1601902-Page-72.png)
![Operating Menus during a Call InformationThe Private function may not be supported in some mobile phones.During Handsfree call Press the [Private] button or press and hold the [] key (over 0.8 seconds) on the steering remote controller.The call will be switched from the Handsfreeto the Bluetooth mobile phone.Switching Call to the Bluetooth phoneSwitching Call to the HandsfreeDuring call on mobile phone Press the [Use Handsfree] button or press and hold the [] key (over 0.8 seconds) on the steering remote controller.The call will be switched from the Bluetooth mobile phone to the car handsfree.Ending a callWhile on a call Press the [End] button or the [ ] Key on the steering remote controller.The Bluetooth handsfree call will end.Part 3. Bluetooth](https://usermanual.wiki/HYUNDAI-MOBIS/AN310DHGG/User-Guide-1601902-Page-73.png)
![Information• Call waiting is a feature that allows the caller to answer a second call while already on a call. When call waiting is used, the first call is placed on waiting mode.• The Private function may not be supported in some mobile phones.If another person calls while you are already on a call, the current call must be placed on hold or ended to answer the new call.If there is waiting call, press the [ ] key on the steering remote controller (under 0.8 seconds) or press the [Switch] button on the Phone screen.While on a call Select [Mute]Switching to Call WaitingWhile on a call Use the [VOL] knob on the head unit or the [+], [-] keys on the steering remote controller to adjust the ring/call volume.Setting Mic OffIf you press the [Mute] button, The outgoing volume is muted and blocked to the other party.Name Description1. Hold 1st call Places current call on callwaiting and answer new call2. End 1st call Ends current call and answernew call3. Reject R e j e c t s new c a l l a n dmaintains current call4. Switch If there is a call waiting,switches to the waiting callwaiting call1234InformationThe volume heard by the other party may differ depending on the mobile phone. If call volume heard by the other party is too low or too high, first adjust the volume setting.Adjusting the Ring/Call VolumePart 3. Bluetooth](https://usermanual.wiki/HYUNDAI-MOBIS/AN310DHGG/User-Guide-1601902-Page-74.png)
![Contacts Information• If there are numerous list entries, selecting the list page area will move to the corresponding list page.• It is possible to download contacts even during a call or during Bluetooth streaming audio. • When downloading call histories, the icon will be displayed within the status bar. • It is not possible to commence download when the contacts download feature has been turned of within the Bluetooth device. In addition, some devices may require device authorization upon attempting to download contacts. If downloading does not normally occur, check the Bluetooth device settings or the screen state. • The download feature may not be supported in some mobile phones. Check to see that the Bluetooth device supports the download feature. For more information of supported Bluetooth devices and function support, visit the BLUmembers website (blu.hyundai.com)• Mobile and car contacts data could be lost depending on the state of the head unit. Please back up important data within a safe location.Information• Mobile phone contacts can only be searched when a Bluetooth device is connected. • Up to 5,000 contacts saved in your Bluetooth phone or USIM can be downloaded into the car contacts. Contacts that have been downloaded to the car cannot be edited or deleted. • Mobile phone contacts are managed separately for each paired Bluetooth device (max 5 devices x 5,000 contacts each). Previously downloaded data is maintained even if the Bluetooth device has been disconnected. (However, the contacts and call history saved to the phone will be deleted if a paired phone is deleted.)Press [PHONE] button Select [Contacts]Name Description1. Send Calls the correspondingnumber2. Search Search contacts by nameor number3. Download Download contacts fromBluetooth device4. Contacts List Downloaded Contacts5. MENU Displays menu screen123415Part 3. Bluetooth](https://usermanual.wiki/HYUNDAI-MOBIS/AN310DHGG/User-Guide-1601902-Page-75.png)
![Information• Upon downloading mobile phone contacts,the previous corresponding datais deleted.• This feature may not be supported insome mobile phones.• Upon downloading, contacts saved inyour USIM and mobile phone are simultaneously downloaded.• When using Contacts Sync, the contactsand call histories within your mobile phone are automatically downloaded upon connecting Bluetooth. If you do not wish to use this feature, turn Contacts Sync Setting off.Press the [MENU] key Press [Download] Press [Yes] Download Mobile Phone ContactsName Description1. Received Displays the incoming callhistory list2. Dialed Displays the outgoing call historylist3. Missed Displays the missed call historylist4. Send Dial to selected number5. Delete All Delete entire call historyEntering Call History ScreenPress the [PHONE] Key Select [Call History] Information• The call history may not become saved in the call history list in some mobile phones.• Calls received with hidden caller ID will not become saved in the call history list. 12356Part 3. Bluetooth](https://usermanual.wiki/HYUNDAI-MOBIS/AN310DHGG/User-Guide-1601902-Page-76.png)
![Press the [Search] Key Select [Search by Name]Searching Contacts (By Name)InformationWhen searching a number, it is possible to search by entering a part of the entire number. (ex: if you enter 1544 , all numbers with 1544 will be searched.After inputting is complete, press the [Done] button to save.InformationUpon search, initial search and intermedial search is supported.Searching Contacts (By Number)Press the [Search] Key Select [Search by Number]After inputting is complete, press the [Done] button to save to search saved numbers.Part 3. Bluetooth](https://usermanual.wiki/HYUNDAI-MOBIS/AN310DHGG/User-Guide-1601902-Page-77.png)
![Bluetooth Settings4123This option is used to select ringtones for the connected phone.Auto ConnectionPress the [Settings] key Select [Auto Connection]If auto connection is turned on, a Bluetooth device will automatically be connected according to the option setting when the car ignition is turned on.Name Description1. Off Disables auto connection2. Previous Phone Auto connection with thepreviously connectedBluetooth phone3. User SelectedPhone Displays the outgoing callhistory list4 . C o n n e c t byPriorityAutomatically connectsaccording to the setBluetooth phone priorityRingtonesPress the [Settings] Key Select [Ringtones]Contacts SyncPress the [Settings] key Select [Contacts Sync]When connecting a Bluetooth device, it is possible to automatically download new contacts.This option is used to check messages (SMS) through the vehicle handsfree.SMSPress the [Settings] Key Select [SMS]Bluetooth AudioPress the [Settings] key Select [Bluetooth Audio]You can play music files saved in your Bluetooth device from the car.Part 3. Bluetooth](https://usermanual.wiki/HYUNDAI-MOBIS/AN310DHGG/User-Guide-1601902-Page-78.png)
![This option is used to check information about the connected device, such as device name, address, and type.Name Description1. Delete all callhistory Delete all dialed / received/ missed call lists2 . D e l e t e AllMessages D e l e t e a l l r e c e i v e dmessages3 . D e l e t e AllPhones Delete all r egister edphones4. Factory Defaults Reset Bluetooth settingsand data to factory stateDevice InformationPress the [Settings] Key Select [DeviceInformation]Data InitializationPress the [Settings] Key Select [Data Initialization]When connecting a Bluetooth device, it is possible to automatically download new contacts.This option is used to change the passkey needed upon connecting a Bluetooth phone.Change PasskeyPress the [Settings] key Select [Change Passkey]InformationThe default pin code is 0000 .4123Part 3. Bluetooth](https://usermanual.wiki/HYUNDAI-MOBIS/AN310DHGG/User-Guide-1601902-Page-79.png)

![System SettingStarting ModePress the [HOME] Key Press [INFO]Part 4. INFOClock SettingPress [System Settings] Press [Clock Settings]This option is used to set the time used within the AVN system. <Time Setting>These options allow you to set clock related settings.<Clock Type>This option is used to set Daylight Saving Time.<Daylight Saving Time>InformationWhen Daylight Savings Time is turnedon, the clock is moved back one hour.](https://usermanual.wiki/HYUNDAI-MOBIS/AN310DHGG/User-Guide-1601902-Page-81.png)
![Setting Power Off Setting (Frame Image)Press [System Settings] Select [Power Off Settings]Upon turning the [Lock RSE System] on, the AV (and Navigation) cannot be operated from the Rear controller.Name Description1. Clock Displays screen as clock2. Date Display Sets whether to includeDate within the display3. Image Display screen as image4. Find Image Used to select a differentimageLock RSE SystemPress [System Settings] [Clock RSE System]Part 4. INFOThis option is used to change the language of the system display. It is possible to set to Korean, English, and other languages.LanguagePress [System Settings] Press [Language] 1234](https://usermanual.wiki/HYUNDAI-MOBIS/AN310DHGG/User-Guide-1601902-Page-82.png)
![KeyboardPress [System Settings] Press [Keyboard]This option allows you to change the typeof keyboard used within the system.Name Description1. ABC Keyboard with charactersarranged in order2. QWERTY Keyboard similar to the oneused within a computerInformationThe set keyboard will be applied to allinput modes across the entire system.Interactive GuidePress [System Settings] Press [Interactive Guide]This option is used to turn on the Interactive Guide that provides explanations and simple examples of ways to use the Controller.Part 4. INFOThis option provides Help sections for key features found within the system.HelpPress [System Settings] Press [Help]12](https://usermanual.wiki/HYUNDAI-MOBIS/AN310DHGG/User-Guide-1601902-Page-83.png)
![Information• This product requires regular updatesfor software corrections, new functionsand map updates. Updating mayrequire up to 1 hour depending on thedata size.• Turning off the power or ejecting the SD card during the update process mayresult in data loss. Make sure to keepthe ignition on and wait until updating iscomplete.• For up-to-date maps and software, visit the site (blu.hyundai.com) and download related files to an SD card.Fader/BalancePress [Sound Settings] Press [Fader/Balance]Use the top/down/left/right buttons on the [ ] to move the cursor on the control screen to the desired position.Press and hold the [ ] for approx 3 seconds to restore sound to the center position.Sound SettingsAfter inserting the SD card where the updated file is downloaded, press [USB Update] to start the update. Once updating is complete, the system will automatically restart.System UpdatePress [System Settings] Press [System Update]InformationThe Balance/Fader settings allow the position of the sound to be set. For example, the sound can be set towards the driver seat so that the volume relatively lower in the passenger seat or back seats.Part 4. INFOCaution• Please use only the SD card that wasincluded with the vehicle purchase.• The use of a separately purchased SDcard may result in damage due to heatrelated deformation.• Product malfunctions caused by theuse of separately purchased SD cardsshall not be covered within the productwarranty.• Repeatedly connecting/disconnectingthe USB in a short period of time maycause damage to the device.](https://usermanual.wiki/HYUNDAI-MOBIS/AN310DHGG/User-Guide-1601902-Page-84.png)
![Use the [<] or [>] cursors to adjust the bass/mid/treble settings.Press and hold the controller for approx 3 seconds to restore all settings back to 0.Treble/Middle/BassPress [Sound Settings] Press [Treble/Middle/Bass]This option is used to change the sound according to user preference.Variable EQPress [Sound Settings] Press [Variable EQ]Name Description1. Innocente Natural sound, soundoptimized for driver2. Forza Powerful soundemphasizing bass, stereosound3. Concerto Sound similar to a concertor live hallThe volume level is automatically controlled according to the vehicle speed.Auto Volume Control (AVC)Press [Sound Settings] Press [Auto Volume Control]Each press of this setting with turn the BEEP tone ON/OFF.Touch Beep TonePress [Sound Settings] Press [Touch Beep Tone]Volume RatioPress [Sound Settings] Press [Volume Ratio] Part 4. INFO123123](https://usermanual.wiki/HYUNDAI-MOBIS/AN310DHGG/User-Guide-1601902-Page-85.png)
![These options are used to set the volume ratio by selecting from Navigation Priority/ Audio Priority/Same Ratio.This option is used to restore all Sound settings back to the default state.InformationThe rear seat speaker will maintain itsaudio volume regardless of which volumeratio is selected.Default SoundPress [Sound Settings] Press [Default Sound]Name Description1.NavigationPriorityNavigation guidance isoutput louder than audiovolume2. Audio Priority Audio volume is outputlouder than the navigationguidance3. Same Ratio Audio volume andnavigation guidance areoutput in identical volumeLCD BrightnessPress [Display Settings] Press [LCD Brightness]This option is used to change the LCD brightness.Press and hold the [ ] for approx 3 seconds to restore brightness to the default settingDisplay Settings IlluminationPress [Display Settings] Press [Illumination]Name Description1. Automatic Adjusts the brightnessautomatically according tosurrounding brightness2. Daylight Always maintains thebrightness on high3. Night Always maintains thebrightness on lowInformationWhen set to Automatic, the screen brightness and color will automatically be adjusted according to the surrounding brightness.Part 4. INFO123](https://usermanual.wiki/HYUNDAI-MOBIS/AN310DHGG/User-Guide-1601902-Page-86.png)
![This option is used to restore all Display settings back to the default state.This option is used to set the screen ratio in video modes, such as VCD/DVD/USB Video/AUX.RatioPress [Display Settings] Press [Ratio]Rear Display OffPress [Display Settings] Press [Rear Display Off]This option is used to turn the Rear Display on/off.Default DisplayPress [Display Settings] Press [Default Display] InformationIf a DVD is created with a defined ratio(example: 16:9), the screen will notchange even if a different screen ratio(example: Normal) is selected.Name Description1. Normal (4:3) 4:3 screen display2. Wide (16:9) 16:9 wide screen display3. Full Screen Full screen displayPart 4. INFO123](https://usermanual.wiki/HYUNDAI-MOBIS/AN310DHGG/User-Guide-1601902-Page-87.png)