HYUNDAI MOBIS AVN-200SLA AVN SYSTEM User Manual 2 of 4
HYUNDAI MOBIS CO., LTD. AVN SYSTEM 2 of 4
Contents
- 1. user manual 1 of 4
- 2. user manual 2 of 4
- 3. user manual 3 of 4
- 4. user manual 4 of 4
user manual 2 of 4
AUDIO SYSTEM 2-31
Operating the external devices
Voice Command
1. Press the button on the steering wheel
remote controller.
2. After the beep sound, say a command.
"USB"
AUX
■
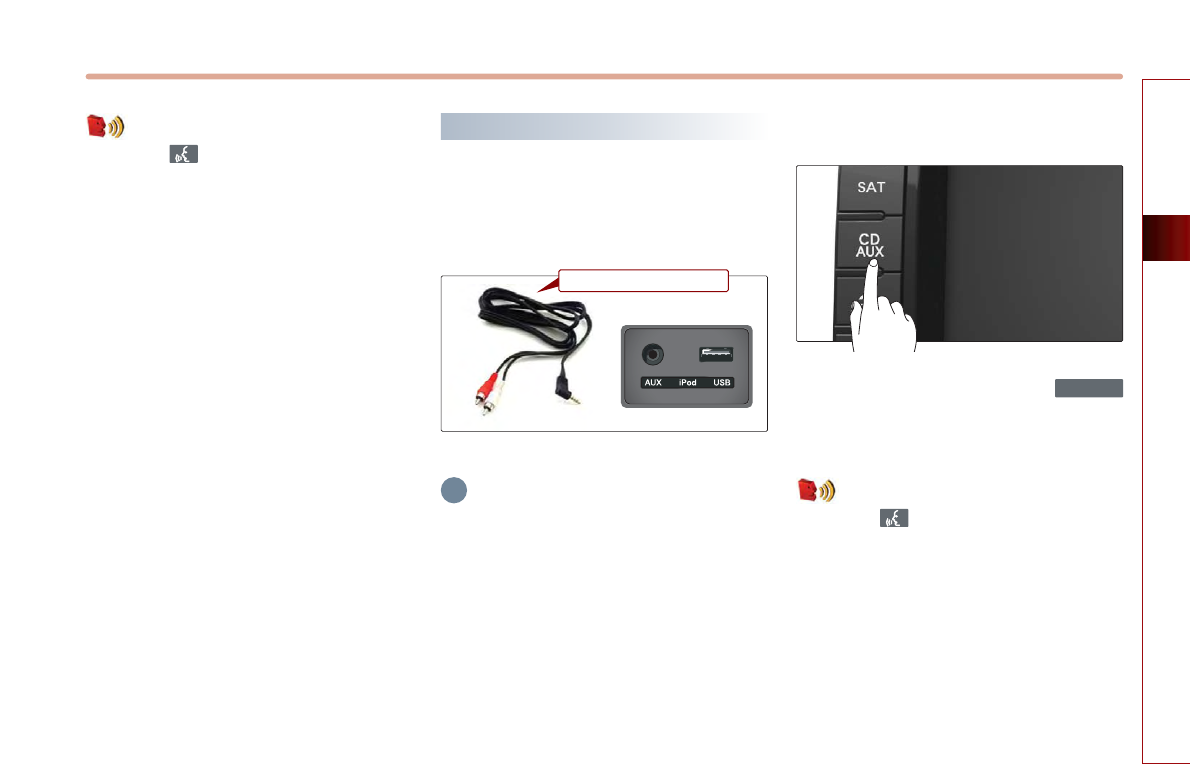
Connecting AUX
Connect the external Audio player as
shown in the picture.
INFORMATION
Connect only by using AUX terminals.
■
Playing AUX
Connect an AUX or press the
button on the control panel if the AUX is
already connected.
Voice Command
1. Press the button on the steering wheel
remote controller.
2. After the beep sound, say a command.
"Line In"
CD/AUX
i
External Audio Device

2-32 AUDIO SYSTEM
PART 2 AUDIO SYSTEM
■
AUX screen
Audio AUX screen

Operating the external devices
MEMO

PART 3 NAVIGATION SYSTEM
PART 3
NAVIGATION SYSTEM
Limitations of the navigation
system ………………………… 3-2
GPS signal reception state ………… 3-2
Vehicle position display …………… 3-3
Route guidance ……………………… 3-4
Route Re-calculation ………………… 3-4
Starting navigation system…… 3-5
Map Functions ………………… 3-5
Current position map screen
(without route) ……………………… 3-5
Switching map mode
(North up/Heading up) ……………… 3-6
Viewing GPS signal state …………… 3-7
Changing the map scale …………… 3-8
Displaying / Hiding POI icons
on the map…………………………… 3-9
Displaying / Hiding Q.POI icons …3-9
Displaying /Hiding icons other than
Q.POI icons………………………… 3-9
Making a call to POI ……………… 3-10
Scrolling map ……………………… 3-11
Setting a Destination ………… 3-12
Destination menu screen and functions
…3-12
Searching a Destination …………… 3-13
Searching an Address …………… 3-13
Searching a Previous Destination
…3-17
Searching an Intersection ……… 3-17
Searching a POI ………………… 3-20
Searching from Address book…… 3-24
Searching for Emergency facilities
…3-25
Searching your Home …………… 3-25
Searching favorite places ……… 3-26
Searching from MAP …………… 3-26
Searching POI by local POI list…… 3-26
Operating after searching a
destination ………………………… 3-27
Changing destination position …3-27
Setting as Destination/waypoint 3-27
Adding to address book ………… 3-27
Operating after setting
a destination ………………… 3-28
Starting Route Guidance…………… 3-28
Route guidance screen …………… 3-28
Selecting other route ……………… 3-29
Route guidance ……………… 3-30
Route menu screen and functions …3-30
Finishing route guidance
(Delete Destination) ……………… 3-30
Route overview(View Entire Route)…3-31
Changing Route option …………… 3-32
Editing waypoints ………………… 3-32
Adding waypoints ……………… 3-32
Deleting waypoints ……………… 3-34
Re-ordering waypoints ………… 3-34
Setting detour distance …………… 3-35
Setting avoid streets on route …… 3-35

NAVIGATION SYSTEM 3-1
NAVIGATION SYSTEM
PART 3
NAVIGATION SYSTEM
Setup and Information ……… 3-36
Setup menu screen and functions …3-36
Main setting………………………… 3-36
Setting keyboard for inputting
letter……………………………… 3-36
Setting voice command feedback
ON/OFF ………………………… 3-37
Setting Language ……………… 3-37
Initializing system ……………… 3-37
Navigation setting ………………… 3-38
Setting units (mile/km) ………… 3-38
Setting arrival time and distance
display …………………………… 3-38
Registering avoid area…………… 3-38
Editing avoid area ……………… 3-40
Deleting avoid area ……………… 3-41
Deleting all avoid areas ………… 3-41
Setting Q.POI icons ……………… 3-42
Setting estimate travel time …… 3-42
My places setting…………………… 3-43
Registering new address in
address book …………………… 3-43
Editing an address of
address book …………………… 3-45
Deleting an address of address
book ……………………………… 3-46
Deleting an address book ……… 3-47
Registering home address ……… 3-48
Deleting home address ………… 3-48
Registering favorite place ……… 3-49
Deleting favorite place…………… 3-50
System information and update…… 3-51
Voice guidance volume setting …… 3-51
Voice guidance volume control …3-51
Adaptive volume control ON/OFF
…3-52
Traffic Setup………………………… 3-52
Traffic Information ………………… 3-52
Help ………………………………… 3-54
3-2 NAVIGATION SYSTEM
PART 3 NAVIGATION SYSTEM
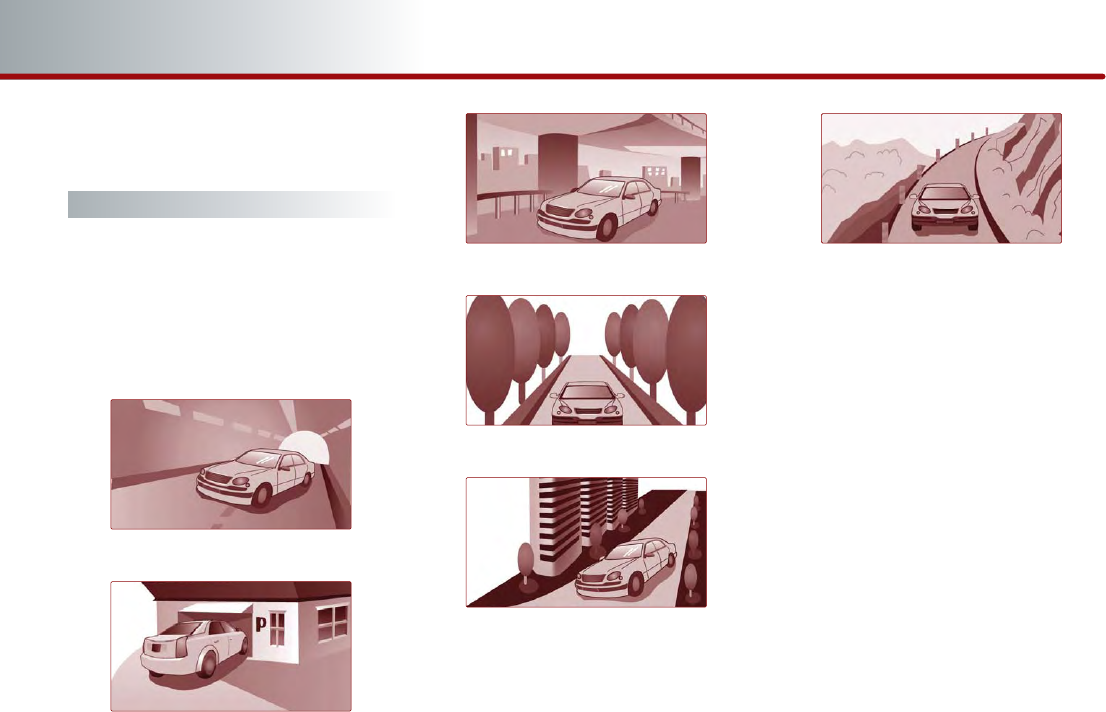
Limitations of the
navigation system
GPS signal reception state
●
As the GPS satellite frequency is received
/transmitted in straight lines, reception
may not work if hiding devices are placed
on or near the GPS antenna or when
traveling through the following locations.
Tunnels
Basement parking structures
Underneath an overpass
Roads within forested areas
Areas near high rise buildings
Roads within canyons

NAVIGATION SYSTEM 3-3
NAVIGATION SYSTEM
Vehicle position display
●
If multipass errors occur due to reflections
from buildings or related causes, the
current position mark on the navigation
may differ from the actual position of the
vehicle.
●
The position of the vehicle on the
navigation may be different from the
actual position if the vehicle is under the
following conditions. If such differences
occur, driving for a short period of time
will automatically correct the position of
the vehicle through map matching or GPS
information (several minutes may be
necessary in certain cases).
When driving on a Y-shaped road with a
narrow angle, the current position may
be displayed in the opposite direction.
If the vehicle is loaded onto a ferry or a
car transport vehicle, the current
position mark may be stalled on the last
position prior to loading.
When driving on a spiral-shaped road.
When driving in mountain regions with
sharp turns or sudden brakes.
When entering a road after having been
in an underground parking structure,
building parking structure, or turntable
with many rotations.
When the tires have recently been
replaced (Especially upon use of spare or
studless tires)
If the battery terminal is removed.
When driving in city streets, the current
position may be displayed on the
opposite side or on an off-road position.
When changing the zoom level from the
maximum zoom in level to a different
zoom level, the current position mark
may be displayed on a different road.
When driving in heavy traffic with frequent
go·stops in traffic or intersections.
When driving under slippery conditions,
such as heavy sand, snow, etc.
When driving with the tire chain in place.
When using a tire with an incorrect size
specification.
When the tire pressure for the 4 tires are
different.
When the replacement tire is a worn or
used tire (Especially studless tires having
passed a 2nd seasons, etc.)
When driving near high-rise buildings
If a roof carrier has been installed
When driving under high speeds or
having calculated a long-distance route.

Route Guidance
●
Suitable route guidance may not occur
caused by search conditions or the
driving position.
Guidance to go straight may be given
while driving on a straight road.
Guidance may not be given even when
having turned at an intersection.
There are certain intersections in which
guidance may not occur.
A route guidance signaling for a U-Turn
in a No U-Turn location may occur.
A route guidance signaling entrance into
a no enter zone may occur (No enter
zone, road under construction, etc.).
Guidance may be given to a position
removed from the actual destination if
roads to reach the actual destination do
not exist or are too narrow.
Faulty voice guidance may be given if
the vehicle breaks from the designated
route (ex: if a turn is made at an
intersection while the navigation
provided guidance to go straight).
Map Data may be missing or incorrect
causing route guidance to not be given.
Route Re-calculation
●
The following phenomena may occur
after conducting route recalculation.
Guidance may be given to a position
differing from the current position when
turning at an intersection.
Route Recalculation may take a longer
period of time when driving under high
speeds.
A route guidance signaling for a U-Turn
in a No U-Turn location may occur.
A route guidance signaling entrance into a
no enter zone may occur (No enter zone,
road under construction, etc).
Guidance may be given to a position
removed from the actual destination if
roads to reach the actual destination do
not exist or are too narrow.
Faulty voice guidance may be given if
the vehicle breaks from the designated
route (ex: if a turn is made at an
intersection while the navigation
provided guidance to go straight)
3-4 NAVIGATION SYSTEM
PART 3 NAVIGATION SYSTEM
NAVIGATION SYSTEM 3-5
NAVIGATION SYSTEM
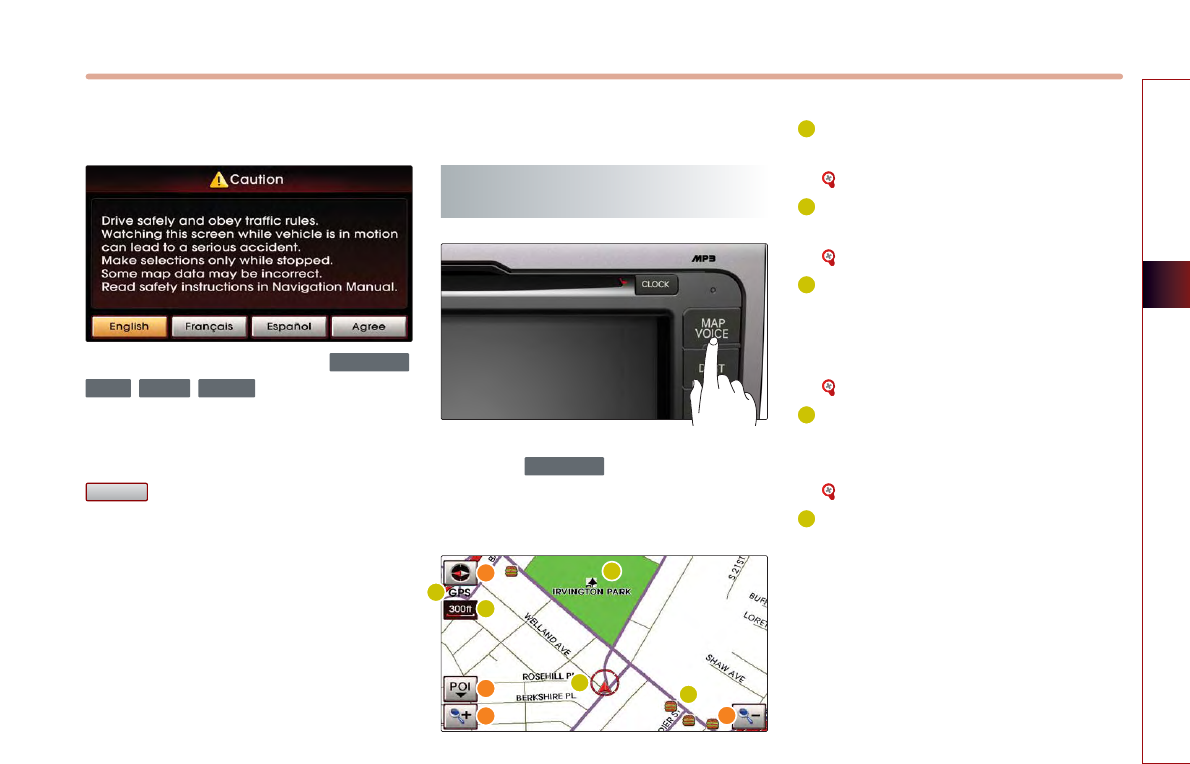
Starting navigation system
Press the Navigation mode key ( ,
, , ). The Caution screen
will always be displayed when first entering
into Navigation mode. Read the contents of
the caution screen carefully and press the
button.
Map Functions
Current position map screen
(without route)
Press the key on the control
panel to display the map of current position
and the neighboring area.
GPS signal state indicator : Displays the
state of GPS signal reception.
[Viewing GPS signal state], page 3-7.
Map scale level indicator : Displays the
current map scale.
[Changing the map scale], page 3-8.
Landmark icons : Landmark icons are
displayed on the map when the map
scale level is set to under 300 ft (100m
depending on map data)
[Appendix : Landmark icons], page 7-11.
POI icons : POI icons are displayed on
the map when the map scale level is set
to under 0.5 mi (800m).
[Appendix : POI icons], page 7-8.
Current vehicle position icon : Displays
the current position of the vehicle.
MAPVOICE
Agree
SETUP
ROUTE
DEST
MAPVOICE
1
2
3
4
5
a
b
cc
1
2
3
4
5
3-6 NAVIGATION SYSTEM
PART 3 NAVIGATION SYSTEM
North Up / Heading Up switch :
Displays the current map mode and the
map mode can be switched between
North Up and Heading Up.
[Switching map mode], page 3-6.
POI : Displays or hides the POI icon on
the map.
[Displaying/Hiding POI icons on the
map], page 3-9.
Map scale : Increases or decreases the
map scale.
[Changing the map scale], page 3-8.
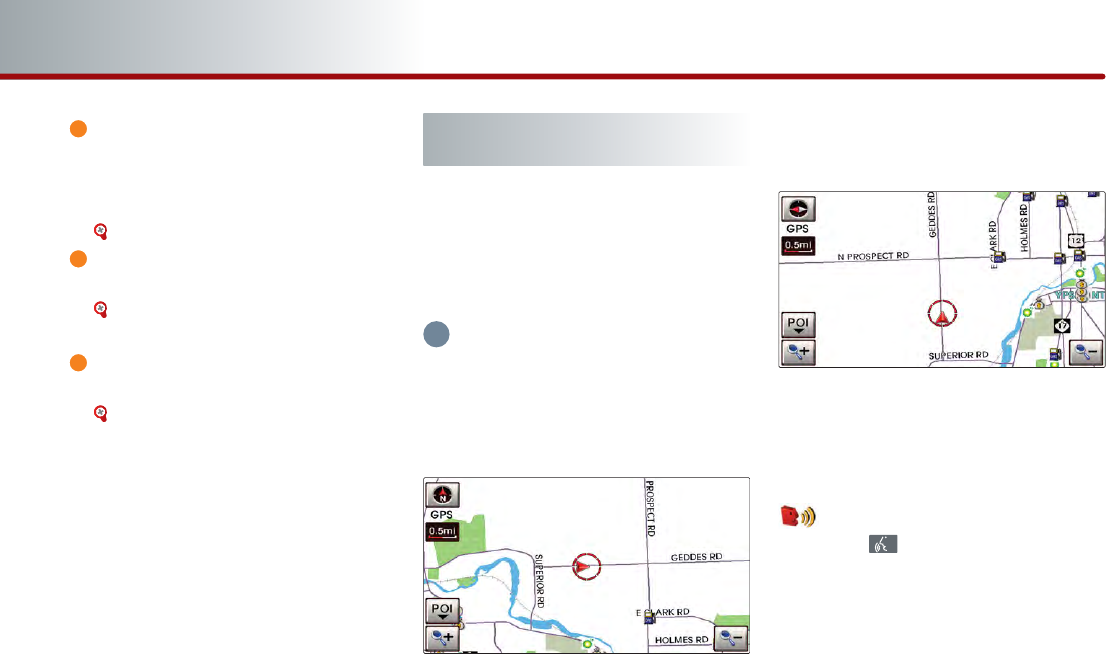
Switching map mode (North Up /
Heading Up)
Each time the compass button is pressed,
the screen will switch in the order shown
below.
Heading Up
→
North Up
→
Heading Up
INFORMATION
All map screens (map screen after setting
destination & whole route display screen)
except the current position screen will always
be displayed in North Up mode.
●
North Up : displays the map always facing
the North direction regardless of the
direction which the vehicle is traveling.
The vehicle icon is displayed in the center
position of the map.
●
Heading Up : displays the map always
facing the direction which the vehicle is
traveling. The vehicle icon is displayed in
the lower center position of the map.
Voice Command
1. Press the key on the steering wheel
remote controller.
2. After the beep sound, say a command.
"North Up"
"Heading Up"
a
b
c
i

NAVIGATION SYSTEM 3-7
NAVIGATION SYSTEM
Viewing GPS signal state
The state of GPS signal reception is
displayed as shown below.
●
GPS (active) :
GPS reception is satisfactory.
●
GPS (inactive) :
GPS reception is unsatisfactory.
[System information and update], page
3-51.
INFORMATION
●GPS (Global Position System) : GPS is a
system developed and operated by the
United States which determines the current
location of the user (longitude, latitude, etc.)
by generally using 4 or more satellites. This
system is used with related GPS information,
various sensors, road map data, and other
navigation related information.
●GPS information may not operate under the
following conditions.
- When buildings, tunnels, or other
obstructions block satellite signals.
- When materials are placed above the GPS
antenna and block satellite signals.
- When the satellite does not transmit
signals (signal transmission is controlled
by the satellite control center in the
United States and may not transmit when
under repair, modification, etc).
- When a digital cellular phone (1.5GHz) is
placed near the GPS antenna.
●This system uses GPS information, various
sensors, road map data, and other related
information to display the current position.
Errors may occur if the satellite is
transmitting inaccurate signals or if which
can only two or less satellite signals can be
received.
Errors which occur in such conditions
cannot be corrected.
i
3-8 NAVIGATION SYSTEM
PART 3 NAVIGATION SYSTEM
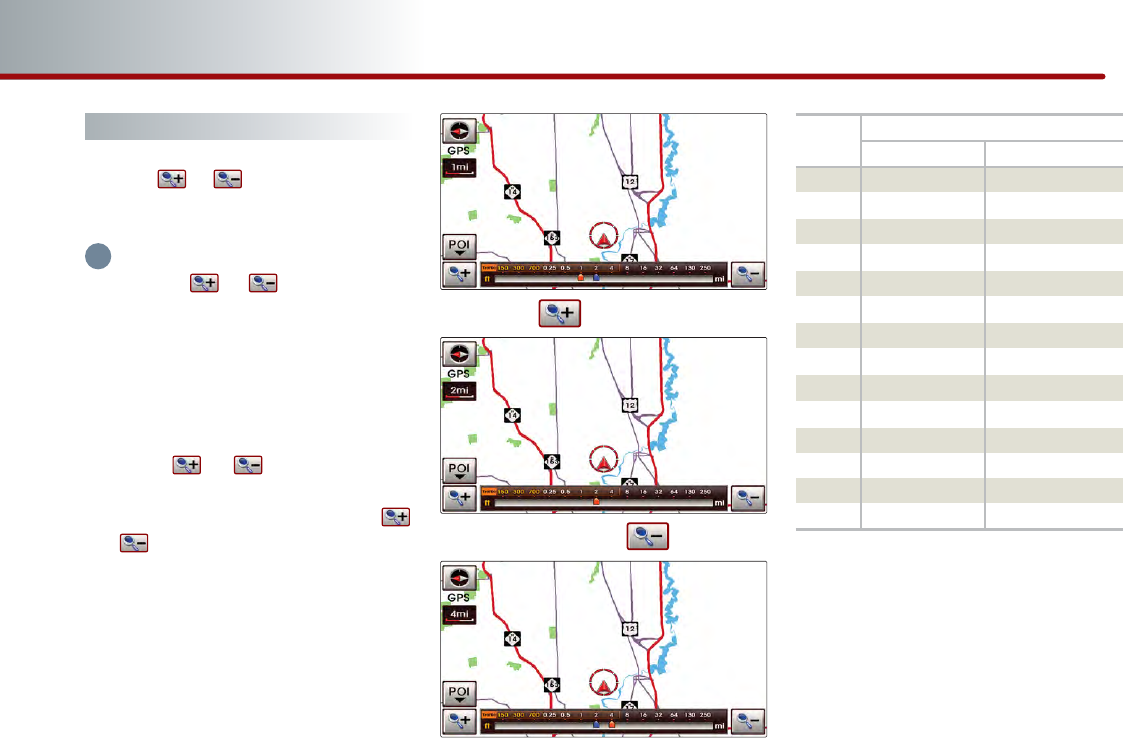
Changing the map scale
Press the or button. The map scale
will be increased or decreased by one level.
INFORMATION
Each time the
or
button is pressed,
the scale bar will be displayed.
The scale can be changed by directly pressing
the scale level on the scale bar.
The green color on the scale bar indicates the
current scale level while the orange color
indicates the selected scale level.
●Press the
or
button for over 0.8
second. The scale will continuously change.
●If the scale range limit is reached, the
or
button will be disabled.
●The map scale range is between 1 and 14:
10,240,000 ~ 1 : 5,000.
i
Level Actual distance
mi / ft km / m
1 150 ft 50 m
2 300 ft 100 m
3 700 ft 200 m
4 0.25 mi 400 m
5 0.5 mi 800 m
6 1 mi 1.6 km
7 2 mi 3.2 km
8 4 mi 6.4 km
9 8 mi 12 km
10 16 mi 25 km
11 32 mi 50 km
12 64 mi 100 km
13 130 mi 200 km
14 250 mi 400 km
NAVIGATION SYSTEM 3-9
NAVIGATION SYSTEM
Voice Command
1. Press the key on the steering wheel
remote controller.
2. After the beep sound, say a command.
"Zoom In"
"Zoom Out"
"Zoom Maximum"
"Zoom Minimum"
"Zoom level <1 to 14>"
"Zoom <actual distance>"
" (ex. Zoom 700ft)"
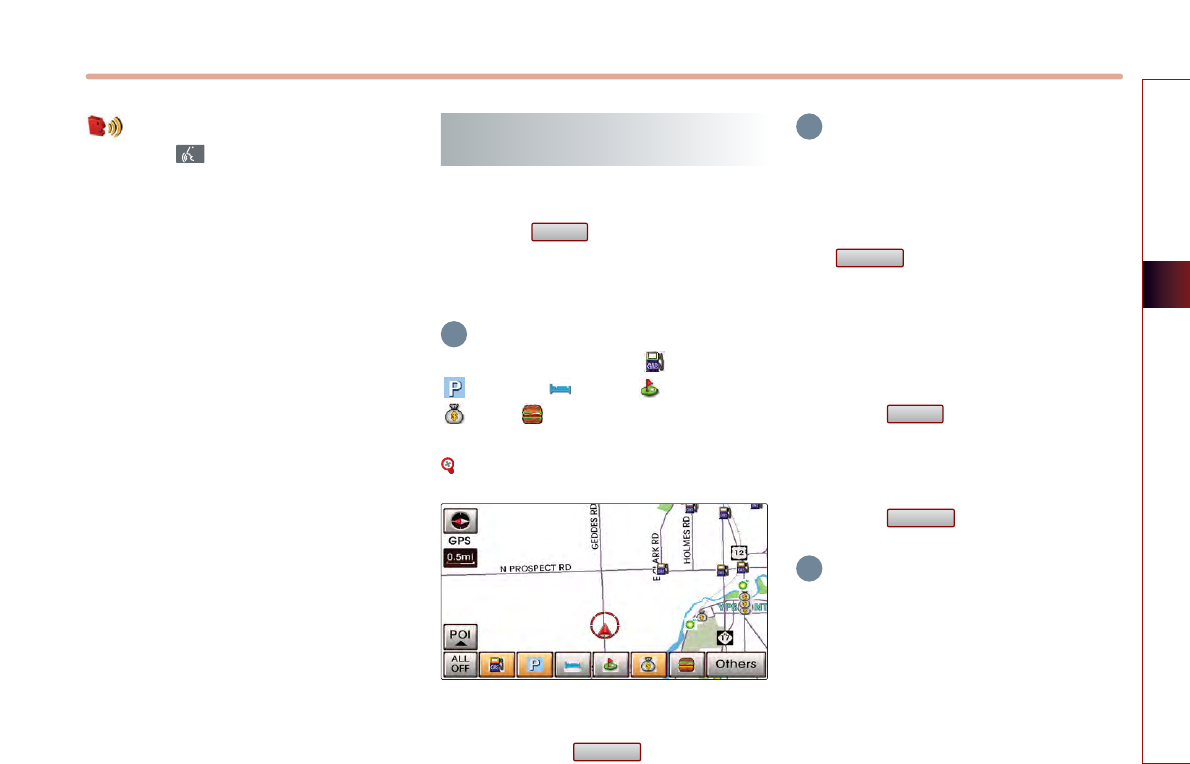
Displaying / Hiding POI icons on
the map
■
Displaying/Hiding Q.POI icons
Press the button.
Related menu buttons will be displayed
at the bottom of the screen.
INFORMATION
The Q.POI icons are set to - Gas Station,
- Parking, - Hotel, - Golf Course,
- Bank, - Fast Food (6 icons) by default.
This setting can be changed in SETUP.
[Setting Q.POI icons], page 3-42.
Press the icon buttons to display or hide.
To turn off all POI icons displayed on the
map, press the button.
INFORMATION
●The current displayed POI icons are
highlighted while the icons not being
displayed are shown as normal buttons.
●If there are no POI icons being displayed,
the button will be disabled.
●POI icons are displayed when the scale is
under 0.5 mi (800m).
■
Displaying / Hiding icons other
than Q.POI icons
Press the button.
Related menu buttons will be displayed
at the bottom of the screen.
Press the button.
INFORMATION
Q.POI stands for Quick POI and refers to the
function which turns POI icon display on or off
on the map.
Others
POI
▼
ALL OFF
ALL OFF
POI
▼
i
i
i
3-10 NAVIGATION SYSTEM
PART 3 NAVIGATION SYSTEM
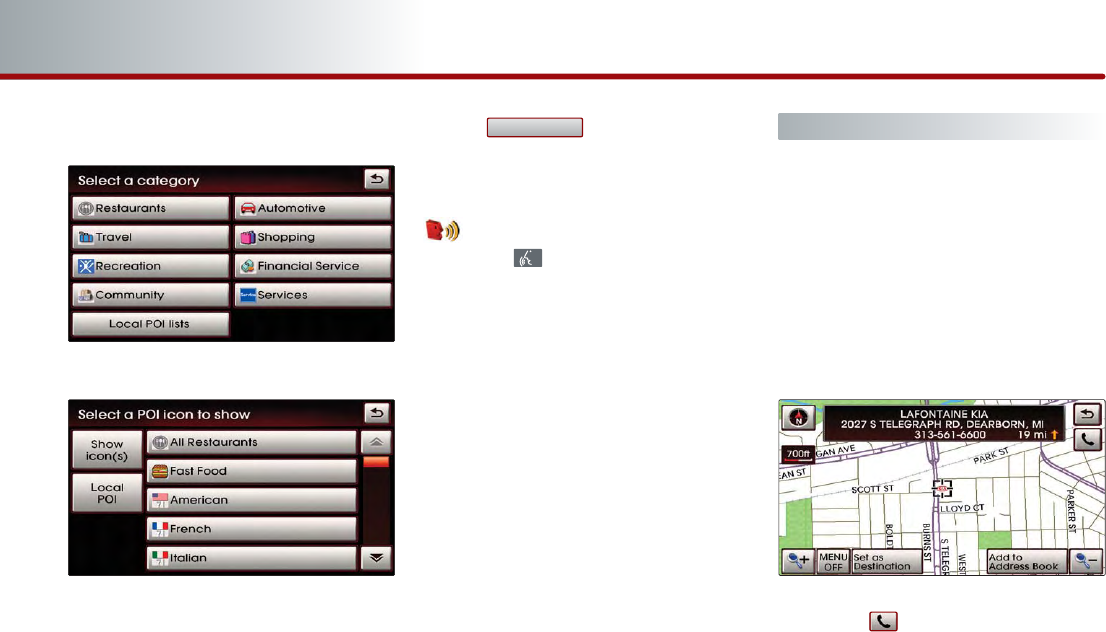
(a) by category list
Press the desired main category button.
Select the desired sub category menu to
display or hide (Multiple selections are
possible).
Press the selected menu again to cancel
the selection.
If the button is pressed, the
selected menus will be displayed or
hidden on the map screen.
Voice Command
1. Press the key on the steering wheel
remote controller.
2. After the beep sound, say a command.
"Show <POI name>" (ex. Show ATM)
"Hide <POI name>" (ex. Hide ATM)
"Hide All"
Making a call to POI
After searching a POI, the POI phone
number information can be used to make a
call to the POI facility.
Use the various search methods, such as
the map scroll function, Q.POI search
function, and destination search function
to search for a POI.
Press the button.
Show Icon(s)
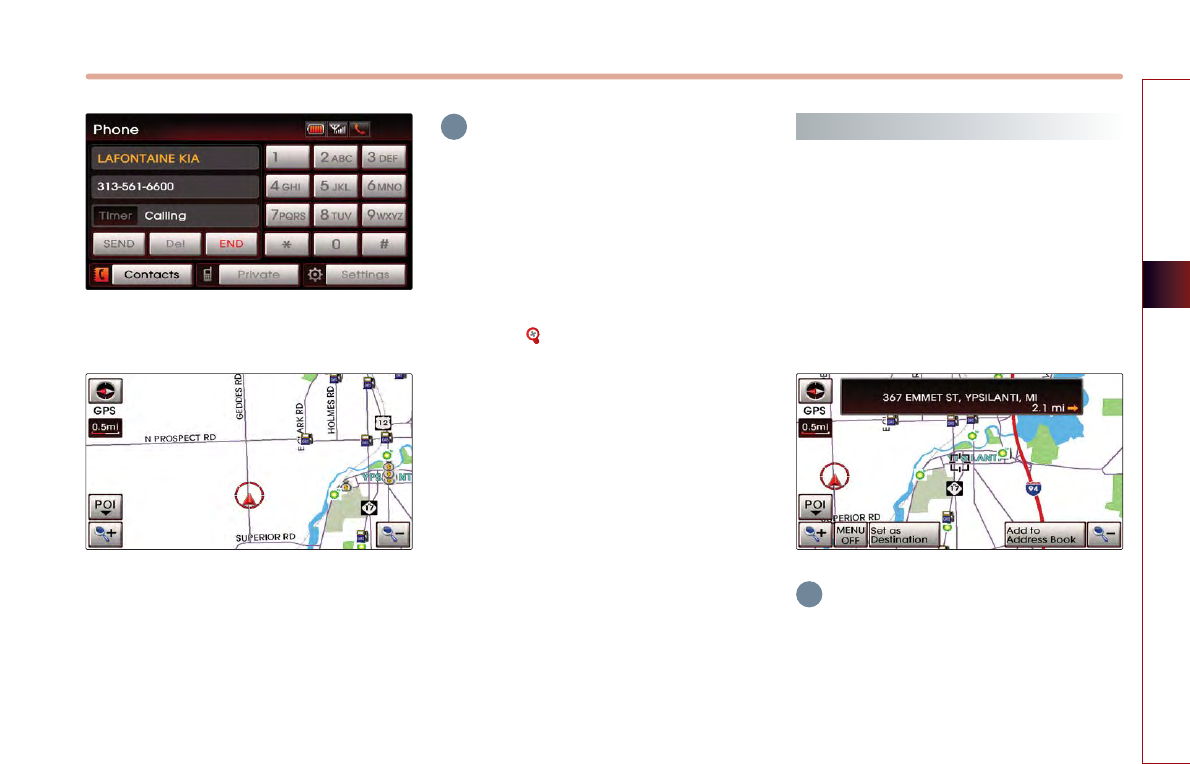
NAVIGATION SYSTEM 3-11
NAVIGATION SYSTEM
Bluetooth is used to make a call to the
POI facility.
Once the call is ended, the map is
restored to the current vehicle location.
INFORMATION
●Making a call is not possible if there is no
telephone information for a POI or if there is
no mobile phone connected through
Bluetooth.
●For more information of mobile phone
authentication through Bluetooth or
detailed information on conducting search,
refer to [Pairing and connecting a
Bluetooth phone], page 5-4.
Scrolling map
Press the map area on the map screen.
The selected point will be centered on the
screen and the scroll mark will be displayed.
Information about the marked point and
straight line distance from the current
position will be displayed at the top of the
screen.
INFORMATION
If a map area on the map screen is pressed,
the map will continuously scroll in the
corresponding direction until the pressing is
released.
i
i
3-12 NAVIGATION SYSTEM
PART 3 NAVIGATION SYSTEM
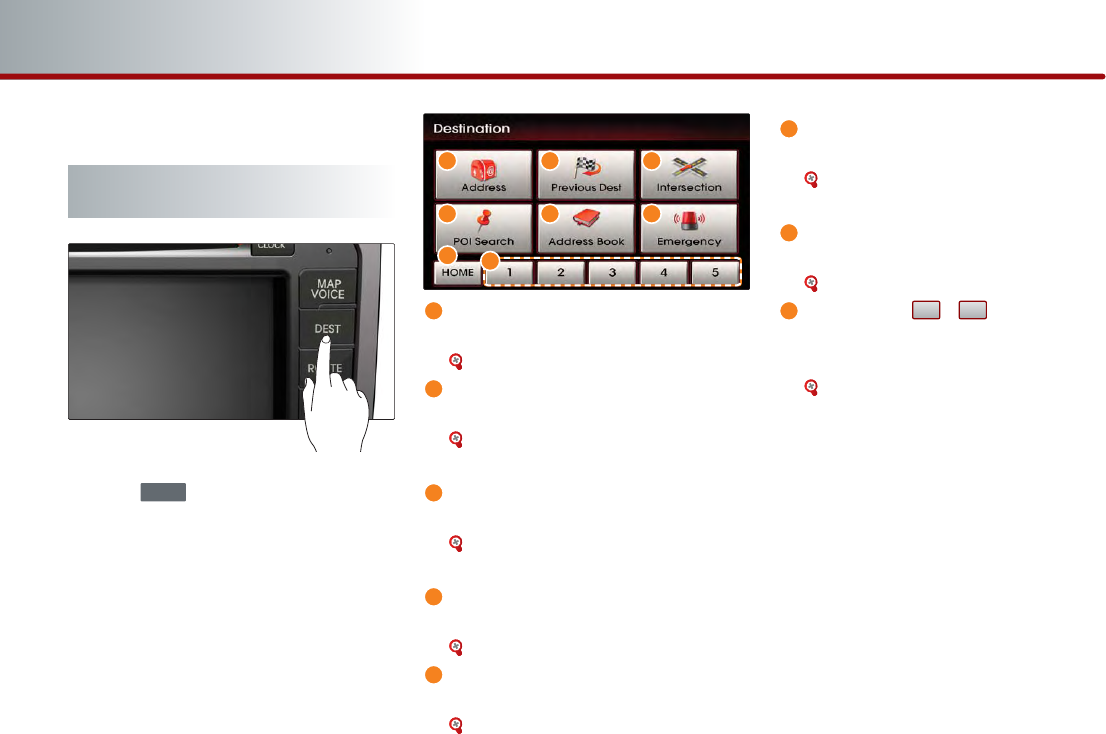
Setting a destination
Destination menu screen and
functions
Press the key on the control panel to
display the destination menu screen.
Address : Sets the destination through
address search.
[Searching an Address], page 3-13.
Previous Dest : Sets the destination
through the previous destination list.
[Searching a Previous Destination],
page 3-17 .
Intersection : Sets the destination
through intersection search.
[Searching an Intersection], page 3-
17.
POI Search : Sets the destination through
POI Category search.
[Searching a POI], page 3-20 .
Address Book : Sets the destination
through address book search.
[Searching from Address book], page
3-24 .
Emergency : Sets the destination
through emergency facilities search.
[Searching for Emergency facilities],
page 3-25 .
HOME : Sets the stored HOME as the
destination.
[Searching your Home], page 3-25 .
Favorite place ~ :
Sets the destination with one of the
stored favorite places.
[Searching favorite places], page 3-26 .
51
DEST
a
a b c
g
d e f
b
c
d
e
f
g
h
h
NAVIGATION SYSTEM 3-13
NAVIGATION SYSTEM
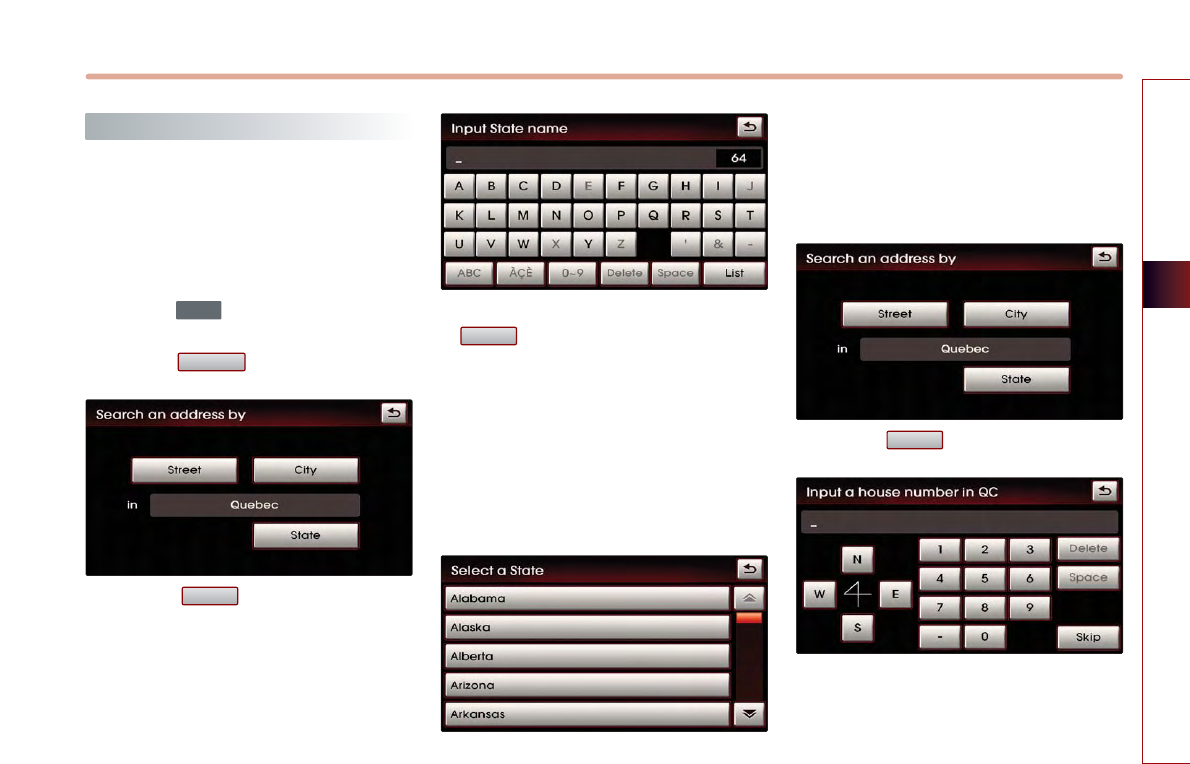
Searching a Destination
■
Searching an Address
There are 2 ways to set the destination
through address search-(a) by street, (b) by
city.
Press the key.
Press the button.
Press the button to change the
state.
Input the State name and press the
button.
If the number of matches with the input
is less than 4 results, then the state list
screen will be displayed automatically.
If the number of matches is only one
result, then the state will automatically be
changed without having to manually
select the state.
Select the desired state from the list to
change the state.
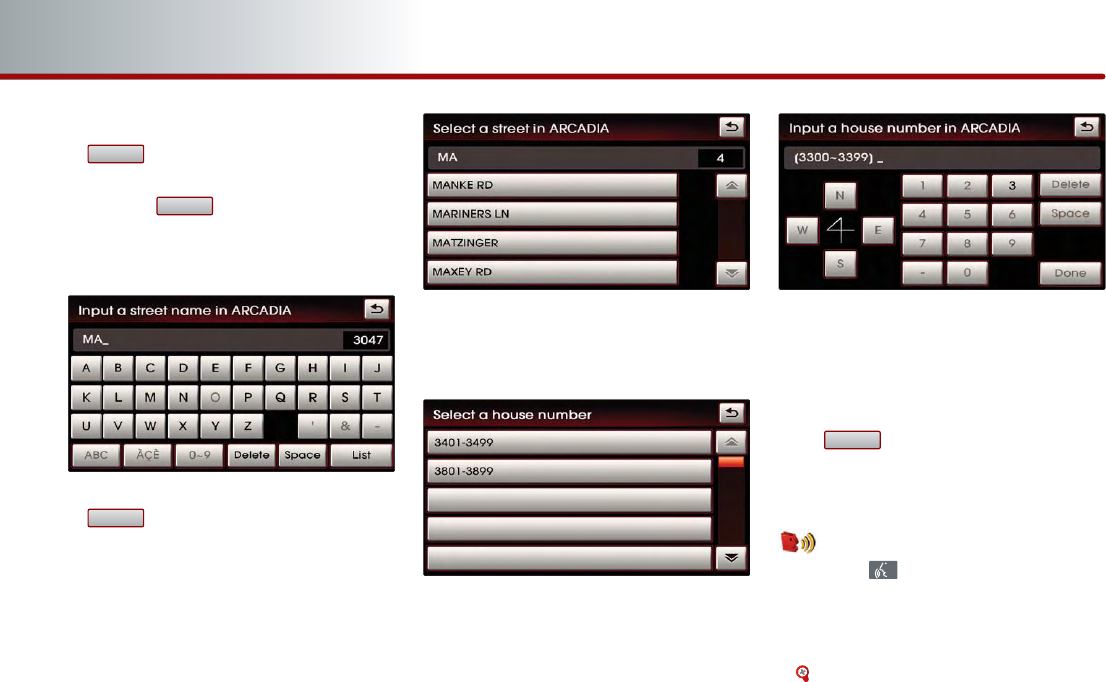
(a) by street
Press the button.
Street
List
State
Address
DEST
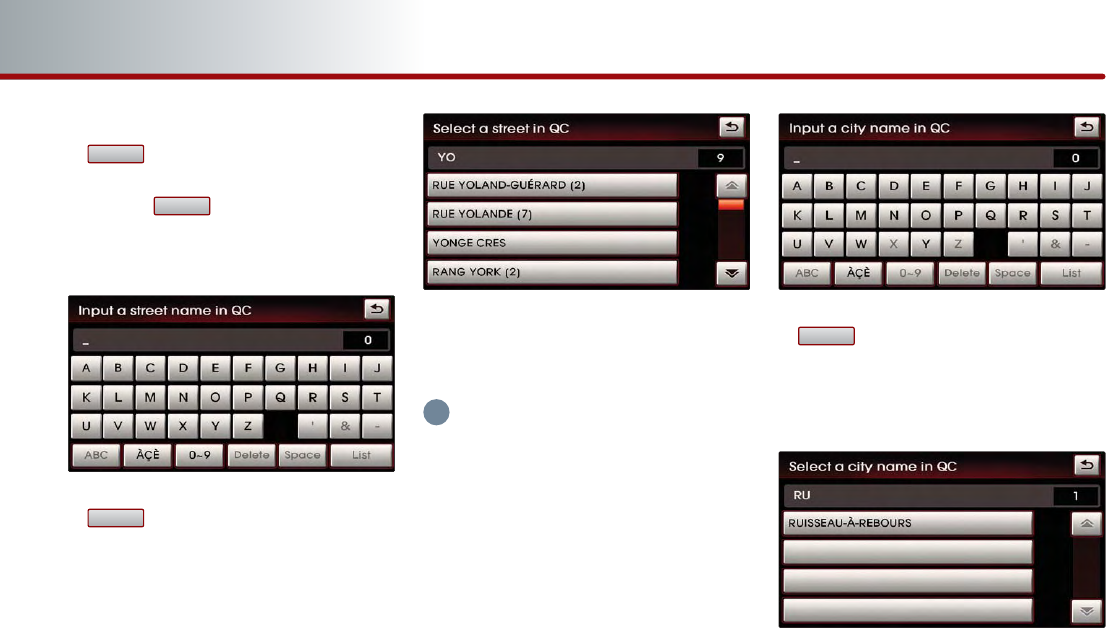
3-14 NAVIGATION SYSTEM
PART 3 NAVIGATION SYSTEM
Input the House number and Press the
button to complete.
If the House number is not recognized,
press the button.
In this case, the range of house numbers
will be displayed during the last step.
Input the Street name and press the
button.
If the number of matches with the input
is less than 4 results, then the street list
screen will be displayed automatically.
If the desired street from the list is
selected, the corresponding position will
be displayed on the map.
INFORMATION
If more than 30 cities exist with the selected
street, then the city input screen will be
displayed. If less than 30 cities exist, then the
city selection screen will be displayed.
Input the city name and press the
button to complete.
If the number of matches with the input
is less than 4 results, then the list screen
will be displayed automatically.
Select the desired city from the list.
List
List
Skip
Done
i
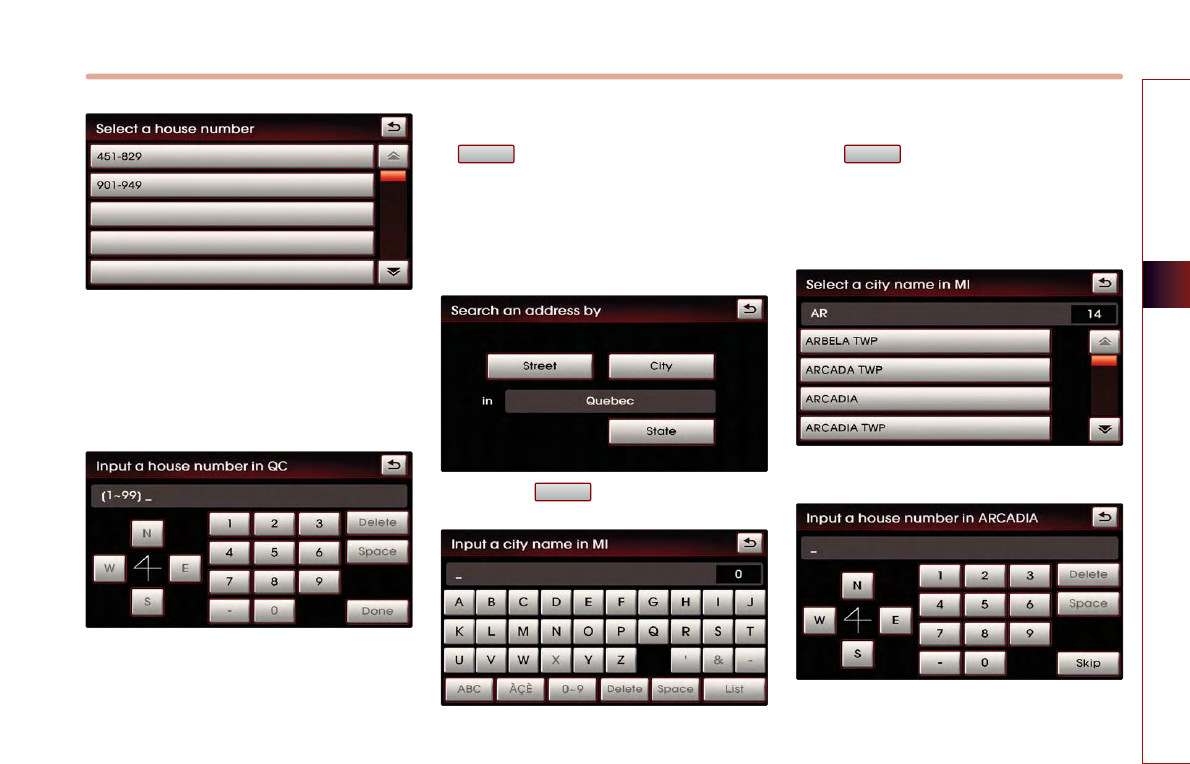
NAVIGATION SYSTEM 3-15
NAVIGATION SYSTEM
This screen will be displayed if the House
number had not been inputted during
step
and more than 2 house numbers
ranges exist.
Select the desired House number range.
This screen will be displayed if the House
number had not been inputted during
step
and only one house numbers
range exists.
Input the House number and press the
button to complete.
The corresponding position will be
displayed on the map.
(b) by city
Press the button.
Input the city name and press and press
the button.
If the number of matches with the input
is less than 4 results, then the city list
screen will be displayed automatically.
Select the desired city from the list.
List
City
Done
3-16 NAVIGATION SYSTEM
PART 3 NAVIGATION SYSTEM
Input the house number and press the
button to complete.
If the House number is not recognized,
press the button.
In this case, the range of house numbers
will be displayed during the last step.
Input the Street name and press the
button to complete.
If the number of matches with the input is
less than 4 results, then the street list
screen will be displayed automatically.
Select the desired street from the list and
the corresponding position will be
displayed on the map.
This screen will be displayed if the House
number had not been inputted during
step
and more than 2 House number
ranges exist.
Select the desired House number range.
This screen will be displayed if the House
number had not been inputted during
step
and only one House number
range exists.
Select the house number range and Press
the button to complete.
The corresponding position will be
displayed on the map.
Voice Command
1. Press the key on the steering wheel
remote controller.
2. After the beep sound, say a command.
"Find address"
[Find address], page 4-19.
Done
List
Skip
Done
NAVIGATION SYSTEM 3-17
NAVIGATION SYSTEM
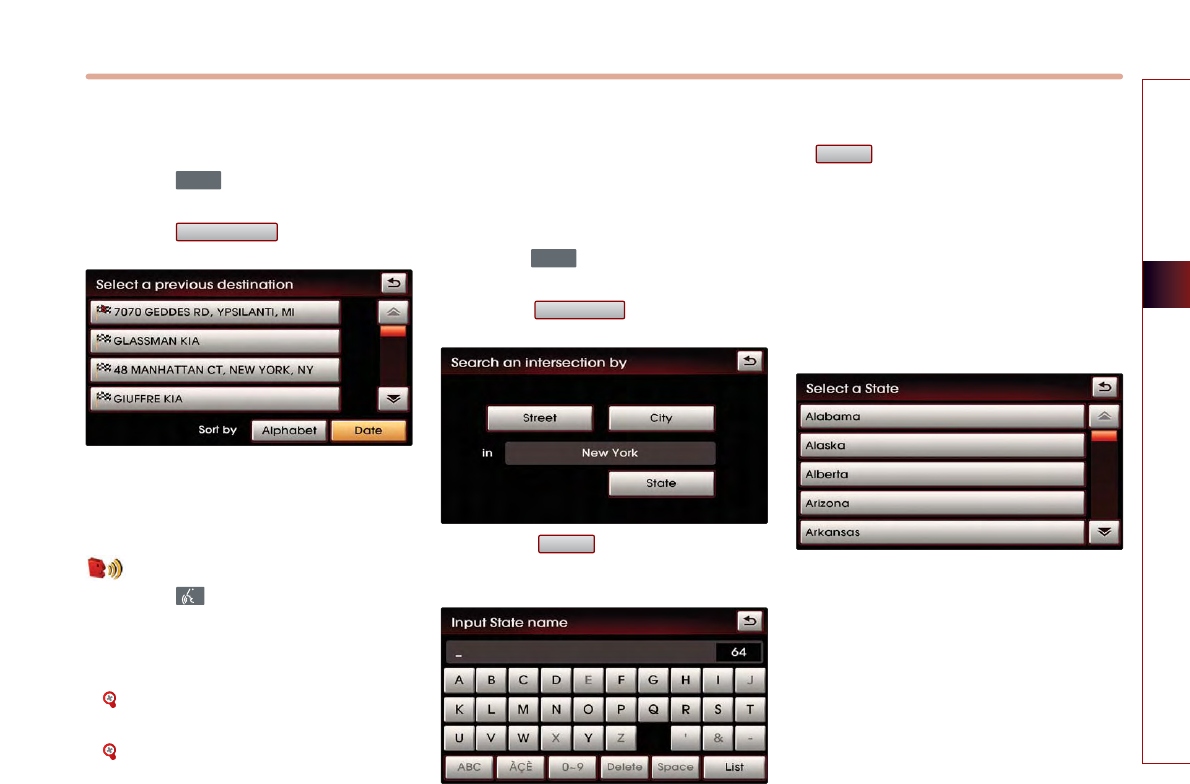
■
Searching a Previous Destination
Press the key.
Press the button.
Select the desired previous destination.
The corresponding position will be
displayed on the map.
Voice Command
1. Press the key on the steering wheel
remote controller.
2. After the beep sound, say a command.
"Previous destination"
[Previous destination], page 4-24.
"Previous start point"
[Previous start point], page 4-25.
■
Searching an Intersection
There are two ways to set the destination
through intersection search-(a) by street, (b)
by city.
Press the key.
Press the button.
Press the button to change the
state.
Input the state name and press the
button. If the number of matches
with the input is less than 4 results, then
the state list screen will be displayed
automatically.
If the number of matches is only one
result, then the state will automatically be
changed without having to manually
select the state.
Select the desired state from the list to
change the state.
List
State
Intersection
DEST
Previous Dest
DEST
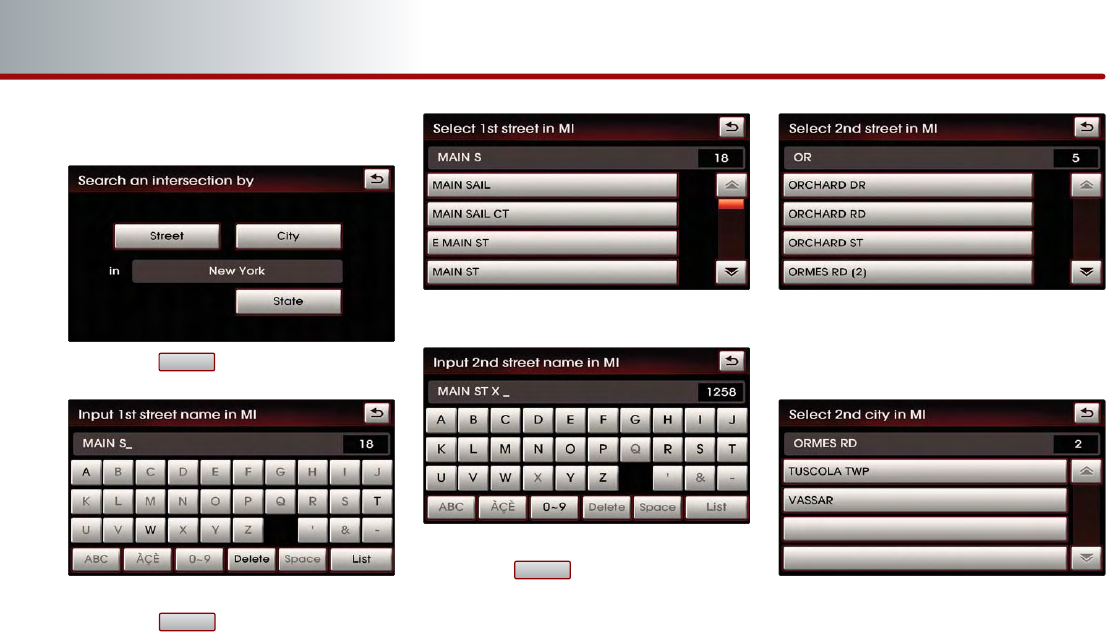
(a) by street
Press the button.
Input the name of the 1st street and
press the button.
If the number of matches with the input
is less than 4 results, then the street list
screen will be displayed automatically.
Select the desired 1st street from the list.
Input the name of the 2nd street and
press the button.
If the number of matches with the input
is less than 4 results, then the street list
screen will be displayed automatically.
Select the desired 2nd street menu from
the list. The corresponding position will
be displayed on the map.
If the selected 2nd street is within more
than 2 cities, then the city list screen will
be displayed.
Select the desired city menu from the list.
The corresponding position will be
displayed on the map.
List
List
Street
3-18 NAVIGATION SYSTEM
PART 3 NAVIGATION SYSTEM
NAVIGATION SYSTEM 3-19
NAVIGATION SYSTEM
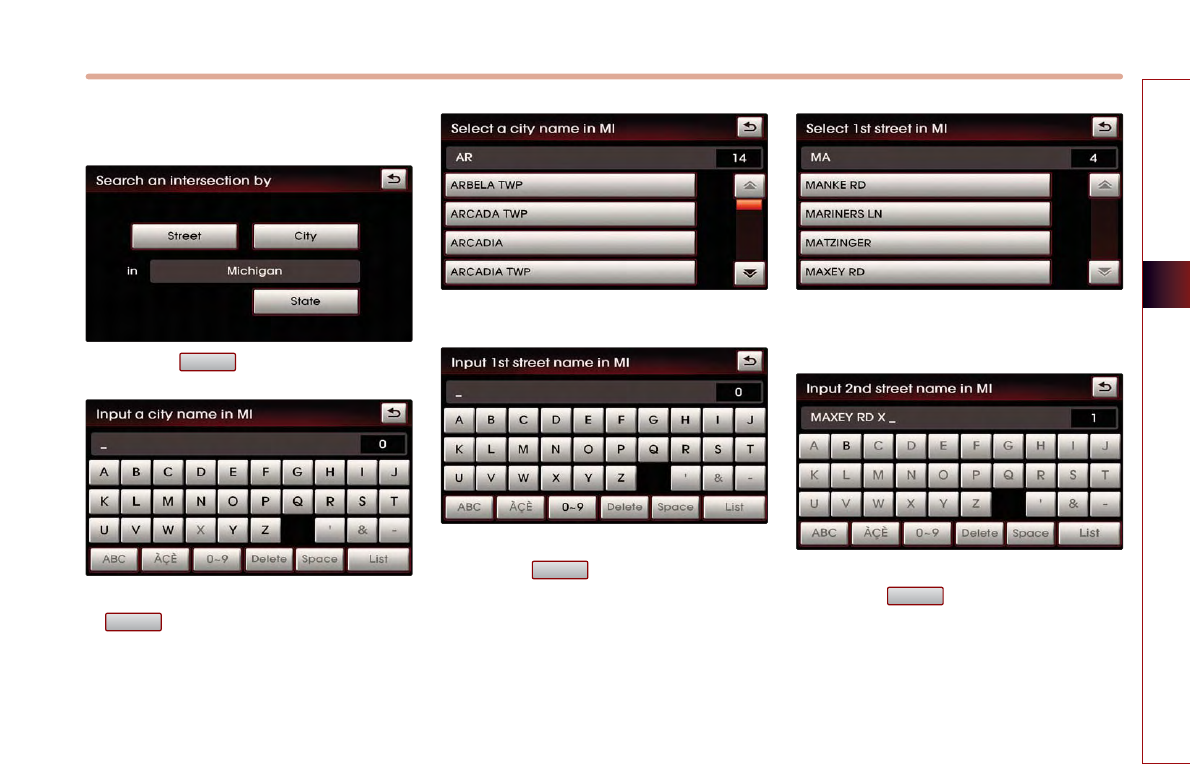
(b) by city
Press the button.
Input the city name and press the
button.
If the number of matches with the input
is less than 4 results, then the city list
screen will be displayed automatically.
Select the desired city name.
Input the name of the 1st street and
press the button.
If the number of matches with the input
is less than 4 results, then the street list
screen will be displayed automatically.
Select the desired 1st street menu from
the list.
Input the name of the 2nd street and
press the button.
If the number of matches with the input
is less than 4 results, then the street list
screen will be displayed automatically.
List
List
List
City
Select the desired 2nd street menu from
the list.
The corresponding position will be
displayed on the map.
If the selected 2nd street is within more
than 2 cities, then the city list screen will
be displayed.
Select the desired city menu from the list.
The corresponding position will be
displayed on the map.
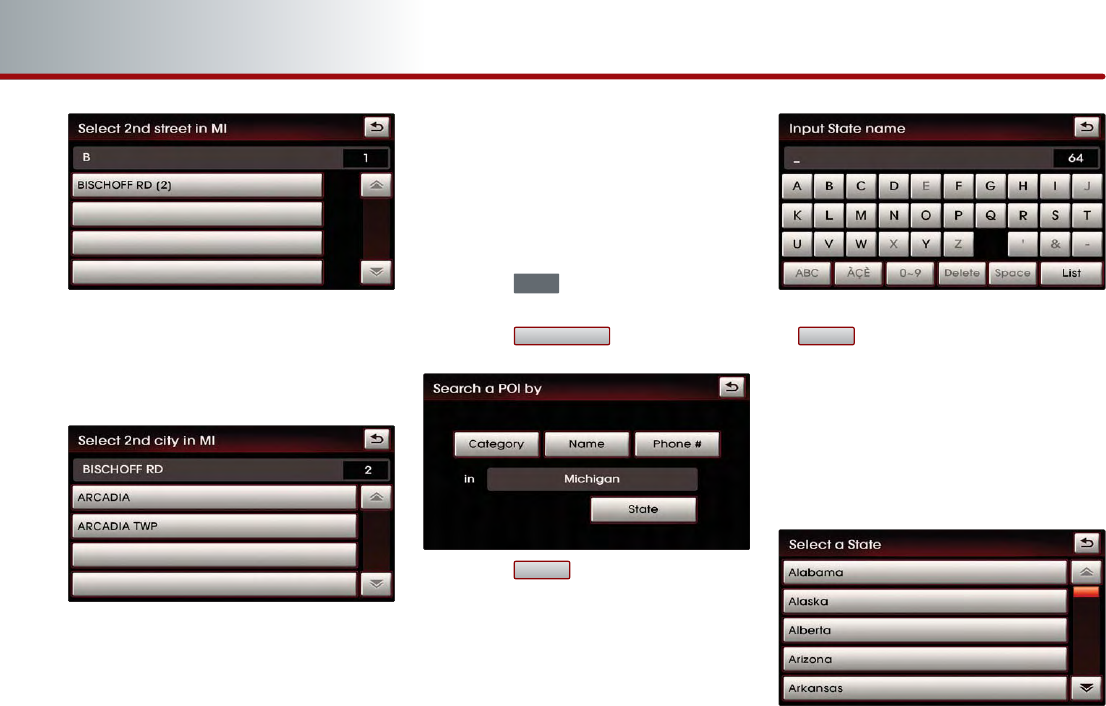
■Searching a POI
There are 3 ways to set the destination
through POI search - (a) by category, (b) by
name, (c) by phone number.
Press the key.
Press the button.
Press the button.
Input the state name and press the
button. If the number of matches
with the input is less than 4 results, then
the state list screen will be displayed
automatically. If there is only one
matching result, then the state will
automatically be changed without having
to manually select the state.
Select the desired state from the list to
change the state.
List
State
POI Search
DEST
3-20 NAVIGATION SYSTEM
PART 3 NAVIGATION SYSTEM
NAVIGATION SYSTEM 3-21
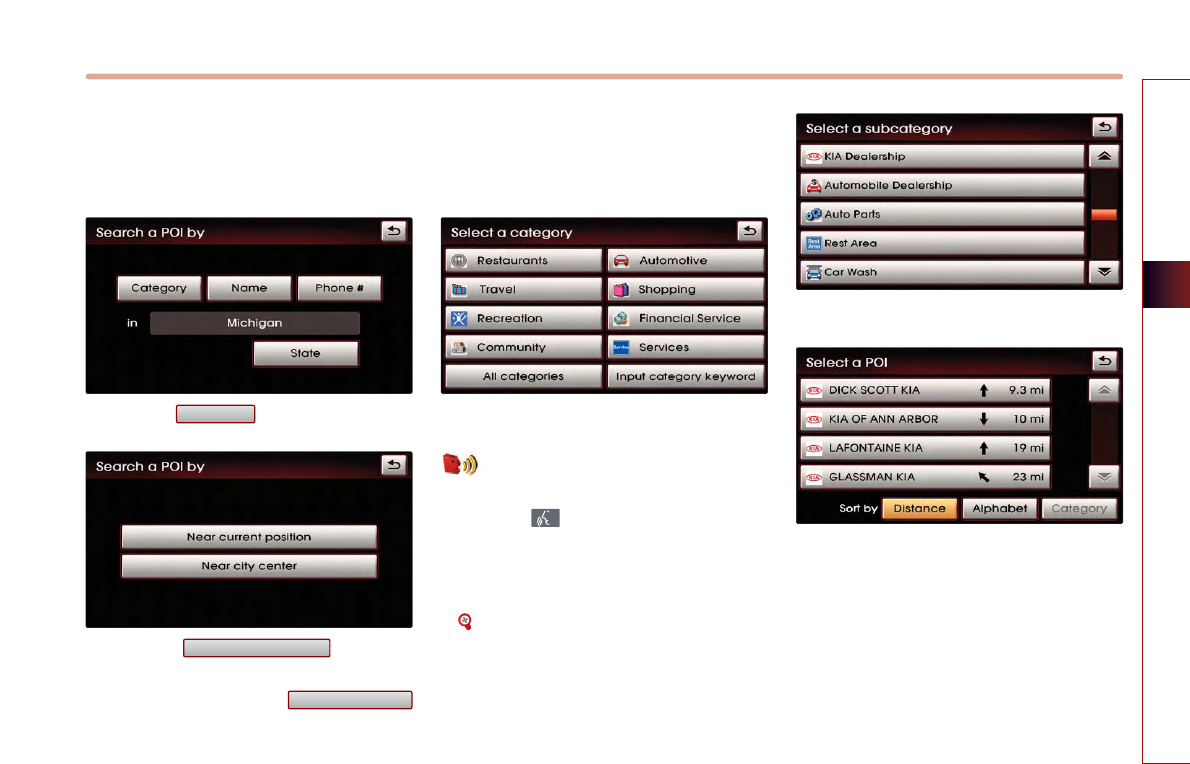
NAVIGATION SYSTEM
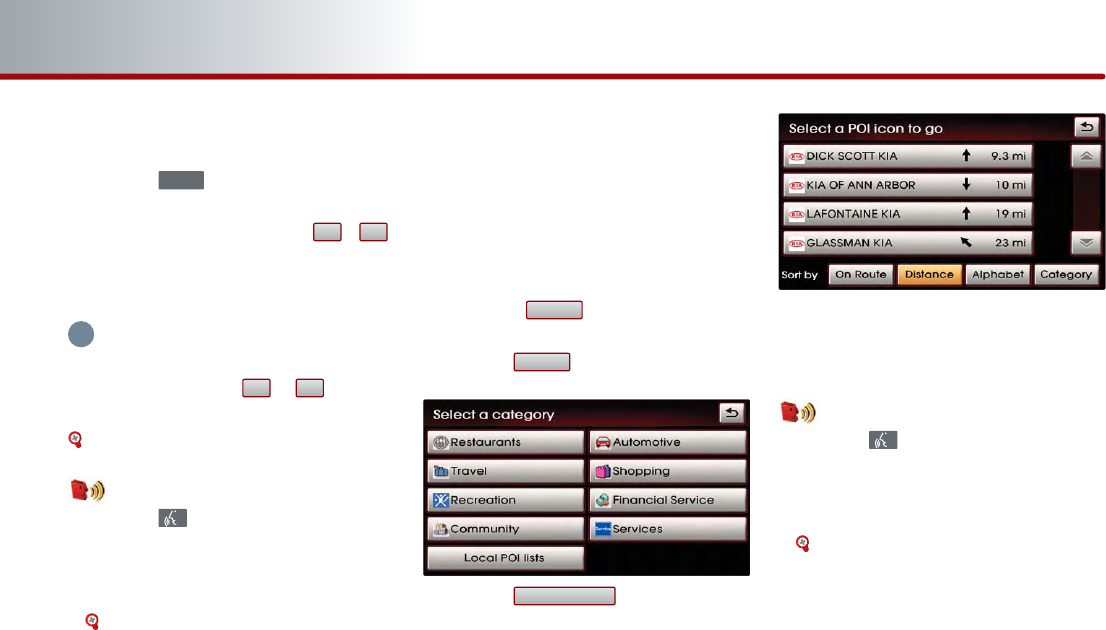
(a) By category
Searches for facilities nearby the current
position or from the city center.
Press the button.
Press the button to
search for facilities nearby the current
position, or press the
button to search for facilities in the near
city center.
(a-1) Near current position
Searches for facilities within a 30 mi (45km)
radius of the current position.
Press the desired main category menu.
Voice Command
1. Press the key on the steering wheel
remote controller.
2. After the beep sound, say a command.
"Find nearest POI"
[Find nearest POI], page 4-20.
Press the desired sub category menu.
Select the desired menu button.
The corresponding position will be
displayed on the map.
Near city center
Near current position
Category
3-22 NAVIGATION SYSTEM
PART 3 NAVIGATION SYSTEM
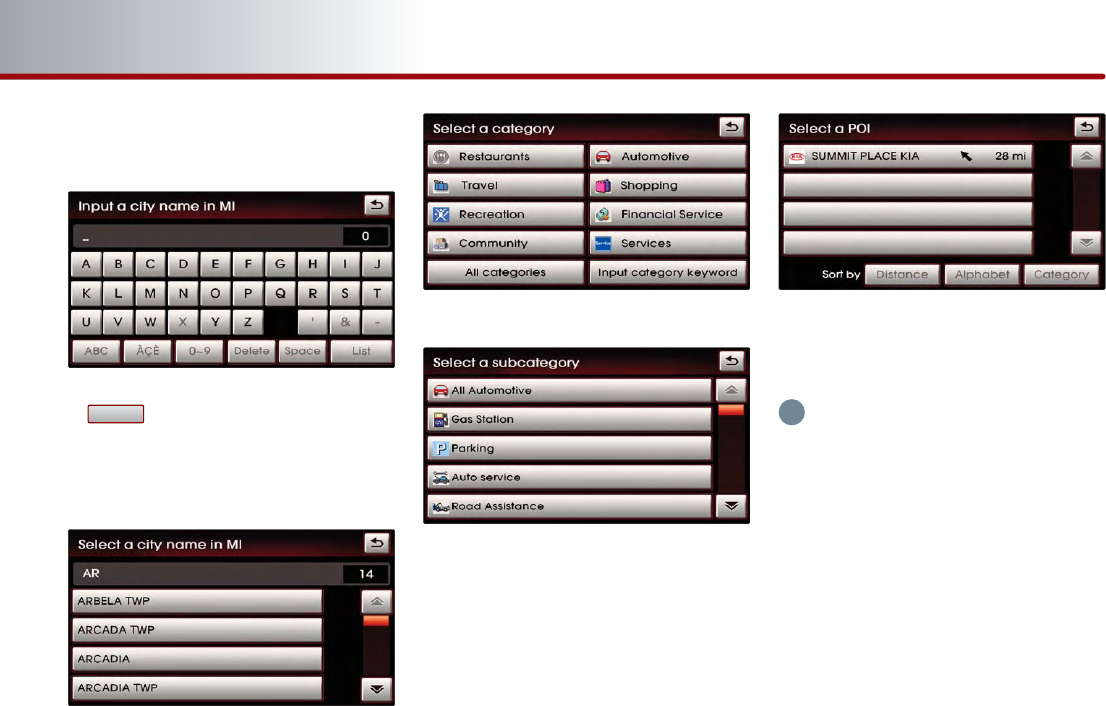
(
a-2) Near city center
Searches for facilities from the city center.
Input the city name and press the
button.
If the number of matches with the input
is less than 4 results, then the city list
screen will be displayed automatically.
Press the desired city menu.
Press the desired main category.
Press the desired sub category.
Select the desired menu button.
The corresponding position will be
displayed on the map.
INFORMATION
The distance on each POI item button refers
to the distance from the city center.
List
i

NAVIGATION SYSTEM 3-23
NAVIGATION SYSTEM
(b) By name
Press the button.
Input the name of the POI and press the
button.
If the number of matches with the input
is less than 4 results, then the facilities list
screen will be displayed automatically.
Select the desired POI menu.
The corresponding position will be
displayed on the map.
INFORMATION
When necessary, the search conditions for
the city and category can be changed by
pressing the button.
●
Changing City
Press the button.
Input the city name and press the
button.
Select the desired city name.
●
Changing Category
Press the button.
Select the desired main category menu.
Select the desired sub category menu.
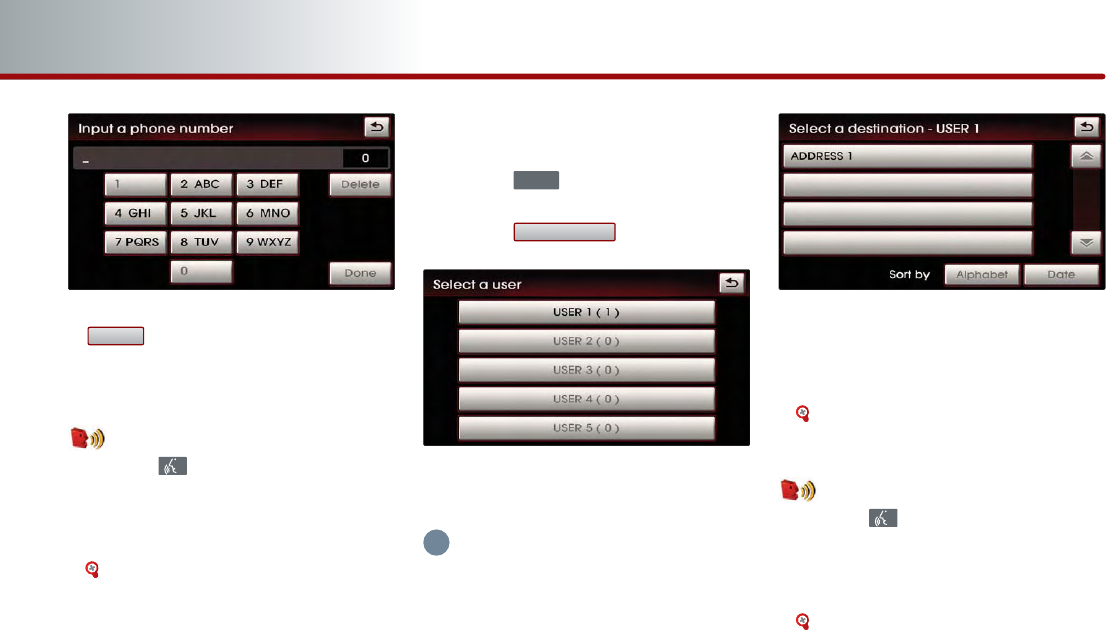
(c) By phone number
Press the button.
Phone #
Category
List
City
Advanced
List
Name
i
3-24 NAVIGATION SYSTEM
PART 3 NAVIGATION SYSTEM
Input the phone number and Press the
button to complete.
The corresponding position will be
displayed on the map.
Voice Command
1. Press the key on the steering wheel
remote controller.
2. After the beep sound, say a command.
"Destination POI by Phone Number"
[Destination POI by phone number],
page 4-22.
■
Searching from Address book
Press the key.
Press the button.
Select the desired address book (user)
menu.
INFORMATION
This system provides 5 address books. Each
addresses book can hold up to 200 entries.
Select the desired address name from
the list.
The corresponding position will be
displayed on the map.
[Registering new address in address
book], page 3-43.
Voice Command
1. Press the key on the steering wheel
remote controller.
2. After the beep sound, say a command.
"Destination by address book"
[Destination by address book], page 4-
24.
Address book
DEST
Done
i
NAVIGATION SYSTEM 3-25
NAVIGATION SYSTEM
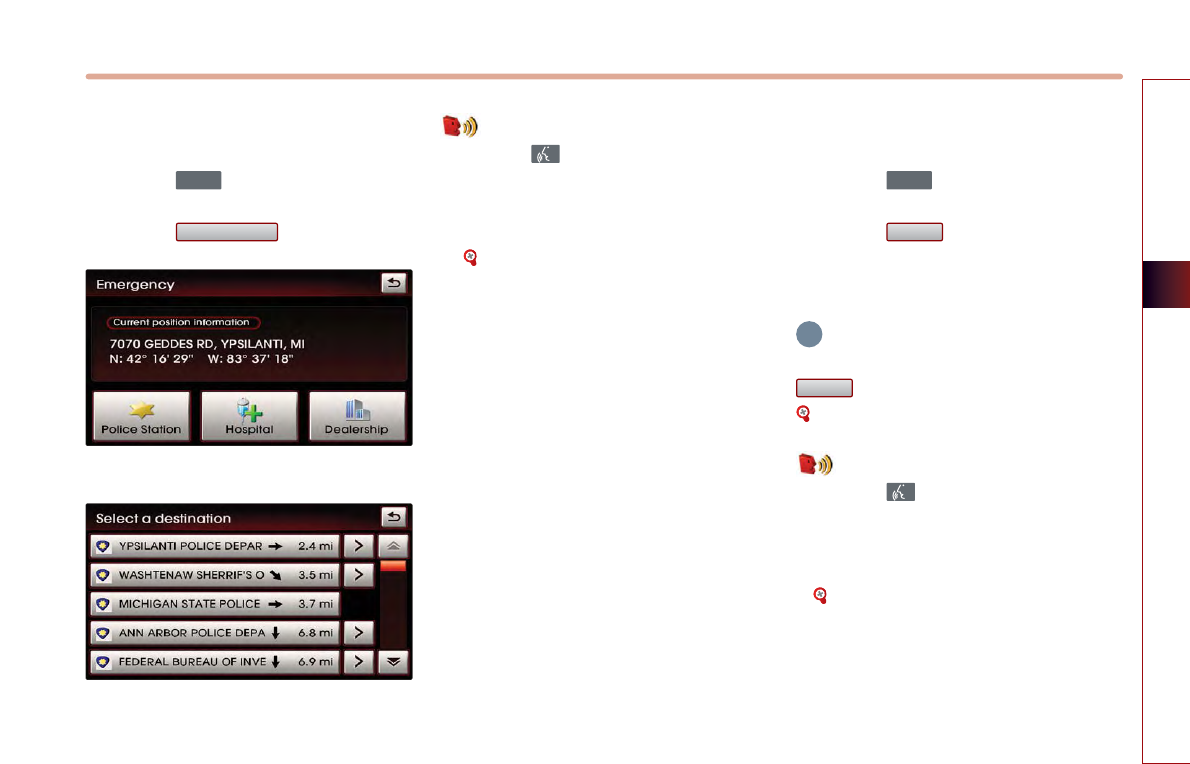
■
Searching for Emergency facilities
Press the key.
Press the button.
Select the desired facility category.
Select the desired facility.
The corresponding position will be
displayed on the map.
Voice Command
1. Press the key on the steering wheel
remote controller.
2. After the beep sound, say a command.
"Find emergency <Category>"
[Find emergency <Category>], page 4-
23.
■
Searching your Home
Press the key.
Press the button.
The Home position will be displayed on
the map.
INFORMATION
If the Home address is not registered, then the
button will be displayed.
[Registering home address], page 3-48.
Voice Command
1. Press the key on the steering wheel
remote controller.
2. After the beep sound, say a command.
"Go home"
[Go home], page 4-25.
HOME
HOME
DEST
Emergency
DEST
i
3-26 NAVIGATION SYSTEM
PART 3 NAVIGATION SYSTEM
■
Searching favorite places
Press the key.
Select the desired button from ~ .
The corresponding position will be
displayed on the map.
INFORMATION
If the address of the Favorite place is not
registered, then the ~ buttons
without registered addresses will be disabled.
[Registering favorite place], page 3-49.
Voice Command
1. Press the key on the steering wheel
remote controller.
2. After the beep sound, say a command.
"Destination by memory point <1 to 5>"
[Destination by memory point <1 to 5>],
page 4-25.
■
Searching from MAP
Position the scroll mark at the destination
by scrolling the map on the map screen.
■
Searching POI by local POI list
Press the button on the map
screen.
Press the button.
Press the button.
Select the desired POI menu.
The corresponding position will be
displayed on the map.
Voice Command
1. Press the key on the steering wheel
remote controller.
2. After the beep sound, say a command.
"Find nearest <POI name>"
[Find nearest <POI name>], page 4-21.
Local POI lists
Others
POI
▼
51
51
DEST
i
NAVIGATION SYSTEM 3-27
NAVIGATION SYSTEM
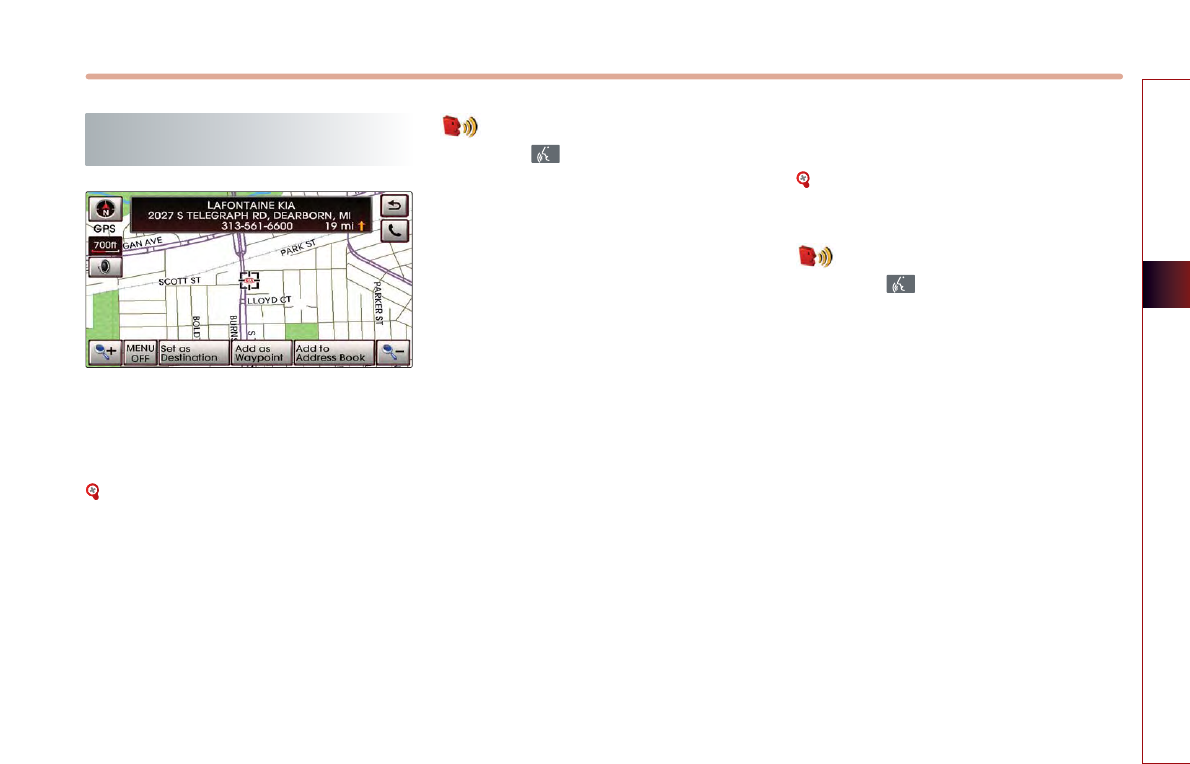
Operating after searching a
destination
■
Changing destination position :
Changes the position of the destination by
scrolling the map.
[Scrolling map], page 3-11.
■
Setting as Destination / waypoint :
Sets the position as the destination or
waypoint.
Voice Command
1. Press the key on the steering wheel
remote controller.
2. After the beep sound, say a command.
"Start guidance"
(Sets the position of the scroll mark as the
destination and begins route guidance.)
■
Adding to address book :
Saves the position in the address book.
[Registering new address in address
book], page 3-43.
Voice Command
1. Press the key on the steering wheel
remote controller.
2. After the beep sound, say a command.
"Store Marked Location to <text tag>"
3-28 NAVIGATION SYSTEM
PART 3 NAVIGATION SYSTEM
Operating after setting a
destination
Starting Route Guidance
Press the button. Route
Guidance will start.
●
Route simulation
If the button is pressed
and held for over 0.8 second, then the
route simulation will start.
If the key on the control panel is
pressed during route simulation, then
route simulation will be terminated.
Voice Command
1. Press the key on the steering wheel
remote controller.
2. After the beep sound, say a command.
"Time to destination"
"Distance to destination"
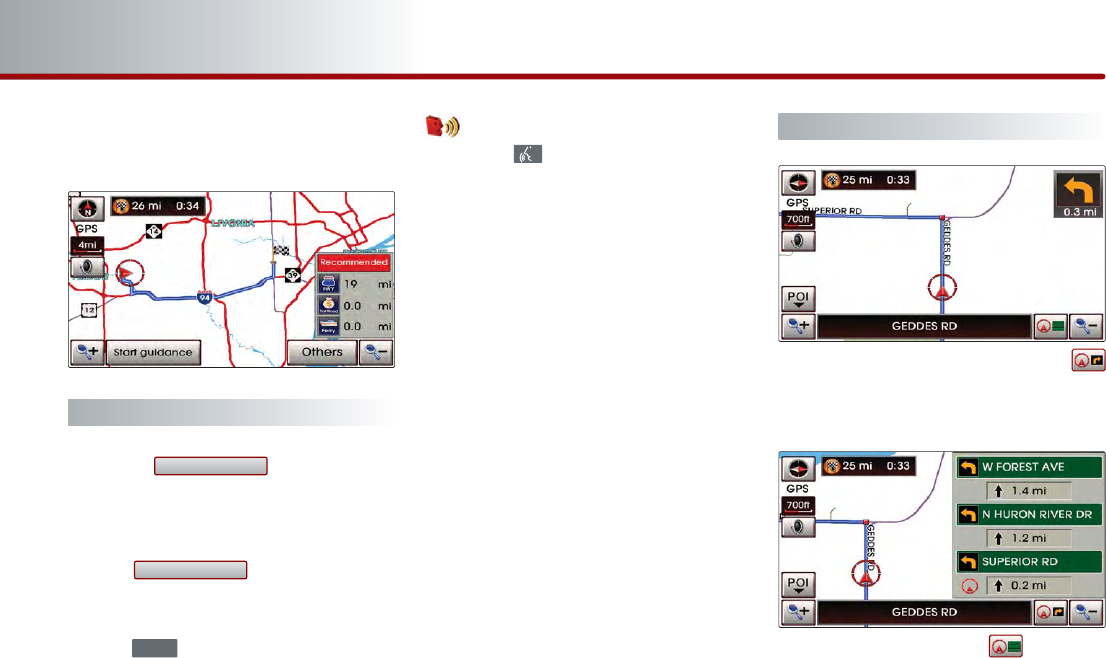
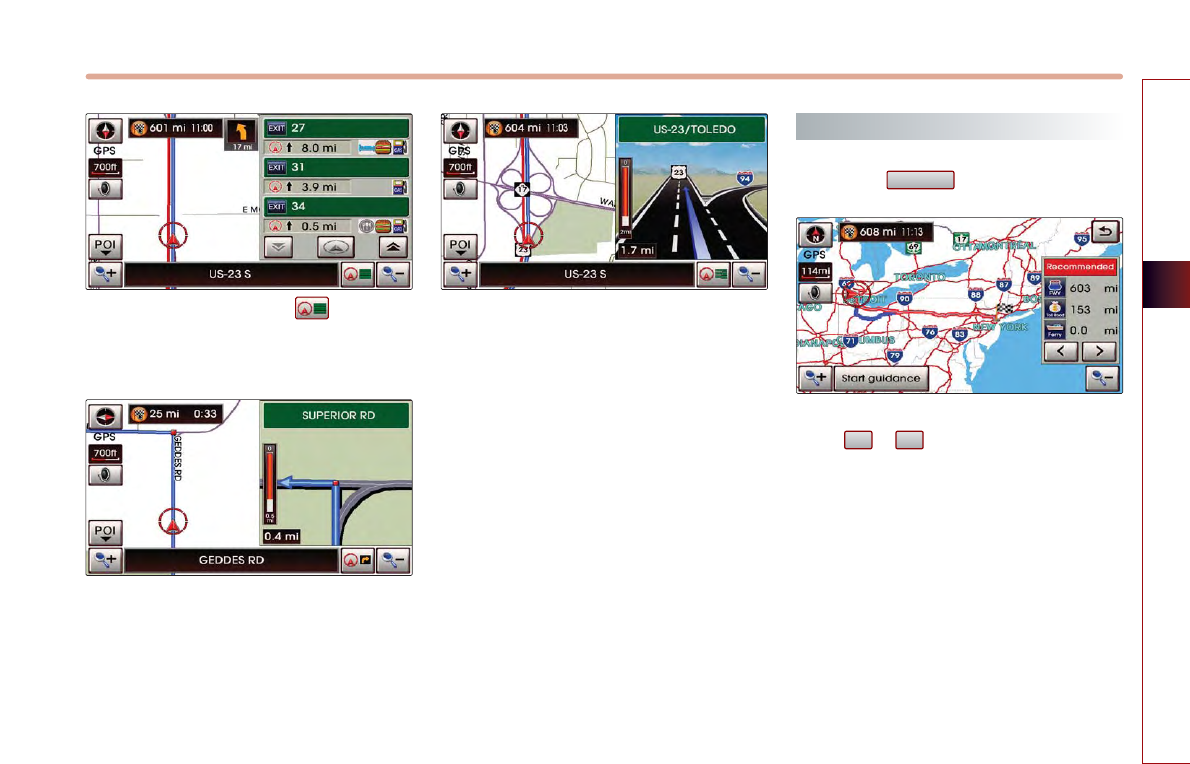
Route guidance screen
●
Symbol guidance mode : If the
button is pressed, then the following
route guidance screen will be displayed.
●
Turn-List mode : If the button is
pressed, then the following route
guidance screen will be displayed.
MAP
Start Guidance
Start Guidance
NAVIGATION SYSTEM 3-29
NAVIGATION SYSTEM
●
Highway mode : If the button is
pressed, then the following route
guidance screen will be displayed.
●
Intersection zoom mode : This route
guidance screen is automatically displayed
during guidance at an intersection.
Once guidance at the intersection is
complete, the screen will automatically
disappear and the previous guidance
screen will be restored.
●
Highway junction mode : This route
guidance screen is automatically
displayed during guidance at highway
junctions.
Once guidance at a highway junction is
complete, this screen will automatically
disappear and the previous guidance
screen will be restored.
Selecting other route
Press the button.
Other routes can be selected by pressing
the or buttons.
▶◀
Others
3-30 NAVIGATION SYSTEM
PART 3 NAVIGATION SYSTEM
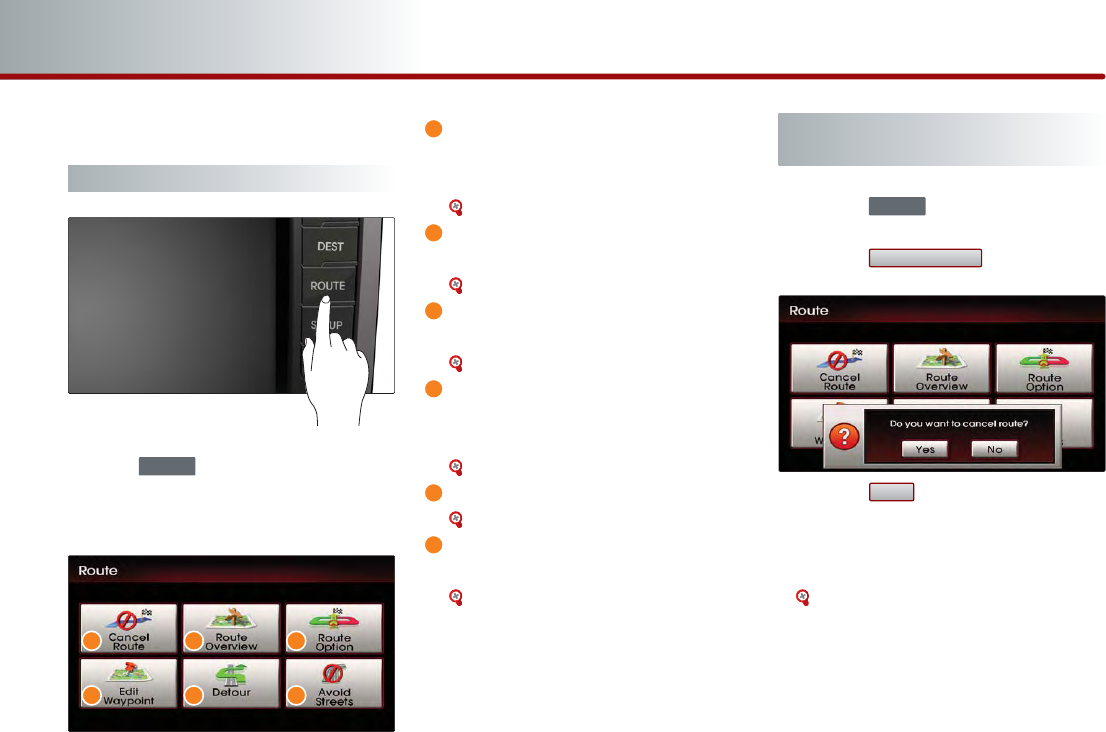
Route guidance
Route menu screen and functions
Press the key on the control panel.
The ROUTE menu screen will be displayed.
Cancel Route: Deletes destination,
waypoints and terminates route
guidance.
[Finishing route guidance], page 3-30 .
Route Overview: Displays the entire
route and route detailed.
[Route overview], page 3-31 .
Route Option: The route option can be
changed.
[Changing Route option], page 3-32 .
Edit Waypoint: Waypoints can be
added/deleted and the order can be
changed.
[Editing waypoints], page 3-32 .
Detour: Searches detour routes.
[Setting detour distance], page 3-35 .
Avoid Streets: Searches routes which
avoid the selected streets.
[Setting avoid streets on route], page
3-35.
Finishing route guidance (Delete
Destination)
Press the key.
Press the button.
Press the button.
The destination and waypoints are
deleted and the route guidance is
terminated.
[Finishing route guidance], page 3-30 .
Yes
Cancel Route
ROUTE
ROUTE
a
a b c
d e f
b
c
d
e
f
NAVIGATION SYSTEM 3-31
NAVIGATION SYSTEM
Voice Command
1. Press the key on the steering wheel
remote controller.
2. After the beep sound, say a command.
"Cancel route"
(Terminates route guidance and deletes the
set destination and waypoints.)
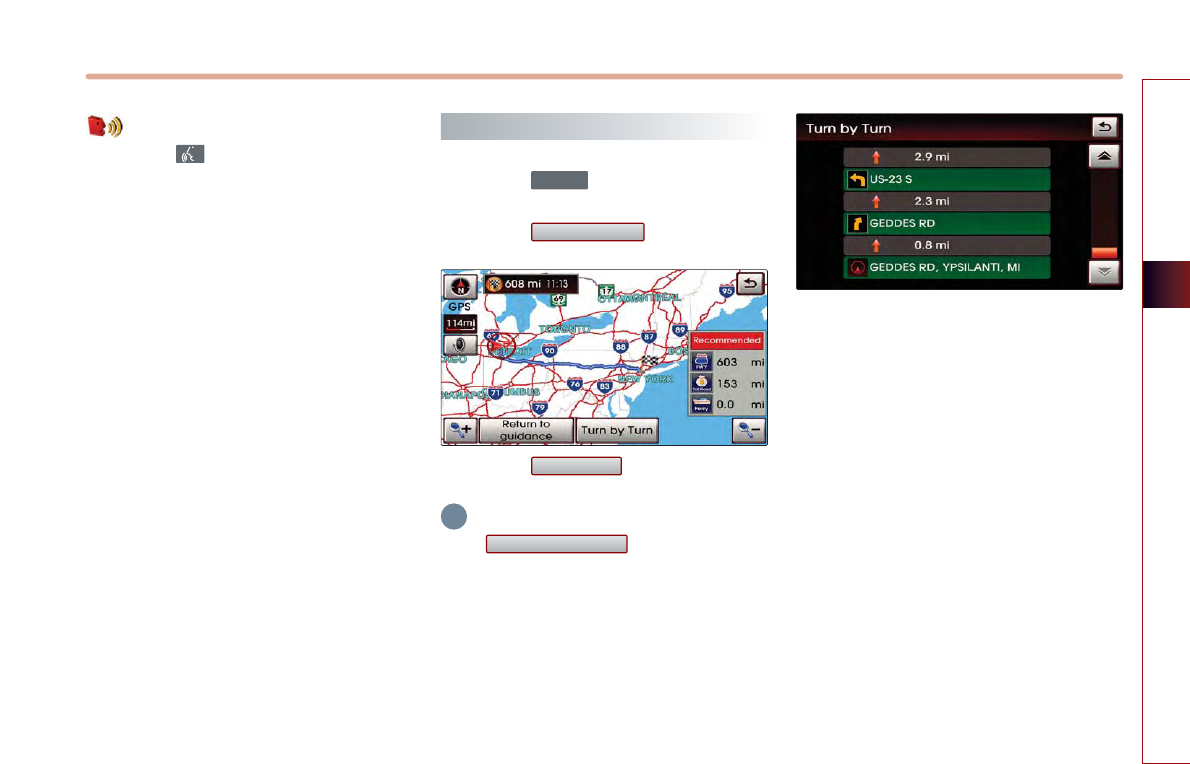
Route overview (View Entire Route)
Press the key.
Press the button.
Press the button.
INFORMATION
If the button is pressed,
route guidance screen is displayed.
The detailed route information can be
viewed.
Return to Guidance
Turn by turn
Route Overview
ROUTE
i
3-32 NAVIGATION SYSTEM
PART 3 NAVIGATION SYSTEM
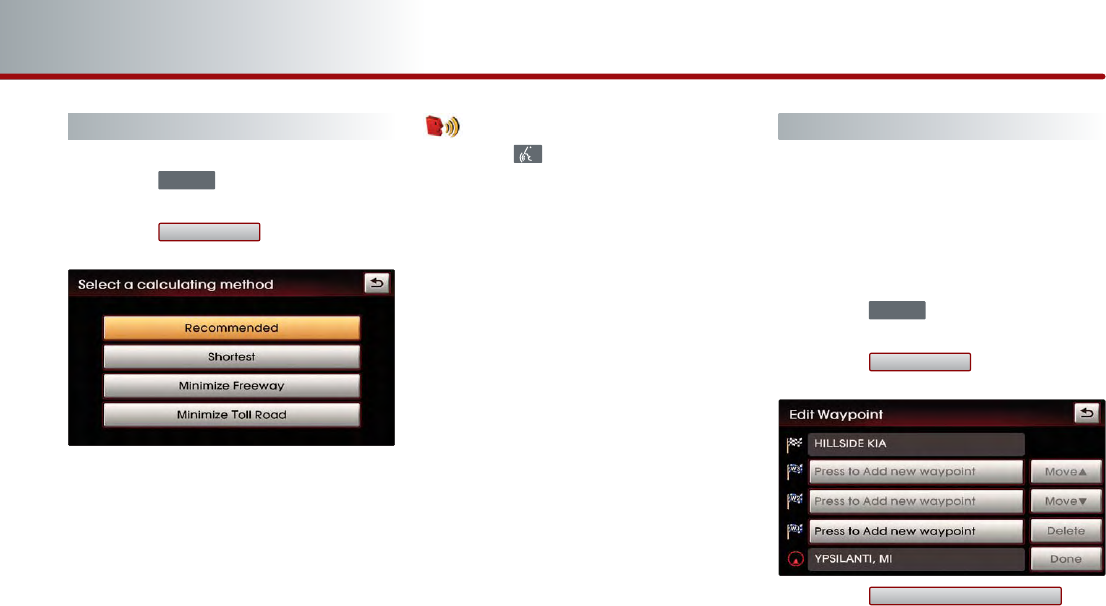
Changing Route option
Press the key.
Press the button.
Press the button for the desired route
guidance method.
Guidance will be restarted after
recalculating the route with the selected
guidance method.
Voice Command
1. Press the key on the steering wheel
remote controller.
2. After the beep sound, say a command.
"Replan recommended route"
"Replan shortest route"
"Replan minimize freeway route"
"Replan minimize toll road route"
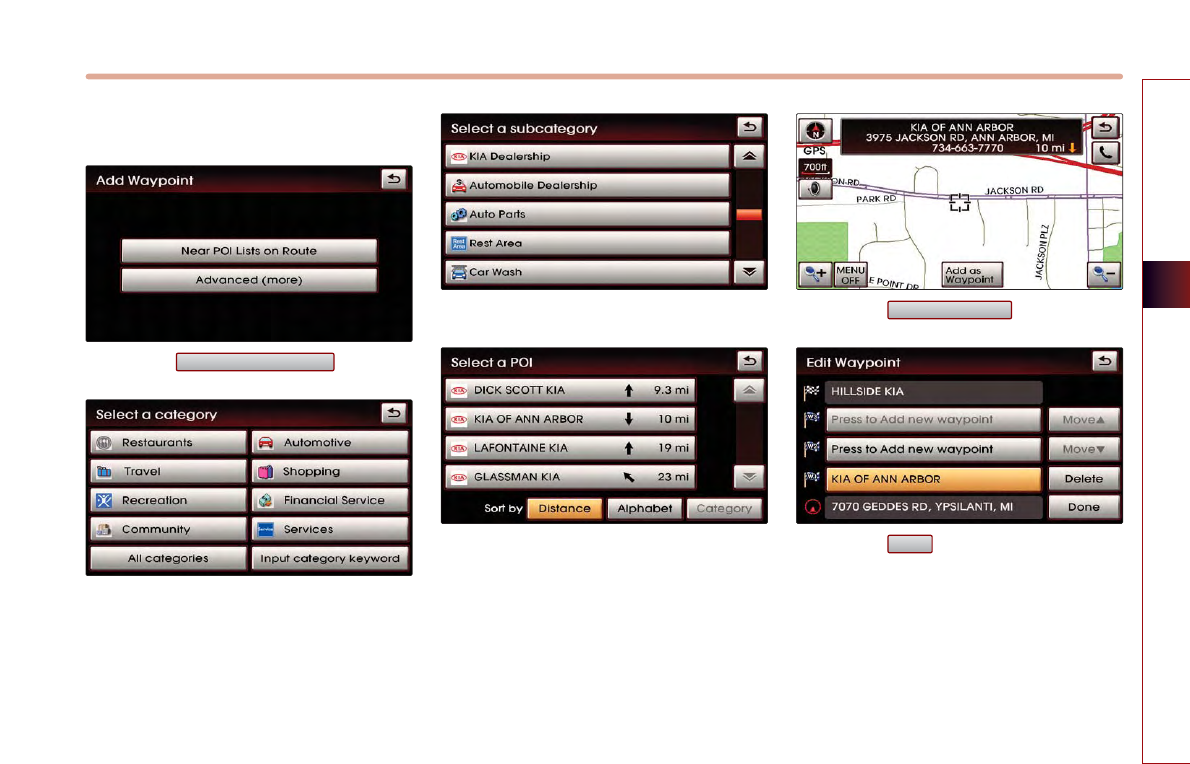
Editing waypoints
■
Adding waypoints
There are 2 ways to add waypoints - (a)
searching for POI nearest to the route, (b)
using advanced search.
Press the key.
Press the button.
Press the
button.
Press to add new waypoint
Edit Waypoint
ROUTE
Route Option
ROUTE
NAVIGATION SYSTEM 3-33
NAVIGATION SYSTEM
(a) Searching POI lists near route
Press the button.
Select the desired category.
Select the desired sub category from list.
Select the desired POI from the list.
The corresponding position will be
displayed on the map.
Press the button.
Press the button to complete.
Guidance will restart after recalculating
the route.
Done
Add as Waypoint
Near POI lists on Route
3-34 NAVIGATION SYSTEM
PART 3 NAVIGATION SYSTEM
(b) Using advanced Search
The method for searching waypoints through
the button is the same
method as searching destination.
[Searching a Destination], page 3-13.
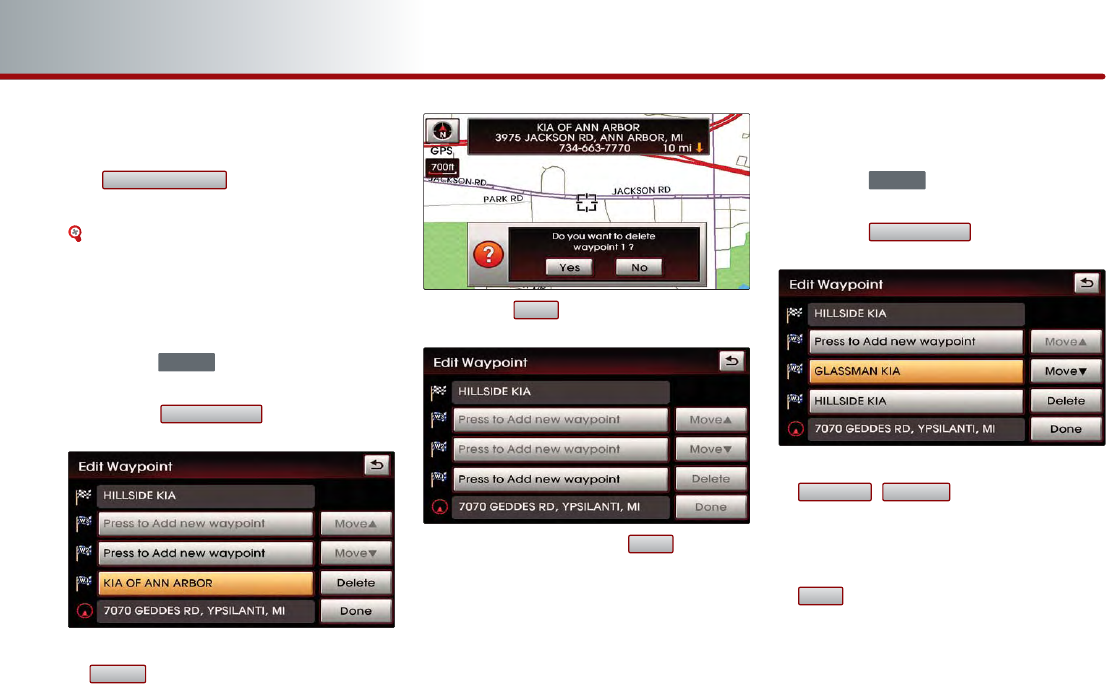
■
Deleting waypoints
Press the key.
Press the button.
Select the waypoint and press the
button.
Press the button.
After deleting, press the button to
complete.
Guidance will be restart after recalculating.
■
Re-ordering waypoints
Press the key.
Press the button.
Select the desired waypoint and use the
, buttons to change
the order.
Once re-ordering is complete, press the
button to complete.
Guidance will restart after recalculating
the route.
Done
MOVE
▼
MOVE
▲
Edit waypoint
ROUTE
Done
Yes
Delete
Edit waypoint
ROUTE
Advanced(more)
NAVIGATION SYSTEM 3-35
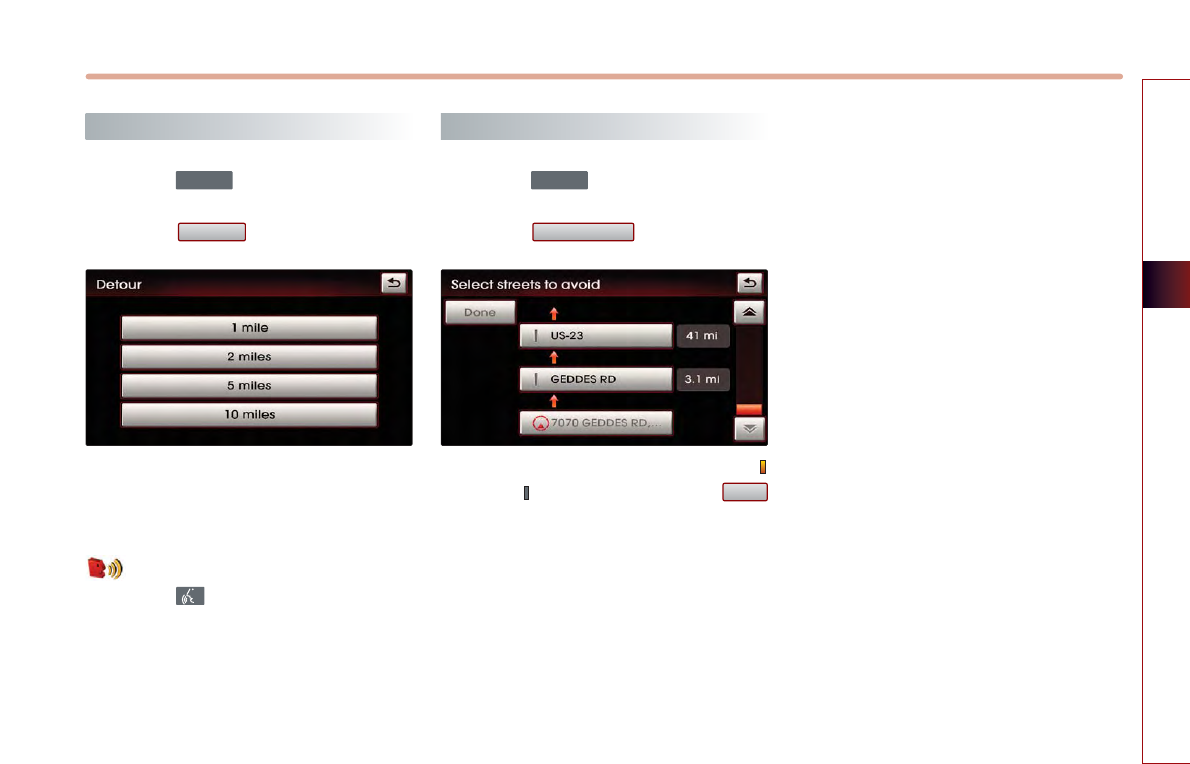
NAVIGATION SYSTEM
Setting detour distance
Press the key.
Press the button.
Select the desired detour range.
Guidance will restart after recalculating
the detour route.
Voice Command
1. Press the key on the steering wheel
remote controller.
2. After the beep sound, say a command.
"Detour <1 or 2 or 5 or 10> miles"
"Detour <1 or 2 or 5 or 10> kilometers"
Setting avoid streets on route
Press the key.
Press the button.
Select the desired streets to avoid(
avoid, allow) and press the
button to complete.
Guidance will restarted after recalculating.
Done
Avoid streets
ROUTE
Detour
ROUTE
3-36 NAVIGATION SYSTEM
PART 3 NAVIGATION SYSTEM
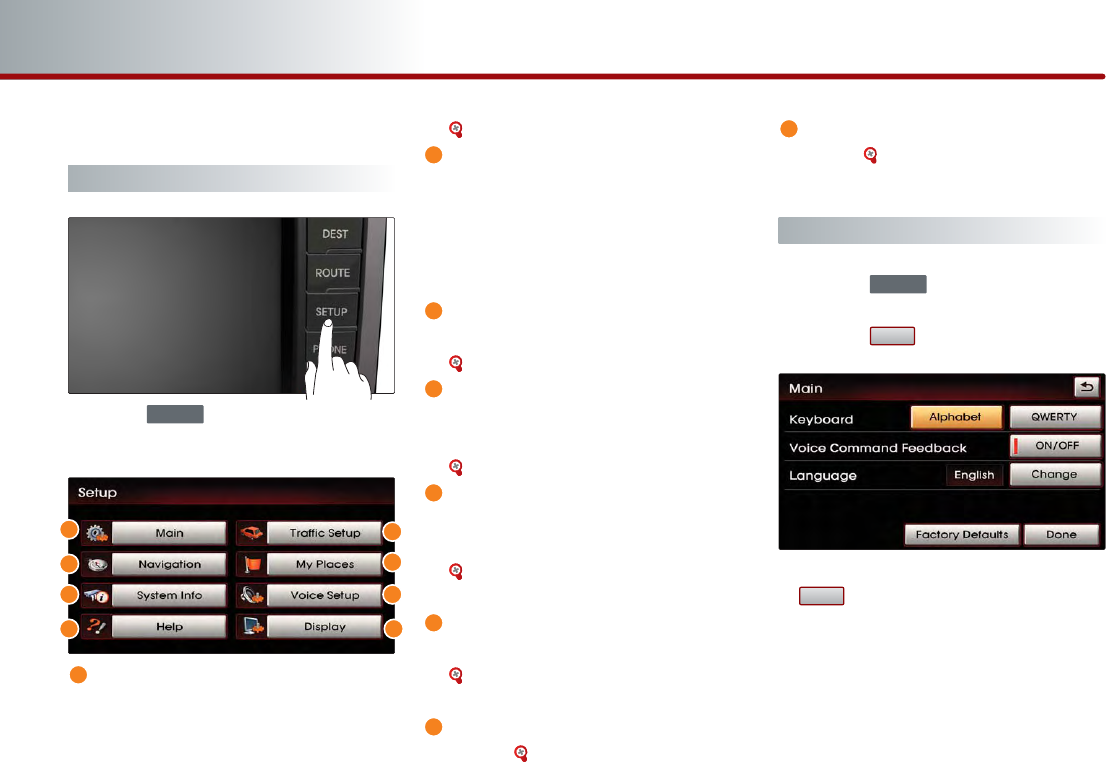
Setup and Information
Setup menu screen and functions
Press the key on the control panel
to display the setup menu screen.
Main button : Changes to the input
keyboard type, voice command feedback
ON/OFF settings and system initialization
can be made.
[Main setting], page 3-36 .
Traffic Setup button : Sets whether to
display traffic information on map,
whether to provide upcoming traffic
information voice guidance, and whether
to display the detour route popup
showing upcoming traffic information.
Navigation button : Navigation related
settings can be set.
[Navigation setting], page 3-38 .
My Places button : The Address book,
Home address, Favorite places, Previous
destination can be edited.
[My places setting], page 3-43 .
System Info button : The system version
information can be viewed and system
upgrades can be conducted.
[System information and update],
page 3-51 .
Voice Setup button : Adjusts the
Navigation guidance volume.
[Voice guidance volume setting],
page 3-51 .
Help button : The help contents can be
viewed. [Help], page 3-54 .
Display button : Adjusts the display
setting. [Display setting], page 1-12 .
Main setting
Press the key.
Press the button.
Select the desired changes and press the
button to complete.
■
Setting keyboard for inputting
letter
Press the desired keyboard type button.
The selection will be highlighted.
Done
Main
SETUP
SETUP
a
a
d
b
e f
c
g h
b
c
d
e
f
g
h
NAVIGATION SYSTEM 3-37
NAVIGATION SYSTEM
■
Setting voice command feedback
ON/OFF
Press the desired setting button.
■
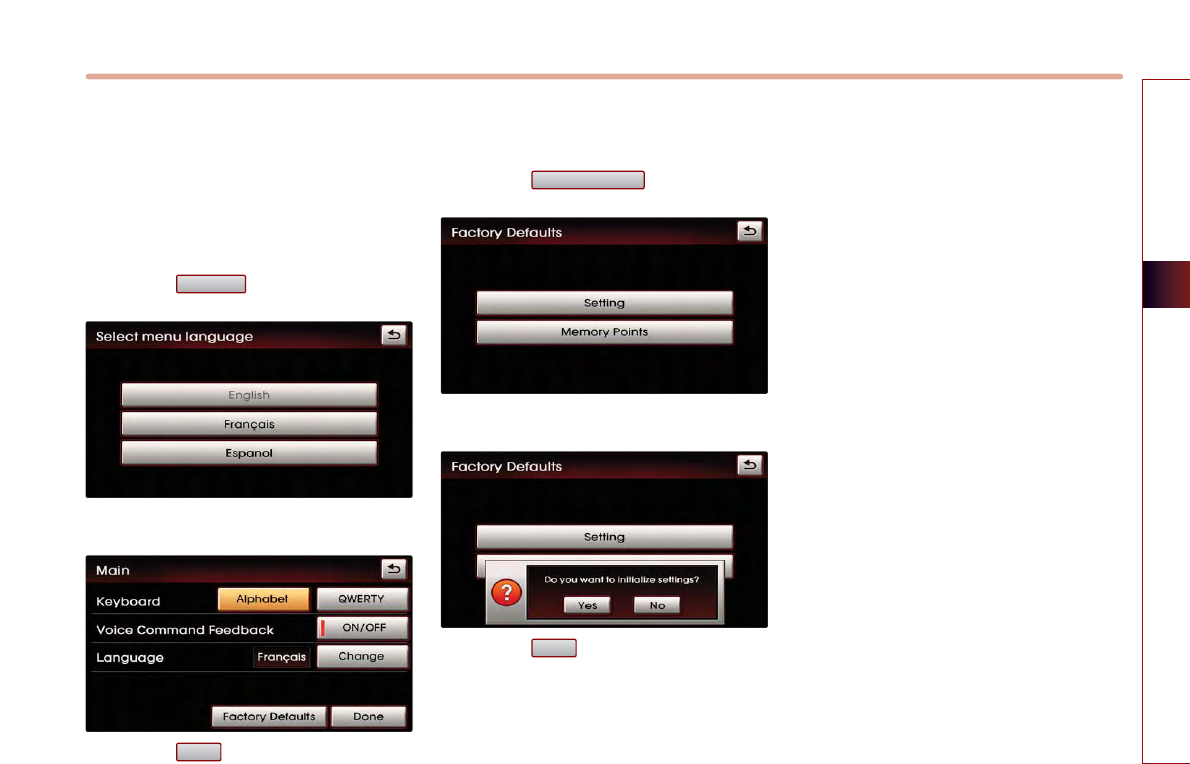
Setting Language
Press the button.
Press the desired language.
Press the button to complete.
■
Initializing system
Press the button.
Press the menu desired for initialization.
Press the button.
Yes
Factory default
Done
Change
3-38 NAVIGATION SYSTEM
PART 3 NAVIGATION SYSTEM
Navigation setting
Press the key.
Press the button.
Select the desired changes and press the
button to complete.
■
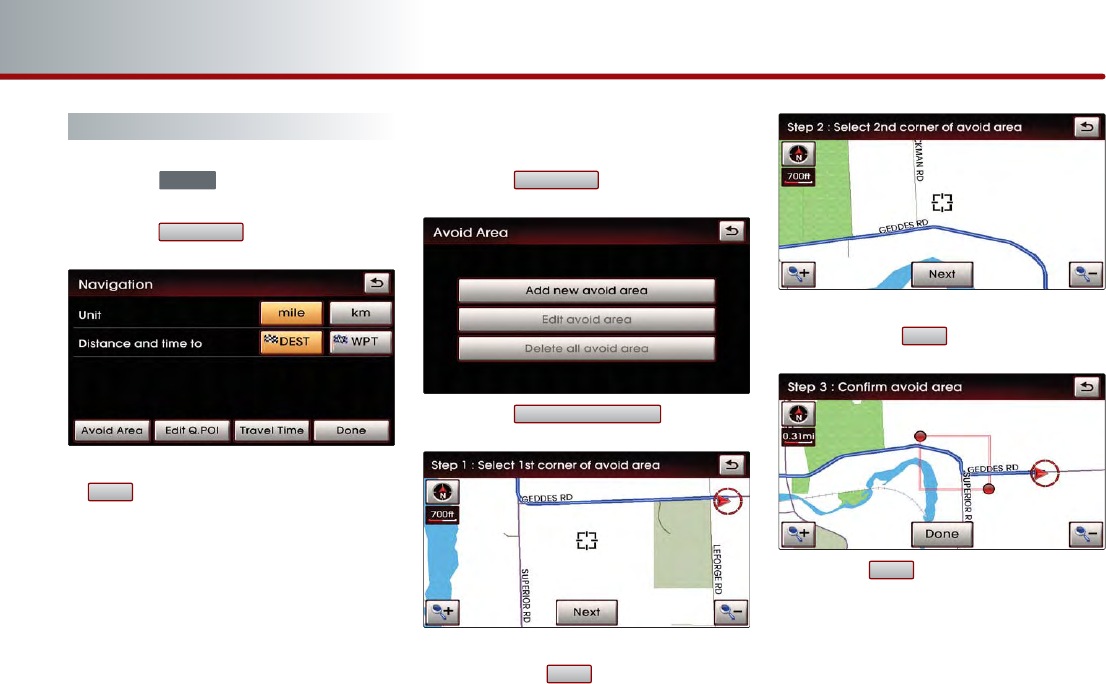
Setting units (mile/ km)
Select the desired distance unit.
■
Setting arrival time and distance
display
Select the desired setting button.
■
Registering avoid area
Press the button.
Press the button.
Set the start position of the avoid area
and press the button.
Set the end position of the avoid area
and press the button.
Press the button to complete.
Done
NEXT
NEXT
Add new avoid area
Avoid Area
Done
Navigation
SETUP
NAVIGATION SYSTEM 3-39
NAVIGATION SYSTEM
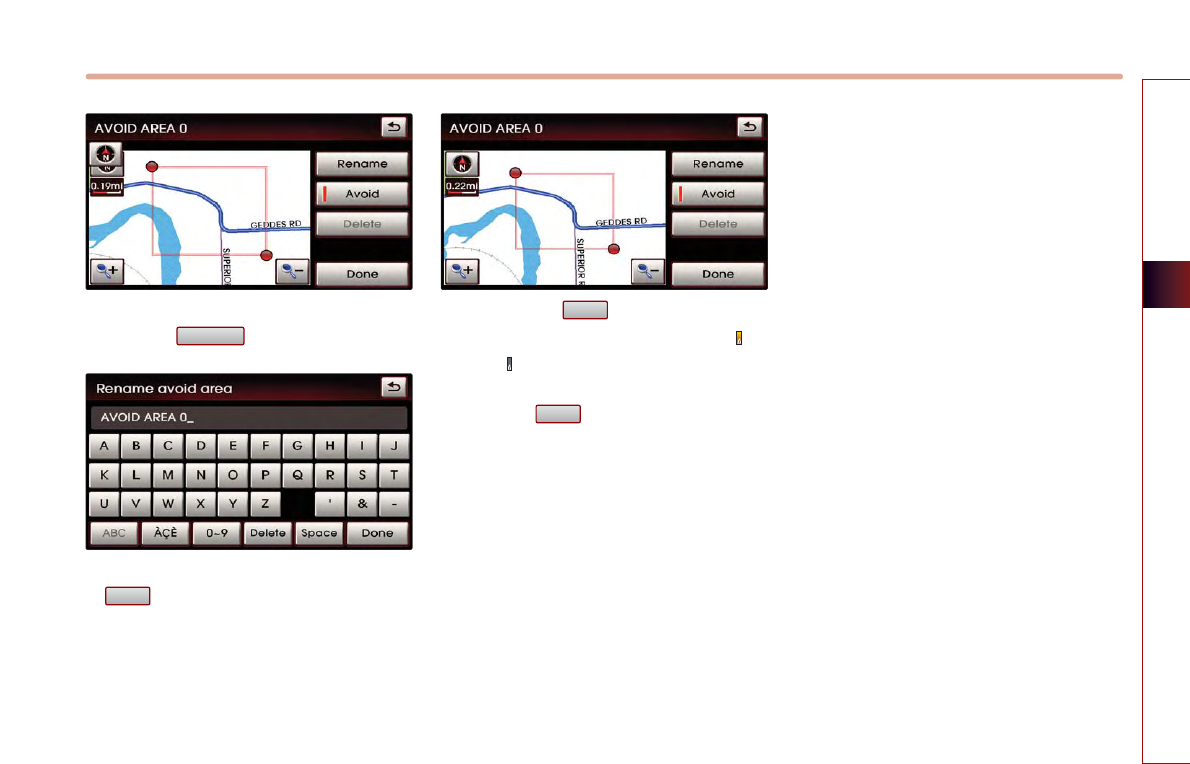
If the Avoid area needs to be renamed,
press the button.
Rename the Avoid area and Press the
button to complete.
Each time the button is pressed, the
function will switch between avoid ( )or
allow( ).
Press the button to complete the
setting.
Done
Avoid
Done
Rename
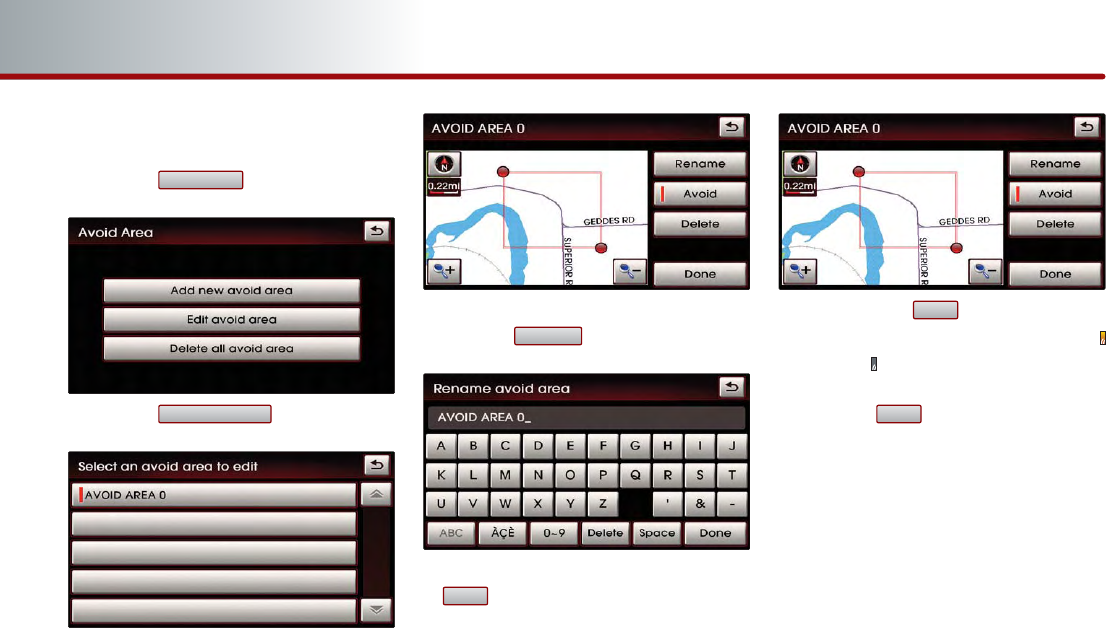
■
Editing avoid area
Press the button.
Press the button.
Select the Avoid area button to edit.
If the Avoid area needs to be renamed,
press the button.
Rename the Avoid area and press the
button to complete.
Each time the button is pressed,
the function will switch between avoid(
)or allow( ).
Press the button once editing is
complete.
Done
Avoid
Done
Rename
Edit avoid area
Avoid Area
3-40 NAVIGATION SYSTEM
PART 3 NAVIGATION SYSTEM
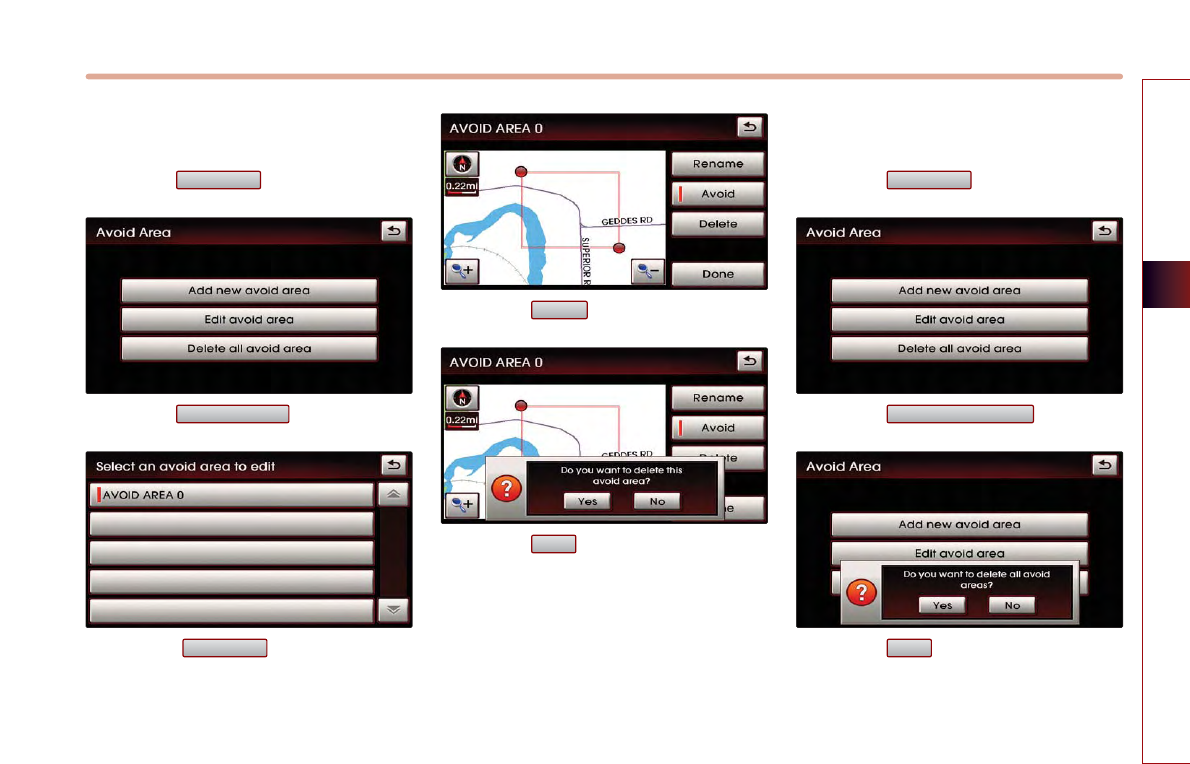
■
Deleting avoid area
Press the button.
Press the button.
Select the button to delete.
Press the button.
Press the button.
■
Deleting all avoid areas
Press the button.
Press the button.
Press the button.
Yes
Delete all avoid area
Avoid area
Yes
Delete
Avoid area
Edit avoid area
Avoid area
NAVIGATION SYSTEM 3-41
NAVIGATION SYSTEM
3-42 NAVIGATION SYSTEM
PART 3 NAVIGATION SYSTEM
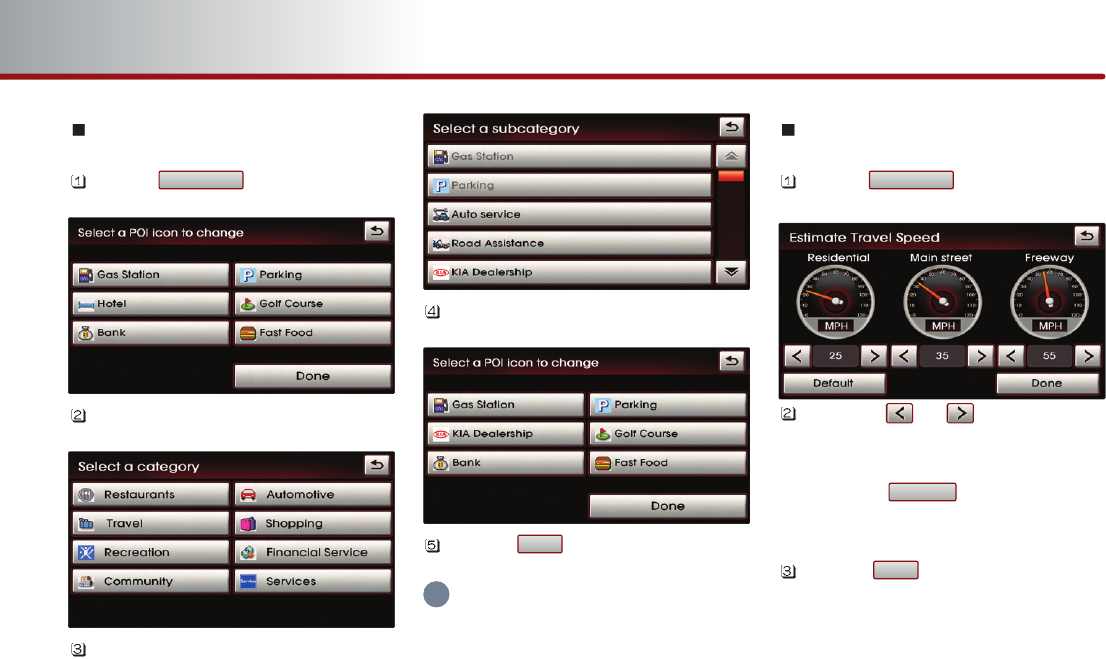
Setting Q.POI icons
Press the button.
Select the desired menu.
Select the desired category.
Select the desired sub category.
Press the button to complete.
INFORMATION
Q.POI stands for Quick POI and refers to the
function which turns POI icon display on or off
on the map.
Setting estimate travel time
Press the button.
Press the or button on the
Residential, Main street, and Freeway
controls to adjust the speed.
Press the button to set the
speeds to the default settings.
Press the button to complete the
setting.
Done
Default
Travel Time
Done
Edit Q.POI
i
NAVIGATION SYSTEM 3-43
NAVIGATION SYSTEM
My places setting
Registering new address in
address book
There are 3 ways to register a new address
in the address book - (a) by DEST menu, (b)
by registering address in address book, (c)
from map scroll.
(a) by DEST menu
Press the key.
Search through the desired method.
The search process is the same as the
method for destination search.
[Searching a destination], page 3-13.
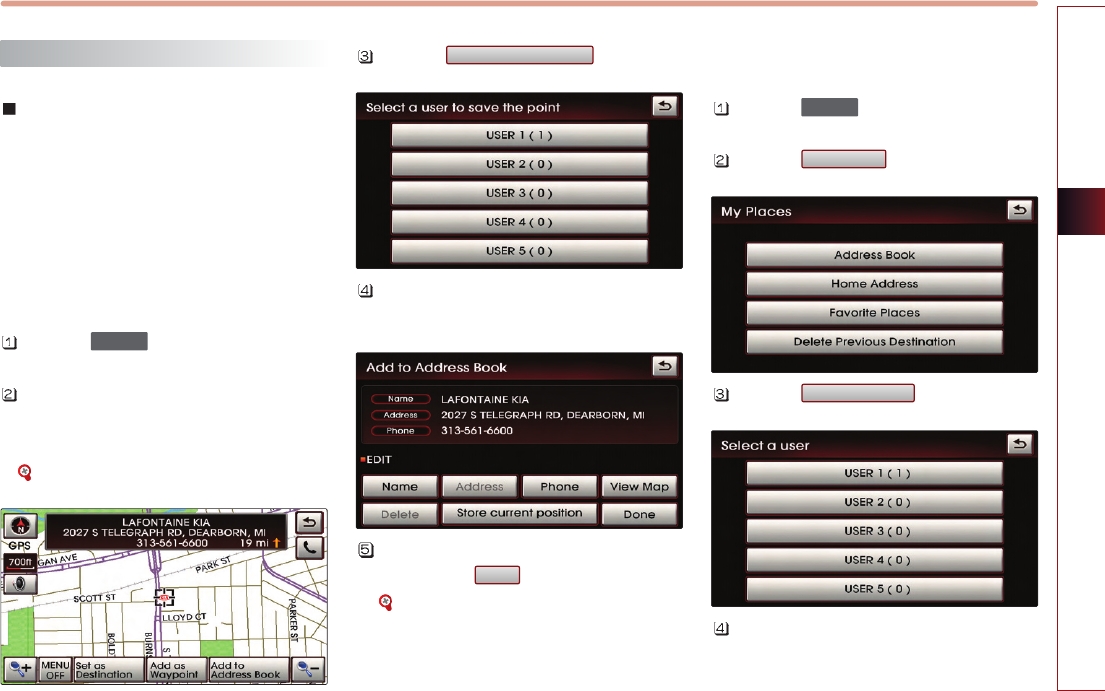
Press the button.
Press the desired address book (user)
button.
Input the name and telephone information
and press the button to complete.
[Editing an address of address book],
page 3-45.
(b) by registering in the address book
Press the key.
Press the button.
Press the button.
Press the desired address book (user)
button.
Address book
My Places
SETUP
Done
Add to Address Book
DEST
3-44 NAVIGATION SYSTEM
PART 3 NAVIGATION SYSTEM
Press the button.
Press the button to search the
address.
[Searching an address], page 3-13.
INFORMATION
Press the button to input
the address of the current position.
Input the name and telephone information
and press the button to complete.
[Editing an address of address book],
page 3-45.
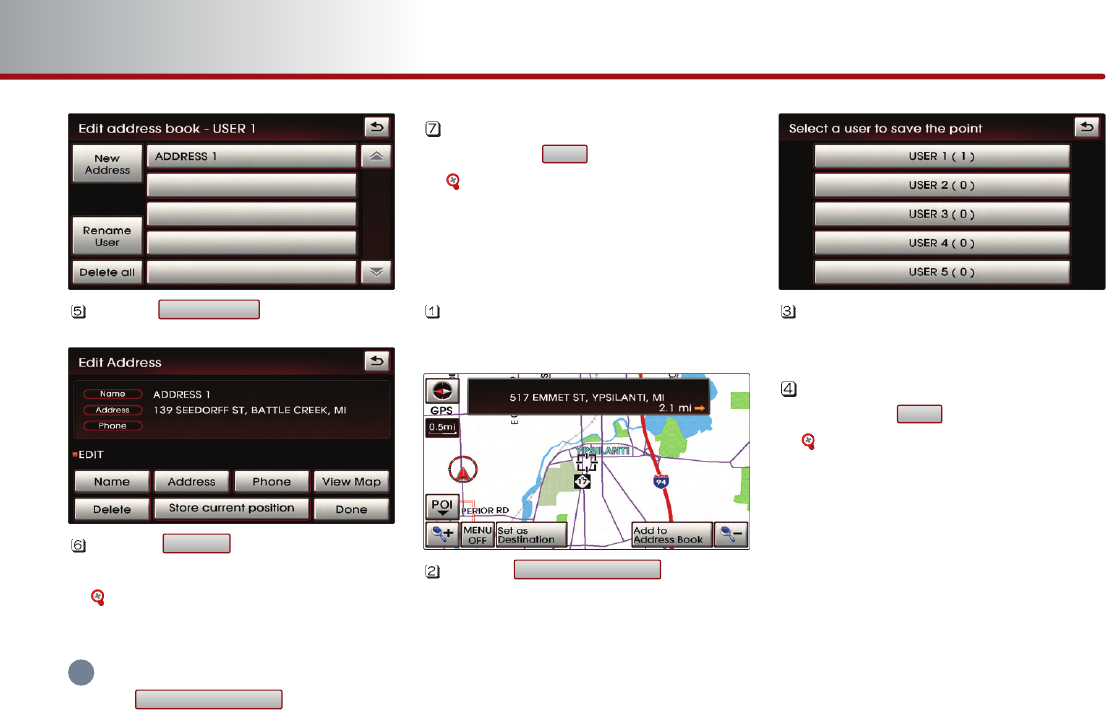
(c) from map scroll
In the map screen, scroll the map to the
desired position.
Press the button.
Press the desired address book (user)
button.
Input the name and telephone information
and press the button to complete.
[Editing an address of address book],
page 3-45.
Done
Add to Address Book
Done
Store current position
Address
New Address
i
NAVIGATION SYSTEM 3-45
NAVIGATION SYSTEM
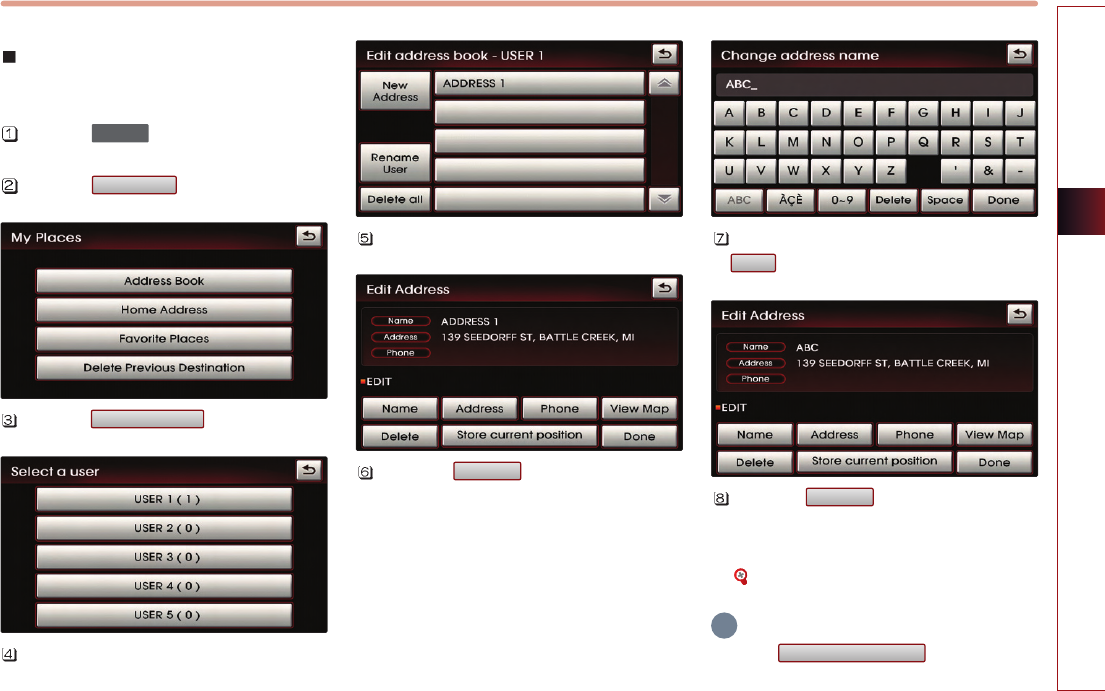
Editing an address of address
book
Press the key.
Press the button.
Press the button.
Select the desired address book (user)
button .
Select the desired address to edit.
Press the button to input the
address name.
Input the address name and press the
button to complete.
Press the button to search the
address. The process is the same as the
method for searching an address.
[Searching an Address] , page 3-13.
INFORMATION
Press the button to input
the address of the current position.
Store current position
Address
Done
Name
Address book
My places
SETUP
i
3-46 NAVIGATION SYSTEM
PART 3 NAVIGATION SYSTEM
Press the button to input the
phone number.
Input the phone number and press the
button to complete.
Press the button to complete.
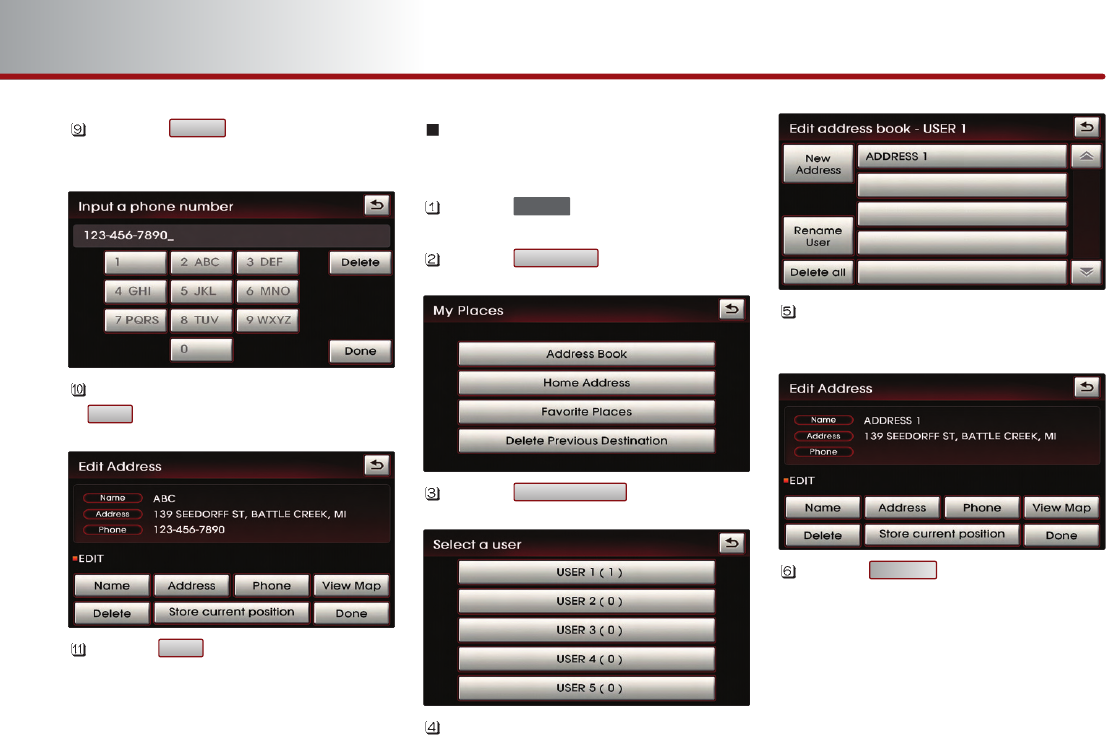
Deleting an address of address
book
Press the key.
Press the button.
Press the button.
Select the desired address book (user)
button.
Select the desired address button to
delete.
Press the button.
Delete
Address book
My places
SETUP
Done
Done
Phone