HYUNDAI MOBIS AVN-200SLA AVN SYSTEM User Manual 1 of 4
HYUNDAI MOBIS CO., LTD. AVN SYSTEM 1 of 4
Contents
- 1. user manual 1 of 4
- 2. user manual 2 of 4
- 3. user manual 3 of 4
- 4. user manual 4 of 4
user manual 1 of 4

FCC ID: TQ8-AVN-200SLA/ IC: 5074A-AVN-200SLCA
HCT CO., LTD.
SAN 136-1, AMI-RI, BUBAL-EUP, ICHEON-SI, KYOUNGKI-DO, 467-701, KOREA
TEL:+82 31 639 8517 FAX:+82 31 639 8525 www.hct.co.kr
Report No. : HCTR1002FR24 1/1
ATTACHMENT E.
- User Manual -
Thank you for purchasing this
Audio Navigation System.
This user manual explains how to
use the KIA Motor Audio Navigation
System.
Before using the product, read the
contents of this user's manual care-
fully and use the product safely.
The screens shown in this manu-
al may differ with the actual
screens of the product.
The design and specification of
this product may change without
prior notification for product
improvement.
When transferring the vehicle to
another individual, include this
user's manual so that the next
driver can continue its use.
iPod
iPod
is a registered trademark of
Apple, Inc.
Bluetooth
Bluetooth
is a trademark owned
by Bluetooth SIG, Inc.
Copyright(c) 2010 by NAVTEQ. All Map Database cannot be copied without permission.
This is protected by U.S. copyright laws. All rights not expressly granted are reserved.
You may not otherwise reproduce, modify, and distribute the content without M&Soft, Inc's prior written consent.
Preface

PART 1
PRE-OVERVIEW
Introduction …………………… 1-2
Important information about this
manual ……………………………… 1-2
Precaution for safe usage …………… 1-2
Controller and functions ……… 1-3
Control panel ………………………… 1-3
Steering wheel remote controller…… 1-6
Basic operation and setting …1-7
Turning the power ON ……………… 1-7
Turning the power OFF ……………… 1-7
Turning the audio ON/OFF ………… 1-7
Adjusting audio volume …………… 1-7
How to operate the screen menu…… 1-8
How to operate menu by
voice command …………………… 1-10
Audio sound setting ……………… 1-11
Display setting……………………… 1-12
PART 2
AUDIO SYSTEM
Operating the radio …………… 2-2
FM/AM Radio ……………………… 2-2
SIRIUS Radio ………………………… 2-6
Operating the CDP …………… 2-11
About CDP ………………………… 2-11
Inserting/Ejecting Disc …………… 2-14
CD…………………………………… 2-15
MP3 ………………………………… 2-18
Operating the external devices
…2-23
iPod ………………………………… 2-23
USB ………………………………… 2-28
AUX ………………………………… 2-31
PART 3
NAVIGATION SYSTEM
Limitations of the navigation
system ………………………… 3-2
GPS signal reception state ………… 3-2
Vehicle position display …………… 3-3
Route guidance ……………………… 3-4
Route Re-calculation ………………… 3-4
Starting navigation system…… 3-5
Map Functions ………………… 3-5
Current position map screen
(without route) ……………………… 3-5
Switching map mode
(North up/Heading up) ……………… 3-6
Viewing GPS signal state …………… 3-7
Changing the map scale …………… 3-8
Displaying / Hiding POI icons
on the map…………………………… 3-9
Displaying / Hiding Q.POI icons …3-9
Displaying /Hiding icons other than
Q.POI icons………………………… 3-9
Making a call to POI ……………… 3-10
Scrolling map ……………………… 3-11
Tables of contents

Setting a Destination ………… 3-12
Destination menu screen and functions
…3-12
Searching a Destination …………… 3-13
Searching an Address …………… 3-13
Searching a Previous Destination
…3-17
Searching an Intersection ……… 3-17
Searching a POI ………………… 3-20
Searching from Address book…… 3-24
Searching for Emergency facilities
…3-25
Searching your Home …………… 3-25
Searching favorite places ……… 3-26
Searching from MAP …………… 3-26
Searching POI by local POI list…… 3-26
Operating after searching a
destination ………………………… 3-27
Changing destination position …3-27
Setting as Destination/waypoint 3-27
Adding to address book ………… 3-27
Operating after setting
a destination ………………… 3-28
Starting Route Guidance…………… 3-28
Route guidance screen …………… 3-28
Selecting other route ……………… 3-29
Route guidance ……………… 3-30
Route menu screen and functions …3-30
Finishing route guidance
(Delete Destination) ……………… 3-30
Route overview(View Entire Route)…3-31
Changing Route option …………… 3-32
Editing waypoints ………………… 3-32
Adding waypoints ……………… 3-32
Deleting waypoints ……………… 3-34
Re-ordering waypoints ………… 3-34
Setting detour distance …………… 3-35
Setting avoid streets on route …… 3-35
Setup and Information ……… 3-36
Setup menu screen and functions …3-36
Main setting………………………… 3-36
Setting keyboard for inputting
letter……………………………… 3-36
Setting voice command feedback
ON/OFF ………………………… 3-37
Setting Language ……………… 3-37
Initializing system ……………… 3-37
Navigation setting ………………… 3-38
Setting units (mile/km) ………… 3-38
Setting arrival time and distance
display …………………………… 3-38
Registering avoid area…………… 3-38
Editing avoid area ……………… 3-40
Deleting avoid area ……………… 3-41
Deleting all avoid areas ………… 3-41
Setting Q.POI icons ……………… 3-42
Setting estimate travel time …… 3-42
My places setting…………………… 3-43
Registering new address in
address book …………………… 3-43
Editing an address of
address book …………………… 3-45
Deleting an address of address
book ……………………………… 3-46
Deleting an address book ……… 3-47
Registering home address ……… 3-48
Deleting home address ………… 3-48
Registering favorite place ……… 3-49
Deleting favorite place…………… 3-50
System information and update…… 3-51
Voice guidance volume setting …… 3-51
Voice guidance volume control …3-51
Adaptive volume control ON/OFF
…3-52
Traffic Setup………………………… 3-52
Traffic Information ………………… 3-52
Help ………………………………… 3-54
Tables of contents

PRE-OVERVIEW
PART 4
VOICE COMMAND SYSTEM
Operating voice command …4-2
Condition for voice command system
…4-2
Basic operation for voice
command control …………………… 4-2
Voice command help ……………… 4-3
Setting up the voice command
system ………………………… 4-4
Setting voice Prompt ON/OFF ……… 4-4
Speaker adaptation ………………… 4-4
Voice command list …………… 4-6
Command list of Help ……………… 4-6
Command list of Audio system
……… 4-7
Command list of Navigation system
…4-13
Searching a destination by
voice command …………………… 4-19
PART 5
BLUETOOTH HANDSFREE
Before using the Bluetooth
Handsfree
……………………… 5-2
What is Bluetooth? …………………… 5-2
Functions supported by Bluetooth
Handsfree ……………………………… 5-2
Converting Bluetooth Handsfree
mode
…………………………… 5-2
Converting from AV/Navigation mode to
Bluetooth Handsfree mode …………… 5-2
Converting from Bluetooth Handsfree mode
to AV/Navigation mode ……………… 5-3
Pairing and connecting a Bluetooth
phone
…………………………… 5-4
Pairing a mobile phone ……………… 5-4
Deleting a paired phone ……………… 5-6
Connecting a mobile phone…………… 5-7
Disconnecting a mobile phone ……… 5-8
Bluetooth Handsfree screen
layout
…………………………… 5-9
Bluetooth Handsfree screen and
functions ……………………………… 5-9
When there is no mobile phone
connected
…………………………… 5-9
When a mobile phone is connected …5-9
When receiving an incoming call …… 5-10
When already on a call ……………… 5-10
When there is a call waiting ………… 5-10
Making a call
…………………… 5-11
Making a call by dialing a phone
number ……………………………… 5-11
Making a call from Speed Dial ……… 5-11
Making a call by redialing …………… 5-12
Answering a call
……………… 5-13
Answering an incoming call ………… 5-13
Rejecting an incoming call …………… 5-13
Operating menus during a call
…5-14
Switching call to the mobile phone …5-14
Activating Call waiting ……………… 5-14
Ending a call ………………………… 5-15

Tables of contents
Phone Book
…………………… 5-16
Making a call from the Phone book …5-16
Searching the Phone Book …………… 5-17
Searching by name ………………… 5-17
Searching by number ……………… 5-18
Call History List
………………… 5-19
Making a call from Call history ……… 5-19
Sorting call history …………………… 5-19
Phone Music
…………………… 5-21
Before playing Phone Music ………… 5-21
Starting Phone Music ………………… 5-21
Phone Music screen layout…………… 5-22
Selecting Phone Music files ………… 5-23
Bluetooth settings
…………… 5-24
Pairing and connecting a mobile phone
…5-24
Setting mobile phone auto connect
priority………………………………… 5-24
Setting Handsfree volume …………… 5-25
Setting Audio streaming……………… 5-26
Advanced settings …………………… 5-26
Searching and modifying
my device properties ………………… 5-27
Changing passkey …………………… 5-28
Deleting all paired phones…………… 5-28
Initializing Bluetooth handsfree……… 5-29
Important information
………… 5-30
About pairing mobile phones ……… 5-30
About making/answering phone calls
………………………………………… 5-31
About Bluetooth device environment
………………………………………… 5-31
PART 6
REAR SEAT ENTERTAINMENT
SYSTEM (RSE)
REAR SEAT ENTERTAINMENT
SYSTEM (RSE) (IF EQUIPPED) …6-2
Important Safety Information ………… 6-2
Product Characteristics………………… 6-3
Name and function of system parts …… 6-4
Operating the Rear (RSE) System ……… 6-7
DVDP/AUX ………………………… 6-9
CD …………………………………… 6-9
MP3 ………………………………… 6-11
VCD ………………………………… 6-13
DVD ………………………………… 6-15
AUX (auxiliary device input) ……… 6-19
PART 7
APPENDIX
Troubleshooting guide ……… 7-2
Before thinking the product has
malfunctioned ……………………… 7-2
Troubleshooting …………………… 7-3
DVD region code and language
code …………………………… 7-6
Region code ………………………… 7-6
Language code ……………………… 7-7
Map legend …………………… 7-8
Road color …………………………… 7-8
POI icons …………………………… 7-9
Landmark icons …………………… 7-11
INDEX ………………………… 7-12
RSE Connector Pin Layoutout
………………………………… 7-17

PART 1 PRE-OVERVIEW
PRE-OVERVIEW 1-1
PRE-OVERVIEW
PART 1
PRE-OVERVIEW
Introduction
…………………… 1-2
Important information about this
manual ……………………………… 1-2
Precaution for safe usage …………… 1-2
Controller and functions
……… 1-3
Control panel ………………………… 1-3
Steering wheel remote controller…… 1-6
Basic operation and setting
…… 1-7
Turning the power ON ……………… 1-7
Turning the power OFF ……………… 1-7
Turning the audio ON/OFF ………… 1-7
Adjusting audio volume …………… 1-8
How to operate the screen menu…… 1-8
Operating typical screen menu…… 1-8
Inputting letters by using screen
keyboard ………………………… 1-8
Displaying the list ………………… 1-9
Selecting an item in a list ………… 1-9
Sorting items from the list………… 1-9
How to operate a menu by
voice command …………………… 1-10
Condition for voice recognition
system …………………………… 1-10
Giving voice command ………… 1-10
Audio sound setting ……………… 1-11
FAD/BAL ………………………… 1-11
BASS/MID/TREB ………………… 1-11
Auto volume control ON/OFF …… 1-11
Touch screen beep ON/OFF …… 1-11
Display setting……………………… 1-12
Display mode …………………… 1-12
Brightness ……………………… 1-12
Display OFF ……………………… 1-12
Display ON ……………………… 1-12
PRE-OVERVIEW 1-3
PRE-OVERVIEW
16
3
4
5
2
8
9
10
11
7
1
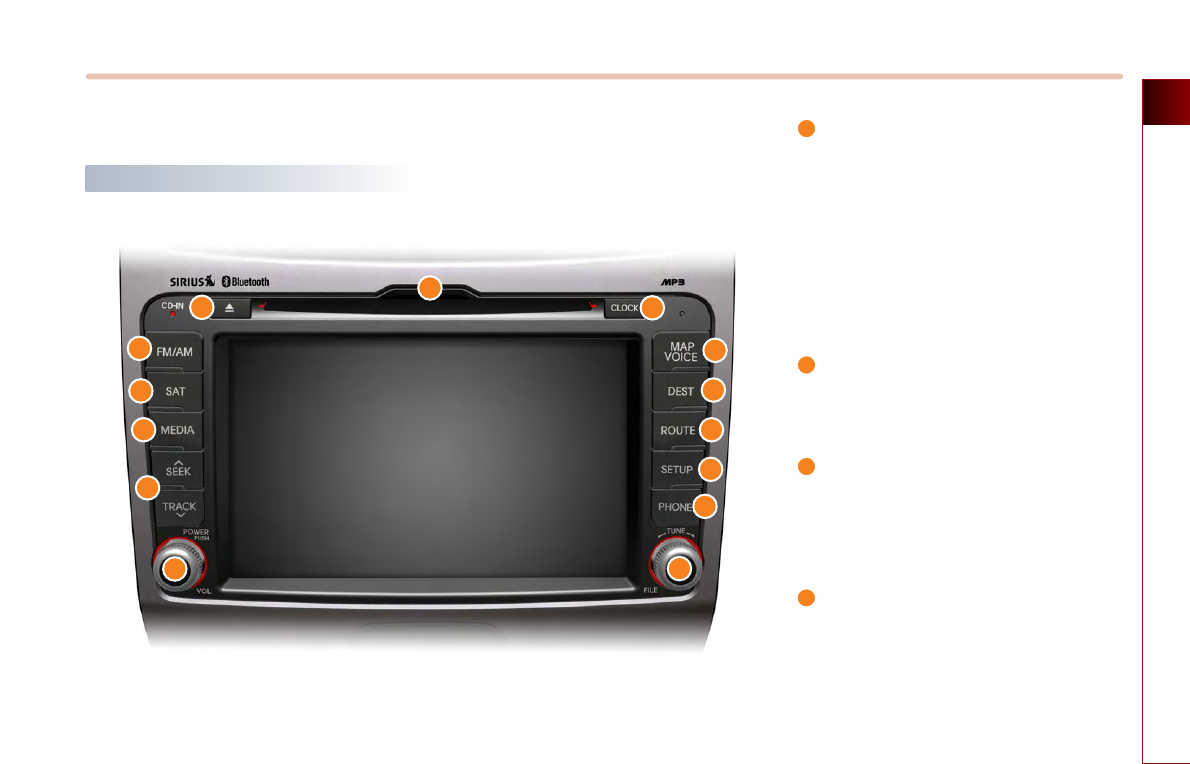
Power / Volume control knob
Push knob (over 0.8 second) : Turns the
power off.
Push knob (under 0.8 second) : Each time
the knob is pressed, the Audio is turned
on and off.
Tune knob : The range of volume
adjustment is between 0 ~ 35.
FM/AM button
Each press will change the bands in the
following order: FM1
→
FM2
→
AM
→
FM1
SAT button
Each press will change the bands in the
following order : SIRIUS1 →SIRIUS2 →
SIRIUS3 →SIRIUS1
CD/AUX button
Each press will change the bands in the
following order : DISC(CD, MP3) →(USB or
iPod) →(AUX) →DISC(CD, MP3)
2
3
4
Controller and functions
Control panel
13
14
12

1-4 PRE-OVERVIEW
PART 1 PRE-OVERVIEW
SEEK/TRACK Up/Down button
SHORT KEY(less than 0.8 second)
- FM/AM Mode : Automatically searches
for the previous or next broadcast
frequency and starts playing.
- SAT Mode : Receives the previous or
next channel.
- CD Mode : Plays the previous or next
track.
- MP3, USB Mode : Plays the previous or
next file.
- iPod Mode : Plays the previous or next
song.
LONG KEY(over 0.8 second)
- FM/AM Mode : Quickly moves through
the frequencies while the button is
pressed. Once released, automatically
searches for broadcasts which can be
received.
- SAT Mode : Quickly moves to the
previous or next channel.
- CD Mode : REW/FF the current playing
track.
- MP3, USB Mode : REW/FF the current
playing file.
- iPod Mode : REW/FF the current playing
song.
TUNE knob
- FM/AM Mode : Turn the knob to search
for the desired frequency. Press the
knob to receive the selected frequency.
- SAT Mode : Turn the knob to search for
the desired channel. Press the knob to
receive the selected channel.
- CD Mode : Turn the knob to search for
the desired track. Press the knob to play
the selected track.
- MP3, USB Mode : Turn the knob to
search for the desired file. Press the
knob to play the selected file.
- iPod Mode : Turn the knob to search for
the desired song. Press the knob to play
the selected song.
MAP button
Displays the map screen for the current
position.
DEST button
Displays the Destination menu screen.
ROUTE button
Displays the Route menu screen.
SETUP button
Displays the Setup menu screen.
DISC Eject button
Eject the inserted disc.
5
6
7
8
9
10
11

PRE-OVERVIEW 1-5
PRE-OVERVIEW
DISC insert indicator LED
Displays that a DISC has been inserted.
RESET button
Resets the system - if software locks-up.
PHONE button
Displays the Bluetooth handsfree screen.
INFORMATION
If pressing the power off knob for over 0.8
second and the system does not shut down,
carefully use a straightened paper clip at the
access hole shown next to the right DISC
indicator LED to reset the software.
The system power will shut-off and restart.
12
13
14
i
1-6 PRE-OVERVIEW
PART 1 PRE-OVERVIEW
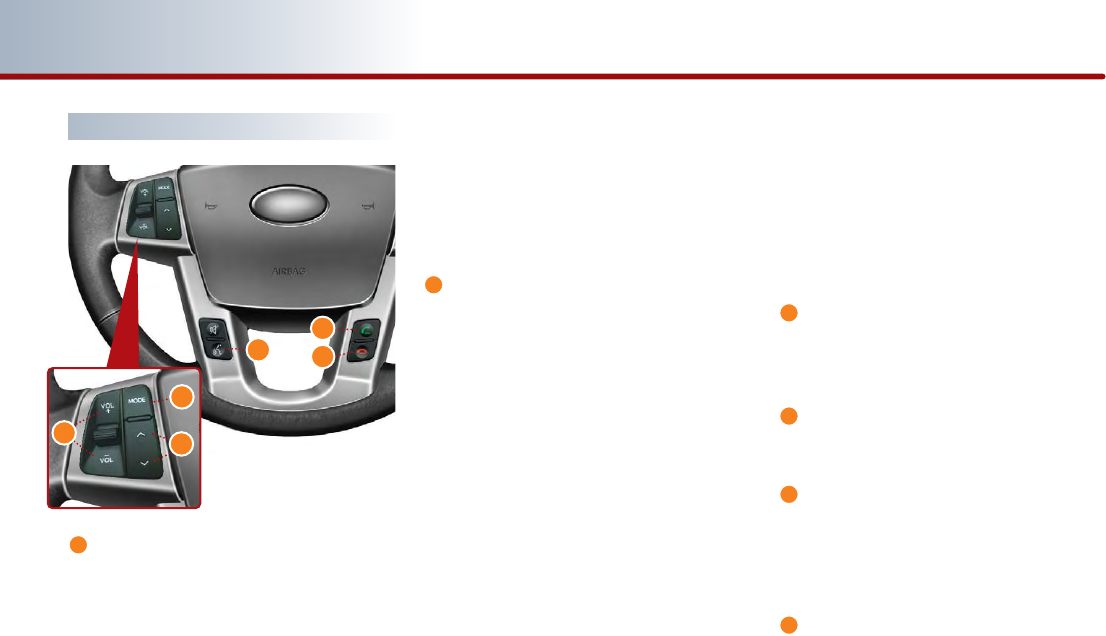
Mode
Each time the mode button is pressed, the
mode will convert in the following order:
FM1
→
FM2
→
AM
→
SIRIUS1
→
SIRIUS2
→
SIRIUS3
→
(DISC)
→
(USB or iPod)
→
(AUX)
→
(Phone Music)
→
(FM1).
If a not supported DISC has been inserted or
if the corresponding unit has not been
connected, the mode will not be recognized
and automatically switch to the next mode.
Press this button for over 0.8 second to turn
the Audio ON and OFF.
Press this button when the Power is turned
off to turn the power on.
Seek Up/ Down
SHORT KEY(less than 0.8 second)
- FM/AM : Receives the previous or next
preset frequency.
- SIRIUS Mode : Receives the previous or
next preset channel.
- CD Mode : Plays the previous or next track.
- MP3, USB Mode : Plays the previous or
next file.
- iPod Mode : Plays the previous or next
song.
LONG KEY(Over 0.8 second)
- FM/AM Mode : Quickly moves through the
frequencies while the button is pressed.
Once released, it automatically searches
for broadcasts which can be received.
- SIRIUS Mode : Quickly moves to the
previous or next channel.
- CD Mode : REW/FF the current playing
track.
- MP3, USB Mode : REW/FF the current
playing file.
- iPod Mode : REW/FF the current playing
song.
Volume Up/Down
Increases or decreases the speaker volume
within a range between 0 ~ 35.
Voice Recognition button
Starts Voice Recognition.
CALL
Press this key to receive an incoming call. If
pressed while in AV/Navigation mode, the
Bluetooth handsfree screen will be displayed.
END
Press this key to reject an incoming call.
If pressed while on a call, then the call will be
ended.
3
4
5
6
Steering wheel remote controller
1
2
4
5
6
2
1
3
PRE-OVERVIEW 1-7
PRE-OVERVIEW
Basic operation and setting
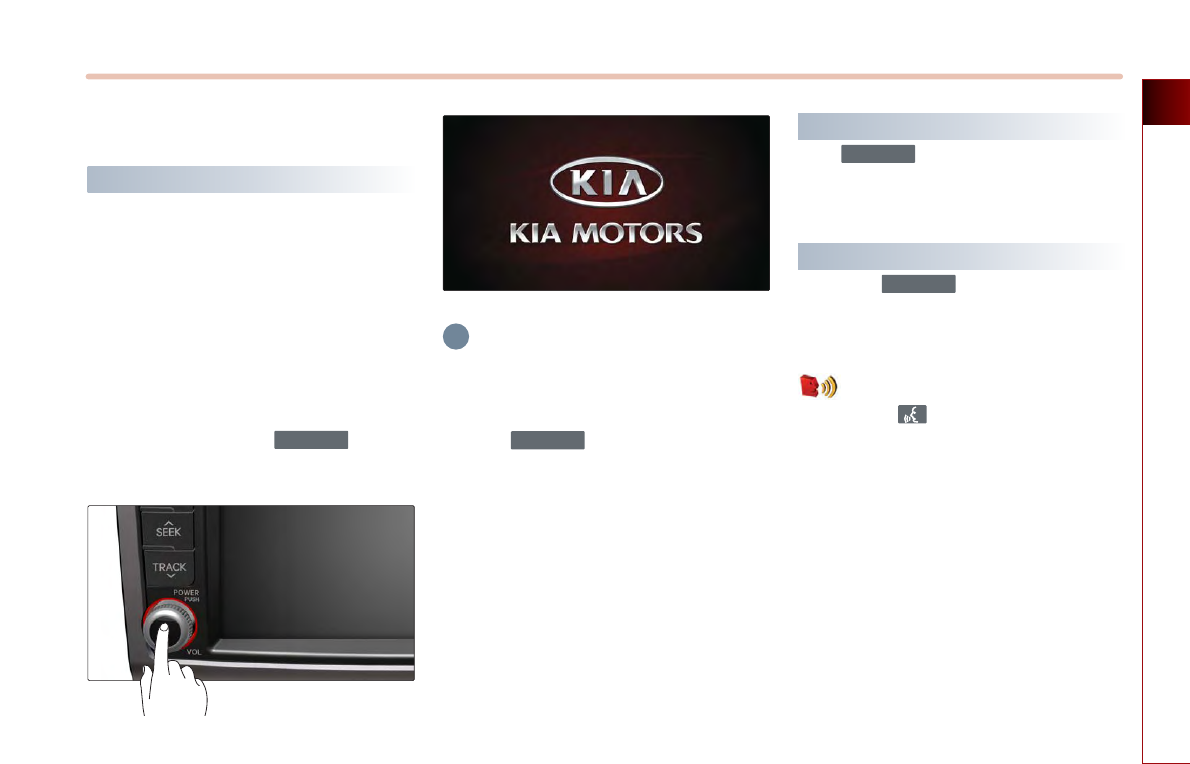
Turning the power ON
Turn the ignition key onto ACC or ON. If the
system power had been on when the
ignition was turned off, the system will turn
back on automatically.
If the system power had been off when the
ignition was turned off, the system will
remain off.
In this case, press the knob to
turn on the system power.
INFORMATION
As system booting starts from the point the
door lock is unlocked, the device may
complete booting before the ACC is turned
on or the knob is pressed.
Once system booting is complete, the most
recent operated mode will be displayed.
For example, turning on the system will
display FM1 radio mode if the last operated
mode prior to turning off the system had
been FM1 radio mode.
Turning the power OFF
If the knob is pressed for over 0.8
second, a beep will sound and the system
power will be turned off.
Turning the audio ON/OFF
Press the knob for under 0.8
second with the system power on to turn the
Audio on and off.
Voice Command
1. Press the button on the steering
wheel remote controller.
2. After the beep sound, say a command.
"Audio On"
"Audio Off"
PWR/VOL
PWR/VOL
PWR/VOL
PWR/VOL
i
1-8 PRE-OVERVIEW
PART 1 PRE-OVERVIEW
INFORMATION
Conducting the following operations while
the AUDIO is off will automatically turn on the
Audio system.
●Pressing the audio related buttons (
, , ).
●Inserting a DISC or connecting an external
device.
Adjusting audio volume
Turn the knob in clockwise direction
to increase the volume and counter-clockwise
to decrease the volume.
INFORMATION
●The range of volume adjustment is
between 0 ~ 35.
●Adjustments to the volume cannot be
made while the AUDIO is turned off.
How to operate the screen menu
■
Operating typical screen menu
●If a menu button on the screen is pressed,
the corresponding function will be operated.
●The same menu button may perform
different functions depending on the length
of time the button is pressed (under 0.8
seconds or over 0.8 second).
For more information, refer to the specific
function within this user manual.
●The current operated button will be
highlighted upon display.
●Buttons which cannot be operated under
the current conditions will be displayed in
disabled state. Pressing a disabled button
will not perform any operation.
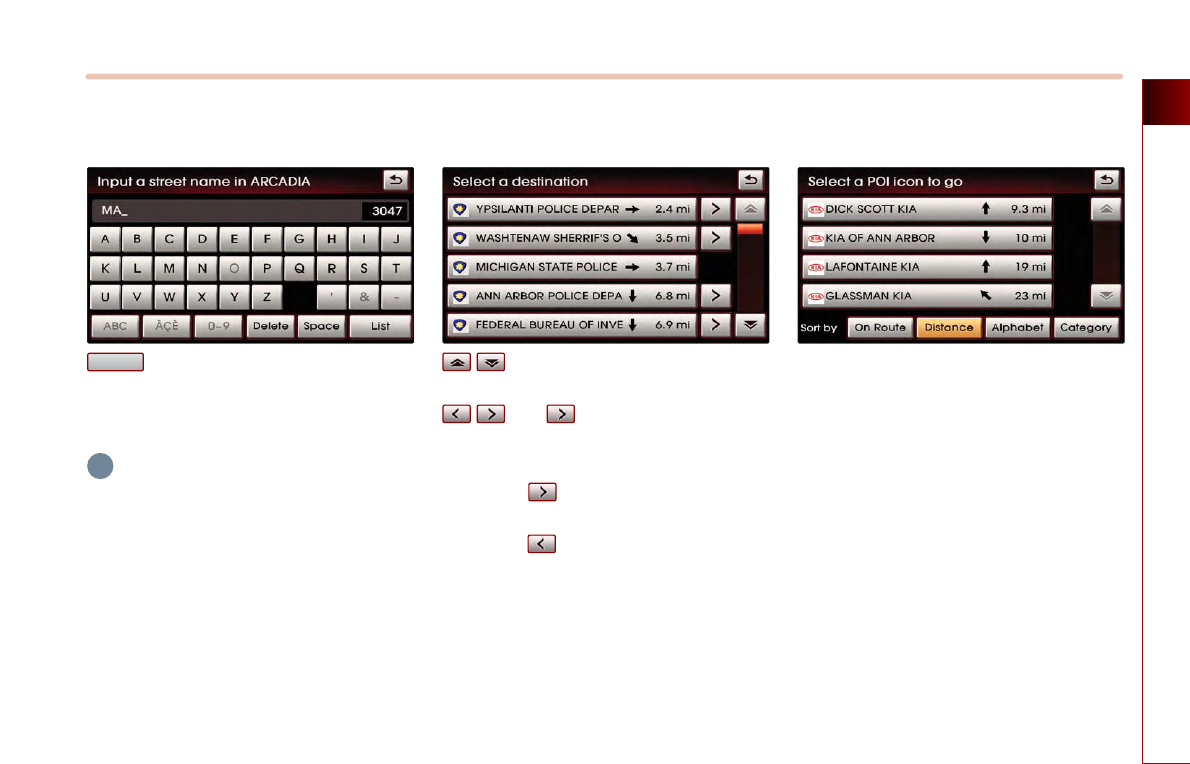
■
Inputting letters by using screen
keyboard
: Displays the English alphabet keypad.
: Displays the French alphabet keypad. (if
available)
: Displays the number and symbol
keypad.
: Deletes the previous inputted letter.
Pressing for over 0.8 second will delete
all content.
: The input is completed.
: Restores to previous screen.
The inputted text will not be saved.
List
Delete
0 - 9
ABC
PWR/VOL
CD/AUXSAT
FM/AM
i
i
PRE-OVERVIEW 1-9
PRE-OVERVIEW
■
Displaying the list
: Even if input is not completed, the
current matching items from the
database will be displayed.
INFORMATION
The number at the upper-right side of the
screen displays the number of current
matches.
■
Selecting an item in a list
: Moves to the next page or previous
page.
: The button will be displayed if
the text is too long to be displayed
in one button.
Press the button to move the cursor to
the end of the text.
Press the button to move the cursor to
the front of the text.
■
Sorting items from the list
Select the desired sorting method to
reorganize the list in accordance to the
selected method.
List
i
1-10 PRE-OVERVIEW
PART 1 PRE-OVERVIEW
How to operate menu by voice
command
■
Condition for voice recognition
system
Most of the functions within the AV and
Navigation system can be operated by
voice.
Please follow the instructions below for
optimal voice recognition performance.
●
Close all windows and sunroof.
The performance of the voice recognition
can be improved in quiet environment.
●
Press the voice recognition button and
say the desired voice command after
the sound of the beep.
●
The microphone is positioned above the
driver so that voice commands can be
said while maintaining a proper posture.
●
Pronounce the voice commands
naturally and clearly as if in normal
conversation.
■
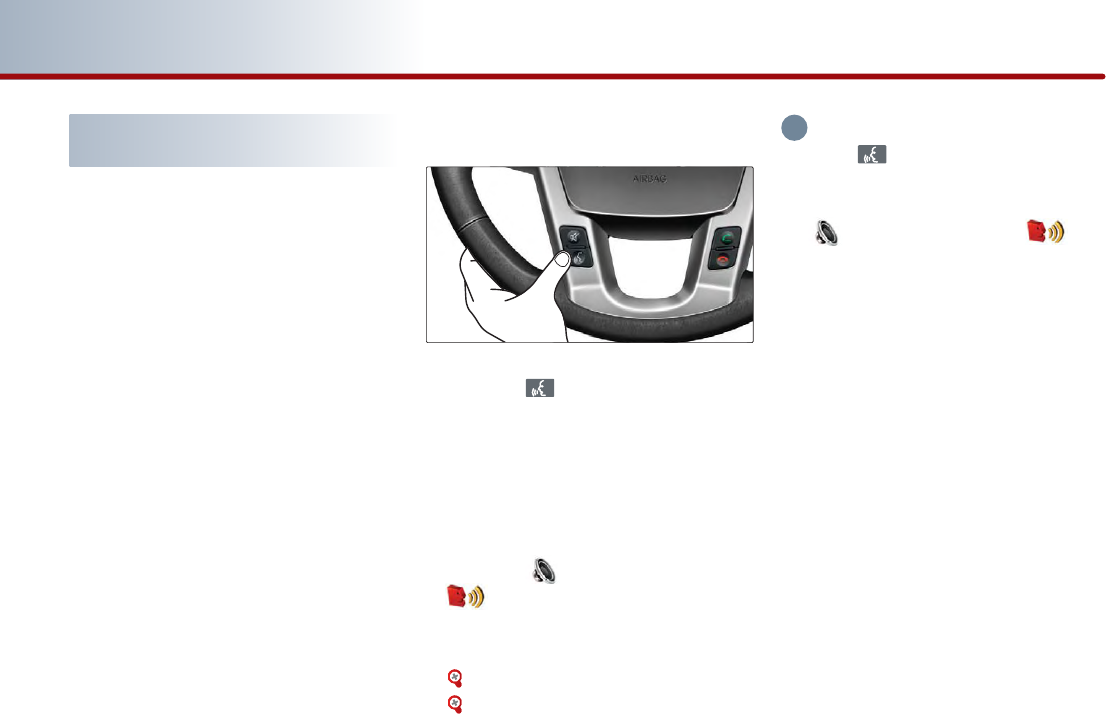
Giving voice command
Press the button on the steering
wheel remote controller.
A voice command window will be
displayed on the lower side of the screen
followed by a "Command please" voice
comment.
Once the icon changes into the
icon on the pop-up screen with a
beep sound, say the desired voice
command.
[Voice command list], page 4-6.
[Searching a destination by voice
command], page 4-20.
INFORMATION
Press the shortly to input the desired
voice command. The system voice instruction
comment will immediately terminate. When
the icon changes into the icon
with a beep sound, it is possible to input voice
commands.
i
PRE-OVERVIEW 1-11
PRE-OVERVIEW
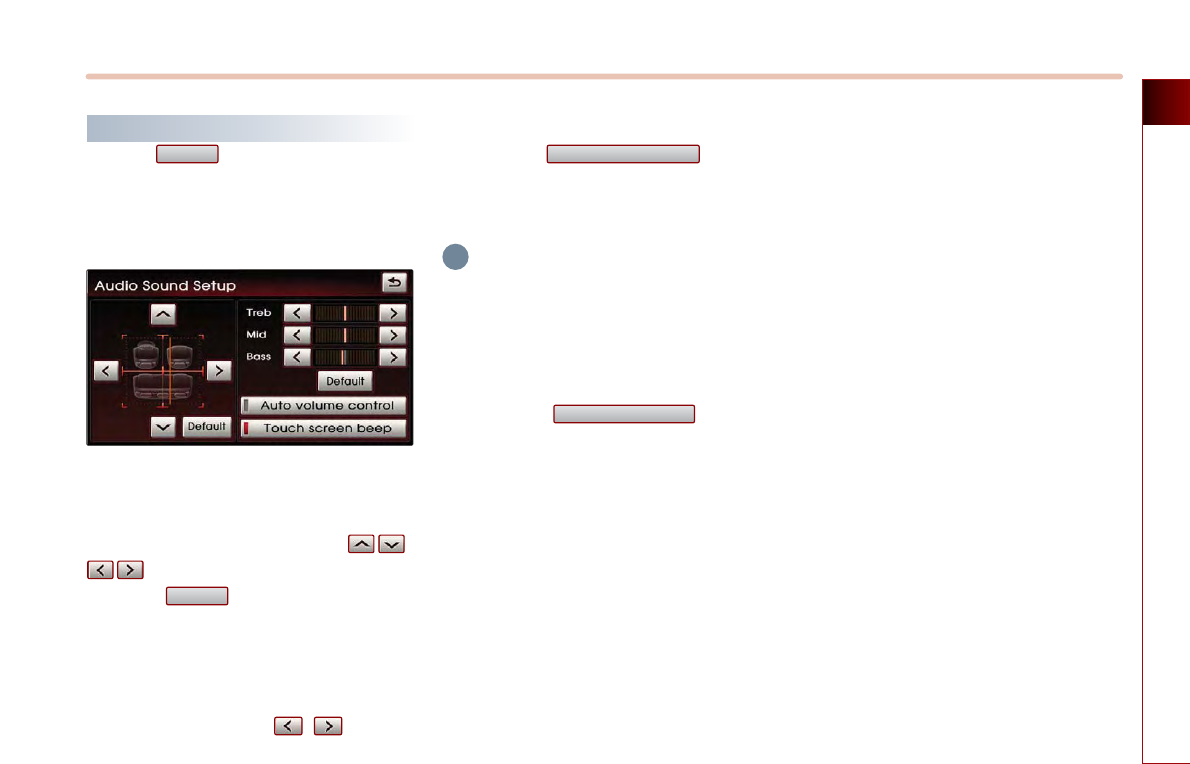
Audio sound setting
Press the button on the main screen
of each AV mode (FM/AM, SIRIUS, CD, MP3,
USB, iPod, and AUX) to display the Audio
sound setup screen.
■
FAD/BAL
The position of the sound can be adjusted by
using the up-down and left-right ( ,
) buttons on the left side of the screen.
Press the button to position the
sound in the center of the vehicle.
■
BASS/MID/TREB
The BASS/MID/TREB can be adjusted by using
the left/right buttons ( , ) of each
control.
■
Auto volume control ON/OFF
Each time the button is
pressed, the Auto volume control function is
turned on or off.
INFORMATION
The Auto volume control is a function which
automatically adjusts the volume level in
accordance to changes in vehicle speed.
■
Touch screen Beep ON/OFF
Each time the button is
pressed, the beeping sound that follows each
press on the screen will turn on or off.
Touch screen beep
Auto volume control
Default
Sound
i
1-12 PRE-OVERVIEW
PART 1 PRE-OVERVIEW
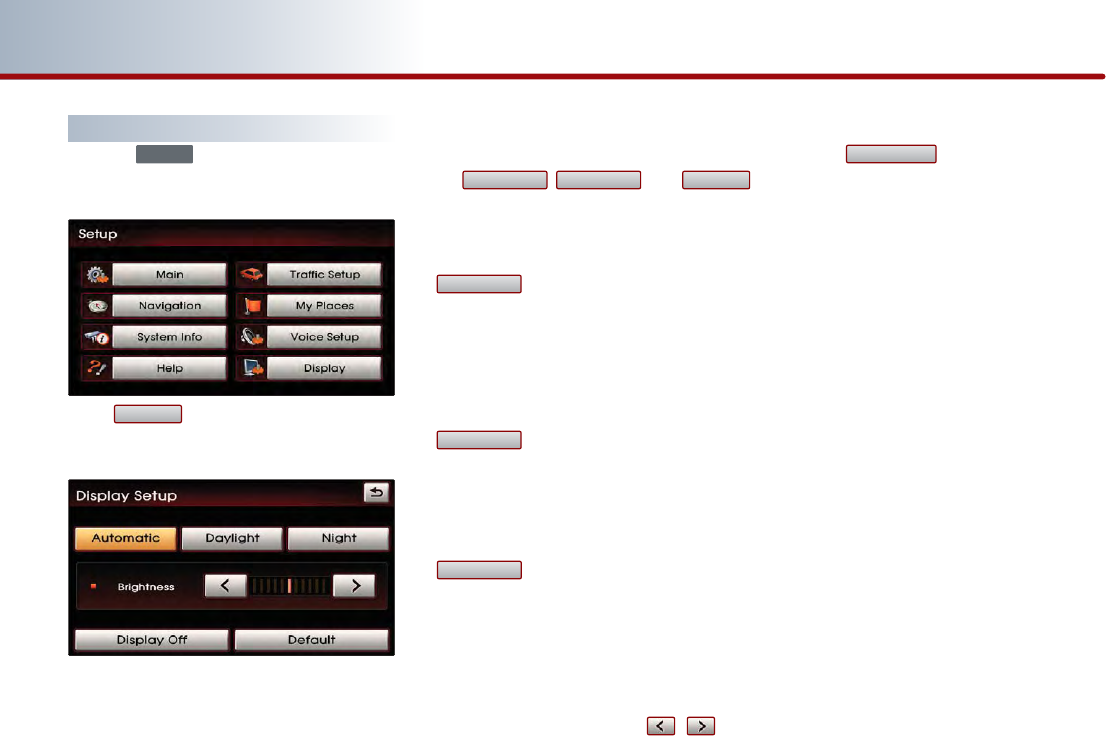
Display setting
Press the button on the control panel
to display the Setup menu screen.
Press button to display the Display
Setup screen.
■
Display mode
Press the button for the desired display mode
from , , and
modes. The current selected mode is
highlighted.
●
The display is automatically converted
between Daylight and Night modes in
accordance to the on/off state of the vehicle
taillights.
●
The bright screen is always maintained
regardless of the on/off state of the vehicle
taillights.
●
The dark screen is always maintained
regardless of the on/off state of the vehicle
taillights.
■
Brightness
Use the left/right buttons ( , ) for
control to make adjustments.
■
Display OFF
Press the button.
■
Display ON
Press anywhere on the black screen.
The screen prior to display setting will be
displayed.
Display off
Night
Daylight
Automatic
NightDaylightAutomatic
Display
SETUP

PRE-OVERVIEW
MEMO

PART 2 AUDIO SYSTEM
PART 2
AUDIO SYSTEM
Operating the radio
…………… 2-2
FM/AM Radio ……………………… 2-2
Listening to the FM/AM radio …… 2-2
FM/AM screen and functions …… 2-2
Selecting FM/AM broadcast
frequency ………………………… 2-4
Storing FM/AM presets…………… 2-5
Scanning FM/AM broadcast
frequency ………………………… 2-5
SIRIUS Radio ………………………… 2-6
Listening to the SIRIUS radio……… 2-6
SIRIUS screen and functions ……… 2-6
Switching the SIRIUS modes
(Channel/Category) ……………… 2-7
Selecting SIRIUS broadcast
channel …………………………… 2-7
Storing SIRIUS presets …………… 2-9
Scanning SIRIUS broadcast channel 2-10
Browsing detailed information
about the SIRIUS channel ……… 2-10
Operating the CDP …………… 2-11
About CDP ………………………… 2-11
Precautions upon handling discs
…2-11
For safe and efficient operation …2-11
Supported disc formats ………… 2-12
Disc/Content format compatibility
…2-13
Inserting/Ejecting disc……………… 2-14
CD…………………………………… 2-15
Listening to CD music …………… 2-15
CD screen and functions ………… 2-15
Selecting the CD track …………… 2-16
REW/FF CD track ………………… 2-16
Setting Random function for
CD music ………………………… 2-16
Setting Repeat function for
CD music ………………………… 2-17
Scanning CD track ……………… 2-17
MP3 ………………………………… 2-18
MP3 disc related information and
precaution ……………………… 2-18
Listening to MP3 music ………… 2-19
MP3 screen and functions ……… 2-19
Selecting the MP3 file …………… 2-20
REW/FF MP3 file ………………… 2-21
Browsing detailed information
about the MP3 file ……………… 2-21
Setting Random function for
MP3 file…………………………… 2-21
Setting Repeat function for
MP3 file…………………………… 2-22
Scanning MP3 file ……………… 2-22

AUDIO SYSTEM 2-1
AUDIO SYSTEM
PART 2
AUDIO SYSTEM
Operating the external devices
…2-23
iPod ………………………………… 2-23
Connecting iPod devices ……… 2-23
Listening to music from iPod …… 2-23
iPod screen and functions ……… 2-24
Selecting music from iPod ……… 2-25
REW/FF iPod music ……………… 2-26
Setting Random function for
iPod music ……………………… 2-26
Setting Repeat function for
iPod music ……………………… 2-27
Browsing detailed information
about the iPod music …………… 2-27
USB ………………………………… 2-28
USB MP3 related information and
precaution ……………………… 2-28
Precautions upon handling USB …2-28
Connecting the USB devices …… 2-30
Listening to USB music ………… 2-30
AUX ………………………………… 2-31
Connecting AUX ………………… 2-31
Playing AUX ……………………… 2-31
AUX screen ……………………… 2-32
2-2 AUDIO SYSTEM
PART 2 AUDIO SYSTEM
Operating the radio
FM/AM Radio
■
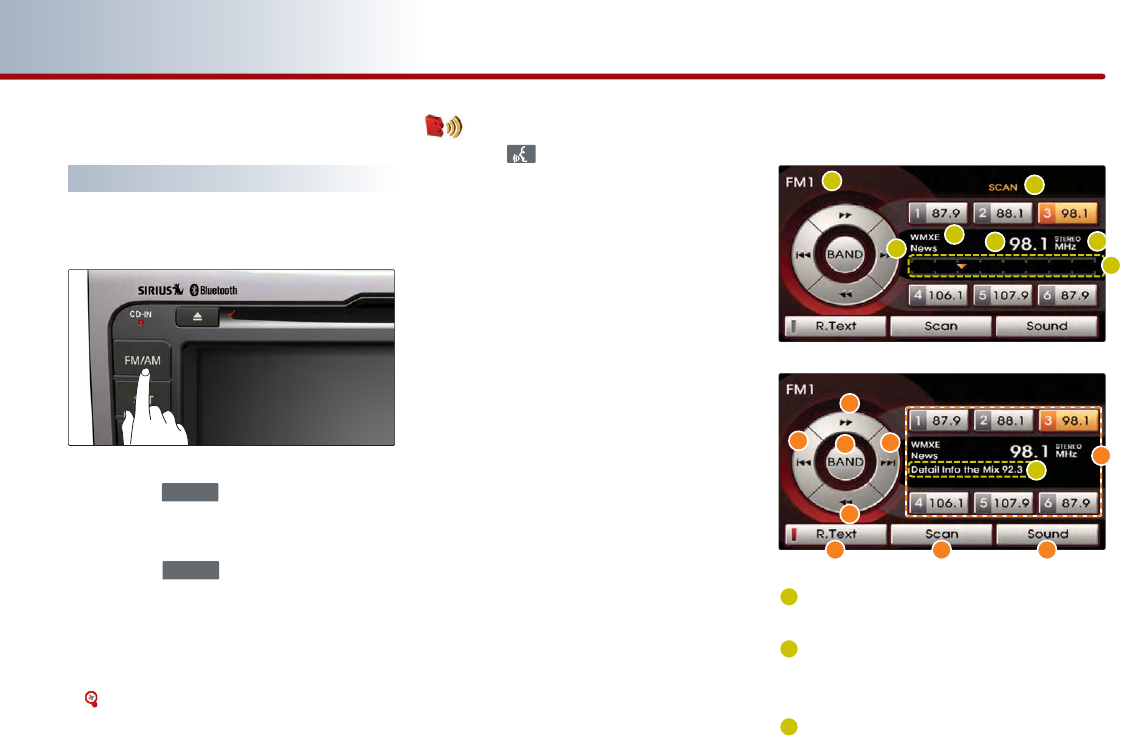
Listening to the FM/AM radio
Press the button on the control
panel. The FM/AM radio band of the most
recent listened station will be displayed.
Press the button to change the
desired radio band. Each press will
change the bands in the following order:
FM1
→
FM2
→
AM
→
FM1
Select the desired broadcast frequency.
[Selecting FM/AM broadcast frequency],
page 2-5.
Voice Command
1. Press the button on the steering wheel
remote controller.
2. After the beep sound, say a command.
" Radio"
"(Radio) AM"
"(Radio) FM"
"FM <1 or 2>"
"AM Frequency <530 to 1710>"
"FM Frequency <87.5 to 107.9>"
"AM Preset <1 to 6>"
"FM <1 or 2> Preset <1 to 6>"
■
FM/AM screen and functions
Mode display : Displays the FM1/FM2/
AM modes.
SEEK/SCAN/PRESET SCAN : If SEEK/SCAN
/PRESET SCAN is operating, the switch is
displayed.
Frequency : Displays the current playing
frequency.
FM/AM
FM/AM
12
5
634
a
b
c
de
gh
1
2
3
f
i
7
8
AUDIO SYSTEM 2-3
Operating the radio
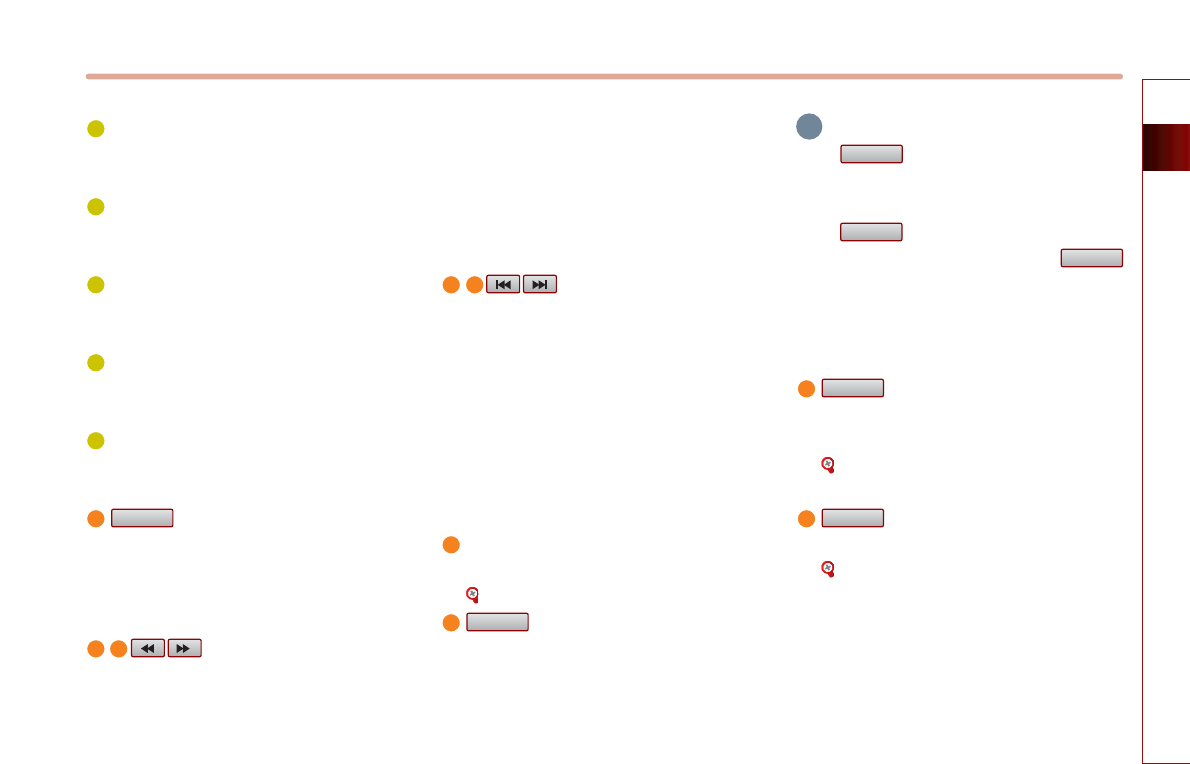
STEREO indicator : If the current
frequency is a stereo broadcast, the
indicator is displayed
Program Service name: Displays the
program service name if data is being
broadcasted.
Program Type name: Displays the
program type name if data is being
broadcasted.
Frequency bar : Displays the position of
the current frequency within the total
frequency range.
Radio Text: Displays the radio text
information if data is being broadcasted.
button : Changes the desired
radio band. Each press will change the
bands in the following order: FM1
→
FM2
→
FM1
TUNE Up/Down button
SHORT KEY(less than 0.8 second)
- The frequency is increased or decreased
by 1-step increments (FM : 0.2MHz, AM :
10kHz).
LONG KEY(over 0.8 second)
- The frequency is rapidly increased or
decreased by 1-step increments (FM :
0.2MHz, AM : 10kHz) and stops operation
upon KEY RELEASE.
SEEK Up/Down button
SHORT KEY(less than 0.8 second)
- Automatically searches for the previous
or next broadcast frequency and starts
playing.
LONG KEY(over 0.8 second)
- Quickly moves through the frequencies
while the button is pressed. Once
released, it automatically searches for
broadcasts which can be received.
Preset buttons : The desired frequency
can be preset and selected.
[Storing FM/AM presets], page 2-5.
button : Turns the Radio Text
information on and off.
INFORMATION
If the is on OFF state, text will not be
displayed even if there is text being
transmitted from the broadcast station.
If the is on ON state, the frequency
bar will not be displayed. Even if the
is on ON state, text may not be displayed if
text is not being received from the broadcast
station.
button : Scans all frequencies or
just the preset frequencies for 5 seconds
each.
[Scanning FM/AM broadcast frequency],
page 2-5.
button : Adjusts the FAD/BAL,
BASS/MID/TREB controls.
[Audio sound setting], page 1-11.
Sound
Scan
R.Text
R.Text
R.Text
R.Text
BAND
4
5
6
8
a
b c
i
d e
f
g
h
7
i
2-4 AUDIO SYSTEM
PART 2 AUDIO SYSTEM
■
Selecting FM/AM broadcast
frequency
There are 3 ways to select the broadcast
frequency - (a) selecting through presets,
(b) selecting through SEEK, (c) selecting
through manual search.
(a) Selecting a frequency through presets
Press the preset button of the desired
broadcast frequency.
INFORMATION
●Press the or buttons for a
short time on the steering wheel remote
controller.
The preset frequencies of the current band
will be selected in order.
●There are 6 different preset frequencies
each for FM1, FM2, and AM modes.
[Storing
FM/AM
preset], page 2-5.
Voice Command
1. Press the button on the steering wheel
remote controller.
2. After the beep sound, say a command.
"Preset <1 to 6>"
"Preset Up"
"Preset Down"
(b) Selecting a Broadcast frequency
through SEEK
Press the
or
buttons on
the control panel or the or
buttons on FM1, FM2, and AM mode
screens for less than 0.8 second. Once the
SEEK function is operating (SEEK indicator
blinking), the next or previous broadcast
frequency with superior reception will be
searched automatically.
INFORMATION
●Press the or buttons on
the control panel or the or
buttons on the steering wheel remote
controller or the
or
buttons on
FM1, FM2, and AM mode screens for more
than 0.8 second to quickly move to the
nearest desired frequency. Once the button
is released, the next frequency with superior
reception will be searched automatically.
●While the SEEK function is operating, pressing
the or buttons on the
control panel again will terminate SEEK
operation and select the current frequency.
Voice Command
1. Press the button on the steering wheel
remote controller.
2. After the beep sound, say a command.
"Seek Up"
"Seek Down"
(c) Selecting a broadcast frequency through
manual search
Press the or buttons or turn the
knob on the control panel in
clockwise or counter-clockwise direction.
Each click on the tune knob or the or
buttons will increase or decrease the
frequency by 1 step (FM: 0.2 MHz, AM: 10
kHz).
TUNE
TRACK
∨
SEEK
∧
SEEK
∨
SEEK
∧
TRACK
∨
SEEK
∧
TRACK
∨
SEEK
∧
SEEK
∨
SEEK
∧
i
i
AUDIO SYSTEM 2-5
Operating the radio
■
Storing FM/AM presets
Select the desired frequency.
[Selecting FM/AM broadcast frequency],
page 2-4.
Press the preset button to store for over
0.8 second. The frequency will become
stored along with a beep sound.
INFORMATION
Six preset frequencies each for FM1/FM2/AM
modes can be stored using the above
instructions.
■
Scanning FM/AM broadcast
frequency
Press the button.
●
SCAN (less than 0.8 second) : Scans all
frequencies and plays only frequencies
with superior reception for 5 seconds each.
Voice Command
1. Press the button on the steering wheel
remote controller.
2. After the beep sound, say a command.
"Scan"
●
PRESET SCAN (over 0.8 second): Scans the
6 frequencies stored as preset frequencies
in the current band for 5 seconds each.
Voice Command
1. Press the button on the steering wheel
remote controller.
2. After the beep sound, say a command.
"Preset Scan"
Press the button again to
continue listening to a frequency.
The scan will be terminated and the
current frequency will continue to be
played.
INFORMATION
When scanning has completed an entire
revolution, the scan function will be terminated
automatically and the previous played
frequency will be restored.
Scan
Scan
i
i
2-6 AUDIO SYSTEM
PART 2 AUDIO SYSTEM
1
1
2
3
4
a
b
c
d
SIRIUS radio
■
Listening to the SIRIUS radio
Press the button on the control
panel. The Sirius radio band screen of the
most recent listened station will be
displayed.
Press the button to change the
desired radio band. Each press will
change the bands in the following order:
SIRIUS1
→
SIRIUS2
→
SIRIUS3
→
SIRIUS1
Select the desired broadcast channel.
[Selecting SIRIUS broadcast channel],
page 2-7.
Voice Command
1. Press the button on the steering wheel
remote controller.
2. After the beep sound, say a command.
"SIRIUS"
"SIRIUS <1 or 2 or 3>"
"SIRIUS Channel <0 to 223>"
"SIRIUS <1 or 2 or 3> Preset <1 to 6>"
■
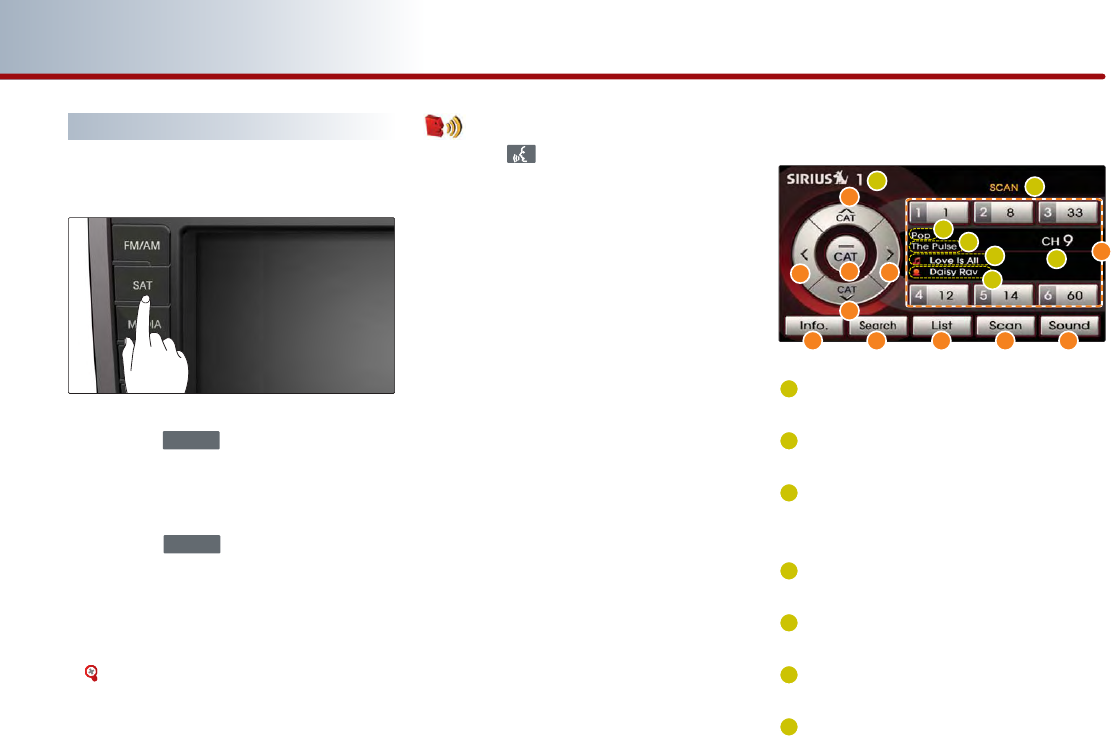
SIRIUS screen and functions
Mode display: Displays the SIRIUS1/
SIRIUS2/SIRIUS 3 modes.
Channel number: Displays the current
playing channel.
SCAN/PRESET SCAN indicator: If SCAN/
PRESET SCAN is operating, the switch is
displayed.
Category name: Displays the category
name.
Channel name: Displays the channel
name.
Song/Program title: Display the song or
program title.
Artist name: Displays the artist or other
related information.
SAT
SAT
f
5
6
7
2
3
h
gi j k
e
456
7
AUDIO SYSTEM 2-7
Operating the radio
iINFORMATION
The Song title display may be delayed in
accordance to the reception quality of the
Sirius broadcast.
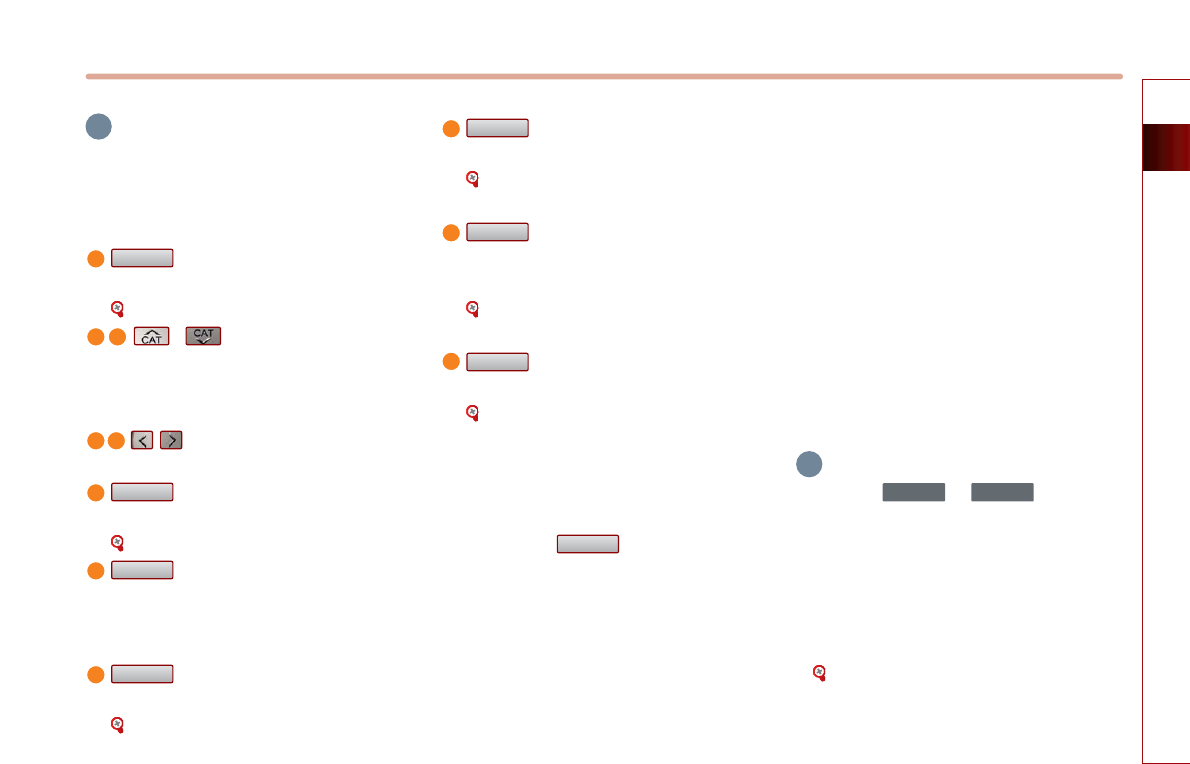
button : Switches between
channel mode and category mode.
[Switching the SIRIUS modes], page 2-7.
, : Moves to the next or
previous category, and automatically
plays the first channel within the
selected category.
, : Moves to the next or previous
channel.
buttons : The desired channel
can be preset and selected.
[Storing SIRIUS presets], page 2-9.
button : Displays the Title,
Artist, Composer, and other information
for the current received channel if the
information exists.
button: Selects the channel by
directly inputting the channel number.
[Selecting SIRIUS broadcast channel],
page 2-7.
button: Displays the channel or
category list.
[Selecting SIRIUS broadcast channel],
page 2-7.
button: Scans all frequencies or
just the preset frequencies for 5 seconds
each.
[Scanning SIRIUS broadcast channel],
page 2-10.
button : Adjusts the FAD/BAL,
BASS/MID/TREB controls.
[Audio sound setting], page 1-11.
■
Switching the SIRIUS modes
(Channel / Category)
Each time the button is pressed,
the mode will switch between channel
mode and category mode.
Category mode will begin operating when
the orange light is turned ON.
■
Selecting SIRIUS broadcast channel
There are 5 ways to select a broadcast
channel - (a) selecting through presets, (b)
selecting with channel Up/Down, (c)
Selecting a channel through manual search,
(d) selecting through channel/category list,
(e) selecting by directly inputting the
channel number.
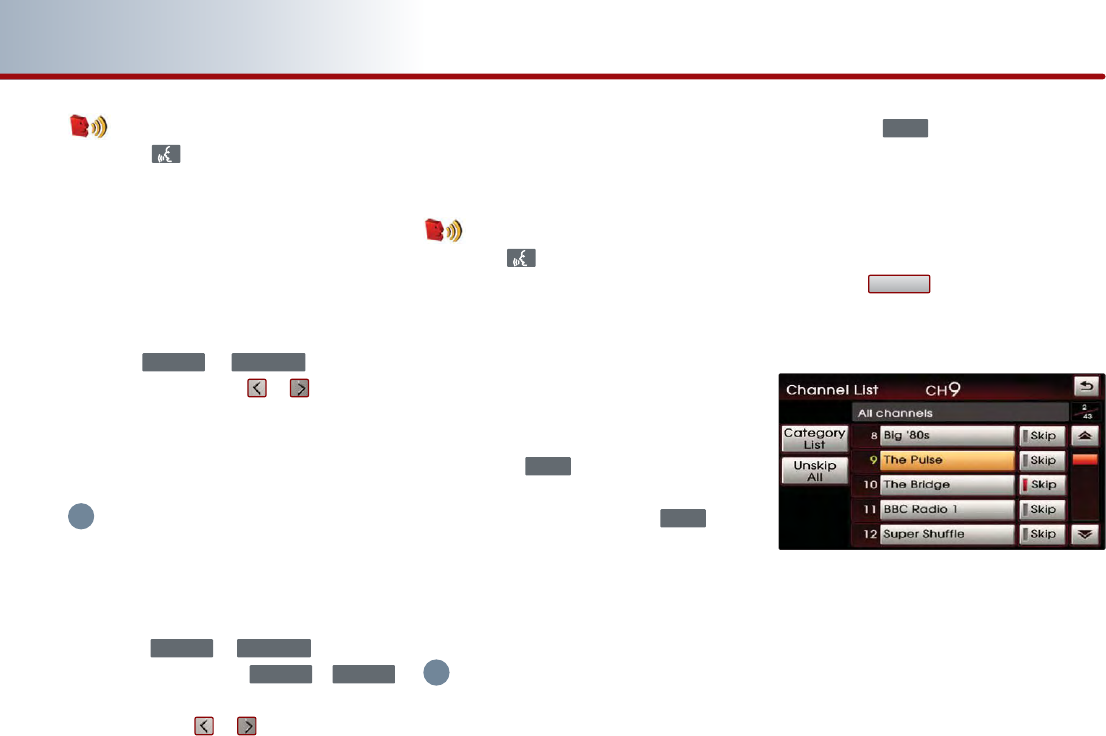
(a) Selecting a channel through presets
Press the preset button of the desired
channel.
INFORMATION
●Press the or buttons on
the steering wheel remote controller for less
than 0.8 second.
The preset channels of the current band will
be selected in order.
●There are 6 preset channels each for
SIRIUS1, SIRIUS2, and SIRIUS3.
[Storing SIRIUS presets], page 2-9.
SEEK
∨
SEEK
∧
CAT
Sound
Scan
List
Search
Info.
Preset
CAT
a
b c
d
f
g
h
e
i
j
i
k
2-8 AUDIO SYSTEM
PART 2 AUDIO SYSTEM
Voice Command
1. Press the button on the steering wheel
remote controller.
2. After the beep sound, say a command.
"Preset <1 to 6>"
"Preset Up"
"Preset Down"
(b) Selecting with Channel Up/Down
Press the or buttons on
the control panel or the or buttons on
SIRIUS1, SIRIUS2, or SIRIUS3 mode screens
for less than 0.8 second.
The previous or next channel will be selected.
INFORMATION
●If in Channel mode, the channel is selected
from all channels. If in Category mode, the
previous or next channel of each category is
selected.
●Press the or buttons on
the control panel or the or
buttons on the steering wheel remote
controller or the
or
buttons on SIRIUS1,
SIRIUS2, and SIRIUS3 mode screens for more
than 0.8 second to quickly move to the
nearest desired channel. Once the button is
released, the current channel will be selected.
Voice Command
1. Press the button on the steering wheel
remote controller.
2. After the beep sound, say a command.
"Channel Up"
"Channel Down"
(c) Selecting a channel through manual
search
Turn the knob on the control
panel in clockwise or counterclockwise
direction. Each click on the knob
will display the channel information of
the previous or next channel. The
current playing channel will continue to
be played.
INFORMATION
If in Channel mode, the channel is selected
from all channels. If in Category mode, the
first channel of each category is selected.
Press the knob at the desired
channel. The selected channel will begin
playing.
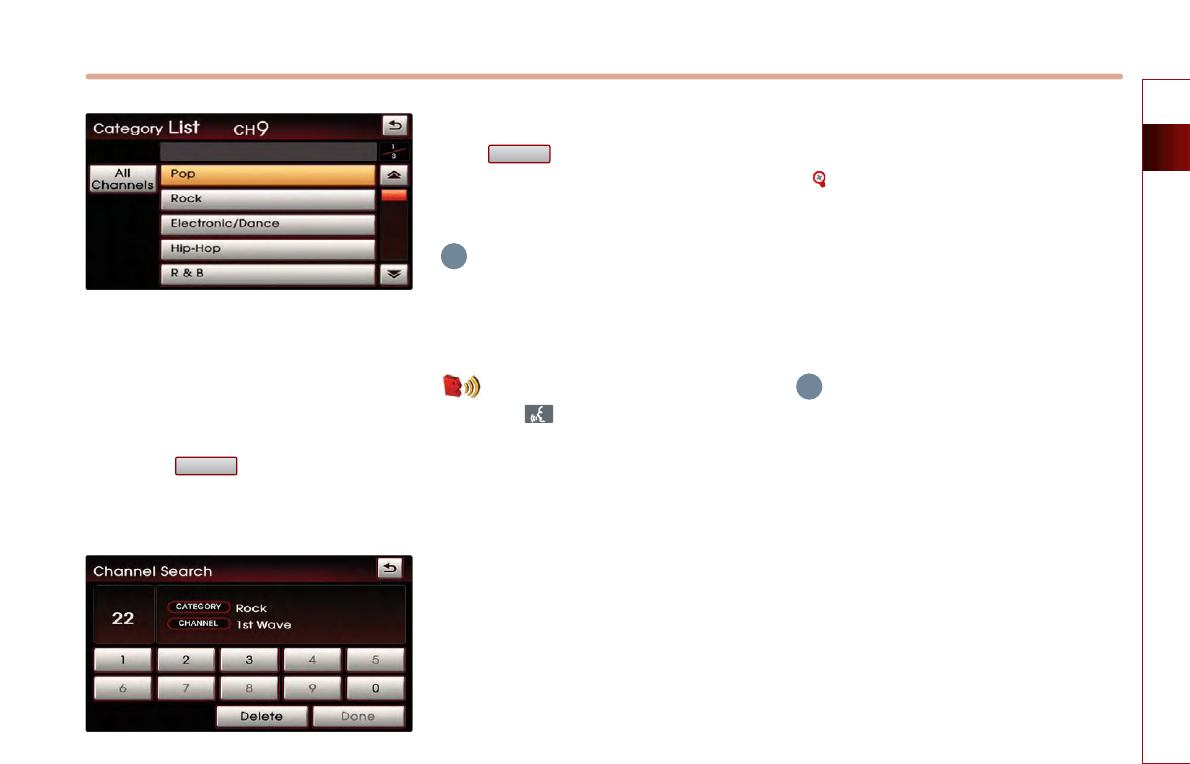
(d) Selecting channel through channel/
category list
Press the button.
If in channel mode, the Channel list
screen will be displayed.
If in category mode, the Category list
screen will be displayed.
Select the desired category button to
display the channel list screen for the
corresponding category.
List
TUNE
TUNE
TUNE
SEEK
∨
SEEK
∧
TRACK
∨
SEEK
∧
TRACK
∨
SEEK
∧
i
i
AUDIO SYSTEM 2-9
Operating the radio
Select the desired channel button.
The previous screen will be restored and
the selected channel will begin playing.
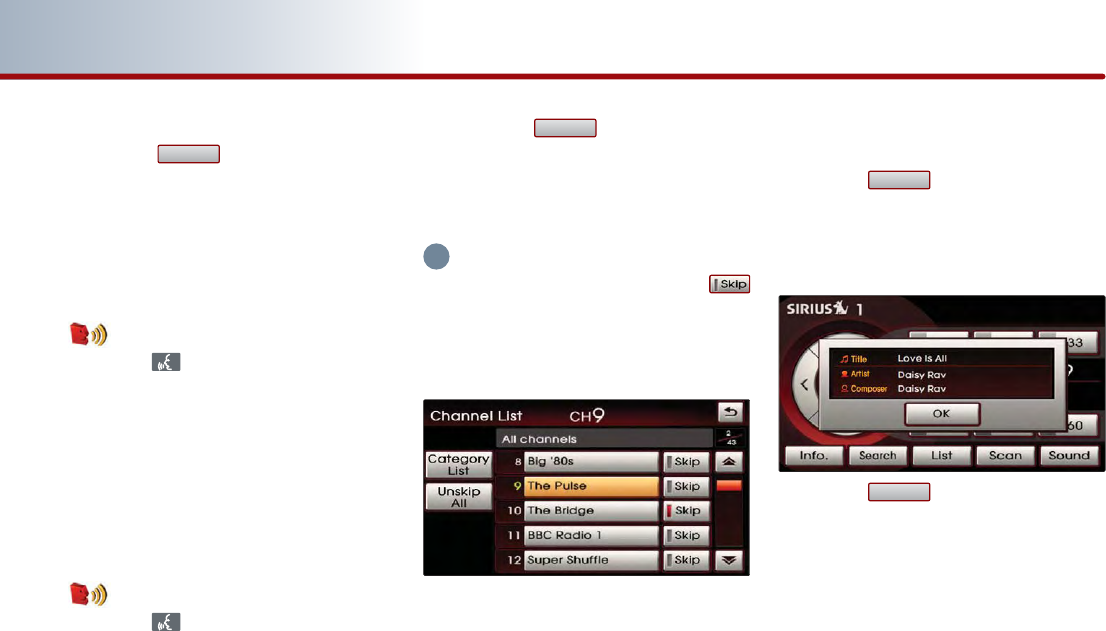
(e) Selecting channel by directly inputting
the channel number
Press the button.
The Channel search screen will be
displayed.
Input desired channel number, and press
the button.
The previous screen will be restored and
the selected channel will begin playing.
INFORMATION
To prevent inputting a channel which exceeds
the channel range, numbers which cannot be
inputted are set to disabled state.
Voice Command
1. Press the button on the steering wheel
remote controller.
2. After the beep sound, say a command.
"Channel<0 to 223>"
■
Storing SIRIUS presets
Select the desired channel.
[Selecting SIRIUS broadcast channel],
page 2-7.
Press the preset button for over 0.8
second.
The frequency will be saved along with
beep sound.
INFORMATION
Six preset frequencies each for SIRIUS1/
SIRIUS2/ SIRIUS3 modes can be stored using
the above instructions.
Done
Search
i
i
2-10 AUDIO SYSTEM
PART 2 AUDIO SYSTEM
■
Scanning SIRIUS broadcast channel
Press the button.
●
SCAN (under 0.8 second): Scans all
channels for 5 seconds each if in channel
mode. If in category mode, scans all
channels within the current category for 5
seconds each.
Voice Command
1. Press the button on the steering wheel
remote controller.
2. After the beep sound, say a command.
"Scan"
●
PRESET SCAN (over 0.8 second): Scans the
6 preset channels within the current band
for 5 seconds each.
Voice Command
1. Press the button on the steering wheel
remote controller.
2. After the beep sound, say a command.
"Preset Scan"
Press the button again to
continue playing the channel.
The scan will be terminated and the
current channel will continue to play.
INFORMATION
●Within the Channel list screen, if the
button next to each channel name is
pressed, the selected channel will be
excluded from SCAN operation.
●When scanning has completed an entire
revolution, the scan function is automatically
terminated and the previous played channel
will be restored.
●Channel 0 is the radio ID and contains
information required for SIRIUS activation.
■
Browsing detailed information
about the SIRIUS channel
Press the button.
The detailed information (Title, Artist and
Composer) for the current channel will be
displayed.
Press the button.
The detailed information will be turned
off.
OK
Info.
Scan
Scan
i

AUDIO SYSTEM 2-11
Operating the CDP
Operating the CDP
About CDP
■
Precautions upon handling discs
●
After using a disc, keep it in the original
case to prevent it from becoming
scratched, which may cause the CD to
make popping sounds.
●
Do not use heart-shaped discs, octagon-
shaped discs, or any other abnormally
shaped disc. Such discs may be the cause
of malfunctions.
●
Do not clean discs with chemical solutions
such as record sprays, antistatic sprays,
antistatic liquids, benzene, or thinners.
Such materials may cause the surface of
DISC to be unrecoverable.
●
Do not expose the disc to direct sunlight
for prolonged periods of time. Such
exposure may lead to disc deformation.
●
Dust, scratch, and other substances may
cause popping sound while playing as
well as sound deterioration.
●
Never place paper on either side of the
disc or write on disc surfaces. Sharp
writing utensils and inks used in felt-tip
pens may cause damage to disc surfaces
●
Clean fingerprints and dust off the signal
surface (coated side) of the disc with a
soft cloth.
Only soft cloths should be used as there
are no grooves for dust to get in as is the
case with LPs.
●
Copy-protected CDs such as S-type CDs
may not function in the device.
●
DATA CDs are not supported by the
device. (However, such discs may operate
abnormally.)
■
For safe and efficient operation
●
Do not disassemble the CDP for repair
purposes. Contact your place of purchase
in the case of malfunction. (Complete
service assistance will not be provided if
the user disassembles the device.)
●
Do not use water to clean the device.
Exposure to water may cause damage to
the device.
●
Be cautious not to introduce foreign
substances into the disc insert slot.
Foreign substances may cause damage
to the interior of the device.
●
The device may fail to operate properly in
extremely hot or cold temperatures.
Discontinue the use of the device unless
normal temperature is maintained.
(The operational temperature range is:
-10
℃
~ 65
℃
).
●
Steam can be condensed on the fiberoptic
lens due to rain, wet conditions, or upon
operating the heating system.
●
Skipping may occur to the audio when
driving on bumpy roads for prolonged
periods of time or upon severe shock to
the vehicle.
●
Do not use chemical solvent to clean the
device. Such solvents may cause damage
to the surfaces of the device.
Always use a clean and dry cloth.
2-12 AUDIO SYSTEM
PART 2 AUDIO SYSTEM
WARNING !
Always give your full attention to driving.
Avoid operating your system in such a way
that you can be distracted driving vehicle
operation.
■
Supported disc formats
●
The disc types supported by this device
are as shown below.
●
CD-R or CD-RW DISC burned with a bulk
CD without quality guarantees may not
be recognized by the device.
●
Inserting an abnormal disc may result in
faulty operation or recognition.
Disc format Disc media Disc format
CD CD-DA
CD-R MP3
CD-RW WMA
Multisession-CD DTS-CD
CD CD-ROM
CD-G
CD-EXTRA
CD-TEXT
SACD SACD
SACD(Hybrid)
Disc format Audio format
CD LPCM
MP3 MPEG1, Layer3
MPEG2, Layer3
MPEG2.5
WMA Ver9
Disc Size
3-inch (7.6 cm)
5-inch (12.7cm)
AUDIO SYSTEM 2-13
Operating the CDP
■
Disc/Content format compatibility
●
Ordinary disc compatibility
This device has been designed/
manufactured to be compatible with
software bearing the following logo marks.
CD-R/RW discs (Audio CD and MP3 CD)
created with CD-writing devices or
personal computers may not properly
function in the device. This may be
caused by damaged recording method,
contamination by dirt and other foreign
substance on the disc surfaces or play
lens, and various other reasons.
●
Special formats or special features
regarding software
CD-R/RW Compatibility.
This device operates as a CD-ROM
including CD-R and CD-RW DISC written in
CD Audio or MP3 CD Format.
However, other contents may cause
abnormal disc operation such noise.
The writing of CD-R and CD-RW discs with
this device is not supported.
Although CD-R/RW discs burned as audio
CDs which have not been finalized are not
supported by the device, some information
such as play time may be displayed.
PC-created DISC compatibility.
When recording a disc with a personal
computer, even discs recorded in a
"format compatible" with the formats
described above may not operate on the
device caused by software settings of the
recording application.
In such cases, contact the software
developer.
Additional information regarding
compatibility can be found on the CD-R/
RW software disc box.
DVD-R/RW are not supported by the
device.
●
Compressed audio compatibility
This device plays audio files compressed by
MPEG-1 audio stream layer 3(MP3) using 32,
44.1 and 48kHz fixed bit rates. Incompatible
files are not supported.
Variable bit rate files may operate, but the
play time information may not be
properly displayed.
Physical formats of CD : Model 1, Model 2
XA format 1.
This device only supports tracks with file
extension of ".MP3" or ".WMA".
This device does not support multi-
session discs.
This device supports a maximum of 256
folders and maximum 512 files.
Folders and files which exceed this limit
will not be supported.
There are various bit rates which can be
encoded onto a MP3 file.
This device has been designed to be
compatible with various bit rates.
Audio which has been encoded at
128kbps will sound similar to CD audio
sound quality.
Audio-CD CD-R CD-RW

2-14 AUDIO SYSTEM
PART 2 AUDIO SYSTEM
Although this device supports low bit rate
MP3 tracks, such tracks may only provide
low quality sound.
For stable operation, the use of files in
95kbps ~ 192kbps bit rate range and
44.1kHz SAMPLING frequency is
recommended.
Inserting/Ejecting Disc
■
Inserting a Disc
Insert the disc into the slot.
The disc will begin playing automatically
after it has been inserted.
INFORMATION
If the operation mode had been Audio mode
before inserting the disc, the device will
convert to the DISC mode screen and begin
playing.
If the operation mode had been Navigation
mode, then Navigation mode screen will
remain and the disc play status will be
displayed through the Audio bar.
■
Ejecting a Disc
Press the button.
The disc will immediately be stopped and
ejected.
INFORMATION
●If the operation mode had been in Audio
mode before ejecting the disc, the device
will be converted back to Audio mode.
If the operation mode had been in
Navigation mode, then Navigation mode
screen will remain.
●If the disc is straddled on the slot without
removing for approximately 10 seconds, the
disc will be re-inserted automatically into
the disc player.
In such a case, the disc will not begin
playing automatically.
i
i
AUDIO SYSTEM 2-15
Operating the CDP
CD
■
Listening to CD music
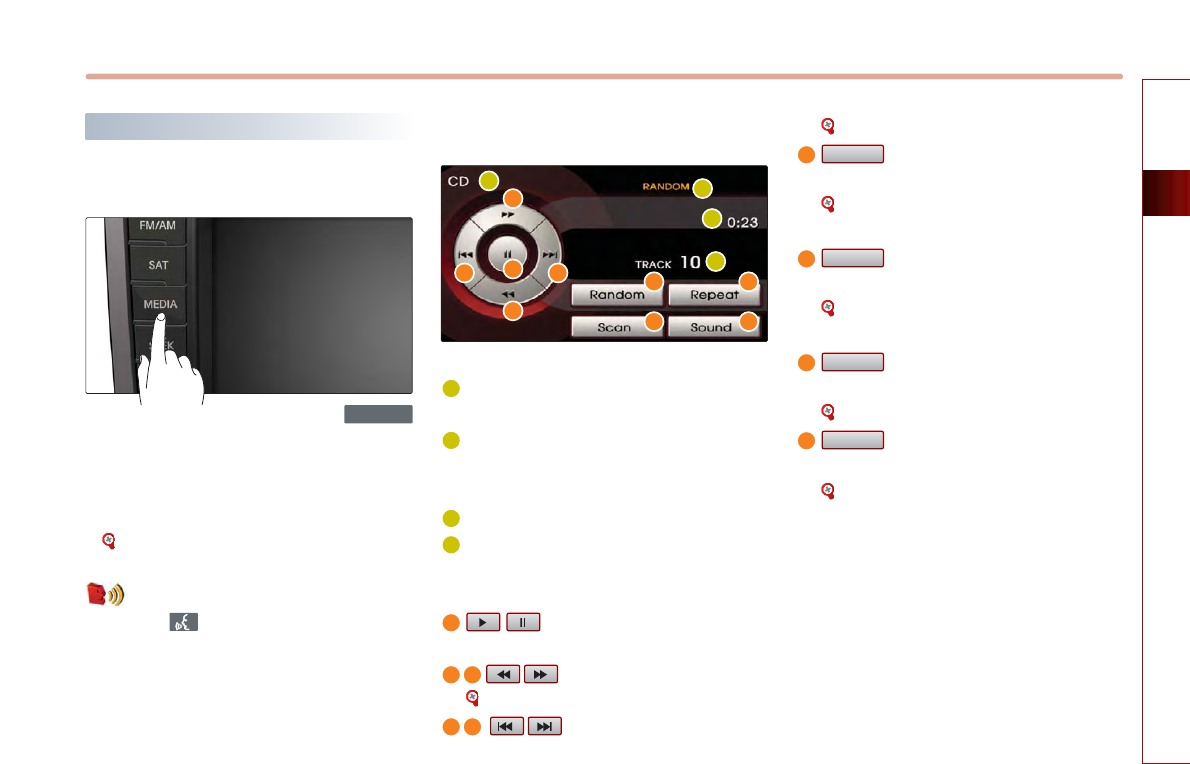
Insert the CD or press the
button on the control panel if the CD is
already inserted.
Select the desired track.
[Selecting the CD track], page 2-16.
Voice Command
1. Press the button on the steering wheel
remote controller.
2. After the beep sound, say a command.
"DISC"
"CD"
"CD Track <1 to 665>"
■
CD screen and functions
Mode display : Displays that the current
mode is CD mode.
RANDOM/REPEAT/SCAN indicator : If
RANDOM/REPEAT/SCAN is operating,
the switch is displayed.
Play time : Displays the play time.
Track number : Displays the current
playing track number.
button : Plays or pauses the
current track.
button : REW or FF
[Selecting the CD track], page 2-17.
button : Previous or next
track.
[REW/FF CD track], page 2-17.
button : Plays the tracks on the
disc in random order.
[Setting Random function for CD
music] , page 2-17.
button : Repeats the current
playing track.
[Setting Repeat function for CD
music], page 2-18.
button : Scans all tracks on the
disc for 10 seconds each.
[Scanning CD track], page 2-18.
button : Adjusts the FAD/BAL,
BASS/MID/TREB controls.
[Audio sound setting], page 1-11.
Sound
Scan
Repeat
Random
MEDIA
1
12
3
4
a
b c
d
a
c
b
d e fg
h
f
g
h
e
2
3
4
i
i
2-16 AUDIO SYSTEM
PART 2 AUDIO SYSTEM
■
Selecting the CD track
There are 2 ways to select a CD Track - (a)
selecting through Track Up/Down, (b)
selecting through searching Track.
(a) Selecting through Track Up / Down
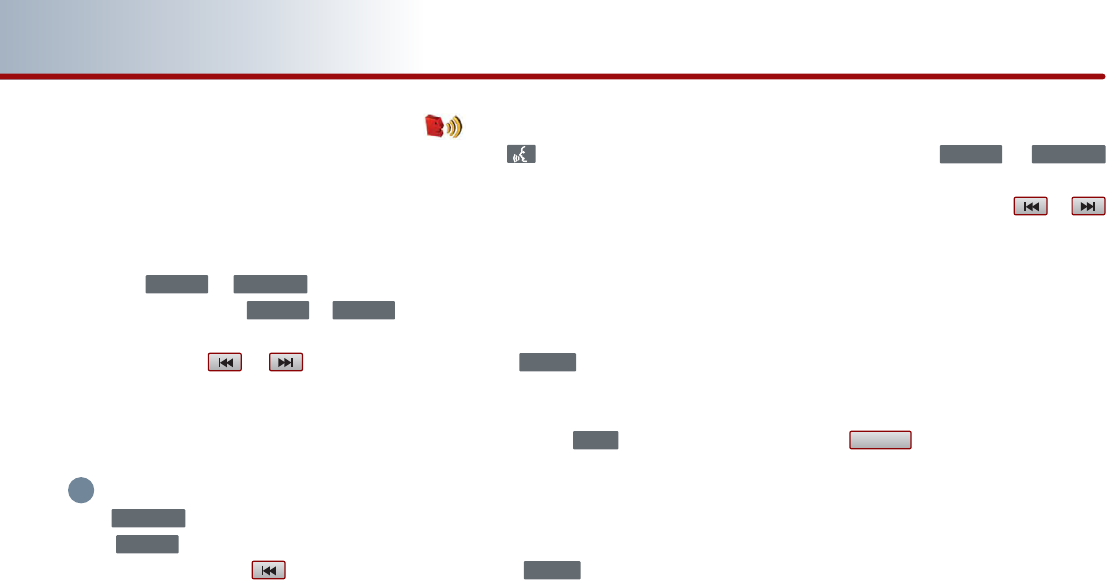
Press the or buttons on
the control panel or the or
buttons on the steering wheel remote
controller or the or buttons on
the screen for less than 0.8 second.
The next or previous track will begin
playing.
INFORMATION
If the button on the control panel
or the button on the steering wheel
remote controller or the button on the
screen is pressed shortly while the track has
played for more than 3 seconds, the start of
the current track will begin playing.
If the track has been playing for less than 2
seconds, the start of the previous track will
begin playing.
Voice Command
1. Press the button on the steering wheel
remote controller.
2. After the beep sound, say a command.
"Next Track"
"Previous Track"
(b) Selecting track through search
Turn the knob on the control
panel in clockwise or counter-clockwise
direction.
Each click on the knob will display
the information of the next or previous
track. The current playing track will
continue to be played.
Press the knob at the desired
track.
The searched track will begin playing.
■
REW/FF CD track
Press and hold the or
buttons on the control panel or steering
wheel remote controller or the or
buttons for over 0.8 second.
The track will play 20 times faster while
holding the button and return to normal
play when the button is released.
■
Setting Random function for CD
music
Press the button.
Each press will change the function in the
following order: RANDOM →RANDOM OFF
→RANDOM
* RANDOM : plays all tracks in the disc in
random order.
Random
TRACK
∨
SEEK
∧
TUNE
TUNE
TUNE
SEEK
∧
TRACK
∨
SEEK
∨
SEEK
∧
TRACK
∨
SEEK
∧
i
AUDIO SYSTEM 2-17
Operating the CDP
Voice Command
1. Press the button on the steering wheel
remote controller.
2. After the beep sound, say a command.
"Random"
Say "Random" or "Random Folder" again or
say "Normal Play" in order to terminate the
set Random function.
■
Setting Repeat function for CD
music
Press the button. Each press will
change the function in the following order:
REPEAT
→
REPEAT OFF
→
REPEAT
* REPEAT : repeats the current playing track.
Voice Command
1. Press the button on the steering wheel
remote controller.
2. After the beep sound, say a command.
"Repeat Track"
Say "Repeat File" or "Repeat Folder" again
or say "Normal Play" in order to terminate
the set Repeat.
■
Scanning CD track
Press the button. Each press will
change the function in the following
order: SCAN
→
SCAN OFF
→
SCAN.
* SCAN : Scans all tracks in the disc for 10
seconds each.
Voice Command
1. Press the button on the steering wheel
remote controller.
2. After the beep sound, say a command.
"Scan"
Say "Normal Play" in order to terminate the
set Scan function.
Press the button again to
continue listening to the track.
The scan will be terminated and the
current track will continue to be played.
INFORMATION
When scanning has completed an entire
revolution, the scan function is automatically
terminated and the previous played track will
be restored.
Scan
Scan
Repeat
i

2-18 AUDIO SYSTEM
PART 2 AUDIO SYSTEM
MP3
■
MP3 disc related information and
precaution
●
Information
The MP3 file standards supported by the
device are as follows.
Acceptable standard: MPEG1 AUDIO
LAYER 3
Acceptable sampling frequency: 32, 44.1,
48 (KHz)
Acceptable bit rate: 32, 40, 48, 56, 64, 80,
96, 112, 128, 160, 192, 224, 256, 320
(kbps)
Recommended bit rate & reference
sampling frequency: 96,128, 192 kbps
fixed bit rate /44.1KHz
ID3 tag
This device supports ID3v1.0, ID3v1.1,
ID3v2.2, ID3v2.3, and ID3v2.4 ID3 tags.
Supported media
The MP3 media supported by the device
are CD-ROM and USB.
Supported media formats
This device supports ISO9660 LEVEL1 and
LEVEL2. Detailed specification is as below.
Maximum directory layers: 8 layers
Maximum folder length: 64 Bytes, file
name length: 64 Bytes
Supported characters for folder name/ file
name: Alphanumeric characters, Korean
standard character set 2350 characters,
Simplified Chinese 4888 characters
Maximum number of folders which can
be stored onto one disc: 256 folders
(including ROOT directory)
Maximum number of files which can be
stored onto one disc: 512 files
Precautions upon burning MP3 files
The use of ISO 9660 LEVEL 2 JULIET
format is recommended when burning
MP3 files. Burning in other formats may
abnormally display the file names.
It is possible to display up to 32 characters
for file and folder names in case of
UNICODE, and up to 64 characters in case of
ASCII.
Although the full length of the file name can
be displayed by using the scroll function, the
full length of folder names may not be
displayed as the scroll function does not
operate when displaying folder names.
●
Precaution
Please use an MP3 bit rate which is less than
128 kbps.
The sound quality cannot be guaranteed for
MP3s exceeding 128kbps.
AUDIO SYSTEM 2-19
Operating the CDP
■
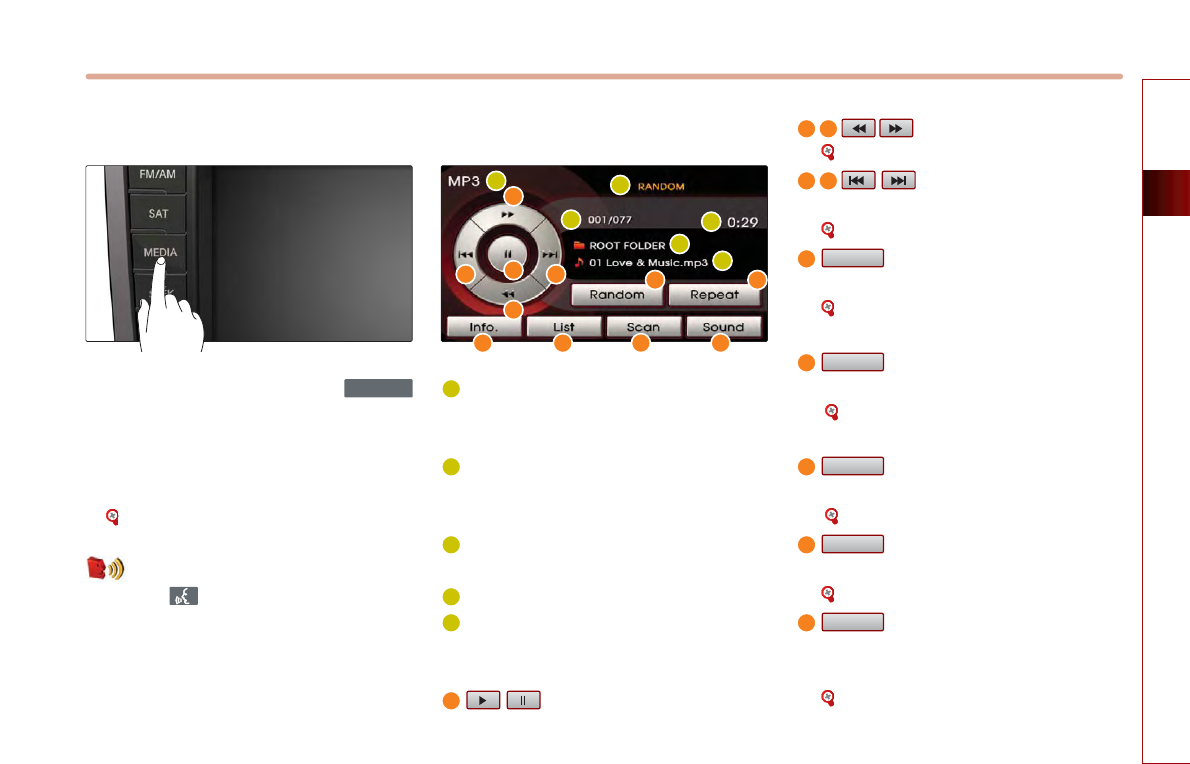
Listening to MP3 music
Insert the MP3 disc or press the
button on the control panel if the MP3
disc is already inserted.
Select the desired file.
[Selecting the MP3 file], page 2-21.
Voice Command
1. Press the button on the steering wheel
remote controller.
2. After the beep sound, say a command.
"DISC"
"CD"
"MP3"
■
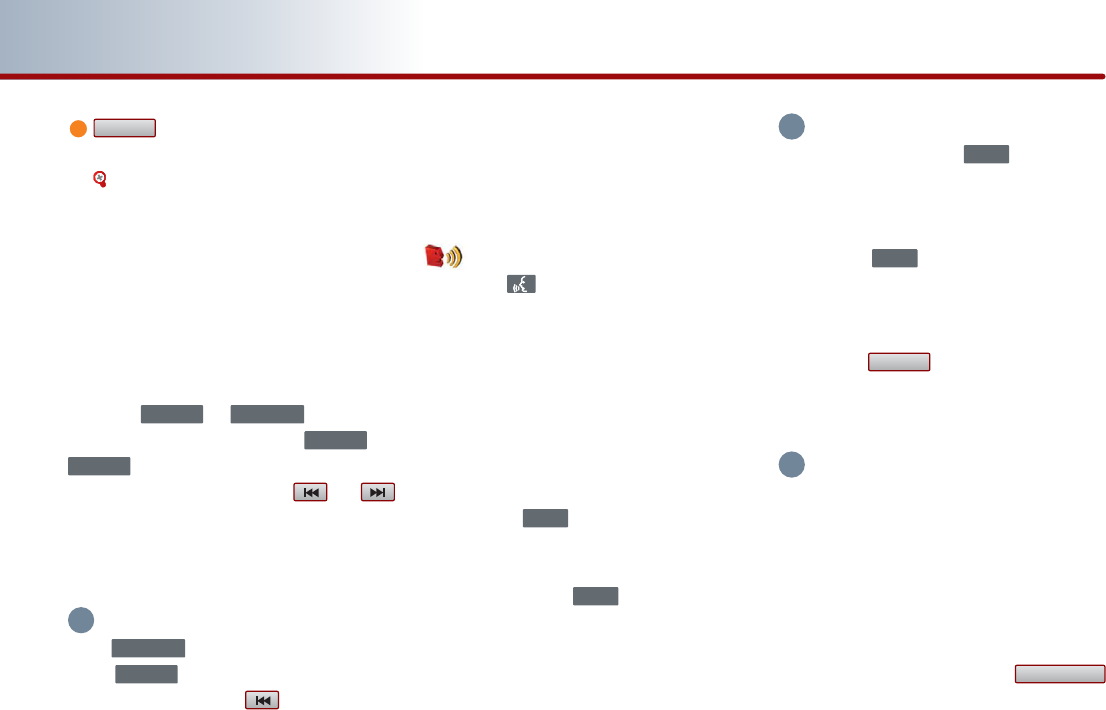
MP3 screen and functions
Mode display: Displays that the current
mode is MP3 disc mode. (MP3 files on
DVDs are not supported.)
REPEAT/RANDOM/SCAN indicator: If
REPEAT/RANDOM/SCAN is operating,
the switch is displayed.
Play file position : Current playing file /
total files
Play time: Displays the play time.
Folder name: Displays the folder name.
File name: Displays the file name.
button: Plays or pauses the
current file.
button : REW or FF.
[REW/FF MP3 file], page 2-22.
button : Previous or next
track.
[Selecting the MP3 file], page 2-21.
button : Plays all files on the
disc or folder in random order.
[Setting Random function for MP3
file] , page 2-22.
button : Repeats the current
playing folder or file.
[Setting Repeat function for MP3 file],
page 2-23.
button : Scans all files on the
disc or folder for 10 seconds each.
[Scanning MP3 file], page 2-23.
button : Displays the MP3
folders and file lists for the disc.
[Selecting the MP3 file], page 2-21.
button : Displays or hides the
detailed file information for the current
playing file.
[Browsing detailed information about
the MP3 file], page 2-22.
Info.
List
Scan
Repeat
Random
MEDIA
1
1
4
2
6
5
3
2
3
4
5
a
a
c
b
d e f
i jh
g
b c
d e
f
g
h
i
j
k
2-20 AUDIO SYSTEM
PART 2 AUDIO SYSTEM
button : Adjusts the FAD/BAL,
BASS/MID/TREB controls.
[Audio sound setting], page 1-11.
■
Selecting the MP3 file
There are 3 ways to select an MP3 file - (a)
selecting through file up/down, (b)
selecting through searching files, (c)
selecting through MP3 list.
(a) Selecting through File Up / Down
Press the or buttons on
the control panel or the or
buttons on the steering wheel
remote controller or the or
buttons on the screen for less than 0.8
second.
The next or previous file will begin playing.
INFORMATION
If the button on the control panel
or the
button
on the steering wheel
remote controller
the
button on the
screen is pressed shortly while the file has
played for more than 3 seconds, the start of
the current file will begin playing.
If the file has been playing for less than 2
seconds, the start of the previous file will
begin playing.
Voice Command
1. Press the button on the steering wheel
remote controller.
2. After the beep sound, say a command.
"Next File"
"Previous File"
"Next Folder"
"Previous Folder"
(b) Selecting through search
Turn the knob on the control
panel in clockwise or counter-clockwise
direction.
Each click on the knob will display
the information of the next or previous
file. The current playing file will continue
to be played.
INFORMATION
If the operation of the knob is too
rapid, there may be a delay in displaying the
file information.
Press the knob at the desired file.
The searched file will begin playing.
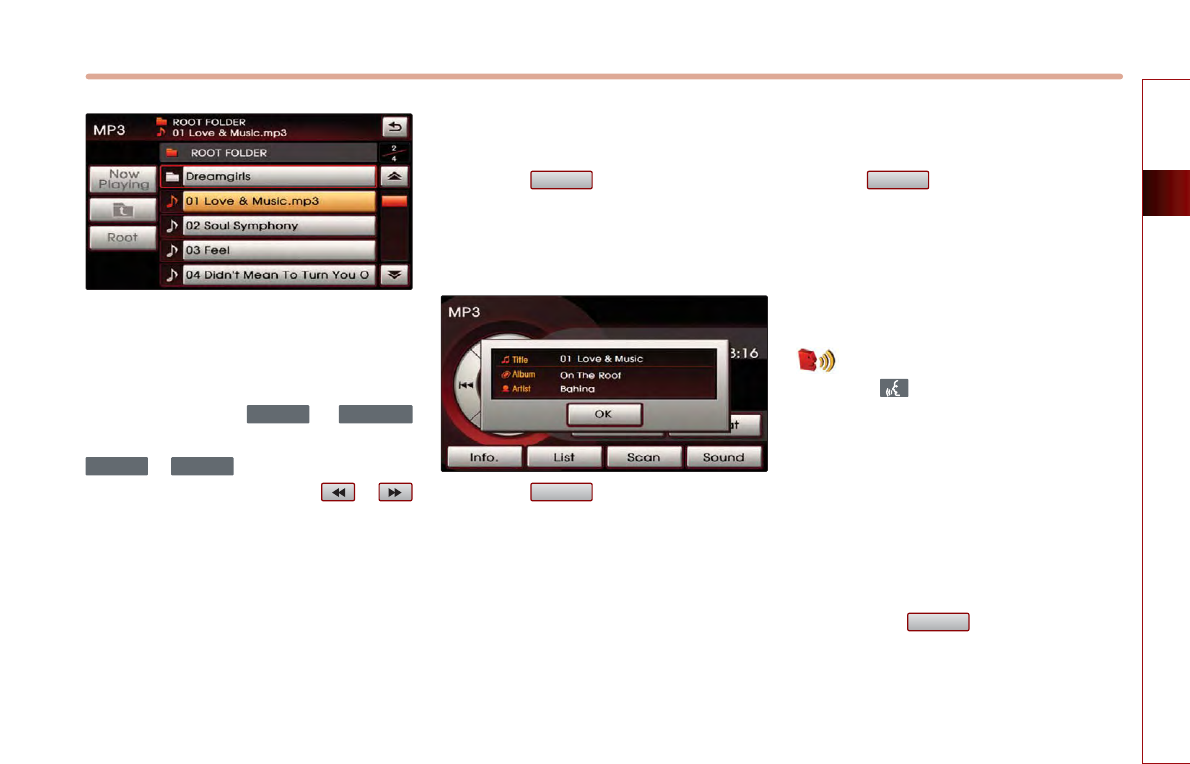
(c) Selecting through MP3 List
Press the button.
The file list of the folder for the current
playing file will be displayed.
INFORMATION
●If many songs and folders are recorded onto
a DISC, file loading time may be longer and
cause the play list to be improperly displayed
or song search through TUNE operation to
operate improperly.
In such cases, wait until file loading is
complete and try again.
●Within the MP3 list screen, if the
button is pressed while searching for files
within a folder or a page, the current playing
file list will become displayed.
Now playing
List
TUNE
TUNE
TUNE
TUNE
SEEK
∨
TRACK
∨
SEEK
∨
SEEK
∧
TRACK
∨
SEEK
∧
Sound
i
i
i
k
AUDIO SYSTEM 2-21
Operating the CDP
Press the desired menu to return to the
main screen and play the selected file.
■
REW/FF MP3 file
Press and hold the or
buttons on the control panel or the
or buttons on the steering
wheel remote controller or the or
buttons for over 0.8 second.
The file will play 20 times faster while
holding the button and return to normal
play when the button is released.
■
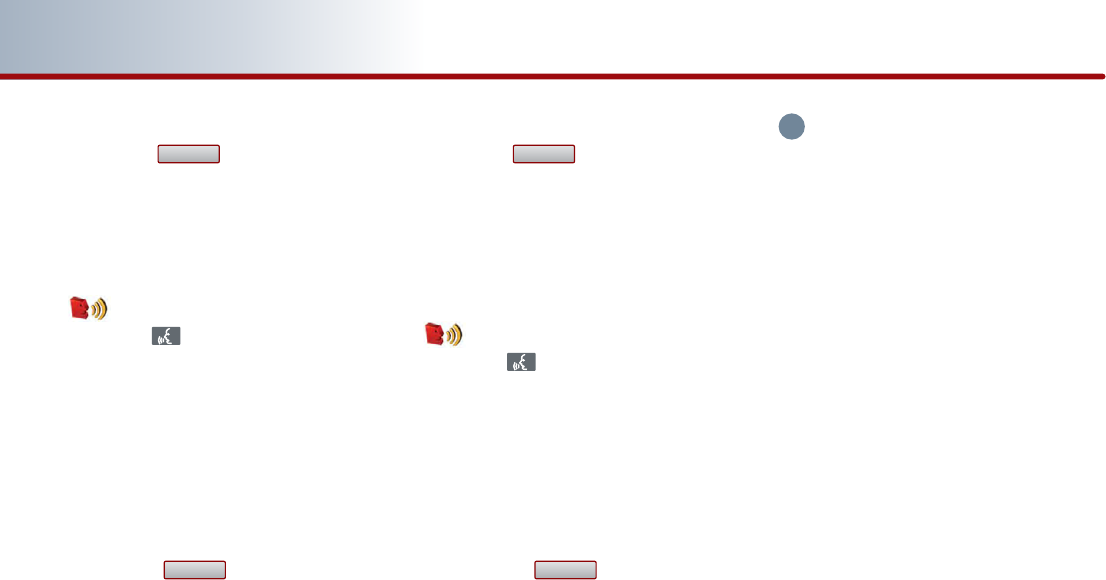
Browsing detailed information
about the MP3 file
Press the button.
The detailed information (Title, Album,
Artist) for the current playing MP3 will be
displayed.
Press the button.
The detailed information will be turned
off.
■
Setting Random function for MP3
file
Press the button.
* RANDOM (less than 0.8 second) : Plays all
files in the disc in random order
* FOLDER RANDOM (over 0.8 second) :
Plays the files in the current folder in
random order.
Voice Command
1. Press the button on the steering wheel
remote controller.
2. After the beep sound, say a command.
"Random"
"Random Folder"
Say "Random" or "Random Folder" again or
say "Normal Play" in order to terminate the
set Random function.
Press the button again to
continue listening to the current file.
The random selection will be terminated
and the current file will continue to play.
Random
Random
OK
Info.
SEEK
∨
SEEK
∧
TRACK
∨
SEEK
∧
2-22 AUDIO SYSTEM
PART 2 AUDIO SYSTEM
■
Setting Repeat function for MP3 file
Press the button.
* REPEAT (less than 0.8 second) : Repeats
the current playing file
* FOLDER REPEAT (over 0.8 second) :
Repeats the files in the current folder
Voice Command
1. Press the button on the steering wheel
remote controller.
2. After the beep sound, say a command.
"Repeat File"
"Repeat Folder"
Say "Repeat File" or "Repeat Folder" again
or say "Normal Play" in order to terminate
the set Repeat function.
Press the button again to stop
repeating the current file.
The repeat selection will be terminated
and the current file will continue to play
once until the next file starts to play.
■
Scanning MP3 file
Press the button.
* SCAN (less than 0.8 second) : Scans all files
in the disc and plays for 10 seconds each.
* FOLDER SCAN (over 0.8 second) : Scans all
files in the current folder for 10 seconds
each.
Voice Command
1. Press the button on the steering wheel
remote controller.
2. After the beep sound, say a command.
"Scan"
"Folder Scan"
Say "Normal Play" in order to terminate the
set Scan function.
Press the button again to
continue listening to the file.
The scan selection will be terminated and
the current file will continue to play.
INFORMATION
When scanning has completed an entire
revolution, the scan function is automatically
terminated and the previous played file will
be restored.
Scan
Scan
Repeat
Repeat
i
AUDIO SYSTEM 2-23
Operating the external devices
Operating the external devices
iPod
iPod
is a registered trademark of Apple
Inc.
■
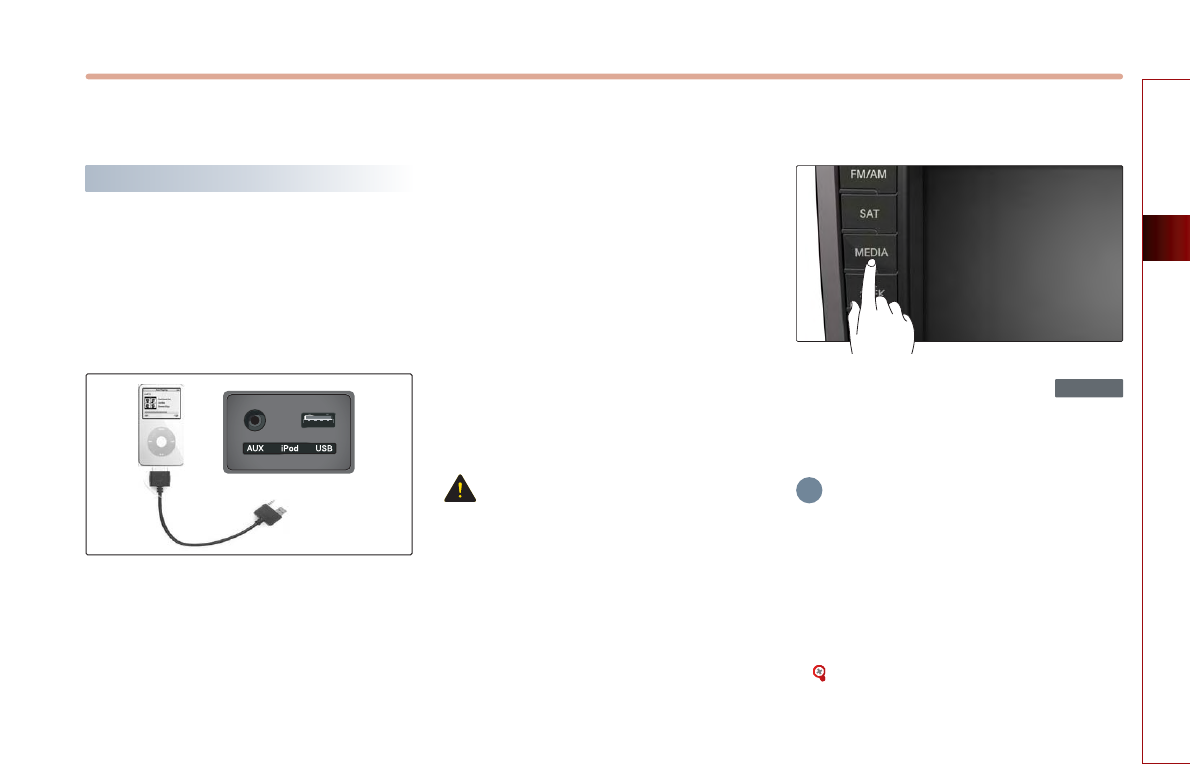
Connecting iPod devices
Connect the iPod device as shown in the
picture.
The identification of the iPod device, battery
recharge, and other functions provided by
the iPod device can be normally supported
only by using a separated sold iPod
connector cable.
If the USB cable provided upon purchasing
the iPod for charging is used as the connector
cable, the device will be recognized as a USB
and may not properly operate or display all of
the display information.
●
Supported iPod devices : iPod 3G, iPod 5G,
5.5G, iPod Mini, iPod Nano 1G, 2G.
If iPod mode cannot be entered due to
identification error, no track, incompatible
protocol version, or other reasons, a pop-up
message "No Media Connected" will be
displayed for 5 seconds and return
automatically to the previous mode.
If the message continues even after
reconnecting the iPod, check to see if there
are any problems with the iPod device.
CAUTION
If a playing iPod is connected to the audio
system, a high-pitched tone may occur for
approximately 1-2 seconds.
Please turn the iPod device to pause/stop
prior to connecting it to the vehicle.
■
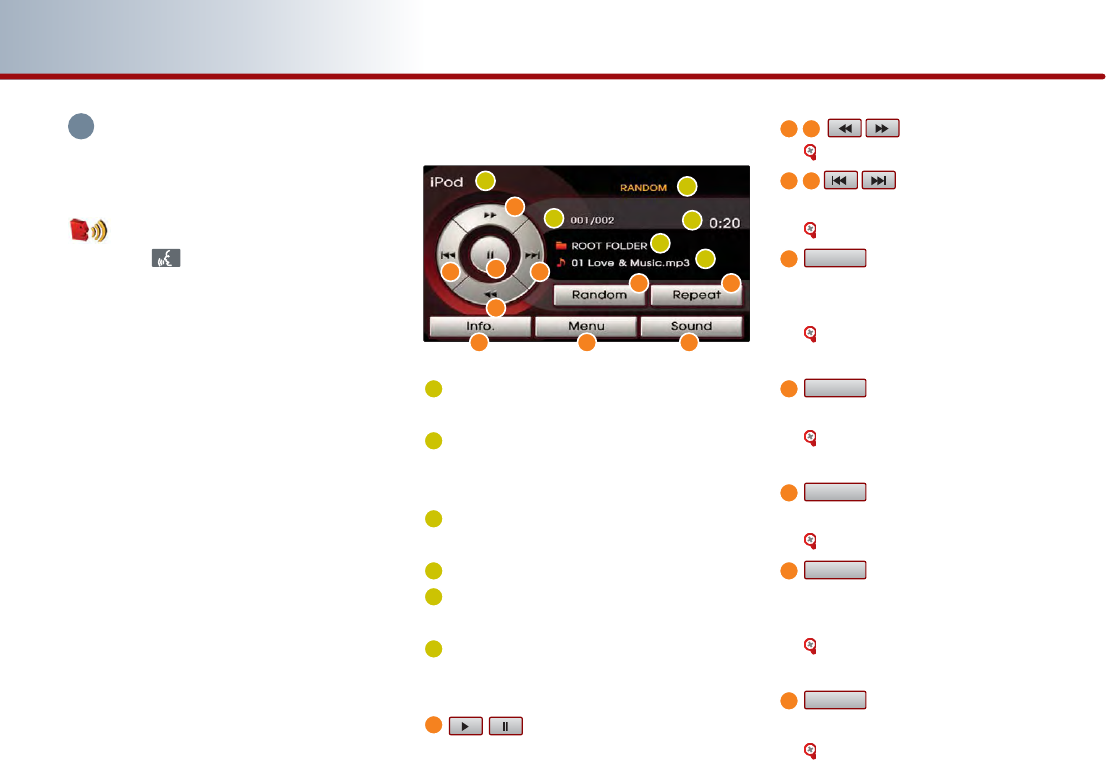
Listening to music from iPod
Connect the iPod or press the
button on the control panel if the iPod is
already connected.
INFORMATION
Even if the iPod is connected, the 'No Media
Connected' message may be displayed if an
error has occurred. In such a case, reconnect
the iPod.
Select the desired song.
[Selecting music from iPod], page 2-26.
MEDIA
i
2-24 AUDIO SYSTEM
PART 2 AUDIO SYSTEM
iINFORMATION
An iPod cable assembly can be purchased at
your local KIA dealer.
Voice Command
1. Press the button on the steering wheel
remote controller.
2. After the beep sound, say a command.
"iPod"
■
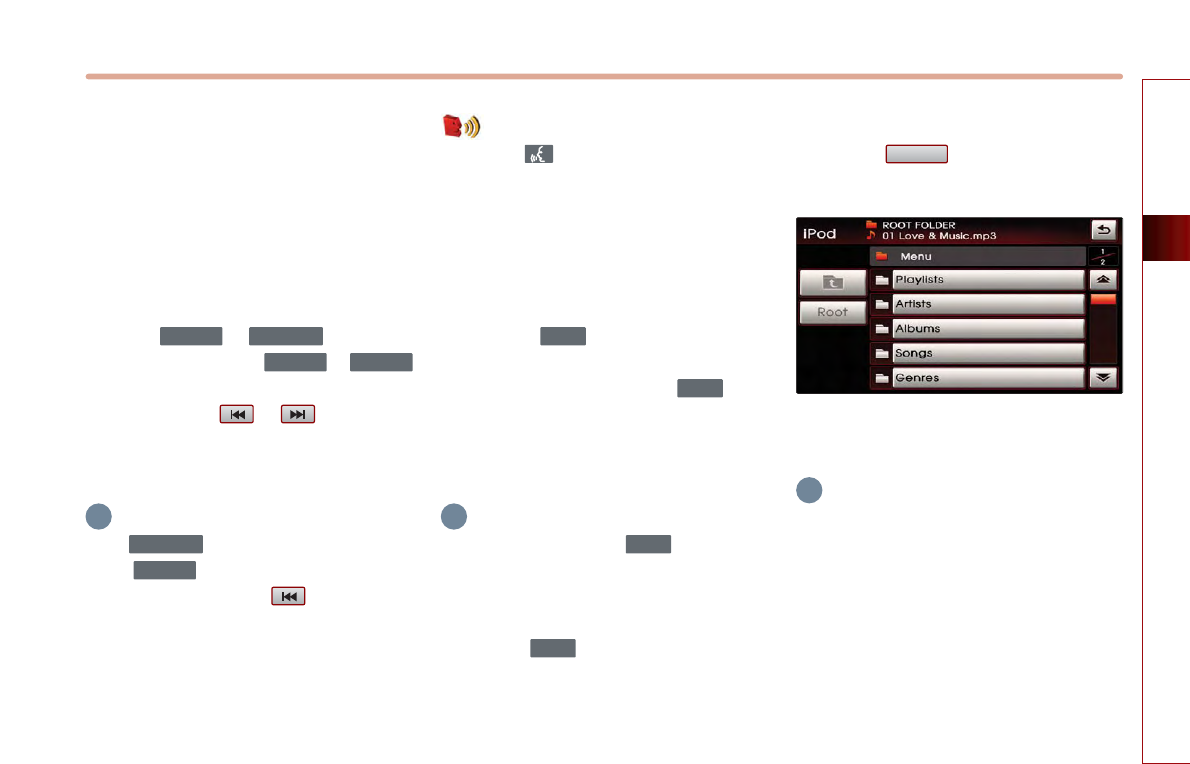
iPod screen and functions
Mode display: Displays that the current
mode is iPod mode.
RANDOM/REPEAT indicator: If RANDOM/
REPEAT is operating, the switch is
displayed.
Play file position: Current playing file /
total files
Play time: Displays the play time.
Category name: Displays the category
name of the playing file.
Title name: Displays the title name of
the playing file.
button : Plays or pauses the
current file.
button : REW or FF.
[REW/FF iPod music], page2-27.
button : Previous or next
track.
[Selcting music from iPod], page 2-26.
button : Plays all music in the
current playing list in random order or
randomly in album unit.
[Setting Random function for iPod
music], page 2-27.
button: Repeats the current
playing music.
[Setting Repeat function for iPod
music], page 2-28.
button : Converts to the
category menu screen.
[Selecting music from iPod], page 2-26.
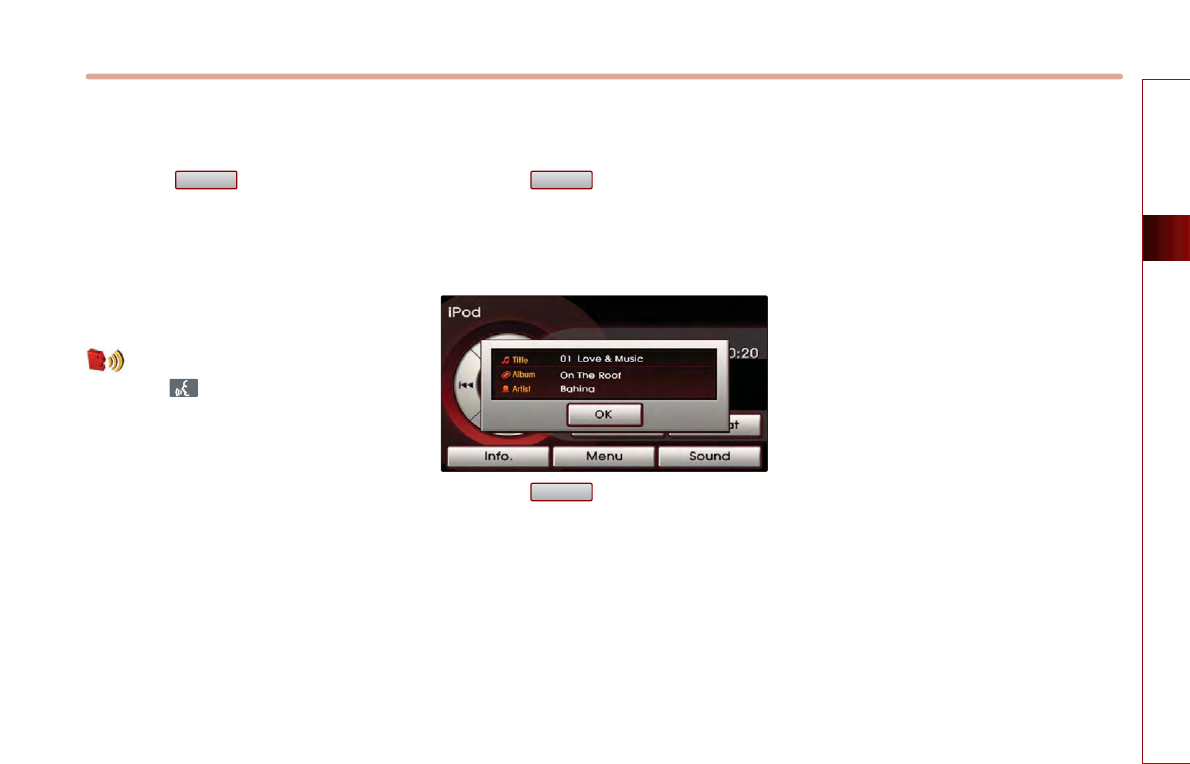
button : Displays or hides the
detailed file information for the current
playing file.
[Browsing detailed information about
the iPod music], page 2-28.
button : Adjusts the FAD/BAL,
BASS/MID/TREB controls.
[Audio sound setting], page 1-10.
Sound
Info.
Menu
Repeat
Random
1
12
34
56
2
3
4
5
6
a
b
a
c
b
d e f g
h i
c
d e
f
g
h
i
j
j
AUDIO SYSTEM 2-25
Operating the external devices
■
Selecting music from iPod
There are 3 ways to select songs from the
iPod device - (a) selecting song through
Up/Down, (b) selecting song through
sequential search, (c) selecting song
through menu.
(a) Selecting song through Up / Down
Press the or buttons on
the control panel or the or
buttons on the steering wheel remote
controller or the or buttons on
the screen for less than 0.8 second. The next
or previous song will begin playing.
INFORMATION
If the button on the control panel
or the button on the steering wheel
remote controller or the button on the
screen is pressed shortly while the song is
playing for more than 3 seconds, the start of
the current song will begin playing. If the
song has been playing for less than 2 seconds,
the start of the previous song will begin
playing.
Voice Command
1. Press the button on the steering wheel
remote controller.
2. After the beep sound, say a command.
"Next Song"
"Previous Song"
(b) Selecting song through search
Turn the knob on the control
panel in clockwise or counter-clockwise
direction. Each click on the knob
will display the information of the next or
previous song. The current playing song
will continue to be played.
INFORMATION
If the operation of the knob is too
rapid, there may be a delay in displaying the
song information.
Press the knob at the desired song.
The searched song will begin playing.
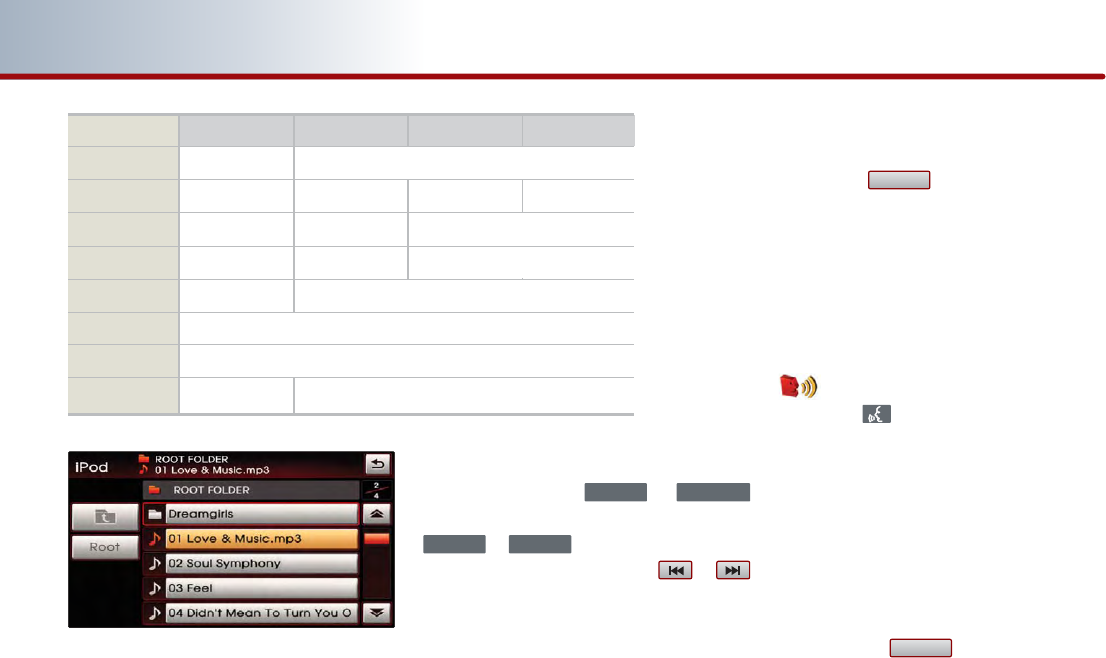
(c) Selecting song through Menu
Press the button.
The iPod menu screen will be displayed.
Press the button for the desired search
method.
INFORMATION
If the search mode is accessed while playing a
song, the most recent searched step will be
displayed.
The search steps upon initial connection are
listed below.
Menu
TUNE
TUNE
TUNE
TUNE
SEEK
∨
TRACK
∨
SEEK
∨
SEEK
∧
TRACK
∨
SEEK
∧
i i
i
2-26 AUDIO SYSTEM
PART 2 AUDIO SYSTEM
Press the desired song button to return
to the main screen and play the selected
song.
■
REW/FF iPod music
Press and hold the or
buttons on the control panel or the
or buttons on the steering
wheel remote controller or the or
buttons for over 0.8 second.
The song will play 20 times faster while
holding the button and return to normal
play when the button is released.
■
Setting Random function for iPod
music
Press the button.
* RANDOM (less than 0.8 second) : Plays all
files in the current playing list in random
order.
* ALBUM RANDOM (over 0.8 second) : Plays
the songs in the current playing list
randomly in Album units.
Voice Command
1. Press the button on the steering wheel
remote controller.
2. After the beep sound, say a command.
"Random"
"Random Album"
Say "Random" or "Random Album" again or
say "Normal Play" in order to terminate the
set Random.
Press the button again to
continue listening to the current song.
The random selection will be terminated
and the current song will continue to
play.
Random
Random
SEEK
∨
SEEK
∧
TRACK
∨
SEEK
∧
1 Step 2 Step 3 Step 4 Step
Playlist Playlist Song
Genre Genre Artist Album Song
Artist Artist Album Song
Composer Composer Album Song
Album Album Song
Audiobooks Song
Songs Song
Podcasts Program Episode
Song
Song
Episode
Song
Song
Song
AUDIO SYSTEM 2-27
Operating the external devices
■
Setting Repeat function for iPod
music
Press the button.
Each press will change the function in the
following order: REPEAT ¡REPEAT OFF ¡
REPEAT
* REPEAT : Repeats the current playing
song.
Voice Command
1. Press the button on the steering wheel
remote controller.
2. After the beep sound, say a command.
"Repeat Song"
Say "Normal Play" in order to terminate the
set Repeat function.
■
Browsing detailed information
about the iPod music
Press the button.
The detailed information (Title, Album
and Artist) for the current channel will be
displayed.
Press the button.
The detailed information will be turned
off.
OK
Info.Repeat

2-28 AUDIO SYSTEM
PART 2 AUDIO SYSTEM
USB
■
USB MP3 related information and
precaution
●
Information
The MP3 file standards supported by the
device are as follows.
Acceptable standard: MPEG1 AUDIO
LAYER 3
Acceptable sampling frequency: 32, 44.1,
48 (kHz)
Acceptable bit rate : 32, 40, 48, 56, 64, 80,
96, 112, 128, 160, 192, 224, 256, 320
(kbps)
Recommended bit rate & reference
sampling frequency: 96,128, 192 kbps
fixed bit rate /44.1kHz
ID3 tag
This device supports ID3v1.0, ID3v1.1,
ID3v2.2, ID3v2.3, and ID3v2.4 ID3 tags.
Supported media
The MP3 media supported by the device
are CD-ROM and USB.
Supported media formats
This device supports ISO9660 LEVEL1 and
LEVEL2. Detailed specification is as below.
Maximum directory layers: 20 layers
Maximum length of folder name/file
name: 250Bytes
Supported characters for folder name/ file
name: Alphanumeric characters, Korean
standard character set 2350 characters,
Simplified Chinese 4888 characters
Maximum number of folders which can
be stored onto one USB: 2000 folders
(including ROOT directory)
Maximum number of files which can be
stored onto one USB: 6000 files
Precautions upon formatting USB &
downloading MP3 files
The device only supports FAT type USB
file system. The device will not play USB
media content if the USB is NTFS type.
●
Precaution
Please use an MP3 bit rate which is less than
192kbps and a fixed bit rate.
The sound quality cannot be guaranteed for
MP3s exceeding 192Kbps and operation of
specific functions (limited to FF/REW
functions) may be abnormal with variable
bit rates.
■
Precautions upon handling USB
●
When using the external USB device, make
sure to keep the device disconnected and
connect only some time after turning on
the vehicle ignition. The USB device may be
damaged if the USB device already
connected when the ignition is turned on.
(USB device is not an electronic automotive
component)
●
The external USB device may not operate
if the USB device already connected when
vehicle ignition is turned on or off.
●
The device will not operate when playing
a format which is not MP3 or WMA file
formats.
Only MP3 files with compression rates
between 8kbps~320kbps are supported.

AUDIO SYSTEM 2-29
Operating the external devices
Only WMA files with compression rates
between 8kbps~320kbps are supported.
●
Be cautious of static electricity when
connecting/disconnecting the external
USB device.
●
Encoded MP3 Players will not be
recognized when connected as the
external device.
●
When connecting an external USB device,
the device may not properly recognize
the USB when the USB is in some states.
●
When formatting the external USB device,
the device may not properly be properly
recognize a Byte/Sector selection other
than 512Byte or 2048Byte.
●
The device will only recognize USB
devices formatted in FAT 12/16/32.
●
Some USB devices may not operate
properly because of compatibility issues.
Verify that the external device is supported
by the device before starting use.
●
Avoid contact between the USB connector
with bodily parts and foreign substances.
●
Repeatedly connecting/disconnecting the
USB in a short period of time may cause
damage to the device.
●
When disconnecting the USB, an abnormal
sound may occur occasionally.
●
Abruptly disconnecting the external USB
device while the USB is operating may
cause the device to be damaged or
function abnormally.
Make sure to disconnect the USB device
only after the audio power is turned off or
when the audio is operating in a different
mode.
●
The amount of time required to recognize
the external USB device may differ
depending on the type, size, or file
formats stored on the USB.
Such differences in the required time are
not indications of malfunction.
Please wait for the required period of
time to recognize the device.
●
The device supports only USB devices
used to play music files.
●
Do not use the USB I/F to charge batteries
or USB accessories which generate heat.
Such acts may lead to deteriorated
performance or damage to the device.
●
The device may not recognize the USB
device if separately purchased USB hubs
and extension cables are being used.
Connect the USB directly to the multimedia
terminal of the vehicle.
●
In the case of high capacity USB devices,
there are instances where the logical drives
are partitioned for user convenience.
In this case, only the USB music in the top-
level logical drive will be possible to play.
When using partitioned drives, save the
desired songs to play on the device only
in the top-level logical drive.
In addition, certain USB devices are
configured with a separate drive used to
install application programs and songs
from such drives may not be possible to
play for the reasons as described above.
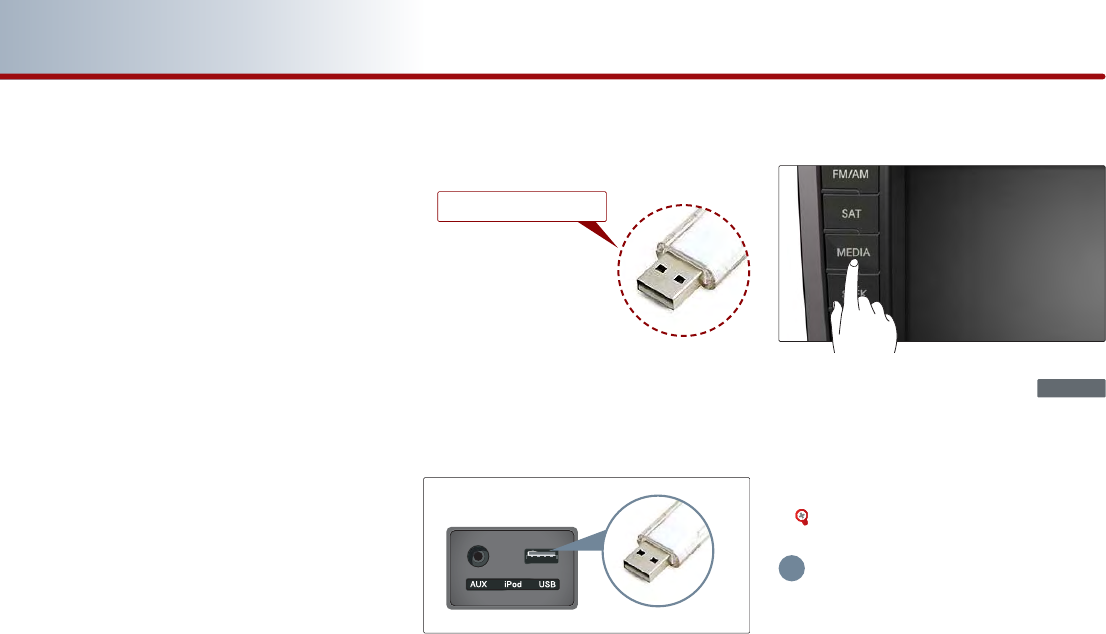
2-30 AUDIO SYSTEM
PART 2 AUDIO SYSTEM
●
The device may not support normal
operation if MP3 Players, cellular phones,
digital cameras, or other electronic
devices (USB devices not recognized as
portable disk drives) are connected to the
device.
●
The device may not support normal
operation when using a USB memory
type besides the Metal Cover Type USB
Memory.
●
The device may not support normal
operation when using formats such as
HDD Type, CF, or SD Memory.
●
The device will not support files locked by
DRM (Digital Rights Management).
●
The device may not support. Please make
sure to use normal operation if the proper
connection with the USB memory fails
due to vibrations caused by the vehicle. (i-
stick type, etc.)
●
Please avoid using USB memory products
which can be used as key chains or
cellular phone accessories as they could
cause damage to the USB jack.
Please make certain only to use plug type
connector products as shown below.
■
Connecting the USB devices
Connect the USB as shown in the picture.
■
Listening to USB music
Connect a USB or press the
button on the control panel if the USB is
already connected.
Select the desired file.
[Selecting the MP3 file], page 2-21.
INFORMATION
The USB screen and operation method is the
same with MP3 mode.
Please refer to the MP3 mode section for
more information.
MEDIA
i
Plug Type Connector