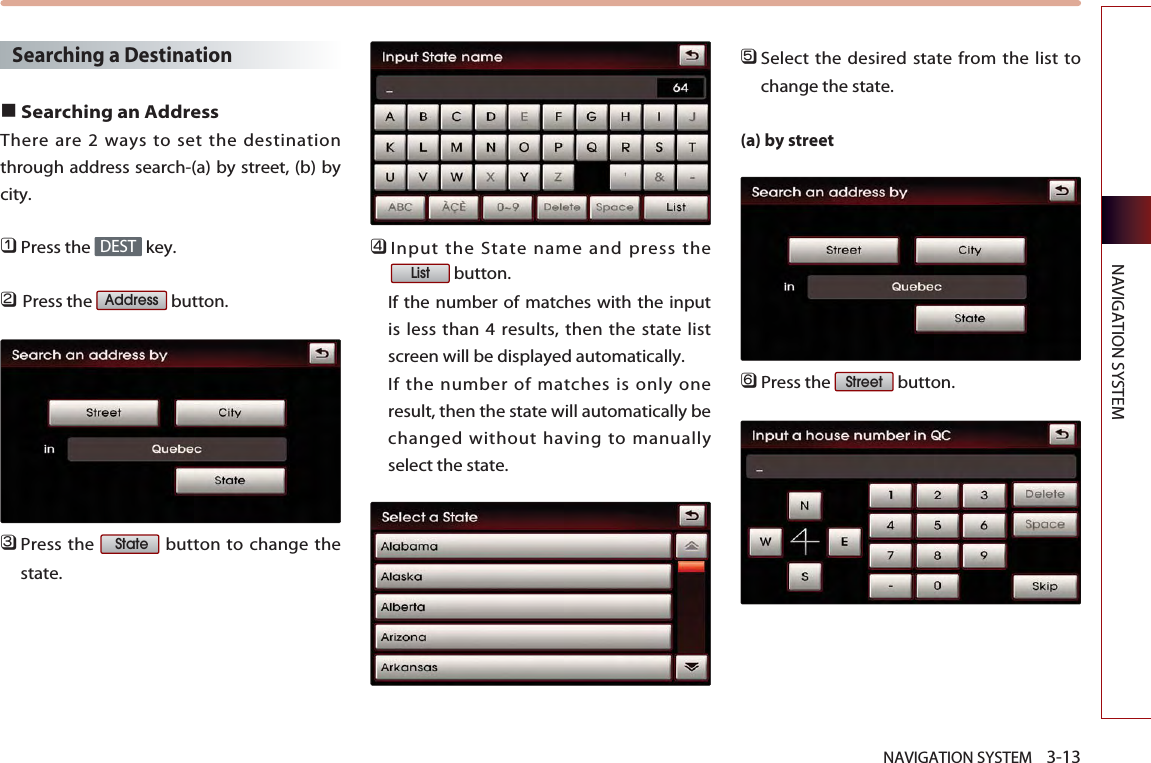
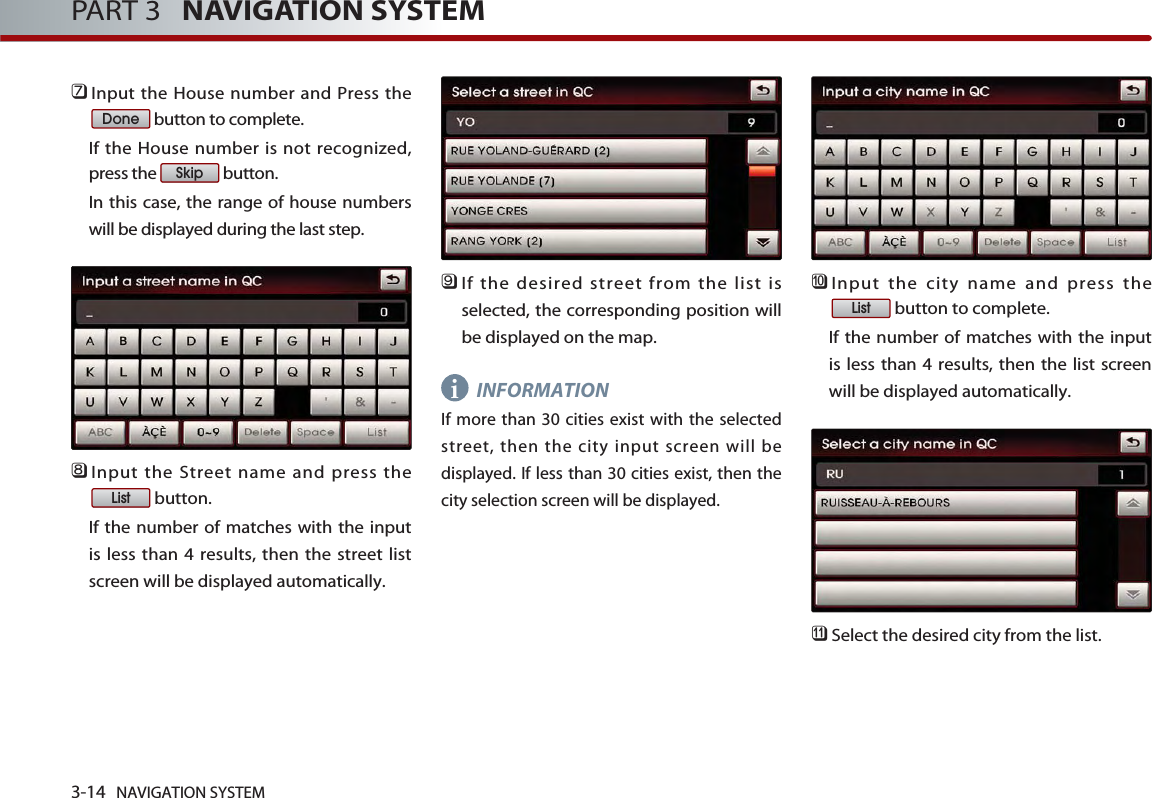
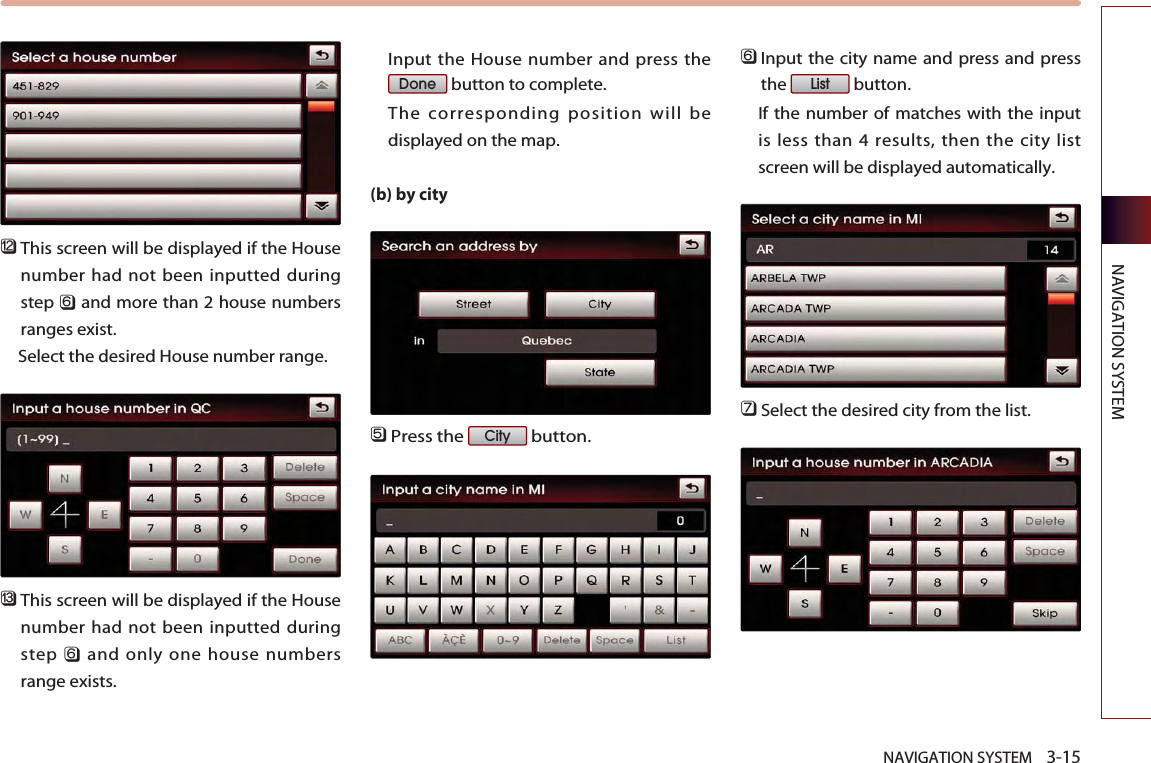
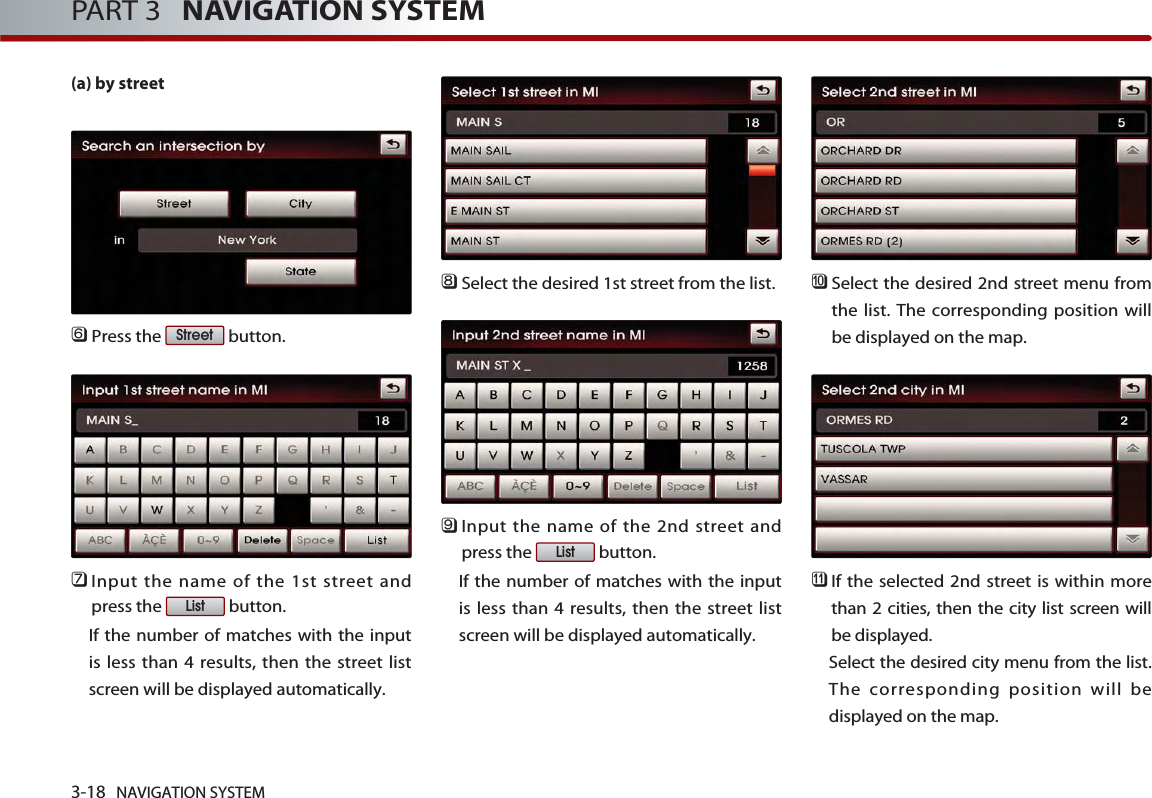
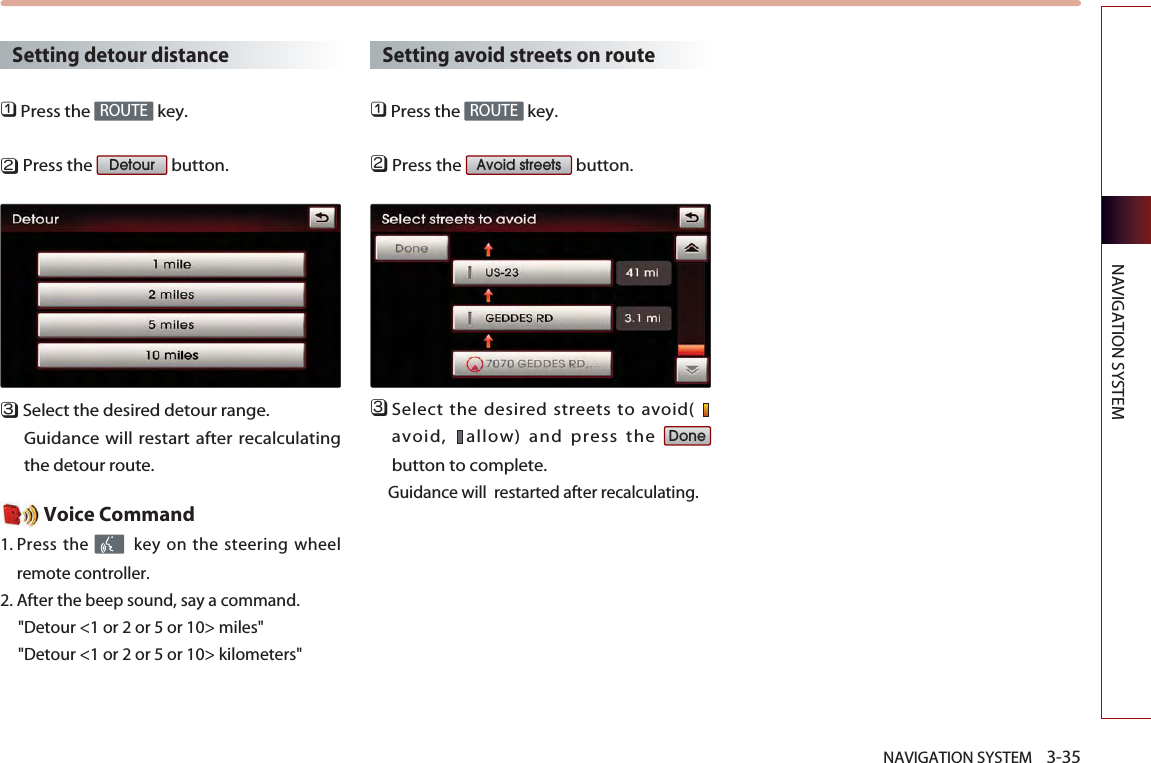
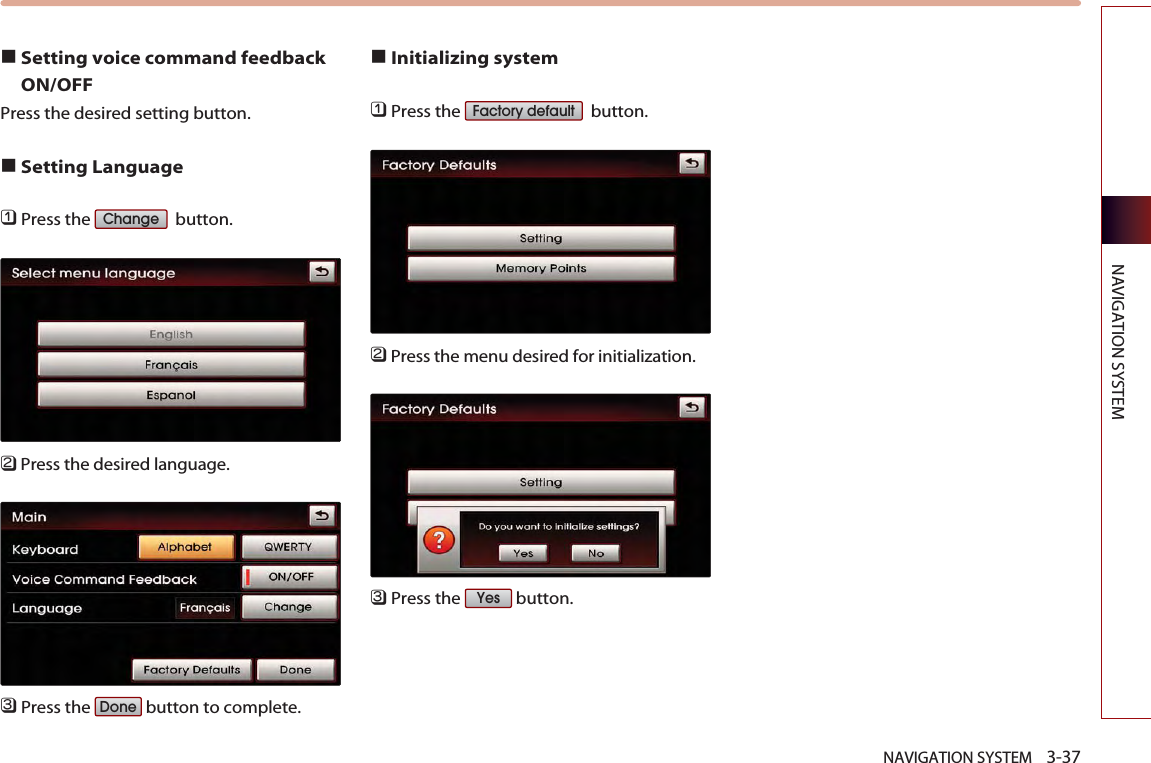
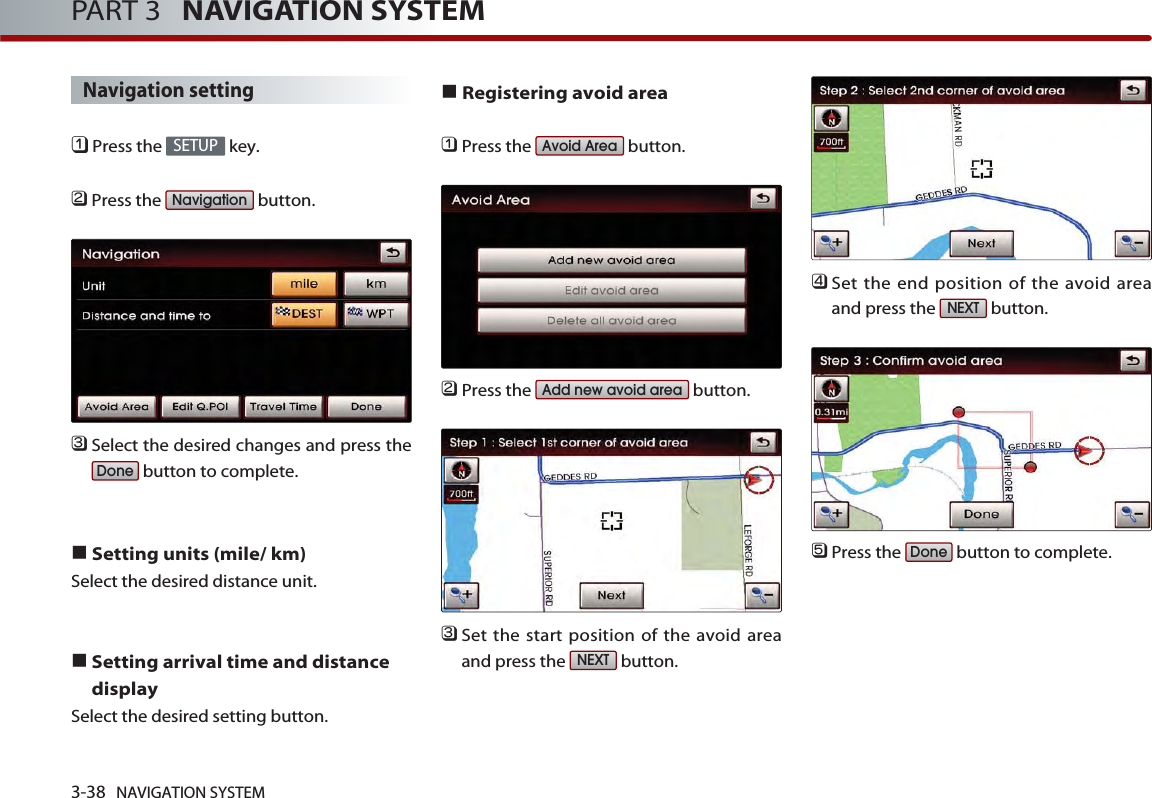
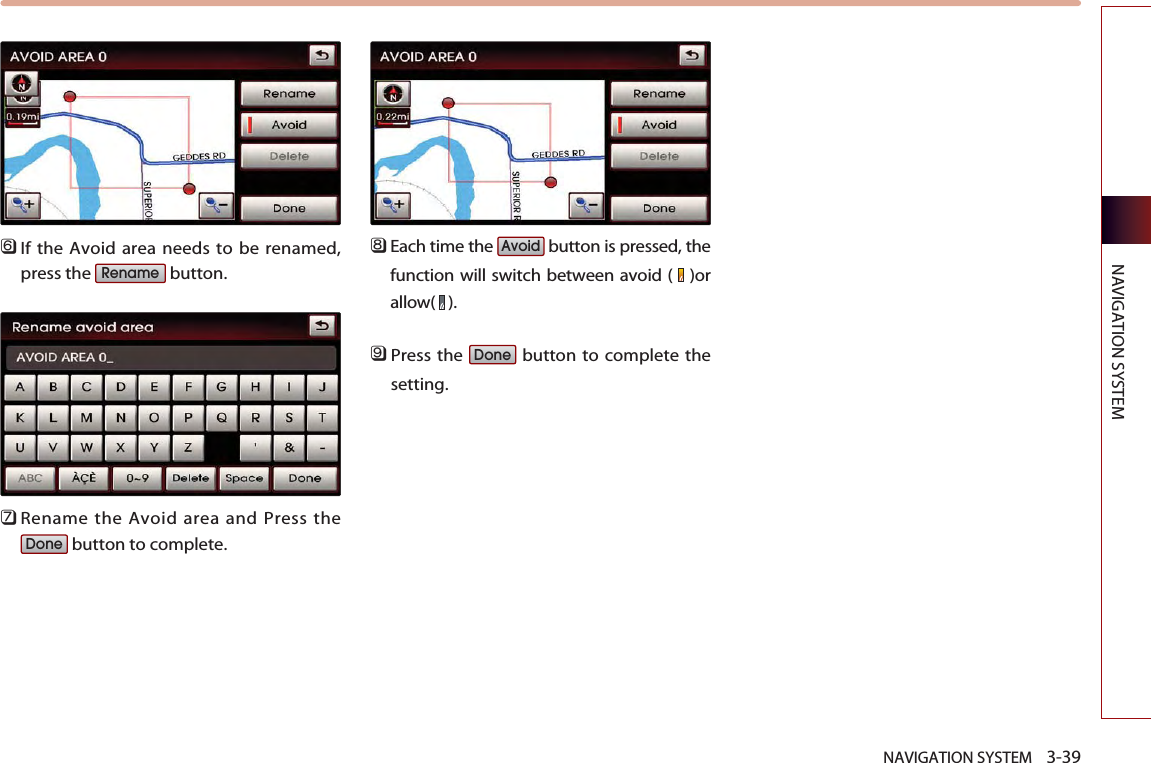
HYUNDAI MOBIS PA710SLUSB CAR AUDIO BLUETOOTH User Manual PA710SLUSB IC ATT E
HYUNDAI MOBIS CO., LTD. CAR AUDIO BLUETOOTH PA710SLUSB IC ATT E
UserManual.wiki
>
HYUNDAI MOBIS
>
PA710SLUSB User Manual
>
user manual 1 of 2
Contents
1.
user manual 1 of 2
2.
user manual 2 of 2
user manual 1 of 2
Navigation menu
Upload a User Manual
Namespaces
Wiki Guide
HTML
PDF
Info
Views
User Manual
Discussion / Help
Navigation


![1-10 PRE-OVERVIEWPART 1 PRE-OVERVIEWHow to operate menu by voicecommandCondition for voice recognitionsystemMost of the functions within the AV andNavigation system can be operated byvoice.Please follow the instructions below foroptimal voice recognition performance. Close all windows and sunroof. The performance of the voice recognitioncan be improved in quiet environment. Press the voice recognition button andsay the desired voice command afterthe sound of the beep. The microphone is positioned above thedriver so that voice commands can besaid while maintaining a proper posture. Pronounce the voice commandsnaturally and clearly as if in normalconversation.Giving voice commandPress the button on the steeringwheel remote controller. A voice command window will bedisplayed on the lower side of the screenfollowed by a "Command please" voicecomment.Once the icon changes into theicon on the pop-up screen with abeep sound, say the desired voicecommand.[Voice command list], page 4-6.[Searching a destination by voicecommand], page 4-20.INFORMATIONPress the shortly to input the desiredvoice command. The system voice instructioncomment will immediately terminate. Whenthe icon changes into the iconwith a beep sound, it is possible to input voicecommands.i](https://usermanual.wiki/HYUNDAI-MOBIS/PA710SLUSB.user-manual-1-of-2/User-Guide-1245664-Page-16.png)

![2-2 AUDIO SYSTEM PART 2 AUDIO SYSTEMOperating the radio FM/AM RadioListening to the FM/AM radioPress the button on the controlpanel. The FM/AM radio band of the mostrecent listened station will be displayed. Press the button to change thedesired radio band. Each press willchange the bands in the following order:FM1FM2AMFM1Select the desired broadcast frequency. [Selecting FM/AM broadcast frequency],page 2-5.Voice Command1. Press the button on the steering wheelremote controller.2. After the beep sound, say a command." Radio""(Radio) AM""(Radio) FM""FM <1 or 2>""AM Frequency <530 to 1710>""FM Frequency <87.5 to 107.9>""AM Preset <1 to 6>""FM <1 or 2> Preset <1 to 6>"FM/AM screen and functionsMode display : Displays the FM1/FM2/AM modes.SEEK/SCAN/PRESET SCAN : If SEEK/SCAN/PRESET SCAN is operating, the switch isdisplayed.Frequency : Displays the current playingfrequency.FM/AMFM/AM](https://usermanual.wiki/HYUNDAI-MOBIS/PA710SLUSB.user-manual-1-of-2/User-Guide-1245664-Page-22.png)
![AUDIO SYSTEM 2-3Operating the radio STEREO indicator : If the currentfrequency is a stereo broadcast, theindicator is displayed Program Service name: Displays theprogram service name if data is beingbroadcasted.Program Type name: Displays theprogram type name if data is beingbroadcasted.Frequency bar : Displays the position ofthe current frequency within the totalfrequency range.Radio Text: Displays the radio textinformation if data is being broadcasted.button : Changes the desiredradio band. Each press will change thebands in the following order: FM1 FM2FM1TUNE Up/Down buttonSHORT KEY(less than 0.8 second)- The frequency is increased or decreasedby 1-step increments (FM : 0.2MHz, AM :10kHz).LONG KEY(over 0.8 second)- The frequency is rapidly increased ordecreased by 1-step increments (FM :0.2MHz, AM : 10kHz) and stops operationupon KEY RELEASE. SEEK Up/Down button SHORT KEY(less than 0.8 second)- Automatically searches for the previousor next broadcast frequency and startsplaying.LONG KEY(over 0.8 second)- Quickly moves through the frequencieswhile the button is pressed. Oncereleased, it automatically searches forbroadcasts which can be received.Preset buttons : The desired frequencycan be preset and selected. [Storing FM/AM presets], page 2-5.button : Turns the Radio Textinformation on and off.INFORMATIONIf the is on OFF state, text will not bedisplayed even if there is text beingtransmitted from the broadcast station. If the is on ON state, the frequencybar will not be displayed. Even if the is on ON state, text may not be displayed iftext is not being received from the broadcaststation.button : Scans all frequencies orjust the preset frequencies for 5 secondseach.[Scanning FM/AM broadcast frequency],page 2-5.button : Adjusts the FAD/BAL,BASS/MID/TREB controls.[Audio sound setting], page 1-11.SoundScanR.TextR.TextR.TextR.TextBAND i ](https://usermanual.wiki/HYUNDAI-MOBIS/PA710SLUSB.user-manual-1-of-2/User-Guide-1245664-Page-23.png)
![2-4 AUDIO SYSTEM PART 2 AUDIO SYSTEMSelecting FM/AM broadcastfrequencyThere are 3 ways to select the broadcastfrequency - (a) selecting through presets,(b) selecting through SEEK, (c) selectingthrough manual search.(a) Selecting a frequency through presetsPress the preset button of the desiredbroadcast frequency.INFORMATIONPress the or buttons for ashort time on the steering wheel remotecontroller.The preset frequencies of the current bandwill be selected in order.There are 6 different preset frequencieseach for FM1, FM2, and AM modes.[StoringFM/AMpreset], page 2-5.Voice Command1. Press the button on the steering wheelremote controller.2. After the beep sound, say a command."Preset <1 to 6>""Preset Up""Preset Down"(b) Selecting a Broadcast frequencythrough SEEKPress the orbuttons onthe control panel or the or buttons on FM1, FM2, and AM modescreens for less than 0.8 second. Once theSEEK function is operating (SEEK indicatorblinking), the next or previous broadcastfrequency with superior reception will besearched automatically.INFORMATIONPress the or buttons onthe control panel or the or buttons on the steering wheel remotecontroller or the orbuttons onFM1, FM2, and AM mode screens for morethan 0.8 second to quickly move to thenearest desired frequency. Once the buttonis released, the next frequency with superiorreception will be searched automatically.While the SEEK function is operating, pressingthe or buttons on thecontrol panel again will terminate SEEKoperation and select the current frequency.Voice Command1. Press the button on the steering wheelremote controller.2. After the beep sound, say a command."Seek Up""Seek Down"(c) Selecting a broadcast frequency throughmanual searchPress the or buttons or turn theknob on the control panel inclockwise or counter-clockwise direction. Each click on the tune knob or the orbuttons will increase or decrease thefrequency by 1 step (FM: 0.2 MHz, AM: 10kHz).TUNETRACKSEEKSEEKSEEKTRACKSEEKTRACKSEEKSEEKSEEKii](https://usermanual.wiki/HYUNDAI-MOBIS/PA710SLUSB.user-manual-1-of-2/User-Guide-1245664-Page-24.png)
![AUDIO SYSTEM 2-5Operating the radio Storing FM/AM presetsSelect the desired frequency. [Selecting FM/AM broadcast frequency],page 2-4.Press the preset button to store for over0.8 second. The frequency will becomestored along with a beep sound. INFORMATIONSix preset frequencies each for FM1/FM2/AMmodes can be stored using the aboveinstructions.Scanning FM/AM broadcastfrequencyPress the button. SCAN (less than 0.8 second) : Scans allfrequencies and plays only frequencieswith superior reception for 5 seconds each. Voice Command1. Press the button on the steering wheelremote controller.2. After the beep sound, say a command."Scan"PRESET SCAN (over 0.8 second): Scans the6 frequencies stored as preset frequenciesin the current band for 5 seconds each.Voice Command1. Press the button on the steering wheelremote controller.2. After the beep sound, say a command."Preset Scan"Press the button again tocontinue listening to a frequency. The scan will be terminated and thecurrent frequency will continue to beplayed.INFORMATIONWhen scanning has completed an entirerevolution, the scan function will be terminatedautomatically and the previous playedfrequency will be restored.ScanScanii](https://usermanual.wiki/HYUNDAI-MOBIS/PA710SLUSB.user-manual-1-of-2/User-Guide-1245664-Page-25.png)
![2-6 AUDIO SYSTEM PART 2 AUDIO SYSTEMSIRIUS radioListening to the SIRIUS radioPress the button on the controlpanel. The Sirius radio band screen of themost recent listened station will bedisplayed.Press the button to change thedesired radio band. Each press willchange the bands in the following order:SIRIUS1SIRIUS2SIRIUS3SIRIUS1Select the desired broadcast channel.[Selecting SIRIUS broadcast channel],page 2-7.Voice Command1. Press the button on the steering wheelremote controller.2. After the beep sound, say a command."SIRIUS""SIRIUS <1 or 2 or 3>""SIRIUS Channel <0 to 223>""SIRIUS <1 or 2 or 3> Preset <1 to 6>"SIRIUS screen and functionsMode display: Displays the SIRIUS1/SIRIUS2/SIRIUS 3 modes.Channel number: Displays the currentplaying channel.SCAN/PRESET SCAN indicator: If SCAN/PRESET SCAN is operating, the switch isdisplayed.Category name: Displays the categoryname.Channel name: Displays the channelname.Song/Program title: Display the song orprogram title.Artist name: Displays the artist or otherrelated information.SATSAT ](https://usermanual.wiki/HYUNDAI-MOBIS/PA710SLUSB.user-manual-1-of-2/User-Guide-1245664-Page-26.png)
![AUDIO SYSTEM 2-7Operating the radio iINFORMATIONThe Song title display may be delayed inaccordance to the reception quality of theSirius broadcast. button : Switches betweenchannel mode and category mode.[Switching the SIRIUS modes], page 2-7., : Moves to the next orprevious category, and automaticallyplays the first channel within theselected category., : Moves to the next or previouschannel.buttons : The desired channelcan be preset and selected. [Storing SIRIUS presets], page 2-9.button : Displays the Title,Artist, Composer, and other informationfor the current received channel if theinformation exists.button: Selects the channel bydirectly inputting the channel number. [Selecting SIRIUS broadcast channel],page 2-7.button: Displays the channel orcategory list.[Selecting SIRIUS broadcast channel],page 2-7.button: Scans all frequencies orjust the preset frequencies for 5 secondseach.[Scanning SIRIUS broadcast channel],page 2-10.button : Adjusts the FAD/BAL,BASS/MID/TREB controls.[Audio sound setting], page 1-11.Switching the SIRIUS modes(Channel / Category)Each time the button is pressed,the mode will switch between channelmode and category mode. Category mode will begin operating whenthe orange light is turned ON. Selecting SIRIUS broadcast channelThere are 5 ways to select a broadcastchannel - (a) selecting through presets, (b)selecting with channel Up/Down, (c)Selecting a channel through manual search,(d) selecting through channel/category list,(e) selecting by directly inputting thechannel number.(a) Selecting a channel through presets Press the preset button of the desiredchannel.INFORMATIONPress the or buttons onthe steering wheel remote controller for lessthan 0.8 second. The preset channels of the current band willbe selected in order.There are 6 preset channels each forSIRIUS1, SIRIUS2, and SIRIUS3.[Storing SIRIUS presets], page 2-9.SEEKSEEKCATSoundScanListSearchInfo.PresetCAT i](https://usermanual.wiki/HYUNDAI-MOBIS/PA710SLUSB.user-manual-1-of-2/User-Guide-1245664-Page-27.png)
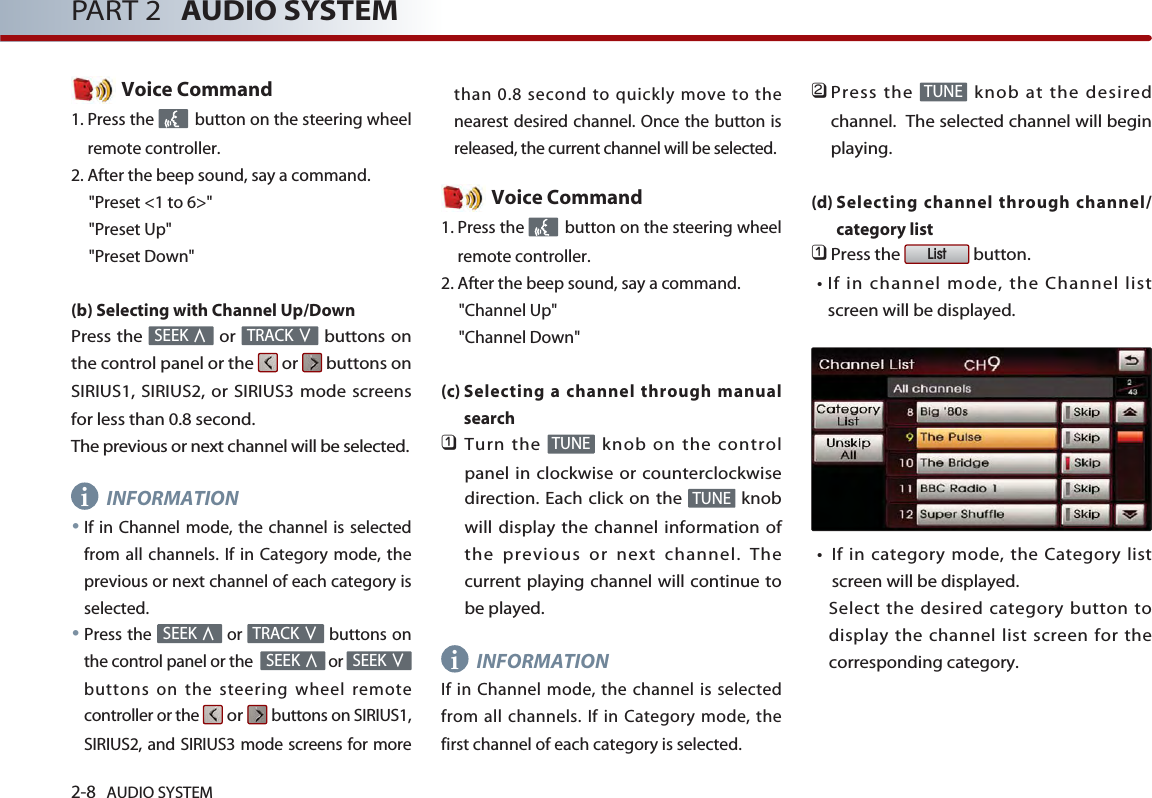
![AUDIO SYSTEM 2-9Operating the radio Select the desired channel button. The previous screen will be restored andthe selected channel will begin playing.(e) Selecting channel by directly inputtingthe channel number Press the button. The Channel search screen will bedisplayed.Input desired channel number, and pressthe button. The previous screen will be restored andthe selected channel will begin playing.INFORMATIONTo prevent inputting a channel which exceedsthe channel range, numbers which cannot beinputted are set to disabled state. Voice Command1. Press the button on the steering wheelremote controller.2. After the beep sound, say a command."Channel<0 to 223>"Storing SIRIUS presetsSelect the desired channel. [Selecting SIRIUS broadcast channel],page 2-7.Press the preset button for over 0.8second.The frequency will be saved along withbeep sound. INFORMATIONSix preset frequencies each for SIRIUS1/SIRIUS2/ SIRIUS3 modes can be stored usingthe above instructions.DoneSearchii](https://usermanual.wiki/HYUNDAI-MOBIS/PA710SLUSB.user-manual-1-of-2/User-Guide-1245664-Page-29.png)

![AUDIO SYSTEM 2-15Operating the CDPCDListening to CD musicInsert the CD or press the button on the control panel if the CD isalready inserted.Select the desired track. [Selecting the CD track], page 2-16.Voice Command1. Press the button on the steering wheelremote controller.2. After the beep sound, say a command."DISC""CD""CD Track <1 to 665>"CD screen and functionsMode display : Displays that the currentmode is CD mode.RANDOM/REPEAT/SCAN indicator : IfRANDOM/REPEAT/SCAN is operating,the switch is displayed.Play time : Displays the play time. Track number : Displays the currentplaying track number.button : Plays or pauses thecurrent track.button : REW or FF[Selecting the CD track], page 2-17.button : Previous or nexttrack.[REW/FF CD track], page 2-17.button : Plays the tracks on thedisc in random order.[Setting Random function for CDmusic] , page 2-17.button : Repeats the currentplaying track.[Setting Repeat function for CDmusic], page 2-18.button : Scans all tracks on thedisc for 10 seconds each. [Scanning CD track], page 2-18.button : Adjusts the FAD/BAL,BASS/MID/TREB controls.[Audio sound setting], page 1-11.SoundScanRepeatRandomMEDIA ](https://usermanual.wiki/HYUNDAI-MOBIS/PA710SLUSB.user-manual-1-of-2/User-Guide-1245664-Page-35.png)
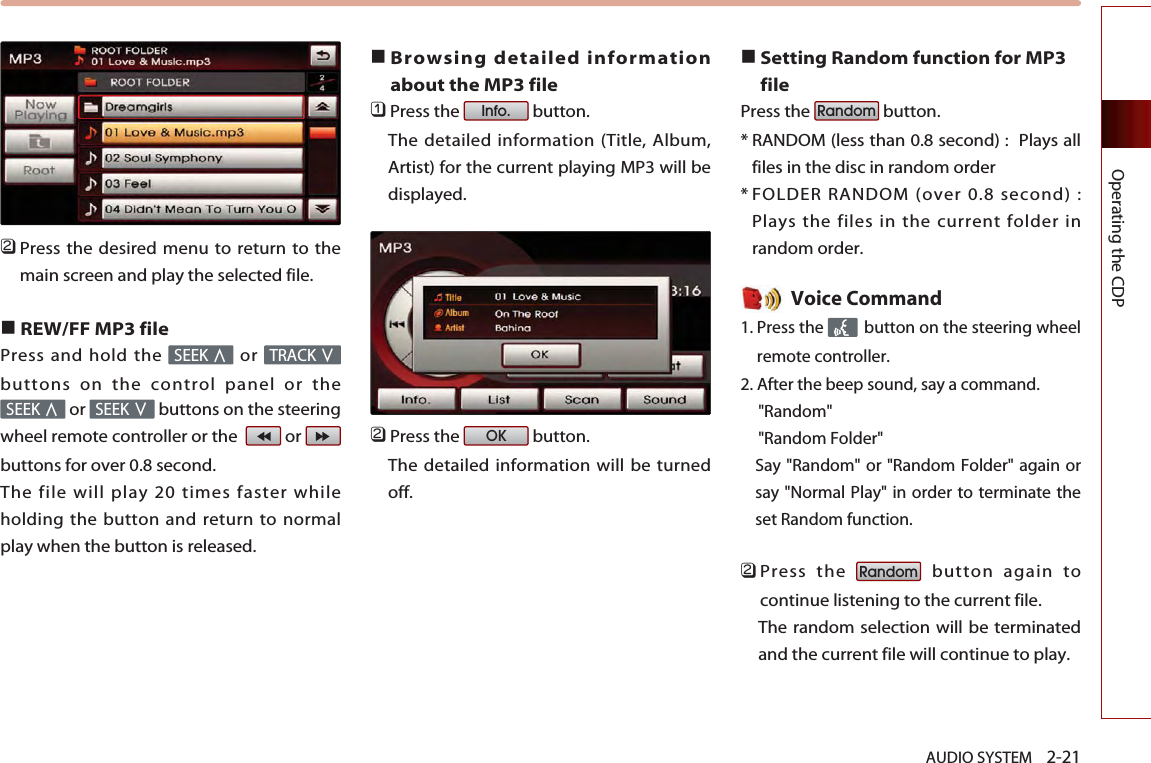
![AUDIO SYSTEM 2-19Operating the CDPListening to MP3 musicInsert the MP3 disc or press the button on the control panel if the MP3disc is already inserted.Select the desired file. [Selecting the MP3 file], page 2-21.Voice Command1. Press the button on the steering wheelremote controller.2. After the beep sound, say a command."DISC""CD""MP3"MP3 screen and functionsMode display: Displays that the currentmode is MP3 disc mode. (MP3 files onDVDs are not supported.)REPEAT/RANDOM/SCAN indicator: IfREPEAT/RANDOM/SCAN is operating,the switch is displayed.Play file position : Current playing file /total files Play time: Displays the play time.Folder name: Displays the folder name.File name: Displays the file name.button: Plays or pauses thecurrent file. button : REW or FF.[REW/FF MP3 file], page 2-22.button : Previous or nexttrack.[Selecting the MP3 file], page 2-21.button : Plays all files on thedisc or folder in random order.[Setting Random function for MP3file] , page 2-22.button : Repeats the currentplaying folder or file.[Setting Repeat function for MP3 file],page 2-23.button : Scans all files on thedisc or folder for 10 seconds each.[Scanning MP3 file], page 2-23.button : Displays the MP3folders and file lists for the disc. [Selecting the MP3 file], page 2-21.button : Displays or hides thedetailed file information for the currentplaying file.[Browsing detailed information aboutthe MP3 file], page 2-22.Info.ListScanRepeatRandomMEDIA ](https://usermanual.wiki/HYUNDAI-MOBIS/PA710SLUSB.user-manual-1-of-2/User-Guide-1245664-Page-39.png)
![2-20 AUDIO SYSTEM PART 2 AUDIO SYSTEMbutton : Adjusts the FAD/BAL,BASS/MID/TREB controls.[Audio sound setting], page 1-11.Selecting the MP3 fileThere are 3 ways to select an MP3 file - (a)selecting through file up/down, (b)selecting through searching files, (c)selecting through MP3 list.(a) Selecting through File Up / DownPress the or buttons onthe control panel or the orbuttons on the steering wheelremote controller or the or buttons on the screen for less than 0.8second.The next or previous file will begin playing.INFORMATIONIf the button on the control panelor the buttonon the steering wheelremote controller thebutton on thescreen is pressed shortly while the file hasplayed for more than 3 seconds, the start ofthe current file will begin playing. If the file has been playing for less than 2seconds, the start of the previous file willbegin playing.Voice Command1. Press the button on the steering wheelremote controller.2. After the beep sound, say a command."Next File""Previous File""Next Folder""Previous Folder"(b) Selecting through search Turn the knob on the controlpanel in clockwise or counter-clockwisedirection.Each click on the knob will displaythe information of the next or previousfile. The current playing file will continueto be played. INFORMATIONIf the operation of the knob is toorapid, there may be a delay in displaying thefile information.Press the knob at the desired file.The searched file will begin playing.(c) Selecting through MP3 List Press the button. The file list of the folder for the currentplaying file will be displayed. INFORMATIONIf many songs and folders are recorded ontoa DISC, file loading time may be longer andcause the play list to be improperly displayedor song search through TUNE operation tooperate improperly. In such cases, wait until file loading iscomplete and try again.Within the MP3 list screen, if the button is pressed while searching for fileswithin a folder or a page, the current playingfile list will become displayed.Now playingListTUNETUNETUNETUNESEEKTRACKSEEKSEEKTRACKSEEKSoundiii](https://usermanual.wiki/HYUNDAI-MOBIS/PA710SLUSB.user-manual-1-of-2/User-Guide-1245664-Page-40.png)
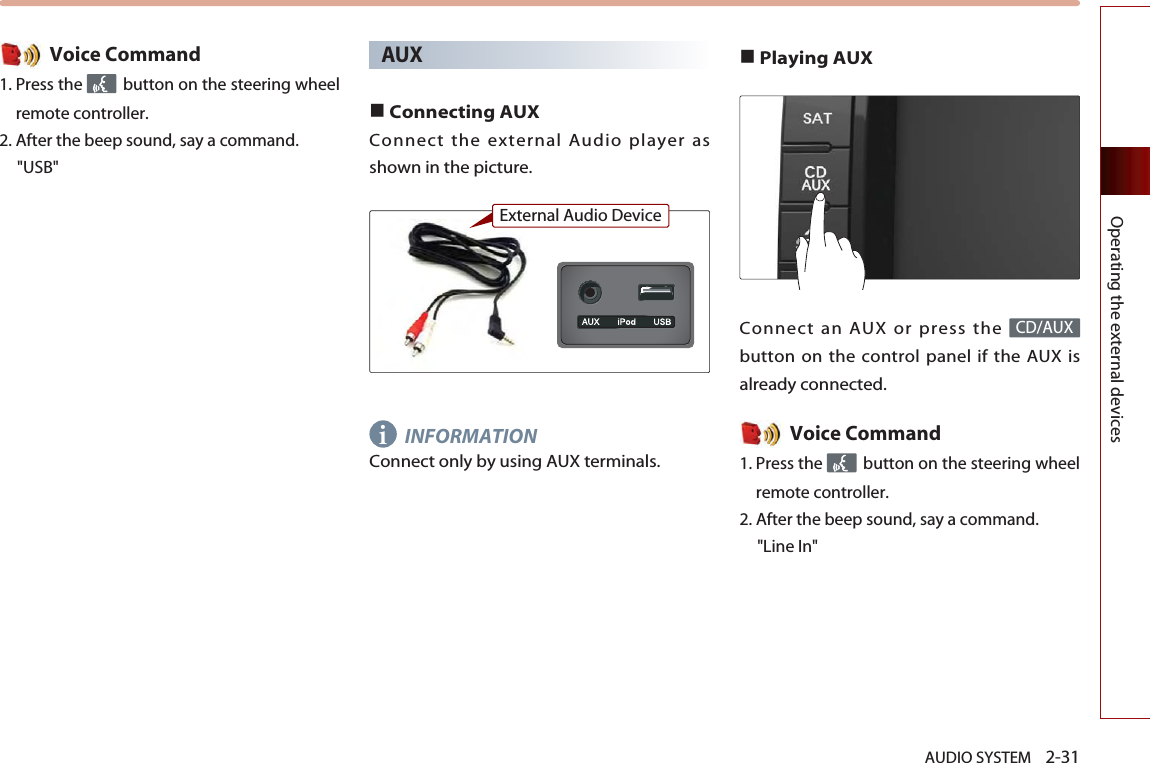
![AUDIO SYSTEM 2-23Operating the external devicesOperating the external devices iPodiPodis a registered trademark of AppleInc.Connecting iPod devicesConnect the iPod device as shown in thepicture.The identification of the iPod device, batteryrecharge, and other functions provided bythe iPod device can be normally supportedonly by using a separated sold iPodconnector cable. If the USB cable provided upon purchasingthe iPod for charging is used as the connectorcable, the device will be recognized as a USBand may not properly operate or display all ofthe display information. Supported iPod devices : iPod 3G, iPod 5G,5.5G, iPod Mini, iPod Nano 1G, 2G.If iPod mode cannot be entered due toidentification error, no track, incompatibleprotocol version, or other reasons, a pop-upmessage "No Media Connected" will bedisplayed for 5 seconds and returnautomatically to the previous mode. If the message continues even afterreconnecting the iPod, check to see if thereare any problems with the iPod device.CAUTIONIf a playing iPod is connected to the audiosystem, a high-pitched tone may occur forapproximately 1-2 seconds. Please turn the iPod device to pause/stopprior to connecting it to the vehicle. Listening to music from iPodConnect the iPod or press thebutton on the control panel if the iPod isalready connected.INFORMATIONEven if the iPod is connected, the 'No MediaConnected' message may be displayed if anerror has occurred. In such a case, reconnectthe iPod. Select the desired song. [Selecting music from iPod], page 2-26.MEDIAi](https://usermanual.wiki/HYUNDAI-MOBIS/PA710SLUSB.user-manual-1-of-2/User-Guide-1245664-Page-43.png)
![2-24 AUDIO SYSTEM PART 2 AUDIO SYSTEMiINFORMATIONAn iPod cable assembly can be purchased atyour local KIA dealer.Voice Command1. Press the button on the steering wheelremote controller.2. After the beep sound, say a command."iPod"iPod screen and functionsMode display: Displays that the currentmode is iPod mode.RANDOM/REPEAT indicator: If RANDOM/REPEAT is operating, the switch isdisplayed.Play file position: Current playing file /total files Play time: Displays the play time.Category name: Displays the categoryname of the playing file.Title name: Displays the title name ofthe playing file.button : Plays or pauses thecurrent file.button : REW or FF.[REW/FF iPod music], page2-27.button : Previous or nexttrack.[Selcting music from iPod], page 2-26.button : Plays all music in thecurrent playing list in random order orrandomly in album unit.[Setting Random function for iPodmusic], page 2-27.button: Repeats the currentplaying music. [Setting Repeat function for iPodmusic], page 2-28.button : Converts to thecategory menu screen.[Selecting music from iPod], page 2-26.button : Displays or hides thedetailed file information for the currentplaying file.[Browsing detailed information aboutthe iPod music], page 2-28.button : Adjusts the FAD/BAL,BASS/MID/TREB controls.[Audio sound setting], page 1-10.SoundInfo.MenuRepeatRandom ](https://usermanual.wiki/HYUNDAI-MOBIS/PA710SLUSB.user-manual-1-of-2/User-Guide-1245664-Page-44.png)
![2-30 AUDIO SYSTEM PART 2 AUDIO SYSTEMThe device may not support normaloperation if MP3 Players, cellular phones,digital cameras, or other electronicdevices (USB devices not recognized asportable disk drives) are connected to thedevice.The device may not support normaloperation when using a USB memorytype besides the Metal Cover Type USBMemory.The device may not support normaloperation when using formats such asHDD Type, CF, or SD Memory. The device will not support files locked byDRM (Digital Rights Management).The device may not support. Please makesure to use normal operation if the properconnection with the USB memory failsdue to vibrations caused by the vehicle. (i-stick type, etc.)Please avoid using USB memory productswhich can be used as key chains orcellular phone accessories as they couldcause damage to the USB jack. Please make certain only to use plug typeconnector products as shown below.Connecting the USB devicesConnect the USB as shown in the picture. Listening to USB musicConnect a USB or press the button on the control panel if the USB isalready connected.Select the desired file. [Selecting the MP3 file], page 2-21.INFORMATIONThe USB screen and operation method is thesame with MP3 mode. Please refer to the MP3 mode section formore information. MEDIAiPlug Type Connector](https://usermanual.wiki/HYUNDAI-MOBIS/PA710SLUSB.user-manual-1-of-2/User-Guide-1245664-Page-50.png)


![NAVIGATION SYSTEM 3-5NAVIGATION SYSTEMStarting navigation system Press the Navigation mode key ( ,, , ). The Caution screenwill always be displayed when first enteringinto Navigation mode. Read the contents ofthe caution screen carefully and press thebutton.Map Functions Current position map screen(without route)Press the key on the controlpanel to display the map of current positionand the neighboring area.GPS signal state indicator : Displays thestate of GPS signal reception.[Viewing GPS signal state], page 3-7. Map scale level indicator : Displays thecurrent map scale.[Changing the map scale], page 3-8.Landmark icons : Landmark icons aredisplayed on the map when the mapscale level is set to under 300 ft (100mdepending on map data)[Appendix : Landmark icons], page 7-11.POI icons : POI icons are displayed onthe map when the map scale level is setto under 0.5 mi (800m).[Appendix : POI icons], page 7-8.Current vehicle position icon : Displaysthe current position of the vehicle.MAPVOICEAgreeSETUPROUTEDESTMAPVOICE](https://usermanual.wiki/HYUNDAI-MOBIS/PA710SLUSB.user-manual-1-of-2/User-Guide-1245664-Page-59.png)
![3-6 NAVIGATION SYSTEMPART 3 NAVIGATION SYSTEMNorth Up / Heading Up switch :Displays the current map mode and themap mode can be switched betweenNorth Up and Heading Up. [Switching map mode], page 3-6.POI : Displays or hides the POI icon onthe map.[Displaying/Hiding POI icons on themap], page 3-9.Map scale : Increases or decreases themap scale. [Changing the map scale], page 3-8.Switching map mode (North Up /Heading Up)Each time the compass button is pressed,the screen will switch in the order shownbelow.Heading Up North Up Heading UpINFORMATIONAll map screens (map screen after settingdestination & whole route display screen)except the current position screen will alwaysbe displayed in North Up mode. North Up : displays the map always facingthe North direction regardless of thedirection which the vehicle is traveling. The vehicle icon is displayed in the centerposition of the map. Heading Up : displays the map alwaysfacing the direction which the vehicle istraveling. The vehicle icon is displayed inthe lower center position of the map.Voice Command1. Press the key on the steering wheelremote controller.2. After the beep sound, say a command."North Up""Heading Up"i](https://usermanual.wiki/HYUNDAI-MOBIS/PA710SLUSB.user-manual-1-of-2/User-Guide-1245664-Page-60.png)
![NAVIGATION SYSTEM 3-7NAVIGATION SYSTEMViewing GPS signal state The state of GPS signal reception isdisplayed as shown below.GPS (active) : GPS reception is satisfactory.GPS (inactive) : GPS reception is unsatisfactory.[System information and update], page3-51.INFORMATIONGPS (Global Position System) : GPS is asystem developed and operated by theUnited States which determines the currentlocation of the user (longitude, latitude, etc.)by generally using 4 or more satellites. Thissystem is used with related GPS information,various sensors, road map data, and othernavigation related information.GPS information may not operate under thefollowing conditions. - When buildings, tunnels, or otherobstructions block satellite signals.- When materials are placed above the GPSantenna and block satellite signals.- When the satellite does not transmitsignals (signal transmission is controlledby the satellite control center in theUnited States and may not transmit whenunder repair, modification, etc). - When a digital cellular phone (1.5GHz) isplaced near the GPS antenna.This system uses GPS information, varioussensors, road map data, and other relatedinformation to display the current position.Errors may occur if the satellite istransmitting inaccurate signals or if whichcan only two or less satellite signals can bereceived.Errors which occur in such conditionscannot be corrected.i](https://usermanual.wiki/HYUNDAI-MOBIS/PA710SLUSB.user-manual-1-of-2/User-Guide-1245664-Page-61.png)
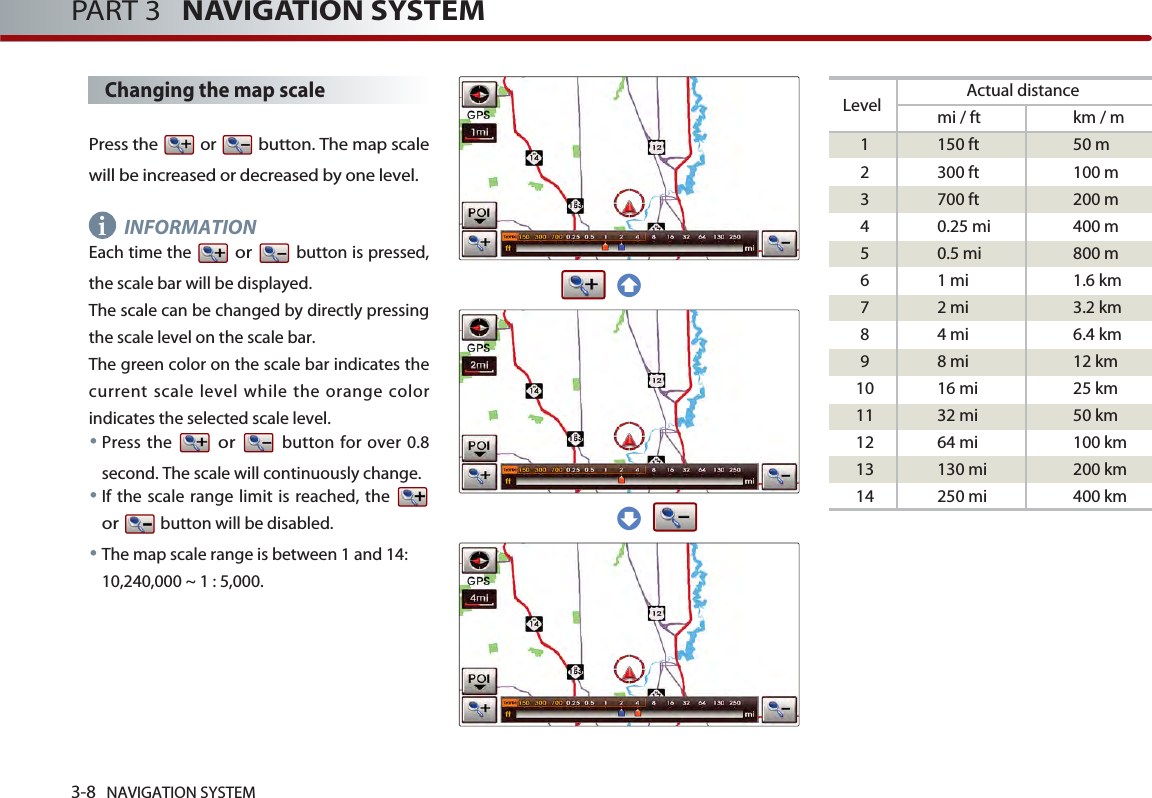
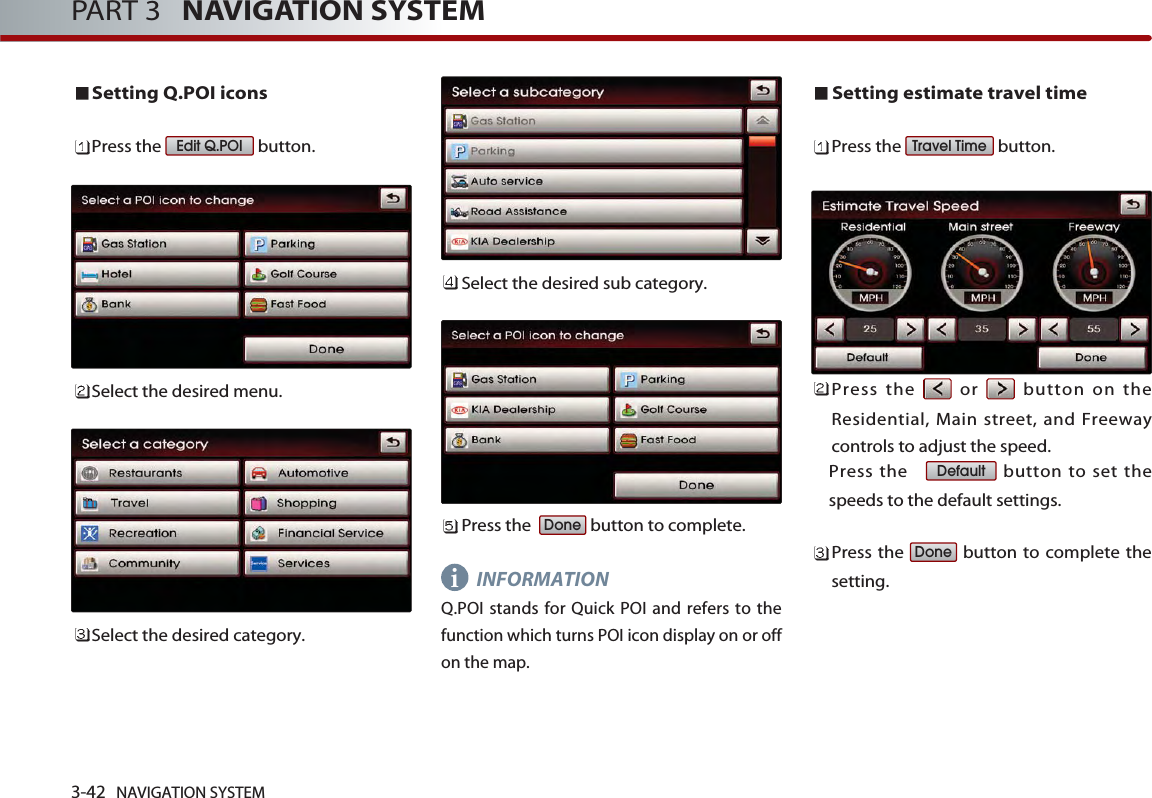
![NAVIGATION SYSTEM 3-9NAVIGATION SYSTEMVoice Command1. Press the key on the steering wheelremote controller.2. After the beep sound, say a command."Zoom In""Zoom Out""Zoom Maximum""Zoom Minimum""Zoom level <1 to 14>""Zoom <actual distance>"" (ex. Zoom 700ft)"Displaying / Hiding POI icons onthe mapDisplaying/Hiding Q.POI iconsPress the button. Related menu buttons will be displayedat the bottom of the screen. INFORMATIONThe Q.POI icons are set to - Gas Station,- Parking, - Hotel, - Golf Course,- Bank, - Fast Food (6 icons) by default.This setting can be changed in SETUP. [Setting Q.POI icons], page 3-42.Press the icon buttons to display or hide.To turn off all POI icons displayed on themap, press the button. INFORMATIONThe current displayed POI icons arehighlighted while the icons not beingdisplayed are shown as normal buttons.If there are no POI icons being displayed,the button will be disabled. POI icons are displayed when the scale isunder 0.5 mi (800m). Displaying / Hiding icons otherthan Q.POI iconsPress the button. Related menu buttons will be displayedat the bottom of the screen. Press the button. INFORMATIONQ.POI stands for Quick POI and refers to thefunction which turns POI icon display on or offon the map. OthersPOIALL OFFALL OFFPOIiii](https://usermanual.wiki/HYUNDAI-MOBIS/PA710SLUSB.user-manual-1-of-2/User-Guide-1245664-Page-63.png)

![NAVIGATION SYSTEM 3-11NAVIGATION SYSTEMBluetooth is used to make a call to thePOI facility.Once the call is ended, the map isrestored to the current vehicle location. INFORMATIONMaking a call is not possible if there is notelephone information for a POI or if there isno mobile phone connected throughBluetooth.For more information of mobile phoneauthentication through Bluetooth ordetailed information on conducting search,refer to [Pairing and connecting aBluetooth phone], page 5-4.Scrolling map Press the map area on the map screen. The selected point will be centered on thescreen and the scroll mark will be displayed.Information about the marked point andstraight line distance from the currentposition will be displayed at the top of thescreen.INFORMATIONIf a map area on the map screen is pressed,the map will continuously scroll in thecorresponding direction until the pressing isreleased.ii](https://usermanual.wiki/HYUNDAI-MOBIS/PA710SLUSB.user-manual-1-of-2/User-Guide-1245664-Page-65.png)
![3-12 NAVIGATION SYSTEMPART 3 NAVIGATION SYSTEMSetting a destination Destination menu screen andfunctionsPress the key on the control panel todisplay the destination menu screen. Address : Sets the destination throughaddress search. [Searching an Address], page 3-13.Previous Dest : Sets the destinationthrough the previous destination list. [Searching a Previous Destination],page 3-17 .Intersection : Sets the destinationthrough intersection search. [Searching an Intersection], page 3-17.POI Search : Sets the destination throughPOI Category search. [Searching a POI], page 3-20 .Address Book : Sets the destinationthrough address book search. [Searching from Address book], page3-24 .Emergency : Sets the destinationthrough emergency facilities search. [Searching for Emergency facilities],page 3-25 .HOME : Sets the stored HOME as thedestination.[Searching your Home], page 3-25 .Favorite place ~ : Sets the destination with one of thestored favorite places. [Searching favorite places], page 3-26 .51DEST ](https://usermanual.wiki/HYUNDAI-MOBIS/PA710SLUSB.user-manual-1-of-2/User-Guide-1245664-Page-66.png)
![3-16 NAVIGATION SYSTEMPART 3 NAVIGATION SYSTEMInput the house number and press thebutton to complete. If the House number is not recognized,press the button. In this case, the range of house numberswill be displayed during the last step.Input the Street name and press thebutton to complete. If the number of matches with the input isless than 4 results, then the street listscreen will be displayed automatically. Select the desired street from the list andthe corresponding position will bedisplayed on the map. This screen will be displayed if the Housenumber had not been inputted duringstepand more than 2 House numberranges exist. Select the desired House number range.This screen will be displayed if the Housenumber had not been inputted duringstepand only one House numberrange exists. Select the house number range and Pressthe button to complete. The corresponding position will bedisplayed on the map.Voice Command1. Press the key on the steering wheelremote controller.2. After the beep sound, say a command."Find address" [Find address], page 4-19.DoneListSkipDone](https://usermanual.wiki/HYUNDAI-MOBIS/PA710SLUSB.user-manual-1-of-2/User-Guide-1245664-Page-70.png)
![NAVIGATION SYSTEM 3-17NAVIGATION SYSTEMSearching a Previous DestinationPress the key.Press the button.Select the desired previous destination.The corresponding position will bedisplayed on the map. Voice Command1. Press the key on the steering wheelremote controller.2. After the beep sound, say a command."Previous destination"[Previous destination], page 4-24."Previous start point"[Previous start point], page 4-25.Searching an Intersection There are two ways to set the destinationthrough intersection search-(a) by street, (b)by city. Press the key.Press the button.Press the button to change thestate.Input the state name and press thebutton. If the number of matcheswith the input is less than 4 results, thenthe state list screen will be displayedautomatically.If the number of matches is only oneresult, then the state will automatically bechanged without having to manuallyselect the state.Select the desired state from the list tochange the state. ListStateIntersectionDESTPrevious DestDEST](https://usermanual.wiki/HYUNDAI-MOBIS/PA710SLUSB.user-manual-1-of-2/User-Guide-1245664-Page-71.png)
![NAVIGATION SYSTEM 3-21NAVIGATION SYSTEM(a) By category Searches for facilities nearby the currentposition or from the city center.Press the button.Press the button tosearch for facilities nearby the currentposition, or press the button to search for facilities in the nearcity center. (a-1) Near current position Searches for facilities within a 30 mi (45km)radius of the current position. Press the desired main category menu. Voice Command1. Press the key on the steering wheelremote controller.2. After the beep sound, say a command."Find nearest POI"[Find nearest POI], page 4-20.Press the desired sub category menu. Select the desired menu button. The corresponding position will bedisplayed on the map. Near city centerNear current positionCategory](https://usermanual.wiki/HYUNDAI-MOBIS/PA710SLUSB.user-manual-1-of-2/User-Guide-1245664-Page-75.png)
![3-24 NAVIGATION SYSTEMPART 3 NAVIGATION SYSTEMInput the phone number and Press thebutton to complete. The corresponding position will bedisplayed on the map. Voice Command1. Press the key on the steering wheelremote controller.2. After the beep sound, say a command."Destination POI by Phone Number"[Destination POI by phone number],page 4-22.Searching from Address bookPress the key.Press the button.Select the desired address book (user)menu.INFORMATIONThis system provides 5 address books. Eachaddresses book can hold up to 200 entries.Select the desired address name fromthe list. The corresponding position will bedisplayed on the map. [Registering new address in addressbook], page 3-43.Voice Command1. Press the key on the steering wheelremote controller.2. After the beep sound, say a command."Destination by address book"[Destination by address book], page 4-24.Address bookDESTDonei](https://usermanual.wiki/HYUNDAI-MOBIS/PA710SLUSB.user-manual-1-of-2/User-Guide-1245664-Page-78.png)
![NAVIGATION SYSTEM 3-25NAVIGATION SYSTEMSearching for Emergency facilitiesPress the key.Press the button.Select the desired facility category. Select the desired facility. The corresponding position will bedisplayed on the map. Voice Command1. Press the key on the steering wheelremote controller.2. After the beep sound, say a command."Find emergency <Category>"[Find emergency <Category>], page 4-23.Searching your HomePress the key.Press the button. The Home position will be displayed onthe map. INFORMATIONIf the Home address is not registered, then thebutton will be displayed. [Registering home address], page 3-48.Voice Command1. Press the key on the steering wheelremote controller.2. After the beep sound, say a command."Go home"[Go home], page 4-25.HOMEHOMEDESTEmergencyDESTi](https://usermanual.wiki/HYUNDAI-MOBIS/PA710SLUSB.user-manual-1-of-2/User-Guide-1245664-Page-79.png)
![3-26 NAVIGATION SYSTEMPART 3 NAVIGATION SYSTEMSearching favorite placesPress the key.Select the desired button from ~ .The corresponding position will bedisplayed on the map. INFORMATIONIf the address of the Favorite place is notregistered, then the ~ buttonswithout registered addresses will be disabled.[Registering favorite place], page 3-49.Voice Command1. Press the key on the steering wheelremote controller.2. After the beep sound, say a command."Destination by memory point <1 to 5>"[Destination by memory point <1 to 5>],page 4-25.Searching from MAP Position the scroll mark at the destinationby scrolling the map on the map screen. Searching POI by local POI listPress the button on the mapscreen.Press the button.Press the button.Select the desired POI menu. The corresponding position will bedisplayed on the map. Voice Command1. Press the key on the steering wheelremote controller.2. After the beep sound, say a command."Find nearest <POI name>"[Find nearest <POI name>], page 4-21.Local POI listsOthersPOI5151DESTi](https://usermanual.wiki/HYUNDAI-MOBIS/PA710SLUSB.user-manual-1-of-2/User-Guide-1245664-Page-80.png)
![NAVIGATION SYSTEM 3-27NAVIGATION SYSTEMOperating after searching adestination Changing destination position : Changes the position of the destination byscrolling the map. [Scrolling map], page 3-11.Setting as Destination / waypoint :Sets the position as the destination orwaypoint.Voice Command1. Press the key on the steering wheelremote controller.2. After the beep sound, say a command."Start guidance" (Sets the position of the scroll mark as thedestination and begins route guidance.)Adding to address book : Saves the position in the address book. [Registering new address in addressbook], page 3-43. Voice Command1. Press the key on the steering wheelremote controller.2. After the beep sound, say a command."Store Marked Location to <text tag>"](https://usermanual.wiki/HYUNDAI-MOBIS/PA710SLUSB.user-manual-1-of-2/User-Guide-1245664-Page-81.png)
![3-30 NAVIGATION SYSTEMPART 3 NAVIGATION SYSTEMRoute guidance Route menu screen and functionsPress the key on the control panel. The ROUTE menu screen will be displayed. Cancel Route: Deletes destination,waypoints and terminates routeguidance.[Finishing route guidance], page 3-30 .Route Overview: Displays the entireroute and route detailed.[Route overview], page 3-31 .Route Option: The route option can bechanged.[Changing Route option], page 3-32 .Edit Waypoint: Waypoints can beadded/deleted and the order can bechanged.[Editing waypoints], page 3-32 .Detour: Searches detour routes. [Setting detour distance], page 3-35 .Avoid Streets: Searches routes whichavoid the selected streets. [Setting avoid streets on route], page3-35.Finishing route guidance (DeleteDestination)Press the key.Press the button. Press the button. The destination and waypoints aredeleted and the route guidance isterminated.[Finishing route guidance], page 3-30 .YesCancel RouteROUTEROUTE ](https://usermanual.wiki/HYUNDAI-MOBIS/PA710SLUSB.user-manual-1-of-2/User-Guide-1245664-Page-84.png)

![3-34 NAVIGATION SYSTEMPART 3 NAVIGATION SYSTEM(b) Using advanced Search The method for searching waypoints throughthe button is the samemethod as searching destination.[Searching a Destination], page 3-13.Deleting waypointsPress the key.Press the button.Select the waypoint and press thebutton.Press the button.After deleting, press the button tocomplete.Guidance will be restart after recalculating.Re-ordering waypointsPress the key.Press the button.Select the desired waypoint and use the, buttons to changethe order. Once re-ordering is complete, press thebutton to complete. Guidance will restart after recalculatingthe route. DoneMOVEMOVEEdit waypointROUTEDoneYesDeleteEdit waypointROUTEAdvanced(more)](https://usermanual.wiki/HYUNDAI-MOBIS/PA710SLUSB.user-manual-1-of-2/User-Guide-1245664-Page-88.png)
![3-36 NAVIGATION SYSTEMPART 3 NAVIGATION SYSTEMSetup and Information Setup menu screen and functionsPress the key on the control panelto display the setup menu screen.Main button : Changes to the inputkeyboard type, voice command feedbackON/OFF settings and system initializationcan be made. [Main setting], page 3-36 .Traffic Setup button : Sets whether todisplay traffic information on map,whether to provide upcoming trafficinformation voice guidance, and whetherto display the detour route popupshowing upcoming traffic information. Navigation button : Navigation relatedsettings can be set. [Navigation setting], page 3-38 .My Places button : The Address book,Home address, Favorite places, Previousdestination can be edited.[My places setting], page 3-43 .System Info button : The system versioninformation can be viewed and systemupgrades can be conducted. [System information and update],page 3-51 .Voice Setup button : Adjusts theNavigation guidance volume. [Voice guidance volume setting],page 3-51 .Help button : The help contents can beviewed. [Help], page 3-54 .Display button : Adjusts the displaysetting. [Display setting], page 1-12 .Main settingPress the key.Press the button.Select the desired changes and press thebutton to complete. Setting keyboard for inputtingletterPress the desired keyboard type button.The selection will be highlighted. DoneMainSETUPSETUP ](https://usermanual.wiki/HYUNDAI-MOBIS/PA710SLUSB.user-manual-1-of-2/User-Guide-1245664-Page-90.png)

![NAVIGATION SYSTEM 3-43NAVIGATION SYSTEMMy places settingRegistering new address inaddress bookThere are 3 ways to register a new addressin the address book - (a) by DEST menu, (b)by registering address in address book, (c)from map scroll. (a) by DEST menuPress the key.Search through the desired method. The search process is the same as themethod for destination search.[Searching a destination], page 3-13.Press the button.Press the desired address book (user)button.Input the name and telephone informationand press the button to complete.[Editing an address of address book],page 3-45.(b) by registering in the address book Press the key.Press the button.Press the button.Press the desired address book (user)button.Address bookMy PlacesSETUPDoneAdd to Address BookDEST](https://usermanual.wiki/HYUNDAI-MOBIS/PA710SLUSB.user-manual-1-of-2/User-Guide-1245664-Page-97.png)
![3-44 NAVIGATION SYSTEMPART 3 NAVIGATION SYSTEMPress the button.Press the button to search theaddress.[Searching an address], page 3-13.INFORMATIONPress the button to inputthe address of the current position. Input the name and telephone informationand press the button to complete.[Editing an address of address book],page 3-45.(c) from map scrollIn the map screen, scroll the map to thedesired position. Press the button.Press the desired address book (user)button.Input the name and telephone informationand press the button to complete.[Editing an address of address book],page 3-45.DoneAdd to Address BookDoneStore current positionAddressNew Addressi](https://usermanual.wiki/HYUNDAI-MOBIS/PA710SLUSB.user-manual-1-of-2/User-Guide-1245664-Page-98.png)
![NAVIGATION SYSTEM 3-45NAVIGATION SYSTEMEditing an address of addressbookPress the key.Press the button.Press the button.Select the desired address book (user)button .Select the desired address to edit. Press the button to input theaddress name.Input the address name and press thebutton to complete.Press the button to search theaddress. The process is the same as themethod for searching an address.[Searching an Address] , page 3-13.INFORMATIONPress the button to inputthe address of the current position.Store current positionAddressDoneNameAddress bookMy placesSETUPi](https://usermanual.wiki/HYUNDAI-MOBIS/PA710SLUSB.user-manual-1-of-2/User-Guide-1245664-Page-99.png)