Hafele America 106 Dialock Furniture Safe User Manual Manual
Hafele America Co. Dialock Furniture Safe Manual
Manual
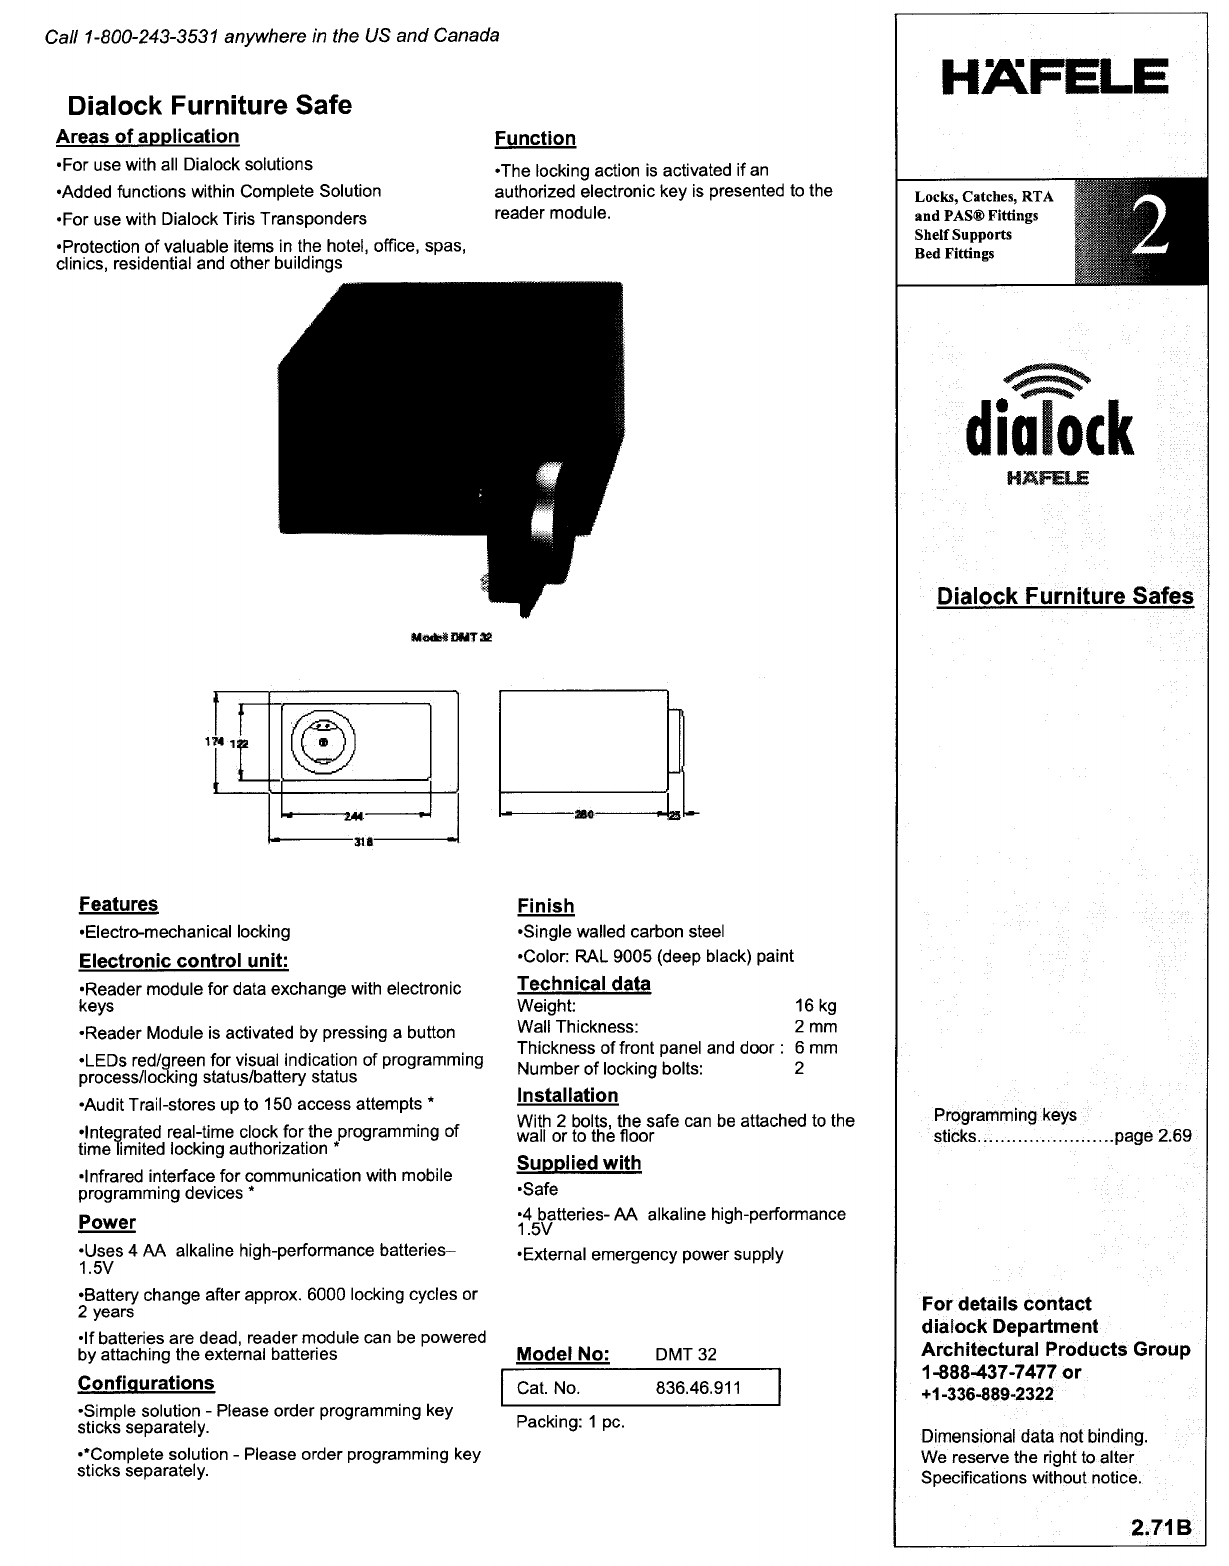

Mounting instructions
engl. 9
Technical information
All safes are supplied in the basic method of operation.
In this method of operation, locking authorisations can be allocated to
personnel keys directly at the safe with a special programming key stick
(green). The locking authorisations are withdrawn again directly at the
safe with a clearing key stick (red).
Guest keys are authorised via the software Hotel.
The configuration takes place when the system is initiated.
Technical data:
weight
TM3
TM4
thickness of steel material
thickness of front plate and
door
safety level
number of locking bolts
13 kg
19 kg, with removable shelf (sheet steel)
2 mm, single walled
6 mm
A according to VDMA, norm 24992
2
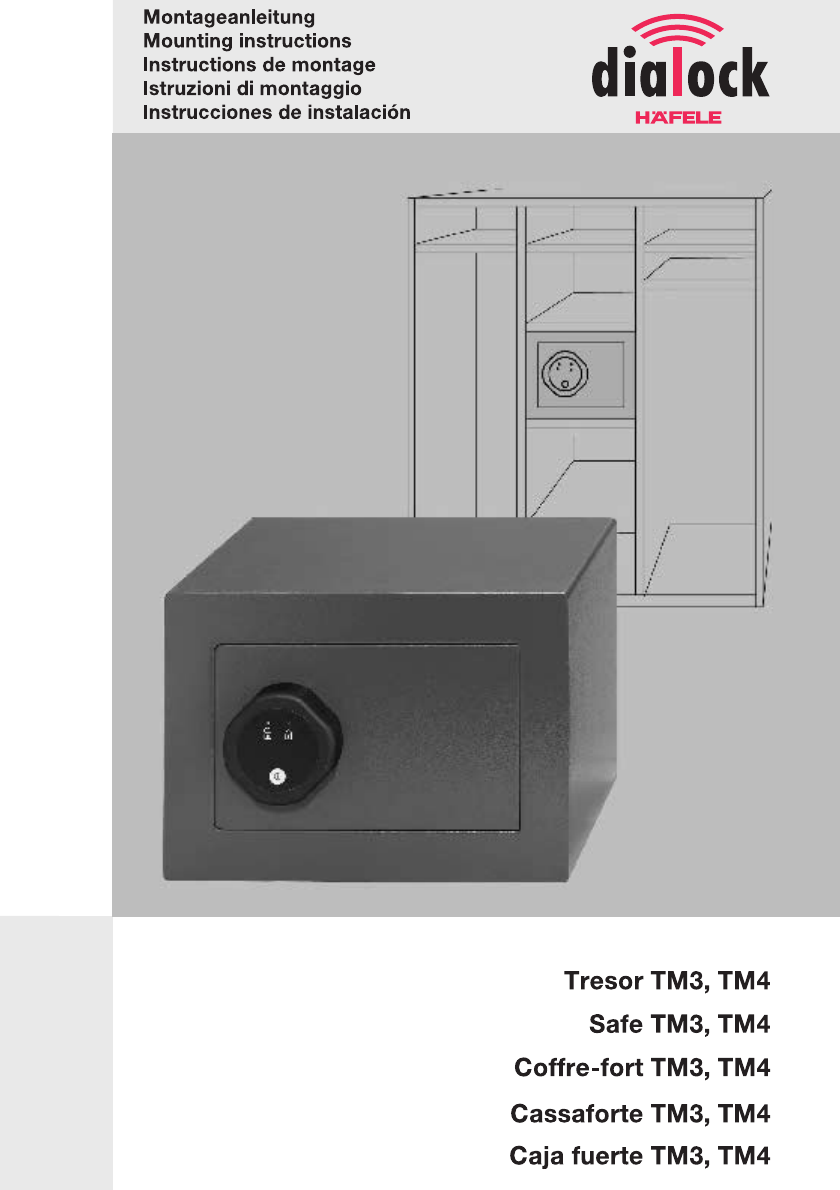
Mounting instructions
10 engl.
Supply schedule
safe
safe TM4: removable shelf (sheet steel)
four Mignon-1,5-V-batteries (already inserted)
battery holder TRE emergency power supply
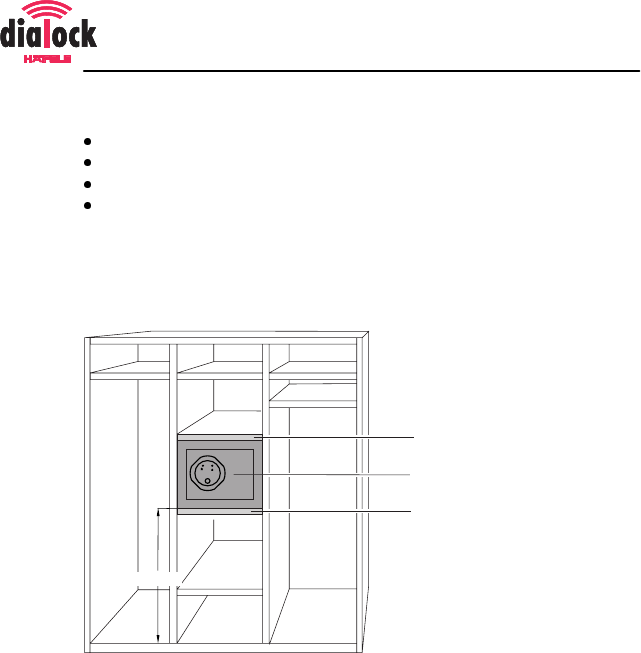
Installation
The safe is designed for installation into furniture.
1
2
3
ca. 1,2 m
1 end plate (19 mm thick)
2 safe
3 base plate (35 to 40 mm thick)

Mounting instructions
engl. 11
280 29
318
173 128
248
Built-in dimensions of safe TM3
300 29
398
278 170
295
Built-in dimensions of safe TM4
1. Glue and screw fix the base plate to the side panels of the cabinet
at approx. 1.2 m above the cabinet base.
2. Glue and screw fix the end plate to the side panels of the cabinet
above the base plate.
3. Insert the safe.
Screw fix the safe in the cabinet
1. For screw fixing to the rear panel of the cabinet: from the inside of
the safe, push two screws through the 10 mm drillings in the back
panel of the safe and screw fix the safe to the cabinet.
2. For screw fixing to the base plate: from the inside of the safe, push
four screws through the 8 mm drillings in the base of the safe and
screw fix the safe to the base plate.

Mounting instructions
12 engl.
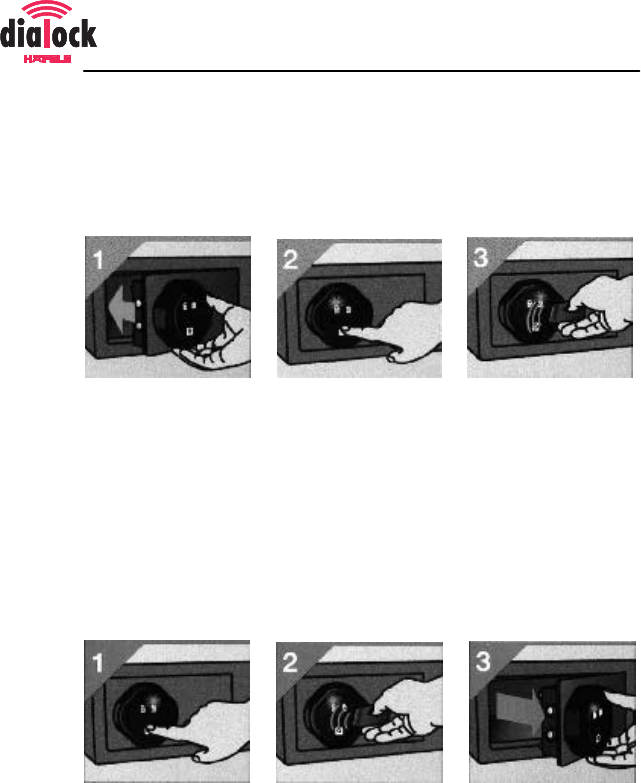
Initiation
Allocation of programming and clearing key stick
In the basic method of operation, the programming and clearing key
sticks must be allocated during the first initiation.
Avoid misuse of the electronic keys by unauthorised persons: keep the
programming and clearing key sticks in a safe place, as these will allow
allocation of locking authorisations to an electronic key.
1. Have the green programming key stick and the red clearing key
stick ready.
2. Push the white button on the display of the safe.
the green indicator (LED) flashes for a few seconds.
3. Hold the green programming key stick in front of the display, whilst
the green LED flashes.
The red indicator (LED) is illuminated once as confirmation of the
allocation process, afterwards it flashes.
4. Hold the red clearing key stick in front of the display, whilst the red
LED flashes.
The green indicator (LED) flashes for a few seconds.
The safe switches off automatically.
If errors occurred during the allocation:
Õswitch the safe back on.
Õre-allocate the programming and clearing key stick.
If errors re-occur:
Õcontact your Dialock sales office.

Mounting instructions
engl. 13
Brief operating instructions for the basic method of operation
Allocation of locking authorisations to a personnel key
1. Push the white button on the display.
The red indicator (LED) is illuminated.
2. Hold the green programming key stick in front of the display.
The green indicator (LED) flashes.
3. Hold the personnel key to be allocated in front of the display within
5 seconds.
The green indicator (LED) is illuminated briefly.
The access authorisation for the personnel key to be allocated has
been given.
4. Remove the allocated personnel key.
The safe switches off automatically.
If the red indicator (LED) is illuminated, the attempt was
unsuccessful:
Õrepeat the allocation of locking authorisations.
5. Hold the next personnel key to be allocated in front of the display in
intervals of 5 seconds.
Withdrawal of locking authorisations from the personnel key
1. Push the white button on the display.
The red indicator (LED) is illuminated.
2. Hold the red clearing key stick in front of the display.
The red indicator (LED) flashes.
3. Hold the personnel key to be deleted in front of the display.
The red indicator (LED) is illuminated briefly.
The locking authorisation is withdrawn.
The safe switches off automatically.
Withdrawal of locking authorisations from all personnel keys
When a personnel key is lost and should no longer have any locking
authorisations, all personnel keys have to be deleted at the safe.
Afterwards, all respective personnel keys re-allocated with locking
authorisations.
1. Push the white button on the display.
The red indicator (LED) is illuminated.

Mounting instructions
14 engl.
2. Hold the red clearing key stick in front of the display.
The red indicator (LED) flashes..
3. Hold the green programming key stick in front of the display.
The red indicator (LED) is illuminated briefly.
The locking authorisations are withdrawn.
4. Re-allocate locking authorisations to all personnel keys, which need
to retain these.
Change of batteries
When the batteries are weak, the red and green indicators (LED) flash
alternately once the safe is switched on.
The smooth operation of the safe is only guaranteed, if the batteries are
replaced immediately.
1. Open the battery compartment on the inside of the safe door with a
cross slot screw driver.
2. Insert four new mignon-1,5-V-batteries (cat. no. 910.54.980). Make
sure, the polarity is correct!
3. Close and screw fix the battery compartment.
Emergency opening
1. Connect the battery holder TRE emergency power supply on the
underside of the display.
2. Hold the valid key in front of the display.
3. Open the safe door.
4. Change the batteries.
Mounting instructions
engl. 15
Operation
Guest keys are allocated automatically, when locking the safe for the
first time.
Up to four guest keys can be allocated per safe.
Locking of the safe
1. Close the safe door.
2. Push the white button on the display.
The green indicator (LED) is illuminated.
3. Hold the electronic key in front of the safe.
The green and the red indicators (LED) flash alternately and the
bolts move audibly.
The red indicator (LED) is illuminated.
The safe is locked.
Opening of the safe
1. Push the white button on the display.
The red indicator (LED) is illuminated.
The safe is switched on.
2. Hold the electronic key in front of the safe.
The green and red indicators (LED) flash alternately and the bolts
move audibly.
The green indicator (LED) is illuminated.
3. Open the safe door.
Montaganleitung 732.29.108
Der Nachdruck der Montageanleitung, auch auszugsweise, oder die Nachahmung der Abbildungen und
Zeichnungen sowie die Nachahmung der Gestaltung sind verboten.
Für Druckfehler und Irrtümer, die bei der Erstellung der Montageanleitung unterlaufen sind, ist jede Haftung
ausgeschlossen.
Liefermöglichkeiten und technische Änderungen vorbehalten.
Stand 06.00
Mounting instructions 732.29.108
The reprint of the mounting instructions, even extracts, or copying of the illustrations and drawings as well
as copying of the layout are prohibited.
No liability is accepted for printing errors or errors occurred during the creation of the mounting instructions.
We reserve the right for technical changes and changes of availability.
Status 06.00
Instructions de montage 732.29.108
Il est interdit de reproduire les instructions de montage ou d’en imprimer des extraits, d’en copier des
illustrations et des dessins ou d’en imiter la présentation.
Il ne sera assumé aucune responsabilité quant aux erreurs et fautes pouvant résulter de l’impression de ces
instructions de montage.
Tous les droits de possibilités de livraison et de modifications techniques sont réservés.
Version du 06.00
Istruzioni di montaggio 732.29.108
E' vietata la copia delle istruzioni di montaggio, anche soltanto parziale, oppure delle raffigurazioni e die
disegni come anche la riproduzione del layout.
E' esclusa qualsiasi responsabilità nei nostri confronti in caso d'errori di stampa e sbagli, sorti durante la
produzione delle istruzioni di montaggio.
Con riserva di ulteriori possibilità di fornitura e di modifiche tecniche.
Stato 06.00
Instrucciones del instalación 732.29.108
Queda rigurosamente prohibida la reproducción total o parcial de esta documentación, así como la
imitación de sus ilustraciones, dibujos o diseño.
No nos hacemos responsables en manera alguna de las erratas o equivocaciones que pudieran existir en
estas instrucciones de instalación.
Nos reservamos la posibilidad de suministro y los derechos a modificación.
Versión del 06.00
Copyright
Häfele GmbH & Co
Adolf-Häfele-Strasse 1 · D-72202 Nagold
Postfach 1237 · D-72192 Nagold
Telefon +49 (0) 74 52 / 95-0
Telefax +49 (0) 74 52 / 95-200
E-Mail: info@haefele.de · www.haefele.de