Haier Information Technology C14XXXX Laptop User Manual
Haier Information Technology(Shenzhen)CO.,Ltd Laptop
Users Manual
Laptop
Hardware User Guide

2
Contents
Table of Contents
1. Introducing the Laptop
General Overview..................................................................................... 6
Notes For The User............................................................................. 6
Safety Precautions ................................................................................... 7
Transportation Precautions ...................................................................... 8
Preparing your Laptop.............................................................................. 9
2. Knowing the Parts
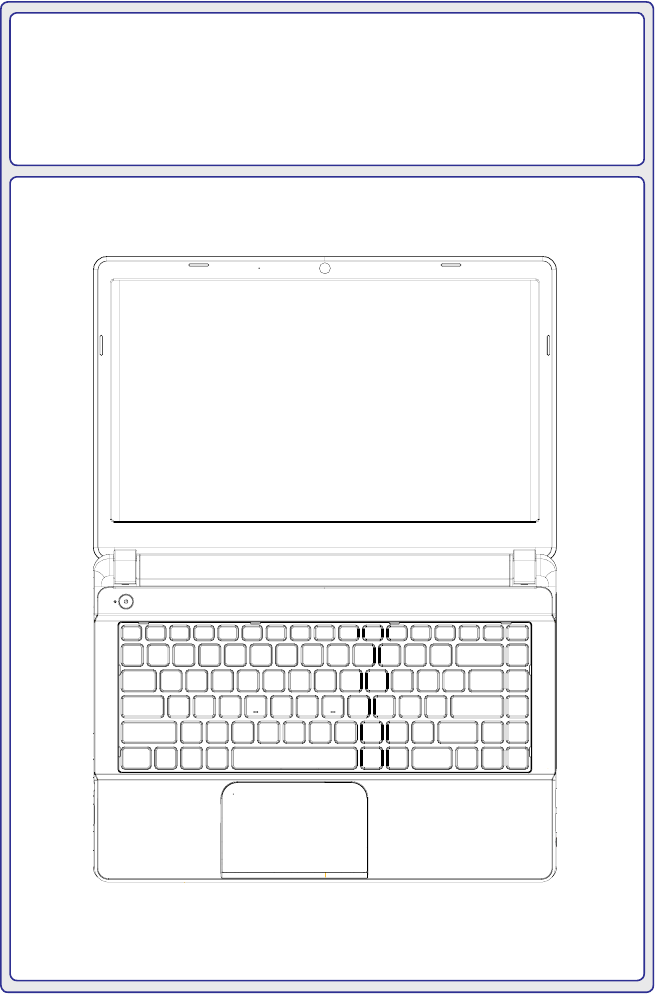
Top and Front Sides ............................................................................... 12
Right Side............................................................................................... 14
Left Side ................................................................................................. 15
Bottom Side............................................................................................ 17
3. Getting Started
Power System ........................................................................................ 20
Using AC Power ................................................................................ 20
Using Battery Power.......................................................................... 21
Battery Care ...................................................................................... 21
Powering ON the Laptop ................................................................... 22
Power Options................................................................................... 22
Checking Battery Power.................................................................... 23
Charging the Battery Pack ................................................................ 23
Power Management Modes .............................................................. 24
Power Manager Utility ....................................................................... 25
Special Keyboard Functions................................................................... 29
Colored Hot Keys .............................................................................. 29
Microsoft Windows Keys ................................................................... 30
Status Indicators..................................................................................... 31

3
Contents
Table of Contents (cont.)
4. Using the Laptop
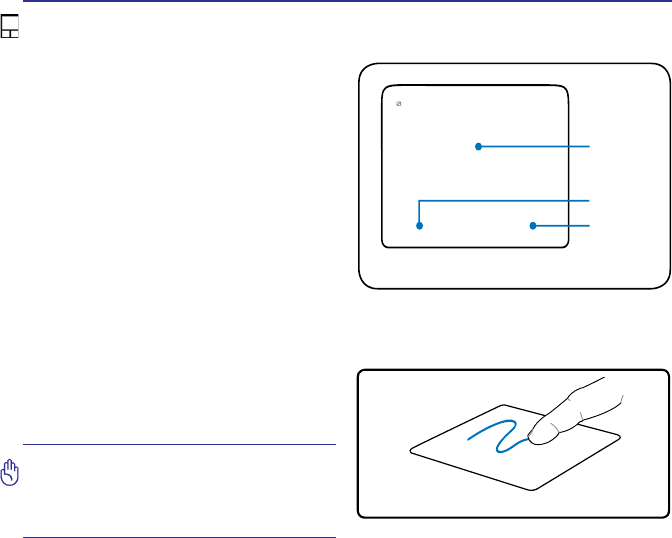
Pointing Device....................................................................................... 34
Using the Touchpad........................................................................... 34
Touchpad Usage Illustrations ............................................................ 35
Multi-touch gesture usage ................................................................ 36
Caring for the Touchpad .................................................................... 38
Storage Devices ..................................................................................... 39
Optical Drive...................................................................................... 39
Flash Memory Card Reader .............................................................. 40
Network Connection ............................................................................... 41
Wireless LAN Connection ................................................................. 42
A. Appendix
Declarations and Safety Statements ...................................................... 46

4
Notes

5
NOTE: Photos and icons in this document are used for artistic purposes only and do
not show what is actually used in the product itself.
1. Introducing the Laptop
About This User Guide
Safety Precautions
Transportation Precautions
Preparing your Laptop

6
1 Introducing the Laptop
General Overview
This document provides information on the various components in the
Laptop and how to use them. The following are the major sections of
this document:
1. Introducing the Laptop
Introduces you to the Laptop and its documentation.
2. Knowing the Parts
Gives you information on the Laptop’s components.
3. Getting Started
Gives you information on getting started with the Laptop.
4. Using the Laptop
Gives you information on using the Laptop’s components.
Notes For The User
A few notes and warnings in bold are used throughout this document that you should
be aware of in order to complete certain tasks safely and completely. These notes
have different degrees of importance as described below:
TIP: Tips and useful information for completing tasks.
IMPORTANT! Vital information that must be followed to prevent damage to data,
components, or persons.
WARNING! Important information that must be followed for safe operation.
Text enclosed in < > or [ ] represents a key on the keyboard; do not actually type the
< > or [ ] and the enclosed letters.
< >
[ ]
NOTE: Tips and information for special situations.
7
Introducing the Laptop 1
Safety Precautions
The following safety precautions will increase the life of the Laptop. Follow all
precautions and instructions. Except as described in this document, refer all servicing
WR TXDOL¿HG SHUVRQQHO 'R QRW XVH GDPDJHG SRZHU FRUGV DFFHVVRULHV RU RWKHU
peripherals. Do not use strong solvents such as thinners, benzene, or other chemicals
on or near the surface.
IMPORTANT! Disconnect the AC power and remove the battery pack(s) before
cleaning. Wipe the Laptop using a clean cellulose sponge or chamois cloth dampened
with a solution of nonabrasive detergent and a few drops of warm water and remove
any extra moisture with a dry cloth.
Battery safety warnings:
'2127WKURZWKHEDWWHU\LQ¿UH
DO NOT disassemble the battery.
DO NOT short circuit the contacts.
DO NOT handle damaged or
leaking batteries.
DO NOT leave the Laptop on
your lap or any part of the body
in order to prevent discomfort or
injury from heat exposure.
DO NOT expose to strong
PDJQHWLFRUHOHFWULFDO¿HOGV7KH
HOHFWURPDJQHWLF¿HOGPD\FDXVH
the computer to malfunction.
DO NOT place or drop objects
on top and do not shove any
foreign objects into the Laptop.
Do not block air vents.
DO NOT throw the Laptop in
municipal waste. Check local
regulations for disposal of
electronic products.
DO NOT carry or cover a Laptop
that is powered ON with any
materials that will reduce air
circulation such as a carrying bag.
CAUTION! Danger of explosion
if battery is incorrectly replaced.
Replace only with the same or
equivalent type recommended
by the manufacturer.
DO NOT expose to dirty or dusty
environments. DO NOT operate
during a gas leak. DO NOT use cut
or damaged connection cables.
DO NOT expose to or use near
liquids, rain, or moisture.
DO NOT place on uneven or
unstable work surfaces. Seek
servicing if the casing has been
damaged.
DO NOT press or touch the
display panel. Do not place
together with small items that
may scratch or enter the Laptop.
SAFE TEMP: This Laptop should
only be used in environments with
ambient temperatures between
5°C (41°F) and 35°C (95°F).
INPUT RATING: Refer to the rating
label on the bottom of the Laptop
and be sure that your power
adapter complies with the rating.
WARNING: To avoid bodily injury, DO NOT attempt to troubleshoot your Laptop if any
of the above conditions have damaged it, the battery, or the battery charger. Instead,
XQSOXJ\RXU/DSWRSDQGFRQWDFWDTXDOL¿HGFRPSXWHUWHFKQLFLDQ
System Power Rating: 65W, 19V, 3.42A / 90W, 19V, 4.74A
IMPORTANT: Listening to audio at full volume for long periods of time can damage
the user’s hearing, to prevent this please adjust audio levels to middle levels.
8
1 Introducing the Laptop
IMPORTANT! There are three main types of airport security devices: X-ray machines
(used on items placed on conveyor belts), magnetic detectors (used on people
walking through security checks), and magnetic wands (hand-held devices used on
people or individual items). You can send your Laptop and diskettes through airport
X-ray machines. However, it is recommended that you do not send your Laptop or
diskettes through airport magnetic detectors or expose them to magnetic wands.
Charge Your Batteries
If you intend to use battery power, be sure to fully charge your battery pack and
any optional battery packs before going on long trips. Remember that the power
adapter charges the battery pack as long as it is plugged into the computer and an
AC power source. Be aware that it takes much longer to charge the battery pack
when the Laptop is in use.
Airplane Precautions
Contact your airline if you want to use the Laptop on the airplane. Most airlines will
have restrictions for using electronic devices. Most airlines will allow electronic use
only between and not during takeoffs and landings.
Transportation Precautions
To prepare the Laptop for transport, you should turn it OFF and disconnect all
external peripherals to prevent damage to the connectors. The hard disk drive’s
head retracts when the power is turned OFF to prevent scratching of the hard disk
surface during transport. Therefore, you should not transport the Laptop while the
power is still ON. Close the display panel and check that it is latched securely in
the closed position to protect the keyboard and display panel.
IMPORTANT! The Laptop’s surface is easily dulled if not properly cared for. Be careful
not to rub or scrape the Laptop surfaces.
Cover Your Laptop
Purchase a carrying bag to protect the Laptop from dirt, water, shock, and scratches.
9
Introducing the Laptop 1
Preparing your Laptop
These are only quick instructions for using your Laptop. Read the later pages for
detailed information on using your Laptop.
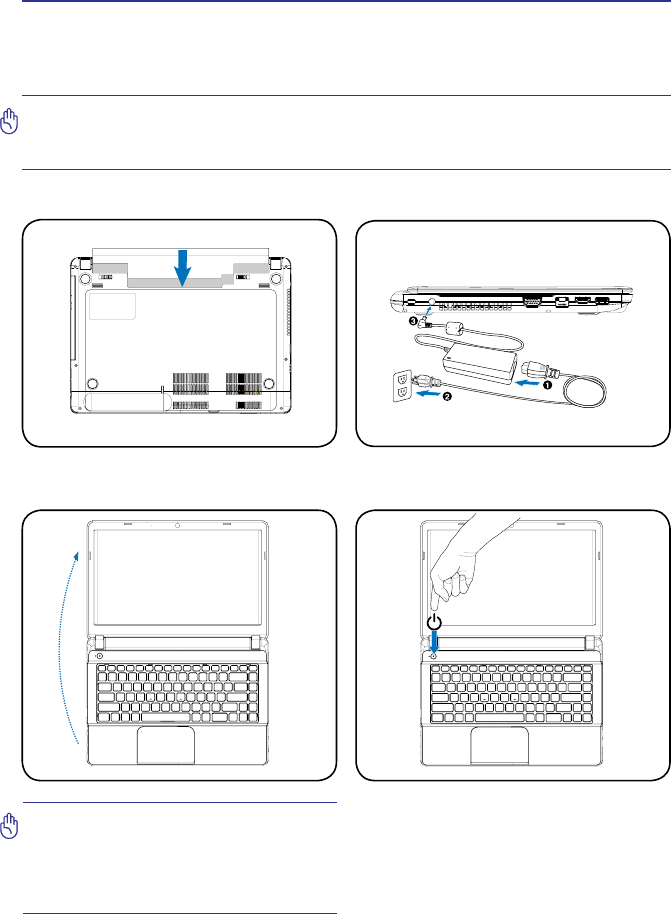
1. Install the battery pack 2. Connect the AC Power Adapter
IMPORTANT! When opening, do not
force the display panel down to the
table or else the hinges may break!
Never lift the Laptop by the display
panel!
3. Open the Display Panel 4. Turn ON the Laptop
IMPORTANT! Selected models may feature display panels that do not fully open
to a 180-degree angle, with such models do not attempt to force the display panel
beyond its limit as it may cause damage to the device.
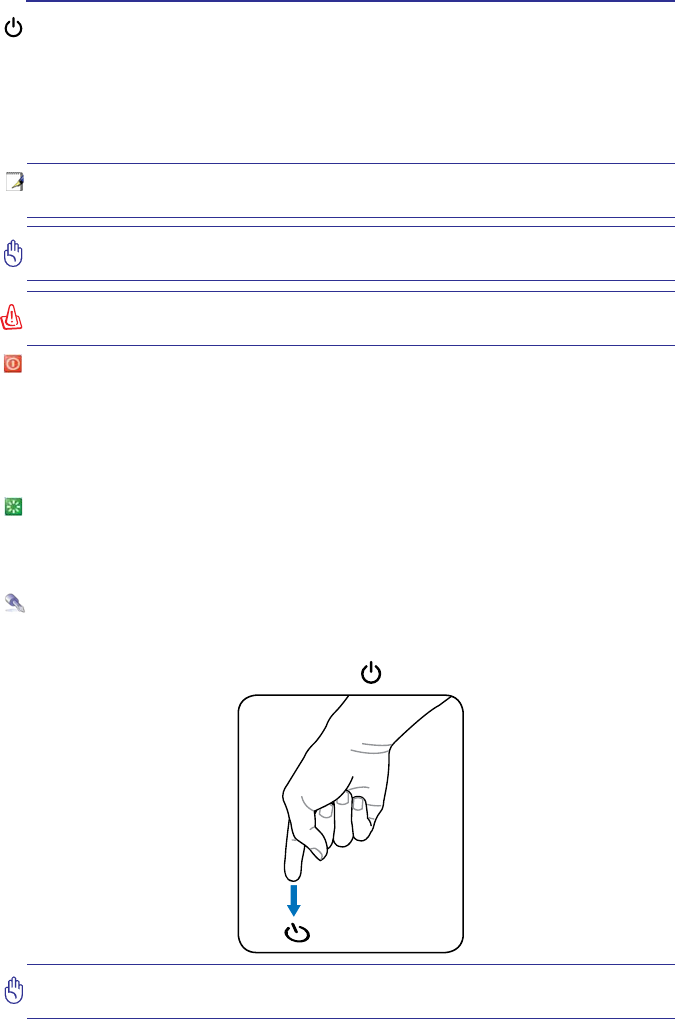
The power switch turns the Laptop ON
and OFF or puts the Laptop into sleep
or hibernation modes. Actual behavior of
the power switch can be customized in
Windows Desktop > Settings > Control
Panel > System and Security > Power
Options.

10
Notes

11
NOTE: Photos and icons in this document are used for artistic purposes only and do
not show what is actually used in the product itself.
2. Knowing the Parts
Basic sides of the Laptop
12
2 Knowing the Parts
Top and Front Sides
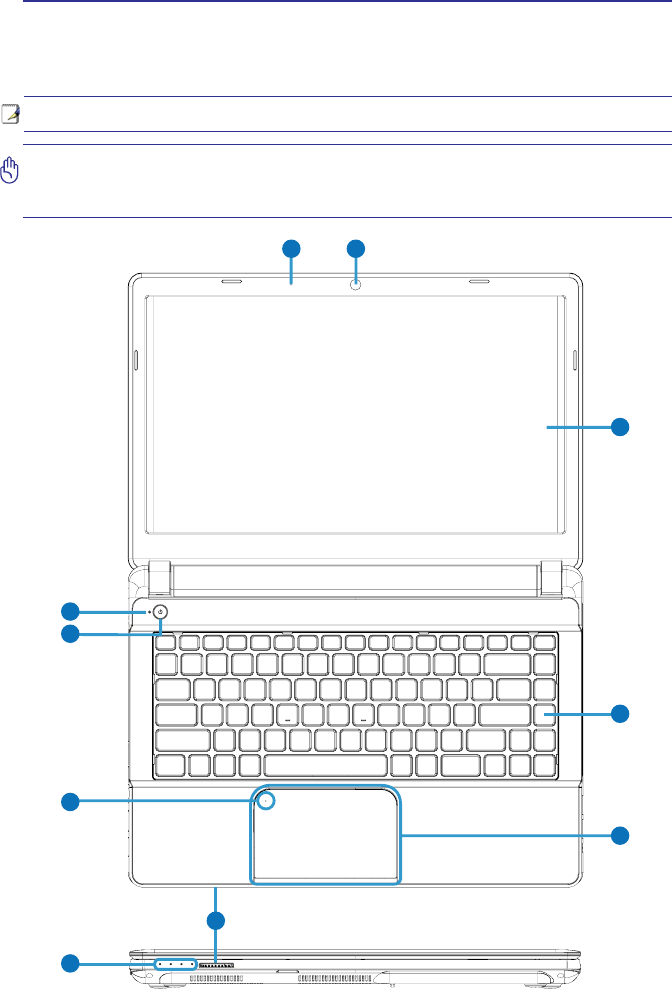
Refer to the diagram below to identify the components on these sides of the Laptop.
NOTE: The keyboard will be different for each territory.
1
3
2
4
5
6
10
9
8
7
IMPORTANT! Selected models may feature display panels that do not fully open
to a 180-degree angle, with such models do not attempt to force the display panel
beyond its limit as it may cause damage to the device.
13
Knowing the Parts 2
Status Indicators
Status indicators represent various hardware/software conditions. See
indicator details in Section 3.
2
3
4
5
1
7
6
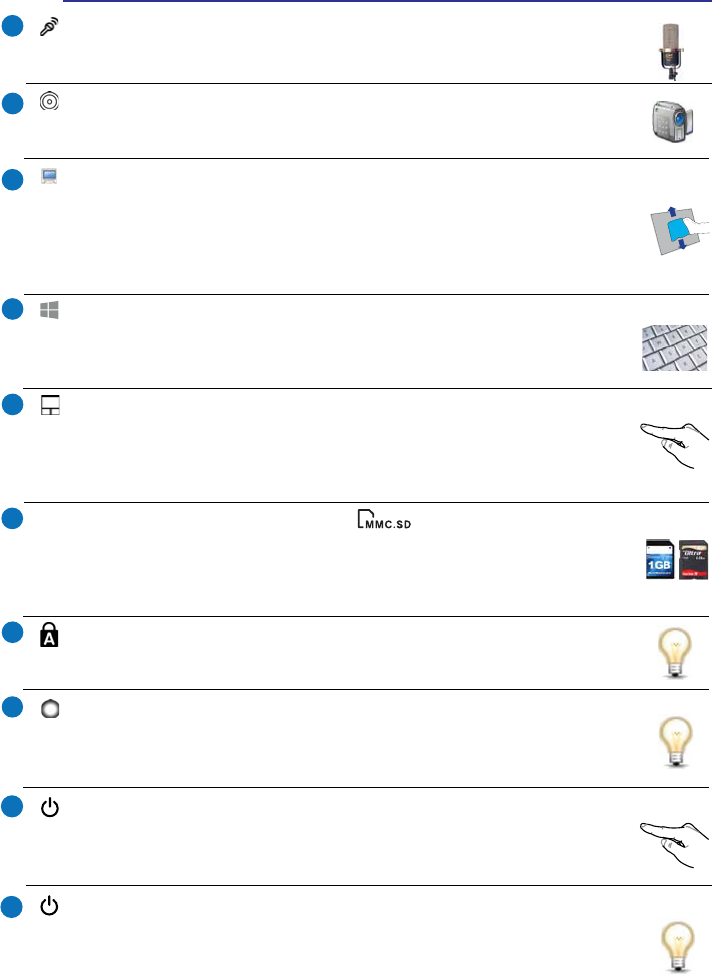
Camera
The built-in camera allows picture taking or video recording. Can be used
with video conferencing and other interactive applications.
Display Panel
7KH/DSWRSXVHVDQXOWUDFOHDUÀDWSDQHOZKLFKSURYLGHVH[FHOOHQWYLHZLQJ
OLNHWKDWRIGHVNWRSPRQLWRUVZLWKRXWDQ\KDUPIXOUDGLDWLRQRUÀLFNHULQJVR
it is easier on the eyes. Use a soft cloth without chemical liquids (use plain
water if necessary) to clean the display panel. WARNING: The display panel
is fragile. Do not to bend or press the panel.
Touchpad and Buttons
The touchpad with its buttons is a pointing device that provides the same
functions as a desktop mouse. A software-controlled scrolling function is
available after setting up the included touchpad utility to allow easy Windows
or web navigation.
8
9
Microphone (Built-in)
The built-in mono microphone can be used for video conferencing, voice
narrations, or simple audio recordings.
Keyboard
The keyboard provides keys with comfortable travel (depth at which the
keys can be depressed) and palm rest for both hands. A Windows function
key is provided to help ease navigation in the Windows operating system.
Flash Memory Card Reader
This Laptop has a built-in high-speed memory card reader that can
FRQYHQLHQWO\ UHDG IURP DQG ZULWH WR PDQ\ ÀDVK PHPRU\ FDUGV XVHGLQ
devices such as digital cameras, MP3 players, mobile phones, and PDAs.
Power Switch
The power switch turns the Laptop ON and OFF or puts the Laptop into
sleep or hibernation modes. Actual behavior of the power switch can be
customized in Windows Control Panel “Power Options.”
Power Indicator
The power indicator lights when the Laptop is turned ON and blinks slowly
when the Laptop is in the Suspend-to-RAM (Sleep) mode. This indicator is
OFF when the Laptop is turned OFF or in the Suspend-to-Disk (Hibernation)
mode.
10
Touchpad Lock Indicator
The touchpad lock indicator lights when the touchpad lock is turned ON
and the touchpad is disabled. NOTE: Double-tapping the icon on the
touchpad enables or disables the touchpad lock.
14
2 Knowing the Parts
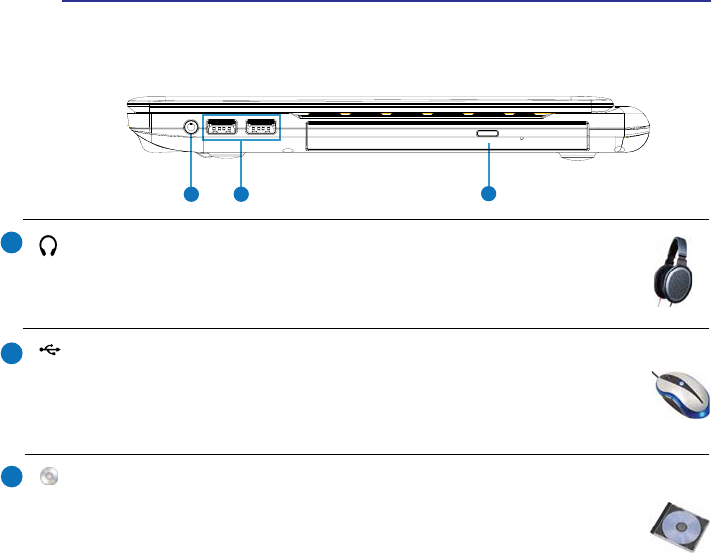
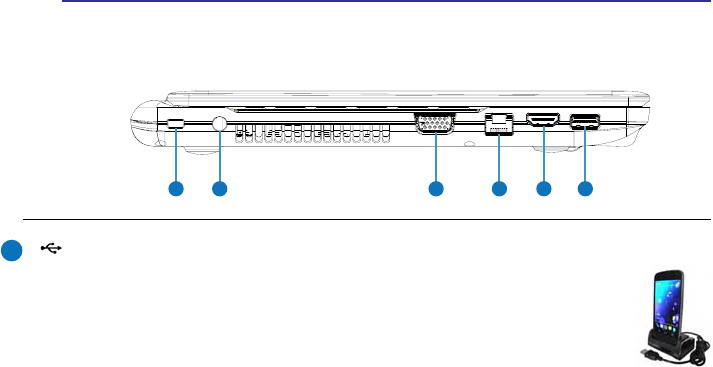
Right Side
Refer to the diagram below to identify the components on this side of the Laptop.
21 3
1
2
3
Optical Drive
The Laptop comes in various models with different optical drives. The
Laptop’s optical drive may support compact discs (CD) and/or digital video
discs (DVD) and may have recordable (R) or re-writable (RW) capabilities.
6HHWKHPDUNHWLQJVSHFL¿FDWLRQVIRUGHWDLOVRQHDFKPRGHO
USB Ports (2.0/1.1)
USB (Universal Serial Bus) allows many devices to run simultaneously on a
single computer, with some peripherals acting as additional plug-in sites or
hubs. USB supports hot-swapping of devices so that most peripherals can
be connected or disconnected without restarting the computer.
Headphone Output / Microphone Input Combo Jack
7KHVWHUHRFRPERMDFNPPLVXVHGWRFRQQHFWWKH/DSWRSWRDPSOL¿HG
speakers, headphones, or a microphone. Using this jack automatically
disables the built-in speakers.
15
Knowing the Parts 2
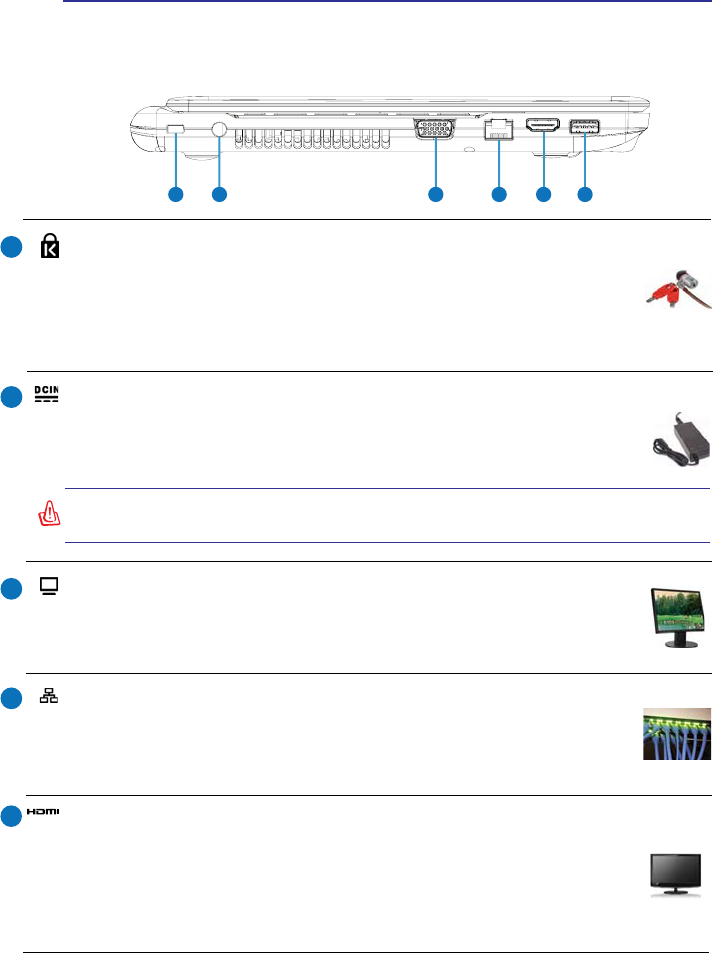
Power (DC) Input
The supplied power adapter converts AC power to DC power for use with
this jack. Power supplied through this jack supplies power to the Laptop and
charges the internal battery pack. To prevent damage to the Laptop and
battery pack, always use the supplied power adapter.
CAUTION: The adapter may become warm to hot when in use. Be sure not to cover
the adapter and keep it away from your body.
Left Side
Refer to the diagram below to identify the components on this side of the Laptop.
1
4
2
3
Display (Monitor) Output
The 15-pin D-sub monitor port supports a standard VGA-compatible
device such as a monitor or projector to allow viewing on a larger external
display.
23 4 5 6
1
LAN Port
The RJ-45 LAN port with eight pins is larger than the RJ-11 modem port and
supports a standard Ethernet cable for connection to a local network. The
built-in connector allows convenient use without additional adapters.
Kensington® Lock Port
The Kensington® lock port allows the Laptop to be secured using
Kensington® compatible Laptop security products. These security products
usually include a metal cable and lock that prevent the Laptop to be removed
IURPD¿[HGREMHFW6RPHPD\DOVRLQFOXGHDPRWLRQGHWHFWRUWRVRXQGDQ
alarm when moved.
HDMI Port
+'0,+LJK'H¿QLWLRQ0XOWLPHGLD,QWHUIDFHLVDQXQFRPSUHVVHGDOOGLJLWDO
audio/video interface between any audio/video source, such as a set-top
box, DVD player, and A/V receiver and an audio and/or video monitor, such
DVDGLJLWDOWHOHYLVLRQ'796XSSRUWVVWDQGDUGHQKDQFHGRUKLJKGH¿QLWLRQ
video, plus multi-channel digital audio on a single cable. It transmits all ATSC
HDTV standards and supports 8-channel digital audio.
5
(continued on the next page)
16
2 Knowing the Parts
Left Side (cont.)
Refer to the diagram below to identify the components on this side of the Laptop.
23 4 5 6
1
USB Port 3.0 with High-Powered USB Port capability
USB (Universal Serial Bus) allows many devices to run simultaneously on
a single computer, with some peripherals acting as additional plug-in sites
or hubs. USB supports hot-swapping of devices so that most peripherals
can be connected or disconnected without restarting the computer.
The High-Powered USB Port function allows the USB port to charge at a
higher current (with a maximum current of 2.5A) than traditional USB ports
when the Laptop is in Suspend/Hibernate mode or when it is powered OFF.
When the Laptop is powered ON and in a normal power state, the port will function
as a traditional USB port with normal charging (with a maximum of 500mA) and
normal data transmission.
The High-Powered charging function will not activate if the battery level is critically
low and the AC adapter is not plugged in.
The High-Powered USB Port does not support USB wakeup.
The High-Powered charging function can be enabled or disabled in BIOS setup.
6
17
Knowing the Parts 2
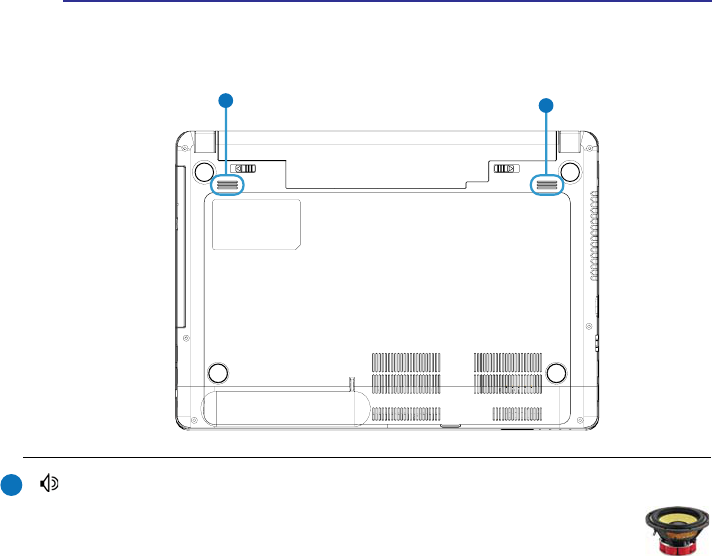
Bottom Side
Refer to the diagram below to identify the components on this side of the Laptop.
1
Audio Speakers
The built-in stereo speaker system allows you to hear audio without
additional attachments. The multimedia sound system features an integrated
digital audio controller that produces rich, vibrant sound (results improved
with external stereo headphones or speakers). Audio features are software
controlled.
11

18
Notes

19
NOTE: Photos and icons in this document are used for artistic purposes only and do
not show what is actually used in the product itself.
3. Getting Started
Power System
Special Keyboard Functions
Status Indicators
20
3 Getting Started
Power System
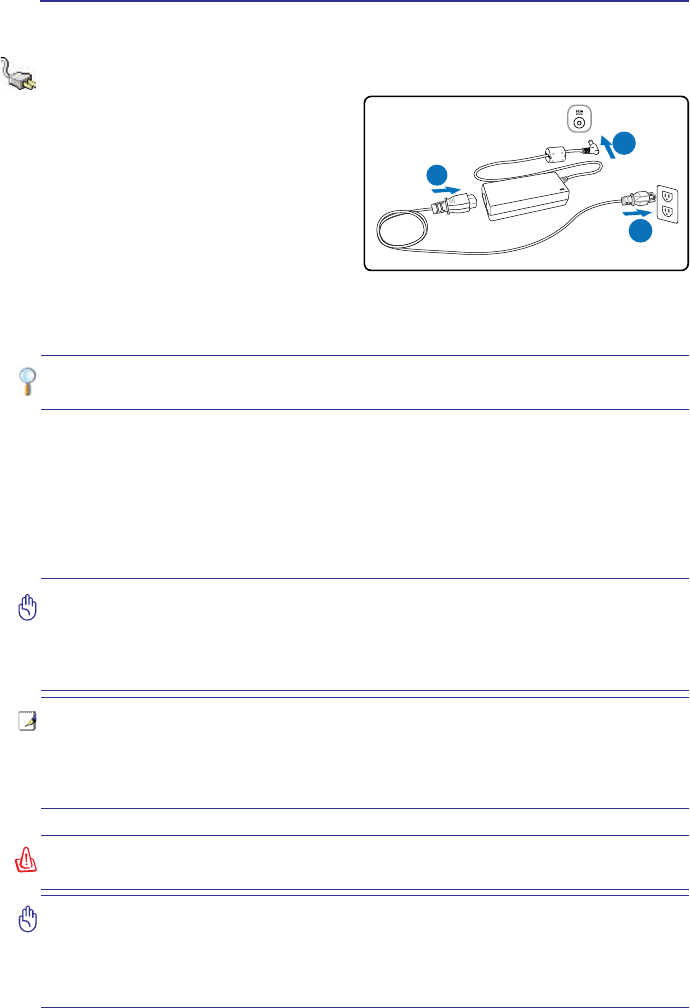
Using AC Power
The Laptop power is comprised of two
parts, the power adapter and the battery
power system. The power adapter
converts AC power from a wall outlet to
the DC power required by the Laptop.
Your Laptop comes with a universal
AC-DC adapter. That means that you
may connect the power cord to any
100V-120V as well as 220V-240V outlets
without setting switches or using power
converters. Different countries may require that an adapter be used to connect the
provided US-standard AC power cord to a different standard. Most hotels will provide
universal outlets to support different power cords as well as voltages.
IMPORTANT! Damage may occur if you use a different adapter to power the Laptop or
use the Laptop’s adapter to power other electrical devices. If there is smoke, burning
scent, or extreme heat coming from the AC-DC adapter, seek servicing. Seek servicing
if you suspect a faulty AC-DC adapter. You may damage both your battery pack(s) and
the Laptop with a faulty AC-DC adapter.
NOTE: This Laptop may come with either a two or three-prong plug depending on
territory. If a three-prong plug is provided, you must use a grounded AC outlet or use a
properly grounded adapter to ensure safe operation of the Laptop DO NOT remove the
grounding prong from the power cable plug. If you use a power extension cable, use the
appropriate type, two-prong or three-prong, to mate with the AC adapter power cable.
WARNING! THE POWER ADAPTER MAY BECOME WARM TO HOT WHEN IN USE. BE
SURE NOT TO COVER THE ADAPTER AND KEEP IT AWAY FROM YOUR BODY.
TIP: You can buy travel kits for the Laptop that includes power and modem adapters
for almost every country.
With the AC power cord connected to the AC-DC converter, connect the AC power
cord to an AC outlet (preferably with surge-protection) and then connect the DC plug
WRWKH /DSWRS &RQQHFWLQJWKH$&'& DGDSWHU WRWKH$& RXWOHW ¿UVW DOORZV \RX WR
test the AC outlet’s power and the AC-DC converter itself for compatibility problems
before connecting the DC power to the Laptop. The power indicator on the adapter
(if available) will light if the power is within accepted ranges. If you use a power strip
with your AC adapter, ensure that the total ampere rating of the products plugged in
to the power strip does not exceed the ampere rating of the power strip.
1
2
3
IMPORTANT! When in use plug the AC adapter cord into an AC outlet that is easily
accessible at all times and place the adapter in a ventilated area, such as a desk top or
RQWKHÀRRU'2127SODFHKHDY\REMHFWVRQWKH$&DGDSWHURUFRYHULWZLWKSDSHUVRU
other items that will reduce cooling; also, DO NOT use the AC adapter inside a carrying
case.
21
Getting Started 3
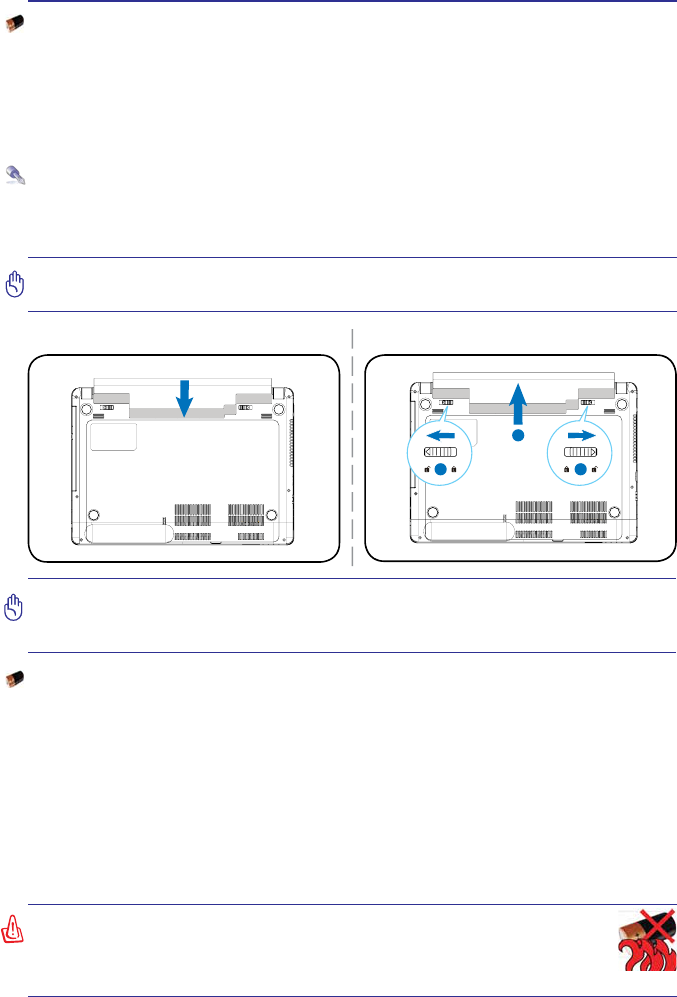
IMPORTANT! Never attempt to remove the battery pack while the Laptop is turned
ON, as this may result in the loss of working data.
IMPORTANT! Only use battery packs and power adapters supplied with this Laptop
RUVSHFL¿FDOO\DSSURYHGE\WKHPDQXIDFWXUHURUUHWDLOHUIRUXVHZLWKWKLVPRGHORU
else damage may occur to the Laptop.
1
1
2
To install the battery pack: To remove the battery pack:
:$51,1*)RUVDIHW\UHDVRQV'2127WKURZWKHEDWWHU\LQ¿UH'2127
short circuit the contacts, and DO NOT disassemble the battery. If there is
any abnormal operation or damage to the battery pack caused by impact,
turn OFF the Laptop and contact an authorized service center.
Battery Care
The Laptop’s battery pack, like all rechargeable batteries, has a limit on the number
times it can be recharged. The battery pack’s useful life will depend on your
environment temperature, humidity, and how your Laptop is used. It is ideal that the
EDWWHU\EHXVHGLQDWHPSHUDWXUHUDQJHEHWZHHQÛ&DQGÛ&Û)DQGÛ)<RX
must also take into account that the Laptop’s internal temperature is higher than the
outside temperature. Any temperatures above or below this range will shorten the life
of the battery. But in any case, the battery pack’s usage time will eventually decrease
and a new battery pack must be purchased from an authorized dealer for this Laptop.
Because batteries also have a shelf life, it is not recommended to buy extras for storing.
Using Battery Power
The Laptop is designed to work with a removable battery pack. The battery pack
consists of a set of battery cells housed together. A fully charged pack will provide
several hours of battery life, which can be further extended by using power
management features through the BIOS setup. Additional battery packs are optional
and can be purchased separately through a Laptop retailer.
Installing and Removing the Battery Pack
Your Laptop may or may not have its battery pack installed. If your Laptop does not
have its battery pack installed, use the following procedures to install the battery pack.
22
3 Getting Started
IMPORTANT! To protect the hard disk drive, always wait at least 5 seconds after
turning OFF your Laptop before turning it back ON.
127(%HIRUHERRWXSWKHGLVSOD\SDQHOÀDVKHVZKHQWKHSRZHULVWXUQHG217KLV
is part of the Laptop’s test routine and is not a problem with the display.
WARNING! DO NOT carry or cover a Laptop that is powered ON with any materials
that will reduce air circulation such as a carrying bag.
Powering ON the Laptop
The Laptop’s power-ON message appears on the screen when you turn it ON. If
necessary, you may adjust the brightness by using the hot keys. If you need to run the
%,266HWXSWRVHWRUPRGLI\WKHV\VWHPFRQ¿JXUDWLRQSUHVV>)@XSRQERRWXSWRHQWHU
WKH%,266HWXS,I\RXSUHVV>7DE@GXULQJWKHVSODVKVFUHHQVWDQGDUGERRWLQIRUPDWLRQ
VXFKDVWKH%,26YHUVLRQFDQEHVHHQ3UHVV>(6&@DQG\RXZLOOEHSUHVHQWHGZLWK
a boot menu with selections to boot from your available drives.
Power Options
The power switch turns ON and OFF the Laptop or puts the Laptop into sleep or
hibernation modes. Actual behavior of the power switch can be customized in Windows
Control Panel “Power Options.”
For other options, such as “Restart, Sleep, or Shut Down,” click the power icon in the
Settings menu of the Windows sidebar.
Restarting or Rebooting
After making changes to your operating system, you may be prompted to restart the
system. Some installation processes will provide a dialog box to allow restart. To
restart the system manually, choose Restart.
IMPORTANT! Do not use emergency shutdown while data is being written; doing
so can result in loss or destruction of your data.
Emergency Shutdown
In case your operating system cannot properly turn OFF or restart, there is a manual
way to shutdown your Laptop:
Hold the power button over 4 seconds
23
Getting Started 3
NOTE: You will be warned when battery power is low. If you continue to ignore the
low battery warnings, the Laptop eventually enters suspend mode (Windows default
uses STR).
WARNING! Suspend-to-RAM (STR) does not last long when the battery power is
depleted. Suspend-to-Disk (STD) is not the same as power OFF. STD requires a small
amount of power and will fail if no power is available due to complete battery depletion
or no power supply (e.g. removing both the power adapter and battery pack).
NOTE: Screen captures
shown here are examples
only and may not reflect
what you see in your
system.
Checking Battery Power
The battery system implements the Smart Battery standard under the Windows
environment, which allows the battery to accurately report the amount of charge
left in the battery. A fully-charged battery pack provides the Laptop a few hours of
ZRUNLQJSRZHU%XWWKHDFWXDO¿JXUHYDULHVGHSHQGLQJRQKRZ\RXXVHWKHSRZHU
saving features, your general work habits, the CPU, system memory size, and the
size of the display panel.
WARNING! Do not leave the battery pack discharged. The battery pack will discharge
over time. If not using a battery pack, it must continued to be charged every three
months to extend recovery capacity or else it may fail to charge in the future.
NOTE: The battery stops charging if the temperature is too high or the battery
voltage is too high.
Charging the Battery Pack
Before you use your Laptop on the road, you will have to charge the battery pack.
The battery pack begins to charge as soon as the Laptop is connected to external
power using the power adapter. Fully charge the battery pack before using it for
WKH ¿UVW WLPH$ QHZ EDWWHU\ SDFN PXVW FRPSOHWHO\ FKDUJH EHIRUH WKH /DSWRS LV
disconnected from external power. It takes a few hours to fully charge the battery
when the Laptop is turned OFF and may take twice the time when the Laptop is
turned ON. The battery status indicator on the Laptop turns OFF when the battery
pack is charged.
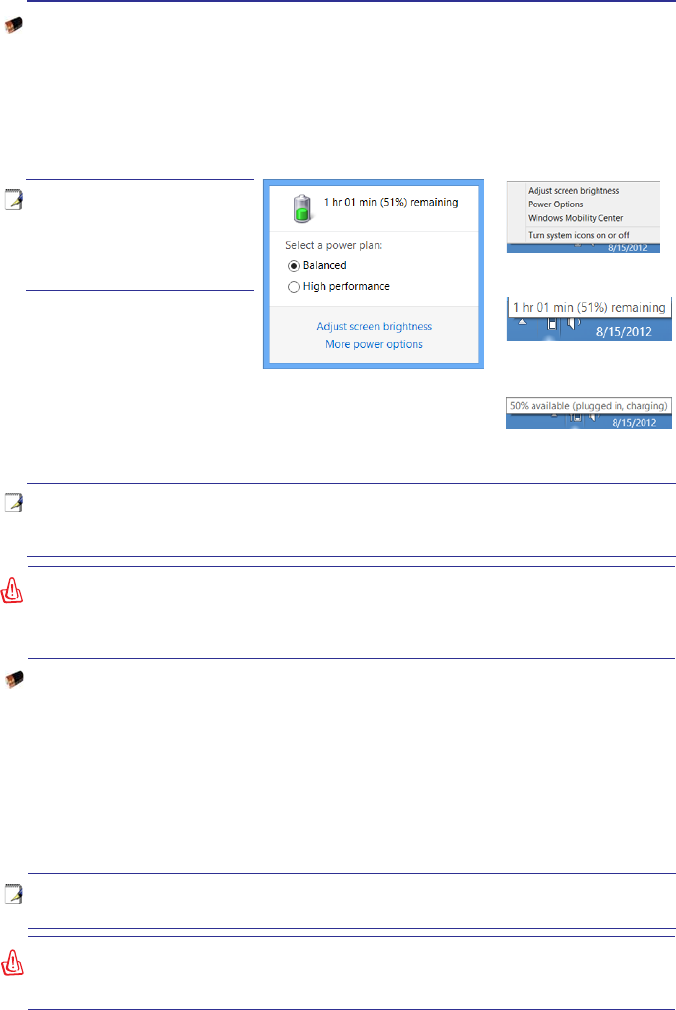
Left-click the battery icon.
Cursor over the battery icon
without power adapter.
Cursor over the battery icon
with power adapter.
Right-click the battery icon.

24
3 Getting Started
Power Management Modes
The Laptop has a number of automatic or adjustable power saving features that
you can use to maximize battery life and lower Total Cost of Ownership (TCO). You
can control some of these features through the Power menu in the BIOS Setup.
ACPI power management settings are made through the operating system. The
power management features are designed to save as much electricity as possible
by putting components into a low power consumption mode as often as possible
but also allow full operation on demand.
Thermal Power Control
There are three power control methods for controlling the Laptop’s thermal state.
7KHVHPHWKRGVFDQQRWEHFRQ¿JXUHGE\WKHXVHUDQGVKRXOGEHNQRZQLQFDVHWKH
Laptop should enter these states. The following temperatures represent the chassis
temperature (not CPU).
7KHIDQWXUQV21IRUDFWLYHFRROLQJZKHQWHPSHUDWXUHUHDFKHVWKHVDIHXSSHUOLPLW
7KH&38GHFUHDVHVVSHHGIRUSDVVLYHFRROLQJZKHQWKHWHPSHUDWXUHH[FHHGVWKH
safe upper limit.
7KHV\VWHPVKXWVGRZQIRUFULWLFDOFRROLQJZKHQWHPSHUDWXUHH[FHHGVWKHPD[LPXP
safe upper limit.
Sleep and Hibernate
Power management settings can be found in
Windows Desktop > Settings > Control Panel >
System and Security > Power Options. In System
6HWWLQJV\RXFDQGH¿QH³6OHHS+LEHUQDWH´RU³6KXW
Down” for closing the display panel or pressing
the power button. “Sleep” and “Hibernate” saves
power when your Laptop is not in use by turning
OFF certain components. When you resume your
work, your last status (such as a document scrolled
down half way or email typed half way) will reappear as if you never left. “Shut Down”
will close all applications and ask if you want to save your work if any are not saved.
Sleep is the same as Suspend-to-RAM (STR). This function stores your current
data and status in RAM while many components are turned OFF. Because RAM
is volatile, it requires power to keep (refresh) the data. Click the power icon in the
Settings menu of the Windows sidebar to see this option. You can also use the
NH\ERDUGVKRUWFXW>)Q)@WRDFWLYDWHWKLVPRGH5HFRYHUE\SUHVVLQJDQ\NH\ERDUG
NH\H[FHSW>)Q@127(7KHSRZHULQGLFDWRUZLOOEOLQNLQWKLVPRGH
Hibernate is the same as Suspend-to-Disk (STD) and stores your current data and
status on the hard disk drive. By doing this, RAM does not have to be periodically
refreshed and power consumption is greatly reduced but not completely eliminated
because certain wake-up components like LAN needs to remain powered.
“Hibernate” saves more power compared to “Sleep”. Click the power icon in the
Settings menu of the Windows sidebar to see this option. Recover by pressing the
power button. (NOTE: The power indicator will be OFF in this mode.)
25
Getting Started 3
Power Manager Utility
The Power Manager Utility provides the user with an integrated power management
tool that:
Features an integrated user interface which lets the user easily control/set a power
plan.
Provides a battery maintenance tool to extend battery life.
Provides an add-on value tool, such as the peak-shift utility, for saving electricity.
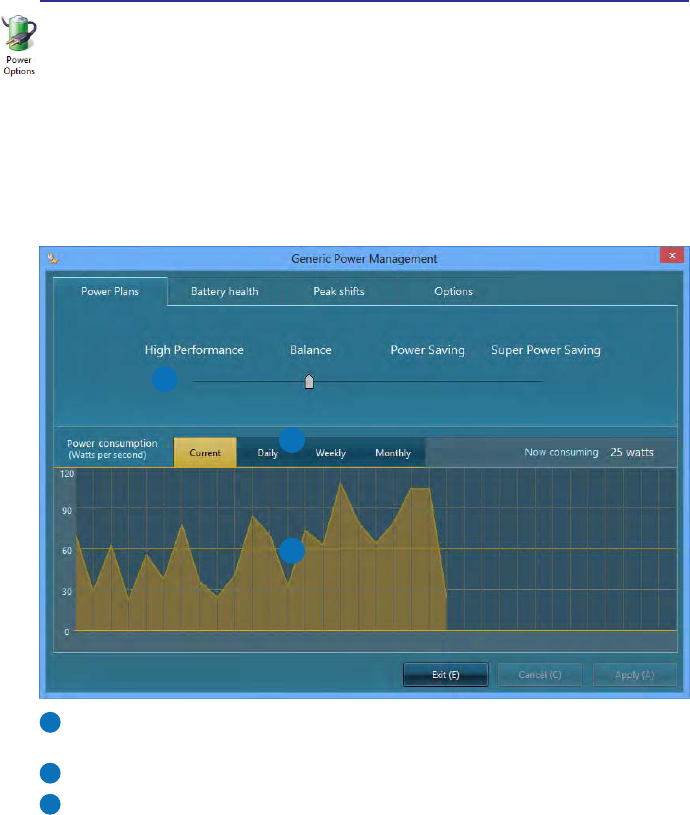
Power Plans (for monitoring power consumption)
Power Plans shows real-time power consumption for the power mode selected by
the user.
1
2
3
1&KRRVHWKHVSHFL¿FSRZHUSODQ\RXZDQWWRYLHZWKHSRZHUFRQVXPSWLRQFKDUW
for here.
2 Choose the time frame you want for the power consumption chart here.
3 The power consumption chart will be displayed in this area.
26
3 Getting Started
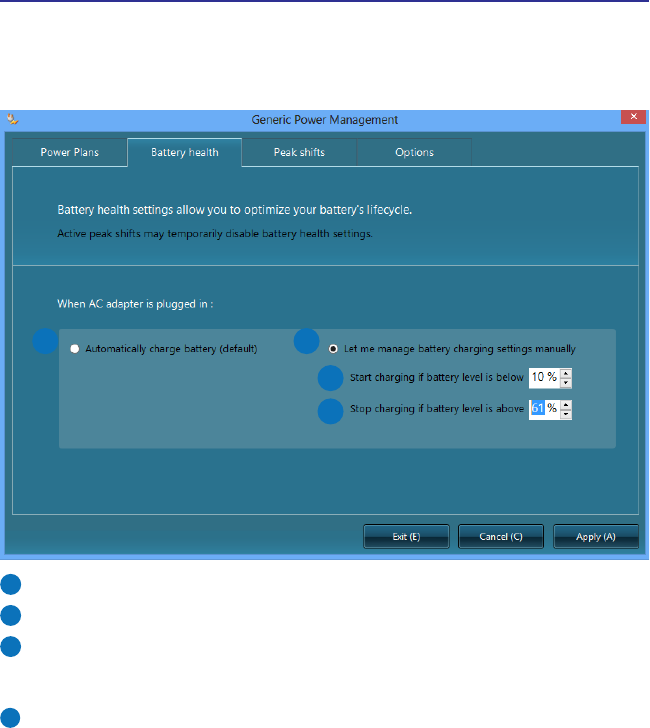
Battery Health
Battery Health provides the user with tools to extend the life of the battery by allowing
the user to select battery charging behavior when the AC adapter is plugged in. When
peak-shift is enabled by the user, this option will not function.
12
3
4
1Choose this option if you want the battery to continuously charge until full.
2Choose this option if you want to manually set battery charging behavior.
36HWWKHEDWWHU\OHYHODWZKLFKWRVWDUWFKDUJLQJKHUH7KLV¿HOGFDQQRWEHRYHU
and cannot be lower than the low battery warning level set by the operating
system.
4Set the battery level at which to stop charging here.
27
Getting Started 3
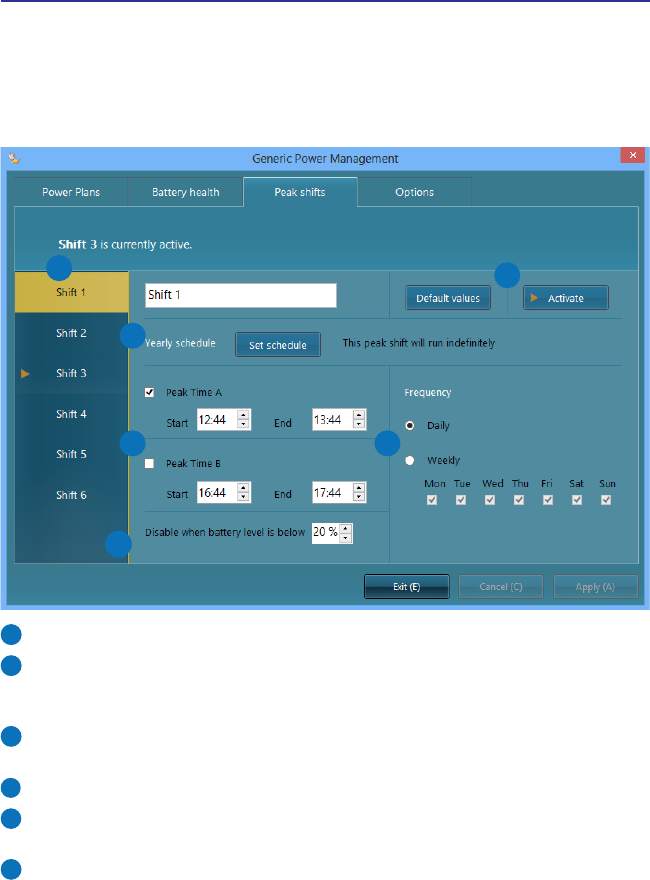
Peak Shift
3HDNVKLIWDOORZVWKHXVHUWRVHWVSHFL¿FWLPHSHULRGVLQZKLFKWKH/DSWRSZLOORQO\XVH
EDWWHU\SRZHUHYHQZKHQWKH$&DGDSWHULVSOXJJHGLQRUGHUWRVWRSWKH/DSWRSIURP
XVLQJHQHUJ\IURPWKHSRZHUVRFNHWGXULQJSHULRGVRISHDNSRZHUGHPDQG:KHQ
WKHDGDSWHULVSOXJJHGLQDQGSHDNVKLIWLVDFWLYDWHG:LQGRZVZLOOVWLOOVKRZWKDWWKH
DGDSWHULVSOXJJHGLQ
1
2
34
5
6
1&KRRVHDQLQGLYLGXDOSHDNVKLIW\RXZDQWWRDFWLYDWHRUHGLW
2&KRRVHWKLVRSWLRQLI\RXZDQWWKHVHOHFWHGSHDNVKLIWWRRQO\EHDFWLYDWHGIRUD
VSHFL¿FWLPHVSDQ$PHQXWRVHOHFWVWDUWDQGHQGGDWHVZLOORSHQLIWKLVRSWLRQLV
FKRVHQ
3&KRRVHWKHVWDUWDQGHQGWLPHIRUWKHVHOHFWHGSHDNVKLIW\RXPD\FKRRVHXSWR
WZRGLIIHUHQWWLPHSHULRGVIRUHDFKLQGLYLGXDOSHDNVKLIW
4&KRRVHKRZIUHTXHQWO\WKHVHOHFWHGSHDNVKLIWZLOORFFXU
5&KRRVHWKHPLQLPXPEDWWHU\OHYHODWZKLFKWKHEDWWHU\ZLOOVWDUWFKDUJLQJGXULQJ
WKHSHDNVKLIW
6&KRRVHZKHWKHUWRDFWLYDWHRUUHVHWWKHVHOHFWHGSHDNVKLIW
28
3 Getting Started
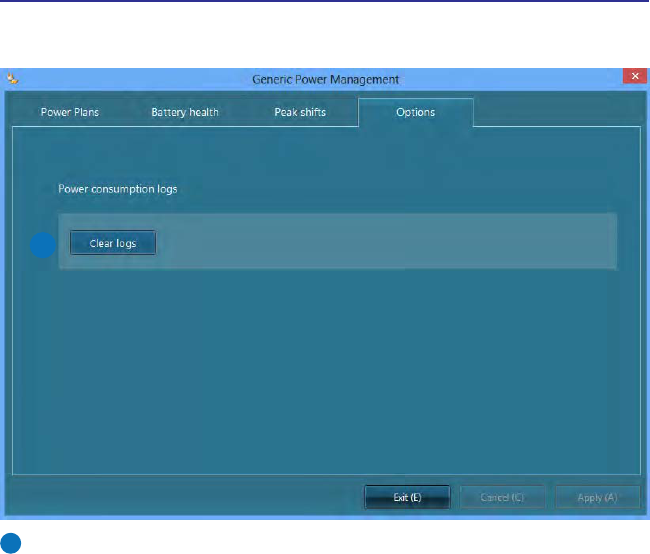
Options
Options allows the user additional functions:
1
1You can clear your power consumption logs here.
29
Getting Started 3
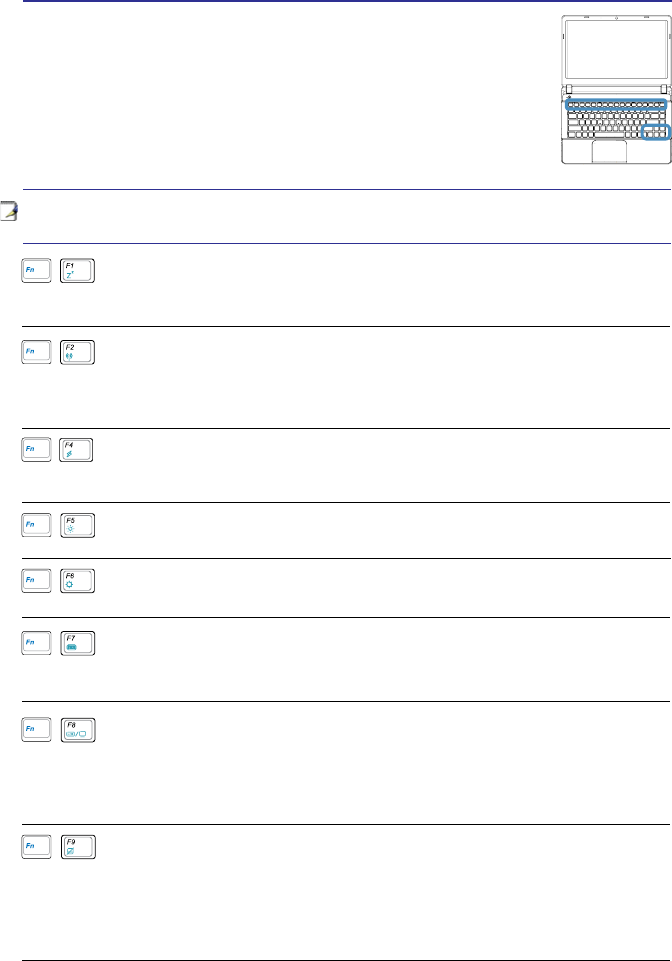
Special Keyboard Functions
Colored Hot Keys
7KHIROORZLQJGH¿QHVWKHFRORUHGKRWNH\VRQWKH/DSWRS¶VNH\ERDUG
7KH FRORUHG FRPPDQGV FDQ RQO\ EH DFFHVVHG E\ ¿UVW SUHVVLQJ
and holding the function key while pressing a key with a colored
command.
NOTE: The Hot Key locations on the function keys may vary depending on model
but the functions should remain the same.
“Zz” Icon (F1): Places the Laptop in suspend mode (either Save-to-RAM
or Save-to-Disk depending on sleep button setting in power management
setup).
Dim Sun Icon (F5):
Decreases the display brightness
Bright Sun Icon (F6):
Increases the display brightness
LCD Icon (F7): Toggles the display panel ON and OFF. (On certain
PRGHOVVWUHWFKHVWKHVFUHHQDUHDWR¿OOWKHHQWLUHGLVSOD\ZKHQXVLQJ
low resolution modes.)
LCD/Monitor Icons (F8): Toggles between the Laptop’s LCD display and
an external monitor in this series: Laptop LCD -> External Monitor -> Both.
(This function does not work in 256 Colors, select High Color in Display
Property Settings.) NOTE: Must connect an external monitor “before”
booting up.
Radio Tower Icon (F2): Toggles the internal wireless LAN & Bluetooth
ON or OFF. When enabled, the corresponding wireless indicator will
light. Windows software settings are necessary to use the wireless LAN
or Bluetooth.
Crossed-out Touchpad (F9): Toggles the built-in touchpad LOCKED
(disabled) and UNLOCKED (enabled). Locking the touchpad will
prevent you from accidentally moving the cursor while typing and
is best used with an external pointing device such as a mouse.
NOTE: Double-tapping the icon on the touchpad also enables or
disables the touchpad lock.
(continued on the next page)
Lightning Icon (F4): Toggles the Laptop between various power
management modes. The power management modes control many
aspects of the device to maximize performance versus battery time.

30
3 Getting Started
Colored Hot Keys (cont.)
Speaker Up Icon (F12):
Increases the speaker volume (only in Windows OS)
Speaker Down Icon (F11):
Decreases the speaker volume (only in Windows OS)
Speaker Icons (F10):
Toggles the speakers ON and OFF (only in Windows OS)
6WRS,FRQĹ
Stops a media player during playback.
3OD\3DXVH,FRQĻ
Plays or pauses media in the media player.
3UHYLRXV,FRQĸ
Moves the media to the previous section/track during playback.
1H[W,FRQĺ
Moves the media to the next section/track during playback.
Scr Lk (Del): Toggles the “Scroll Lock” ON and OFF. Allows you to
use a larger portion of the keyboard for cell navigation.
Num Lk (Ins): Toggles the numeric keypad (number lock) ON and
OFF. Allows you to use a larger portion of the keyboard for number
entering.
Microsoft Windows Keys
There are two special Windows keys on the keyboard as described below.
The key with the Windows Logo toggles between the Windows Start screen
and the most recently opened window.
The other key, that looks like a Windows menu, activates the properties menu
and is equivalent to pressing the right mouse button on a Windows object.
31
Getting Started 3
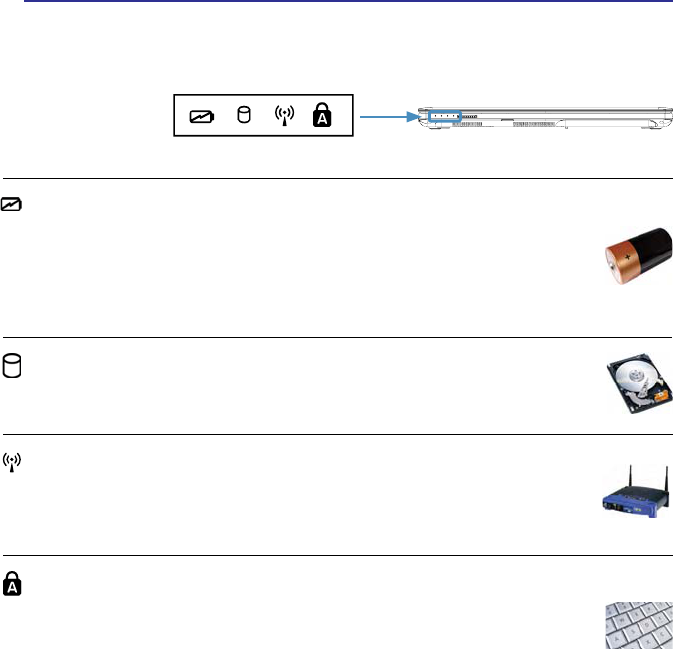
Battery Charge Indicator
The battery charge indicator shows the status of the battery’s power as follows:
ON: The Laptop’s battery is charging when AC power is connected.
OFF: The Laptop’s battery is charged or completely drained.
%OLQNLQJ %DWWHU\ SRZHU LV OHVV WKDQ DQG WKH$& SRZHU LV QRW
connected.
Drive Activity Indicator
Indicates that the Laptop is accessing one or more storage device(s) such
DVWKHKDUGGLVN7KHOLJKWÀDVKHVSURSRUWLRQDOWRWKHDFFHVVWLPH
Status Indicators
Capital Lock Indicator
,QGLFDWHVWKDWFDSLWDOORFN>&DSV/RFN@LVDFWLYDWHGZKHQOLJKWHG&DSLWDO
lock allows some of the keyboard letters to type using capitalized letters
(e.g. A, B, C). When the capital lock light is OFF, the typed letters will be
in the lower case form (e.g. a,b,c).
Wireless Indicator
This is only applicable on models with built-in wireless LAN. When the
built-in wireless LAN is enabled, this indicator will light. (Windows software
settings are necessary.)

32
Notes

33
NOTE: Photos and icons in this document are used for artistic purposes only and do
not show what is actually used in the product itself.
4. Using the Laptop
Pointing Device
Storage Devices
Connections
34
4 Using the Laptop
IMPORTANT! Do not use any objects
LQSODFH RI \RXU ¿QJHU WR RSHUDWH WKH
touchpad or else damage may occur
to the touchpad’s surface.
Pointing Device
Using the Touchpad
/LJKWSUHVVXUHZLWKWKHWLSRI\RXU¿QJHULV
all that is required to operate the touchpad.
Because the touchpad is electrostatic
sensitive, objects cannot be used in
SODFH RI \RXU ¿QJHUV 7KH WRXFKSDG¶V
primary function is to move the cursor
around or select items displayed on
WKHVFUHHQZLWKWKHXVHRI\RXU¿QJHUWLS
instead of a standard desktop mouse.
The following illustrations demonstrate
proper use of the touchpad.
Moving The Cursor
3ODFH \RXU ¿QJHU LQ WKH FHQWHU RI WKH
touchpad and slide in a direction to move
the cursor.
Cursor
Movement
Right Click
Left Click
35
Using the Laptop 4
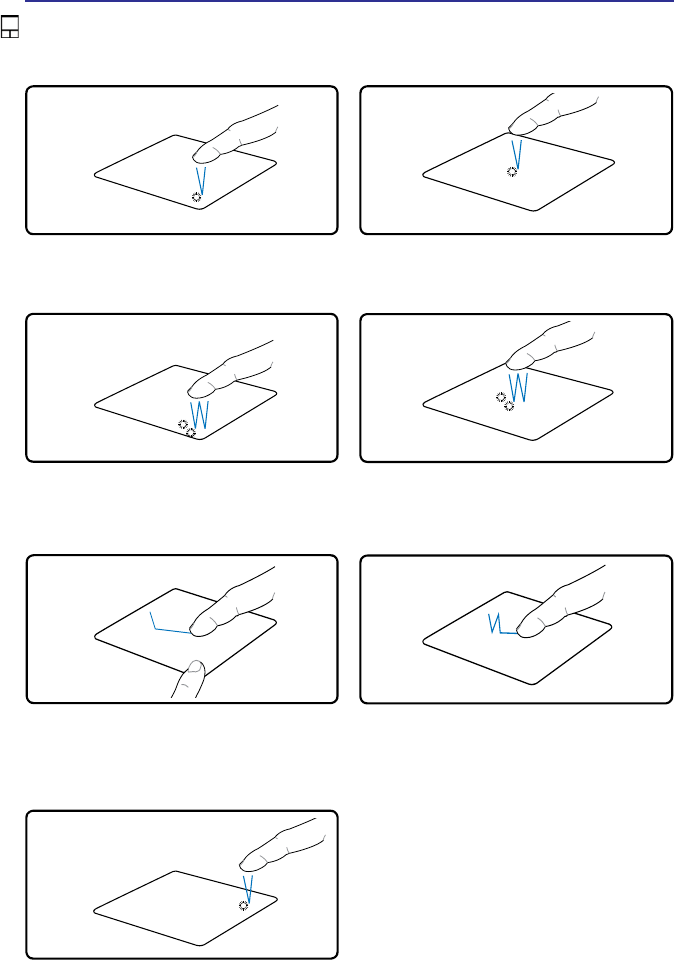
Touchpad Usage Illustrations
Press the left button twice and release.
Press the right cursor button and
release.
Lightly but rapidly strike the touchpad
twice.
Press the left cursor button and release. Lightly but rapidly strike the touchpad.
Clicking Function
Double-Clicking Function
Right-Clicking Function
+ROGOHIWEXWWRQDQGVOLGH¿QJHURQ
touchpad.
Lightly strike the touchpad twice, sliding
¿QJHURQWRXFKSDGGXULQJVHFRQGVWULNH
Dragging-Clicking Function
36
4 Using the Laptop
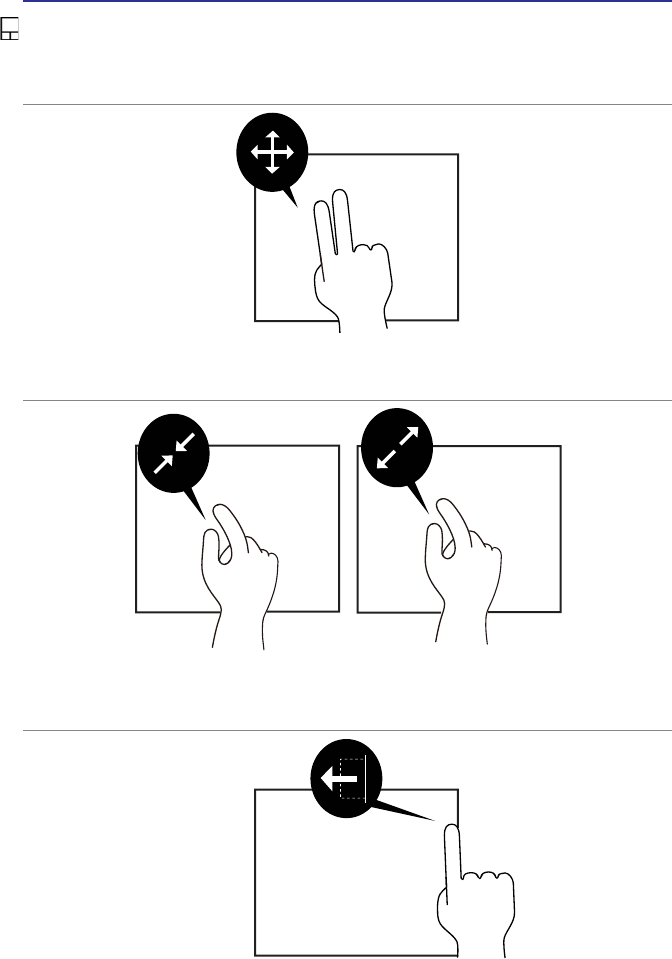
Multi-touch gesture usage
Multi-touch recognizes multiple simultaneous touch points to allow advanced software
DFWLRQVXVLQJ\RXU¿QJHUV*HVWXUHDYDLODELOLW\GHSHQGVRQ/DSWRSPRGHO
Two Finger Scrolling
6OLGHWZR¿QJHUVXSGRZQOHIWULJKWWRVFUROOZLWKLQDQDSSOLFDWLRQZLQGRZ
Two Fingers Pinch Zoom
6OLGH WZR ¿QJHUV RXWZDUGV WR ]RRP LQ 6OLGH WZR ¿QJHUV LQZDUGV WR ]RRP RXW
Convenient for viewing photos.
Edge Swipe (Right)
Slide inwards from the right edge to open the sidebar.
37
Using the Laptop 4
Multi-touch gesture usage (cont.)
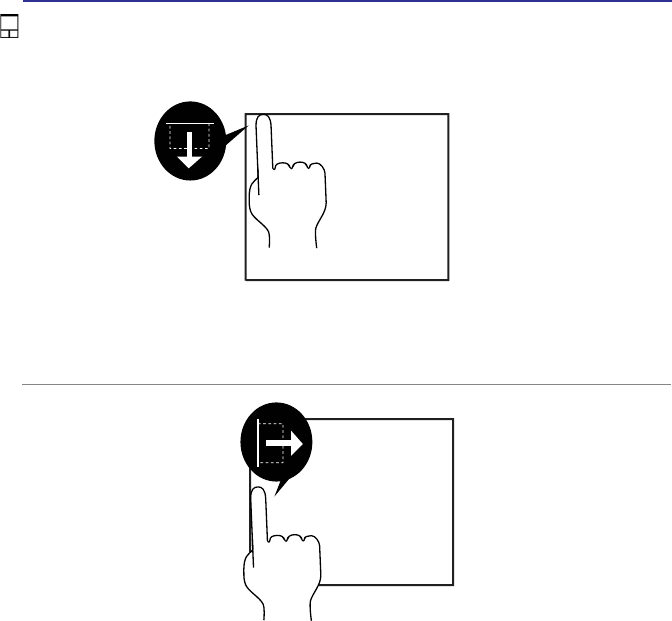
Edge Swipe (Top)
Slide inwards from the top edge to open the Applications bar.
Edge Swipe (Left)
Slide inwards from the left edge to switch to the last opened application.

38
4 Using the Laptop
NOTE: The touchpad responds to movement not to force. There is no need to tap
the surface too hard. Tapping too hard does not increase the responsiveness of the
touchpad. The touchpad responds best to light pressure.
Caring for the Touchpad
The touchpad is pressure sensitive. If not properly cared for, it can be easily
damaged. Take note of the following precautions.
0DNHVXUHWKHWRXFKSDGGRHVQRWFRPHLQWRFRQWDFWZLWKGLUWOLTXLGVRUJUHDVH
'RQRWWRXFKWKHWRXFKSDGLI\RXU¿QJHUVDUHGLUW\RUZHW
'RQRWUHVWKHDY\REMHFWVRQWKHWRXFKSDGRUWKHWRXFKSDGEXWWRQV
'RQRWVFUDWFKWKHWRXFKSDGZLWK\RXU¿QJHUQDLOVRUDQ\KDUGREMHFWV
39
Using the Laptop 4
Storage Devices
Storage devices allow the Laptop to read or write documents, pictures, and other
¿OHVWRYDULRXVGDWDVWRUDJHGHYLFHV7KLV/DSWRSKDVWKHIROORZLQJVWRUDJHGHYLFHV
2SWLFDO'LVF'ULYH
)ODVK0HPRU\&DUG5HDGHU
Optical Drive
Using the Optical Drive
Optical discs and equipment must be handled with care because of the precise
mechanics involved. Keep in mind the important safety instructions from your disc
suppliers. Unlike desktop optical drives, the Laptop uses a hub to hold the disc in place
regardless of the angle. When inserting a disc, it is important that the disc be pressed
onto the center hub or else the optical drive tray will scratch the disc.
WARNING! If the disc is not properly locked onto the center hub, the disc can be
damaged when the tray is closed. Always watch the disc closely while closing the
tray slowly to prevent damage. DO NOT exert pressure on ODD tray.
An optical drive letter should be present regardless of the presence of a disc in the
drive. After the disc is properly inserted, data can be accessed just like with hard disk
drives; except that nothing can be written to or changed on the disc. Using the proper
software, a CD-RW drive or DVD+CD-RW drive can allow CD-RW discs to be used
like a hard drive with writing, deleting, and editing capabilities.
Vibration is normal for high-speed optical drives due to unbalanced discs or prints.
To decrease vibration, use the Laptop on an even surface and do not place labels
on the disc.
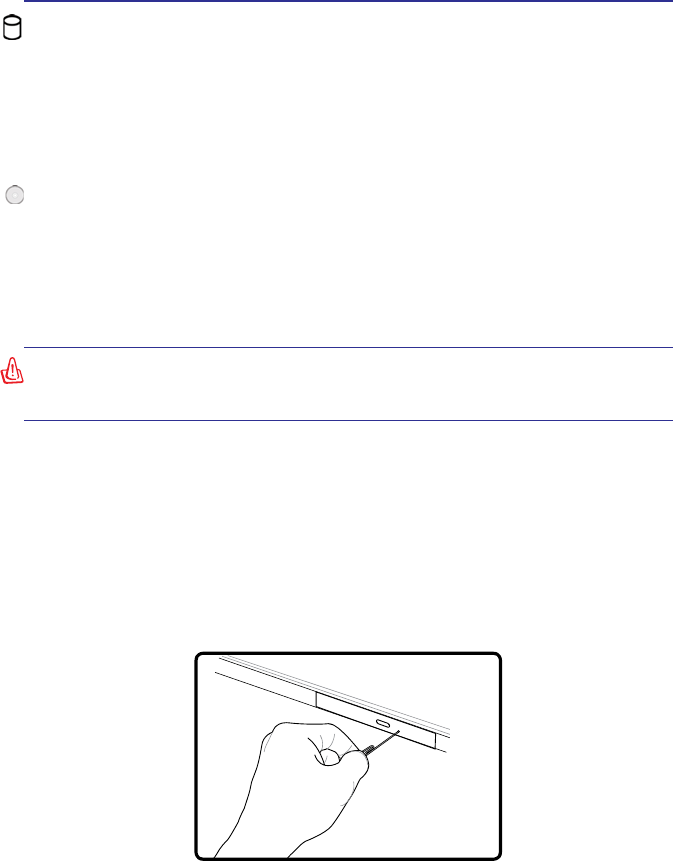
Emergency eject
The emergency eject is located in a hole on the optical drive and is used to eject the
optical drive tray in case the electronic eject does not work. Do not use the emergency
eject in place of the electronic eject. Note: Make sure not to stab the activity indicator
located in the same area.
Actual location will
vary by model.
40
4 Using the Laptop
IMPORTANT! Never remove cards while or immediately after reading, copying,
formatting, or deleting data on the card or else data loss may occur.
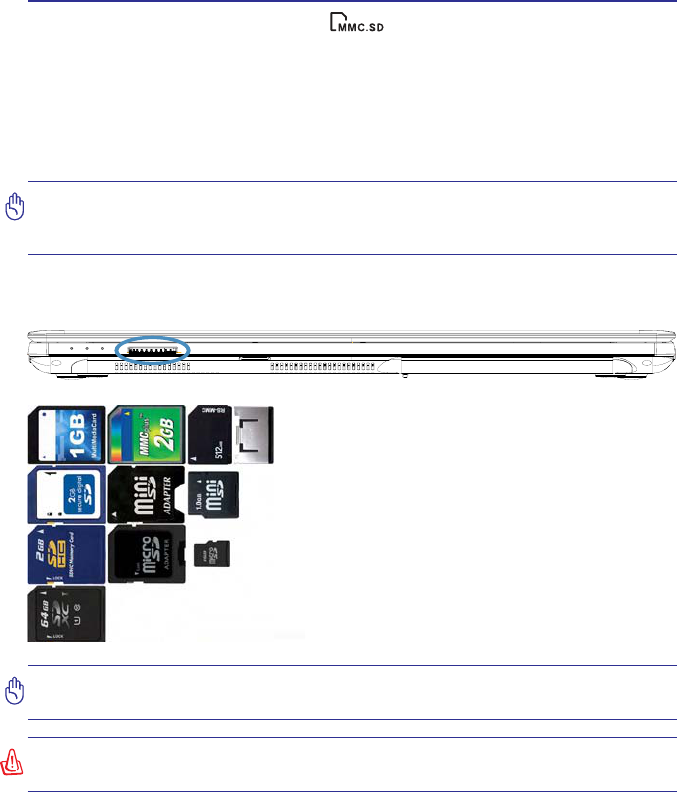
Flash Memory Card Reader
Normally a memory card reader must be purchased separately in order to use
memory cards from devices such as digital cameras, MP3 players, mobile phones,
DQG3'$V7KLV/DSWRSKDVDEXLOWLQPHPRU\FDUGUHDGHUWKDWFDQXVHPDQ\ÀDVK
memory cards as shown in the example below. The built-in memory card reader is
not only convenient, but also faster than most other forms of memory card readers
because it utilizes the internal high-bandwidth PCI bus.
IMPORTANT! Flash memory card compatibility varies depending on Laptop model
DQGÀDVKPHPRU\FDUGVSHFL¿FDWLRQV)ODVKPHPRU\FDUGVSHFL¿FDWLRQVFRQVWDQWO\
change so compatibility may change without warning.
Flash Memory Card Examples
WARNING! To prevent data loss, use “Windows Safely Remove Hardware” on the
WDVNEDUEHIRUHUHPRYLQJWKHÀDVKPHPRU\FDUG
SD (Secure Digital)
miniSD (with SD adapter)
SDHC (Secure Digital High Capacity)
microSD (with SD adapter)
MMC (Multimedia Card)
MMC Plus
RS-MMC (Reduced Size) (with MMC adapter)
SDXC (Secure Digital eXtended Capacity)
41
Using the Laptop 4
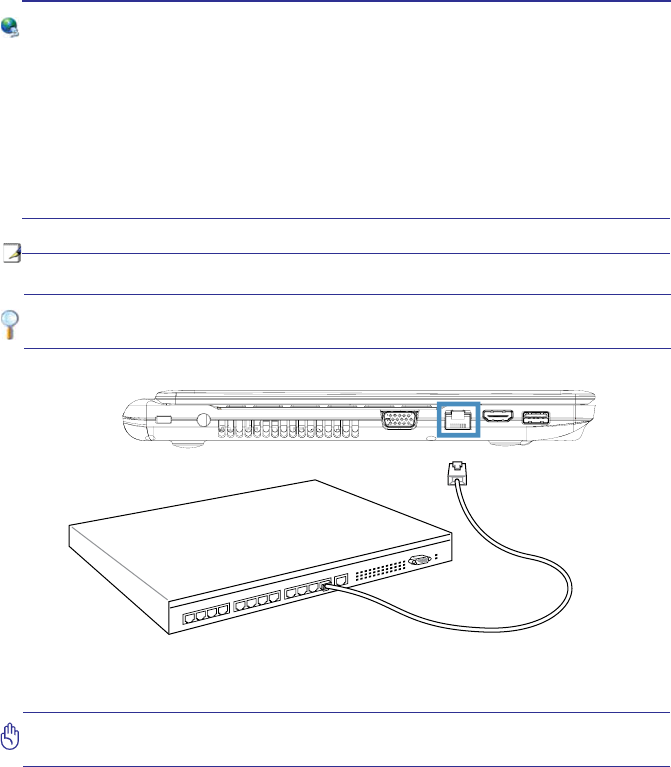
Example of the Laptop connected to a Network Hub or Switch for use with the built-
in Ethernet controller.
Network Connection
Connect a network cable, with RJ-45 connectors on each end, to the modem/network
port on the Laptop and the other end to a hub or switch. For 100 BASE-TX / 1000
BASE-T speeds, your network cable must be category 5 or better (not category 3) with
twisted-pair wiring. If you plan on running the interface at 100/1000Mbps, it must be
connected to a 100 BASE-TX / 1000 BASE-T hub (not a BASE-T4 hub). For 10Base-T,
use category 3, 4, or 5 twisted-pair wiring. 10/100 Mbps Full-Duplex is supported on
this Laptop but requires connection to a network switching hub with “duplex” enabled.
The software default is to use the fastest setting so no user-intervention is required.
1000BASE-T (or Gigabit) is only supported on selected models.
Network Hub or Switch
Network cable with RJ-45 connectors
&$87,217RUHGXFHWKHULVNRIHOHFWULFVKRFN¿UHRUGDPDJHWRWKHHTXLSPHQW'2
NOT plug a modem cable or telephone cable into the RJ-45 (network) jack.
42
4 Using the Laptop
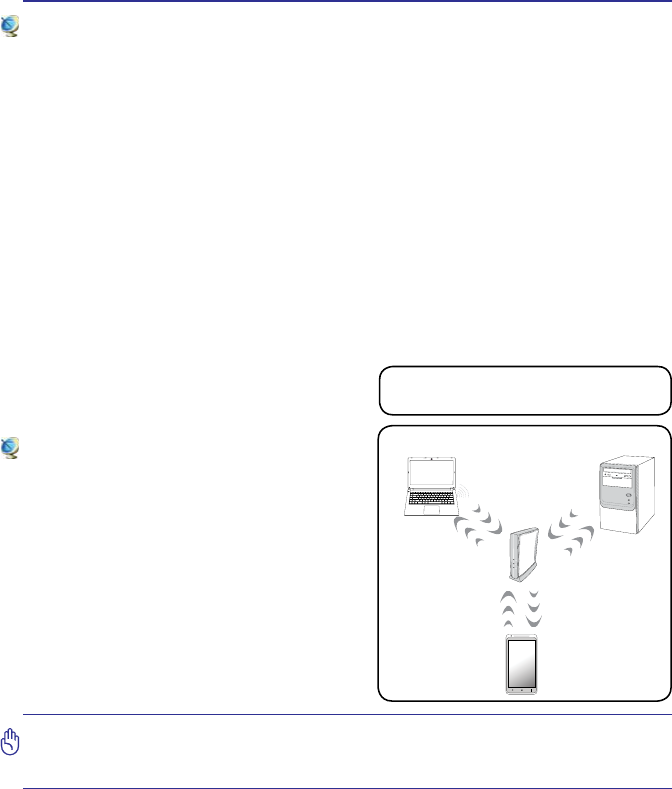
This is an example of the Laptop connected to a
Wireless Network.
Wireless LAN Connection
The optional built-in wireless LAN is a compact easy-to-use wireless Ethernet
adapter. Implementing the IEEE 802.11 standard for wireless LAN (WLAN), the
optional built-in wireless LAN is capable of fast data transmission rates using
Direct Sequence Spread Spectrum (DSSS) and Orthogonal Frequency Division
Multiplexing (OFDM) technologies on 2.4GHz/5GHz frequencies. The optional
built-in wireless LAN is backward compatible with the earlier IEEE 802.11 standards
allowing seamless interfacing of wireless LAN standards.
The optional built-in wireless LAN is a client adapter that supports an Infrastructure
PRGHJLYLQJ\RXÀH[LELOLW\RQ\RXUH[LVWLQJRUIXWXUHZLUHOHVVQHWZRUNFRQ¿JXUDWLRQV
for distances up to 40 meters between the client and the access point.
7RSURYLGHHI¿FLHQWVHFXULW\WR\RXUZLUHOHVVFRPPXQLFDWLRQWKHRSWLRQDOEXLOWLQ
wireless LAN comes with a 64-bit/128-bit Wired Equivalent Privacy (WEP) encryption
and Wi-Fi Protected Access (WPA) features.
Infrastructure mode
The Infrastructure mode allows the Laptop
and other wireless devices to join a wireless
network created by an Access Point (AP)
(sold separately) that provides a central
link for wireless clients to communicate with
each other or with a wired network.
(All devices must install optional 802.11 wireless LAN
adapters.)
CAUTION: DO NOT use wireless LAN on hospital premises or near a pacemaker,
doing so may cause medical devices to malfunction. DO NOT use wireless LAN on
an aircraft, as doing so may cause the aircraft’s equipment to malfunction.
Access
Point
Desktop PC
Mobile Device
Laptop
43
Using the Laptop 4
(continued on the next page)
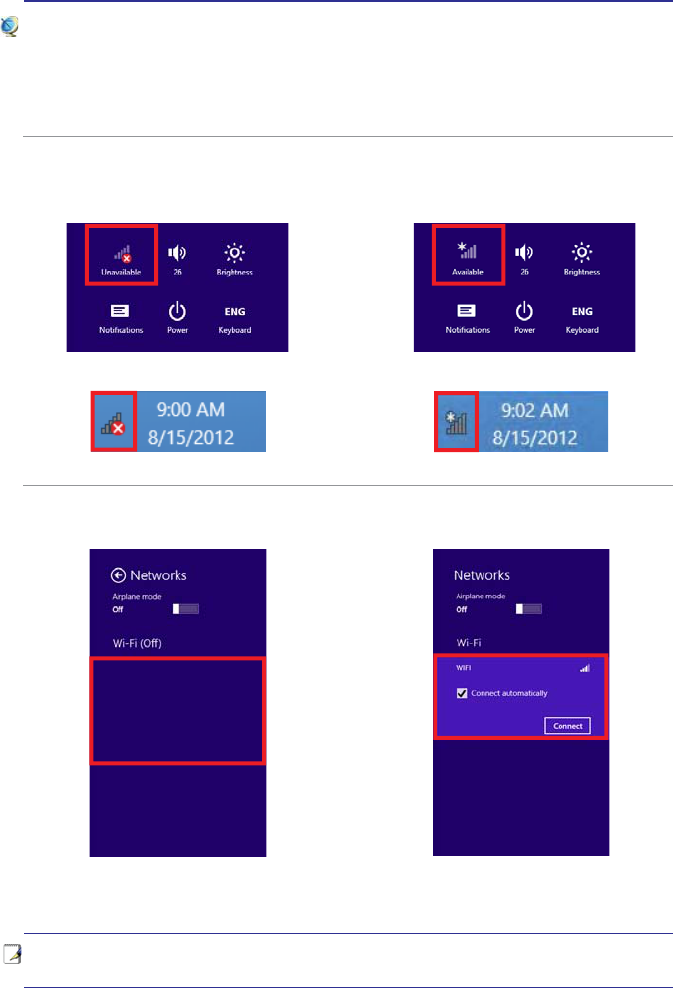
Windows Wireless Network Connection
Connecting to a network
1. Switch ON the Wireless function if necessary for your model (see switches and/or
special keyboard functions in Section 3).
2. A network icon will appear in the Sidebar or Taskbar depending on your network
status:
3. Clicking on the network icon will open the network connection panel:
No connection (Wireless function OFF)
If the wireless function on your device has
not been switched on you will see no open
connections available. Make sure the wireless
function is switched on and try again.
Not connected (Connections available)
Click on a connection to
connect
127(6FUHHQ FDSWXUHV VKRZQKHUHDUHH[DPSOHVRQO\ DQG PD\QRWUHÀHFWZKDW
you see in your system.
No connection (Wireless function OFF) Not connected (Connections available)
Sidebar Sidebar
Taskbar Taskbar
44
4 Using the Laptop
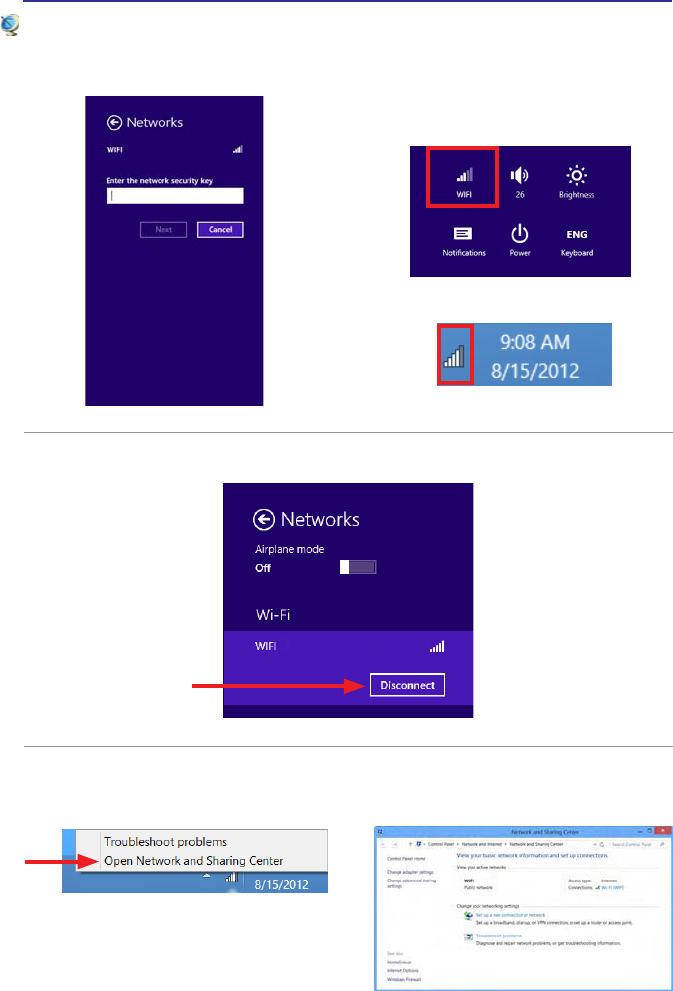
4. When connecting, you may have to
enter a password:
Connected
5. When you have successfully connected
you will see the following icon in the
Sidebar or Taskbar:
7. For more options, right-click on the network icon in the taskbar and select the option
as shown:
Windows Wireless Network Connection (cont.)
6. To disconnect, click on the network icon and select the option as shown:
Taskbar
Sidebar

45
NOTE: Photos and icons in this document are used for artistic purposes only and do
not show what is actually used in the product itself.
A. Appendix
Declaration and Safety Statements
Federal Communications Commission Statement

46
A Appendix
FCC Radio Frequency Interference Requirements
This device is restricted to INDOOR USE due to its operation in the 2.4 GHz
frequency range. FCC requires this product to be used indoors to reduce the potential
for harmful interference to co-channel of the Mobile Satellite Systems.
IMPORTANT: This device and its antenna(s) must not be co-located or operating in
conjunction with any other antenna or transmitter.
Declarations and Safety Statements
Federal Communications Commission Statement
This device complies with FCC Rules Part 15. Operation is subject to the following
two conditions:
7KLVGHYLFHPD\QRWFDXVHKDUPIXOLQWHUIHUHQFHDQG
7KLVGHYLFHPXVWDFFHSWDQ\LQWHUIHUHQFHUHFHLYHGLQFOXGLQJLQWHUIHUHQFHWKDW
may cause undesired operation.
&KDQJHV RU PRGL¿FDWLRQV QRW H[SUHVVO\ DSSURYHG E\ WKH SDUW\ UHVSRQVLEOH IRU
compliance could void the user’s authority to operate the equipment.
This equipment has been tested and found to comply with the limits for a class B
digital device, pursuant to Part 15 of the Federal Communications Commission (FCC)
rules. These limits are designed to provide reasonable protection against harmful
interference in a residential installation. This equipment generates, uses, and can
radiate radio frequency energy and, if not installed and used in accordance with the
instructions, may cause harmful interference to radio communications. However,
there is no guarantee that interference will not occur in a particular installation. If this
equipment does cause harmful interference to radio or television reception, which can
be determined by turning the equipment off and on, the user is encouraged to try to
correct the interference by one or more of the following measures:
5HRULHQWRUUHORFDWHWKHUHFHLYLQJDQWHQQD
,QFUHDVHWKHVHSDUDWLRQEHWZHHQWKHHTXLSPHQWDQGUHFHLYHU
&RQQHFWWKHHTXLSPHQWLQWRDQRXWOHWRQDFLUFXLWGLIIHUHQWIURPWKDWWRZKLFK
the receiver is connected.
&RQVXOWWKHGHDOHURUDQH[SHULHQFHGUDGLR79WHFKQLFLDQIRUKHOS
WARNING! The use of a shielded-type power cord is required in order to meet
FCC emission limits and to prevent interference to the nearby radio and television
reception. It is essential that only the supplied power cord be used. Use only shielded
cables to connect I/O devices to this equipment. You are cautioned that changes or
PRGL¿FDWLRQVQRWH[SUHVVO\DSSURYHGE\WKHSDUW\UHVSRQVLEOHIRUFRPSOLDQFHFRXOG
void your authority to operate the equipment.
(Reprinted from the Code of Federal Regulations #47, part 15.193, 1993. Washington
'&2I¿FHRIWKH)HGHUDO5HJLVWHU1DWLRQDO$UFKLYHVDQG5HFRUGV$GPLQLVWUDWLRQ86
*RYHUQPHQW3ULQWLQJ2I¿FH

47
Appendix A
R&TTE Directive (1999/5/EC)
7KHIROORZLQJLWHPVZHUHFRPSOHWHGDQGDUHFRQVLGHUHGUHOHYDQWDQGVXI¿FLHQWIRU
the R&TTE (Radio & Telecommunications Terminal Equipment) directive:
(VVHQWLDOUHTXLUHPHQWVDVLQ>$UWLFOH@
3URWHFWLRQUHTXLUHPHQWVIRUKHDOWKDQGVDIHW\DVLQ>$UWLFOHD@
7HVWLQJIRUHOHFWULFVDIHW\DFFRUGLQJWR>(1@
3URWHFWLRQUHTXLUHPHQWVIRUHOHFWURPDJQHWLFFRPSDWLELOLW\LQ>$UWLFOHE@
7HVWLQJIRUHOHFWURPDJQHWLFFRPSDWLELOLW\LQ>(1@>(1@
7HVWLQJDFFRUGLQJWR>@
(IIHFWLYHXVHRIWKHUDGLRVSHFWUXPDVLQ>$UWLFOH@
5DGLRWHVWVXLWHVDFFRUGLQJWR>(1@
FCC Radio Frequency (RF) Exposure Caution Statement
This equipment complies with FCC RF exposure limits set forth for an uncontrolled
environment. To maintain compliance with FCC RF exposure compliance
requirements, please follow operation instructions in the user guide. This equipment
is for operation within the 2.4 GHz frequency range and is restricted to indoor
environments only.
)&&&DXWLRQ$Q\FKDQJHVRUPRGL¿FDWLRQVQRWH[SUHVVO\DSSURYHGE\WKHSDUW\
responsible for compliance could void the user’s authority to operate this equipment.
“The manufacturer declares that this device is limited to Channels 1 through 11 in
WKH*+]IUHTXHQF\E\VSHFL¿HG¿UPZDUHFRQWUROOHGLQWKH86$´
FCC RF Exposure Guidelines (Wireless Clients)
This device has been tested for compliance with FCC RF Exposure (SAR) limits in
W\SLFDOSRUWDEOHFRQ¿JXUDWLRQV,QRUGHUWRFRPSO\ZLWK6$5OLPLWVHVWDEOLVKHGLQWKH
ANSI C95.1 standards, it is recommended when using a wireless LAN adapter that
WKHLQWHJUDWHGDQWHQQDLVSRVLWLRQHGPRUHWKDQ>FP@IURP\RXUERG\RUQHDUE\
persons during extended periods of operation. If the antenna is positioned less
WKDQ>FP@IURPWKHXVHULWLVUHFRPPHQGHGWKDWWKHXVHUOLPLWWKHH[SRVXUHWLPH
CE Mark Warning
This is a Class B product, in a domestic environment, this product may cause radio
interference, in which case the user may be required to take adequate measures.

48
A Appendix
Service warning label
WARNING: Making adjustments or performing procedures other than those
VSHFL¿HGLQWKHXVHUJXLGHPD\UHVXOWLQKD]DUGRXVODVHUH[SRVXUH'RQRWDWWHPSW
to disassemble the optical drive. For your safety, have the optical drive serviced
only by an authorized service provider.
CAUTION: INVISIBLE LASER RADIATION WHEN OPEN. DO NOT STARE INTO BEAM
OR VIEW DIRECTLY WITH OPTICAL INSTRUMENTS.
Optical Drive Safety Information
Laser Safety Information
Internal or external optical drives sold with this Laptop contains a CLASS 1 LASER
352'8&7/DVHUFODVVL¿FDWLRQVFDQEHIRXQGLQWKHJORVVDU\DWWKHHQGRIWKLV
user guide.
+'0,WKH+'0,ORJRDQG+LJK'H¿QLWLRQ0XOWLPHGLD,QWHUIDFH
are trademarks or registered trademarks of HDMI Licensing, LLC.

49
Appendix A
5HJLRQ'H¿QLWLRQV
Region 1
Canada, US, US Territories
Region 2
Czech, Egypt, Finland, France, Germany, Gulf States, Hungary, Iceland, Iran,
Iraq, Ireland, Italy, Japan, Netherlands, Norway, Poland, Portugal, Saudi Arabia,
Scotland, South Africa, Spain, Sweden, Switzerland, Syria, Turkey, UK, Greece,
Former Yugoslav Republics, Slovakia
Region 3
Burma, Indonesia, South Korea, Malaysia, Philippines, Singapore, Taiwan, Thailand,
Vietnam
Region 4
$XVWUDOLD&DULEEHDQ([FHSW867HUULWRULHV&HQWUDO$PHULFD1HZ=HDODQG3DFL¿F
Islands, South America
Region 5
CIS, India, Pakistan, Rest of Africa, Russia, North Korea
Region 6
China
127(7KHUHJLRQVHWWLQJPD\EHFKDQJHGXSWR¿YHWLPHVXVLQJWKHYLHZHUVRIWZDUH
then it can only play DVD movies for the last region setting. Changing the region
code after that will require factory resetting which is not covered by warranty. If
resetting is desired, shipping and resetting costs will be at the expense of the user.
DVD-ROM Drive Information
The Laptop comes with an optional DVD-ROM drive or a CD-ROM drive. In order
to view DVD titles, you must install your own DVD viewer software. Optional DVD
viewer software may be purchased with this Laptop. The DVD-ROM drive allows
the use of both CD and DVD discs.
Regional Playback Information
Playback of DVD movie titles involves decoding MPEG2 video, digital AC3 audio
and decryption of CSS protected content. CSS (sometimes called copy guard) is
the name given to the content protection scheme adopted by the motion picture
industry to satisfy a need to protect against unlawful content duplication.
Although the design rules imposed on CSS licensors are many, one rule that is
most relevant is playback restrictions on regionalized content. In order to facilitate
JHRJUDSKLFDOO\VWDJJHUHGPRYLHUHOHDVHV'9'YLGHRWLWOHVDUHUHOHDVHGIRUVSHFL¿F
JHRJUDSKLFUHJLRQVDVGH¿QHGLQ³5HJLRQ'H¿QLWLRQV´EHORZ&RS\ULJKWODZVUHTXLUHWKDW
all DVD movies be limited to a particular region (usually coded to the region at which it
is sold). While DVD movie content may be released for multiple regions, CSS design
rules require that any system capable of playing CSS encrypted content must only be
capable of playing one region.