Haier Telecom 1101HW-A57W Quad-Band GSM/GPRS/EDGE and WCDMA Mobile Phone User Manual
Haier Telecom (Qingdao) Co., Ltd. Quad-Band GSM/GPRS/EDGE and WCDMA Mobile Phone
User Manual

WCDMA Digital Mobile Phone
Single SIM
User Manual
Before use Please read the manual

2
WELCOME:
Thank you for choosing the WCDMA digital mobile phone. After reading this
guide, you will be able to fully master the usage of your mobile phone and
appreciate all its thorough functions and simple operation approaches.
DECLARATION:
This manual as a product use instruction does not represent the explanation for
the produt’s softare ad hardware, the features possibly varies by region.
This dual SIM dual stanby mobile is compatible with GSM/GPRS/EDGE/WCDMA
technology. Some functions referred in this guide also need the support from a
network operator or a service provider.
In order to ensure use in safety, please read the “afety Notie in advance.
Regarding all the functions marked (*)the manufacturer reserves the right to
final interpretation.

III
ICONs:
INDICATES caution information.
INDICATES SPECIAL EXPLANATION OR TIP
INDICATES warning for special attention.
IV
Contents
1. GETTING TO KNOW YOUR PHONE ·············································· 10
STATUS BAR ···································································· 12
2. GETTING STARTED ································································ 14
INSTALL THE USIM/SIM CARD AND BATTERY ··································· 14
INSERT THE MEMORY CARD····················································· 17
CHARGE THE BATTERY ·························································· 18
TURN YOUR PHONE ON AND OFF ··············································· 18
PASSWORD ····································································· 18
PIN code ···························································· 18
PIN2 code ··························································· 19
PUK code ···························································· 19
PUK2 code ·························································· 19
3. QUICK START GUIDE ······························································ 20
STANDBY AND UNLOCK ························································· 20
Standby Mode ······················································ 20
Main Menu ························································· 21
Screen Lock Settings ··············································· 21
Unlock ······························································· 22
Date and Time Setting············································· 22
MAKE A CALL ··································································· 22
Make a call ·························································· 22
Make a call from Dial Board ······································ 22
Make a call from Phonebook ····································· 23
Make a call from Call Log ········································· 23
Make an international call ········································ 23
Dial an extension number ········································ 23
V
Make an emergence call ·········································· 23
ANSWER A CALL, CHECK MISSED CALLS ········································· 24
Answer a call ······················································· 24
Answer two calls in the same time ······························ 24
Check missed calls ················································· 24
Adjust volume ······················································ 24
End call ······························································ 24
SEND A MESSAGE ······························································ 25
READ A NEW MESSAGE························································· 25
Read a message ···················································· 25
4. FUNCTIONS DESCRIPTION ······················································· 26
CALL LOG ······································································ 26
Check call log ······················································· 26
Call back quickly···················································· 27
Delete call log ······················································ 27
CONTACTS ··································································· 28
Add a new contact ················································· 29
View contacts information········································ 29
Edit contact information ·········································· 30
Delete contacts ····················································· 30
Speed find ·························································· 31
MESSAGE ···································································· 31
Create a SMS/MMS ··············································· 31
Read the message·················································· 32
Inbox ································································ 32
Outbox ······························································ 32
Drafts ································································ 32
Sent ·································································· 32
VI
Settings ······························································ 32
SMS setting ························································· 32
Cell broadcast ······················································ 33
Text template ······················································· 33
SETTINGS····································································· 33
Profiles ······························································ 33
Personal display ···················································· 34
Personal ringtone ·················································· 34
Phone setting ······················································· 34
Time and Date ····················································· 34
Language···························································· 34
Dual SIM manager ················································· 35
Network settings ··················································· 36
Call settings ························································· 36
Security settings ··················································· 37
Reset default ······················································· 37
CAMERA······································································ 38
Preview······························································ 38
Take a photo ························································ 38
Record a video ····················································· 39
RECORDER ··································································· 39
Voice clips ··························································· 39
Settings ······························································ 39
MULTIMEDIA ································································ 40
Play music··························································· 40
Play video ··························································· 41
FM RADIO ··································································· 41
FILE MANAGER ······························································ 41
VII
BROWSER ···································································· 42
JAVA APP ······································································ 43
BLUETOOTH ································································· 43
Use Bluetooth earphone. ········································· 44
ALARM ······································································· 44
CALENDAR ··································································· 45
New ·································································· 45
View ································································· 45
Monthly view ······················································· 45
Delete ······························································· 45
Go to date ·························································· 45
Settings ······························································ 45
WORLD TIME ································································ 46
NOTEPAD ····································································· 46
STOP WATCH ································································· 46
CALCULATOR ································································ 46
CONVERTER ································································· 47
U-DISK ······································································· 47
PC SYNC ····································································· 47
5. INPUT METHOD ··································································· 48
6. MAINTENANCE ···································································· 49
BATTERY MAINTENANCE ······················································· 49
PHONE MAINTENANCE ························································· 49
7. TROUBLESHOOTING ······························································ 51
THE ENVIRONMENTAL DESCRIPTION OF THE MOBILE PHONE ······················· 53

VIII
SAFETY NOTICE:
Before using the phone, please read and follow the rules as below carefully.
If you make or answer a call while driving, please use the
hands-free device (e.g. earphone, vehicle hands-free system,
mobile hands-free system) or use your phone after parking.
Please switch off your phone where you see signs forbidding
phone use. Such signs can be found in medical centers or
establishments with medical equipments.
The phone may interfere with the communication network of
aero planes, so please make sure your phone is switched off
during the flight.
To avoid the risk of any explosion, please switch off the phone
at petrol stations and places which are near fuel, chemical
solvent or other dangerous substances.
Please switch off your phone in areas where there could be a
risk of explosion and where you are asked to switch off
bidirectional radios. Notice and adhere to any rules and
regulations concerning mobile phone use.
All phones can be subject to interference, which may affect its
performance.

IX
In order to ensure high performance and to avoid damaging
the phone, please use the original accessories and battery.
Avoid using products which are not compatible.
Keep this product away from excessive moisture and extreme
temperatures.
Please neither burn the phone battery nor take it as ordinary
rubbish, as this could endanger life and contaminate the
environment. Please obey the environmental policy of the
local government and have them dispose and recycle in time.
If you need to connect your phone to other devices, please
read the user guide carefully to ensure the procedure is
carried out safely.
Keep small parts (e.g. SIM card) out of the reach of children to
prevent batteries from being swallowed or cause other
dangers.
Please back up the important information of phone and make
sure to have a copy in case data lost from your phone.
SOS
Make sure the phone is on and in service before making an
emergency call. Then press the call key for your position to be
loated. Please do’t ed all uless you are told to do so.
Getting to know your phone
10
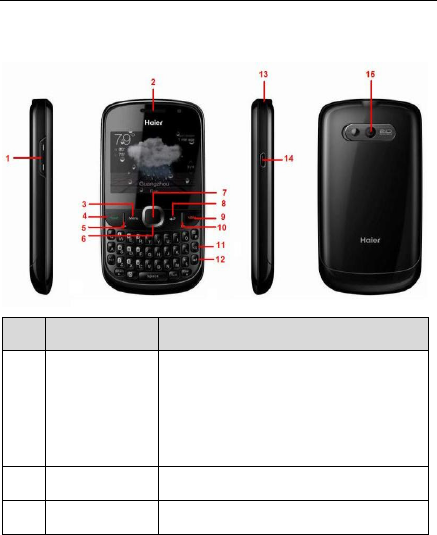
1. Getting to know your phone
No.
Name
Description
1
Volume key
1) Regulate the ring volume of the current profile.
2) Augment/Lessen Call volume in call.
3) Regulate the volume of Audio/Video when media
player is playing on front desk or background.
4) Keep the ringtone of an incoming call to mute.
2
Earpiece
Close to ear to listen
3
menu key
Access Main Menu

Getting to know your phone
11
4
send key
Answer or make a call/ enter call history screen in
standby mode
5
option key
Pop up a Option menu window.
6
Up/Down/Left/Right
key
1)Move focus / cursor 2) Page Left/Page Right on Main
menu.3) Move Switcher items on Idle screen.
7
OK key
1)Carry out SelectConfirm,etc.2)Enter into function of
the current focused item.
8
Back key
End the current window and back to previous screen.
9
End/power key
1)Power on/off with a long keypress2)Refuse a coming
call/End calling3)Exit app and return to IDLE SCREEN.
10
Message shortcut
key
Access to SMS quickly
11
Back space key
1) Delete one character of edit interface.
2) Delete Selected list item.
12
Enter key
Move the cursor to the next line
13
Earphone jack
3.5mm
14
USB connector
Charge or connect to date
15
Camera lens
Camera lens
Getting to know your phone
12
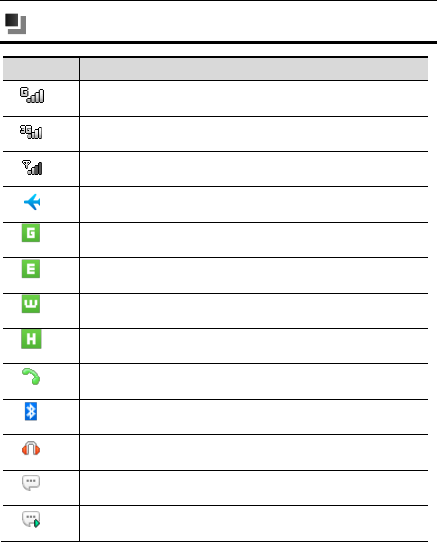
Status bar
Icon
Function
GSM network
UMTS network
unknown network
airplane network
GPRS
EDGE
UMTS
HSDPA
Calling
Bluetooth
Earphone
unread message
Unread multimedia message
Getting to know your phone
13
Missed call
Alarm clock
Memory full
Music playing background
FM playing background
Profiles stay vibrating.
Profiles stay silent.
Profiles stay ringing.
Profiles stay vibrating and ringing.

Getting Started
14
2. Getting Started
Install the USIM/SIM card and battery
Always turn off your device before inserting or replacing the USIM/SIM
card and battery.
Battery performance depends on various factors, including network
configuration, signal strength, the temperature of the environment in which you
operate the device, the features and/or settings you select and use, items
attached to connecting ports, and your talk time, data transmission, and other
software usage patterns.
To reduce risk of fire or burns:
- Do not attempt to open, disassemble, or repair the battery.
- Do not crush, puncture, short-circuit the external connector, or dispose in
fire or water.
- Do not expose to temperatures above 60℃ (140℉).
- Replace only with the battery designated for this product.
- Recycle or dispose of used battery as stipulated by local regulations.
Remove the rear cover and the battery:
(1) If the phone is on, press and hold [Power] to turn it off.
(2) Hold the device with the front panel facing down, and remove the rear
cover.
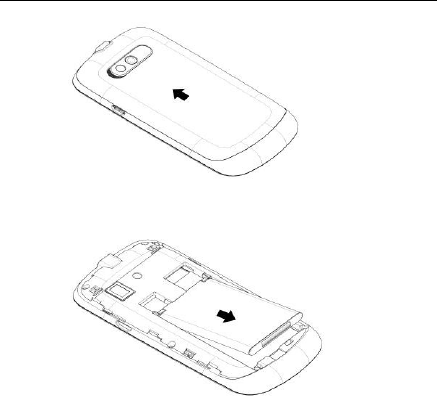
Getting Started
15
(3) Remove the battery.
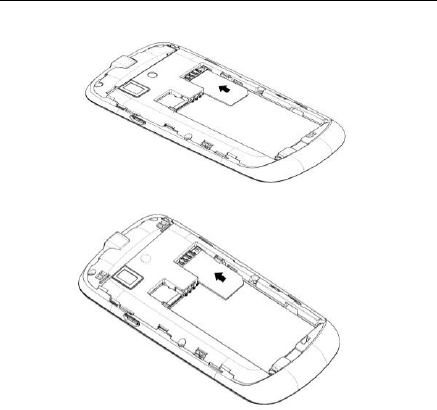
Insert the SIM card:
(4) Place the SIM card in the phone with the gold-coloured contact area facing
down.
Getting Started
16
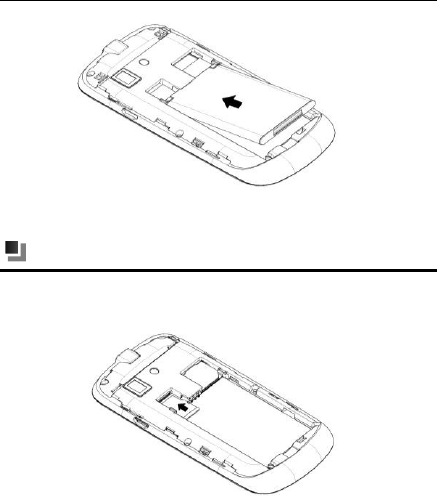
Insert the battery:
(5) Make sure the contacts of the battery face the correct direction, and
push the other side of the battery lightly until it is completely fit within the
battery compartment.
Getting Started
17
(6) Place back the rear cover.
Insert the memory card
You can insert a Micro SD Card to enhance the phoe’s eory.
Insert the Micro SD Card:
Turn off the device; remove the rear cover and the battery. Make sure the
side with the golden contact area is facing down. And then, close the card
cover.

Getting Started
18
Charge the battery
Charging the battery by the travel charger:
(1) Make sure the battery inserted in the phone.
(2) Connect the USB cable to the travel charger.
(3) Insert the USB cable to USB port on the phone carefully, and connect
the charger to a standard wall outlet.
(4) When the battery is fully charged (the icon is no longer moving),
unplug the travel charger from the power outlet.
New batteries have been pre-charged partially before shipment. Before you
start using your device, it is recommended that you insert and charge the battery.
Some batteries perform best after several full charge/discharge cycles.
Do not remove the battery from the device while charging.
Turn your phone on and off
After installing your SIM card and battery and charging the battery, you can now
power on and start using your device.
Press and hold the [END/POWER] key for a few seconds.
Password
PIN code
PIN code (Personal Identification Number) will avoid illegal use on your SIM.
PIN code is provided with SIM card. If inputting wrong PIN code for three
times, you should unlock it by PUK code. Default PIN code is 1234. For more

Getting Started
19
information, please consult your service provider .
PIN2 code
You need to input PIN2 code in some functions ( such as, call costs). If
inputting wrong PIN code for three times, you should unlock it by PUK code.
For more information, please consult your service provider .
PUK code
When PIN code is locked, PUK is required. Usually, PUK code is provided with
SIM card. If not provided or lost, please buy a new SIM card. The PUK code
can not be changed.
PUK2 code
When PIN2 code is locked, PUK2 is required. PUK2 code is provided with SIM
card. If not provided or lost, please buy a new SIM card. The PUK2 code can
not be changed.
Quick Start Guide
20
3. Quick Start Guide
Learn how to perform basic operations and use the main functions of your
mobile phone.
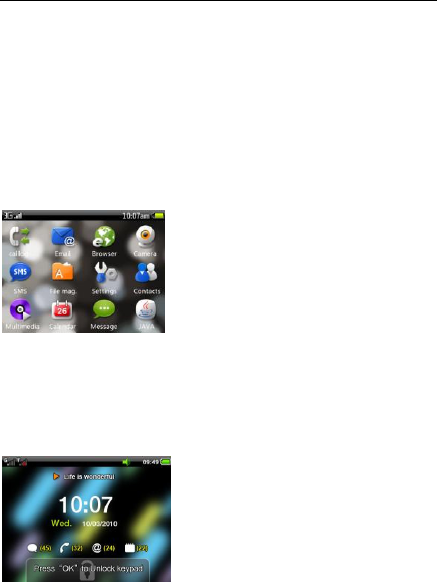
Standby and Unlock
Standby Mode
In the basic idle screen of the standby mode, press the option key and there will
be:
(1) Hide Widgets: press OK key to hide or show widgets
(2) Hide Switcher: press OK key to hide or show switcher
(3) Change Widgets: press OK key to change widgets, available options are:
Operator, Analogue clock, Digital clock, Player, FM, RSS, New event,
Notepad.
(4) Switcher Settings: press OK key to set the 7 shortcuts in the switcher. Press
any shortcut to replace with a new one.
Available shortcuts are: Add contacts, Call log, Email, Browser, Camera,
SMS, File mag., Settings, Contacts, Multimedia, Calendar, Message, Java
apps, Games, FM radio, Recorder, Bluetooth, Notepad, Clock, Calculator,
Quick Start Guide
21
Converter, STK.
(5) Change Wallpaper: press OK key to change wallpaper. Select Add more to
add more wallpapers.
(6) Only display wallpaper: press OK key to hide widgets and switcher. When
Basic Idle Screen is shown in the options, press OK key to show the basic
idle screen.
Move the focus on any widget or any item in the switcher to make the expected
changes.
Main Menu
Screen Lock Settings
You can set the duration of auto screen locking. <Main Menu> → <“ettigs>
→<Phoe settig> → <Auto lock >.
To lok the phoe i the stady ode, press * for a hile or press ed key.

Quick Start Guide
22
Unlock
(1) Press * ad the press “ed key.
Date and Time Setting
(1) < Mai Meu >→<“ettigs>→<Phoe settigs>→<Tie and date>.
(2) Choose <Time>, input to adjust the time, and then press<Save>.
(3) Choose <Date>, input to adjust the date, and then press<Save>.
(4) Choose time zone, 24-hour format & date format, and then press
<Back>. The settings will be automatically saved.
Make a call
Make a call
In standby or main menu, press any number key to enter Dial board, input
numbers to make a call.
Make a call from Dial Board
(1) In standby or main menu, press any number key to enter Dial board,
input numbers to make a call.
(2) Press <End > key to end the call.
When inputting numbers, press <clear> key to clear an error inputting.

Quick Start Guide
23
Make a call from Phonebook
(1) In main menu, press <Contacts> to enter the Contacts menu.
(2) Scroll to search for the contact, or search for a contact through instant
initial letter searching.
(3) Press <send> key to make a call.
Make a call from Call Log
(1) In standby mode, press < Send > key to enter Call history menu.
(2) Scroll to search for a Call Log.
(3) Press <send>key to make a call.
Make an international call
(1) press for a log tie ad sho + i dial board
(2) input country code and phone number
(3) Press <send>key to make a call.
Dial an extension number
You should dial the phone number first and then dial the extension number. If
you isert Plog press the key * to shift to pi dial oardetee phoe
number and the extension number, then press <send>key, so call to the extension
will be made automatically.
Make an emergence call
Input the emergence number and then press [send] key.

Quick Start Guide
24
Answer a call, Check missed calls
Answer a call
When a call comes in, a dialog box will appear, showing the incoming number
or a contact, press <send> key to answer, or <end> key to reject the call.
When a call comes in, press <volume>key or <send> key -<silence> in
the screen to stop ringing.
Answer two calls in the same time
If call waiting is on, (service from the operator is required), you can follow as
below when the second call comes:
Press sendkey to answer the second call , the current call will be on hold.
Press endkey to reject the second call, the current call continuous.
Check missed calls
Your phone will display a pop-up box to prompt the calls you have missed, to
check details, press [ok] key ; to cancel, press <end>key, and a missed call icon
will appear in Status line.
You can also enter the <Call Log> to check missed calls.
Adjust volume
Press Ǐvolumeǐkey to adjust the volume in the calling.
End call
Press Ǐendǐkey to end call.

Quick Start Guide
25
Send a Message
Create and send SMS message from your device.
(1) In message screen, choose <new SMS>to create a new message.
(2) Input the otat’s uer or hoose from <Contacts>.
(3) Input your message text and choose<option>key -<Send> to send it.
Press <option>key- <Insert> to choose and insert Contact info, Text template
or Calendar event.
Read a new Message
Read a message
When you have a new message, a pop-up box appears. To read the message,
press the item; to cancel, press <back>, and a missed message icon < >
appears in status Line.

Input Method
26
4. Functions Description
Call Log
Call log can record the numbers of all calls, missed calls, dialed calls and answered
calls.
Only if the network supports these functions, with the device switched on
and located within the network service area, the phone can record missed calls
and answered calls.
(1) In< main menu>, press <Send >key to enter the call log screen.
Check call log
(2) Call logs display the otat’s ae and the phone number, the times of
calling from/ to the same contact and the last time of the incoming /
outgoing call. Choose a record you want to enter the detailed call log.
(3) If the current number is not recorded in the contacts, you can view the
details of call time and operate as follows:
Voice call : call this number
Video call : make a video call( *service from operator is required)
Copy to dialer: copy the number to the dialer
Send message: enter to send a SMS to this number
Add to contacts: enter and choose New contact to add this number
to a new contact; or choose Existing contact to add this number to a
previous contact.
Add to reject list: press OK key to add any number in the list into the

Input Method
27
reject list. To manage the reject list, <Settings>-<Security
settings>-<Firewall>, enter phone code (default phone code is 0000)
to finish the operation.
Delete: press OK key to delete the number in the call log.
(4) If the current numbers have been recorded in the contacts, you can view
the details of call time and the contact, and operate as below:
Voice call : call this number
Video call : make a video call( *service from operator is required)
Copy to dialer: copy the number to the dialer
Send message: enter to send a SMS to this number
Contact detail: press OK key to view the details of the contact
Add to reject list: press OK key to add any number in the list into the
reject list. To manage the reject list, <Settings>-<Security
settings>-<Firewall>, enter phone code (default phone code is 0000)
to finish the operation.
Delete: press OK key to delete the number in the call log.
Call back quickly
(5) In the call log, select number and press < send > to call back quickly.
Delete call log
(6) In the call log, click <delete>select the item you want to delete or <delete
all>click <delete>again.
Input Method
28
Contacts
You can manage your contact information in contacts menu.
if the contacts are saved in USIM/SIM cardonly contact name and one
number can be recorded and edited.
(1) In standby screen, choose to enter the contact list.
(2) The contact list can display the contact name and the storage location. You
can choose or to make a call.
(3) In the contact list, press option key to have:
Add new contact: eter the e otat’s editing screen, choose the
contact will be saved in the phone or SIM. And input the contact name,
storage location, number and etc., and then choose <option> key to
save all the information.
Send message: send a message to this contact
Edit contact: edit the information of this contact
Voice call: make a voice call with this contact
Video call: make a video call with this contact
Copy to dialer: copy this number to dialer
Send as card: via SMS, via MMS, via Email or via Bluetooth
Groups: view all the contacts in groups and to add new group, send
message to a group, edit groups and delete.
Delete: delete this number from contacts

Input Method
29
Move to Phone or SIM card: move the contact from phone to SIM, or
from SIM to phone. After that, the contact will be not in the previous
phone or SIM.
Copy to Phone or SIM card: move the contact from phone to SIM, or
from SIM to phone.
Add to reject list: reject the call of this contact
Mark: mark contacts to send messages, send as card, delete, move to,
copy to, add to reject list and export to SD card.
Export to SD card
Import from SD card
Settings: includes speed dial, contacts to display, saving memory
Storage status: view all the contact information in the phone, SIM and
groups.
Add a new contact
(1) In the contact list, choose <option>key -<Add new contact> to enter
the new contat’s editing screen.
(2) In the editing screen, input the contact name, storage location, number
and etc., then choose <save> to save all the information.
Choose the image to add contact image from photos or camera. To add
more numbers or emails, you can choose<add detail>.
View contacts information
(3) In the contacts list, click the contact name to view.

Input Method
30
(4) Press option key to have :
Send message: send a message to this contact
Edit contact: edit the information of this contact
Voice call: make a voice call with this contact
Video call: make a video call with this contact
Copy to dialer: copy this number to dialer
Send as card: via SMS, via MMS, via Email or via Bluetooth
Delete: delete this number from contacts
Move to Phone or SIM card: move the contact from phone to SIM, or
from SIM to phone. After that, the contact will be not in the previous
phone or SIM.
Copy to Phone or SIM card: move the contact from phone to SIM, or
from SIM to phone.
Duplicate contact: duplicate this contact in the same phone or SIM
Export to SD card: output this contact to SD card
Speed dial: add as one of the speed dials and choose a number from
1-9 as the speed dial number for this number.
Add to reject list: reject the call of this contact
Edit contact information
(5) In the contact list detailed screen, click below<edit>.
Delete contacts
In the contact list, click <delete>select the item you want to delete or <delete
Input Method
31
all>click <delete>again.
Speed find
In the standby mode or in the contact list, input the first letter to find the contact.
Message
In message screen, you can create, send, receive, view, edit and set the SMS/
MMS. You can also receive network service message and broadcasting message.
SMS and MMS functions require the service from service provider. Only the
devices that are compatible with MMS function can receive and display
MMS.
(1) In standby mode/main menu, choose <Message> in the shortcut
menu to enter the message function.
Create a SMS/MMS
(2) In the message function screen, choose the <New SMS> on top of the
screen to edit a new message.
(3) Enter the phone number in the receiver column or choose <Contacts> to
select one or more numbers and then choose <OK> to add to the receiver list.
Choose <Add contacts> to add a receiver.
(4) Input the message content in message column.
Choose <Insert> to insert pictures, music, video, files and others and then
the SMS becomes an MMS automatically.

Input Method
32
(5) Choose <Send> to send the message.
Choose <Save> to save the message in Drafts.
Read the message
(1) When a new message comes, a dialogue box will appear on the screen.
Choose the item to enter the Inbox.
(2) Choose unread message to read it.
Inbox
View message list and read/unread status.
Outbox
Save and view/delete messages waiting to be sent
Drafts
Save and view/delete drafts.
Sent
Save and view/delete sent message.
Settings
Set SMS settings, Text template and Cell Broadcast.
SMS setting
Service centre:
When sending message, you must set the number of the service
provider center, or get the number from the service provider. Most
USIM/SIM cards have included the number.

Input Method
33
If you revise or delete the number of the message center, it may result that
the phoe a’t sed essage.
Delivery report: When it is on, message center will send you the
delivery report.
Validity period: Set the period that messages stay in the message
center.
SMS Type: select the type for SMS.
Save sent SMS: select on/off.
Cell broadcast
On/off to receive cell broadcast or not and also set channel.
Text template
Edit /delete/add text template.
Settings
Profiles
Profile settings can help you to set the ringing tone, message alert tone,
volume, notification type and etc. Profiles modes include "Normal", "Silent",
""Meeting", "Outdoor", "Offline", "Customised".
Profile setting
(1) In <Profiles> menu, select the profile you prefer to set <on>.

Input Method
34
Editing Profile
(1) In <Profile> menu, Press [option key], select Settings
(2) Set the options according to menu prompt.
In Standby mode, the current profile settings and ring mode is
displayed in the Status line on the top of screen.
Personal display
Set the themes, wallpaper, widgets and shortcuts
Personal ringtone
Include:
Call default ringtone
SIM voice call ringtone
SIM video call ringtone
Message ringtone
Phone setting
Time and Date
You can set the time, the date and the format in the menu.
If you remove the battery from the phone or the battery is depleted for a
long time, then you may need to reset the time and the date when restart the
phone after charging/reinstalling the battery.
Language
Select the language shown on the phone, including English and Chinese.

Input Method
35
Backlight
Adjust backlight.
Input setting
To set the input method.
Auto lock
Select to turn on/off.
Lock key and screen fast
Select to turn on/off.
Dual SIM manager
SIM card on/off
Activate or deactivate the SIM card.
Backtrack
When Backtrack is on, then all operations about sending a call or a message will
be carried out according to origin SIM.
When Backtrack is turned off, then all operations of sending a call or a message
will be carried out via default SIM.
Default SIM
Ca selet “IM or Alays ask. After that, all operations of sending a call or a
message will be carried out via default SIM (or always ask).
Data registration
Ca selet “IM . All operations of data connections will be carried out via
default SIM.

Input Method
36
Network settings
Network settings menu can help you to search the network
automatically/manually and set the network mode and set the data connection
settings.
Call settings
All calls >Send my number
To set Send or Hide your number.
The service requires network service.
Reject with message
Select to turn on/off, and edit the reject message text.
Call connect tone
Select to turn on/off.
Minute minder
During a call, a prompt will appear to show the call duration, every time it is up to
50 seconds.
Call end tone
Select to turn on/off.
Answer mode
To set Normal, Auto answer or Any key.
Voice call
Include Call diverting, Call Barring, Call waiting and Auto redial.

Input Method
37
The network service and the SIM card are required to activate the call
restriction function.
Video call
Include Setting my show, Call diverting, Call barring.
Voice mailbox
Edit the name and number of the voice mailbox.
Security settings
SecuritySIM
Manage PIN and PIN2 code.
Phone lock
Select to turn on/off phone lock. (Default password is "0000".)
Change phone code
Function Protect
Functional protection provides password protection for phonebook, message
and call log. You have to enter the phone code when activating the functional
protection for any function.
You have to input the phone code before setting the functional protection.
Reject list
Manage reject list. Entering this function requires phone code.
Reset default
You can select the functions to be restored as default value.

Input Method
38
Input password. (Default password is "0000".)
Camera
You a use the phoe’s aera to take photos ad adjust the aera’s
settings. The camera is on the back of the phone and takes the screen as a
viewfinder. The photos taken by the camera are in JPG format. Please use the
appropriate software to view them when you upload to the computer.
You need to delete some pictures or other files i file manager to
release some space in memory if the memory space is not enough for new
picture.
Preview
In the preview screen, press option key then you can perform:
Switch mode: switch between camera and camcorder.
Scene mode: Select Normal, Continuous, MMS or other modes.
Switch : switch between the main camera and the front camera
Exposure value: adjust Exposure value.
Settings: including settings of Resolution, Timer, White Balance,
Effects, ISO, Image quality, Shutter sound and Storage.
Album: view pictures in album.
Take a photo
To a take photo, press [back] key when there is no option menu. After shooting,
you can delete, send, rename the photo or set it as wallpaper or slideshow or
details.

Input Method
39
Record a video
To record a video, press [back] key when there is no option menu, press [pause]
key or [stop] key to stop recording. After recording, you can delete, send, rename
or replay the video.
Recorder
You a use the phoe’s recorder to record sounds and adjust the recorder’s
settings. The voice clips are taken in AMR format. Please use the appropriate
software to use when you upload the voice clips to the computer.
In the main screen of the recorder, press OK key to record, press OK key again
to stop and this record clip will be saved automatically.
In the main screen of the recorder, press option key to view:
Voice clips
In this screen, you could view the voice clips in list. Press option key to have:
Delete
Rename
Send via: MMS, Email, Bluetooth
Set as: profile ringtone, caller ringtone
Settings: to view the record mode and the storage location
Details: to view the name, format, size, date and protect or not
Settings
record mode: choose normal or MMS
storage location: choose to save the voice clips in the phone or
storage card
Input Method
40
You need to delete soe pitures or other files i file manager to
release some space in memory if the memory space is not enough for new
Multimedia
The device supports to play music in MP3, WMA, AMR, AAC, MIDI format and
play video in MP4, WMV, 3GP format.
You may see the following submenu in Multimedia screen::
Now playing: to view all the music files being played now
1Settings includes equalizer setting, play mode, sleeping
mode and lyrics display
2Update: to update the music files in the multimedia player
All Tracks: to view all the music files in memory, and play all the
songs.
Artists: to search music files and play the alu y Artist’s ae.
Albums: to search music files and play the alu y alu’s
name.
Playlists: to view the playlists and play songs in lists.
Movies: to view all the video files in memory.
In the menu screen, choose <Now playing>on the screen to enter the
player.
Play music
Choose a music file to play.
The phone supports to play MP3 as the background music. In Multimedia
screen, press [END] to return to standby mode and music will be played as
the background music. If you want to close the multimedia player, please

Input Method
41
enter the multimedia screen to close.
Play video
Choose a video file to play.
FM Radio
The phone supports FM radio.
You can use the FM radio only with the headset plugged.
The operations of FM are as follows:
My channels
All channels
Manual tuning
Fine –tune
Add to my channels
Scan channels
Activate loudspeaker
File manager
You may manage the Micro SD card memory in this menu, including images,
videos, sounds, others and files received via Bluetooth.
In the screen of file manager, press option key to obtain more items as below:
Delete
Send via: MMS, Email or Bluetooth
Print via Bluetooth
Rename
Manage: Move to folder, Copy to folder and New folder
Input Method
42
List by: date, name, type, size (largest first)
Properties
Storage status
Please backup important information in T card to prevent loss;
In computer format T card, select FAT file system format.
Browser
Your mobile phone supports wireless application protocol WAP and WWW
service. Please make sure that you have launched the mobile Internet
services before you use the function. It may be charged to use the internet
service. The charge information is provided by the network service
providers.
Your can access many different Internet services such as news, weather
reports, flight information, and others. These services are especially
designed for mobile phones and maintained by WAP/WWW service
providers.
Network service is necessary for WAP. Please contact your network provider
and/or the service provider of the desired service. The service provider will
also provide instructions about how to use their service.
The charge information and other specific settings are provided by the
network service providers.
Input Method
43
Java app
You can download and view all installed JAVA games and applications in JAVA
menu.
Bluetooth
Enter the Bluetooth screen to activate the Bluetooth for more operations.
Bluetooth operates as below:
˄1˅ Press [option key] in device list screen
˄2˅ Select Devices you wanted
˄3˅ Input password
˄4˅ Choose next (input the same password to the corresponding devices)
˄5˅ Display ok
˄6˅ Select a document you want to send
˄7˅ Press [option key], select Send via>Bluetooth
˄8˅ Select Device you wanted
˄9˅ Choose ok
Bluetooth technology enables wireless connections between electronic devices
within a range of 10 meters (33 feet). A Bluetooth connection can be used to
send images, videos, texts, business cards, calendar notes, or to wirelessly
connect to devices using Bluetooth technology.
When Bluetooth technology starts, the distance between phone and
Bluetooth device will greatly influence transfer speed and the quality of talk.
Activate Bluetooth: selet o/off. o aepts other devices to connect to your
phone; off rejets other devices to connect to your phone.
My phoe’s isibility: select Shown to all or Hidden to decide if the phone can be
searched by other devices.

Input Method
44
Device lists: show the compatible Bluetooth.
My phoe’s ae: It ill e sho i the other deie he it is found.
Service information includes hands free, Bluetooth headset, stereo service, basic
image, dial up modem connection, file transfer and object push.
Use Bluetooth earphone.
Open the paired devices tab and stay within 10 meters in the match statue.
(1) <Bluetooth settings>menuselect <on>.
(2) <Bluetooth settings>menu <My phoe’s isiility>-<Show to all>
(3) <Bluetooth Device lists>menuchoose <Search new device>, the device
starts to search for Bluetooth devices within range. If you have used
Bluetooth before, a list of the previous search results is displayed. Select the
devices with which you want to pair, and enter the password. The same
password must be inputted to the other device as well.
(4) If a successful match is made, Bluetooth earphone will be shown in the
device list, select the earphone, choose <Bluetooth earphone> to active
earphone function.
(5) Now you can call via Bluetooth phone.
Bluetooth icon will be shown when the Bluetooth is on.
Alarm
You can set several alarm clocks at different times and you can set the alarm on
or off and delete in this menu.

Input Method
45
Calendar
The function allows you to view calendar, remind you your schedules by alarm
clock and record your schedules.
New
In this item, you could add new meetings, to-dos and anniversaries in the
calendar.
View
In this item, you could view all events, all meetings, all to-dos and all
anniversaries.
Monthly view
In this item, you could choose monthly view or weekly view.
Delete
In this item, you could delete any schedules in the calendar.
Go to date
In this item, you could choose the date to view in the calendar.
Settings
(1) Calendar alarm ring: choose the calendar alarm ringtones
(2) Alarm snooze time: choose the alarm snooze time from 1 to 60 minutes
(3) Week starts on: choose Sunday or Monday
(4) Default view: choose default view as monthly view or weekly view
Input Method
46
World Time
You can add a new region of time to the list of world time from the world time
map.
Enter the world time to view the existing list of world time. Press<option>key:
Add: select the region you need to add, and then done. In the world time
list, choose <Delete> to delete the time of list.
Delete: delete the time of region as expected
Move up: move up the time of region in the expected sequence
Move down: move down the time of region in the expected sequence
Notepad
Record information in TXT format and all TXT files in the memory can be viewed.
Notepad supports the functions: create new, view and delete.
Stop watch
The operations of this function are as follows:
Start: to start.
Stop: to record the timecontinuous click to record several time points.
Reset: to restart.
Calculator
This supports simple calculation, such as +,,×,÷. The calculator has limited
accuracy and is designed only for simple calculations.

Input Method
47
Converter
This supports conversion including currency, area, length, weight, temperature,
volume and velocity.
U-Disk
Through the futio, the iforatio i the phoe’s eory ard a e
managed by data cable on the computer. Please turn on mobile U-Disk when you
use the function. When the data cable is plugged, the tip of mobile U-Disk will
appear on the screen, you may turn it on manually.
PC Sync
Through PC sync, the mobile information, such as contacts, messages can be
managed by software on the computer. Please keep the PC sync on when you use
the function. When the data cable is plugged, the tip of PC Sync will appear on
the screen, you may turn on PC Sync mode manually.

Input Method
48
5. Input Method
This mobile phone supports these methods: eng and abc.

Maintenance
49
6. Maintenance
Battery Maintenance
1. Please do not put/throw batteries into a fire, as this will cause the
battery to burn and explode.
2. When installing the battery, do not use force or pressure, as this will
cause the battery to leak, overheat, crack and burn.
3. Please do not use wires, needles or other metal objects to short-circuit
the battery. Also, do not put the battery near necklaces or other metal
objects, as this will cause the battery to leak overheat, crack and burn.
4. Please do not solder the contact points of the battery, as this will cause
the battery to leak overheat, crack and burn.
5. If the battery overheats, changes color, or becomes distorted in use,
charging, or storage, please stop using and replace it with a new battery.
6. If the battery leaks or gives off a strange odor, please remove it from the
vicinity of the open fire to avoid a fire or explosion.
7. Please do not use or place batteries in places of high temperature such as
in the sun.
Phone Maintenance
1. Please keep the phone and the spare parts beyond reach of children.
2. Avoid contact with water or other liquids. Liquid in the phone could cause
a short circuit, battery leak or other malfunctions.
3. Please keep the phone away from the high temperature, as it will shorten
the service life of the phone, and make the plastic damage the battery.

Maintenance
50
4. Do not disassemble or modify the mobile phone, as it will lead to damage
to the phone such as battery leakage or circuitry failure.
5. Do not use acid or alkali substances to clean the phone.
6. Do use the original spare parts. Otherwise it will fail the warranty.

Troubleshooting
51
7. Troubleshooting
Problems
Cause
The phoe a’t e sithed o
The battery power is used up; Incorrect battery
installation.
(U)SIM card
malfunction
(U)SIM card is damaged; Contact your network
service provider.
(U)SIM card is not properly inserted; Confirm
(U)SIM card is properly inserted.
There is a foreign substance on the metal
surface of the (U)SIM card. Use a clean cloth to
wipe off the metal contact point of the (U)SIM
card
Poor reception
Using the mobile phone in an area with poor
signal such as near tall buildings or in a
basement where radio waves cannot be
transmitted.
Using the mobile phone when the network is
busy, such as during rush hour, when the lines
are full making it impossible to get through.
Related to the distance from the base station
built by the network. You can request the
network service provider to provide a service
area plan.
Echo or noise
Caused by poor network relay, a regional
problem; Some regional problem when calling.

Troubleshooting
52
Hang up and redial, if the relay is changed then
the line may be better.
Unable to make a call
Using the call bar function. Cancel the function.
Using the fixed dialing function. Cancel the
fixed call setting
Unable to charge
Battery or charger is damaged, Replace the
battery or charger.
Recharging in the environment of less than
-10C or higher than 55C, Change the charging
environment.
Poor contact, Check if the plug is properly
connected
Unable to connect
to the network
Expired (U)SIM card. Contact your network
service provider.
Out of the GSM service area. Consult your
network provider within the service area.
Poor signal. Please move to a place with a
better signal and try again
Shortening of the
standby time
Standby time is related to the network system.
Please temporarily turn off your mobile phone,
as you are located in an area with poor signal.
Batteries need to be replaced.
When you cannot get a signal, the phone will
continue to transmit in order to find a base
station, thereby expending large amounts of
electricity causes the standby time to decrease.
Pleas move to an area with a strong signal or
Troubleshooting
53
temporarily turn off your mobile phone.
Incorrect PIN
number
Consecutively enter the incorrect password for
three times.
Contact your network provider.
Unable to add new contact
The storage space of the phone book is full.
Delete a portion of the phone number.
Unable to set certain functions
Your network provider does not support this
function or you have not applied for it.
Contact your network provider.
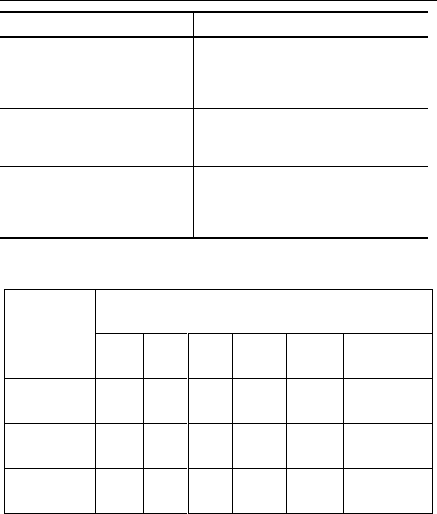
The Environmental Description of the Mobile Phone
Parts
Hazardous Substance
Pb
Hg
Cd
Cr6+
PBB
PBDE
Phone
X
O
O
O
O
O
Battery
X
O
O
O
O
O
Accessories
X
O
O
O
O
O

Troubleshooting
54
O:means the concentration of the hazardous substance in all homogeneous
materials in the part is under the limit requirement of the SJ/T 11363-2006
standard.
X:means the concentration of the hazardous substance in at least one kind of
homogeneous materials in the part is beyond the limit requirement of the
SJ/T 11363-2006 standard.
PS:The reason for the product marked with X is:there is no alternative
technologies or components at present.
FCC Regulations:
This mobile phone complies with part 15 of the FCC Rules. Operation is subject to
the following two conditions: (1) This device may not cause harmful interference,
and (2) this device must accept any interference received, including interference
that may cause undesired operation.

Troubleshooting
55
This mobile phone has been tested and found to comply with the limits for a
Class B digital device, pursuant to Part 15 of the FCC Rules. These limits are
designed to provide reasonable protection against harmful interference in a
residential installation. This equipment generates, uses and can radiated radio
frequency energy and, if not installed and used in accordance with the instructions,
may cause harmful interference to radio communications. However, there is no
guarantee that interference will not occur in a particular installation If this
equipment does cause harmful interference to radio or television reception, which
can be determined by turning the equipment off and on, the user is encouraged to
try to correct the interference by one or more of the following measures:
-Reorient or relocate the receiving antenna.
-Increase the separation between the equipment and receiver.
-Connect the equipment into an outlet on a circuit different from that to which the
receiver is connected.
-Consult the dealer or an experienced radio/TV technician for help.

Troubleshooting
56
Changes or modifications not expressly approved by the party responsible for
compliance could void the user‘s authority to operate the equipment.
The antenna(s) used for this transmitter must not be co-located or operating in
conjunction with any other antenna or transmitter.

Troubleshooting
57
RF Exposure Information (SAR)
This mobile phone meets the government’s requirements for exposure to radio
waves.
This phone is designed and manufactured not to exceed the emission limits for
exposure to radio frequency (RF) energy set by the Federal Communications
Commission of the U.S. Government.
The exposure standard for wireless mobile phones employs a unit of measurement
known as the Specific Absorption Rate, or SAR. The SAR limit set by the FCC is
1.6W/kg. *Tests for SAR are conducted using standard operating positions
accepted by the FCC with the phone transmitting at its highest certified power
level in all tested frequency bands. Although the SAR is determined at the
highest certified power level, the actual SAR level of the phone while operating can
be well below the maximum value. This is because the phone is designed to
operate at multiple power levels so as to use only the poser required to reach the
network. In general, the closer you are to a wireless base station antenna, the
lower the power output.
The highest SAR value for the model phone as reported to the FCC when tested for
use at the ear is 1.35 W/kg and when worn on the body, as described in this user
guide, is 1.09 W/kg (Body-worn measurements differ among phone models,
depending upon available accessories and FCC requirements.)

Troubleshooting
58
While there may be differences between the SAR levels of various phones and at
various positions, they all meet the government requirement.
The FCC has granted an Equipment Authorization for this model phone with all
reported SAR levels evaluated as in compliance with the FCC RF exposure
guidelines. SAR information on this model phone is on file with the FCC and can
be found under the Display Grant section of www.fcc.gov/oet/ea/fccid after
searching on FCC ID: SG71101HW-A57W.
For body worn operation, this phone has been tested and meets the FCC RF
exposure guidelines for use with an accessory that contains no metal and the
positions the handset a minimum of 1.5 cm from the body. Use of other
accessories may not ensure compliance with FCC RF exposure guidelines. If you
do no t use a body-worn accessory and are not holding the phone at the ear,
position the handset a minimum of 1.5 cm from your body when the phone is
switched on.
Please make sure the temperature for production unit will be
between -10~50 ˚C