Hansaton Akustik WL700 eControl User Manual UserManual
Hansaton Akustik GmbH eControl UserManual
Contents
- 1. UserManual.pdf
- 2. UserManual_RegulatoryNotices.pdf
UserManual.pdf
Checking the Battery Status
When the batteries of the remote control are low, this is indicated in
the status bar.
Additionally, you can check the battery status at any time in the menu.
•
To enter the menu, press the volume up button and the volume
down button simultaneously.
•
Navigate to the menu entry
Info
by pressing the volume up button
or the volume down button.
•
Confirm your selection by pressing the program change button.
The battery status is displayed:
battery full battery empty
•
To return to the standard display, press the program change button.
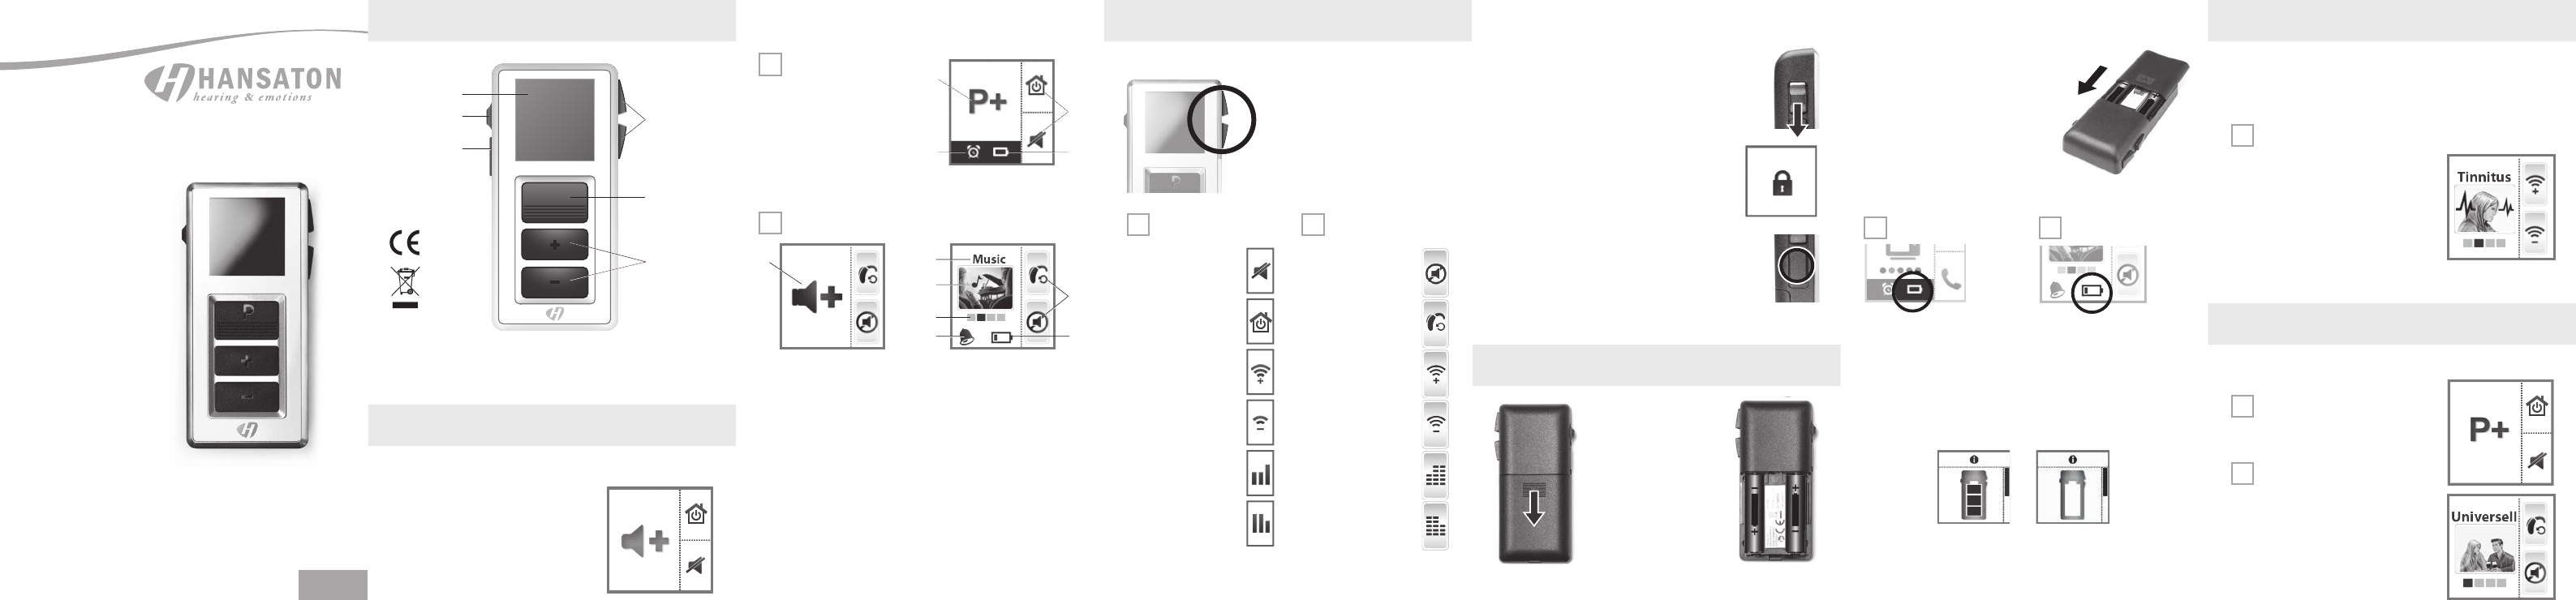
P
ɳɵɶɷɸ
Program
change button
Key lock switch Control buttons
Display
Control Buttons
Your Remote Control. Functions. Adjusting Volume.
Changing Hearing Programs.
Volume up/
down buttons
Programming
connection
Remove empty batteries immediately and dispose of them
according to local regulations.
!
Instructions For Use
GB
See also ”General Warnings and
Safety Instructions“, Page 6-13
i
More functions are available in the menu. To enter or exit the menu,
press the volume up button and the volume down button simultane-
ously.
All actions initiated with the remote control are immediately reflected
on the display. For example, if you press the volume up button, the
following icon is shortly displayed.
The remote control does not receive informa-
tion from your hearing systems.
All actions that you initiate with the controls of
your hearing systems are not reflected on the
remote control’s display.
You can quickly access two functions
with the control buttons on the right
hand side of the remote control.
The control buttons of the eControl
advanced can be configured by
your Hearing Care Professional.
Small icons on the display show the
functions.
Power Save Mode
If the remote control is not used for some time, the display automati-
cally turns black. The remote control is then in its power save mode.
•
Press any button to activate the display again. All other icons: Shortcut to select a preferred hearing program. The
available icons and hearing programs depend on your personal setup.
1
Indicates change of volume
2
Program name
3
Program icon
4
Program number
5
Alarm clock is activated
6
Batteries of the remote control are low
7
Function of programmable control buttons
Key Lock Switch
•
To prevent any accidental operation while the remote
control is in pockets or bags, move the key lock switch to
lock position (red color visible).
When the key lock is active, all buttons on the
remote control are disabled.
The following icon is displayed.
Programming Connection
This connection is only to be used by your Hearing Care
Professional for programming the remote control.
Batteries.
•
Attach the cover by sliding it onto the remote
control.
The current time setting is displayed.
If you want to change it, refer to section
„Setting the time”.
The remote control uses two
AAA batteries.
Inserting Batteries
•
Slide the battery compartment
cover in the direction of the
arrow.
•
Insert the batteries. Make sure
the „+” symbols on the battery
and compartment are aligned.
1
Indicates change of hearing
program and volume
2
Alarm clock is activated
3
Batteries of the remote control
are low
4
Function of control buttons
Display eControl Advanced
Display eControl Basic
eControl Basic eControl Advanced eControl Basic eControl Advanced
If you are wearing two hearing systems, the volume will be adjusted on
both systems at the same time.
•
Press the volume up button or the volume down button to adjust
the volume by one step.
•
Press the program change button to switch
to the next hearing program.
•
Press the program change button repeat-
edly until the icon of the desired hearing
program is displayed.
Or:
•
Press the control button next to the icon
indicating the desired hearing program. The
control buttons have to be configured by your
Hearing Care Professional.
eControl Basic
Adjusting the Tinnitus Noiser Level
eControl Advanced
If you are wearing two hearing systems, the hearing program will be
changed on both systems.
This function is only available if your Hearing
Care Professional has configured the tinnitus
noiser for both your hearing systems and for
the control buttons of the remote control.
You can recognize the setting, if the corre-
sponding icons are displayed next to the
control buttons.
•
To adjust the noiser level, press the upper
or the lower control button.
D
GB
F
I
E
NL
Turn hearing systems on
or off (standby).
Turn hearing systems on
or off (standby).
Reset to default volume
and hearing program.
Reset to default volume
and hearing program.
Tinnitus noiser level up. Tinnitus noiser level up.
Tinnitus noiser level
down.
Tinnitus noiser level
down.
Adjust treble. Adjust treble.
Adjust bass. Adjust bass.
Display.
1
2 3
4
2
3
4
5 6
7
1
P
eControl

Ending the Alarm
When the alarm clock rings, a corresponding
icon is displayed on the remote control.
If you do not end the alarm, it is repeated
within the next minutes.
•
To end the alarm, press the program change
button.
The alarm clock will ring at the same time on
the next day.
Turning the Alarm Clock o
•
To enter the menu, press the volume up but-
ton and the volume down button simultaneously.
•
Navigate to the menu entry
Alarm
by press-
ing the volume up button or the volume down
button.
•
Confirm your selection by pressing the pro-
gram change button. The entry field for hours is
highlighted.
•
Press the program change button twice to
skip the entry fields for hours and minutes.
The alarm on/off selection field is highlighted.
•
Press the volume up button or the volume
down button to position the cursor next to alarm
clock off:
•
Confirm your selection by pressing the pro-
gram change button.
Setup and Service Functions.
Advice on Care.
Troubleshooting.
Setting the Time
•
To enter the menu, press the volume up button and the volume
down button simultaneously.
•
Navigate to the menu entry Clock by pressing the volume up button
or the volume down button.
•
Confirm your selection by pressing the pro-
gram change button. The entry field for hours is
highlighted.
•
Set the hours by pressing the volume up
button or the volume down button.
•
Confirm your setting by pressing the program
change button. The entry field for minutes is
highlighted.
•
Set the minutes by pressing the volume up button or the volume
down button.
•
Save the settings by pressing the
program change button.
The time is displayed.
The time is always displayed in the header
of the menu. To enter or exit the menu,
press the volume up button and the
volume down button simultaneously.
Resetting Volume and Hearing Program
If you have made changes to volume or program and do not know why
the hearing systems are acting the way they are, you can manually set
the
default
volume and hearing program for your hearing systems.
•
To enter the menu, press the volume up button and the volume
down button simultaneously.
•
Navigate to the menu entry
HI Restore
by pressing the volume up
button or the volume down button.
•
Confirm your selection by pressing the program change button.
The hearing systems are reset and a corresponding icon is displayed.
i
•
You can also reset the hearing systems by pressing the control
button next to the following icon.
The control buttons have to be configured by your Hearing Care
Professional.
Displaying Contact Data
If your Hearing Care Professional has saved his or her contact data on
the remote control, you can view this information:
•
To enter the menu, press the volume up button and the volume
down button simultaneously.
•
Navigate to the menu entry
Contact
by pressing the volume up
button or the volume down button.
•
Confirm your selection by pressing the program change button. The
contact data is displayed.
•
To return to the standard display, press the program change button.
Setting the Language of the Menu
•
Ask your Hearing Care Professional.
•
Clean the remote control as necessary with a soft cloth and use a
nonabrasive household soap.
•
Avoid abrasive cleaning liquids with additives such as citric acid,
ammonia, etc.
•
Do not put your remote control in water!
•
Do not clean your remote control with alcohol or benzine.
!
Should a problem occur, you can usually correct it quickly. Use the
following troubleshooting tips to resolve simple issues.
If you still encounter problems after trying these suggestions, consult
your hearing system professional.
Problem
The remote control does
not work.
Another remote control
affects your hearing
systems.
Possible Solution
Check, if the key lock is activated.
Deactivate it, if necessary.
Change the batteries.
Return remote control and hearing systems
to your Hearing Care Professional.
Your Hearing Care Professional can change
the wireless address to avoid interference.
Turning your Hearing Systems on and o (mute). Alarm Clock.
You have several options to turn your hearing systems on
and off with your remote control. Both hearing systems
are simultaneously turned on or off.
When you turn your hearing systems off via remote
control, the following icon is displayed. It is displayed
until you turn your hearing systems back on.
Additionally, all buttons are disabled. The only available function is to
turn the hearing systems back on.
After turning on, the previously used volume and hearing program
are set.
Via Control Button
•
Press the control button next to the following icon to turn
your hearing systems on or off.
The control buttons have to be configured by your Hearing
Care Professional.
Via Menu
Turning off:
•
To enter the menu, press the volume up button and the volume
down button simultaneously.
•
Navigate to the menu entry
HI Mute/Unmute
by pressing the
volume up button or the volume down button.
•
Confirm your selection by pressing the program change button.
Turning on:
•
Press any button to activate the display.
•
Wait until the information about the turned off hearing systems
disappears.
The menu is displayed and the
HI Mute/Unmute
entry is still selected.
•
To turn your hearing systems back on, confirm the selection by
pressing the program change button.
You can set an alarm clock reminding you at the same time every day
by a repeating signal tone and by an alarm clock icon.
i
The alarm is initiated by the remote control but the acoustic signal is
emitted by your hearing systems.
•
Turn on your hearing systems.
•
Keep your hearing systems within the remote control’s operating
distance.
Otherwise you will not be able to hear the alarm.
Setting the Alarm Clock
•
To enter the menu, press the volume up but-
ton and the volume down button simultaneously.
•
Navigate to the menu entry
Alarm
by press-
ing the volume up button or the volume down
button.
•
Confirm your selection by pressing the pro-
gram change button. The entry field for hours is
highlighted.
•
Set the hours by pressing the volume up
button or the volume down button.
•
Confirm your setting by pressing the program
change button. The entry field for minutes is
highlighted.
•
Set the minutes by pressing the volume up
button or the volume down button.
•
Confirm your setting by pressing the program
change button. The alarm on/off selection field
is highlighted.
•
Press the volume up button or the volume
down button to position the cursor next to alarm
clock on:
•
Confirm your selection by pressing the
program change button.
When the alarm clock is turned on, this is
indicated in the status bar.
Distributed in USA by
Hansaton Acoustics Inc.
15650 36th Ave N Ste 110
Plymouth, MN 55446
USA
www.hansaton-usa.com
order@hansaton.com
Manufactured by
Hansaton Akustik GmbH
Sachsenkamp 5
20097 Hamburg
Germany
www.hansaton.com
JB-SP
84354
Technical Informations.
The operating distance of the remote control is approximately
40 inches (1 meter).
•
Make sure the distance between your remote control and hearing
instrument does not exceed the operating distance.
Operating frequencies: Fc=3.28 MHz
Maximum field strength @ 10m: -7 dBμA/m
Hansaton eControl
FCC ID: WU7-WL500
Transport and Storage Conditions
During extended periods of transport and storage, please observe the
following conditions:
Storage Transport
Temperature 10 to 40 °C -20 to 60 °C
Relative humidity 10 to 80 % 5 to 90 %
Air pressure 700 to 1050 hPa 200 to 1200 hPa
For other parts, such as batteries, other conditions may apply.
With the CE marking HANSATON confirms compliance with
the European Directive 99/5/EC (R&TTE) concerning radio and
telecommunications terminal equipment.