Hansol LCD B15CL CRT Monitor User Manual
Hansol LCD Inc. CRT Monitor
User Manual

Power management system
This monitor complies with VESA, Nutek, and Energy Star power saving requirements.
The power saving system works only when used with VESA DPMS compliant PC’s
and/or graphic controllers.
The monitor goes into various power saving stages depending on the incoming
video signal as shown in the following table
Note
The monitor automatically goes through the DPMS steps when it is idle. To release the
monitor from the DPMS condition, press any key on the keyboard or mouse.
Electrical Specifications
Mechanical Specifications
Environmental Specifications
Preset Timings
This Monitor B15CL has preset modes for the 8 most popular industry standards for
Plug and Play capability.
Function of controls
Adjustment
This monitor features an On Screen Display(OSD) that shows information about this
display controls.
On Screen Display (OSD) Controls.
The OSD window appears on the screen when you press DO key.
It is include the following extended controls such as Size, Position, Geometry,
Color_temp, Degauss, Moire, Language, OSD-Position, Zoom and hidden Exit.
Brightness
This item adjusts the overall brightness of the displayed image.
Press the "-" key first, and then adjust the
properly brightess.
If you want to exit, press DO key.
Contrast
This item adjusts the contrast level of the
displayed image.
Press the "+" key first, and then adjust to the
properly contrast.
If you want to exit, press DO key.
OSD menu functions
How to control functions on the main menu.
Press the OSD control key (with RED icon)
Move the desired control function.
Adjust the properly displayed screen image.
When you are done all progress, move the exit (None select) and then press
DO key.
OSD Adjust FUNCTION
15Inch (Viewable size 13.8 )
High Resolution Color Monitor
(B15CL)
User s Manual
Printed on the recyclable paper
Printed in Korea
Part No. 942335020001 - 01
Package
Congratulations on your purchase of this top quality color monitor!
The items illustrated below are contained in the carton.
First, be sure that your carton includes all of them.
If any items are missing or damaged, please contact your local dealer or supplier.
- Color Monitor
- AC Power input cable
- Stand Ass'y
- User’s Manual
Safety information
Use only a power source and connection appropriate for the monitor as indicated
on the marking label.
Slots and openings in the cabinet are provided for ventilation;
these openings must not be blocked or covered. Never push objects of any kind
into cabinet slots or other openings.
Never insert anything metallic into the monitor openings.
Doing so may create a danger of electric shock.
To avoid electric shock, never touch the inside of the monitor.
Only a qualified technician should open the monitor s case.
Unplug the monitor from the wall outlet before cleaning. Do not use liquid cleaners
or aerosol cleaners. Use a damp, lint-free cloth for cleaning.
Install the monitor near an outlet that you can reach easily. Disconnect the product
by grasping the plug firmly and pulling in from the outlet.
Never disconnect it by pulling the cord.
Caution
Changes or modifications not expressly approved by the party responsible for
compliance could void the user’s authority to operate the equipment.
Notice
The information contained in this document is subject to change without notice.
Features
Superior image
On Screen menu fingertip control system to visually select and adjust screen using
buttons on front panel and on screen menus.
Super contrast screen for superior contrast and richer color.
Advanced INVAR Shadow mask for superior focus, brightness and color.
15", 0.28dot pitch high resolution, non-interlaced technology provides sharp, flicker-
free images.
On screen menu color control system easily allows the white of the image to be
adjusted as well as R.G. B signals, resulting in true-to-life colors.
Ergonomic Design
Flat, square screen to reduce image distortion and glare, thus relieving eye strain.
Tilt base allowing 90 rotation in the horizontal and 17 in the vertical for greater user
comfort.
Low-leak radiation prevention meeting MPR magnetic field emissions standards
for increased user safety.
Environmentally Friendly
Power management circuit conforming to VESA DPMS standards controls energy
consumption when monitor is not in use, you save energy.
All plastic parts are recyclable. All materials are strictly selected to ensure ease of
maintenance, inspection and disposal.
Timing
Automatic tracking of horizontal frequencies of 30 to 72 kHz,and vertical frequencies
of 50 to 160 Hz.
Eight timings are factory preset for image size and position
Ten additional timings are user definable.
Synchronizing input signals (separate, composite) can be automatically selected.
System Flexibility
Equipped with DDC1, DDC2B and DDC2Bi for Plug & Play compatibility.
Monitor is compatible with VGA, SVGA, VESA and high resolution video modes up
to 1280(H) 1024(V)@60Hz
Monitor may be used with IBM or compatible PC, Mac.
Automatic universal power supply is built in permitting AC power input of 100 - 240V
AC, 50 or 60Hz.
Self-test menu allows the display unit to be checked on screen without connecting
to a computer.
Compact case minimizes desktop space giving you a large screen image without
loss of workspace.
Power cable included easily plugs into a standard outlet.
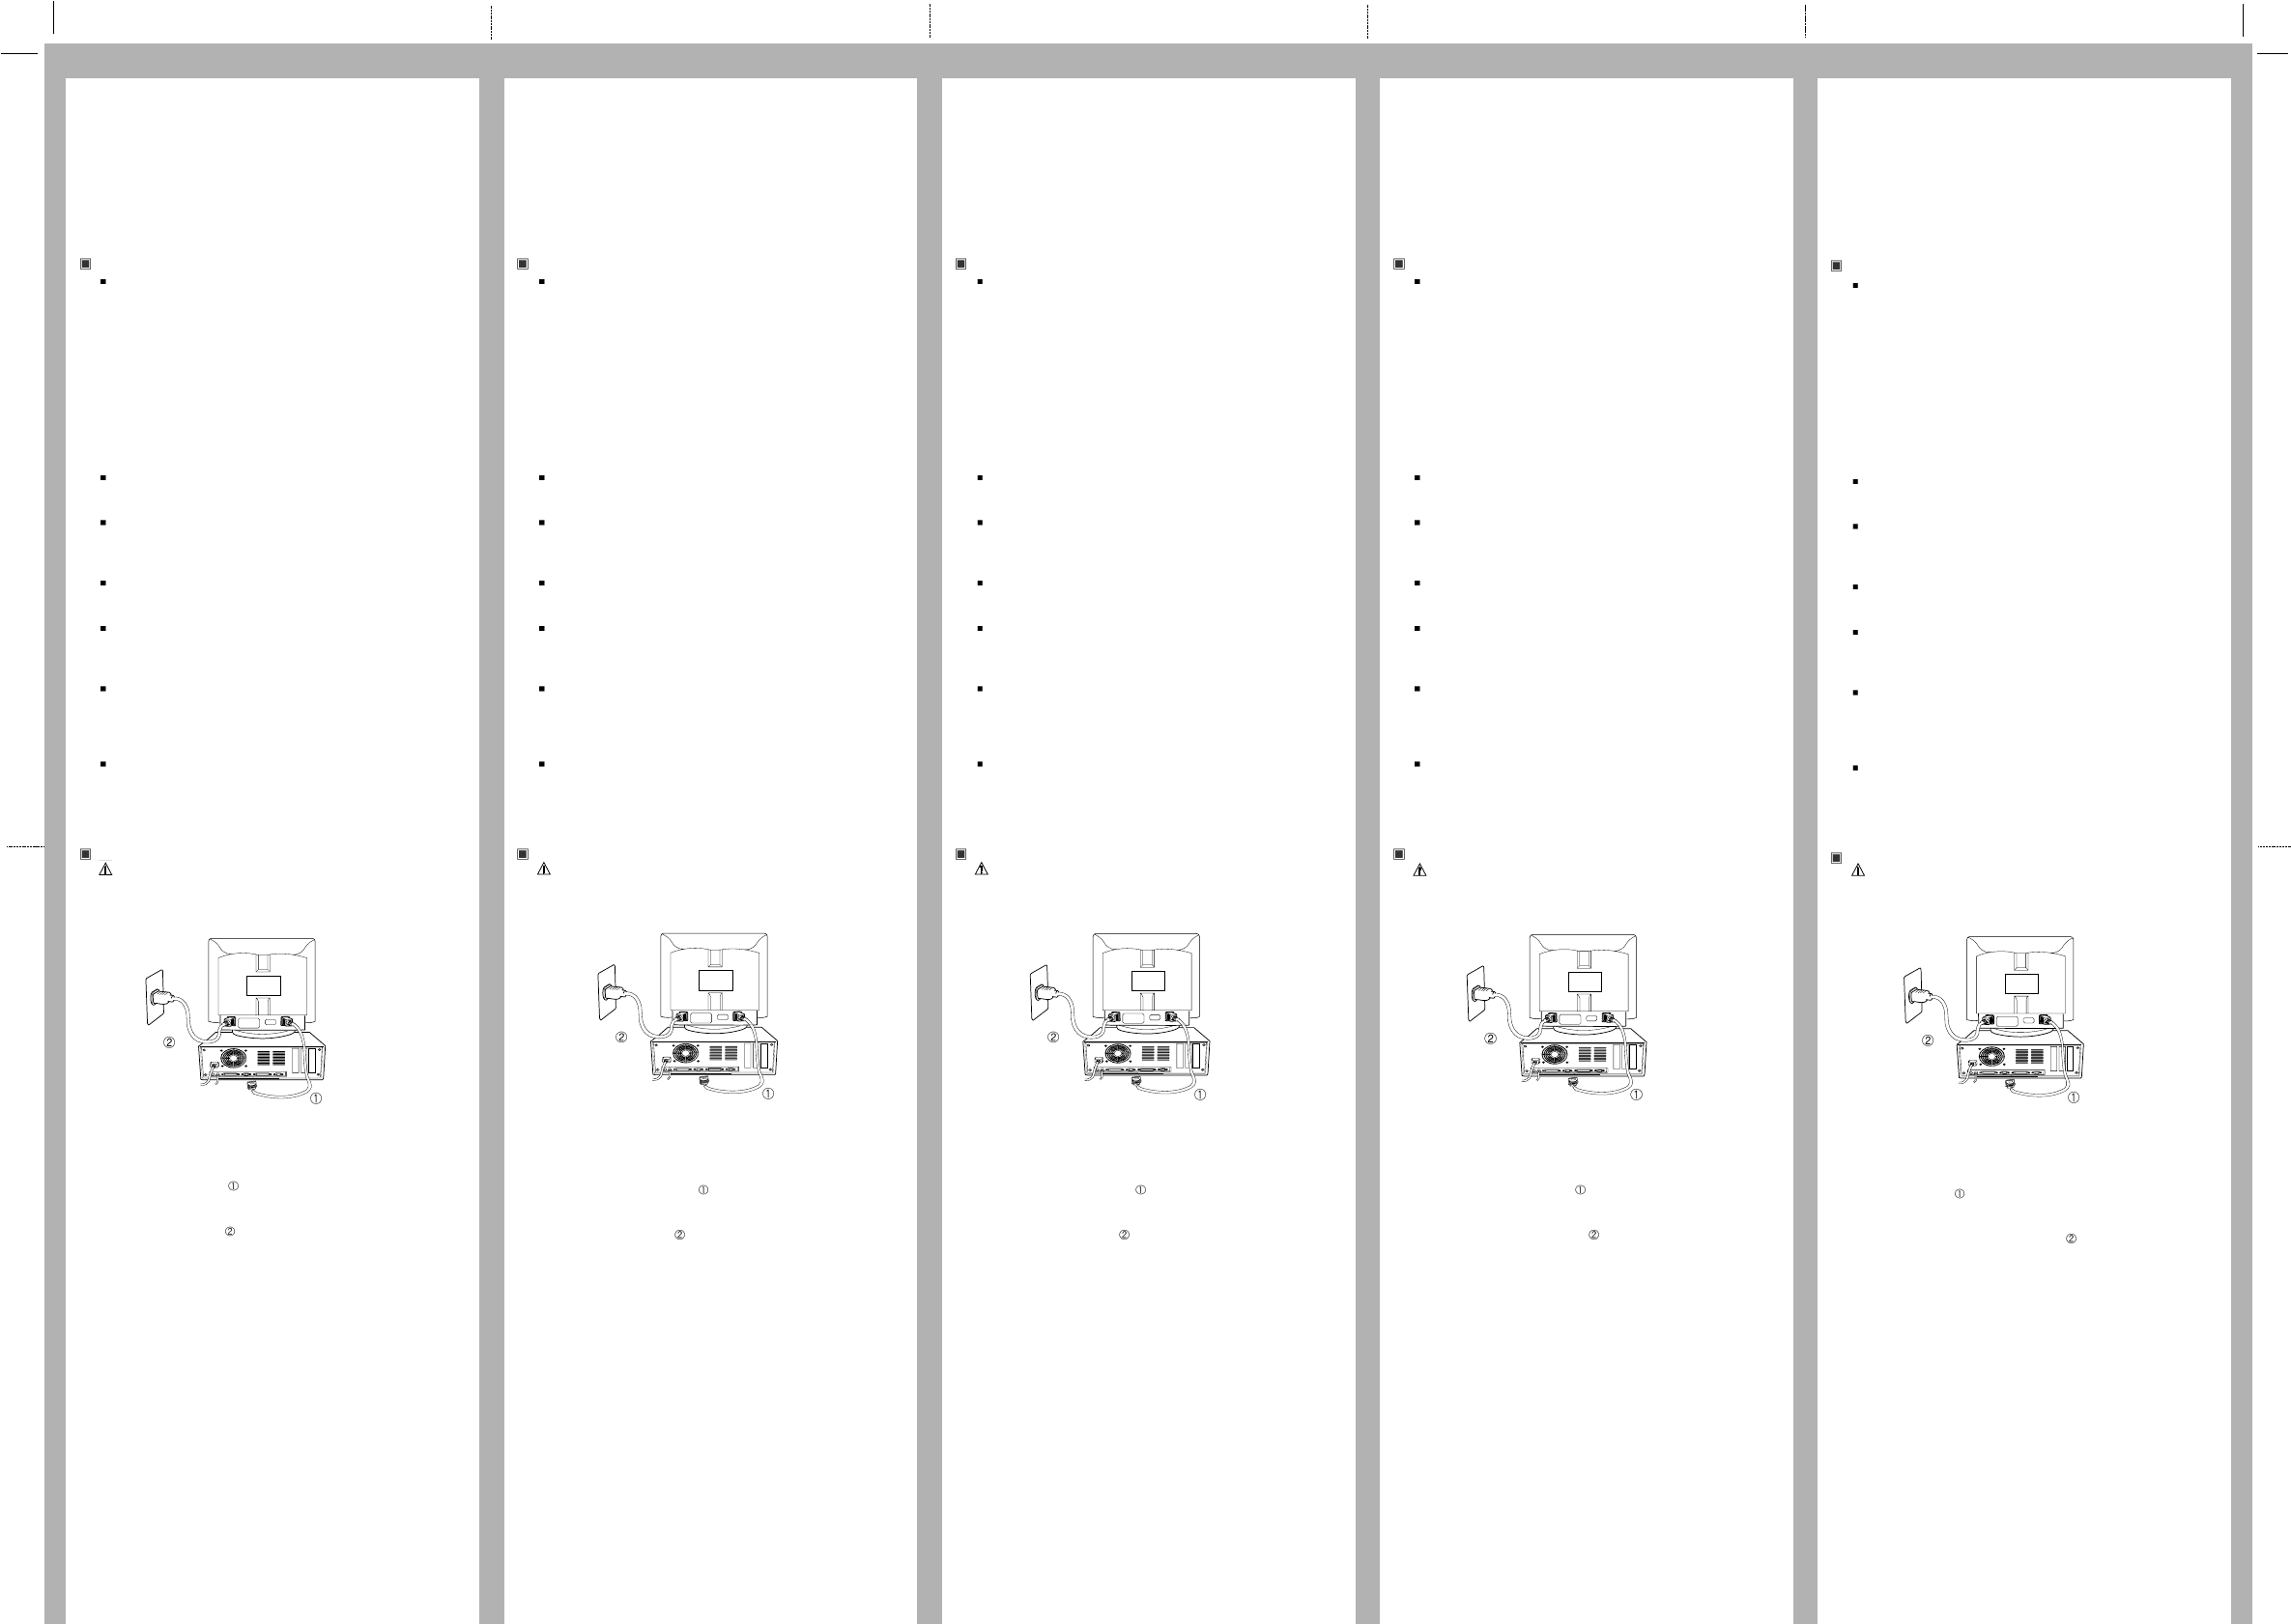
Connection to your computer
CAUTION
Ensure that both the PC and the display monitor are switched off.
To attach the monitor to your system, as
shown in the following illustrations.
1. Insert the AC power cord into monitor
and then into an AC power outlet.
2. Connect the signal cable to the 15pin
graphics connector of the system and
tighten the fastening screws.
3. To turn on the monitor, push the power
switch.
Note : To attach the monitor to the Macintosh system, please contact an authorized
dealer.(Need to use a special adaptor)
Troubleshooting
No picture
Check that the AC cord is correctly connected.
Check that the AC socket is live by plugging in another piece of equipment.
Power switch and computer power switch should be in position.
Ensure that the signal cable is properly connected to the video card or PC.
Ensure that the video card is securely seated in the PC.
Check the connector for bent or pushed-in pins.
Press a key on the keyboard or move the mouse, in case the screen power-saver
mode has blanked the screen.
Image is scrolling or unstable
Signal cable should be securely attached to the computer.
Check the pin assignments and signal timings of the monitor and your video card
with respect to recommended timings and pin assignments.
Ensure that the video card is securely seated in the PC.
Picture is fuzzy
Adjust the Contrast and Brightness Controls.
If the colors are distorted in some areas, you should demagnetize your monitor.
(See "Degauss" function in section Controls)
Caution : A minimum interval of 20 minutes should exist before the Degauss Button is
used a second time. Do not hold the button down continuously.
Picture bounces or a waving pattern is present in the picture
Move electrical devices that may be causing electrical interference away from the
monitor.
See the inside front cover of this manual for FCC information.
Unshielded audio speakers placed next to the monitor can cause picture distortion.
Move the speakers away.
Edges of the display image are not square
Adjust the distortion using the Side Pincushion or Trapezoid Pincushion Balance,
Parallel adjustment controls under the on screen menu.
Display image is not centered, too small, or too large
Adjust the horizontal and vertical image sizes using the Horizontal and Vertical Size
adjustment controls under the on screen menu.
Controls
ControlsControls
SpecificationsIntroduction IntroductionIntroduction
Video
Sync
Vertical
Video
Sync
Horizontal
State LED Power Recovery Time
On Green Normal (70 Watts) N/A
Stand by Green 65 Watts 2 Sec
Suspend Green/Blink (0.5 Sec) 15 Watts 5 Sec
Off Green/Blink(1 Sec) 3 Watts 15 Sec
State Horizontal Sync Vertical Sync
On On On
Stand by Off On
Suspend On Off
Off Off Off
Recall ( ) : If the monitor is operation in a factory preset mode, this control will reset the
screen image state to the factory preset mode by pressing DO key.
Degauss ( ) : Eliminates the build-up of stray magnetic fields which alter the correct scan
of the electron beams and affect the purity of the screen colors, focus, and
convergence. When pressed, you screen image will jump and waver a bit
as the screen is demagnetized.
ITEM B15CL
CRT Type 15 , 90 deflection FST
CRT Dot pitch 0.28mm
CRT Surface Anti-static, Non-glare
H/V Separate, TTL, positive/negative
H/V Composite, TTL, positive/negative
RGB Analog (0.7Vp-p), positive
75 Terminated
30kHz~72kHz (Automatically)
50Hz~160Hz (Automatically)
Maximum Resolution 1280Dots 1024Lines (60Hz)
Pixel Clock (Max.) 110 MHz
Display Size (Standard) Horizontal 265mm, Vertical 197mm
Power Consumption (Max.) 75 Watts
Power Supply AC 100~240Volt, 50/60Hz 3Hz
Input Connector D-Sub, 15Pin Connectors
Display Colors Unlimited
ITEM B15CL
14.6 (W) 15.7 (D) 14.8 (H)
371mm (W) 398mm (D) 375mm (H)
18.1 (W) 19.4 (D) 17.6 (H)
459mm (W) 492mm (D) 446mm (H)
26.4Ibs (12.0Kg)
30.4Ibs (13.8Kg)
ITEM B15CL
32 F to 104 F (0 C to 40 C)
-4 F to 140 F (-20 C to 60 C)
10% to 85% R.H. Non-condensing
Input
Signal
Dimension
Sync
Video
Carton
Unit
Horizontal
Net
Vertical
Gross
Operating
Storage
Humidity
Scanning
frequency
Weight
Temperature
This item allows you to move the Horizontal and Vertical
position of the screen image.
- To move screen image toward right, left, up and down.
After select the position, press "-/+" key toward
right and left.
- When you are done, press DO key once to return to
main menu at V. position.
This item allows you to adjust te Horizantal and Vertical
size of the screen image.
- Decreases the size of the screen image by pressing
"-" key.
- Increases the size of the screen image by pressing
"+" key.
- When you are done, press DO key once to return to
main menu at the V. size.
This item allows you to adjust the curvature or angle of
the sides on screen image.
Pincushion : Increases or decreases the curvature of the
sides either inward or outward.
Parallelogram : Increases or decreases the tilt of the sides
either to the left or right.
Trapezoid : Increases or decreases the bottom of the
screen to be the same as the top.
Pinbalance : Increases or decreases the curvature of the
sides either to the left or right.
Rotation : Increases or decreases the tilt of the screen
image relative to a horizontal line.
- When you are done all progress, moves the exit
(None select) and then press DO key.
This item allows you to reduce the moire.
If you want to adjust it, using "-/+" key.
When you are done, press DO key once to return to
main menu at the V. Moire adjust.
This item allows you to choose the language (With RED
icon) in while the control menu displayed.
After select the language using "-/+" key, press DO key
once to return to main menu.
This item allows you to move the OSD position on the
screen.
- H. position : To move the screen right and left
- V. position : To move the screen up and down.
When you are done, press DO key once to return to
main menu at the OSD V.position.
This item selects the different color temperature (USER,
6500K, 9300K) of the screen image.
USER : To set your own color levels. Allows for specific
adjustments to Red and Blue (Green fix).
RB - Red background raster
GB - Green background raster (fix)
BB - Blue background raster
RG - Red level gain
GG - Green level gain (fix)
BG - Blue level gain
6500K : Slightly reddish white.
9300K : Slightly bluish white.
This item adjusts the Vertical and Horizontal of the
screen image at the same time.
No. ICON CONTROL FUNCTION
DO OSD Proceed the controls.
/ Adjust button Decrease the selected function.
/ Adjust button Increase the selected function.
LED Power indicator
Power switch Turns the monitor on and off.
+
-
VGA/70Hz VGA/60Hz 640/75Hz 640/85Hz
720 400 640 480 640 480 640 480
H-Freq(KHz) 31.469 31.469 37.5 43.269
Asec 31.777 31.777 26.667 23.111
Bsec 3.813 3.813 2.032 1.556
Csec 1.907 1.907 3.81 2.222
Dsec 25.422 25.422 20.317 17.778
Esec 0.636 0.636 0.508 1.556
V-Freq(Hz) 70.09 59.94 75 85.008
Omsec 14.268 16.684 13.333 11.764
Pmsec 0.064 0.064 0.08 0.069
Qmsec 1.08 1.048 0.427 0.578
Rmsec 12.711 15.253 12.8 11.093
Smsec 0.413 0.318 0.027 0.023
Pixel rate(MHz) 28.322 25.175 31.500 36
H-Polarity Negative Negative Negative Negative
V-Polarity Positive Negative Negative Negative
Resolution
Timing
IBM VESA
800/75Hz 800/85Hz 1024/75Hz 1024/85Hz
800 600 800 600 1024 768 1024 768
H-Freq(KHz) 46.875 53.674 60.023 68.677
Asec 21.333 18.631 16.660 14.561
Bsec 1.616 1.138 1.219 1.016
Csec 3.232 2.702 2.235 2.201
Dsec 16.162 14.222 13.003 10.836
Esec 0.323 0.569 0.203 0.508
V-Freq(Hz) 75 85.061 75.029 84.997
Omsec 13.333 11.756 13.328 11.765
Pmsec 0.064 0.056 0.050 0.044
Qmsec 0.448 0.503 0.466 0.524
Rmsec 12.8 11.179 12.795 11.183
Smsec 0.021 0.019 0.017 0.015
Pixel rate(MHz) 49.5 56.25 78.750 94.5
H-Polarity Positive Positive Positive Positive
V-Polarity Positive Positive Positive Positive
Resolution
Timing
VESA
FCC Information
This equipment has been tested and found to comply with limits for a class B digital
device, pursuant to Part 15 of the FCC Rules. These limits are designed to provide
reasonable protection against harmful interference in a residential installation.
This equipment generates, uses, and can radiate radio frequency energy and, if not
installed and used in accordance with the instructions, may cause harmful inteference
to radio Communications. However, there is no guarantee that interference will not
occur in a particular installation.
If this equipment does cause unacceptable interference to radio and television
reception, which can be determined by turning the equipment off and on, the user is
encouraged to try to correct the interference by one or more of the following measures.
Reorient or relocate the receiving antenna.
Increase the separation between the equipment and receiver.
Connect the equipment into an outlet on a circuit different from that to which
the receiver is connected.
Consult the dealer or an experienced Radio/TV technician for help.
To ensure the product compliance to FCC Rules and Regulations, only use
supplied monitor signal cable.
Use of any other monitor signal cable may not ensure product compliance.
Achtung
Mit dem optionalen Dreh-Kippfuß kann der Monitor aus verschiedenen
Blickwinkeln betrachtet werden.
Hinweis
Alle Daten in dieser Anleitung können sich ohne besondere Ankündigung ändern.
Sicherheitshinweise
Mit diesem Monitor wird ein separates Netzkabel mit IEC320-Stecker geliefert. Es
kann zusammen mit jedem UL-geprüften Computer verwendet werden, der
entsprechend ausgerüstet ist. Vergewissern Sie sich vor dem Anschluß, daß an der
Netzstromausgangsbuchse des Computers eine für den Monitor geeignete
Spannung anliegt und daß der angegebene Amperewert der Leistungsaufnahme
des Monitors entspricht bzw. sie übersteigt.
Für den Anschluß an 120V-Stromquellen dürfen nur UL-geprüfte steckbare
Netzkabel mit einem 5-15P-NEMA-Stecker (mit Parallelkontakten) verwendet
werden. Für den Anschluß an 240V-Stromquellen dürfen nur UL-geprüfte steckbare
Netzkabel mit einem 6-15P-NEMA-Stecker (Doppelkontakte) verwendet werden.
Verwenden Sie nur für den Monitor geeignete Stromquellen und Kabel wie auf dem
Typenschild angegeben.
Die Schlitze und Gehäuseöffnungen gewährleisten die Luftzirkulation im Monitor. Sie
dürfen nicht verschlossen oder verdeckt werden. Stecken Sie auf keinen Fall
Fremdkörper durch die Schlitze im Gehäuse oder in andere Öffnungen.
Stecken Sie keine metallenen Gegenstände in die Monitoröffnungen. Dabei können
Sie einen elektrischen Schlag erleiden.
Zur Vermeidung von elektrischen Schlägen sollten Sie keine Bauteile im Inneren des
Monitors berühren. Nur qualifizierte Techniker dürfen den Monitor öffnen.
Ziehen Sie vor der Reinigung des Monitors den Netzstecker. Verwenden Sie zur
Reinigung keine Flüssigreiniger oder Sprays, sondern ein feuchtes, fusselfreies
Tuch.
Stellen Sie den Monitor in der Nähe einer gut zugänglichen Netzsteckdose auf.
Trennen Sie den Monitor vom Netz, indem Sie das Kabel am Stecker fassen und
aus der Steckdose ziehen; ziehen Sie niemals am Kabel selbst.
Anschluß an den Computer
VORSICHT
Vergewissern Sie sich, daß sowohl der Computer als auch der Monitor
ausgeschaltet sind.
Befolgen Sie beim Anschließen des Monitors an Ihren Computer die folgenden
Hinweise.
1. Stecken Sie das Videokabel in den 15-poligen Videoausgang des Computers
und ziehen Sie die Befestigungsschrauben an.
2. Stecken Sie das Netzkabel in die Buchse am Monitor und dann in eine
Netzsteckdose.
3. Schalten Sie den Monitor mit dem Netzschalter ein.
Hinweis : Wenden Sie sich bitte an einen autorisierten Händler, wenn Sie den Monitor
an einen Macintosh-Computer anschließen wollen. Es wird dazu ein
spezieller Adapter benötigt.
Avertissement
Si cet appareil a plus d’une prise interface, ne pas laisser de câbles branchés sur
des interfaces inutilisées.
NB
Les informations contenues dans ce document peuvent être modifiées sans avis
préalable.
Informations de sécurité
Ce moniteur est fourni avec un cordon d’alimentation détachable muni de fiches de
type IEC320. Il convient au raccordement de tout micro-ordinateur agréé UL de
configuration similaire. Avant de procéder au raccordement, vérifiez que la tension
secteur de la prise de courant de l’ordinateur est la même que celle du moniteur et
que la puissance nominale de la prise de courant de l’ordinateur est identique ou
supérieure à celle du moniteur.
Pour des applications en 120 V, utilisez uniquement un cordon d’alimentation
détachable agrée UL avec une fiche de configuration NEMA 5-15P (lames
parallèles).
Pour des applications en 240 V, utilisez uniquement un cordon d’alimentation
détachable agréé UL avec une fiche de configuration NEMA 6-15P (lames tandem).
Utilisez uniquement une alimentation et un raccordement adéquats pour le moniteur
comme indiqué sur l’étiquette de fabrication.
Les fentes et ouvertures du boîtier sont prévues pour l’aération; ces ouvertures ne
doivent pas être obturées ni fermées. Ne jamais introduire d’objets dans les fentes
ou autres ouvertures du boîtier.
N’insérez jamais d’objet métallique dans les ouvertures du moniteur. Ceci peut créer
un risque d’électrocution.
Pour éviter tout électrochoc, ne touchez jamais l’intérieur du moniteur. Seul un
technicien qualifié doit ouvrir le boîtier du moniteur.
Débranchez le moniteur de la prise secteur avant le nettoyage. N’utilisez pas de
nettoyants liquides ou de nettoyants en aérosol. Utilisez un linge humide, non
pelucheux pour le nettoyage.
Installez le moniteur près d’une prise de courant facile d’accès. Déconnectez
l’appareil en saisissant fermement la fiche et en la sortant de la prise. Ne
déconnectez jamais l’appareil en tirant sur le cordon.
Raccordement à l’ordinateur
ATTENTION
Assurez-vous que l’ordinateur et le moniteur sont mis hors tension.
Pour raccorder le moniteur à votre système, suivez les instructions ci-dessous :
1. Connectez le câble de signal vidéo au connecteur vidéo 15 broches du système
et serrez les vis de fixation.
2. Fixez le cordon d’alimentation au moniteur et branchez-le ensuite sur une prise
de courant.
3. Mettez le moniteur sous tension en appuyant sur l’interrupteur d’alimentation.
NB : Pour raccorder le moniteur à un système Macintosh, adressez-vous à un
distributeur agréé. (Un adaptateur spécial est nécessaire.)
Attenzione
Il monitor potrebbe disporre del piedistallo basculante girevole opzionale che
consente di orientarlo con vari angoli di visualizzazione.
Avviso
Le informazioni contenute in questo documento sono soggette a modifica senza
preavviso.
Informazioni sulla sicurezza
Questo monitor viene fornito in dotazione con un cavo di alimentazione staccabile
dotato di terminali standard IEC320. Questo cavo può essere utilizzato per il
collegamento a qualunque personal computer omologato UL con configurazione
simile. Prima di effettuare il collegamento, assicurarsi che la tensione nominale della
presa elettrica passante del computer sia la stessa del monitor e che l’amperaggio
massimo della presa elettrica passante del computer sia uguale o superiore a
quello del monitor.
Per applicazioni da 120 Volt, utilizzare esclusivamente un cavo di alimentazione
staccabile omologato UL con spina tipo NEMA 5-15P (con spinotti piatti in
parallelo). Per applicazioni da 240 Volt, utilizzare esclusivamente un cavo di
alimentazione staccabile omologato UL con spina tipo NEMA 6-15P (con spinotti
piatti in serie).
Impiegare esclusivamente una fonte di alimentazione ed un cavo adatti al monitor,
secondo quanto indicato sulla targhetta.
Il cabinet del monitor è dotato di fessure ed aperture di ventilazione; queste
aperture non devono essere ostruite o coperte. Non introdurre assolutamente
oggetti di alcun tipo nelle fessure del cabinet o nelle altre aperture.
Non inserire mai alcun oggetto metallico nelle aperture del monitor.
Ciò può creare rischi di scosse elettriche.
Per evitare scosse elettriche, non toccare mai i componenti interni del monitor.
L’involucro esterno del monitor deve essere aperto esclusivamente da un tecnico
qualificato.
Prima di procedere con la pulizia, scollegare il monitor dalla presa elettrica. Non
usare detergenti liquidi o aerosol. Pulire utilizzando un panno inumidito privo di
sfilacciature.
Installare il monitor in prossimità di una presa elettrica facilmente accessibile.
Scollegare l’apparecchio dalla presa afferrando saldamente e tirando la spina, non
il cavo.
Collegamento al computer
ATTENZIONE
Assicurarsi che sia il PC che il monitor siano spenti.
Per collegare il monitor al sistema, procedere come segue.
1. Collegare il cavo del segnale video al connettore video a 15 pin del sistema e
stringere le viti di fissaggio.
2. Inserire il cavo di alimentazione nel monitor e collegarlo ad una presa elettrica.
3. Per accendere il monitor, premere l’interruttore di accensione.
Nota : Per collegare il monitor ad un sistema Macintosh, rivolgersi ad un rivenditore
autorizzato (è necessario un adattatore speciale).
Precaución
Los cambios o modificaciones, sin la expresa aprobación de la parte responsable
del cumplimiento de las normas, podrían desautorizar al usuario a operar el equipo.
Aviso
La información contenida en este documento está sujeta a cambios sin previo
aviso.
Información de Seguridad
Este monitor se entrega con un cable de alimentación eléctrica desmontable con
terminaciones tipo IEC320. Puede resultar adecuado para la conexión a cualquier
ordenador personal de la Lista UL que dispongan de configuraciones similares.
Antes de efectuar la conexión, verifique que el voltaje de la toma de corriente del
ordenador sea la misma que la del monitor y que el voltaje en amperes de la toma
de corriente del ordenador sea igual o superior al voltaje de la corriente del monitor.
Para aplicaciones de 120 V utilice solamente el cable de alimentación desmontable
de la Lista UL con la configuración NEMA.
Clavija de conexión tipo 5-15P (cuchillas en paralelo). Para aplicaciones de 240 V
utilice solamente el cable de alimentación desmontable de la Lista UL con clavija de
conexión tipo 6-15P con configuración NEMA (cuchillas en serie).
Utilice solamente una fuente de alimentación y conexión apropiadas para el monitor
tal como se indica en la etiqueta de marca.
Las ranuras y aberturas de la carcasa se utilizan para ventilación; dichas aberturas
no deben estar bloqueadas o tapadas. No debe introducir nunca ningún objeto
dentro de las ranuras o aberturas de la carcasa.
Nunca inserte ningún objeto metálico dentro de las aberturas del monitor. De lo
contrario, podrÍa producirse una descarga eléctrica.
Para evitar la descarga eléctrica, no debe tocar nunca el interior del monitor.
Únicamente un técnico autorizado debe abrir la carcasa del monitor.
Desenchufe el monitor de la toma de corriente de la pared antes de efectuar la
limpieza. No debe utilizar ningún limpiador lÍquido o en aerosol. Para realizar la
limpieza, utilice un paño húmedo sin pelusa.
Instale el monitor cerca de una toma de corriente a la que pueda acceder
fácilmente. Desconecte el equipo sujetando firmemente el enchufe y quitándolo de
la toma de corriente. Nunca desconecte el equipo tirando del cable.
Conexión a su ordenador
PRECAUCIÓN
Verifique que el PC y el monitor estén desconectados.
Para conectar el monitor a su sistema, siga la instrucciones que se indican a
continuación:
1. Conecte el cable de señal de vÍdeo al conector para gráficos de 15 patillas del
sistema y ajuste los tornillos correspondientes.
2. Inserte el cable de alimentación de AC en el monitor y luego en una toma de
corriente de AC.
3. Para encender el monitor, presione el interruptor de alimentación.
Nota : Para conectar el monitor a un sistema Macintosh, póngase en contacto con un
distribuidor autorizado. (Es necesario utilizar un adaptador especial)
Conselho
Se este equipamento tem mais de um conector interface, não deixe os cabos
conectados aos interfaces que não estão sendo utilizados.
Notice
The information contained in this document is subject to change without notice.
Informaçáo de segurança
Juntamente com este monitor existe um cabo separável com terminações tipo
IEC320. Este pode apenas ser ligado a um computador pessoal existente na lista
UL com configuração similar. Antes de fazer a ligação assegure-se de que a
voltagem da tomada é a mesma que a do monitor e que a amperagem máxima da
tomada do computador é igual ou excede a corrente eléctrica do monitor.
Para aplicações de 120 volts, use somente a corda destacável da lista UL com o
pino de tomada de configuração NEMA do tipo 5-15P(gumes paralelos).
Para aplicações de 240volt, use somente a corda destacável da lista UL com o
pino de tomada de configuração NEMA do tipo 6-15P(gumes tandem).
Use apenas fontes de alimentação e ligações apropriadas para o monitor como
indicado na etiqueta.
Aberturas e ranhuras na caixa do monitor destinam-se a ventilação. Estas aberturas
não podem ser bloqueadas ou cobertas. Nunca empurre objectos de qualquer
espécie para dentro da caixa do monitor.
Nunca introduza objectos metálicos nas aberturas do monitor devido a risco de
choque eléctrico.
Para evitar choque eléctrico, nunca toque no interior do monitor. Apenas um
técnico qualificado dever· abrir a caixa do monitor.
Desligue a tomada do monitor antes de o limpar. Não use líquidos ou aerossóis de
limpeza. Use um pano húmido que não liberte pêlos para a limpeza do monitor.
Instale o monitor perto de uma tomada que possa alcançar facilmente. Para
desligar o monitor, agarre a ficha firmemente e puxe-a da tomada. Nunca desligue
o monitor puxando pelo cabo.
Ligação ao computador
ATENÇÃO
Certifique-se de que o PC e o monitor estão desligados.
Para ligar o monitor ao seu sistema, como demonstram as ilustrações seguintes.
1. Ligue o cabo de sinal ao conector gráfico de 15 pinos do sistema e aperte os
parafusos.
2. Introduza o cabo de alimentação de energia AC no monitor e depois na tomada
de energia.
3. Para ligar o monitor, pressione o botão interruptor de energia.
NOTA: Para conectar seu monitor ao um computador Macintosh, entrar em contato
com seu revendedor, um adaptor é necessário.
PortuguêsItaliano EspañolDeutsch Français