Hansol LCD D17DL-1 17" CRT MONITER User Manual model
Hansol LCD Inc. 17" CRT MONITER model
MANUAL
User’s Guide
730D(D17DL)
COLOR MONITOR
Regulatory Information.......................................................................................................................... 2
Introduction
Features ...................................................................................................................................................3
Controls
OSD Controls ...........................................................................................................................................4
OSD Menus ..............................................................................................................................................5
Power Management Feature................................................................................................................. 8
Standard Signal Table ............................................................................................................................ 8
Specifications .......................................................................................................................................... 9
Pin assignment table D-Sub Mini 15pin connector ...................................................................... 10
Troubleshooting .....................................................................................................................................11
Table of Contents

Color Monitor
2
Regulatory
Information
- FCC Information
Caution
Changes or modifications not expressly approved by the party responsible for compliance could void the user’s
authority to operate the equipment.
- Canadian Notice This Class B digital apparatus meets all requirements of the Canadian Interference Causing Equipment Regulations.
- Avis Canadien Cet appareil numérique de la classe B respecte toutes les exigences du Règlement sur le matériel brouilleur du
Canada.
- Energy Star As an ENERGY STAR partner, Hansol Electronics Inc. has determined that this product meets energy Star
guidelines for energy efficiency.
Notice
The information contained in this document is subject to change without notice.
This equipment has been tested and found to comply with limits for a class B digital device, pursuant to Part 15 of
the FCC Rules. These limits are designed to provide reasonable protection against harmful interference in a
residential installation.
This equipment can generates, uses, and radiate radio frequency energy and, if not installed and used in
accordance with the instructions, may cause harmful interference to radio communications. However, there is no
guarantee that interference will not occur in a particular installation.
If this equipment does cause unacceptable interference to radio and television reception, which can be determined
by turning the equipment off and on, the user is encouraged to try to correct the interference by one or more of the
following measures.
Reorient or relocate the receiving antenna.
Increase the separation between the equipment and receiver.
Connect the equipment into an outlet on a circuit different from that to which the receiver is connected.
Consult the dealer or an experienced Radio/TV technician for help.

Color Monitor
3
Introduction
- Features
The exclusive double dynamic focus system with a hyperbolic focus compensation circuit controls the electron
beams resulting in a fine image display over the entire area of the screen.
Super contrast screen for superior contrast and richer color.
Advanced INVAR Shadow mask for superior focus, brightness and color.
On screen menu color control system easily allows the white of the image to be adjusted as well as R.G.B
signals, resulting in true-to-life colors.
Ergonomic Design
Flat, square screen to reduce image distortion and glare, thus relieving eye strain.
Low-leak radiation prevention meeting MPR Ⅱ and the very stringent TCO(optin) magnetic field emissions
standards for increased user safety.
Environmentally Friendly
Power management circuit conforming to VESA DPMS standards controls energy consumption when monitor
is not in use, you save energy.
All plastic parts are recyclable. All materials are strictly selected to ensure ease of maintenance, inspection and
disposal.
Timing
Automatic tracking of horizontal frequencies of 30 to 95 kHz, and vertical frequencise of 50 to 160 Hz.
Ten timings are factory preset for image size and position.
Ten additional timings are user definable.
System Flexibility
Equipped with DDC1, DDC2B and DDC2Bi for Plug & Play compatibility.
Monitor is compatible with VGA, SVGA, VESA and high resolution video modes up to 1600(H) x 1200(V) @ 75Hz.
Automatic universal power supply is built in permitting AC power input of 100 - 240V AC, 50 or 60Hz.
Power supply operates on AC 200-240V( ±10%), 50/60Hz for use all over the world.(Europe Version)
Self-test menu allows the display unit to be checked on screen without connecting to a computer.
Superior image
Color Monitor
4
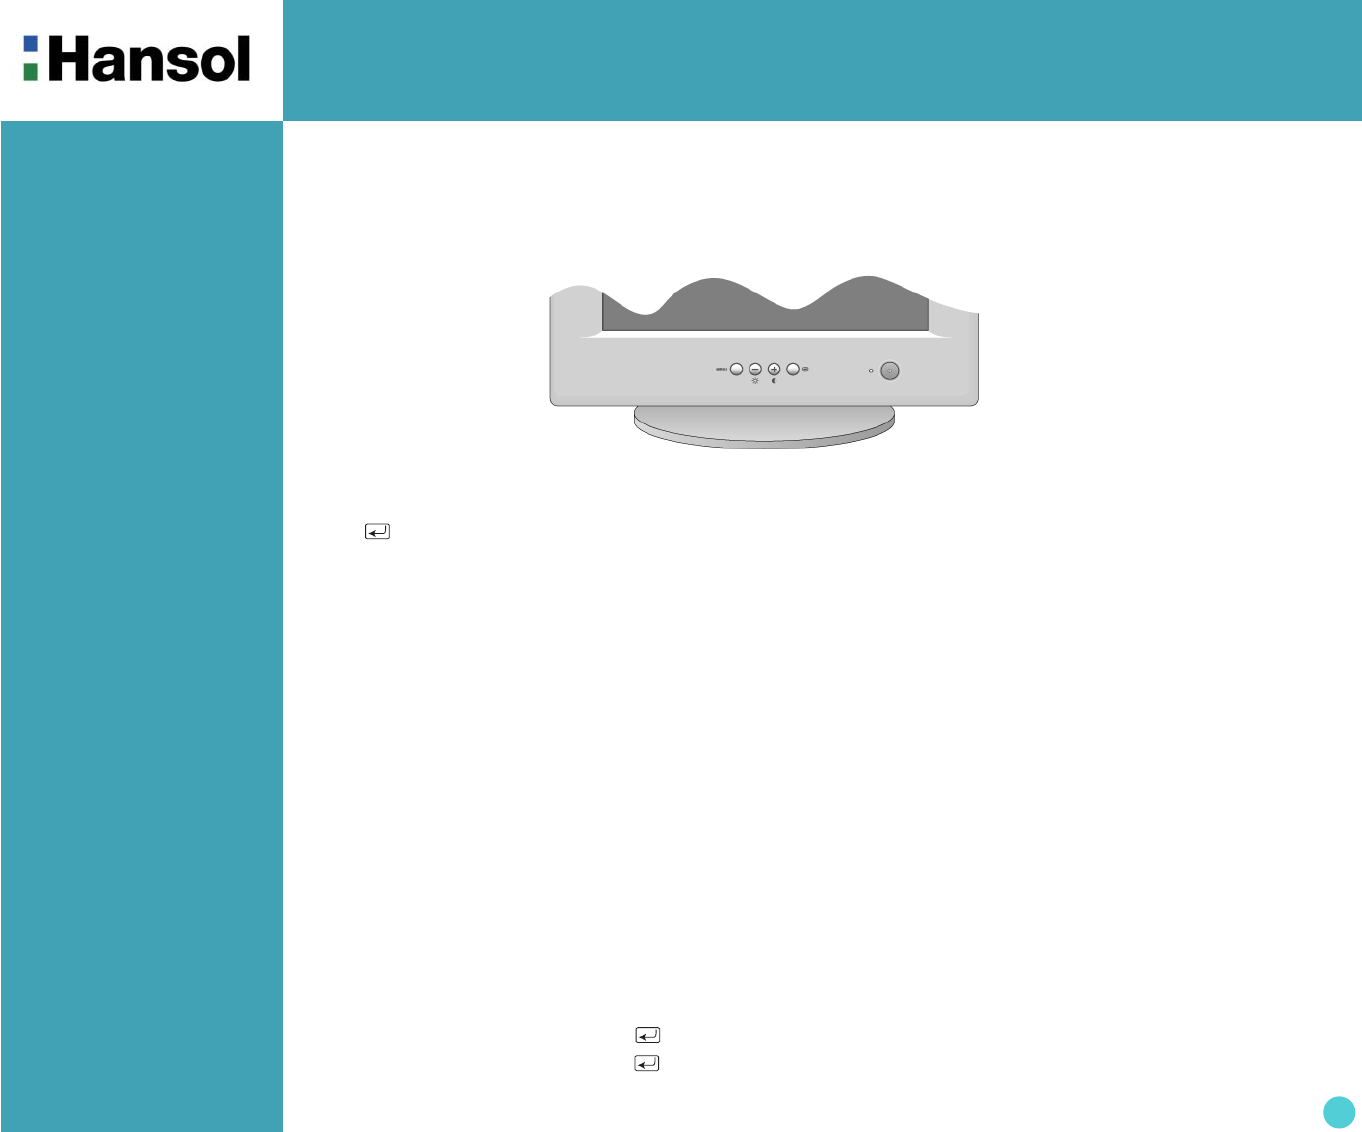
Controls
- OSD controls
Function of OSD buttons on the front of the monitor
In the main menu, exits the OSD controls. In a submenu, exits to the OSD main menu.
- / +
1) When no OSD on the Screen,
- : Direct access to Brightness controls.
+ : Direct access to Contract controls.
2) When Main menu is displayed. : Moves to function what you want to adjust.
3) When the Sub menu is displayed. : Controls the amount what you want to adjust.
MENU : Displays OSD main Menu.
1) When Main menu is displayed. : Selects function with RED ICON.
2) When Sub menu is displayed. : Selects function with RED ICON.
Additional front controls
Power Switch : Turns the monitor power on or off. When the power is on, the LED is on.
LED Power indicator Light : Located left side of the power switch and indicates the monitor's power mode.
Each mode reduces the amount of power used by the monitor.
Accessing on screen menu
Press MENU Button.
Turning off on screen menu
When in the main menu, press button.
When in submenus, press the button twice.
"ON SCREEN MENU" controls include the following extended controls such as Size, Position,
Geometry, Color Adjust, Brightness and Contrast Utilities. Adjustments are saved instantly.
The currently addressed control can be reset to factory settings by pressing the Reset button.
Color Monitor
5
Controls
OSD MENU MENU CONTROL
1. NO OSD Proceeds to NO.2
- Proceeds to NO.3
+ Proceeds to NO.4
No meaning
2. MAIN MENU The function with RED ICON is
- Performed : Recall, Degauss
- Selected and blinked :
Color Adjust, Zoom
- Proceeded : Others
- + Moves to function you want.
Exit to No.1
3. BRIGHTNESS
Moves to No.2
- Decreases the brightness
+ Increases the brightness
Exit to No.1
4. CONTRAST
Moves to No.2
- Decreases the contrast
+ Increases the contrast
Exit to No.1
5. H/V-POSITION
Toggles horizontal or
vertical position
- Moves the image down or left in the
selected function.
+ Moves the image up or right in the
selected function.
Exit to No.2
6. H/V-SIZE
Toggles horizontal or
vertical size
- Shrinks the image in the selected
function.
+ Expands the image in the selected
function.
Exit to No.2
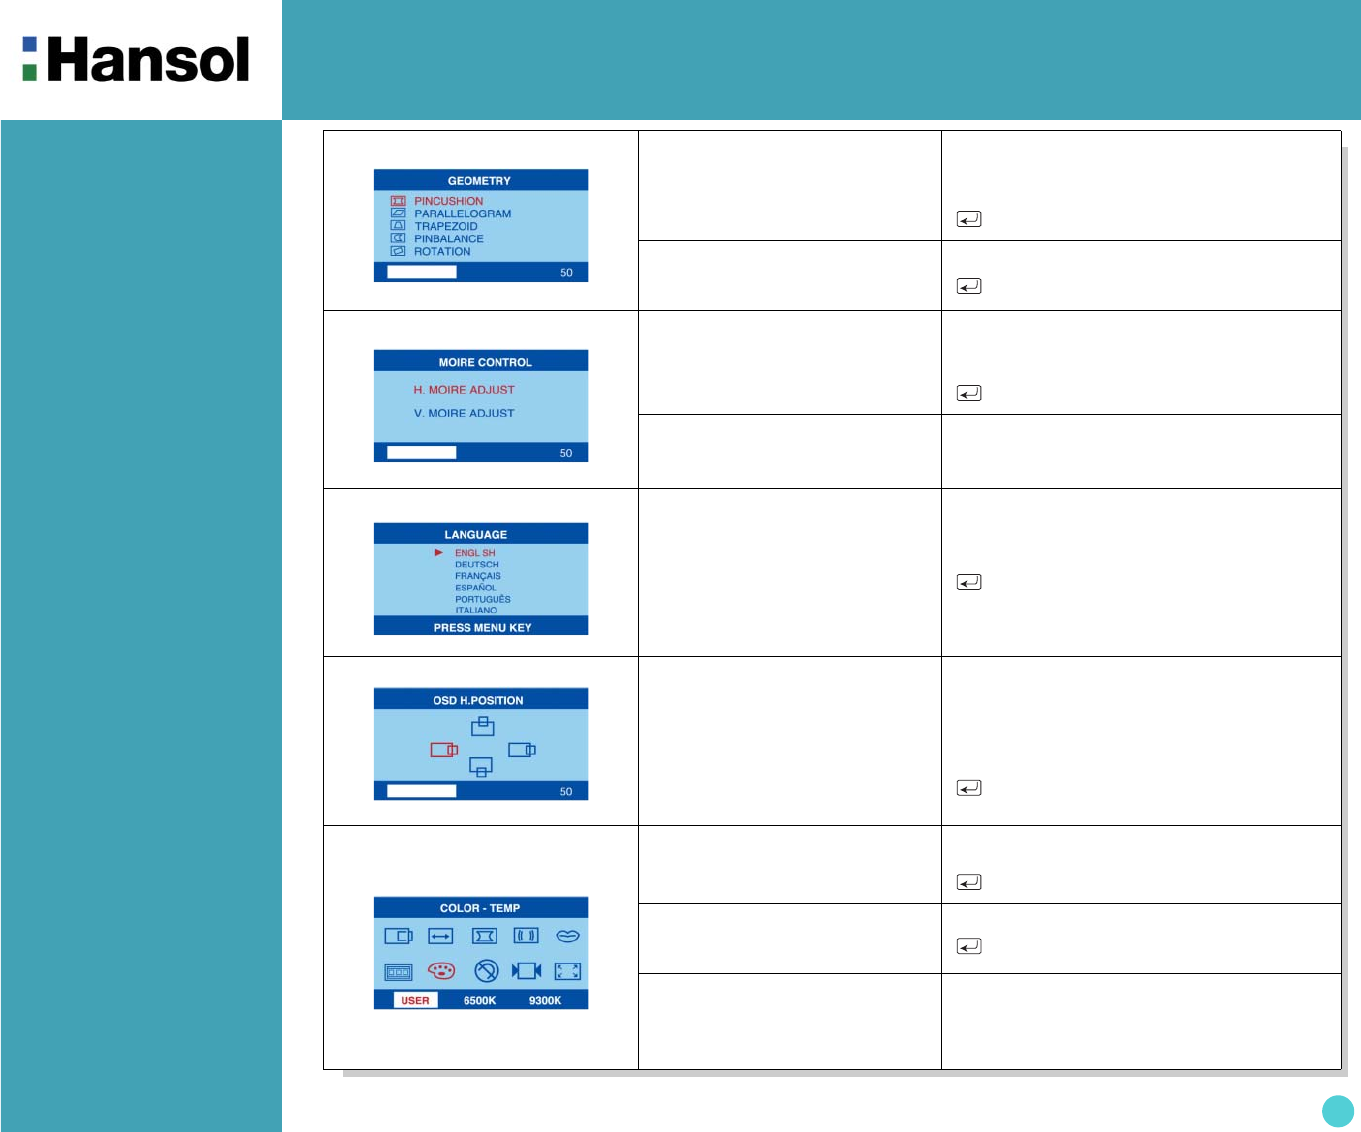
- OSD Menu
Color Monitor
6
7. GEOMETRY Odd press
: Selects and blinks the function
with RED ICON.
- + Controls the amount of the Selected
function. (Refer to Geometry
controls menu in detail)
Exit to No.2
Even press
: Stops blinking and ready to
move function you want.
- + Moves to function you want.
Exit to No.2
8. MOIRE Odd press
: Selects and blinks the
function with RED ICON.
- + Controls the amount of the seleccted
function. Please control these key
in order the image not to shiver.
Exit to No.2
Even press
: Stops blinking and ready to
move function you want.
- + Moves to function you want.
9. LANGUAGE
Selects the languages with
RED ICON and Exit to No.2.
- + Moves to language you want.
Exit to No.2
10. OSD POSITION
Toggles OSD position
horizontally or vertically.
- Moves the OSD menu left or down in
the selected function.
+ Moves the OSD menu right or up
in the selected function.
Exit to No.2
11. COLOR MODE
Odd press
: Blinks the RED ICON
- color menu ICON.
- + Moves to color mode you want and
the selected “color mode” will blink.
Exit to No.1
Even press
: Stops blinking and ready to
move function you want.
- + Moves to function you want.
Exit to No.1
When the color mode ICON
is blinking in user mode, press,
then go to color adjust mode
No.12.
-
Color Monitor
7
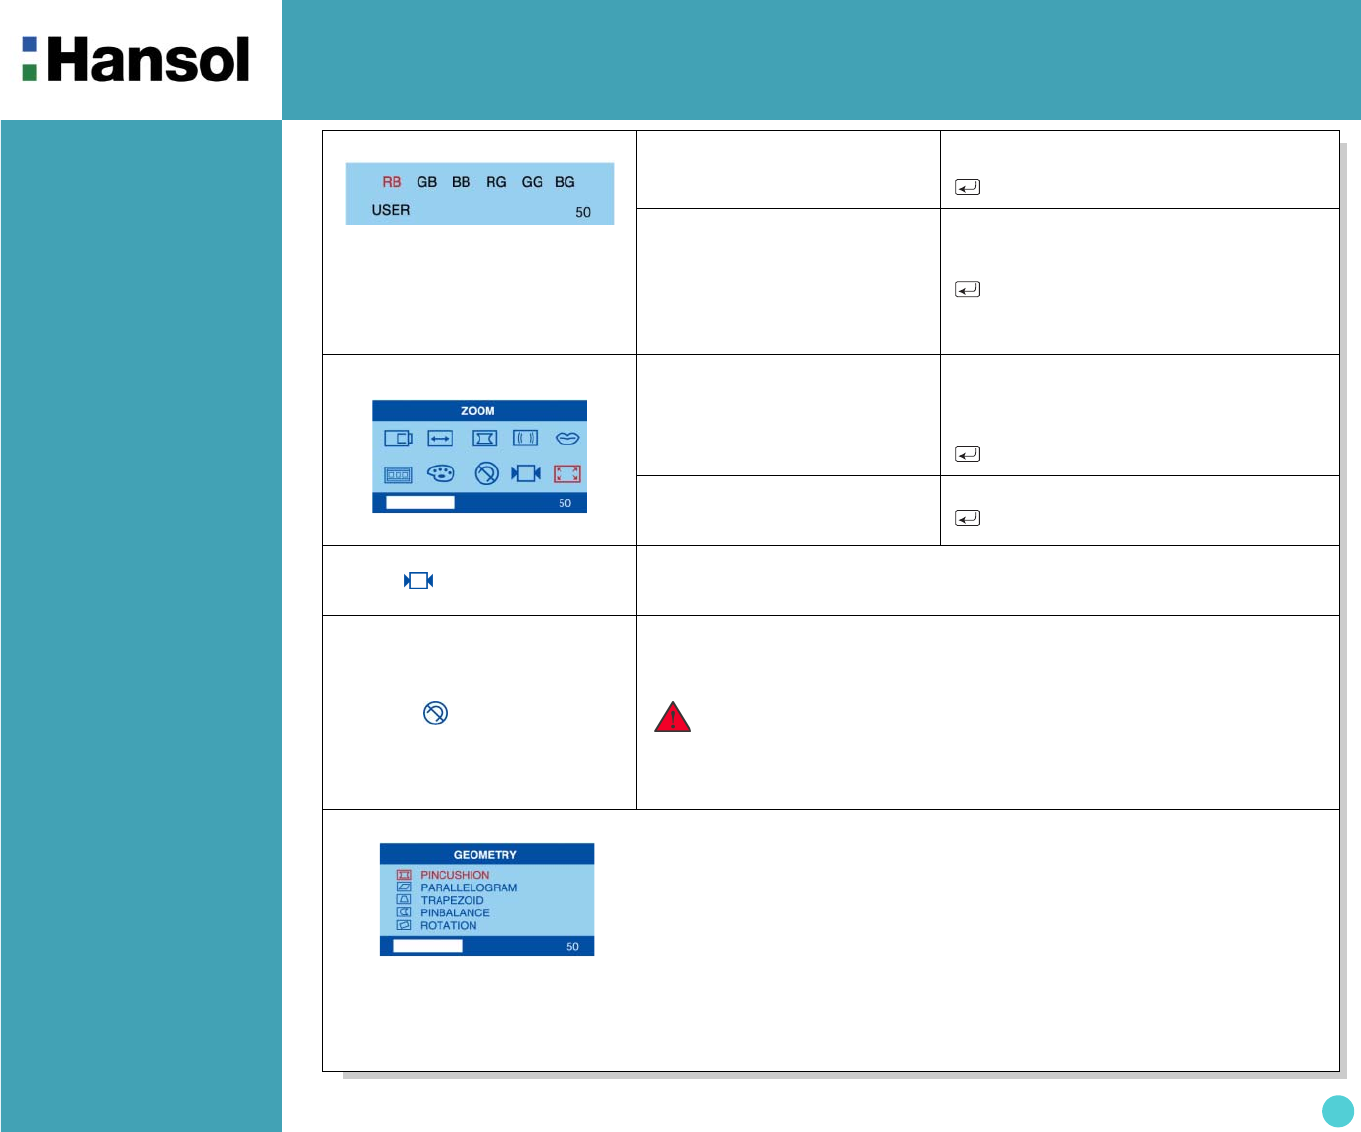
12. COLOR ADJUST MODE
RB - Red background raster
GB - Green background raster
BB - Blue background raster
RG - Red level gain
GG - Green level gain
BG - Blue level gain
Odd press
: Selects and blinks the
function you want.
- + Controls the amount of function
you want.
Exit to No.11
Even press
: Stops blinking and ready to
move function you want.
- + Moves to function you want.
Exit to No.11
13. ZOOM Odd press
: Selects zoom and blinks the
zoom ICON.
- Shrinks the image horizontally and
vertically.
+ Expands the image horizontally and
vertically.
Exit to No.1
Even press
: Stops blinking and ready to
move another function.
- + Moves to the function you want.
Exit to No.1
Recall ( )
Recall control to the factory setting resets all the controls within the all menu.
If you want to return to the factory mode setting, press menu key on Recall
ICON.
Degauss( )
Eliminates the build-up of stray magnetic fields which alter the correct scan of
the electron beams and affect the purity of the screen colors, focus, and
convergence. When pressed, you screen image will jump and waver a
bit as the screen is demagnetized.
※Geometry Controls Menu
•Pincushion : Increases or decreases the curvature of the sides either inward or outward.
•Parallelogram : Increases or decreases the tilt of the sides either to the left or right.
•Trapezoid : Increases or decreases the bottom of the screen to be the same as the top.
•Pin Balance : Increases or decreases the curvature of the sides either to the left or right.
•Rotation : Increases or decreases the tilt of the screen image relative to a horizontal line.
Caution : Please allow a minimum of 20 minutes to elapse between
uses of the Degauss button. Do no hold the button down
continuously to avoid decreasing the life the Deguass
circuitry.
The Geometry controls allow you to adjust the curvature or
angle of the sides of you display.
Color Monitor
8
Power
Management
Feature
The monitor is equipped with a power saving circuit that confirms to the world-standard Display Power Manager
Signalling (DPMS) mode of Video Electronics Standard Association(VESA).
The power management feature requires that the video card of the computer should support DPMS function.
Standard Signal
Table
Status LED Sign Power Consumption
Normal mode Green 100 Watts
DPMS mode LED Off Less than 5 W
Resolution Horizontal
Frequency(kHz)
Vertical
Frequency(Hz)
Clock Frequency
(MHz)
Sync Polarity
(H/V)
VGA (720 x 400) 31.469 70.087 28.322 - / +
VGA (640 x 480) 31.469 59.940 25.175 - / -
VGA (640 x 480) 43.269 85.008 36.000 - / -
VGA (720 x 400) 37.927 85.039 35.500 - / -
SVGA (800 x 600) 46.875 75.000 49.500 + / +
SVGA (800 x 600) 53.674 85.061 56.250 + / +
XGA (1024 x 768) 60.023 75.029 78.750 + / +
XGA (1024 x 768) 68.677 84.997 94.500 + / +
SXGA (1280 x 1024) 79.976 75.025 135.000 + / +
SXGA (1280 x 1024) 91.146 85.024 157.500 + / +
UXGA (1600 x 1200) 93.750 75.000 202.500 + / +
No image is displayed with Green blinking
Monitor is in power saving mode.
Use mouse or keyboard to release power saving mode.
No image is displayed without LED on.
Power cable plug must be pulled out.
Check the power plug on monitor and on the wall.
"Out of range" displayed on the screen.
This message is displayed when the signal from video card exceeds the maximum
frequency of the monitor. Readjust resolution and frequency in accordance with the monitor
capacity.(Refer to Standard Signal Table).
.
Color Monitor
9
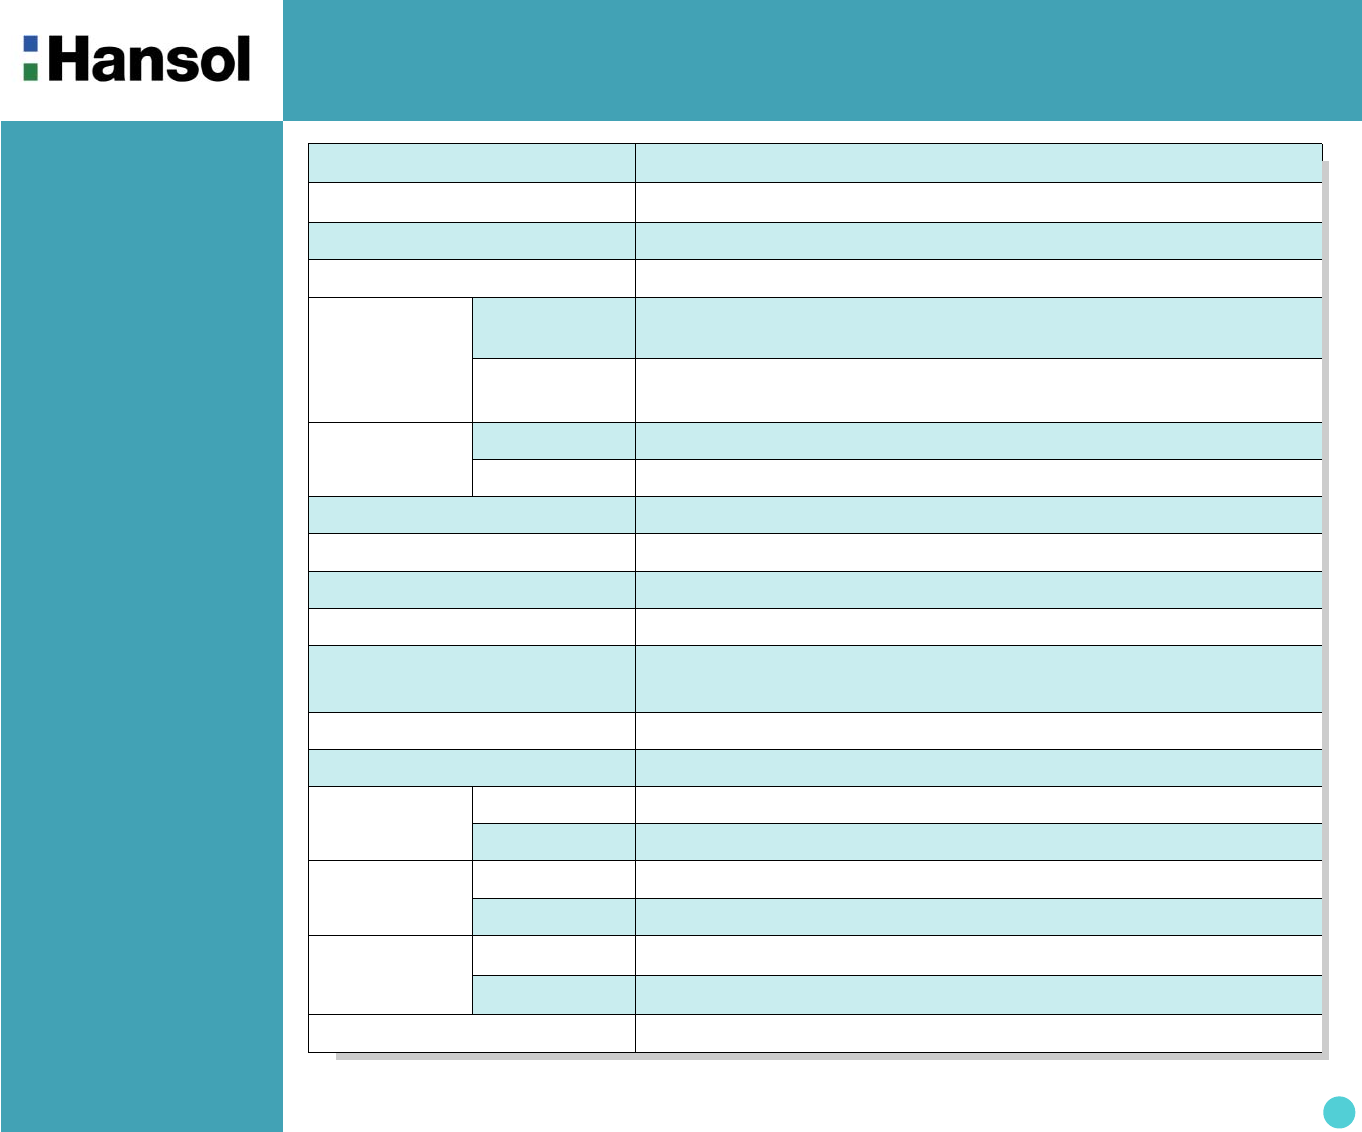
Specifications
ITEM 730D(D17DL)
CRT Type 17", 90° deflection FLAT
CRT Horizontal Dot pitch 0.20mm
CRT Surface Non-glare, Anti-Reflection & Anti-Static
Input
Signal
Sync. H/V Separate, TTL, positive/negative
H/V Composite, TTL, positive/negative
Video RGB Analog (0.7Vp-p), positive
75 Ω Terminated
Scanning
frequency
Horizontal 30KHz~95KHz (Automatically)
Vertical 50Hz~160Hz (Automatically)
Maximum Resolution 1600Dots x 1200Lines (Non-interlace)
Pixel Clock(Max.) 157.8 MHz
Display Size (Standard) Horizontal 306mm, Vertical 230mm
Power Consumption(Max.) 100 Watts
Power Supply AC 100~240Volt, 60/50Hz ±3Hz
AC 220~240V( ±10%), 50/60Hz ±3Hz(Europe Version)
Input Connector D-Sub, 15Pin Connectors
Display Colors Unlimited
Dimension Unit 15.6" (W) x 16.2" (D) x 16.1"(H) / 397mm(W) x 412.7mm(D) x 410.2mm(H)
Carton 18.1" (W) x 20.3" (D) x 18.1"(H) / 460mm(W) x 515mm(D) x 460mm(H)
Weight Net 34.8lbs (15.8kg)
Gross 38.1lbs (17.3kg)
Temperature
Operating 32℉ to 104℉ (0℃ to 40℃)
Storage -4℉ to 140℉ (-20℃ to 60℃)
Humidity 10% to 85% R.H. Non-condensing
Color Monitor
10
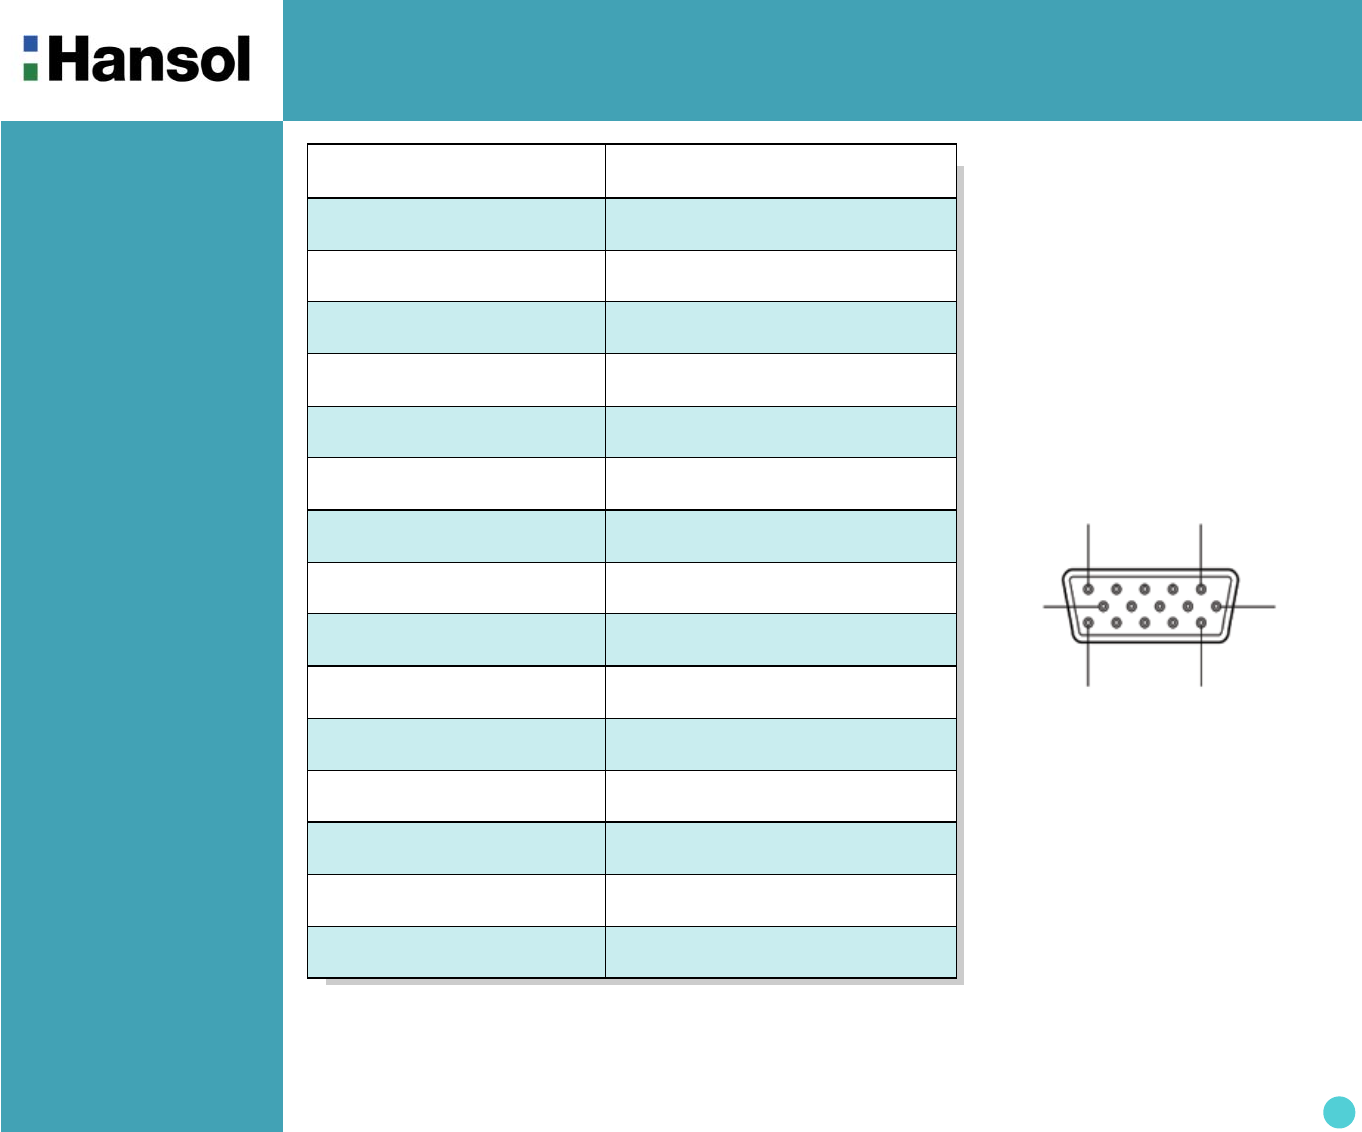
Pin assignment
table D-Sub Mini
15pin connector
z
The 15-pin D-Sub connector
(male) of the signal cable
(IBM Systems) :
1
5
610
11 15
(15 Pin D-Sub)
Pin No. Assignment
1Red Video
2 Green Video
3Blue Video
4 Frame Ground
5Ground
6 Red Video Ground
7Green Video Ground
8 Blue Video Ground
9 N.C
10 Sync. Ground
11 Ground
12 SDA
13 H-Sync.
14 V-Sync.
15 SCL
Color Monitor
11
Troubleshooting Problem Solution
No picture Check that the AC cord is correctly connected.
Check that the AC socket is live by plugging in another piece of equipment.
Power switch and computer power switch should be in position.
Ensure that the signal cable is properly connected to the video card or PC.
Ensure that the video card is securely seated in the PC.
Check the connector for bent or pushed-in pins.
Press a key on the keyboard or move the mouse, in case the screen
power-saver mode has blanked the screen.
Image is scrolling or unstable Signal cable should be securely attached to the computer.
Check the pin assignments and signal timings of the monitor and your video
card with respect to recommended timings and pin assignments.
Ensure that the video card is securely seated in the PC.
Picture is fuzzy Adjust the Contrast and Brightness Controls.
Push the Degauss Button once.
Picture bounces or a waving
pattern is present in the picture
Move electrical devices that may be causing electrical interference away from
the monitor.
See the inside front cover of this manual for FCC information.
Unshielded audio speakers placed next to the monitor can cause picture
distortion. Move the speakers away.
Edges of the display image are
not square
Adjust the distortion using the Side Pincushion or Trapezoid Pincushion
Balance, Parallel adjustment controls under the on screen menu.
Display image is not centered,
too small, or too large
Adjust the horizontal and vertical image sizes using the Horizontal and Vertical
Size adjustment controls under the on screen menu.
Caution
A minimum interval of 20 minutes should exist before the Degauss Button
is used a second time. Do not hold the button down continuously.