Hansong ZEMIARIA Zemi Aria User Manual 30 43441 00 ZMA Manual artwork 9 28
Hansong(Nanjing) Technology Ltd. Zemi Aria 30 43441 00 ZMA Manual artwork 9 28
Hansong >
user manual

O W N E R S M A N U A L
For alternative language versions of this owners manual, please visit www.pellisari.com/ownersmanual
1 x Zemi Aria Spherical Speaker
1 x Stainless Steel Magnetic Grill
(already installed on speaker)
1 x Remote Control
1 x Power Cord
(2 x Power Cords European Version)
1 x Headphone Jack Cable
1 x USB Mini Adapter Cable
1 x Clear Acrylic Circular Stand
PAC K AG E CO N TE N TS
2
3
Z E M I AR I A
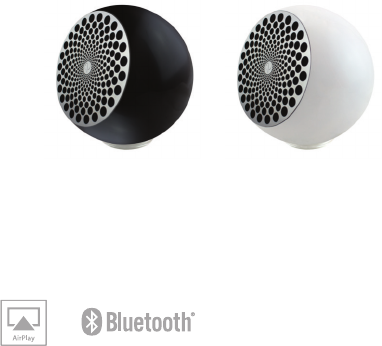
AirPlay works with iPhone, iPad, and iPod touch with iOS 4.3.3 or later, Mac with OS X Mountain Lion,
and Mac and PC with iTunes 10.2.2 or later.
AirPlay, iPad, iPhone and iPod Touch are trademarks of Apple Inc., registered in the U.S. and other
countries. iPad Air and iPad Mini are trademarks of Apple Inc.
The Bluetooth ® word mark and logos are registered Trademarks owned by Bluetooth SIG, Inc.
Born in the 1960s in Rimini on the
Italian Coast, Francesco Pellisari is the twin son
of a member of the Italian avant-garde literary
movement known as Gruppo 63. Growing up in
this creative environment, free from convention,
surrounded by great art, Francesco and his
brother Emiliano were raised with sculptors,
poets and philosophers as primary infuencers.
In early adulthood, Emiliano turned his attention
toward theater arts, while Francesco focused on
robotics and began developing his technical and
scientifc acumen.
Francesco later began to deeply explore the
acoustic concepts of Roy Allison, and sought
the guidance of the renowned speaker engineer
to master loudspeaker design and application.
Under Allison’s mentorship, Francesco began
applying his own acoustic innovations to unique
loudspeaker designs. The combination of his
artistic sensibility and acoustic expertise took
the form of handcrafted, beautifully-shaped,
ceramic loudspeakers sold today by his company
NACSound, located in Rome.
Now, in collaboration with artist, industrial
designer and architect, Ron Arad, Francesco
Pellisari presents to you the Zemi Aria: an
exciting combination of Italian shape and sound
designed to bring your listening experience
to life.
We hope you thoroughly enjoy this masterpiece
of design and technology.
H I S T O RY
4
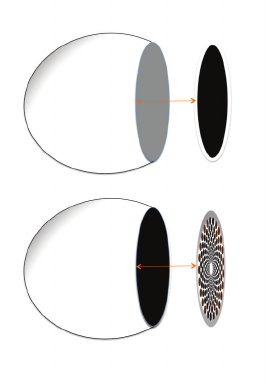
AT TA C H I NG T HE G RI L L E
You can customize the look of your Zemi.
1. Ron Arad design on top of black
cloth grille (installed)
2. Black cloth grille alone
3. No grille (best for full volume
listening)
The grille is magnetic and
attached to the magnets
around the face of the speaker
For additional cloth grille colors
please go to pellisari.com
Metal
Cloth
Magnet Cloth
5
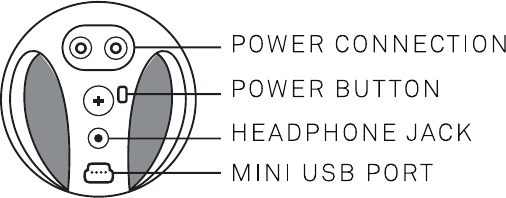
Z E M I CON N E C T IO N S
(not for audio playback)
6
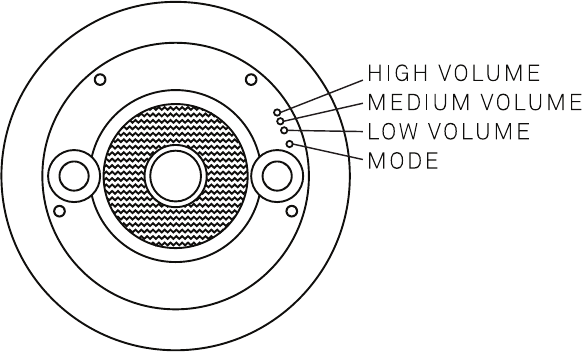
Z E M I IN D I C ATO R L I GH T S*
*Zemi indicator lights are located on the
upper right hand side of the Zemi face.
When illuminated, these lights should be
visible through the metal grill. If they are
not visible, the grill may be rotated slightly,
or completely removed to ensure proper
set up and function.
7
Q U I C K S TAR T S E T U P & OP E R AT I NG I N S T R UC T I O N S
SET UP
1. Find a fat surface and remove the acrylic ring from the box.
2. Remove Zemi Aria, and place it on the acrylic ring.
3. Remove the power cord and plug it into the back of the Zemi.
4. Plug the power cord into an outlet.
5. The mode light should be solid orange indicating “Standby” mode.
6. The Zemi is now set up and ready to be powered on.
8
P O W E R O N & O FF
TURNING THE ZEMI ON
1. To turn Zemi on, push the Power Button once (located below the Power Connection).
2. The Mode Light will fash orange for 10-15 seconds during the ZEMI startup sequence.
3. When the startup sequence is complete, the Mode Light will either continue to fash slowly
orange or will fash blue if ZEMI has previously connected with a Wi-Fi network. If ZEMI is
able to connect to a previous Wi-Fi network, the Mode Light will become solid blue.
4. The Low Volume Light will turn blue meaning the ZEMI is on and ready to play.
TURNING THE ZEMI OFF
1. Push and hold the power button for 3 seconds.
2. The mode light and volume lights turn of after 3 seconds.
3. The mode light will turn orange indicating the Zemi is of and in “Standby” mode.
9
O P E R AT I O N
PLAY MUSIC WITH THE ZEMI
When speaker is turned on, you may choose to play music wirelessly or through the
provided headphone jack cable.
BLUETOOTH WIRELESS PLAYBACK
1. Go to Bluetooth menu on your Bluetooth enabled music device.
2. Choose Zemi from the list of available Bluetooth devices.
3. Pair the Zemi and the music device.
4. Once Zemi is connected to your device, you may begin playing music wirelessly.
5. The mode light will illuminate orange and the blue lights will indicate the current volume.
6. Play music and control volume with your music device.
7. To switch users, Zemi must frst be disconnected from the current music device it is paired
with.
10
CON N E C T IN G TO T H E Z EM I T H R O UG H WI - FI N E T W O R K
AIRPLAY WIRELESS PLAYBACK
You will need to connect your music device to the Zemi using your device’s USB charging cable.
1. Plug your USB charging cable into your music device (iPhone, iPad, iPod only).
2. Plug the USB connector on your USB charging cable into the USB Mini adaptor cable.
3. Plug the USB Mini adapter cable into the USB port on the back of the Zemi, located below the power
cord connection. Make sure all connections are secure.
4. Push the Power Button 2 times.
5. A message on the screen of your music device will ask if you want to allow sharing of network setting.
If you do not see this message, check all connections are secure and repeat step 4.
6. Touch “Allow” on your music device.
7. The Zemi may take up to 1 minute to join the network. During this initial set up process, the Zemi
mode light will fash blue. Once connected, the light will remain a solid blue.
8. Unplug the USB mini cable from the Zemi once mode light is a solid blue.
9. With Zemi now connected to your Wi-Fi network, it will connect automatically when it is turned on.
10. To play music, select the Zemi from the Airplay menu on your music device.
11. Once connected, you may play music and control volume from your music device.
11
P L AY M U S IC U S I N G T H E H EA D P H O N E J AC K
12
1. Plug the provided headphone jack into your music device.
2. Ensure the connection is secure and the headphone jack is plugged completely into your
device (cases can interfere with connection and may need to be removed).
3. Plug the other end of the headphone cable into the headphone jack.
4. Play music and control volume with your music device.
5. When finished listening to music with the headphone cable, remove it from the Zemi to
avoid feedback while not in use.
Caution: Zemi does not support USB audio playback. Do not attempt to play music
through the mini USB port as you may seriously damage the unit.
OT H E R F U N C T I O N S
MUTE
1. To mute the Zemi, push the Power Button one time. The mode and volume lights will fash
while the Zemi is muted.
2. To resume listening, push the Power Button one time.
3. If Zemi remains in mute mode for more than 30 seconds, volume will drop to the lowest
level with one fashing volume light.
RESET
1. Push and hold the Power Button for 10 seconds. All lights will fash orange.
2. This will erase any currently stored Wi-Fi network or Bluetooth settings.
13
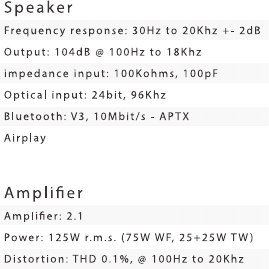
S P E C I F I C AT I O N S
14
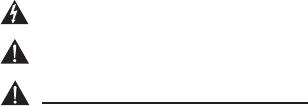
I M P O R TA N T S A F E T Y I NF O R M AT I ON
This symbol is intended to alert the user to the presence of uninsulated “dangerous voltage” within the product’s
enclosure that may be of sufcient magnitude to constitute a risk of fre and electric shock.
This symbol is intended to alert the user to the presence of important operating and maintenance (servicing)
instructions in the literature accompanying the product.
WARNING - DO NOT INGEST BATTERY, CHEMICAL BURN HAZARD.
Caution: Danger of explosion if battery is incorrectly
replaced. Replace only with the same or equivalent type.
Caution: No user serviceable parts inside. Only allow
qualified personnel to service this unit.
Caution: The main plug is used as the disconnect device,
the disconnect device shall remain readily operable
Caution: Listening at full volume at close range for
extended periods maybe harmful to your hearing. Please
listen responsibly.
The remote control supplied with this product contains coin/button cell battery. If the coin/button cell battery is swallowed, it
can cause severe internal burns in 2 hours and can led to death. Keep new and used batteries away from children. If the battery
compartment does not close securely, stop using the product and keep it away from children. If you think batteries might have
been swallowed or placed inside any part of the body, seek immediate medical attention.
15
The rating for the USB output is 5V and 1A.
A warning that batteries (battery pack or batteries installed) shall not be exposed to excessive heat such as sunshine, fire or the like.

Please read this safety information carefully before setting
up and using your Zemi Aria Speaker.
1. Read these instructions.
2. Keep these instructions.
3. Heed all warning.
4. Follow all instructions
5. Do not use this apparatus near water.
6. Clean only with dry cloth.
registers, stoves, or other apparatus (including ampliers) that
produce heat.
9. Do not defeat the safety purpose of the polarized or
grounding-type plug. A polarized plug has two blades with
one wider than the other. A grounding type plug has two
blades and a third grounding prong. The wide blade or the
third prong are provided for your safety. If the provided
plug does not fit into your outlet, consult an electrician for
replacement of the obsolete outlet.
10. Protect the power cord from being walked on or pinched
particularly at plugs, convenience receptacles, and the point
where they exit from the apparatus.
11. Only use attachments/accessories specied by the
manufacturer.
7. Do not block any ventilation openings. Install in
accordance with manufacturer’s instructions.
8. Do not install near any heat sources such as radiators, heat
12. Use only with the cart, stand, tripod, bracked, or table
specied by the manufacturer, or sold with the apparatus.
When a cart is used, use caution when moving the cart/
apparatus combination to avoid injury from tip-over.
13. Unplug this apparatus during lighting storms or when
unused for long periods of time.
14. Refer all servicing to qualied service personnel. Servicing
is required when the apparatus has been damaged in any
way, such as power-supply cold or plug is damaged, liquid
has been spilled or object have fallen into the apparatus, the
apparatus has been exposed to rain or moisture, does not
operate normally, or has been dropped.
WARNING:
To reduced the risk of fire or electric shock, do not expose
this apparatus to rain or moisture
The apparatus shall not be exposed to dripping or
splashing and that no objects filled with liquids,such
as vases, shall be placed on the apparatus.
16
Compliance
FCC Statement
This equipment has been tested and found to comply
with the limits for a Class B digital device, pursuant to Part
15 of the FCC rules. These limits are designed to provide
reasonable protection against harmful interference in a
residential installation. This equipment generates, uses and
can radiate radio frequency energy and, if not installed and
used in accordance with the instructions, may cause harmful
Interference to radio communications. However, there is
no guarantee that interference will not occur in a particular
installation. If this equipment does cause harmful
interference to radio or television reception, which can be
determined by turning the equipment off and on, the user is
encouraged to try to correct the interference by one of the
following measures:
- Reorient or relocate the equipment.
-Connect the equipment to an outlet on a circuit different
from that to which the receiver is connected.
-Consult the dealer or an experienced radio/TV technician
for help
FCC Caution
Any changes or modifications not expressly approved by
the party responsible for compliance could void the user’s
authority to operate this equipment.
17
This device complies with part 15 of the FCC Rules.
Operation is subject to the following two conditions: (1)
This device may not cause harmful interference, and (2) this
device must accept any interference received, including
interference that may cause undesired operation.
Cet appareil est conforme à la section 15 des
réglementations wwde la FCC. Le fonctionnement de
l’appareil est sujetaux deux conditions suivantes :
(1) cet appareil ne doit pas provoquer d’interférences
néfastes, et (2) cet appareil doit tolérer les interférences
reçues, y compris celles qui risquent de provoquer un
fonctionnement indésirable.
This device and its antenna must NOT be co-located or
used in conjunction with any other antenna or transmitter.
Important note: Radiation exposure statement. This EUT is
compliant with SAR for general population / uncontrolled
exposure limits in ANSI/IEEE C95.1-1999 and has been
tested in accordance with the measurement methods and
procedures specified in OET bulletin 65 supplement C.
To satisfy FCC / IC RF exposure requirements, a separation
distance of 20 cm or more should be maintained between
the antenna of this device and persons during device
operation. To ensure compliance, operations at closer than
this distance is not recommended.
Les antennes installées doivent être situées de facon à ce
que la population ne puisse y être exposée à une distance
de moin de 20 cm. Installer les antennes de facon à ce que
le personnel ne puisse approcher à 20 cm ou moins de la
position centrale de l’ antenne. La FCC des éltats-unis stipule
que cet appareil doit être en tout temps éloigné d’au moins
20 cm des personnes pendant son functionnement.
IC Statement:
This Class B digital apparatus complies with Canadian
ICES-003 Cet apparel numerique de la classe C conform a
la norme NMB-003 du Canada. This device complies with
industry Canada license-exempt RSS standard(s). Operation
is subject to the following two conditions:
(1) this device may not cause interference, and
(2) this device must accept an interference that may cause
undesired operation of the device.
Le présent appareil est conforme aux CNR d’Industrie Canada
applicables aux appareils radioexempts de licence.
L’exploitation est autorisée aux deux conditions suivantes :
(1) l’appareil ne doit pas produire de brouillage, et
(2) l’utilisateur de l’appareil doit accepter tout brouillage
radioélectrique subi, même si le brouillage est susceptible
d’en compromettre le fonctionnement.
Limited by local law regulations, version for North America
does not have region selection option. Under Industry
18
Canada regulations, this radio transmitter may only operate
using an antenna of a type and maximum (or lesser) gain
approved for the transmitter by Industry Canada. To reduce
potential radio interference to other users, the antenna
type and its gain should be so chosen that the equivalent
isotropically radiated power (e.i.r.p.) is not more than that
necessary for successful communication.
Conformément à la réglementation d’Industrie Canada, le
présent émetteur radio peut fonctionner avec une antenne
d’un type et d’un gain maximal (ou inférieur) approuvé pour
l’émetteur par Industrie Canada. Dans le but de réduire les
risques de brouillage radioélectrique à l’intention des autres
utilisateurs, il faut choisir le type d’antenne et son gain de
sorte que la puissance isotrope rayonnée équivalente (p.i.r.e.)
ne dépasse pas l’intensité nécessaire à l’établissement d’une
communication satisfaisante.
This radio transmitter (identify the device by certication
number, or model number if Category II) has been approved
by Industry Canada to
operate with the antenna types listed below with the
maximum permissible gain and required antenna impedance
for each antenna type indicated.
Antenna types not included in this list, having a gain greater
than the maximum gain indicated for that type, are strictly
prohibited for use
with this device.
Gain of antenna: 2 dBi max.
Type of antenna: 50ohm, Omni
Le présent émetteur radio (identier le dispositif par son
numéro de certication ou son numéro de modèle s’il fait
partie du matériel de catégorie I)
a été approuvé par Industrie Canada pour fonctionner avec
les types d’antenne énumérés ci-dessous et ayant un gain
admissible maximal
et l’impédance requise pour chaque type d’antenne. Les
types d’antenne non inclus dans cette liste, ou dont le gain
est supérieur au gain
maximal indiqué, sont strictement interdits pour
l’exploitation de l’émetteur.
Gain d’antenne: 2 dBi maximal
Type d’antenne: 50 ohm, Omni
19

w w w . p e l l i s a r i . c o m
Pellisari, P. O. Box 13157, Carlsbad, CA92013USA