Hantel HTT-800A CDMA Fixed Wireless Terminal User Manual
Hantel Co., Ltd. CDMA Fixed Wireless Terminal
Hantel >
User Manual
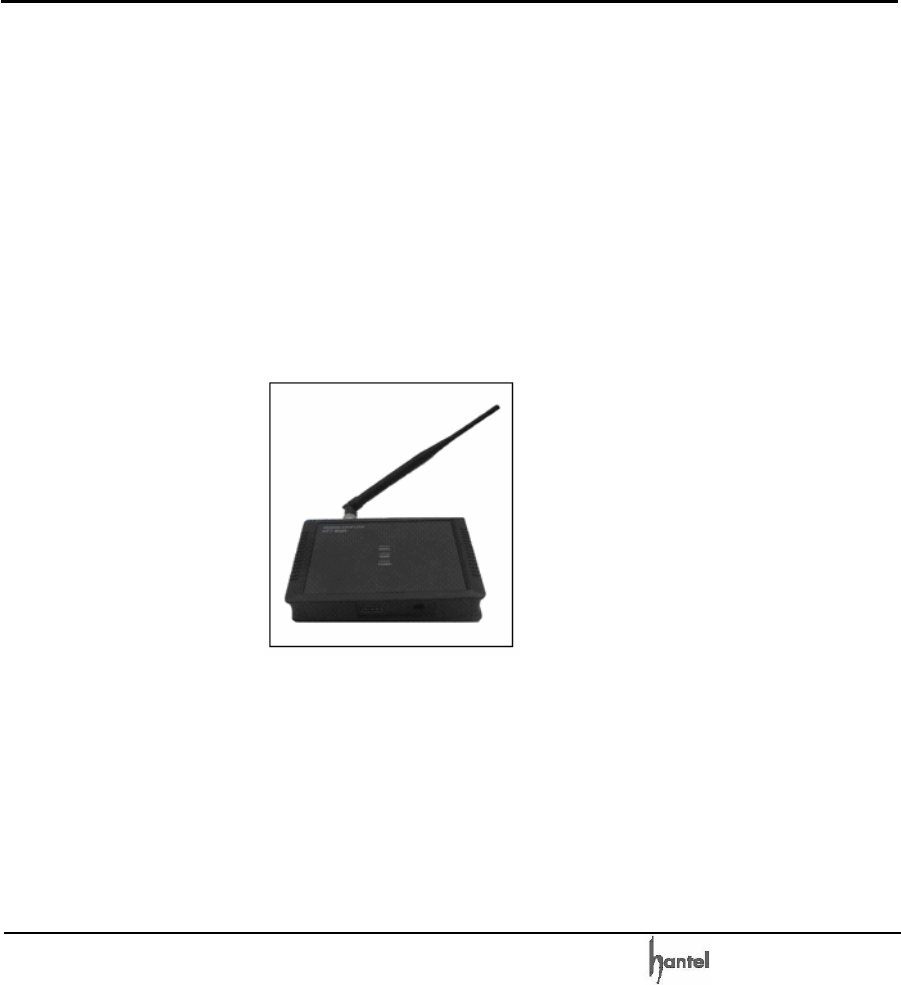
CDMA WLL User’s Guide HTT-800A
-1-
CDMA – 2000 1X
Fixed Wireless Terminal
User's Guide
Model No. HTT-800A
Supports Voice, PCO, G3 Fax, Data
Read this manual carefully before operating the instrument.
V1.0
CDMA WLL User’s Guide HTT-800A
-2-
FCC RF EXPOSURE INFORMATION
WARNING! Read this information before using your phone
In August 1996 the Federal Communications
Commission (FCC) of the United States with its
action in Report and Order FCC 96~326
adopted an updated safety standard for human
exposure to radio frequency electromagnetic
energy emitted by FCC regulated transmitters.
Those guidelines are consistent with the safety
standard previously set by both U.S. and
international standards bodies. The design of
this phone complies with the FCC guidelines
and these international standards.
To comply with FCC RF exposure requirements,
a minimum separation distance of 2.5cm (1
inch) must be maintained between the
user/bystander and the back of the unit,
including the antenna.
When using the Optional external antenna
please note the following precautions:
This system is designed to be operated as a
fixed system device and must be located either
on the roof top site, or up on or near the ceiling
away from the user. It must be mounted in a
manner to ensure that all user's and bystanders
are kept a minimum of 20cm away from the
antennas at all times.
CDMA WLL User’s Guide HTT-800A
-3-
Warning: Exposure to Radio Frequency
Radiation The radiated output power of this
device is far below the FCC radio frequency
exposure limits. Nevertheless, the device
should be used in such a manner that the
potential for human contact during normal
operation is minimized. In order to avoid the
possibility of exceeding the FCC radio
frequency exposure limits, human proximity
to the antenna should not be less than 20 cm
during normal operation. The gain of the
antenna for Cellular band must not exceed 2.0
dBi.
For more information about RF exposure, please visit
the FCC website at www.fcc.gov

CDMA WLL User’s Guide HTT-800A
-4-
CONTENTS
FCC RF EXPOSURE INFORMATION.....................................2
HIGHLIGHTS...........................................................................9
1. BEFORE YOU START ...................................................13
1.1 SAFETY PRECAUTIONS........................................ 13
1.1.1 Warning............................................................ 13
1.1.2 Important.......................................................... 13
1.2 Optimal Phone Performance .................................. 13
1.3 Care and Service .................................................... 16
2. GETTING STARTED AND INSTALLATION...................18
2.1 Checking the Parts ................................................. 18
2.2 Know your Terminal ..............................................19
2.3 Setting up your Terminal ....................................... 21
2.3.1 Adjust Your FWT ............................................. 22
2.3.2 Adding More Phones ....................................... 22
2.3.3 Additional Telephone Equipment .................. 232
2.4 Installation on Desktop........................................... 23
2.5 Installation on Wall................................................. 23
2.6 How to Install Battery ............................................ 24
2.7 Installation for the Data Service ............................ 25
2.8 Indications .............................................................. 25

CDMA WLL User’s Guide HTT-800A
-5-
2.9 Multi-extension Installations ................................. 26
3. BASIC FUNCTIONS..........................................................27
3.1 Power On/Off .......................................................... 27
3.2 Making a call........................................................... 28
3.3 Receiving a call....................................................... 28
3.4 Ending a call ........................................................... 29
4. ADVANCED FUNCTIONS & SETTING.............................30
4.1 One Minute Alert .................................................... 30
4.2 Alarm....................................................................... 30
4.2.1 12 Hour Mode .................................................. 30
4.2.2 24 Hour Mode .................................................. 31
4.2.3 Release Alarm Setting .....................................31
4.3 Connection tone...................................................... 31
4.4 Earpiece Volume .................................................... 32
4.5 CID / CLIP Mode..................................................... 32
4.6 Calls Restrict .......................................................... 33
4.6.1 Outgoing Call Restrict...................................... 33
4.6.2 Long Call Restrict .......................................... 33
4.6.3 International Call Restrict ..............................34
4.6.4 Incoming Call Restrict ..................................... 35
4.7 Lock Code............................................................... 36
4.8 Reset ....................................................................... 37
4.9 Auto Dial Time........................................................ 37
4.10 Data Service ......................................................... 38

CDMA WLL User’s Guide HTT-800A
-6-
4.11 R-UIM (Optional).................................................. 38
4.12 Authentication Function (Optional) ...................... 39
5. SUPPLEMENTARY FUNCTIONS .....................................40
5.1 Call Functions ......................................................... 40
5.1.1 Speed Dial ........................................................ 40
5.1.2 Redialing .......................................................... 41
5.1.3 Emergency call ................................................ 42
5.1.4 Hot Line ........................................................... 43
5.2 Pay Phone Interface ............................................... 45
5.3 Phone Book........................................................... 465
5.3.1 Storing Phone Numbers................................... 46
5.3.2 Deleting Phone Numbers................................. 46
5.4 Voice Privacy ......................................................... 46
5.5 Ringer Frequency & Cadence Control ................... 47
5.5.1 Ringer Frequency Setting................................ 47
5.5.2 Ringer Cadence Setting ................................... 47
5.6 Dial Tone Frequency Control.................................48
5.7 Hook Flash.............................................................. 48
5.8 ROH (Receiver off Hook) ....................................... 49
5.9 Restrict Call Mode Setting ..................................... 49
5.9.1 Set Restrict Call Level..................................... 50
5.9.2 Storing (Deleting) the Permit Dial Number..... 50
5.9.3 Storing (Deleting) the Deny Dial Number
(Restricted dial number) ........................................... 51

CDMA WLL User’s Guide HTT-800A
-7-
6. SYSTEM FUNCTIONS ......................................................52
6.1 Call Waiting............................................................. 52
6.2 Three-way calling.................................................. 52
6.3 Call Forwarding ...................................................... 52
7. FAX FUNCTIONS..............................................................53
7.1 FAX Set-up............................................................. 53
7.2 Sending FAX Message............................................ 53
7.3 Receiving G3 FAX Message ................................... 54
7.4 Receiving PC FAX Message ................................. 544
8. DATA SERVICE ................................................................56
8.1 For Windows 98, Windows 2000............................ 56
8.1.1 Setting the phone to DS (Data
Service)
.......... 56
8.1.2 Setting a USB driver in PC.............................. 57
8.1.3 Setting a Standard Modem in PC..................... 66
8.1.4 Browsing the Internet...................................... 68
8.2 For Windows XP ..................................................... 74
8.2.1 Setting the phone to DS (Data
Service)
.......... 74
8.2.2 Setting a USB driver in PC.............................. 74
8.2.3 Setting a Standard Modem in PC..................... 82
8.2.4. Browsing the Internet..................................... 83
8.3 Data Installation Trouble Shooting ........................ 89
8.3.1 Message Box ................................................... 89
9. SUMMARY TABLE........................................................9796

CDMA WLL User’s Guide HTT-800A
-8-
9.1 Advanced Functions ............................................... 96
9.2 Supplementary Functions ....................................... 98
10. TROUBLESHOOTING GUIDE ....................................1021
11. SPECIFICATIONS.......................................................1041

CDMA WLL User’s Guide HTT-800A
-9-
Highlights
Dear Customer,
Congratulations on your purchase of the Fixed Wireless
Terminal Model No. HTT-800A designed to operate on
the latest digital mobile communications technology,
Code Division Multiple Access (CDMA). This CDMA
digital technology has greatly enhanced voice clarity and
can provide various advanced features. The terminal
enables the normal operation and direct connection of
standard telephone equipment into the cellular network.
Note:
Supplied Product supports Voice, PCO, G3 Fax, 14.4 kbps
data in Circuit mode & 144 kbps data in Packet mode.
■ This Model looks perfect on your desk in the office.
It can also be installed on any wall in your office or
home. Thanks to the wall-mount kit that comes with
the unit.
■ These Model owners can easily adjust the volume
of the handset (earpiece) with the volume control,
and set the volume at an optimal level.
■ This Model has a practical and elegant design. It
can be used at office or home. This Model also
offers many useful features and technological
advantages.
■ This Model has Versatile Installation Options.

CDMA WLL User’s Guide HTT-800A
-10-
■ This Model offers its users superior voice quality
through its use of QCELP or EVRC Vocoder.
■ Various sounds and LED functions provide audio
and visual alerts for Low Battery, Air Link Cut-Off
and Function status.
■ The owner can use the terminal with the Outgoing
Call Lock function.
■ Connect this Model with your PC for data
transmission, PC Fax and SMS communication.
■ Simple and quick transmission of the stored
numbers in the phone book with One-Touch, Two-
Touch and Three-Touch Dial.
■ The Emergency Call Hold function enables a user to
contact emergency center personnel.
■ The Hotline Call function allows the most frequently
used numbers to be automatically connected when
a user picks up the handset.
■ The Voice Privacy function ensures against illegal
phone tapping and thus it can be prevented.
■ The Authentication Key function prevents the
owner’s phone numbers from being cloned by
others.
■ CID/CLIP function lets you know who is calling you.
■ G3 Fax service is supported for analog environment.
■ The Pay Phone Interface allows this Model to work
as a payphone.
■ This Model offers R-UIM Function (Optional).

CDMA WLL User’s Guide HTT-800A
-11-
This Model provides:
■ AC Power supply with AC/DC Adapter.
■ Touch tone (DTMF) or Pulse Dialing
■ A phone jack to plug in the telephone
equipment (RJ-11 Port)
■ Support Caller ID Telephone
■ Ring voltage used to ring the telephone
connected to the unit, with a REN (Ringer
Equivalence Numbers) of 4 Phones.
■ A phone jack to plug in the G3 FAX equipment
(RJ-11 Port)
■ Data Port for service and repair (USB / RS-232
data cable, Optional)
■ Three lights (LEDs) to indicate the status of the
unit
■ Dipole Antenna
■ R-UIM (Optional)
Some of the features are supported by service provider’s
system.

CDMA WLL User’s Guide HTT-800A
-12-
For instance, the following features may not be
supported:
■ Emergency Call
■ Hot Line Call
■ Speed Dial
■ Alarm
■ Outgoing Call Lock

CDMA WLL User’s Guide HTT-800A
-13-
1. Before You Start
1.1 SAFETY PRECAUTIONS
1.1.1 Warning
To reduce the risk of fire or electric shock, do not expose
this product to rain or moisture. Do not use this product
near swimming pools or other bodies of water.
Telephones with multiple terminating impedance, should
be set for 600ohms.
The adapter provided along with FWT is designed for a
rated voltage only. So it may cause trouble, if the
adapter is used out of a rated voltage range.
1.1.2 Important
Before installing or operating this product, read this
information.
1.2 Optimal Phone Performance
■ Do not use the unit with a damaged antenna.
Have your antenna replaced by a qualified
technician immediately. Use only a
manufacturer-approved antenna. Non-approved
antennas, modifications, or attachments could
impair call quality, damage the Terminal /

CDMA WLL User’s Guide HTT-800A
-14-
phone.
■ For the best call quality, keep the antenna free
from obstructions and point the antenna straight
up.
■ Do not operate your product when holding the
antenna, or when someone is within four inches
(ten centimeters) of the antenna. Holding the
antenna affects call quality and may cause the
telephone to operate at a higher power level
than needed.
■ RF energy may affect improperly installed or
inadequately shielded personal medical devices
such as pace markers, hospital monitor.
Consult the manufacturer of any personal
medical devices to determine if they are
adequately shielded from external RF energy.
■ Turn your terminal OFF in health care facilities
when any regulations posted in the areas
instruct you to do so. Hospitals or health care
facilities may be using equipment that could be
sensitive to external RF energy.
■ If this equipment does cause harmful
interference to radio or television reception,
which can be determined by turning the
equipment off and on, the user is encouraged

CDMA WLL User’s Guide HTT-800A
-15-
to try to correct the interference by one or more
of the following measures:
- Reorient or relocate the receiving antenna.
- Increase the separation between the radio
or television and the telephone.
- Connect the equipment into an outlet on a
circuit different from that to which the
terminal is connected.
- Consult you Authorized Dealer of an
experienced Radio/TV technician for help.
■ Use only the battery, antenna and AC power
supply provided by Authorized Dealer. Using
any other type will invalidate the warranty.
■ Only authorized personnel should service the
phone and its accessories. Faulty installation or
service may be dangerous and invalidate the
warranty.
■ Do not use the unit in designated “no cellular
phone use” area.
■ Avoid exposure to high temperature or humidity
■ Avoid wetting the unit with any liquids. If the
unit gets wet, turn the power off immediately
and remove the backup battery and AC power
supply. If the unit is inoperable, then return to
the service agent for service.

CDMA WLL User’s Guide HTT-800A
-16-
■ Avoid shock or impact.
■ We recommend you to charge the backup
battery before initial use for 10/12 hours.
Backup battery may be discharged during
delivery.
■ This device complies with part 15 of the FCC
Rules. Operation is subject to the following two
conditions:
- This device may not cause harmful
interference, and
- This device must accept any interference
received, including interference that may
cause undesired operation.
1.3 Care and Service
■ If the unit fails for any reason, do not attempt to
disassemble; contact the telephone service
provider for assistance.
■ Unplug the FWT from the wall outlet and
remove antenna (or disconnect antenna cable)
before cleaning. Do not use liquid or aerosol
cleaners. Use a damp cloth for cleaning.
■ If any of the following conditions exist: Unplug
the unit at the wall plug, remove battery, and
call the service provider.

CDMA WLL User’s Guide HTT-800A
-17-
- The unit has been exposed to rain or water.
- Liquid has been spilled into the unit.
- The power supply cord is damaged or
frayed.
- The unit has been dropped or damaged.
- The unit does not work normally by
following the operating instructions.
Note:
■ Don't disassemble or modify this product
deliberately.
■ Use only an approved adapter.
■ Don't touch adapter with wet hands.
■ Don't install this product in dusty area.
■ Avoid areas near sunlight, heating apparatus,
vibration
■ This product is designed for being used within
commercial power. In other voltage area,
please install voltage stability device and use
it.
■ When struck by lightning, unplug to protect
terminal from lightning damage and fire.
■ Don't install this product near other electronic
appliance.
■ When installing battery, be careful of polarity.
■ Install in area of good signal. ( Signal LED is
CDMA WLL User’s Guide HTT-800A
-18-
Green )
2. Getting Started and Installation
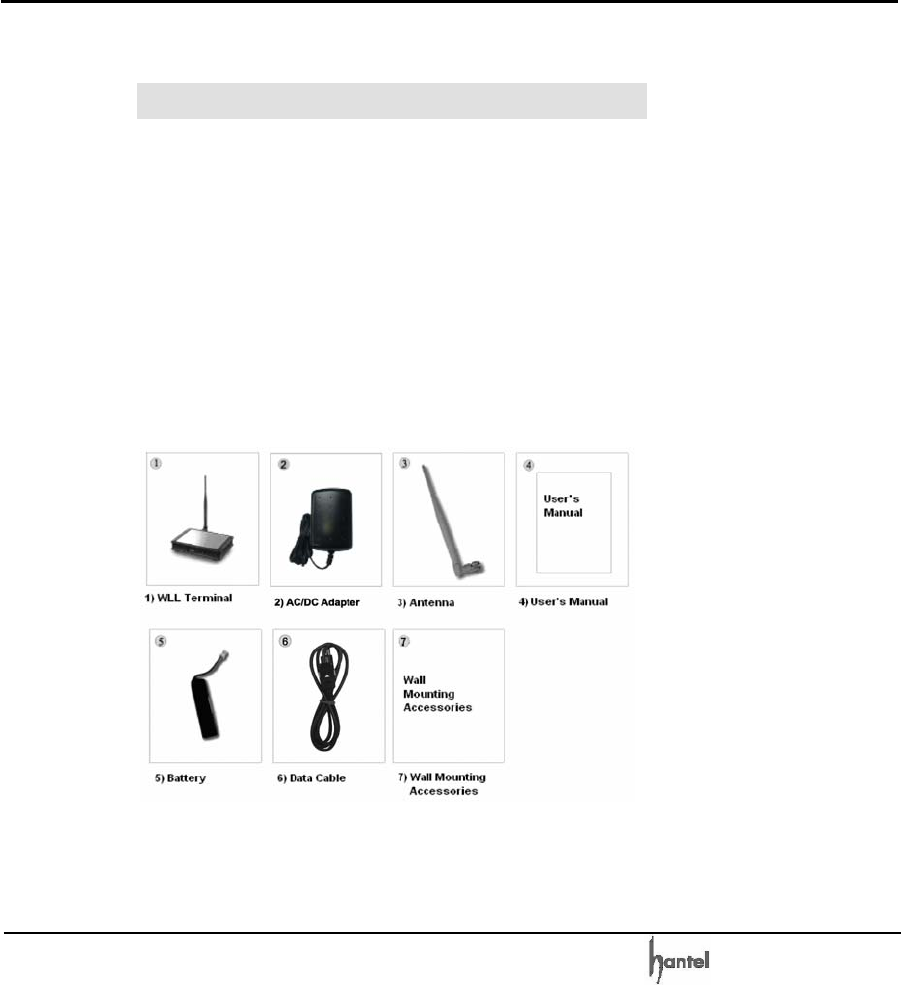
2.1 Checking the Parts
Please make sure that these components are present
before you begin the unit installation. And then compare
the following figures and components. If components are
missing or damage is found, contact the store where you
purchased the unit immediately.

CDMA WLL User’s Guide HTT-800A
-19-
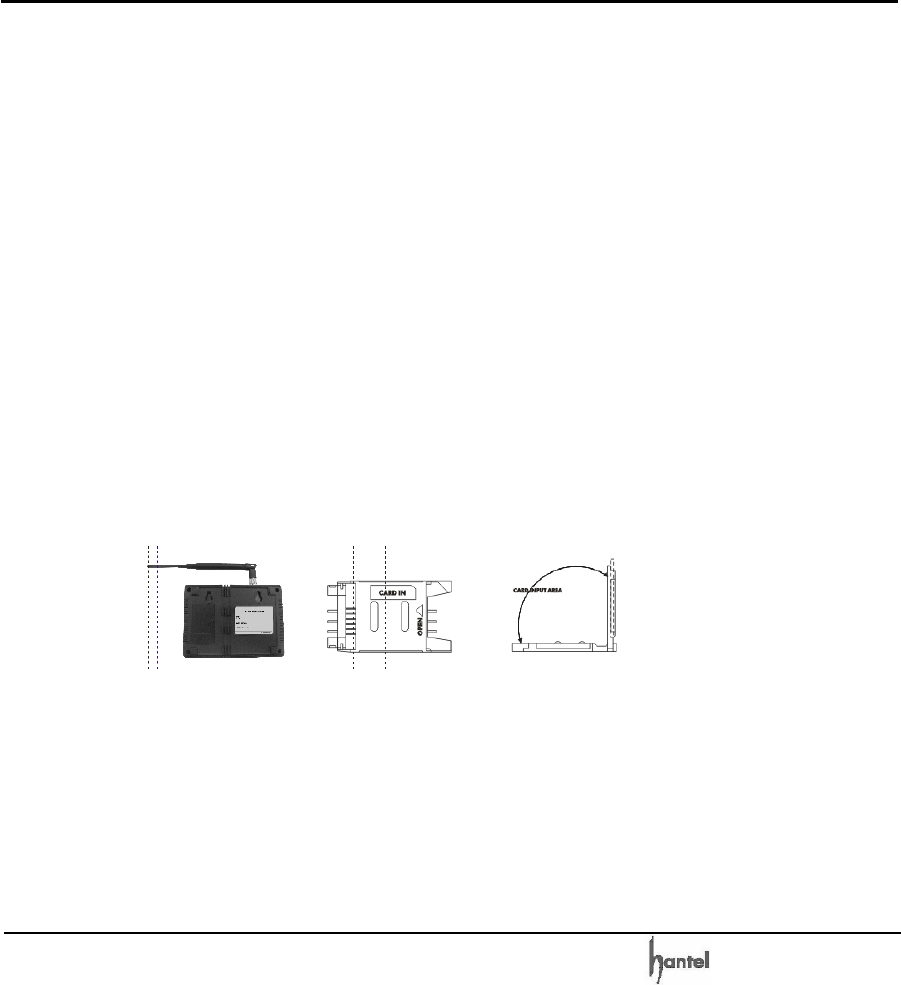
2.2 Know your Terminal
1. Antenna: Connector Connecting Port for TNC
Antenna
2. LEDs: Indicate the status of the unit
- LED indications are described in the
following table.
CDMA WLL User’s Guide HTT-800A
-20-
3. DATA Port: The DATA Port used to connect the
terminal to the PC for maintenance/repair, and
data communication.
4. Battery Switch: If you use Battery, you should
switch on the battery Switch.
The Battery pack is charged when battery
switch is on.
5. UIM Connector: Refer to 4.11 R-UIM.
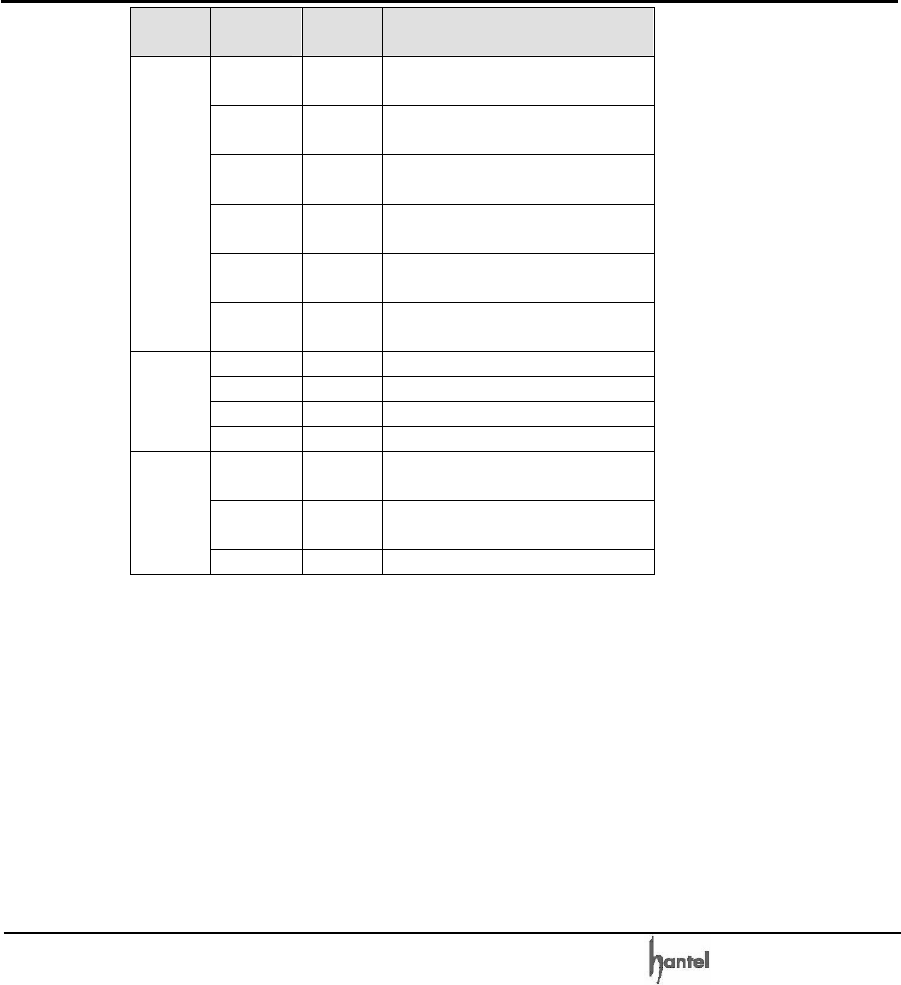
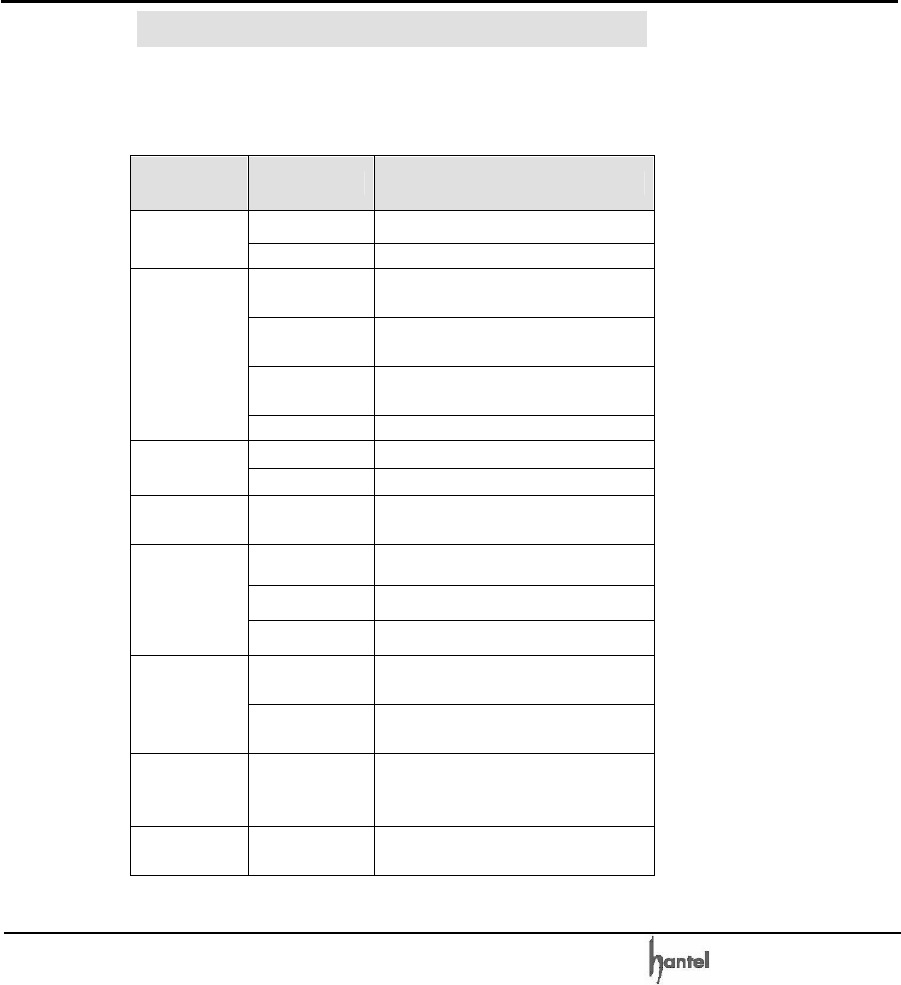
Name LED
Color
Activity Meaning
GREEN On
AC/DC adapter is giving 12V DC
without a battery.
ORANGE On Battery is fully charged. (AC/DC
adapter is connected.)
ORANGE Flashing Battery is charging. (AC/DC
adapter is connected.)
RED On
Battery Power is applied without
AC/DC adapter.
RED Flashing Low Battery Warning. (AC/DC
adapter is not connected.)
POWER
- Off
No AC Power/No power is being
supplied by battery.
GREEN On Good Signal
RED On Poor Signal
RED Flashing Poor Signal Warning
SIGNAL
- Off No service area.
GREEN On
Voice Message is received.
Data Call is connected.
GREEN Flashing Data service or G3 FAX is
incoming / outgoing.
MODE
RED Flashing Voice call is incoming.
CDMA WLL User’s Guide HTT-800A
-21-
6. PHONE / FAX (RJ-11 port): Connecting Ports
for a G3 FAX Machine or SLT (Single Line
Telephone)
7. DC 12V: 12V AC/DC Power Adapter. The
SMPS supplies the power to the FWT terminal.
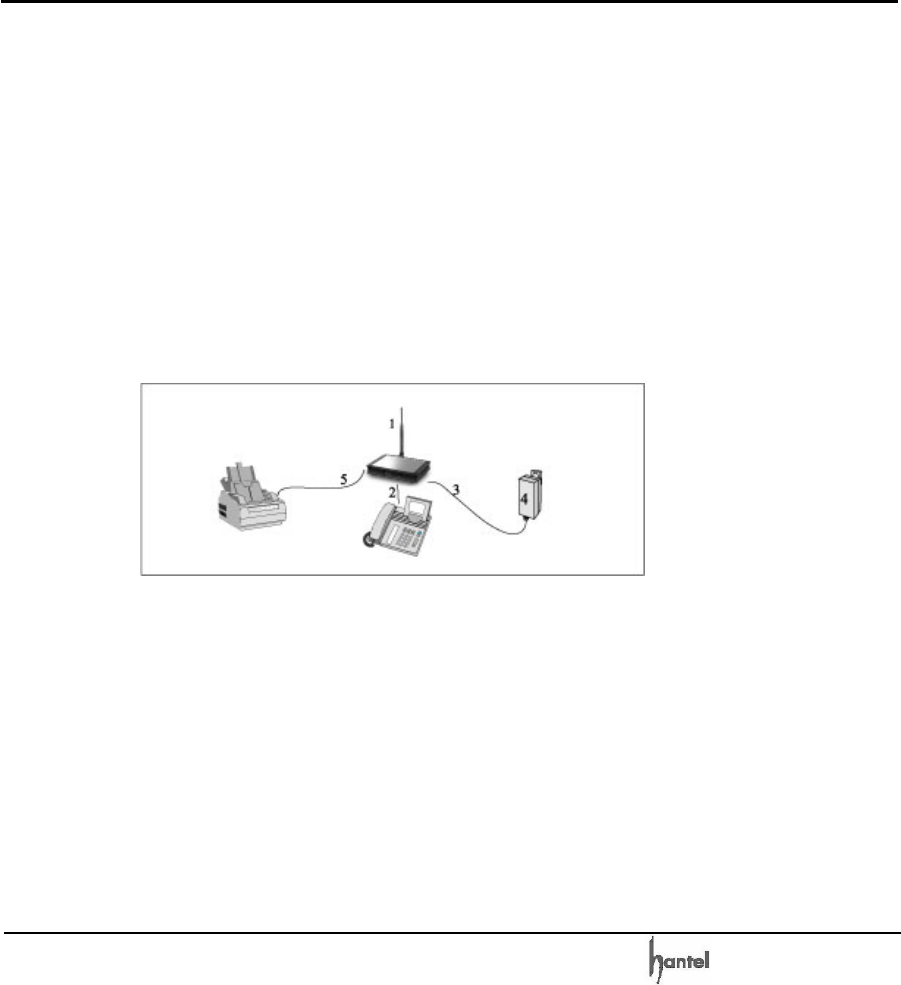
2.3 Setting up your Terminal
This Model operates by receiving electricity from an
AC/DC Adapter or internal battery.
1. Connect Indoor antenna on the Rear side of the
terminal.
2. Connect a conventional wired telephone to a
RJ-11 PHONE port. Use the telephone
compatible to FCC part 68 as possible
otherwise it may not work properly.
3. Plug the AC/DC adapter output onto the DC
12V jack of the Terminal.

CDMA WLL User’s Guide HTT-800A
-22-
4. Plug the AC/DC adapter plug into an
appropriate electrical outlet.
5. Connect a G3 analog facsimile machine to a
dedicated RJ-11 port marked as FAX.
2.3.1 Adjust Your FWT
1. Pick up the phone receiver and listen to dial
tone.
2. If you hear dial tone, make a call.
3. If ether static or echo is heard While you’re
talking with the other party move the antenna
until you find the spot where voice conversation
is strong, and static and echo are minimized.
Note:
If you are unsuccessful in dialing out, verify the following:
- The antenna location needs to be adjusted.
- The NAM/Phone Numbers need to be set
up.
- Your FWT phone numbers has not been
activated – contact your service provider.
2.3.2 Adding More Phones
Plug in an RJ-11 line splitter (not supplied) to connect
additional phones to your FWT.(Maximum 04 phones
can be connected)
Note: you can only make one phone call at a time.

CDMA WLL User’s Guide HTT-800A
-23-
2.3.3 Additional Telephone Equipment
If you plan to use a device other than a telephone with
your FWT, make sure that device will work with a normal
wired telephone line.
Fax Machines – Connect a fax machine with the same
way it needs to be set up for use on a regular wired
telephone line.
2.4 Installation on Desktop
Installing your FWT Terminal on a desktop is very easy.
Simply place the FWT Terminal on the desktop (or any
flat, desk, table, stable horizontal surface, etc.).
Avoid direct exposure to the sun lights and damp area.
Read the Information located at the first part of this
document before you place the terminal.
2.5 Installation on Wall
Before finalizing the precise location of the phone,
please perform the signal strength test to ensure the
best operating condition location for the assembled unit.
■ For installing the unit on a concrete wall,
attach the installation sheet onto a concrete
wall and make holes with a drill at the
marked location. When installing mounting
screws along with rawal Plugs, do not screw
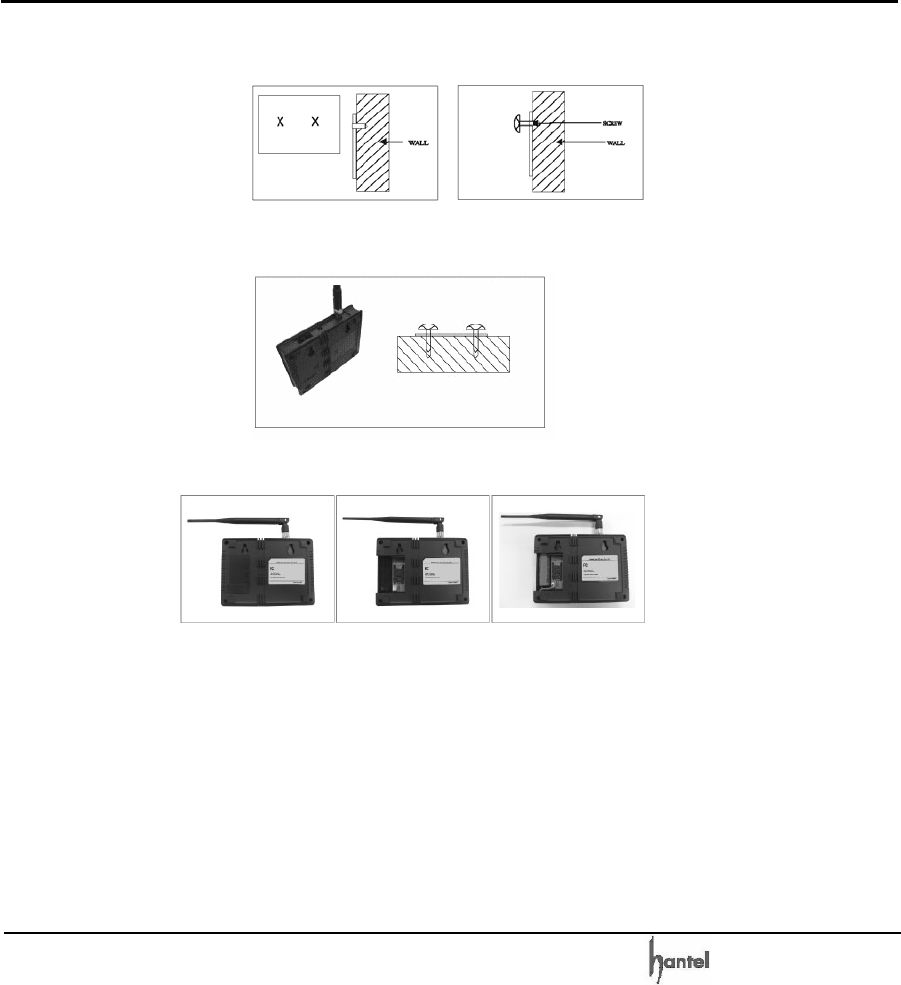
CDMA WLL User’s Guide HTT-800A
-24-
them in all the way. Leave space between
the screw head and the installation sheet.
■ Install the FWT on 02 screws with the help
of eyeholes provided on the rear side of unit.
2.6 How to Install Battery
1. Open battery cover on the bottom side of the
FWT.
2. Connect the battery on battery socket of the
FWT.
3. Insert the battery pack in the right position
between the hold bars.
4. Close the battery cover.
CDMA WLL User’s Guide HTT-800A
-25-
Note: You need to be careful for getting hurt when you
change the battery pack.
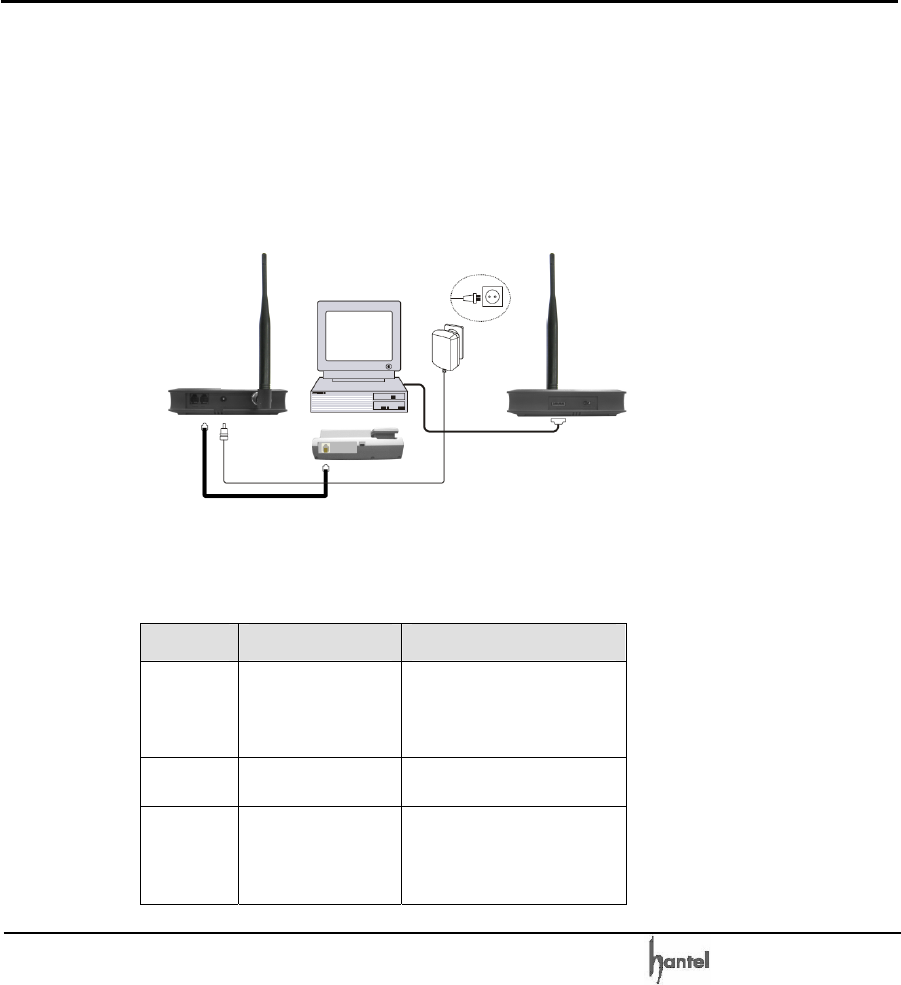
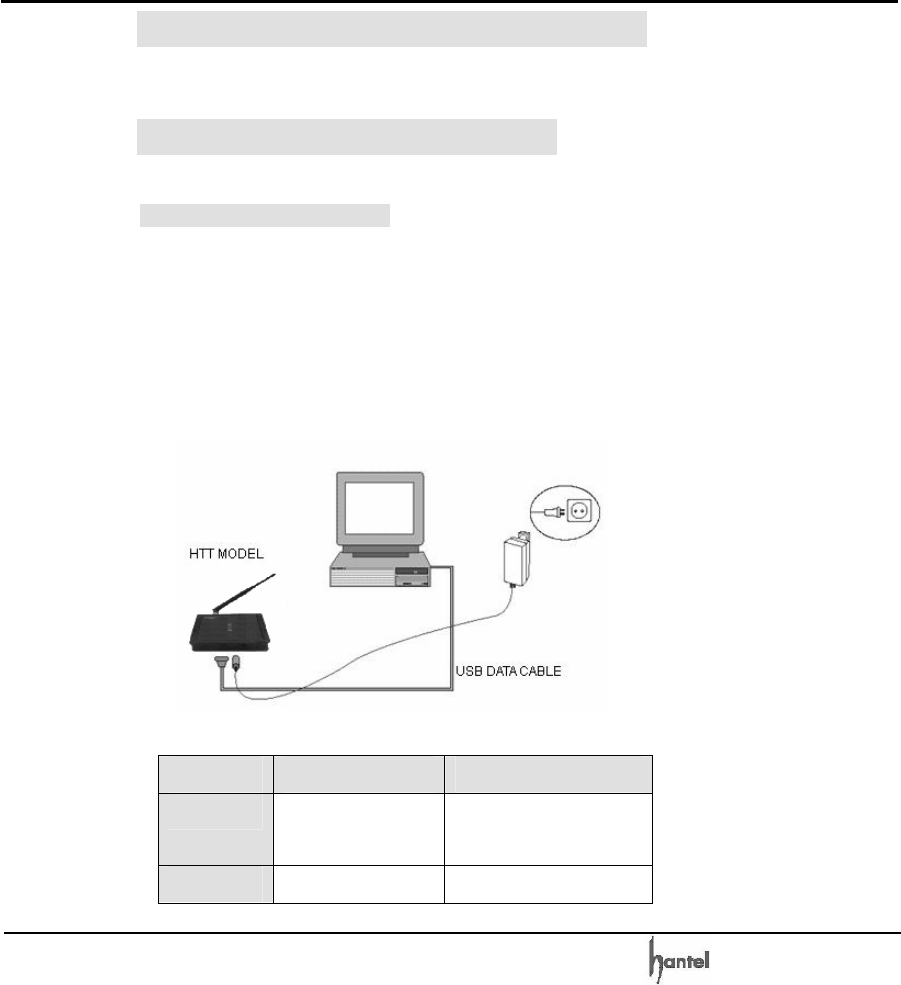
2.7 Installation for the Data Service
As shown below, connect a USB or RS-232 data cable
to the port mark as Data port on side of the FWT.
2.8 Indications
Sound indications are described in the following table:
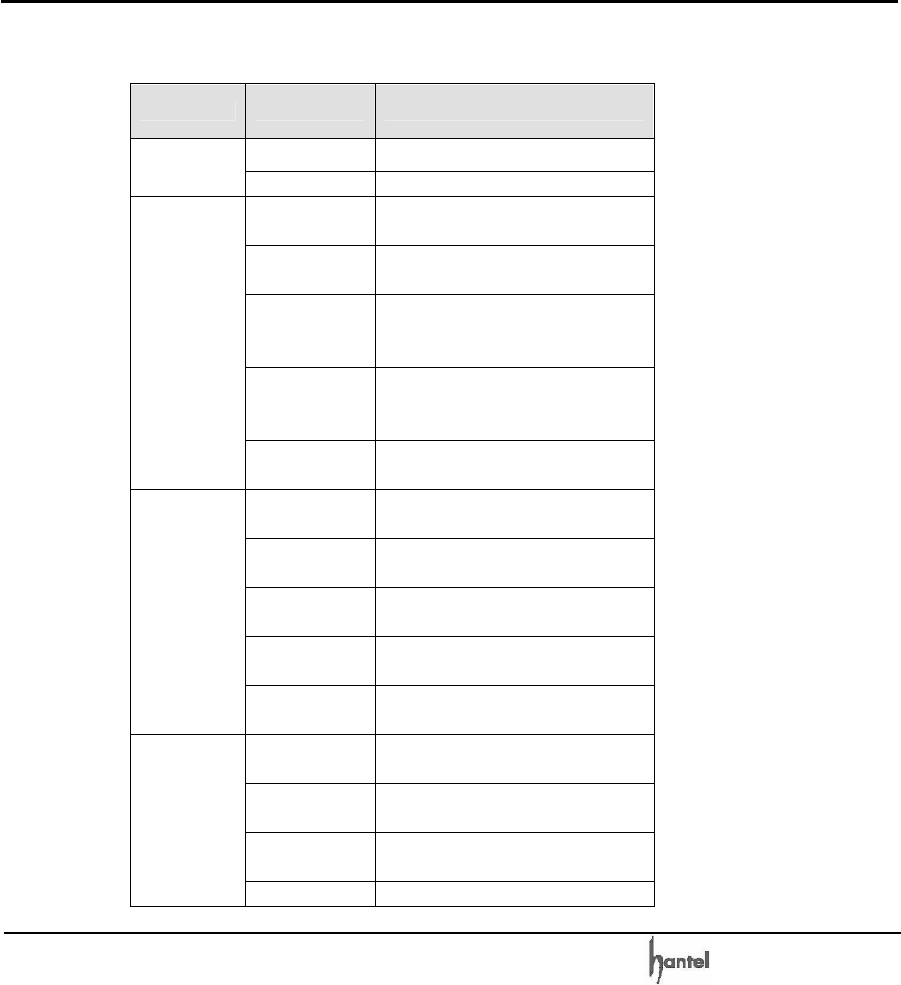
Type Status Meaning
Normal
dial tone
20 sec on ; 300
msec off
The FWT is in-service with
adequate receive signal. So
Indicates that call service is
available.
No Service
tone
800 msec on ; 200
msec off
FWT is not capable of
making or receiving calls.
Outgoing
call
restriction
tone
800 msec on ; 200
msec off
FWT is not capable of
Making calls but is capable
of receiving calls.
CDMA WLL User’s Guide HTT-800A
-26-
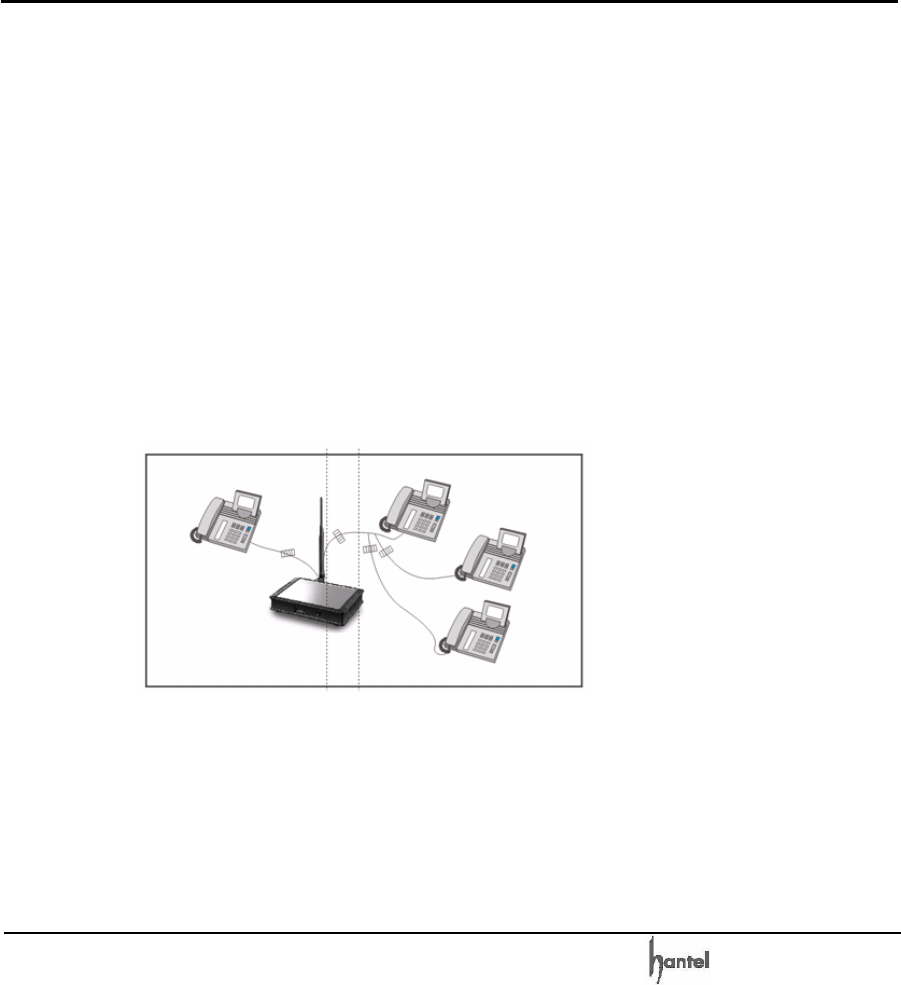
2.9 Multi-extension Installations
This Model has 2 jacks. You can connect up to 4 phones
to the terminal using RJ-11 jack. A user must buy
additional parts to extend the connection.
For a multi-extension installation, make sure that all the
extensions are on-hook.
If one extension is off-hook (not hang up), none of the
extensions on that line will ring when a call is being
received.

CDMA WLL User’s Guide HTT-800A
-27-
3. Basic Functions
3.1 Power On/Off
¾ The power jack is on the side of the FWT. The
POWER LED indicates the present status;
¾ When the terminal is succeeded in getting the
service, SIGNAL LED indicates the strength of
the signal. Lifting handset on telephone, dial
tone is heard and you can enter a phone
number.
Note:
- When you turn on the FWT, it will
automatically search for service signal.
When it successfully acquires a service
state, it will generate a dial tone on the
handset.
- If Hot Line function is enabled, busy tone is
not produced and hot line number is
automatically connected.
¾ If the radio service is not available or radio
signal is too weak to detect; the SIGNAL LED is
OFF.

CDMA WLL User’s Guide HTT-800A
-28-
3.2 Making a call
1. First check to see that your FWT Phone is
turned on.
2. Pick up the handset. You will hear a dial tone.
3. Using the number keypad, dial the desired
telephone number (Max 32 digits).
Note: When you finish entering phone number,
the call will be connected automatically after 5
seconds. Please Refer to 4.9 Auto dial time.
4. When the other person answers, begin your
conversation.
5. To end the call, replace the handset.
Note: Dial Tone
Dial tone will be generated if you lift your handset until
your press any key. This Model will not generate any dial
tone in NO Service status.
3.3 Receiving a call
1. The terminal signals telephone(s) to ring when
an incoming call is detected.
2. Pick up telephone handset and begin talking
through handset.

CDMA WLL User’s Guide HTT-800A
-29-
Note: When the handset is picked up and the
incoming call is ringing, you can receive the
call by pressing any key.
3.4 Ending a call
When you have completed the call, place the handset
back on telephone. Also you can hook flash more than
about 1 second to end a call and place a new call
without hanging up the handset.

CDMA WLL User’s Guide HTT-800A
-30-
4. Advanced Functions & Setting
4.1 One Minute Alert
A one minute alert is generated after each minute
interval into the call conversation to notify you that a
minute has passed since the beginning of the call or
after the previous time of discrete tone, regardless of
when you make or receive a call.
1. Pick up the handset.
2. Press <*>, <*> and <0>, <1>.
3. Press <*> to set 1 minute alert.
Press <#> to release 1 minute alert.
4.2 Alarm
You can set or release alarm on your phone.
4.2.1 12 Hour
Mode
1. Pick up the handset.
2. Press <*>, <*>, <0>, <2> and <1 (12 Hour
mode)>, <1 (AM mode)> or <2 (PM mode)>.
3. Press alarm time (00:00~11:59(AM) /
00:00~12:59(PM)).
4. Press <*> to set alarm.

CDMA WLL User’s Guide HTT-800A
-31-
4.2.2 24 Hour
Mode
1. Pick up the handset.
2. Press <*>, <*>, <0>, <2> and <2 (24 Hour
mode)>.
3. Press alarm time (00:00~23:59).
4. Press <*> to set alarm.
4.2.3 Release Alarm Setting
1. Pick up the handset.
2. Press <*>, <*>, <0>, <2> and <#>.
Note: When you will hear the alarm sound, pick up the
handset to turn off alarm.
4.3 Connection tone
A connection tone is generated when a call is connected
successfully.
1. Pick up the handset.
2. Press <*>, <*> and <0>, <3>.
3. Press <*> to set connection tone.
Press <#> to release connection tone.

CDMA WLL User’s Guide HTT-800A
-32-
4.4 Earpiece Volume
You can adjust the Earpiece volume to levels 1-4. The
Number 4 is highest volume.
1. Pick up the handset (Standby mode).
2. Press <*>, <*> and <0>, <4>.
3. Press to select one among from <1> to <4>.
4. Press <*> for save.
4.5 CID / CLIP Mode
If your phone connected to the FWT is caller ID enabled,
you can set the FWT to display the caller number on the
phone. The default setting of caller ID is DTMF type.
1. Pick up the handset.
2. Press <*>, <*> and <0>, <5>.
3. Press <1> for DTMF type phone or <2> for Bell
core type phone.
Press <#> to release caller ID setting.
4. Press <*> for save.
Note: Caller ID is a feature, which notifies you who is
calling by displaying the caller’s number on the
telephone’s LCD when an incoming call comes through.
This feature is available only with a telephone that has
an LCD display on it. Contact your service provider to

CDMA WLL User’s Guide HTT-800A
-33-
activate or deactivate Caller ID.
4.6 Calls Restrict
4.6.1 Outgoing Call
Restrict
If you try to make an outgoing call while outgoing call
restrict is enabled, then you will hear warning tone after
dial time-out. Outgoing Call restrict feature is disabled as
a factory setting.
1. Pick up the handset.
2. Press <*>, <*> and <0>, <6>.
3. Press 4 digits Lock Code Number (Default
Number is 0000 (four times zero)).
Note: If the code is correct, it sounds
confirmation beep. If not, it returns to
the standby mode with error beep.
4. Press <*> to set outgoing call restrict or Press
<#> to release outgoing call restrict.
Note: If someone tries to make a call when
outgoing call restriction is set, it sounds
restriction beep.
4.6.2 Long Call Restrict
If you try to make a long call while long call restrict is
enabled, then you will hear warning tone after dial time-

CDMA WLL User’s Guide HTT-800A
-34-
out. Long Call restrict feature is disabled as a factory
setting.
1. Pick up the handset.
2. Press <*>, <*> and <1>, <2>.
3. Press 4 digits Lock Code Number. (Default
Number is 0000 (four times zero)).
Note: If the code is correct, it sounds
confirmation beep. If not, it returns to the
standby mode with error beep.
4. Press <*> to set long call restrict or Press <#>
to release long call restrict.
Note: If someone tries to make a call when
long call restriction is set, it sounds restriction
beep.
4.6.3 International Call Restrict
If you try to make an international call while international
call restrict is enabled, then you will hear warning tone
after dial time-out. International Call restrict feature is
disabled as a factory setting.
1. Pick up the handset.
2. Press <*>, <*> and <1>, <3>.
3. Press 4 digits Lock Code Number. (Default
Number is 0000 (four times zero)).
Note: If the code is correct, it sounds

CDMA WLL User’s Guide HTT-800A
-35-
confirmation beep. If not, it returns to the
standby mode with error beep.
4. Press <*> to set international call restrict or
Press <#> to release international call restrict.
Note: If someone tries to make a call when
international call restriction is set, it sounds
restriction beep.
4.6.4 Incoming Call
Restrict
If your terminal receive a call from someone when
incoming call restrict is set, your terminal don’t ring the
bell because your terminal reject incoming call.
Incoming Call Lock feature is disabled as a factory
setting.
1. Pick up the handset.
2. Press <*>, <*> and <1>, <4>.
3. Press 4 digits Lock Code Number. (Default
Number is 0000 (four times zero)).
Note: If the code is correct, it sounds
confirmation beep. If not, it returns to the
standby mode with error beep.
4. Press <*> to set Incoming call restrict or Press
<#> to release Incoming call restrict.

CDMA WLL User’s Guide HTT-800A
-36-
4.7 Lock Code
Used when you wish to change the lock code of the
terminal. The programmed lock code prevents the
terminal from being operational to any other people
without your permission. This feature can be disabled
and enabled through simple keypad number code entry.
When you first buy the phone, the lock number is 0000.
1. Pick up the handset.
2. Press <*>, <*> and <0>, <7>.
3. Press 4 digits Look Code Number (The default
lock code is preset to 0000 at the factory).
Note: If the code is correct, it sounds
confirmation beep. If the code is incorrect, it
returns to the standby mode with error beep.
4. Press 4 digits new Lock Code Number. It
sounds confirmation beep.
5. Press 4 digits new Lock Code Number again. If
it is different from the new Lock code you
entered in the beginning, it returns to the step 4
with error beep.
6. Press <*> to store new Lock Code. If you press
other key, it returns to the standby mode with
error beep.
Note: If it is correct, it sounds confirmation beep.

CDMA WLL User’s Guide HTT-800A
-37-
4.8 Reset
Reset the terminal back to the initial service status of
factory pre-programmed state (Default). This feature can
be disabled and enabled through simple keypad number
code entry.
1. Pick up the handset.
2. Press <*>, <*> and <1>, <0>.
3. Press 4 digits Lock Code Number. (The default
lock code is preset to 0000 at the factory.)
Note: If the code is correct, it sounds
confirmation beep. If not, it returns to the
standby mode with error beep.
4. Press <*>.
5. Wait until you hear confirmation beep.
Important: Above reset function will clear Phone book
also.
4.9 Auto Dial Time
You can set Auto Dial time (0sec ~ 9sec) on your phone.
Default setting is 5sec.
1. Pick up the handset.
2. Press <*>, <*> and <1>, <1>.
3. Press Auto dial time (0~9).
Note: Auto dial time change to latest digit
CDMA WLL User’s Guide HTT-800A
-38-
pressed until press <*>.
4. Press <*>.
5. Wait until you hear confirmation beep.
4.10 Data Service
Using USB or RS-232 Cable, you can connect this
model to PC for Internet, PC Communication and/or G3
Fax communication, if your service provider provides
Wireless Data Communication Service.
Refer Section 7 for G3 Fax
Refer Section 8 for Data Service
4.11 R-UIM (Optional)
The R-UIM (Removable User Identity Module)
Specification is TIA/EIA/IS-820 and R-UIM Addendum1
is TIA/EIA/IS-820-1.
1. Open UIM cover on the bottom side of the FWT.
2. Connect the UIM Card connector to FWT.
3. Close the UIM cover.
Note: Turn off the phone whenever you insert or remove
UIM card.
R-UIM feature is network supported.

CDMA WLL User’s Guide HTT-800A
-39-
4.12 Authentication Function (Optional)
The Authentication Key function prevents the owner’s
phone number from being cloned by others. The phone
has its own authentication key function. This will prohibit
any illegal use of the phone. Your service provider will
need to register your phone using this authentication
function.

CDMA WLL User’s Guide HTT-800A
-40-
5. Supplementary Functions
5.1 Call Functions
5.1.1 Speed Dial
This model will store up to 200 phone numbers using 3
digit addresses (001-200). The stored number in the
Phonebook allows a call to be placed by pressing the
three digit address.
1) Speed Dial Function On / Off
You can set the Speed Dial function by entering the
following functions.
1. Press “36*#011*” to Speed Dial On
2. Press “36*#012*” to Speed Dial Off
2) Making a Call Using the Speed Dialing Function
- Make sure the Speed Dial Function is “on”
and find the memory station number in the
Phonebook.
- If the saved address is a single digit,
between 1 and 9, pick up the handset and
press the number and hold it down, then the
call will be made.

CDMA WLL User’s Guide HTT-800A
-41-
- If the saved address is two digits, pick up
the handset and press the first digit and then
press the second digit and hold it down then
a call is made.
- If the saved address is three digits, pick up
the handset and press the first digit , second
digit and then press the third digit and hold it
down then a call is made.
Note :
If you attempt a Speed Dialing while the Speed Dial
Function is OFF, an error tone will sound to indicate
wrong operation.
5.1.2 Redialing
Used for dialing the latest dial phone number.
1. Pick up the handset and long press to <*>. The
line is connected to the number called latest.
This function would not work if you tried no call
after power on.
2. Speak to the called party when the line is
connected. And Hang up the handset after
conversation.

CDMA WLL User’s Guide HTT-800A
-42-
5.1.3 Emergency call
When emergency call number is connected once, it will
not be terminated unless the called party disconnects
the call (Emergency Call Hold Service).
Therefore even caller hangs up the telephone, the line
will be still connected, so if the caller picks up the
telephone again, he can continue talking.
The Emergency Call Hold function operates only when
the phone numbers are saved at Emergency call
number, and when the Emergency Call Hold function is
enabled. This model has max. 3 emergency
number(01~03) and max. 32 digit can be stored in each
emergency call number.
1) Emergency call hold on/off
1. Pick up the telephone handset and Press
“36*#02”
2. Press “1” to set Emergency Call Hold On or “2”
to set Emergency Call Hold Off
3. Press “Lock code” (4 digits)
4. Press <*> to save the setting.
2) Storing (deleting) the Emergency call number

CDMA WLL User’s Guide HTT-800A
-43-
1. Pick up the telephone handset and Press
“36*#02”
2. Press “3” to enter Emergency call number store
step
Note: If you want to Delete at this point, Press
“4” to save (except 5, 6 step). If you want to
Delete All at this point then Press “5” to save
(except 4, 5, 6 step).
3. Press “Lock code” (4 digits)
4. Press one of “Memory number” for Emergency
call number(01-03)
5. Press the “digits” (Max 32 digits)
6. If you want to store more Emergency call
number continue from step2
7. Press <*> to save.
5.1.4 Hot Line
1. The designated number will be automatically
dialed when you pick up the handset without
any key press.
2. The Hot Line function operates only when the
phone number is saved at hot line number, and
when the hot line function is enabled. Hotline
operates in 2 modes;
- Timed Hot Line: The call will be made in

CDMA WLL User’s Guide HTT-800A
-44-
delayed manner between 4-8 seconds
(sending waiting time), depending on your
default value, after you pick up the handset.
Original default value is 6 seconds.
- Immediate Hot Line: The call will be made
as soon as you pick up the handset.
3. The Hotline function overrides any other
functions.
1) Hot Line function on/off
1. Pick up the telephone handset
2. Press “36*#031” to Timed Hot Line On
Or “36*#032” to Immediate Hot Line On
Or “36*#033” to Hot Line Off
3. Press “Lock code” (4 digits)
4. Press <*> to save.
2) Storing (Deleting) the Hot Line call number
1. Pick up the telephone handset and Press
“36*#03”
2. Press “4” to enter Hot Line call number store
step
Note: If you want to delete at this point, Press
“5” to save. (Except 4 steps)
3. Press “Lock code” (4 digits)
4. Press the “digits” (Max 32 digits)

CDMA WLL User’s Guide HTT-800A
-45-
5. Press <*> to save.
Note:
If the Hot Line function is in the Immediate Hot Line
mode, a call may not be made to another number. In this
case, to make a call to another number, change the
setup mode. Pick up the handset and press <#> within 1
second and go to the setup mode, and deactivate the
Hot Line function.
5.2 Pay Phone Interface
This terminal supports the Metering Pulse (12kHz,
16kHz) and the Polarity Reverse for the PCO Interface.
1. Press “36*#041*” to Pay Phone Interface 12kHz
Metering pulse.
2. Press “36*#042*” to Pay Phone Interface 16kHz
Metering pulse
3. Press “36*#043*” to Pay Phone Interface
Polarity Reverse
4. Press “36*#044*” to Pay Phone Interface auto
mode (depends on network)

CDMA WLL User’s Guide HTT-800A
-46-
5.3 Phone Book
5.3.1 Storing Phone
Numbers
1. Pick up the telephone handset and Press
“36*#051”
2. Press the 3 digit memory address (001~200).
3. Press the phone numbers (Max 32 digits).
4. Press <*> to store.
5.3.2 Deleting Phone Numbers
1) Deleting a Number
1. Pick up the telephone handset and Press
“36*#052”
2. Press the 3 digit memory address to be deleted.
3. Press <*> to delete
2) Deleting All Numbers
1. Pick up the telephone handset and Press
“36*#053”
2. Press <*> to delete all
5.4 Voice Privacy
This terminal is equipped with voice privacy function to
prevent illegal tapping.

CDMA WLL User’s Guide HTT-800A
-47-
There are two detailed settings available, <Standard> for
regular level voice privacy mode and <Enhanced> for
reinforced voice privacy mode.
1. Press “36*#06”.
2. Press <1> for Enhanced Voice Privacy mode or
<2> for Standard Voice Privacy mode.
3. Press <*> to save.
5.5 Ringer Frequency & Cadence Control
This function is used to control the ringer frequency and
cadence. Select the frequency first and then select the
cadence. Default setting is 20Hz, 1 sec on – 2sec Off.
5.5.1 Ringer Frequency
Setting
1. Press “36*#07”.
2. Select a desired number from 1(16Hz), 2 (20Hz),
3 (25Hz).
3. Press <*> to save.
5.5.2 Ringer Cadence Setting
1. Press “36*#08”.
2. Select a desired number from 1~6.
- 1: 1Sec On – 2 Sec Off
- 2: 0.4 Sec On – 0.2 Sec Off - 0.4 Sec On – 2

CDMA WLL User’s Guide HTT-800A
-48-
Sec Off
- 3: 1 Sec On – 4.5 Sec Off
- 4: 1 Sec On – 4 Sec Off
- 5: 0.25 Sec On – 0.25 Sec Off - 0.25 Sec On
– 1.25 Sec Off
- 6: 2 Sec On – 4 Sec Off
3. Press <*> to save.
5.6 Dial Tone Frequency Control
This function is used to select the dial sent from the
handset.
1. Press “36*#09”.
2. Select a desired tone from 1(350 + 440Hz),
2(400Hz), 3(425Hz), 4(450Hz), 5(312.5 +
412.5Hz).
3. Press <*> to save.
5.7 Hook Flash
When the terminal receives a hook-flash from the
connected telephone device, it will automatically allow:
1. For producing dial tone again after a phone
number has been dialed without connection.
2. The use of special cellular services which may
be available in your cellular service area.

CDMA WLL User’s Guide HTT-800A
-49-
Note: Hook-flash is accomplished in a call through either
pressing the dedicated hook-flash key which is available
on some phones or through a rapid single press of the
hang-up mechanism upon which the handset rests when
the phone is hung up.
5.8 ROH (Receiver off Hook)
If the telephone equipment remains “off-hook”, meaning
that the handset is left off of its cradle as it would be
when you hang up, a ROH tone emits from the receiver
for a period of 60 seconds.
This feature may be different or not by country
specification.
5.9 Restrict Call Mode Setting
While the Restrict Call function is enabled, the specified
numbers cannot be called. These specified numbers
start with specific digits. The specific digits are set
according to the following procedure (Storing the Deny
dial number).
Among these specified numbers you can permit some
numbers by designating start digits by following
procedure (Storing the Permit dial number).

CDMA WLL User’s Guide HTT-800A
-50-
This terminal has 10 Deny dial numbers (1~10), and
max. 32 digits can be stored in each Deny dial number.
This terminal has 10 Permit dial number (1~10), and
max. 32 digits can be stored in each Permit dial number.
If you set Emergency call, the emergency number is not
applied to this restrict call.
5.9.1 Set Restrict Call Level
1. Press “36*#11”.
2. Press restrict level (1~2)
- 1: No restriction
- 2 : Restriction
3. Press “LOCK code” (4 digits).
4. Press <*> to save.
5.9.2 Storing (Deleting) the Permit Dial
Number
1. Press “36*#12”.
2. Press “1” to enter Permit Dial Number store step.
Note: If you want to Delete at this point, Press
“2” to save (except 5, 6 step). If you want to All
Delete at this point, Press “3” to save (except 4,
5, 6 step).

CDMA WLL User’s Guide HTT-800A
-51-
3. Press “LOCK code” (4 digits).
4. Press one of “Memory number” for permit dial
number (01~10).
5. Press the “digits” (Max. 32digits).
6. If you want to store more Permit Dial Numbers
continue from step2
7. Press <*> to save.
5.9.3 Storing (Deleting) the Deny Dial Number
(Restricted dial number)
1. Press “36*#13”.
2. Press “1” to enter Deny Dial Number store step.
Note: If you want to Delete at this point, Press
“2” to save (except 5, 6 step). If you want to All
Delete at this point, Press “3” to save (except 4,
5, 6 step).
3. Press “LOCK code” (4 digits).
4. Press one of “Memory number” for deny dial
number (01~10).
5. Press the “digits” (Max. 32digits).
6. If you want to store more Deny Dial Numbers
continue from step2
7. Press <*> to save.

CDMA WLL User’s Guide HTT-800A
-52-
6. System Functions
6.1 Call Waiting
Call Waiting is a feature, which enables you to be alerted
to a second incoming call while you are on the first call
of your telephone. You have the option of responding to
the second call while putting the first call on hold or you
can disable the call waiting option during a particular call.
Contact your service provider to activate or deactivate
Call Waiting.
6.2 Three-way calling
Three-Way Calling is a feature that enables you to set up
a three-way conversation with two other users. Contact
your service provider to activate or deactivate Three-
Way Calling.
6.3 Call Forwarding
Call Forwarding is a feature that enables you to forward
all your incoming calls to another phone number, even if
your telephone is turned off. You can still make calls
from your telephone even when Call Forwarding is
activated. Contact your service provider to activate or
deactivate Call Forwarding.

CDMA WLL User’s Guide HTT-800A
-53-
7. FAX Functions
7.1 FAX Set-up
1) To send or receive analog fax messages, the FWT
should be equipped with an analog fax module,
connected to a conventional fax machine with the FWT,
as shown in section 2.3
Note: When you use a fax function and terminal should
be connected to AC/DC adapter. Other wise it may
indicate Low battery warning.
7.2 Sending FAX Message
You can send and receive fax massages using a fax
machine connected to the FWT.
1) Dual dialing Method
1. Load documents to send into a fax machine.
2. Pick up the handset or press On-hook of the fax
machine.
3. Press <*>, <*>, <0>, <8>, <1> and wait for dial
tone.
4. Dial destination fax number when you hear dial
tone.

CDMA WLL User’s Guide HTT-800A
-54-
2) Per-digit Method
1. Load documents to send into a fax machine.
2. Pick up the handset or press On-hook button of
the fax machine.
3. Press <*>, <8>, <9>, <*> and destination fax
number in sequence.
The FWT will make a call automatically.
7.3 Receiving G3 FAX Message
You can set the FWT to “Always Mode” or “Once” fax
reception mode.
1. Pick up the handset or press On-hook button of
the fax machine.
2. Press <*>, <*>, <0>, <9>, <1> to set “Always
Mode”
Press <*>, <*>, <0>, <9>, <2> to set “Once
Mode”
3. Wait for a confirmation dial tone. The FWT is
ready to receive fax machine
Note 1: If you set the FWT to always mode, the
FWT will transfer every call to the fax machine
connected. If you set the FWT to once mode,
the FWT will transfer the first incoming call to
the fax machine and set back to voice call
mode automatically.
Note 2: To set back the FWT from always fax

CDMA WLL User’s Guide HTT-800A
-55-
mode to voice call mode.
- Pick up the handset or press On-hook key.
- Press <*>, <*>, <0>, <9>, <7> in sequence.
- Wait for a confirmation dial tone.
7.4 Receiving PC FAX message
You can set the FWT to “Always” or “Once” Mode fax
reception mode.
1. Pick up the handset or press On-hook key.
2. Press <*>, <*>, <0>, <9>, <3> to set “Always
Mode”. Press <*>, <*>, <0>, <9>, <4> to set
“Once Mode”.
3. Wait for a confirmation dial tone.
4. Make you setup the FAX Program in your PC that
you use.
5. Make a document and sent it.
CDMA WLL User’s Guide HTT-800A
-56-
8. Data Service
8.1 For Windows 98, Windows 2000
8.1.1 Setting the phone to DS (Data
Service)
Data Service mode setting
) Press 36*#103* (Data Service through USB
Cable) from phone keypad.
) Press 36*#102* (Data Service through RS-232
Cable) from phone keypad.
FWT and PC Setting
Dial up Number Modem B.Rate
Packet data #777 115200 bps <
36*#205*>
Circuit data XXXX 19200 bps< 36*#202*>
CDMA WLL User’s Guide HTT-800A
-57-
Notes:
1. XXXX (where XXXX is depends on Service
provider location).
2. Below Setup is shown for Packet data, for
circuit data Dial up Number and Modem
baud rate to be changed accordingly.
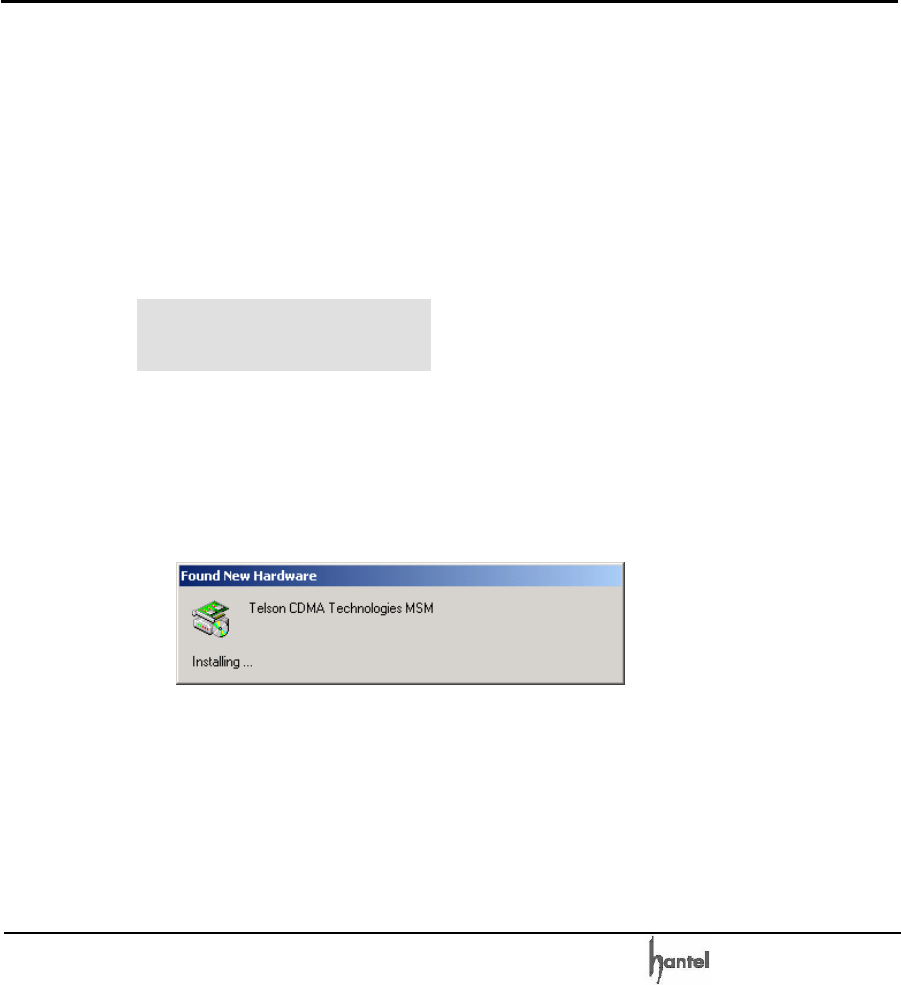
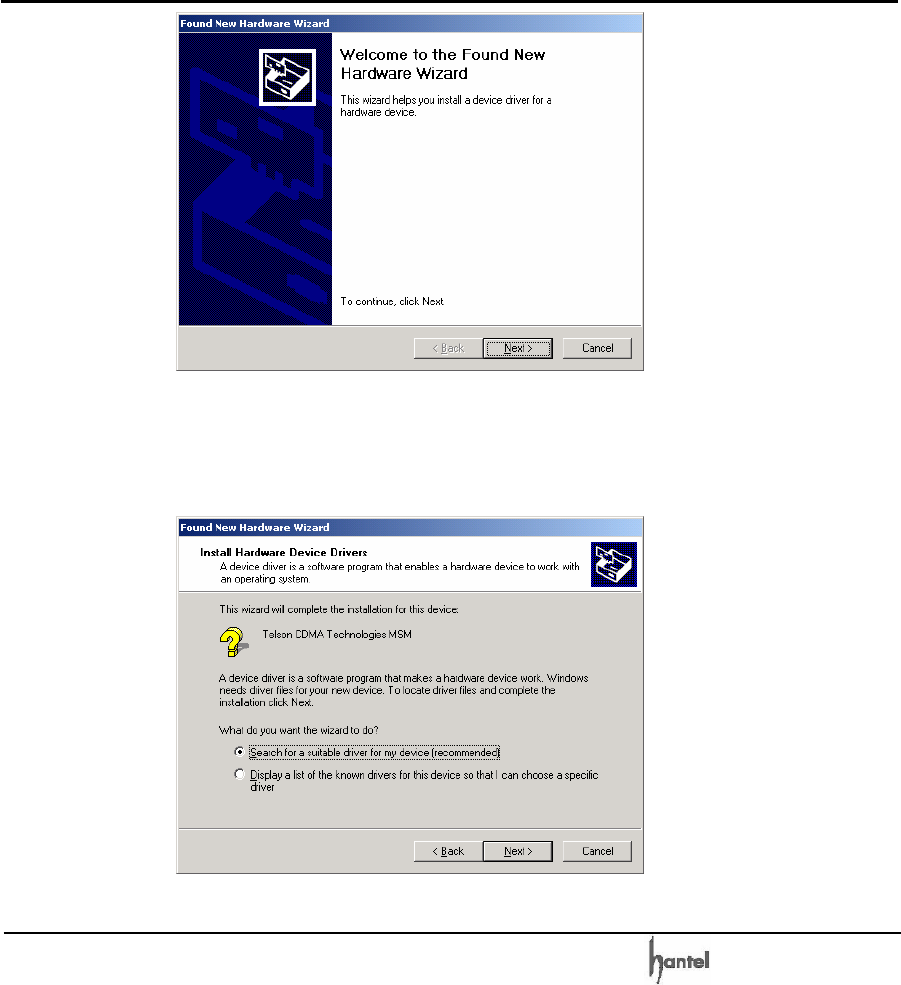
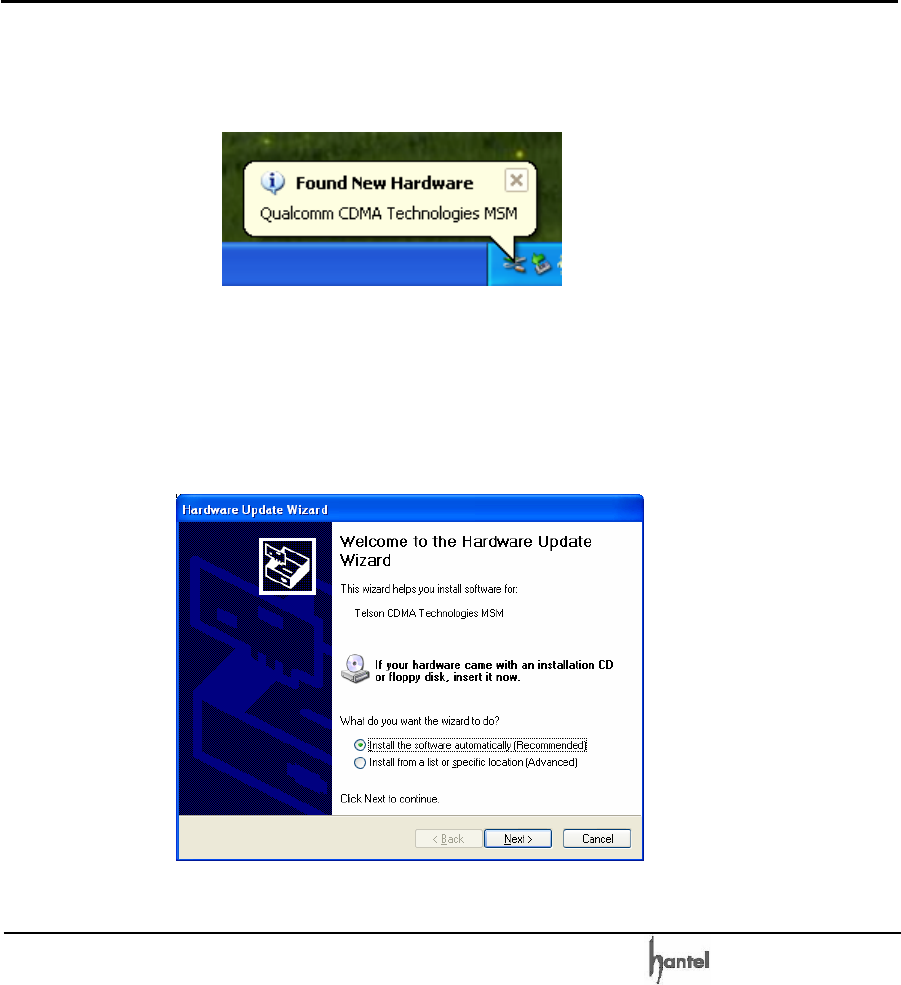
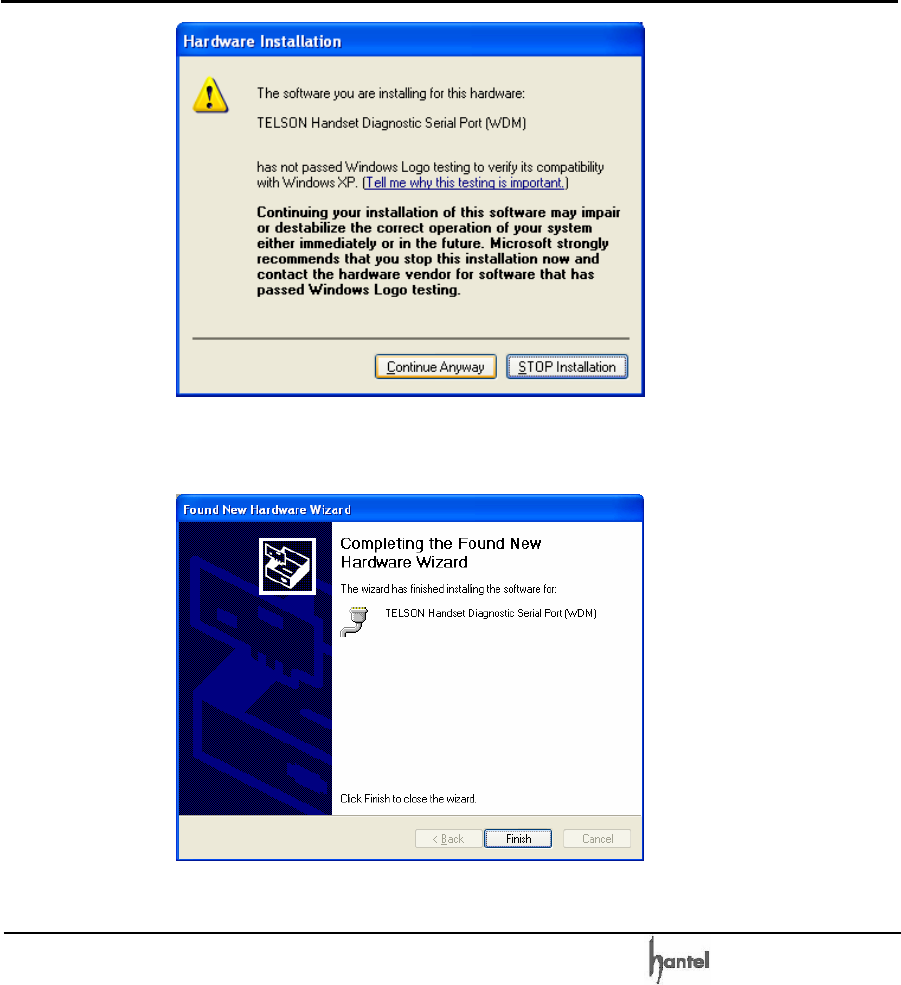
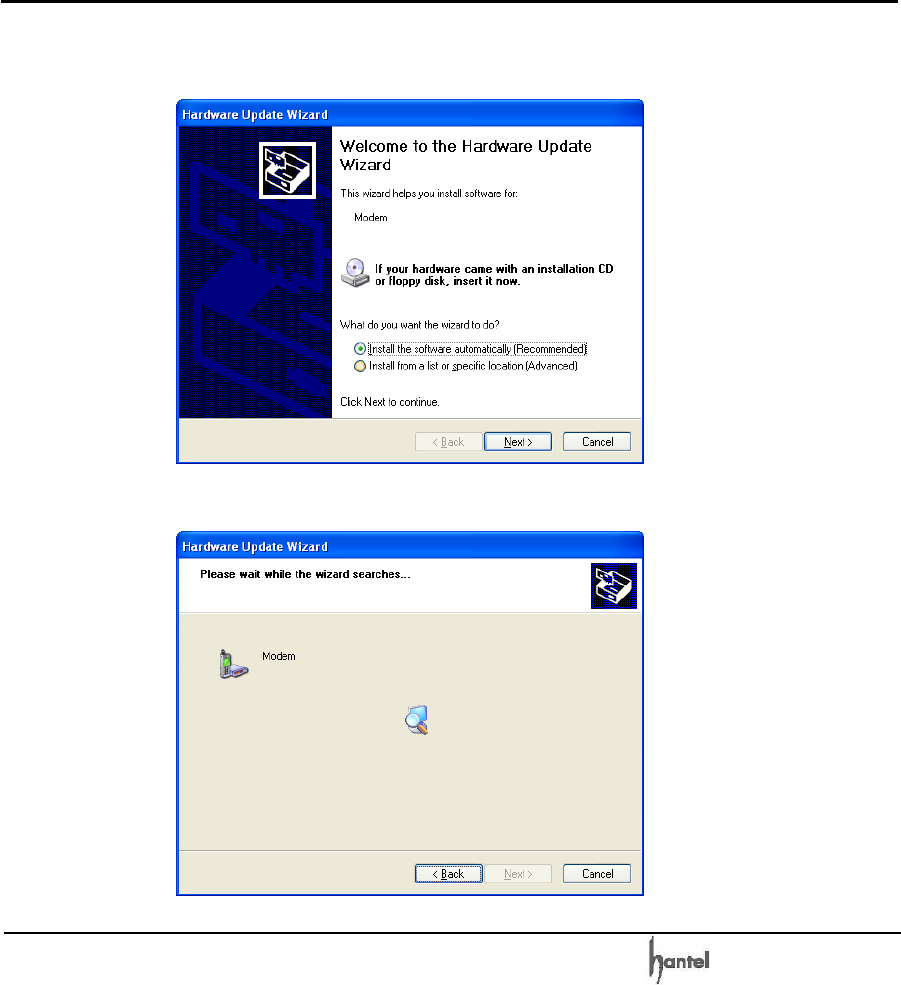
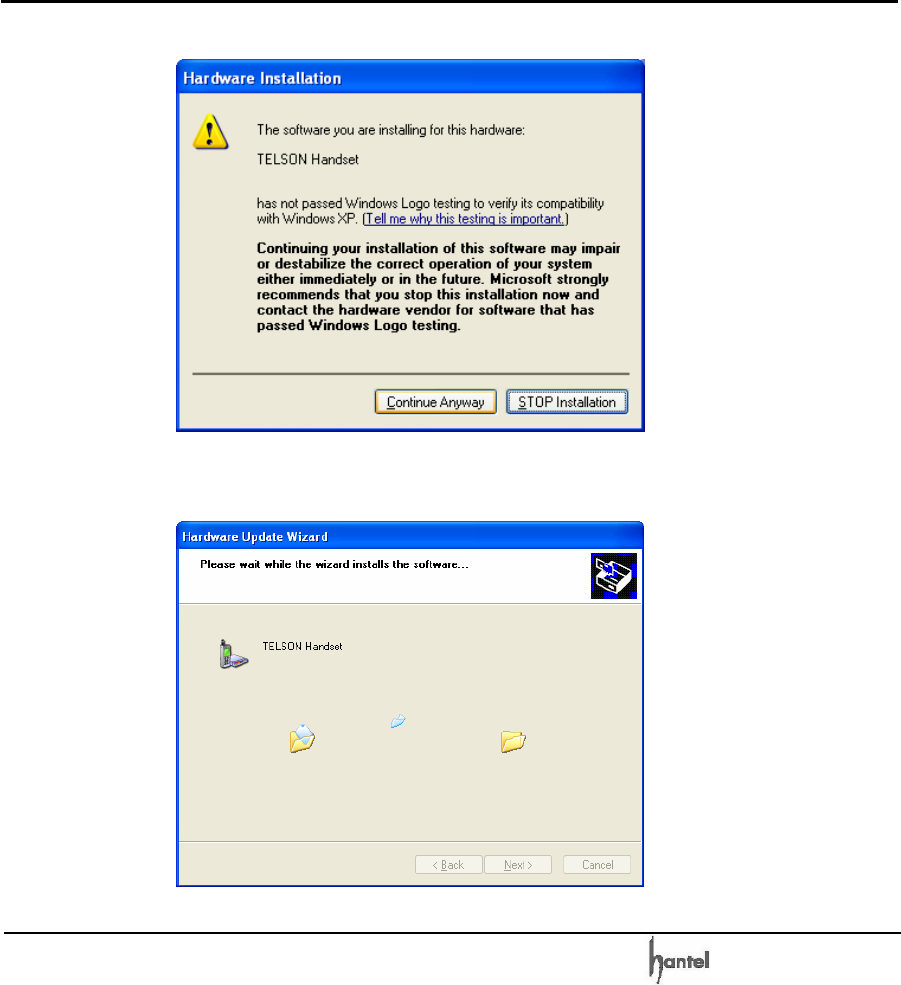
8.1.2 Setting a USB driver in
PC
Users must designate a proper standard modem to a
proper serial port (COM port) of their computers.
If you connect PC with the USB cable, you will be
displayed with the following message.
) Click on the Next button.
CDMA WLL User’s Guide HTT-800A
-58-
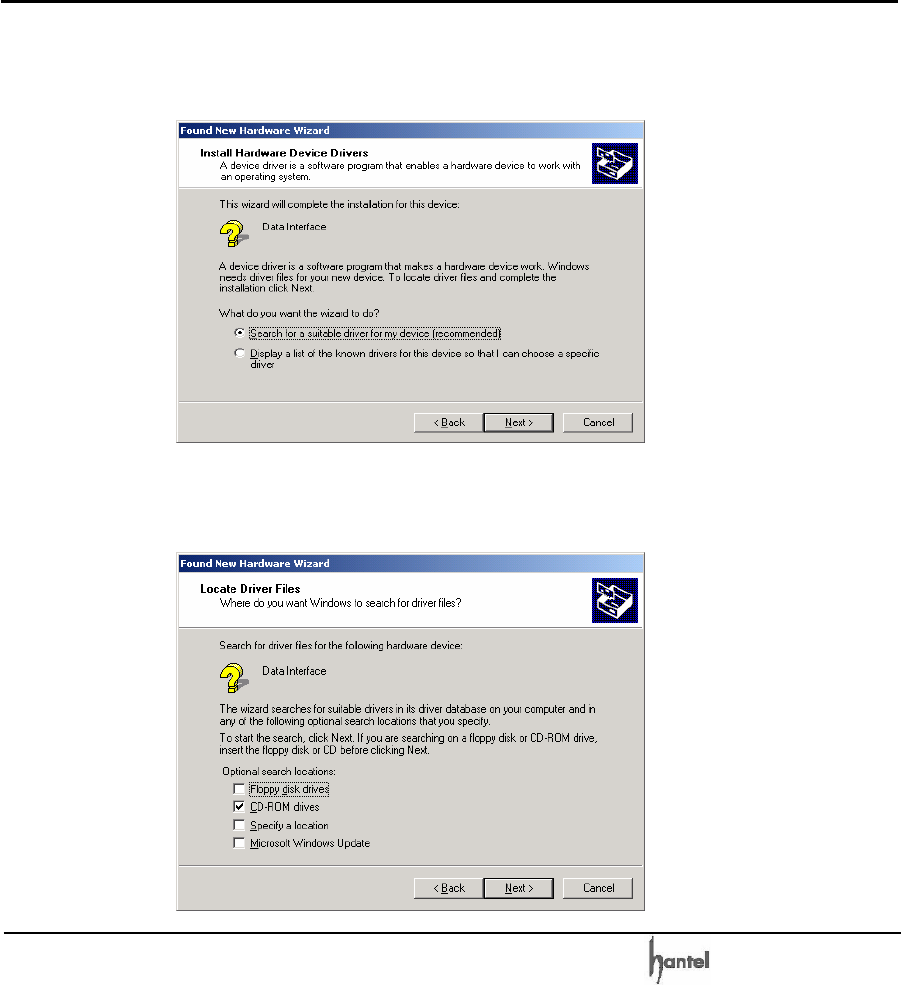
) Check the box next to where it says, “Search for a
suitable driver for my device (recommended)” and
then click on the Next button.
CDMA WLL User’s Guide HTT-800A
-59-
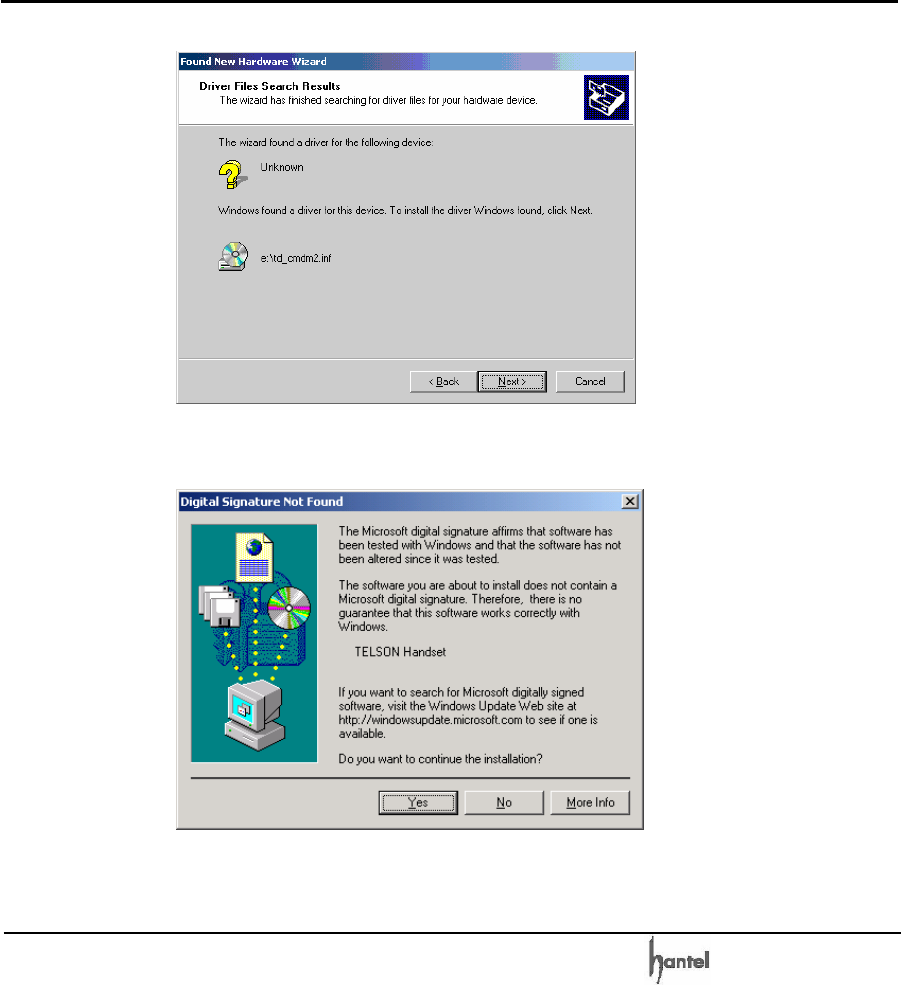
) Check the box next to where it says, “CD – ROM
drives” and then click on the Next button.
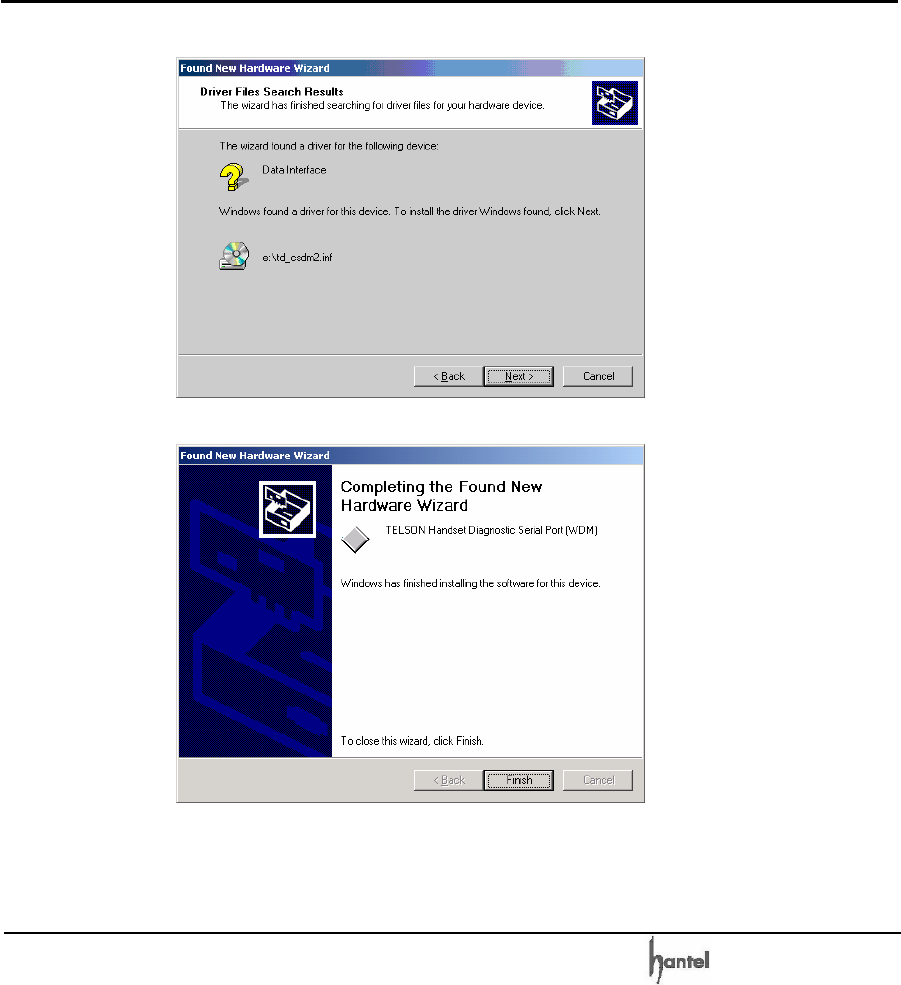
) Click on the Next button.
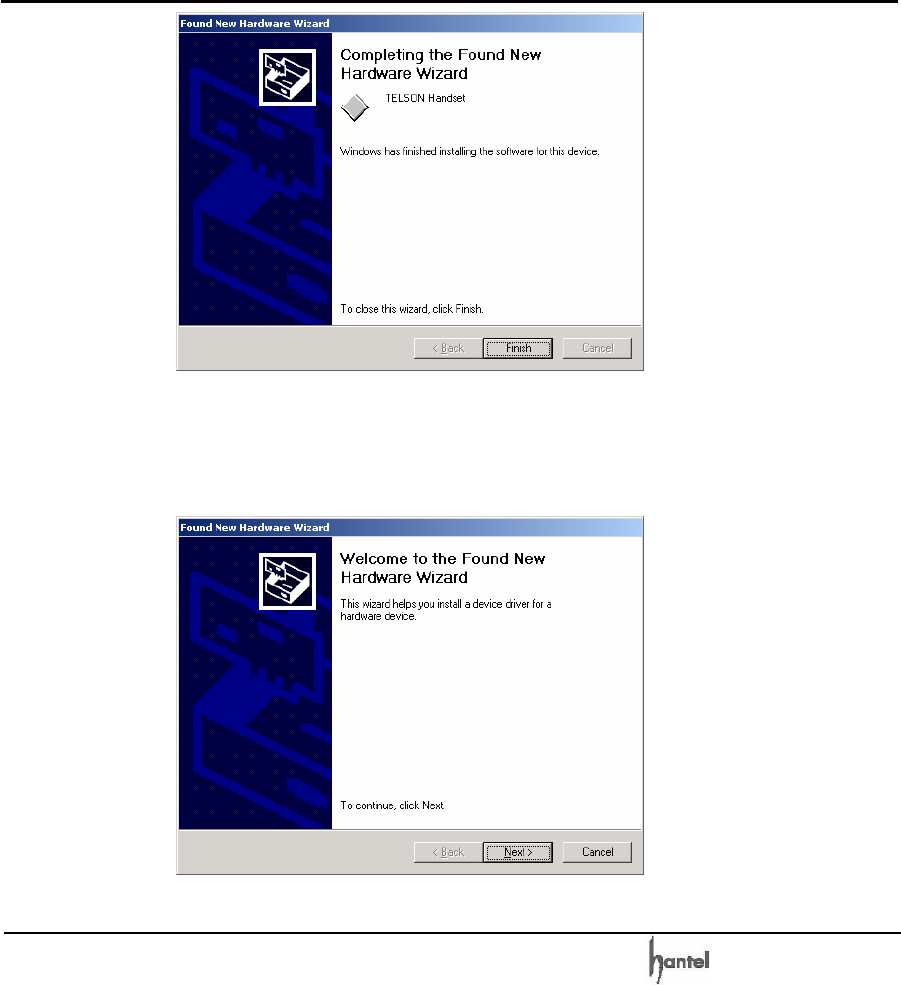
) Click on the Finish button.
CDMA WLL User’s Guide HTT-800A
-60-
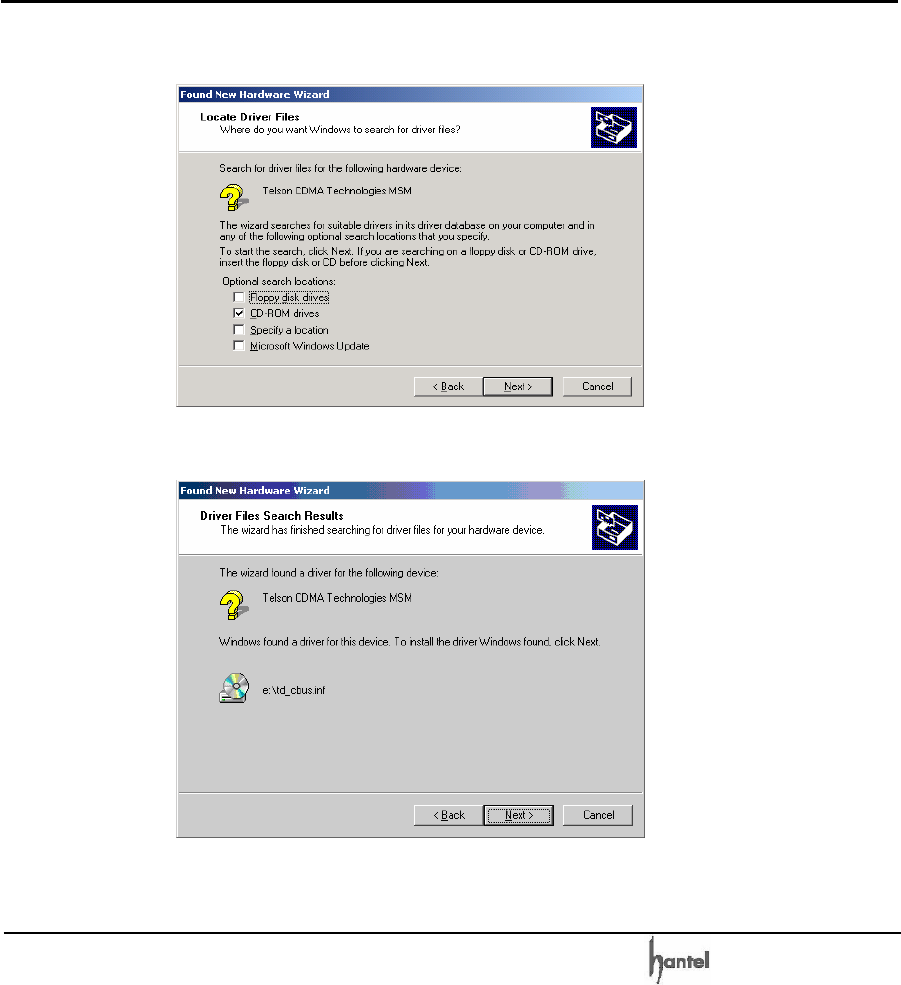
) This is not over. You have to continue to setup USB
Driver. The following window appears automatically.
Click on the Next button.
CDMA WLL User’s Guide HTT-800A
-61-
) Check the box next to where it says, “Search for a
suitable driver for my device (recommended)” and
then click on the Next button.
) Check the box next to where it says, “CD – ROM
drives” and then click on the Next button.
CDMA WLL User’s Guide HTT-800A
-62-
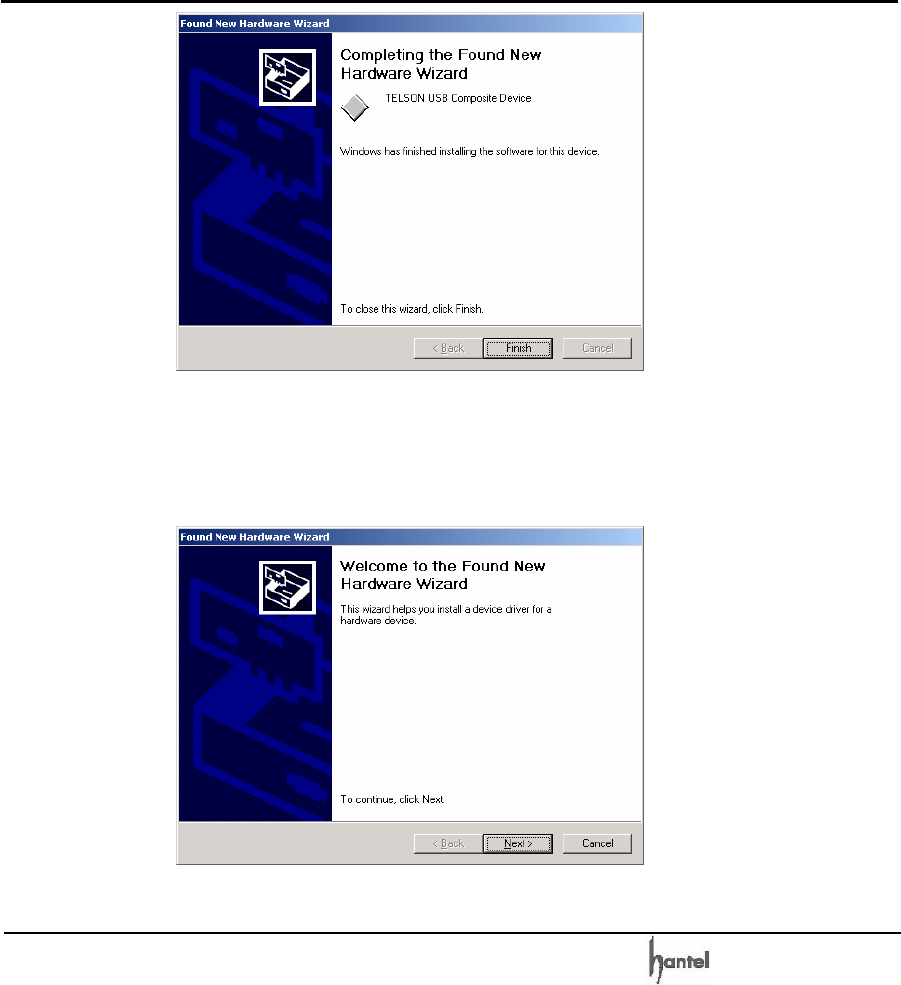
) Click on the Next button.
) Click on the Yes button.
) Click on the Finish button.
CDMA WLL User’s Guide HTT-800A
-63-
) This is the last setup. The following window appears
automatically too. Click on the Next button.
CDMA WLL User’s Guide HTT-800A
-64-
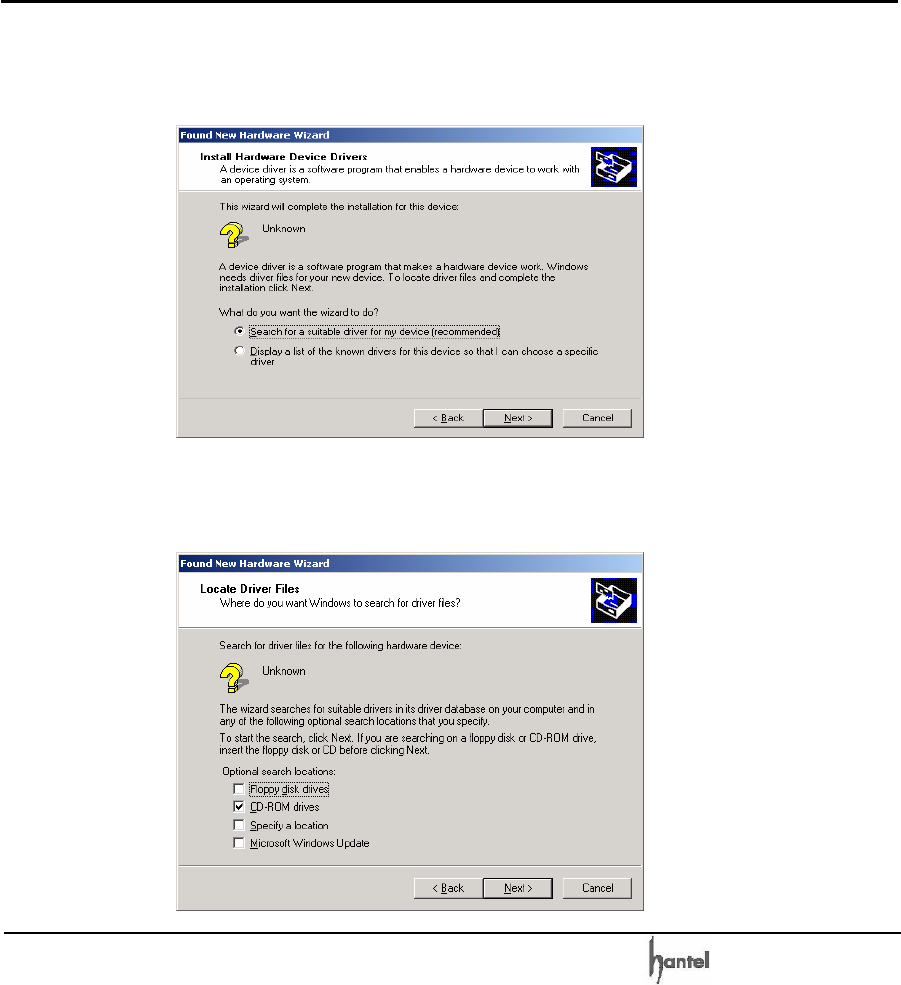
) Check the box next to where it says, “Search for a
suitable driver for my device (recommended)” and
then click on the Next button.
) Check the box next to where it says, “CD – ROM
drives” and then click on the next button.
CDMA WLL User’s Guide HTT-800A
-65-
) Click on the Next button.
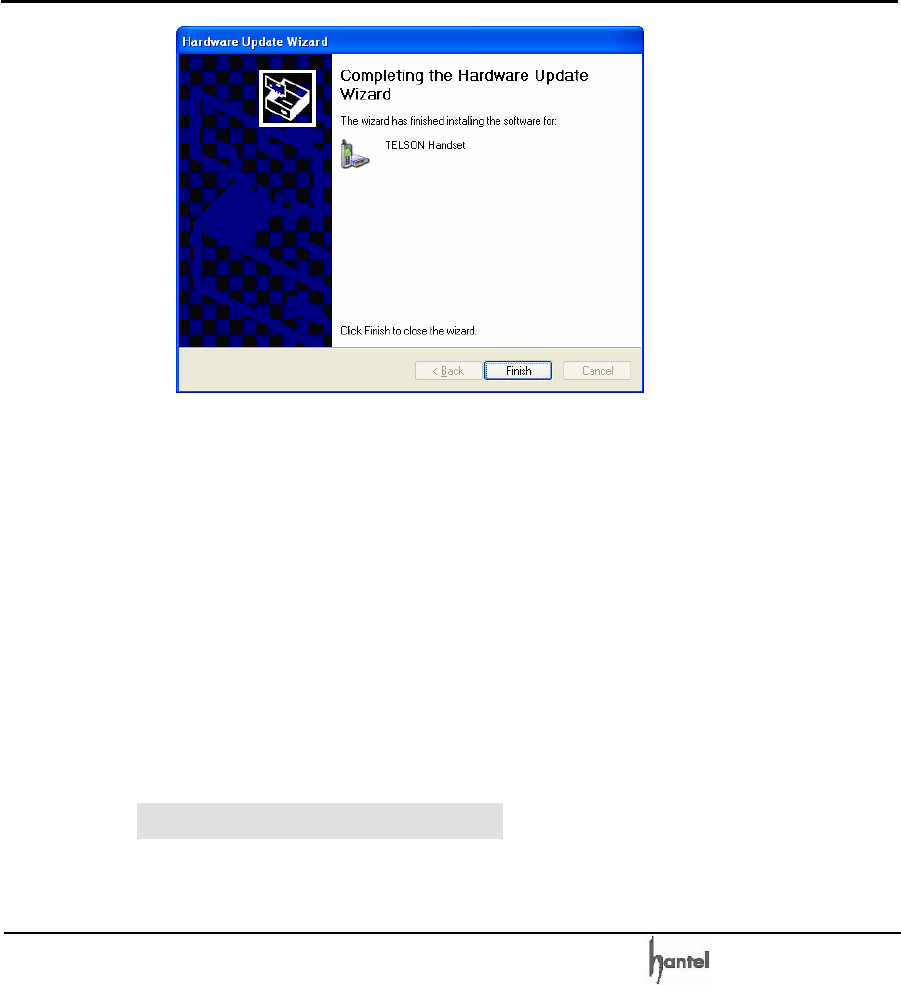
) Click on the Finish button.
) Double-click [control panel] → Double-click
[system] → Click [hardware] → Click [device
CDMA WLL User’s Guide HTT-800A
-66-
manager]. You will see a ‘Modems’ icon. You can
check if USB Driver setup is right or not.
You have completed the setup for USB Driver.
From now, you can use the USB, connecting the
FWT (WLL).
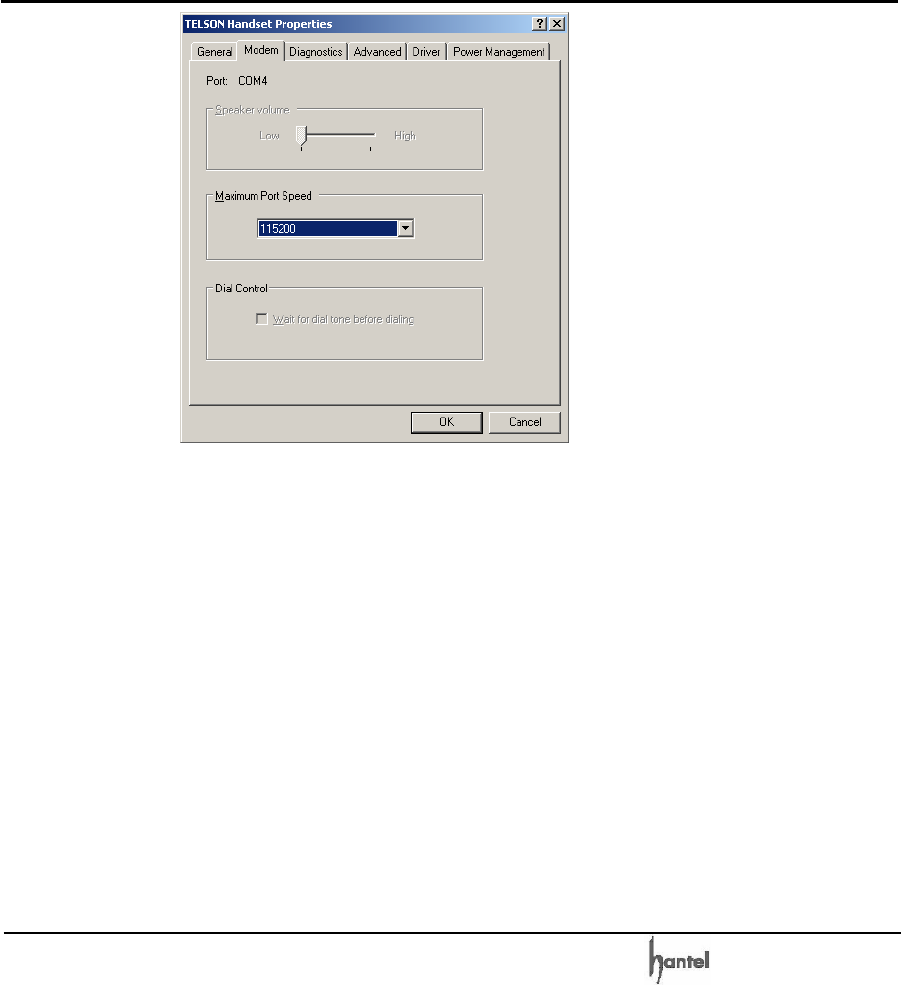
8.1.3 Setting a Standard Modem in PC
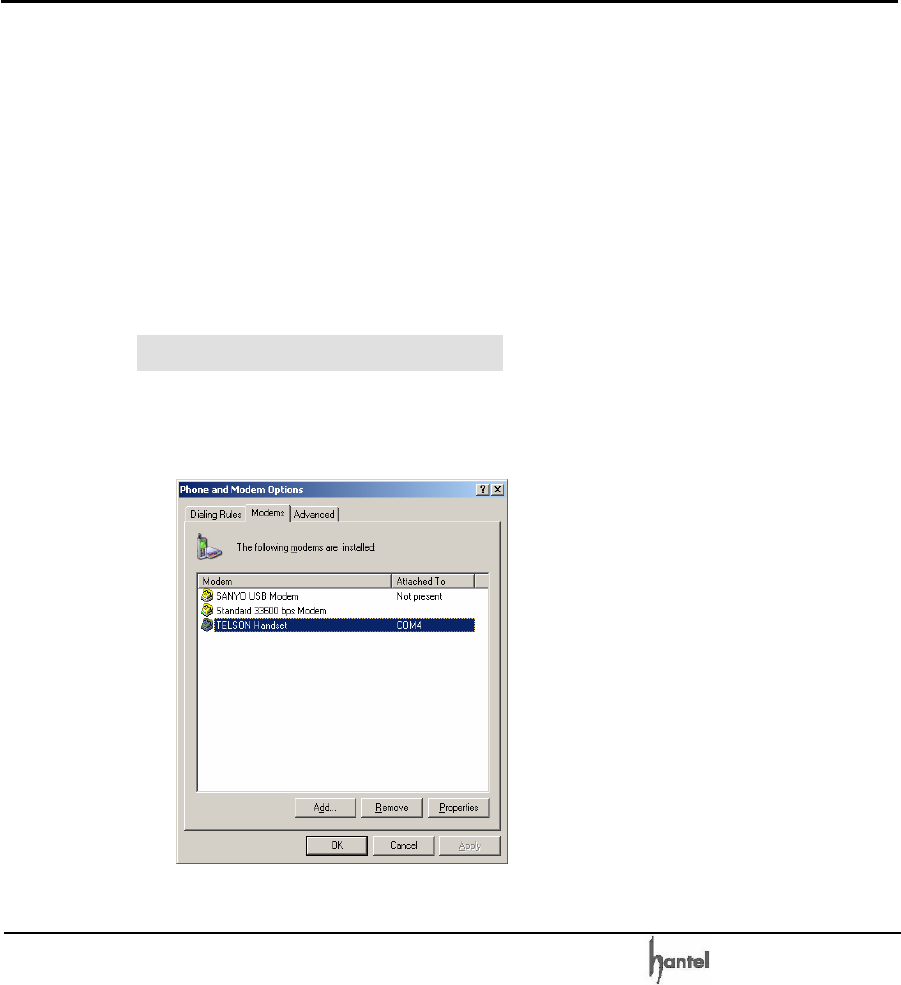
) Click [Start] → Double-click [Phone and Modem
Options] → click [Modem].
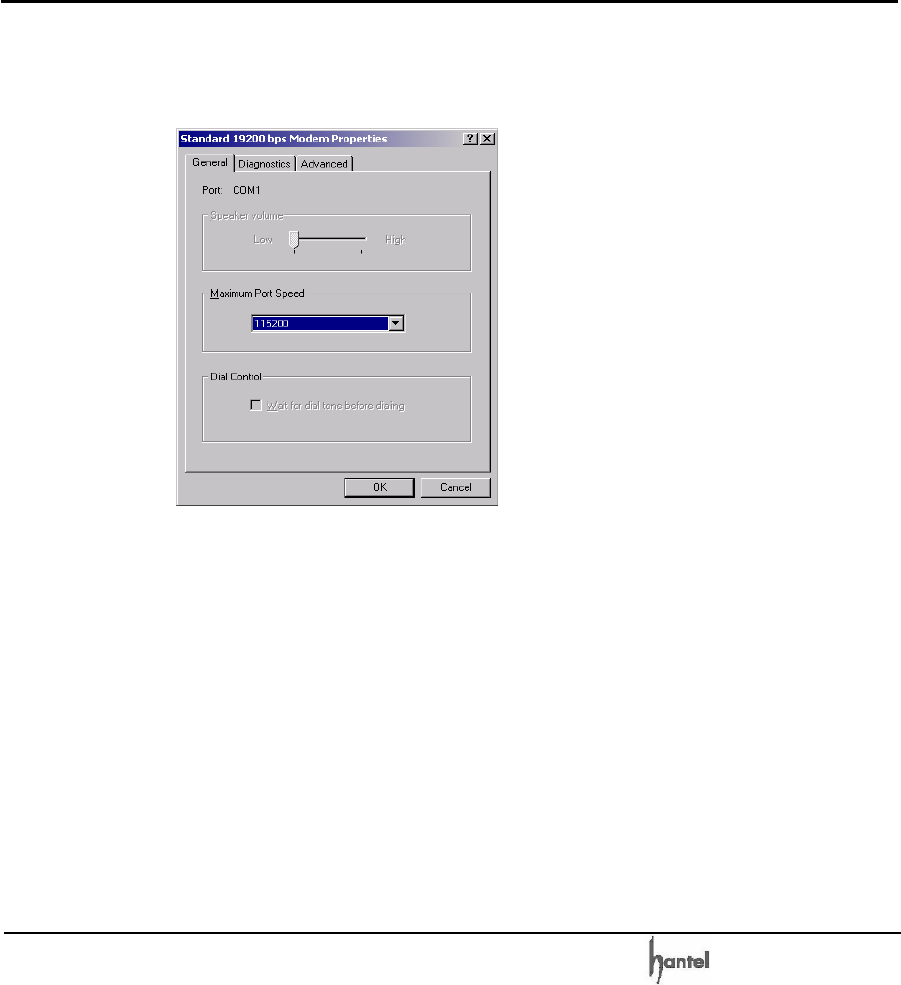
) Select a COM port and click Properties. Make sure
CDMA WLL User’s Guide HTT-800A
-67-
that the modem is installed properly including serial
port number and data speed. If not, make a
correction.
Note:
Maximum Speed type has many kinds. We
recommend 115,200bps. And Port is properly
serial port for your PC.
Now, you’re ready to make a data call, using HTT
Model.
CDMA WLL User’s Guide HTT-800A
-68-
8.1.4 Browsing the Internet
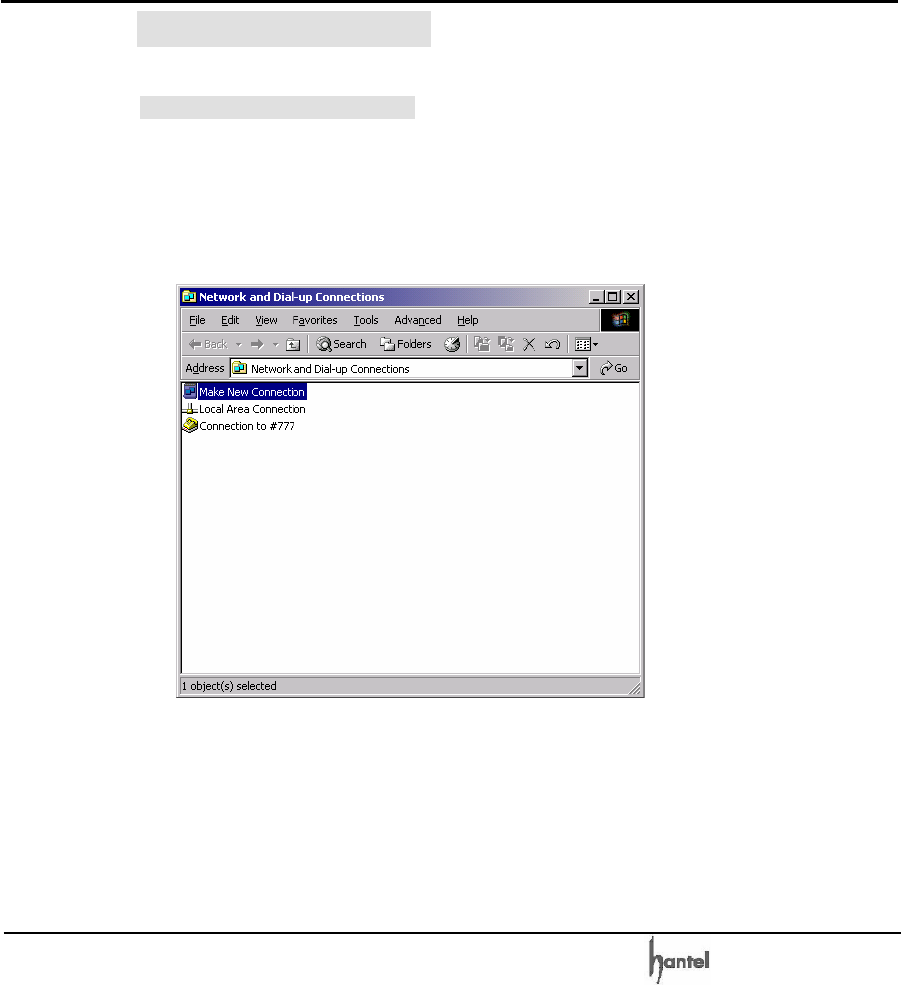
Setting a Dial-Up Networking
) Double-click [Control panel] → Double-click
[Network and Dial-up Connections] → Double-click
[Make New Connection].
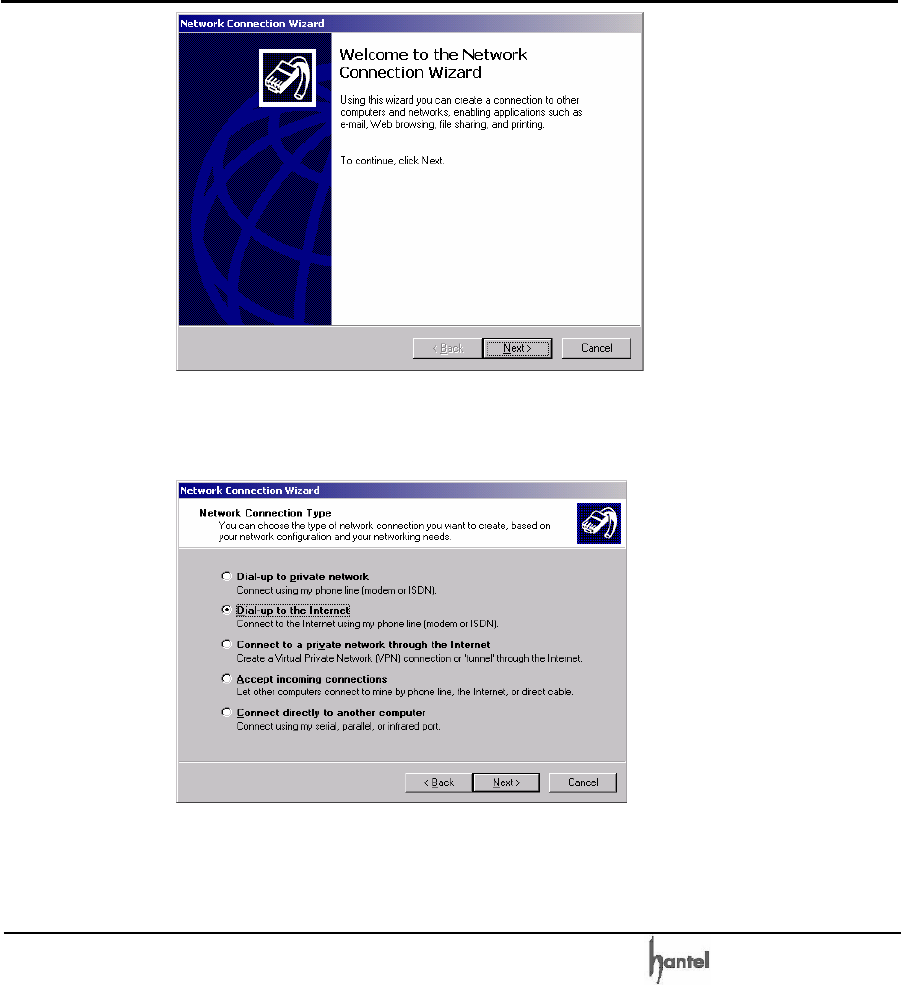
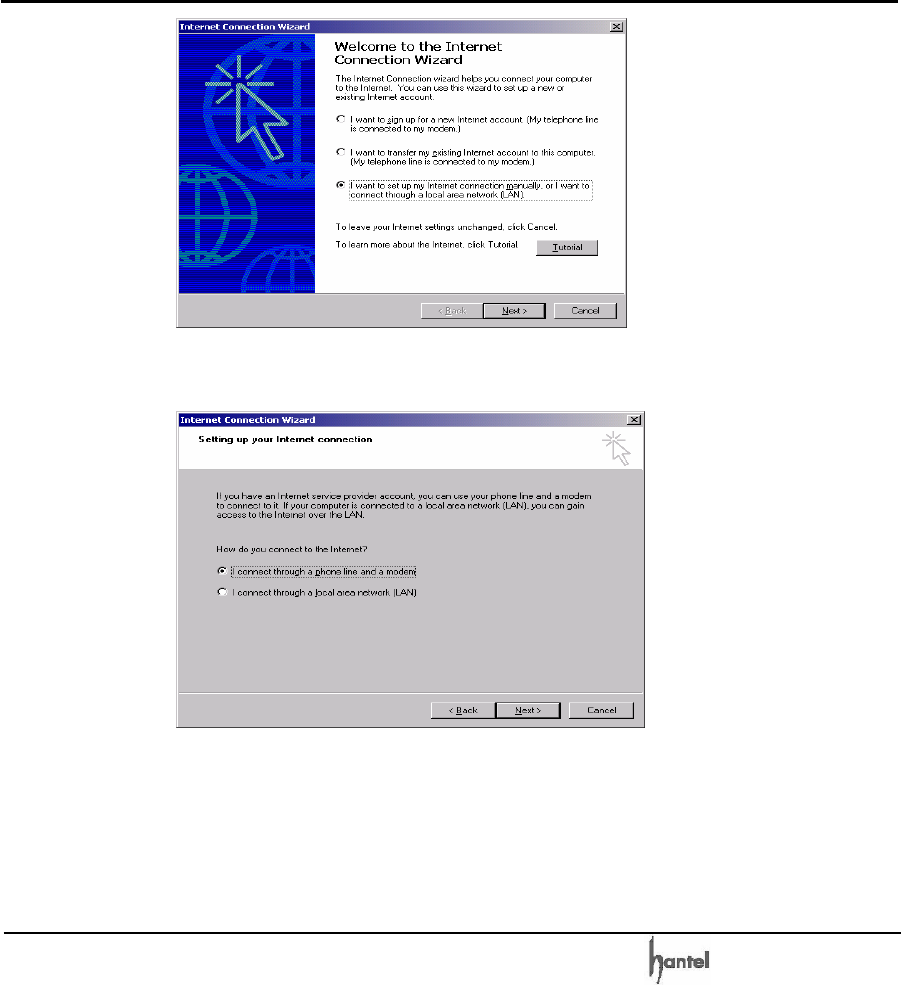
) Click on the Next button.
CDMA WLL User’s Guide HTT-800A
-69-
) Check second radio button and click on the Next
button.
) Check third radio button and click on the Next button.
CDMA WLL User’s Guide HTT-800A
-70-
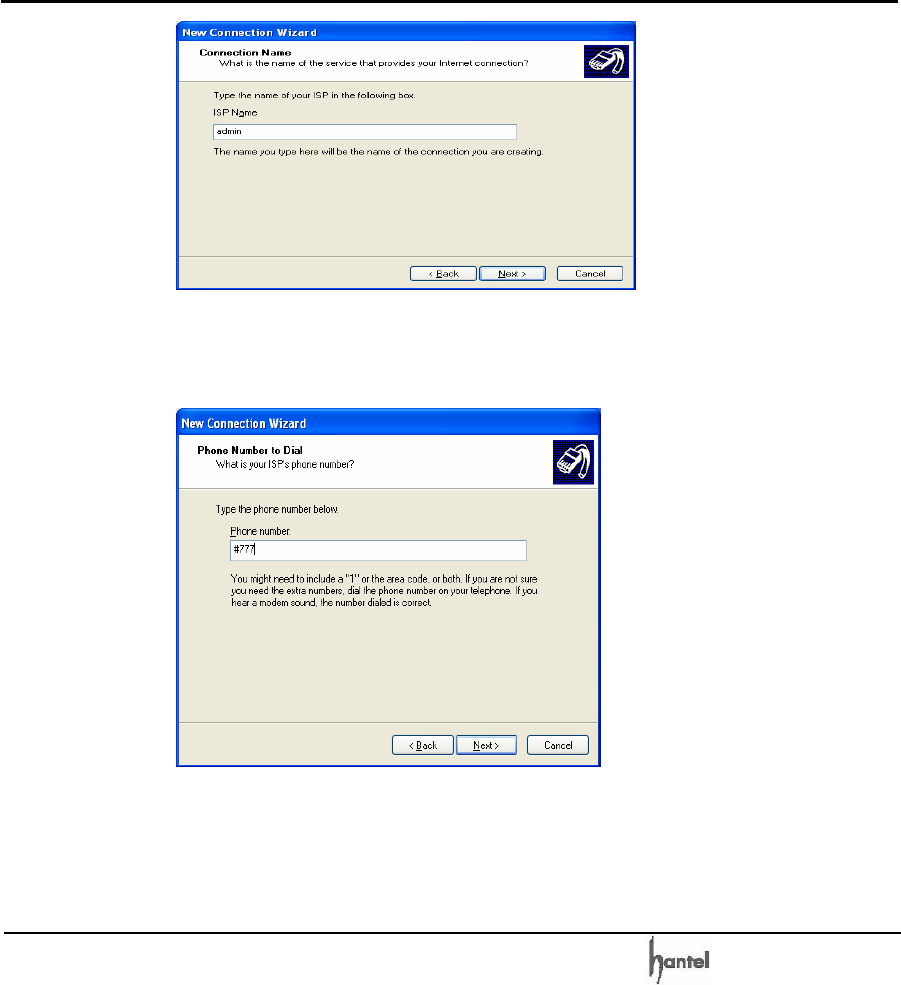
) Check first radio button and click on the Next button.
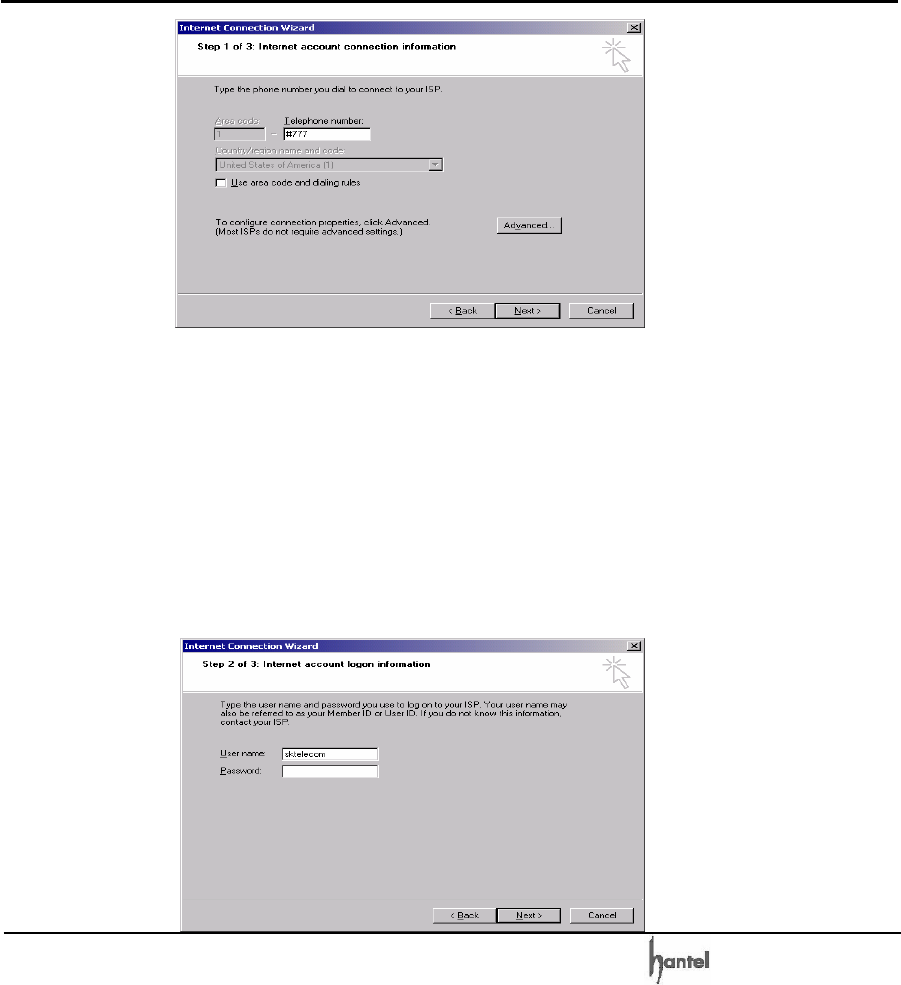
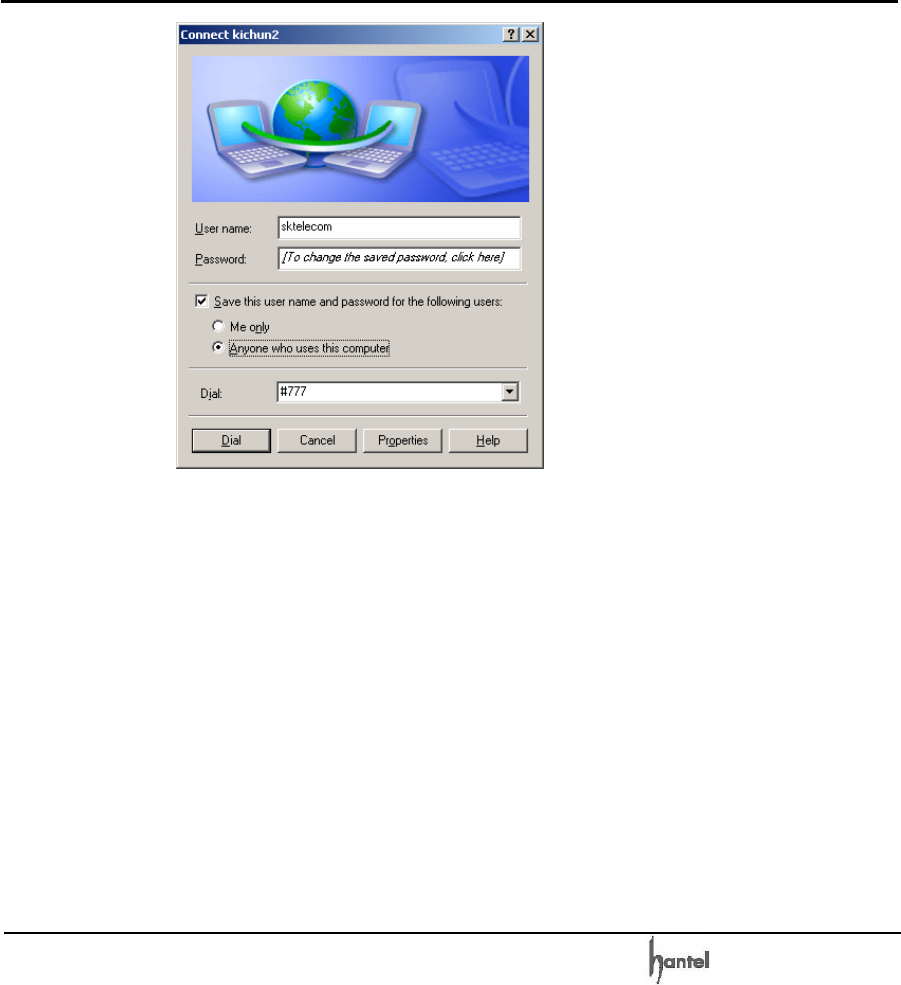
) Input the telephone number, the designated number
of your operator or ISP (ex #777). Click on the Next
button.
CDMA WLL User’s Guide HTT-800A
-71-
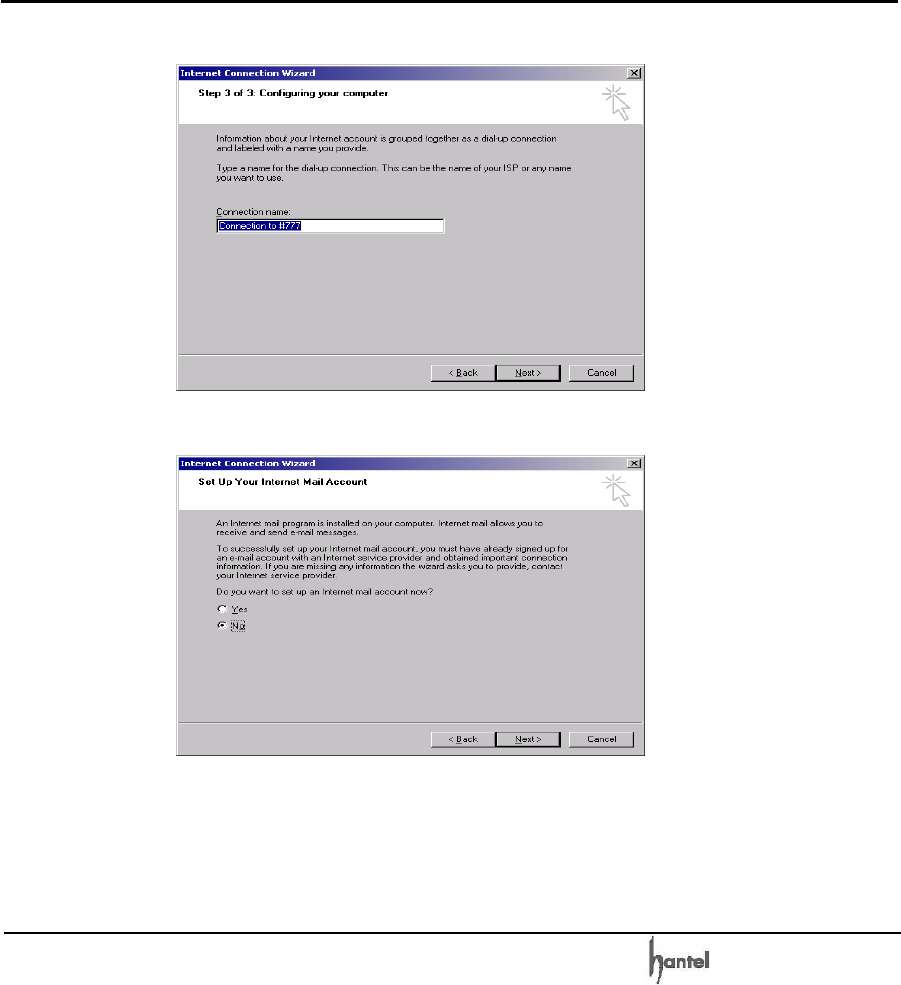
) Enter User Name and Password. Click on the Next
button.
Note:
User name and password will be provided by your
operator or ISP.
For Instance
“
Sktelecom
”
and blank can be used
for User name and password respectively in Korea.
CDMA WLL User’s Guide HTT-800A
-72-
) Click on the Next button.
) Select “No” and then click on the Next button.
) Uncheck the check button and click on the Finish
button.

CDMA WLL User’s Guide HTT-800A
-73-
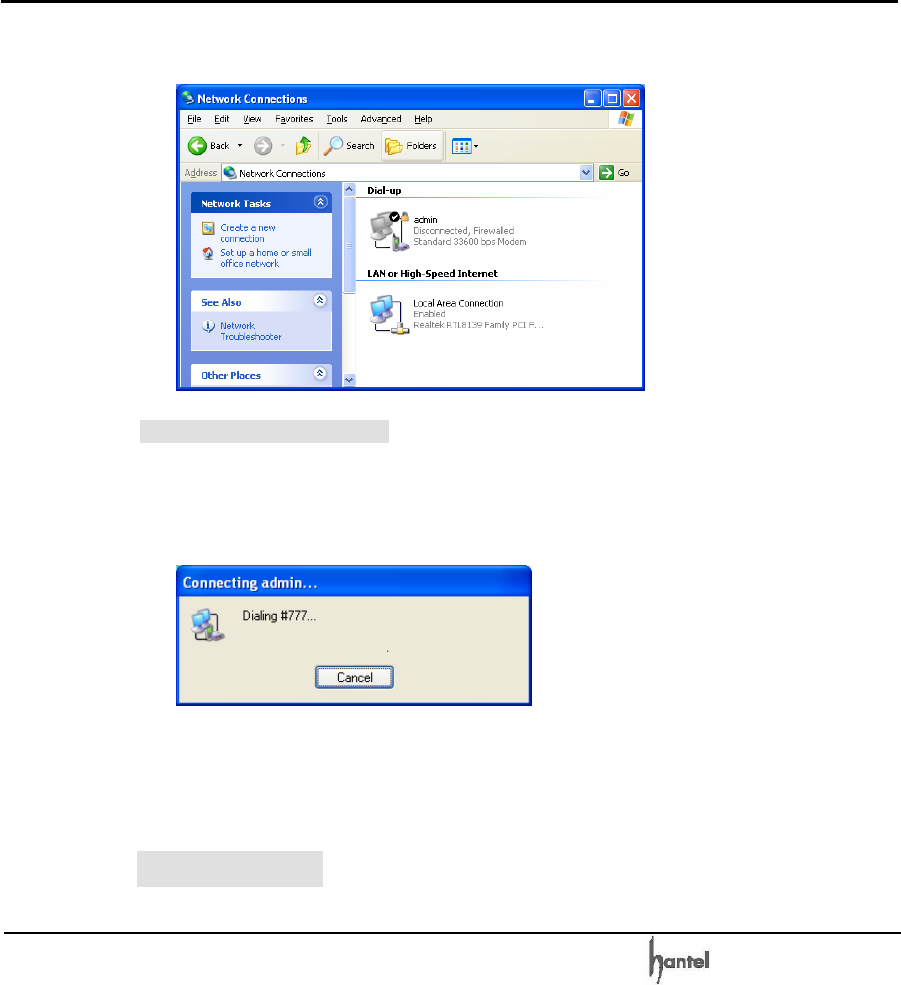
) Double-click [Control Panel] → Double-click
[Network and Dial-up Connections]. You will see a
new icon. (Dial-up networking icon)
CDMA WLL User’s Guide HTT-800A
-74-
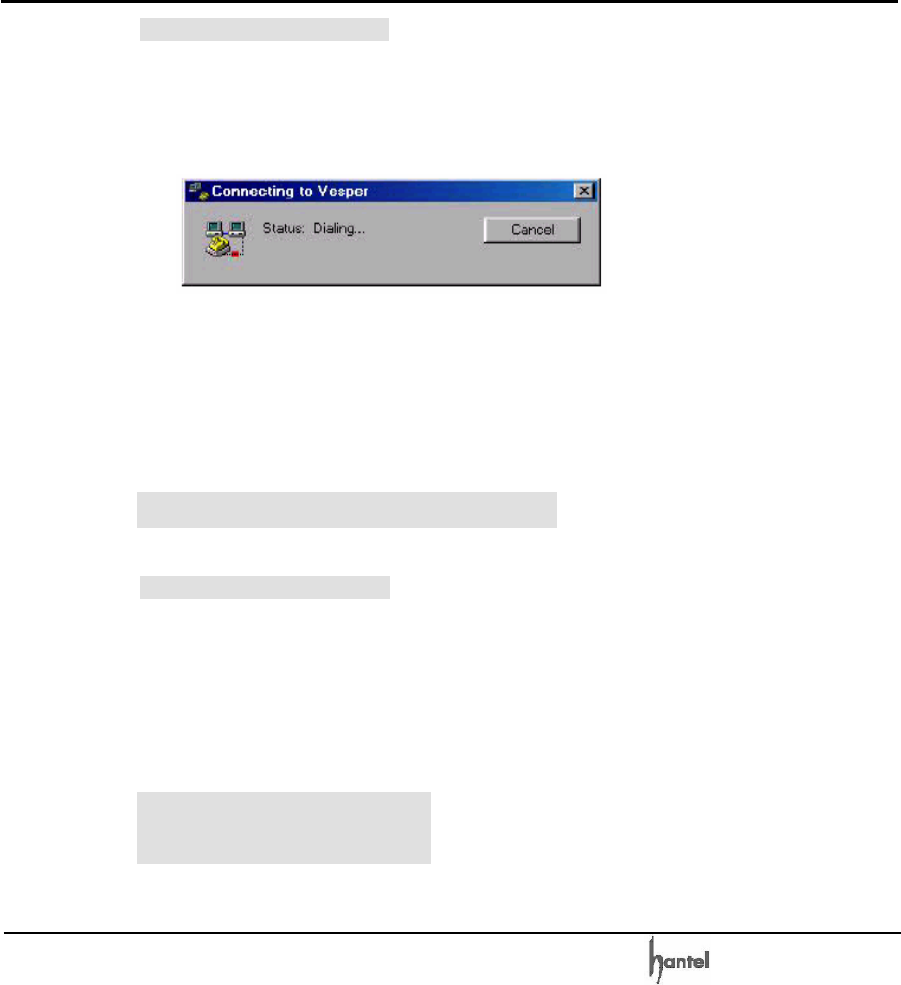
Connecting to the Internet
) Double-click Dial-up Networking icon which you
made in your PC.
) Click “Dial” button.
) When connected, run the internet browser.
8.2 For Windows XP
8.2.1 Setting the phone to DS (Data
Service)
Data Service mode setting
) Press 36*#103*. (Data Service through USB
Cable)
) Press 36*#102*. (Data Service through RS-232
Cable)
8.2.2 Setting a USB driver in
PC
Users must designate a proper standard modem to a
proper serial port (COM port) of their computers.
CDMA WLL User’s Guide HTT-800A
-75-
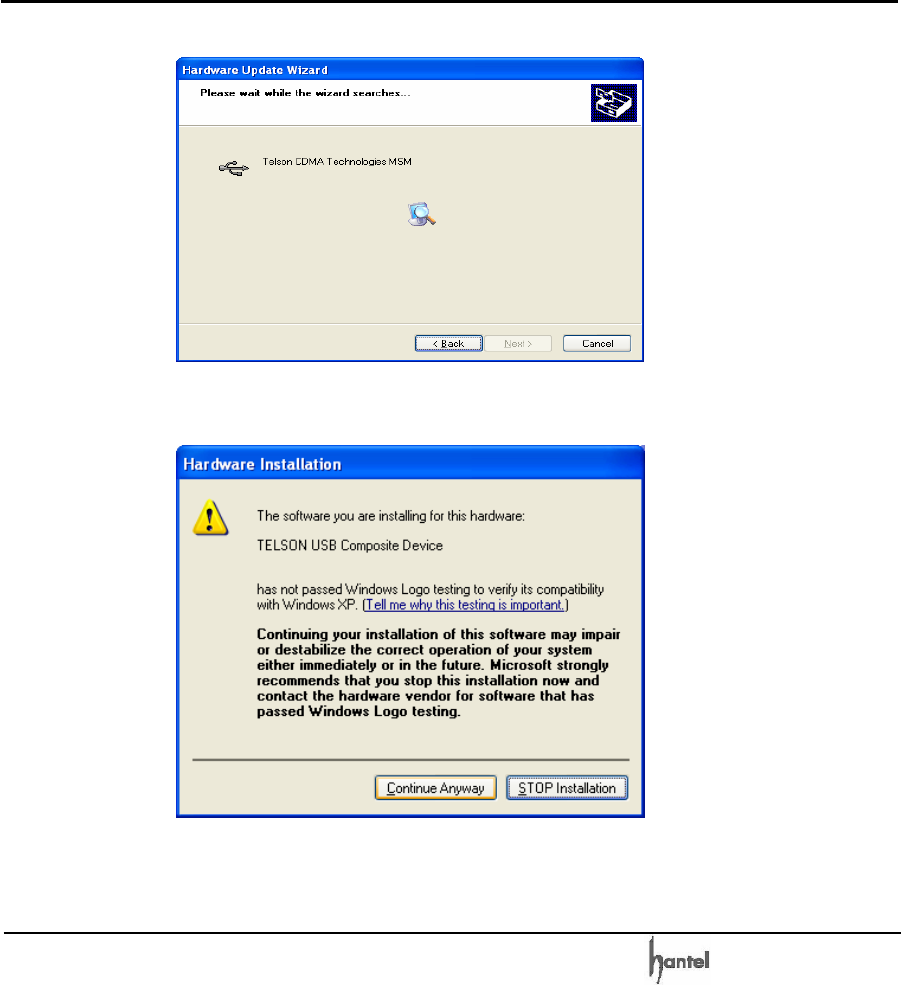
If you connect PC with the USB cable, you will see the
message.
) Click on the Next button and check the box next to
where it says, “Search for a suitable driver for my
device (recommended)” and then click on the Next
button.
CDMA WLL User’s Guide HTT-800A
-76-
) The following dialog box appears:
) Click on the Continue Anyway button.
) The following dialog box appears:
CDMA WLL User’s Guide HTT-800A
-77-
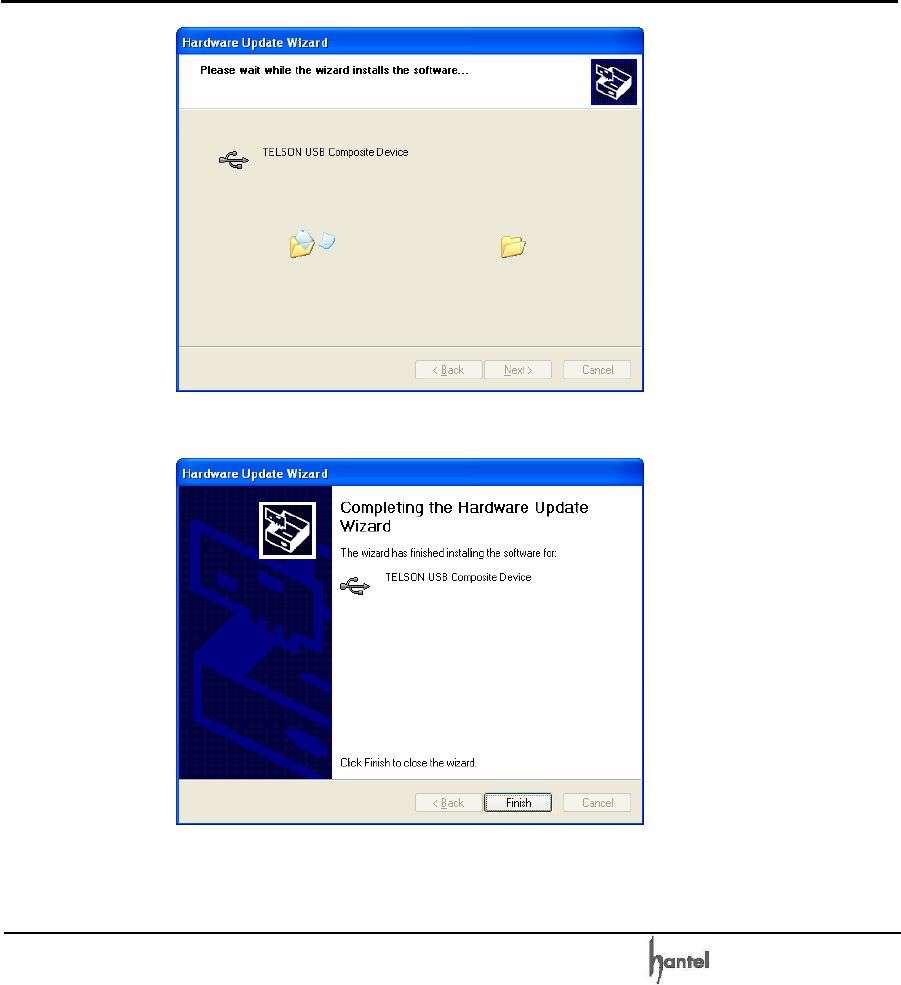
) Click on the Finish button.
) This is not over. You have to continue to setup USB
Driver. The following window appears automatically.
CDMA WLL User’s Guide HTT-800A
-78-
Click on the Next button.
) The following dialog box appears:
) Click on the Continue Anyway button.
CDMA WLL User’s Guide HTT-800A
-79-
) Click on the Finish button.
CDMA WLL User’s Guide HTT-800A
-80-
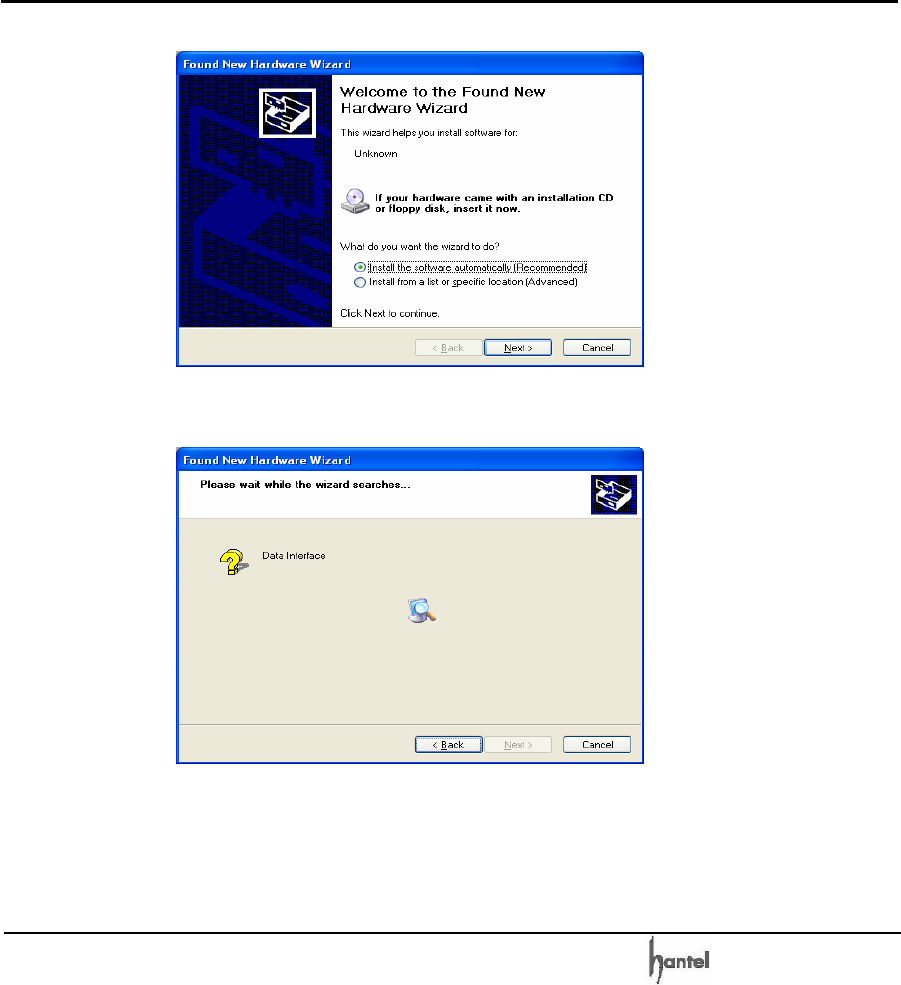
) This is the last setup. The following window appears
automatically too. Click on the Next button.
) The following dialog box appears:
CDMA WLL User’s Guide HTT-800A
-81-
) Click on the Continue Anyway button.
) The following dialog box appears:
) Click on the Finish button.
CDMA WLL User’s Guide HTT-800A
-82-
) Double-click [control panel] → Double-click
[system] → Click [hardware] → Click [device
manager]. You will see a ‘Modems’ icon. You can
check that USB Driver setup is right or not.
You have Complete the setup for USB Driver.
From now, you can use the USB, connecting the
FWT (WLL)
8.2.3 Setting a Standard Modem in PC
) Click [Start] → Double-click [Phone and Modem
CDMA WLL User’s Guide HTT-800A
-83-
Options] → click [Modem].
) Select a COM port and click Properties. Make sure
that the modem is installed properly including serial
port number and data speed. If not, make a
correction.
Note:
Maximum Speed type has many kinds. We
recommend 115,200bps. You check it whether a
port is properly serial port for your PC or not.
Now, you’re ready to make a data call, using HTT
model.
8.2.4. Browsing the
CDMA WLL User’s Guide HTT-800A
-84-
Internet
Setting a Dial-Up Networking
) Double-click [Control Panel] → Double-click
[Network Connections] → Click [view network
connects] → Click [Create a new connection].
) Click next
CDMA WLL User’s Guide HTT-800A
-85-
) Check first radio button and Click Next.
) Check second radio button and Click Next.
CDMA WLL User’s Guide HTT-800A
-86-
) Check first radio button and Click Next.
) Write arbitrary ISP name and Click Next.
CDMA WLL User’s Guide HTT-800A
-87-
) Enter the telephone number, the designated number
of your operator or ISP (ex #777). Click Next.
) Enter User Name and Password. Click Next.
Note: User name and password will be provided by
CDMA WLL User’s Guide HTT-800A
-88-
your operator or ISP.
) Uncheck the check button and Click Finish.
) Double-click [Control Panel] → Double-click
[Network Connections]. You will see a new icon.
CDMA WLL User’s Guide HTT-800A
-89-
(Dial-up networking icon)
Connecting to the Internet
) Double click Dial-up Networking icon which you
made in your PC.
) Click “Dial” button.
) When connected, run the internet browser.
8.3 Data Installation Trouble Shooting
8.3.1 Message Box
When an error occurs, you can refer following

CDMA WLL User’s Guide HTT-800A
-90-
instructions.
1) Error 680: No dial tone.
Make sure that the phone is in the Service State.
Unless an antenna is not displayed, check the line
between a phone and PC is well-connected and
channel, ESN and MIN are well-put.
2) Error 691: Authentication failed.
This error occurs when it cannot establish a dial
up networking connection. Check user name and
password are correct.
3) Error 692: Hardware failure in port or attached
device.
This message may be displayed when a phone is
not in the DS mode. You can shoot out this by
changing the mode to the DS, referring 8.1.1
Setting the phone to DS (Data
Service) mode.
And
try connecting again.
4) Error 797: The modem could not be found.
This error appears when your PC can’t detect a
phone as a modem. PC is responsible for it. So
this problem may be corrected by rebooting your
computer or reinstalling a modem driver.
5) Error 676: The line is busy.
Make sure you’re dialing the right number and try
again.

CDMA WLL User’s Guide HTT-800A
-91-
6) Error 619 : Disconnected
This error may be displayed in case of setting
problem. You have to check the DS Baud rate in 3
places.
1. Setting the phone into DS Baud
2. Setting [Phone and Modem Options] into your
PC in the [Control panel].
Reference to section 8.1 (in case of Window
2000, Window98), section 8.2 (Window XP)
3. Setting the [Dial- up icon] into your PC
[Dial- up icon] => Properties => Configure
8.3.2 PC setting
Phone and Modem Option
) Control panel Æ Phone and Modem Option
In this case, USB Cable is been used. Please
verify TELSON Handset Modem is selected.
CDMA WLL User’s Guide HTT-800A
-92-
) Click on “Properties” button.
) Click “Modem” and select the BAUD rate
In case of Packet Data: 115,200
In case of Circuit Data: 19,200.
) Click on the “OK” button.
CDMA WLL User’s Guide HTT-800A
-93-
) Click on the “OK” button.
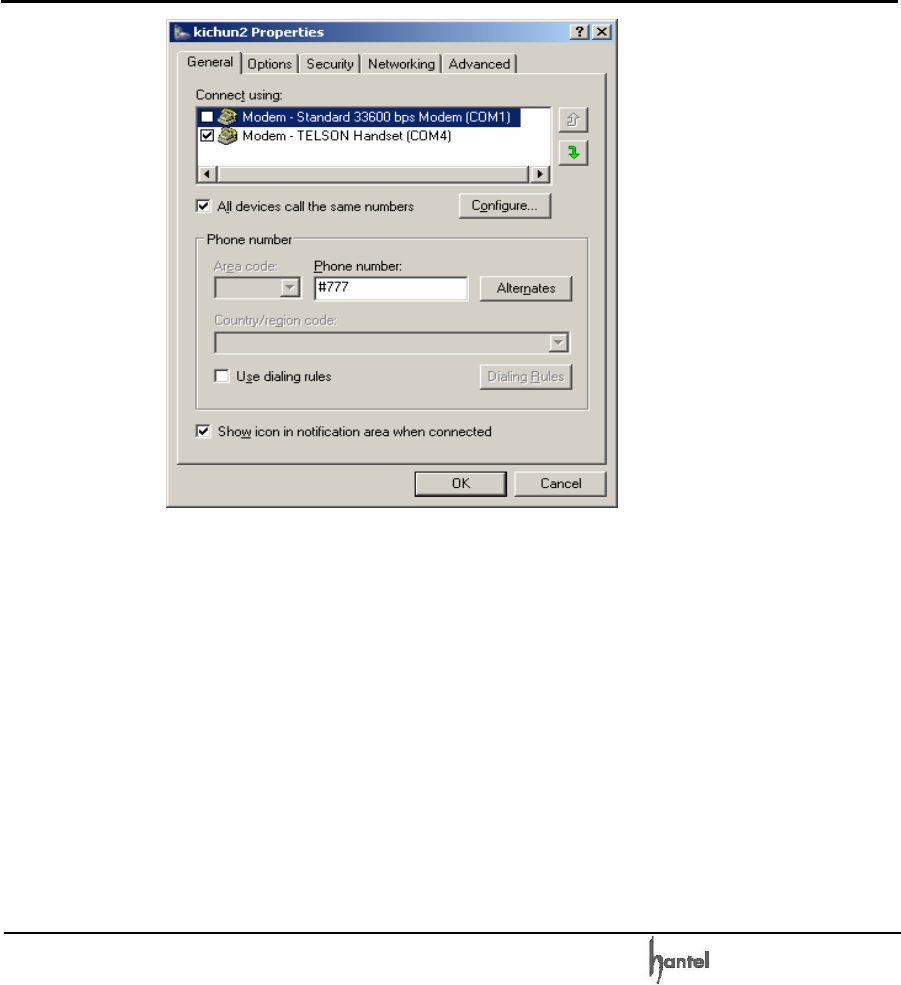
Dial- up icon (Standard Modem) setting
The following is the procedure to make a Dial-up icon
(Standard Modem):
CDMA WLL User’s Guide HTT-800A
-94-
) Click on the “Properties” button.
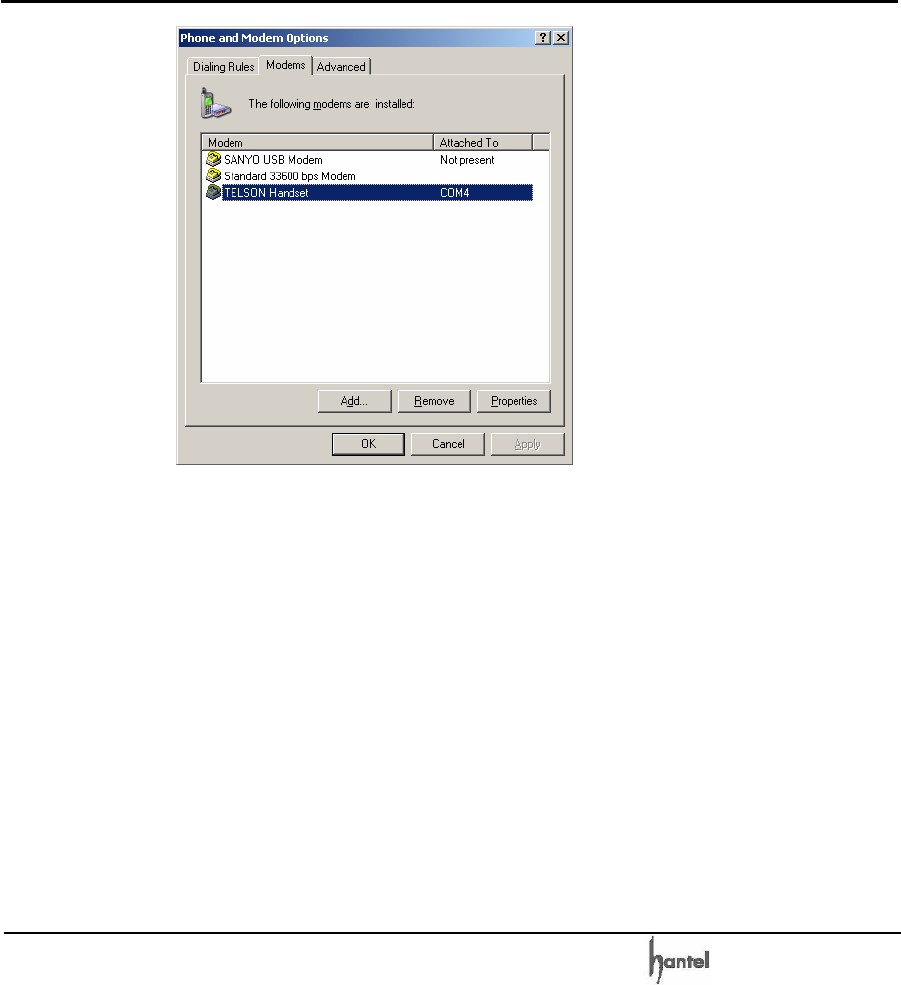
) Select your COM Port (Since USB Cable is been
used, select “Modem – TELSON Handset (COM4)”).
You should select the same com port which you
selected in “Phone and Modem Option”
CDMA WLL User’s Guide HTT-800A
-95-
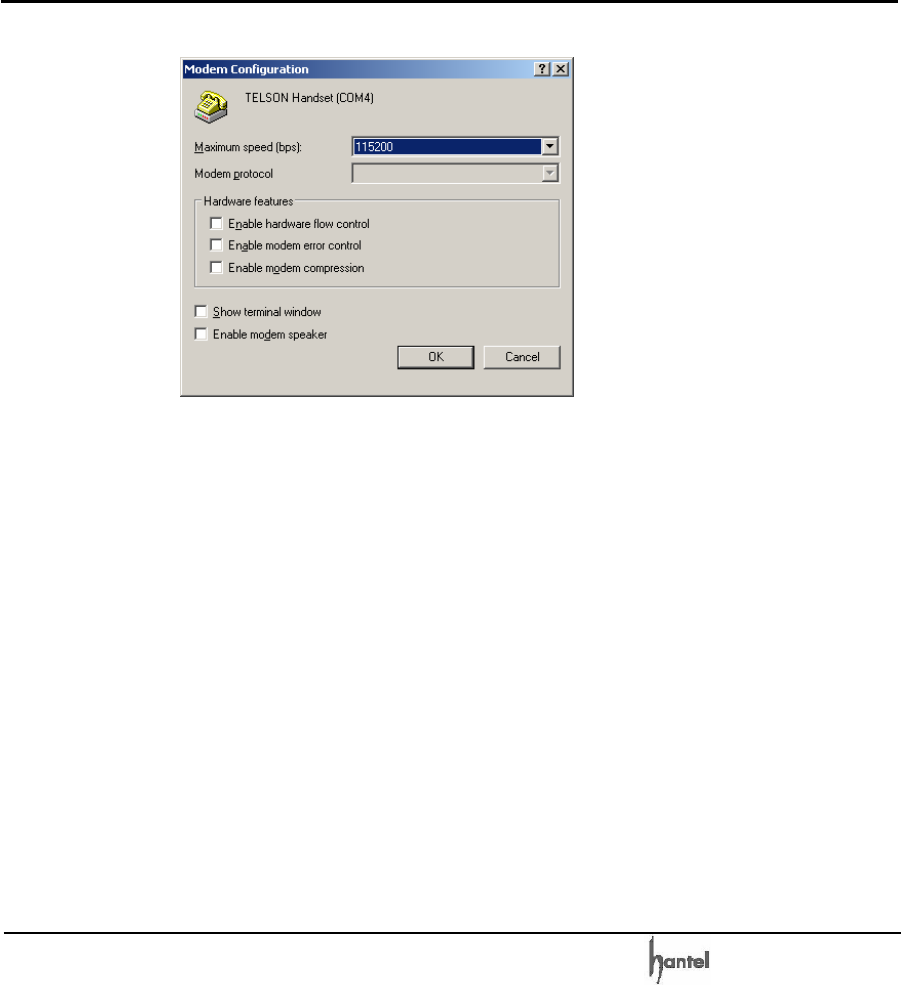
) Click on the “Configure” button.
o Verify under Phone Number Column #777 is
used for Packet data & XXXX is used for
Circuit data (where XXXX depends on
Network).
o Verify Modem Baud rate, should be 115200
In case of Packet Data & 19200 in case of
Circuit Data.
CDMA WLL User’s Guide HTT-800A
-96-
) Click on the “OK” button.
CDMA WLL User’s Guide HTT-800A
-97-
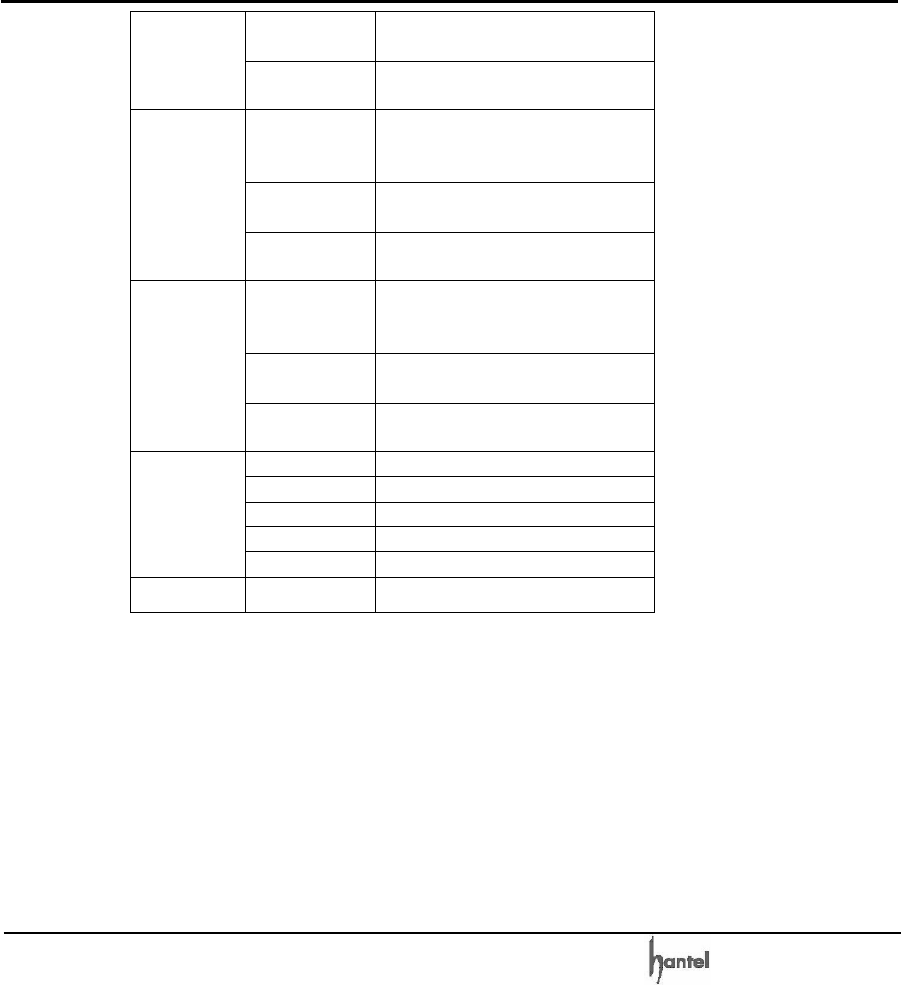
9. Summary Table
9.1 Advanced Functions
Menu Item Process
Set
<*>, <*> Î 0
1
Î
<*>
1. One Minute
Alert Release
<*>, <*> Î 0
1
Î
<#>
12 Hour mode
(AM)
<*>, <*> Î 0
2
Î
<1> <1>
Î
(00:00~11:59)
Î
<*>
12 Hour mode
(PM)
<*>, <*> Î 0
2
Î
<1> <2>
Î
(00:00~12:59)
Î
<*>
24 Hour mode
<*>, <*> Î 0
2
Î
<2>
Î
(00:00~23:59)
Î
<*>
2. Alarm
Release
<*>, <*> Î 0
2
Î
<#>
Set
<*>, <*> Î 0
3
Î
<*>
3. Connecting
tone Release
<*>, <*> Î 0
3
Î
<#>
4. Earpiece
Volume
Volume Set
<*>, <*> Î 04 ( <1>Down ~
<4>Up ( <*> Save
DTMF <*>, <*> ( 05 ( <1> ( <*>
Bellcore <*>, <*> ( 05 ( <2> ( <*>
5. CID
Mode
Release <*>, <*> ( 05 ( <#>
Enable <*>, <*> ( 06 ( lock code(4
digits) ( <*>
6.
Outgoing
calls
restrict
Disable <*>, <*> ( 06 ( lock code(4
digits) ( <#>
7. Lock code
Change
<*>, <*> Î 0
7
Î
lock code(4 digits)
Î New code(4 digits) Î Confirm
code(4 digits) Î <*>
8. Analog Fax
TX
<*>, <*> Î 0
8
Î
<1>
Î
Fax number
CDMA WLL User’s Guide HTT-800A
-98-
Analog Fax
Always mode
<*>, <*> Î 0
9
Î
<1>
Analog Fax
Once mode
<*>, <*> Î 0
9
Î
<2>
PC Fax
Always mode
<*>, <*> Î 0
9
Î
<3>
PC Fax
Once mode
<*>, <*> Î 0
9
Î
<4>
A sync Data
Always mode
<*>, <*> Î 0
9
Î
<5>
A sync Data
Once mode
<*>, <*> Î 0
9
Î
<6>
9. Data Rx
Voice mode
<*>, <*> Î 0
9
Î
<7>
10. Reset
<*>, <*> Î
10
Î
lock code(4 digits)
Î <*>
11. Auto Dial
time
<*>, <*> Î
11
Î
< 0 ~ 9>
Î
<*>
Enable <*>, <*> Î
12
Î
lock code(4 digits)
Î
<*>
12. Long calls
restrict
Disable <*>, <*> Î
12
Î
lock code(4 digits)
Î
<#>
Enable <*>, <*> Î
13
Î
lock code(4 digits)
Î
<*>
13.
International
calls restrict
Disable <*>, <*> Î
13
Î
lock code(4 digits)
Î
<#>
Enable <*>, <*> Î
14
Î
lock code(4 digits)
Î
<*>
14. Incoming
calls restrict
Disable <*>, <*> Î
14
Î
lock code(4 digits)
Î
<#>
CDMA WLL User’s Guide HTT-800A
-99-
9.2 Supplementary Functions
Menu Item Process
On 36*#01
Î
1
Î
<*>
1. Speed dial Off 36*#01
Î 2 ( <*>
On
36*#02
Î
1
Î
lock code(4 digits) Î
<*>
Off
36*#02
Î
2
Î
lock code(4 digits) Î
<*>
Store
36*#02
Î 3 ( lock code(4
digits) ( address (01~03)
( phone number ( <*>
Delete 36*#02 ( 4 ( lock code(4
digits) ( address (01~03)
( <*>
2. Emergency
All Delete
36*#02
Î 5
Î
lock code(4 digits) Î
<*>
Time On
36*#03
Î 1
Î
lock code(4 digits) Î
<*>
Immediate On
36*#03
Î 2
Î
lock code(4 digits) Î
<*>
Off 36*#03
Î 3
Î
lock code(4 digits) Î
<*>
Store 36*#03
Î 4
Î
lock code(4 digits) Î
phone number Î <*>
3. Hot Line
Delete 36*#03
Î 5
Î
lock code(4 digits) Î
<*>
Metering
Pulse(12K)
36*#04
Î 1
Î <*>
Metering
Pulse(16K)
36*#04
Î 2
Î <*>
Polarity
Reverse
36*#04
Î 3
Î <*>
4. Pay Phone
Interface
Auto mode 36*#04
Î 4
Î <*>

CDMA WLL User’s Guide HTT-800A
-100-
Store 36*#05
Î 1
Î address (001~200)
Î phone number Î <*>
Delete 36*#05
Î 2
Î address (001~200)
Î <*>
5. Phone
Book
All Delete 36*#05
Î 3
Î <*>
Enhanced 36*#06
Î 1
Î <*>
6. Voice
Privacy Standard
36*#06
Î 2
Î <*>
16Hz 36*#07
Î 1
Î <*>
20Hz 36*#07
Î 2
Î <*>
7. Ringer
Freq. 25Hz 36*#07
Î 3
Î <*>
1Sec On–2
Sec Off
36*#08
Î 1
Î <*>
0.4Sec On–
0.2Sec Off
-0.4Sec On–2
Sec Off
36*#08
Î 2
Î <*>
1Sec On–
4.5Sec Off
36*#08
Î 3
Î <*>
1Sec On–4Sec
Off
36*#08
Î 4
Î <*>
0.25Sec On–
0.25 Sec Off
-0.25Sec On–
1.25Sec Off
36*#08
Î 5
Î <*>
8. Ringer
Cadence
Control
2Sec On–4
Sec Off
36*#08
Î 6
Î <*>
350+440Hz 36*#09
Î 1
Î <*>
400Hz
36*#09
Î 2
Î <*>
425Hz
36*#09
Î 3
Î <*>
450Hz 36*#09
Î 4
Î <*>
9. Dial Tone
Freq.
312.5 +412.5Hz 36*#09
Î 5
Î <*>
RS 232 36*#10
Î 2
Î <*>
10. DS mode
USB 36*#10
Î 3
Î <*>
CDMA WLL User’s Guide HTT-800A
-101-
No Restriction 36*#11
Î 1
Î lock code(4 digits)
Î
<*>
11. Restrict
Call mode Restriction 36*#11
Î 2
Î lock code(4 digits)
Î
<*>
Store
36*#12
Î 1
Î lock code(4 digits)
Î
address (01~10)
Î
phone number
Î
<*>
Delete
36*#12
Î 2
Î lock code(4 digits)
Î
address (01~10)
Î
<*>
12. Restrict
Call mode
– Permit
Number
Delete All
36*#12
Î 3
Î lock code(4 digits)
Î
<*>
Store
36*#13
Î 1
Î lock code(4 digits)
Î
address (01~10)
Î
phone number
Î
<*>
Delete
36*#13
Î 2
Î lock code(4 digits)
Î
address (01~10)
Î
<*>
13. Restrict
Call mode
- Deny Dial
Number
Delete All
36*#13
Î 3
Î lock code(4 digits)
Î
<*>
9,600bps
36*#20
Î 1
Î <*>
19,200bps
36*#20
Î 2
Î <*>
38,400bps
36*#20
Î 3
Î <*>
115,200bps
36*#20
Î 4
Î <*>
14. DS Baud
Rate
230,400bps
36*#20
Î 5
Î <*>
15. Redial
*(Long)

CDMA WLL User’s Guide HTT-800A
-102-
10. Troubleshooting Guide
Problems What To Do
Troubleshoot the
conventional wired
telephone
In the event you are unable to dial or
receive telephone calls, first be sure
that the connection wire is properly
connected to the RJ-11 phone port
on the terminal and to the RJ-11 port
of the telephone. If unsure whether
or not the telephone is operational,
connect a telephone, which is known
to be operational to the terminal. If
service is available with the
operational telephone, replace or
repair your telephone equipment. If
service is still not available, then
follow instructions under
“Troubleshoot the Fixed Wireless
Terminal”
When you hear no
sound after hook-off?
Check
If the power LED or battery LED of
the terminal is on.
If off, check if the SMPS power plug
is properly connected to the terminal.
Check the RJ-11 jack of the terminal
connected to the telephone
Troubleshoot the
Fixed Wireless
Terminal
Check for the appropriate power
indication on the LED. If no power,
check the AC/DC adapter (or
External Power Supply) connection
between the electrical outlet and the
terminal. Check for the appropriate
Received Signal Strength Indication
(RSSI), Power, and Message
Indication through the designated
LED, respectively.

CDMA WLL User’s Guide HTT-800A
-103-
When the battery LED
is off
Check if the battery on/off switch at
the bottom of the terminal is on.
The backup battery is discharged,
Check the Battery Switch or freshly
charged one.
When the RSSI LED
blinks or off
Check if the antenna is connected
correctly, or move the location of the
terminal
When the never or
poor ring/sound
Check you will achieve the best
audio quality with only a single
telephone “Off-hook” at a time
Check Re-measure your cable and
accordingly.
Make the number less than 5 by
removing some of the telephones or
changing to telephones with smaller
REN values.
Voice call works but
Data Service / Fax
does not work
Check the PC setup in Data Service
/ Fax setup.
Note:
1. Only Authorized Service Personnel should
remove the cover of the fixed wireless terminal
for additional service. The contents of the
terminal contain components that present an
Electric Shock Hazard if handled improperly.
2. According to the power condition, you can hear
a little noise during connection. For further
assistance, contact your Authorized Distributor
for service and assistance.
※ If the problem you are experiencing persists or is
not mentioned above, please contact your local
distributor or service center.

CDMA WLL User’s Guide HTT-800A
-104-
11. Specifications
Frequency
Range HTT-800A Tx : 824~849 MHz
Rx : 869~894 MHz
Channel Bandwidth CDMA 1.25 MHz
RJ-11 Phone/Analog Fax port 2
Frequency Stability ± 300 Hz
Tx Power Max. 0.2W
Rx Power Level -104 ~ -25 dBm
Temperature of operation -10℃ ~ + 55℃
Relative humidity 5% ~ + 95%
Power Supply(Adapter) Input : AC 90~300V / 50~60Hz
Output : DC 12V 1A
Battery Capacity 3.7V Li-Ion
Dimension 155 × 110 × 35 (mm)
Weight(with battery) 270g
* Specifications are subject to change without notice.
* The adapter provided along with FWT is designed
for a rated voltage only. So it may cause trouble, if
the adapter is used out of a rated voltage range.
* The battery might lose the recharging capacity if it i
s not used for long time.
U.S.A.
U.S.FEDERAL COMMUNICATIONS COMMISSION
RADIO FREQUENCY INTERFERENCE STATEMENT
INFORMATION TO THE USER
NOTE : This equipment has been tested and found to comply with the limits for a
Class B digital device pursuant to Part 15 of the FCC Rules. These limits are
designed to provide reasonable protection against harmful Interference in a
residential installation This equipment generates, uses, and can radiate radio
frequency energy and, if Not installed and used in accordance with the
instructions, may cause harmful Interference to radio communications. However,
there is no guarantee that interference will not occur in a particular Installation. If
this equipment does cause harmful interference to radio or television reception,
which can be determined by turning the equipment off and on, the user is
encouraged to try to correct the interference by one or more of the following
measures:
*- Reorient or relocate the receiving antenna.
Increase the separation between the equipment and receiver.
*- Connect the equipment into an outlet of a circuit different from that to which the
receiver is connected.
*- Consult the dealer or an experienced radio/TV technician for assistance.
Changes or modification not expressly approved by the party responsible for
Compliance could void the user’s authority to operate the equipment. Connecting
of peripherals requires the use of grounded shielded signal cables.