Hanwha Techwin DIGIMAX210SE DIGITAL CAMERA User Manual
Samsung Techwin Co Ltd DIGITAL CAMERA
UserManual.wiki
>
Hanwha Techwin
>
DIGIMAX210SE User Manual
USER MANUAL
Navigation menu
Upload a User Manual
Namespaces
Wiki Guide
HTML
PDF
Info
Views
User Manual
Discussion / Help
Navigation

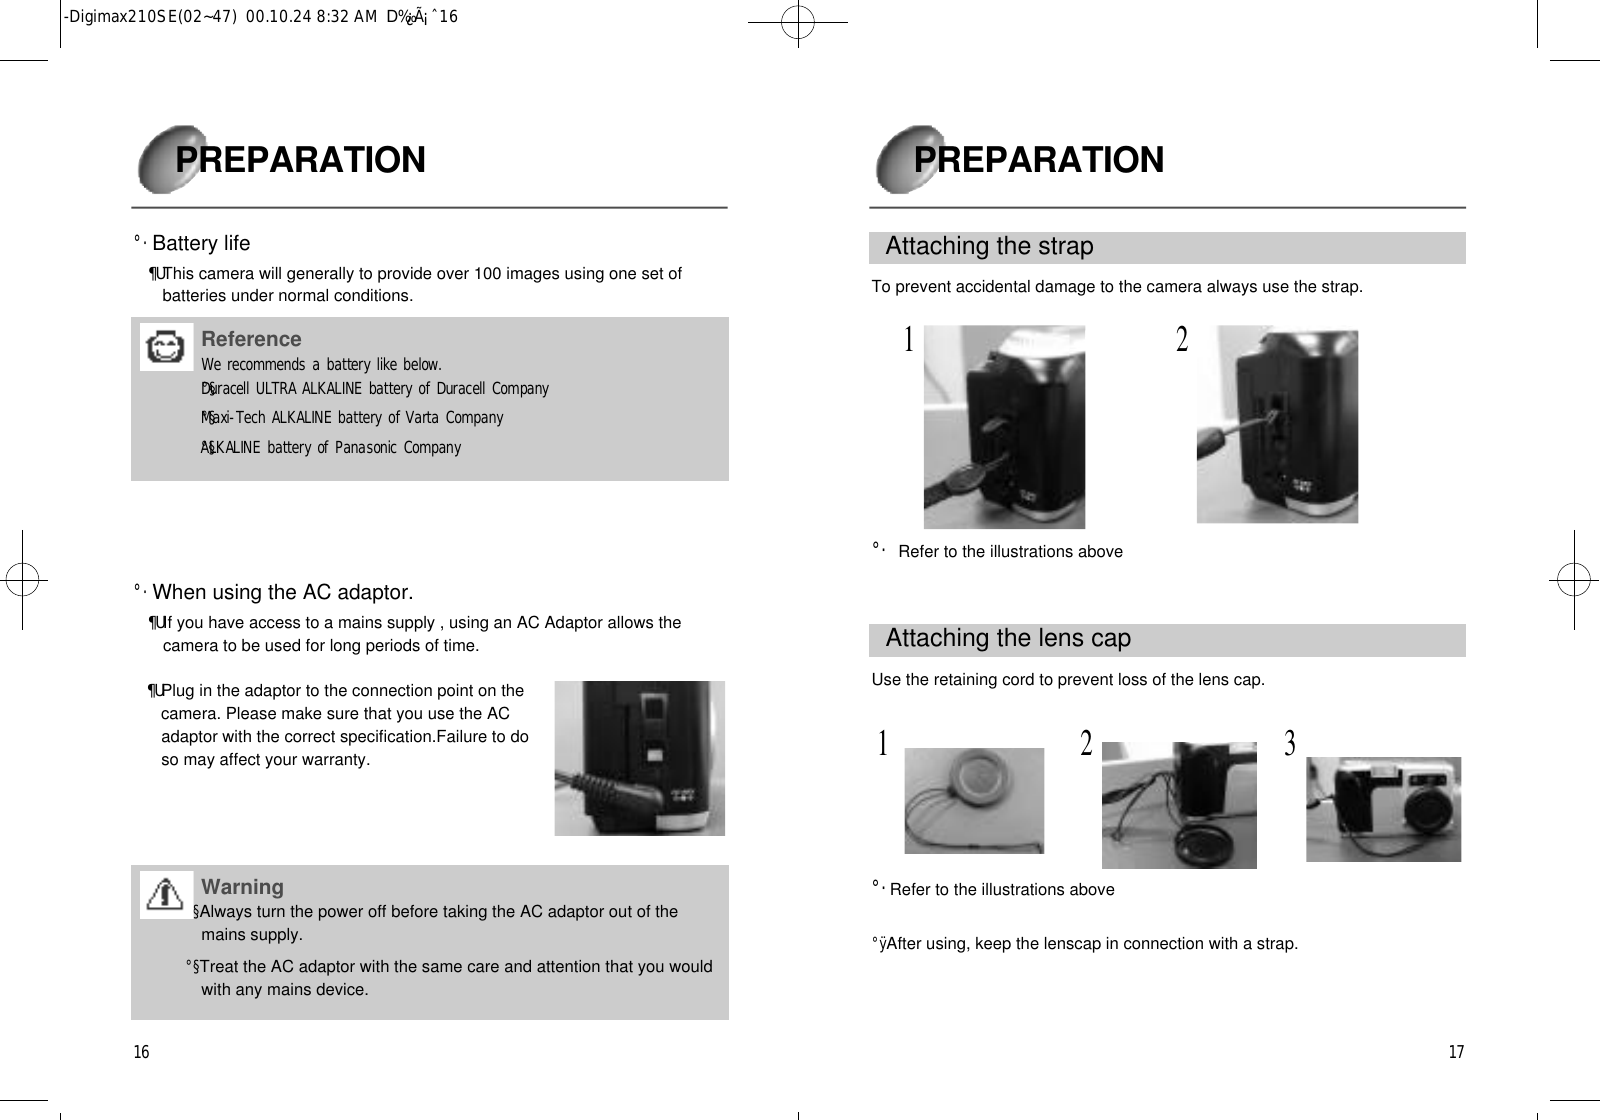
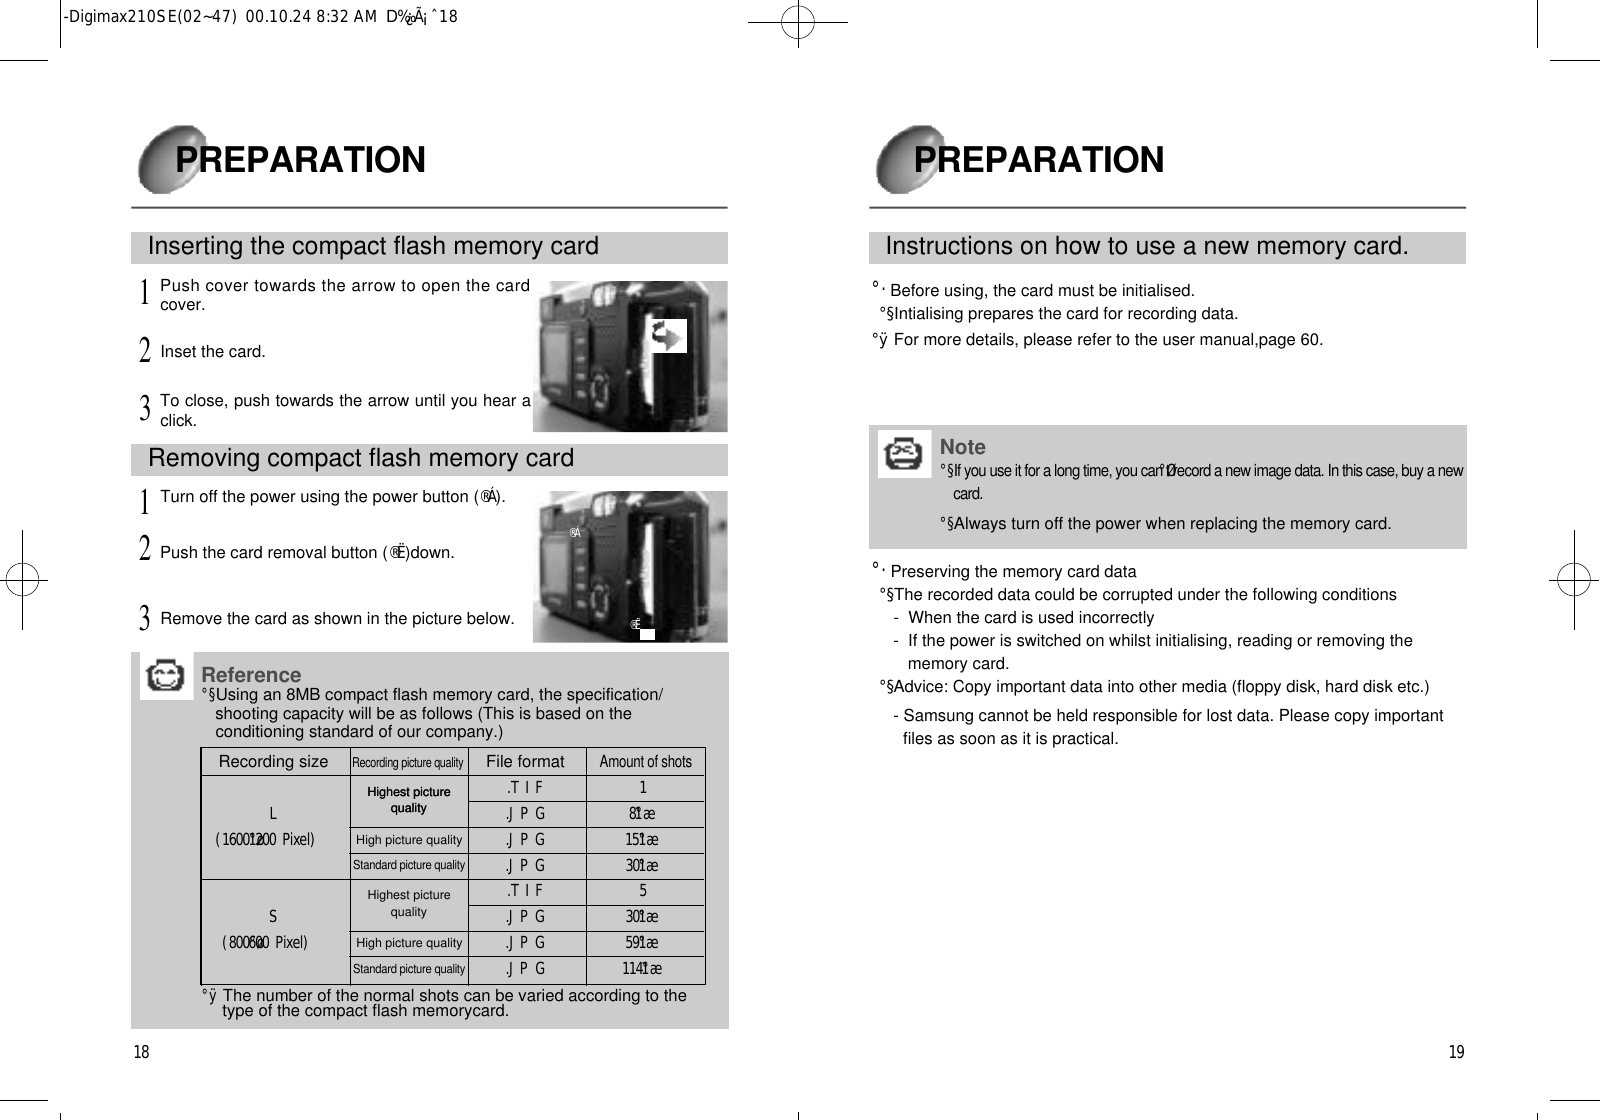
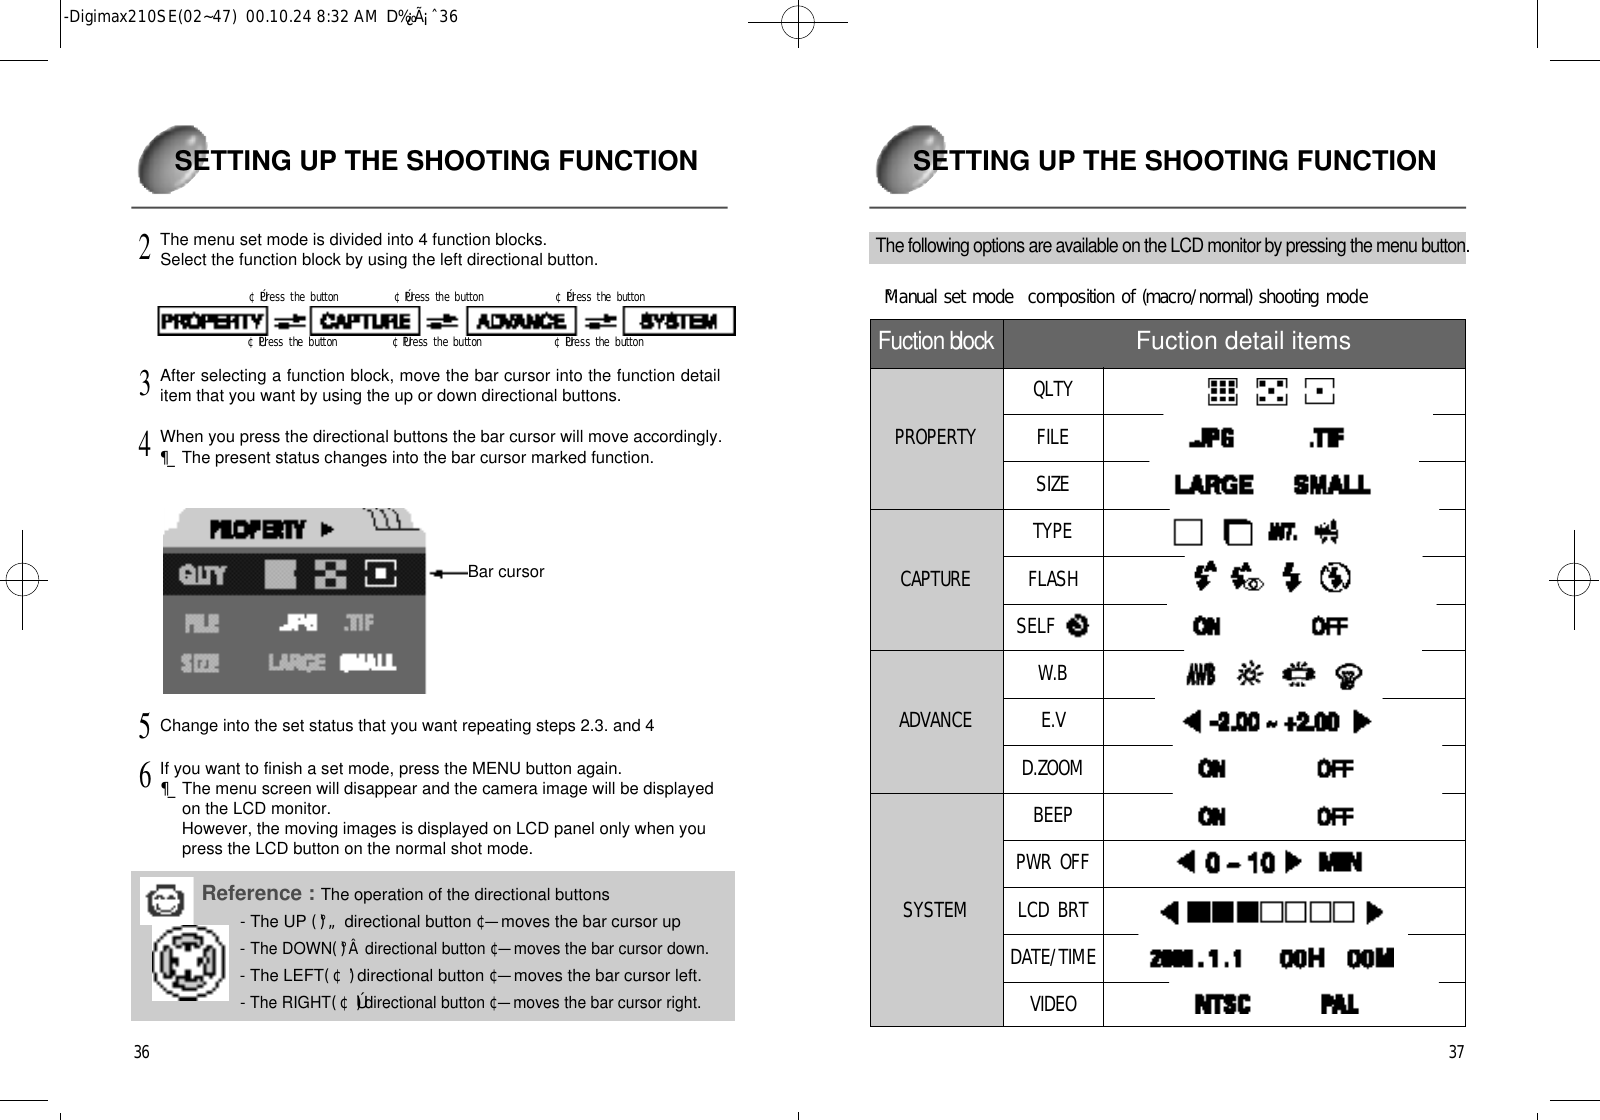
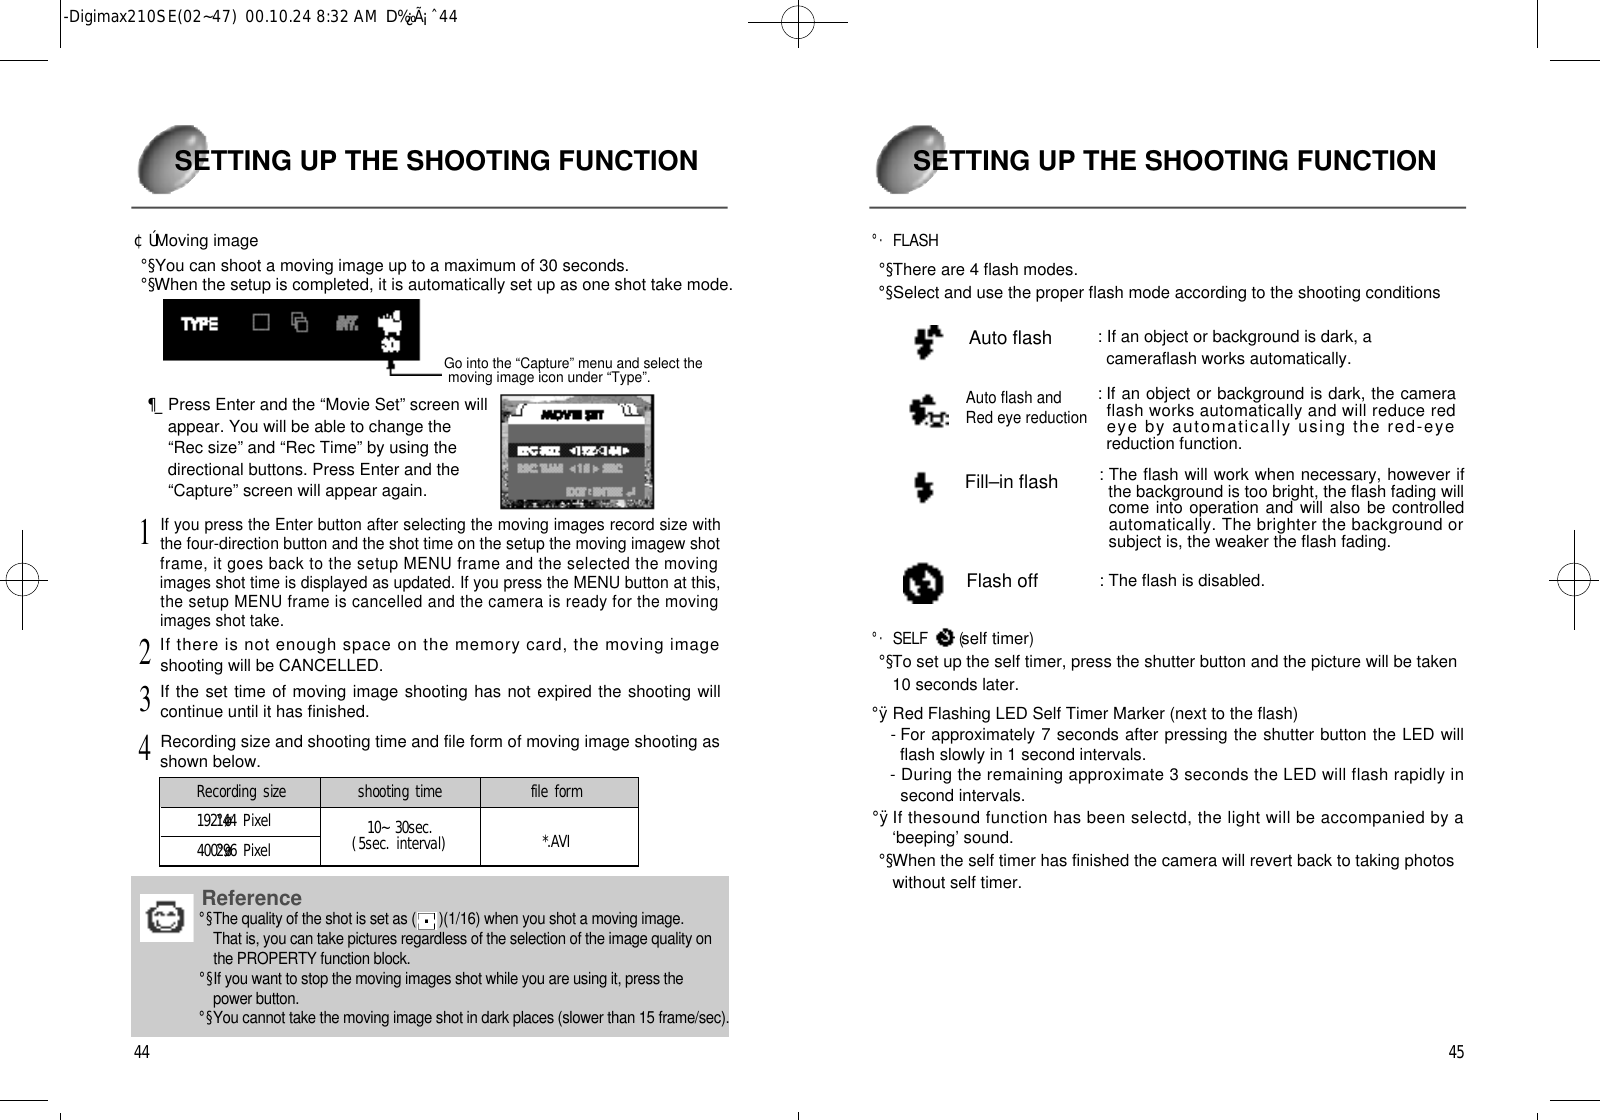
![2 12 0PREPARATION PREPARATIONNoteImportant information in using memorycard.°§If you switch off this camera whilst it is reading initialising or playing,the information on the memory card may be corrupted.°§Do not bend, drop or expose the card to any heavy impact.°§Do not store the memory card in an environment with strong electronicor magnetic fields, e.g. near loud speakers or TV receivers.°§Please do not use or store in an environment where there are extremes of temperature.°§DO NOT allow the camera to get into contact with sand, water or other contaminants. Damage caused in this way will INVALIDATE THE WARRANTY and may damage the camera beyond economicrepair.°§Please keep the card in its case when not in use.°§Through periods of long use you may find that the card is warm, this is normal.Selecting the date and time°·You can record the date and time with the image data in the memorycard whenyou take a picture.Please select the date and time when you use the camera for the first time.Turn the power on by pressing the power button.1Set the mode dial to the shot mode.(macro /normal )2Press the MENU button When the liquid crystal monitor is automaticallyturned on, the setup MENU frame is displayed.3Move to the function block [system] by using the RIGHT button(¢Ú) among the four direction button.4Move to the detail function list [date/time] byusing the DOWN button(°Â) among the fourdirection buttons and press the Enter buttonand then the next frame is displayed.5Select the right Date and Time by using thefour direction buttons on the next ‘selectingdate and time’ frame and press the Enterbutton and then you go back to the setupMENU frame and the date/time is displayedas is updated.6In this, the MENU mode is cancelled if you press the MENU button and thesetup is completed.7Reference°§The range of selecting the date/time setup : 2000~2050 (It is automatically corrected incase of the leap year/month)°§It is originally set as [2000/01/01 00:00]°§If you left the camera without the battery for over one hour, check the date/time again.°[4 directional button°\-Digimax210SE(02~47) 00.10.24 8:32 AM D‰¿Ã¡ˆ20](https://usermanual.wiki/Hanwha-Techwin/DIGIMAX210SE/User-Guide-128052-Page-11.png)
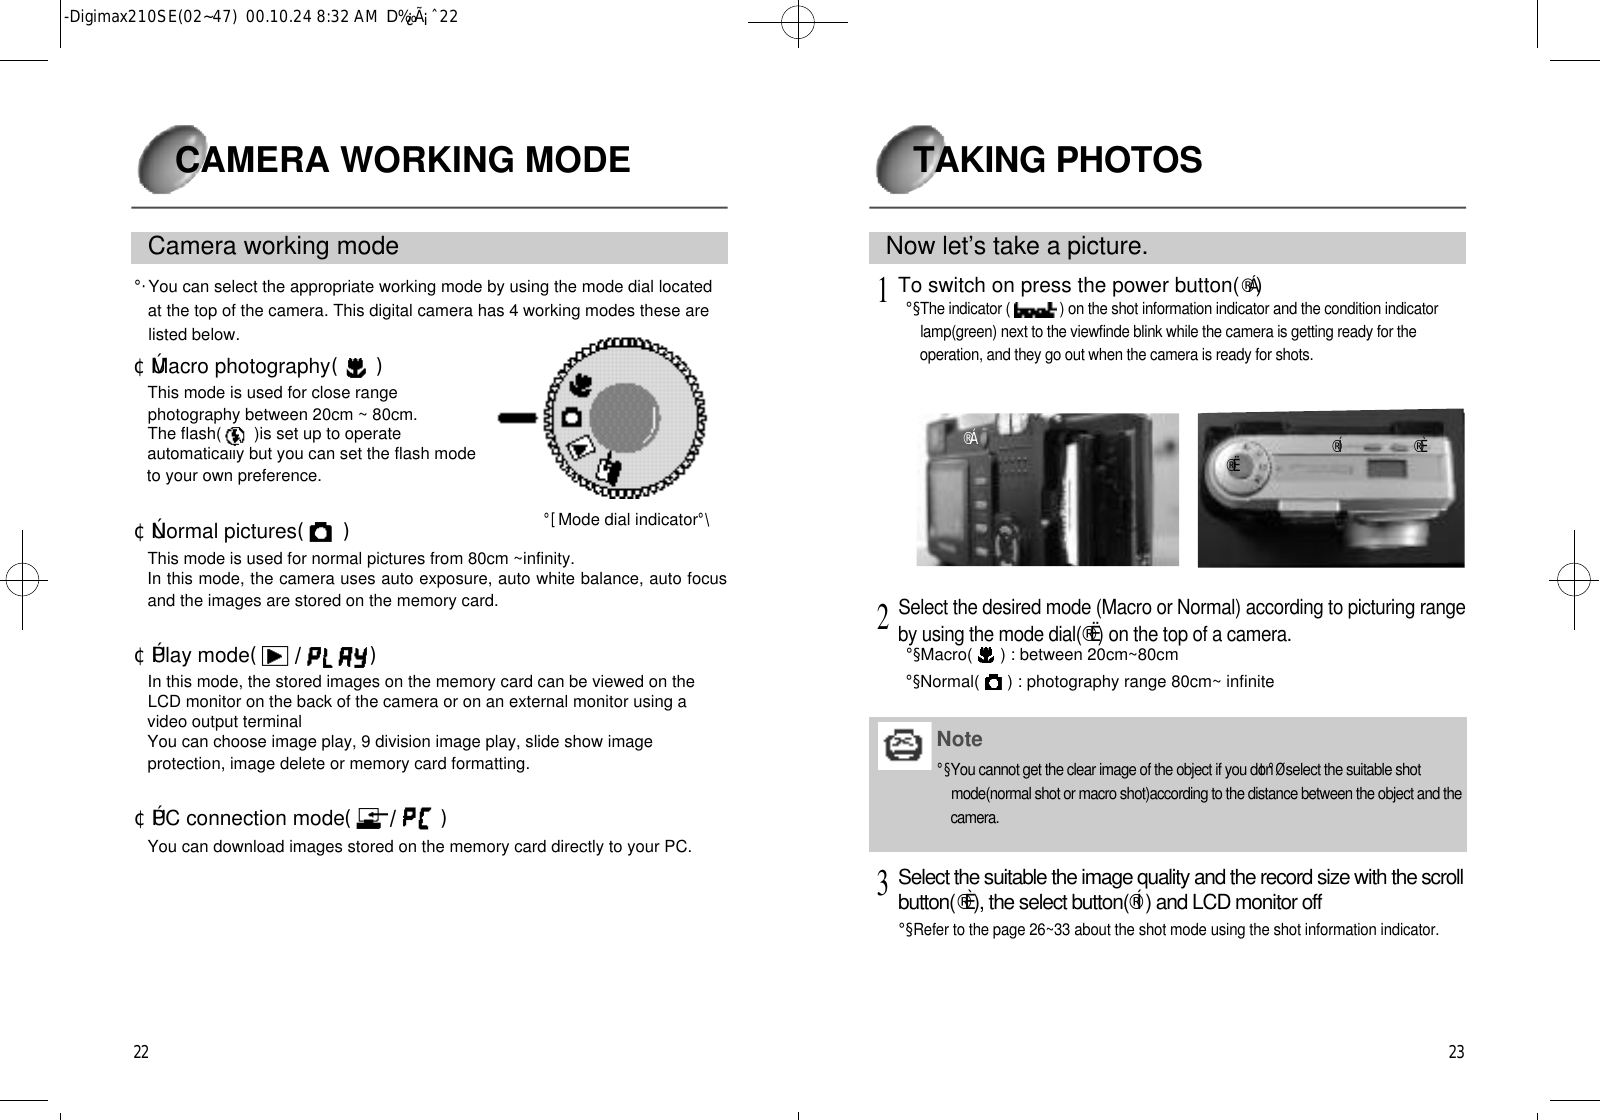
![3 33 2SETTING UP THE SHOOTING FUNCTION SETTING UP THE SHOOTING FUNCTIONOther indicating items of photographing information indicator°§If you select macro photography mode, a symbol( )will appear on thephotograph information indicator.°§If you select the normal shooting mode, the symbol( ) will disappear.Macro picture indicator °§According to the condition of the camera and memorycard, it is shown onshot information indicator as below.°·camera condition indicatorThe Indicator ( ) on shot information indicator blinks if you press thepower button.¶_The indicator ( ) is cancelled when the camera is ready for the operation.°·When the memory card is set up properlyThe number of pictures available to take is determined by the image qualityselected and recording size.¶_The maximum pictures available will be 9999(subject to memory size andpicture quality)°·When the memory card is not set up properly( ) symbol flashes on the location of picturing available indicator. ¶_If there is no card a beep will sound.°·When a memory card is set and there is short capacitysymbol ( ) will flash on the location of pictures available indicator.¶_If the sound function is on, the card memory capacity short warningsound will.°·When you are saving the tiff file form image in the memorycardThe indicator blinks on the [indicator for the number of the remainingshot]. ¶_When the saving to the memorycard is completed, The indicator iscancelled. °·Indicator for the camera errorWhen the error occurs while the operation of the camera, The indicatoron the shot information indicator blinks. ¶_Refer to the page 68 about the detail information about the occurrence ofthe error. Indicator for the number of the remaining shot, condition of the card and other information.°§If you select exposure compensation in manual set mode on the LCDmonitor, a symbol will appear on the camera status LCD.¶_Refer to the user manual [exposure compensation status] page 47 aboutexposure compensation status. °§If you select exposure compensation 0, the symbol will disappear.Exposure compensation status mark°§The battery status symbol of the photograph information indicator is shown below.Checking the batteryReference°§When the memory capacity is low it will not be possible to take a picture.°§A warning will sound regarding low memory or no card will sound inthe following events.- When you have pressed the shutter button.- When you have used mode dial.: Battery status: Preparing a new battery: Battery low-Replace new batteries.-Digimax210SE(02~47) 00.10.24 8:32 AM D‰¿Ã¡ˆ32](https://usermanual.wiki/Hanwha-Techwin/DIGIMAX210SE/User-Guide-128052-Page-17.png)
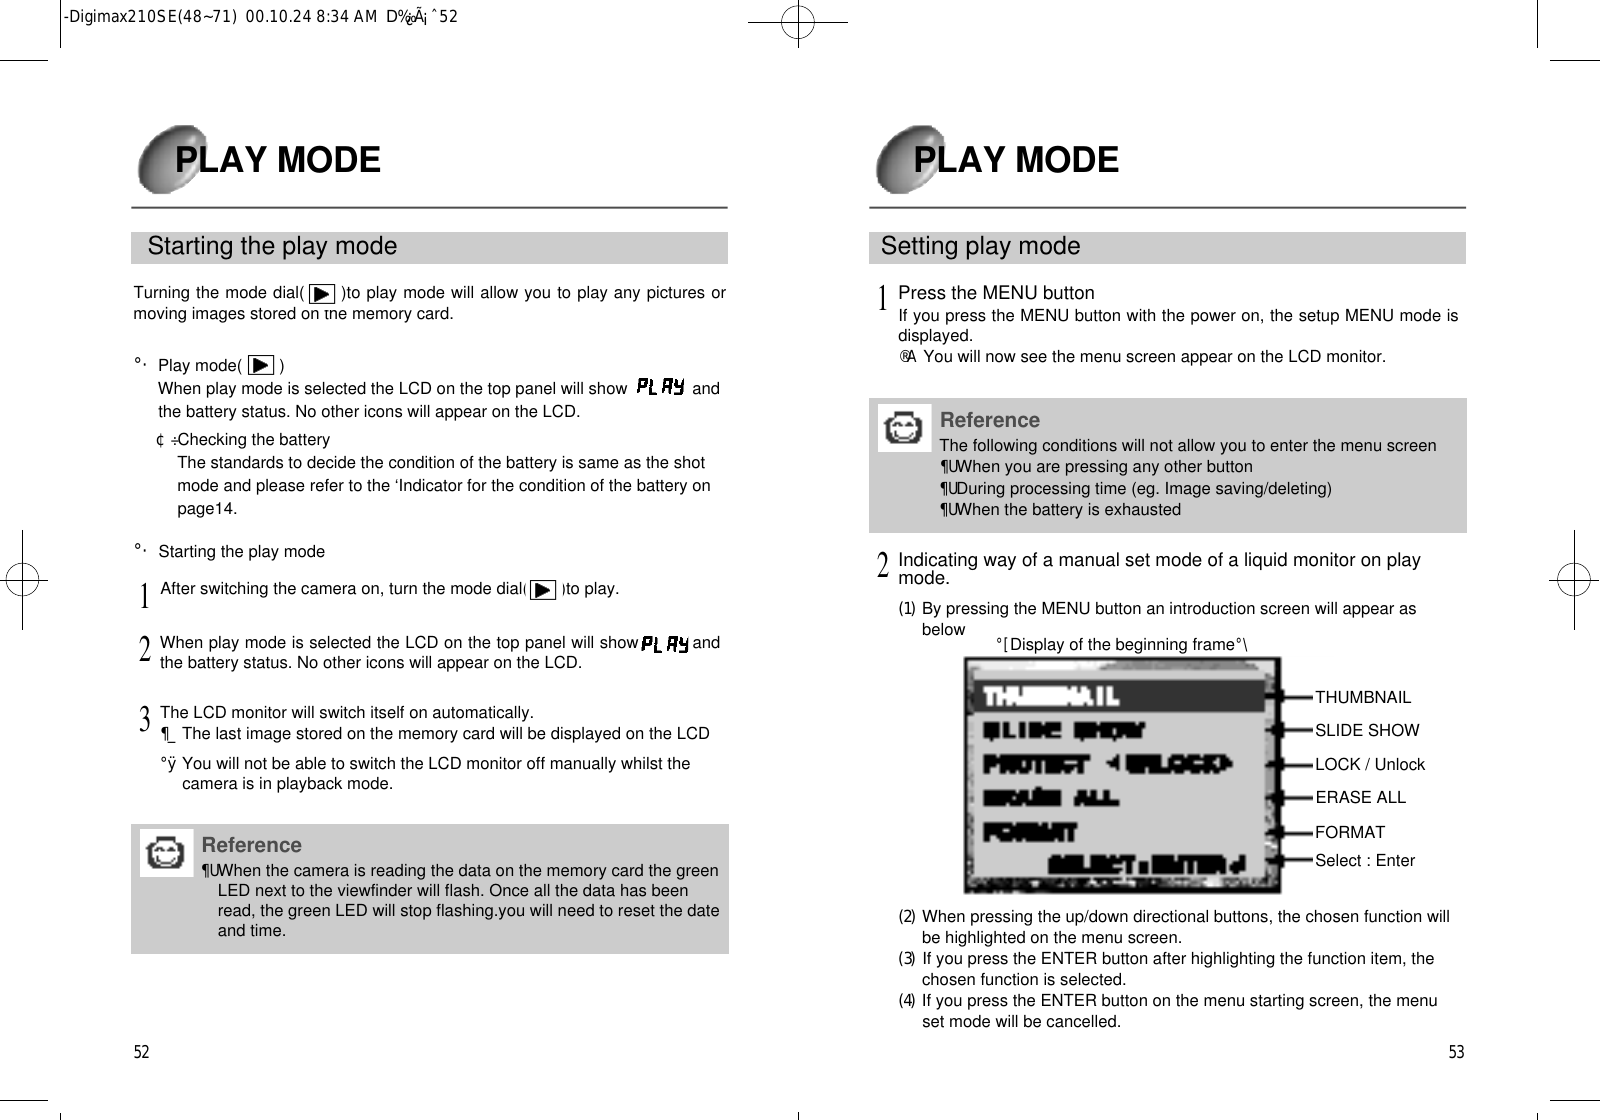
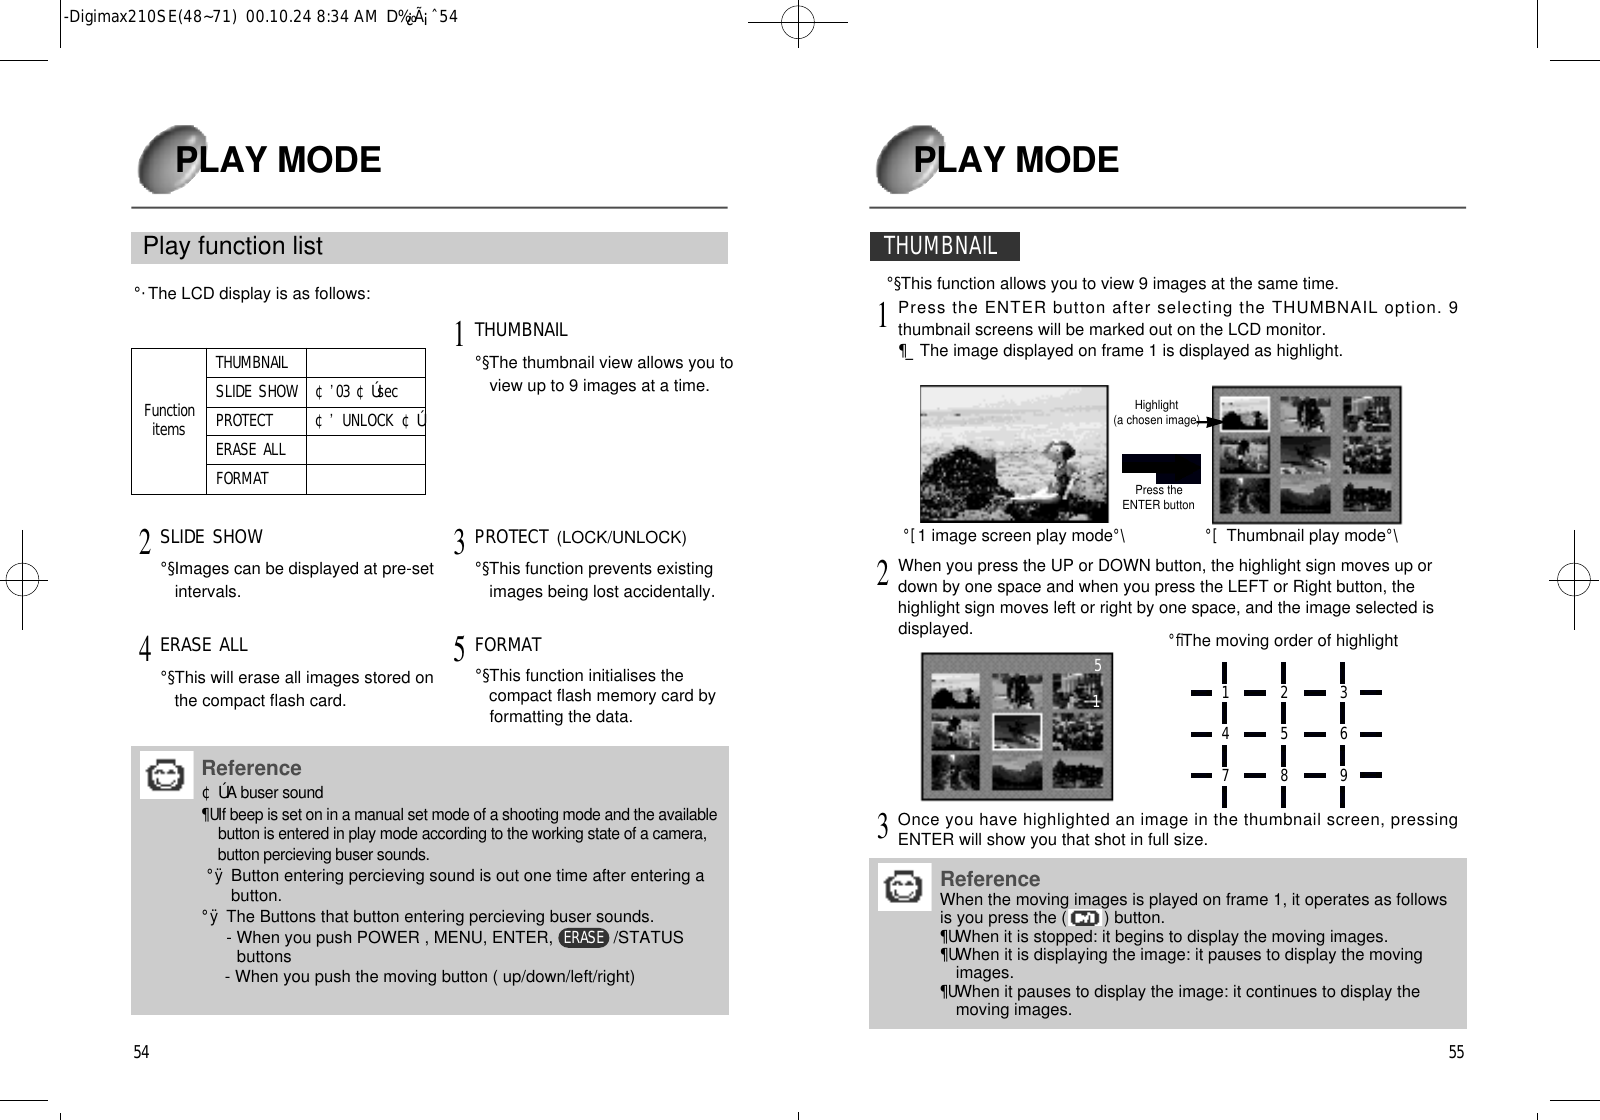
![5 7PLAY MODEMove the cursor on [protect] position on the beginning frame and select[lock or unlock] with the LEFT(¢ ’)/RIGHT(¢ Ú)button, and the image is lockedor unlocked.°ÿIf you select [protect](¢ ’)lock(¢ Ú)with the LEFT(¢ ’)/RIGHT(¢ Ú)button: the unlocked image is locked.°ÿIf you select [protect](¢ ’)unlock(¢ Ú)with the LEFT(¢ ’)/RIGHT(¢ Ú)button: the locked image is cancelled.1Cancel the setup MENU mode by pressing the MENU button.2°§You can lock the important images which are already taken or cancel thelocked images.PROTECT ( L o c k / U n l o c k )Lock mark°ÿIt is not indicated when theimage is unlockedReference°§The locked image is protected on [ERASE (image 1 erased)] or[ERASE ALL(all images deleted)], but deleted on [FORMAT(memory card begins)].1 75 6PLAY MODEIf you push ENTER button after selecting a bar cursor into [SLIDE SHOW]in a manual starting screen status, SLIDE SHOW is executed.°ÿSLIDE SHOW°§Highlight slide show and press ENTER. The LCD will give a timeinterval option between 1-10 seconds. Use the left/right directional buttons to select the required interval(pre-set at 3 seconds).1Pressing ENTER again will cause the show to pause( ).2When you press the ( ) button again, the ‘slide show’ continues to bedisplayed.3To stop the slide show, press the menu button twice. °§Pressing the MENU button again will cancel the menu function.4°§You can view each image at a set interval using the slide show function.3 3= PAUSE =SLIDE SHOW Reference¶UIt does not support the *.TIF file form in slide show.°[LCD panel indication system°\-Digimax210SE(48~71) 00.10.24 8:34 AM D‰¿Ã¡ˆ56](https://usermanual.wiki/Hanwha-Techwin/DIGIMAX210SE/User-Guide-128052-Page-29.png)
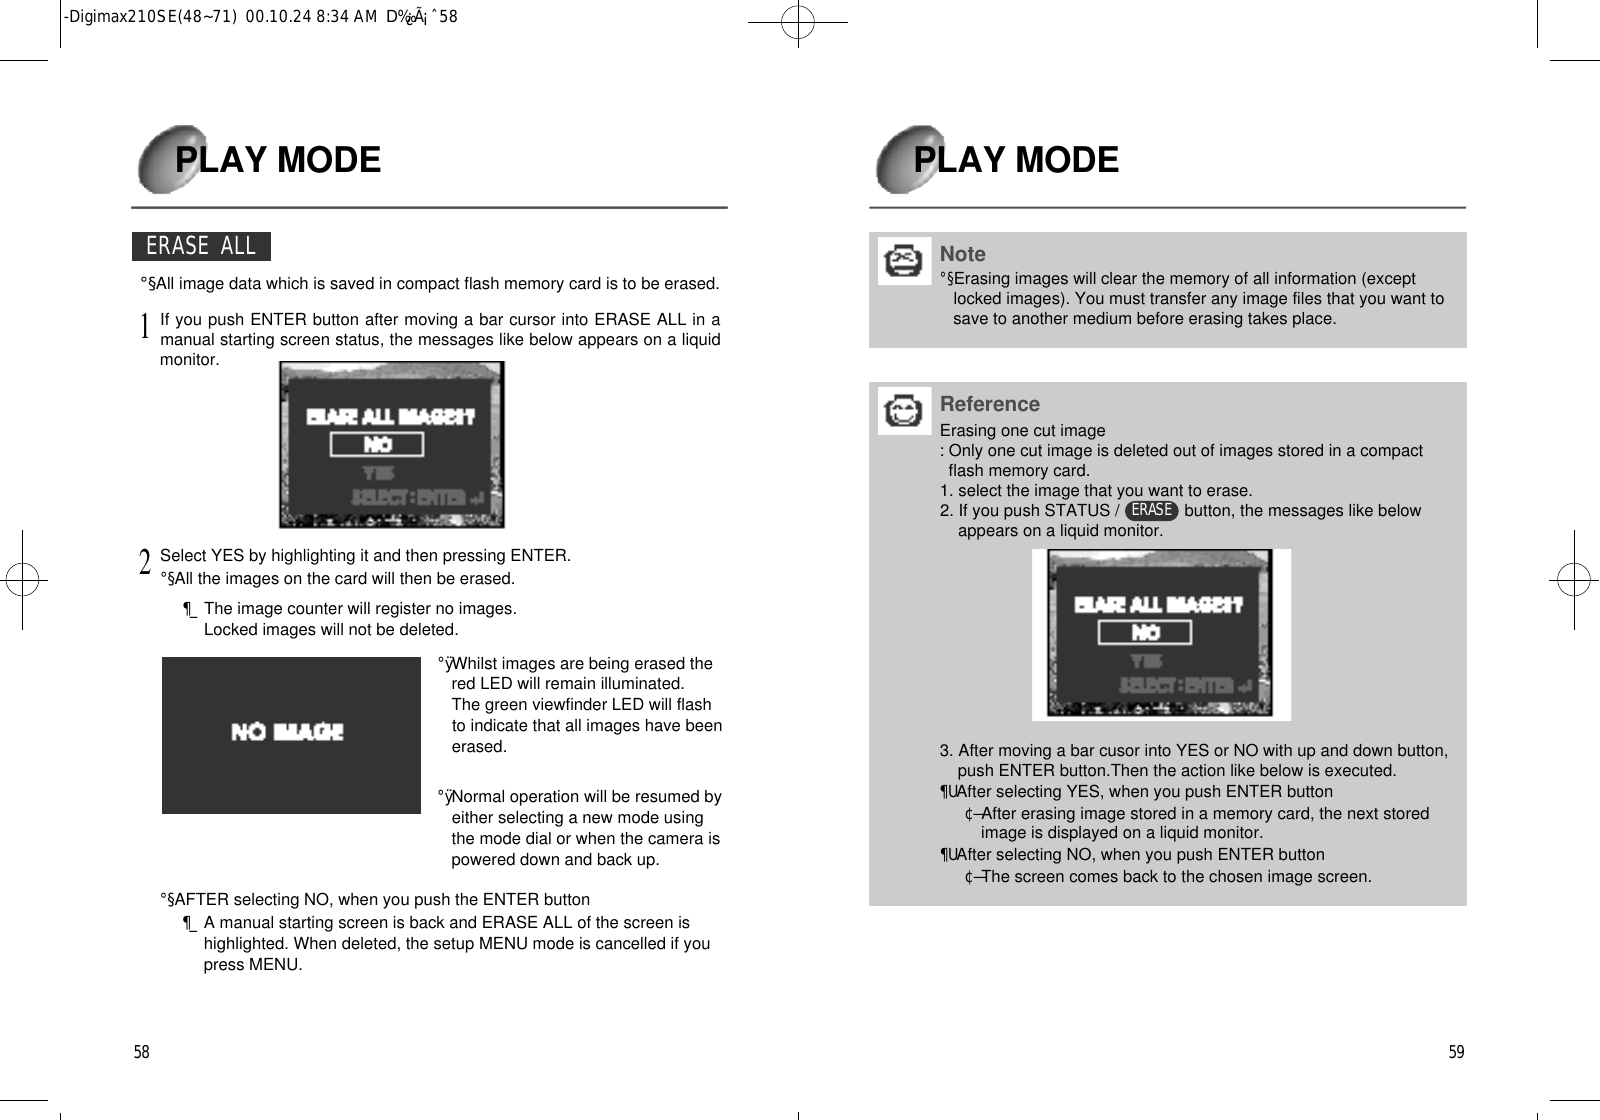
![6 1PLAY MODE°§When viewing a single image on the LCD panel you can zoom in toenlarge a portion of the image. Simply press the zoom (T) button toenlarge the image.°ÿThe scale of enlargement of the shooting image is as follows.°§In case of recording size is large : 1.5/2.0/3.0/4.0/5.0 times.°§In case of recording size is small : 1.5 ~2.5 times (0.5times interval)°ÿWhen an image is enlarged, you may use the directional control to selecta particular part of the enlarged image.°ÿPressing the (W) wide button will reduce the level of enlargement.¶_You can distinguish the extended position of the image by the indicatoron upper left on the liquid crystal monitor [digital extension magnification/no indication(the original shot image)].Enlarging imageReference°§Compact flash memory card as follows should be in the beginningstage of memory card:- the compact flash memory card that is not initializd- the compact flash memory card that a camera can’t percieve.6 0PLAY MODEAfter moving the bar cursor to FORMAT, press ENTER then the followingmessages will appear on the LCD monitor.1Move the bar cursor into YES or NO with the up and down directionalbuttons. Then press the ENTER button for the action to be executed.°§After selecting YES, when you push ENTER button¶_After formatting the memory card, a NO IMAGE message will appearon the LCD monitor.°§After selecting NO, when you push ENTER button.¶_A screen is back to a manual starting screen and FORMAR of thescreen is highlighted. When deleted, the setup MENU mode iscancelled if you press MENU.°ÿThe LED symbol during formattingThe green LED on the top right of the viewfinder will flash until formatting is finished.°ÿFORMATThis function will configure the memoryfor the compact flash card. It will now beready to take pictures.2°§This function is for formatting a compact flash memory card. Formatting thecard allows data to be stored on it.FORMAT Note°§[ERASE ALL] function is for erasing only image files of a memorycard that a camera can percieve but [FORMATTING] function is fordeleting all data of a memory card.-Digimax210SE(48~71) 00.10.24 8:34 AM D‰¿Ã¡ˆ60](https://usermanual.wiki/Hanwha-Techwin/DIGIMAX210SE/User-Guide-128052-Page-31.png)
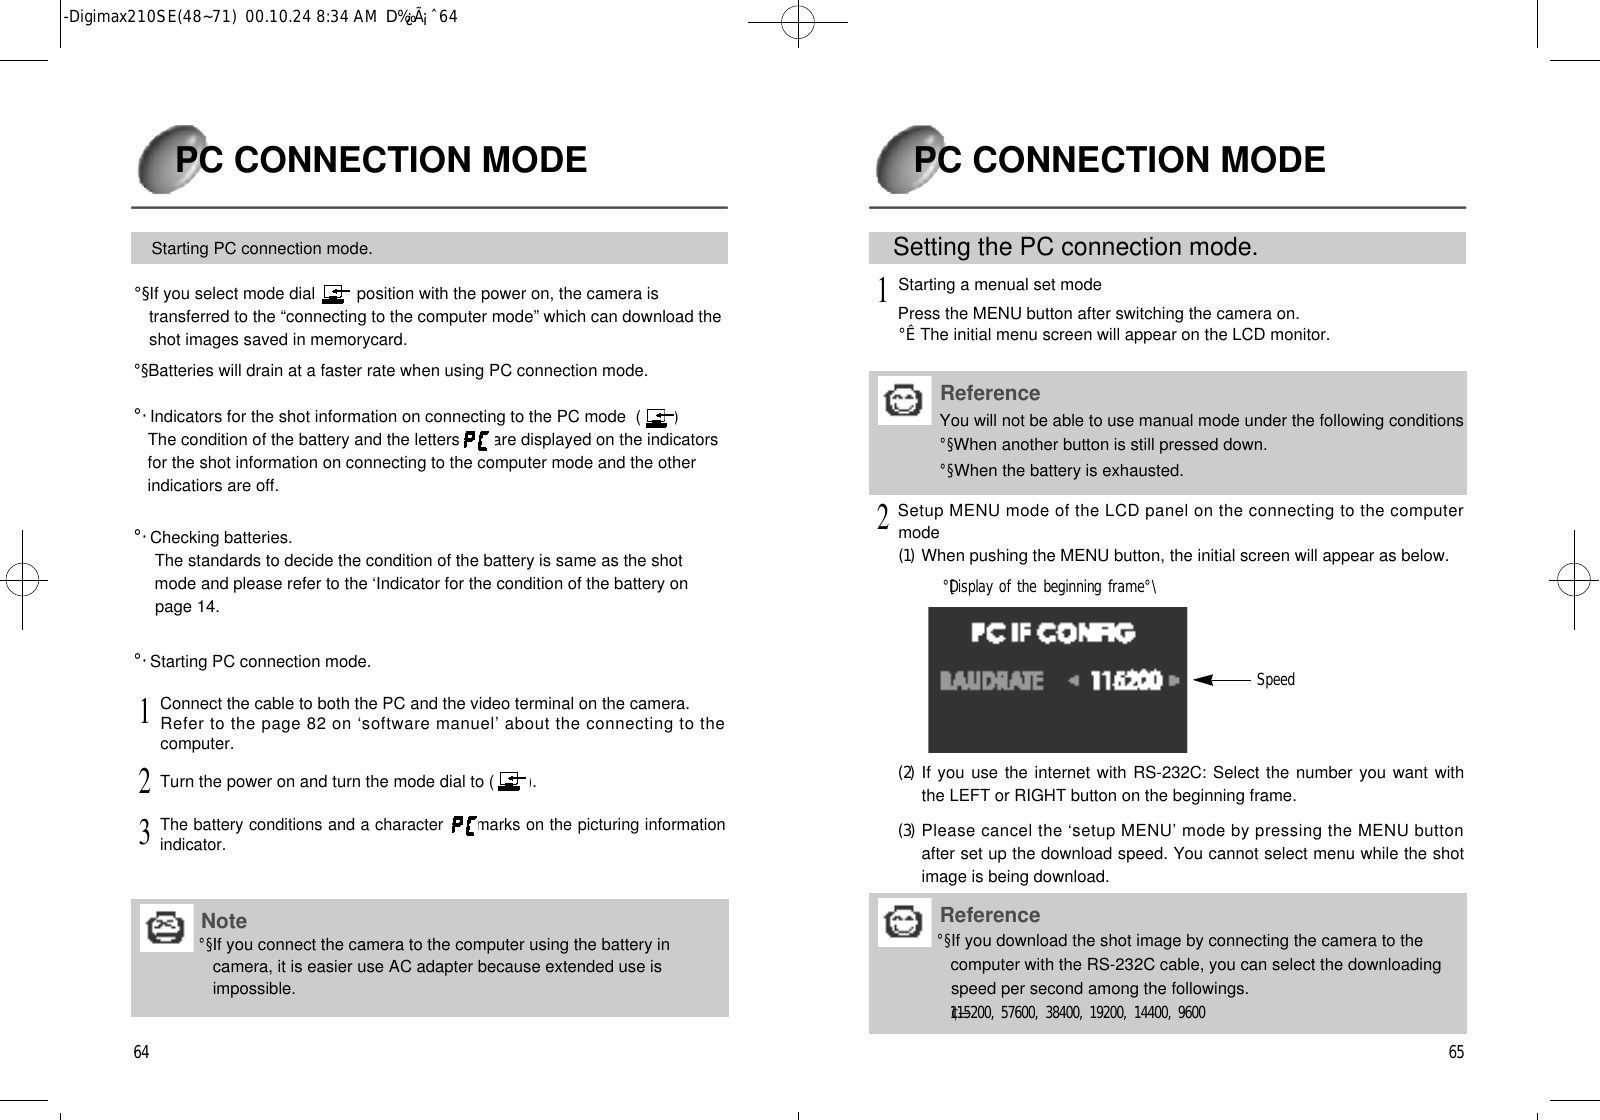
![6 3CONNECTION TO AN EXTERNAL MONITORConnection to an external monitor.°§Connect the video connection terminal on the Digimax 210 to an externalmonitor with a connection cable. Set the Digimax to play mode or movingimages to view them on the external monitor. The LCD monitor willautomatically switch off.¢—The information on the external screen will be exactly the same as on theLCD monitor on the camera.°·Selecting the Video output type°§You can select an NTSC or PAL video output signal, depending on theexternal equipment.¢—Refer to the [setup the Video output mode] on page 51 about theselecting the video output indicator from the camera.Reference°§When using a TV as an external monitor, you will need to select theexternal or AV channel.°§If there is noise (the picture is fuzzy) please refer to your TV manualfor more information. °§If the picture is not in the centre of the screen, please use the TVcontrols to centre it.6 2PLAY MODE°§You can print out the saved images in compact memorycard as much as youset up with the digital photo printer which supports DPOF.DPOF (Direct Print Ordering Format) If you put the LCD/ button under the state of the first monitor displayin the play mode, the below messages appear on a liquid monitor.1Press the LCD/ button once to display 'No of prints 'message on themonitor. Use the left and right directional buttons to change the printnumber.¢—The maximum print number is 92After removing the compact flash card and inserting it into a digital photoprinter, you will be able to print out the preset images.3D P O FD P O F-Digimax210SE(48~71) 00.10.24 8:34 AM D‰¿Ã¡ˆ62](https://usermanual.wiki/Hanwha-Techwin/DIGIMAX210SE/User-Guide-128052-Page-32.png)
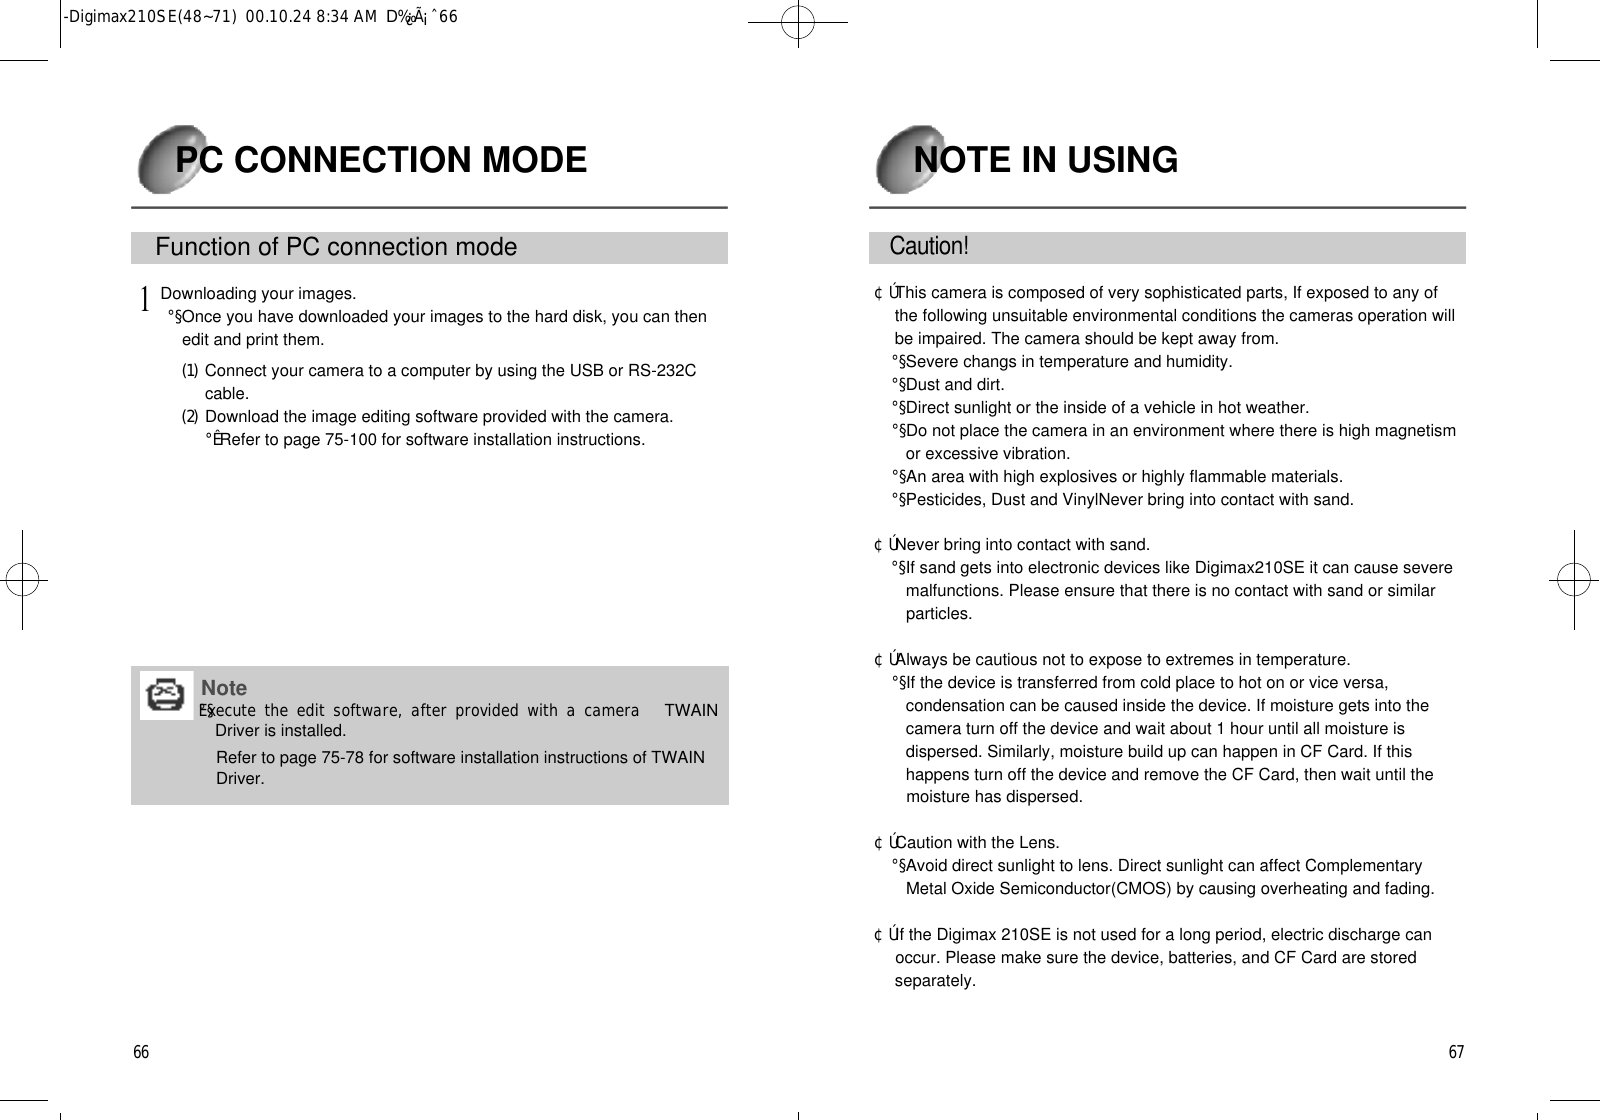
![6 96 8BEFORE CONTACTING SERVICE CENTER¶UBatteries need replacing.¶UReplace batteries with new ones¶UAC Power Adapter¶UConnect AC Power Adapter.is not connected.¶UBatteries need replacing¶UReplace batteries with new ones¶UCamera has shut off automatically ¶UPower on¶UThe card is taken off before the ¶UDo not remove the memorycard image is saved in the memorycard. while you save the image.¶UThe adapter jack is off because it loosens.¶UPlug in the adapter jack again.¶UExternal temperature is too cold. ¶UKeep batteries at the correct t e m p e r a t u r e .¶UThe camera has old and ¶UReplace all batteries andnew batteriesinsert new ones¶UCF Card is not inserted ¶UInsert CF Card¶UThe memory card has not been inifialised.¶UI n i t i a l i s e¶UMemory card are almost drained. ¶UInsert new CF Card from manufacturer¶UThe power has not been switched on.¶UPower on.¶UThe batteries are weak. ¶UReplace batteries with new ones¶UThe camera is not set to ¶UShooting modeshooting mode.¶USelect the macro mode in case it is¶UYou select the wrong shot mode.within 80 cm and select the general mode in case it is over 80cm.¶UThe camera is flash off ¶UThe flash off mode is canceled.¶UThe wrong date/time is displayed ¶USelect the appropriate number inor saved as the basic number.MENU mode.[Refer to the selectingDATE/TIME on the page 21.]Before contacting service center (please check the following)Warning indicatorThe power isnot turned onIf the powerwill not turn on.Battery poweris drainedquickly.Camera does nottake pictureswhen pressingthe Shutterb u t t o n .The flash modedoes not work.The focus cannotbe adjusted.The wrong date/time is displayed.¶UNo memorycard¶UInsert the memorycard.¶UThe card cannot be read.¶UInsert the memorycard again.¶UThe capacity for shot in ¶UReplace the card with thememorycard is lacking. new one or use it after youerase the locked image.NOTE IN USING¢ÚMaintenance°§To clear the Lens or LCD Status panel, a soft brush should be used. If thisdoes not work lens-cleaning paper with lens cleaning fluid can be used.°§Clean the camera with a soft cloth or a mild detergent. It may cause thedeterioration, deformation or falling off the paint.°§The LCD moniter can be damaged very easily, please ensure that it doesnot come into contact with any sharp impact.¢ÚDo not attempt to disassemble or modify the device by yourself.°§The warning indicator displayed on the shot information indication is as follows.¶UPlease turn the power off andturn it on again.If it happensagain, please ask for the repairservice to the near Samsungservice center.¶UThe camera indicates abnormaloperation.warningindicatorwarning contents treatmentSymptom Cause Steps-Digimax210SE(48~71) 00.10.24 8:34 AM D‰¿Ã¡ˆ68](https://usermanual.wiki/Hanwha-Techwin/DIGIMAX210SE/User-Guide-128052-Page-35.png)
![7 17 0SPECIFICATIONcompact digital camera1/2.7” color CCD CMOS Sensor with 210 thousands pixelFocusing range : f=5.8~17.4mmIris : F2.8(W) ~ F4.9(T)real image & LCD moniter1.8”color TFT LCDCompact Flash cardJPEG(observes the DCF standard), TIFF(non-compression), AVI(Motion JPEG) & DPOF support1 image deletion/continuous shooting/ interval shooting/Moving image shootingL(1600X1200 pixel): Highest picture quality shot 8°æ1( 1sheet in case of TIF)Highest picture quality 15 °æ1, Standard picture quality 30 °æ1S(800X600 pixel): Highest picture quality shot 30°æ1 (5 sheet in case of TIF)Highest picture quality 59°æ1 , Standard picture quality 114°æ1Normal :0.8m~°ƒMacro : 0.2m~0.8mAuto / Auto & Red - eye reduction/ fill-in flash / flash offShooting: 2 times, playing : Large - 5 times, Small - 2.5 times1/2 sec ~ 1/10.000 secprogram AEabout 10 sec. delay shooting0 minute (OFF) / 1~10 minute(Except PC mode) 1 image / thumbnail / Slide show1 image deletion / all deletion / FormatVideo output : NTSC / PAL (BDGHI)Digital output connector : USB / RS232CDC power output connector : 6.0v255g (excluding batteries & card)114.5(W) °ø 56.1(D) °ø 7 0 . 7 ( H ) m mWindows 98/2000 : TWAIN Driver, Direct DownloadMAC OS over 8.6 : TWAIN Driver, Direct DownloadPhoto deluxe 3.0 home EditionT y p eImage sensorL e n sViewfinder Requid moniterS t o r a g eR e c o r d i n gShooting modeFocus distanceF l a s hDigital ZoomShutter SpeedExposure Self TimerAuto power offImage playImage deletePower input/O u t p u tW e i g h tBundle softwareD e m e n s i o n sPC softwareThe number ofstored imagespossible with an 8MBmemory card is asf o l l o w s .BEFORE CONTACTING SERVICE CENTER¶UCamera not functioning prorerly ¶URemove the batteries and insert them again.¶UThere is a difference of the ¶UStart the memorycard and use it.beginning memorycard.‘Refer to the FORMAT on the page 60.]¶UThere is any trouble with the W.B mode.¶UThere is excessive exposure. ¶UReset exposure compensation.(Refer to page 47 E.V.)¶UThe lens is smudged or dirty. ¶UYou should clean the lens.¶UThe video cable is not connectedto the camera or externalm o n i t o r . ¶Uconnected properly¶UThe incorrect memory cardis not recording properly.¶UCable is not connected properly ¶UCheck the connections¶UCamera is off. ¶UTurn on the camera¶UThere is no battery or the adapter ¶UInsert new batteries or connect is not connected. with AC Power Adapter.¶UOS is not Window 98/2000 or ¶UInstalling Window 98/2000 or PC is not equipped with u s e RS232C port.USB port .¶UUSB driver is not installed ¶UInstall USB Driver.¶UCable is not properly connected. ¶UCheck the connections¶UCamera is off ¶UTurn on the camera¶UCamera has no batteries or not ¶ULoad the new battery orconnected with AC Power Adapter. check the adapter.The play screen isdisplayed on theexternal Monitor.The camera deesnot download filesinto PCThe camera deesnot download filesinto PCCamera fails to workby any button ors w i t c hThere is something wrongwith the color of capturedi m a g e .The screen is toob r i g h t .The screen is not veryc l e a r .The card error indicator is onwith the memorycardi n s e r t e d .Symptom Cause Steps¶UThere is any trouble with the W/B mode. Setup the right one for each light source. [Referto W.B.(white balance) on the page 46.]°ÿSpecifications are subject to without prior notice.-Digimax210SE(48~71) 00.10.24 8:34 AM D‰¿Ã¡ˆ70](https://usermanual.wiki/Hanwha-Techwin/DIGIMAX210SE/User-Guide-128052-Page-36.png)
![7 4BEFORE YOU SET UP THE SOFTWARE H OW TO SET UP THE SOFTWA R E¢ÚFor windowscomputer : Personal computer with processor better than MMX Pentium 200 MHzOperating System : Windows 98, 98SE, 2000M e m o r y: Minimum 32MB RAM .Others : Serial port, USB port140MB and free hard disc space.16 bit color display adapter and compatible monitor, 800X600 pixel resolution (24 bit color display adapter and true color display, etc. arer e c o m m e n d e d . )¢ÚFor Macintoshcomputer : PowerMac with built-in GeoPort(DMA – support Serial Port)PowerMac G3, G4, iMac series with built-in USB PortOperating System : better than Mac OS 8.5(set up better than QuickTime 4.0)M e m o r y: memory with margin over 16MBOthers : USB port , communication portSystem Requirements(2000 S e p t e m b e r)°· When you put the Drive CD-ROM provided with this camera into the CD-ROM drive, thefollowing frame is automatically run.1. Setup the DriverSelect the driver you want on the above frame.Refer to the page 76 in case of the USB TWAIN Driver setup for Windows.Refer to the next contents for the details about setting up the Driver.¶USetup the RS232C TWAIN Driver for Windows : page 82¶USetup the Direct Download_USB program for Windows : page 84¶USetup the Direct Download_Serial for Windows : page 852. Internet linkYou can link to the Samsung homepage through the internet.¶Uhttp://www.samsungcamera.com : English¶Uhttp://www.zoomin.co.kr : KoreaHow to set up the software7 5Reference°§You need 5~10 seconds for running the automatic setup program according tothe capability of the computer. If the frame is not displayed even after this, runthe [Windows search] and select "Samsung.exe" in the CD-ROM Drive rootd i r e c t o r y .-Digimax210SE(72~) 00.10.24 8:34 AM D‰¿Ã¡ˆ74](https://usermanual.wiki/Hanwha-Techwin/DIGIMAX210SE/User-Guide-128052-Page-38.png)
![7 77 6SET UP THE TWAIN DRIVER (FOR WINDOW S )Click on the [next] button whenthe next screen is shown4Move the files you needfrom the [set up Driver] CDp r o v i d e d .5[USB TWAIN Driver]installation wasfinished.Now click the‘finish’ button6When installation has completedsuccessfully you will be able tosee [Samsung Digimax 210SECamera] in the [Imaging device]bar at the bottom right of themonitor. If you want to seeinstalling administrator, Clickorderly [ initiating menu®As e t t i n g®Ac o n t r o l l e r®Ae q u i p m e n tadministrator ]7SET UP THE TWAIN DRIVER (FOR WINDOW S )Installation of the USB Twain Dri ver (Windows 98)After connecting the computerand the camera via the USBcable the message [newhardware additional wizard] willbe displayed on your screen.Click [next] to proceed.1After selecting [searching adriver best appropriate forinstallation], click [Next]b u t t o n .2Insert the [set up Driver] CDin CD-ROM drive andselect [CD-ROM drive] onthe next frame and click‘ n e x t ’ .3-Digimax210SE(72~) 00.10.24 8:34 AM D‰¿Ã¡ˆ76](https://usermanual.wiki/Hanwha-Techwin/DIGIMAX210SE/User-Guide-128052-Page-39.png)
![7 97 8SET UP THE TWAIN DRIVER (FOR WINDOW S ) SET UP THE TWAIN DRIVER (FOR WINDOW S )Installation of the USB Twain Dri v er (Windows 2000)After connecting the computerand the camera via the USBcable, the message °’F o u n dNew Hardware Wizard°pwill bedisplayed on your screen. Click°’N e x t °pb u t t o n .1After selecting °’Search for asuitable driver for myd e v i c e [ r e c o m m e n d e d ] °p, click°’N e x t °pb u t t o n .2Insert the Driver CD in CD-ROM drive and select °’C D -ROM drives°pon the nextframe and click °’N e x t°pb u t t o n .3Click on the °’N e x t°pbutton whenthis screen is shown.4Click on the °’Y e s °pb u t t o nwhen this screen is shown.5Move the files you need fromthe Driver CD provided.6-Digimax210SE(72~) 00.10.24 8:34 AM D‰¿Ã¡ˆ78](https://usermanual.wiki/Hanwha-Techwin/DIGIMAX210SE/User-Guide-128052-Page-40.png)
![8 18 0SET UP THE TWAIN DRIVER (FOR WINDOW S ) SET UP THE TWAIN DRIVER (FOR WINDOW S )NoteDo as follows when the following frame is displayed while you are setting up USBTWAIN Driver.Insert the provided Driver CDin CD-ROM drive and Click°’O K°pb u t t o n .1Click [Search] on the nextframe, [open] the [MSVCRT.DLL] files on the frame belowand then press the[Confirmation] button.2°’USB TWAIN Driver°pi n s t a l l a t i o nwas finished. After clicking °’F i n i s h°pbutton, restart the computer.7When installation has completedsuccessfully, you will be able to see°’Samsung Digimax 210SE Camera°pin the °’Imaging Device°pof the°’Device Manager°p. If you want to see°’Device Manager°p, click orderly°’Start menu°Ês e t t i n g°Êc o n t r o l l e r°Ês y s t e m°ÊDevice Manager°p.8-Digimax210SE(72~) 00.10.24 8:34 AM D‰¿Ã¡ˆ80](https://usermanual.wiki/Hanwha-Techwin/DIGIMAX210SE/User-Guide-128052-Page-41.png)
![8 38 2SET UP THE DRIVER (FOR WINDOW S )Move the files you need from the DriverCD-ROM provided.4Click [ Finish ] button.Then RS-232C Twain Driverinstallation is finished.5SET UP THE DRIVER (FOR WINDOW S )Set up RS-232C Twain DriverWhen you click Serial-TWAIN Driver on the frame displayed after you put theprovided [setup the Driver] CD into the CD-ROM Driver, the following frame isd i s p l a y e d .1If this screen is displayed click the “NEXT” button2Enter your user information and then click the 'NEXT' button.3-Digimax210SE(72~) 00.10.24 8:35 AM D‰¿Ã¡ˆ82](https://usermanual.wiki/Hanwha-Techwin/DIGIMAX210SE/User-Guide-128052-Page-42.png)
![8 58 4SET UP THE DIRECT DOWNLOAD PROGRAMThe Direct download set up is completed. Click the [Finish] button.5When the set up is normally completed, it isautomatically registered on the Start Menuprogram as next frame.¢—Click Serial-Direct Download on the frame displayed after you put the provided[setup the Driver] CD into the CD-ROM Driver.¢—When the set up is normally completed, it is automatically registered on the Start Menu program as next frame.6Set up the Direct Dow n l o a d - S e rial Program for window sNote°§Please play Direct download_USB program after setting up the TWAIN Driver first.SET UP THE DIRECT DOWNLOAD PROGRAMWhen you click USB -TWAIN Driver on theframe displayed after you put the provided[setup the Driver] CD into the CD-ROM Driver,the following frame is displayed.1Click the [Next] button if you want to set up inthe folder provided from the next frame andclick the [Next] button after selecting the folderyou want with the [Browse..] button if you savein other folder.2Click [ Next ] button after the beside screen isdisplayed .3Move the files you need from the Driver CD.4Set up the Direct Download-USB Program for window s-Digimax210SE(72~) 00.10.24 8:35 AM D‰¿Ã¡ˆ84](https://usermanual.wiki/Hanwha-Techwin/DIGIMAX210SE/User-Guide-128052-Page-43.png)
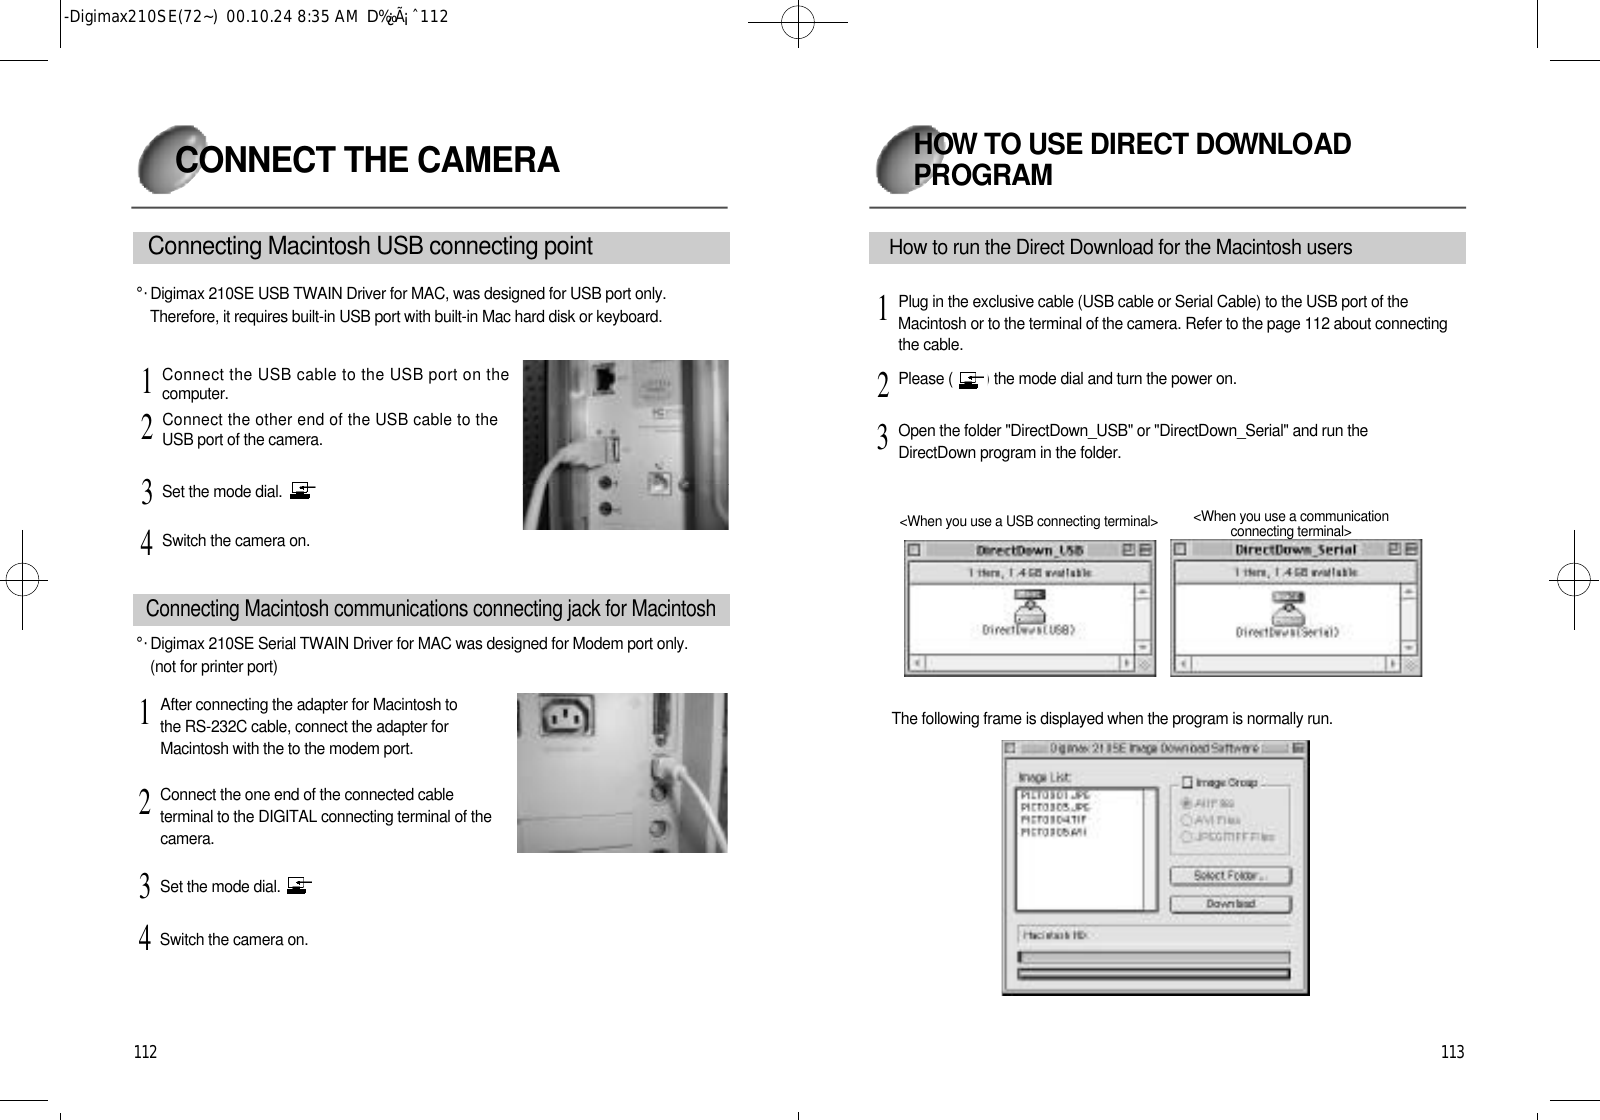
![8 78 6CONNECT THE CAMERA°·To download the images from Digimax 210SE to PC and edit them, both Windows98(or 2000) and USB connecting jack are required.°·This is used when you want to download the taken images to the PC or edit in theediting software using the computer without USB port. Connecting USB connecting jack for WindowsJoining DIGITAL connection terminal ( RS232C print-out term i n a l )Connect the USB cable to the USB port on thec o m p u t e r .1Connect the other end of the USB cable to theUSB port of the camera.2Switch the camera on.4Set the mode dial.3Connect the RS232C cable to the COM port atthe back of the computer.1Connect the other end of the RS-232C cable to thedigital camera.2Switch the camera on.4Set the mode dial.3SET UP THE EDITING SOFTWA R EInstallation of Adobe Photo Deluxe 3.0 editing softwa r e¢ÚThis software is provided only for Windows and guaranteed over Windows NT 4.0 withservice Pack 3 or Windows 95, 98.When [Samsung digimax 210SE application] is inserted into the CD-Rom drive anAutoplay screen like the one above will appear.Follow the instructions on screen.¢ÚOnce installation is complete Autoplay will open the starting menu.Reference°§If Autoplay does not appear automatically, double click on [Autoplay.exe]which is located in the route directory of [Samsung digimax 210SEa p p l i c a t i o n ]Note°§Please turn on the power after you connect the RS-232C to Digital connectingterminal on camera for fluent communication such as prevention of thecommunication error.-Digimax210SE(72~) 00.10.24 8:35 AM D‰¿Ã¡ˆ86](https://usermanual.wiki/Hanwha-Techwin/DIGIMAX210SE/User-Guide-128052-Page-44.png)
![8 98 8H OW TO USE DIRECT DOW N L O AD P RO G R A MTo start Direct Download program:H o w to start Direct Download program for Window sConnect the cable (either USB cable or RS-232C cable) from the camera to aconnecting jack on PC.1Select the mode dial and turn on the power (of the camera).2Click [START DOWNLOAD] after starting Direct Download program. Refer to thepage 88 regarding how to start the program. The following are the functions of thebuttons in Direct Download program.3Select this button when you download all images storedinmemory cardThis button will download the latest image recorded.(generally) Or, select this button when you want todownload the image in [play mode]Select this button when you want to download JPEG andTIFF format) the moving imges stored in memory cardSelect this button when you want to download AVIthemoving images(AVI format ) stored in memory cardThis button will download the shot images from camera to c o m p u t e r .Select this button when you want to cancel the action whiledownloading. The image downloaded before selecting thisbutton will be stored in computer.This button will specify the folder where the downloaded images are to be stored.S e c t i o n F u n c t i o nALL FILESC U R R E N TJ P E G / T I F FAVI FILESSTART DOWNLOADSAVE ATCANCEL DOWNLOADH OW TO USE DIRECT DOW N L OAD P RO G R A MTo start Direct Download program:¢ÚWhen USB cable is connectedThe following screen is displayed when you click [START MENU -> PROGRAM ->DirectDown USB-> Direct Down USB] in order or click [Direct Down USB] icon on thebeginning frame.¢ÚWhen RS-232C cable is connectedThe following screen is displayed when you click [START MENU -> PROGRAM ->DirectDown Serial-> Direct Down Serial] in order or click [Direct Down Serial] icon onthe beginning frame.H o w to start Direct Download program for Window s-Digimax210SE(72~) 00.10.24 8:35 AM D‰¿Ã¡ˆ88](https://usermanual.wiki/Hanwha-Techwin/DIGIMAX210SE/User-Guide-128052-Page-45.png)
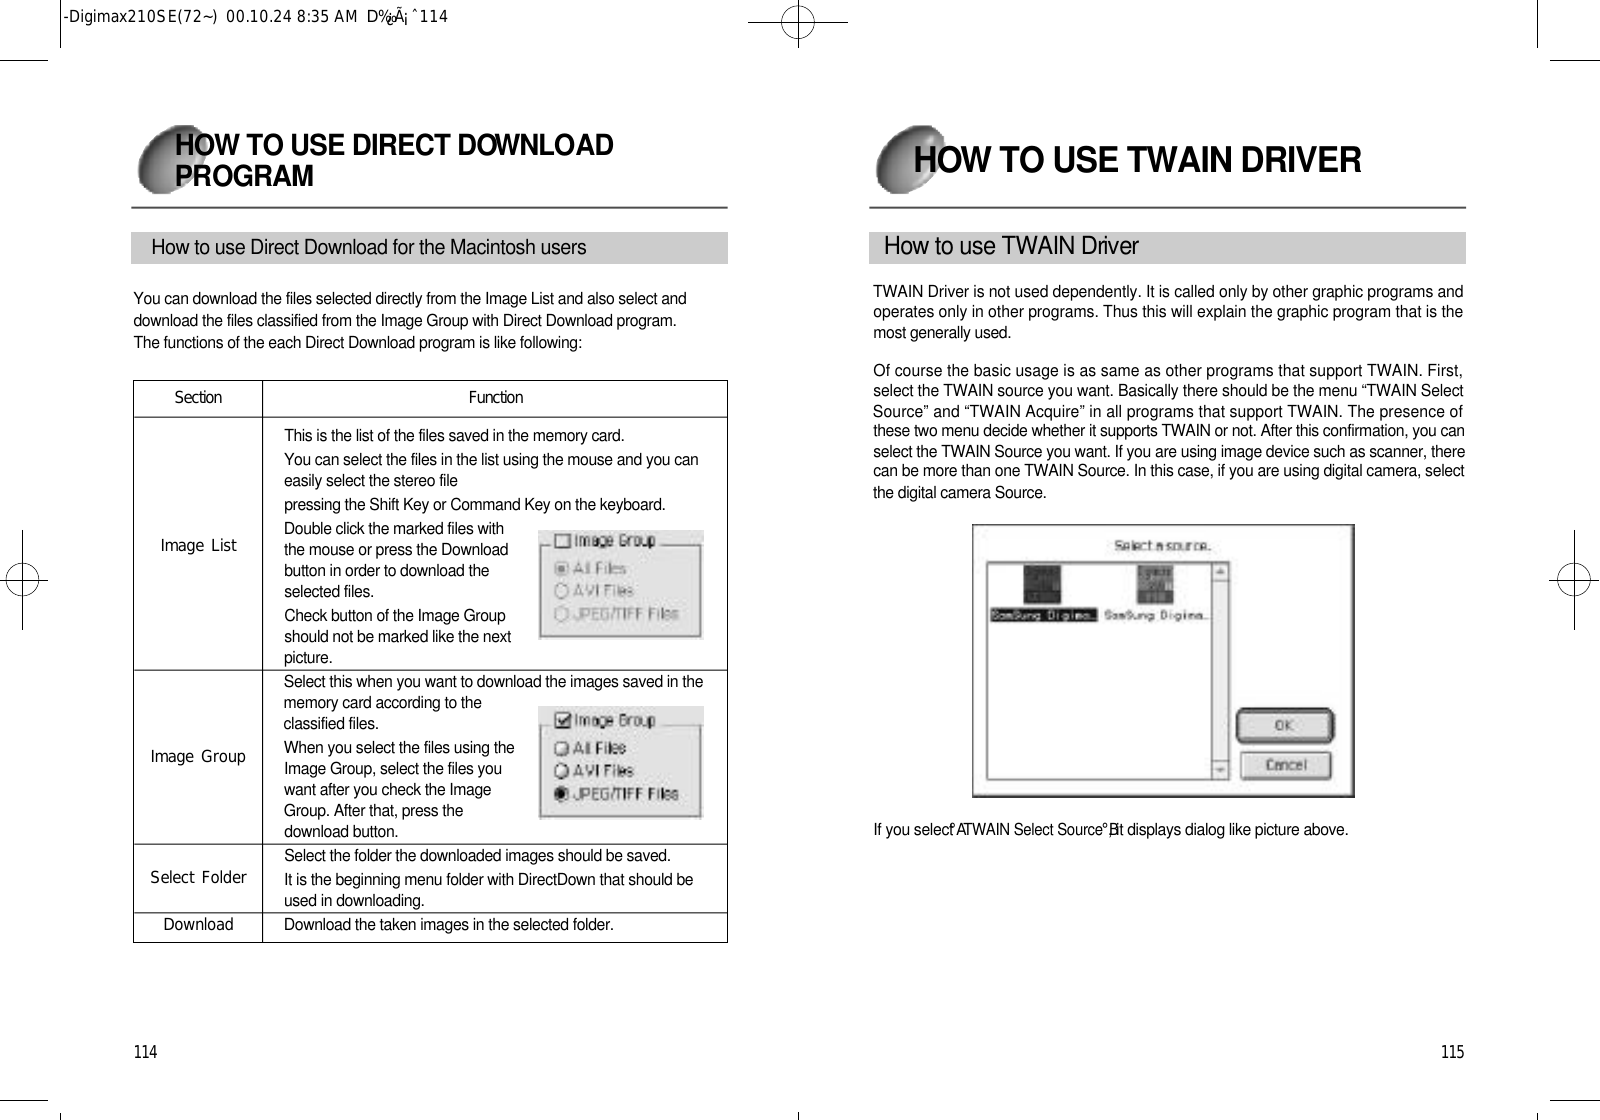
![9 1HOW TO USE TWAIN DRIVERH o w to use TWAIN Dri ve rTWAIN Driver is not used independently. TWAIN Driver should be brought in to othergraphic programs and be operated by them. The following is how to use the most widely-used image-editing program. Refer to the page in 92 for more information regarding[Adobe PhotoDeluxe Home Edition], image editing software for Windows.First of all, User should select the TWAIN Source. Every program that supports TWAINhas two items in the menu, or, [TWAIN Select Source *] and [TWAIN Acquire *].Depending on whether the menu has these two items or not, you can decide whetheryour computer supports TWAIN or not. After you are sure that the program supportsTWAIN, select TWAIN Source. Your TWAIN Driver may have more than one TWAINSources if the computer has been connected to Image Devices such as scanner. In thiscase of using digital camera, you should select digital camera source.IF you select [TWAIN Select Source*], you will see this dialog box.9 0H OW TO USE DIRECT DOW N L OAD P RO G R A MÂü°íIf the moving image you downloaded is not played, set up and use the videocompression codec.Put the provided Driver CD into CD-ROM Drive.1Play the windows search and then click JPEG_Decoder folder in theCD-ROM Drive folder.2The frame below is displayed when you select Jpegcode.inf inJPEG_Decoder folder and then press the right button on yourmouse. When you select [installation], the video compression codecis automatically set up.3-Digimax210SE(72~) 00.10.24 8:35 AM D‰¿Ã¡ˆ90](https://usermanual.wiki/Hanwha-Techwin/DIGIMAX210SE/User-Guide-128052-Page-46.png)
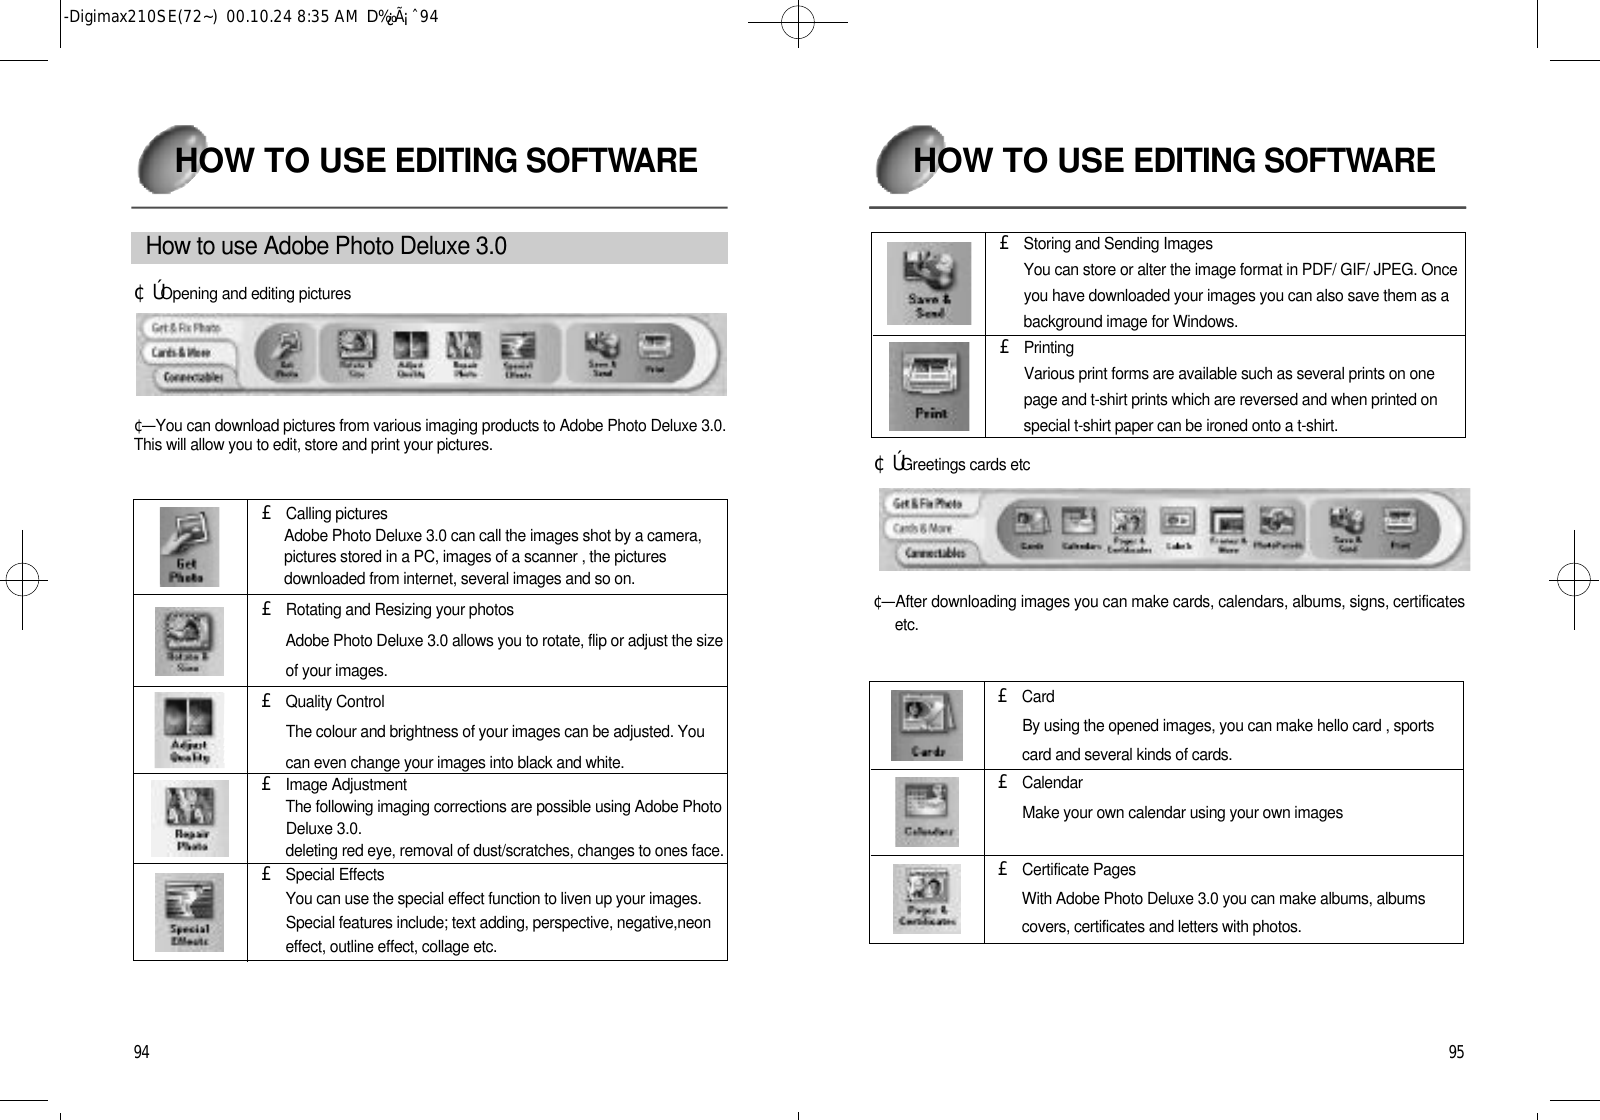
![9 3HOW TO USEEDITING SOFTWA R EThis software is provide only for Windows.To open Adobe Photo Deluxe 3.0 click the start button at the bottom left of your monitor,then click programs, then Adobe, and then double click on Photo Deluxe 3.0. PhotoDeluxe will now open.H o w to open Adobe Photo Deluxe 3.09 2Select [Samsung Digimax210SE Serial] if your computer has RS-232C connecting jack,and select [Samsung Digimax210SE USB’ if your computer has USB connecting jack.Then, you are done with selecting TWAIN Source. After selecting TWAIN Source, select[TWAIN Acquire*] and the following window will appear. Here is the function of each icon.D e l e t eThis button will erase the selected image.R o t a t eThis button will rotate the image to proper orientationR e f r e s hThis button will display the image stored in memory cardL o c kThis button will set the unlocked image into [locked]U n l o c kThis button will set the locked image into [unlocked]A c q u i r eThis button will download the image to editing programP r o p e r t i e sThis button will specify the features of the imageThis is the name ofthe file saved on thememory card. HOW TO USE TWAIN DRIVER-Digimax210SE(72~) 00.10.24 8:35 AM D‰¿Ã¡ˆ92](https://usermanual.wiki/Hanwha-Techwin/DIGIMAX210SE/User-Guide-128052-Page-47.png)
![9 7HOW TO USEEDITING SOFTWA R E£πObtaining the things that is possible to connectYou can obtain several pictures, clip art templet through internetgallery provided in Adobe PhotoDeluxe.£πAdobe ActivitiesYou can obtain all the informations that can be connected throughAdobe except for season’s activity information.£πExtensis ActivitiesYou can obtain all the other activity information possible to extend.¢ÚAdvanced Settings¢—From the Adobe internet page you can download all ofthe advanced settings. °ÿIf you ever want to edit pictures or personalise the picture you will now be able toselect the advanced menu. Click the higher menu buttonR e fe r e n c e°§Click Help and then contents on the file menu for more details about eachfunction. Help will then be displayed.9 6HOW TO USEEDITING SOFTWA R E£πL a b e lSeveral kinds of labels and gift tags can be made using AdobePhoto Deluxe 3.0.£πF r a m e sThe photo frames function can be used to frame photos or as aframe in the T-shirt transfer.£πP h o t o P a r a d eYou can make and execute PotoParade. And you can also obtaina detail information about Photoparade.£πStorage and SendingThis is exactly the same as in the [storing and sending] function in [Opening and Editing Pictures]£πP r i n tThis is same with [print] function of [opening and editing pictures]¢ÚThings that is possibe to connect¢—You can connect into the world of a additional contents by world wide web. Here areimages, letter forms, clip art, templet, plug-in for special effects and Photo Deluxebackground design. And You can download service and product by visiting other website related with PhotoDeluxe 3.0 and can use more links on screen.-Digimax210SE(72~) 00.10.24 8:35 AM D‰¿Ã¡ˆ96](https://usermanual.wiki/Hanwha-Techwin/DIGIMAX210SE/User-Guide-128052-Page-49.png)
![9 9HOW TO USEEDITING SOFTWA R E¢ÚFamilarisation of Functions£πE n l a r g e m e n tThe images are enlarged by at least 16 times.£πR e d u c t i o nThe images are reduced by at least 16 times£πZ o o mThe chosen part of the picture is enlargedThe number of images stored in thecamera will be displayed on them o n i t o r .4Select the image that you want and clickon it . The camera will then downloadthat image.59 8HOW TO USEEDITING SOFTWA R ER e t ri e ving Images from the Digimax 210SESelect [opening and editing pictures],then click download pictures from thec a m e r a .1If the following screen is displayed click (1. Camera)2You will have to either select - USB : Samsung Digimax 210SE USB.- RS-232C : Samsung Digimax 210SE Serial Then click [opening the camera]3-Digimax210SE(72~) 00.10.24 8:35 AM D‰¿Ã¡ˆ98](https://usermanual.wiki/Hanwha-Techwin/DIGIMAX210SE/User-Guide-128052-Page-50.png)
![1 0 1HOW TO USEEDITING SOFTWA R E¢ÚAlternative Storing Methods? Select [opening and editing picture] thenstoring and sending and then store..S t o ring images in Adobe Photo Deluxe 3.0 N o t e°§Photo Deluxe converts all images to its native file format, which is PDD orPBD, and save them. If you want to save in other formats, choose [File®AE x p o r t®AFile Format] and select your format from the Save As drop-downl i s t .°§When editing images, please ensure to save it as a new file under a newname. If this procedure is not followed, you may lose the original images.Otherwise, the original images will be distorted.If you wish to download pictures and store themonto a hard disk etc. the click on [file: store]1After choosing a file name on the displayscreen click on the store button.21 0 0HOW TO USEEDITING SOFTWA R E- Enlargement rateSelect the arrow and select the enlargement rate.- Waste BoxA selected portion of the picture is deleted- Object OrderYou will be able to move objects to the front or back after selectingthe object order menu.- Text toolsThis gives the option to add text- HelpClick help when it appears on the online menu list.- C a n c e lThis will undo the latest command functionR e fe r e n c e°§Click (Help Contents) on the file menu for further instructions on the use ofthe functions of Adobe Photo Deluxe 3.0-Digimax210SE(72~) 00.10.24 8:35 AM D‰¿Ã¡ˆ100](https://usermanual.wiki/Hanwha-Techwin/DIGIMAX210SE/User-Guide-128052-Page-51.png)
![1 0 31 0 2HOW TO REMOVE THE DRIVER ANDPROGRAM HOW TO REMOVE THE DRIVER ANDPROGRAMR e fe r e n c eDo as follows in case Inf folder inside Windows folder is not displayed.Select [seeing->folder option] onthe file menu like the next picture.Select [tools->folder option] incase of Windows 2000.1Press the confirmation button afterselecting [hiding files] as [all thefiles are displayed] on the seeingof the folder option.Press the confirmation button afterselecting [hiding files and folderdisplay] as [hiding files and folderdisplay] on the seeing of the folderoption in case of Windows 2000.2The elimination of USB TWAIN Driver is completed when you eliminate [SamsungTechwinCOACH.INF] in [Other] folders.In case of Windows 2000, you can eliminate [oem*.inf/oem*.pnf] in [Inf] folder. Eliminatethe file named "Samsung Digimax 210SE Camera" after opening the file named[ o e m * . i n f ] .4How to remove the USB TWAIN DriverClick in order [start menu->setting->controller->system]. Select [Samsung Digimax210SE Camera] on [Imaging Device] in [system registration information->DeviceManager], and then click [elimination] then the frame below is displayed.1Press the [confirmation] button on the frame above.2Click in order [My computer ->(C:) -> Windows->Inf->Others] on the background frame.3¢ÚRefer to the below if you want to eliminate the Driver and Direct Downloadprogram which are already set up.°Ê °Ê °Ê °Ê-Digimax210SE(72~) 00.10.24 8:35 AM D‰¿Ã¡ˆ102](https://usermanual.wiki/Hanwha-Techwin/DIGIMAX210SE/User-Guide-128052-Page-52.png)
![1 0 51 0 4HOW TO REMOVE THE DRIVER ANDPROGRAM HOW TO REMOVE THE DRIVER ANDPROGRAMHow to remove the Direct Download_USB program.When you select [program addition/elimination] icon on the control board, the framebelow is displayed.1After selecting °’D i r e c t D o w n _ U S B °pon the frame above and pressing[addition/elimination], and then Direct Download_USB is automatically eliminated.2How to remove the Serial TWAIN DriverWhen you select [program addition/elimination] icon on the control board, the framebelow is displayed.1After selecting [Samsung Digimax 210SE TWAIN Driver] on the frame above andpressing [addition/elimination], and then Serial TWAIN Driver is automaticallye l i m i n a t e d .2-Digimax210SE(72~) 00.10.24 8:35 AM D‰¿Ã¡ˆ104](https://usermanual.wiki/Hanwha-Techwin/DIGIMAX210SE/User-Guide-128052-Page-53.png)
![1 0 7H OW TO SOLVE THE PROBLEMS ¢ÚExpected problemsYou will see the frame below in the image-editing program, [Adobe PhotoDeluxe]when TWAIN Driver doesn’t operate normally.1. The problems can occur when you first start the program after the first installation ofTWAIN Driver or when you had selected another TWAIN driver before.¢—Click the OK button and follow Step 1 through 4 on the next page. Walk themthrough and check if they work. If this doesn’t work out, refer to the page 85 andstart TWAIN Driver again.2. When the program, which has operated normally, doesn’t operate any more¢—Follow Step 1 and 2 on the next page and check out if each of them works. If thisdoesn’t work out, click the Ok button and then, click Open Camera icon.3. When the problem occurs when this program is in process¢—Follow Step 3 on the next page and check out if this works. If this doesn't work out, click the OK button and then, click Open Camera icon.1 0 6HOW TO REMOVE THE DRIVER ANDPROGRAMHow to remove the Direct Download_Serial program.When you select [program addition/elimination] icon on the control board, the framebelow is displayed.1After selecting °’D i r e c t D o w n _ S e r i a l °pon the frame above and pressing[addition/elimination], and then °’Direct Download_Serial°pis automatically eliminated.2-Digimax210SE(72~) 00.10.24 8:35 AM D‰¿Ã¡ˆ106](https://usermanual.wiki/Hanwha-Techwin/DIGIMAX210SE/User-Guide-128052-Page-54.png)
![1 0 9SET UP THE TWAIN DRIVER (FOR MAC)T WAIN Dri ver Installation for MacintoshShut down all the programs before starting the installation.1Insert Driver CD-ROM into CD-ROM driver.2There are three categories in the installation of MAC TWAIN Driver.°§Installation for TWAIN Protocol (You can skip this if your Mac already has thisi n s t a l l e d . )°§Installation of Digimax 210SE USB TWAIN Driver°§Installation of Digimax 210SE Serial TWAIN Driver3Installation for TWAIN ProtocolIf your MAC already has [TWAIN Protocol] installed, you may skip this instruction.1You see this window when you open [MAC TWAINInstaller] folder from Driver CD-ROM.2Select all the files and folders in [IntoExtentions] Folder and then, copy them intoExtentions(extension file)Folder, which is inSystem Folder(korean system).3In the same way, select all the files and folders in [Into Preferences]Folder and then, move them into Preferences Folder, which is inSystem Folder.4If all process goes successfully , reboot the computer.51 0 8H OW TO SOLVE THE PROBLEMS ¢ÚCheck points & Solutions1. When TWAIN Driver is set up improperlyThese problems may occur when TWAIN Driver is set up improperly or TWAIN Driverhas been already set up for another camera.¢—Select the proper camera model on the following frame displayed when you run theAdobe PhotoDeluxe testing version and then click [open the image and correct it ->take the image -> camera -> 1. camera -> camera model] in this order.2 .When the connection between camera and PC is not proper.¢—You will have the problems when USB cable (or RS-232C cable) is not connectedfrom camera to PC or you have connected another cable other than the oneprovided with this camera.3. When camera is turned off¢—The problems may occur when the camera is turned off or the battery doesn’t havesufficient power or the adapter is not properly connected.4. Other than possible reasons listed above, there may be some other Review thesystem information in reasons.There may be some problems with Serial port on PC. Control panel to check out thestatus of serial port. You will see the question mark with yellow background if there issomething wrong with serial port.¢—For more information, call A/S Center of PC manufacturer.-Digimax210SE(72~) 00.10.24 8:35 AM D‰¿Ã¡ˆ108](https://usermanual.wiki/Hanwha-Techwin/DIGIMAX210SE/User-Guide-128052-Page-55.png)
![1 1 1SETTING UP THE DIRECT DOW N L OAD FORM AC I N T OSH USERS1 1 0If all process goes successfully, reboot the computer.5SET UP THE TWAIN DRIVER (FOR MAC)USB TWAIN Dri v er Installation for MacintoshTo install USB TWAIN Driver, TWAIN Protocol is required. Refer to the page in (109 )for information regarding TWAIN Protocol installation.1You see the frame below when you open [MAC USB TWAIN ]folder from Driver CD-ROM.2Select [Samsung Digimax 210SE USB] file in [MAC USBTWAIN ] folder and copy it into [TWAIN Data Sources] folder in[Extentions] folder.3Select [SSA USB Camera Driver] file in [MAC USB TWAIN ] folder and copy it into[Extentions] folder, which is in System folder.4S e rial TWAIN Dri v er Installation for MacintoshTo install Serial TWAIN Driver, TWAIN Protocol is required. Refer to the page in (109)for information regarding TWAIN Protocol installation.1You see the frame below when you open [MAC Serial TWAIN]folder from Driver CD-ROM.2Select [Samsung Digimax 210SE Serial] file in [MAC SerialTWAIN] folder and copy it into [TWAIN Data Sources] folderin [Extentions] folder.3If all process goes successfully, the installation is completed.4°·Setting up the Direct Download for Macintosh users is same either when you use a USBconnecting terminal or when you use a communication connecting terminal.Setting up the Direct Download for Macintosh usersWhen you use USB connecting terminalCopy the file "DirectDown USB" from the Driver set up CD-ROM which is providedwith the Samsung Digimax 210SE digital camera to the hard disk of the Macintosh.1When you use communication connecting terminalCopy the file "DirectDown Serial" from the Driver set up CD-ROM which is providedwith the Samsung Digimax 210SE digital camera to the hard disk of the Macintosh2®x®x-Digimax210SE(72~) 00.10.24 8:35 AM D‰¿Ã¡ˆ110](https://usermanual.wiki/Hanwha-Techwin/DIGIMAX210SE/User-Guide-128052-Page-56.png)
![1 1 71 1 6H OW TO SOLVE THE PRO B L E M SH OW TO USE TWAIN DRIVERSelect [Samsung Digimax210SE Serial ] if your computer Communications connectingjack for Macintosh, or select [Samsung Digimax210SE USB ] if your computer has USBconnecting jack. Then, the selection of TWAIN Source for this camera is completed.This will specify the information of the selected image. (image size, file format, lock/unlock, file size)This will erase the image.This will erase all the images stored in camera.This will cancel TWAIN Acquire instruction.This will bring the image from the camera to the program.This will enable you to search for the images.(via First ,Up , Down , Last )S e a r c h i n gi m a g eType 1. The memory is not enough or the memory is abnormal.¢—End the program you are using and run the program again. Begin the Mac again if you need.Type 2. This the error that happens when you first set up the USB port orcommunication port.¢—You cannot use the Samsung Digimax 210SE TWAIN Driver in the severalprograms at the same time. Thus, end the program you are using when it isbeing used in other programs. You cannot use the Samsung Digimas 210SETool Driver in the several programs at the same time when you use USBport. Run the application program again if the DirectDown is running.Begin the Mac again if you need.Solutions for Macintosh-based Programs-Digimax210SE(72~) 00.10.24 8:35 AM D‰¿Ã¡ˆ116](https://usermanual.wiki/Hanwha-Techwin/DIGIMAX210SE/User-Guide-128052-Page-59.png)