Hanwha Techwin DIGIMAXI5 Digital Camera User Manual sl1en c v09 1
Samsung Techwin Co Ltd Digital Camera sl1en c v09 1
UserManual.wiki
>
Hanwha Techwin
>
DIGIMAXI5 User Manual
Users Manual 1 of 2
Navigation menu
Upload a User Manual
Namespaces
Wiki Guide
HTML
PDF
Info
Views
User Manual
Discussion / Help
Navigation

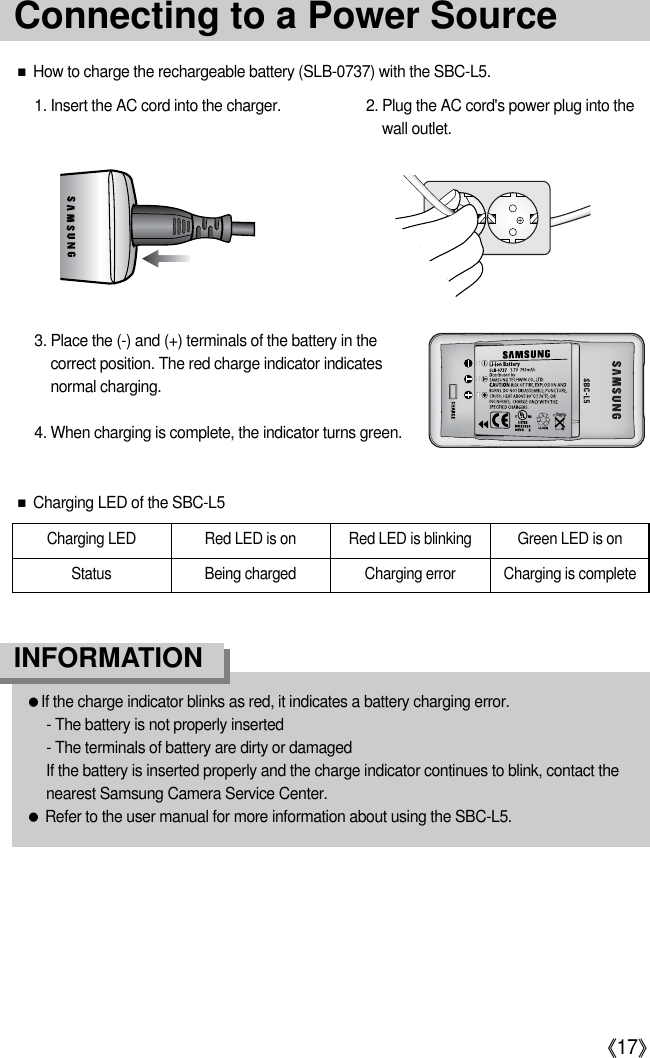
![《2》Instructions■Use this camera in the following orderInsert the USB cableSet up the camera driverBefore connecting the camera to a PC, via the USBcable, you will need to set up the camera driver.Install the camera driver that is contained inApplication software CD-ROM. (p.117)Take a picture. (p.24)Insert the supplied USB cable into the PC’s USBport and the camera’s USB connection terminal.(p.127)Check the camera’s power. If the power is turned off,press the camera button to turn it on. (p.31)Take a pictureCheck the camera’s powerCheck [Removable Disk]Open Window’s EXPLORER and search for[Removable Disk]. (p.128)●If you use a card reader to copy the images on the memory card to your PC, the imagescould be damaged. When transferring the images taken with the camera to your PC, be sureto use the supplied USB cable to connect the camera to your PC. Please note that themanufacturer holds no responsibility for loss or damage of images on the memory card dueto the use of a card reader.](https://usermanual.wiki/Hanwha-Techwin/DIGIMAXI5/User-Guide-545630-Page-2.png)
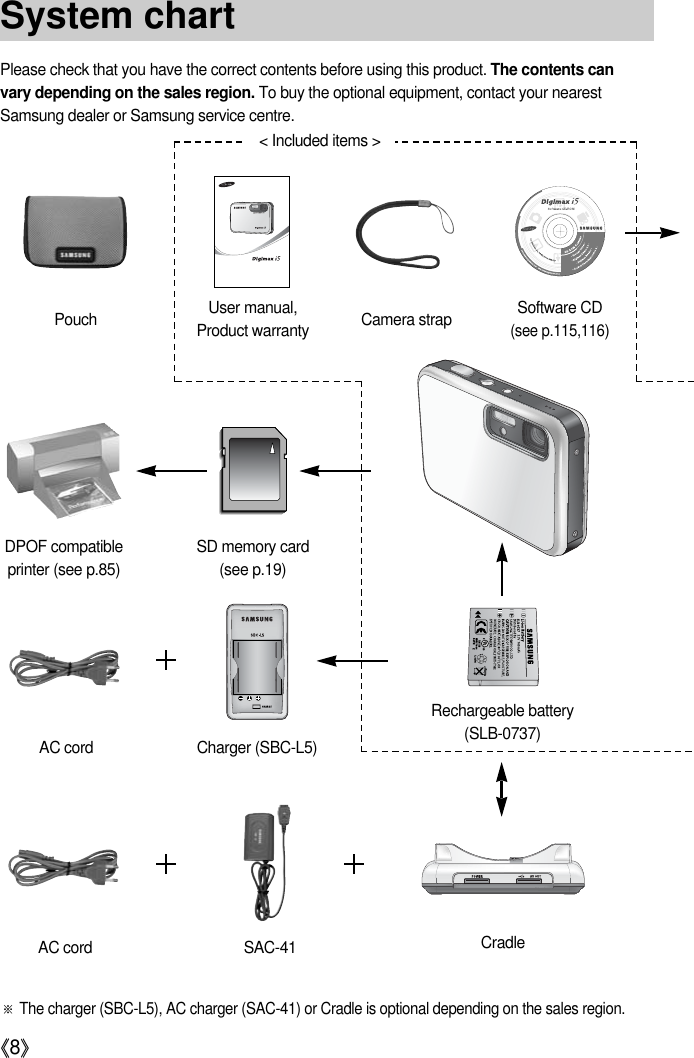
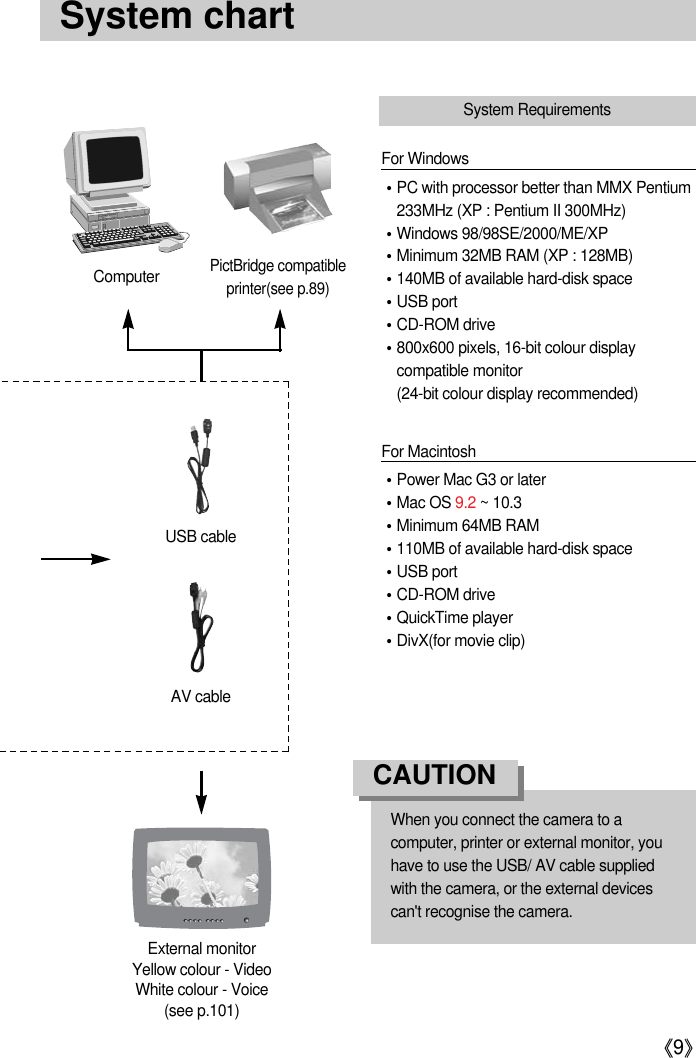
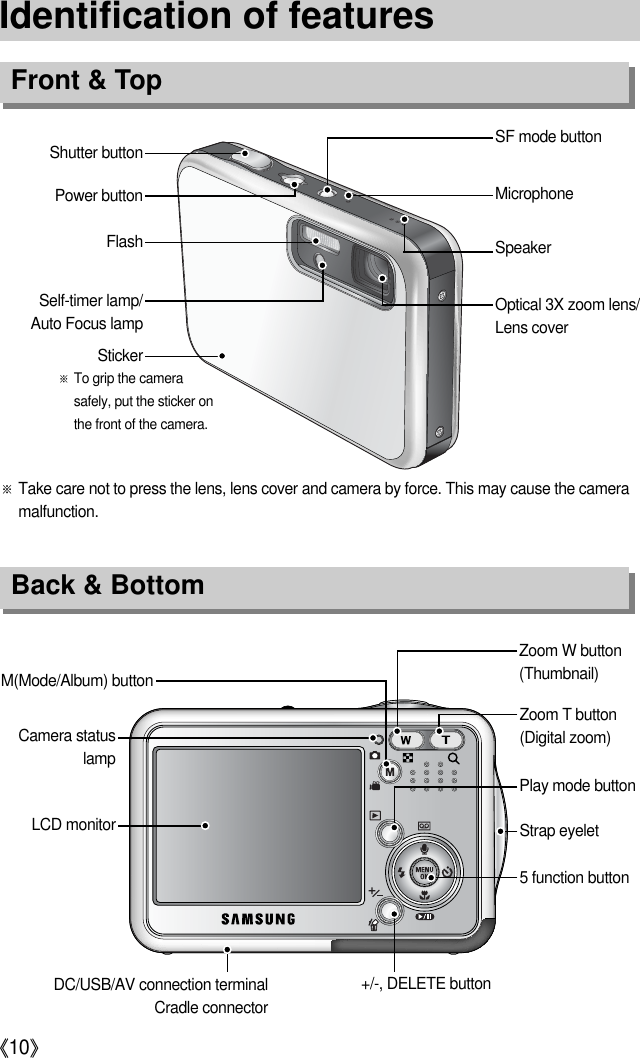
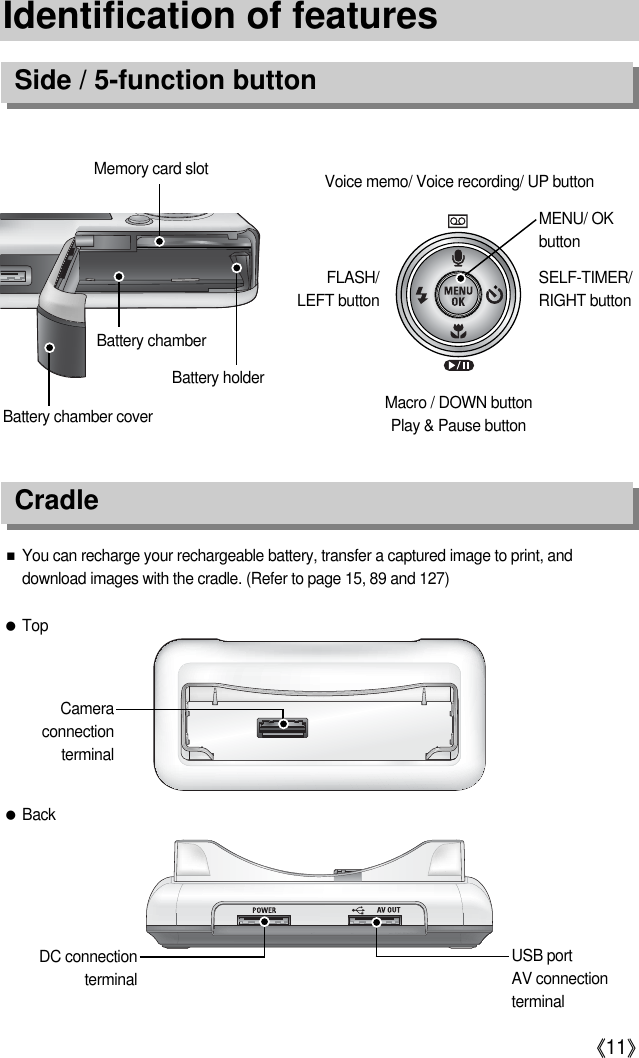
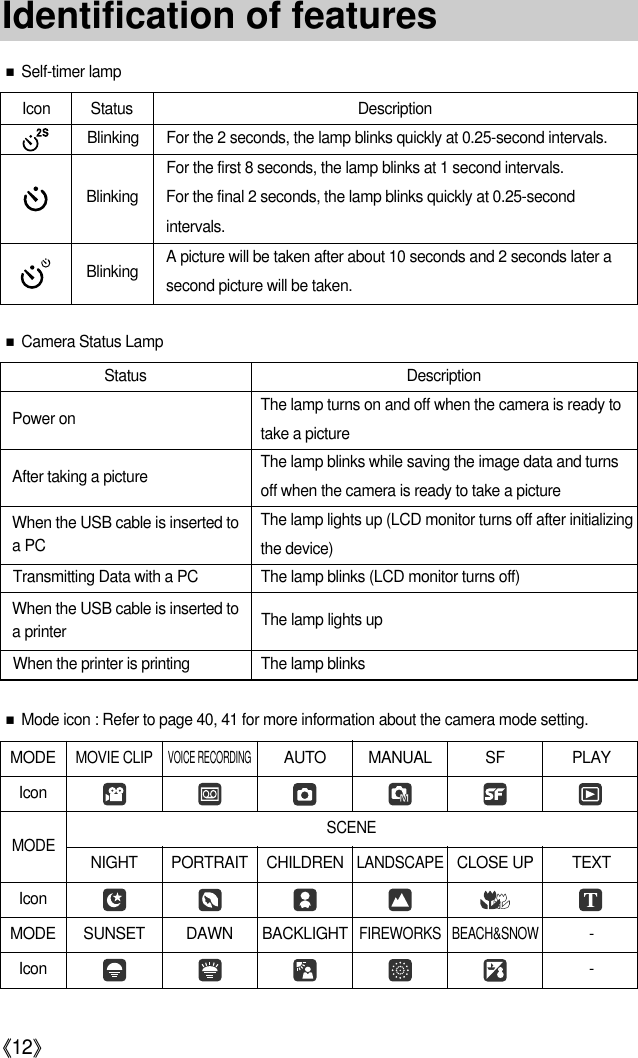
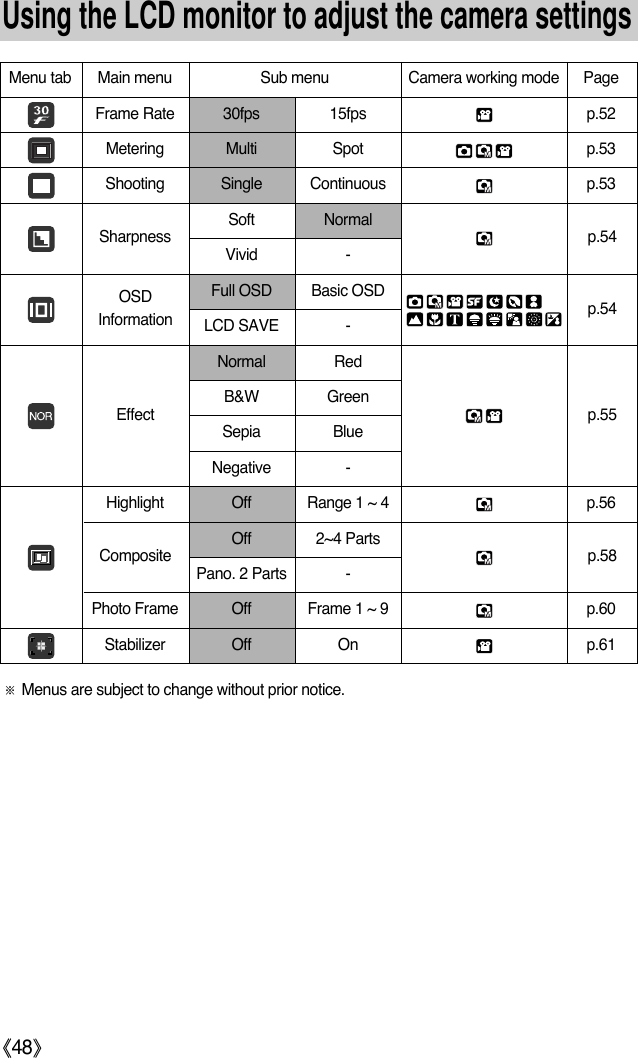
![《3》ContentsREADY●Getting to know your camera 5●Danger 6●Warning 6●Caution 7●An FCC warning 7●System chart 8●Identification of features 10■Front & Top 10■Back & Bottom 10■Side/ 5-function button 11■Cradle 11■Self-timer lamp 12■Camera Status Lamp 12■Mode icon 12●Connecting to a Power Source 13■Using the SAC-41 14■Using the batteries 18■Removing the battery 18●Instructions on how to use the memory card 19 ●Inserting the memory card 21●Removing the memory card 21●When Using the Camera for the First Time22●LCD monitor indicator 23●Changing the recording mode 24■Selecting the [Mode] menu 24■How to use the Auto mode 26■How to use the Movie clip mode 26■Recording the movie clip without voice 27■Using Successive Recording 27■How to use the Manual mode 27■How to use the Scene modes 28■How to use the VOICE RECORDING mode 29■How to use the SF mode 29●Things to Watch Out for When TakingPictures 30●Using the camera buttons to adjust thecamera 31■POWER button 31■SHUTTER button 31●ZOOM W/T button 31●Voice recording/ Voice memo/ UP button34●Macro/ Down button 35●Focus lock 36●Flash/ Left button 37●Self-timer/ Right button 39●MENU/ OK button 40●M (Mode) button 40●SF button 42●+/- button 43●Using the LCD monitor to adjust the camerasettings 47●How to use the menu 49●Mode 49●Mode Set 50●Size 51●Quality / Frame rate 52●Metering 53●Continuous shot 53●Sharpness 54●OSD information 54●Effect 55●Special Effect 56●Special Effect : Preset focus frames 56●Special Effect : Composite shooting 58●Special Effect : Photo Frame 60●Movie Clip frame stabiliser 61●Starting play mode 62■Playing back a still image 62RECORDINGPLAY](https://usermanual.wiki/Hanwha-Techwin/DIGIMAXI5/User-Guide-545630-Page-3.png)


![《19》Instructions on how to use the memory card●Be sure to format the memory card (see p.97) if you are using a newly purchased memory forthe first time, if it contains data that the camera cannot recognise, or if it contains imagescaptured with a different camera.●Turn off the camera power whenever the memory card is being inserted or removed.●Repeated use of the memory card will eventually reduce the memory card’s performance.Should this be the case, you will need to purchase a new memory card. Wear and tear on the memory card is not covered by the Samsung warranty.●The memory card is an electronic precision device. Do not bend, drop or subject the memory card to any heavy impact.●Do not store the memory card in an environment with strong electronic or magnetic fields,e.g. near loud speakers or TV receivers.●Please do not use or store in an environment where there are extremes in temperature.●Do not allow the memory card to become dirty or to come into contact with any liquid. Should this happen, clean the memory card with a soft cloth.●Please keep the memory card in its case when not in use.●During and after periods of extended use, you may notice that the memory card is warm. This is perfectly normal.●Do not use a memory card that is used in another digital camera.To use the memory card in this camera, format the memory card using this camera. ●Do not use a memory card formatted by another digital camera or memory card reader.●If the memory card is subjected to any of the following, the recorded data may becomecorrupted :- When the memory card is used incorrectly.- If the power is switched off or the memory card is removed while recording, deleting(formatting) or reading.●Samsung cannot be held responsible for lost data.●It is advisable to copy important data onto other media as back-up e.g. floppy disks, harddisks, CD etc.●If there is insufficient memory available : A [Card Full!] message will appear and the camera will not operate. To optimise the amountof memory in the camera, replace the memory card or delete unnecessary images storedon the memory.](https://usermanual.wiki/Hanwha-Techwin/DIGIMAXI5/User-Guide-545630-Page-20.png)
![《20》Instructions on how to use the memory card●Don't remove the memory card when the camera status lamp is blinking as this maycause damage to data in the memory card.INFORMATION[ SD (Secure Digital) memory card ]WriteprotectswitchLabelCard pins■The camera can use SD Memory Cards and MMC (Multi Media Cards). Please consult theenclosed manual for using the MMC Cards.The SD memory card has a write protect switchthat prevents image files from being deleted orformatted. By sliding the switch to the bottom ofthe SD memory card, the data will be protected.By sliding the switch to the top of the SD memorycard, the data protection will be cancelled. Slide the switch to the top of the SD memory cardbefore taking a picture.■When using a 50MB internal memory, the specified shooting capacity will be as follows.These figures are approximate as image capacities can be affected by variables such assubject matter.Recorded image size S. Fine Fine Normal30FPS 15FPS5M(2592x1944) 11 21 33 - -4M(2272x1704) 14 26 40 - -3M(2048x1536) 17 33 50 - -2M(1600x1200) 30 51 75 - -1M(1024x768) 60 106 129 - -VGA(640x480) 121 165 202 - -640(640X480) - - -About 2MIN About 4MIN320(320X240) - - -About 4MIN About 7MIN160(160X128) - - -About 8MIN About 15MINStillimageMovieclip](https://usermanual.wiki/Hanwha-Techwin/DIGIMAXI5/User-Guide-545630-Page-21.png)
![《22》When Using the Camera for the First Time■Charge the rechargeable battery fully before using the camera for the first time. ■If the camera is turned on for the first time, a menu will be displayed to set date, time andlanguage in the LCD monitor. This menu will not be displayed after setting up the date, timeand language. Set up the date, time and language before using this camera. ●Setting up the date, time and date type1. Select the [D & Time] menu by pressing the UP/DOWNbutton and press the RIGHT button.2. Select the desired sub menu by pressing the UP/ DOWN/LEFT/ RIGHT button.RIGHT button : selects YEAR/ MONTH/ DAY/ HOUR/ MINUTE/DATE TYPELEFT button : Moves the cursor to the [Date&Time]main menu if the cursor is at the first item of the date and time setup.In all other instances, the cursor will be shifted to the left of its currentposition.UP/ DOWN button : changes the value of each item.●You can select 18 languages. These are listed below: English, Korean, French, German, Spanish, Italian, S. Chinese, T. Chinese, Japanese,Russian, Portuguese, Dutch, Danish, Swedish, Finnish, Thai, BAHASA(MALAY/INDONESIAN) and Arabic. ●Even if the camera is restarted, the language setting will be maintained.INFORMATION●Setting up the language1. Select the [Language] menu by pressing the UP/DOWNbutton and press the RIGHT button.2. Select the desired sub menu by pressing the UP/ DOWNbutton and press the OK button. When the settings are complete, press the MENU buttontwice to exit the menu screen.Date&TimeLanguageSetupBack:◀Set:OK▲05/05/01 13:01▼yy/mm/ddDate&TimeLanguage ENGLISH한국어FRANÇAISDEUTSCHESPAÑOLSetupBack:◀Set:OK](https://usermanual.wiki/Hanwha-Techwin/DIGIMAXI5/User-Guide-545630-Page-23.png)
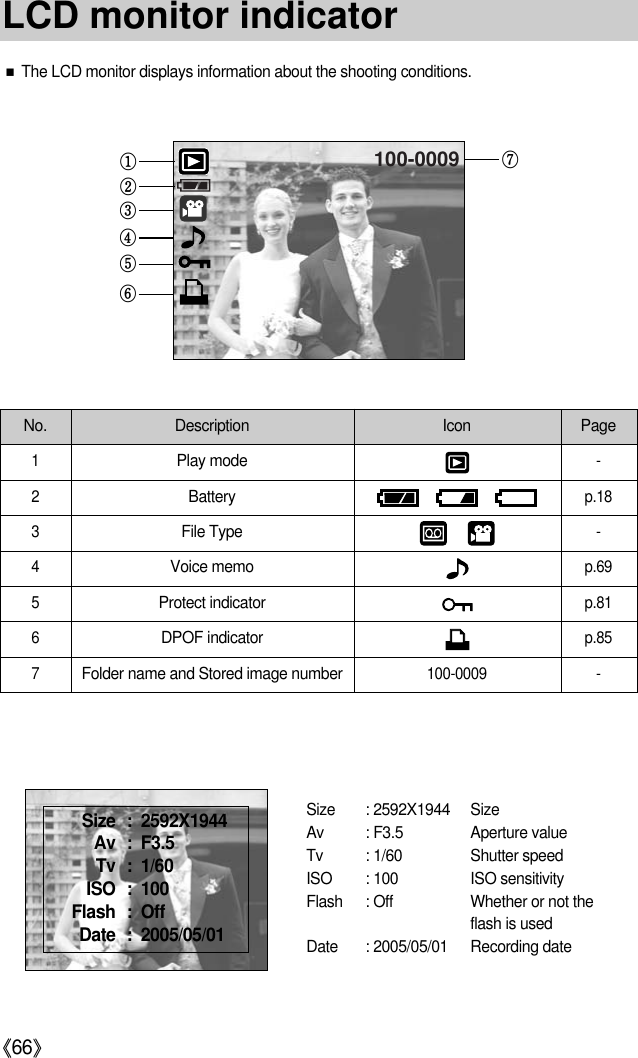
![《23》LCD monitor indicator■The LCD monitor displays information about the shooting functions and selections.[Image & Full Status]No. Description Icons Page2Battery p.183Continuous shot p.534Flash p.375Self-timer p.396 Macro p.357 Metering p.538 Card inserted indicator -9 Auto focus frame -10 Camera shake warning p.3011 Date/ Time 2005/05/01 01:00 PM p.9812 Exposure compensation p.4513 White Balance p.4414 ISO p.44Recording mode1p.5038①②③④⑤⑥⑦⑧⑬⑫⑭⑮⑰⑯⑱⑲⑩⑨ ⑪⑳](https://usermanual.wiki/Hanwha-Techwin/DIGIMAXI5/User-Guide-545630-Page-24.png)
![《24》LCD monitor indicatorChanging the recording mode■Selecting the [Mode] menu1. Insert the battery (p.18). 2. Insert the memory card (p.21). As this camera has a 50MB internal memory, you do notneed to insert the memory card. If the memory card is not inserted, an image will be storedin the internal memory. If the memory card is inserted, an image will be stored on thememory card.3. Close the battery chamber cover.4. Press the power button to turn on the camera.5. Press the menu button and a menu will display. 6. Use the UP/DOWN button to select the [Mode] menu. 7. Select [Still & Movie] or [Full] sub menu by pressing theUP/DOWN button. - [Still & Movie] : A still image mode that was selectedon the [Mode set] menu and movie clip mode can be selected. Refer to page 50 for more information about using the [Mode set] menu. - [Full] : Auto, Manual, Movie clip and scene modes can be selected.8. Press the MENU button and the menu will disappear. ■You can select the desired working mode by the M (Mode) button located on the back of thecamera and [Mode], [Mode set] menu. Auto, manual, movie clip, scene (night, portrait,children, landscape, text recognition, close-up, sunset, dawn, backlight, fireworks, beach &snow) camera modes are available. 15 RGB RGB p.4316 Sharpness p.5417 Image quality p.52Number of available shots remaining 38Remaining time (Movie clip/ Voice recording)00:01:30/ 01:00:0020 Voice memo/ Mic. off p.34/271918p.51p.20Image sizeOptical/ Digital Zoom bar/ Digital Zoom rate21 p.32Still & MovieFullMode](https://usermanual.wiki/Hanwha-Techwin/DIGIMAXI5/User-Guide-545630-Page-25.png)
![《25》Changing the recording mode●Changing the recording mode : If the [Still & Movie] menu was selectedSteps from 1-4 are the same as those for selecting the [Mode] menu. 5. A recording mode used just before will display.6. Press the M (Mode) button located on the back of the camera and the recording mode willchange to the movie clip mode. 7. Press the M (Mode) button again and a still image mode selected on the [Mode set] menuwill be selected. ●Changing the recording mode : If the [Full] menu was selectedSteps from 1-4 are the same as those for selecting the [Mode] menu. 5. A recording mode used just before will display.6. Press the M (Mode) button located on the back of the camera and the mode selectionmenu will display. 7. To select the Auto, Manual, Movie clip or Scene modes, press the Left/Right button. To move between the Auto, Manual, Movie clip menu line and Scene menu line, press theUp/Down button. 8. Press the M (Mode) button and the mode selection menu will disappear.3800:03:39Pressing the M (Mode) button[AUTO mode] [MOVIE CLIP mode]Pressing the Up buttonNight[Selecting the Scene mode]Pressing the Left button[Mode selection menu]AUTOSet : OK/MMovie[Selecting the Movie clip mode]Set : OK/MSet : OK/M](https://usermanual.wiki/Hanwha-Techwin/DIGIMAXI5/User-Guide-545630-Page-26.png)
![《26》Starting the recording mode■How to use the Auto modeUse this for shooting basic still images. 1. Select the [Full] sub menu on the [Mode] menu (p.24). 2. Select the Auto mode by pressing the M (Mode) button(p.25).3. Point the camera towards the subject and compose theimage by using the LCD monitor.4. Press the shutter button to capture an image.■How to use the Movie clip modeA movie clip can be recorded for as long as the available recording time of the memorycapacity allows. 1. Select the [Full] sub menu on the [Mode] menu (p.24). 2. Select the Movie clip mode by pressing the M (Mode)button (p.25).3. Point the camera towards the subject and compose theimage by using the LCD monitor.4. Press the shutter button once and movie clips arerecorded for as long as the available recording timeallows. Movie clips will still be recorded if the shutterbutton is released. If you wish to stop recording, press the shutter button again.※Image size and type are listed below.- Image size : 640X480, 320X240, 160X128 (user selectable)- Movie clip file type : AVI (MPEG-4)●If the auto focus frame turns to red when you press the shutter button down half way, itmeans that the camera cannot focus on the subject. Should this be the case, the camerais unable to capture an image clearly.●Avoid obstructing the lens or the flash when you capture an image.INFORMATION38[AUTO mode]00:03:39[MOVIE CLIP mode]](https://usermanual.wiki/Hanwha-Techwin/DIGIMAXI5/User-Guide-545630-Page-27.png)
![《27》Starting the recording mode■How to use the Manual modeSelecting the automatic mode will configure the camera with optimal settings. You can still manually configure all functions except the aperture value and shutter speed.1. Select the [Full] sub menu on the [Mode] menu (p.24). 2. Select the Manual mode by pressing the M (Mode) button(p.25).3. Point the camera towards the subject and compose theimage by using the LCD monitor.4. Press the shutter button to capture an image.■Pausing while recording a movie clip (Successive Recording)This camera allows you to temporarily stop during unwanted scenes, while recording a movieclip. Using this function, you can record your favourite scenes into a movie clip without havingto create multiple movie clips.●Using Successive RecordingSteps from 1-2 are the same as those for MOVIE CLIPmode.3. Point the camera towards the subject and compose theimage by using the LCD monitor. Press the shutterbutton and movie clips are recorded for as long as theavailable recording time. Movie clips will still be recordedif the shutter button is released.4. Press the Pause button( ) to pause recording.5. Press the Pause button( ) again to resume the recording.6. If you wish to stop recording, press the shutter button again.■Recording the movie clip without voiceYou can record the movie clip without voice. Steps from 1-3 are the same as those for MOVIE CLIPmode. 4. Press the Up button and the ( ) icon will display onthe LCD monitor. 5. Press the shutter button and movie clip is recorded for aslong as the available recording time without voice. 6. To stop the recording, press the shutter button again. 38[MANUAL mode]00:03:39[Successive recording of a movie clip]00:02:00](https://usermanual.wiki/Hanwha-Techwin/DIGIMAXI5/User-Guide-545630-Page-28.png)
![《28》Starting the recording mode■How to use the Scene modesUse the menu to easily configure optimal settings for a variety of shooting situations.1. Select the [Full] sub menu on the [Mode] menu (p.24). 2. Select the Scene mode by pressing the M (Mode) button(p.25).3. Point the camera towards the subject and compose theimage by using the LCD monitor.4. Press the shutter button to capture an image.※The scene modes are listed below.[Night]( ) : Use this for shooting still images at night or in other darkconditions.[Portrait]( ) : To take a picture of a person.[Children]( ) : To take a still picture of moving children.[Landscape]( ) : Scenery with green woods or blue sky.[Close up]( ) : Close-up shooting for small objects such as plants and insects.[Text]( ) : Use this mode to shoot a document.[Sunset]( ) : For taking pictures of sunsets.[Dawn]( ) : Daybreak scenes.[Backlight]( ) : Portrait without shadows caused by backlight.[Firework]( ) : Firework scenes.[Beach & Snow]( ) : For ocean, lake, beach and snowscape scenes.38[SCENE mode]](https://usermanual.wiki/Hanwha-Techwin/DIGIMAXI5/User-Guide-545630-Page-29.png)
![《29》Starting the recording mode●A distance of 40cm between you and the camera (microphone) is the best distance torecord sound.INFORMATION■How to use the VOICE RECORDING modeA voice recording can be recorded for as long as the available recording time of the memorycapacity allows. (Max: 1 hour)1. In any mode with the exception of the Movie clip, select theVOICE RECORDING mode by pressing the Voicerecording button twice.2. Press the shutter button to record a voice.- Press the shutter button once and voice is recorded for aslong as the available recording time (Max : 1 hour) allows.The recording time will be displayed on the LCD monitor.Voice will still be recorded if the shutter button is released.- If you wish to stop recording, press the shutter buttonagain.- File type : WAV■How to use the SF modeIn poor indoor light conditions, Safety Flash will help you get a good image without the use ofa flash. In every camera mode, the SF mode can be selected. 1. Press the SF mode button. 2. Press the shutter button to capture an image.※Refer to page 42 for more information about the SF function.01:21:32[VOICE RECORDING mode]38[SF mode]](https://usermanual.wiki/Hanwha-Techwin/DIGIMAXI5/User-Guide-545630-Page-30.png)
![《30》Things to Watch Out for When Taking Pictures■Pressing the shutter button down half way Lightly press the shutter button to confirm focus and flash battery charge. Press the shutter button all way down to take the picture.■The available recording time may vary depending on shooting conditions and camerasettings.■When the Flash Off or Slow synchro mode is selected in a low lighting condition, the camerashake warning indicator ( ) may appear on the LCD monitor. In this case, support thecamera on a solid surface or change the flash mode to flash shot mode.■Backlight compensated shots : When taking an outdoor shot, avoid facing the sun, as theimage may be dark because of the strong backlight. To take a picture against the sun, please use the [Backlight] inthe scene shooting mode (see page 28), Fill-in flash (see page 37), Spot metering (see page 53), or Exposurecompensation (see page 45).■Avoid obstructing the lens or the flash when you capture an image.■Under certain conditions the auto focus system may not perform as expected.- When photographing a subject that has little contrast.- If the subject is highly reflective or shiny.- If the subject is moving at high speed.- When there is strong reflected light, or when the background is very bright.- When the subject matter has only horizontal lines or the subject is very narrow (such as a stick or flagpole).- When the surroundings are dark[ Lightly press the shutter button ] [ Press the shutter button ]](https://usermanual.wiki/Hanwha-Techwin/DIGIMAXI5/User-Guide-545630-Page-31.png)
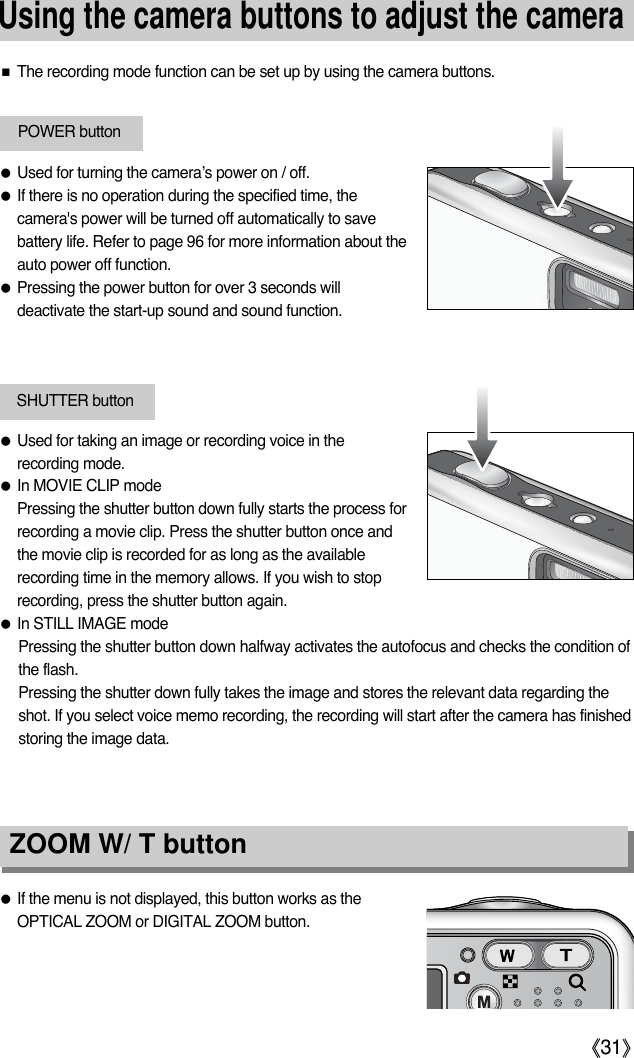
![《32》ZOOM W/ T button■This camera has a 3X optical zoom and a 5X digital zoom function. Using both will offer atotal zoom ratio of 15X.●TELE ZoomOptical zoom TELE : Pressing the ZOOM T button. This will zoom into the subject i.e.the subject will appear nearer.Digital zoom TELE : When the maximum (3X) optical zoom is selected, pressing theZOOM T button activates the digital zoom software. ReleasingZOOM T button stops the digital zooming at the required setting. Once the maximum digital zoom (5X) is achieved, pressing theZOOM T button will have no effect.38 38 38[ WIDE zoom ] [ TELE zoom ] [ Digital zoom 5.0X ]Pressing theZOOM T buttonPressing theZOOM T button●WIDE ZoomOptical zoom WIDE : Pressing the ZOOM W button. This will zoom out from the subjecti.e. the subject will appear further away. Pressing the ZOOM Wbutton continuously will set the camera to its minimum zoomsetting i.e. the subject appears at its furthest from the camera.Digital zoom WIDE : When the digital zoom is in operation, pressing the ZOOM Wbutton will reduce the digital zooming in steps.Releasing ZOOM W button stops digital zooming.Pressing the ZOOM W button will reduce the digital zoom andthen it will continue to reduce the optical zoom until the minimumsetting is reached. 3838 38[ TELE zoom ] [ Optical zoom 2X ] [ WIDE zoom ]Pressing theZOOM W buttonPressing theZOOM W button383838[ Digital zoom 5.0X ] [ TELE zoom ] [ WIDE zoom ]Pressing theZOOM W buttonPressing theZOOM W buttonOptical zoomDigital zoom](https://usermanual.wiki/Hanwha-Techwin/DIGIMAXI5/User-Guide-545630-Page-33.png)
![《33》ZOOM W/ T button●Images taken using the digital zoom may take a little longer for the camera to process.Allow time for this to take place.●The digital zoom cannot be used in movie clip shots.●If the Zoom buttons are being pressed during the Movie clip shots, the voice will notrecorded.●You may notice a decrease in image quality when using the digital zoom.●To view more clear digital zoom image, press the shutter button halfway at the maximum(3X) optical zoom position and press the zoom T button again.●The digital zoom can’t be activated in the [Night], [Children], [Close up], [Text] and[Fireworks] scene modes.●Take care not to press the lens, lens cover and camera by force. This may cause thecamera malfunction.INFORMATION](https://usermanual.wiki/Hanwha-Techwin/DIGIMAXI5/User-Guide-545630-Page-34.png)
![《34》Voice recording( ) / Voice memo( ) / UP button●A distance of 40cm between you and the camera (microphone) is the best distance torecord sound.INFORMATION■While the menu is showing, press the UP button to move up the submenu cursor. When themenu is not displayed on the LCD monitor, the UP button operates as the voice recording ( ) or voice memo ( ) button. You can record your voice or add your voice-over to astored still image.Refer to page 29 for more information about the voice recording. ●Recording a voice memo1. Press the M (Mode) button to select a Recording mode with the exception of Movie clipmode.2. Press the Voice memo ( ) button. If the voice memo indicator is displayed on the LCDmonitor, the setting is completed.3. Press the shutter button and take a picture. The picture is stored on the memory.4. Voice memo will be recorded for ten seconds from themoment the picture is stored. In the middle of the voicerecording, pressing the shutter button will stop the voicememo.3838Pressing the Voice memo button38[Recording Voice Memo]](https://usermanual.wiki/Hanwha-Techwin/DIGIMAXI5/User-Guide-545630-Page-35.png)
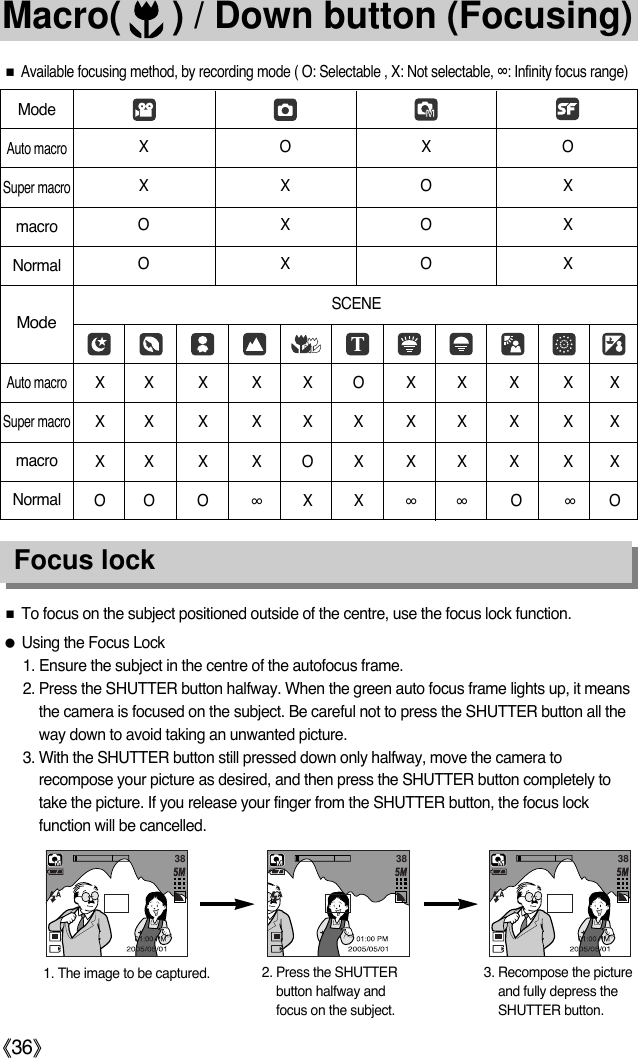
![Mode Auto ( )Focus TypeAuto macro ( )Super macro ( ) Macro ( ) Normal《35》Macro( ) / Down button■While the menu is showing, press the DOWN button tomove from the main menu to a submenu, or to move downthe submenu cursor. When the menu is not showing, youcan use the MACRO/ DOWN button to take macro pictures.The distance ranges are shown below. Press the Macrobutton until the desired macro mode indicator displays onthe LCD monitor. ■Types of focus modes and focus ranges (W: Wide, T: Tele) (Unit : cm)●When the macro mode is selected, it is possible that camera shake will occur. Take care not to shake the camera.●When you take a picture within 30cm(MACRO focus), select the FLASH OFF mode.●When you take a picture within 5cm, the AF may take a time to get exact focus range. ●The super macro is executed on the wide zoom position only. INFORMATION38[Auto focus - No icon]3838[Super macro ( )][Auto macro ( )]38[Macro ( )]※See the next page for the available focusing method, by recording mode.Focus range W : 5 ~ InfinityT : 50 ~ InfinityW : 5 ~ InfinityT : 50 ~ InfinityW : 1 ~ 5(Wide only)W : 5 ~ 50T : 25 ~ 50Manual ( )](https://usermanual.wiki/Hanwha-Techwin/DIGIMAXI5/User-Guide-545630-Page-36.png)
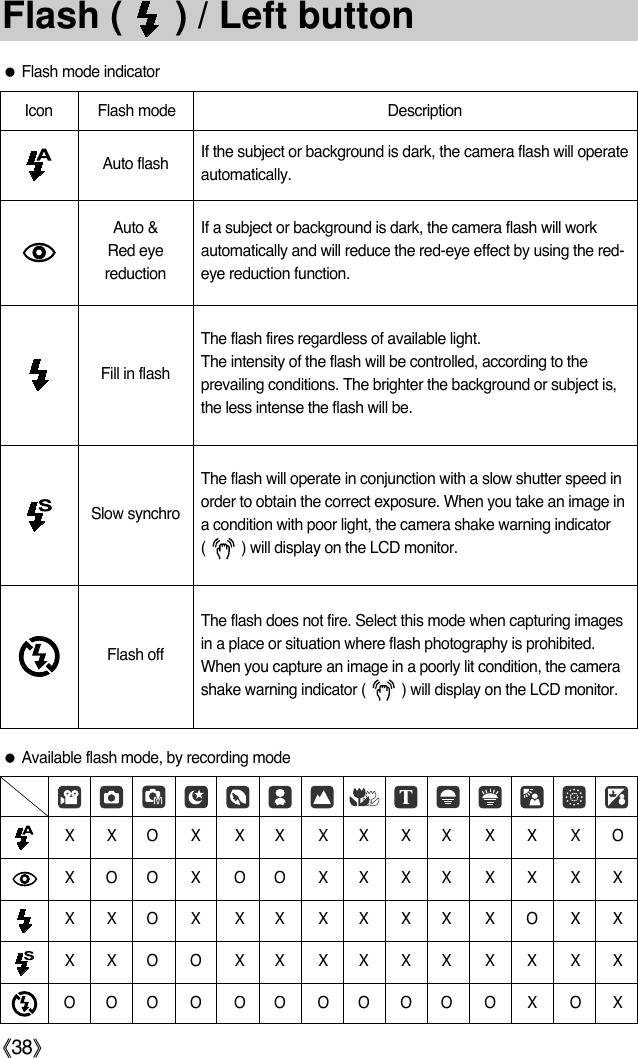
![《37》Flash ( ) / Left button[Selecting the Auto flash]●Flash range (Unit : m)■When the menu is displayed on the LCD monitor, pressingthe LEFT button makes the cursor shift to the left tab.■When the menu is not displayed on the LCD monitor, theLEFT button operates as the FLASH ( ) button.●Selecting the flash mode1. Press the M (Mode) button to select a Recording modewith the exception of Movie clip mode (p.25).2. Press the Flash button until the desired flash modeindicator displays on the LCD monitor. 3. A flash mode indicator will be displayed on the LCD monitor. Use the correct flash to suitthe environment.●When the flash is charging, a flash mode icon (red colour) will blink on the LCD monitor. ●Using the flash frequently will reduce the life of the batteries.●Under normal operating conditions the charging time for the flash is normally within5seconds. If the batteries are weak, the charging time will be longer.●During the continuous shot and movie clip mode, the flash function will not operate. ●Take photographs within the flash range.●The image quality is not guaranteed if the subject is too close or highly reflective.INFORMATIONAuto Macro Auto macroWIDE TELE WIDE TELE WIDE TELE0.5 ~ 2.4 0.5 ~ 1.9 0.2 ~ 0.5 0.3 ~ 0.5 0.2 ~ 2.4 0.5 ~ 1.9ISOAuto※If the Super macro is selected, the flash is fixed as the Flash Off. 38](https://usermanual.wiki/Hanwha-Techwin/DIGIMAXI5/User-Guide-545630-Page-38.png)
![《39》Self-timer ( ) / Right button■When the menu is displayed on the LCD monitor, pressing the Right button makes the cursorshift to the right tab. The right button can also be used to move to a sub menu to select adifferent setting. When the menu is not displayed on the LCD monitor, the RIGHT buttonoperates as the Self-timer. This function is used when the photographer would also like to bein the image.●Using the self-timer1. Press the M (Mode) button to select a still image mode or movie clip mode (p.25). 2. Press the Self-timer button until the desired mode indicator displays on the LCD monitor. In Movie clip mode, only the 10 Sec. self-timer can be used.- 2 Sec. Self-timer( ) : Pressing the shutter button will allow an interval of 2 secondsbefore the image is taken. - 10 Sec. Self-timer( ) : Pressing the shutter button will allow an interval of 10 secondsbefore the image is taken. - Double Self-timer( ) : A picture will be taken after about 10 seconds and 2 secondslater a second picture will be taken. When using the flash, the 2-second self-timer may be delayed for longer than 2 secondsdepending on the flash charge time.3. When you press the Shutter button, the picture will be taken after the specified time haselapsed.※If you operate the Power button and Self-timer button during the self-timer operation, theself-timer function is cancelled.3838[Pressing the Self-timer button][2 Sec. self-timer]3838[Pressing the Self-timer][10 Sec. self-timer][Double self-timer]](https://usermanual.wiki/Hanwha-Techwin/DIGIMAXI5/User-Guide-545630-Page-40.png)
![《40》MENU/ OK button■MENU button- When you press the MENU button, a menu related to each camera mode will be displayedon the LCD monitor. Pressing it again will return the LCD to the initial display.- A menu option can be displayed when the following are selected :MOVIE CLIP and STILL IMAGE mode. There is no menu available when the VOICERECORDING mode is selected.■OK button- When the menu is displayed on the LCD monitor, this button is used for shifting the cursorto the sub menu or for confirming data.■You can turn on the camera with this button. ■You can select the desired recording mode.The selectable recording modes are different from what you selected sub menu in the [Mode] menu.- [Still & Movie] : A recording mode selected in the [Mode set] menu, Movie clip mode- [Full] : Auto, Movie clip, Manual, Scene modes●How to use the mode button : In case of [Still & Movie] and [Auto] sub menu M (Mode) button 38[Pressing the MENU button][Menu off] [Menu on]AutoMaunalMovieNightportraitChildrenModeSet[Auto mode] [Movie clip mode]38[Pressing the M button]00:03:39](https://usermanual.wiki/Hanwha-Techwin/DIGIMAXI5/User-Guide-545630-Page-41.png)
![PortraitSet : OK/MManualSet : OK/M《41》M (Mode) button ●How to use the mode button : In case of [Full] sub menu and Auto mode※Press the Mode button and the mode selection menu will disappear.Pressing the Up button[Pressing the Right button][Pressing the Left/Right button][Pressing the Left button][Auto mode][Manual mode][Mode selection menu][Movie clip mode]38[Scene mode]Pressing the Mode button[Selecting a scene mode]NightAUTOSet : OK/MSet : OK/MMovieSet : OK/M](https://usermanual.wiki/Hanwha-Techwin/DIGIMAXI5/User-Guide-545630-Page-42.png)
![《42》SF button ■Pressing the SF button selects the SF(Safety Flash) modeIn poor indoor light conditions, Safety Flash will help you get a good image without the use ofa flash.●Things to watch out for using the SF mode1. If you select the SF in the 2048 or above image size, the captured image size is changedto 1600.2. The SF range is 2m(WIDE) and 1.5m(TELE).3. The digital zoom will not operate in the SF mode. 4. If the lighting conditions are brighter than fluorescent lighting condition, the SF doesn’tactivate.5. If the lighting condition is darker than in fluorescentlighting condition,[SF OFF] message and camera shakewarning indicator ( ) will display.If you press the shutter button in this condition, the SFwill not activate. 6. If the subject is moving the final image captured may beblurred.7. As the SF uses the camera’s digital processor, imagestaken using the SF may take a little longer for the camera to process.38SF OFF](https://usermanual.wiki/Hanwha-Techwin/DIGIMAXI5/User-Guide-545630-Page-43.png)
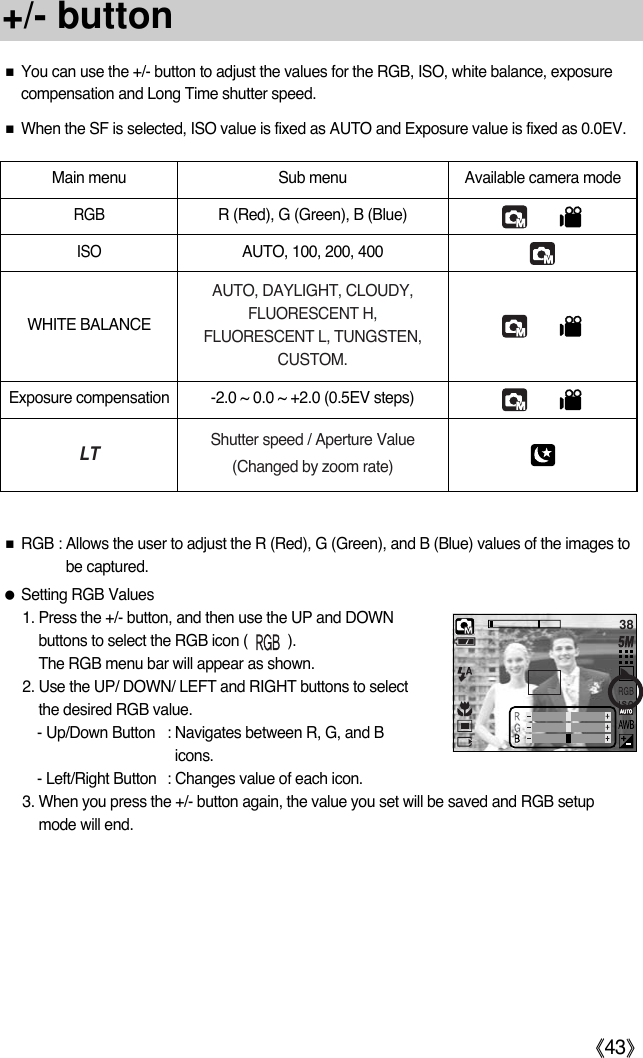

![《45》+/- button●Using the Custom White BalanceWhite balance settings may vary slightly depending on the shooting environment. You can select the most appropriate white balance setting for a given shooting environmentby setting up the custom white balance.1. Select the CUSTOM ( ) menu of the WhiteBalance.2. Place a sheet of white paper in front of the camera sothat the LCD monitor shows only white, and then pressthe SHUTTER button.3. Your custom white balance value is stored.- The custom white balance value will be applied,starting with the next picture you take.- The user configured white balance will be remaineffective until it is overwritten.[ White paper ]■Exposure compensation : This camera automatically adjusts the exposure according to theambient lighting conditions. You can also select the exposure value by using the +/- button.●Compensating Exposure1. Press the +/- button, and then use the UP and DOWNbuttons to select the exposure compensation icon ( ). The exposure compensation menu bar willappear as shown.2. Use the LEFT and RIGHT buttons to set the desiredexposure compensation factor.3. Press the +/- button again. The value you set will besaved and the Exposure Compensation setup mode willclose. If you change the exposure value, the exposure indicator ( ) will be displayedon the bottom of the LCD monitor.※A negative exposure compensation value reduces the exposure. Note that a positive exposure compensation value increases the exposure and the LCDmonitor will appear white or you may not get good pictures.38Measure:Shutter 38](https://usermanual.wiki/Hanwha-Techwin/DIGIMAXI5/User-Guide-545630-Page-46.png)
![《46》+/- button■Long Time shutter : This camera automatically adjusts the shutter speed and aperture valuesto the shooting environment. However, in NIGHT SCENE mode, you canset the shutter speed and aperture values to your preference.●Adjusting the shutter speed and aperture values1. Select the [Night] scene mode. (M button →[Scene] →[Night])2. Press +/- button and Long Time shutter menu(LT, For selecting shutter speed and aperture value) willbe displayed.3. Configure the Long Time shutter value with the up/ down/left/ right button.Up/ Down Button : Select the Aperture / Shutter speedLeft/ Right Button : Change the value. Available aperture value options, depending onzoom step will be displayed on the menu.4. Press the +/- button again. The value you set will be saved and the mode will switch toNIGHT SCENE mode. Press the SHUTTER button to take the picture.Aperture ValueShutter SpeedLarge/Small(Press right button)Large/Small(Press left button)Fast(Press left button)Slow(Press right button)■Aperture values and shutter speeds changed by zoom scale are listed below.F 3.51 S Supported Aperture Values: AUTO, WIDE : F3.5 ~ F6.3, TELE : F4.5 ~ F8.0Supported Shutter Speeds: AUTO, 1 ~ 16S38](https://usermanual.wiki/Hanwha-Techwin/DIGIMAXI5/User-Guide-545630-Page-47.png)
![《49》How to use the menu3. Use the UP and DOWN buttons to select a sub menu.4. Select a sub menu, and then the value you set will be saved. Press the MENU button andthe menu will disappear.■You can select the desired working mode by the M(mode) button located on the back of thecamera and [Mode] menu. Auto, manual, movie clip, scene (night, portrait, children,landscape, text recognition, close-up, sunset, dawn, backlight, fireworks, beach & snow)camera modes are available.- [Still & Movie] : A still image mode that was selected onthe [Mode set] menu and movie clip modecan be selected. - [Full] : Auto, Manual, Movie clip and scenemodes can be selected.1. Turn on the camera and press the MENU button. A menu for each camera mode appears.However, there is no menu for Voice Recording mode ( ).2. Use the LEFT and RIGHT buttons to navigate through the menus.ModeStill & MovieFullModePress the LEFT or RIGHT button.Press the LEFT or RIGHT button.AutoMaunalMovieNightportraitChildrenMode Set2592 X 19442272 X 17042048 X 15361600 X 12001024 X 768640 X 480SizeStill & MovieFullModePress the UP orDOWN button.Press the UP orDOWN button.AutoMaunalMovieNightportraitChildrenMode SetAutoMaunal MovieNightportraitChildrenMode SetAutoMaunal Movie NightportraitChildrenMode Set](https://usermanual.wiki/Hanwha-Techwin/DIGIMAXI5/User-Guide-545630-Page-50.png)
![《50》Mode Set■You can select the desired recording mode.[Auto] : For shooting basic still image[Manual] : You can still manually configure allfunctions except the aperture value andshutter speed.[Movie] : For taking a movie clip [Night] : Use this for shooting still images at nightor in other dark conditions.[Portrait] : To take a picture of a person.[Children] : To take a still picture of moving children.[Landscape] : Scenery with green woods or blue sky.[Close up] : Close-up shooting for small objects such as plants and insects.[Text] : Use this mode to shoot a document.[Sunset] : For taking pictures of sunsets.[Dawn] : Daybreak scenes.[Backlight] : Portrait without shadows caused by backlight.[Firework] : Firework scenes.[Beach & Snow] : For ocean, lake, beach and snowscape scenes.●When [Night], [Close up], [Sunset], [Dawn] and [Firework] scene mode are selected, it ispossible that camera shake will occur. In this case, take care of the camera shaking. INFORMATIONAutoMaunalMovieNightportraitChildrenMode Set](https://usermanual.wiki/Hanwha-Techwin/DIGIMAXI5/User-Guide-545630-Page-51.png)
![《51》Size■You can select the image size appropriate for your application.Icon5M 4M 3M 2M 1M VGA 640 320 160Size2592X1944 2272X1704 2048X15361600X1200 1024X768640X480 640X480 320X240 160X128STILL IMAGE modeMode MOVIE CLIP mode●The higher the resolution, the lower the number of available shots will be because highresolution images require more memory than lower resolution images.INFORMATION[ STILL IMAGE mode ] [ MOVIE CLIP mode ]2592 X 19442272 X 17042048 X 15361600 X 12001024 X 700640 X 480Size640 X 480320 X 240160 X 128Size](https://usermanual.wiki/Hanwha-Techwin/DIGIMAXI5/User-Guide-545630-Page-52.png)
![《52》Quality / Frame rate■You can select the compression ratio appropriate for your application of the captured images.The higher the compression ratio, the lower the picture quality.Mode IconSub menu S. Fine Fine Normal 30FPS 15FPSFile Format jpeg jpeg jpeg avi avi STILL IMAGE mode MOVIE CLIP mode●S. Fine is the highest quality and Normal is the lowest setting.Choose the setting appropriate for your needs.●This file format complies with the DCF(Design rule for Camera File system).●JPEG (Joint Photographic Experts Group) : JPEG is the image compression standard developed by the Joint Photographic ExpertsGroup. This type of compression is most commonly used for compressing photos andgraphics because it can compress the files efficiently without damaging the data.INFORMATION[ STILL IMAGE mode ] [ MOVIE CLIP mode ]30 FPS15 FPSFrame RateS.FineFineNormalQuality](https://usermanual.wiki/Hanwha-Techwin/DIGIMAXI5/User-Guide-545630-Page-53.png)
![《53》Metering■Select the number of pictures in continuous shooting.[Single] : Take one picture only [Continuous] : Images will be taken continuously until theshutter button is released. The shootingcapacity depends on the memory. ※High resolution and picture quality increases file savingtime, which increases stand-by time.※If the [Continuous] sub menu is selected, the flash willbe off automatically.[MANUAL mode]■If you cannot obtain suitable exposure conditions, you can change the metering method totake brighter pictures.[Multi] ( ) : Exposure will be calculated based on anaverage of the available light in the imagearea. However, the calculation will bebiased towards the centre of the imagearea. This is suitable for general use.[Spot] ( ) : Only the rectangular area in the centreof the LCD monitor will be metered forlight. This is suitable when the subject inthe centre is exposed correctly, regardless of the back lighting. ●The default metering mode is Multi pattern metering.●If the subject is not the centre of the focus area, do not use the spot metering as this mayresult in an exposure error. In this circumstance, It is better to use exposurecompensation.INFORMATIONContinuous shot[STILL IMAGE mode]MultiSpotMeteringSingleContinuousShooting](https://usermanual.wiki/Hanwha-Techwin/DIGIMAXI5/User-Guide-545630-Page-54.png)
![《54》SharpnessOSD information■You can adjust the sharpness of the picture you want to take.You cannot check the sharpness effect on the LCD monitorbefore you take a picture, because this function is appliedonly when the captured image is stored on the memory. Sub menu Icon Description The edges of the image are softened. This effect is suitable for editing images on your PC.The edges of the image are sharp. This is suitable for printing.The edges of the image are emphasized. The edges will appearsharp, but noise may occur in the recorded image.VividNormalSoft■In any mode with the exception of VOICE RECORDINGmode, you can check the recording status in the LCD monitor.■Idle mode : If you select the [Save Mode] and the camera isn'toperated during the specified time(about 30SEC.), the camera power will be idle (LCDmonitor : OFF, Camera status lamp : Blinking)automatically.- To use the camera again, press any of the camera buttons except the power button.- If there is no operation during the specified time, the camera power will be turned offautomatically to save battery life. Refer to page 96 for more information about the autopower off function.SoftNormalVividSharpnessFull OSDBasic OSDSave ModeOSD Infomation3838 38[Full information mode] [Basic information mode] [Power save mode]Full Inf. Mode Basic Inf. Mode Save Mode](https://usermanual.wiki/Hanwha-Techwin/DIGIMAXI5/User-Guide-545630-Page-55.png)
![《55》Effect■By using the camera’s digital processor, it is possible to add special effects to your images.[Normal] : No effect is added to the image.[B & W] : Converts the image to black and white.[Sepia] : Captured images will be stored in a sepia tone (a gradient of yellowish brown colours).[Red] : Captured images will be stored in a red tone.[Green] : Captured images will be stored in a green tone.[Blue] : Captured images will be stored in a blue tone.[Negative] : Save the image in negative mode. [MANUAL mode] [ MOVIE CLIP mode]NormalB & WSepiaRedGreenBlueEffectNormalB & WSepiaRedGreenBlueEffect](https://usermanual.wiki/Hanwha-Techwin/DIGIMAXI5/User-Guide-545630-Page-56.png)
![《56》Special Effect■You can make the subject stand out from its surroundings. The subject will be sharp and in focus while making the restout of focus.1. Select the MANUAL mode, and press the menu button. 2. Press the LEFT/ RIGHT button and select the [Special Effect] menu tab.3. Select the [HighLight] menu by pressing the UP/ DOWNbutton and press the Right button.4. Select a desired sub menu by pressing the UP/ DOWN button and press the OK button.- [Off] : The preset focus frame will not be added. ■By using the camera’s digital processor, it is possible to add special effects to your images.You can select this menu only in the MANUAL mode.■You can select the preset focus frame, Composite shooting and Photo frame function. If aspecial effect is selected, the rest special functions set before are cancelled automatically. ■Even if the camera is turned off, the special effect setting will be preserved. To cancel thespecial effect, select the [Off] sub menu of each menu. ■The digital zoom function will not activate in the special effect menu. ■Date & Time information will not be displayed on the LCD monitor in the special effect menu. Special Effect : Preset focus frames5. Press the menu button twice and the menu will disappear.If you select the [Range 1 ~ 4] menu, the preset focusframe area will appear. [Range 1] [Range 2] [Range 3] [Range 4]HighLightCompositePhoto FrameOffRange 1Range 2Range 3Range 4Special EffectBack:◀Set:OK38Capture:SH Edit:+/-](https://usermanual.wiki/Hanwha-Techwin/DIGIMAXI5/User-Guide-545630-Page-57.png)
![《57》Special Effect : Preset focus frames●Moving and changing the focus frameYou can change the focus frame after selecting a Range menu.1. Point the camera towards the subject and compose the image by using the LCD monitor. 2. Press the +/- button. 3. The colour of focus frame turns white. Press the Up/Down/Left/Right button to moves thefocus frame position. 4. To select the focus frame position, press the +/- button again and you can take a picture. 38Pressing the +/- button[The frame is activated][After changing the frameposition]38Pressing the +/- button3838Pressing theUp/Down/Left/RightbuttonCapture:SH Edit:+/- Capture:SH Move:▲▼◀▶Capture:SH Move:▲▼◀▶Capture:SH Edit:+/-](https://usermanual.wiki/Hanwha-Techwin/DIGIMAXI5/User-Guide-545630-Page-58.png)
![《58》Special Effect : Composite shooting■You can combine 2 ~ 4 different shots in a still image.※You can use the flash button, self-timer button, macro button, voice memo button and theZoom W/T button during the composite shooting.※If you press the camera buttons (SF button, Play mode buttonand M button) during the composite shots, each mode of thecamera buttons is executed. ※If you press the Menu button during the composite shots, awindow will display. Select the submenu value by pressing theUp/Down button and then press the OK button.[Menu] : A menu will display. After confirming a menu, a camera mode used before will be executed. [Cancel] : Turns to the previous capture mode. ※The voice memo will start after taking the last composite shooting.※You can’t select the Voice recording mode during the composite shots. ※Selecting 2 composite shooting7. To save the composite shots, press the OK button after taking the last shot. 1. Select the MANUAL mode, and press the menu button.2. Press the LEFT/ RIGHT button and select the [Special Effect] menu tab.3. Select the [Composite] menu by pressing the UP/ DOWNbutton and press the Right button.4. Select a desired sub menu by pressing the UP/ DOWNbutton and press the OK button.- [Off] : cancels the composite shooting- [2 Parts] : 2 different shots are combined in a still image. - [3 Parts] : 3 different shots are combined in a still image.- [4 Parts] : 4 different shots are combined in a still image.- [Pano. 2 Parts] : 2 different panorama shots are combined in a still image. 5. Press the menu button twice and the menu will disappear.6. The number of frames you selected in step 4 is displayed on the LCD monitor. Press the shutter button to start the composite shootingHighLightCompositePhoto FrameOff2 Parts3 Parts4 PartsPANO.2 PartSpecial EffectBack:◀Set:OK[Ready for taking]38Pressingthe shutterbutton[First shot]38Pressing the shutterbutton[Second shot]37Pressingthe OKbutton[The result image] 100-000338Menu?MenuCancelConfirm:OKSave:OK Del:+/-Capture:SH Del:+/-Capture:SH Del:+/-](https://usermanual.wiki/Hanwha-Techwin/DIGIMAXI5/User-Guide-545630-Page-59.png)
![《59》Special Effect : Composite shooting●Changing a part of composite shot before taking the last shotBefore taking the last composite shot, you can change a part of composite shot. 1. During the composite shots, press the +/- button. 2. A previous image will be deleted and new frame will display. If there is an image takenbefore, press the +/- button again and a previous image will be deleted again. 3. Press the shutter button to capture a new image.●Changing a part of composite shot after taking the last shotAfter taking the last composite shot, you can change a part of composite shot. 1. After taking the last shot , a cursor to select a frame will display. Press theUp/Down/Left/Right button to select the frame. 2. Press the +/- button and an image will be deleted. Composite frame will be activated. 3. Press the Shutter button. You can take another images again by using theUp/Down/Left/Right button and +/- button.4. Press the OK button again to save the captured image.38After taking the 4th shotPressing the Up button38Moving backward to the 2nd shot 38Deleting the 2nd shot 100-0003A stored imagePressing theOK button 38After taking the 2nd shot againPressing theShutter button. Pressing the +/- button38Pressing the +/- button[Before taking the 3rd shot][Moving backward to the 2nd shot]38Save:OK Del:+/- Save:OK Del:+/-Save:OK Del:+/-Capture:SH Del:+/- Capture:SH Del:+/-](https://usermanual.wiki/Hanwha-Techwin/DIGIMAXI5/User-Guide-545630-Page-60.png)
![《60》Special Effect : Photo Frame■You can add 9 types of frame-like borders to a still image you want to capture.■Date & Time information will not be printed on the stored image taken with [Photo Frame]menu. 1. Select the MANUAL mode, and press the menu button.2. Press the LEFT/ RIGHT button and select the [Special Effect] menu tab.3. Select the [Photo Frame] menu by pressing the UP/ DOWNbutton and press the Right button.4. Select a desired sub menu by pressing the UP/ DOWNbutton and press the OK button.- [Off] : The photo frame will not be added. 5. Press the menu button twice and the menu willdisappear. If you select the [Frame 1 ~ 9] menu, theselected photo frame will appear.[Frame 1] [Frame 2] [Frame 3][Frame 4] [Frame 5] [Frame 6][Frame 7] [Frame 8] [Frame 9]HighLightCompositePhoto FrameOffFrame1Frame2Frame3Frame4Special EffectBack:◀Set:OK38](https://usermanual.wiki/Hanwha-Techwin/DIGIMAXI5/User-Guide-545630-Page-61.png)
![《61》Movie Clip frame stabiliser■This function helps stabilize images captured during movie recording. You can select this menu only in the MOVIE CLIP mode.●How to use this function 1. Select the MOVIE CLIP mode by pressing the M (Mode)button and press the menu button. Press the Left/Rightbutton to select the [Stabilizer] menu.2. Select a desired sub menu by pressing the Up/Downbutton and press the OK button. - [Off] : Movie clip frame stabilizer function becomesdisabled. - [On] : Prevents camera shake during movie recording. The recording frame range willbecome narrower than when you select the [Off] menu. Pre-view frames may notdisplay smoothly on the LCD monitor.●When you select the [On] sub menu, the movie clip frame range will be narrow dependingon the movie clip size. INFORMATIONOffOnStabilizer](https://usermanual.wiki/Hanwha-Techwin/DIGIMAXI5/User-Guide-545630-Page-62.png)
![《63》Starting play mode●Playing back a movie clipSteps from 1-2 are the same as those to play back a stillimage.3. Select the recorded movie clip that you want to play backby using the LEFT/RIGHT button. If you select a movieclip, the movie clip indicator ( ) will be displayed onthe LCD monitor.4. Press the play & pause button ( ) to play back amovie clip file.- To pause a movie clip file while playing it back, pressthe play & pause button again.- Pressing the play & pause button again will cause themovie clip file will restart.- To rewind the movie clip while it is playing, press theLEFT button. To fast forward the movie clip, press the RIGHT button.- To stop playback of the movie clip, press the play & pause button, and then press theLEFT or RIGHT button.●How to capture the movie clipSteps 1-2 are the same as those for playing back a stillimage.3. Select the recorded movie clip that you want to playback by using the LEFT/RIGHT button.4. Press the Play/Pause button to play the movie clip5. Press the Play/Pause button while playing the movieclip. Then press the Shutter button.6. The paused movie clip is saved in a new file name.※The captured movie clip file has same size as theoriginal movie clip (640X480, 320X240, 160X128).■Movie clip capture function : capture still images from the movie clip.100-0009100-0009[Paused][Press the shutter button]Trim:T Capture:SH](https://usermanual.wiki/Hanwha-Techwin/DIGIMAXI5/User-Guide-545630-Page-64.png)
![《64》Starting play mode■On camera movie trimming : You can extract desired frames of movie clip during the movieclip play back. ●If the running time is under 10 seconds, the movie clip can’tbe trimmed.1. Select a desired movie clip in the play mode. 2. Play back the movie clip by pressing the Play & Pausebutton.3. Press the Pause button at the point of the movie clip thatyou want to start extracting. 4. Press the T button. (The start point doesn't display on thestatus bar, but the start point will be marked.)5. Press the Play & Pause button and the extracted range willbe displayed on the status bar. 6. Press the Play & Pause button once more at the pointwhere you wish the extracted file to stop. 7. Press the T button and a confirmation window will display.8. Select a desired sub menu by pressing the UP/ DOWNbutton and press the OK button.[Trimming] : The extracted frames are saved as a new filename. [Cancel] : The movie trimming will cancel. ●If you want to extract the movie clip at the beginning of the frame, press the Zoom Tbutton before starting the movie clip. (The start point doesn’t display on the status bar, butthe start point is selected.)●If the time line bar passes by the start point by pressing the REW(Left) button, the firstframe of the movie clip will display. ●If you doesn’t specify the ending point of the movie clip, the trimming confirmation windowwill display at the point of the last frame.INFORMATION 100-0009Trim:T Capture:SH100-0009Trim:T100-0009Trimming?TrimmingCancelConfirm:OK](https://usermanual.wiki/Hanwha-Techwin/DIGIMAXI5/User-Guide-545630-Page-65.png)
![《67》Using the camera buttons to adjust the camera■In Play mode, you can use the buttons on the camera to conveniently set up the Play modefunctions.■If you have turned on the camera by pressing the POWER button, you can press the PLAYMODE button once to switch to Play mode and press it (Under 1 Sec.) again to switch toRecording mode.■You can turn the power on with the play mode button. The camera is turned on in play mode.Press the play mode button (Under 1 Sec.) again to turn off the camera.■Pressing the Play mode button for over 1 Sec., you can check the recording information.Play mode button100-0009[Play mode display] [Recording information]Pressing for over 1 Sec.Pressing under 1 Sec.Size : 2592X1944Av : F3.5Tv : 1/60ISO : 100 Flash : OffDate : 2005/05/01](https://usermanual.wiki/Hanwha-Techwin/DIGIMAXI5/User-Guide-545630-Page-68.png)
![《68》Thumbnail( ) / Enlargement( ) button ●Image enlargement1. Select an image that you want to enlarge and press the enlargement button.2. Different parts of the image can be viewed by pressingthe 5 function button.3. Pressing the thumbnail button will zoom back to theoriginal full sized image.- You can tell whether the image displayed is an enlargedview by checking the image enlargement indicatorshown at the bottom left of the LCD monitor. (If the image is not an enlarged view, the indicator willnot be displayed.) You can also check the area ofenlargement.- Movie clips and WAV files can’t be enlarged.- If an image is enlarged, a loss of quality may occur.■You can view multiple pictures, enlarge a selected picture, and crop and save a selected areaof an image.●Thumbnail display1. While an image is displayed full screen, press thethumbnail button.2. The thumbnail display will highlight the image that hadbeen showing at the time the thumbnail mode wasselected.3. Press the 5 function button to move to a desired image.4. To view an image separately, press the enlargement button.100-0009[Normal display mode] [Thumbnail display mode]Pressing the thumbnail button ( )Pressing the enlargementbutton ( )Highlighted imageX1.5](https://usermanual.wiki/Hanwha-Techwin/DIGIMAXI5/User-Guide-545630-Page-69.png)
![《69》Thumbnail( ) / Enlargement( ) button ●The maximum enlargement rate in proportion to the image size.●Trimming : You can extract part of the image that you want and save it separately.1. Select an image that you want to enlarge and press theenlargement button.2. Different parts of the image can be viewed by pressingthe 5 function button.3. Press the MENU button and a message will bedisplayed as shown alongside.4. Select a desired sub menu by pressing the UP/ DOWNbutton and press the OK button.- [Trimming] : The trimmed image will save as a new file name, and display on the LCDmonitor. - [Cancel] : The trimming menu will disappear. ※If there is little memory space to save the trimmed image, the image can’t be trimmed.※To delete the enlarged image during the trimming function, press the delete button.Image size 2592 2272 2048 1600 1024 640Maximum enlargement rate X10.1 X8.8 X8.0 X6.2 X4.0 X2.5Voice ( ) memo / Up button■When the menu is displayed on the LCD monitor, pressing the UP button makes the menucursor move up. ■When the menu is not displayed on the LCD monitor, the UP button operates as the voicememo button. You can add your voice to a stored still image.●Adding a Voice Memo to a Still Image1. Press the LEFT/ RIGHT button to select an image thatyou wish to add sound to.2. Press the voice memo button ( ) and the voice memoindicator will display. The camera is now ready to recorda voice memo.X1.5Trimming?TrimmingCancelConfirm:OK100-0009START:SHUTTER](https://usermanual.wiki/Hanwha-Techwin/DIGIMAXI5/User-Guide-545630-Page-70.png)