Hanwha Techwin DIGIMAXL55W Digital Camera User Manual L55W en c V04
Samsung Techwin Co Ltd Digital Camera L55W en c V04
UserManual.wiki
>
Hanwha Techwin
>
DIGIMAXL55W User Manual
>
Users Manual 1 of 3
Contents
1.
Users Manual 1 of 3
2.
Users Manual 2 of 3
3.
Users Manual 3 of 3
Users Manual 1 of 3
Navigation menu
Upload a User Manual
Namespaces
Wiki Guide
HTML
PDF
Info
Views
User Manual
Discussion / Help
Navigation
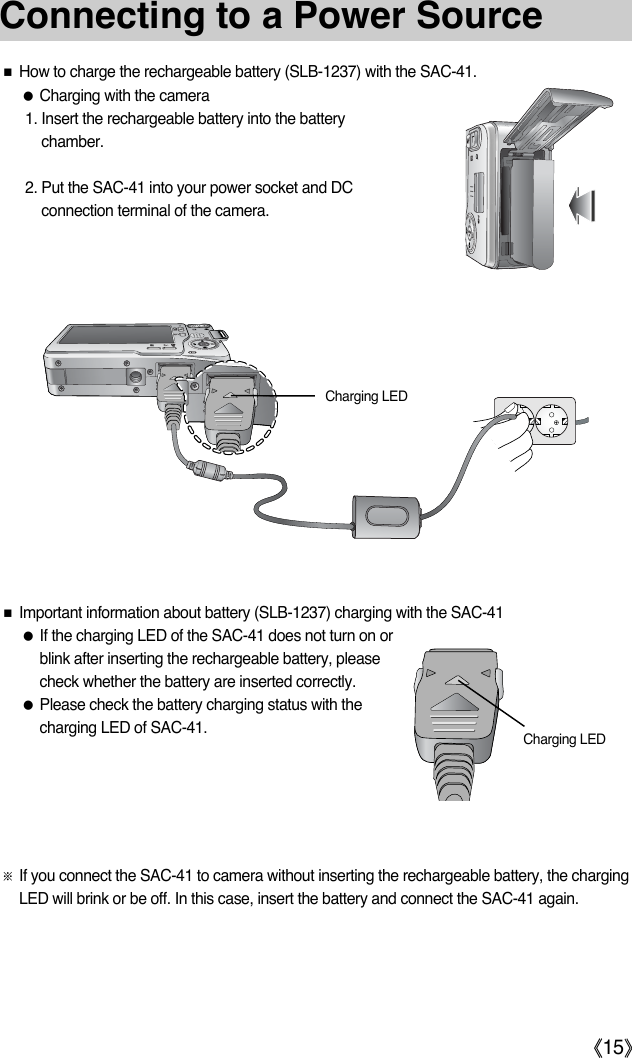
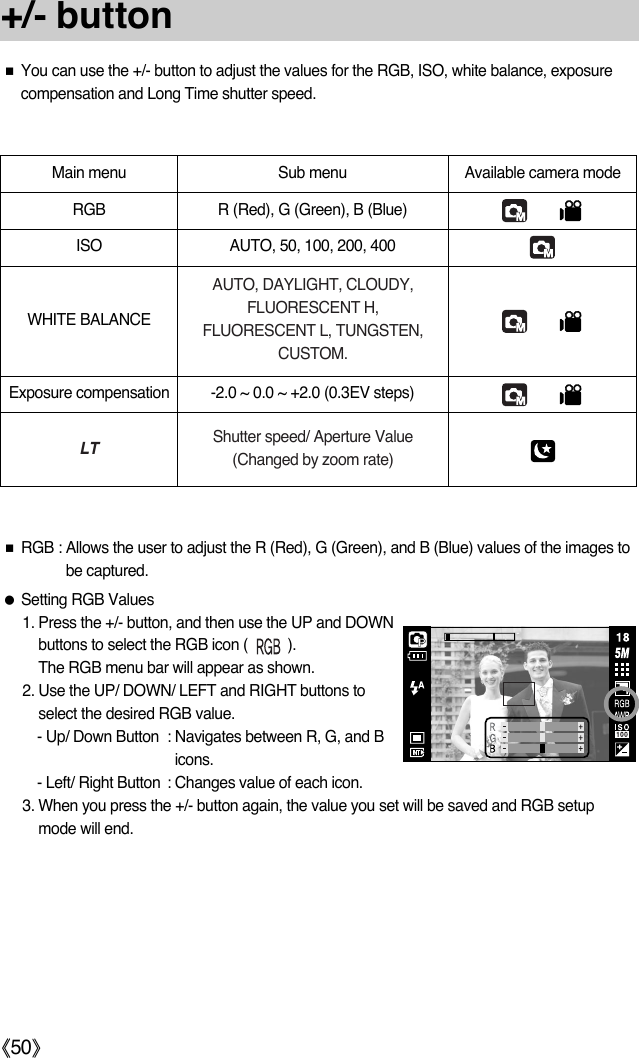
![ŝ2ŞInstructionsƈUse this camera in the following orderInsert the USB cableSet up the camera driverBefore connecting the camera to a PC, via the USBcable, you will need to set up the camera driver.Install the camera driver that is contained inApplication software CD-ROM. (p.118)Take a picture. (p.26)Insert the supplied USB cable into the PC’s USBport and the camera’s USB connection terminal.(p.127)Check the camera’s power. If the power is turned off,press the camera button to turn it on. Take a pictureCheck the camera’s powerCheck [Removable Disk]Open WindowŖs EXPLORER and search for[Removable Disk]. (p.128)ƃIf you use a card reader to copy the images on the memory card to your PC, the imagescould be damaged. When transferring the images taken with the camera to your PC, be sureto use the supplied USB cable to connect the camera to your PC. Please note that themanufacturer holds no responsibility for loss or damage of images on the memory card dueto the use of a card reader.](https://usermanual.wiki/Hanwha-Techwin/DIGIMAXL55W.Users-Manual-1-of-3/User-Guide-585772-Page-2.png)
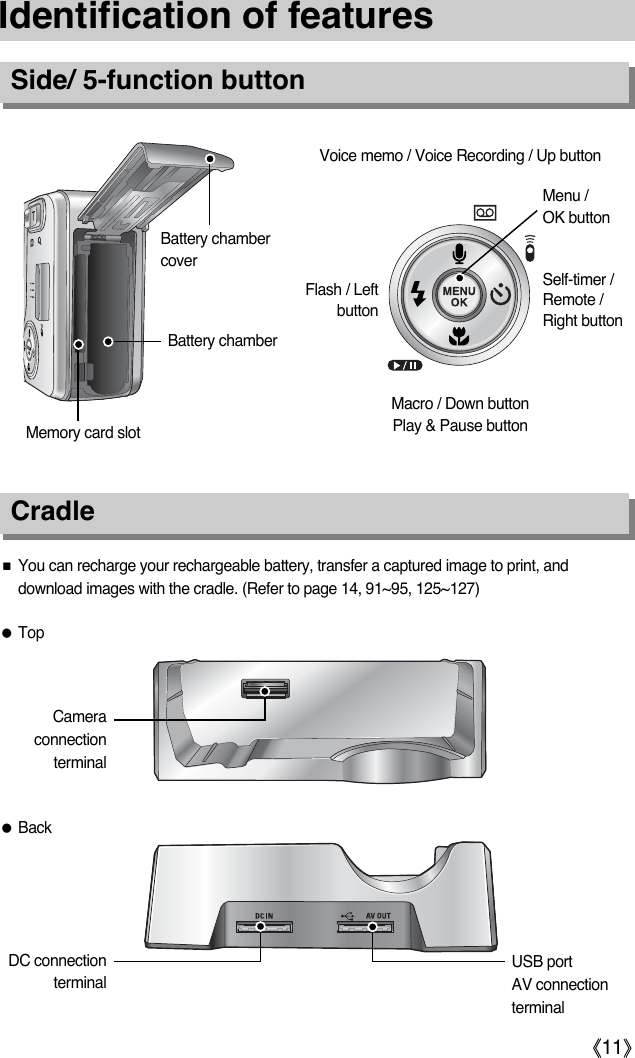
![ŝ3ŞƃGetting to know your camera 5ƃDanger 6ƃWarning 6ƃCaution 7ƃSystem chart 8ƃIdentification of features 10ƈFront & Top 10ƈBack & Bottom 10ƈSide / 5-function button 11ƈCradle 11ƈSelf-timer lamp 12ƈCamera Status Lamp 12ƈMode icon 12ƃConnecting to a Power Source 13ƈUsing the SAC-41 14ƈHow to charge the rechargeable battery(SLB-1237) with the SAC-41. 15ƈUsing the battery 17ƈRemoving the battery 17ƃInstructions on how to use the memory card18ƃInserting the memory card 20ƃRemoving the memory card 20ƃWhen Using the Camera for the First Time21ƃLCD monitor indicator 22ƃChanging the recording mode 23ƈSelecting the [MODE] menu 23ƈIf the [STILL & MOVIE] menu was selected24ƈIf the [FULL] menu was selected 24ƈIf the [CUSTOM] menu was selected 25ƃStarting the recording mode 26 ƈHow to use the Auto mode 26ƈHow to use the Movie clip mode 26ƈRecording the movie clip without voice 27ƈPausing while recording a movie clip(Successive Recording) 27ƈHow to use the Program mode 27ƈHow to use the Scene modes 28ƈHow to use the VOICE RECORDING mode29ƈPausing while recording a voice recording29ƃThings to Watch Out for When TakingPictures 30ƃUsing the camera buttons to adjust thecamera 31ƈPOWER button 31ƈSHUTTER button 31ƈZOOM W / T button 31ƈVoice recording / Voice memo / UP button34ƈMacro / Down button 35ƈFocus lock 36ƈFlash / Left button 37ƈSelf-timer / Remote / Right button 39ƈMENU / OK button 41ƈM (Mode) button 41ƈE (Effect) button 44ƈSpecial Effect : Colour 44ƈSpecial Effect : Preset focus frames 45ƈSpecial Effect : Composite shooting 46ƈSpecial Effect : Photo Frame 48ƈMovie Clip frame stabiliser 49ƈ+/- button 50ƈWide button 54ƃUsing the LCD monitor to adjust the camerasettings55ƈHow to use the menu 57ƈMode 57ƈMode set 58ƈSize 59ƈQuality / Frame rate 60ƈMetering 61ƈContinuous shot 61ƈSharpness 62ƈOSD(On Screen Display) information 62ƈSave / Load a specific camera configuration(MySET) 63ContentsREADYRECORDING](https://usermanual.wiki/Hanwha-Techwin/DIGIMAXL55W.Users-Manual-1-of-3/User-Guide-585772-Page-3.png)
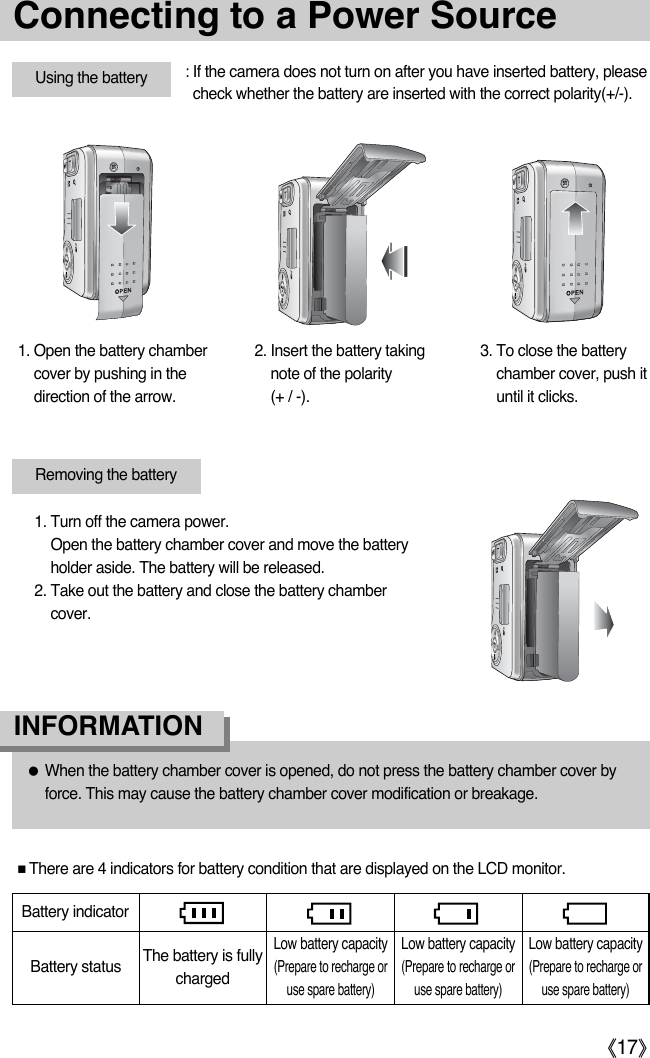
![Instructions on how to use the memory cardƃBe sure to format the memory card (see p.99) if you are using a newly purchased memory forthe first time, if it contains data that the camera cannot recognise, or if it contains imagescaptured with a different camera.ƃTurn off the camera power whenever the memory card is being inserted or removed.ƃRepeated use of the memory card will eventually reduce the memory card’s performance.Should this be the case, you will need to purchase a new memory card. Wear and tear on the memory card is not covered by the Samsung warranty.ƃThe memory card is an electronic precision device. Do not bend, drop or subject the memory card to any heavy impact.ƃDo not store the memory card in an environment with strong electronic or magnetic fields,e.g. near loud speakers or TV receivers.ƃPlease do not use or store in an environment where there are extremes in temperature.ƃDo not allow the memory card to become dirty or to come into contact with any liquid. Should this happen, clean the memory card with a soft cloth.ƃPlease keep the memory card in its case when not in use.ƃDuring and after periods of extended use, you may notice that the memory card is warm. This is perfectly normal.ƃDo not use a memory card that is used in another digital camera.To use the memory card in this camera, format the memory card using this camera. ƃDo not use a memory card formatted by another digital camera or memory card reader.ƃIf the memory card is subjected to any of the following, the recorded data may becomecorrupted :- When the memory card is used incorrectly.- If the power is switched off or the memory card is removed while recording, deleting(formatting) or reading.ƃSamsung cannot be held responsible for lost data.ƃIt is advisable to copy important data onto other media as back-up e.g. floppy disks, harddisks, CD etc.ƃIf there is insufficient memory available : A [CARD FULL! / MEMORY FULL!] message will appear and the camera will not operate.To optimise the amount of memory in the camera, replace the memory card or deleteunnecessary images stored on the memory.ŝ18Ş](https://usermanual.wiki/Hanwha-Techwin/DIGIMAXL55W.Users-Manual-1-of-3/User-Guide-585772-Page-18.png)
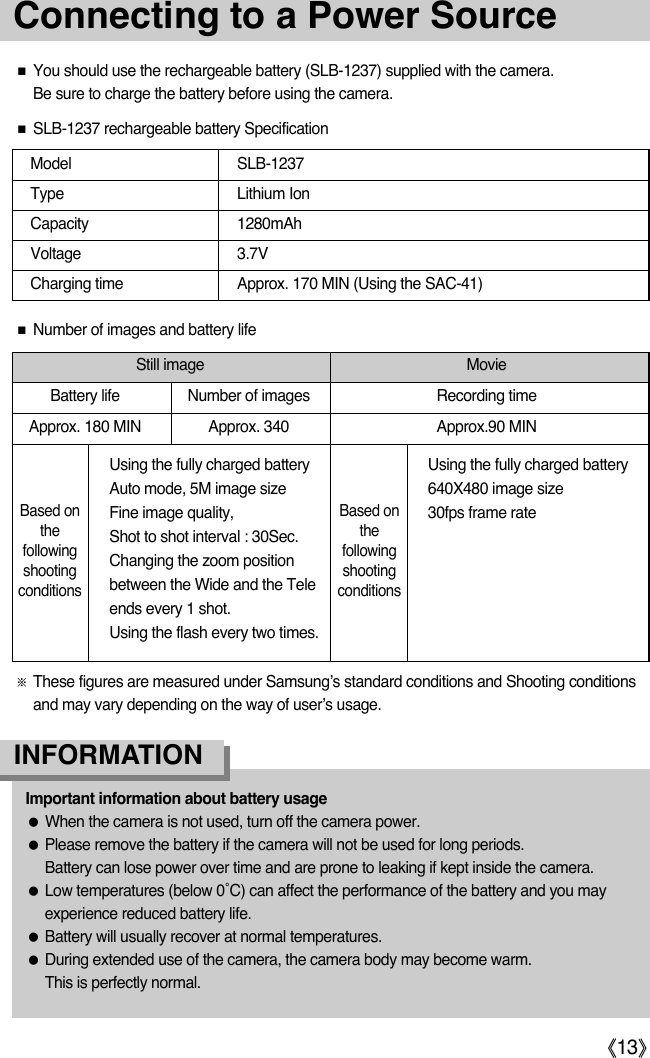
![ŝ19ŞInstructions on how to use the memory cardƃDon't remove the memory card when the camera status lamp is blinking as this maycause damage to data in the memory card.INFORMATION[ SD (Secure Digital) memory card ]WriteprotectswitchLabelCard pinsƈThe camera can use SD Memory Cards and MMC (Multi Media Cards). Please consult the enclosed manual for using the MMC Cards.The SD memory card has a write protect switchthat prevents image files from being deleted orformatted. By sliding the switch to the bottom ofthe SD memory card, the data will be protected.By sliding the switch to the top of the SD memorycard, the data protection will be cancelled. Slide the switch to the top of the SD memory cardbefore taking a picture.ƈWhen using a 24MB internal memory, the specified shooting capacity will be as follows.These figures are approximate as image capacities can be affected by variables such assubject matter and memory card type.ſFigures in the ( ) are shooting capacity taken in the Wide angle mode. ſThe recording times can be changed by the zoom operation. The zoom button doesn’t use during the movie recording.Recorded image size TIFF S. FINE FINE NORMAL 30FPS 15FPS5M 1(1) 9(9) 18(19) 27(27) - -4M 2(1) 12(11) 23(22) 34(33) - -3M 2(2) 14(15) 28(29) 41(43) - -2M 4(4) 23(25) 45(46) 64(67) - -1M 10(8) 47(41) 74(64) 106(99) - -VGA 24(22) 99(92) 148(135) 185(185) - -640 - - - -)JW]\ 1min 26sec )JW]\ 2min 06sec320 - - - -)JW]\ 3min 25sec )JW]\ 4min 38sec160 - - - -)JW]\ 6min 04sec )JW]\ 7min 10secStillimage* Movieclip](https://usermanual.wiki/Hanwha-Techwin/DIGIMAXL55W.Users-Manual-1-of-3/User-Guide-585772-Page-19.png)
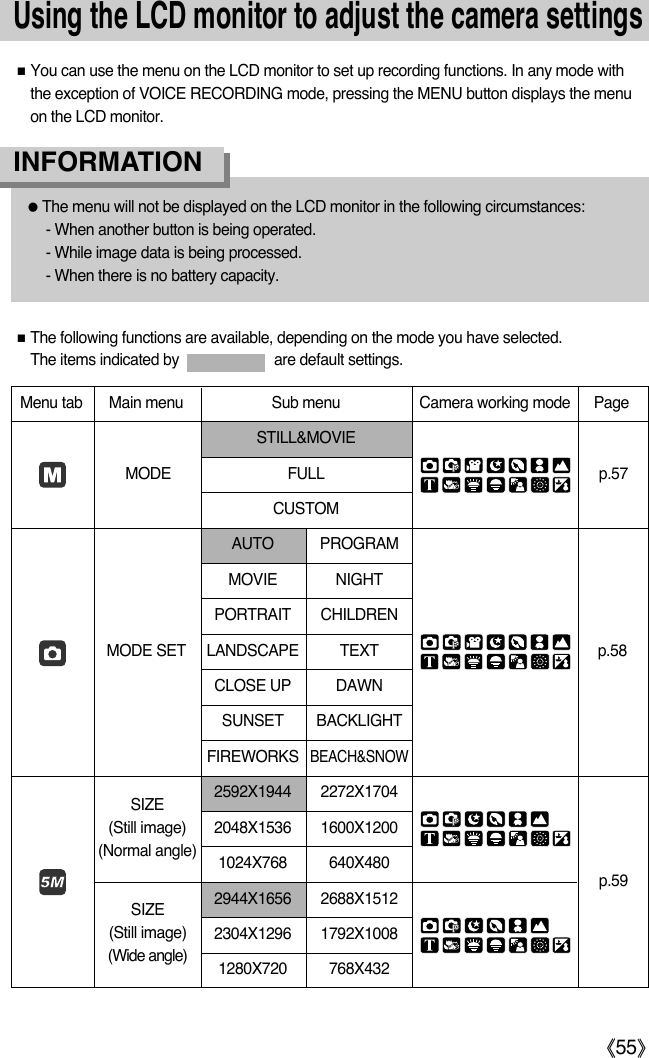
![ŝ21ŞWhen Using the Camera for the First TimeƈCharge the rechargeable battery fully before using the camera for the first time. ƈWhen the camera is turned on for the first time, a menu will be displayed to set date, time andlanguage in the LCD monitor. This menu will not be displayed after setting up the date, timeand language. Set up the date, time and language before using this camera. ƃSetting up the date, time and date type1. Select the [DATE&TIME] menu by pressing theUP/DOWN button and press the RIGHT button.2. Select the desired sub menu by pressing the UP/ DOWN/LEFT/ RIGHT button and press the OK button.RIGHT button : selects YEAR/ MONTH/ DAY/ HOUR/MINUTE/ DATE TYPELEFT button : Moves the cursor to the [DATE&TIME]main menu if the cursor is at the firstitem of the date and time setup. In all other instances, the cursor will beshifted to the left of its current position.UP/ DOWN button : changes the value of each item.ƃYou can select 21 languages. These are listed below : English, Korean, French, German, Spanish, Italian, S.Chinese, T.Chinese, Japanese,Russian, Portuguese, Dutch, Danish, Swedish, Finnish, Thai, BAHASA(MALAY/ INDONESIAN), Arabic, Hungarian, Czech and Polish. ƃEven if the camera is restarted, the language setting will be maintained.INFORMATIONƃSetting up the language1. Select the [LANGUAGE] menu by pressing theUP/DOWN button and press the RIGHT button.2. Select the desired sub menu by pressing the UP/ DOWNbutton and press the OK button. When the settings are complete, press the MENU buttontwice to exit the menu screen.DATE&TIMELANGUAGESETUPBACK:ȜSET:OKƊ"ƌAAAA55,,DATE&TIMELANGUAGE ENGLISHጥૹFRANÇAISDEUTSCHESPAÑOLSETUPBACK:ȜSET:OK](https://usermanual.wiki/Hanwha-Techwin/DIGIMAXL55W.Users-Manual-1-of-3/User-Guide-585772-Page-21.png)
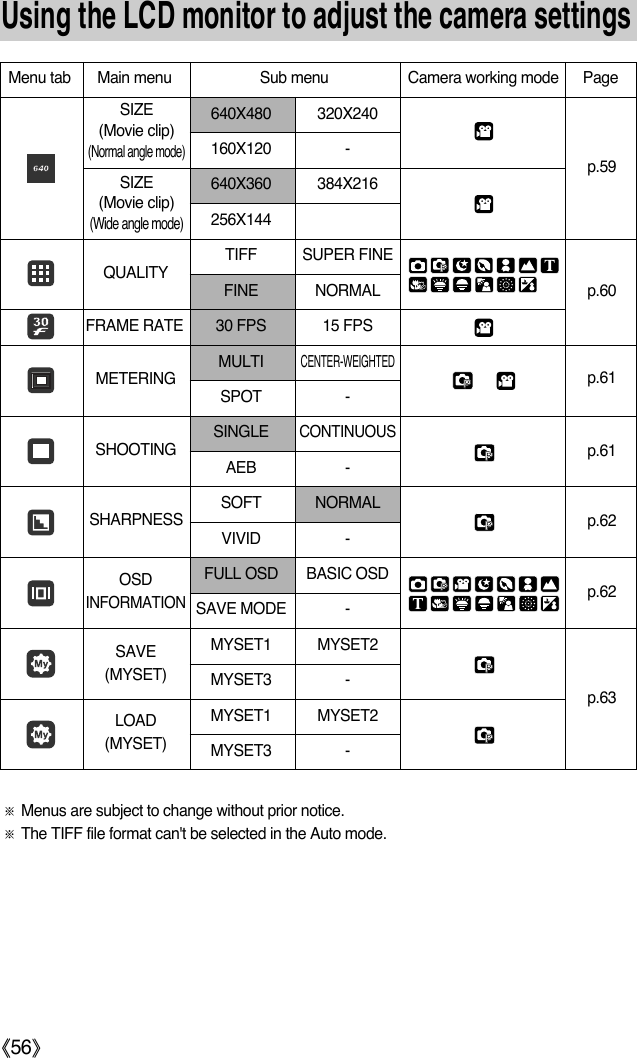
![ŝ22ŞLCD monitor indicatorƈThe LCD monitor displays information about the shooting functions and selections.ƈYou can see the wider angle of subject by using the Wide button (p.54). The illustrations ofthis manual are based on the normal angle mode.[Image & Full Status]No. Description Icons Page2Battery p.173Continuous shot/ Stabiliser p.614Flash p.375Self-timer p.396Macro p.357Metering p.618Card inserted indicator -9Auto focus frame -10 Camera shake warning p.3011 Date/ Time 2005/08/01 01:00 PM p.10012 Exposure compensation p.5213 ISO p.5114 White Balance p.5115 RGB RGB p.5016 Sharpness p.62Recording mode1p.58ڹںڻڼڽھڿۀۅۄۆۇ؆؇؈ۂہ ۃ؊؉](https://usermanual.wiki/Hanwha-Techwin/DIGIMAXL55W.Users-Manual-1-of-3/User-Guide-585772-Page-22.png)
![ŝ23ŞLCD monitor indicatorChanging the recording modeƈYou can select the desired working mode by the M (mode) button located on the back of thecamera and [MODE], [MODE SET] menu. Auto, Program, Movie clip, Scene (Night, Portrait,Children, Landscape, Text, Close-up, Dawn, Sunset, Backlight, Fireworks, Beach & Snow)camera modes are available.MODE17 Image quality / Frame rate p.60Number of available shots remaining 15 p.19Remaining time (Movie clip/ Voice recording)00:01:30/ 01:00:00 p.1920 Voice memo/ Mic. off p.29/271918 p.59Image sizeOptical/ Digital Zoom bar/ Digital Zoom rate21 p.32ƃSelecting the [MODE] menu1. Insert the battery (p.17). 2. Insert the memory card (p.20). As this camera has a 24MB internal memory, you do notneed to insert the memory card. If the memory card is not inserted, an image will be storedin the internal memory. If the memory card is inserted, an image will be stored on thememory card.3. Close the battery chamber cover.4. Press the power button to turn on the camera.5. Press the menu button and a menu will display. 6. Use the Left/ Right button to select the [MODE] menu. 7. Select [STILL & MOVIE], [FULL] or [CUSTOM] sub menuby pressing the UP/ DOWN button. - [STILL & MOVIE] : A still image mode that was selectedon the [MODE SET] menu and movieclip mode can be selected. Refer to page 58 for more information about using the [MODE SET] menu. - [FULL] : Auto, Program, Movie clip and Scene modes can be selected. - [CUSTOM] : Modes set as on in the [MODE SET] menu can be selected.8. Press the MENU button and the menu will disappear. STILL & MOVIEFULLCUSTOMTIFF](https://usermanual.wiki/Hanwha-Techwin/DIGIMAXL55W.Users-Manual-1-of-3/User-Guide-585772-Page-23.png)
![ŝ24ŞƃChanging the recording mode : If the [STILL & MOVIE] menu was selectedSteps from 1-4 are the same as those for selecting the [MODE] menu. 5. The recording mode used just before will display.6. Press the M (Mode) button located on the back of the camera and the recording mode willchange to the movie clip mode.7. Press the M (Mode) button again and a still image mode selected on the [MODE SET]menu will be selected.ƃChanging the recording mode : If the [FULL] menu was selectedSteps from 1-4 are the same as those for selecting the [MODE] menu. 5. The recording mode used just before will display.6. Press the M (Mode) button located on the back of the camera and the mode selectionmenu will display.7. To select the Auto, Program, Movie clip or Scene modes, press the Left/ Right button. To move between the Auto, Manual, Movie clip menu line and Scene menu line, press theUp/ Down button.8. Press the M (Mode) button and the mode selection menu will disappear.Pressing the M (Mode) button[AUTO mode] [MOVIE CLIP mode]Pressing the Up button[Selecting the Scene mode]Pressing the Left button[Mode selection menu]AUTO MOVIE[Selecting the Movie clip mode]SET:OK SET:OKSET:OKNIGHTChanging the recording mode](https://usermanual.wiki/Hanwha-Techwin/DIGIMAXL55W.Users-Manual-1-of-3/User-Guide-585772-Page-24.png)
![ŝ25ŞƃChanging the recording mode : If the [CUSTOM] menu was selectedSteps from 1-4 are the same as those for selecting the [MODE] menu. 5. The recording mode used just before will display.6. Press the M (Mode) button located on the back of the camera and the mode selectionmenu will display.7. You can select modes set as on in the [MODE SET] menu by pressing the Up/ Down/ Left/Right buttons. Refer to page 58 for more information about using the [MODE SET] menu. 8. Press the M (Mode) button and the mode selection menu will disappear.Pressing the Up buttonNIGHT[Selecting the Scene mode]Pressing the Left button[Mode selection menu]AUTOSET:OKMOVIE[Selecting the Movie clip mode]SET:OKSET:OKChanging the recording mode](https://usermanual.wiki/Hanwha-Techwin/DIGIMAXL55W.Users-Manual-1-of-3/User-Guide-585772-Page-25.png)
![ŝ26ŞƈHow to use the Movie clip modeA movie clip can be recorded for as long as the available recording time of the memorycapacity allows. 1. Select the [FULL] sub menu on the [MODE] menu(p.23).2. Select the Movie clip mode by pressing the M(Mode) button (p.24).3. Point the camera towards the subject and composethe image by using the LCD monitor.4. Press the shutter button once and movie clips arerecorded for as long as the available recording timeallows. Movie clips will still be recorded if the shutterbutton is released.If you wish to stop recording, press the shutter button again.ſImage size and type are listed below.- Image size : Normal angle mode - 640X480, 320X240, 160X120 (user selectable)Wide angle mode - 640X360, 384X216, 256X144 (user selectable)- Movie clip file type : MP4 (MPEG-4)ƃIf the auto focus frame turns to red when you press the shutter button down half way, itmeans that the camera cannot focus on the subject. Should this be the case, the camerais less likely to capture an image clearly.ƃAvoid obstructing the lens or the flash when you capture an image.INFORMATION[AUTO mode][MOVIE CLIP mode]ƈHow to use the Auto modeUse this for shooting basic still images. 1. Select the [FULL] sub menu on the [MODE] menu (p.23). 2. Select the Auto mode by pressing the M (Mode)button (p.24).3. Point the camera towards the subject and composethe image by using the LCD monitor.4. Press the shutter button to capture an image.Starting the recording mode](https://usermanual.wiki/Hanwha-Techwin/DIGIMAXL55W.Users-Manual-1-of-3/User-Guide-585772-Page-26.png)
![ŝ27ŞƈHow to use the Program modeSelecting the automatic mode will configure the camera with optimal settings and you canmanually configure various functions. 1. Select the [FULL] sub menu on the [MODE] menu(p.23).2. Select the Program mode by pressing the M (Mode)button (p.24).3. Point the camera towards the subject and composethe image by using the LCD monitor.4. Press the shutter button to capture an image.[PROGRAM mode]ƈPausing while recording a movie clip (Successive Recording)This camera allows you to temporarily stop during unwanted scenes, while recording a movieclip. Using this function, you can record your favourite scenes into a movie clip without havingto create multiple movie clips.ƃUsing Successive RecordingSteps from 1-2 are the same as those for MOVIE CLIPmode.3. Point the camera towards the subject and composethe image by using the LCD monitor. Press theshutter button and movie clips are recorded for aslong as the available recording time. Movie clips willstill be recorded if the shutter button is released.4. Press the Pause button( ) to pauserecording.5. Press the Pause button( ) again to resume the recording.6. If you wish to stop recording, press the shutter button again.ƈRecording the movie clip without voiceYou can record the movie clip without voice. Steps from 1-3 are the same as those for MOVIE CLIPmode. 4. Press the Up button and the ( ) icon will displayon the LCD monitor.5. Press the shutter button and movie clip is recordedfor as long as the available recording time without voice. 6. To stop the recording, press the shutter button again.[Successive recording of a movie clip]Starting the recording mode](https://usermanual.wiki/Hanwha-Techwin/DIGIMAXL55W.Users-Manual-1-of-3/User-Guide-585772-Page-27.png)
![ŝ28ŞStarting the recording modeƈHow to use the Scene modesUse the menu to easily configure optimal settings for a variety of shooting situations.1. Select the [FULL] sub menu on the [MODE] menu (p.23). 2. Select the Scene mode by pressing the M (Mode) button (p.24).3. Point the camera towards the subject and composethe image by using the LCD monitor.4. Press the shutter button to capture an image.ſThe scene modes are listed below.[NIGHT] ( ) : Use this for shooting stillimages at night or inother dark conditions.[PORTRAIT] ( ) : To take a picture of a person.[CHILDREN] ( ) : To take a picture of fast moving objects, for example, children.[LANDSCAPE] ( ) : To take pictures of distant scenery.[TEXT] ( ) : Use this mode to shoot a document.[CLOSE UP] ( ) : Close-up shooting for small objects such as plants and insects.[DAWN] ( ) : Daybreak scenes.[SUNSET] ( ) : For taking pictures of sunsets.[BACKLIGHT] ( ) : Portrait without shadows caused by backlight.[FIREWORKS] ( ) : Firework scenes.[BEACH&SNOW]( ) : For ocean, lake, beach and snowscape scenes.[SCENE mode]](https://usermanual.wiki/Hanwha-Techwin/DIGIMAXL55W.Users-Manual-1-of-3/User-Guide-585772-Page-28.png)
![ŝ29ŞƃA distance of 40cm between you and the camera (microphone) is the best distance torecord sound.ƃIf the camera power is turned off while the voice recording is paused, the voice recordingis cancelled.INFORMATIONƈHow to use the VOICE RECORDING modeA voice recording can be recorded for as long as the available recording time of the memorycapacity allows. (Max: 1 hour)1. In any mode with the exception of the Movie clip,select the VOICE RECORDING mode by pressingthe Voice recording button twice.2. Press the shutter button to record a voice.- Press the shutter button once and voice is recordedfor as long as the available recording time (Max : 1hour) allows. The recording time will be displayed onthe LCD monitor. Voice will still be recorded if theshutter button is released.- If you wish to stop recording, press the shutter button again.- File type : WAV[VOICE RECORDING mode][Pausing the voice recording]RECORD :RECORD : SHUTTERƃPausing while recording a voice recordingThis camera allows you to temporarily stop during unwanted recording, while recording avoice. Using this function, you can record your favorite voices into a voice recording filewithout having to create multiple voice recording files.1. Press the shutter button and voice is recorded for as long as the available recording time.Voice will still be recorded if the shutter button isreleased.2. Press the Pause button( ) to pause recording.3. Press the Pause button( ) again to resume therecording.4. If you wish to stop recording, press the shutter buttonagain.Starting the recording mode](https://usermanual.wiki/Hanwha-Techwin/DIGIMAXL55W.Users-Manual-1-of-3/User-Guide-585772-Page-29.png)
![ŝ30ŞƈPressing the shutter button down half way Lightly press the shutter button to confirm focus and flash battery charge. Press the shutter button all way down to take the picture.ƈThe available recording time may vary depending on shooting conditions and camera settings.ƈWhen the Flash Off or Slow synchro mode is selected in a low lighting condition, the camerashake warning indicator ( ) may appear on the LCD monitor. In this case, use a tripod,support the camera on a solid surface or change the flash mode to flash shot mode.ƈBacklight compensated shots : When taking an outdoor shot, avoid facing the sun, as theimage may be dark because of the strong backlight. To take a picture against the sun, please use the [BACKLIGHT] in the scene shooting mode (see page 28), Fill-in flash (see page 37), Spot metering (see page 61), orExposure compensation (see page 52).ƈAvoid obstructing the lens or the flash when you capture an image.ƈUnder certain conditions the auto focus system may not perform as expected.- When photographing a subject that has little contrast.- If the subject is highly reflective or shiny.- If the subject is moving at high speed.- When there is strong reflected light, or when the background is very bright.- When the subject matter has only horizontal lines or the subject is very narrow (such as a stick or flagpole).- When the surroundings are dark.[Lightly press the shutter button] [Press the shutter button]Things to Watch Out for When Taking Pictures](https://usermanual.wiki/Hanwha-Techwin/DIGIMAXL55W.Users-Manual-1-of-3/User-Guide-585772-Page-30.png)
![ŝ32ŞZOOM W / T buttonƈThis camera has a 4.8X optical zoom and a 5X digital zoom function. Using both will offer atotal zoom ratio of 24X.ſThe illustrations as shown below are for your information about using the W/ T button.The pre-view images are can be different with the illustrations.ƃTELE ZoomOptical zoom TELE : Pressing the ZOOM T button. This will zoom into the subject i.e.the subject will appear nearer.Digital zoom TELE : When the maximum (4.8X) optical zoom is selected, pressing theZOOM T button activates the digital zoom software. ReleasingZOOM T button stops the digital zoom at the required setting.Once the maximum digital zoom (5X) is achieved, pressing theZOOM T button will have no effect.[ WIDE zoom ] [ TELE zoom ][ Digital zoom 5.0X ]Pressing theZOOM T buttonPressing theZOOM T buttonƃWIDE ZoomOptical zoom WIDE : Pressing the ZOOM W button. This will zoom out from the subjecti.e. the subject will appear further away. Pressing the ZOOM Wbutton continuously will set the camera to its minimum zoomsetting i.e. the subject appears at its furthest from the camera.Digital zoom WIDE : When the digital zoom is in operation, pressing the ZOOM Wbutton will reduce the digital zooming in steps.Releasing ZOOM W button stops digital zooming.Pressing the ZOOM W button will reduce the digital zoom andthen it will continue to reduce the optical zoom until the minimumsetting is reached. [ TELE zoom ] [ Optical zoom 2X ] [ WIDE zoom ]Pressing theZOOM W buttonPressing theZOOM W button[ Digital zoom 5.0X ][ TELE zoom ] [ WIDE zoom ]Pressing theZOOM W buttonPressing theZOOM W buttonOptical zoomDigital zoom](https://usermanual.wiki/Hanwha-Techwin/DIGIMAXL55W.Users-Manual-1-of-3/User-Guide-585772-Page-32.png)
![ŝ33ŞƃImages taken using the digital zoom may take a little longer for the camera to process.Allow time for this to take place.ƃYou may notice a decrease in image quality when using the digital zoom.ƃTo view more clear digital zoom image, press the shutter button halfway at the maximum(4.8X) optical zoom position and press the zoom T button again.ƃThe digital zoom can’t be activated in the [NIGHT], [CHILDREN], [CLOSE UP], [TEXT]and [FIREWORKS] scene modes.ƃTake care not to press the lens, lens cover and camera by force. This may cause thecamera malfunction.INFORMATIONZOOM W / T button](https://usermanual.wiki/Hanwha-Techwin/DIGIMAXL55W.Users-Manual-1-of-3/User-Guide-585772-Page-33.png)
![ŝ34ŞVoice recording( ) / Voice memo( ) / UP buttonƃA distance of 40cm between you and the camera (microphone) is the best distance torecord sound.INFORMATIONƈWhile the menu is showing, press the UP button to move up the submenu cursor. When the menu is not displayed on the LCD monitor, the UP button operates as the voicerecording or voice memo button. You can record your voice or add your voice-over to a storedstill image. Refer to page 29 for more information about the voice recording.ƃRecording a voice memo1. Press the M (Mode) button to select a Recording mode with the exception of Movie clipmode.2. Press the Voice memo ( ) button. If the voice memo indicator is displayed on the LCDmonitor, the setting is completed.3. Press the shutter button and take a picture. The picture is stored on the memory.4. Voice memo will be recorded for ten secondsfrom the moment the picture is stored. In themiddle of the voice recording, pressing theshutter button will stop the voice memo.Pressing the Voice memo button[Recording Voice Memo]STOP: SHUTTER](https://usermanual.wiki/Hanwha-Techwin/DIGIMAXL55W.Users-Manual-1-of-3/User-Guide-585772-Page-34.png)
![ŝ35ŞƈWhile the menu is showing, press the DOWN button to move from the main menu to asubmenu, or to move down the submenu cursor. When the menu is not showing, you canuse the MACRO/ DOWN button to take macro pictures. The distance ranges are shownbelow. Press the Macro button until the desired macro mode indicator displays on the LCDmonitor.[Auto macro ( )][Macro ( )][Auto focus - No icon]ƃWhen the macro mode is selected, it is possible that camera shake will occur. Take carenot to shake the camera.ƃWhen you take a picture within 30cm in the Macro mode, select the FLASH OFF mode.INFORMATIONƈTypes of focus modes and focus ranges (W: Wide, T: Tele)ſSee the next page for the available focusing method, by recording mode.(Unit : cm)ModeFocus Type Auto macro ( ) Normal Macro ( ) NormalFocus range W : 5~InfinityT : 14~InfinityW : 80~InfinityT : 80~InfinityW : 80~InfinityT : 80~InfinityW : 2~80T : 14~80Program ( )Auto ( )Macro( ) / Down button](https://usermanual.wiki/Hanwha-Techwin/DIGIMAXL55W.Users-Manual-1-of-3/User-Guide-585772-Page-35.png)
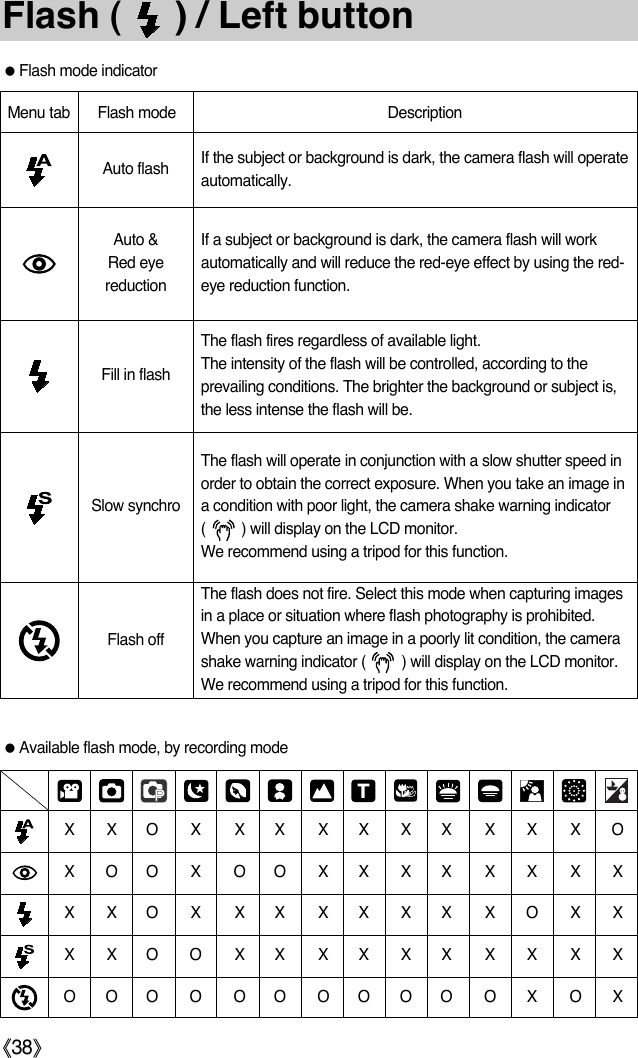
![ŝ37ŞFlash ( ) / Left button[Selecting the Auto flash]ƃFlash range (Unit : m)ƈWhen the menu is displayed on the LCD monitor,pressing the LEFT button makes the cursor shift to theleft tab.ƈWhen the menu is not displayed on the LCD monitor,the LEFT button operates as the FLASH ( ) button.ƃSelecting the flash mode1. Press the M (Mode) button to select a Recordingmode with the exception of Movie clip mode (p.24).2. Press the Flash button until the desired flash modeindicator displays on the LCD monitor. 3. A flash mode indicator will be displayed on the LCD monitor. Use the correct flash to suit the environment.ƃIf you press the shutter button after selecting the Auto, Fill-in, Slow sychro flash, the firstflash fires to check the shooting condition (Flash range and Power ratio of flash). Do not move until the second flash fires. ƃUsing the flash frequently will reduce the life of the battery.ƃUnder normal operating conditions the charging time for the flash is normally within 5seconds. If the battery is weak, the charging time will be longer.ƃDuring the continuous shot, AEB and movie clip mode, the flash function will not operate.ƃTake photographs within the flash range.ƃThe image quality is not guaranteed if the subject is too close or highly reflective.INFORMATIONNormalWIDE TELE WIDE TELE WIDE TELE0.8 ~ 3.0 0.8 ~ 2.0 0.3 ~ 0.8 0.3 ~ 0.8 0.3 ~ 3.0 0.3 ~ 2.0 Macro Auto macroISOAUTO](https://usermanual.wiki/Hanwha-Techwin/DIGIMAXL55W.Users-Manual-1-of-3/User-Guide-585772-Page-37.png)
![ŝ39ŞSelf-timer( ) / Remote ( ) / Right buttonƈWhen the menu is displayed on the LCD monitor, pressing the Right button makes the cursorshift to the right tab. The right button can also be used to move to a sub menu to select adifferent setting.ƈWhen the menu is not displayed on the LCD monitor, the RIGHT button operates as the Self-timer ( ) and Remote ( ) button. This function is used when the photographer wouldalso like to be in the image.ƃUsing the self-timer and remote control1. Press the M (Mode) button to select a still image mode or movie clip mode (p.24).2. Press the SELF-TIMER button until the desired mode indicator displays on the LCDmonitor. A self-timer icon or remote control icon appears on the LCD monitor.- Selecting a self-timer : When you press the Shutter button, the picture will be taken after thespecified time has elapsed and the self-timer function will be canceled.- Selecting a remote mode : Pressing the shutter button of remote control will allow an interval of2 seconds before the image is taken. In the remote mode, theshutter button of the camera canŖt be activated. After taking apicture, the remote mode will be maintained. But, pressing thePower button, Mode button, Play mode button and Self-timer buttonwill cancel the remote mode.[Selecting the 2 SEC self-timer] [Selecting the remote control]ƃDescription of Self-timer/ Remote modeIcon Mode DescriptionPressing the shutter button will allow an interval of 2 secondsbefore the image is taken.Pressing the shutter button will allow an interval of 10 secondsbefore the image is taken.A picture will be taken after about 10 seconds and 2 secondslater a second picture will be taken.You can take a picture by remote control instead of using theshutter button of the camera.Double10s2sRemote](https://usermanual.wiki/Hanwha-Techwin/DIGIMAXL55W.Users-Manual-1-of-3/User-Guide-585772-Page-39.png)
![ŝ40ŞƃRemote control rangeWhen you take a picture by using the remote control, refer to theillustrations shown alongside about the remote control range.[ Shutter button on theremote control ]ƃWhen taking a picture using the self-timer, the self-timer lamp works as follows:2 second self-timer setting : The self-timer lamp blinks at 0.25 second interval for 2seconds.10 second self-timer setting : The self-timer lamp blinks at 1 second interval for the first 8seconds. It blinks at 0.25 second interval for the remaining2 seconds.ƃIf you operate the Self-timer button and Play mode button during the self-timer operation,the self-timer function is canceled.ƃUse a tripod to prevent the camera from shaking.ƃIn Movie Clip mode, only the 10s self-timer and remote will work.INFORMATIONƃReplacing battery for the remote controlMake sure the + polarity is toward the top and the - polarity is toward the bottom whileinstalling battery for the remote control. Replace battery for the remote control in the localservice centre. Use the CR 2025 3V battery.Self-timer( ) / Remote ( ) / Right button](https://usermanual.wiki/Hanwha-Techwin/DIGIMAXL55W.Users-Manual-1-of-3/User-Guide-585772-Page-40.png)
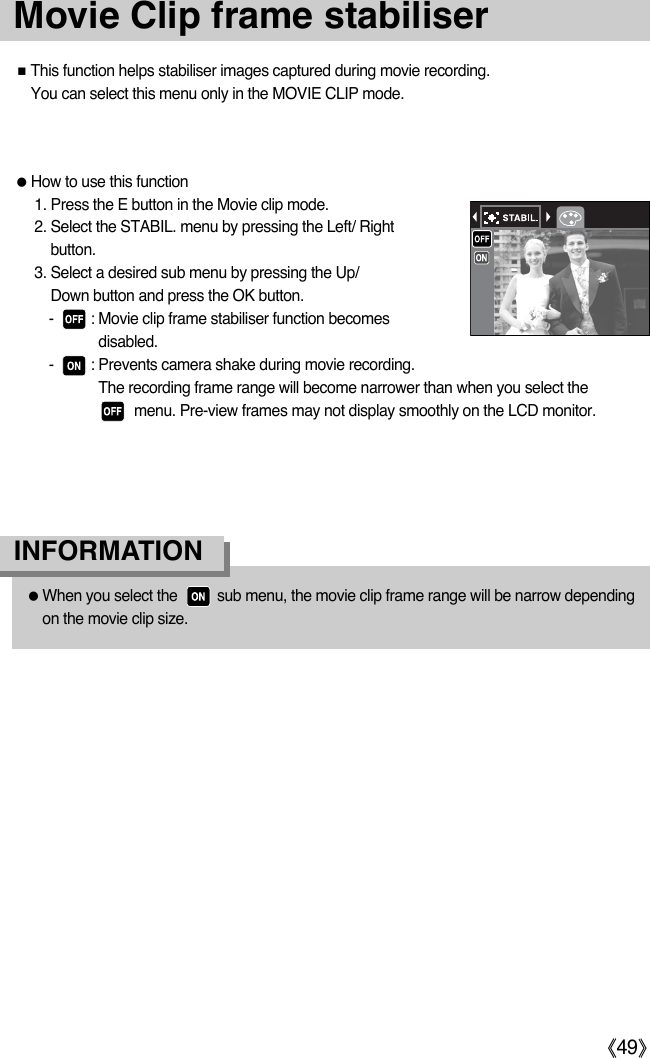
![ŝ41ŞMENU / OK buttonƈMENU button- When you press the MENU button, a menu related to each camera mode will be displayedon the LCD monitor. Pressing it again will return the LCD to the initial display.- A menu option can be displayed when the following are selected :MOVIE CLIP and STILL IMAGE mode. There is no menu available when the VOICERECORDING mode is selected.ƈOK button- When the menu is displayed on the LCD monitor, this button is used for shifting the cursorto the sub menu or for confirming data.Pressing the MENU button[Menu off][Auto mode][Menu on]ƈYou can turn on the camera with this button.ƈYou can select the desired recording mode. The selectable recording modes are differentfrom what you selected sub menu in the [MODE] menu.- [STILL & MOVIE] : A recording mode selected in the [MODE SET] menu, Movie clip mode- [FULL] : Auto, Movie clip, Program, Scene modes- [CUSTOM] : Modes set as on in the [MODE SET] menuƃHow to use the mode button : In case of [STILL & MOVIE] sub menu and Auto mode [Pressing the M button]M (Mode) buttonSIZE2592X19442272X17042048X15361600X12001024X7684M3M2M1M[Movie clip mode]](https://usermanual.wiki/Hanwha-Techwin/DIGIMAXL55W.Users-Manual-1-of-3/User-Guide-585772-Page-41.png)
![ŝ42Ş[Pressing the Up button]ƃHow to use the mode button : In case of [FULL] sub menu and Auto modeſPress the Mode button and the mode selection menu will disappear.[Pressing the Right button][Pressing the Left/ Right button][Pressing the Left button][Auto mode][Program mode][Pressing the Mode button][Selecting a scene mode]PORTRAITPROGRAM[Mode selection menu]AUTOSET:OK[Scene mode]NIGHTMOVIE[Movie cliip mode]SET:OK SET:OKSET:OKSET:OKM (Mode) button](https://usermanual.wiki/Hanwha-Techwin/DIGIMAXL55W.Users-Manual-1-of-3/User-Guide-585772-Page-42.png)
![ŝ43ŞM (Mode) button[Pressing the Right button]ƃHow to use the mode button : In case of [CUSTOM] sub menu and Auto modeſPress the Mode button and the mode selection menu will disappear.ſThe illustrated images and modes are for yourinformation. They can be changed as the [MODE SET] menusetting. [Pressing the Up button][Pressing the Down button][Auto mode][Portrait scene mode][Pressing the Mode button][Program mode]PROGRAMPORTRAIT[Mode selection menu]AUTO[Night scene mode]SET:OKSET:OKSET:OKSET:OKNIGHT](https://usermanual.wiki/Hanwha-Techwin/DIGIMAXL55W.Users-Manual-1-of-3/User-Guide-585772-Page-43.png)
![ŝ44ŞE (Effect) buttonƈIt is possible to add special effects to your images by using this buttonƈStill image mode : You can select the colour, focus, composite and frame menus. Movie clip mode : You can select the colour and stabiliser menus.ƈAvailable Effects, by recording mode (O : Selectable X : Not selectable)ſThis button will not operate in the Voice recording mode and some scene modes (Night, Text,Sunset, Dawn, Backlight, Fireworks and Beach & Snow)If a special effect is selected, the rest special effect (FOCUS, COMP. FRAME) functions setbefore are cancelled automatically.ſIf you select a TIFF file format, only the COLOR menu can be selected. ƈEven if the camera is turned off, the special effect setting will be preserved. To cancel the special effect, select the [OFF] sub menu of each menu. ƈBy using the camera’s digital processor, it is possible to add special effects to your images1. Press the E button in the still image mode or Movie clip mode. 2. Select the COLOR menu by pressing the Left/ Right button.Special Effect : ColourOOOOOOOXXOXXXXXXOXXXXXXOXXXXOXXXXXXNORMAL[Still image mode] [Movie clip mode]NORMAL](https://usermanual.wiki/Hanwha-Techwin/DIGIMAXL55W.Users-Manual-1-of-3/User-Guide-585772-Page-44.png)
![ŝ45Ş[Range 1]ƈYou can make the subject stand out from its surroundings.The subject will be sharp and in focus while making therest out of focus.1. Press the E button in the program mode. 2. Select the FOCUS menu by pressing the Left/ Rightbutton. 3. Select a desired sub menu by pressing the Up/ Downbutton and press the OK button.4. The preset focus frame will appear. Press the shutter button to capture an image[Range 2] [Range 3] [Range 4]Special Effect : Preset focus frames3. Select a desired sub menu by pressing the Up/Down button and press the OK button. : No effect is added to the image: Captured images will be stored in black and white.: Captured images will be stored in a sepia tone (a gradient of yellowish brown colours).: Captured images will be stored in a red tone.: Captured images will be stored in a green tone.: Captured images will be stored in a blue tone.: Save the image in negative mode.4. Press the shutter button to capture an image.Special Effect : Colour](https://usermanual.wiki/Hanwha-Techwin/DIGIMAXL55W.Users-Manual-1-of-3/User-Guide-585772-Page-45.png)
![ŝ46ŞƈYou can combine 2 ~ 4 different shots in a still image.1. Press the E button in the program mode. 2. Select the COMP. menu by pressing the Left/ Right button. 3. Select a desired sub menu by pressing the Up/ Downbutton and press the OK button.- : cancels the composite shooting- : 2 different shots are combined in a still image.- : 3 different shots are combined in a still image.- : 4 different shots are combined in a still image.- : 2 different panorama shots are combined in a still image.4. The number of frames you selected in step 3 is displayed on the LCD monitor. Press the shutter button to start the composite shootingCOMP.ſYou can use the flash button, self-timer button, macro button, voice memo button and theZoom W/T button during the composite shooting.ſIf you press the camera buttons (Play mode button, M button, E button, Menu button andWide button) during the composite shots or press the voice recording button twice, eachmode of the camera buttons is executed. The images captured before will be deleted.ſThe voice memo will start after taking the last composite shooting.[Ready for taking]Pressing theshutter buttonPressing theshutter button[First shot] [Second shot] [The final picture]ſSelecting 2 composite shooting5. After taking the last shot, the image will be saved. Special Effect : Composite shooting](https://usermanual.wiki/Hanwha-Techwin/DIGIMAXL55W.Users-Manual-1-of-3/User-Guide-585772-Page-46.png)
![ŝ47ŞSpecial Effect : Composite shootingƃChanging a part of composite shot before taking the last shotBefore taking the last composite shot, you can change a part of composite shot.1. During the composite shots, press the +/- button.2. A previous image will be deleted and new frame will display. If there is an image taken before, press the +/- button again and a previous image will bedeleted again.3. Press the shutter button to capture a new image.Pressing the +/- button[Before taking the 3rd shot][Moving backward to the 2nd shot]](https://usermanual.wiki/Hanwha-Techwin/DIGIMAXL55W.Users-Manual-1-of-3/User-Guide-585772-Page-47.png)
![ŝ48ŞƈYou can add 5 types of frame-like borders to a still image you want to capture.1. Press the E button in the program mode. 2. Select the FRAME menu by pressing the Left/ Rightbutton. 3. Select a desired sub menu by pressing the Up/ Downbutton and press the OK button.- : The photo frame will not be added.4. The photo frame will appear. Press the shutter button to capture an imageSpecial Effect : Photo Frame[Frame 1] [Frame 2][Frame 4] [Frame 5][Frame 3]](https://usermanual.wiki/Hanwha-Techwin/DIGIMAXL55W.Users-Manual-1-of-3/User-Guide-585772-Page-48.png)
![ŝ52Ş+/- buttonƃUsing the Custom White BalanceWhite balance settings may vary slightly depending on the shooting environment. You can select the most appropriate white balance setting for a given shooting environmentby setting up the custom white balance.1. Select the CUSTOM ( ) menu of the WhiteBalance.2. Place a sheet of white paper in front of the camera sothat the LCD monitor shows only white, and thenpress the SHUTTER button.3. Your custom white balance value is stored.- The custom white balance value will be applied,starting with the next picture you take.- The user configured white balance will be remaineffective until it is overwritten.[ White paper ]ƈExposure compensation : This camera automatically adjusts the exposure according to theambient lighting conditions. You can also select the exposure value by using the +/- button.ƃCompensating Exposure1. Press the +/- button, and then use the UP and DOWNbuttons to select the exposure compensation icon ( ). The exposure compensation menu bar willappear as shown.2. Use the LEFT and RIGHT buttons to set the desiredexposure compensation factor.3. Press the +/- button again. The value you set will besaved and the Exposure Compensation setup mode will close. If you change the exposure value, the exposure indicator ( ) will be displayed on thebottom of the LCD monitor.ſA negative exposure compensation value reduces the exposure. Note that a positive exposure compensation value increases the exposure and the LCDmonitor will appear white or you may not get good pictures.](https://usermanual.wiki/Hanwha-Techwin/DIGIMAXL55W.Users-Manual-1-of-3/User-Guide-585772-Page-52.png)
![ŝ53Ş+/- buttonƈLong Time shutter : This camera automatically adjusts the shutter speed and aperture valuesto the shooting environment. However, in NIGHT SCENE mode, you canset the shutter speed and aperture values to your preference.ƃAdjusting the shutter speed and aperture values1. Select the [NIGHT] scene mode. (p.24)2. Press +/- button and Long Time shutter menu(LT, For selecting shutter speed and aperture value)will be displayed.3. Configure the Long Time shutter value with the up/down/ left/ right button.Up/ Down Button : Select the Aperture/ Shutter speedLeft/ Right Button : Change the value. Availableaperture value options, depending on zoom step will be displayed onthe menu.4. Press the +/- button again. The value you set will be saved and the mode will switch toNIGHT SCENE mode. Press the SHUTTER button to take the picture.Aperture ValueShutter SpeedLarge/Small(Press right button)Large/Small(Press left button)Fast/Slow(Press left button)Fast/Slow(Press right button)ƈAperture values and shutter speeds changed by zoom scale are listed below.F 3.31 S Supported Aperture Values: AUTO, WIDE : F3.3 ~ F5.4, TELE : F4.8 ~ F9.3Supported Shutter Speeds: AUTO, 1 ~ 16S](https://usermanual.wiki/Hanwha-Techwin/DIGIMAXL55W.Users-Manual-1-of-3/User-Guide-585772-Page-53.png)
![ŝ54ŞWide buttonƈYou can select the wide angle mode or normal angle mode by using this button. When youselect the wide angle mode the LCD monitor size will change from 4:3 to 16:9 screen size. ſWhen you select the wide angle mode, sub menus of [SIZE] menu are changed. For detailsub menu, refer to below table. ;QbM 6WZUITIVOTMUWLM ?QLMIVOTMUWLM5M 2592Ŧ1944 2944Ŧ16564M 2272Ŧ1704 2688Ŧ15123M 2048Ŧ1536 2304Ŧ12962M 1600Ŧ1200 1792Ŧ10081M 1024Ŧ768 1280Ŧ720VGA 640Ŧ480 768Ŧ4328ZM[[QVO\PM?QLMJ]\\WV[Normal angle mode] [Wide angle mode]](https://usermanual.wiki/Hanwha-Techwin/DIGIMAXL55W.Users-Manual-1-of-3/User-Guide-585772-Page-54.png)
![ŝ57ŞHow to use the menu3. Use the UP and DOWN buttons to select a sub menu.4. Select a sub menu, and then the value you set will be saved. Press the MENU button andthe menu will disappear.ƈYou can select the desired working mode by the M (Mode) button located on the back of thecamera and [MODE] menu. Auto, Program, Movie clip, Scene (Night, Portrait, Children,Landscape, Text, Close-up, Dawn, Sunset, Backlight, Fireworks, Beach & Snow) cameramodes are available.- [STILL & MOVIE] : A still image mode that was selected onthe [MODE SET] menu and movie clipmode can be selected. - [FULL] : Auto, Program, Movie clip and Scenemodes can be selected.- [CUSTOM] : You can select modes set as on in the[MODE SET] menu1. Turn on the camera and press the MENU button. A menu for each camera mode appears.However, there is no menu for Voice Recording mode ( ).2. Use the LEFT and RIGHT buttons to navigate through the menus.Press the LEFT or RIGHT button.Press the LEFT or RIGHT button.ModePress the UP orDOWN button.Press the UP orDOWN button.MULTICENTER-WEIGHTEDSPOTMETERINGTIFFSUPER FINEFINENORMALQUALITY2592X19442272X17042048X15361600X12001024X768SIZE55552592X19442272X17042048X15361600X12001024X768SIZE5555STILL & MOVIEFULLCUSTOMMODESIZE2592X19442272X17042048X15361600X12001024X7685555SIZE2592X19442272X17042048X15361600X12001024X7685555<1..](https://usermanual.wiki/Hanwha-Techwin/DIGIMAXL55W.Users-Manual-1-of-3/User-Guide-585772-Page-57.png)
![ŝ58ŞMode setƈYou can select the desired recording mode.ƈIf you select the [CUSTOM] sub menu in the [MODE] menu, you can select modes set as on in this menuby pressing the M button. - The maximum custom modes you can select are 7 and theminimum custom modes are 3. - If you select over 7 custom modes, the menus are set asoff automatically from the lower placed sub menu. [AUTO] : For shooting basic still image[PROGRAM] : You can manually configure all functions.[MOVIE] : For taking a movie clip [NIGHT] : Use this for shooting still images at night or in other dark conditions.[PORTRAIT] : To take a picture of a person.[CHILDREN] : To take a still picture of moving children.[LANDSCAPE] : Scenery with green woods or blue sky.[TEXT] : Use this mode to shoot a document.[CLOSE UP] : Close-up shooting for small objects such as plants and insects.[DAWN] : Daybreak scenes.[SUNSET] : For taking pictures of sunsets.[BACKLIGHT] : Portrait without shadows caused by backlight.[FIREWORKS] : Firework scenes.[BEACH&SNOW]: For ocean, lake, beach and snowscape scenes.ƃWhen [NIGHT], [LANDSCAPE], [CLOSE UP], [TEXT], [SUNSET], [DAWN] and[FIREWORKS] scene mode are selected, it is possible that camera shake will occur. Inthis case, you should use a tripod. INFORMATIONONONONONONAUTOPROGRAMMOVIENIGHTPORTRAITMODE SETEXIT:MENU MOVE:](https://usermanual.wiki/Hanwha-Techwin/DIGIMAXL55W.Users-Manual-1-of-3/User-Guide-585772-Page-58.png)
![ŝ59ŞSizeƈYou can select the image size appropriate for your application.1KWV 5M 4M 3M 2M 1M VGA 640 320 1202592X 2272X 2048X 1600X 1024X 640X 640X 320X 160X1944 1704 1536 1200 768 480 480 240 1202944X 2688X 2304X 1792X 1280X 768X 640X 384X 256X1656 1512 1296 1008 720 432 360 216 144Still image modeMode Size (Normal angle)Size (Wide angle)Movie clip modeƃThe higher the resolution, the lower the number of available shots will be because highresolution images require more memory than lower resolution images.INFORMATION[ MOVIE CLIP mode ][ STILL IMAGE mode ]640 X 480320 X 240160 X 120SIZESIZE2592X19442272X17042048X15361600X12001024X7685555](https://usermanual.wiki/Hanwha-Techwin/DIGIMAXL55W.Users-Manual-1-of-3/User-Guide-585772-Page-59.png)
![ŝ60ŞQuality / Frame rateƈYou can select the compression ratio appropriate for your application of the captured images.The higher the compression ratio, the lower the picture quality.ModeIcon TIFFSub menu TIFFSUPER FINEFINE NORMAL 30FPS 15FPSFile Format tif jpeg jpeg jpeg mp4 mp4STILL IMAGE mode MOVIE CLIP modeƃThe TIFF file can’t be rotated, resized and trimmed. ƃThe TIFF file format is for professionals and provides the best quality.However, large file size reduces number of available pictures to take and increasessaving time to the memory card.ƃ[PROCESSING!] message is displayed while saving a TIFF file to the memory card.ƃThe TIFF file format can't be selected in the Auto mode.ƃThis file format complies with the DCF (Design rule for Camera File system).ƃJPEG (Joint Photographic Experts Group): JPEG is the image compression standarddeveloped by the Joint Photographic Experts Group. This type of compression is mostcommonly used for compressing photos and graphics because it can compress the filesefficiently without damaging the data.INFORMATION[STILL IMAGE mode] [MOVIE CLIP mode]30 FPS15 FPSFRAME RATEQUALITYTIFFSUPER FINEFINENORMAL<1..](https://usermanual.wiki/Hanwha-Techwin/DIGIMAXL55W.Users-Manual-1-of-3/User-Guide-585772-Page-60.png)