Hanwha Techwin DIGIMAXL55W Digital Camera User Manual L55W en c V04
Samsung Techwin Co Ltd Digital Camera L55W en c V04
UserManual.wiki
>
Hanwha Techwin
>
DIGIMAXL55W User Manual
>
Users Manual 3 of 3
Contents
1.
Users Manual 1 of 3
2.
Users Manual 2 of 3
3.
Users Manual 3 of 3
Users Manual 3 of 3
Navigation menu
Upload a User Manual
Namespaces
Wiki Guide
HTML
PDF
Info
Views
User Manual
Discussion / Help
Navigation
![Setting up the application software16. Specify the file types you want toassociate with QuickTime. Click [Finish].17. Installation is complete. Click [Close].14. Set the transfer rate for downloadingcontent from the Internet, and then click[Next >].15. Set up your browser for QuickTime plug-in.Click [Next >].ſThe QuickTime program folder will appear.Click on the Close button to close the folder.13. The QuickTime Settings – Introductionwindow appears. Click [Next >].[Click !][Click !][Click !][Click !][Click !] [Click !]ŝ121Ş](https://usermanual.wiki/Hanwha-Techwin/DIGIMAXL55W.Users-Manual-3-of-3/User-Guide-585774-Page-1.png)
![ŝ122ŞSetting up the application software* The QuickTime Player will launch, the readme file will open, and the Step 18 window will open.Click on the Close 1 and Close 2 buttons to exit the program.[Close 1 button] [Close 2 button]18. A window where you can choose the program youwant to install will appear. Click [Install]. For information on application software, please referto page 117.19. The Digimax Master installation window will bedisplayed as shown alongside.Click the [Next >] button.[Click !]ƃIf you select [Exit] at step 18, the application program installation will be cancelled.INFORMATION[Click !]](https://usermanual.wiki/Hanwha-Techwin/DIGIMAXL55W.Users-Manual-3-of-3/User-Guide-585774-Page-2.png)
![ŝ123Ş20. A window will open. Click the [Next >] button.21. A destination selection window will open. Click [Next >].To copy the files to another folder, click [Browse..] andchoose a folder you want.23. Click [Install] button and Digimax Master starts installing.22. A window will open, asking you to choose a folder towhich program icons will be added.Click [Next >] button. If you want to choose anotherfolder, click [Browse..] and choose a folder you want.[Click !][Click !]ƃIf you select [Cancel] at step 20, a window for installing Digimax Reader will be displayed.INFORMATIONSetting up the application software[Click !][Click !]](https://usermanual.wiki/Hanwha-Techwin/DIGIMAXL55W.Users-Manual-3-of-3/User-Guide-585774-Page-3.png)
![ŝ124ŞSetting up the application software25. A window will be displayed as shown alongside.Click the [INSTALL] button.- If you click the [MANUAL] button instructions,instructions for using Digimax reader will bedisplayed.- Click the [EXIT] button and the Digimax readerinstallation will be cancelled and a window forrestarting the computer will appear.26. A window will open. Click the [Next >] button.[Click !][Click !]27. The Software License Agreement window will bedisplayed. If you agree to this, click [Yes],the window will then move to the next step.If you disagree, click [No] and the installationprogram will be cancelled.[Click !]24. Digimax Master installation is successfullycompleted.Click the [Finish] button to install Digimax Reader.* The screen shot of step 24 can be different fromthe illustration depending on the systemrequirements. [Click !]](https://usermanual.wiki/Hanwha-Techwin/DIGIMAXL55W.Users-Manual-3-of-3/User-Guide-585774-Page-4.png)
![Setting up the application software28. A destination selection window will open.Click the [Next >] button.To copy the files to another folder, click[Browse...] and choose a folder you want.[Click !]29. Digimax Reader Installation is completed.The system will not reboot even if the [Yes, Iwant to restart the computer now] option isselected.[Click !]30. To apply changes, you must restart the computer.Select [Yes, I want to restart my computer now], andthen click the [OK] button. [Click !]31. After restarting the computer, connect the PC to the camera with the USB cable.32. Turn the camera power on.The [Found New Hardware Wizard] will open and the computer will recognise the camera.* If your OS is Windows XP, an image viewerprogram will open.If the download window of Digmax Master opensafter starting Digimax Master, the camera driver wassetup successfully.ŝ125Ş](https://usermanual.wiki/Hanwha-Techwin/DIGIMAXL55W.Users-Manual-3-of-3/User-Guide-585774-Page-5.png)
![ŝ126ŞSetting up the application softwareƃIf you have installed the camera driver, The [Found New Hardware Wizard] may not open.ƃOn a Windows 98 or 98 SE system, the Found New Hardware Wizard dialog box opensand a window asking you to select a driver file may appear. In this case, specify "USBDriver" in the CD supplied. (for Windows 98 and 98 SE).ƃBefore connecting the camera to the PC, You should first install the camera driver.ƃAfter installing the camera driver, you have to restart your PC.ƃIf you connect the camera to the PC before installing the camera driver, the [Found NewHardware Wizard] will open.In this case, cancel the [Found New Hardware Wizard] and disconnect the camera.Install the camera driver and connect the camera to the PC again.ƃShould the computer not find the camera driver after installation, please try one or more ofthe following measures.1. Delete the camera driver (p.130), and re-install the driver.2. Refer to FAQ (p.142) to check for a possible solution to the problem.3. If your PC’s central processing unit is VIA chip (This is shown in the USB HostController), download the patch file from the Samsung Camera web page.(http://www.samsungcamera.com)INFORMATION33. If you can see [Removable Disk] under [My computer],the camera driver installation was successful.Now you can transfer image files from the camera toPC via the USB cable.](https://usermanual.wiki/Hanwha-Techwin/DIGIMAXL55W.Users-Manual-3-of-3/User-Guide-585774-Page-6.png)
![ҮIf you connect the USB cable to a USB port on your PC and then turn on the power, thecamera will automatically switch to "computer connection mode".ҮIn this mode, you can download stored images to your PC through the USB cable.ҮThe LCD monitor is always turned off in PC mode.ҮThe camera status lamp will blink when the files are transferring via the USB connection.Starting PC modeŝ127ŞƈConnecting the camera to a PC1. In any mode with the exception of Voice Recordingmode, press the Menu button.2. Press the LEFT/ RIGHT button and select the [SETUP]menu tab.3. Select the [USB] menu by pressing the UP/ DOWNbutton and press the RIGHT button.4. Use the UP and DOWN buttons to select[COMPUTER], and then press the OK button.DATE&TIMEIMPRINTAF LAMPSOUNDUSBCOMPUTERPRINTERSETUPBACK:SET:OKſIf you selected [PRINTER] in Step 4, when you connect the camera to your printer, the[CONNECTING PRINTER] message will display and the connection will not be established.In this case, disconnect the USB cable, and then follow the procedure from Step 2 andonward.[Using the USB cable with Cradle][Using the USB cable with Camera]](https://usermanual.wiki/Hanwha-Techwin/DIGIMAXL55W.Users-Manual-3-of-3/User-Guide-585774-Page-7.png)
![ŝ128Ş3. Select an image and press the right mouse button.4. A pop-up menu will open.Click the [Cut] or [Copy] menu.- [Cut] : cuts a selected file.- [Copy] : copies files.ƈDownloading stored imagesYou can download the still images stored on the camera to your PC's hard disk and printthem or use a photo editing software to edit them.1. Connect the camera to your PC with the USB cable.2. On your computer's desktop display, select[My computer] and double click [Removable DiskƍDCIM ƍ100SSCAM].The image files will then be displayed.5. Click a folder where you want to paste the file.Starting PC mode](https://usermanual.wiki/Hanwha-Techwin/DIGIMAXL55W.Users-Manual-3-of-3/User-Guide-585774-Page-8.png)
![6. Press the right mouse button and a pop-up menuwill open. Click [Paste].7. An image file is transferred from the camera toyour PC.- By using [Digimax Master], you can see the stored images in the memory directly on thePC monitor and you can copy or move the image files.Starting PC modeŝ129Ş](https://usermanual.wiki/Hanwha-Techwin/DIGIMAXL55W.Users-Manual-3-of-3/User-Guide-585774-Page-9.png)
![ŝ130ŞƈTo remove the USB driver, refer to the process shown below.1. Click [Start ƍSettings] and click [Control Panel].2. Double-click [System].3. Select [Device manager ƍHard Disk Controller ƍSamsung DSC] and click the [Remove] button.4. Click the [OK] button.The camera is removed from the system.[Click !]Removing the USB Driver for Windows 98SE](https://usermanual.wiki/Hanwha-Techwin/DIGIMAXL55W.Users-Manual-3-of-3/User-Guide-585774-Page-10.png)
![[Click !]7. Uninstallation is complete. Click the [Finish]button and the window will disappear.6. The [Add/Remove Programs Properties] windowwill open. Click [Digimax L55W] and click the[Add/Remove] button.[Click !]5. Click [Start ƍSettings ƍControl Panel] and doubleclick [Add/Remove programs].Removing the USB Driver for Windows 98SEŝ131Ş](https://usermanual.wiki/Hanwha-Techwin/DIGIMAXL55W.Users-Manual-3-of-3/User-Guide-585774-Page-11.png)
![ŝ132ŞƈTo use this camera as a Removable Disk, install (p.118) the USB Driver.1. Before turning the camera power on, connect the camera to the PC with the USB cable.2. Click [Removable Disk] under [My computer] or [Windows Explorer].3.Image files stored in the Removable Disk (DCIM ƍ100SSCAM) can be transferred to the PC.Important information whilst using the Removable DiskƃThe [Removable Disk] indicator will not show when the camera power is off or the USBcable is removed.ƃWe recommend that you should copy the images to the PC to view them. Openingimages directly from the removable disk may be subject to unexpected disconnection.ƃWhen uploading images from the PC to the camera, ensure that the uploaded file namesare not the same as those already stored on the memory. ƃWhen you upload a file that is not taken by this camera to the Removable Disk, the [FILEERROR!] message will be displayed on the LCD monitor in the PLAY mode, and nothingis displayed in THUMBNAIL mode.ƃThe camera status lamp will blink, when a file istransferred (copy or deletion) between the PC andthe camera. Do not remove the USB cable until thelamp stops blinking. To remove the USB cable in Windows 2000/ME/XP,use the [Unplug or Eject Hardware] icon on the taskbar.INFORMATIONRemovable Disk](https://usermanual.wiki/Hanwha-Techwin/DIGIMAXL55W.Users-Manual-3-of-3/User-Guide-585774-Page-12.png)
![ƈWindows 98 / 98SE1. Check whether the camera and PC are transferring a file.If the camera status lamp blinks, you have to wait until the lamp illuminates.2. Unplug the USB cable.ƈWindows 2000 / ME / XP(The illustrations may be different from the real display in accordance with the Windows O/S.)1. Check whether the camera and PC are transferring a file.If the camera status lamp blinks, you have to wait until the lamp illuminates.2. Double-click the [Unplug or Eject Hardware]icon on the task bar.3. The [Unplug or Eject Hardware] window willopen. Select the [USB Mass Storage Device]and click the [Stop] button.4. The [Stop a Hardware device] window willopen. Select the [USB Mass Storage Device]and click the [OK] button.5. A [Safe to Remove Hardware] window willopen. Click the [OK] button.ŝ133ŞRemoving the removable disk[Click !][Double-click!][Click !][Click !]](https://usermanual.wiki/Hanwha-Techwin/DIGIMAXL55W.Users-Manual-3-of-3/User-Guide-585774-Page-13.png)
![ŝ134Ş1. A USB Driver for MAC is not included with the software CD as MAC OS supports thecamera driver.2. Check the MAC OS. You can check the MAC OS version during MAC OS start-up. This camera is compatible with MAC OS 10.0 or later. 3. Connect the camera to the Macintosh and turn the camera power on.4. A new icon will be displayed on the desktop after connecting the camera to the MAC.Using the USB Driver for MACSetting up the USB Driver for MAC1. Double click a new icon on the desktop and the folder in the memory will be displayed.2. Select an image file and copy or move it to MAC.ƃFor Mac OS 10.0 or later : First complete uploading from computer to camera and thenremove the removable disk with the Extract command.CAUTION6. A [Unplug or Eject Hardware] window will open.Click the [Close] button and the removable diskwill be removed safely.7. Unplug the USB cable.Removing the removable disk[Click !]](https://usermanual.wiki/Hanwha-Techwin/DIGIMAXL55W.Users-Manual-3-of-3/User-Guide-585774-Page-14.png)
![ƈYou can download, view, edit and save your images and movies with this software. Thissoftware is only compatible with Windows except for the Windows 98.ƈTo start the program, click [Start ƍPrograms ƍSamsung ƍDigimax Master].ƃDownloading images1. Connect the camera to your PC.2. A window for downloading images will display afterconnecting the camera and your PC.- To download the captured images, select the[Select All(A)] button.- Select desired folder in the window and click the[Select All(A)] button. You can save capturedimages and selected folder.- If you click the [Cancel] button, downloading will becancelled.3. Click [Next(N) >] button.Digimax Masterŝ135Ş[Click !][Click !]](https://usermanual.wiki/Hanwha-Techwin/DIGIMAXL55W.Users-Manual-3-of-3/User-Guide-585774-Page-15.png)
![ŝ136Ş7. Downloaded images will be displayed.4. Select a destination and make a folder to savedownloaded images and folders.- Folder names can be made in order of date andimages will be downloaded.- Folder name will be made as you want and imageswill be downloaded.- After selecting a folder that was made before,images will be downloaded.5. Click [Next(N) >] button.6. A window will open as shown alongside.The destination of the selected folder will bedisplayed on the upper side of the window.Click the [Start] button to download the images.Digimax Master[Click !][Click !]](https://usermanual.wiki/Hanwha-Techwin/DIGIMAXL55W.Users-Manual-3-of-3/User-Guide-585774-Page-16.png)
![ƃImage viewer : You can view the stored images.- Image viewer functions are listed below.ڹMenu bar : You can select menus.File, Edit, View, Tools, Change functions, Auto download, help, etc.ںImage selection window : You can select the desired images in this window.ڻMedia type selection menu : You can select image viewer, image edit and movie editfunctions in this menu.ڼPreview window : You can preview a image or a movie clip and check the multi mediainformation.ڽZoom bar : You can change preview size.ھFolder display window : You can see the folder location of the selected image.ڿImage display window : Images of the selected folder are displayed.ſRefer to the [Help] menu in Digimax Master for further information.ڹڽھڿںڻڼDigimax Masterŝ137Ş](https://usermanual.wiki/Hanwha-Techwin/DIGIMAXL55W.Users-Manual-3-of-3/User-Guide-585774-Page-17.png)
![ŝ138ŞƃImage edit : You can edit the still image.- Image edit functions are listed below.ڹEdit menu : You can select the following menus.[Tools] : You can resize or crop the selected image. See the [Help] menu.[Adjust] : You can modify image quality. See the [Help] menu.[Retouch] : You can change image or insert effects on the image. See the [Help] menu.ںDrawing tools : Tools for editing an image.ڻImage display window : a selected image displays in this window.ڼPreview window : You can preview the changed image.ſA still image edited with Digimax Master can’t be played back on the camera.ſRefer to the [Help] menu in Digimax Master for further information.ڹںڻڼDigimax Master](https://usermanual.wiki/Hanwha-Techwin/DIGIMAXL55W.Users-Manual-3-of-3/User-Guide-585774-Page-18.png)
![ƃMovie edit : You can get the still image, movie clip, narration, music files together in a movie clip.- Movie clip edit functions are listed below.ڹEdit menu : You can select the following menus.[Add Media] : You can add other media elements to a movie.[Edit Clip] : You can change the brightness, contrast, colour and saturation.[Effects] : You can insert an effect.[Set Text] : You can insert texts.[Narrate] : You can insert a narration.[Produce] : You can save the edited multi media as a new file name.You can insert multi media in this window. You can select AVI, Windowsmedia (wmv), Windows media (asf) and movie clip for this camera (AVI,MPEG-4) file types.ںFrame display window : You can insert multi media in this window.ſSome movie clips that was compressed with a codec that is not compatible with the DigimaxMaster can’t play back in the Digimax Master.ſRefer to the [Help] menu in Digimax Master for further information.ڹںDigimax Masterŝ139Ş](https://usermanual.wiki/Hanwha-Techwin/DIGIMAXL55W.Users-Manual-3-of-3/User-Guide-585774-Page-19.png)
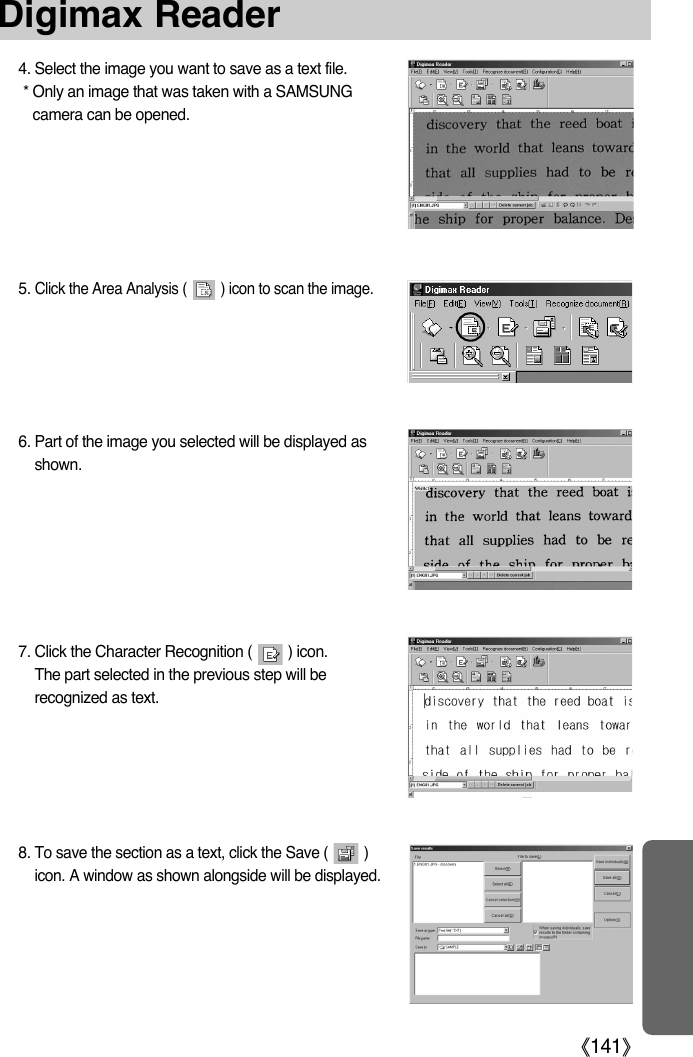
![ŝ140ŞƈDigimax Reader is a Text recognition program. You can save an image file that is captured inthe Text mode, as a text file with this program.This software is only compatible with Windows.ƈTo start the program, click [Start ƍPrograms ƍDigimax Reader Eng].The following screen will appear.ƈHow to use the Digimax Reader1. Connect the camera and the PC with a USB cable and download the images that werestored in the camera to the PC.* Please see page 127~129 for details on Connecting a camera and PC, Downloadingimages.2. Run the Digimax Reader.3. Click the Open ( ) icon as shown alongside.Digimax Reader](https://usermanual.wiki/Hanwha-Techwin/DIGIMAXL55W.Users-Manual-3-of-3/User-Guide-585774-Page-20.png)
![ŝ142ŞƃTo get an image that can be recognized as a text :-Keep a distance that you can capture the image clearly between the subject and the camera.- The subject need to be centered.- Avoid camera shake to get a good image.ƃRefer to the [Help] menu in Digimax Reader for further information.INFORMATION 9. Select the file type that you want.Selectable file types : *.TXT, *.HWP, *.DOC, *.RTFFAQƈPlease check the following if the USB connection malfunctions.[Case 1] The camera power is off.ƍTurn the camera power on. [Case 2] USB Driver is not installed correctly.ƍInstall the USB Driver correctly. Refer to page 118.[Case 3] The USB cable is not connected or you are using a cable with an incorrectspecification.ƍUse a USB cable with the correct specification.[Case 4] The camera is not recognized by your PC.Sometimes, the camera may appear under [Unknown Devices] in DeviceManager.ƍInstall the camera driver correctly.Turn off the camera, remove the USB cable, plug in the USB cable again, andthen turn on the camera.Digimax Reader](https://usermanual.wiki/Hanwha-Techwin/DIGIMAXL55W.Users-Manual-3-of-3/User-Guide-585774-Page-22.png)
![Case 5] There is an unexpected error during file transferƍTurn the camera power off and on again. Transfer the file again.[Case 6] How do I know my computer supports a USB Interface?ƍCheck the USB port in your computer or keyboard.ƍCheck the OS version. A USB Interface is available in Windows 98, 98SE,2000, ME, XP.ƍCheck [Universal Serial Bus controllers] in Device Manager. Do the following tochecks [Universal Serial Bus controllers].Win 98/ME : Follow [Start ƍSettings ƍControl Panel ƍSystem ƍDevice Manager ƍUniversal Serial Bus controllers].Win 2000 : Follow [Start ƍSettings ƍControl Panel ƍSystem ƍHardware ƍDevice Manager ƍUniversal Serial Buscontrollers].Win XP : Follow [Start ƍControl Panel ƍPerformance andMaintenance ƍSystem ƍHardware ƍDevice ManagerƍUniversal Serial Bus controllers].There must be USB Host Controller and USB root hub under [Universal SerialBus controllers].In addition, double-click on the USB Universal Host Controller and the USBRoot Hub to check if the Device Status states "This device is working properly".If the Device Status says the device is "not working properly", click the "Driver"tab and then click [Update Driver] or [Reinstall Driver].ƍWhen all the conditions mentioned above are met, the computer can supportthe USB interface.[Case 7] When using the USB hub.ƍThere may be a problem in connecting the camera to the PC through the USBhub if the PC and the hub are not compatible. Wherever possible, connect thecamera to the PC directly.[Case 8] Are other USB cables connected to the PC?ƍThe camera may malfunction when it is connected to the PC at the same timeas another USB cable. In this case, disconnect the other USB cable, andconnect only one USB cable to the camera.FAQŝ143Ş](https://usermanual.wiki/Hanwha-Techwin/DIGIMAXL55W.Users-Manual-3-of-3/User-Guide-585774-Page-23.png)
![ŝ144Ş[Case 9] When I open the Device Manager (by clicking Start ƍ(Settings) ƍControlPanel ƍ(Performance and Maintenance) ƍSystem ƍ(Hardware) ƍDeviceManager), there are èUnknown Deviceséor èOther Deviceséentries with ayellow question mark (?) beside them or devices with an exclamation mark (!)beside them.ƍRight-click on the entry with the question (?) or exclamation (!) mark and select"Remove". Restart the PC and connect the camera the again. For Windows 98PC, remove the camera driver also, restart the PC, and then reinstall thecamera driver.ƍDouble-click on the entry with the question (?) or exclamation (!) mark, click the"Driver" tab, and click [Update Driver] or [Reinstall Driver]. If a message appearsasking you to specify the location of the appropriate device driver, specify "USBDriver" in the CD supplied.[Case 10] In some security programs (Norton Anti Virus, V3, etc.), the computer may notrecognise the camera as a removable disk.ƍStop the security programs and connect the camera to the computer. Refer tothe security program instructions about how to stop the program.ƈWhen the movie clip doesn’t play back on the PCſWhen the movie clip recorded by the camera doesn’t play back on the PC, the causes aremostly due to the codec installed on the PC.ƃWhen the DirectX 9.0 or later is not installedƍInstall the DirectX 9.0 or later1) Insert the CD provided with the camera2) Run the windows explorer and select [CD-ROM drive:\USB Driver\DirectX 9.0] folder andclick the DXSETUP.exe file.The DirectX will be installed. Visit the following site fordownloading the DirectX.http://www.microsoft.com/directxFAQ](https://usermanual.wiki/Hanwha-Techwin/DIGIMAXL55W.Users-Manual-3-of-3/User-Guide-585774-Page-24.png)