Hanwha Techwin DIGIMAXS500 Digital Camera User Manual S500 en c v04
Samsung Techwin Co Ltd Digital Camera S500 en c v04
UserManual.wiki
>
Hanwha Techwin
>
DIGIMAXS500 User Manual
>
Users Manual 1
Contents
1.
Users Manual 1
2.
Users Manual 2
Users Manual 1
Navigation menu
Upload a User Manual
Namespaces
Wiki Guide
HTML
PDF
Info
Views
User Manual
Discussion / Help
Navigation
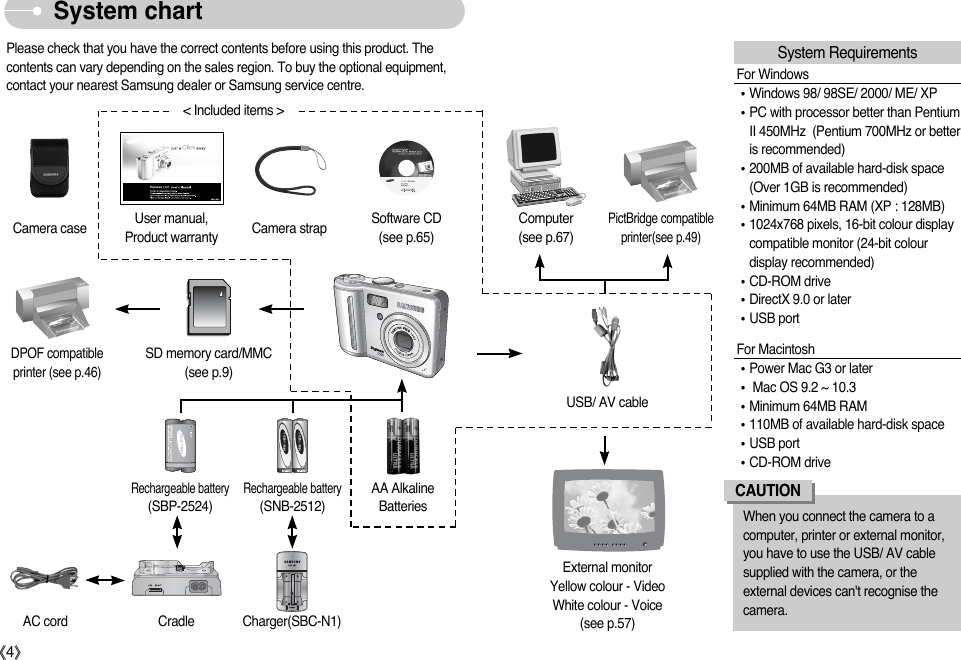
![ŝ1ŞInstructions Getting to know your cameraƈUse this camera in the following orderSet up the camera driverTake a pictureInsert the USB cableCheck the camera’s powerCheck [Removable Disk]Before connecting the camera to a PC, viathe USB cable, you will need to set up thecamera driver. Install the camera driverthat is contained in Application softwareCD-ROM. (p.66)Take a picture. (p.14)Insert the supplied USB cable into thePC’s USB port and the camera’s USBconnection terminal. (p.67)Check the camera’s power. If the power isturned off, press the camera button to turnit on. Open WindowŖs EXPLORER and searchfor [Removable Disk]. (p.68)ƃIf you use a card reader to copy the images on the memory card to your PC, theimages could be damaged. When transferring the images taken with the camerato your PC, be sure to use the supplied USB cable to connect the camera toyour PC. Please note that the manufacturer holds no responsibility for loss ordamage of images on the memory card due to the use of a card reader.Thank you for buying a Samsung Digital Camera.ƃPrior to using this camera, please read the user manual thoroughly.ƃWhen you require After Sales service, please bring the camera and the cause ofthe camera malfunction (such as battery, Memory card etc.) to the A/S centre.ƃPlease check that the camera is operating properly prior to when you intend touse it (e.g. for a trip or an important event) to avoid disappointment. Samsungcamera takes no responsibility for any loss or damages that may result fromcamera malfunction.ƃKeep the manual in a safe place.ҬMicrosoft, Windows and Windows logo are registered trademarks of MicrosoftCorporation incorporated in the United States and/or other countries.ҬAll brand and product names appearing in this manual are registered trademarksof their respective companies.](https://usermanual.wiki/Hanwha-Techwin/DIGIMAXS500.Users-Manual-1/User-Guide-615923-Page-2.png)

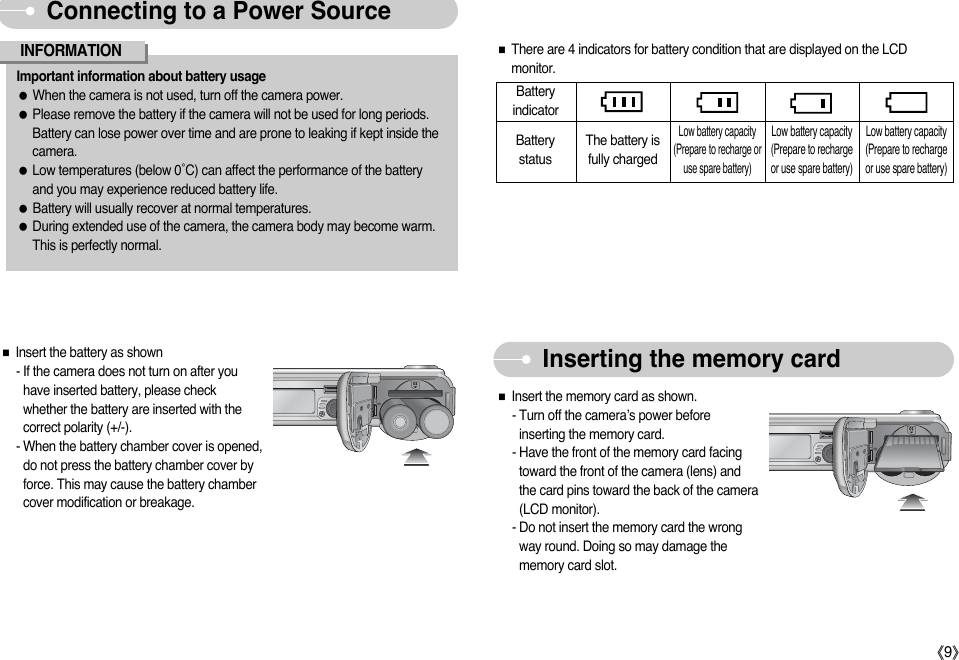
![ƃBe sure to format the memory card (see p.55) if you are using a newlypurchased memory for the first time, if it contains data that the camera cannotrecognise, or if it contains images captured with a different camera.ƃTurn off the camera power whenever the memory card is being inserted orremoved.ƃRepeated use of the memory card will eventually reduce the memory card’sperformance. Should this be the case, you will need to purchase a new memorycard. Wear and tear on the memory card is not covered by the Samsungwarranty.ƃThe memory card is an electronic precision device. Do not bend, drop or subject the memory card to any heavy impact.ƃDo not store the memory card in an environment with strong electronic ormagnetic fields, e.g. near loud speakers or TV receivers.ƃPlease do not use or store in an environment where there are extremes intemperature.ƃDo not allow the memory card to become dirty or to come into contact with anyliquid. Should this happen, clean the memory card with a soft cloth.ƃPlease keep the memory card in its case when not in use.ƃDuring and after periods of extended use, you may notice that the memory cardis warm. This is perfectly normal.ƃDo not use a memory card that is used in another digital camera.To use the memory card in this camera, format the memory card using thiscamera. ƃDo not use a memory card formatted by another digital camera or memory cardreader.ƃIf the memory card is subjected to any of the following, the recorded data maybecome corrupted :- When the memory card is used incorrectly.- If the power is switched off or the memory card is removed while recording,deleting (formatting) or reading.ƃSamsung cannot be held responsible for lost data.ƃIt is advisable to copy important data onto other media as back-up e.g. floppydisks, hard disks, CD etc.ƃIf there is insufficient memory available : A [Memory Full!] message will appear and the camera will not operate. Tooptimise the amount of memory in the camera, replace the memory card ordelete unnecessary images stored on the memory.ŝ10ŞInstructions on how to use the memory card](https://usermanual.wiki/Hanwha-Techwin/DIGIMAXS500.Users-Manual-1/User-Guide-615923-Page-11.png)
![ŝ11ŞInstructions on how to use the memory card[ SD (Secure Digital) memory card ]Write protectswitchLabelCard pinsƈThe camera can use SD Memory Cards and MMC (Multi Media Cards). Please consult the enclosed manual for using the MMC Cards.The SD memory card has a write protectswitch that prevents image files frombeing deleted or formatted. By sliding theswitch to the bottom of the SD memorycard, the data will be protected. By slidingthe switch to the top of the SD memorycard, the data protection will becancelled. Slide the switch to the top of the SDmemory card before taking a picture.ƃDon't remove the memory card when the camera status lamp is blinking asthis may cause damage to data in the memory card.INFORMATION ƈWhen using a 20MB internal memory, the specified shooting capacity will be asfollows. These figures are approximate as image capacities can be affected byvariables such as subject matter and memory card type.ſThe recording times can be changed by the zoom operation. The zoom button doesn’t use during the movie recording.Recorded image sizeSuper Fine Fine Normal30FPS 15FPS7 14 21 - -10 18 24 - -12 22 32 - -19 34 43 - -52 83 89 - -114 125 157 - -About 17" About 30"About 59" About 1' 48"About 2' 53" About 4' 42"6403201605M4M3M2M1MVGA*MovieclipStillimage](https://usermanual.wiki/Hanwha-Techwin/DIGIMAXS500.Users-Manual-1/User-Guide-615923-Page-12.png)
![ŝ12ŞWhen Using the Camera for the First TimeƈCharge the rechargeable battery fully before using the camera for the first time.ƈWhen the camera is turned on for the first time, a menu will be displayed to setdate / time, language and battery type in the LCD monitor. This menu will not bedisplayed after setting up. Set up the date / time, language and battery typebefore using this camera.ƃSetting up the date, time and date type1. Select the [Date&Time] menu by pressing the UP/DOWN button and press the RIGHT button.2. Select the desired sub menu by pressing the UP / DOWN / LEFT / RIGHT button and press the OK button.RIGHT button : Selects YEAR / MONTH / DAY / HOUR / MINUTE / DATETYPELEFT button : Moves the cursor to the [Date&Time] main menu if the cursoris at the first item of the date and time setup. In all otherinstances, the cursor will be shifted to the left of its currentposition.UP/ DOWN button : Changes the value of each item.ƃSetting up the battery type1. Select the [Battery Type] menu by pressing theUP / DOWN button and press the RIGHT button.2. Select the desired sub menu by pressing theUP / DOWN button and press the OK button.ƃSetting up the language1. Select the [Language] menu by pressing theUP/DOWN button and press the RIGHT button.2. Select the desired sub menu by pressing theUP / DOWN button and press the OK button. When the settings are complete, press theMENU button twice to exit the menu screen.ƃYou can select 22 languages. These are listed below :- English, Korean, French, German, Spanish, Italian, S.Chinese, T.Chinese,Japanese, Russian, Portuguese, Dutch, Danish, Swedish, Finnish, Thai,BAHASA(MALAY/ INDONESIAN), Arabic, Hungarian, Czech, Polish andTurkish.ƃEven if the camera is restarted, the language setting will be maintained.INFORMATIONSETUPDate&TimeLanguageBattery TypeBack:ȜSet:OKƊ05/11/21 ƌ14:29yy/mm/ddSETUPDate&TimeLanguageBattery TypeAlkalineNi-MHBack:ȜSet:OKSETUPDate&TimeLanguageBattery TypeENGLISHFRANÇAISDEUTSCHESPAÑOLBack:ȜSet:OK](https://usermanual.wiki/Hanwha-Techwin/DIGIMAXS500.Users-Manual-1/User-Guide-615923-Page-13.png)
![ŝ13ŞLCD monitor indicator[Image & Full Status]ںڻڽڼھڿۀہۇۅۆ؇؆؉؈ۄۂ ۃ؋ ؊ڹƈThe LCD monitor displays information about the shooting functions andselections. No. Description Icons Page4Continuous shot p.335Flash p.21~236Self-timer p.237Macro p.20~218 Metering p.339 Card inserted indicator -10 Auto focus frame -11 Camera shake warning p.1712 Date / Time 2005/12/01 01:00 PM p.5513 Exposure compensation p.3014 White Balance p.29~3015 ISO p.2916 RGB RGB p.2817 Sharpness p.3418Image quality / Frame ratep.3219 Image size p.32Number of available shots remaining12 p.11Remaining time (Movie clip/ Voice recording)00:01:30/ 01:00:00 p.1221 Voice memo p.2022 Optical/ Digital Zoom bar/ Digital Zoom ratep.18~1920No. Description Icons Page2Battery p.93Aperture Value / Shutter SpeedF2.8, 1/30s p.14Recording mode p.14~171](https://usermanual.wiki/Hanwha-Techwin/DIGIMAXS500.Users-Manual-1/User-Guide-615923-Page-14.png)
![ŝ14ŞStarting the recording modeƈHow to use the PROGRAM mode ( )Selecting the automatic mode will configure thecamera with optimal settings. You can still manuallyconfigure all functions except the aperture value andshutter speed.1. Select the PROGRAM mode by rotating the modedial.2. Press the menu button to configure advancedfunctions such as image size (p.32), quality (p.32),metering (p.33), continuous shooting (p.33) andspecial effects (p.24).ƈHow to use the MANUAL mode ( )You can manually configure all functions with theaperture value and shutter speed.1. Select the MANUAL mode by rotating the modedial.2. Press the + / - button and menu for the shutterspeed and aperture value will display. Up / Down button : changes aperture valueLeft / Right button : changes shutter speed. 3. Press the + / - button twice and take an image. * When the aperture value is changed, the camera will change the shutter speedautomatically to get proper exposure.When the shutter speed is changed, the camera will change the aperture valueautomatically to get proper exposure. * Smaller Aperture values make the object sharp but blur the background. LargerAperture values make both the object and background sharp.* High Shutter speeds can capture a moving object in a still image as if the object isnot moving. Low Shutter speeds can capture a moving object with an ‘active’effect.ƈHow to use the AUTO mode ( )[ AUTO mode ][MANUAL mode][ PROGRAM mode ]ƃIf the auto focus frame turns to red when you press the shutter button downhalf way, It means that the camera cannot focus on the subject. Should thisbe the case, the camera is unable to capture an image clearly.INFORMATION1. Insert the batteries (p.9). Insert the batteries takingnote of the polarity (+ / -).2. Insert the memory card (p.9). As this camera has a20MB internal memory, you do not need to insertthe memory card. If the memory card is notinserted, an image will be stored in the internalmemory. If the memory card is inserted, an imagewill be stored on the memory card.3. Close the battery chamber cover.4. Press the power button to turn on the camera. (If the date/ time that is displayed on the LCDmonitor is incorrect, reset the date / time beforetaking a picture.)5. Select the AUTO mode by rotating the mode dial.6. Point the camera towards the subject and compose the image by using theLCD monitor.7. Press the shutter button to capture an image.](https://usermanual.wiki/Hanwha-Techwin/DIGIMAXS500.Users-Manual-1/User-Guide-615923-Page-15.png)
![ŝ15ŞStarting the recording modeƈHow to use the MOVIE CLIP mode ( )1. Select the MOVIE CLIP mode by rotating themode dial.2. The MOVIE CLIP mode icon and availablerecording time will display on the LCD monitor.3. Point the camera towards the subject andcompose the image by using the LCD monitor.Press the shutter button and movie clips arerecorded for as long as the available recordingtime. Movie clips will still be recorded if the shutterbutton is released.* If you wish to stop recording, press the shutterbutton again.* Image size and type are listed below.- Image size : 640X480, 320X240, 160X120 (Selectable) - File type : *.avi (MJPEG)ƈRecording the movie clip without voiceYou can record the movie clip without voice.1. Press the Up button and the ( ) icon willdisplay on the LCD monitor.2. Press the shutter button and movie clip isrecorded for as long as the available recordingtime without voice.3. To stop the recording, press the shutter buttonagain.[ MOVIE CLIP mode ][ MOVIE CLIP mode ]ƈPausing while recording a movie clip (Successive Recording)This camera allows you to temporarily stop during unwanted scenes, whilerecording a movie clip. Using this function, you can record your favourite scenesinto a movie clip without having to create multiple movie clips.ƃUsing Successive Recording 1. Press the shutter button and movie clips arerecorded for as long as the available recording time.Movie clips will still be recorded if the shutter buttonis released.2. Press the Pause button ( ) to pause recording.Press the Pause button ( ) again to resumethe recording.3. If you wish to stop recording, press the shutterbutton again.[Successive recording of a movie clip]Stop:Shutter REC:/](https://usermanual.wiki/Hanwha-Techwin/DIGIMAXS500.Users-Manual-1/User-Guide-615923-Page-16.png)
![ŝ16ŞStarting the recording mode[Night mode] [Portrait mode] [Children mode]ƈNight / Portrait / Children mode Rotate the mode dial to select a desired mode. Each mode suit the followingenvironment. - Night mode : Use this for still images at night or in other dark conditions- Portrait mode : To take a picture of a person- Children mode : To take a still picture of moving childrenƈHow to use the SCENE mode ( )Use the menu to easily configure optimal settings fora variety of shooting situations. These includeLANDSCAPE, CLOSE UP, SUNSET, DAWN,BACKLIGHT, FIREWORKS and BEACH & SNOWscenes.1. Select the SCENE mode by rotating the mode dial.2. Press the menu button and select a desired scenemenu.[Scene mode][Landscape] ( ) : To take pictures of distant scenery.[Close up] ( ) : Close-up shooting for small objects such asplants and insects.[Sunset] ( ) : For taking pictures of sunsets.[Dawn] ( ) : Daybreak scenes..[Backlight] ( ) : Portrait without shadows caused by backlight.[FIirework] ( ) : Firework scenes.[Beach&Snow] ( ) : For ocean, lake, beach and snowscape scenes.](https://usermanual.wiki/Hanwha-Techwin/DIGIMAXS500.Users-Manual-1/User-Guide-615923-Page-17.png)
![ŝ17ŞStarting the recording modeThings to Watch Out for When Taking PicturesƈHow to use the VOICE RECORDING mode ( )A voice recording can be recorded for as long as theavailable recording time of the memory capacity allows.(Max: 1 hour)1. In any mode with the exception of Movie clip mode,select the VOICE RECORDING mode by pressing theVoice recording button twice.2. Press the shutter button to record a voice. - Press the shutter button once and voice isrecorded for as long as the available recordingtime (Max : 1 hour) allows. The recording timewill be displayed on the LCD monitor. Voice willstill be recorded if the shutter button is released.- If you wish to stop recording, press the shutterbutton again.- File type : *.wav* A distance of 40cm between you and the camera (microphone) is the bestdistance to record sound.ƈPressing the shutter button down half way.Lightly press the shutter button to confirm focus and flash battery charge. Press the shutter button all way down to take the picture.[ Lightly press the shutter button ][ Press the shutter button ]ƈThe available recording time may vary depending on shooting conditions andcamera settings.ƈWhen the Flash Off or Slow synchro mode is selected in a low lighting condition,the camera shake warning indicator ( ) may appear on the LCD monitor. Inthis case, use a tripod, support the camera on a solid surface or change the flashmode to flash shot mode.ƈCompensated shooting against the light : Please do not take pictures to the sunlight direction. Taking a picture against thesun may make the picture dark. To take a picture against the sun, please use the[Backlight] in the scene shooting mode (see page 16), fill-in flash (see page 22),spot metering (see page 33), or exposure compensation (see page 30).ƈAvoid obstructing the lens or the flash when you capture an image.ƈCompose the image by using the LCD monitor.ƈUnder certain conditions the auto focus system may not perform as expected.- When photographing a subject that has little contrast.- If the subject is highly reflective or shiny.- If the subject is moving at high speed.- When there is strong reflected light, or when the background is very bright.- When the subject matter has only horizontal lines or the subject is very narrow (such as a stick or flagpole).- When the surroundings are dark.[ VOICE RECORDING mode ]REC:Shutter Exit](https://usermanual.wiki/Hanwha-Techwin/DIGIMAXS500.Users-Manual-1/User-Guide-615923-Page-18.png)
![ŝ18ŞUsing the camera buttons to adjust the cameraZOOM W / T buttonƈThe recording mode function can be set up by using the camera buttons.ƃUsed for turning the camera’s power on / off.ƃIf there is no operation during the specified time,the camera's power will be turned offautomatically to save battery life. Refer to page 54 for more information about theauto power off function.POWER buttonƃUsed for taking an image or recording voice inthe RECORDING mode.ƃIn MOVIE CLIP mode : Pressing the shutter button down fully starts theprocess for recording a movie clip. Press theshutter button once and the movie clip isrecorded for as long as the available recordingtime in the memory allows. If you wish to stop recording, press the shutter buttonagain.ƃIn STILL IMAGE modePressing the shutter button down halfway activates the autofocus and checksthe condition of the flash. Pressing the shutter button down fully takes the imageand stores the relevant data regarding the shot. If you select voice memorecording, the recording will start after the camera has finished storing the imagedata.Shutter buttonƃIf the menu is not displayed, this button worksas the OPTICAL ZOOM or DIGITAL ZOOMbutton.ƃThis camera has a 3X optical zoom and a 5X digital zoom function. Using both will offer a total zoom ratio of 15X.ƃTELE ZoomOptical zoom TELE : Pressing the ZOOM T button. This will zoom into thesubject i.e. the subject will appear nearer.Digital zoom TELE : When the maximum (3X) optical zoom is selected,pressing the ZOOM T button activates the digital zoomsoftware. Releasing ZOOM T button stops the digitalzooming at the required setting. Once the maximumdigital zoom (5X) is achieved, pressing the ZOOM Tbutton will have no effect.2005/12/01[ WIDE zoom ] [ TELE zoom ] [ Digital zoom 5.0X ]Pressing the ZOOM T buttonPressing the ZOOM T button](https://usermanual.wiki/Hanwha-Techwin/DIGIMAXS500.Users-Manual-1/User-Guide-615923-Page-19.png)
![ŝ19ŞZOOM W / T buttonƃImages taken using the digital zoom may take a little longer for the camerato process. Allow time for this to take place.ƃThe digital zoom cannot be used in movie clip shots.ƃYou may notice a decrease in image quality when using the digital zoom.ƃTo view more clear digital zoom image, press the shutter button halfway atthe maximum (3X) optical zoom position and press the zoom T buttonagain.ƃThe digital zoom can't be activated in the Nightscene mode, Children modeand two scene modes(Close up, Fireworks).ƃTake care not to touch the lens to avoid taking an unclear image andpossibly causing camera malfunction. If the image is dim, turn the camerapower off and on again to modify the lens position.ƃTake care not to press the lens as this may cause a camera malfunction.ƃWhen the camera is turned on, take care not to touch the camera's movinglens parts as this may cause the resulting image to be dim and unclear.ƃTake care not to touch the lens during zoom operation as this may causedamage.INFORMATION[ TELE zoom ] [ Optical zoom 2X ] [ WIDE zoom ]Pressing the ZOOM W buttonPressing the ZOOM W button[ Digital zoom 5.0X ] [ TELE zoom ] [ WIDE zoom ]Pressing the ZOOM W buttonPressing the ZOOM W buttonƃWIDE ZoomOptical zoom WIDE : Pressing the ZOOM W button. This will zoom out fromthe subject i.e. the subject will appear further away.Pressing the ZOOM W button continuously will set thecamera to its minimum zoom setting i.e. the subjectappears at its furthest from the camera.Digital zoom WIDE : When the digital zoom is in operation, pressing theZOOM W button will reduce the digital zooming insteps. Releasing ZOOM W button stops digitalzooming. Pressing the ZOOM W button will reducethe digital zoom and then it will continue to reduce theoptical zoom until the minimum setting is reached. Optical zoomDigital zoom](https://usermanual.wiki/Hanwha-Techwin/DIGIMAXS500.Users-Manual-1/User-Guide-615923-Page-20.png)
![ŝ20ŞVoice recording( ) / Voice memo( ) / UP buttonMacro( ) / Down buttonƈWhile the menu is showing, press the UP button to move up the submenucursor. When the menu is not displayed on the LCD monitor, the UP buttonoperates as the voice recording or voice memo ( ) button. You can add yourvoice-over to a stored still image. Refer to page 17 for more information aboutthe voice recording. ƃRecording a voice memo1. Rotate the MODE DIAL to select a RECORDING mode with the exception ofMOVIE CLIP mode. 2. Press the VOICE MEMO ( ) button. If the voice memo indicator isdisplayed on the LCD monitor, the setting is completed.3. Press the shutter button and take a picture. The picture is stored on thememory card.4. Voice memo will be recorded for ten seconds from the moment the picture isstored. In the middle of the sound recording, pressing the shutter button willstop the voice memo.ƃA distance of 40cm between you and the camera (microphone) is the bestdistance to record sound.INFORMATIONƈWhile the menu is showing, press the DOWN button to move from the mainmenu to a submenu, or to move down the submenu cursor. When the menu isnot showing, you can use the MACRO / DOWN button to take macro pictures.The distance ranges are shown below. Press the Macro button until the desiredmacro mode indicator displays on the LCD monitor.ƈTypes of focus modes and focus ranges (W: Wide, T: Tele) (Unit : cm)ModeFocus TypeAuto macro ( ) Normal Macro ( ) NormalFocus rangeW : 5~InfinityT : 40~InfinityW : 80~InfinityT : 80~InfinityW : 80~InfinityT : 80~InfinityW : 5~80T : 40~80Program ( )Auto ( )ƃWhen the macro mode is selected, it is possible that camera shake willoccur. Take care not to shake the camera.ƃWhen you take a picture within 30cm in the Macro mode, select the FLASHOFF mode.INFORMATION[Preparing for Voice Memo] [Recording Voice Memo]Stop:Shutter [Auto macro ( )][Macro ( )][Auto focus - No icon]](https://usermanual.wiki/Hanwha-Techwin/DIGIMAXS500.Users-Manual-1/User-Guide-615923-Page-21.png)
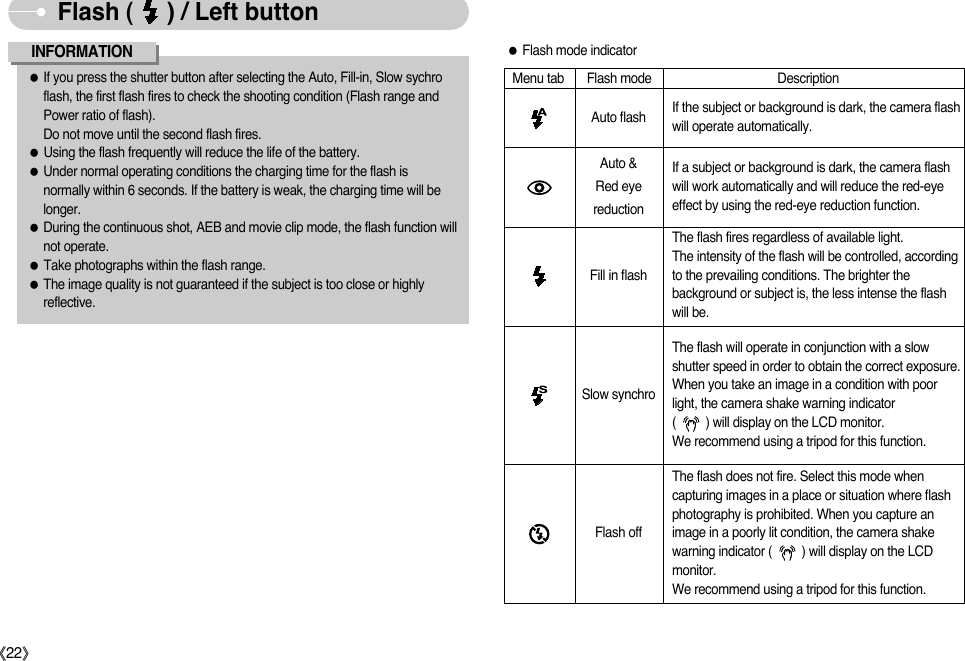
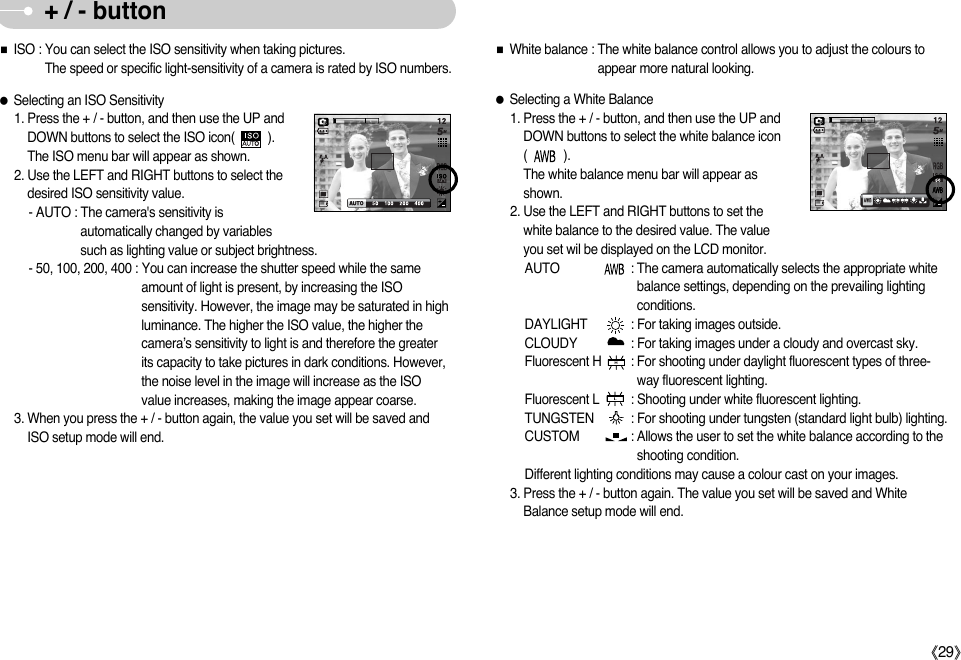
![ŝ21ŞMacro( ) / Down button Flash ( ) / Left buttonƃFlash range (Unit : m)ƈWhen the menu is displayed on the LCD monitor,pressing the LEFT button makes the cursor shift tothe left tab.ƈWhen the menu is not displayed on the LCDmonitor, the LEFT button operates as the FLASH ( ) button.ƃSelecting the flash mode1. Rotate the MODE DIAL to select a RECORDINGmode with the exception of MOVIE CLIP mode.2. Press the Flash button until the desired flash mode indicator displays on theLCD monitor. 3. A flash mode indicator will be displayed on the LCD monitor. Use the correct flash to suit the environment.WIDE TELE WIDE TELE WIDE TELE0.8 ~ 3.0 0.8 ~ 2.5 0.2 ~ 0.8 0.4 ~ 0.8 0.2 ~ 3.0 0.4 ~ 2.5 ISOAUTO[Selecting the Auto flash]ƈAvailable focusing method, by recording mode (O: Selectable , X: Not selectable, ∞: Infinity focus range)OOOOOOOXOOXXXOOXXXXXXModeNormalMacroAuto macroNormalMacroAuto macroMode SCENEūXūūOūOXOXXXXXXXXXXXXƈTo focus on the subject positioned outside of the centre, use the focus lock function.ƃUsing the Focus Lock1. Ensure the subject is in the centre of the autofocus frame.2. Press the SHUTTER button halfway. When the green auto focus frame lightsup, it means the camera is focused on the subject. Be careful not to press theSHUTTER button all the way down to avoid taking an unwanted picture.3. With the SHUTTER button still pressed down only halfway, move the camerato recompose your picture as desired, and then press the SHUTTER buttoncompletely to take the picture. If you release your finger from the SHUTTERbutton, the focus lock function will be cancelled.1. The image to becaptured.2. Press the SHUTTERbutton halfway andfocus on the subject.3. Recompose the pictureand fully depress theSHUTTER button.Focus lockNormal Macro Auto macro](https://usermanual.wiki/Hanwha-Techwin/DIGIMAXS500.Users-Manual-1/User-Guide-615923-Page-22.png)
![ŝ23ŞFlash ( ) / Left button Self-timer ( ) / Right buttonƃIf you operate the Self-timer and Play mode button during the self-timeroperation, the self-timer function is canceled.ƃUse a tripod to prevent the camera from shaking.ƃIn Movie Clip mode, only the 10s self-timer and remote will work.ƃAvailable flash mode, by recording modeXXOXXXXXXXX XXOXOOXXOOXXXX XXXXXOOXXXXXXXOXXXXOXOXXXXXX XXXOOOOOOOOOOO XOXƃSelecting the self-timer1. Rotate the MODE DIAL to select a RECORDINGmode with the exception of VOICE RECORDINGmode.2. Press the SELF-TIMER button until the desiredmode indicator displays on the LCD monitor.A 2 second, 10 second or double self-timer iconappears on the LCD monitor. In Movie Clip mode,only the 10-second self-timer will work.2SEC self-timer ( ): Pressing the shutter button will allow an intervalof 2 seconds before the image is taken.10SEC self-timer ( ) : Pressing the shutter button will allow an intervalof 10 seconds before the image is taken.Double self-timer ( ) : A picture will be taken after about 10 seconds and 2 seconds later asecond picture will be taken. When using the flash, the 2-second self-timermay be delayed for longer than 2 seconds depending on the flash chargetime.3. When you press the SHUTTER button, the picture will be taken after thespecified time has elapsed.ƈWhen the menu is displayed on the LCD monitor, pressing the Right buttonmakes the cursor shift to the right tab.ƈWhen the menu is not displayed on the LCD monitor, the RIGHT buttonoperates as the Self-timer( ) button. This function is used when thephotographer would also like to be in the image.INFORMATION[Selecting the 10 SEC self-timer]Self-timer( ) / Right button](https://usermanual.wiki/Hanwha-Techwin/DIGIMAXS500.Users-Manual-1/User-Guide-615923-Page-24.png)
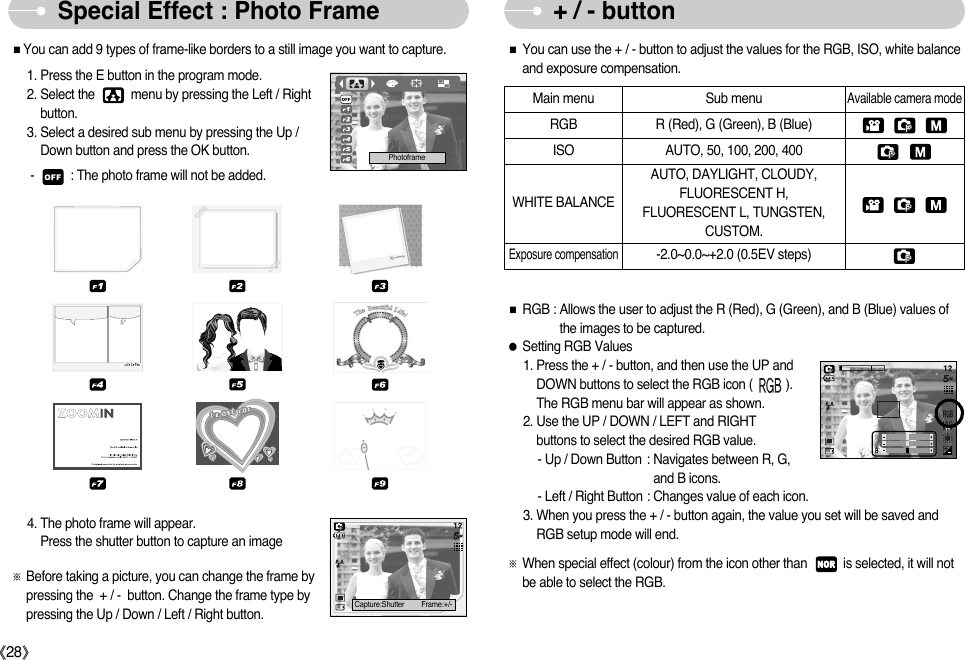
![ŝ24ŞMENU / OK button E (Effect) buttonƈIt is possible to add special effects to your images by using this button.ƈStill image mode : You can select the colour, outfocus, composite and framemenus.ƈMovie clip mode : You can select the colour menu.ƈAvailable Effects, by recording mode (O : Selectable X : Not selectable)ſThis button will not operate in the Voice recording mode and some scene modes(Night, Sunset, Dawn, Backlight, Firework).If a special effect is selected, the rest special effect (Preset focus frames,Composite shooting, Photo frame) functions set before are cancelledautomatically.ƈEven if the camera is turned off, the special effect setting will be preserved. Tocancel the special effect, select the ( ) sub in the Colour menu and selectthe ( ) sub menu in the rest special effect menu.ƈMENU button- When you press the MENU button, a menu related to each camera mode willbe displayed on the LCD monitor. Pressing it again will return the LCD to theinitial display.- A menu option can be displayed when the following are selected :MOVIE CLIP and STILL IMAGE mode. There is no menu available when theVOICE RECORDING mode is selected.ƈOK button- When the menu is displayed on the LCD monitor, this button is used for shiftingthe cursor to the sub menu or for confirming data.Pressing the MENU button[Menu off] [Menu on]SIZE2592X19442272X17042048X15361600X12001024X768640X480OO O OO OO O OXXOOOOOOOXXOOOOOOOXXOOOOOOO](https://usermanual.wiki/Hanwha-Techwin/DIGIMAXS500.Users-Manual-1/User-Guide-615923-Page-25.png)
![ŝ25ŞSpecial Effect : ColourSpecial Effect : Preset focus frames3. Select a desired sub menu by pressing the Up / Down button and press theOK button. : No effect is added to the image: Captured images will be stored in black and white.: Captured images will be stored in a sepia tone (a gradient of yellowish brown colours).: Captured images will be stored in a red tone.: Captured images will be stored in a green tone.: Captured images will be stored in a blue tone.: Save the image in negative mode.4. Press the shutter button to capture an image.ƈYou can make the subject stand out from itssurroundings. The subject will be sharp and in focuswhile making the rest out of focus.1. Press the E button in the program mode. 2. Select the ( ) menu tab by pressing the Left /Right button. 3. Select a desired sub menu by pressing the Up /Down button and press the OK button.4. The preset focus frame will appear. Press the shutter button to capture an image[Range 1] [Range 2] [Range 3] [Range 4]ƈBy using the camera’s digital processor, it is possible to add special effects toyour images1. Press the E button in the still image mode or Movie clip mode. 2. Select the ( ) menu tab by pressing the Left / Right button. [Still image mode] [Movie clip mode]Normal Normal0QOP4QOP\0QOP4QOP\ 0QOP4QOP\ 0QOP4QOP\ 0QOP4QOP\Capture:Shutter Edit:+/-](https://usermanual.wiki/Hanwha-Techwin/DIGIMAXS500.Users-Manual-1/User-Guide-615923-Page-26.png)
![ŝ26ŞSpecial Effect : Preset focus framesSpecial Effect : Composite shootingƈYou can combine 2 ~ 4 different shots in a still image.1. Press the E button in the program mode. 2. Select the menu by pressing the Left / Rightbutton. 3. Select a desired sub menu by pressing the Up /Down button and press the OK button.- : cancels the composite shooting- : 2 different shots are combined in a still image.- : 3 different shots are combined in a still image.- : 4 different shots are combined in a still image.- : 2 different panorama shots are combined in a still image.4. The number of frames you selected in step 3 is displayed on the LCD monitor. Press the shutter button to start the composite shootingſSelecting 2 composite shooting5. After taking the last shot, the image will be saved. Composite[Ready for taking] [First shot] [Second shot] [The final picture]Capture:Shutter Edit:+/-Capture:Shutter Edit:+/-Capture:Shutter Move:ƃMoving and changing the focus frameYou can change the focus frame after selecting a Range menu.1. Point the camera towards the subject and compose the image by using theLCD monitor. 2. Press the + / - button.3. The colour of focus frame turns white. Press the Up / Down / Left / Rightbutton to moves the focus frame position.4. To select the focus frame position, press the + / - button again and you cantake a picture. [The frame is activated]Capture:Shutter Move:[After changing the frame position]Pressing the + / - buttonPressing the + / - buttonCapture:Shutter Del:+/- Save:OK Del:+/-Pressing theUp / Down / Left /Right buttonPressingthe shutterbuttonPressingthe shutterbutton](https://usermanual.wiki/Hanwha-Techwin/DIGIMAXS500.Users-Manual-1/User-Guide-615923-Page-27.png)
![ŝ27ŞSpecial Effect : Composite shootingƃChanging a part of composite shot before taking the last shotBefore taking the last composite shot, you can change a part of composite shot.1. During the composite shots, press the + / - button.2. A previous image will be deleted and new frame will display. If there is an image taken before, press the + / - button again and a previousimage will be deleted again.3. Press the shutter button to capture a new image.[Before taking the 3rd shot]Pressing the Up buttonPressing the OKbutton Pressing the + / - buttonƃChanging a part of composite shot after taking the last shotAfter taking the last composite shot, you can change a part of composite shot. 1. After taking the last shot , a cursor to select a frame will display. Press the Up /Down / Left / Right button to select the frame. 2. Press the + / - button and an image will be deleted. Composite frame will beactivated. 3.Press the Shutter button. You can take another images again by using the Up /Down / Left / Right button and + / - button.4. Press the OK button again to save the captured image.ƃYou can use the flash button, self-timer button, macro button, voice memobutton and the Zoom W / T button during the composite shooting.ƃIf you press the Play mode button or press the Voice recording button twiceduring the composite shots, each camera working mode is executed.When the Menu or E button is pressed, a confirmation window will display.The images captured before will be deleted.ƃThe voice memo will start after taking the last composite shooting.INFORMATION[Moving backward to the 2nd shot]Capture:Shutter Del:+/-Capture:Shutter Del:+/-[After taking the 4th shot]Save:OK Del:+/-[Moving backward to the 2nd shot]Save:OK Del:+/-[After taking the 2nd shot again]Save:OK Del:+/-[Deleting the 2nd shot] [The final picture]Pressing theShutter button. Pressing the + / - button](https://usermanual.wiki/Hanwha-Techwin/DIGIMAXS500.Users-Manual-1/User-Guide-615923-Page-28.png)
![ŝ30Ş+ / - buttonƃUsing the Custom White BalanceWhite balance settings may vary slightly depending on the shootingenvironment. You can select the most appropriate white balance setting for a given shootingenvironment by setting up the custom white balance.ƈExposure compensation : This camera automatically adjusts the exposureaccording to the ambient lighting conditions. You can also select the exposure value by using the + / - button.3. Press the + / - button again. The value you set will be saved and the ExposureCompensation setup mode will close. If you change the exposure value, the exposure indicator ( ) will bedisplayed on the bottom of the LCD monitor.ſA negative exposure compensation value reduces the exposure. Note that a positive exposure compensation value increases the exposureand the LCD monitor will appear white or you may not get good pictures.1. Select the CUSTOM ( ) menu of theWhite Balance.2. Place a sheet of white paper in front of thecamera so that the LCD monitor shows onlywhite, and then press the SHUTTER button.3. Your custom white balance value is stored.- The custom white balance value will beapplied, starting with the next picture youtake.- The user configured white balance will beremain effective until it is overwritten. ٌ[ White paper ]ƃCompensating Exposure1. Press the + / - button, and then use the UP andDOWN buttons to select the exposurecompensation icon ( ). The exposure compensation menu bar willappear as shown.2. Use the LEFT and RIGHT buttons to set thedesired exposure compensation factor.](https://usermanual.wiki/Hanwha-Techwin/DIGIMAXS500.Users-Manual-1/User-Guide-615923-Page-31.png)
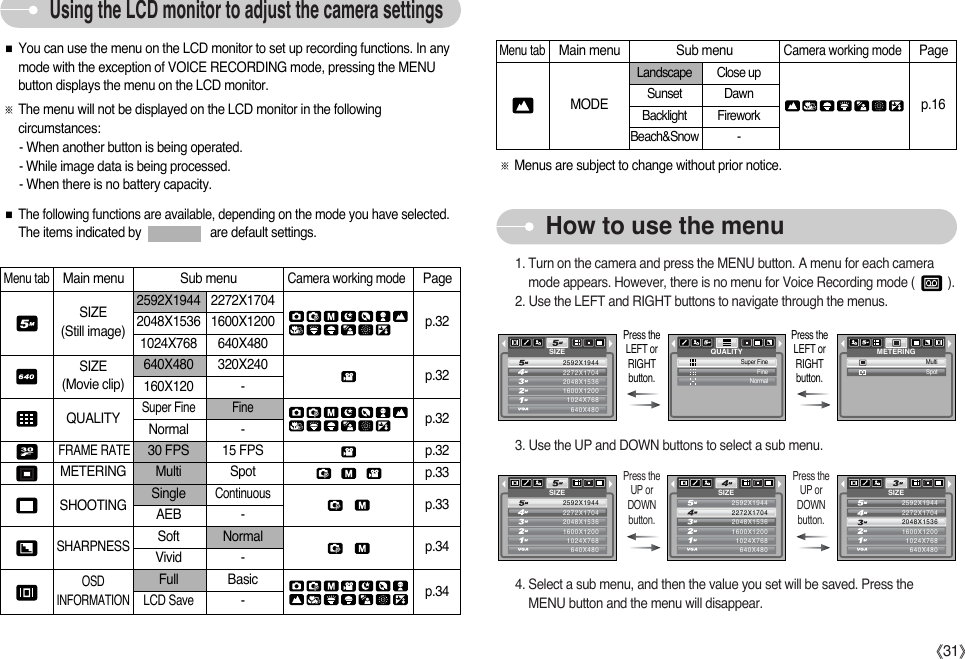
![ŝ32ŞSize Quality / Frame rate[ STILL IMAGE mode ]QUALITYSuper FineFineNormal[ MOVIE CLIP mode ]FRAME RATE30FPS15FPSƈYou can select the compression ratio appropriate for your application of thecaptured images.The higher the compression ratio, the lower the picture quality.IconSub menuSuper FineFine Normal 30FPS 15FPSFile Formatjpeg jpeg jpeg avi aviSTILL IMAGE modeMode MOVIE CLIP modeƃThis file format complies with the DCF (Design rule for Camera Filesystem).ƃJPEG (Joint Photographic Experts Group) : JPEG is the imagecompression standard developed by the Joint Photographic Experts Group.This type of compression is most commonly used for compressing photosand graphics because it can compress the files efficiently without damagingthe data.INFORMATIONƈYou can select the image size appropriate for your application.Icon2592X 2272X 2048X 1600X 1024X 640X 640X 320X 160X1944 1704 1536 1200 768 480 480 240 120Still image modeMode SizeMovie clip modeƃThe higher the resolution, the lower the number of available shots will bebecause high resolution images require more memory than lower resolutionimages.INFORMATION[ STILL IMAGE mode ]SIZE2592X19442272X17042048X15361600X12001024X768640X480[ MOVIE CLIP mode ]SIZE640X480320X240160X120](https://usermanual.wiki/Hanwha-Techwin/DIGIMAXS500.Users-Manual-1/User-Guide-615923-Page-33.png)
![ŝ33ŞƈIf you cannot obtain suitable exposure conditions, you can change the meteringmethod to take brighter pictures.[Multi] : Exposure will be calculated based on anaverage of the available light in the imagearea. However, the calculation will bebiased towards the centre of the imagearea. This is suitable for general use.[Spot] : Only the rectangular area in the centre ofthe LCD monitor will be metered for light.This is suitable when the subject in thecentre is exposed correctly, regardless of the back lighting.ſIf the subject is not the centre of the focus area, do not use the spot meteringas this may result in an exposure error. In this circumstance, It is better to useexposure compensation.ƈYou can select continuous shot, and AEB (AutoExposure Bracketing).- [SIingle] : Take one picture only- [Continuous] : Images will be taken continuouslyuntil the shutter button is released.The shooting capacity depends onthe memory.- [AEB] : Take three pictures in a series indifferent exposures: short exposure(-0.5EV), standard exposure (0.0EV) and over exposure(+0.5EV). Use the mode if it is hard to decide exposure of theobject. ſHigh resolution and picture quality increases file saving time, which increasesstand-by time. ſIf the [Continuous] or [AEB] sub menu is selected, the flash will be offautomatically. ſIf less than 3 pictures are available in the memory, the AEB shooting is notavailable. ſIt is best to use a tripod for the AEB shooting as the time to save each imagefile is longer and the blurring caused by camera shake may occur. [ PROGRAM mode ]METERINGMultiSpor[ PROGRAM mode ]SHOOTINGSingleContinuousAEBMetering Continuous shot](https://usermanual.wiki/Hanwha-Techwin/DIGIMAXS500.Users-Manual-1/User-Guide-615923-Page-34.png)
![ŝ34ŞSharpnessOSD (On Screen Display) informationƈIn any mode with the exception of VOICE RECORDING mode, you can checkthe recording status in the LCD monitor.ƈIdle mode : If you select the [LCD Save] and thecamera isn't operated during thespecified time(about 30 SEC.), thecamera power will be idle (LCD monitor: OFF, Camera status lamp : Blinking)automatically.- To use the camera again, press any of thecamera buttons except the power button.- If there is no operation during the specified time,the camera power will be turned off automaticallyto save battery life. Refer to page 54 for moreinformation about the auto power off function.OSD INFORMATIONFullBasicLCD Save[ Full information mode ] [ Basic information mode ]ƈYou can adjust the sharpness of the picture youwant to take. You cannot check the sharpness effecton the LCD monitor before you take a picture,because this function is applied only when thecaptured image is stored on the memory. Sub menu Icon Description The edges of the image are softened. This effect is suitable for editing images on your PC.The edges of the image are sharp. This is suitable for printing.The edges of the image are emphasized. The edgeswill appear sharp, but noise may occur in therecorded image.VividNormalSoft[ PROGRAM mode ]SHARPNESSSoftNormalVivid](https://usermanual.wiki/Hanwha-Techwin/DIGIMAXS500.Users-Manual-1/User-Guide-615923-Page-35.png)
![ŝ35ŞStarting play modeƃPlaying back a movie clipSteps from 1-2 are the same as those to play backa still image.3. Select the recorded movie clip and press thePlay & Pause button ( ) to play back. - To pause a movie clip file while playing it back,press the play & pause button again.- Pressing the play & pause button again willcause the movie clip file will restart.- To rewind the movie clip while it is playing,press the LEFT button. To fast forward themovie clip, press the RIGHT button.- To stop playback of the movie clip, press the play & pause button, and thenpress the LEFT or RIGHT button.ƈMovie clip capture function : capture still images from the movie clip.ƃHow to capture the movie clipSteps 1-3 are the same as those for playing backa movie clip.4. Press the Play / Pause button while playing themovie clip. Then press the E button.5. The paused movie clip is saved in a new filename.ſThe captured movie clip file has same size asthe original movie clip (640X480, 320X240,160X120).[Paused][Pressing the E button]ƈIf the memory card is inserted in the camera, all the camera functions apply onlyto the memory card.ƈIf the memory card is not inserted in the camera, all the camera functions applyonly to the internal memory.ƈIf you have turned on the camera by pressing the POWER button, you can pressthe PLAY MODE button once to switch to Play mode and press it again to switchto Recording mode.ƈYou can turn the power on with the play mode button. The camera is turned on inplay mode. Press the play mode button again and the camera will be turned off. ƈYou can set up the PLAY mode function by using the camera buttons and LCDmonitor.3. Select an image that you want to play backby pressing the LEFT / RIGHT button.ſPress and hold the Left or Right button tofast forward the images played.2. The last image stored on the memory isdisplayed on the LCD monitor.ƃPlaying back a still image1. Select the PLAY mode by pressing theplay mode button ( ).ƃManner mode : Pressing the play mode button for more than 3 secondschanges the buzzer and start-up sound setting to OFF, even though youmay have set these to ON.ƃLightly press the shutter button in Play mode to switch to the currently setshooting mode.INFORMATION00:00:35100-0010Capture:E00:00:12100-0010Capture:E](https://usermanual.wiki/Hanwha-Techwin/DIGIMAXS500.Users-Manual-1/User-Guide-615923-Page-36.png)

![ŝ37Ş[ Thumbnail display mode ]Using the camera buttons to adjust the cameraThumbnail( ) / Enlargement ( ) button ƈIn Play mode, you can use the buttons on the camera to conveniently set up thePlay mode functions.ƃImage enlargement1. Select an image that you want to enlarge andpress the enlargement button.2. Different parts of the image can be viewed bypressing the 5 function button.3. Pressing the thumbnail button will zoom back tothe original full sized image.- You can tell whether the image displayed is anenlarged view by checking the imageenlargement indicator shown at the bottom left ofthe LCD monitor. (If the image is not an enlargedview, the indicator will not be displayed.) You canalso check the area of enlargement.- Movie clips and WAV files can’t be enlarged.- If an image is enlarged, a loss of quality mayoccur.ƃYou can view multiple pictures, enlarge a selected picture, and crop and save aselected area of an image.ƃThumbnail display1. While an image is displayed full screen, press thethumbnail button.2. The thumbnail display will highlight the image that had been showing at the time the thumbnail mode was selected.3. Press the 5 function button to move to a desired image.4. To view an image separately, press the enlargementbutton.Thumbnail ( ) / Enlargement ( ) button [ Normal display mode ]Highlighted imagePressing the enlargementbutton ( )Pressing the thumbnailbutton ( )](https://usermanual.wiki/Hanwha-Techwin/DIGIMAXS500.Users-Manual-1/User-Guide-615923-Page-38.png)
![ŝ38ŞThumbnail ( ) / Enlargement ( ) button ƈWhen the menu is displayed on the LCD monitor, pressing the UP button makesthe menu cursor move up. ƈWhen the menu is not displayed on the LCD monitor, the UP button operates asthe voice memo button. You can add your voice to a stored still image.ƃAdding a Voice Memo to a Still Image1. Press the LEFT / RIGHT button to select animage that you wish to add sound to.2. Press the voice memo button ( ) and thevoice memo indicator will display. The camera isnow ready to record a voice memo.3. Press the shutter button to start recording andvoice will be recorded to the still image for 10seconds. While the voice is recording, the recording statuswindow will be displayed as shown alongside.4. The recording can be stopped by pressing the shutter button again.5. The ( ) icon will be displayed on the LCDmonitor after voice memo recording has finished. - Voice memos can’t be recorded onto movieclip and voice recording files.- A distance of 40cm between you and thecamera (microphone) is the best distance torecord sound.- The voice memo will be saved in ҭ.wav format, but has the same file nameas the still image to which it corresponds.- If you add a new voice memo to the still image that already has a voicememo, the existing voice memo will be erased.Voice ( ) memo / Up buttonStop:Shutter ƃThe maximum enlargement rate in proportion to the image size.Image size 5M 4M 3M 2M 1M VGAX10.1 X8.9 X8.0 X6.3 X4.0 X2.5Maximumenlargement rateƃTrimming : You can extract part of the image thatyou want and save it separately.1. Select an image that you want to enlarge andpress the enlargement button.2. Different parts of the image can be viewed bypressing the 5 function button.3. Press the MENU button and a message will be displayed as shownalongside.4. Select a desired sub menu by pressing the UP / DOWN button and press theOK button.[Yes] : The trimmed image will save as a new file name, and display on theLCD monitor. [No] : The trimming menu will disappear. ſIf there is little memory space to save the trimmed image, the image can’t betrimmed.ſTo delete the enlarged image during the trimming function, press the deletebutton.Trimming?Yes NoConfirm:OK](https://usermanual.wiki/Hanwha-Techwin/DIGIMAXS500.Users-Manual-1/User-Guide-615923-Page-39.png)
![ŝ39ŞƈIn Play mode, the play & pause/ down button works as follows:- If the menu is displayedPress the DOWN button to move from the main menu to a sub menu, or tomove down the sub menu cursor.- If a still image with a voice memo, a voice file, or a movie clip is playingIn Stop mode : Plays a still image with a voice memo, a voice file, or amovie clip.During playback : Temporarily stops playback.In Pause mode : Resumes playback[Voice recording is stopped]Play & Pause ( ) / Down buttonE (Effect) buttonƈIt is possible to add special effects to your images by using this button.ſThe changed image is saved in a new file name. [Voice recording is playing] [Voice recording is paused]PLAY:PLAY:Pause:FFREWSTOP:OK Exit:OKExit:E1. Select a still image or movie clip and press the E button. 2. Select a desired sub menu and press the OK button. : Captured images will be stored in black and white.: Captured images will be stored in a sepia tone(a gradient of yellowish brown colours).: Captured images will be stored in a red tone.: Captured images will be stored in a green tone.: Captured images will be stored in a blue tone.: Save the image in negative mode.](https://usermanual.wiki/Hanwha-Techwin/DIGIMAXS500.Users-Manual-1/User-Guide-615923-Page-40.png)