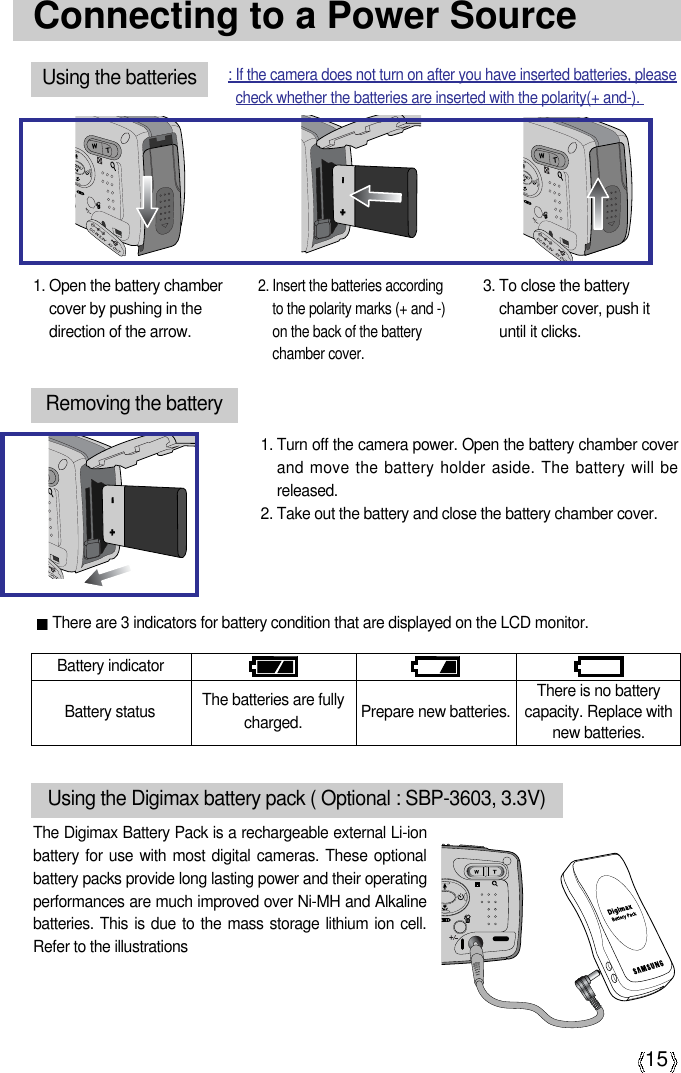
Hanwha Techwin DIGIMAXU-CA3 Digital Camera User Manual uc1en 02
Samsung Techwin Co Ltd Digital Camera uc1en 02
UserManual.wiki
>
Hanwha Techwin
>
DIGIMAXU CA3 User Manual
User Manual
Navigation menu
Upload a User Manual
Namespaces
Wiki Guide
HTML
PDF
Info
Views
User Manual
Discussion / Help
Navigation
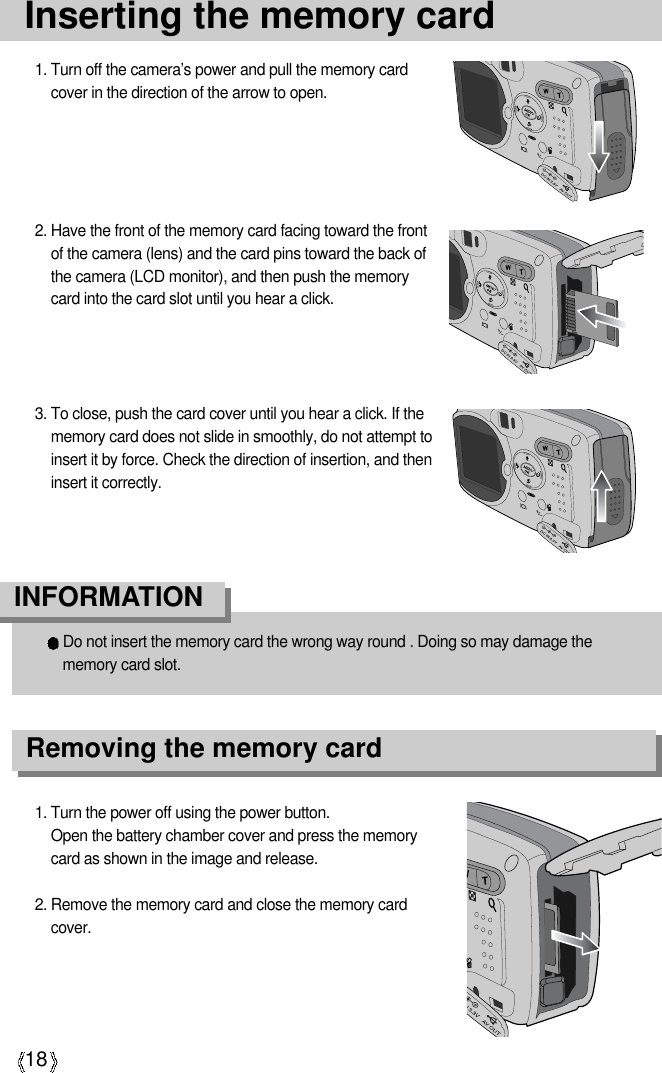
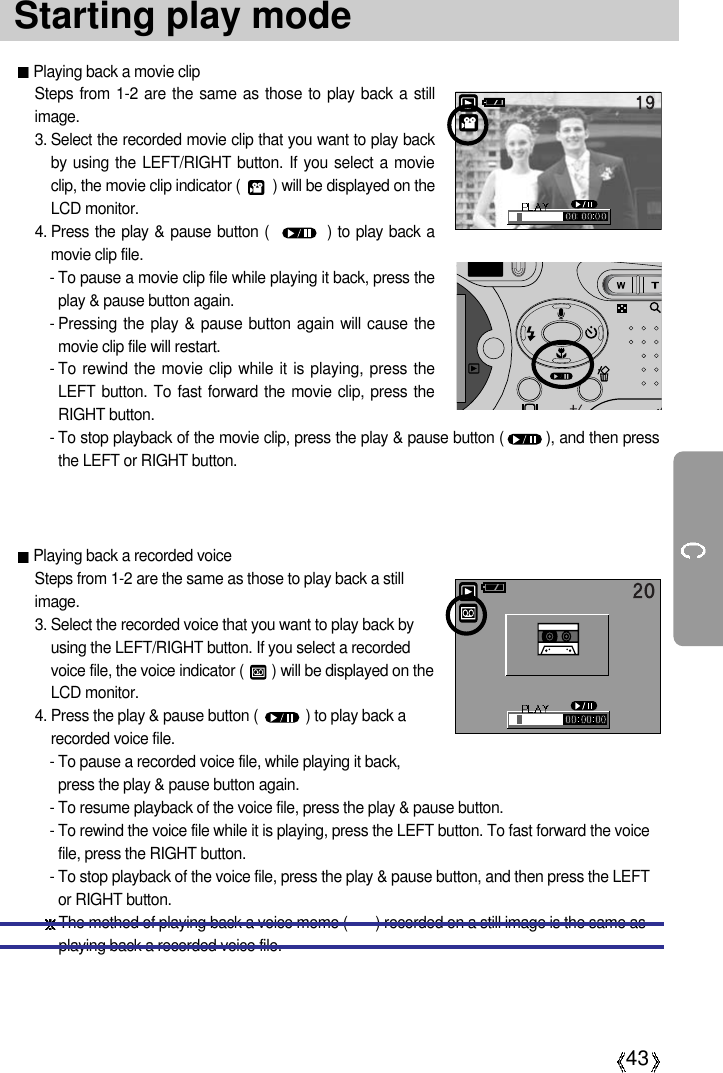
![2InstructionsUse this camera in the following orderInsert the USB cableSet up the camera driverBefore connecting the camera to a PC, via the USBcable, you will need to set up the camera driver.Install the camera driver that is contained in theApplication S/W CD-ROM.(p.98)Take a picture (p.27)Insert the supplied USB cable into the PC’s USB portand the camera’s USB connection terminal.(p.82)Check the camera’s powerIf the power is turned off, press the camera button topower it on.(p.30) Take a pictureCheck the camera’s powerCheck [Removable Disk]Open Window s EXPLORER and search for[Removable Disk].(p.85)To play back a video shot with this camera, be sure to use the QuickTime player suppliedon the software CD-ROM. Applications that do not support the MPEG-4 codec (e.g., Windows Media Player) may not be able to play back the video.](https://usermanual.wiki/Hanwha-Techwin/DIGIMAXU-CA3/User-Guide-360975-Page-2.png)

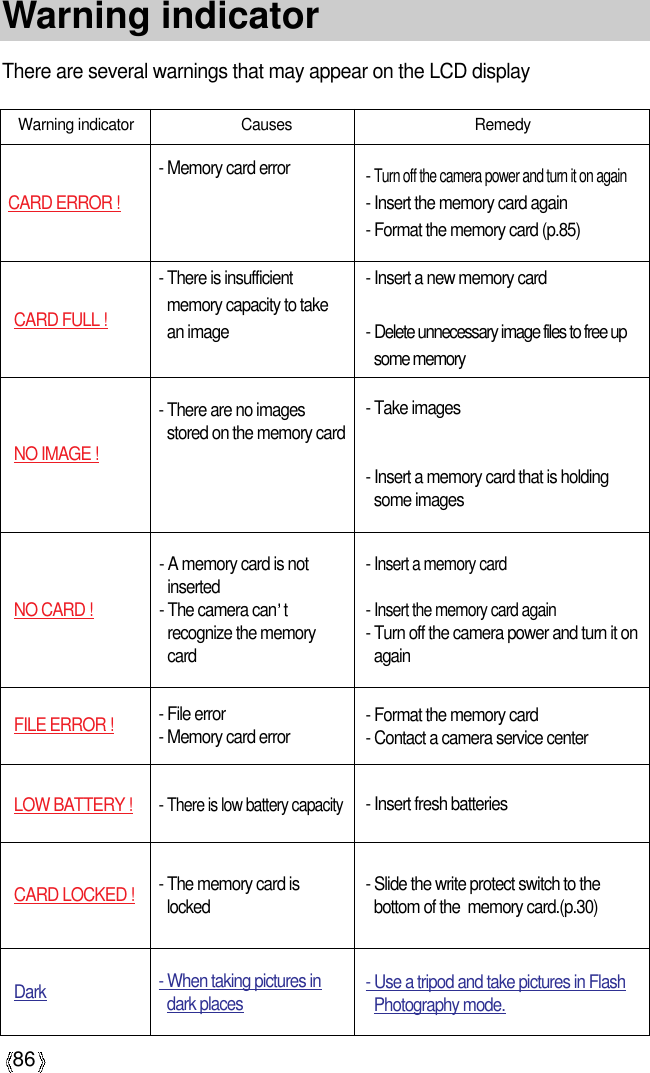
![16Precautions on Using the Memory Stick DuoDo not insert the Memory Stick Duo on its own into a Memory Stick-compatible device.Do not insert the Memory Stick Duo adapter into a Memory Stick-compatible device withoutattaching the Memory Card Duo to the adapter. Using it without the Memory Stick Duo mayadversely affect the device into which it is inserted.Be sure to check the proper direction of insertion before use .Insert the Memory Stick Duo all the way into the Memory Stick Duo adapter. If the MemoryStick Duo is not inserted correctly into the adapter, it may not operate properly.Do not attach labels to any part of the Memory Stick Duo and Memory Stick Duo adapter. Thelabels may come off as you insert the Memory Stick Duo into the adapter or into a MemoryStick-compatible device.When inserting the Memory Stick Duo into the slot, do not force or bend it.Do not touch the Memory Stick Duo adapter's card pins with your fingers or with metal objects.Do not allow dirt or foreign material to get into the Memory Stick Duo adapter slot.Do not leave the Memory Stick Duo with its adapter in areas subject to high temperatures.Those models with the write-protect switch on the back of the card prevents accidental erasureof data from deletion or formatting. By sliding the switch to the top of the memory card, the datawill be protected. By sliding the switch to the bottom of the memory card, the data protectionability will be canceled. Please use a pointed object to move the write-protect switch. Check theswitch position before taking an image.Card pins(A)Writeprotectswitch(B)Label(C)[ Memory Stick Duo ]FrontBackThis camera operates only with a Memory Stick Duo.Some models of Memory Stick Duo media do not have the write-protect switch (B).Do not touch the card pins (part A) withyour fingers or with metal objects.Do not press hard when writing on thelabel (part C).If you insert the Memory Stick Duo intothe Memory Stick Duo adapter, you willbe able to use it with a Memory Stick-compatible device.](https://usermanual.wiki/Hanwha-Techwin/DIGIMAXU-CA3/User-Guide-360975-Page-16.png)
![A17Precautions on Using the Memory Stick DuoMaintenance of the Memory Stick Duo(Hereafter the Memory Stick Duo isreferred to as the "Memory Card".)Turn off the camera power whenever the memory card is being inserted or removed.Repeated use of the memory card will eventually reduce the memory card's performance.Should this be the case, you will need to purchase a new memory card.Wear and tear on the memory card is not covered by the Samsung warranty.The memory card is an electronic precision device. Do not bend, drop or subject the memorycard to any heavy impact.Do not store the memory card in an environment with strong electronic or magnetic fields, e.g.near loud speakers or TV receivers.Please do not use or store in an environment where there are extremes in temperature.Do not allow the memory card to become dirty or to come into contact with any liquid. Shouldthis happen, clean the memory card with a soft cloth.Please keep the memory card in its case when not in use.During and after periods of extended use, you may notice that the memory card is warm. This is perfectly normal.Do not use a memory card that has been used in another digital camera or memory card reader.Do not use a memory card formatted by another digital camera or memory card reader.Preserving the memory card dataDo not remove the memory card while the camera status lamp (green) is blinking. Doing so will corrupt the data on the memory card.Samsung cannot be held responsible for lost data.It is advisable to copy important data onto other media as back-up e.g. floppy disks, hard disks,CD etc.If there are no shots remainingWhen you press the shutter button, a [CARD FULL !] message is displayed and the camera willnot operate. To optimize the amount of memory in the camera, replace the memory card ordelete unnecessary images stored in the memory.](https://usermanual.wiki/Hanwha-Techwin/DIGIMAXU-CA3/User-Guide-360975-Page-17.png)
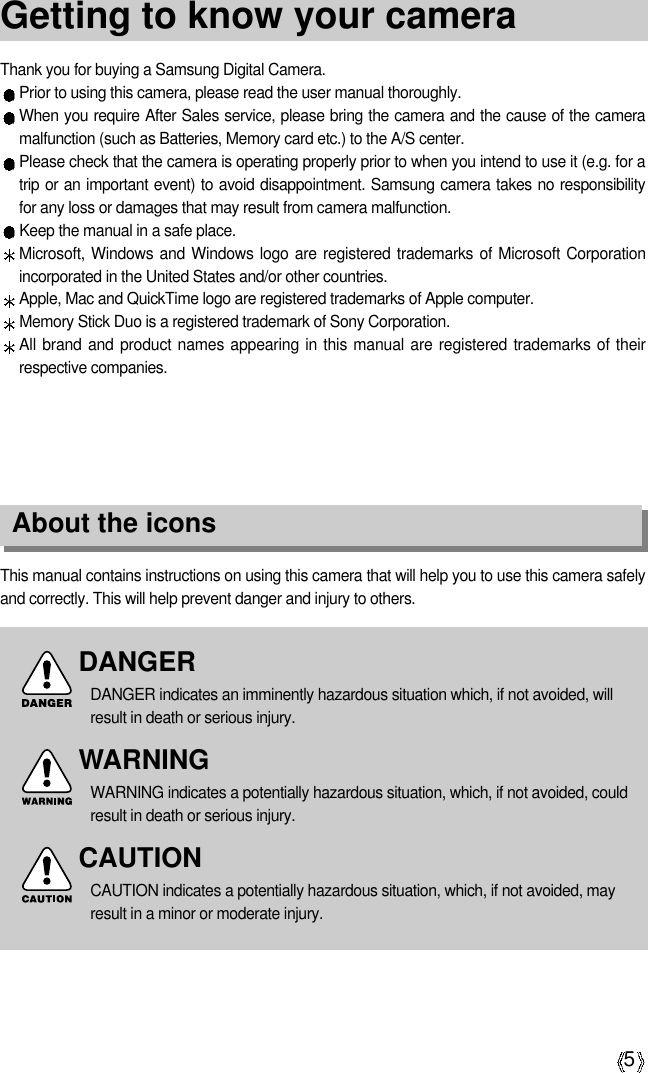
![19When Using the Camera for the First TimeIf the camera is turned on for the first time, a menu will be displayed to set date, time andlanguage in the LCD monitor. This menu will not be displayed after setting up the date, timeand language. Set up the date, time and language before using this camera. Setting up the date, time and date type1. Select the [DATE.TIME] menu by pressing the UP/DOWNbutton and press the RIGHT button.2. Select the desired sub menu by pressing the UP/ DOWN/LEFT/ RIGHT button.RIGHT button : selects YEAR/ MONTH/ DAY/ HOUR /MINUTE/DATE TYPELEFT button : Moves the cursor to the [DATE/TIME]main menu if the cursor is at the firstitem of the date and time setup. In all other instances, the cursor will beshifted to the left of its current position.UP/ DOWN button : changes the value of each item.Date setting range : 2003/01/01 ~ 2050/12/31(Leap years and months are corrected automatically)You will need to check and select the correct Date / Time when the batteries have beenremoved for a period longer than 1 hour.INFORMATIONYou can select 16 languages. These are listed below.English, Korean, T. Chinese, S.Chinese, Japanese, Russian, Germany, Spanish, French, Italian, Danish, Dutch,Swedish, Finnish, Portuguese, Thai.Even if the camera is restarted, the language setting will be maintained.INFORMATIONSetting up the language1. Select the [LANGUAGE] menu by pressing theUP/DOWN button and press the RIGHT button.2. Select the desired sub menu by pressing the UP/ DOWNbutton and press the OK button. ,2.](https://usermanual.wiki/Hanwha-Techwin/DIGIMAXU-CA3/User-Guide-360975-Page-19.png)
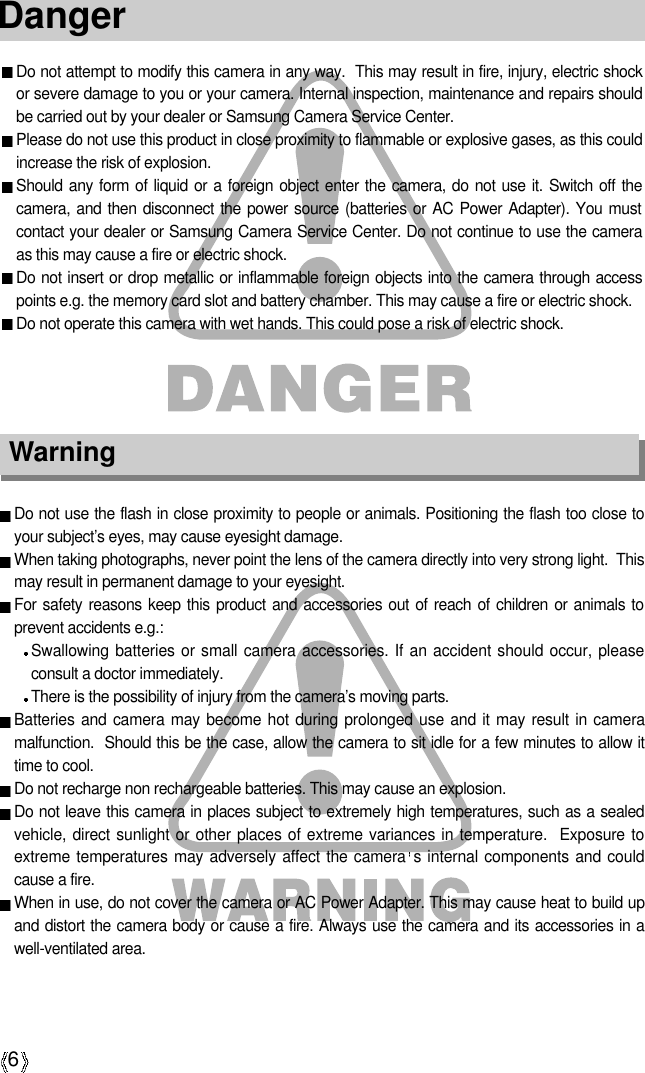
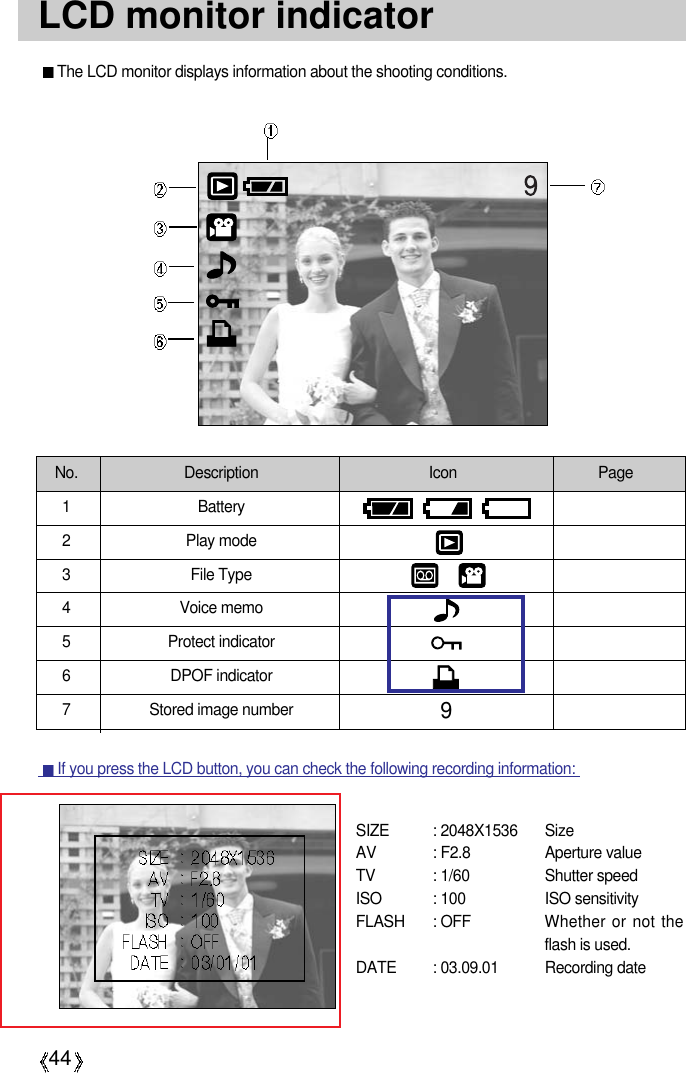
![20LCD monitor indicatorThe LCD monitor displays information about the shooting functions and selections.[ Image & Full Status ]No. Description Icons Page1Batteryp.202Recording modep.183Camera shake warningp.294Flashp.385Self-timerp.406 Voice memop.337 Macrop.498 Meteringp.379 Auto focus framep.3610 Time01:00 PM p.74~7611 Date2003/01/01 p.74~7612 Exposure compensation13 White Balancep.43](https://usermanual.wiki/Hanwha-Techwin/DIGIMAXU-CA3/User-Guide-360975-Page-20.png)
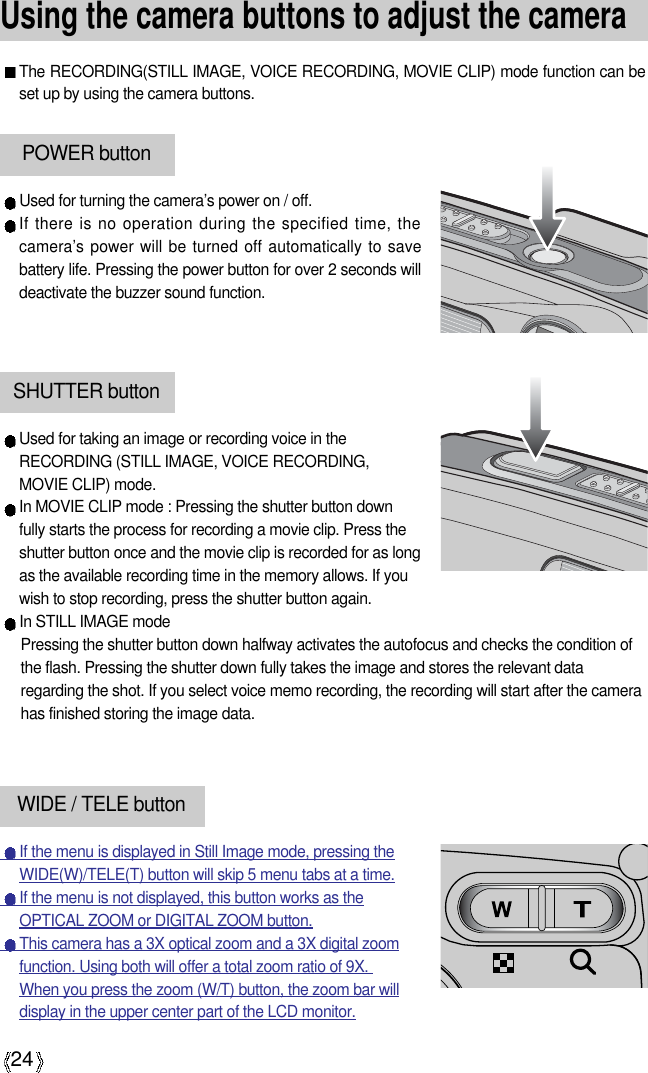
![21LCD monitor indicatorStarting the recording modeRecording a Movie clip1. Insert the batteries (p.16). Insert the batteries taking note of the polarity (+ / -).2. Insert the memory card (p.22).3. Close the memory card cover.4. Press the power button to turn on the camera.5. Select the MOVIE CLIP( ) mode by sliding the modeswitch.6. Point the camera towards the subject and compose theimage by using either the viewfinder or LCD monitor.7. Press the shutter button to take a movie clip. Press the shutter button once and movie clips arerecorded for as long as the available recording timeallows. Movie clips will still be recorded if the shutterbutton is released. If you wish to stop recording, press theshutter button again. Image size and type are listed below.- Image size : 320X240, 160X120(Selectable)- File type : *.mov (MPEG4)The available recording time may vary depending on shooting conditions and camerasettings.INFORMATION14 ISO p.4615 Sharpnessp.4616 Image qualityp.4217 Image size2048, 2048P, 1600, 1024, 64018Number of available shots remaining50Remaining time( Movie clip/ Voice recording)00:05:00 p.34~3519 Digital Zoom rateX3.0 p.34~3520 Optical zoom[ MOVIE CLIP mode ]](https://usermanual.wiki/Hanwha-Techwin/DIGIMAXU-CA3/User-Guide-360975-Page-21.png)
![22Starting recording modeRecording a still imageSteps from 1-4 are the same as those for recording a movieclip.5. Select the STILL IMAGE( ) mode by sliding the modeswitch.6. Point the camera towards the subject and compose theimage by using either the viewfinder or LCD monitor.7. Press the shutter button to capture an image.A [DELETE?] message may be displayed after taking apicture. Refer to p.93 for more information about this[DEL. ANSWER].Recording VoiceSteps from 1-4 are the same as those for recording a movieclip.5. Select the VOICE RECORDING( ) mode by slidingthe mode switch.6. Press the shutter button to record a voice.- Press the shutter button once and voice is recorded foras long as the available recording time allows. The recording time will be displayed on the LCD monitor.- Voice will still be recorded if the shutter button isreleased.- If you wish to stop recording, press the shutter buttonagain.- File type : *.wavA distance of 40cm between you and the camera (microphone) is the best distance torecord sound.INFORMATIONManner mode: Pressing the power button for more than 2 seconds changes the buzzerand start-up sound setting to OFF, even though you may have set these to ON. To turnon the startup sound and operation sound, set the startup sound (MyCAM mode) andoperation sound (Setup mode) to a submenu other than [OFF].INFORMATION[ STILL IMAGE mode ][ VOICE RECORDING mode ]](https://usermanual.wiki/Hanwha-Techwin/DIGIMAXU-CA3/User-Guide-360975-Page-22.png)
![25WIDE / TELE buttonTELE ZoomOptical zoom TELE : Pressing the zoom button T. This will zoom into the subject i.e. thesubject will appear nearer.Digital zoom TELE : When the maximum (3X) optical zoom is selected, pressing the zoombutton T activates the digital zoom software. Releasing zoom button Tstops the digital zooming at the required setting. Once the maximumdigital zoom (3X) is achieved, pressing the zoom button T will have noeffect. You can check the digital zoom rate with the [X1.5 ~ X 3.0]numerical mark next to the zoom bar.[ WIDE zoom ] [ TELE zoom ] [ Digital zoom 2.0X ]Pressing theTELE buttonPressing theTELE buttonWIDE ZoomOptical zoom WIDE : Pressing the zoom button W. This will zoom out from the subjecti.e. the subject will appear further away. Pressing the W buttoncontinuously will set the camera to its minimum zoom setting i.e.the subject appears at its furthest from the camera.Digital zoom WIDE : When the digital zoom is in operation, pressing the zoom buttonW will reduce the digital zooming in steps. Releasing zoom buttonW stops digital zooming. Pressing the W button will reduce thedigital zoom and then it will continue to reduce the optical zoomuntil the minimum setting is reached. [ TELE zoom ] [ Optical zoom 2X ] [ WIDE zoom ]Pressing theWIDE button Pressing theWIDE button[ Digital zoom 3.0X ] [ Digital zoom 2.0X ] [ Optical zoom 3X ]Pressing theWIDE buttonPressing theWIDE buttonOptical zoomDigital zoom](https://usermanual.wiki/Hanwha-Techwin/DIGIMAXU-CA3/User-Guide-360975-Page-25.png)
![26WIDE / TELE buttonTo use the digital zoom the LCD monitor has to be turned on.Images taken using the digital zoom may take a little longer for the camera to process.Allow time for this to take place.The digital zoom cannot be used in movie clip shots.You may notice a decrease in image quality when using the digital zoom.When the maximum(3X) optical zoom is selected, pressing the zoom button Tincreases the digital zoom ratio by 0.5 steps.If the movie clip is being recorded, the zoom operation cannot be activated.Take care not to touch the lens to avoid taking an unclear image and possibly causingcamera malfunction. If the image is dim, turn the camera power off and on again to modify the lens position.Take care not to press the lens as this may cause a camera malfunction.When the camera is turned on, take care not to touch the camera s moving lens partsas this may cause the resulting image to be dim and unclear.Take care not to touch the lens during zoom operation as this may cause damage.INFORMATIONVoice memo( )/ UP buttonWhile the menu is showing, press the UP button to move up the submenu cursor.When the menu is not displayed on the LCD monitor, the UP button operates as the voicememo( ) button. You can add your voice-over to a stored still image.Recording a voice memo1. Select the STILL IMAGE mode by sliding the mode switch.2. Press the VOICE MEMO( ) button. If the voice memo indicator is displayed on the LCDmonitor, the setting is completed.[ Preparing for Voice Memo ] [ Recording Voice Memo ]](https://usermanual.wiki/Hanwha-Techwin/DIGIMAXU-CA3/User-Guide-360975-Page-26.png)
![27Voice memo( )/ UP button3. Press the shutter button and take a picture. The picture is stored on the memory card.4. Voice memo will be recorded for ten seconds from the moment the picture is stored. In the middle of the sound recording, pressing the shutter button will stop the voice memo.A distance of 40cm between you and the camera (microphone) is the best distance torecord sound.The voice memo function will operate only once, and then it will automatically becancelled.INFORMATIONAuto (Auto Shooting Mode) : The changed Focus mode will be maintained until thecamera is turned off.Myset (Myset Shooting Mode) : The changed Focus mode will be maintained evenafter the camera is turned off.Night (Night Shooting Mode) : The MACRO button will not work.When the macro mode is selected, it is possible that camera shake will occur. If this is the case, use a tripod to eliminate this.When the macro mode is selected, it is recommended that you use the LCD monitor tocompose these shots.INFORMATIONMacro( ) / Down button (Focusing)While the menu is showing, press the DOWN button to move from the main menu to asubmenu, or to move down the submenu cursor.When the menu is not showing, you can use the MACRO ( )/DOWN button to take macropictures (within the distance range of 5-80 cm for WIDE and 50-80 cm for TELE) in the STILLIMAGE mode.[ Macro ][ Autofocus ]Pressing theMACRO button](https://usermanual.wiki/Hanwha-Techwin/DIGIMAXU-CA3/User-Guide-360975-Page-27.png)
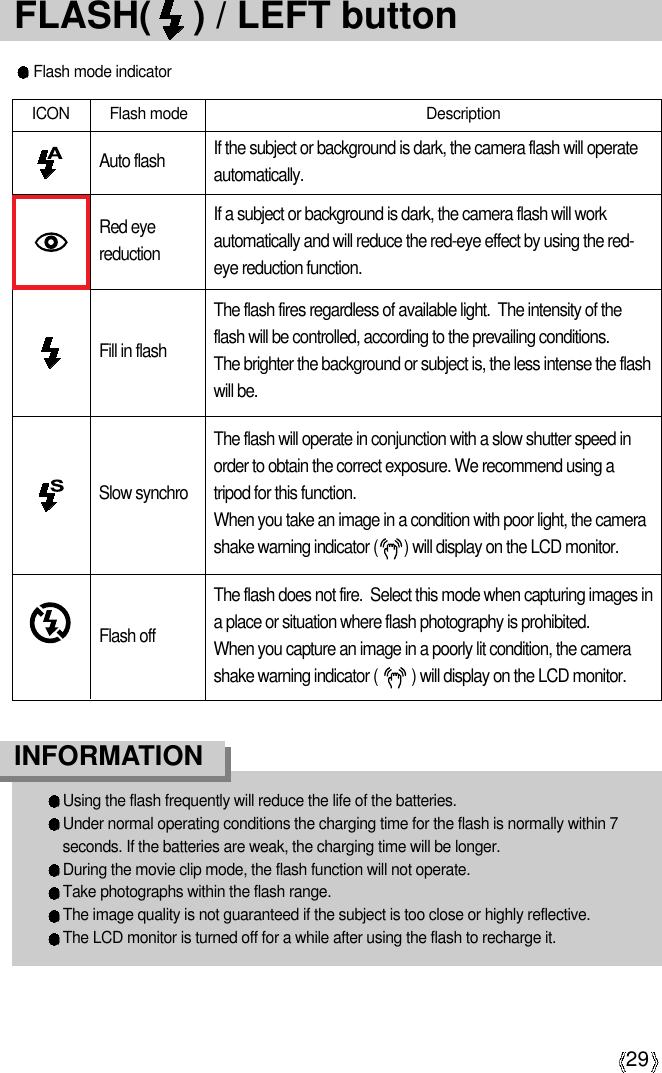
![28Fixed focusTo focus on the subject positioned outside of the center, use the focus lock function.Using the Focus Lock1. Ensure the subject in the center of the autofocus frame.2. Press the SHUTTER button halfway. The camera status lamp (green) will light up, indicatingthat the camera is in focus. Be careful not to press the SHUTTER button all the way down toavoid taking an unwanted picture. 3. With the SHUTTER button still pressed down only halfway, move the camera to recompose yourpicture as desired, and then press the SHUTTER button completely to take the picture. If yourelease your finger from the SHUTTER button, the focus lock function will be canceled.[ The image to be captured ] [ Press the SHUTTER buttonhalfway and focus on the subject ] [ Recompose the picture and fullydepress the SHUTTER button ]FLASH( ) / LEFT buttonAUTOFOCUSMACROAUTO 100 200 400WIDE 0.8~3 0.8~2.6 1~3.7 1~5.2TELE 0.8~2 0.8~1.5 1~2.1 1~2.9WIDE 0.2~0.8 0.2~0.8 0.2~0.8 0.2~0.8TELE 0.5~0.8 0.5~0.8 0.5~0.8 0.5~0.8(Unit : m)[ Selecting the Auto flash ]Flash rangeWhen the menu is displayed on the LCD monitor, pressingthe LEFT( ) button makes the cursor shift to the left tab.When the menu is not displayed on the LCD monitor, theLEFT( ) button operates as the FLASH ( ) button.Selecting the flash mode1. Slide the mode switch to the STILL IMAGE mode.2. Press the Flash( ) button until the desired flash modeindicator displays on the LCD monitor. 3. A flash mode indicator will be displayed on the LCD monitor. Use the correct flash to suit the environment.ISO](https://usermanual.wiki/Hanwha-Techwin/DIGIMAXU-CA3/User-Guide-360975-Page-28.png)
![30Self-timer( ) / Right( ) buttonSelecting the self-timer1. Slide the mode switch to the STILL IMAGE mode.2. Press the SELF-TIMER( ) button until the desiredmode indicator displays on the LCD monitor. A 2 secondself-timer or 10 second self-timer icon appears on theLCD monitor.2SEC self-timer( ): Pressing the shutter button will allow an interval of 2seconds before the image is taken.10SEC self-timer( ): Pressing the shutter button will allow an interval of 10seconds before the image is taken.3. Press the SHUTTER button. The picture will be takenafter the specified time has elapsed.When the menu is displayed on the LCD monitor, pressing the Right button makes the cursorshift to the sub tab.When the menu is not displayed on the LCD monitor, the RIGHT button operates as the Self-timer( ) button. This function is used when the photographer would also like to be in theimage.[ Selecting the 10SEC self-timer ]The default is OFF.When taking a picture using the self-timer, the function lamp works as follows:2 second self-timer setting : The function lamp blinks at 0.25 second interval for 2seconds.10 second self-timer setting : The function lamp blinks at 1 second interval for the first 7seconds. It blinks at 0.25 second interval for the remaining3 seconds.If you operate the Power button, Mode switch, and Self-timer button during the self-timeroperation, the self-timer function is cancelled.Use a tripod to prevent the camera from shaking.INFORMATION](https://usermanual.wiki/Hanwha-Techwin/DIGIMAXU-CA3/User-Guide-360975-Page-30.png)
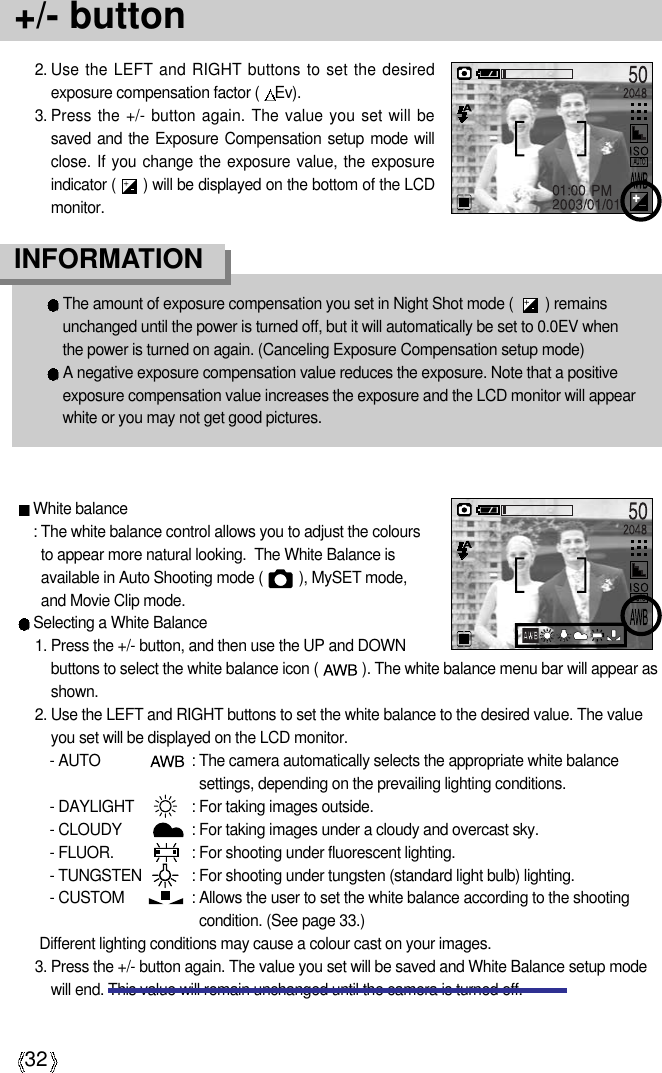
![31MENU/ OK button If the menu is displayed, use the 5-Function buttons ( ///) to change the data valuesand for your changes to be accepted.If the menu is not displayed, press the MENU/OK button to display a menu for the currentcamera mode on the LCD monitor. Press the button again to return to the previous state.Exposure compensation : This camera automatically adjusts the exposureaccording to the ambient lighting conditions. In Auto or Myset mode, theexposure compensation can be adjusted between -2.0EV and +2.0EV (at0.5EV increment), and in Night mode, you can set the long time shutter.The setting value you have adjusted in Auto mode will remain unchangedeven after the camera is turned off.Compensating Exposure1. Press the +/- button, and then use the UP andDOWN buttons to select the exposurecompensation icon ( ). The exposurecompensation menubar will appear as shown.+/- button You can use the +/- button to adjust the values for the exposure compensation, white balance,and ISO.Main menu Sub menu Available camera mode-2.0EV ~ +2.0EV(0.5EV steps)White balanceISOExposure[ Menu on ][ Menu off ]Pressing theMENUbutton2048AUTO MANUALNIGHTMODEAUTO](https://usermanual.wiki/Hanwha-Techwin/DIGIMAXU-CA3/User-Guide-360975-Page-31.png)
![33+/- button ISO: You can select the ISO sensitivity when taking pictures. The speed or specific light-sensitivity of a camera is rated by ISO numbers. This is available only in Auto or Manualmode.Selecting an ISO Sensitivity1. Press the +/- button, and then use the UP and DOWNbuttons to select the ISO icon ( ). The ISO menu barwill appear as shown.2. Use the LEFT and RIGHT buttons to select the desiredISO sensitivity value. - AUTO : The camera's sensitivity isautomatically changed by variablessuch as lighting value or subject brightness.- 100, 200, 400 : You can increase the shutter speed while the same amount of light ispresent, by increasing the ISO sensitivity. However, the image may besaturated in high luminance.The higher the ISO value, the higher the camera’s sensitivity to light is and therefore thegreater its capacity to take pictures in dark conditions. However, the noise level in the imagewill increase as the ISO value increases, making the image appear coarse.3. When you press the +/- button again, the value you set will be saved and ISO setup modewill end. This value will remain unchanged until the camera is turned off.Using the Custom White BalanceWhite balance settings may vary slightly depending on the shooting environment. You canselect the most appropriate white balance setting for a given shooting environment by settingup the custom white balance.1. Select the [CUSTOM] menu, and then press the +/-button.2. The autofocus indicator ( ) on the LCD monitor willblink in green.3. Place a sheet of white paper in front the camera so thatthe LCD monitor shows only white, and then press theSHUTTER button. 4. Your custom white balance value is stored.- The custom white balance value will be applied, startingwith the next picture you take.- If you select another White Balance submenu, yourcustom white balance value will be cleared. In thisinstance, store the custom white balance value againbefore using it.White paper](https://usermanual.wiki/Hanwha-Techwin/DIGIMAXU-CA3/User-Guide-360975-Page-33.png)
![34+/- button 2) Setting Manual Shooting1. In Night Shot mode, press the +/- button. A screenappears as shown to the right.2. Use the LEFT and RIGHT buttons to set the shutterspeed. Available shutter speeds are as follows:AUTO, 1/8, 3/16, 1/4, 3/8, 1/2, 3/4, 1, 3/2, 2, 3, 4, 6, 8, 12,and 16 seconds.Use the UP and DOWN buttons to set the aperture value.Use the UP and DOWN button to display the large/smallaperture values at the top left of the shutter speed bar.3. Press the +/- button again. The value you set will be saved and the mode will switch to NightShot mode. Press the SHUTTER button to take the picture. Manual Shooting: This camera automatically adjusts the shutter speed and aperture values to the shootingenvironment. However, in Night Shot mode, you can set the shutter speed and aperturevalues to your preference. Select Night Shot mode, and then press the +/- button. The zoom function does not work while setting up the aperture value and shutter speed.1) Selecting the Night Shot Mode1. Slide the MODE switch to select Still Image mode ( ).2. Press the MENU button.3. Use the LEFT and RIGHT buttons to select the [MODE]menu tab, and then use the UP and DOWN buttons toselect the [NIGHT] menu.4. Press the MENU button. The menu will disappear and themode will switch to Night Shot mode.AUTO MANUALNIGHTMODE](https://usermanual.wiki/Hanwha-Techwin/DIGIMAXU-CA3/User-Guide-360975-Page-34.png)
![35+/- button zoom0 zoom1 zoom2 zoom3 zoom4 zoom5 zoom6 zoom75.8 7.4 9.1 10.7 12.4 14.0 15.7 17.42.8 3.1 3.4 3.7 4.0 4.3 4.6 4.85.8 6.4 7.0 7.6 8.2 8.8 9.4 10.0Optical ZoomLargeSmallApertureValueZoom PositionFocusing range(mm)[ Image & full information ] [ Image & basic information ] [ LCD off ]You can check the recording status in the LCD monitor.Pressing the LCD button in the RECORDING (STILLIMAGE, MOVIE CLIP) mode will change the display asshown below.Pressing theLCD buttonPressing theLCD buttonPressing the LCD buttonAperture values that can be selected for each zoom position are as follows:LCD buttonIf the LCD monitor is turned off, the camera status lamp will blink.Aperture ValueLarge (Press the UP button.)Small (Press theDOWN button.)Shutter SpeedFast (Press theLEFT button.)Slow (Press theRIGHT button.)](https://usermanual.wiki/Hanwha-Techwin/DIGIMAXU-CA3/User-Guide-360975-Page-35.png)
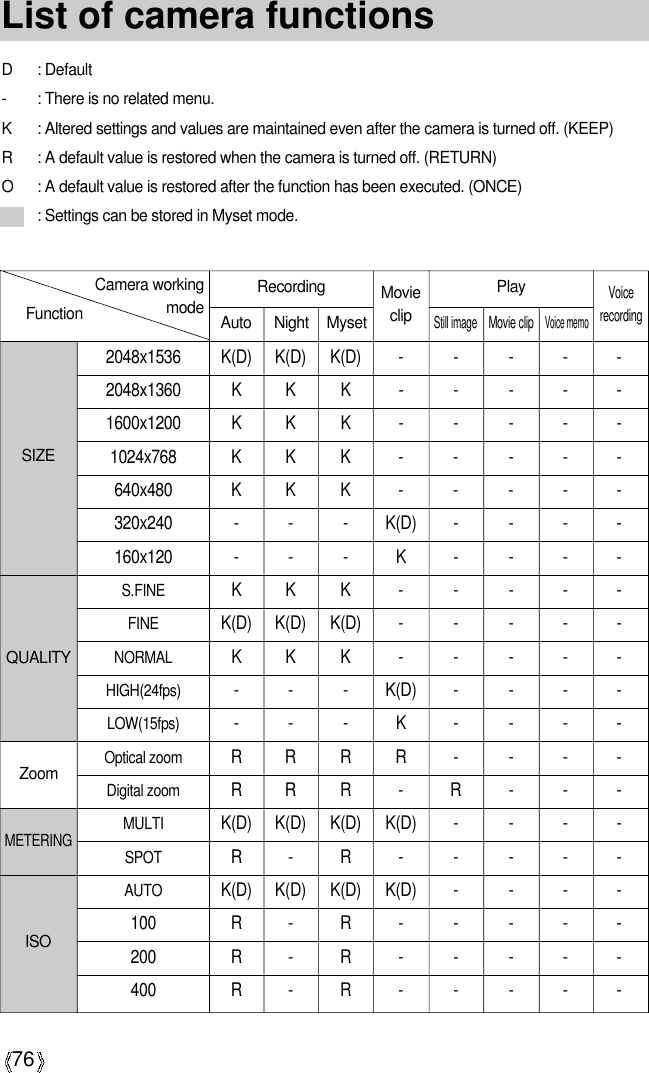
![38ModeAUTO : Use this for shooting basic still images.The changed settings will return to theirdefaults when the camera is turned off.MANUAL : Use this to store your custom settings forthe camera. Any changes made tosettings other than Self-Timer and VoiceRecording will be saved.NIGHT : Use this for shooting still images at nightor in other dark conditions.You can select the image size appropriate for your application. You can select from AUTO, MANUAL, NIGHT and Movie Clip modes.SizeThe higher the resolution, the lower the number of available shots will be because highresolution images require more memory than lower resolution images.This value will be maintained, even after the camera is turned off.INFORMATION Print sizes for different megapixeland dip settings are as follows:Image Size to Print Size by DPI (300 DPI)You can select the desired Still Image mode. This is available in Auto, Manual, and Night modes.(Unit: cm) Mode Icon2048 2048P 1600 1024 640Size2048 1536 2048 1360 1600 1200 1024 768 640 480 320 240 160 120STILL IMAGE mode MOVIE CLIP mode320 160[ STILL IMAGE mode ][ STILL IMAGE mode ]AUTO MANUALNIGHTMODEAUTO [ MOVIE CLIP mode ]](https://usermanual.wiki/Hanwha-Techwin/DIGIMAXU-CA3/User-Guide-360975-Page-38.png)
![39Quality You can select the compression ratio appropriate for your application of the captured images.The higher the compression ratio, the lower the picture quality. You can select from AUTO,NIGHT, MySET, and Movie Clip modes.Mode IconSub menu S.FINE FINE NORMAL HIGH LOWCompression Ratio1:4 1:8 1:12 20fps 15fpsFile Format jpeg jpeg jpeg mov movSTILL IMAGE mode MOVIE CLIP modeImage Size and Quality for the Number of Images that can be saved in a Memory Card/ShootingTime(When using a 32MB Memory Stick Duo; based on Samsung's own testing)S.FINE is the highest quality and NORMAL is the lowest setting. Choose the settingappropriate for your needs.This file format complies with the DCF(Design rule for Camera File system).Even if the camera should be restarted, the quality setting is maintained.JPEG (Joint Photographic Experts Group): JPEG is the image compression standarddeveloped by the Joint Photographic Experts Group. This type of compression is mostcommonly used for compressing photos and graphics because it can compress the filesefficiently without damaging the data.INFORMATIONSTILL IMAGE mode MOVIE CLIP modeModeQuality/Size2048 2048P 1600 1024 640320 240 160 120S.FINE17 19 27 66 169 - -FINE33 38 54 132 336 - -NORMAL50 56 82 198 501 - -HIGH-----3 MIN 6 MINLOW-----6 MIN 12 MIN[ STILL IMAGE mode ] [ MOVIE CLIP mode ]](https://usermanual.wiki/Hanwha-Techwin/DIGIMAXU-CA3/User-Guide-360975-Page-39.png)
![40MeteringIf you cannot obtain suitable exposure conditions, you can change the metering method to takebrighter pictures. This can be set in Auto and Manual modes.MULTI( ) : Exposure will be calculated based on anaverage of the available light in theimage area. However, the calculationwill be biased towards the centre of theimage area. This is suitable for generaluse.SPOT( ) : Only the rectangular area in the centerof the LCD monitor will be metered forlight. This is suitable when the subject in the center is exposed correctly,regardless of the back lighting. The default metering mode is Multi pattern metering.If the subject is not the centre of the focus area, do not use the spot metering as this mayresult in an exposure error. In this circumstance, rather use exposure compensation.The changed Metering mode will remain unchanged even after the power is turned off.INFORMATIONEffect By using the camera’s digital processor, it is possible to add special effects to your images. You can select from AUTO, MANUAL, and Movie Clip modes. The value you set will remainunchanged until the camera is turned off.NORMAL : No effect is added to the image.B & W : Converts the image to black and white.SUNSET : Used for capturing images at sunsetSEPIA : Captured images will be stored in a sepia tone (a gradient of yellowish brown colours).RGB : Allows the user to adjust the R (Red), G (Green), and B (Blue) values of the imagesto be captured.[ STILL IMAGE mode ] [ MOVIE CLIP mode ]](https://usermanual.wiki/Hanwha-Techwin/DIGIMAXU-CA3/User-Guide-360975-Page-40.png)
![41Effect SharpnessYou can adjust the sharpness of the picture you want to take.You cannot check the sharpness effect on the LCD monitorbefore you take a picture, because this function is applied onlywhen the captured image is stored on the memory. You canselect from AUTO and MANUAL modes. This value will remainunchanged until the camera is turned off.Sub menu Icon Description The edges of the image are softened. This effect is suitable for editing images on your PC.The edges of the image are sharp. This is suitable for printing.The edges of the image are emphasized. The edges willappear sharp, but noise may occur in the recorded image.Setting RGB Values1. Use the DOWN button to select "RGB" among the Effectsubmenus, and then press the OK button. A screen thatlooks like the one shown on the right will appear.2. Use the UP and DOWN buttons to select the [CANCEL]or [CHANGE] auxiliary menu, and then press the OKbutton.[CANCEL] : Select this if you do not want to changethe RGE values.[CHANGE] : Select this to open a window where youcan adjust the RGB values.Use the UP and DOWN buttons to navigate the R, G, andB controls. Use the LEFT and RIGHT buttons to set thevalue for each control. If you press the OK button, yourchanges will be saved and the menu will disappear.VIVIDNORMALSOFTRGB[ STILL IMAGE mode ]](https://usermanual.wiki/Hanwha-Techwin/DIGIMAXU-CA3/User-Guide-360975-Page-41.png)
![42Starting play modeTurn the camera on and select Play mode by pressing the play mode button ( ). The camera can now play back the images stored in the memory. Press the PLAY button ( ) again to switch to the Recording mode.If you have turned on the camera by pressing the POWER button, you can press the PLAYbutton once to switch to Play mode and press it again to switch to Recording mode. If you have turned on the camera by pressing the PLAY button, you can press the PLAY buttonagain to turn off the camera. You can set up the PLAY mode function by using the camera buttons and LCD monitor.Playing back a still image1. Select the PLAY mode( ) by pressing theplay mode button.2. The last image stored on the memory isdisplayed on the LCD monitor.3. Select an image that you want to play back bypressing the LEFT / RIGHT button.Press and hold the LEFT or RIGHT button toplay back the images quickly.Manner mode: Pressing the power button for more than 2 seconds changes the buzzer andstart-up sound setting to OFF, even though you may have set these to ON. To turn on the startup sound and operation sound, set the startup sound(MyCAM mode) and operation sound (Setup mode) to a setting other than[OFF].Even if the camera s power is off, you can start the play mode by pressing the playmode button.The LCD monitor will remain in operation until the camera is switched off in PLAY mode.To turn off the camera’s power, press the power button.INFORMATION](https://usermanual.wiki/Hanwha-Techwin/DIGIMAXU-CA3/User-Guide-360975-Page-42.png)
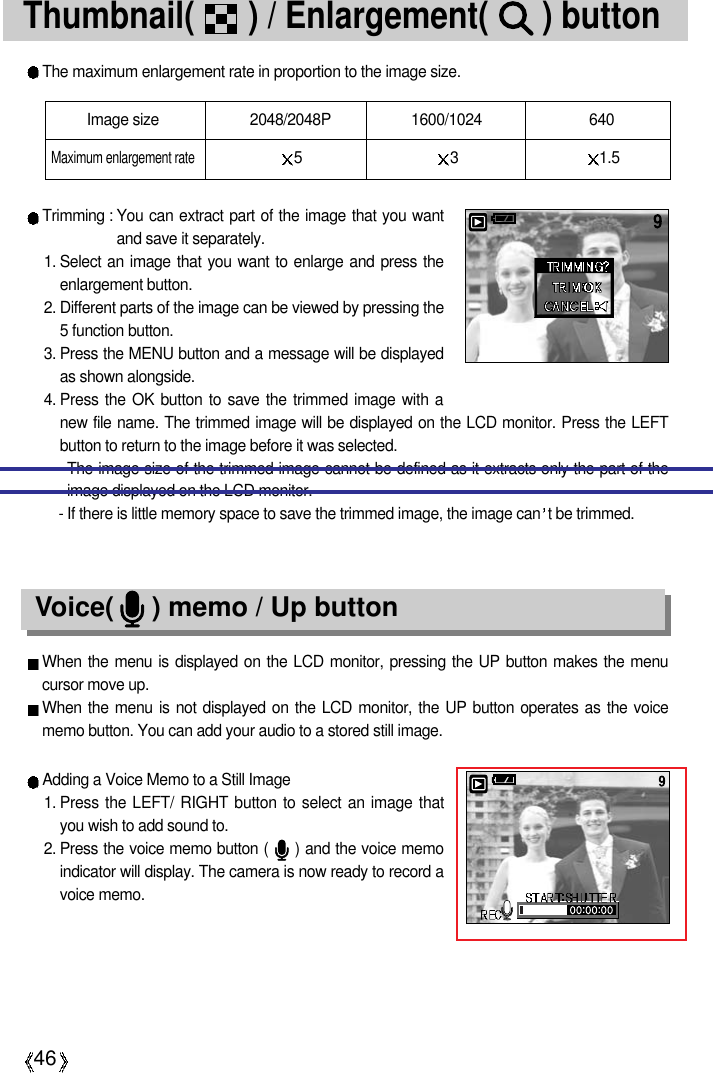
![45Using the camera buttons to adjust the cameraThe play mode function can be set up by using the camera button.Image enlargement1. Select an image that you want to enlarge and press the enlargement button.2. Different parts of the image can be viewed by pressing the5 function button.3. Pressing the thumbnail button will zoom back to theoriginal full sized image.- You can tell whether the image displayed is an enlargedview by checking the image enlargement indicator shownat the bottom left of the LCD monitor. (If the image is notan enlarged view, the indicator will not be displayed.)You can also check the area of enlargement.- Movie clips and WAV files can’t be enlarged.- If an image is enlarged, a loss of quality may occur.Thumbnail( ) / Enlargement( ) button [ Normal display mode ]Pressing the thumbnailbutton( )Pressing the enlargementbutton( )Highlighted imageYou can view multiple pictures, enlarge a selected picture, and crop and save a selected areaof an image.Thumbnail display1. While an image is displayed full screen, press thethumbnail button.2. The thumbnail display will highlight the image that hadbeen showing at the time the thumbnail mode wasselected.3. Press the 5 function button to move to a desired image.4. To view an image separately, press the enlargementbutton ( ).[ Thumbnail display mode ]](https://usermanual.wiki/Hanwha-Techwin/DIGIMAXU-CA3/User-Guide-360975-Page-45.png)
![47Voice( ) memo / Up button3. Press the shutter button to start recording. The [REC]message will be displayed on the LCD monitor (as shown)and voice will be recorded to the still image for 10seconds.4. The recording can be stopped by pressing the shutterbutton again.5. The ( ) icon will be displayed on the LCD monitor aftervoice memo recording has finished. - Voice memos can’t be recorded onto movie clip files.- A distance of 40cm between you and the camera(microphone) is the best distance to record sound.- The voice memo will be saved in *.wav format, but hasthe same file name as the still image to which itcorresponds.- If you add a new voice memo to the still image thatalready has a voice memo, the existing voice memo will be erased.Play & Pause( )/ Down buttonIn Play mode, the play & pause/ down button works as follows:- If the menu is displayedPress the DOWN button to move from the main menu to a sub menu, or to move down thesub menu cursor.- If a still image with a voice memo, a voice file, or a movie clip is playingIn Stop mode : Plays a still image with a voice memo, a voice file, or a movie clip.During playback : Temporarily stops playback.In Pause mode : Resumes playback[ Voice recording is stopped. ] [ Voice recording is paused. ][ Voice file is playing. ]](https://usermanual.wiki/Hanwha-Techwin/DIGIMAXU-CA3/User-Guide-360975-Page-47.png)
![48LEFT / RIGHT/ MENU/ OK buttonLEFT / RIGHT/ MENU/ OK buttons activate the following.- LEFT button : While the menu is showing, press the LEFT button to select the menu tabto the left of the cursor.- RIGHT button : While the menu is showing, press the RIGHT button to select the menutab to the right of the cursor, or to move an auxiliary menu.- MENU button : When you press the MENU button, the play mode menu will be displayedon the LCD monitor. Pressing it again will return the LCD to the initialdisplay.- OK button : When the menu is displayed on the LCD monitor, the OK button is usedfor confirming data that is changed by using the 5 function button.The shooting information will be displayed on the LCDmonitor.The last image stored in the memory is displayed on theLCD monitor by pressing the play mode button.Pressing the LCD button in the PLAY( ) mode willchange the display as shown below. [Image & Icons] [Image & Information] [Image only][ Image & Icons ] [ Image & Information ] [ Image only ]LCD button Pressingthe LCDbuttonPressing the LCD buttonPressingthe LCDbuttonIf you press the LCD button in Thumbnail Display mode, the image to be deleted ( ) will beselected.](https://usermanual.wiki/Hanwha-Techwin/DIGIMAXU-CA3/User-Guide-360975-Page-48.png)
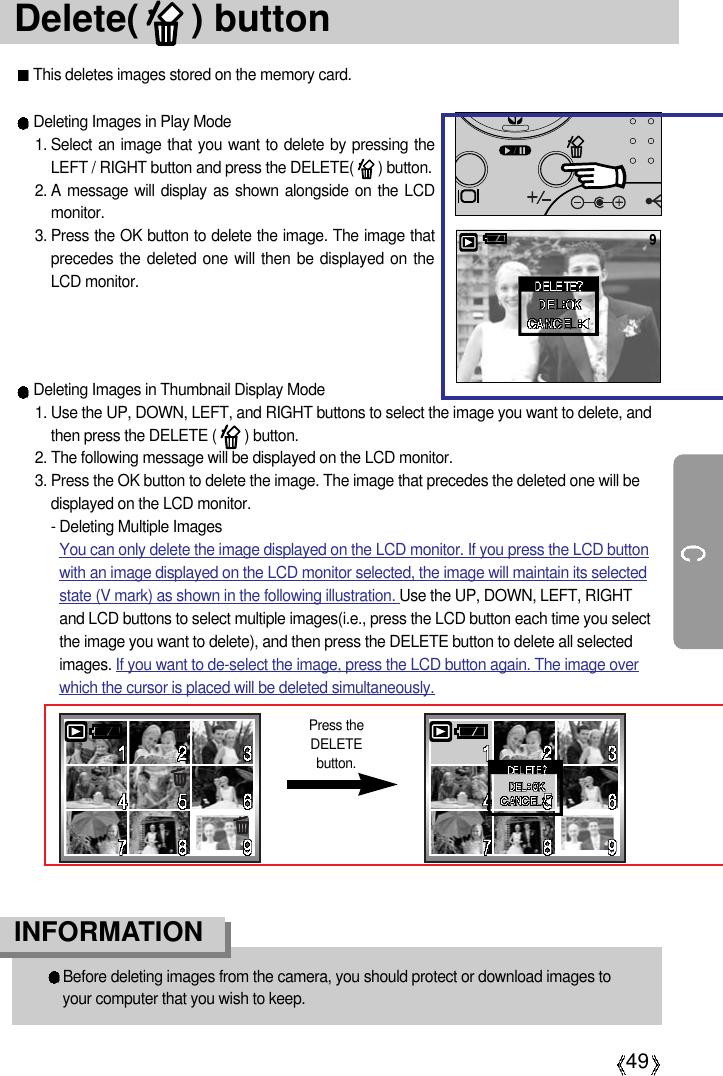
![52Deleting all imagesOf all the files stored in the memory card, the unprotected files in the DCIM subfolder will bedeleted.Deleting all images1. Press the play mode button and press the menu button.2. Press the LEFT/ RIGHT button and select the [DEL.ALL]menu tab.3. Select a desired sub menu by pressing the UP/ DOWNbutton and press the OK button. Selecting [NO] : The display returns to the initial menu.Selecting [YES] : A delete confirmation window willappear. When you press the OK button,a [PLEASE WAIT!] message willdisplay while all the unprotected imagesare deleted. If there aren’t protected images, all the images are deletedand a [NO IMAGE!] message will display. Press the PLAY button or slidethe Mode switch to clear the message.Remember that this will permanently delete unprotected images. Important shots should be stored on a computer before deletion takes place.The startup image is stored in the camera's internal memory (i.e., not on the memorycard) and it will not be deleted even if you delete all files on the memory card.INFORMATION Protecting imagesThis is used to protect specific shots from being accidentally erased (LOCK).It also unprotects images that have been previously protected (UNLOCK).Protecting Images1. Press the play mode button and press the menu button.2. Press the LEFT/ RIGHT button and select the[PROTECT] menu tab.3. Select a desired sub menu by pressing the UP/ DOWNbutton and press the OK button.[ONE PIC] : Only an image that is displayed on the LCDmonitor is protected or unprotected.[ALL PICS] : All of the stored images are protected orunprotected.](https://usermanual.wiki/Hanwha-Techwin/DIGIMAXU-CA3/User-Guide-360975-Page-52.png)
![53Protecting images4. Select the desired secondary menu by pressing theUP/DOWN button and press the OK button.[UNLOCK] : Cancels the protect function.[LOCK] : Sets up the protect function.- If you select the[ONE PIC] sub menu at step 3, you canprotect or unprotect another image by pressing theLEFT/ RIGHT button. If you press the SHUTTER button,the Image Protection menu will disappear.- If you selected [ALL] in Step 3, the Image Protection menu will disappear. - If you protect an image, the protect icon( ) will be displayed on the LCD monitor. (An unprotected image has no indicator)- An image in LOCK mode will be protected from [DELETE] or [DELETE ALL] functions, butwill NOT be protected from the [FORMAT] function.5. Press the menu button and the menu will disappear.Images can be displayed continuously at pre-set intervals. You can view the slide show byconnecting the camera to an external monitor. (p.93)1. Press the play mode button and press the menu button.2. Press the LEFT/ RIGHT button and select the [SLIDESHOW] menu tab.3. Use the UP and DOWN buttons to select the desiredsubmenu value, and then press the RIGHT button.- Slide Show Display Interval: OFF, 1 ~10 seconds4. Use the UP and DOWN buttons to set whether to repeatthe slide show.[ON] : Even once a cycle(from the first image to the lastimage) is completed, the slide show will continue torepeat itself.[OFF]: If a cycle is completed, the slide show will stopautomatically.5. Press the OK button and the slide show will start.- To pause the slide show, press the play & pause button. -To start the slide show again, press the play & pausebutton again. - Press the menu button again and the slide show will stop.The loading time depends on the image size and quality.The slide show will start from an image that was displayed on the LCD monitor. The [POWER OFF] function can t be activated. While the slide show is playing, only the first frame of an MOVIE file is displayed. In case of a voice file, the voice recording icon will appear.If there is only one image in the memory card, the slide show will not start.INFORMATION Starting the slide show](https://usermanual.wiki/Hanwha-Techwin/DIGIMAXU-CA3/User-Guide-360975-Page-53.png)
![54ResizeA stored image size can be changed and used as a logo image.The resized image will have a new file name.1. Press the play mode button and press the menu button.2. Press the LEFT/ RIGHT button and select the [RESIZE]menu tab.3. Select a desired sub menu by pressing the UP/ DOWNbutton and press the OK button.A Large image can be resized to be made smaller, but a small image cannot be resizedto become larger.Only JPG images can be resized. MOVIE and WAV files can’t be resized. You can change the resolution of only those files compressed in the JPEG 4:2:2 format.The resized image will have a new file name. The start-up image is stored not on the memory card but on the internal memory.Only one startup image can be saved. If you save a new startup image, the existingstartup image will be deleted. If the memory capacity is insufficient to store the resized image, a [N/A] message willdisplay on the LCD monitor and the resized image will not be stored.INFORMATIONImage Resize TypesSub menu 1600X1200 1024X768 640X480 LOGOApplication For printing For wallpaper For simplestorageFor the startupimage](https://usermanual.wiki/Hanwha-Techwin/DIGIMAXU-CA3/User-Guide-360975-Page-54.png)
![55Rotating an imageYou can rotate the stored images by 90, 180, or 270 degrees.1. Press the play mode button and press the menu button.2. Press the LEFT/ RIGHT button and select the [ROTATE]menu tab.3. Select a desired sub menu by pressing the UP/ DOWNbutton.If [No] is selected : Press the OK button to cancel theimage rotation.If [Yes] is selected : If you press the OK button, anauxiliary menu from which you can select a rotation orientation willappear. Use the UP and DOWN buttons to select the degree of rotation.The image will be rotated according to the value you selected and bedisplayed on the LCD monitor. [ Rotated 180 degrees ][ Rotated 90 degrees ] [ Rotated 270 degrees ]If you display the rotated image on the LCD monitor, empty spaces may appear to theleft and right of the image.INFORMATIONDPOF : PRINT ORDERDPOF(Digital Print Order Format) allows you to embed printing information on your memorycard. Select the pictures to be printed and how many prints to make.The DPOF indicator will display on the LCD monitor when an image that has DPOF informationplays back. Images can then be printed on DPOF printers, or at an increasing number of photo labs.This function is not available for Movie clips and WAV files.4. Press the OK button. The rotated image will be saved with a new file name and the menuwill disappear. : Rotate 0 : Rotate 90 : Rotate 180 : Rotate 270](https://usermanual.wiki/Hanwha-Techwin/DIGIMAXU-CA3/User-Guide-360975-Page-55.png)
![56DPOF : STANDARDThis function allows you to embed print quantity information on a stored image.1. Press the play mode button and press the menu button.2. Press the LEFT/ RIGHT button and select the [DPOF]menu tab.3. Select the [STANDARD] menu by pressing the UP/DOWN button and press the RIGHT button.4. Select a desired sub menu by pressing the UP/ DOWNbutton .[ONE PIC] : Specifies the number of copies for aselected image.[ALL PICS] : Specifies the number of copies for allimages except for movie clips and voicerecording files.5. Press the OK button and a display to select the quantitywill appear on the LCD monitor.6. Select the print quantity by pressing the UP/DOWNbutton. If you select the [ONE PIC] sub menu at step 4,you can embed a print quantity on another image by pressing the LEFT / RIGHT button.7. Press the OK button to confirm the setting.8. Press the shutter button and the camera working mode is turned to play mode. If an imagecarries DPOF instructions, the DPOF indicator ( ) will show.9. Press the MENU button twice and the menu will disappear.Images (except for movie clips and voice file) are printed as index type.1. Press the play mode button and press the menu button.2. Press the LEFT/ RIGHT button and select the [DPOF]menu tab.3. Select the [INDEX] menu by pressing the UP/ DOWNbutton and press the RIGHT button.4. Select a desired sub menu by pressing the UP/ DOWNbutton.If [NO] is selected : The image will be printed in standardprint format.If [YES] is selected : The image will be printed in indexformat.5. Press the OK button to confirm the setting.6. Press the menu button twice and the menu will disappear.DPOF : INDEX](https://usermanual.wiki/Hanwha-Techwin/DIGIMAXU-CA3/User-Guide-360975-Page-56.png)
![57DPOF : PRINT SIZEYou can specify the print size when printing images stored on the memory card.Setting the Print Size1. Press the play mode button and press the menu button.2. Press the LEFT/ RIGHT button and select the [DPOF]menu tab.3. Select the [PRINT SIZE] menu by pressing the UP/DOWN button and press the RIGHT button.4. Select a desired sub menu by pressing the UP/ DOWNbutton.Print size: Default, 3X5, 4X6, 5X7, 8X10⁵. Press the OK button to confirm the setting.6. Press the menu button twice and the menu will disappear.You can cancel the [Standard], [Index], or [Print Size] settings.1. Press the play mode button and press the menu button.2. Press the LEFT/ RIGHT button and select the [DPOF]menu tab.3. Select the [CANCEL] menu by pressing the UP/ DOWNbutton and press the RIGHT button.4. Select a desired sub menu by pressing the UP/ DOWNbutton.If [STANDARD] is selected : Cancels the standardprint setting.If [INDEX] is selected : Cancels the index print setting.If [PRINT SIZE] is selected : Cancels the print size setting.5. Press the OK button to confirm the setting.6. Press the menu button twice and the menu will disappear.DPOF : CANCEL](https://usermanual.wiki/Hanwha-Techwin/DIGIMAXU-CA3/User-Guide-360975-Page-57.png)
![58PictBridgeYou can use the USB cable to connect this camera to a printer that supports PictBridge (soldseparately) and print the stored images directly. Movie clips and voice files cannot be printed.You can set up the following settings from the PictBridge menu.IMAGES : Setting up the scope of PictBridgePRINTER SETUP : Setting up printingPRINT : Printing picturesDPOF AUTO PRINT : Printing the DPOF filesRESET : Initializing the PictBridge functionsConnecting the Camera to a Printer1. Press the POWER button to turn on the camera.2. In a mode other than Voice Recording mode, press theMENU button.3. Press the LEFT/ RIGHT button and select [SETUP] menutab.4. Select [USB] menu by pressing the UP/ DOWN buttonand press the RIGHT button.5. Select [PRINTER] menu by pressing the UP/ DOWNbutton and press the OK button.6. Press the menu button twice and the menu will disappear.7. Use the supplied USB cable to connect the camera to theprinter as shown below.8. Turn on the printer to connect the camera to the printer.](https://usermanual.wiki/Hanwha-Techwin/DIGIMAXU-CA3/User-Guide-360975-Page-58.png)
![59PictBridge: Picture Selection1. Connect the camera to your printer. The USB menu mustbe set to "PRINTER" before you connect the camera tothe printer.(See p.58)2. The [PictBridge] menu will appear.3. Use the UP and DOWN buttons to select [IMAGES], andthen press the RIGHT button.4. Use the UP and DOWN buttons to select the desiredsubmenu value, and then press the OK button.When [ONE PIC] is selected : The PictBridge function will be applied only to the picturecurrently displayed.When [ALL PICS] is selected : The PictBridge function will be applied to all pictures,excluding movie clips and voice files.Setting the Number of Copies to Print- Select [ONE PIC] or [ALL PICS]. A screen where you can set the number of copies to printwill appear as shown below. When the camera is connected to the printer via the USB cable,a connection icon appears on the top right of the LCD monitor.- Use the UP and DOWN buttons to select the number of copies to print and then press the OKbutton. The number of copies you wish to make: 1 ~ 99- When selecting [ONE PIC] in Step 4, you can use the LEFT and RIGHT buttons to move tothe previous or next picture.- Press the SHUTTER button to return to the PictBridge menu. You can select the scope of the PictBridge function.[ When [ONE PIC] is selected ] [ When [ALL PICS] is selected ]](https://usermanual.wiki/Hanwha-Techwin/DIGIMAXU-CA3/User-Guide-360975-Page-59.png)
![60PictBridge: Print SettingYou can select the Paper Size, Print Format, Paper Type, Print Quality, Date Print, and FileName Print menus for printed pictures.Menu Function Sub menu1. Connect the camera to your printer. The USB menu mustbe set to "PRINTER" before you connect the camera tothe printer.(See p.58)2. The [PictBridge] menu will appear.3. Use the UP and DOWN buttons to select [PRINTERSETUP], and then press the RIGHT button.4. Use the UP and DOWN buttons to select the desiredsubmenu value, and then press the OK button.If [DEFAULT] is selected: The print format will be set to the printer's defaultvalues.If [CUSTOM] is selected: A window from which the user can set up the printformat with the desired values will appear.Use the UP and DOWN buttons to select asubmenu value, and then press the RIGHT button.Auxiliary menus will appear. Use the UP and DOWN buttons to select the desiredauxiliary menu, and then press the OK button.The menus you can set up are as follows:P.SIZE Setting the size of the printing paperSetting the number of pictures to be printed on a sheet of paperSetting the quality of the printing paperSetting the quality of the picture to be printedSetting whether to print the dateSetting whether to print the file namePOST CARD, 4X6, 8X6, A6, A4,B5FULL, 1, 2, 4, 6, 8, INDEXPLAIN, PHOTO, FASTPHOTODRAFT, NORMAL, FINEON, OFFON, OFFLAYOUTP.TYPEP.QUALITYDATEFILE](https://usermanual.wiki/Hanwha-Techwin/DIGIMAXU-CA3/User-Guide-360975-Page-60.png)
![61PictBridge: Picture PrintingPrinting Pictures1. Connect the camera to your printer. The USB menumust be set to "PRINTER" before you connect thecamera to the printer.(See p.58)2. The [PictBridge] menu will appear.3. Use the UP and DOWN buttons to select the [PRINT]menu, and then press the RIGHT button.4. Use the UP and DOWN buttons to select the desiredsubmenu value, and then press the OK button.If [YES] is selected : The screen shown on the rightappears and the picture(s) will print.Press the SHUTTER button to stopprinting.If [No] is selected : The command to print the picturewill be canceled and the[PictBridge] menu will appear.When printing pictures by connecting the camera to the printer, use the AC adapter.The camera's MODE button does not work while printing a picture.If the printer is turned off during printing, the printing will stop and the paper will be dispelled.INFORMATION - Fatal Error : Press the OK button to cancelprinting. Follow the Steps 1 to 4 againto print the picture(s).5. If an error occurs during printing, the screen shown below will appear.[ Fatal error ]](https://usermanual.wiki/Hanwha-Techwin/DIGIMAXU-CA3/User-Guide-360975-Page-61.png)
![62PictBridge : DPOF AUTO PRINTThis allows you to directly print the files with DPOF information. For instructions on how to set up DPOF, refer to pages 70 to 89.This allows you to restore the values of the PictBridge menu, which was changed inCUSTOMIZE, to their default values.1. Connect the camera to your printer. The USB menu mustbe set to "PRINTER" before you connect the camera tothe printer.(See p.58)2. The [PictBridge] menu will appear.3. Use the UP and DOWN buttons to select the [RESET]menu, and then press the RIGHT button.4. Use the UP and DOWN buttons to select the desiredsubmenu value, and then press the OK button.If [NO] is selected : The changed values will be maintained.If [YES] is selected : Restores the changed values to their default values.PictBridge : RESET[ Recoverable error ]1. Connect the camera to your printer. The USB menu mustbe set to "PRINTER" before you connect the camera tothe printer.(See p.58)2. The [PictBridge] menu will appear.3. Use the UP and DOWN buttons to select the [DPOFAUTO PRINT], and then press the RIGHT button.4. Use the UP and DOWN buttons to select the desiredsubmenu value, and then press the OK button.If [Yes] is selected : The picture will be printed.If [No] is selected : The command to print the picture will be canceled and the [PictBridge]menu will appear.5. If an error occurs during printing, the screen shown on the right will appear.- Recoverable Error : Press the OK button to resumeprinting, or press the RIGHT button tocancel printing.Default print setting varies depending on the printer manufacturer. For your printer s default setting, refer to the user s guide that came with your printer.](https://usermanual.wiki/Hanwha-Techwin/DIGIMAXU-CA3/User-Guide-360975-Page-62.png)
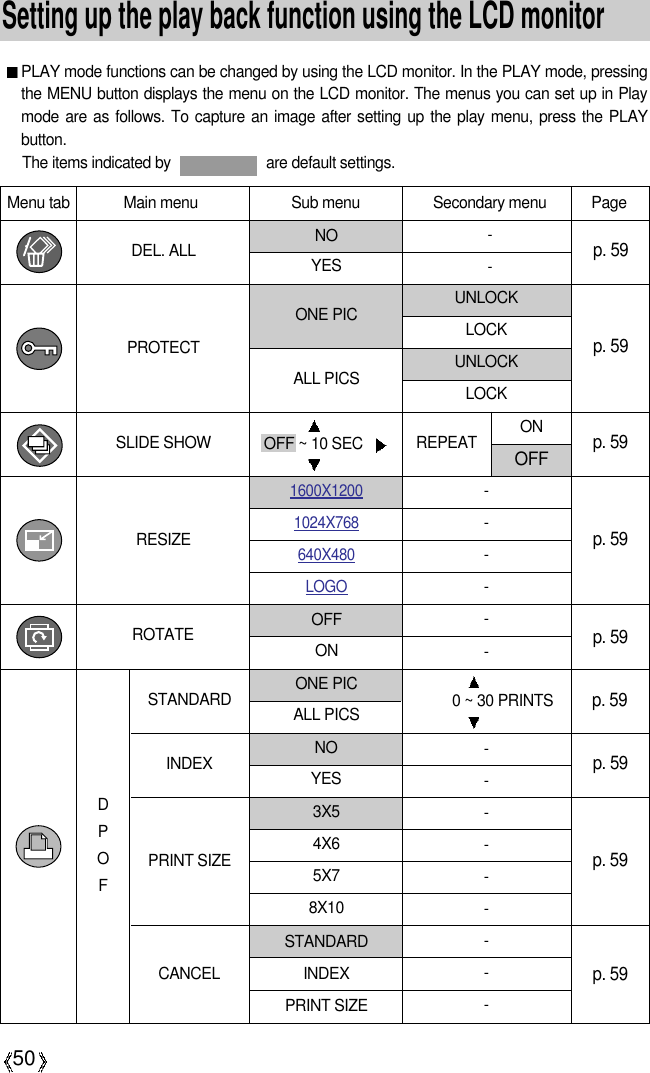
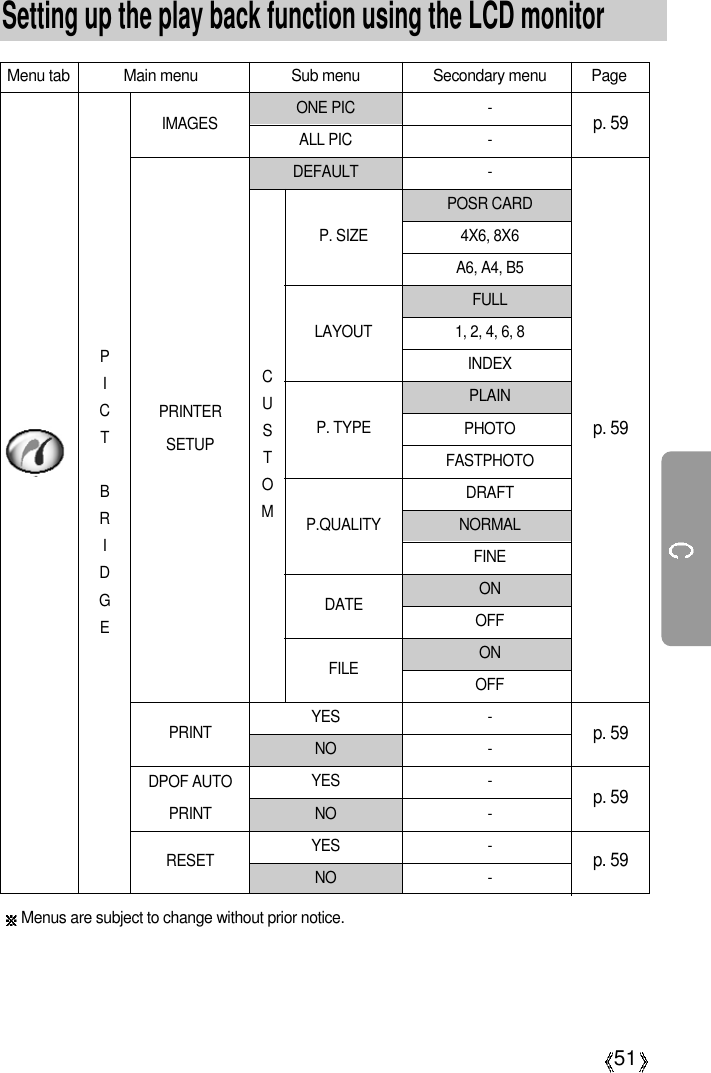
![63Setup menuIn this mode, you can set up basic settings. Every camera working mode has [SETUP] tab intheir own menu. You can use the setup menu in all camera modes, except Voice Recordingmode. The changed setup mode values will be maintained even if you turn the camera off andthen back on. The items indicated by are default settings.Menu tab Main menu Sub menu Secondary menu PageRESETp.59SERIESOFFp.59KOREAN JAPANESEp.59ENGLISH RUSSIANFRENCH PORTUGUESEGERMAN DUTCHSPANISH DANISHITALIAN SWEDISHS.CHINESE FINNISHT.CHINESE THAINOYESY/M/DM/D/YD/M/YOFF DATEDATE&TIMEOFFON01 ~ 03 ~10 MIN03/01/01 13:00FILE NAMEPOWER OFFLANGUAGEFORMATDATE/ TIMEDATE TYPEIMPRINTLAMPON](https://usermanual.wiki/Hanwha-Techwin/DIGIMAXU-CA3/User-Guide-360975-Page-63.png)
![64Setup menuThis function allows the user to select the file naming format.Assigning File Names1. In any mode other than Voice Recording mode, press theMENU button.2. Press the LEFT/ RIGHT button and select the [SETUP]menu tab.3. Select the [FILE NAME] menu by pressing the UP/DOWN button and press the RIGHT button.4. Select a desired sub menu by pressing the UP/ DOWNbutton and press the OK button.[RESET] : After using the reset function, the next filename will be set from 0001 even after formatting, deleting all or inserting a newmemory card.[SERIES] : Under this system, the file name will directly follow the last stored file name,regardless of any actions such as file deletion or formatting.5. Press the menu button twice and the menu will disappear.File nameMenu tab Main menu Sub menu Secondary menu PageOFFp.59LOW NORMALp.59HIGHLOWp.59 NORMALHIGHNTSCp.59PALOFFp.59COMPUTER p.59PRINTERNO p.59YES1 ~ 5 SECDELANSWERONOFFSOUNDLCD VIDEO OUT QUICKVIEWUSBRESET ALL](https://usermanual.wiki/Hanwha-Techwin/DIGIMAXU-CA3/User-Guide-360975-Page-64.png)
![65File nameThe first stored folder name is 100SSCAM, and the first file name is SUC30001.Whenever you store an image, the file number is increased by 1.The file numbers are named from SUC30001 to SUC39999 automatically, 9999 files willbe stored in a folder.The folder number is assigned sequentially from 000 to 999 as follows: 100SSCAM 101SSCAM ~ 999SSCAM.The files used with the memory card conform to the DCF(Design rule for Camera Filesystems) format.INFORMATIONEven if the batteries or AC adapter are removed and inserted again, the power offsetting will be preserved.Note that the automatic power off function will not operate if the camera is in PC mode,slide show, playing back a voice recording or movie clip.INFORMATIONAuto power offSetting Power Off1. In any mode other than Voice Recording mode, press theMENU button.2. Press the LEFT/ RIGHT button and select the [SETUP]menu tab.3. Select the [PWR OFF] menu by pressing the UP/ DOWNbutton and press the RIGHT button.4. Select a desired sub menu by pressing the UP/ DOWNbutton and press the OK button.Selecting [OFF] : The power off function will not operate.Selecting [ON] : A menu will be displayed on the LCDmonitor as shown alongside. Select thedesired time by pressing theUP/DOWN button.5. Press the menu button twice and the menu will disappear.This function switches the camera off after a set amount of time in order to preventunnecessary battery drainage.](https://usermanual.wiki/Hanwha-Techwin/DIGIMAXU-CA3/User-Guide-360975-Page-65.png)
![66Language Setting Language1. In any mode other than Voice Recording mode, press theMENU button.2. Press the LEFT/ RIGHT button and select the [SETUP]menu tab.3. Select the [LANGUAGE] menu by pressing the UP/DOWN button and press the RIGHT button.4. Select a desired sub menu by pressing the UP/ DOWNbutton and press the OK button. LANGUAGE sub menu: Korean, English, French,German, Spanish, Italian, T.Chinese, S.Chinese, Japanese,Russian, Portuguese, Dutch, Danish, Swedish, Finnish, Thai.5. Press the menu button twice and the menu will disappear.There is a choice of languages that can be displayed on the LCD monitor. Even if the batteriesor AC adapter are removed and inserted again, the language setting will be preserved.Formatting a memory cardFormatting a Memory Card1. In any mode other than Voice Recording mode, press theMENU button.2. Press the LEFT/ RIGHT button and select the [SETUP]menu tab.3. Select the [FORMAT] menu by pressing the UP/ DOWNbutton and press the RIGHT button.4. Select a desired sub menu by pressing the UP/ DOWNbutton and press the OK button.If [No] is selected : The memory card will not be formatted. Press the menu button twiceand the menu display will disappear. If [Yes] is selected : A [PLEASE WAIT!] message appears and the memory card will beformatted. If you ran FORMAT in Play mode, a [NO IMAGE!]message will appear.This is used for formatting the memory card. If you run [FORMAT] on the memory card, allimages, including the protected images, will be deleted. Be sure to download important imagesto your PC before formatting the memory card.Be sure to run [FORMAT] on the following types of memory card.- A new memory card, or an unformatted memory card.- A memory card that has a file this camera can t recognize or one that has been takenfrom another camera.Always format the memory card using this camera. If you insert a memory card that hasbeen formatted using other cameras, memory card readers, or PCs, you will get a[CARD ERROR!] message.INFORMATION](https://usermanual.wiki/Hanwha-Techwin/DIGIMAXU-CA3/User-Guide-360975-Page-66.png)
![67Setting up the Date/ Time/ Date typeYou can change the date and time that will be displayed on the captured images and set up thedate type.Setting Date/Time & Selecting Date type1. In any mode other than Voice Recording mode, press theMENU button.2. Press the LEFT/ RIGHT button and select the [SETUP]menu tab.3. Select the [DATE.TIME] menu by pressing the UP/DOWN button and press the RIGHT button.4. Use the UP, DOWN, LEFT, and RIGHT buttons to select thedesired submenu value, and then press the OK button.RIGHT button : Selects theyear/month/day/hour/minute/date type.LEFT button : Moves the cursor to the [DATE/TIME]main menu if the cursor is at the first itemof the date and time setup. In all othercases, the cursor will be shifted to the leftof its current position.UP and DOWN buttons: Changes the setting value.- Date type [YY/MM/DD] : year/month/day [MM/DD/YY] : month/day/year [DD/MM/YY] : day/month/year5. Press the menu button twice and the menu will disappear.There is an option to include DATE/TIME on still images.Date Imprinting1. In any mode other than Voice Recording mode, press theMENU button.2. Press the LEFT/ RIGHT button and select the [SETUP]menu tab.3. Select the [IMPRINT] menu by pressing the UP/ DOWNbutton and press the RIGHT button.4. Use the UP and DOWN buttons to select the desired dateimprint type, and then press the OK button.[OFF] : The DATE & TIME will not be imprinted on the image file.[DATE] : Only the DATE will be imprinted on the image file.[DATE&TIME] : The DATE & TIME will be imprinted on the image file.5. Press the menu button twice and the menu will disappear.Imprinting the recording date](https://usermanual.wiki/Hanwha-Techwin/DIGIMAXU-CA3/User-Guide-360975-Page-67.png)
![68Imprinting the recording dateThe Date & Time are imprinted at the bottom right side of the still image.The date will be imprinted as a DATE TYPE setting.TIME is imprinted in the following way : [Hour : Minute] and hours are shown using the12 hour clock.The imprint function is unaffected by the camera being switched on and off.The imprint function is applied only to still images.INFORMATIONFunction lampSetting the function lamp1. In any mode other than Voice Recording mode, press theMENU button.2. Press the LEFT/ RIGHT button and select the [SETUP]menu tab.3. Select the [LAMP] menu by pressing the UP/ DOWNbutton and press the RIGHT button.4. Select a desired sub menu by pressing the UP/ DOWNbutton and press the OK button. If [OFF] is selected : The fucntion lamp will not light up.If [ON] is selected : The function lamp will light up.5. Press the menu button twice and the menu will disappear.Description of the Function lampFunction DescriptionDuring power-on7 color lights blink and then turns off when the camera is ready to take a pictureAfter an image is capturedThe green lamp will blink once.While recording a movie clipThe purple lamp will blink at a 1-second interval. During voice recording The blue lamp will blink at a 1-second interval. You can turn on and off the function lamp located on the front of the camera.When the self-timer isactivatedEven if the function lamp is set to OFF, the self-timer LED willwork. (See page 32.)](https://usermanual.wiki/Hanwha-Techwin/DIGIMAXU-CA3/User-Guide-360975-Page-68.png)
![69Sound If you set the operation sound to ON, various sounds will be activated for camera startup, whenbutton are pressed, and if there is a card error, so that you can be aware of the cameraoperation status.Setting Operation Sounds1. In any mode other than Voice Recording mode, press theMENU button.2. Press the LEFT/ RIGHT button and select the [SETUP]menu tab.3. Select the [SOUND] menu by pressing the UP/ DOWNbutton and press the RIGHT button.4. Select a desired sub menu by pressing the UP/ DOWNbutton and press the OK button.- [SOUND] sub menu : OFF/LOW/MEDIUM/HIGH5. Press the menu button twice and the menu will disappear.Adjusting LCD Brightness1. In any mode other than Voice Recording mode, press theMENU button.2. Press the LEFT/ RIGHT button and select the [SETUP]menu tab.3. Select the [LCD] menu by pressing the UP/ DOWN buttonand press the RIGHT button.4. Select a desired sub menu by pressing the UP/ DOWNbutton and press the OK button.- [LCD] sub menu : DARK, NORMAL, BRIGHT5. Press the menu button twice and the menu will disappear.LCD brightnessYou can adjust the LCD brightness.](https://usermanual.wiki/Hanwha-Techwin/DIGIMAXU-CA3/User-Guide-360975-Page-69.png)
![70Selecting Video out typeThe Movie output signal from the camera can be NTSC or PAL. Your choice of output will be governed by the type of device (monitor or TV, etc.) to which thecamera is connected. PAL mode can support only BDGHI.Setting the Video Out Type1. In any mode other than Voice Recording mode, press theMENU button.2. Press the LEFT/ RIGHT button and select the [SETUP]menu tab.3. Select the [VIDEO OUT] menu by pressing the UP/DOWN button and press the RIGHT button.4. Select a desired sub menu by pressing the UP/ DOWNbutton and press the OK button.- [VIDEO OUT] sub menu : NTSC, PAL5. Press the menu button twice and the menu will disappear.NTSC : U.S.A, Canada, Japan, South Korea, Taiwan, Mexico.PAL : Australia, Austria, Belgium, China, Denmark, Finland, Germany, U.K.,Holland, Italy, Kuwait, Malaysia, New Zealand, Singapore, Spain, Sweden,Switzerland, Thailand, Norway.When using a TV as an external monitor, you will need to select the external or AVchannel of the TV.There will be a digital noise on the external monitor, but it is not a malfunction.If the image is not in the centre of the screen, use the TV controls to centre it.When the camera is connected to an external monitor, the menu will be visible on theexternal monitor and the menu functions are the same as those indicated on the LCDmonitor.INFORMATIONConnecting to an external monitorIn RECORDING/ PLAY mode,you can view the stored stillimages or movie clips byconnecting the camera to anexternal monitor via the A/Vcable. When the camera isconnected to an externalmonitor, the LCD monitor will beturned off automatically. Yellow color-VideoWhite color-Voice](https://usermanual.wiki/Hanwha-Techwin/DIGIMAXU-CA3/User-Guide-360975-Page-70.png)
![71Quick viewIf you enable Quick View before capturing an image, you can view the image you just capturedon the LCD monitor for the duration set in the [Quick View] setup. Quick view is possible onlywith still images.Setting Quick View1. In any mode other than Voice Recording mode, press theMENU button.2. Press the LEFT/ RIGHT button and select the [SETUP]menu tab.3. Select the [QUICK VIEW] menu by pressing the UP/DOWN button and press the RIGHT button.4. Select a desired sub menu by pressing the UP/ DOWNbutton and press the OK button.[OFF] : The quick view function can’t be activated.[1 ~ 5 SEC] : The captured image is briefly displayed during the selected time.5. Press the menu button twice and the menu will disappear.Deleting Images in Quick ViewYou can delete images directly from the quick view screen.If you select the [1~5SEC] sub menu at step 4, press theRIGHT button and the [DEL. ANSWER] menu will bedisplayed.5. Select the desired [DEL. ANSWER] sub menu bypressing the UP/DOWN button.Selecting [OFF] : A [DELETE?] message will not display.Selecting [ON] : You can delete the captured image at once.6. Press the menu button twice and the menu will disappear.Using the [DEL.ANSWER] menuIf you select [ON] at the [DEL.ANSWER] menu, a messageas shown alongside will be displayed after taking a picture.Pressing the OK button : the captured image is deleted.Pressing the LEFT button : the captured image is stored.](https://usermanual.wiki/Hanwha-Techwin/DIGIMAXU-CA3/User-Guide-360975-Page-71.png)
![72Connecting an External Device (USB)You can select an external device to which you want to connect the camera using the USBcable.Selecting an External Device1. In any mode other than Voice Recording mode, press theMENU button.2. Press the LEFT/ RIGHT button and select the [SETUP]menu tab.3. Select the [USB] menu by pressing the UP/ DOWN buttonand press the RIGHT button.4. Select a desired sub menu by pressing the UP/ DOWNbutton and press the OK button.COMPUTER : Select this if you want to connect the camera to your PC. Refer to page 70 forinstructions on how to connect the camera to your PC.PRINTER : Select this if you want to connect the camera to your printer. Refer to page 60for instructions on how to connect the camera to your printer.5. Press the menu button twice and the menu will disappear.All camera menu and function settings will be restored to their default values. However, valuesfor DATE/TIME, LANGUAGE, and VIDEO OUT will not be changed.Initializing the Camera1. In any mode other than Voice Recording mode, press theMENU button.2. Press the LEFT/ RIGHT button and select the [SETUP]menu tab.3. Select the [RESET ALL] menu by pressing the UP/DOWN button and press the RIGHT button.4. Select a desired sub menu by pressing the UP/ DOWNbutton and press the OK button.If [NO] is selected : Settings will not be restored to their defaults.If [YES] is selected : All settings will be restored to their defaults.5. Press the menu button twice and the menu will disappear.Initialization(RESET ALL)](https://usermanual.wiki/Hanwha-Techwin/DIGIMAXU-CA3/User-Guide-360975-Page-72.png)
![74AvatarSelecting Avatars1. In a mode other than Voice Recording mode, press theMENU button.2. Use the LEFT and RIGHT buttons to select the [MYCAM]menu tab.3. Select [AVATAR] menu by pressing the UP/ DOWNbutton and press the RIGHT button.4. Select a desired sub menu by pressing the UP/ DOWNbutton and press the OK button.If [NO] is selected: Avatars will not be used by thecamera.If [CHANGE] is selected: Avatars will be displayed inthumbnail format.Use the UP, DOWN, LEFT, and RIGHT buttons to selectthe desired avatar, and then press the OK button.5. Press the menu button twice and the menu will disappear.Only avatars stored in the 100SSCAM folder of the memory card can be selected.Avatar file format is "avatxxxx.mov".You can store as many avatars as memory capacity allows.When the avatar is selected, the startup image will be replaced by the avatar.INFORMATIONYou can select the image that is first displayed on the LCD monitor whenever the camera isturned on. If both the avatar and startup image are selected, only the avatar will be displayed. To view the startup image, cancel the selection of an avatar. Setting Startup Image1. In a mode other than Voice Recording mode, press theMENU button.2. Press the LEFT/ RIGHT button and select [MYCAM]menu tab.3. Select [S.IMAGE] menu by pressing the UP/ DOWNbutton and press the RIGHT button.4. Select a desired sub menu by pressing the UP/ DOWNbutton and press the OK button.5. Press the menu button twice and the menu will disappear.Start up image](https://usermanual.wiki/Hanwha-Techwin/DIGIMAXU-CA3/User-Guide-360975-Page-74.png)
![75Start up imageOnly an image that is saved as a LOGO in the [RESIZE] sub menu can be used as thestart up image.The logo image will not be deleted by the [DEL.ALL] or [FORMAT] menu.INFORMATIONStart up soundSetting the Startup Sound1. In any mode other than Voice Recording mode, press theMENU button.2. Press the LEFT/ RIGHT button and select the [MYCAM]menu tab.3. Select the [S.SOUND] menu by pressing the UP/ DOWNbutton and press the RIGHT button.4. Select a desired sub menu by pressing the UP/ DOWNbutton and press the OK button.5. Press the menu button twice and the menu will disappear.Shutter soundYou can select the shutter sound.Selecting the Shutter Sound1. In any mode other than Voice Recording mode, press theMENU button.2. Press the LEFT/ RIGHT button and select the [MYCAM]menu tab.3. Select the [SH.SOUND] menu by pressing the UP/DOWN button and press the RIGHT button.4. Select a desired sub menu by pressing the UP/ DOWNbutton and press the OK button.5. Press the menu button twice and the menu will disappear.You can select the sound that is activated whenever the camera is turned on.](https://usermanual.wiki/Hanwha-Techwin/DIGIMAXU-CA3/User-Guide-360975-Page-75.png)

![82Starting PC modeIf you insert the USB cable into the USB connection terminal, the camera working mode willchange to the PC mode automatically.In this mode, you can download stored images to your PC through the USB cable.The LCD monitor is always turned off in PC mode.The function lamp will blink when the files are transferring via the USB connection.Connecting the camera to a PC1. Turn the PC power on.2. Turn the camera power on.3. In any mode other than Voice Recording mode, press the MENU button.4. Press the LEFT/ RIGHT button and select the [SETUP] menu tab.5. Select the [USB] menu by pressing the UP/ DOWN buttonand press the RIGHT button.6. Use the UP and DOWN buttons to select [COMPUTER],and then press the OK button.7. Press the menu button twice and the menu will disappear.8. Connect the PC and the camera via the USB cable.- Insert the small plug of the USB cable into the cameraUSB connection terminal.- Insert the large connector of the USB cable into the USB port of the PC.- The plugs must be firmly inserted.The camera driver must be installed before using PC mode.To save battery power, it is recommended that you use an AC adapter (Optional) whenconnecting the camera to a computerINFORMATIONDisconnecting the camera and PC : Refer to page 127 (Removing the removable disk).](https://usermanual.wiki/Hanwha-Techwin/DIGIMAXU-CA3/User-Guide-360975-Page-82.png)
![83Starting PC modeDownloading stored imagesYou can download the still images stored on the camera to your PC's hard disk and print themor use photo editing software to edit them.1. Connect the camera to your PC with the USB cable. (p.94)2. On your computer’s desktop display, select [My computer]and double click [Removable Disk DCIM 100SSCAM]. The image files will then be displayed.3. Select an image and press the right mouse button.4. A pop-up menu will open. Click the [Cut] or [Copy] menu[Cut] : cuts a selected file.[Copy] : copies files.5. Click a folder that you want to paste the file into.6. Press the right mouse button and a pop-up menu willopen. Click [Paste].](https://usermanual.wiki/Hanwha-Techwin/DIGIMAXU-CA3/User-Guide-360975-Page-83.png)
![84Starting PC mode7. An image file is transferred from the camera to your PC.- By using [Digimax Viewer], you can see the stored images in the memory directly on the PCmonitor and you can copy or move the image files. (p.130)Important notesBe sure to observe the following precautions!This unit contains precision electronic components. Do not use or store thisunit in the following locations.- Areas exposed to severe changes in temperature and humidity.- Areas exposed to dust and dirt.- Areas exposed to direct sunlight or the inside of a vehicle in hot weather.- Environments where there is high magnetism or excessive vibration.- Areas with high explosives or highly flammable materials.Do not let the unit come into contact with dust, vinyl goods, or chemicals,such as insecticides, for an extended period of time.Sand can be particularly troublesome to cameras.- Do not let sand get inside the unit when using it on beaches, coastal dunes, or other areaswhere there is lots of sand.- Doing so may result in failure or may permanently render the unit unusable.Extremes in temperature may cause problems.- If the camera is transferred from a cold to a warm and humid environment, condensation canform on the delicate electronic circuitry. If this occurs, turn the camera off and wait for at least 1 hour until all moisture is dispersed.Moisture build up can also occur in the memory card. If this happens, turn off the camera andremove the memory card. Wait until the moisture has dispersed.](https://usermanual.wiki/Hanwha-Techwin/DIGIMAXU-CA3/User-Guide-360975-Page-84.png)
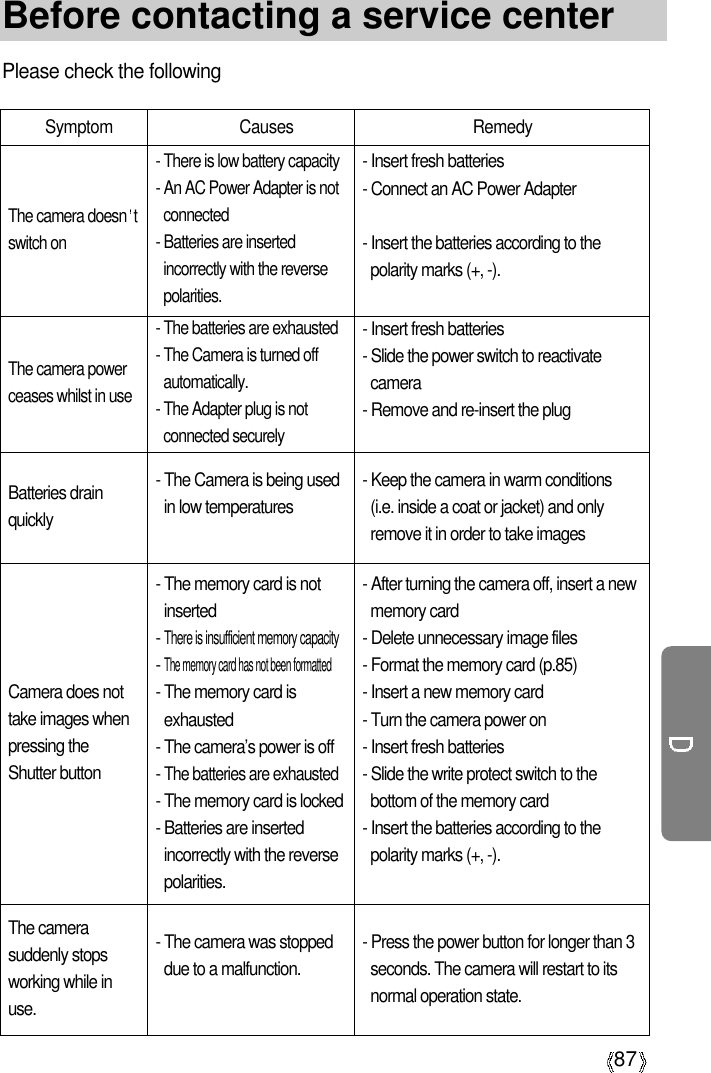
![89Before contacting a service centerSymptom Causes Remedy- White balance setting isincorrect. - Exposure is excessive.- Cable connection isincorrect.- The camera is off.- There are no batteries, thebatteries are exhausted orthe AC adapter is notconnected.- The operating system isnot Windows 98, 98SE,2000, ME, XP/ Mac OS9.0~10.2. Alternatively thePC does not support USB.- The USB driver is notinstalled.Colour of image isdifferent to theoriginal sceneImages are toobrightWhen using thePC’s explorer, the[Removable Disk]file does not show- Select appropriate White balance.- Reset exposure compensation.- The external monitor hasnot been connectedproperly with the camera.- There are incorrect files inthe memory card.No image onexternal monitor- Check the connection cables.- Insert a memory card that has correctfiles.- Check the connection.- Turn the camera on.- Insert new batteries or check theadapter connection.- Install Windows 98, 98SE, 2000, ME,XP/ Mac OS 9.0~10.2 to PC thatsupports USB.- Install a [USB Storage Driver].](https://usermanual.wiki/Hanwha-Techwin/DIGIMAXU-CA3/User-Guide-360975-Page-89.png)
![92Software NotesPlease ensure that you read the instruction manual carefully before use.The attached software is a camera driver and image editing software tool for Windows.Under no circumstances should all or part of either the software or the user manual bereproduced.Copyrights for software are licensed only for use with a camera.In the unlikely event of a manufacturing fault, we will repair or exchange your camera. We cannot, however, be held responsible in any way for damage caused by inappropriate use.Using a Hand-made PC or a PC that has not been guaranteed by the manufacturer is notcovered by the Samsung warranty.Before reading this manual, you should have a basic knowledge of computers and O/S(Operating Systems).After inserting the CD-ROM provided with this camera into the CD-ROM drive, the followingwindow should automatically run.Before connecting the camera tothe PC, you should first install thecamera driver.Camera driver : This enables images to transfer between the camera and PC. This camera uses the USB Storage Driver as the camera driver. You can use the camera as aUSB card reader.After installing the driver and connecting this camera to the PC, you can find [Removable Disk] in[Windows Explorer] or [My computer]. A USB Storage Driver is provided only for Windows. A USB Driver for MAC is not included with the Application CD. But you can use the camera withMac OS 9.0~10.2.About the software](https://usermanual.wiki/Hanwha-Techwin/DIGIMAXU-CA3/User-Guide-360975-Page-92.png)
![93Software NotesQuickTime Player : The program for playing back QuickTime movies (.mov). It can also playvideo files compressed with MPEG4 codec.This software is only compatible with Windows.Digimax Viewer 2.1: This is a program for viewing stored images.You can see the stored images in the memory directly on a PC monitor. You can also copy,move or delete the images and enlarge /downscale the image sizes with Digimax Viewer. Thissoftware is only compatible with Windows.MGI PhotoSuite III SE: Image editing programYou can edit or store still images that you download from the camera.This software is only compatible with Windows.DigiStudio: Software for creating 3D avatars.You can store 3D avatar files on the camera and use one of the avatar as the startup image.Please be sure to check the system requirements for the software before installing. Thissoftware is only compatible with Windows.Be sure to check the system requirements (page 112) before installing the driver.You should allow 5~10 seconds for running the automatic setup program according tothe capability of the computer. If the frame does not show, run the [Windows Explorer]and select [samsung.exe] in the CD-ROM Drive root directory.INFORMATIONRecommended System RequirementsMinimum System RequirementsCPU Pentium III 500Mhz Pentium II 400Mhz RAM 64MB 128MBGraphic CardSound Card 16 Bit Stereo Sound CardHard Disk 150MB or more available space Operating SystemWindows 98SE/2000/ME/XP Web BrowserInternet Explorer 5.0 or laterGraphic card with 3D acceleration andat least 16MB of video RAMGraphic card with 3D acceleration andat least 8MB of video RAM](https://usermanual.wiki/Hanwha-Techwin/DIGIMAXU-CA3/User-Guide-360975-Page-93.png)
![94Setting up the application softwareTo use this camera with a PC, install the application software first. After this has been done, the stored images in the camera can be moved to the PC and can beedited by an image editing program.You can visit the Samsung web-site through the internet.http://www.samsungcamera.com : Englishhttp://www.samsungcamera.co.kr : KoreanClose other programs before installing the application software.Before installing the application software, disconnect the USB connection.INFORMATION 4. A Welcome window will appear. Click [Next >] to proceed to the next screen.[Click !]1. Click the [Install] menu in the Autorun frame. The UCA 3 camera driver is installed automatically. 2. Installation is complete. Click the [Finish] button.3. Click [Next >] to begin installing QuickTime.[Click !][Click !][Click !]](https://usermanual.wiki/Hanwha-Techwin/DIGIMAXU-CA3/User-Guide-360975-Page-94.png)
![95Setting up the application software5. The Software License Agreement window will be displayed. Ifyou agree to this, click [Yes], the window will then move tothe next step. If you disagree, click [ No ] and the installationprogram will be canceled.6. Click [Browse...] to specify a destination directory for theinstallation, and then click [Next >].7. The [Choose Installation Type ] window appears. Select thetype of installation you want to perform and click [Next >].Minimum : Installs required files only.Recommended : Installs required files and the mostcommonly used optional files.* When using the DigiStudio program, please be sure toselect "Recommended".Custom : Allows you to install only thecomponents you choose.8. Select the program folder in which you want to create theprogram's shortcuts, and then click [Next >]. [Click !][Click !][Click !]9. The Enter Registration window appears. Enter your name and organization in the respective fields,and then click [Next >]. You do not have to enter a registration number.[Click !]](https://usermanual.wiki/Hanwha-Techwin/DIGIMAXU-CA3/User-Guide-360975-Page-95.png)
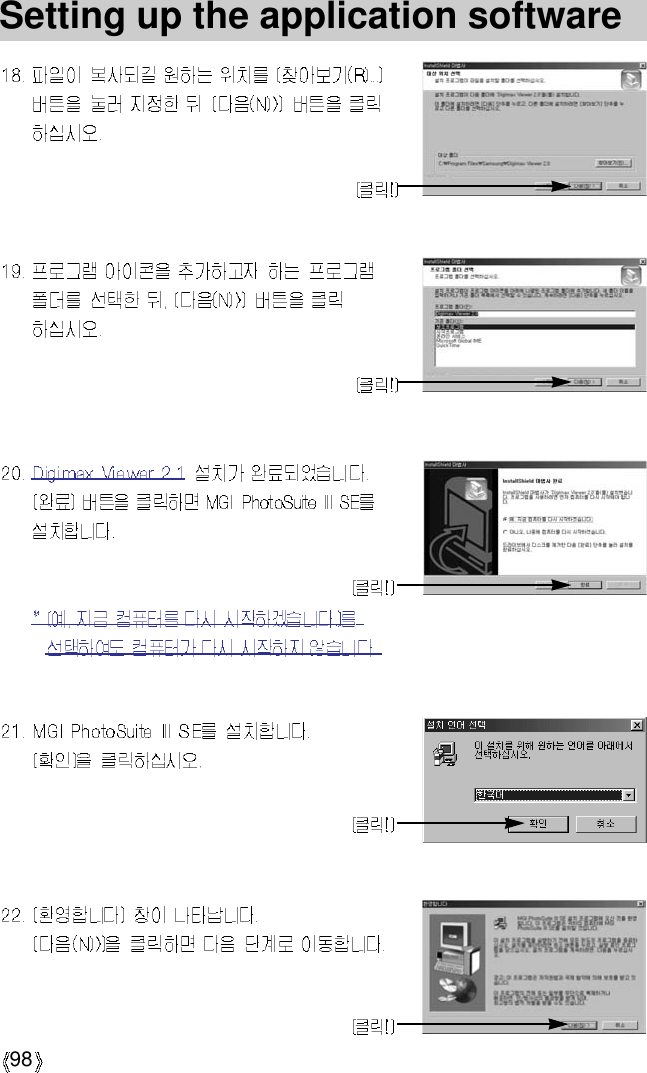
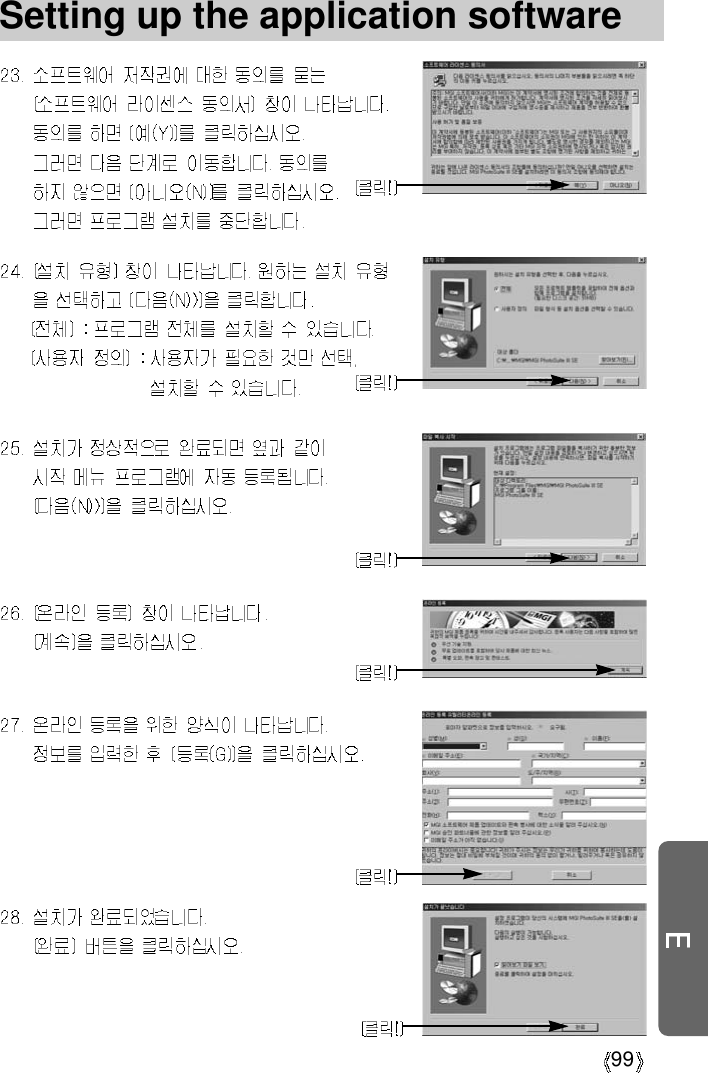
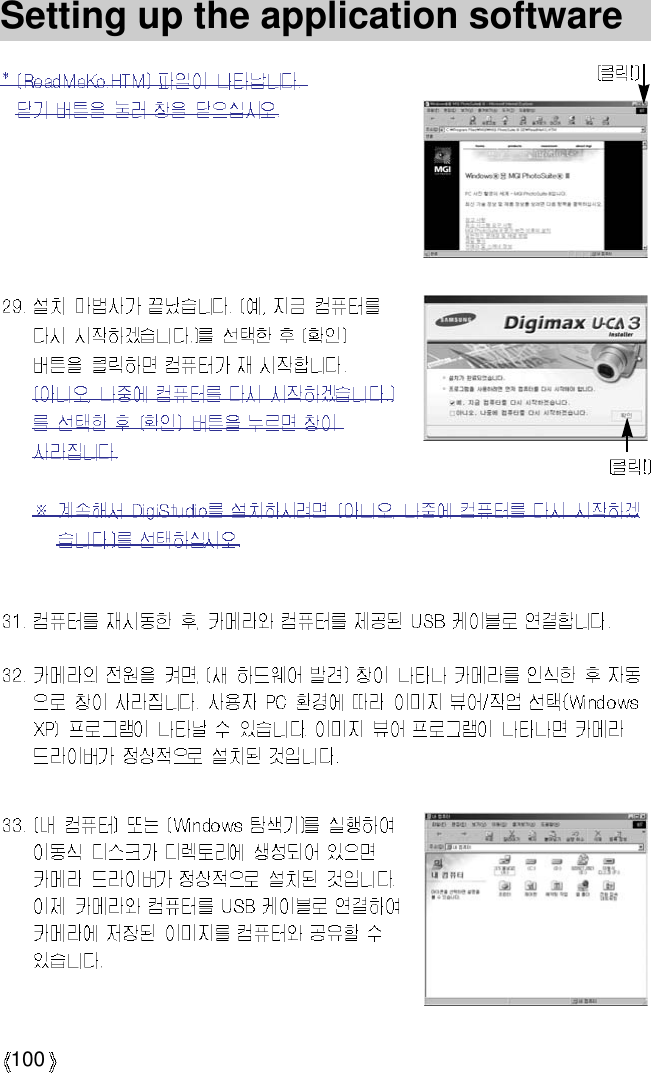
![101Setting up the application softwareIf you have installed the camera driver, [FoundNew Hardware Wizard] may not open.On a Windows 98 or 98 SE system, the FoundNew Hardware Wizard dialog box opens and awindow asking you to select a driver file mayappear. In this case, select the[C:\WINDOWS\INF\OTHER] folder.If you can’t find the [INF\OTHER] folder, check the[Show all files] button in [Window's Explorer View Folder option View].When connecting the camera to your PC, it isrecommended that you use an AC poweradapter.Before connecting the camera to the PC, You should first install the camera driver.After installing the camera driver, you have to restart your PC.If you connect the camera to the PC before installing the camera driver, the [FoundNew Hardware Wizard] will open.In this case, cancel the [Found New Hardware Wizard] and disconnect the camera.Install the camera driver and connect the camera to the PC again.Should the computer not find the camera driver after installation, please try one or moreof the following measures.1. Delete the camera driver (p.124), and re-install the driver.2. Refer to FAQ (p.146) to check for a possible solution to the problem.3. If your PC’s central processing unit is VIA chip (This is shown in the USB HostController), download the patch file from the Samsung Camera web page.(http://www.samsungcamera.com)INFORMATION](https://usermanual.wiki/Hanwha-Techwin/DIGIMAXU-CA3/User-Guide-360975-Page-101.png)
![102Removing the USB Driver for Windows 98SETo remove the USB driver, refer to the process shown below.1. Trace [Start Settings] and click [Control Panel].[Click !]4. A window will open. Click the [OK] button andthe camera driver will be removed.5. Uninstallation is complete. Click the [Finish] button and the windowwill disappear.[Click !][Click !]2. Double-click [Add/Remove programs].3. The [Add/Remove Programs Properties] window willopen. Click [Digimax U-CA3 Camera] and click the[Add/Remove] button.](https://usermanual.wiki/Hanwha-Techwin/DIGIMAXU-CA3/User-Guide-360975-Page-102.png)
![103Removable DiskTo use this camera as a Removable Disk, install (p.115) the USB Driver.1. Before turning the camera power on, connect the camera to the PC with the USB cable.2. Click [Removable Disk] under [My computer] or [Windows Explorer].3. Image files stored in the Removable Disk (DCIM 100SSCAM) can be transferred to the PC.Important information whilst using the Removable DiskThe [Removable Disk] indicator will not show when the camera power is off.We recommend that you should copy the images to the PC to view them. Openingimages directly from the removable disk may be subject to unexpected disconnection.When uploading images from the PC to the camera, ensure that the uploaded filenames are not the same as those already stored on the memory.When you upload a file that is not taken by this camera to Removable Disk, the [FILEERROR!] message will be displayed on the LCD monitor in the PLAY mode, andnothing is displayed in THUMBNAIL mode.The function lamp will blink, when a file is transferred (copy or deletion) between the PCand the camera. Do not remove the USB cable until the lamp stops blinking. To removethe USB cable in Windows 2000/ME/XP, use the [Unplug or Eject Hardware] icon onthe task bar.INFORMATION](https://usermanual.wiki/Hanwha-Techwin/DIGIMAXU-CA3/User-Guide-360975-Page-103.png)
![104Removing the removable diskWindows 98SE1. Check whether the camera and PC are transferring a file. If the function lamp blinks, you haveto wait until the lamp illuminates.2. Unplug the USB cable.Windows 2000/ME/XP(The illustrations may be different from the real display in accordance withthe Windows O/S.)1. Check whether the camera and PC are transferring a file. If the function lamp blinks, you haveto wait until the lamp illuminates.2. Double-click the [Unplug or Eject Hardware] icon on thetask bar.3. The [Unplug or Eject Hardware] window will open.Select the [USB Mass Storage Device] and click the[Stop] button.4. The [Stop a Hardware device] window will open. Selectthe [SAMSUNG DIGIMAX UCA3 USB Device] andclick the [OK] button.5. A [Safe to Remove Hardware] window will open. Click the [OK] button.[Click !][Double-click][Click !][Click !]](https://usermanual.wiki/Hanwha-Techwin/DIGIMAXU-CA3/User-Guide-360975-Page-104.png)
![105Removing the removable diskIf you use Mac OS 10.0 or later, you may experience an error occurring when youtransfer files from the PC to the camera.If you cannot play a video in MAC OS 9.x, check the version of your QuickTime Player.If your version of QuickTime Player is earlier than 5.x, then install a version 6.0.3 orlater. To install QuickTime Player, use the supplied CD-ROM or download a free versionfrom the Apple site at http://www.apple.com. INFORMATION1. A USB Driver for MAC is not included with the software CD as MAC OS supports the cameradriver.2. Check the MAC OS. You can check the MAC OS version during MAC OS start-up. This camera is compatible with MAC OS 9.X~10.2.3. Connect the camera to the Macintosh and turn the camera power on in PC mode.4. A new icon (Untitled) will be displayed on the desktop after connecting the camera to the MAC.Using the USB Driver for MACSetting up the USB Driver for MAC1. Double click a new icon (Untitled) on the desktop and the folder in the memory will bedisplayed.2. Select an image file and copy or move it to MAC.6. A [Unplug or Eject Hardware] window will open. Click the [Close] button and the removable disk will beremoved safely.7. Unplug the USB cable.[Click !]](https://usermanual.wiki/Hanwha-Techwin/DIGIMAXU-CA3/User-Guide-360975-Page-105.png)
![106Digimax Viewer 2.1This software is only compatible with Windows.1. To open Digimax Viewer, click the [Start Programs Samsung Digimax Viewer 2.1 Digimax Viewer 2.1 ]and Digimax Viewer 2.1 will then open. 3. You can easily use the Digimax viewer 2.1program as itoffers a FILE menu and TOOL bar.And, you can use thepop up menu. Click an image and press the right mousebutton.Digimax Viewer functions are listed below.- Basic functions : Copy, Move, Delete, Rotate, Rename, changing file type, Resize,Property.- Advanced functions : Print, Slide show, Export, Sending e-mail, On-line print, Web album etc.2. If the [Auto Launch] option is selected, this program will be executed automatically withrecognizing the camera.Before deleting images from the camera, you should protect or download images toyour computer that you wish to keep.Refer to the [Help] menu in Digimax viewer 2.1for further information.INFORMATION](https://usermanual.wiki/Hanwha-Techwin/DIGIMAXU-CA3/User-Guide-360975-Page-106.png)
![107MGI PhotoSuite III SEAn introduction to the Welcome screenThis software is only compatible with Windows.To open MGI PhotoSuite lll SE, click the [Start Programs MGI PhotoSuite lll SE MGIPhotoSuite lll SE] and MGI PhotoSuite lll SE will then open.GetGet images.PrepareA number of photo editing activities can be performed within this module.ComposeUse your photos in a variety of fun, creative and interesting ways.OrganizeOrganize your photos and other media files into albums.ShareSave your results to show to others.PrintPrint hard copies of photos and projects.](https://usermanual.wiki/Hanwha-Techwin/DIGIMAXU-CA3/User-Guide-360975-Page-107.png)
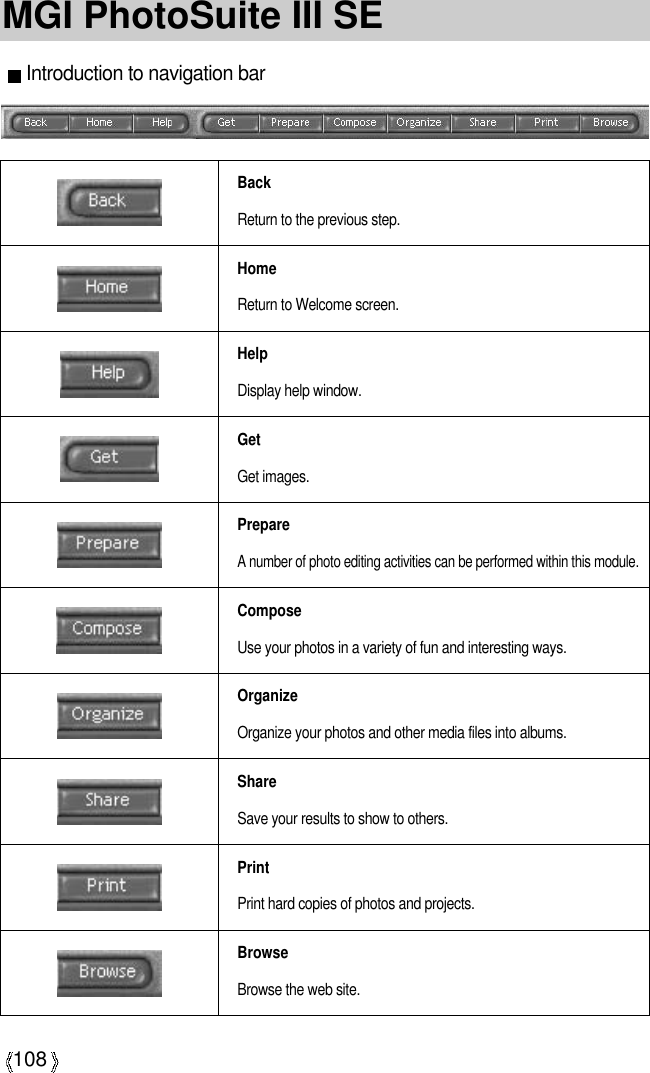
![109MGI PhotoSuite III SEGetWhen you obtain images from the digital camera.Before transferring an image file, check the USB connection.1. To acquire images, click the large [Get] buttonon the Welcome screen, or the [Get] button onthe Navigation bar. Click [Computer] from the listof options displayed on the activity panel. 2. The Open file selector is displayed. Click [Lookin :] to choose [Removable Disk( :)] and click[open] for the open file window to be displayed.To obtain images from the computer1. To acquire images, Click the large [Get] buttonon the Welcome screen, or the [Get] button onthe Navigation bar. Click [Computer] from the listof options displayed on the activity panel.2. The Open file selector is displayed. Now select the image file and click [open].3. The Welcome screen will change to the nextwork step, with the selected image displayed.](https://usermanual.wiki/Hanwha-Techwin/DIGIMAXU-CA3/User-Guide-360975-Page-109.png)
![110MGI PhotoSuite III SE3. Select the [ DCIM 100sscam ] folder. Then select an image and click [ Open ].When you use the Digimax camera, only [Computer]and [Album] from the list of options displayed are available. You will be able to obtain images from the digital camera.NOTICE4. The Welcome screen will change to the nextwork step, with the selected image displayed.[Computer and Album Only]1. To acquire images, click the large [Get] buttonon the Welcome screen, or the [Get] button onthe Navigation bar. Click [Album] from the list ofoptions displayed on the activity panel. Acquiring images from an Album.](https://usermanual.wiki/Hanwha-Techwin/DIGIMAXU-CA3/User-Guide-360975-Page-110.png)
![111MGI PhotoSuite III SE2. After selecting Album on the [ Choose a photoalbum], click an image in the album and click[Open].3. The Welcome screen will change to the nextwork step, with the selected image displayed.Refer to page 95 for more information aboutcreating an Album.PrepareWhen the image is loaded, the step changes to Prepare automatically.Menu for [PREPARE] stepsRotate & CropYou can rotate, flip or crop images along with a host of others.TouchupRemove Red eye, Remove Scratches etc.. are available in this menu.Special EffectsA number of special effects can be applied.StitchingJoin a series of photos together to create a sweeping panoramic effect.](https://usermanual.wiki/Hanwha-Techwin/DIGIMAXU-CA3/User-Guide-360975-Page-111.png)
![112MGI PhotoSuite III SEComposeAdd text, Compound Images etc. are available in this step.Menu of [COMPOSE] stepsCollages : A collage consists of severalphotos or sections of photosarranged together on acommon background.Photo Layouts : The Photo Layouts activityincludes many collage andlayout options.Cards & tags : Use your photos to createitems such as Gift Tags,Greeting Cards, Invitations,Postcards, and Sports Cards.Calendars : Use your photos to create avariety of calendars (monthly,quarterly, seasonal, yearly).Collections : Photos can also be used tocreate a variety of items forbusiness purposes.Fun stuff : You can create magazinecovers, Backgrounds etc. inthis menu.Business : You can make business itemssuch as business cards,certificates, signs, labels,promotions, name tags,stationaryFrames & Edges : Add frames and edge effectsto your photos according topredefined templates.](https://usermanual.wiki/Hanwha-Techwin/DIGIMAXU-CA3/User-Guide-360975-Page-112.png)
![113MGI PhotoSuite III SEOrganizeOrganize your photos and other media files into albums.Menu of [ORGANIZE] steps [Choose a photo album to view or edit]Select Album : To create an Album, click[Organize] in the welcomescreen or navigation bar. Album.. : Open Master Album.[Select a photo, and choose an action below.]- Open : Open selected image.- Delete : Delete selected image.- Properties... : view image information.[Choose an action to manage your album.]- Add : click [Add] to add an image to anAlbum.- Sort : click [Sort] to Sort saved images.- Search : click [Search] to Search savedimages.- Reset : click [Reset] to reset the setting.- Update : click [Update] to update images.- Create Slide Show : click [Create SlideShow] to create a SlideShow.Always start on this page : If you select thisoption, the program will start in [Organize].](https://usermanual.wiki/Hanwha-Techwin/DIGIMAXU-CA3/User-Guide-360975-Page-113.png)
![114MGI PhotoSuite III SECreating an Album1. To create an Album, click the large Organizebutton on the Welcome screen, or theOrganize button on the Navigation bar.2. Click [Album..] in [ Choose a photo album toview or edit.]3. The Master Album window will be displayed,then click [New..].4. Put a new Album name in the New Albumwindow and click [OK]. A new album will nowbe created.5. A [Master Album] window will open. Click the[OK] button.](https://usermanual.wiki/Hanwha-Techwin/DIGIMAXU-CA3/User-Guide-360975-Page-114.png)
![115MGI PhotoSuite III SEAdd images to the album1. Select [ Choose an action to manage youralbum. Add..] to add images to the album. 2. Click [Computer] in Add Photos menu.[Digital Camera(Direct)], [Scanner(TWAIN)],[Digital Camera(TWAIN)] sources can't beused.[Click!][Click!]3. A [Add photo to Album] window will open. Select images that you want to add. Click the [Add] button.4. Adding images is complete.[Click!]](https://usermanual.wiki/Hanwha-Techwin/DIGIMAXU-CA3/User-Guide-360975-Page-115.png)
![116MGI PhotoSuite III SEMenu of [SHARE] stepsSaveTo save the active file according to its currentname and path.Save AsTo assign a new name or path to the file.Send E-maile-mailing images.Slide ShowViewing images as a slide show.Saving or sharing images. SharePrintYou can print images.Menu for the [PRINT] stepsPrintPrinting images.Print MultiplesPrint multiple copies of a photo or project, or onecopy of each of the photos included in an album,according to a predefined template.Choose a printer, an orientation, the print size,and the number of copies. You can then print the images.For more information, please refer to the Help file in [Help MGI PhotoSuite lll help].INFORMATION](https://usermanual.wiki/Hanwha-Techwin/DIGIMAXU-CA3/User-Guide-360975-Page-116.png)
![117FAQPlease check the following if the USB connection malfunctions.[Case 1] The camera power is off.Turn the camera power on. We recommend using an AC power adapter in PCmode.[Case 2] USB Driver is not installed correctly.Install the USB Driver correctly. Refer to page 115.[Case 3] The USB cable is not connected or you are using a cable with an incorrectspecification.Use a USB cable with the correct specification.[Case 4] The camera is not recognized by your PC. Sometimes, the camera may appear under [Unknown Devices] in DeviceManager.Install the camera driver correctly.Turn off the camera, remove the USB cable, plug in the USB cable again, andthen turn on the camera.[Case 5] There is an unexpected error during file transferTurn the camera power off and on again. Transfer the file again.[Case 6] How do I know my computer supports a USB Interface?Check the USB port in your computer or keyboard.Check the OS version. A USB Interface is available in Windows 98, 98SE, 2000,ME .XP.Check [Universal serial bus controller] in Device Manager. Do the following tocheck [Universal serial bus controller].Win 98/ME : Trace [Start Setting Controller System DeviceManager Universal serial bus controller]Win 2K : Trace [Start Setting Controller System HardwareDevice Manager Universal serial bus controller].](https://usermanual.wiki/Hanwha-Techwin/DIGIMAXU-CA3/User-Guide-360975-Page-117.png)
![118FAQWin XP : Trace [Start Control Panel Performance andMaintenance System Hardware Device Manager Universal Serial Bus controller].There must be USB Host Controller and USB root hub under [Universal serial buscontroller].When all the conditions mentioned above are met, the computer can support theUSB interface.[Case 7] When using the USB hub.There may be a problem in connecting the camera to the PC through the USBhub if the PC and the hub are not compatible. Wherever possible, connect thecamera to the PC directly.[Case 8] Are other USB cables connected to the PC?The camera may malfunction when it is connected to the PC at the same time asanother USB cable. In this case, disconnect the other USB cable, and connectonly one USB cable to the camera.Please check the following if you encounter a problem while running DigiStudio.[Case 1] My PC slows down when I launch DigiStudio.Check the system requirements for the installation of DigiStudio.If your PC does not meet the recommended system requirements for theinstallation, your PC may run slowly.](https://usermanual.wiki/Hanwha-Techwin/DIGIMAXU-CA3/User-Guide-360975-Page-118.png)