Hanwha Techwin DIGIMAXU-CA5 Digital Camera User Manual UC2 en c V07
Samsung Techwin Co Ltd Digital Camera UC2 en c V07
UserManual.wiki
>
Hanwha Techwin
>
DIGIMAXU-CA5 User Manual
>
Users Manual 2 of 2
Contents
1.
Users Manual 1 of 2
2.
Users Manual 2 of 2
Users Manual 2 of 2
Navigation menu
Upload a User Manual
Namespaces
Wiki Guide
HTML
PDF
Info
Views
User Manual
Discussion / Help
Navigation
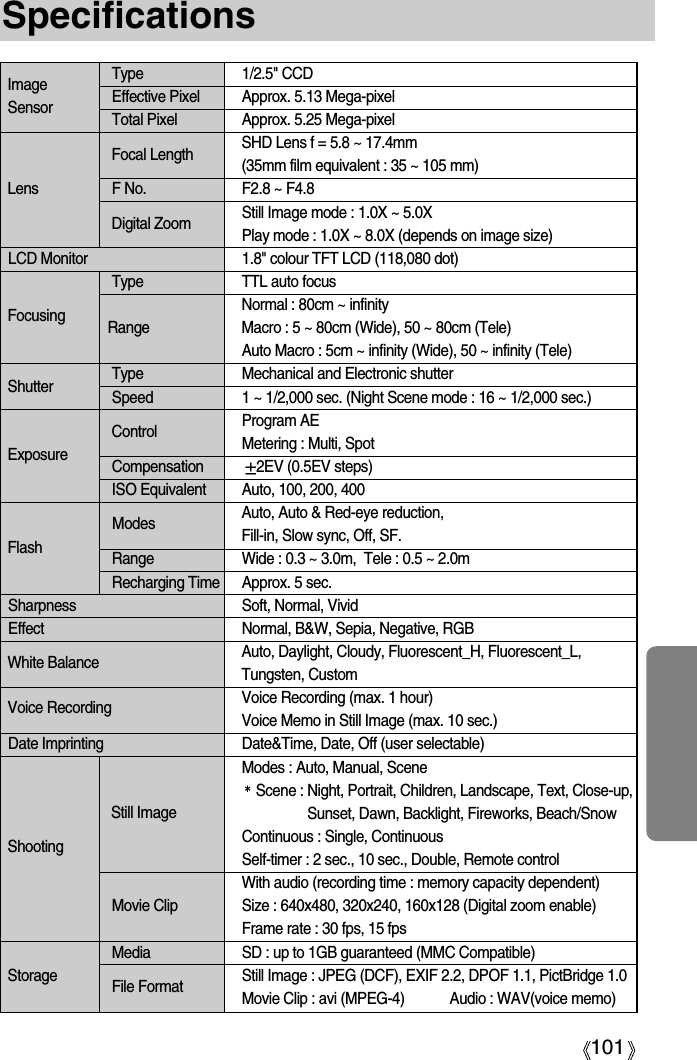
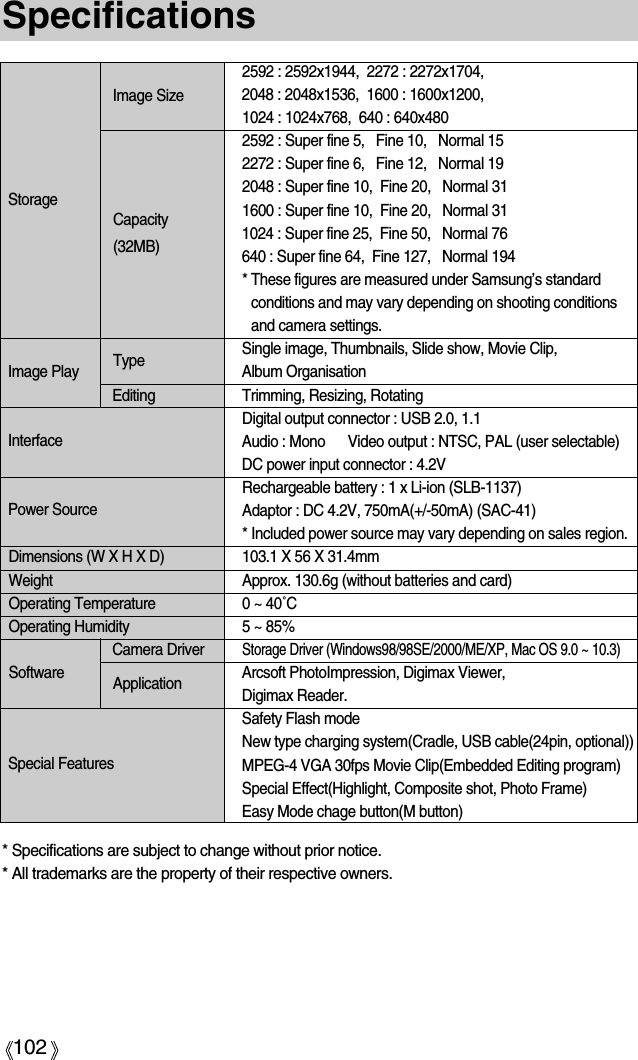
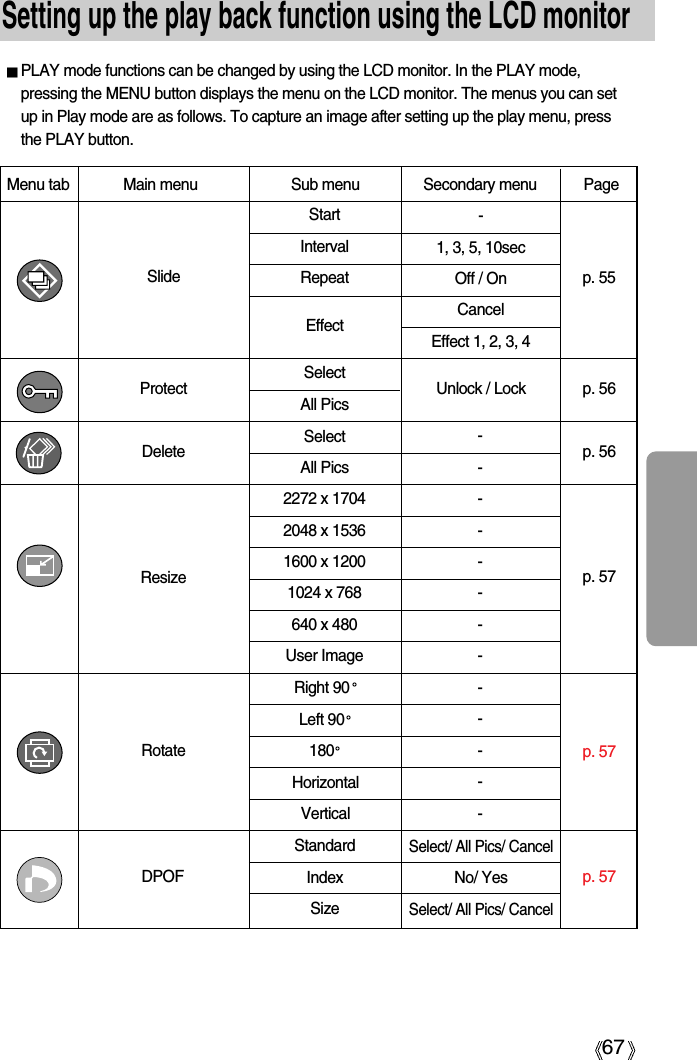
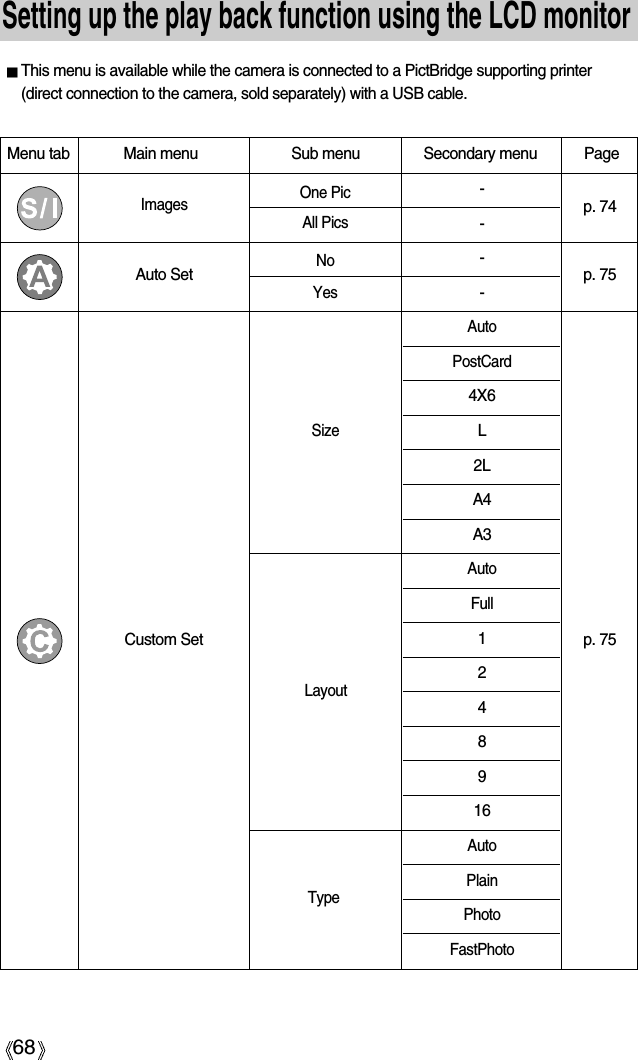
![61Voice ( ) memo / Up button3. Press the shutter button to start recording and voice willbe recorded to the still image for 10 seconds. While the voice is recording, the recording statuswindow will be displayed as shown alongside.4. The recording can be stopped by pressing the shutterbutton again.5. The ( ) icon will be displayed on the LCD monitorafter voice memo recording has finished. - Voice memos can’t be recorded onto movie clip files.- A distance of 40cm between you and the camera(microphone) is the best distance to record sound.- The voice memo will be saved in *.wav format, but hasthe same file name as the still image to which itcorresponds.- If you add a new voice memo to the still image thatalready has a voice memo, the existing voice memo will be erased.Play & Pause ( )/ Down buttonIn Play mode, the play & pause/ down button works as follows:- If the menu is displayedPress the DOWN button to move from the main menu to a sub menu, or to move down thesub menu cursor.- If a still image with a voice memo, a voice file, or a movie clip is playingIn Stop mode : Plays a still image with a voice memo, a voice file, or a movie clip.During playback : Temporarily stops playback.In Pause mode : Resumes playback[ Voice recording is stopped ] [ Voice recording is paused ][ Voice recording is playing ]33 3Stop : ShutterPLAYPAUSEPLAY](https://usermanual.wiki/Hanwha-Techwin/DIGIMAXU-CA5.Users-Manual-2-of-2/User-Guide-505743-Page-1.png)
![62LEFT/ RIGHT/ MENU/ OK buttonLEFT / RIGHT/ MENU/ OK buttons activate the following.- LEFT button : While the menu is showing, press the LEFT button to select the menu tabto the left of the cursor.- RIGHT button : While the menu is showing, press the RIGHT button to select the menu tabto the right of the cursor, or to move an secondary menu.- MENU button : When you press the MENU button, the play mode menu will be displayedon the LCD monitor. Pressing it again will return the LCD to the initialdisplay.- OK button : When the menu is displayed on the LCD monitor, the OK button is used forconfirming data that is changed by using the 5 function button.The shooting information will be displayed on the LCD monitor.The last image stored in the memory is displayed on theLCD monitor by pressing the play mode button.Pressing the LCD( ) button in the PLAY mode willchange the display as shown below. [Image & Icons] [Image & Information] [Image only][ Image & Icons ] [ Image & Information ] [ Image only ]Pressing the LCD buttonPressing theLCD buttonPressing theLCD buttonLCD ( ) button Size : 2592X1944Av : F2.8Tv : 1/60ISO : 100Flash : OffDate : 2005/01/01](https://usermanual.wiki/Hanwha-Techwin/DIGIMAXU-CA5.Users-Manual-2-of-2/User-Guide-505743-Page-2.png)
![63Album button (M button)All A1 A2A3 A4 A5A6 A7 A8SelectSlideAddRemoveExit:MENU Move : All A1 A2A3 A4 A5A6 A7 A8SelectSlideAddRemoveExit:MENUA4SelectSlideAddRemoveExit:MENU Move : You can organise the captured still images into albumsby using the M button. This camera has 8 albums and each album can take upto 100 images. How to use the albumSelecting the album1. In the play mode, press the M button.2. Select [Select] menu by pressing the Up/Down buttonand press the Right button. 3. Select a desired album by pressing theUp/Down/Left/Right buttons and press the OK button. Inserting still images into the album1. After selecting an album, press the menu button. 2. Select the [Add] menu by pressing the Up/Downbutton and press the Right button.](https://usermanual.wiki/Hanwha-Techwin/DIGIMAXU-CA5.Users-Manual-2-of-2/User-Guide-505743-Page-3.png)
![64Album button (M button)A4No Image!A4A4No Image!AddAddCancelConfirm:OKA4RemoveRemoveCancelConfirm:OKA4SelectSlideAddRemoveExit:MENU Move : SelectAll Pics3. Select the still images you wish to add by pressing theUp/Down/Left/Right buttons and press the Zoom Tbutton. V marks are displayed on the selected images.* To cancel the selection, press the Zoom T button again. 4. Press the OK button and a confirmation window willdisplay. Select a desired sub menu by pressing theUP/ DOWN button and press the OK button.- [Add] : Inserts the selected images into the album. - [Cancel] : Cancels the inserting images.Removing still images from the album1. Select a desired album and press the menu button. 2. Select [Remove] menu by pressing the Up/Downbutton and press the Right button. 3. Select a desired sub menu and press the OK button. - [All] : All of the still images in the album will beremoved. - [Select] : Specific still images in the album can beremoved. If [Select] is selected- Select images that you want to remove by pressingthe Up/Down/Left/Right buttons and press the Zoom T button. V marks are displayed on theselected images. 4. Press the OK button and a confirmation window willdisplay. Select a desired sub menu by pressing theUP/ DOWN button and press the OK button.- [Remove]: Removes the selected images from thealbum. - [Cancel] : Cancels the removing images.* The removed images are not deleted from thememory, but just removed from the album.](https://usermanual.wiki/Hanwha-Techwin/DIGIMAXU-CA5.Users-Manual-2-of-2/User-Guide-505743-Page-4.png)
![65Album button (M button)If a an image is deleted from the memory, the image doesn’t display on an album. An image can’t be added twice into the same album. An image can be added into the different albums. INFORMATIONA4SelectSlideAddRemoveExit:MENU Move : SelectAll PicsA4SelectSlideAddRemoveExit:MENU Move : A4SelectSlideAddRemoveExit:MENU Move : StartIntervalRepeatEffect3 SecOffCancelStartIntervalRepeatEffect3 SecOffCancelPlaying back the albumsPlaying back all of the albums1. Select [All] menu and press the OK button. All of thealbums will be selected. 2. Press the menu button. 3. Select [Slide] menu by pressing the Up/Down buttonand press the Right button. You can select [Start], [Interval], [Repeat] and[Effect] menus. - [Start] : Start the slide show- [Interval] : Set the slide show play interval- [Repeat] : Choose to repeat the slide show afterfinishing the first cycle. - [Effect] : Unique screen effects can be used forthe slide show.4. Select [Start] menu by pressing the Up/Down buttonand press the OK button to start the slide show. Playing a desired album1. Select a desired album and press the OK button. 2. Press the menu button.3. Select [Slide] menu by pressing the Up/Down buttonand press the Right button. You can select [Start], [Interval], [Repeat] and[Effect] menu.4. Select the [Start] menu and press the OK button tostart the slide show. A4Select:T Set:OK](https://usermanual.wiki/Hanwha-Techwin/DIGIMAXU-CA5.Users-Manual-2-of-2/User-Guide-505743-Page-5.png)
![66Delete( ) buttonThis deletes images stored on the memory card.Before deleting images from the camera, you should protect or download images to yourcomputer that you wish to keep.INFORMATION Deleting Images in Thumbnail Display Mode1. Use the UP, DOWN, LEFT, and RIGHT buttons to select the image you want to delete,and then press the DELETE ( ) button.2. The following message will be displayed on the LCD monitor.3. Select the submenu values by pressing the UP/DOWN button and then press the OKbutton.If [Delete] is selected : deletes the selected images.If [Cancel] is selected : cancels "Delete Image".Deleting Images in Play Mode1. Select an image that you want to delete by pressing theLEFT / RIGHT button and press the DELETE( )button.2. A message will display as shown alongside on the LCDmonitor.3. Select the submenu values by pressing the UP/DOWNbutton and then press the OK button.If [Delete] is selected: deletes the selected images.If [Cancel] is selected: cancels "Delete Image".Press the DELETE button.Delete?DeleteCancelConfirm:OKDelete?DeleteCancelConfirm:OK](https://usermanual.wiki/Hanwha-Techwin/DIGIMAXU-CA5.Users-Manual-2-of-2/User-Guide-505743-Page-6.png)
![70Starting the slide showImages can be displayed continuously at pre-set intervals.You can view the slide show by connecting the camera to an external monitor.1. Press the play mode button and press the menu button.2. Press the LEFT/ RIGHT button and select the [Slide]menu tab.Start the slide show: The slide show can start only in the[Start] menu.1. Use the Up/Down buttons to select the [Start] menu.2. Press the OK button to start the slide show.- Press the Pause button to pause the slide show.- Press the Pause button ( ) again to resume the slide show.- To stop the slide show, press the play & pause button, and then press the LEFT or RIGHTbutton.Setting play interval: Set the slide show play interval.1. Select the [Interval] sub menu by pressing the UP/DOWN button and press the RIGHTbutton.2. Use the Up/Down buttons to select the desired interval.3. Press the OK button to save the configuration.Repeat setting : setting the slide show to repeat after the first cycle.1. Use the Up/Down buttons to select the [Repeat] menu and press the Right button.2. Use the Up/Down buttons to select the desired sub menu.[On] selected : The slide show is repeated until cancelled.[Off] Selected : The slide show is closed after one cycle.3. Press the OK button to save the configuration.The loading time depends on the image size and quality.The slide show will start from an image that was displayed on the LCD monitor.The [Power Off] function can’t be activated.While the slide show is playing, only the first frame of a MOVIE file is displayed.INFORMATIONSlideExit: MENU Move : StartInterval 1 secRepeat Off](https://usermanual.wiki/Hanwha-Techwin/DIGIMAXU-CA5.Users-Manual-2-of-2/User-Guide-505743-Page-10.png)
![71Starting the slide showProtecting imagesConfigure slide show effects: Unique screen effects can be used for the slide show.1. Select the [Effect] sub menu by pressing the UP/ DOWN button and press the RIGHTbutton.2. Use the Up/Down Button to select the type of effect.[Cancel] : Normal display.[Effect 1] : Image is displayed slowly.[Effect 2] : Image is displayed slowly from the centreoutwards.[Effect 3] : Image moves from the top left.[Effect 4] : The image slides diagonally from top left tobottom right. 3. Press the OK button to confirm the setting.This is used to protect specific shots from being accidentally erased (Lock).It also unprotects images that have been previously protected (Unlock).Protecting Images1. Press the play mode button and press the menu button.2. Press the LEFT/ RIGHT button and select the [Protect]menu tab.3. Select a desired sub menu by pressing the UP/ DOWNbutton and press the OK button.[Select ] : Selection window for an image to beprotected/released is displayed.- Up/Down/Left/Right : Select an image- Zoom W/T Button : Protect/release the image- Menu Button : Your changes will be saved andthe menu will disappear.[All Pics] : Protect/release all saved images- Zoom W/T Button : Protect/release the images- Menu Button : Your changes will be saved andthe menu will disappear.Back:Set : OKInterval CancelRepeat Effect1Effect Effect2SlideProtectExit: MENU Move : SelectAll PicsSet:OKWUnlock TSet:OKWUnlock T](https://usermanual.wiki/Hanwha-Techwin/DIGIMAXU-CA5.Users-Manual-2-of-2/User-Guide-505743-Page-11.png)
![72Protecting images- If you protect an image, the protect icon will be displayedon the LCD monitor. (An unprotected image has noindicator)- An image in LOCK mode will be protected from thedelete function or [Delete] functions, but will NOT beprotected from the [Format] function.Deleting imagesOf all the files stored in the memory card, the unprotected files in the DCIM subfolder will bedeleted. Remember that this will permanently delete unprotected images. Important shots should be stored on a computer before deletion takes place. The startupimage is stored in the camera's internal memory (i.e., not on the memory card) and it will notbe deleted even if you delete all files on the memory card.Deleting images1. Press the play mode button and press the menu button.2. Press the LEFT/ RIGHT button and select the [Delete]menu tab.3. Select a desired sub menu by pressing the UP/ DOWNbutton and press the OK button.[Select ]: Selection window for an image to delete isdisplayed.- Up/Down/Left/Right : Select an image- Zoom T Button : Select the image for deletion.(V mark)- OK Button : Press the OK Button to displayconfirmation message. Select the[Delete] menu and press the OKbutton to delete V marked images. [All Pics] : Displays confirmation window. Select the[Delete] menu and press the OK button todelete all unprotected images. If there aren’tprotected images, all the images are deletedand a [No Image!] message will display. 4. After deletion, the screen will be changed to the playmode screen.Del:OKSelect:TDel:OKDelete?DeleteCancelConfirm:OKDeleteExit: MENU Move : SelectAll Pics](https://usermanual.wiki/Hanwha-Techwin/DIGIMAXU-CA5.Users-Manual-2-of-2/User-Guide-505743-Page-12.png)
![73ResizeChange the resolution (size) of pictures taken. Select [[User image]] to save an image to bethe start-up image. The resized image will have a new file name.1. Press the play mode button and press the menu button.2. Press the LEFT/ RIGHT button and select the [Resize]menu tab.3. Select a desired sub menu by pressing the UP/ DOWNbutton and press the OK button.A large sized image can be resized to a smaller sized image, but not vice versa.Only JPEG images can be resized. Movie clip(AVI) and Voice recording(WAV) files can’tbe resized.You can change the resolution of only those files compressed in the JPEG 4:2:2 format.The resized image will have a new file name. The [User Image] image is stored not on thememory card but on the internal memory.Only two [User Image] images can be saved. If you save a new [User Image] image, theexisting startup image will be deleted in order.If the memory capacity is insufficient to store the resized image, a [Card Full!] messagewill display on the LCD monitor and the resized image will not be stored.INFORMATIONResize2272X1704 2048X1536 1600X12001024X768640X480User image2592 O O O O O O2272 X O O O O O2048 X X O O O O1600 X X X O O O1024 X X X X O O640 X X X X X OImage Resize TypesExit: MENU Move : 2272X17042048X15361600X1200Resize](https://usermanual.wiki/Hanwha-Techwin/DIGIMAXU-CA5.Users-Manual-2-of-2/User-Guide-505743-Page-13.png)
![74Rotating an imageYou can rotate the stored images by various degrees.1. Press the play mode button and press the menu button.2. Press the LEFT/ RIGHT button and select the [Rotate]menu tab.3. Select a desired sub menu by pressing the UP/ DOWNbutton.4. Press the OK button and a confirmation window willdisplay. Select a desired sub menu by pressing the UP/DOWN button and press the OK button. [Rotate] : The image will be rotated.[Cancel] : The rotation will be cancelled. 5. Press the OK button and the rotated image will be displayed. If you display the rotated image on the LCD monitor, empty spaces may appear to the leftand right of the image.[Right 90˚] : Rotate picturein a clock-wise direction[Left 90˚] : Rotate picture in acounter-clock-wise direction[180˚] : Rotate picture 180degrees[Horizontal] : Rotate picturehorizontally[Vertical] : Rotate picturevertically DPOF DPOF(Digital Print Order Format) allows you to embed printing information on your memorycard’s MISC folder. Select the pictures to be printed and how many prints to make.The DPOF indicator will display on the LCD monitor when an image that has DPOFinformation plays back. Images can then be printed on DPOF printers, or at an increasingnumber of photo labs.This function is not available for Movie clips and Voice recording files.Exit: MENU Move : Right 90˚Left 90˚180˚Rotate](https://usermanual.wiki/Hanwha-Techwin/DIGIMAXU-CA5.Users-Manual-2-of-2/User-Guide-505743-Page-14.png)
![75DPOF : STANDARDImages (except for movie clips and voice file) are printed as index type.1. Press the play mode button and press the menu button.2. Press the LEFT/ RIGHT button and select the [DPOF]menu tab.3. Select the [Index] menu by pressing the UP/ DOWNbutton and press the RIGHT button.4. Select a desired sub menu by pressing the UP/ DOWNbutton.If [No] is selected : Cancel the index print setting.If [Yes] is selected : The image will be printed in indexformat.5. Press the OK button to confirm the setting.DPOF : INDEXThis function allows you to embed print quantity information on a stored image.1. Press the play mode button and press the menu button.2. Press the LEFT/ RIGHT button and select the [DPOF]menu tab.3. Select the [Standard] menu by pressing the UP/ DOWNbutton and press the RIGHT button.4. Select a desired sub menu by pressing the UP/ DOWNbutton and press the OK button.[Select] : Selection window for an image to print isdisplayed.- Up/Down/Left/Right: Select an image to print.- Zoom W/T Button: Select the number of prints.[All Pics] : Configure number of prints for all picturesexcept movie and voice files.- W/T button : Select a number of prints[Cancel] : Cancel the print setup.5. Press the OK button to confirm the setting.If an image carries DPOF instructions, the DPOFindicator ( ) will show.Set:OKW0 Prints TSet:OKWPrints TDPOFExit: MENU Move : Standard SelectIndex NoSize SelectDPOFBack:Set : OKStandardIndex NoSize Yes](https://usermanual.wiki/Hanwha-Techwin/DIGIMAXU-CA5.Users-Manual-2-of-2/User-Guide-505743-Page-15.png)
![76DPOF : PRINT SIZEYou can specify the print size when printing images stored on the memory card.The [Size] menu is available only for DPOF 1.1 compatible printers.Setting the Print Size1. Press the play mode button and press the menu button.2. Press the LEFT/ RIGHT button and select the [DPOF]menu tab.3. Select the [Size] menu by pressing the UP/ DOWN buttonand press the RIGHT button.4. Select a desired sub menu by pressing the UP/ DOWNbutton and press the OK button.[Select] : Selection window for an image to be changedprinted size is displayed.- Up/Down/Left/Right : Select an image.- Zoom W/T Button : Change the print size.- OK button : Your changes will be saved and the menuwill disappear.[All Pics] : Change print size of all saved images.- Up/Down/Left/Right : Select an image.- W/ T button : Select a print size- OK button : Confirm the changed setting.[Cancel] : Cancel all of the print size settings.* DPOF [Size] secondary menu : Cancel, 3X5, 4X6, 5X7,8X10Set:OKWTSet:OKWTDPOFBack:Set : OKStandard SelectIndex All PicsSize Cancel](https://usermanual.wiki/Hanwha-Techwin/DIGIMAXU-CA5.Users-Manual-2-of-2/User-Guide-505743-Page-16.png)
![77[Using the USB cable with Cradle][Using the USB cable with Camera]PictBridgeYou can use the USB cable to connect this camera to a printer that supports PictBridge (soldseparately) and print the stored images directly. Movie clips and voice files cannot be printed. Setting up the camera for connection with the printer1. In any mode with the exception of Voice Recording mode,press the MENU button.2. Press the LEFT/ RIGHT button and select [Setup] menutab.3. Select [USB] menu by pressing the UP/ DOWN buttonand press the RIGHT button.4. Select [Printer] menu by pressing the UP/ DOWN buttonand press the OK button.Connecting the Camera to a PrinterUsing the USB cable with Cradle : Connect the camera and the cradle. Connect the cradle toa printer’s USB port with the supplied USB cable. Using the USB cable with Camera : Connect the camera to a printer’s USB port with the supplied USB cable.If you selected [Computer] in Step 4, when you connect the camera to your printer, the[Connecting Computer] message will display and the connection will not be established.In this case, disconnect the USB cable, and then follow the procedure from Step 2 andonward.DPOFBack:Set : OKSoundUSB ComputerLamp PrinterNOR](https://usermanual.wiki/Hanwha-Techwin/DIGIMAXU-CA5.Users-Manual-2-of-2/User-Guide-505743-Page-17.png)
![78PictBridge: Picture SelectionSelect pictures to print1. The [Images] menu will appear.2. Use the UP and DOWN buttons to select the desiredsubmenu value, and then press the OK button.When [One Pic] is selected : The PictBridge function willbe applied only to thepicture currently displayed.When [All Pics] is selected : The PictBridge function willbe applied to all pictures,excluding movie clips and voice files.Images : Select the pictures to be printed.Printer Setup : Setting up printing(Auto Set/ Custom Set)Print : Printing picturesDPOF Print : Printing the DPOF filesReset : Initializing the PictBridge functionsYou can set up the following settings from the PictBridge menu.[When [One Pic] is selected] [When [All Pics] is selected]- Press the Up/Down button to select the number of prints. : Maximum 30 prints.- Use the Left/Right button to select another picture and select the number of prints foranother picture.- After setting the number of prints, press the OK button to save.- Press the Shutter button to return to the menu without setting the number of prints.Setting the Number of Copies to Print- Select [One Pic] or [All Pics]. A screen where you can set the number of copies to print willappear as shown below.ImagesExit : MENU Move:One PicAll Pics0Exit:Shutter Set:OK10PREV NEXT0Exit:Shutter Set:OK](https://usermanual.wiki/Hanwha-Techwin/DIGIMAXU-CA5.Users-Manual-2-of-2/User-Guide-505743-Page-18.png)
![79PictBridge: Print SettingMenuSize Setting the size of the printing paperAuto, PostCard, 4x6, L, 2L, A4, A3Setting the number of pictures to be printed on a sheet of paperType Setting the quality of the printing paper Auto, Plain, Photo, FastPhotoQualitySetting the quality of the picture to be printedAuto, Draft, Normal, FineDate Setting whether to print the date Auto, Off, OnFile Name Setting whether to print the file name Auto, Off, OnAUTO SET1. Use the LEFT and RIGHT buttons to select the [Auto Set] menu tab.2. Use the UP and DOWN buttons to select the desiredsubmenu value, and then press the OK button.[No] : [Custom Set] values are kept.[Yes] : All values in the [Custom Set] are automaticallychanged.Some menu options are not supported in all manufacturer and printer models. If notsupported, the menus are still displayed in the LCD, but are not selectable.If the setting values are not changed in the automatic/manual setting, the setting values areautomatically kept.Custom Set : You can select the Paper Size, Print Format, Paper Type, Print Quality, DatePrint, and File Name Print menus for printed pictures.Function Sub menuThe menus you can set up are as follows:Auto SetExit : MENU Move:NoYesCustom SetBack:Set : OKSize AutoLayOut PostCardType 4X6Auto, Full, 1, 2, 4, 8, 9, 16Layout1. Use the LEFT and RIGHT buttons to select the [CUSTOM SET] menu tab.2. Use the UP and DOWN buttons to select the desiredsubmenu value, and then press the RIGHT button.3. Use the UP and DOWN buttons to select the desiredsubmenu value, and then press the OK button.](https://usermanual.wiki/Hanwha-Techwin/DIGIMAXU-CA5.Users-Manual-2-of-2/User-Guide-505743-Page-19.png)
![80PictBridge: PrintingDPOF Print : This allows you to directly print the files with DPOF information.1. Use the LEFT and RIGHT buttons to select the [DPOF Print] menu tab.2. Use the UP and DOWN buttons to select the desiredsubmenu value, and then press the OK button.[No] : Cancel the printing[Yes] : Directly print the file with the DPOF informationDepending on the manufacturer and printer model,some menus may not be available. With a printer without supporting the DPOF, themenu is still displayed but not available.Printing Pictures1. Use the LEFT and RIGHT buttons to select the [Print]menu tab.2. Use the UP and DOWN buttons to select the desiredsubmenu value, and then press the OK button.[Standard]: Print the pictures stored in the memory cardin set numbers. One picture is printed onone piece of paper.[Index] : Print multiple images on one sheet ofpaper.3. The screen shown on the right will appear and thepicture will be printed. If no picture is selected, the [No image!] message will be displayed. Press theMenu/OK button while printing to cancel the printing andthe [Images] menu is displayed.Number of pictures in an index print varies dependson the printer used.1/1PrintExit : MENU Move:StandardIndexDPOF PrintExit : MENU Move:NoYesCancel : OK](https://usermanual.wiki/Hanwha-Techwin/DIGIMAXU-CA5.Users-Manual-2-of-2/User-Guide-505743-Page-20.png)
![81PictBridge : RESETInitialises user-changed configurations.1. Use the LEFT and RIGHT buttons to select the [Reset]menu tab.2. Use the UP and DOWN buttons to select the desiredsubmenu value, and then press the OK button.If [No] is selected : Settings will not be reset.If [Yes] is selected : All print and image settings will bereset.Default print setting varies depending on the printer manufacturer.For your printer’s default setting, refer to the user’s guide that came with your printer.ResetExit : MENU Move:NoYes](https://usermanual.wiki/Hanwha-Techwin/DIGIMAXU-CA5.Users-Manual-2-of-2/User-Guide-505743-Page-21.png)
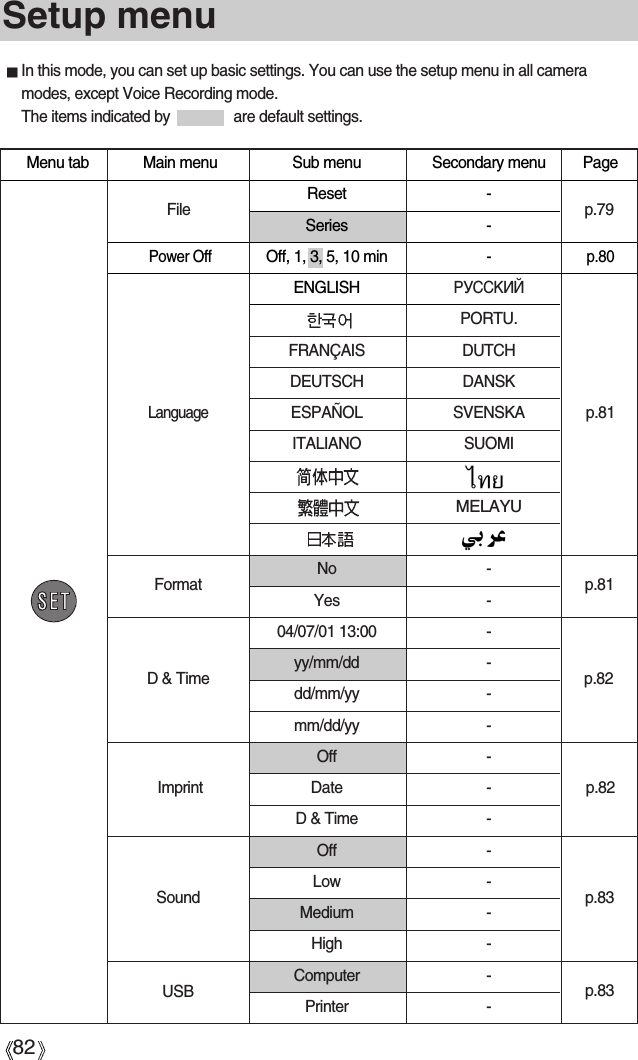
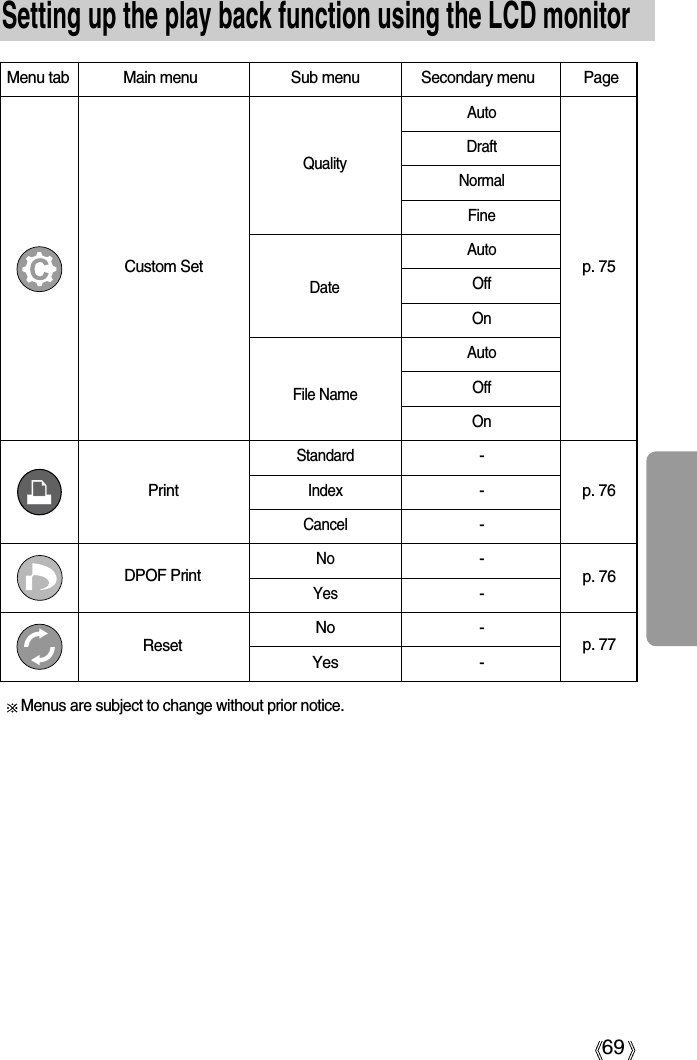
![83Setup menuThis function allows the user to select the file naming format.Assigning File Names1. In any mode with the exception of Voice Recording mode,press the MENU button.2. Press the LEFT/ RIGHT button and select the [Setup]menu tab.3. Select the [File] menu by pressing the UP/ DOWN buttonand press the RIGHT button.4. Select a desired sub menu by pressing the UP/ DOWNbutton and press the OK button.[Reset] : After using the reset function, the next file name will be set from 0001 even afterformatting, deleting all or inserting a new memory card.[Series]: New files are named using numbers that follow the previous sequence, evenwhen a new memory card is used, or after formatting, or after deleting all pictures5. Press the menu button twice and the menu will disappear.File name* Menus are subject to change without prior notice.Menu tab Main menu Sub menu Secondary menu PageOff -On -Off -On -Dark -LCD Normal - p.85Bright -NTSC -PAL -Quick View Off, 1, 3, 5 sec -No -Yes -Video OutLampAF LampResetp.84p.85p.86Back:Set : OKFileResetPower Off SeriesLanguageNORSetup](https://usermanual.wiki/Hanwha-Techwin/DIGIMAXU-CA5.Users-Manual-2-of-2/User-Guide-505743-Page-23.png)
![84File nameThe first stored folder name is 100SSCAM, and the first file name is SUC50001.File names are assigned sequentially from SUC50001 SUC50002 ~ SUC59999.The folder number is assigned sequentially from 100 to 999 as follows: 100SSCAM 101SSCAM ~ 999SSCAM.The files used with the memory card conform to the DCF(Design rule for Camera Filesystems) format.INFORMATIONEven if the batteries or AC adapter are removed and inserted again, the power off settingwill be preserved.Note that the automatic power off function will not operate if the camera is in PC mode,slide show, playing back a voice recording, playing back a movie clip and the [Composite]shots. INFORMATIONAuto power offSetting Power Off1. In any mode with the exception of Voice Recording mode,press the MENU button.2. Press the LEFT/ RIGHT button and select the [Setup]menu tab.3. Select the [Power Off] menu by pressing the UP/ DOWNbutton and press the RIGHT button.4. Select a desired sub menu by pressing the UP/ DOWNbutton and press the OK button.Selecting [Off] : The power off function will not operate.[1, 3, 5, 10min] : The power will turn off automatically if not used for the period of timespecified.5. Press the menu button twice and the menu will disappear.This function switches the camera off after a set amount of time in order to preventunnecessary battery drainage.Back:Set : OKFileOffPower Off 1 minLanguage 3 minNORSetup](https://usermanual.wiki/Hanwha-Techwin/DIGIMAXU-CA5.Users-Manual-2-of-2/User-Guide-505743-Page-24.png)
![85Language Setting Language1. In any mode with the exception of Voice Recording mode,press the MENU button.2. Press the LEFT/ RIGHT button and select the [Setup]menu tab.3. Select the [Language] menu by pressing the UP/ DOWNbutton and press the RIGHT button.4. Select a desired sub menu by pressing the UP/ DOWNbutton and press the OK button. LANGUAGE sub menu : English, Korean, French, German, Spanish, Italian, S.Chinese,T.Chinese, Japanese, Russian, Portuguese, Dutch, Danish,Swedish, Finnish, Thai. Malaysian and Arabic.5. Press the menu button twice and the menu will disappear.Formatting a Memory Card1. In any mode other than Voice Recording mode, press theMENU button.2. Press the LEFT/ RIGHT button and select the [Setup]menu tab.3. Select the [Format] menu by pressing the UP/ DOWNbutton and press the RIGHT button.4. Select a desired sub menu by pressing the UP/ DOWNbutton and press the OK button.If [No] is selected : The memory card will not be formatted. Press the menu button twice and the menu display will disappear. If [Yes] is selected : A [ Please Wait! ] message appears and the memory card will beformatted. If you ran FORMAT in Play mode, a [ No Image! ] messagewill appear.There is a choice of languages that can be displayed on the LCD monitor. Even if the batteries orAC adapter are removed and inserted again, the language setting will be preserved.Formatting a memory cardThis is used for formatting the memory card. If you run [Format] on the memory card, allimages, including the protected images, will be deleted. Be sure to download importantimages to your PC before formatting the memory card.Be sure to run [Format] on the following types of memory card.- A new memory card, or an unformatted memory card.- A memory card that has a file this camera can t recognise or one that has been takenfrom another camera.Always format the memory card using this camera. If you insert a memory card that hasbeen formatted using other cameras, memory card readers, or PCs, you will get a [ Card Error! ] message.INFORMATIONBack:Set : OKFileEnglishPower OffLanguageFRANÇAISNORSetupBack:Set : OKPower OffLanguage NoFormatYesNORSetup](https://usermanual.wiki/Hanwha-Techwin/DIGIMAXU-CA5.Users-Manual-2-of-2/User-Guide-505743-Page-25.png)
![86Setting up the Date/ Time/ Date typeYou can change the date and time that will be displayed on the captured images and set upthe date type.Setting Date/Time & Selecting Date Format1. In any mode with the exception of Voice Recording mode,press the MENU button.2. Press the LEFT/ RIGHT button and select the [Setup]menu tab.3. Select the [D & Time] menu by pressing the UP/ DOWNbutton and press the RIGHT button.4. Use the UP, DOWN, LEFT, and RIGHT buttons to selectthe desired submenu value, and then press the OK button.RIGHT button : Selects the year/month / day/hour / minute date type.LEFT button : Moves the cursor to the [D & Time] main menu if the cursor is atthe first item of the date and time setup. In all other cases, thecursor will be shifted to the left of its current position.UP and DOWN buttons : Changes the setting value.- Date type : [yy/mm/dd] / [dd/mm/yy] / [mm/dd/yy]5. Press the menu button twice and the menu will disappear.There is an option to include DATE/TIME on still images.Date Imprinting1. In any mode with the exception of Voice Recording mode,press the MENU button.2. Press the LEFT/ RIGHT button and select the [Setup] menu tab.3. Select the [Imprint] menu by pressing the UP/ DOWNbutton and press the RIGHT button.4. Use the UP and DOWN buttons to select the desired dateimprint type, and then press the OK button.[Off] : The DATE & TIME will not be imprinted on the image file.[Date] : Only the DATE will be imprinted on the image file.[D & Time] : The DATE & TIME will be imprinted on the image file.5. Press the menu button twice and the menu will disappear.Imprinting the recording dateThe Date & Time are imprinted at the bottom right side of the still image.The date will be imprinted as a DATE TYPE setting.TIME is imprinted in the following way : [Hour : Minute] and hours are shown using the 24hour clock.The imprint function is applied only to still images.INFORMATIONBack:Set : OKFormat OffD & Time DateImprint D & TimeNORSetupBack:Set : OKLanguageFormatD & TimeNORSetup05 / 01/ 01 01:00yy/mm/dd](https://usermanual.wiki/Hanwha-Techwin/DIGIMAXU-CA5.Users-Manual-2-of-2/User-Guide-505743-Page-26.png)
![87Sound Connecting an External Device (USB)If you set the operation sound to ON, various sounds will be activated for camera startup,when button are pressed, and if there is a card error, so that you can be aware of the cameraoperation status.Setting Operation Sounds1. In any mode with the exception of Voice Recording mode,press the MENU button.2. Press the LEFT/ RIGHT button and select the [Setup]menu tab.3. Select the [Sound] menu by pressing the UP/ DOWNbutton and press the RIGHT button.4. Select a desired sub menu by pressing the UP/ DOWNbutton and press the OK button.[Sound] sub menu : Off/ Low/ Medium/ High5. Press the menu button twice and the menu will disappear.You can select an external device to which you want to connect the camera using the USB cable.Selecting an External Device1. In any mode with the exception of Voice Recording mode,press the MENU button.2. Press the LEFT/ RIGHT button and select the [Setup]menu tab.3. Select the [USB] menu by pressing the UP/ DOWN buttonand press the RIGHT button.4. Select a desired sub menu by pressing the UP/ DOWNbutton and press the OK button.[Computer] : Select this if you want to connect the camera to your PC. Refer to page 105 for instructions on how to connect the camera to your PC.[Printer] : Select this if you want to connect the camera to your printer. Refer to page 73 for instructions on how to connect the camera to yourprinter.5. Press the menu button twice and the menu will disappear.Back:Set : OKD & Time OffImprint LowSound MediumNORSetupBack:Set : OKImprintSound ComputerUSB PrinterNORSetup](https://usermanual.wiki/Hanwha-Techwin/DIGIMAXU-CA5.Users-Manual-2-of-2/User-Guide-505743-Page-27.png)
![88Function lampSetting the function lamp1. In any mode with the exception of Voice Recording mode,press the MENU button.2. Press the LEFT/ RIGHT button and select the [Setup]menu tab.3. Select the [Lamp] menu by pressing the UP/ DOWNbutton and press the RIGHT button.4. Select a desired sub menu by pressing the UP/ DOWNbutton and press the OK button.If [Off] is selected : The function lamp will not light up.If [On] is selected : The function lamp will light up.Function DescriptionThe lamp blinks and turns off when the camera is readyto take a pictureThe lamp blinks while saving the image data and turnsoff when the camera is ready to take a pictureWhile movie recording The lamp blinks at a 1-second intervalWhile voice recording The lamp blinks at a 1-second intervalWhen the USB cable is inserted The lamp lights up Transmitting Data The lamp blinksWhile the self timer isfunctioningAfter taking a picturePower onThe lamp will function while using the self-timer even ifthe configuration is set to off the lamp. (Based on 10-second Self-timer; see p. 36)Back:Set : OKSoundUSB OffLamp OnNORSetupYou can turn on and off the function lamp located on the front of the camera.Description of the Function lamp](https://usermanual.wiki/Hanwha-Techwin/DIGIMAXU-CA5.Users-Manual-2-of-2/User-Guide-505743-Page-28.png)
![89Auto Focus lampLCD brightnessYou can adjust the LCD brightness.Adjusting LCD Brightness1. In any mode with the exception of Voice Recording mode,press the MENU button.2. Press the LEFT/ RIGHT button and select the [Setup]menu tab.3. Select the [LCD] menu by pressing the UP/ DOWN buttonand press the RIGHT button.4. Select a desired sub menu by pressing the UP/ DOWNbutton and press the OK button.[LCD] sub menu : Dark, Normal, Bright5. Press the menu button twice and the menu will disappear.You can turn on and off the Auto Focus lampHow to set up the lamp1. In any mode with the exception of Voice Recording mode,press the MENU button.2. Press the LEFT/ RIGHT button and select the [Setup]menu tab.3. Select the [AF Lamp] menu by pressing the UP/ DOWNbutton and press the RIGHT button.4. Select a desired sub menu by pressing the UP/ DOWNbutton and press the OK button.If [Off] is selected : The AF lamp will not light up.If [On] is selected : The AF lamp will light up.If you select [Off] menu and take an image in poorly lit conditions or select the [Night]scene mode, the camera may not take exact focus.Back:Set : OKUSBLamp OffAF Lamp OnNORSetupBack:Set : OKLamp DarkAF Lamp NormalLCD BrightNORSetup](https://usermanual.wiki/Hanwha-Techwin/DIGIMAXU-CA5.Users-Manual-2-of-2/User-Guide-505743-Page-29.png)
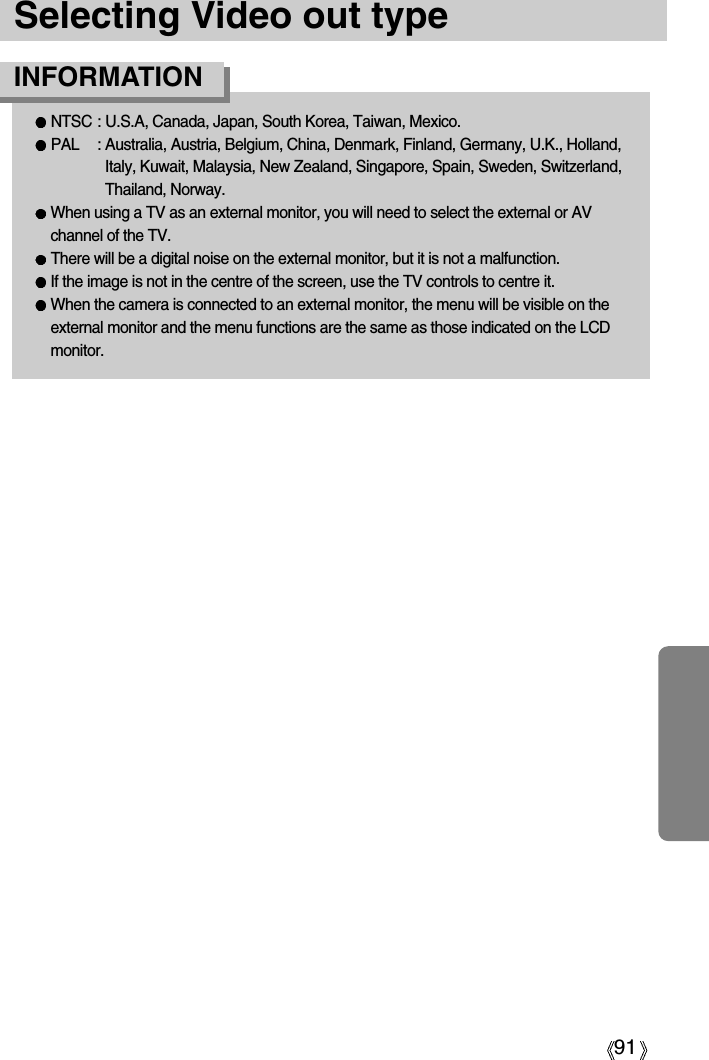
![90Selecting Video out typeThe Movie output signal from the camera can be NTSC or PAL.Your choice of output will be governed by the type of device (monitor or TV, etc.) to which thecamera is connected. PAL mode can support only BDGHI.Setting the Video Out Type1. In any mode with the exception of Voice Recording mode,press the MENU button.2. Press the LEFT/ RIGHT button and select the [Setup]menu tab.3. Select the [Video Out] menu by pressing the UP/ DOWNbutton and press the RIGHT button.4. Select a desired sub menu by pressing the UP/ DOWNbutton and press the OK button.- [Video Out] sub menu : NTSC, PAL5. Press the menu button twice and the menu will disappear.Connecting to an external monitorUsing the AV cable with Cradle : Connect the camera and the cradle. Connect the cradleto an external monitor with the supplied AV cable.Using the AV cable with Camera : Connect the camera to an external monitor with thesupplied AV cable.[Using the AV cable with Cradle][Using the AV cable with Camera]Back:Set : OKAF LampLCD NTSCVideo Out PALNORSetup](https://usermanual.wiki/Hanwha-Techwin/DIGIMAXU-CA5.Users-Manual-2-of-2/User-Guide-505743-Page-30.png)
![92Quick viewIf you enable Quick View before capturing an image, you can view the image you justcaptured on the LCD monitor for the duration set in the [Quick View] setup. Quick view ispossible only with still images.Setting Quick View1. In any mode with the exception of Voice Recording mode,press the MENU button.2. Press the LEFT/ RIGHT button and select the [Setup]menu tab.3. Select the [Quick View] menu by pressing the UP/ DOWNbutton and press the RIGHT button.4. Select a desired sub menu by pressing the UP/ DOWNbutton and press the OK button.[Off] : The quick view function can’t be activated.[1, 3, 5sec] : The captured image is briefly displayed during the selected time.5. Press the menu button twice and the menu will disappear.Initialisation(RESET ALL)All camera menu and function settings will be restored to their default values. However, values for DATE/TIME, LANGUAGE, and VIDEO OUT will not be changed.Initialising the Camera1. In any mode with the exception of Voice Recording mode,press the MENU button.2. Press the LEFT/ RIGHT button and select the [Setup]menu tab.3. Select the [Reset] menu by pressing the UP/ DOWNbutton and press the RIGHT button.4. Select a desired sub menu by pressing the UP/ DOWNbutton and press the OK button.If [No] is selected : Settings will not be restored to their defaults.If [Yes] is selected : All settings will be restored to their defaults.5. Press the menu button twice and the menu will disappear.Back:Set : OKLCD OffVideo Out 1 secQuick View 3 secNORSetupBack:Set : OKVideoQuick View NoReset YesNORSetup](https://usermanual.wiki/Hanwha-Techwin/DIGIMAXU-CA5.Users-Manual-2-of-2/User-Guide-505743-Page-32.png)
![93Setting up the MYCAM menuYou can set up a start up image, start up sound and shutter sound. Every camera workingmode (with the exception of Voice recording mode) has the MyCAM menu.The items indicated by are default settings.Menu tab Main menu Sub menu PageOff LOGOUser Image 1 User Image 2Off Sound 1Sound 2 Sound 3Off Sound 1Sound 2 Sound 3S.ImageS.SoundSH.Soundp.87p.88p.88You can select the image that is first displayed on the LCD monitor whenever the camera isturned on.Setting a Startup Image1. In any mode with the exception of Voice Recording mode,press the MENU button.2. Press the LEFT/ RIGHT button and select the [Mycam]menu tab.3. Select the [S.Image] menu by pressing the UP/ DOWNbutton and press the RIGHT button.4. Select a desired sub menu by pressing the UP/ DOWNbutton and press the OK button.5. Press the menu button twice and the menu will disappear.Start up imageUse a saved image for the start-up image with the [User Image] in the [Resize] menu inthe play mode.The start-up image will not be deleted by deleting all images or [Format] menu.INFORMATION* Menus are subject to change without prior notice.Back:Set : OKS.ImageS.SoundSH.Sound2592Mycam](https://usermanual.wiki/Hanwha-Techwin/DIGIMAXU-CA5.Users-Manual-2-of-2/User-Guide-505743-Page-33.png)
![94Start up soundShutter soundSetting the Startup Sound1. In any mode with the exception of Voice Recording mode,press the MENU button.2. Press the LEFT/ RIGHT button and select the [Mycam]menu tab.3. Select the [S.Sound] menu by pressing the UP/ DOWNbutton and press the RIGHT button.4. Select a desired sub menu by pressing the UP/ DOWNbutton and press the OK button.5. Press the menu button twice and the menu will disappear.You can select the sound that is activated whenever the camera is turned on.Selecting the Shutter Sound1. In any mode with the exception of Voice Recording mode,press the MENU button.2. Press the LEFT/ RIGHT button and select the [Mycam]menu tab.3. Select the [SH.Sound] menu by pressing the UP/ DOWNbutton and press the RIGHT button.4. Select a desired sub menu by pressing the UP/ DOWNbutton and press the OK button.5. Press the menu button twice and the menu will disappear.You can select the shutter sound.Back:Set : OK2592MycamS.Image OffS.Sound Sound1SH.Sound Sound2Back:Set : OK2592MycamS.Image OffS.Sound Sound1SH.Sound Sound2](https://usermanual.wiki/Hanwha-Techwin/DIGIMAXU-CA5.Users-Manual-2-of-2/User-Guide-505743-Page-34.png)
![98Warning indicatorPlease check the followingBefore contacting a service centreLow Light !When taking pictures in dark placesUse a tripod and take pictures in Flash Photography modeSet USB[USB] sub menu and connected device are not matched.Reconfigure [USB] in the [Setup] menu. Out Of NumberWhen selecting too many printing pages in the PictBridge menu. Select printing page within the limitation. The camera doesn’t switch onThere is low battery capacityInsert charged batteryBatteries are inserted incorrectly with the reverse polaritiesInsert the batteries according to the polarity marks (+, -)The rechargeable battery is not insertedInsert the battery and turn on the cameraAn AC Power Adapter is not connectedConnect an AC Power AdapterThe camera power ceases while in useThe batteries are exhaustedInsert charged batteryThe Camera is turned off automaticallyTurn off the camera power and turn it on againAn AC Power Adapter is not connectedConnect an AC Power AdapterBatteries drain quicklyThe Camera is being used in low temperaturesKeep the camera in warm conditions (i.e. inside a coat or jacket) and only remove it inorder to take images](https://usermanual.wiki/Hanwha-Techwin/DIGIMAXU-CA5.Users-Manual-2-of-2/User-Guide-505743-Page-38.png)
![99Before contacting a service centreCamera does not take images when pressing the Shutter buttonThe memory card is not insertedAfter turning the camera off, insert a new memory cardThere is insufficient memory capacityDelete unnecessary image filesThe memory card has not been formattedFormat the memory card (p.82)The memory card is exhaustedInsert a new memory cardThe memory card is lockedRefer to [Card Locked !] error message (p.93)The camera’s power is offTurn the camera power onThe batteries are exhaustedInsert charged battery.Batteries are inserted incorrectly with the reverse polaritiesInsert the batteries according to the polarity marks (+, -)The camera suddenly stops working while in use The camera was stopped due to a malfunctionRemove /re-insert batteries and switch the camera onThe images are unclearA picture was taken within 0.8 m from the subject without setting an appropriate macro modeIf the subject is closer than 0.8m, select macro shot modeTaking a picture beyond the flash rangeTake a picture within the flash rangeThe lens is smudged or dirtyClean the lensThe flash does not fireFlash off mode has been selectedDis-engage flash off modeThe camera mode can’t use the flashRefer to the FLASH instruction (p.30)Incorrect date and time is displayedThe date and time have been set incorrectly or the camera has adopted the default settingsReset the date and time correctly](https://usermanual.wiki/Hanwha-Techwin/DIGIMAXU-CA5.Users-Manual-2-of-2/User-Guide-505743-Page-39.png)
![100Before contacting a service centreThe camera buttons do not operateCamera malfunctionRemove /re-insert batteries and switch the camera onA card error has occurred while the memory card is in the camera.Incorrect memory card formatRe-format the memory card The images don't play backIncorrect file name (Violation of DCF format)Do not change the image file nameColour of image is different to the original scene White balance setting is incorrectSelect appropriate White balanceImages are too brightExposure is excessiveReset exposure compensationNo image on external monitorThe external monitor has not been connected properly with the cameraCheck the connection cablesThere are incorrect files in the memory cardInsert a memory card that has correct filesWhen using the PC’s explorer, the [Removable Disk] file does not showCable connection is incorrectCheck the connectionThe camera is offTurn the camera onThe operating system is not Windows 98, 98SE, 2000, ME, XP/ Mac OS 9.0 ~ 10.3.Alternatively the PC does not support USBInstall Windows 98, 98SE, 2000, ME, XP/ Mac OS 9.0 ~ 10.3 to PC that supports USBThe camera driver is not installedInstall a [USB Storage Driver]](https://usermanual.wiki/Hanwha-Techwin/DIGIMAXU-CA5.Users-Manual-2-of-2/User-Guide-505743-Page-40.png)