Hanwha Techwin DIGIMAXV70 Digital Camera User Manual v70en 02 v03
Samsung Techwin Co Ltd Digital Camera v70en 02 v03
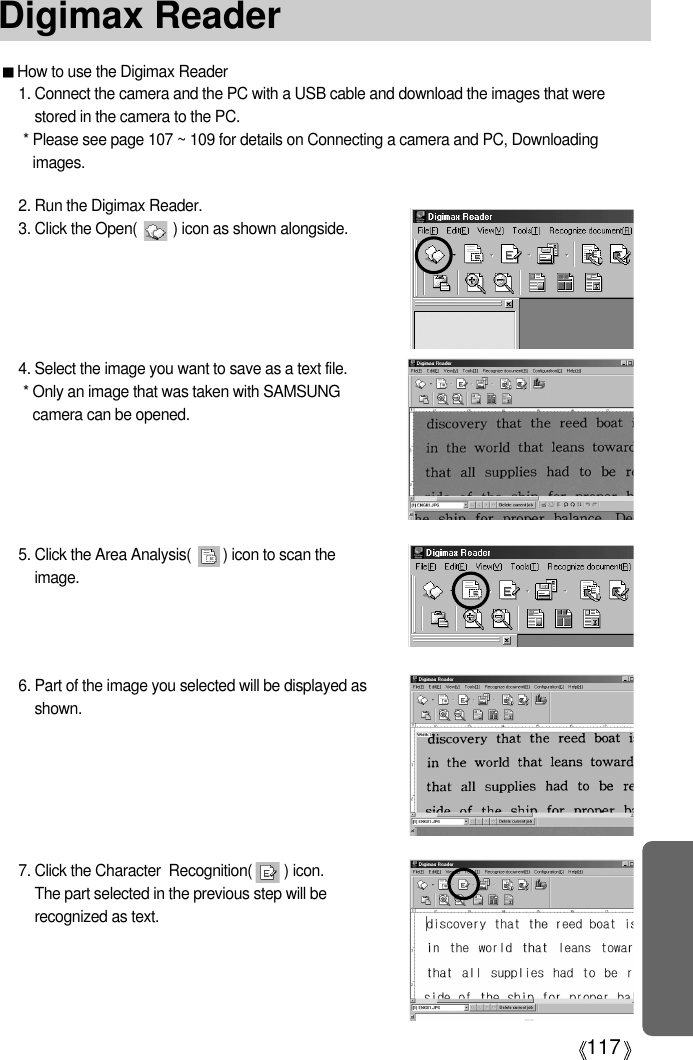
UserManual.wiki
>
Hanwha Techwin
>
DIGIMAXV70 User Manual
>
Users Manual 3 of 3
Contents
1.
Users Manual 1 of 3
2.
Users Manual 2 of 3
3.
Users Manual 3 of 3
Users Manual 3 of 3
Navigation menu
Upload a User Manual
Namespaces
Wiki Guide
HTML
PDF
Info
Views
User Manual
Discussion / Help
Navigation
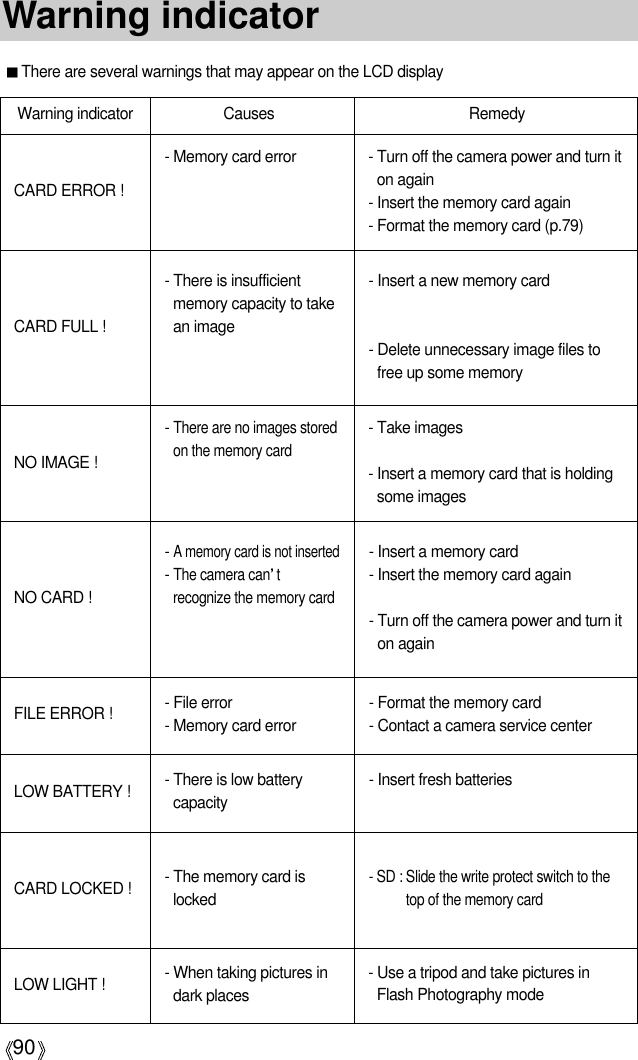
![78File nameThe first stored folder name is 100SSCAM, and the first file name is SA700001.Whenever you store an image, the file number is increased by 1.The file numbers are named from SA700001 to SA709999 automatically, 9999 files willbe stored in a folder.The folder number is assigned sequentially from 100 to 999 as follows: 100SSCAM 101SSCAM ~ 999SSCAM.The files used with the memory card conform to the DCF(Design rule for Camera Filesystems) format.INFORMATIONEven if the batteries or AC adapter are removed and inserted again, the power offsetting will be preserved.Note that the automatic power off function will not operate if the camera is in PC mode,slide show, playing back a voice recording or movie clip.INFORMATIONAuto power offSetting Power Off1. In any mode other than Voice Recording mode, press theMENU button.2. Press the LEFT/ RIGHT button and select the [SETUP]menu tab.3. Select the [PWR SAVE] menu by pressing the UP/DOWN button and press the RIGHT button.4. Select a desired sub menu by pressing the UP/ DOWNbutton and press the OK button.Selecting [OFF] : The power off function will not operate.Selecting [1~10MIN] : The power will turn off automatically if not used for the period of timespecified.This function switches the camera off after a set amount of time in order to preventunnecessary battery drainage.SET UPFILEPWR SAVELANGUAGEFORMATDATE.TIMEBACK: SET:OK3072OFF](https://usermanual.wiki/Hanwha-Techwin/DIGIMAXV70.Users-Manual-3-of-3/User-Guide-479816-Page-1.png)
![79Language Setting Language1. In any mode other than Voice Recording mode, pressthe MENU button.2. Press the LEFT/ RIGHT button and select the [SETUP]menu tab.3. Select the [LANGUAGE] menu by pressing the UP/DOWN button and press the RIGHT button.4. Select a desired sub menu by pressing the UP/ DOWNbutton and press the OK button. LANGUAGE sub menu- Type A : English, French, German, Spanish, Italian, Russian, Dutch and Portuguese.- Type B : English, Korean, Simplified Chinese, Traditional Chinese, Danish, Swedish,Thai, and Malaysian.Formatting a Memory Card1. In any mode other than Voice Recording mode, pressthe MENU button.2. Press the LEFT/ RIGHT button and select the [SETUP]menu tab.3. Select the [FORMAT] menu by pressing the UP/ DOWNbutton and press the RIGHT button.4. Select a desired sub menu by pressing the UP/ DOWNbutton and press the OK button.If [NO] is selected : The memory card will not be formatted. Press the menu button twiceand the menu display will disappear.If [YES] is selected : A [PLEASE WAIT!] message appears and the memory card will beformatted. If you ran FORMAT in Play mode, a [NO IMAGE!] message will appear.Be sure to run [FORMAT] on the following types of memory card.- A new memory card, or an unformatted memory card.- A memory card that has a file this camera can t recognize or one that has been taken fromanother camera.Always format the memory card using this camera. If you insert a memory card that has beenformatted using other cameras, memory card readers, or PCs, you will get a [CARDERROR!] message.There is a choice of languages that can be displayed on the LCD monitor. Even if the batteries orAC adapter are removed and inserted again, the language setting will be preserved.Formatting a memory cardThis is used for formatting the memory card. If you run [FORMAT] on the memory card, allimages, including the protected images, will be deleted. Be sure to download importantimages to your PC before formatting the memory card.SET UPFILEPWR SAVELANGUAGEFORMATDATE.TIMEBACK: SET:OK3072ENGLISHDANSKSET UPFILEPWR SAVELANGUAGEFORMATDATE.TIMEBACK: SET:OK3072NO YES](https://usermanual.wiki/Hanwha-Techwin/DIGIMAXV70.Users-Manual-3-of-3/User-Guide-479816-Page-2.png)
![80Setting up the Date/ Time/ Date typeYou can change the date and time that will be displayed on the captured images and set upthe date type.There is an option to include DATE/TIME on still images.Date Imprinting1. In any mode other than Voice Recording mode, pressthe MENU button.2. Press the LEFT/ RIGHT button and select the [SETUP]menu tab.3. Select the [IMPRINT] menu by pressing the UP/ DOWNbutton and press the RIGHT button.4. Use the UP and DOWN buttons to select the desireddate imprint type, and then press the OK button.[OFF] : The DATE & TIME will not be imprinted on the image file.[DATE] : Only the DATE will be imprinted on the image file.[DATE&TIME] : The DATE & TIME will be imprinted on the image file.Imprinting the recording dateSetting Date/Time & Selecting Date type1. In any mode other than Voice Recording mode, pressthe MENU button.2. Press the LEFT/ RIGHT button and select the [SETUP]menu tab.3. Select the [DATE. TIME] menu by pressing the UP/DOWN button and press the RIGHT button.4. Use the UP, DOWN, LEFT, and RIGHT buttons toselect the desired submenu value, and then press theOK button.RIGHT button : Selects the year/month/day/hour/minute/date type.LEFT button : Moves the cursor to the [DATE. TIME] main menu if the cursor is at thefirst item of the date and time setup. In all other cases, the cursor will beshifted to the left of its current position.UP and DOWN buttons: Changes the setting value.- Date type [YY/MM/DD] : year/ month/ day [MM/DD/YY] : month/ day/ year [DD/MM/YY] : day/ month/ yearSET UPFILEPWR SAVELANGUAGEFORMATDATE.TIMEBACK: SET:OK307204/ 09/ 0100:00YY/MM/DDSET UPPWR SAVELANGUAGEFORMATDATE.TIMEIMPRINTBACK: SET:OK3072OFFDATEDATE & TIME](https://usermanual.wiki/Hanwha-Techwin/DIGIMAXV70.Users-Manual-3-of-3/User-Guide-479816-Page-3.png)
![81Imprinting the recording dateFunction lampYou can turn on and off the function lamp located on the front of the camera.Setting the function lamp1. In any mode other than Voice Recording mode, press theMENU button.2. Press the LEFT/ RIGHT button and select the [SETUP]menu tab.3. Select the [LAMP] menu by pressing the UP/ DOWNbutton and press the RIGHT button.4. Select a desired sub menu by pressing the UP/ DOWNbutton and press the OK button. If [OFF] is selected : The function lamp will not light up.If [ON] is selected : The function lamp will light up.Description of the Function lampFunction DescriptionPower onBlue light blinks and then turns off when the camera is ready to take a picture.After taking a pictureBlue lamp blinks once.While movie recordingBlue lamp blinks at a 1-second interval.While voice recording Blue lamp blinks at a 1-second interval.After selecting the remote controller modeBlue lamp blinks at a 1-second interval.* The lamp will function while using the self-timer even if theconfiguration is set to off the lamp. (See p. 36)The Date & Time are imprinted at the bottom right side of the still image.The date will be imprinted as a DATE TYPE setting.TIME is imprinted in the following way : [Hour : Minute: Second] and hours are shownusing the 24 hour clock.The imprint function is applied only to still images.INFORMATIONWhile the self timer isfunctioningSET UPLANGUAGEFORMATDATE.TIMEIMPRINTLAMPBACK: SET:OK3072OFFON](https://usermanual.wiki/Hanwha-Techwin/DIGIMAXV70.Users-Manual-3-of-3/User-Guide-479816-Page-4.png)
![82Sound If you set the operation sound to ON, various sounds will be activated for camera startup,when button are pressed, and if there is a card error, so that you can be aware of the cameraoperation status.Setting Operation Sounds1. In any mode other than Voice Recording mode, press theMENU button.2. Press the LEFT/ RIGHT button and select the [SETUP]menu tab.3. Select the [SOUND] menu by pressing the UP/ DOWNbutton and press the RIGHT button.4. Select a desired sub menu by pressing the UP/ DOWNbutton and press the OK button.- [SOUND] sub menu : OFF/ LOW/MEDIUM/ HIGHYou can adjust the LCD brightness.Adjusting LCD Brightness1. In any mode other than Voice Recording mode, press theMENU button.2. Press the LEFT/ RIGHT button and select the [SETUP]menu tab.3. Select the [LCD] menu by pressing the UP/ DOWN buttonand press the RIGHT button.4. Select a desired sub menu by pressing the UP/ DOWNbutton and press the OK button.- [LCD] sub menu : DARK, NORMAL, BRIGHTLCD brightnessSET UPFORMATDATE.TIMEIMPRINTLAMPSOUNDBACK: SET:OK3072OFFLOWMEDIUMHIGHSET UPDATE.TIMEIMPRINTLAMPSOUNDLCDBACK: SET:OK3072DARKNORMALBRIGHT](https://usermanual.wiki/Hanwha-Techwin/DIGIMAXV70.Users-Manual-3-of-3/User-Guide-479816-Page-5.png)
![83Selecting Video out typeThe Movie output signal from the camera can be NTSC or PAL. Your choice of output will be governed by the type of device (monitor or TV, etc.) to which thecamera is connected. PAL mode can support only BDGHI.Setting the Video Out Type1. In any mode other than Voice Recording mode, press theMENU button.2. Press the LEFT/ RIGHT button and select the [SETUP]menu tab.3. Select the [VIDEO] menu by pressing the UP/ DOWNbutton and press the RIGHT button.4. Select a desired sub menu by pressing the UP/ DOWNbutton and press the OK button.- [VIDEO] sub menu : NTSC, PALNTSC : U.S.A, Canada, Japan, South Korea, Taiwan, Mexico.PAL : Australia, Austria, Belgium, China, Denmark, Finland, Germany, U.K., Holland,Italy, Kuwait, Malaysia, New Zealand, Singapore, Spain, Sweden, Switzerland,Thailand, Norway.When using a TV as an external monitor, you will need to select the external or AVchannel of the TV.There will be a digital noise on the external monitor, but it is not a malfunction.If the image is not in the centre of the screen, use the TV controls to centre it.When using a PAL type monitor, there will be a black frame on the lower part of themonitor.When the camera is connected to an external monitor, the menu will be visible on theexternal monitor and the menu functions are the same as those indicated on the LCDmonitor.INFORMATIONConnecting to an external monitorIn RECORDING/ PLAY mode, you canview the stored still images or movie clipsby connecting the camera to an externalmonitor via the A/V cable. When thecamera is connected to an externalmonitor, the LCD monitor will be turned offautomatically.Yellow color-VideoWhite color-VoiceSET UPIMPRINTLAMPSOUNDLCDVIDEOBACK: SET:OK3072NTSCPAL](https://usermanual.wiki/Hanwha-Techwin/DIGIMAXV70.Users-Manual-3-of-3/User-Guide-479816-Page-6.png)
![84Quick viewIf you enable Quick View before capturing an image, you can view the image you justcaptured on the LCD monitor for the duration set in the [Q.VIEW] setup. Quick view ispossible only with still images.Setting Quick View1. In any mode other than Voice Recording mode, press theMENU button.2. Press the LEFT/ RIGHT button and select the [SETUP]menu tab.3. Select the [Q.VIEW] menu by pressing the UP/ DOWNbutton and press the RIGHT button.4. Select a desired sub menu by pressing the UP/ DOWNbutton and press the OK button.[OFF] : The quick view function can’t be activated.[1 ~ 5 SEC] : The captured image is briefly displayed during the selected time.Connecting an External Device (USB)You can select an external device to which you want to connect the camera using the USBcable.Selecting an External Device1. In any mode other than Voice Recording mode, press theMENU button.2. Press the LEFT/ RIGHT button and select the [SETUP]menu tab.3. Select the [USB] menu by pressing the UP/ DOWN buttonand press the RIGHT button.4. Select a desired sub menu by pressing the UP/ DOWNbutton and press the OK button.[COMPUTER] : Select this if you want to connect the camera to your PC. Refer to page107 for instructions on how to connect the camera to your PC.[PRINTER] : Select this if you want to connect the camera to your printer. Refer topage 71 for instructions on how to connect the camera to your printer.SET UPSOUNDLCDVIDEOQ.VIEWUSBBACK: SET:OK3072COMPUTERPRINTERSET UPLAMPSOUNDLCDVIDEOQ.VIEWBACK: SET:OK30721 SEC](https://usermanual.wiki/Hanwha-Techwin/DIGIMAXV70.Users-Manual-3-of-3/User-Guide-479816-Page-7.png)
![85Initialization(RESET ALL)All camera menu and function settings will be restored to their default values. However,values for DATE/TIME, LANGUAGE, and VIDEO OUT will not be changed.Initializing the Camera1. In any mode other than Voice Recording mode, press theMENU button.2. Press the LEFT/ RIGHT button and select the [SETUP]menu tab.3. Select the [RESET] menu by pressing the UP/ DOWNbutton and press the RIGHT button.4. Select a desired sub menu by pressing the UP/ DOWNbutton and press the OK button.If [NO] is selected : Settings will not be restored to their defaults.If [YES] is selected : All settings will be restored to their defaults.SET UPLCDVIDEOQ.VIEWUSBRESETBACK: SET:OK3072NOYES](https://usermanual.wiki/Hanwha-Techwin/DIGIMAXV70.Users-Manual-3-of-3/User-Guide-479816-Page-8.png)
![86Setting up the MYCAM menuYou can set up a start up image, start up sound and shutter sound. Every camera workingmode (with the exception of Voice recording mode) has the MyCAM menu.The items indicated by are default settings.Menu tab Main menu PageOFF IMAGE 1IMAGE 2 IMAGE 3OFF SOUND 1SOUND 2 SOUND 3OFF SH.SOUND 1SH.SOUND 2 SH.SOUND 3START IMAGESTART SOUNDSH.SOUNDp.86p.87p.88You can select the image that is first displayed on the LCD monitor whenever the camera isturned on.Setting a Startup Image1. In any mode with the exception of Voice Recordingmode, press the MENU button.2. Press the LEFT/ RIGHT button and select the [MYCAM]menu tab.3. Select the [START IMAGE] menu by pressing the UP/DOWN button and press the RIGHT button.4. Select a desired sub menu by pressing the UP/ DOWNbutton and press the OK button.Start up imageUse a saved image for the start-up image with the [LOGO] in the [RESIZE] menu in theplay mode. The start-up image will not be deleted by deleting all images or [FORMAT] menu.INFORMATIONSub menu* Menus are subject to change without prior notice. MYCAMSTART IMAGESTART SOUNDSH.SOUNDBACK: SET:OK3072](https://usermanual.wiki/Hanwha-Techwin/DIGIMAXV70.Users-Manual-3-of-3/User-Guide-479816-Page-9.png)
![87You can select the sound that is activated whenever the camera is turned on.Start up soundYou can select the shutter sound.Selecting the Shutter Sound1. In any mode with the exception of Voice Recording mode,press the MENU button.2. Press the LEFT/ RIGHT button and select the [MYCAM]menu tab.3. Select the [SH.SOUND] menu by pressing the UP/DOWN button and press the RIGHT button.4. Select a desired sub menu by pressing the UP/ DOWNbutton and press the OK button.Shutter soundSetting the Startup Sound1. In any mode with the exception of Voice Recording mode,press the MENU button.2. Press the LEFT/ RIGHT button and select the [MYCAM]menu tab.3. Select the [START SOUND] menu by pressing the UP/DOWN button and press the RIGHT button.4. Select a desired sub menu by pressing the UP/ DOWNbutton and press the OK button.MYCAMSTART IMAGESTART SOUNDSH.SOUNDBACK: SET:OK3072OFFSOUND 1SOUND 2SOUND 3MYCAMSTART IMAGESTART SOUNDSH.SOUNDBACK: SET:OK3072OFFSH.SOUND 1SH.SOUND 2SH.SOUND 3](https://usermanual.wiki/Hanwha-Techwin/DIGIMAXV70.Users-Manual-3-of-3/User-Guide-479816-Page-10.png)
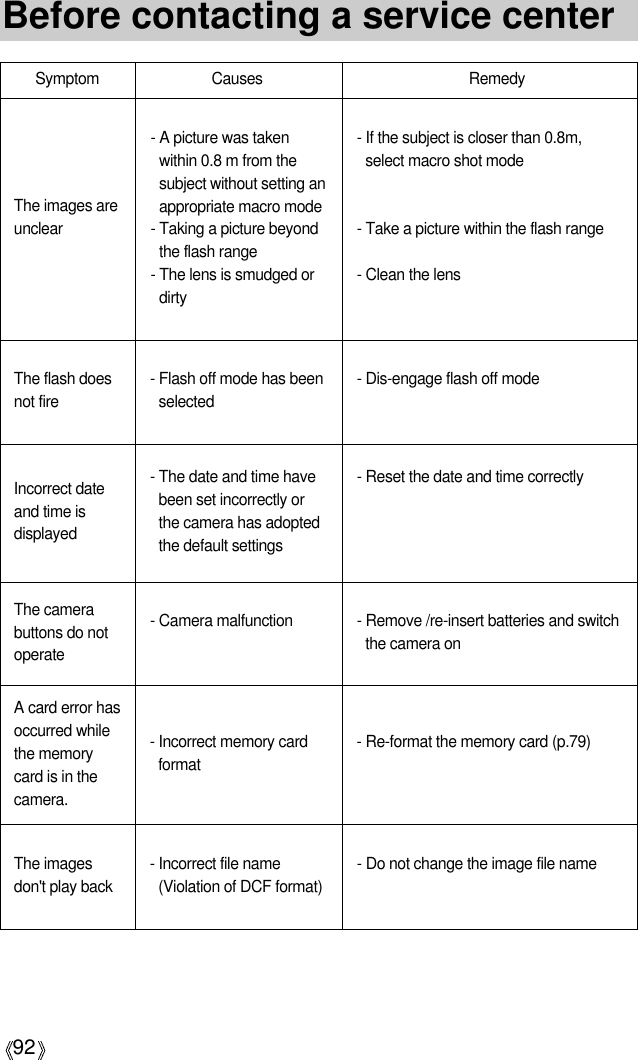
![91Before contacting a service centerPlease check the followingSymptom Causes Remedy- Insert fresh batteries- Connect an AC Power Adapter- Insert the batteries according to thepolarity marks (+, -)- There is low batterycapacity- An AC Power Adapter isnot connected- Batteries are insertedincorrectly with thereverse polarities- The batteries are exhausted- The Camera is turned offautomatically- The Adapter plug is notconnected securely- The Camera is beingused in low temperatures- The memory card is notinserted- There is insufficientmemory capacity- The memory card hasnot been formatted- The memory card isexhausted- The camera’s power is off- The batteries are exhausted- The memory card islocked- Batteries are insertedincorrectly with thereverse polaritiesThe cameradoesn t switch onThe camerapower ceaseswhilst in useBatteries drainquicklyCamera doesnot take imageswhen pressingthe Shutterbutton- Insert fresh batteries- Press the power button to reactivatecamera- Remove and re-insert the plug- Keep the camera in warm conditions (i.e. inside a coat or jacket) and onlyremove it in order to take images- After turning the camera off, insert anew memory card- Delete unnecessary image files- Format the memory card (p.79)- Insert a new memory card- Turn the camera power on- Insert fresh batteries- Refer to [CARD LOCKED!] errormessage (p.90)- Insert the batteries according to thepolarity marks (+, -)- The camera was stoppeddue to a malfunctionThe camerasuddenly stopsworking while inuse- Remove /re-insert batteries and switchthe camera on](https://usermanual.wiki/Hanwha-Techwin/DIGIMAXV70.Users-Manual-3-of-3/User-Guide-479816-Page-14.png)
![93Before contacting a service centerSymptom Causes Remedy- White balance setting isincorrect- Exposure is excessive- Cable connection isincorrect- The camera is off- There are no batteries,the batteries areexhausted or the ACadapter is not connected.- The operating system isnot Windows 98, 98SE,2000, ME, XP/ Mac OS9.0 ~ 10.3. Alternativelythe PC does not supportUSB- The camera driver is notinstalledColour of imageis different tothe originalsceneImages are toobrightWhen using thePC’s explorer,the [RemovableDisk] file doesnot show- Select appropriate White balance- Reset exposure compensation- The external monitor hasnot been connectedproperly with the camera- There are incorrect filesin the memory cardNo image onexternal monitor- Check the connection cables- Insert a memory card that has correctfiles- Check the connection- Turn the camera on- Insert new batteries or check theadapter connection- Install Windows 98, 98SE, 2000, ME,XP/ Mac OS 9.0 ~ 10.3 to PC thatsupports USB- Install a [USB Storage Driver]](https://usermanual.wiki/Hanwha-Techwin/DIGIMAXV70.Users-Manual-3-of-3/User-Guide-479816-Page-16.png)
![97About the softwareCamera driver : This enables images to transfer between the camera and PC.This camera uses the USB Storage Driver as the camera driver. You can use the camera asa USB card reader. After installing the driver and connecting this camera to the PC, you canfind [Removable Disk] in [Windows Explorer] or [My computer]. A USB Storage Driver isprovided only for Windows. A USB Driver for MAC is not included with the Application CD.But you can use the camera with Mac OS 9.0 ~ 10.3.QuickTime Player : The program for playing back QuickTime movies (.mov). It can also playvideo files compressed with MPEG4 codec.Digimax Viewer : This is a program for viewing stored images.You can see the stored images in the memory directly on a PC monitor. You can also copy,move or delete the images and enlarge/downscale the image sizes with Digimax Viewer.This software is only compatible with Windows.PhotoImpression : Image editing program.You can edit or store still images that you download from the camera. This software is onlycompatible with Windows.Digimax Reader : Text recognition programYou can save an image file that was captured in the TEXT mode as a text file with thisprogram. This software is only compatible with Windows.* Be sure to check the system requirements (page 96) before installing the driver.* You should allow 5~10 seconds for running the automatic setup program according to thecapability of the computer. If the frame does not show, run the [Windows Explorer] and select[Samsung.exe] in the CD-ROM Drive root directory.After inserting the CD-ROM provided withthis camera into the CD-ROM drive, thefollowing window will automatically run.Before connecting the camera to the PC,you should first install the camera driver.](https://usermanual.wiki/Hanwha-Techwin/DIGIMAXV70.Users-Manual-3-of-3/User-Guide-479816-Page-20.png)
![98Setting up the application softwareTo use this camera with a PC, install the application software first. After this has been done, the stored images in the camera can be moved to the PC and can beedited by an image editing program.You can visit the Samsung web-site through the internet.http://www.samsungcamera.com : Englishhttp://www.samsungcamera.co.kr : KoreanClose other programs before installing the application software.Before installing the application software, disconnect the USB connection.INFORMATION 4. A Welcome window will appear. Click [Next >] to proceed to the next screen.[Click !]1. Click the [Install] menu in the Autorun frame. The camera driver is installed automatically. 2. Installation is complete. Click the [Finish] button.3. Click [Next >] to begin installing QuickTime.[Click !][Click !][Click !]](https://usermanual.wiki/Hanwha-Techwin/DIGIMAXV70.Users-Manual-3-of-3/User-Guide-479816-Page-21.png)
![99Setting up the application software5. The Software License Agreement window will open, askingyou to agree to the licensing. Use the button on the bottomleft to select the language of your choice, and then click[Agree] to accept the license agreement. The installationwill proceed to the next stage. If you do not agree to thelicense agreement, click [Disagree]. The installation will becanceled. If the language of your choice is not listed, pleaseselect [English].6. A window will open, asking you to select a destinationfolder where the files will be copied to. Click [Next >]. Tocopy the files to another folder, click [Browse..] to select afolder you want to copy the files to. 7. The Choose Installation Type window will open. Click [Next >].[Minimum] : Installs required files only.[Recommended] : Installs required files and the mostcommonly used optional files.[Custom] : Allows you to install only thecomponents you choose.8. A window will open, asking you to choose a folder to whichprogram icons will be added. Click [Next >]. If you want toadd the program icons to a different folder, choose anotherfolder, and then click [Next >].[Click !][Click !][Click !]9. The Enter Registration window appears. Enter your name and organization in the respective fields,and then click [Next >]. You do not have to enter a registration number.[Click !]](https://usermanual.wiki/Hanwha-Techwin/DIGIMAXV70.Users-Manual-3-of-3/User-Guide-479816-Page-22.png)
![100Setting up the application software13. Specify the file types you want toassociate with QuickTime. Click [Finish].14. Installation is complete. Click [Close].11. Set the transfer rate for downloadingcontent from the Internet, and then click[Next >].12. Set up your browser for QuickTime plug-in.Click [Next >].The QuickTime program folder will appear.Click on the Close button to close the folder.10. The QuickTime Settings - Introductionwindow appears. Click [Next >].[Click !][Click !][Click !][Click !][Click !][Click !]](https://usermanual.wiki/Hanwha-Techwin/DIGIMAXV70.Users-Manual-3-of-3/User-Guide-479816-Page-23.png)
![101Setting up the application software16. The [Digimax Viewer 2.1] installation window will bedisplayed as shown alongside. Click the [Next] button.[Click !]If you select [Cancel] at step 16, a window for installing PhotoImpression will bedisplayed.INFORMATION15. A window where you can choose the program you wantto install will appear. Click [Install]. For information onapplication software, please refer to page 97.* The QuickTime Player will launch, the readme file will open, and the Step 15 window will open.Click on the Close 1 and Close 2 buttons to exit the program.If you select [Cancel] , the application program installation will be cancelled.17. The Software License Agreement window will bedisplayed. If you agree to this, click [Yes], the window willthen move to the next step. If you disagree, click [ No ]and the installation program will be canceled.[Click !][Click !][Close 1button][Close 2button]](https://usermanual.wiki/Hanwha-Techwin/DIGIMAXV70.Users-Manual-3-of-3/User-Guide-479816-Page-24.png)
![102Setting up the application software18. A destination selection window will open.Click [Next >]. To copy to the files to anotherfolder, click [Browse..] and choose a folderyou want.[Click!]19. A window will open, asking you to choose afolder to which program icons will be added.Click [Next >] button. If you want to add the program icons to adifferent folder, choose another folder, andthen click [Next >] button.If you select [Cancel] at step 21, a window for installing Digimax Reader will bedisplayed.INFORMATION[Click!]20. Digimax Viewer installation is successfullycompleted. Click the [Finish] button to installPhotoImpression.The system will not rebooteven the [Yes, I want to restart the computernow] option is selected.*The frame 20 may not appear accordingto the system requirements. [Click!]21. Digimax Viewer Installation is completed. The PhotoImpression installation window willbe displayed as shown alongside. Click the [OK] button.[Click!]22. A Welcome window will be displayed.Click the [Next >] button.[Click!]](https://usermanual.wiki/Hanwha-Techwin/DIGIMAXV70.Users-Manual-3-of-3/User-Guide-479816-Page-25.png)
![103Setting up the application software23. The Software License Agreement windowwill be displayed. If you agree to this, click[Yes], the window will then move to the nextstep. If you disagree, click [No] and theinstallation program will be canceled.[Click!]24. A destination selection window will open.Click [Next >]. To copy to the files to anotherfolder, click [Browse...] and choose a folderyou want.[Click!]25. The [Select Components] window willappear. Click [Next >] button.[Click!]26. A window will open, asking you to choose afolder to which program icons will be added.Click [Next >] button. If you want to add the program icons to adifferent folder, choose another folder, andthen click [Next >] button. [Click!]](https://usermanual.wiki/Hanwha-Techwin/DIGIMAXV70.Users-Manual-3-of-3/User-Guide-479816-Page-26.png)
![104Setting up the application software27. PhotoImpression Installation is completed.Click the [Finish] button and Digimax Readerinstallation will be started. The system willnot reboot even the [Yes, I want to restartthe computer now] option is selected.*The frame 27 may not appear according tothe system requirements. [Click!]28. A window will be displayed as shown alongside. Click the [INSTALL] button.- Check the [MANUAL] button. Instructions for usingDigimax reader will be displayed.- Click the [EXIT] button and Digimax reader installation willbe canceled and the Restart window will appear.29. A window will open. Click the [Next(N)>] button.30. The Software License Agreement window will bedisplayed. If you agree to this, click [Yes], the window willthen move to the next step. If you disagree, click [No] andthe installation program will be canceled.31. A destination selection window will open. Click [Next >]. To copy to the files to another folder, click [Browse...] andchoose a folder you want.[Click!][Click!][Click!][Click!]](https://usermanual.wiki/Hanwha-Techwin/DIGIMAXV70.Users-Manual-3-of-3/User-Guide-479816-Page-27.png)
![105Setting up the application software32. Installation is complete. To apply changes,you must restart the computer. Select [Yes, Iwant to restart my computer now], and thenclick [OK].33. After restarting the computer, connect the PC to the camera with the USB cable.35. If you can see [Removable Disk] under [My computer], the camera driver installationwas successful. Now you can transfer image files from thecamera to PC via the USB cable.[Click!]*The frame 32 may be displayed according thesystem requirements. Click the [Finish] buttonto restart the computer.[Click!]34. Turn the camera power on. [Found New Hardware Wizard] will open andthe computer will recognize the camera.If you have ever installed an image viewerprogram or your OS is Windows XP, animage viewer program will open. If the image viewer program opens, thecamera driver was setup successfully.](https://usermanual.wiki/Hanwha-Techwin/DIGIMAXV70.Users-Manual-3-of-3/User-Guide-479816-Page-28.png)
![106Setting up the application softwareIf you have installed the camera driver, [Found New Hardware Wizard] may not open.On a Windows 98 or 98 SE system, the Found New Hardware Wizard dialog box opensand a window asking you to select a driver file may appear. In this case, specify "USBDriver" in the CD supplied. (for Windows 98 and 98 SE).When connecting the camera to your PC, it is recommended that you use an AC poweradapter.Before connecting the camera to the PC, You should first install the camera driver.After installing the camera driver, you have to restart your PC.If you connect the camera to the PC before installing the camera driver, the [Found NewHardware Wizard] will open.In this case, cancel the [Found New Hardware Wizard] and disconnect the camera.Install the camera driver and connect the camera to the PC again.Should the computer not find the camera driver after installation, please try one or moreof the following measures.1. Delete the camera driver (p.110), and re-install the driver.2. Refer to FAQ (p.119) to check for a possible solution to the problem.3. If your PC’s central processing unit is VIA chip (This is shown in the USB HostController), download the patch file from the Samsung Camera web page.(http://www.samsungcamera.com)INFORMATION](https://usermanual.wiki/Hanwha-Techwin/DIGIMAXV70.Users-Manual-3-of-3/User-Guide-479816-Page-29.png)
![107Starting PC ModeThe camera driver must be installed before using PC mode.To save battery power, it is recommended that you use an AC adapter (Optional) whenconnecting the camera to a computer.INFORMATIONIf you connect the USB cable to a USB port on your PC and then turn on the power, thecamera will automatically switch to "computer connection mode".In this mode, you can download stored images to your PC through the USB cable.The LCD monitor is always turned off in PC mode.The auto focus lamp will blink when the files are transferring via the USB connection.Connecting the camera to a PC1. Turn the PC power on.2. Turn the camera power on.3. In any mode other than Voice Recording mode, pressthe MENU button.4. Press the LEFT/ RIGHT button and select the [SETUP]menu tab.5. Select the [USB] menu by pressing the UP/ DOWNbutton and press the RIGHT button.6. Use the UP and DOWN buttons to select[COMPUTER], and then press the OK button.7. Press the menu button twice and the menu will disappear.8. Connect the PC and the camera via the USB cable.- Insert the small plug of the USB cable into the camera USB connection terminal.- Insert the large connector of the USB cable into the USB port of the PC.- The plugs must be firmly inserted.Disconnecting the camera and PC : Refer to page 112 (Removing the removable disk).If you selected [PRINTER] in Step 6,when you connect the camera to yourcomputer, the [PLEASE WAIT, USB I/FPRINTER] message will be displayed onthe LCD monitor and the connection willnot be established. In this case,disconnect the USB cable, and thenfollow the procedure from Step 3 andonward.SET UPBACK: SET:OKSOUNDLCDVIDEOQ.VIEWUSBCOMPUTERPRINTER](https://usermanual.wiki/Hanwha-Techwin/DIGIMAXV70.Users-Manual-3-of-3/User-Guide-479816-Page-30.png)
![108Starting PC Mode3. Select an image and press the right mousebutton.4. A pop-up menu will open.Click [Cut] or [Copy] menu.- [Cut] : cuts a selected file.- [Copy] : copies files.Downloading stored imagesYou can download the still images stored on the camera to your PC's hard disk and printthem or use a photo editing software to edit them.1. Connect the camera to your PC with the USB cable.2. On your computer's desktop display, select[My computer] and double click [RemovableDisk DCIM 100SSCAM].The image files will then be displayed.5. Click a folder where you want to paste the file.](https://usermanual.wiki/Hanwha-Techwin/DIGIMAXV70.Users-Manual-3-of-3/User-Guide-479816-Page-31.png)
![109Starting PC Mode6. Press the right mouse button and a pop-upmenu will open. Click [Paste].7. An image file is transferred from the camera toyour PC.- By using [Digimax Viewer], you can see the stored images in the memory directly on the PCmonitor and you can copy or move the image files.](https://usermanual.wiki/Hanwha-Techwin/DIGIMAXV70.Users-Manual-3-of-3/User-Guide-479816-Page-32.png)
![110Removing the USB Driver for Windows 98SETo remove the USB driver, refer to the process shown below.1. Trace [Start Settings] and click [Control Panel].[Click !]4. Uninstallation is complete. Click the [Finish] button and the window willdisappear.2. Double-click [Add/Remove programs].3. The [Add/Remove Programs Properties] windowwill open. Click [Digimax V70] and click the[Add/Remove] button.[Click !]](https://usermanual.wiki/Hanwha-Techwin/DIGIMAXV70.Users-Manual-3-of-3/User-Guide-479816-Page-33.png)
![111Removable DiskTo use this camera as a Removable Disk, install (p.98) the USB Driver.1. Before turning the camera power on, connect the camera to the PC with the USB cable.2. Click [Removable Disk] under [My computer] or [Windows Explorer].3. Image files stored in the Removable Disk (DCIM 100SSCAM) can be transferred to thePC.Important information whilst using the Removable DiskThe [Removable Disk] indicator will not show when the camera power is off or the USBcable is removed.We recommend that you should copy the images to the PC to view them. Openingimages directly from the removable disk may be subject to unexpected disconnection.When uploading images from the PC to the camera, ensure that the uploaded filenames are not the same as those already stored on the memory. When you upload a file that is not taken by this camera to Removable Disk, the [FILEERROR!] message will be displayed on the LCD monitor in the PLAY mode, andnothing is displayed in THUMBNAIL mode.The auto focus lamp will blink, when a file istransferred (copy or deletion) between the PCand the camera. Do not remove the USB cableuntil the lamp stops blinking. To remove the USBcable in Windows 2000/ME/XP, use the [Unplugor Eject Hardware] icon on the task bar.If your PC wasn't patched with Windows 2000 Service Packs 4, the USB 2.0 does notoperate properly. In this case, you have to download and install the Windows ServicePacks 4.INFORMATION](https://usermanual.wiki/Hanwha-Techwin/DIGIMAXV70.Users-Manual-3-of-3/User-Guide-479816-Page-34.png)
![112Removing the removable disk[Click!][Double-click!][Click!][Click!]Windows 98SE1. Check whether the camera and PC are transferring a file. If the auto focus lamp blinks, youhave to wait until the lamp illuminates.2. Unplug the USB cable.Windows 2000/ME/XP(The illustrations may be different from the real display in accordance with the Windows O/S.)1. Check whether the camera and PC are transferring a file. If the auto focus lamp blinks, youhave to wait until the lamp illuminates.2. Double-click the [Unplug or Eject Hardware]icon on the task bar.3. The [Unplug or Eject Hardware] window willopen. Select the [USB Mass Storage Device]and click the [Stop] button.4. The [Stop a Hardware device] window willopen. Select the [USB Mass Storage Device]and click the [OK] button.5. A [Safe to Remove Hardware] window willopen. Click the [OK] button.](https://usermanual.wiki/Hanwha-Techwin/DIGIMAXV70.Users-Manual-3-of-3/User-Guide-479816-Page-35.png)
![113Removing the removable disk1. A USB Driver for MAC is not included with the software CD as MAC OS supports thecamera driver.2. Check the MAC OS. You can check the MAC OS version during MAC OS start-up. Thiscamera is compatible with MAC OS 9.0 ~ 10.3.3. Connect the camera to the Macintosh and turn the camera power on.4. A new icon will be displayed on the desktop after connecting the camera to the MAC.Using the USB Driver for MACSetting up the USB Driver for MAC1. Double click a new icon on the desktop and the folder in the memory will be displayed.2. Select an image file and copy or move it to MAC.For Mac OS 10.0 or later : First complete uploading from computer to camera and thenremove the removable disk with the Extract command.CAUTION6. A [Unplug or Eject Hardware] window willopen. Click the [Close] button and theremovable disk will be removed safely.7. Unplug the USB cable.[Click!]](https://usermanual.wiki/Hanwha-Techwin/DIGIMAXV70.Users-Manual-3-of-3/User-Guide-479816-Page-36.png)
![114Digimax Viewer 2.1This software is only compatible with Windows.1. To open Digimax Viewer, click the [Start ProgramsSamsung Digimax Viewer 2.1 Digimax Viewer2.1 ] and Digimax Viewer 2.1 will then open. 3. You can easily use the Digimax viewer 2.1 program asit offers a FILE menu and TOOL bar.And, you can usethe pop up menu. Click an image and press the rightmouse button.Digimax Viewer functions are listed below.- Basic functions : Copy, Move, Delete, Rotate, Rename, changing file type, Resize,Property.- Advanced functions : Print, Slide show, Export, Sending e-mail, On-line print, Web album etc.2. If the [Auto Launch] option is selected, this program will be executed automatically withrecognizing the camera.Before deleting images from the camera, you should download images to yourcomputer that you wish to keep.Refer to the [Help] menu in Digimax viewer 2.1 for further information.INFORMATION](https://usermanual.wiki/Hanwha-Techwin/DIGIMAXV70.Users-Manual-3-of-3/User-Guide-479816-Page-37.png)
![115Using PhotoImpressionYou can use PhotoImpression to perform the following tasks.With PhotoImpression, you can edit or store still images that you downloaded from the camera.This software is only available in Windows version.To start the program, click [Start Programs ArcSoft PhotoImpression PhotoImpression].The following screen will appear.[ Command Button ][ Tool Bar ]Command Button[ Help Button ]Button DescriptionImports a picture from an album, a source folder, or the camera/scanner, orcaptures screen shots of what is being viewed on the current monitor.Selects Cut, Resize, Edit Image, Insert Text, Enhance Picture, InsertEffects, or Layer.Performs Insert Frame, Insert Borders, Insert Calendar, Insert GreetingCards, Insert Template, or Connect with Other Software.Saves the edited picture, and sends an e-mail or uses it as the backgroundimage.Outputs the edited picture according to your preferences.](https://usermanual.wiki/Hanwha-Techwin/DIGIMAXV70.Users-Manual-3-of-3/User-Guide-479816-Page-38.png)
![116Using PhotoImpressionFor detailed instructions on how to use PhotoImpression, please refer to the program'sHelp.INFORMATIONTool BarDigimax Reader is a Text recognition program. You can save an image file that is captured inthe Text mode, as a text file with this program. This software is only compatible with Windows.To start the program, click [Start Programs Digimax Reader Eng]. The following screen will appear.Digimax ReaderButton Description Button DescriptionResize LayerFlip Layer HorizontallyUndoCopyDelete LayerRotate LayerRotate All LayersRedoPasteClose Picture](https://usermanual.wiki/Hanwha-Techwin/DIGIMAXV70.Users-Manual-3-of-3/User-Guide-479816-Page-39.png)
![118Please check the following if the USB connection malfunctions.[Case 1] The camera power is off.Turn the camera power on. We recommend using an AC power adapter in PC mode.[Case 2] USB Driver is not installed correctly.Install the USB Driver correctly. Refer to page 98.[Case 3] The USB cable is not connected or you are using a cable with an incorrectspecification.Use a USB cable with the correct specification.[Case 4] The camera is not recognized by your PC. Sometimes, the camera may appear under [Unknown Devices] in DeviceManager.Install the camera driver correctly.Turn off the camera, remove the USB cable, plug in the USB cable again, andthen turn on the camera.[Case 5] There is an unexpected error during file transferTurn the camera power off and on again. Transfer the file again.Digimax ReaderTo get an image that can be recognized as a text : - Keep a distance of 20cm between the subject and the camera. - The subject need to be centered. - Avoid the camera shake to get a good image. Refer to the [Help] menu in Digimax Reader for further information.INFORMATION 8. To save the section as a text, click the Save( )icon. A window as shown alongside will bedisplayed. 9. Select a file type that you want to. Selectable file type : *.TXT, *.HWP, *.DOC, *.RTFFAQ](https://usermanual.wiki/Hanwha-Techwin/DIGIMAXV70.Users-Manual-3-of-3/User-Guide-479816-Page-41.png)
![119FAQPlease check the following if the USB connection malfunctions.[Case 6] How do I know my computer supports a USB Interface?Check the USB port in your computer or keyboard.Check the OS version. A USB Interface is available in Windows 98, 98SE,2000, ME .XP.Check [Universal Serial Bus controllers] in Device Manager. Do the following tocheck [Universal Serial Bus controllers].Win 98/ME : Trace [Start Settings Control Panel System Device Manager Universal Serial Bus controllers].Win 2000 : Trace [Start Settings Control Panel System Hardware Device Manager Universal Serial Buscontrollers].Win XP : Trace [Start Control Panel System Hardware Device Manager Universal Serial Bus controllers].There must be USB Host Controller and USB root hub under [Universal SerialBus controllers].In addition, double-click on the USB Universal Host Controller and the USBRoot Hub to check if the Device Status states "This device is working properly".If the Device Status says the device is "not working properly", click the "Driver"tab and then click [Update Driver] or [Reinstall Driver].When all the conditions mentioned above are met, the computer can supportthe USB interface.[Case 7] When using the USB hub.There may be a problem in connecting the camera to the PC through the USBhub if the PC and the hub are not compatible. Wherever possible, connect thecamera to the PC directly.[Case 8] Are other USB cables connected to the PC?The camera may malfunction when it is connected to the PC at the same timeas another USB cable. In this case, disconnect the other USB cable, andconnect only one USB cable to the camera.[Case 9]When I open the Device Manager (by clicking Start (Settings) Control Panel (Performance and Maintenance) System (Hardware) Device Manager),there are Unknown Devices or Other Devices entries with a yellow questionmark(?) beside them or devices with an exclamation mark(!) beside them.Right-click on the entry with the question(?) or exclamation (!) mark and select"Remove". Restart the PC and connect the camera the again. For Windows 98 PC,remove the camera driver also, restart the PC, and then reinstall the camera driver.Double-click on the entry with the question (?) or exclamation (!) mark, click the"Driver" tab, and click [Update Driver] or [Reinstall Driver]. If a message appearsasking you to specify the location of the appropriate device driver, specify "USBDriver" in the CD supplied.](https://usermanual.wiki/Hanwha-Techwin/DIGIMAXV70.Users-Manual-3-of-3/User-Guide-479816-Page-42.png)
