Hanwha Techwin DIGIMAXV700 Digital Camera User Manual v700en 02 V05
Samsung Techwin Co Ltd Digital Camera v700en 02 V05
UserManual.wiki
>
Hanwha Techwin
>
DIGIMAXV700 User Manual
Users Manual
Navigation menu
Upload a User Manual
Namespaces
Wiki Guide
HTML
PDF
Info
Views
User Manual
Discussion / Help
Navigation
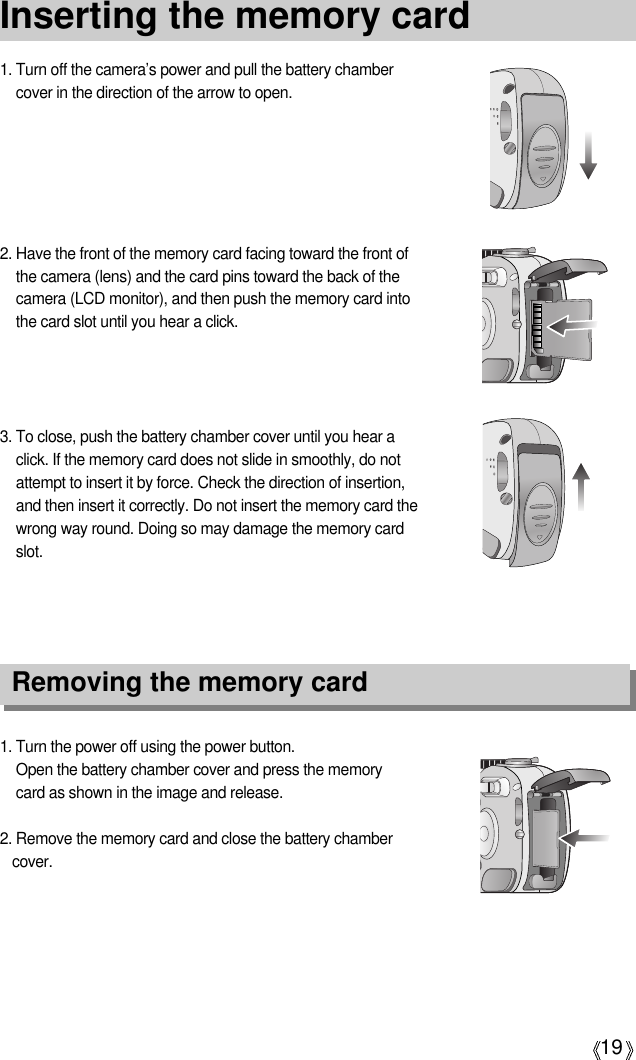
![2InstructionsUse this camera in the following orderInsert the USB cableSet up the camera driverBefore connecting the camera to a PC, via theUSB cable, you will need to set up the cameradriver. Install the camera driver that is contained inApplication software CD-ROM.(p.90)Take a picture (p.19)Insert the supplied USB cable into the PC’s USBport and the camera’s USB connectionterminal.(p.98)Check the camera’s power. If the power is turnedoff, press the camera button to turn it on.Take a pictureCheck the camera’s powerCheck [Removable Disk]Open Window s EXPLORER and search for[Removable Disk].(p.99)If you use a card reader to copy the images on the memory card to your PC, the imagescould be damaged. When transferring the images taken with the camera to your PC, be sureto use the supplied USB cable to connect the camera to your PC. Please note that themanufacturer holds no responsibility for loss or damage of images on the memory card dueto the use of a card reader.](https://usermanual.wiki/Hanwha-Techwin/DIGIMAXV700/User-Guide-506951-Page-2.png)

![17Instructions on how to use the memory cardBe sure to format the memory card (see p.73) if you are using a newly purchased memory forthe first time, if it contains data that the camera cannot recognise, or if it contains imagescaptured with a different camera.Turn off the camera power whenever the memory card is being inserted or removed.Repeated use of the memory card will eventually reduce the memory card’s performance.Should this be the case, you will need to purchase a new memory card. Wear and tear on the memory card is not covered by the Samsung warranty.The memory card is an electronic precision device. Do not bend, drop or subject the memory card to any heavy impact.Do not store the memory card in an environment with strong electronic or magnetic fields,e.g. near loud speakers or TV receivers.Please do not use or store in an environment where there are extremes in temperature.Do not allow the memory card to become dirty or to come into contact with any liquid. Should this happen, clean the memory card with a soft cloth.Please keep the memory card in its case when not in use.During and after periods of extended use, you may notice that the memory card is warm. This is perfectly normal.Do not use a memory card that is used in another digital camera.To use the memory card in this camera, format first the memory card by using this camera. Do not use a memory card formatted by another digital camera or memory card reader.Maintenance of the memory cardPreserving the memory card dataIf the memory card is subjected to any of the following, the recorded data may becomecorrupted :- When the memory card is used incorrectly.- If the power is switched off or the memory card is removed while recording, deleting(formatting) or reading.Samsung cannot be held responsible for lost data.It is advisable to copy important data onto other media as back-up e.g. floppy disks, harddisks, CD etc.If there is insufficient memory available : If you press the shutter button for the shot, a [Card Full !] message will appear and the camera will not operate. To optimise the amount ofmemory in the camera, replace the memory card or delete unnecessary images stored onthe memory.](https://usermanual.wiki/Hanwha-Techwin/DIGIMAXV700/User-Guide-506951-Page-18.png)
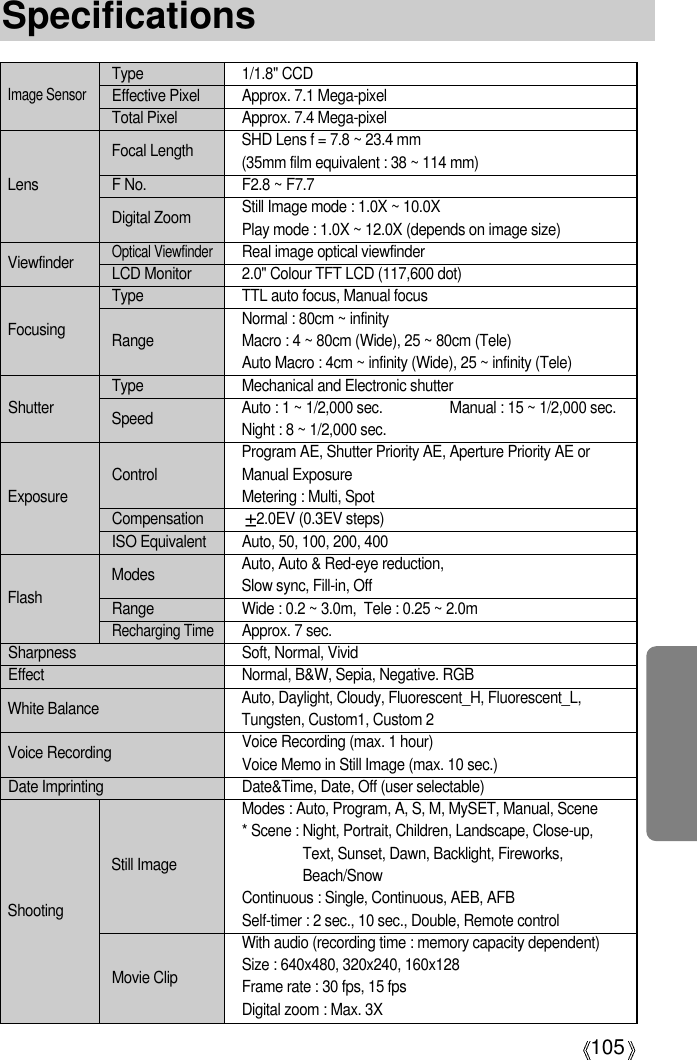
![18Instructions on how to use the memory cardDon't remove the memory card when the Auto focus lamp(Green) is blinking as this maycause damage to data in the memory card.INFORMATION[ SD(Secure Digital) memory card ]WriteprotectswitchLabelCardpinsRecorded image size TIFF S. Fine Fine Normal 30 FPS 15FPS3072X2304 1 9 15 13 - -2816X2112 1 10 18 26 - -2592X1944 1 11 21 33 - -2272X1704 2 14 26 40 - -2048X1536 3 17 33 50 - -1600X1200 4 30 51 75 - -1024X768 11 60 106 129 - -640X480 22 121 165 202 - -640X480 - - - -2MIN 4SEC 4MIN 1SEC320X240 - - - -4MIN 3SEC 7MIN 9SEC160X128 - - - -10MIN 10SEC 18MIN 11SECThe camera can use SD Memory Cards and MMC (Multi Media Cards).Please consult the enclosed manual for using the the MMC Cards.The SD memory card has a write protect switchthat prevents image files from being deleted orformatted.By sliding the switch to the bottom of the SDmemory card, the data will be protected. By sliding the switch to the top of the SDmemory card, the data protection will becanceled. Slide the switch to the top of the SDmemory card before taking a picture.When using a 32MB SD memory card, the specified shooting capacity will be as follows.(These figures are intended as an indication of expected performance). These figures areapproximate as image capacities can be affected by variables such as subject matter.StillimageMovieclip](https://usermanual.wiki/Hanwha-Techwin/DIGIMAXV700/User-Guide-506951-Page-19.png)
![20When Using the Camera for the First TimeIf the camera is turned on for the first time, a menu will be displayed to set date, time andlanguage in the LCD monitor. This menu will not be displayed after setting up the date, timeand language. Set up the date, time and language before using this camera. Setting up the date, time and date type1. Select the [D & Time] menu by pressing the UP/DOWNbutton and press the RIGHT button.2. Press the UP/DOWN/LEFT/RIGHT button to select thedesired sub menu and press the OK button. RIGHT button : Selects YEAR/ MONTH/ DAY/ HOUR /MINUTE/DATE TYPELEFT button : Moves the cursor to the [D & Time]main menu if the cursor is at the firstitem of the date and time setup. In all other instances, the cursor will beshifted to the left of its current position.UP/ DOWN button : changes the value of each item.You can select 18 languages. These are listed below: English, Korean, French, German,Spanish, Italian, S. Chinese, T. Chinese, Japanese, Russian, Portuguese, Dutch, Danish,Swedish, Finnish, Thai, BAHASA(MALAY/ INDONISIA) and Arabic. Even if the camera is restarted, the language setting will be maintained.INFORMATIONSetting up the language1. Select the [Language] menu by pressing the UP/DOWNbutton and press the RIGHT button.2. Select the desired sub menu by pressing the UP/ DOWNbutton and press the OK button.LanguageD & TimeENGLISH04/09/01SetupLanguageD & TimeENGLISH04/09/01Setup](https://usermanual.wiki/Hanwha-Techwin/DIGIMAXV700/User-Guide-506951-Page-21.png)
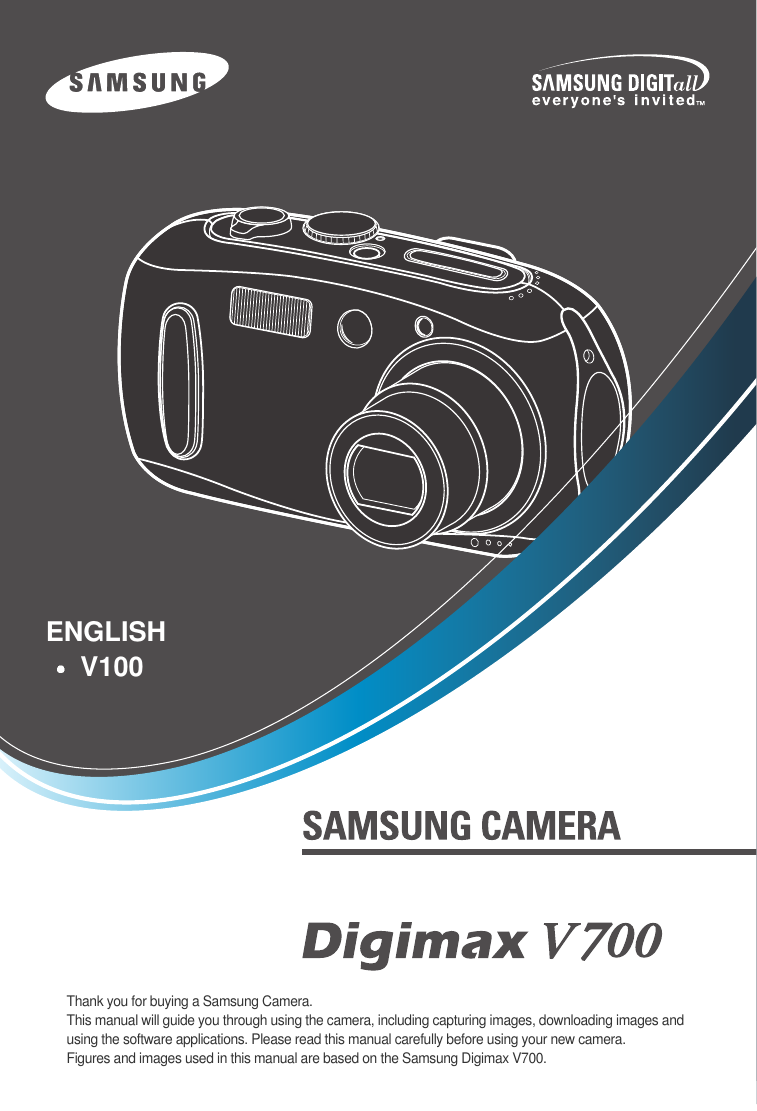
![21LCD monitor indicator[ Image & Full Status ]The LCD monitor displays information about the shooting functions and selections.No. Description Icons Page1 Battery p.153 Shooting type p.274 Flash p.345 Self-timer p.366 Voice memo p.317 Macro p.328 Metering p.509 AEL10 Manual/ Continuous auto focusp.4411 Sharpness p.5112 Auto focus frame13 Camera shake warning 14 Date/ Time 2005/01/01 01:00 PMRecording mode2p.12~13](https://usermanual.wiki/Hanwha-Techwin/DIGIMAXV700/User-Guide-506951-Page-22.png)
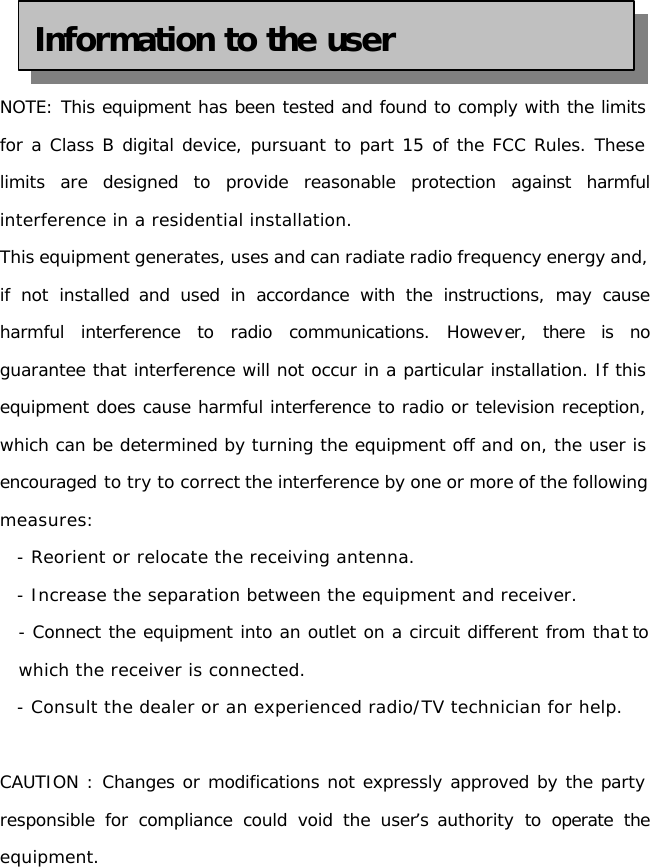
![22LCD monitor indicatorStarting the recording mode1. Insert the batteries (p.15). Insert the batteries takingnote of the polarity (+ / -).2. Insert the memory card. (p.19)3. Close the battery chamber cover.4. Press the power button to turn on the camera. (If the date/time that is displayed on the LCD monitor isincorrect, reset the date/time before taking a picture.)5. Select the AUTO mode by rotating the mode dial.6. Point the camera towards the subject and compose theimage by using either the viewfinder or LCD monitor.7. Press the shutter button to capture an image.How to use the AUTO mode ( )[ AUTO mode ]If the auto focus frame turns to red when you press the shutter button down half way, it means that the camera cannot focus on the subject. Should this be the case, thecamera is unable to capture an image clearly.INFORMATION15 Exposure compensation p.3916 White Balance p.4017 ISO p.4118 RGB RGB19 Image quality p.4920 Image size p.48Number of available shots remaining16Remaining time (Movie clip/ Voice recording)00:01:30/ 01:00:0022 Optical/ Digital Zoom bar213072, 2816, 2592, 2272, 2048, 1600, 1024, 640](https://usermanual.wiki/Hanwha-Techwin/DIGIMAXV700/User-Guide-506951-Page-23.png)
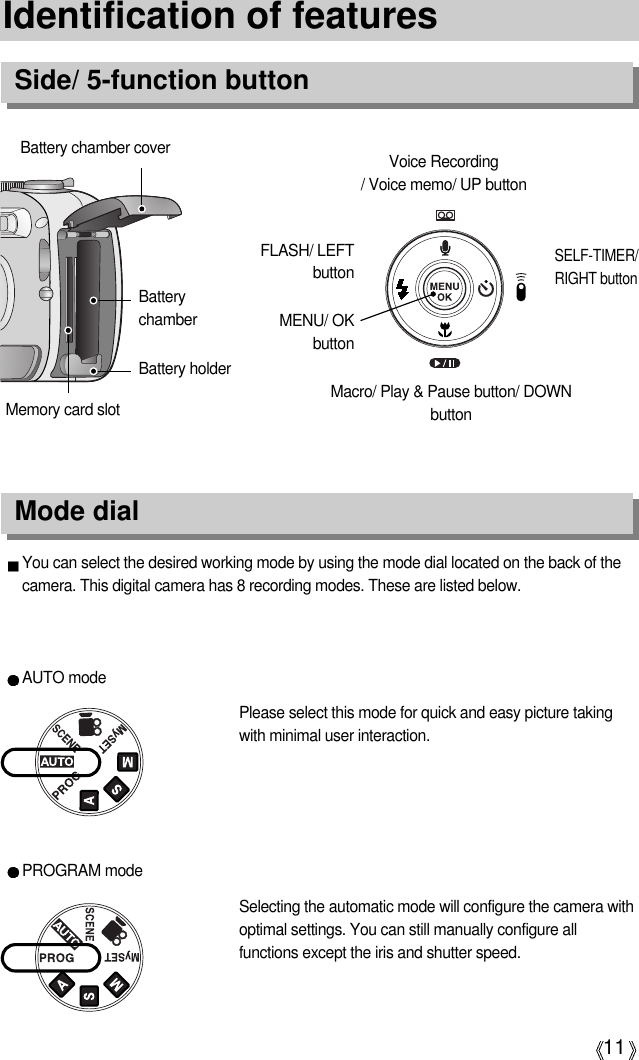
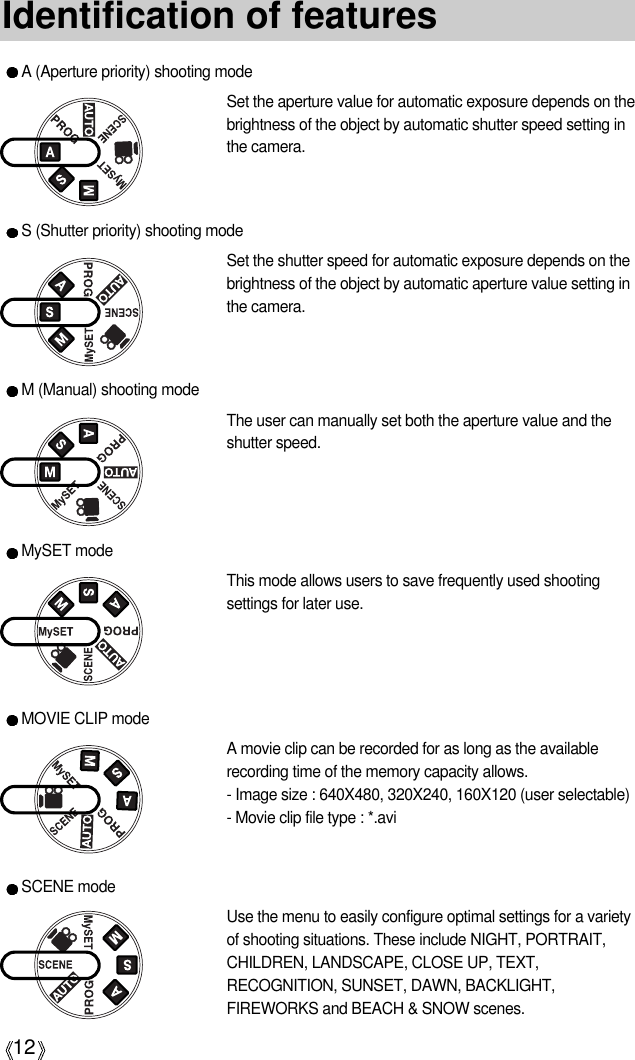
![23Starting the recording modeHow to use the PROGRAM mode ( )Selecting the automatic mode will configure the camerawith optimal settings. You can still manually configure allfunctions except the aperture value and shutter speed.Steps from 1-4 are the same as those for AUTO mode.5. Select the PROGRAM mode by rotating the mode dial.6. Press the menu button to configure advanced functionssuch as image size (p.48), quality (p.49), metering (p.50),continuous shooting (p.51) , picture effects (p.50) andspecial effects (p.51). 7. Point the camera towards the subject and compose theimage by using either the viewfinder or LCD monitor.8. Press the shutter button to capture an image.[ PROGRAM mode ][ Aperture priority mode ]How to use the APERTURE PRIORITY mode ( )Steps from 1-4 are the same as those for AUTO mode.5. Select the APERTURE PRIORITY mode by rotating themode dial.6. Select the desired aperture value by rotating the jog dial.7. Point the camera towards the subject and compose theimage by using either the viewfinder or LCD monitor.8. Press the shutter button to capture an image.* Smaller Aperture values make the object sharp but blurthe background. Larger Aperture values make both theobject and background sharp.](https://usermanual.wiki/Hanwha-Techwin/DIGIMAXV700/User-Guide-506951-Page-24.png)
![24Starting the recording modeHow to use the SHUTTER PRIORITY mode ( )Steps from 1-4 are the same as those for AUTO mode.5. Select the SHUTTER PRIORITY mode by rotating themode dial.6. Select the desired aperture value by rotating the jog dial.7. Point the camera towards the subject and compose theimage by using either the viewfinder or LCD monitor.8. Press the shutter button to capture an image.* High Shutter speeds can capture a moving object in astill image as if the object is not moving. Low Shutterspeeds can capture a moving object with an ‘active’effect.[ Shutter Priority mode ]How to use the MANUAL mode ( )Steps from 1-4 are the same as those for AUTO mode.5. Select the MANUAL mode by rotating the mode dial.6. Press the ASM button to select the shutter speed or theaperture value. Then select the desired speed or value byrotating the jog dial.7. Point the camera towards the subject and compose theimage by using either the viewfinder or LCD monitor.8. Press the shutter button to capture an image.[ Manual mode ]](https://usermanual.wiki/Hanwha-Techwin/DIGIMAXV700/User-Guide-506951-Page-25.png)
![25Starting the recording modeHow to use the MySET mode ( )This mode allows users to save frequently used shootingsettings for later use. Steps from 1-4 are the same as those for AUTO mode.5. Select the MySET mode by rotating the mode dial.6. Press the menu button.7. Use the Left/Right buttons to select the [Load Myset]menu tap. Use the Up/Down buttons to select desiredMySET number.8. Press the OK button to load the camera configurationsaved in the MySET number and close the menuscreen.9. Point the camera towards the subject and compose theimage by using either the viewfinder or LCD monitor.10. Press the shutter button to capture an image.Please see page 52 for details of the MySET shootingmode and menus.[ MySET mode ]How to use the MOVIE CLIP mode ( )Steps from 1-4 are the same as those for AUTO mode.5. Select the MOVIE CLIP mode by rotating the mode dial.6. The MOVIE CLIP mode icon and available recordingtime will display on the LCD monitor.7. Point the camera towards the subject and compose the image by using either the viewfinder or LCD monitor.Press the shutter button and movie clips are recordedfor as long as the available recording time.Movie clips will still be recorded if the shutter button isreleased. The auto focus lamp(green) will blink duringthe movie clip recording. * If you wish to stop recording, press the shutter buttonagain.* Image size and type are listed below.- Image size : 640X480, 320X240, 160X128(Selectable) - File type : *.avi[ MOVIE CLIP mode ]STANDBY](https://usermanual.wiki/Hanwha-Techwin/DIGIMAXV700/User-Guide-506951-Page-26.png)
![26Starting the recording modePausing while recording a movie clip (Successive Recording)This camera allows you to temporarily stop during unwanted scenes, while recording a movieclip. Using this function, you can record your favourite scenes into a movie clip without havingto create multiple movie clips.Using Successive Recording Steps from 1-6 are the same as those for MOVIE CLIPmode.7. Point the camera towards the subject and compose theimage by using the viewfinder or LCD monitor. Pressthe shutter button and movie clips are recorded for aslong as the available recording time. Movie clips will stillbe recorded if the shutter button is released.8. Press the Pause button( ) to pause recording.9. Press the Pause button( ) again to resume therecording.10. If you wish to stop recording, press the shutter button again.00:00:04640[Successive recording of a movie clip]Stop:Shutter](https://usermanual.wiki/Hanwha-Techwin/DIGIMAXV700/User-Guide-506951-Page-27.png)
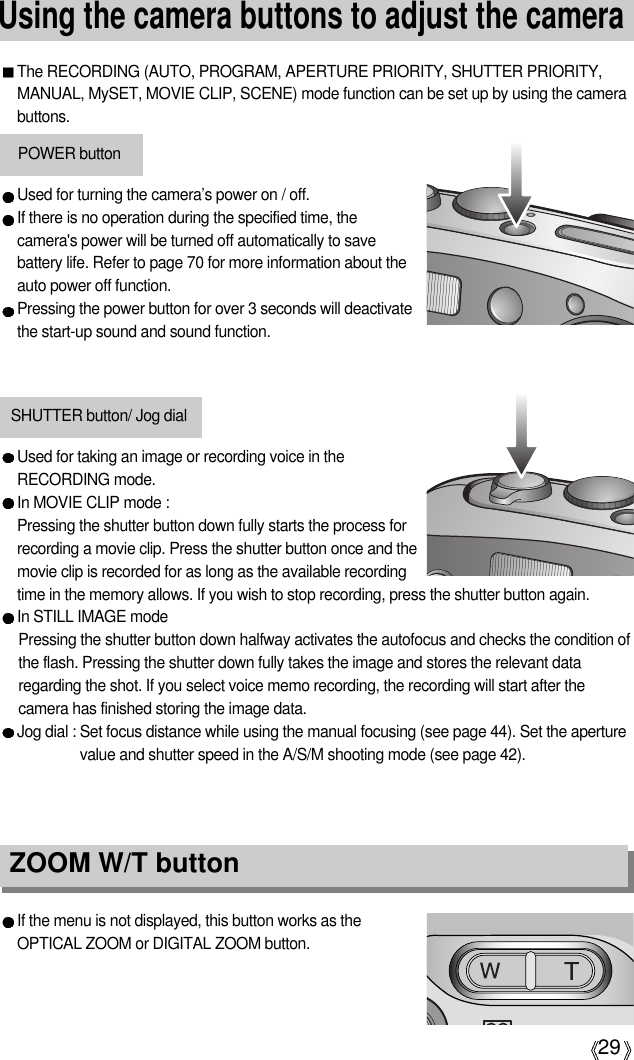
![27Starting the recording modeHow to use the SCENE mode ( )Use the menu to easily configure optimal settings for a variety of shooting situations. These include NIGHT, PORTRAIT, CHILDREN, LANDSCAPE, CLOSE UP, TEXTRECOGNITION, SUNSET, DAWN, BACKLIGHT, FIREWORKS and BEACH & SNOWscenes.Steps from 1-4 are the same as those for AUTO mode.5. Select the SCENE mode by rotating the mode dial.6. Press the menu button and select the [Scene] menu bypressing the left and right button. 7. Select the desired [Scene] sub menu by pressing the UP andDOWN buttons and press the OK button. Please see page 53for detailed descriptions for each screen.8. The current scene icon is displayed at the top left of theLCD.9. Point the camera towards the subject and compose theimage by using either the viewfinder or LCD monitor.10. Press the shutter button to capture an image.[ SCENE mode ]How to use the VOICE RECORDING mode ( )1. Select the VOICE RECORDING mode by pressing theVoice recording button twice. (In Movie clip mode, pressthe Voice recording button once to select the VOICERECORDING mode)2. Press the shutter button to record a voice. - Press the shutter button once and voice is recorded foras long as the available recording time (Max : 1 hour)allows. The recording time will be displayed on theLCD monitor. Voice will still be recorded if the shutterbutton is released.- If you wish to stop recording, press the shutter buttonagain.- File type : *.wav* A distance of 40cm between you and the camera(microphone) is the best distance to record sound.[ VOICE RECORDING mode ]Start: Shutter](https://usermanual.wiki/Hanwha-Techwin/DIGIMAXV700/User-Guide-506951-Page-28.png)
![28Things to Watch Out for When Taking PicturesPressing the shutter button down half way. Lightly press the shutter button to confirm focus and flash battery charge. Press the shutter button all way down to take the picture.The available recording time may vary depending on shooting conditions and camerasettings.When the Flash Off or Slow synchro mode is selected in a low lighting condition, the camerashake warning indicator ( ) may appear on the LCD monitor. In this case, use a tripod,support the camera on a solid surface or change the flash mode to flash shot mode.Compensated shooting against the light : Please do not take pictures to the sunlight direction. Taking a picture against the sun maymake the picture dark. To take a picture against the sun, please use the [Backlight] in thescene shooting mode (see page 53), forced flash (see page 34), spot side light (see page 50),or exposure compensation (see page 39).Avoid obstructing the lens or the flash when you capture an image.As there can be some differences between what is seen through the Viewfinder and theresulting image when taken at a range closer than 1.5m, it is recommended that you use theLCD monitor to compose these shots.Using the LCD monitor extensively will drain the batteries. We recommend turning off the LCD monitor and using the optical viewfinder as often aspossible in order to extend battery life.Under certain conditions the auto focus system may not perform as expected.- When photographing a subject that has little contrast.- If the subject is highly reflective or shiny.- If the subject is moving at high speed.- When there is strong reflected light, or when the background is very bright.- When the subject matter has only horizontal lines or the subject is very narrow (such as a stick or flagpole).- When the surroundings are dark.[ Lightly press the shutter button ] [ Press the shutter button ]](https://usermanual.wiki/Hanwha-Techwin/DIGIMAXV700/User-Guide-506951-Page-29.png)
![30ZOOM W/T buttonThis camera has a 3X optical zoom and a 10X digital zoom function. Using both will offer atotal zoom ratio of 30X.TELE ZoomOptical zoom TELE : Pressing the ZOOM T button. This will zoom into the subject i.e.the subject will appear nearer.Digital zoom TELE : When the maximum (3X) optical zoom is selected, pressing theZOOM T button activates the digital zoom software. ReleasingZOOM T button stops the digital zooming at the required setting.Once the maximum digital zoom (10X) is achieved, pressing theZOOM T button will have no effect.[ WIDE zoom ] [ TELE zoom ] [ Digital zoom 5.0X ]Pressing theZOOM T buttonPressing theZOOM T buttonWIDE ZoomOptical zoom WIDE : Pressing the ZOOM W button. This will zoom out from the subjecti.e. the subject will appear further away. Pressing the ZOOM Wbutton continuously will set the camera to its minimum zoomsetting i.e. the subject appears at its furthest from the camera.Digital zoom WIDE : When the digital zoom is in operation, pressing the ZOOM Wbutton will reduce the digital zooming in steps. Releasing ZOOM Wbutton stops digital zooming. Pressing the ZOOM W button willreduce the digital zoom and then it will continue to reduce theoptical zoom until the minimum setting is reached. [ TELE zoom ][ Optical zoom 2X ][ WIDE zoom ]Pressing theZOOM W button Pressing theZOOM W button[ Digital zoom 5.0X ] [ TELE zoom ] [ WIDE zoom ]Pressing theZOOM W buttonPressing theZOOM W buttonOptical zoomDigital zoom](https://usermanual.wiki/Hanwha-Techwin/DIGIMAXV700/User-Guide-506951-Page-31.png)
![31ZOOM W/T buttonTo use the digital zoom the LCD monitor has to be turned on.Images taken using the digital zoom may take a little longer for the camera to process.Allow time for this to take place.Only the digital zoom can be activated during the movie clip recording.You may notice a decrease in image quality when using the digital zoom.The digital zoom can’t be activated in the [Night], [Close up] and [Text] scene modes. Take care not to touch the lens to avoid taking an unclear image and possibly causingcamera malfunction. If the image is dim, turn the camera power off and on again to modifythe lens position.Take care not to press the lens as this may cause a camera malfunction.When the camera is turned on, take care not to touch the camera's moving lens parts asthis may cause the resulting image to be dim and unclear.Take care not to touch the lens during zoom operation as this may cause damage.INFORMATION](https://usermanual.wiki/Hanwha-Techwin/DIGIMAXV700/User-Guide-506951-Page-32.png)
![32Voice memo( ) / UP buttonWhile the menu is showing, press the UP button to move up the submenu cursor.When the menu is not displayed on the LCD monitor, the UP button operates as the voicememo ( ) button. You can add your voice-over to a stored still image.Recording a voice memo1. Rotate the MODE DIAL to select a RECORDING mode with the exception of MOVIE CLIPmode. 2. Press the VOICE MEMO ( ) button. If the voice memo indicator is displayed on theLCD monitor, the setting is completed.3. Press the shutter button and take a picture. The picture is stored on the memory card.4. Voice memo will be recorded for ten seconds from the moment the picture is stored. In the middle of the sound recording, pressing the shutter button will stop the voice memo.[Recording Voice Memo][Preparing for Voice Memo]A distance of 40cm between you and the camera (microphone) is the best distance torecord sound.INFORMATIONSTOP:SHUTTER](https://usermanual.wiki/Hanwha-Techwin/DIGIMAXV700/User-Guide-506951-Page-33.png)
![33Available focusing method, by recording mode(O:Selectable, X:Not selectable, :Infinity focus range)OOOOOOOOXOOOOOOXOXXXX XXXModeAutoMacroAuto macroModeAutoMacroAuto macroOO XX O OXXXOOXXXXXXXXXXXXXXXMacro( ) / Down button (Focusing)When the macro mode is selected, it is possible that camera shake will occur. If this is thecase, use a tripod to eliminate this.When you take a picture within 30cm(MACRO focus), select the FLASH OFF mode.In the AUTO mode, the Auto macro will be selected by pressing the macro button. INFORMATIONWhile the menu is showing, press the DOWN button to move from the main menu to asubmenu, or to move down the submenu cursor.When the menu is not showing, you can use the MACRO/ DOWN button to take macropictures (within the distance range of 4-80 cm).[ Macro ][ Auto focus ]Pressing the macrobuttonWIDE TELE WIDE TELE WIDE TELE80 ~ 80 ~ 4 ~ 80 25 ~ 80 4 ~ 25 ~ Unit : cmTypes of focus modes and focus rangesFocus typeFocus rangeMacro Auto macroAuto](https://usermanual.wiki/Hanwha-Techwin/DIGIMAXV700/User-Guide-506951-Page-34.png)
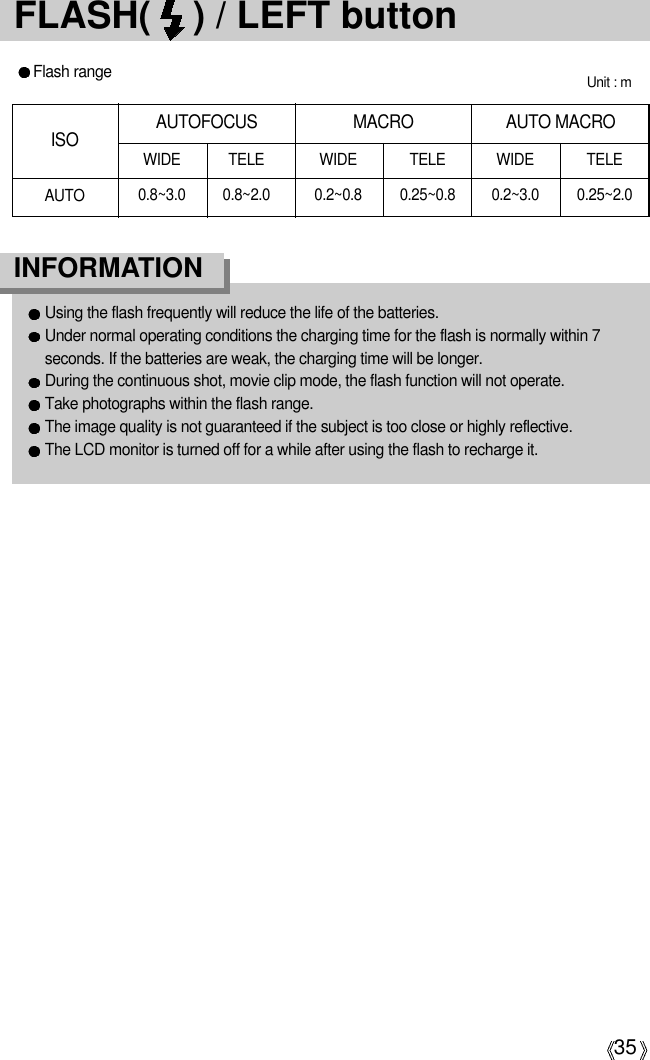
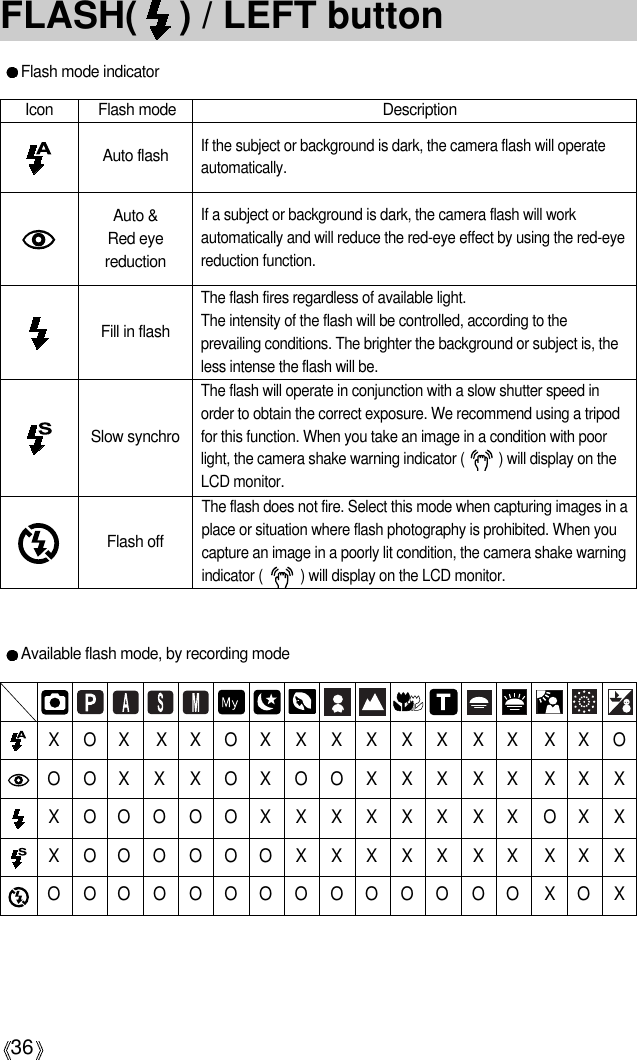
![34Focus lockTo focus on the subject positioned outside of the centre, use the focus lock function.Using the Focus Lock1. Ensure the subject in the centre of the autofocus frame.2. Press the SHUTTER button halfway. When the green auto lights up, it means the camerais focused on the subject. Be careful not to press the SHUTTER button all the way down toavoid taking an unwanted pictured.3. With the SHUTTER button still pressed down only halfway, move the camera torecompose your picture as desired, and then press the SHUTTER button completely totake the picture. If you release your finger from the SHUTTER button, the focus lockfunction will be cancelled.[ The image to becaptured ][ Press the SHUTTER button ]halfway and focus on the subject[ Recompose the picture ]and fully depress theSHUTTER buttonFLASH( ) / LEFT button[ Selecting the Auto flash ]When the menu is displayed on the LCD monitor,pressing the LEFT button makes the cursor shift to the lefttab.When the menu is not displayed on the LCD monitor, theLEFT button operates as the FLASH ( ) button.Selecting the flash mode1. Rotate the MODE DIAL to select a RECORDING modewith the exception of MOVIE CLIP and VOICERECORDING modes.2. Press the Flash button until the desired flash mode indicator displays on the LCD monitor.3. A flash mode indicator will be displayed on the LCD monitor. Use the correct flash to suitthe environment.](https://usermanual.wiki/Hanwha-Techwin/DIGIMAXV700/User-Guide-506951-Page-35.png)
![37Self-timer( ) / Remote ( )/ Right buttonWhen the menu is displayed on the LCD monitor, pressing the Right button makes the cursorshift to the right tab. The right button can also be used to move to a sub menu to select adifferent setting.When the menu is not displayed on the LCD monitor, the RIGHT button operates as the Self-timer ( ) and Remote ( ) button. This function is used when the photographer wouldalso like to be in the image.Using the self-timer and remote control.1. Rotate the mode dial to the RECORDING mode.2. Press the SELF-TIMER button until the desired mode indicator displays on the LCDmonitor. A self-timer icon or remote control icon appears on the LCD monitor.- Selecting a self-timer : When you press the SHUTTER button, the picture will betaken after the specified time has elapsed and the self-timerfunction will be canceled.- Selecting a remote mode : Pressing the shutter button of remote control will allow aninterval of 2 seconds before the image is taken. In the remotemode, the shutter button of the camera can’t be activated. Aftertaking a picture, the remote mode will be maintained. But,pressing the power button, rotating the mode dial, pressing theplay mode button and pressing the self-timer button will cancelthe remote mode.[Selecting the 2 SEC self-timer] [Selecting the remote control]Description of Self-timer/Remote modeIcon Mode Description Pressing the shutter button will allow an interval of 2 secondsbefore the image is taken.Pressing the shutter button will allow an interval of 10 secondsbefore the image is taken.A picture will be taken after about 10 seconds and 2 secondslater a second picture will be taken.You can take a picture by remote control instead of using theshutter button of the camera.DoubleRemotemode2s10s](https://usermanual.wiki/Hanwha-Techwin/DIGIMAXV700/User-Guide-506951-Page-38.png)
![38Self-timer( ) / Remote ( )/ Right buttonSelf-timer/ remote mode settingRemote control range When you take a picture by using the remote control, referto the illustrations shown alongside about the remotecontrol range.Off 2s self-timer 10s self-timer Double self-timer RemoteOff 10s self-timer RemoteMode dialAUTOPROGRAMA/S/M, MySETSCENEMOVIE CLIP[ Shutter button on theremote control ]When taking a picture using the self-timer, the self-timer lamp works as follows: 2 second self-timer setting : The self-timer lamp blinks at 0.25 second interval for 2seconds. 10 second self-timer setting : The self-timer lamp blinks at 1 second interval for the first 7seconds. It blinks at 0.25 second interval for the remaining3 seconds.If you operate the Mode dial and Self-timer button during the self-timer operation, the self-timer function is canceled.Use a tripod to prevent the camera from shaking.In Movie Clip mode, only the 10s self-timer and remote will work.INFORMATIONSetting ( marked camera working mode is the default setting.)](https://usermanual.wiki/Hanwha-Techwin/DIGIMAXV700/User-Guide-506951-Page-39.png)
![39Self-timer( ) / Remote ( )/ Right buttonReplacing batteries for the remote controlMENU/ OK button Make sure the + polarity is toward the top and the polarity is toward the bottom whileinstalling batteries for the remote control. Replace batteries for the remote control in the localservice centre. Use the CR 2025 3V batteries.If the menu is displayed, use the 5-Function buttons to change the data values and for yourchanges to be acceptedIf the menu is not displayed, press the MENU/OK button to display a menu for the currentcamera mode on the LCD monitor. Press the button again to return to the previous state.- There is no menu for VOICE RECORDING mode.- The menu screen may not show on the LCD when another button is pressed or image datais being processed. (The green lamp next to the view finder blinks)- When the menu is showing on the LCD monitor, it is not possible to operate the shutterbutton i.e. capture an image. To capture an image, simply cancel the menu display bypressing the MENU button.[ Menu on ][ Menu off ]Pressing the MENUbutton3072X23042816X21122592X19442272X17043072Size](https://usermanual.wiki/Hanwha-Techwin/DIGIMAXV700/User-Guide-506951-Page-40.png)

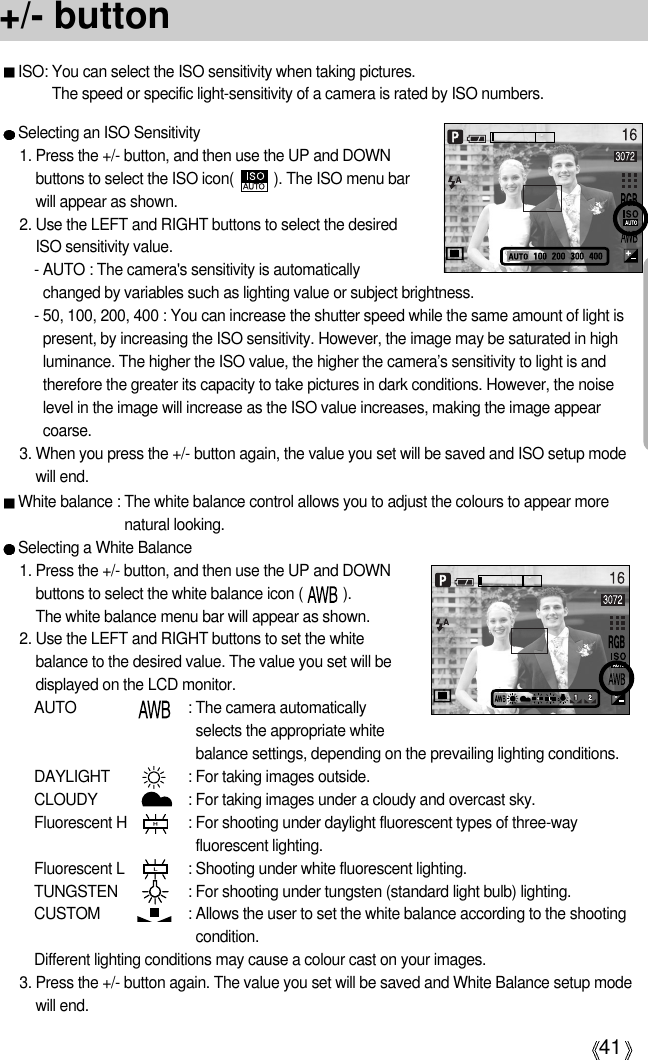
![42+/- buttonUsing the Custom White BalanceWhite balance settings may vary slightly depending on the shooting environment. You canselect the most appropriate white balance setting for a given shooting environment by settingup the custom white balance.1. Select the CUSTOM ( ) menu of the White Balance. You can select CUSTOM 1 or CUSTOM 2 whitebalance. 2. Place a sheet of white paper in front of the camera sothat the LCD monitor shows only white, and then pressthe SHUTTER button.3. The value you set will be saved.- The custom white balance value will be applied, startingwith the next picture you take.- The user configured white balance will remain effectiveuntil it is overwritten.[White paper]MEASURE : SHUTTERExposure compensation : This camera automatically adjusts the exposure according to theambient lighting conditions. You can also select the exposure value by using the +/- button.Compensating Exposure1. Press the +/- button, and then use the UP and DOWNbuttons to select the exposure compensation icon ( ).The exposure compensation menu bar will appear asshown.2. Use the LEFT and RIGHT buttons to set the desiredexposure compensation factor.3. Press the +/- button again. The value you set will besaved and the Exposure Compensation setup mode will close. If you change the exposurevalue, the exposure indicator ( ) will be displayed on the bottom of the LCD monitor.* A negative exposure compensation value reduces the exposure. Note that a positive exposure compensation value increases the exposure and the LCDmonitor will appear white or you may not get good pictures.](https://usermanual.wiki/Hanwha-Techwin/DIGIMAXV700/User-Guide-506951-Page-43.png)
![43You can use the ASM button to select the Aperture Value and Shutter speed in the Manual mode. AEL/ASM button The camera measures brightness of the object and automatically set the best exposurevalue. If difference between the exposure values of the object and background is too great,use the AEL button to manually set the exposure value against sunlight or in strong light. This button is available in the PROGRAM, Aperture priority(A), Shutter priority(S), MySETand MOVIE CLIP mode.Use the automatic exposure lock. 1. Ensure the subject in the centre of the autofocus frame.2. Move the camera to point the automatic focus mark on the object of desired exposure.3. Press the AEL button to lock the exposure and display the AEL icon in the bottom of theLCD.4. Focus the camera again and press the shutter button again for shooting.[ Screen for shooting ] [ Focus to the object and ]press the AEL button[ Refocus and fully press ]the shutter buttonUsing the ASM button in the M mode1. Rotate the MODE DIAL to select the M mode.2. Press the ASM button and the aperture value andshutter speed are displayed. To select the aperturevalue or shutter speed, press the ASM button. The selected item is then highlighted in red.3. Rotate the jog dial to select the aperture value andshutter speed. Press the SHUTTER button to take thepicture.In the Manual mode, the exposure information will be displayed by pressing the shutterbutton down halfway.](https://usermanual.wiki/Hanwha-Techwin/DIGIMAXV700/User-Guide-506951-Page-44.png)
![44MF button Use this button to select the focusing method. Repeatedly press the MF button to rotate [Manualfocusing] [Continuous automatic focusing] [Automatic focusing].Automatic focusing : Slightly press the shutter to let the camera measure distance to theobject and select the best focusing. If successfully focused with the slight press of the shutter, the automaticfocusing mark is turned green.Manual focusing : Where the automatic focusing is not available, for example, in very darkconditions, use the manual focus. Please be careful when using themanual focus as the picture can be blurred easily.Focus distance of 0.04~0.3m are only supported in the Wide zoom. The flash is fixed as not available.The focus value displayed in the LCD while manually focusing is measured from the endof the lensINFORMATION Long distanceClose-upManual focusing.1. Press the MF button to display the MF bar. The MF icon is displayed in the bottom of the LCD.2. Use the jog dial to set the focus distance.Turn to the left : Move the focus farther.Turn to the right : Move the focus closer.](https://usermanual.wiki/Hanwha-Techwin/DIGIMAXV700/User-Guide-506951-Page-45.png)
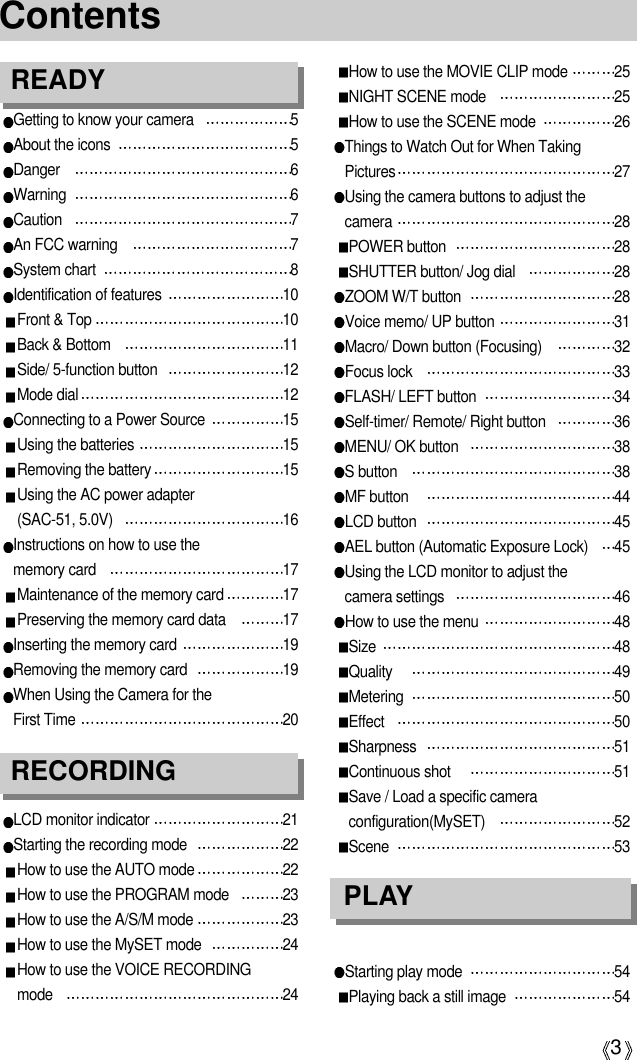
![45LCD button[Image & full information][Image & basic information][Histogram] [LCD off]You can check the recording status in the LCD monitor. In any modewith the exception of VOICE RECORDING mode, pressing the LCDbutton will change the display as shown below.If the LCD monitor is turned off, the mode dial lamp will light up.HistogramShows you the distribution of brightness in recordedimages. If the bars in the histogram are higher towards theright, the image may be too bright. If the bars are higher onthe left, the image may be too dark. If the lightingconditions are too bright to check the subject by using theLCD monitor, checking the histogram will enable moreprecise exposure control for the shots.Pressingthe LCDbuttonPressingthe LCDbuttonPressingthe LCDbuttonPressing the LCD buttonPixelDark BrightDistribution of brightness](https://usermanual.wiki/Hanwha-Techwin/DIGIMAXV700/User-Guide-506951-Page-46.png)
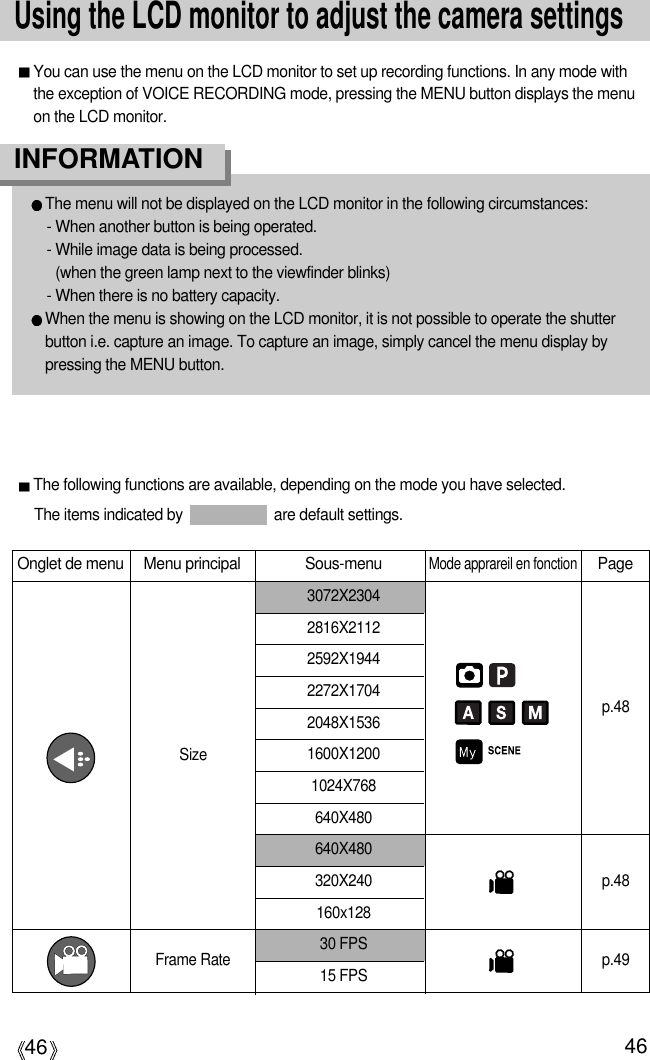
![49How to use the menu3. Use the UP and DOWN buttons to select a sub menu.4. Select a sub menu, and then press the OK button. The value you set will be saved and themenu will disappear.1. Turn on the camera and press the MENU button. A menu for each camera mode appears.However, there is no menu for Voice Recording mode ( ).2. Use the LEFT and RIGHT buttons to navigate through the menus.Press the LEFTor RIGHT button.Press the LEFTor RIGHT button.Press the UP orDOWN button.Press the UP orDOWN button.You can select the image size appropriate for your application.Mode Icon3072 2816 2592 2272 2048 1600 1024 640 640 320 160Size3072X2304 2816X2112 2592X1944 2272X1704 2048X1536 1600X1200 1024X768 640X480 640X480 320X240 160X128STILL IMAGE modeMOVIE CLIP modeThe higher the resolution, the lower the number of available shots will be because highresolution images require more memory than lower resolution images.INFORMATION SizeMeteringMultiSpot3027ShootingSingleContinuousAEBAFBEffectNormalB & WSepiaNegativeNOR[ PROGRAM mode ]Size3072X23042816X21122592X19442272X17043072[ MOVIE CLIP mode ]Size640X480320X240160X12832030FPSEffect EffectNormalB & WSepiaNegativeNormalB & WSepiaNegativeNORQualityTIFFS.FineFineNormal3072](https://usermanual.wiki/Hanwha-Techwin/DIGIMAXV700/User-Guide-506951-Page-50.png)
![50Quality You can select the compression ratio appropriate for yourapplication of the captured images. The higher thecompression ratio, the lower the picture quality. Mode IconTIFFSub menuTIFFS. Fine Fine Normal30FPS 15FPSFile Formattif jpeg jpeg jpeg avi aviSTILL IMAGE mode MOVIE CLIP modeTIFF is the highest quality and NORMAL is the lowest setting. Choose the setting appropriate for your needs.The TIFF file format is for professionals and provides the best quality. However, large file size reduces number of available pictures to take and increasessaving time to the memory card.[Please Wait !] message is displayed while saving a TIFF file to the memory card.If you select the TIFF file format, the double self-timer can’t be selected. This file format complies with the DCF(Design rule for Camera File system).JPEG (Joint Photographic Experts Group): JPEG is the image compression standarddeveloped by the Joint Photographic Experts Group. This type of compression is mostcommonly used for compressing photos and graphics because it can compress the filesefficiently without damaging the data.INFORMATION[ PROGRAM mode ]QualityTIFFS.FineFineNormal3072](https://usermanual.wiki/Hanwha-Techwin/DIGIMAXV700/User-Guide-506951-Page-51.png)
![51MeteringIf you cannot obtain suitable exposure conditions, you can change the metering method totake brighter pictures.Multi ( ) : Exposure will be calculated based onan average of the available light in theimage area. However, the calculation will be biasedtowards the centre of the image area.This is suitable for general use.Spot ( ) : Only the rectangular area in the centreof the LCD monitor will be metered forlight. This is suitable when the subject in the centre is exposed correctly,regardless of the back lighting. [ PROGRAM mode ]MeteringMultiSpot3072](https://usermanual.wiki/Hanwha-Techwin/DIGIMAXV700/User-Guide-506951-Page-52.png)
![52Continuous shotYou can select continuous shot, AEB (Auto Exposure Bracketing) and AFB (Auto FocusBracketing). If you select CONTINUOUS, AEB or AFB, the flash will automatically be set toFlash Off.[Single]: Take one picture only[Continuous]: Images will be taken continuously until the shutter button isreleased. The shooting capacity depends on the memory. If less than 3 pictures are available in the memory, the Sequential and the AEB shootingare not available.If you select 3072X2304 or 2816X2112 image size, the maximum numbers of continuousshot are 3. It is best to use a triangular support for the AEB shooting for saving time is long and handshaking may occur.If you selected the TIFF image format, you can t select the [Continuous], [AEB] and [AFB]menu.If you select the [S.Fine] image quality, you can’t select the [Continuous] menu. The self-timer can’t be activated during the continuous shooting. INFORMATION[ PROGRAM mode ]ShootingSingleContinuousAEBAFB[AEB]: You can select the exposure bracket range( 0.3EV step,6 steps) by rotating the jog dial. Three pictures are taken ina series in different exposure value. Use this menu if it ishard to decide exposure of the object. [AFB]: You can select the focus bracket range( 1 step, 3 steps)by rotating the jog dial. Three pictures are taken in a seriesin different focus range. Use this menu if it is hard todecide distance of the object. NORShootingNORShootingNORSingleContinuousAEBAFBSingleContinuousAEBAFB](https://usermanual.wiki/Hanwha-Techwin/DIGIMAXV700/User-Guide-506951-Page-53.png)
![53SharpnessBy using the camera's digital processor, it is possible to add special effects to your images. Normal : No effect is added to the image.B & W : Converts the image to black and white.Sepia : Captured images will be stored in a sepia tone (a gradient of yellowish browncolours).Negative : Save the image in negative mode.Effect You can adjust the sharpness of the picture you want to take.You cannot check the sharpness effect on the LCD monitorbefore you take a picture, because this function is appliedonly when the captured image is stored on the memory.[ PROGRAM mode ]SharpnessSoftNormalVivid[ PROGRAM mode ] [ MOVIE CLIP mode ]EffectNormalB & WSepiaNegativeNORNORSub menu Icon Description VividNormalSoftThe edges of the image are softened. This effect is suitable for editing images on your PC.The edges of the image are sharp. This is suitable for printing.The edges of the image are emphasized. The edges will appearsharp, but noise may occur in the recorded image.EffectNormalB & WSepiaNegativeNOR30FPS](https://usermanual.wiki/Hanwha-Techwin/DIGIMAXV700/User-Guide-506951-Page-54.png)
![54Special EffectBy using the camera s digital processor, it is possible to add special effects to your images.You can select this menu only in the PROGRAM, MySET, Aperture priority, Shutter priorityand MANUAL modes.You can select this menu only in the 2592x1944, 2272x1704, 2048x1536, 1600x1200,1024x768, 640x480 image size. You can select the preset focus frame, Part shot and Photo frame function. If a special effectis selected, the rest special functions set before are canceled automatically.You can make the subject stand out from its surroundings. The subject will be sharp and infocus while making the rest out of focus.1. Select the PROGRAM, MySET, Aperture priority, Shutterpriority or MANUAL modes. Then press the menu button.2. Press the LEFT/ RIGHT button and select the [SpecialEffect] menu tab.3. Select the [Out Focus] menu by pressing the UP/ DOWNbutton and press the Right button.4. Select a desired sub menu by pressing the UP/ DOWNbutton and press the OK button.- [Cancel] : The preset focus frame will not be added. Special Effect : Preset focus frames5. Press the menu button twice and the menu will disappear.6. When you press the Shutter button half-way, autofocuswill be performed and the preset focus frame area willappear simultaneously.[Range 1] [Range 2] [Range 3] Special EffectHighLightCompositePhoto FrameOffOffOffNORMove : Change:](https://usermanual.wiki/Hanwha-Techwin/DIGIMAXV700/User-Guide-506951-Page-55.png)
![55Special Effect : Part shot[The result image][1/2] [2/2]You can combine 2~4 different shots in a still image.1. Select the PROGRAM, MySET, Aperture priority, Shutter priority or MANUAL modes.Then press the menu button.2. Press the LEFT/ RIGHT button and select the [SpecialEffect] menu tab.3. Select the [Part Shot] menu by pressing the UP/ DOWNbutton and press the Right button.4. Select a desired sub menu by pressing the UP/ DOWNbutton and press the OK button.- [Off] : cancels the part shot- [2 Parts] : 2 different shots are combined in a still image. - [3 Parts] : 3 different shots are combined in a still image.- [4 Parts] : 4 different shots are combined in a still image.5. Press the menu button twice and the menu will disappear.6. The number of frames you selected in step 4 is displayed on the LCD monitor. Press the shutter button to start the Part shot. Pressing theshutter buttonPressing theshutter buttonSelecting 2 Parts shotSpecial EffectHighLightCompositePhoto FrameOffOffOffNORMove : Change:You can use the flash button, self-timer button, macro button, +/- button and the ZoomW/T button during the composite shots. If you change the image size, press the camera buttons (Play mode button , Voice menu(UP)button) or rotate the mode dial during the composite shots, the captured images aren’t savedand the first step of the composite shot will display on the LCD monitor. Do not press thecamera buttons or rotate the mode switch during the composite shots. To insert the voice memo, press the voice memo button before starting the compositeshot. The voice memo will start after taking the last composite shot. If you select [Cancel] in the [Composite] menu, the composite shot will be cancelled.INFORMATION](https://usermanual.wiki/Hanwha-Techwin/DIGIMAXV700/User-Guide-506951-Page-56.png)
![56Special Effect : Photo FrameYou can add 3 types of frame-like borders to a still image you want to capture.[Frame 1] [Frame 2] [Frame 3] 1. Select the PROGRAM, MySET, Aperture priority,Shutter priority or MANUAL modes. Then press themenu button.2. Press the LEFT/ RIGHT button and select the [SpecialEffect] menu tab.3. Select the [Photo Frame] menu by pressing the UP/DOWN button and press the Right button.4. Select a desired sub menu by pressing the UP/ DOWNbutton and press the OK button.- [Cancel] : The photo frame will not be added. 5. Press the menu button twice and the menu willdisappear. If you select the [Frame 1~3] menu, thepreset focus frame area will appear. * You can check the photo frame you added to picturesin Quick View or Play mode.Special EffectHighLightCompositePhoto FrameOffOffOffNORMove : Change:](https://usermanual.wiki/Hanwha-Techwin/DIGIMAXV700/User-Guide-506951-Page-57.png)
![57Save / Load a specific camera configuration (MySET)Use the MySET mode to save frequently used camera settings (Save Myset) and use it later(Load Myset)Saving the camera configuration : Available in the PROGRAM, A, S and M shooting mode. 1. Use the camera buttons and menu to set desired camera configuration.2. Press the menu button in any mode except AUTO,VOICE RECORDING, MOVIE CLIP, SCENE and MySETmode. 3. Press the Left/Right buttons to select the [Save Myset]menu tap.4. Press the Up/Down buttons to select desired MySET slotnumber to save.5. Press the OK button to save the current configuration inthe selected MySET slot and close the menu.Loading the saved camera configuration: available in the MySET shooting mode.1. Turn the mode dial to select the MySET shooting modeand press the menu button.2. Press the Left/Right buttons to select the [Load Myset]menu tap.3. Press the Up/Down buttons to select a MySET slotnumber to load.4. Press the OK button to set the camera configuration assaved in the MySET slot.* The current MySET slot number is displayed in the top left of the LCD.Saving is available for the following camera functions.Functions using the camera buttons - Macro, flash, white balance, ISO, Aperture valueand Shutter speed. Functions using the menu screen - Size, quality, metering, effect, sharpness andcontinuous shot.INFORMATION[ PROGRAM mode ][ MySET mode ]Save MysetMyset 1Myset 2Myset 3NORLoad MysetMyset 1Myset 2Myset 33072](https://usermanual.wiki/Hanwha-Techwin/DIGIMAXV700/User-Guide-506951-Page-58.png)
![58SceneSub menu Icon Description ChildrenLandscapeClose upSunsetDawnBacklightFireworkBeach&SnowSelect the [Scene] submenu to automatically configureoptimal settings, depending on the selected scene. Onlyavailable in the SCENE Mode.To take a still picture of moving children Portrait To take a picture of a personNight Use this for shooting still images at night or in other dark conditions.Close-up shooting for small objects such as plants and insectsFor taking pictures of sunsets Scenery with green woods or blue skyDaybreak scenesPortrait without shadows caused by backlightFirework scenesText Use this mode to shoot a documentFor ocean, lake, beach and snowscape scenes[SCENE mode]When the close-up, sunset, dawn, fireworks are selected, it is possible that camera shakewill occur. If this is the case, use a tripod to eliminate this.In the [Children] and [Close up] scene mode, the Continuous Automatic Focusing (CAF)function will be activated and the CAF icon is displayed at the bottom of the LCD monitor. Continuous automatic focusing : The camera keeps focusing while the object is movingeven if the shutter button is not slightly pressed. Note that using the Continuous automaticfocusing uses more battery than the Automatic focusing does.INFORMATIONSceneNightPortraitChildrenLandscape3072](https://usermanual.wiki/Hanwha-Techwin/DIGIMAXV700/User-Guide-506951-Page-59.png)
![59Movie Clip frame stabiliserThis function helps stabilize images captured during movie recording.You can select this menu only in the MOVIE CLIP mode. How to use this function 1. Select the MOVIE CLIP mode by sliding the mode switchand press the menu button. Select the [Stabilizer] menuand press the right button. 2. Select a desired sub menu by pressing the Up/Downbutton and press the OK button. [On] : Prevents camera shake during movie recording.The recording frame range will become narrowerthan when you select the [Off] menu. Pre-view frames may not display smoothly on the LCD monitor, but stored movieclips have no problems. [Off] : Movie clip frame stabilizer function becomes disabled.StabilizerOffOnNOR](https://usermanual.wiki/Hanwha-Techwin/DIGIMAXV700/User-Guide-506951-Page-60.png)
![61Starting play modePlaying back a movie clipSteps from 1-2 are the same as those to play back a still image.3. Select the recorded movie clip that you want to play backby using the LEFT/RIGHT button. If you select a movieclip, the movie clip indicator ( ) will be displayed onthe LCD monitor.4. Press the play & pause button ( ) to play back amovie clip file.- To pause a movie clip file while playing it back, pressthe play & pause button again.- Pressing the play & pause button again will cause themovie clip file will restart.- To rewind the movie clip while it is playing, press theLEFT button. To fast forward the movie clip, press theRIGHT button.- To stop playback of the movie clip, press the play &pause button, and then press the LEFT or RIGHT button.How to capture the movie clipSteps 1-2 are the same as those for playing back a stillimage.3. Select the recorded movie clip that you want to playback by using the LEFT/RIGHT button.4. Press the Play/Pause button to play the movie clip5. Press the Play/Pause button while playing the movieclip. Then press the Shutter button.6. The paused movie clip is saved in a new file name.* The captured movie clip file has same size as the originalmovie clip (640X480, 320X240, 160X128).Movie clip capture function: capture still images from the movie clip.[ Paused ][ Press the shutter button ]9PLAYREW FFTrim:T Capture:SH](https://usermanual.wiki/Hanwha-Techwin/DIGIMAXV700/User-Guide-506951-Page-62.png)
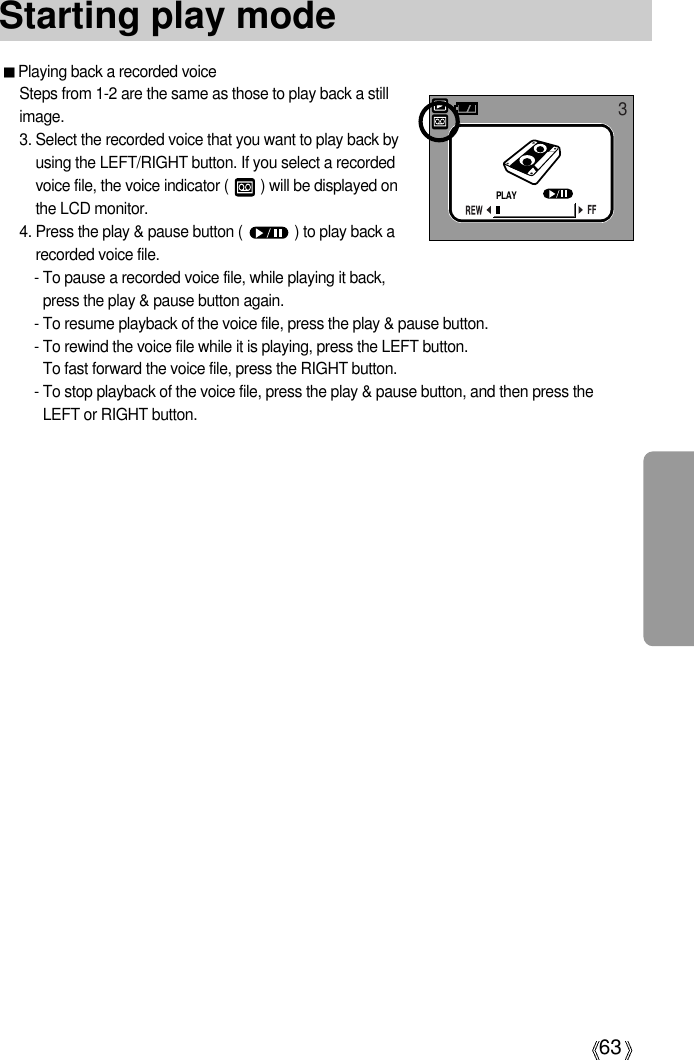
![62Starting play modeOn camera movie trimming : You can extract desired frames of movie clip during the movieclip play back. 1. Select a desired movie clip in the play mode. 2. Play back the movie clip by pressing the Play &Pause button.3. Press the Pause button at the point of the movie clipthat you want to start extracting. 4. Press the T button. (The start point. Doesn t displayon the status bar, but the start point will be marked.)5. Press the Play button and the extracted range will bedisplayed on the status bar. 6. At the point of movie clip that you want to stopextracting, press the Pause button.7. Press the T button and a confirmation window willdisplay.8. Select a desired sub menu by pressing the UP/DOWN button and press the OK button.[Trimming] : The extracted frames are saved as anew file name. [Cancel] : The movie trimming will cancel. If the running time is under 10 seconds, the movie clip can t be trimmed.If you want to extract the movie clip at the beginning of the frame, press the Zoom Tbutton before starting the movie clip. If the time line bar passes by the start point by pressing the REW button, the first frame ofthe movie clip will display. If you doesn t specify the ending point of the movie clip, the trimming confirmationwindow will display at the point of the last frame.INFORMATION 9PLAYREW FFTrim:T Capture:SH9PLAYREW FFTrim:T 9PLAYREW FFTrimming?TrimmingCancelConfirm : OK](https://usermanual.wiki/Hanwha-Techwin/DIGIMAXV700/User-Guide-506951-Page-63.png)
![65Using the camera buttons to adjust the cameraIn Play mode, you can use the buttons on the camera to conveniently set up the Play modefunctions.Image enlargement1. Select an image that you want to enlarge and press the enlargement button.2. Different parts of the image can be viewed by pressingthe 5 function button.3. Pressing the thumbnail button will zoom back to theoriginal full sized image.- You can tell whether the image displayed is anenlarged view by checking the image enlargementindicator shown at the bottom left of the LCD monitor.(If the image is not an enlarged view, the indicator willnot be displayed.) You can also check the area ofenlargement.- Movie clips and WAV files can’t be enlarged.- If an image is enlarged, a loss of quality may occur.Thumbnail ( ) / Enlargement ( ) button You can view multiple pictures, enlarge a selected picture, and crop and save a selected areaof an image.Thumbnail display1. While an image is displayed full screen, press thethumbnail button.2. The thumbnail display will highlight the image that hadbeen showing at the time the thumbnail mode wasselected.3. Press the 5 function button to move to a desired image.4. To view an image separately, press the enlargementbutton ( ).[ Normal display mode ] [ Thumbnail display mode ]Pressing the thumbnail button ( )Pressing the enlargementbutton ( )Highlighted image](https://usermanual.wiki/Hanwha-Techwin/DIGIMAXV700/User-Guide-506951-Page-66.png)
![66Thumbnail( ) / Enlargement( ) button The maximum enlargement rate in proportion to the image size.Trimming : You can extract part of the image that you wantand save it separately.1. Select an image that you want to enlarge and press theenlargement button.2. Different parts of the image can be viewed by pressingthe 5 function button.3. Press the MENU button and a message will bedisplayed as shown alongside.4. Select a desired sub menu by pressing the UP/ DOWN button and press the OK button.- [Trim] : The trimmed image will save as a new file name, and display on the LCD monitor.- [Cancel] : The trimming menu will disappear.* If there is little memory space to save the trimmed image, the image can’t be trimmed.* To delete the enlarged image during the trimming function, press the delete button. Image size 3072 2816 2592 2272 2048 1600 1024 640Maximum enlargement rateX12.0 X11.0 X10.1 X8.8 X8.0 X6.2 X4.0 X2.5Voice ( ) memo / Up buttonWhen the menu is displayed on the LCD monitor, pressing the UP button makes the menucursor move up. When the menu is not displayed on the LCD monitor, the UP button operates as the voicememo button. You can add your voice to a stored still image.Adding a Voice Memo to a Still Image1. Press the LEFT/ RIGHT button to select an image thatyou wish to add sound to.2. Press the voice memo button ( ) and the voice memoindicator will display. The camera is now ready to recorda voice memo.Trimming?Trim:OKCancelConfirm:OKStart:Shutter](https://usermanual.wiki/Hanwha-Techwin/DIGIMAXV700/User-Guide-506951-Page-67.png)
![67Voice ( ) memo / Up button3. Press the shutter button to start recording and voice willbe recorded to the still image for 10 seconds. While the voice is recording, the recording statuswindow will be displayed as shown alongside.4. The recording can be stopped by pressing the shutterbutton again.5. The ( ) icon will be displayed on the LCD monitorafter voice memo recording has finished. - Voice memos can’t be recorded onto movie clip files.- A distance of 40cm between you and the camera(microphone) is the best distance to record sound.- The voice memo will be saved in *.wav format, but hasthe same file name as the still image to which itcorresponds.- If you add a new voice memo to the still image thatalready has a voice memo, the existing voice memo will be erased.Play & Pause ( )/ Down buttonIn Play mode, the play & pause/ down button works as follows:- If the menu is displayedPress the DOWN button to move from the main menu to a sub menu, or to move down thesub menu cursor.- If a still image with a voice memo, a voice file, or a movie clip is playingIn Stop mode : Plays a still image with a voice memo, a voice file, or a movie clip.During playback : Temporarily stops playback.In Pause mode : Resumes playbackStop:Shutter[ Voice recording is stopped ]3[ Voice recording is paused ][ Voice recording is playing ]33PLAYPAUSEPLAY](https://usermanual.wiki/Hanwha-Techwin/DIGIMAXV700/User-Guide-506951-Page-68.png)
![68LEFT/ RIGHT/ MENU/ OK buttonLEFT / RIGHT/ MENU/ OK buttons activate the following.- LEFT button : While the menu is showing, press the LEFT button to select the menutab to the left of the cursor.- RIGHT button : While the menu is showing, press the RIGHT button to select the menutab to the right of the cursor, or to move an secondary menu.- MENU button : When you press the MENU button, the play mode menu will bedisplayed on the LCD monitor. Pressing it again will return the LCD tothe initial display.- OK button : When the menu is displayed on the LCD monitor, the OK button is usedfor confirming data that is changed by using the 5 function button.The shooting information will be displayed on the LCD monitor.The last image stored in the memory is displayed on theLCD monitor by pressing the play mode button.Pressing the LCD( ) button in the PLAY mode willchange the display as shown below. [Image & Icons] [Image & Information] [Image only][ Image & Icons ] [ Image & Information ] [ Image only ]Pressing the LCD buttonPressingthe LCDbuttonPressingthe LCDbuttonLCD ( ) button Size : 3072X2304Av : F2.8Tv : 1/60ISO : 75 Flash : OffDate : 2005/01/01](https://usermanual.wiki/Hanwha-Techwin/DIGIMAXV700/User-Guide-506951-Page-69.png)
![70Album button (MF button)You can organise the captured still images into albumsby using the MF button.This camera has 8 albums and each album can take upto 100 images. How to use the albumSelecting the album1. In the play mode, press the MF button.2. Select [Select] menu by pressing the Up/Down buttonand press the Right button. 3. Select a desired album by pressing theUp/Down/Left/Right buttons and press the OK button. Inserting still images into the album1. After selecting an album, press the menu button. 2. Select the [Add] menu by pressing the Up/Downbutton and press the Right button.All A1 A2A3 A4 A5A6 A7 A8SelectSlideAddRemoveExit:MENU Move : All A1 A2A3 A4 A5A6 A7 A8SelectSlideAddRemoveSet : OK A4SelectSlideAddRemoveSelect:T Set:OK](https://usermanual.wiki/Hanwha-Techwin/DIGIMAXV700/User-Guide-506951-Page-71.png)
![71Album button (MF button)Removing still images from the album1. Select a desired album and press the menu button. 2. Select [Remove] menu by pressing the Up/Down buttonand press the Right button. 3. Select a desired sub menu and press the OK button. - [All Pics] : All of the still images in the album will beremoved. - [Select] : Specific still images in the album can beremoved.If [Select] is selected : - Select images that you want to remove by pressing theUp/Down/Left/Right buttons and press the Zoom Tbutton. V marks are displayed on the selected images. 4. Press the OK button and a confirmation window willdisplay.Select a desired sub menu by pressing the UP/ DOWNbutton and press the OK button.[Remove] : Removes the selected images from thealbum.[Cancel] : Cancels the removing images.* The removed images are not deleted from the memory,but just removed from the album. A4Select:T Set:OKA4A4Select:T Set:OKA4A4SelectSlideAddRemoveSet : OKRemoveRemoveCancelConfirm:OKSelectAll PicsSelect:T Set:OKSelect:T Set:OKSelectSlideAddRemoveSelectSlideAddRemoveAddAddCancelConfirm:OK3. Select the still images you wish to add by pressing theUp/Down/Left/Right buttons and press the Zoom Tbutton. V marks are displayed on the selected images. * To cancel the selection, press the Zoom T button again. 4. Press the OK button and a confirmation window willdisplay. Select a desired sub menu by pressing the UP/DOWN button and press the OK button.[Add] : Inserts the selected images into the album. [Cancel] : Cancels the inserting images.](https://usermanual.wiki/Hanwha-Techwin/DIGIMAXV700/User-Guide-506951-Page-72.png)
![72Album button (MF button)If an image is deleted from the memory, the image doesn’t display on an album. An image can’t be added twice into the same album. An image can be added into the different albums. INFORMATIONPlaying back the albumsPlaying back all of the albums1. Select [All] menu and press the OK button. All of the albums will be selected. 2. Press the menu button. 3. Select [Slide] menu by pressing the Up/Down buttonand press the Right button. You can select [Start], [Interval] and [Repeat] menus. - [Start] : Start the slide show- [Interval] : Set the slide show play interval- [Repeat] : Choose to repeat the slide show afterfinishing the first cycle.- [Effect] : Unique screen effects can be used for theslide show.4. Select the [Start] menu by pressing the Up/Down buttonand press the OK button to start the slide show. Playing a desired album1. Select a desired album and press the OK button. 2. Press the menu button. 3. Select [Slide] menu by pressing the Up/Down buttonand press the Right button. You can select [Start], [Interval], [Repeat] and [Effect]menu.4. Select [Start] menu and press the OK button to start theslide show. A4SelectSlideAddRemoveExit:MENU Move: All A1 A2A3 A4 A5A6 A7 A8SelectSlideAddRemoveExit:MENU Move : StartIntervalRepeatEffect1 SecOffCancelA4SelectSlideAddRemoveStartIntervalRepeatEffect1 SecOffCancelMove: Set:OKA4SelectSlideAddRemoveMove : Set:OK](https://usermanual.wiki/Hanwha-Techwin/DIGIMAXV700/User-Guide-506951-Page-73.png)
![76Starting the slide showImages can be displayed continuously at pre-set intervals. You can view the slide show byconnecting the camera to an external monitor.1. Press the play mode button and press the menu button.2. Press the LEFT/ RIGHT button and select the [Slide]menu tab.Start the slide show: The slide show can start only in the[Start] menu.1. Use the Up/Down buttons to select the [Start] menu.2. Press the OK button to start the slide show.- Press the Pause button to pause the slide show.- Press the Pause button ( ) again to resume the slide show.- To stop the slide show, press the play & pause button, and then press the LEFT or RIGHTbutton.Setting play interval: Set the slide show play interval.1. Select the [Interval] sub menu by pressing the UP/DOWN button and press the RIGHTbutton.2. Use the Up/Down buttons to select the desired interval.3. Press the OK button to save the configuration.Repeat setting : setting the slide show to repeat after the first cycle.1. Use the Up/Down buttons to select the [Repeat] menu and press the Right button.2. Use the Up/Down buttons to select the desired sub menu.[Off] Selected : The slide show is closed after one cycle.3. Press the OK button to save the configuration.The loading time depends on the image size and quality.While the slide show is playing, only the first frame of a MOVIE file is displayed.INFORMATIONExit: MENU Move : StartInterval 1 secRepeat OFFSlide](https://usermanual.wiki/Hanwha-Techwin/DIGIMAXV700/User-Guide-506951-Page-77.png)
![77Starting the slide showProtecting imagesConfigure slide show effects: Unique screen effects can be used for the slide show.1. Select the [Effect] sub menu by pressing the UP/ DOWN button and press the RIGHTbutton.2. Use the Up/Down Button to select the type of effect.[Cancel] : Normal display.[Effect 1] : Image is displayed slowly.[Effect 2] : Image is displayed slowly from the centreoutwards.[Effect 3] : Image moves from the top left.[Effect 4] : The image slides diagonally from top left tobottom right.3. Press the OK button to confirm the setting.This is used to protect specific shots from being accidentally erased (Lock).It also unprotects images that have been previously protected (Unlock).Protecting Images1. Press the play mode button and press the menu button.2. Press the LEFT/ RIGHT button and select the [Protect]menu tab.3. Select a desired sub menu by pressing the UP/ DOWNbutton and press the OK button.[Select] : Selection window for an image to beprotected/released is displayed.- Up/Down/Left/Right : Select an image- Zoom W/T Button : Protect/release the image- Menu Button : Your changes will be saved and themenu will disappear.[All Pics] : Protect/release all saved images- Zoom W/T Button : Protect/release the images- Menu Button : Your changes will be saved and themenu will disappear.SET:OKWUnlock TSET:OKWLock TBack: Set : OKSlideInterval CancelRepeat Effect1Effect Effect2Exit: MENU Move : SelectAll PicsProtect](https://usermanual.wiki/Hanwha-Techwin/DIGIMAXV700/User-Guide-506951-Page-78.png)
![78Protecting images- If you protect an image, the protect icon will be displayedon the LCD monitor. (An unprotected image has noindicator)- An image in LOCK mode will be protected from thedelete function or [Delete] functions, but will NOT beprotected from the [Format] function.Deleting imagesOf all the files stored in the memory card, the unprotected files in the DCIM subfolder will bedeleted. Remember that this will permanently delete unprotected images. Important shots should be stored on a computer before deletion takes place. The startupimage is stored in the camera's internal memory (i.e., not on the memory card) and it will notbe deleted even if you delete all files on the memory card.Deleting images1. Press the play mode button and press the menu button.2. Press the LEFT/ RIGHT button and select the [Delete]menu tab.3. Select a desired sub menu by pressing the UP/ DOWNbutton and press the OK button.[Select]: Selection window for an image to delete isdisplayed.- Up/Down/Left/Right: Select an image- Zoom T Button: Select the image for deletion.( mark)- OK Button: Press the OK Button to display theconfirmation message. Press the OK Buttonagain to delete V marked images.[All Pics] : Displays confirmation window. Select the[Delete] menu and press the OK button todelete all unprotected images. 4. After deletion, the screen will be changed to the playmode screen.Del:OKSelect:TDel:OKDelete?DeleteCancelConfirm:OKExit: MENU Move : SelectAll PicsDelete](https://usermanual.wiki/Hanwha-Techwin/DIGIMAXV700/User-Guide-506951-Page-79.png)
![79ResizeChange the resolution (size) of pictures taken. Select [User Image] to save an image to bethe start-up image. The resized image will have a new file name.1. Press the play mode button and press the menu button.2. Press the LEFT/ RIGHT button and select the [Resize]menu tab.3. Select a desired sub menu by pressing the UP/ DOWNbutton and press the OK button.A large sized image can be resized to a smaller sized image, but not vice versa.Only JPEG images can be resized. TIFF, Movie clip(AVI) and Voice recording(WAV) files can’t be resized.You can change the resolution of only those files compressed in the JPEG 4:2:2 format.The resized image will have a new file name. The [User Image] image is stored not on thememory card but on the internal memory.Only two [User Image] images can be saved. If you save a new [User Image] image, theexisting startup image will be deleted in order.If the memory capacity is insufficient to store the resized image, a [Card Full!] messagewill display on the LCD monitor and the resized image will not be stored.INFORMATIONImage Resize Types3072 O O O O O O O O2816 X O O O O O O O2592 X X O O O O O O2272 X X X O O O O O2048 X X X X O O O O1600 X X X X X O O O1024 X X X X X X O O640 X X X X X X X OResize2272X17042816X21122592X19442048X15361600X12001024X768640X480UserImageExit: MENU Move : 2816X21122592X19442272X1704Resize](https://usermanual.wiki/Hanwha-Techwin/DIGIMAXV700/User-Guide-506951-Page-80.png)
![80Rotating an imageYou can rotate the stored images by 90, 180, or 270 degrees.1. Press the play mode button and press the menu button.2. Press the LEFT/ RIGHT button and select the [Rotate]menu tab.3. Select a desired sub menu by pressing the UP/ DOWNbutton.4. Press the OK button and a confirmation window willdisplay. Select a desired sub menu by pressing the UP/DOWN button and press the OK button. [Rotate] : The image will be rotated.[Cancel] : The rotation will be cancelled.5. Press the OK button and the rotated image will be displayed. If you display the rotated image on the LCD monitor, empty spaces may appear to the left andright of the image.[Right 90 ] : Rotate picture ina clock-wisedirection[Left 9 ] : Rotate picture in acounter clock- wisedirection[180 ] : Rotate picture 180degrees[Horizontal] : Rotate picturehorizontally[Vertical] : Rotate pictureverticallyExit: MENU Move : Right 90˚Left 90˚180˚Rotate](https://usermanual.wiki/Hanwha-Techwin/DIGIMAXV700/User-Guide-506951-Page-81.png)
![81DPOF : STANDARDThis function allows you to embed print quantity information on a stored image.1. Press the play mode button and press the menu button.2. Press the LEFT/ RIGHT button and select the [DPOF]menu tab.3. Select the [Standard] menu by pressing the UP/ DOWNbutton and press the RIGHT button.4. Select a desired sub menu by pressing the UP/ DOWNbutton and press the OK button.[Select]: Selection window for an image to print isdisplayed.- Up/Down/Left/Right: Select an image to print.- Zoom W/T Button: Select the number of prints.[All Pics] : Configure number of prints for all picturesexcept movie and voice files.- Zoom W/T Button: Select the number of prints.[Cancel] : Cancel the print setup.5. Press the OK button to confirm the setting. If an imagecarries DPOF instructions, the DPOF indicator ( )will show.DPOFDPOF(Digital Print Order Format) allows you to embed printing information on your memorycard’s MISC folder. Select the pictures to be printed and how many prints to make.The DPOF indicator will display on the LCD monitor when an image that has DPOFinformation plays back. Images can then be printed on DPOF printers, or at an increasingnumber of photo labs.This function is not available for Movie clips and Voice recording files.Set:OKW 0 Prints TSet:OKW0 Prints TExit: MENU Move : Standard SelectIndex NoSize SelectDPOF](https://usermanual.wiki/Hanwha-Techwin/DIGIMAXV700/User-Guide-506951-Page-82.png)
![82DPOF : INDEXImages (except for movie clips and voice file) are printed as index type.1. Press the play mode button and press the menu button.2. Press the LEFT/ RIGHT button and select the [DPOF]menu tab.3. Select the [Index] menu by pressing the UP/ DOWNbutton and press the RIGHT button.4. Select a desired sub menu by pressing the UP/ DOWNbutton.If [No] is selected : Cancel the index print setting.If [Yes] is selected : The image will be printed in index format.5. Press the OK button to confirm the setting.DPOF : PRINT SIZEYou can specify the print size when printing images stored on the memory card.The [Size] menu is available only for DPOF 1.1 compatible printers.Setting the Print Size1. Press the play mode button and press the menu button.2. Press the LEFT/ RIGHT button and select the [DPOF]menu tab.3. Select the [Size] menu by pressing the UP/ DOWN buttonand press the RIGHT button.4. Select a desired sub menu by pressing the UP/ DOWNbutton and press the OK button.[Select] : Selection window for an image to be changedprinted size is displayed.- Up/Down/Left/Right : Select an image.- Zoom W/T Button : Change the print size.- OK button : Your changes will be saved and the menuwill disappear.[All Pics] : Change print size of all saved images- Zoom W/T button : Change the print size- OK button : Confirm the changed setting. [Cancel] : Cancel all of the print size settings.* DPOF [Size] secondary menu : Cancel, 3X5, 4X6, 5X7,8X10Back: Set : OKDPOFStandardIndex NoSize YesBack: Set : OKDPOFStandard SelectIndex All PicsSize CancelSet:OKW Cancel TSet:OKW Cancel T](https://usermanual.wiki/Hanwha-Techwin/DIGIMAXV700/User-Guide-506951-Page-83.png)
![83PictBridgeYou can use the USB cable to connect this camera to a printer that supports PictBridge (soldseparately) and print the stored images directly. TIFF, Movie clips and voice files cannot beprinted. You can set up the following settings from the PictBridge menu.Images : Select the pictures to be printed.PRINTER SETUP : Setting up printing(Auto Set/Custom Set)Print : Printing picturesDPOF Print : Printing the DPOF filesReset : Initialising the PictBridge functionsConnecting the Camera to a Printer1. Press the POWER button to turn on the camera.2. In a mode other than Voice Recording mode, press theMENU button.3. Press the LEFT/ RIGHT button and select [Setup] menutab.4. Select [USB] menu by pressing the UP/ DOWN buttonand press the RIGHT button.5. Select [Printer] menu by pressing the UP/ DOWN buttonand press the OK button.6. Press the menu button twice and the menu will disappear.7. Use the supplied USB cable to connect the camera to the printer as shown below.8. Turn on the printer to connect the camera to the printer.If you selected [Computer] in Step 5, when you connect the camera to your printer, the Modedial lamp(Green) will illuminate and the connection will not be established. In this case,disconnect the USB cable, and then follow the procedure from Step 2 and onward.Back: Set : OKSetup ImprintSound ComputerUSB Printer](https://usermanual.wiki/Hanwha-Techwin/DIGIMAXV700/User-Guide-506951-Page-84.png)
![84PictBridge: Picture SelectionSelect pictures to print1. Connect the camera to your printer. The USB menu mustbe set to [Printer] before you connect the camera to theprinter.(See p.86)2. The [Images] menu will appear.3. Use the UP and DOWN buttons to select the desiredsubmenu value, and then press the OK button.When [One Pic] is selected : The PictBridge function willbe applied only to the picture currently displayed.When [All Pics] is selected : The PictBridge function will be applied to all pictures, excludingTIFF, movie clips and voice files.[ When [One Pic] is selected ] [ When [All Pics] is selected ]- Press the Up/Down button to select the number of prints. Maximum 30 prints.- Use the Left/Right button to select another picture and select the number of prints foranother picture.- After setting the number of prints, press the OK button to save.- Press the Shutter button to return to the menu without setting the number of prints.0Exit:Shutter Set:OKSetting the Number of Copies to Print- Select [One Pic] or [All Pics]. A screen where you can set the number of copies to print willappear as shown below.PREV NEXT0Exit:Shutter Set:OKExit: MENU Move : One PicAll PicsImages](https://usermanual.wiki/Hanwha-Techwin/DIGIMAXV700/User-Guide-506951-Page-85.png)
![85PictBridge: Print SettingMenuSize Setting the size of the printing paperAuto, Postcard, 4x6, L, 2L, A4, A3LayoutSetting the number of pictures to be printed on a sheet of paperAuto, Full, 1, 2, 4, 8, 9, 16Type Setting the quality of the printing paper Auto, Plain, Photo, FastphotoQualitySetting the quality of the picture to be printedAuto, Draft, Normal, FineDate Setting whether to print the date Auto, Off, OnFile Name Setting whether to print the file name Auto, Off, OnAUTO SET1. Connect the camera to your printer. The USB menumust be set to [Printer] before you connect the camerato the printer. (See p.86)2. Use the LEFT and RIGHT buttons to select the [AutoSet] menu tab.3. Use the UP and DOWN buttons to select the desiredsubmenu value, and then press the OK button.[No] : [Custom Set] values are kept.[Yes] : All values in the [Custom Set] are automatically changed.Some menu options are not supported in all manufacturer and printer models. If notsupported, the menus are still displayed in the LCD, but are not selectable.If the setting values are not changed in the automatic/manual setting, the setting values areautomatically kept.1. Connect the camera to your printer. The [USB] menumust be set to [Printer] before you connect the camera tothe printer.(See p.86)2. Use the LEFT and RIGHT buttons to select the [CustomSet] menu tab.3. Use the UP and DOWN buttons to select the desiredsubmenu value, and then press the RIGHT button.4. Use the UP and DOWN buttons to select the desiredsubmenu value, and then press the OK button.CUSTOM SET : You can select the Paper Size, Print Format, Paper Type, Print Quality, DatePrint, and File Name Print menus for printed pictures.Function Sub menuThe menus you can set up are as follows:Exit: MENU Move : NoYesAuto SetCustom SetBack:Set : OKSize AutoLayOut PostCardType 4X6](https://usermanual.wiki/Hanwha-Techwin/DIGIMAXV700/User-Guide-506951-Page-86.png)
![86PictBridge: PrintingPrinting Pictures1. Connect the camera to your printer. The USB menumust be set to [Printer] before you connect the camerato the printer. (See p.86)2. Use the LEFT and RIGHT buttons to select the [Print]menu tab.3. Use the UP and DOWN buttons to select the desiredsubmenu value, and then press the OK button.[Standard] : Print the pictures stored in thememory card in set numbers. One picture is printed on one piece ofpaper.[Index] : Print multiple images on one sheet of paper.1. Connect the camera to your printer. The [USB] menumust be set to [Printer] before you connect the camerato the printer. (See p.86)2. Use the LEFT and RIGHT buttons to select the [DPOFPrint] menu tab.3. Use the UP and DOWN buttons to select the desiredsubmenu value, and then press the OK button.[Yes] : Directly print the file with the DPOF information[No] : Cancel the printingDepending on the manufacturer and printer model, some menus may not be available.With a printer without supporting the DPOF, the menu is still displayed but not available.4. The screen shown on the right will appear and thepicture will be printed. If no picture is selected, the [NoImage !] message will be displayed. Press the Menu/OKbutton while printing to cancel the printing and the[Images] menu is displayed.Number of pictures in a index print varies depends onthe printer used.DPOF PRINT : This allows you to directly print the files with DPOF information.PrintExit : MENU Move:StandardIndexNow Printing1/1Cancel : OKDPOF PrintExit : MENU Move:NoYes](https://usermanual.wiki/Hanwha-Techwin/DIGIMAXV700/User-Guide-506951-Page-87.png)
![87PictBridge : RESETInitialises user-changed configurations.1. Connect the camera to your printer. The [USB] menumust be set to [Printer] before you connect the camerato the printer. (See p.86)2. Use the LEFT and RIGHT buttons to select the [Reset]menu tab.3. Use the UP and DOWN buttons to select the desiredsubmenu value, and then press the OK button.- If [Yes] is selected : All print and image settings will be reset.- If [No] is selected : Settings will not be reset.Default print setting varies depending on the printer manufacturer.For your printer’s default setting, refer to the user’s guide that came with your printer.ResetExit : MENU Move:NoYes](https://usermanual.wiki/Hanwha-Techwin/DIGIMAXV700/User-Guide-506951-Page-88.png)
![89Setup menuThis function allows the user to select the file naming format.Assigning File Names1. In any mode with the exception of Voice Recording mode,press the MENU button.2. Press the LEFT/ RIGHT button and select the [Setup]menu tab.3. Select the [File] menu by pressing the UP/ DOWN buttonand press the RIGHT button.4. Select a desired sub menu by pressing the UP/ DOWNbutton and press the OK button.[Reset] : After using the reset function, the next file name will be set from 0001 evenafter formatting, deleting all or inserting a new memory card.[Series] : New files are named using numbers that follow the previous sequence, evenwhen a new memory card is used, or after formatting, or after deleting allpictures5. Press the menu button twice and the menu will disappear.File name* Menus are subject to change without prior notice.Back:Set : OKFileResetPower Off SeriesLanguage3072SetupMenu tab Main menu Sub menu Secondary menu PageComputer -Printer -Off -On -Dark -LCD Normal - p.85Bright -NTSC -PAL -Quick View Off/ 1, 3, 5 sec -No -Yes -USBVideo OutAF LampResetp.83p.84p.85p.86](https://usermanual.wiki/Hanwha-Techwin/DIGIMAXV700/User-Guide-506951-Page-90.png)
![90File nameThe first stored folder name is 100SSCAM, and the first file name is SV100001.File names are assigned sequentially from SV100001 SV100002 ~ SV109999.The folder number is assigned sequentially from 100 to 999 as follows: 100SSCAM 101SSCAM ~ 999SSCAM.The files used with the memory card conform to the DCF(Design rule for Camera Filesystems) format.INFORMATIONEven if the batteries or AC adapter are removed and inserted again, the power off settingwill be preserved.Note that the automatic power off function will not operate if the camera is in PC mode, slideshow, playing back a voice recording, playing back a movie clip or during composite shooting.INFORMATIONAuto power offSetting Power Off1. In any mode with the exception of Voice Recording mode,press the MENU button.2. Press the LEFT/ RIGHT button and select the [Setup]menu tab.3. Select the [Power Off] menu by pressing the UP/ DOWNbutton and press the RIGHT button.4. Select a desired sub menu by pressing the UP/ DOWNbutton and press the OK button.Selecting [Off] : The power off function will not operate.[1~10 min] : The power will turn off automatically if not used for the period of timespecified.5. Press the menu button twice and the menu will disappear.This function switches the camera off after a set amount of time in order to preventunnecessary battery drainage.Back:Set : OKFileOffPower Off 1 minLanguage 3 min3072Setup](https://usermanual.wiki/Hanwha-Techwin/DIGIMAXV700/User-Guide-506951-Page-91.png)
![91Language Setting Language1. In any mode with the exception of Voice Recording mode,press the MENU button.2. Press the LEFT/ RIGHT button and select the [Setup]menu tab.3. Select the [Language] menu by pressing the UP/ DOWNbutton and press the RIGHT button.4. Select a desired sub menu by pressing the UP/ DOWNbutton and press the OK button. LANGUAGE sub menu : English, Korean, French, German, Spanish, Italian, S. Chinese,T. Chinese, Japanese, Russian, Portuguese, Dutch, Danish, Swedish, Finnish, Thai,BAHASA(MALAY/ INDONISIA) and Arabic. 5. Press the menu button twice and the menu will disappear.Formatting a Memory Card1. In any mode other than Voice Recording mode, press theMENU button.2. Press the LEFT/ RIGHT button and select the [Setup]menu tab.3. Select the [Format] menu by pressing the UP/ DOWNbutton and press the RIGHT button.4. Select a desired sub menu by pressing the UP/ DOWNbutton and press the OK button.If [No] is selected : The memory card will not be formatted. Press the menu button twice and the menu display will disappear. If [Yes] is selected : A [Please Wait !] message appears and the memory card will beformatted. If you ran FORMAT in Play mode, a [No Image !]message will appear.There is a choice of languages that can be displayed on the LCD monitor. Even if the batteries orAC adapter are removed and inserted again, the language setting will be preserved.Formatting a memory cardThis is used for formatting the memory card. If you run [Format] on the memory card, allimages, including the protected images, will be deleted. Be sure to download importantimages to your PC before formatting the memory card.Be sure to run [Format] on the following types of memory card.- A new memory card, or an unformatted memory card.- A memory card that has a file this camera can t recognise or one that has been takenfrom another camera.Note that the automatic power off function will not operate if the camera is in PC mode, slideshow, playing back a voice recording, playing back a movie clip and the [Composite] shots. INFORMATIONBack:Set : OKFileEnglishPower OffLanguageFrançais3072SetupBack:Set : OKPower OffLanguage NoFormatYes3072Setup](https://usermanual.wiki/Hanwha-Techwin/DIGIMAXV700/User-Guide-506951-Page-92.png)
![92Setting up the Date/ Time/ Date typeYou can change the date and time that will be displayed on the captured images and set upthe date type.Setting Date/Time & Selecting Date Format1. In any mode with the exception of Voice Recording mode,press the MENU button.2. Press the LEFT/ RIGHT button and select the [Setup]menu tab.3. Select the [D & Time] menu by pressing the UP/ DOWNbutton and press the RIGHT button.4. Use the UP, DOWN, LEFT, and RIGHT buttons to selectthe desired submenu value, and then press the OK button.RIGHT button : Selects the year/month / day/hour / minute date type.LEFT button : Moves the cursor to the [D & Time] main menu if the cursor is at the first itemof the date and time setup. In all other cases, the cursor will be shifted to theleft of its current position.UP and DOWN buttons : Changes the setting value.- Date type : [yy/mm/dd] /[dd/mm/yy] /[mm/dd/yy]5. Press the menu button twice and the menu will disappear.There is an option to include DATE/TIME on still images.Date Imprinting1. In any mode with the exception of Voice Recording mode,press the MENU button.2. Press the LEFT/ RIGHT button and select the [Setup]menu tab.3. Select the [Imprint] menu by pressing the UP/ DOWNbutton and press the RIGHT button.4. Use the UP and DOWN buttons to select the desired dateimprint type, and then press the OK button.[Off] : The DATE & TIME will not be imprinted on the image file.[Date] : Only the DATE will be imprinted on the image file.[D & Time] : The DATE & TIME will be imprinted on the image file.5. Press the menu button twice and the menu will disappear.* The Date & Time are imprinted at the bottom right side of the still image.* The date will be imprinted as a DATE TYPE setting.* TIME is imprinted in the following way : [Hour : Minute] and hours are shown using the 24hour clock.* The imprint function is applied only to still images except for the images taken in the [Text]scene mode. Imprinting the recording dateBack:Set : OKFormat OffD & Time Datelmprint D & Time3072SetupBack:Set : OKLanguageFormatD & Time3072Setup05 / 01/ 01 01:00yy/mm/dd](https://usermanual.wiki/Hanwha-Techwin/DIGIMAXV700/User-Guide-506951-Page-93.png)
![93Sound Connecting an External Device (USB)If you set the operation sound to ON, various sounds will be activated for camera startup,when button are pressed, and if there is a card error, so that you can be aware of the cameraoperation status.Setting Operation Sounds1. In any mode with the exception of Voice Recording mode,press the MENU button.2. Press the LEFT/ RIGHT button and select the [Setup]menu tab.3. Select the [Sound] menu by pressing the UP/ DOWNbutton and press the RIGHT button.4. Select a desired sub menu by pressing the UP/ DOWNbutton and press the OK button.[Sound] sub menu : Off/ Low/ Medium/ High5. Press the menu button twice and the menu will disappear.You can select an external device to which you want to connect the camera using the USBcable.Selecting an External Device1. In any mode with the exception of Voice Recording mode,press the MENU button.2. Press the LEFT/ RIGHT button and select the [Setup]menu tab.3. Select the [USB] menu by pressing the UP/ DOWN buttonand press the RIGHT button.4. Select a desired sub menu by pressing the UP/ DOWNbutton and press the OK button.[Computer] : Select this if you want to connect the camera to your PC. Refer to page 105 for instructions on how to connect the camera to yourPC.[Printer] : Select this if you want to connect the camera to your printer. Refer to page 73 for instructions on how to connect the camera to yourprinter.5. Press the menu button twice and the menu will disappear.Back:Set : OKD & Time Offlmprint LowSound Medium3072SetupBack:Set : OKlmprintSound ComputerUSB Printer3072Setup](https://usermanual.wiki/Hanwha-Techwin/DIGIMAXV700/User-Guide-506951-Page-94.png)
![94Auto Focus lampLCD brightnessYou can adjust the LCD brightness.Adjusting LCD Brightness1. In any mode with the exception of Voice Recording mode,press the MENU button.2. Press the LEFT/ RIGHT button and select the [Setup]menu tab.3. Select the [LCD] menu by pressing the UP/ DOWN buttonand press the RIGHT button.4. Select a desired sub menu by pressing the UP/ DOWNbutton and press the OK button.[LCD] sub menu : Dark, Normal, Bright5. Press the menu button twice and the menu will disappear.You can turn on and off the Auto Focus lampHow to set up the lamp1. In any mode with the exception of Voice Recording mode,press the MENU button.2. Press the LEFT/ RIGHT button and select the [Setup]menu tab.3. Select the [AF Lamp] menu by pressing the UP/ DOWNbutton and press the RIGHT button.4. Select a desired sub menu by pressing the UP/ DOWNbutton and press the OK button.If [Off] is selected : The AF lamp will not light up.If [On] is selected : The AF lamp will light up.If you select [Off] menu and take an image in poorly lit condition or select the [Night]scene mode, the camera may not take exact focus.Back:Set : OKSoundUSB OffAF Lamp On3072SetupBack:Set : OKUSB DarkAF Lamp NormalLCD Bright3072Setup](https://usermanual.wiki/Hanwha-Techwin/DIGIMAXV700/User-Guide-506951-Page-95.png)
![95Selecting Video out typeThe Movie output signal from the camera can be NTSC or PAL. Your choice of output will be governed by the type of device (monitor or TV, etc.) to which thecamera is connected. PAL mode can support only BDGHI.Setting the Video Out Type1. In any mode with the exception of Voice Recording mode,press the MENU button.2. Press the LEFT/ RIGHT button and select the [Setup]menu tab.3. Select the [Video Out] menu by pressing the UP/ DOWNbutton and press the RIGHT button.4. Select a desired sub menu by pressing the UP/ DOWNbutton and press the OK button.[Video Out] sub menu : NTSC, PAL5. Press the menu button twice and the menu will disappear.NTSC : U.S.A, Canada, Japan, South Korea, Taiwan, Mexico.PAL : Australia, Austria, Belgium, China, Denmark, Finland, Germany, U.K., Holland,Italy, Kuwait, Malaysia, New Zealand, Singapore, Spain, Sweden, Switzerland,Thailand, Norway.When using a TV as an external monitor, you will need to select the external or AVchannel of the TV.There will be a digital noise on the external monitor, but it is not a malfunction.If the image is not in the centre of the screen, use the TV controls to centre it.When the camera is connected to an external monitor, the menu will be visible on theexternal monitor and the menu functions are the same as those indicated on the LCDmonitor.INFORMATIONConnecting to an external monitorIn RECORDING/ PLAY mode, you canview the stored still images or movie clipsby connecting the camera to an externalmonitor via the A/V cable. When thecamera is connected to an externalmonitor, the LCD monitor will be turnedoff automatically.Yellow Colour-VideoWhite Colour-VoiceBack:Set : OKAF LampLCD NTSCVideo Out PAL3072Setup](https://usermanual.wiki/Hanwha-Techwin/DIGIMAXV700/User-Guide-506951-Page-96.png)
![96Quick viewIf you enable Quick View before capturing an image, you can view the image you justcaptured on the LCD monitor for the duration set in the [Quick View] setup. Quick view ispossible only with still images.Setting Quick View1. In any mode with the exception of Voice Recording mode,press the MENU button.2. Press the LEFT/ RIGHT button and select the [Setup]menu tab.3. Select the [Quick View] menu by pressing the UP/ DOWNbutton and press the RIGHT button.4. Select a desired sub menu by pressing the UP/ DOWNbutton and press the OK button.[off] : The quick view function can’t be activated.[1 ~ 3 sec] : The captured image is briefly displayed during the selected time.5. Press the menu button twice and the menu will disappear.Initialisation(RESET ALL)All camera menu and function settings will be restored to their default values. However, values for DATE/ TIME, LANGUAGE, and VIDEO OUT will not be changed.Initialising the Camera1. In any mode with the exception of Voice Recording mode,press the MENU button.2. Press the LEFT/ RIGHT button and select the [Setup]menu tab.3. Select the [Reset] menu by pressing the UP/ DOWNbutton and press the RIGHT button.4. Select a desired sub menu by pressing the UP/ DOWNbutton and press the OK button.If [No] is selected : Settings will not be restored to their defaults.If [Yes] is selected : All settings will be restored to their defaults.5. Press the menu button twice and the menu will disappear.Back:Set : OKLCD OffVideo Out 1 secQuick View 3 sec3072SetupBack:Set : OKVideo OutQuick View NoReset Yes3072Setup](https://usermanual.wiki/Hanwha-Techwin/DIGIMAXV700/User-Guide-506951-Page-97.png)
![97Setting up the MYCAM menuYou can set up a start up image, start up sound and shutter sound. Every camera workingmode (with the exception of Voice recording mode) has the MyCAM menu.The items indicated by are default settings.Menu tab Main menu Sub menu PageOff LOGOUser Image 1 User Image 2Off Sound 1Sound 2 Sound 3Off Sound 1Sound 2 Sound 3S.ImageS.SoundSH.Soundp.87p.88p.88You can select the image that is first displayed on the LCD monitor whenever the camera isturned on.Setting a Startup Image1. In any mode with the exception of Voice Recording mode,press the MENU button.2. Press the LEFT/ RIGHT button and select the [MyCam]menu tab.3. Select the [S.Image] menu by pressing the UP/ DOWNbutton and press the RIGHT button.4. Select a desired sub menu by pressing the UP/ DOWNbutton and press the OK button.5. Press the menu button twice and the menu will disappear.Start up imageUse a saved image for the start-up image with the [LOGO] in the [Resize] menu in theplay mode.The start-up image will not be deleted by deleting all images or [Format] menu.The User images will be deleted by [Reset] menu.INFORMATION* Menus are subject to change without prior notice.Back:Set : OKS.ImageS.SoundSH.Sound3072Mycam](https://usermanual.wiki/Hanwha-Techwin/DIGIMAXV700/User-Guide-506951-Page-98.png)
![98Start up soundYou can select the shutter sound.Selecting the Shutter Sound1. In any mode with the exception of Voice Recording mode,press the MENU button.2. Press the LEFT/ RIGHT button and select the [MyCam]menu tab.3. Select the [SH.Sound] menu by pressing the UP/ DOWNbutton and press the RIGHT button.4. Select a desired sub menu by pressing the UP/ DOWNbutton and press the OK button.5. Press the menu button twice and the menu will disappear.Shutter soundSetting the Startup Sound1. In any mode with the exception of Voice Recording mode,press the MENU button.2. Press the LEFT/ RIGHT button and select the [MyCam]menu tab.3. Select the [S.Sound] menu by pressing the UP/ DOWNbutton and press the RIGHT button.4. Select a desired sub menu by pressing the UP/ DOWNbutton and press the OK button.5. Press the menu button twice and the menu will disappear.Back:Set : OK3072MycamS.Image OffS.Sound Sound1SH.Sound Sound2Back:Set : OK3072MycamS.Image OffS.Sound Sound1SH.Sound Sound2You can select the sound that is activated whenever the camera is turned on.](https://usermanual.wiki/Hanwha-Techwin/DIGIMAXV700/User-Guide-506951-Page-99.png)
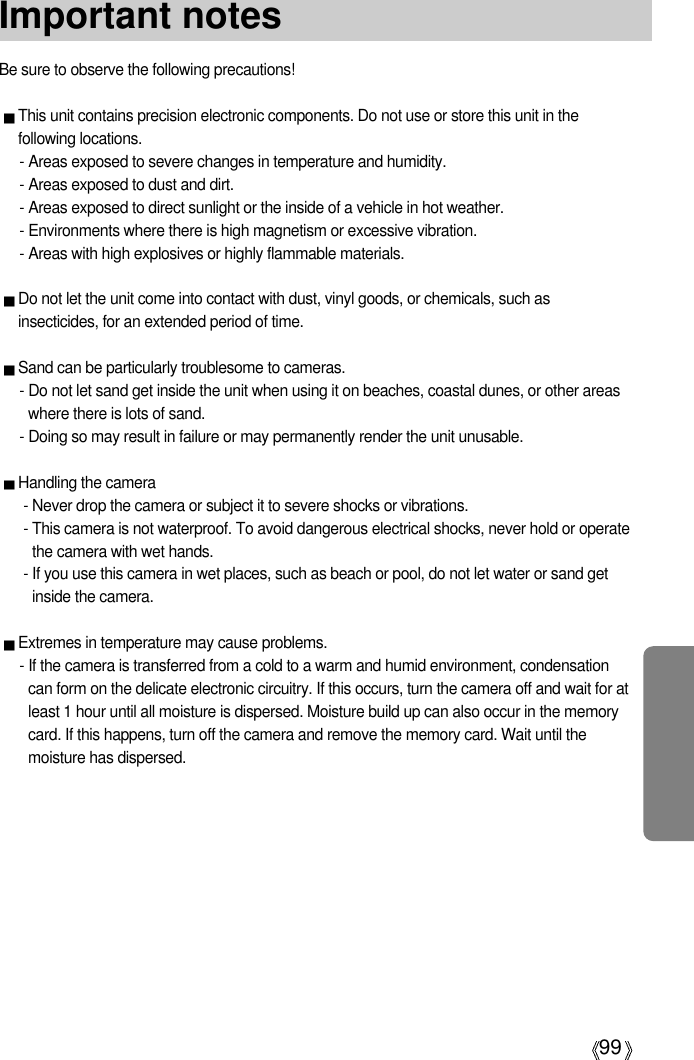
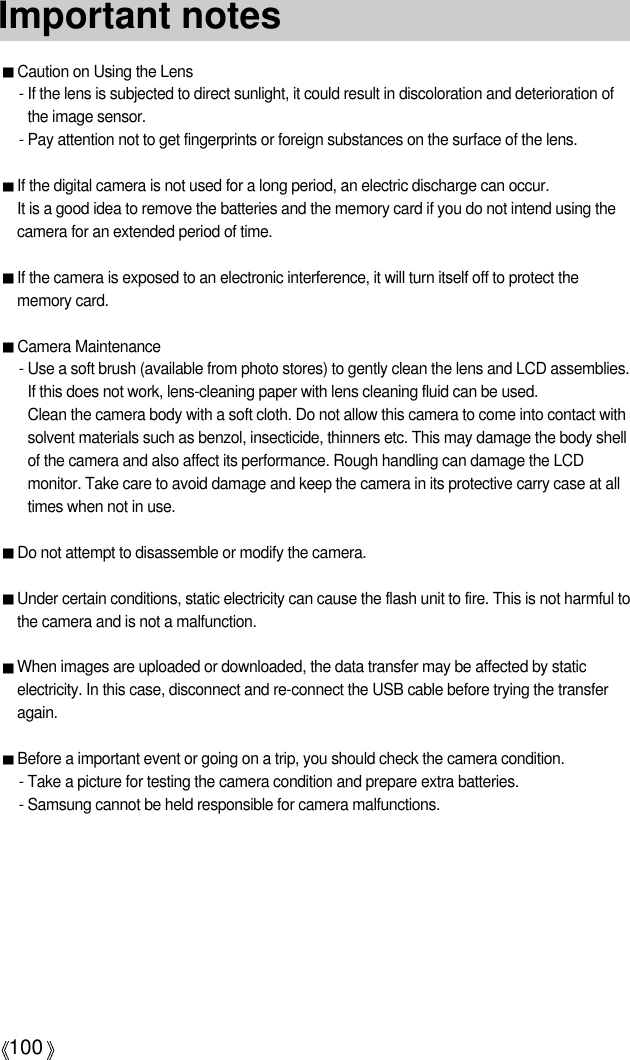
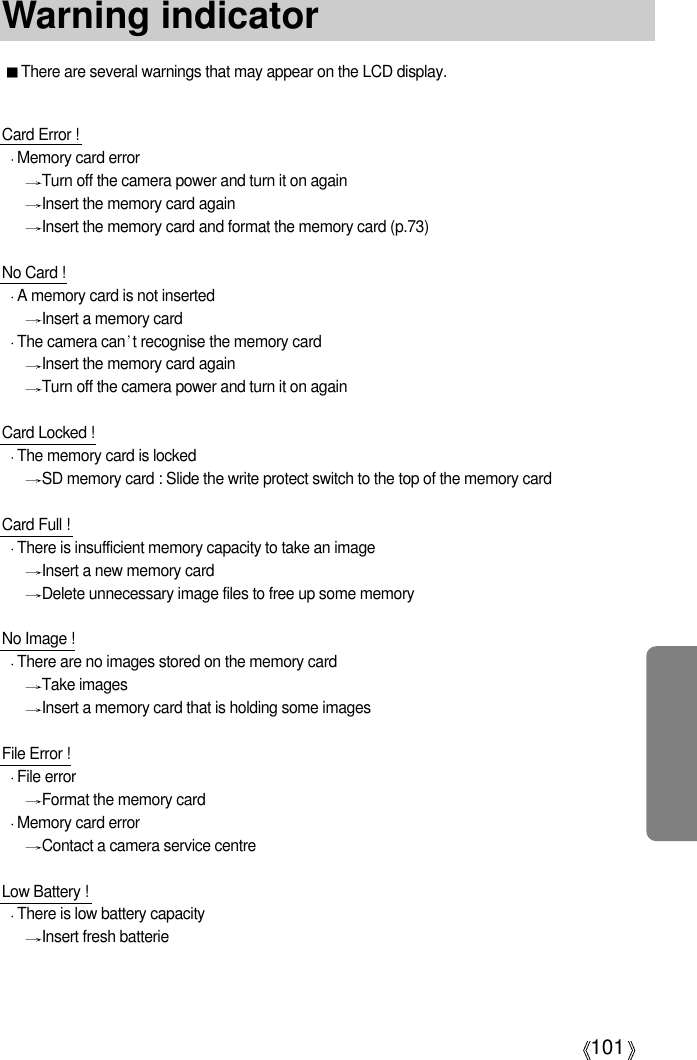
![102Warning indicatorPlease check the followingBefore contacting a service centreLow Light !When taking pictures in dark placesUse a tripod and take pictures in Flash Photography modeSet USB[USB] sub menu and connected device are not matched.Reconfigure [USB] in the [SETUP] menu. Out Of NumberWhen selecting too many printing pages in the PictBridge menu. Select printing page within the limitation. The camera doesn’t switch onThere is low battery capacity.Insert fresh batteries.Batteries are inserted incorrectly with the reverse polarities.Insert the batteries according to the polarity marks (+, -).The camera power ceases while in use.The batteries are exhausted.Insert fresh batteries.The Camera is turned off automatically.Turn off the camera power and turn it on again.Batteries drain quicklyThe Camera is being used in low temperatures.Keep the camera in warm conditions (i.e. inside a coat or jacket) and only remove it inorder to take images.](https://usermanual.wiki/Hanwha-Techwin/DIGIMAXV700/User-Guide-506951-Page-103.png)
![103Before contacting a service centreCamera does not take images when pressing the Shutter buttonThere is insufficient memory capacity.Delete unnecessary image filesThe memory card has not been formattedFormat the memory card (p.73)The memory card is exhaustedInsert a new memory cardThe memory card is lockedRefer to [Card Locked !] error message (p.93)The camera’s power is offTurn the camera power onThe batteries are exhaustedInsert fresh batteriesBatteries are inserted incorrectly with the reverse polarities.Insert the batteries according to the polarity marks (+, -).The camera suddenly stops working while in use The camera was stopped due to a malfunctionRemove /re-insert batteries and switch the camera onThe images are unclearA picture was taken within 0.8 m from the subject without setting an appropriate macro modeIf the subject is closer than 0.8m, select macro shot modeTaking a picture beyond the flash rangeTake a picture within the flash rangeThe lens is smudged or dirtyClean the lensThe flash does not fireFlash off mode has been selectedDis-engage flash off modeThe camera mode can’t use the flashRefer to the FLASH instruction (p.27)Incorrect date and time is displayedThe date and time have been set incorrectly or the camera has adopted the default settingsReset the date and time correctly](https://usermanual.wiki/Hanwha-Techwin/DIGIMAXV700/User-Guide-506951-Page-104.png)
![104Before contacting a service centreThe images don't play backIncorrect file name (Violation of DCF format)Do not change the image file nameColour of image is different to the original scene White balance setting is incorrectSelect appropriate White balanceImages are too brightExposure is excessiveReset exposure compensationNo image on external monitorThe external monitor has not been connected properly with the cameraCheck the connection cablesThere are incorrect files in the memory cardInsert a memory card that has correct filesWhen using the PC’s explorer, the [Removable Disk] file does not showCable connection is incorrectCheck the connectionThe camera is offTurn the camera onThe operating system is not Windows 98, 98SE, 2000, ME, XP/ Mac OS 9.0 ~ 10.3.Alternatively the PC does not support USBInstall Windows 98, 98SE, 2000, ME, XP/ Mac OS 9.0 ~ 10.3 to PC that supports USBThe camera driver is not installedInstall a [USB Storage Driver]](https://usermanual.wiki/Hanwha-Techwin/DIGIMAXV700/User-Guide-506951-Page-105.png)